Serial Spirometry
Building Related Asthma Research in Public Schools
Appendix_J
Serial Spirometry
OMB: 0920-0793
Building Related Asthma Research in Public Schools (New)
Principal Investigator:
Jean M. Cox-Ganser, PhD
NIOSH
Division of Respiratory Disease Studies
Phone: 304-285-5818
Fax: 304-285-5820
Reviewed January, 2008
Appendix J: Protocols
1. Spirometry Protocol
I. BACKGROUND
Spirometry may be used to measure lung function volume during forced breathing maneuvers. The important measurements include: forced vital capacity (FVC) or the greatest volume of air exhaled from a maximal inspiration to a complete exhalation, the forced expiratory volume in one second (FEV1) or the volume of air exhaled in the first second of a FVC maneuver, and the ratio between these two values (FEV1/FVC). All procedures will conform to current American Thoracic Society (ATS) guidelines.1 Test results will be compared to predicted values determined from the third National Health and Nutrition Examination Survey (NHANES III) reference equations.2
II. INDICATIONS
To detect obstructive, restrictive, and mixed lung function patterns.
III. CONTRAINDICATIONS3
Hemoptysis (coughing up blood)
Pneumothorax (collapsed lung)
Chest pain, myocardial infarction (MI), or stroke within the last 3 months
Abdominal (belly) or cerebral (brain) arterial aneurysm
Eye surgery including LASIK within the last 3 months
Acute disorders that might affect subject performance during testing: e.g., chest, back or gastrointestinal (GI) distress/discomfort.
Chest or abdominal surgery within last 3 months
Systolic Blood Pressure >180 or Diastolic Blood Pressure >110 or pulse rate > 110 beats per minute (See Appendix 4 for Blood Pressure Protocol)
If any of the contraindications are present, the technician will not proceed with the test.
IV. DESCRIPTION OF EQUIPMENT AND SUPPLIES
Spirometry will be conducted in a private room, and the ambient temperature will be maintained between 17 and 40°C (62.6-104°F).4
Volume Spirometer (See Appendix 2 for manufacturer contact information):
Ohio 822/ 827 dry rolling seal spirometer or SensorMedics 922 or 1022 digital volume encoder to RS232 interface
OMI-HF5 spirometry software program (most recent NIOSH version) installed on a notebook computer
Calibration syringe (3.00 liters- Hans Rudolph model #5530)
Spirometer hoses (#894787 2” ID x 28” length- SensorMedics)
Spirotube mouthpieces (1/16” OD x 3 3/16 ” length- SensorMedics)
Mouthpiece adaptors – hose reducer (#894788 2” OD, 11/16” ID - SensorMedics)
Nose clips
Miscellaneous supplies: pens, log sheets, barometer, first aid kit (including ammonia capsules), tape measure, scale, germicidal disposable cloth, tissues, memory stick, stopcock grease, room thermometer, waste basket
Flow Spirometer (See Appendix 2 for manufacturer contact information):
EasyOne™ spirometer
EasyWare™ software installed on a notebook computer
USB Connector
Calibration syringe
Syringe adapter
Spirette mouthpieces
Nose clips
Miscellaneous supplies: pens, log sheets, barometer, first aid kit (including ammonia capsules), tape measure, scale, germicidal disposable cloth, tissues, memory stick, room thermometer, waste basket
V. PREPARATION AND CALIBRATION OF EQUIPMENT
Before Site Visit
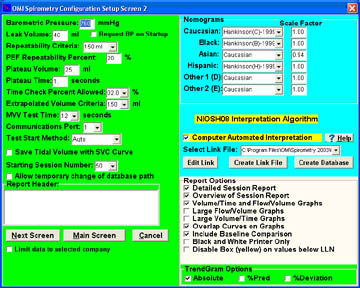
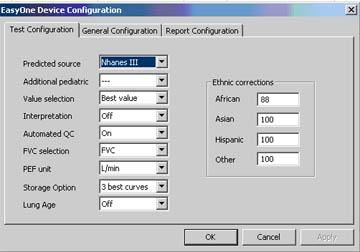
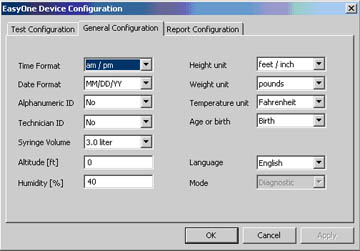
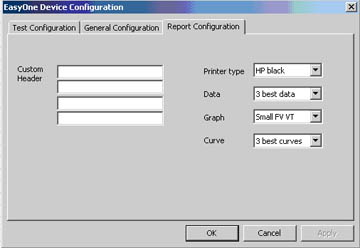
Calibrate spirometers and verify them to be in correct operating condition. Verify that software parameters are correctly defined (for volume spirometers see Appendix 1, Part A, for flow spirometers see Appendix 1, Part B).
At Site
Set up equipment and connect cables. Connect power cords to grounded electrical receptacles.
Turn on the spirometer and then the computer.
Record room temperature and barometric pressure.
Perform volume calibration and leak check using 3-Liter syringe (repeat after every 4 hours of testing).
Perform biological control test at beginning and end of each testing session.
VI. PRE-TEST PROCEDURE
Measure and record height and weight of subject without shoes.
Measure and record blood pressure and pulse rate of subject (see Appendix 4 for procedure for obtaining blood pressure). Record blood pressure on wallet card and give to subject for their records. If blood pressure or pulse rate is a contraindication for spirometry (Systolic Blood Pressure >180 or Diastolic Blood Pressure >110 or pulse rate > 110 beats per minute), explain to the subject the reason the test will not be performed and advise the subject to seek immediate guidance from their physician. If blood pressure or pulse rate are elevated (Systolic Blood Pressure between 120 and 180, or Diastolic Blood Pressure between 80 and 110, or pulse rate between 100 and 110 beats per minute) and the test can still be performed, advise the subject to recheck their measurements within a week and if still elevated to seek guidance from their physician.
Administer the pre-test questionnaire and record if contraindications are present (see Appendix 3).
Do not perform test if any contraindications are present.
VII. TEST PROCEDURES
Explain the purpose of the examination and the need for maximal effort from the subject to get accurate results. Tell the subject, “I want to measure how much air you can blow out and how fast you can blow it out.”
Ask the subject to loosen any tight clothing.
Ask the subject to stand during the examination. If unable to perform the test standing, encourage the subject to sit up straight. Record whether subject is sitting or standing.
Demonstrate a deep inspiration and proper placement of the mouthpiece.
Blast out the air in a demonstration of the effort and length of time you expect the subject to blow.
Prepare the spirometry system for collection.
Place nose clip on subject’s nose. Clips may be removed between trials. If the nose clip falls off or is uncomfortable, ask the subject to hold their nose during the FVC maneuvers.
Encourage the subject to stand/sit up straight and not lower chin or bend over. Emphasize not straining with the neck but pushing from the belly.
Give the following instructions (enthusiastic coaching is required, shouting is not):
a. “Open your mouth, take the largest breath of air that you can inhale, while holding the hose near your mouth.”
b. “Quickly, put the mouthpiece into your mouth and seal your lips tightly around it. Blast your air into the tube as hard and fast as you can.”
c. “Keep on blowing out the same breath of air until I tell you to stop.”
d. Coach: “keep blowing, keep going, almost there,” until plateau is observed.
e. “You can stop now.”
f. “Okay, now catch your breath.”
Review the procedure and correct any problems at the end of each trial. Flow-volume curves should have sharp peak flows and volume-time curves must have a plateau and at least 6 seconds of exhalation. Record your impression of the subject’s effort at the end of each trial.
Continue testing until three acceptable trials are completed and the repeatability criteria are met or until a maximum of eight trials have been performed, or until the subject cannot or should not continue (see Appendix 5 for acceptability and repeatability criteria).
VIII. QUALITY CONTROL PROGRAM
Equipment
The Medical Instrumentation Laboratory (DRDS/FSB) maintains all spirometers, as well as detailed records of calibration results, equipment repairs or modifications, dates of software and hardware changes, and the dates and location of equipment use. Periodically, the accuracy and repeatability of the spirometers is evaluated over a range of mechanically-simulated exhalation maneuvers.1
Test Quality
Every spirometry test is given two overall quality grades, one for the measurement of FVC and one for the measurement of FEV1. The grades are assigned using the following definitions:
FVC Quality Grade:
A = at least three acceptable trials, highest two FVC values match within 100 ml (or within 50 ml if highest FVC from last trial)
B = at least two acceptable trials, highest two FVC values match within 150 ml
C = at least two acceptable trials, highest FVC values match within 250 ml
D = only one acceptable FVC trial
F = no acceptable FVC trials
FEV1 Quality Grade:
A = at least three acceptable trials, highest two FEV1 values match within 100 ml (or within 50 ml if highest FEV1 from last trial)
B = at least two acceptable trials, highest two FEV1 values match within 150 ml
C = at least two acceptable trials, highest FEV1 values match within 250 ml
D = only one acceptable FEV1 trial
F = no acceptable FEV1 trials
The quality of all spirometry tests is reviewed by a quality control specialist. Quality control reports are generated and provided to each spirometry technician. If coaching deficiencies are identified during this review, technicians receive additional training prior to the next testing session.
IX. SAFETY PROCEDURES
To prevent electrical shock, all equipment will be plugged into a grounded electrical outlet.
Infection control measures:
When a volume spirometer is used, a clean hose will be used for each subject.
Only disposable mouthpieces will be used.
Mouthpieces are handled only by the subject.
Spirometers and accessories will be cleaned and disinfected daily.
Technicians will have successfully completed a National Institute for Occupational Safety and Health (NIOSH) spirometry training course and will have been supervised while testing 20 subjects by a trained and experienced technician.
Subjects in wheelchairs will perform the test while seated in their wheelchairs. Wheelchair wheels will be locked prior to testing.
A non-rolling chair will be placed behind subject during the test.
Subjects that become faint or tired may sit for the remainder of the test.
X. EMERGENCY PROCEDURES
An emergency card will be present at the test site. This card will include:
Instructions to call 911.
Arrangement information for transportation to the nearest hospital.
Address and telephone number for the nearest hospital.
A subject who feels faint during testing will be guided onto a stationary chair and encouraged to lower their head towards their knees and to breathe slowly and deeply until recovered.
XI. REFERENCE LIST
Miller MR, Hankinson J, Brusasco V, et al, ATS/ERS Task Force. Standardisation of spirometry. Eur Respir J. 2005 Aug; 26(2):319-338.
Hankinson JL, Odencrantz JR, Fedan KB. Spirometric reference values from a sample of the general U.S. population. Am J Respir Crit Care Med 1999; 159:179-187.
AARC (American Association for Respiratory Care) clinical practice guideline. Spirometry: 1996 update. Respir Care 1996; 36:629-636.
American Thoracic Society. Standardization of Spirometry: 1994 update. Am J Respir Crit Care Med 1995; 152:1107-1136.
APPENDIX 1
Part A: Volume Spirometer Setup Parameters


Part B: Flow Spirometer Setup Parameters


APPENDIX 2
Manufacturer Contact Infomation
SensorMedics Spirometer
22705 Savi Ranch Parkway
Yorba Linda, CA 92887-4645
Phone: (714) 283-1830
(800) 520-4368
OMI –HF5 spirometry software program
Occupational Marketing, Inc.
11211 Kathy Freeway Ste 420
Houston, TX 77079
Phone: (713) 468-3201
EasyOne™ Spirometer (including EasyWare™ software)
ndd Medical Technologies
17 Progress Ave
Chelmsford, MA 01824
Phone: (978) 244-0620
Spirotube mouthpieces
Occupational Marketing, Inc.
11211 Kathy Freeway Ste 420
Houston, TX 77079
Phone: (713) 468-3201
Calibration syringes
Hans Rudolph, Inc.
7200 Wyandotte
Kansas City, MO 64114
Phone: (816) 363-5522
Noseclips
Medical Graphics Corporation
350 Oak Grove Parkway
St. Paul, MN 55127
Phone: (651) 484-4874
Spirette mouthpieces
ndd Medical Technologies
2 Dundee Park
Andover, MA 01810
Phone: (877) 904-0090
APPENDIX 3
Control Card
Project Name
Subject ID
|
Name |
|||||
Birthdate
|
Age |
Gender
|
||||
Height (Nearest ½ inch)
|
Weight (pounds) |
Blood Pressure |
Pulse |
|||
Current Medications/ Inhalers
|
||||||
Initial when complete: |
Questionnaire
|
|
||||
Spirometry
|
|
|||||
Spirometry Contraindications: YES / NO Within the last 3 months: chest pain (angina), heart attack, stroke, eye surgery (including LASIK surgery), chest/abdominal surgery Ever: coughing up blood, collapsed lung, arterial aneurysm of the belly or brain Current: gastrointestinal distress, chest discomfort, back discomfort Systolic BP >180, diastolic BP >110, pulse >110 bpm
|
APPENDIX 4
Blood Pressure Measurement Protocol
Ask the subject to refrain from smoking or ingesting caffeine for 30 minutes prior to blood pressure measurement.
Have the subject sit quietly for at least 5 minutes before taking blood pressure.
Seat the subject with feet flat on the floor. Ask the subject to bare their upper arm. Support the subject’s arm at heart level.
Select appropriate cuff size (bladder should encircle at least 80% of the upper arm).
Measure and record blood pressure.
If Systolic Blood Pressure >180 or Diastolic Blood Pressure >110, then wait 2 minutes and take and record a second blood pressure measurement. If Systolic Blood Pressure <180 and Diastolic Blood Pressure <110 on the second measurement, use the second measurement when determining contraindications.
APPENDIX 5
Quality Assessment
Acceptability Criteria
The following criteria will be used to judge whether a trial is acceptable:
No hesitation or false starts
The volume of back-extrapolation (Vext) must be less than 5% of the FVC or 150 ml, whichever is greater
No coughing during the first second
No glottis closure
No mouthpiece obstruction by tongue or dentures
No leaks
A plateau in the volume-time curve is achieved with at least 6 seconds of exhalation
No extra breaths
Repeatability Criteria
After collecting three acceptable trials, the following criteria will be used to judge whether a test is repeatable:
The two largest FVC values from acceptable trials should agree within 150 ml
The two largest FEV1 values from acceptable trials should agree within 150 ml
2. Protocol for Training of Subjects on a Hand-Held Spirometer
I Background:
Serial spirometry will be performed in an unsupervised setting by the subject using a hand-held, lightweight spirometer with a micro-processor that records data which can then be down-loaded into a computer for analysis. The hand-held spirometer allows for multiple lung flow measurements while the subject is conducting regular activities and is away from the lung function testing laboratory.
Contraindications:
Hemoptysis (coughing up blood)
Pneumothorax (collapsed lung)
Chest pain, myocardial infarction (MI), or stroke (within last 3 months)
Abdominal or cerebral arterial aneurysm (belly or brain)
Eye surgery including LASIK (within last 3 months)
Acute disorders that might affect subject performance during testing: e.g., chest, back or gastrointestinal (GI) distress/discomfort.
Chest or abdominal surgery (within last 3 months)
8. Systolic Blood Pressure>180 or Diastolic Blood Pressure >110 or pulse rate > 110 beats per minute
III Procedure:
1. Subject Preparation
a. Informed Consent.
b. Record height and weight.
c. Check for contraindications. Proceed if none.
d. Instruct subject on doing FVC maneuvers, timing and recording maneuvers and entering data into the diary on the spirometer.
e. Perform baseline spirometry.
2. Test Procedure
a. Demonstrate to subject the correct performance of the forced vital capacity maneuver.
b. Have subject do procedure to reinforce instructions:
- Stand for the test
- Hold your chin slightly up; don’t bend over
- Place lips around mouthpiece
- Blow out as hard and as fast as you can and continue blowing until the black box beeps (6 seconds)
- After a few seconds, the unit will grade the effort. A flashing BAD (red) light means you didn’t blow hard or fast enough. A flashing OK (green) light means the test was done properly.
-Wait for the flashing light to go out. Then press the red button and repeat the test trying to get at least three flashing OK lights for 3 acceptable maneuvers.
c. If subject makes a mistake (cough, block the meter, etc), repeat the blows
3. Data Collection: Provide subject with the hand-held spirometer and remind him/her that as needed, if quality or compliance falls, we will telephone him/her to provide encouragement and further coaching. The meter will be returned by the subject according to instructions provided by the study team. Provide mailers.
Log for Serial Spirometer By Technician
1. Check for contraindications.
2. Height and weight.
3. Note day and time of instruction; record which meter is distributed to each subject.
4. Note a convenient time and phone number for follow-up phone calls. Follow-up phone calls to encourage use of the spirometer and to reinforce proper techniques will be made as necessary.
5. Note the date on which meter will be returned.
References
1. Gannon PFG, Burge PS. Serial peak expiratory flow measurement in the diagnosis of occupational asthma. Eur Respir J 1997; 10: Suppl. 24, 57s-63s.
2. Burge PS. Use of serial measurements of peak flow in the diagnosis of occupational asthma. Occupational Medicine: State of the Art Reviews - Vol 8, No 2, April-June 1993.
3. Standardization of Spirometry - 1994 Update, Am J Respir Crit Care Med. 1995, 152: 11071136.
3. Hand-Held Spirometer Self-Monitoring Instruction Sheet
You are being lent a hand-held spirometer for two three-week periods so that you can perform self-testing. You are asked to return the spirometer, cradle, modem, and cables to NIOSH at the end of testing. We will provide a mailer.
The hand-held spirometer is to be used by you only. Please do not share it with anyone else.
You are asked complete five breathing sessions every day for the next three weeks. The testing times are
Waking Up: 1. Right after you wake up (before medication)
Mid-day: 2. As soon as you arrive at work, or mid-morning on days when you are not at work
3. Before lunch
4. Right before you leave work for the day, or before the evening meal on days when you are not at work
Bedtime: 5. At bedtime
As you were shown in the training session, if you need to delay the breathing session, press 1-4-7 for a 15 minute snooze.
To Perform A Breathing Session:
1. Conduct a breathing session as soon as possible after the hand-held spirometer alarm sounds
2. Place a plastic mouthpiece on the end of the spirometer
3. Unlock the spirometer by pressing 1-2-3
4. Press “enter”
5. Follow the directions on the screen
6. Use the arrow keys to select the type of session that you will be conducting (arising, awake hours, bedtime)
7. Press “enter” after you select the type of session
8. Answer the questions about your location, recent medication use, respiratory symptoms, and whether you smoked within the last hour using the arrows. Press “enter” when you are finished.
9. Blow into the spirometer as directed below:
a. Stand up straight and tilt your chin up slightly. Do not bend at the waist. If needed, bend your knees.
b. Position the spirometer near your face and wait until it beeps.
c. Take as deep a breath as possible, place the mouthpiece on top of your tongue, put your teeth around the mouthpiece, and seal your lips around the mouthpiece. Do not bite down on the mouthpiece.
e. Blow as hard and as fast as you can for six seconds. Stop blowing when the spirometer beeps.
f. Press “enter” to view coaching messages. These messages may instruct you on how to improve your blow.
g. Press “enter” to begin the next blow.
h. Three good blows are required for each breathing session.
10. Continue to follow directions on the screen. The session will end when you have completed 3 good blows.
11. When you have finished your session, press “enter” to lock the spirometer.
Important Things to Remember:
If you have difficulty performing the blows, you may stop the breathing session by pressing and holding the Esc key.
Position the spirometer near your face before you inhale so you do not quickly move the spirometer towards your mouth prior to blowing out. If the spirometer is quickly moved, the machine may think that you are trying to blow.
During the wake-up session, if you skipped a bedtime session, the spirometer will ask you what time you went to bed. During the mid-day session, if you skipped a waking-up session, the spirometer will ask you what time you got up. During the bedtime session, if you did not enter the time you got up that day, the spirometer will ask you what time you got up.
How to Connect the Cradle and Modem to Your Telephone Line:
1. Disconnect your telephone line from the telephone wall jack
2. Connect one modem line to the telephone wall jack and the second modem line to the telephone.
(Your telephone will work normally except for the 3 minutes that it takes to transmit information)
3. Plug the modem electrical cord into a wall outlet or extension cord
4. Turn on the modem and leave on all the time
How to Download Data:
Cradle spirometer after your bedtime breathing session so that it can download during the nighttime. The modem needs to be on.
What to Do if the Batteries Lose Their Charge:
You spirometer uses two AA batteries. If these batteries lose their charge you should turn off the spirometer, replace the batteries with the spare batteries provided, and then turn the spirometer back on by pressing and holding down on the “on/off” key until the spirometer beeps.
Returning the Spirometry Equipment and Gift Certificate:
Please return the spirometer, cradle, modem and cables to NIOSH personnel. Upon receipt of the spirometry equipment and evaluation of the data, your gift certificate of up to $50 will be mailed to you.
| File Type | application/msword |
| File Title | Building Related Asthma Research in Public Schools (New) |
| Author | sqg8 |
| Last Modified By | sqg8 |
| File Modified | 2008-05-02 |
| File Created | 2007-11-09 |
© 2026 OMB.report | Privacy Policy