ERE Registration
Electronic Records Express
Complete ERE User Guide
ERE Registration
OMB: 0960-0753
Automated User Account Setup
Electronic Records Express
Sponsor Instruction Guide

Office of Disability Programs
Office of Process Policy
May 2006
Automated User Account Setup – Sponsor Instruction Guide
Table of Contents
Access the Account Maintenance Menu 3
Create an Individual End-User Account 5
Create an Organizational Shared End-User Account 15
Search Accounts on Specified Criteria 25
List All Accounts Alphabetically by User ID 28
Access the Account Maintenance Menu
You should login to the Electronic Records Express website using your personal User ID and password. The website address is: http://eme.ssa.gov. Upon a successful login, you will see the Electronic Records Express home page. In the left navigation panel, select the “Account Maintenance” hyperlink.
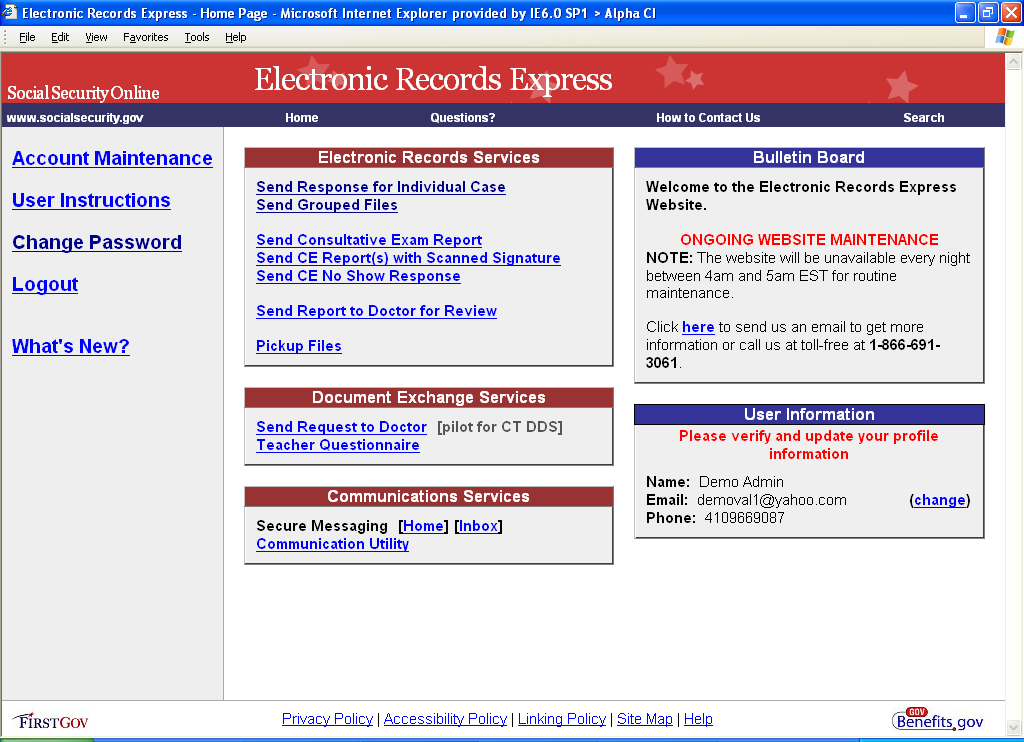

Next, you will see the Account Maintenance Menu screen which is shown below.
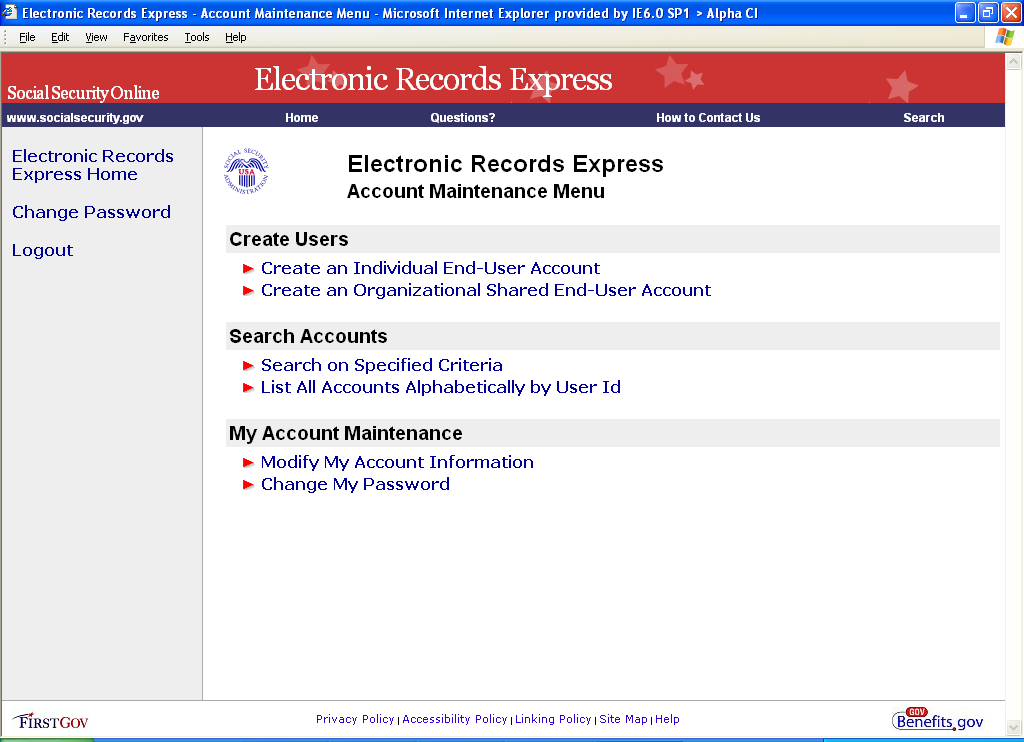
From the Account Maintenance Menu, you can select options which will allow you to create users, search accounts, and perform maintenance on your own account.
Create an Individual End-User Account
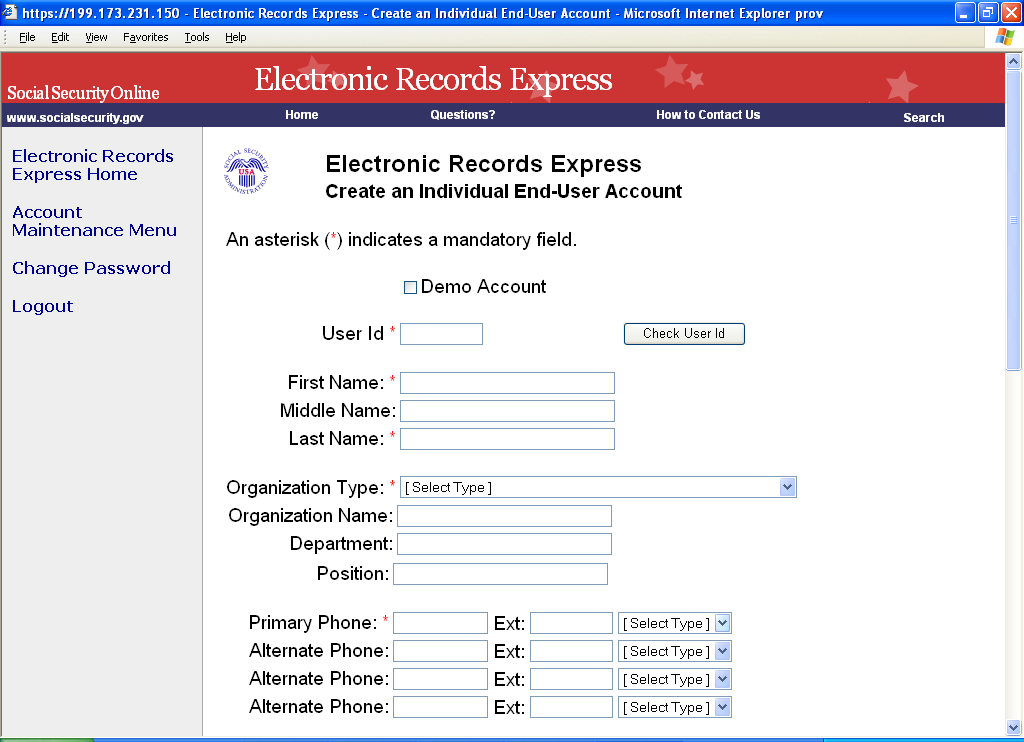
From the Account Maintenance Menu, select the “Create an Individual End User Account” hyperlink.
Note that mandatory fields on this web page are marked with a red asterisk.
You may select the “Demo Account” checkbox at the top of the page. Doing so will set up a demo account. This is probably not an option you want to select for your providers as files submitted under a demo account login do not get received by DMA and routed into the electronic folder. Therefore, please be certain that you are not selecting this checkbox when you are setting up medical evidence providers to use the Electronic Records Express Services website to upload files to the DDS.
Enter a User ID in the text box shown below. SSA Policy requires that all User IDs be exactly 8 characters in length and they must contain at least 1 numeric and 1 alphabet character. Special characters (e.g., &, %, #, @, etc.) are not permitted. Once you have typed in the User ID, click the Check User ID button.

The screenshot below shows that the User ID “newuser2” does not exist. So, this may be used as a User ID for the account signup. If the User ID you entered had already existed, you would have to select a different User ID to signup the provider.
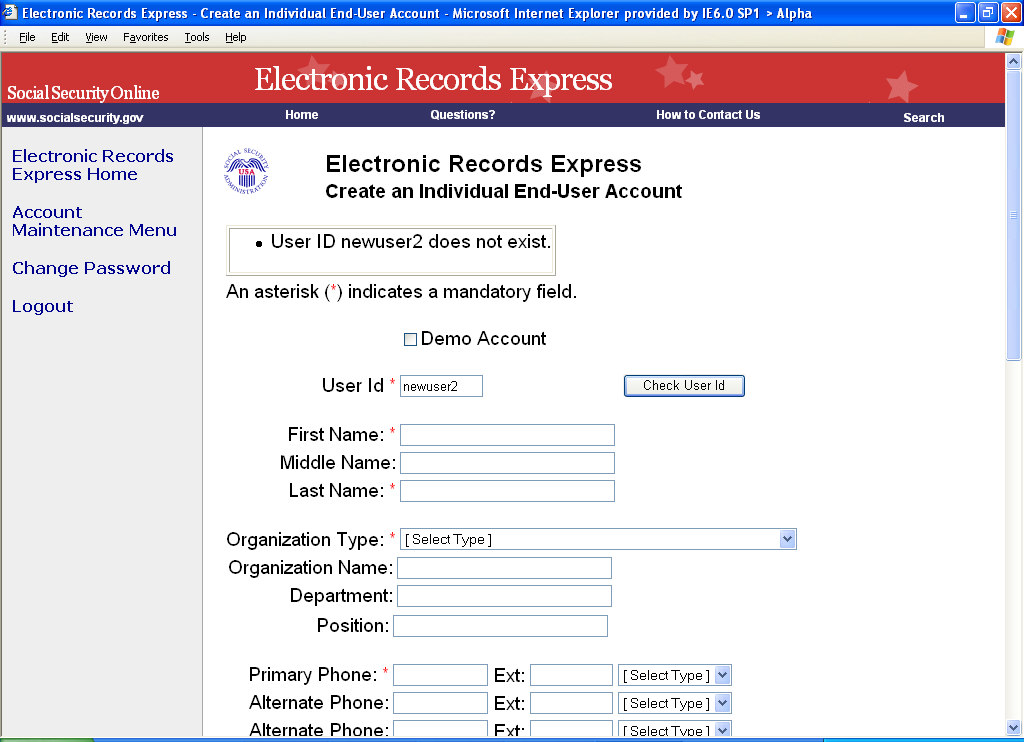

Next you’ll continue to enter information into the web page:
First Name
Last Name
Select an organization type from the drop down menu
Organization Name
Department
Position title of the new user
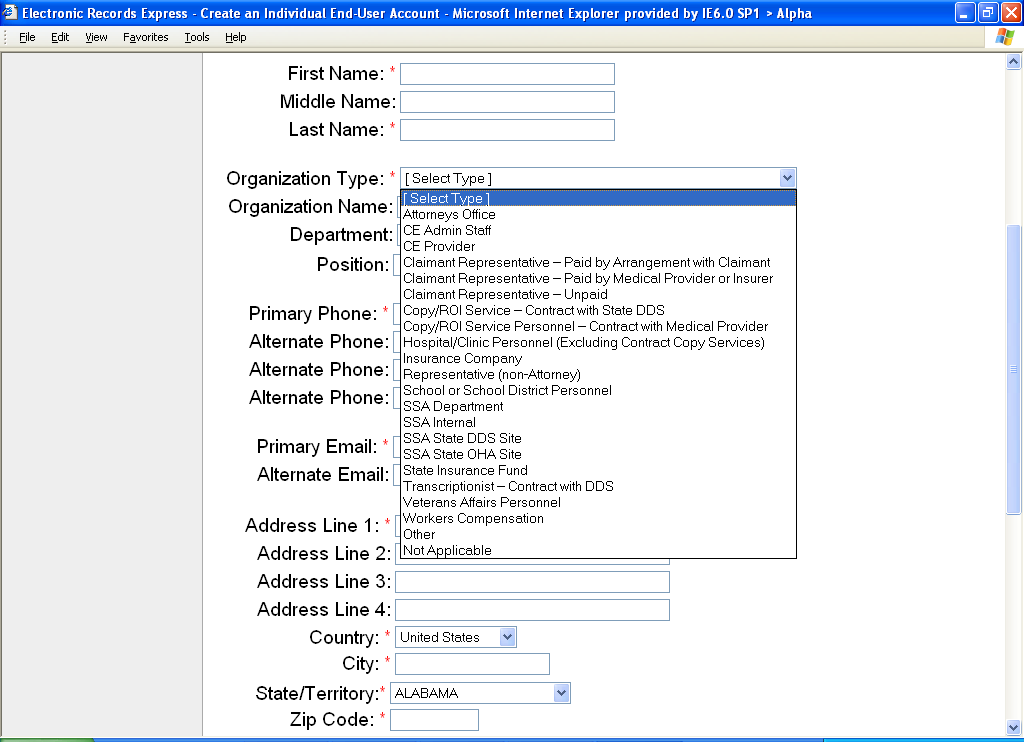
Continue entering information into the web page:
Primary telephone number
Select type of phone number from the drop down menu (work, fax, cell, pager, other)
You may enter up to 3 additional alternate telephone numbers
Enter primary email address
You may enter an alternate email address
Enter the address for the user


You will see a line separator in the web page. This signals you to enter sponsor information.


From the drop down list, select the primary DDS site the user will send evidence.
Select the sponsor from the drop down list.
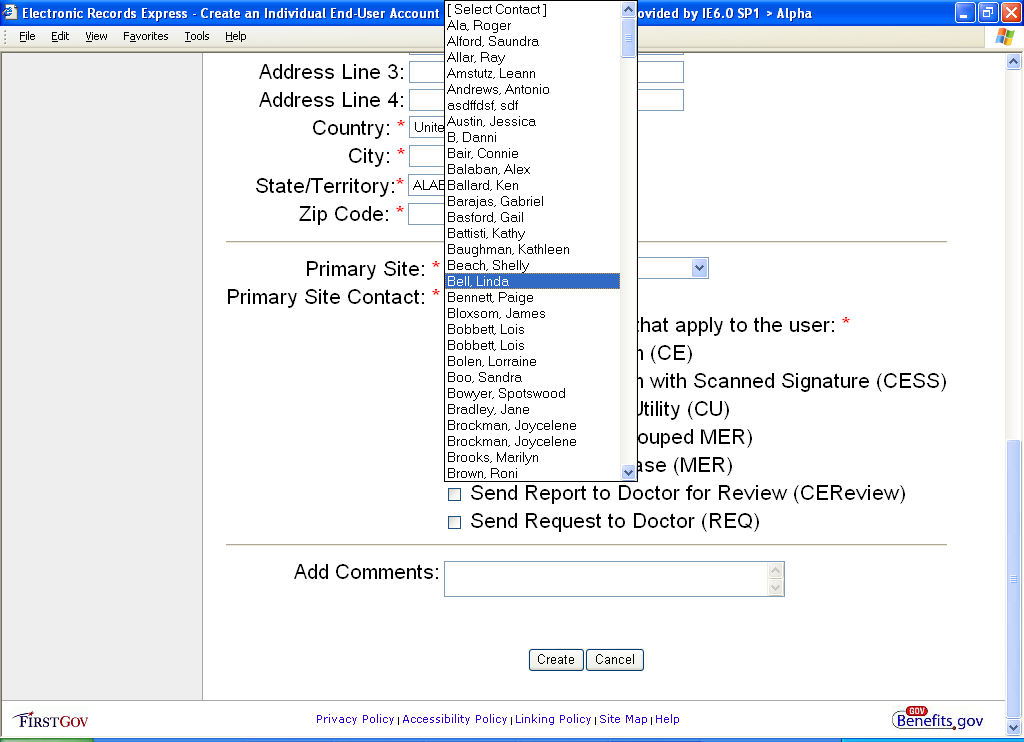

The next step is extremely important. You will be selecting the website utilities that permit the user access. Please be sure to select all utilities the user needs.
Note: The secure messaging option needs prior approval from the Electronic Records Express Project Manager.


You may type in any comments in the “Comments” text box.
Click the Create button to continue to create the account. Click the Cancel button to cancel this account setup.
You will now see a summary page for the account.

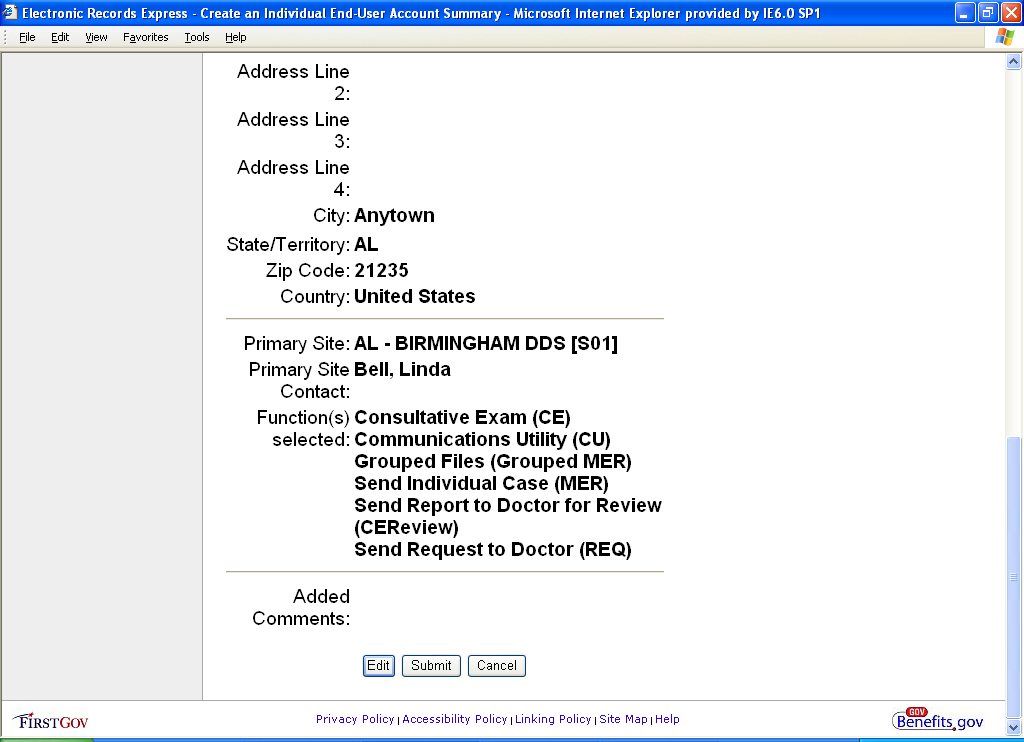
Click the Edit button to return to the prior screen to change any information you have entered. Click the Submit button to create the account. Click the Cancel button to cancel the account setup.
Clicking Submit will activate the new account. You will receive a confirmation screen similar to the one shown below:
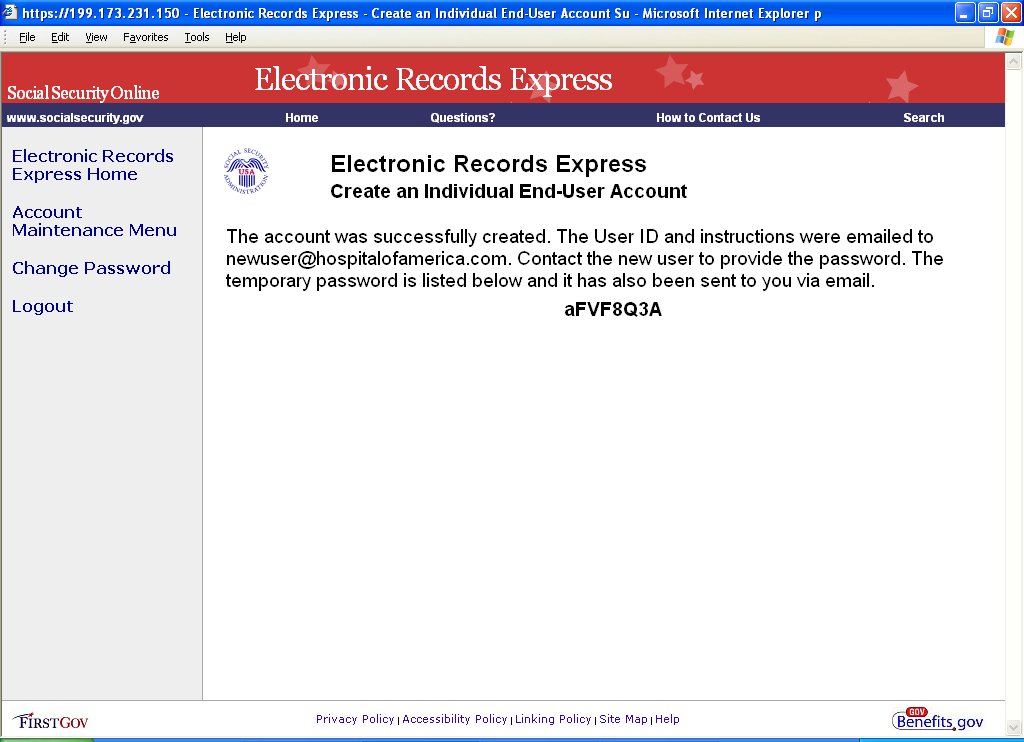
You, the sponsor, will receive a confirmation email similar to the one shown below:
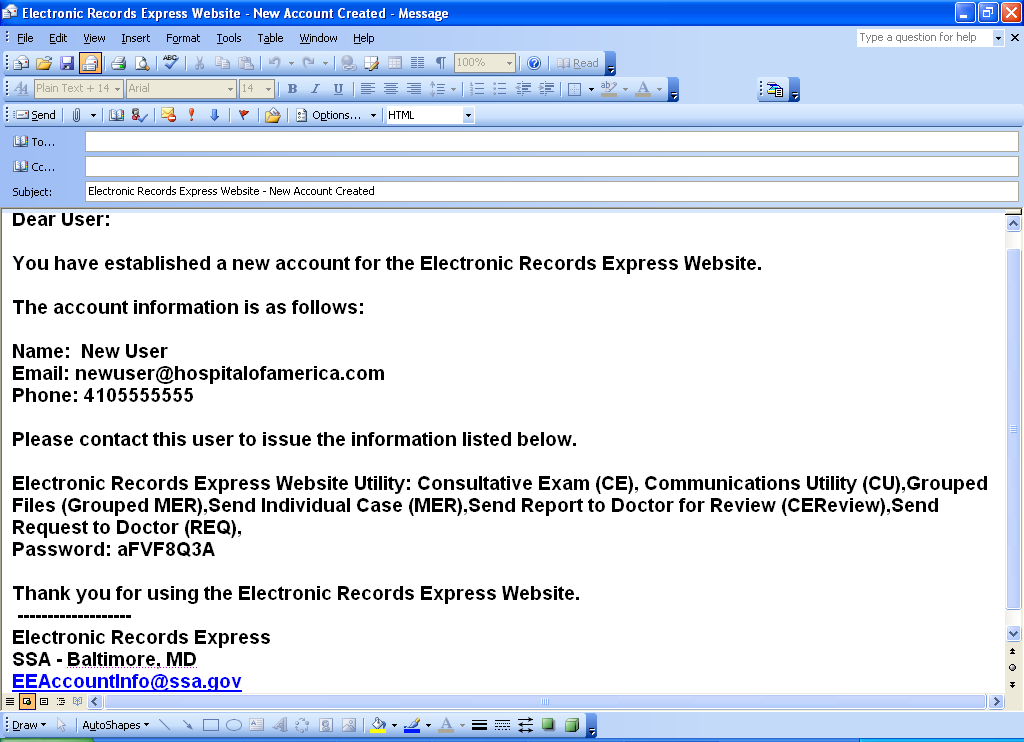
Your provider will receive an email message similar to the one shown below:

What happens now?
The User ID and instructions have been emailed to the primary email address you provided for the new user.
The sponsor must contact the new user to provide the password. The temporary password is listed on the website confirmation screen and it has also been sent to you via your SSA email address.
Please be sure to explain to your new user that the password which was automatically generated by the website is valid for one time use only. The first time the new user logs into the website, he/she must change their password.
Your new user now has access to the Electronic Records Express website.
Create an Organizational Shared End-User Account
From the Account Maintenance Menu, select the “Create an Organizational Shared End User Account” hyperlink.
Note that mandatory fields on this webpage are marked with a red asterisk.
You may select the “Demo Account” checkbox at the top of the page. Doing so will set up a demo account. This is probably not an option you want to select for your providers as files submitted under a demo account login do not get received by DMA and routed into the electronic folder. Therefore, please be certain that you are not selecting this checkbox when you are setting up medical evidence providers to use the Electronic Records Express Services website to upload files to the DDS.
Enter a User ID in the text box shown below. SSA Policy requires that all User IDs be exactly 8 characters in length and they must contain at least 1 numeric and 1 alphabet character. Special characters (e.g., &, %, #, @, etc.) are not permitted. Once you have typed in the User ID, click the Check User ID button.
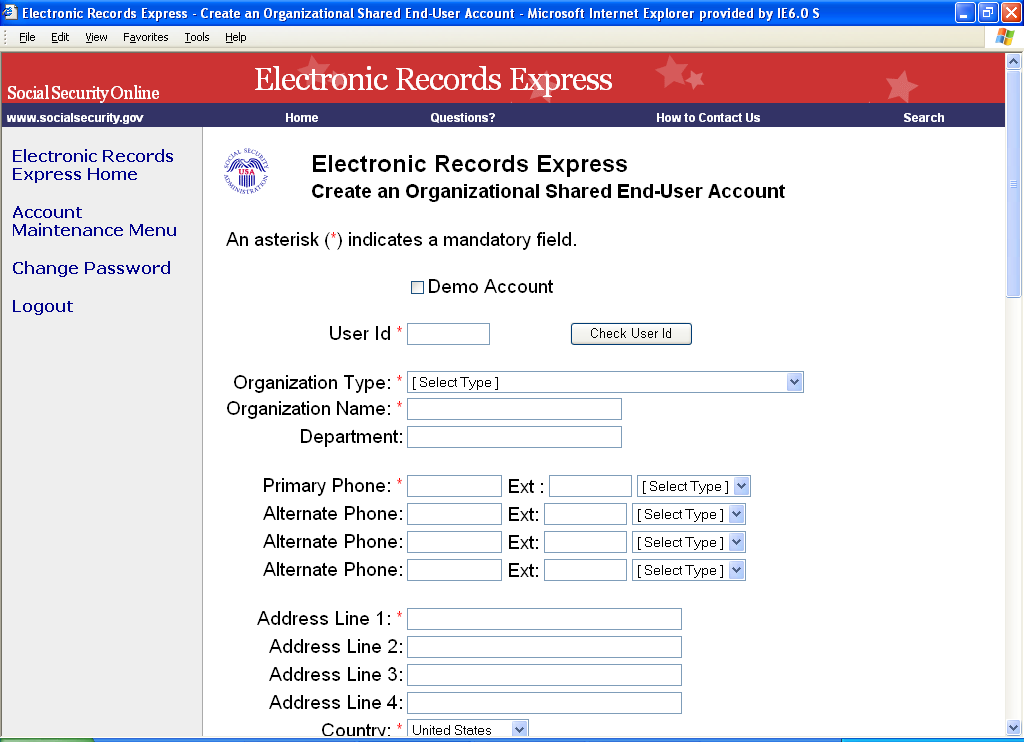

The screenshot below shows that the User ID “neworg39” does not exist. So, this may be used as a User ID for the account signup. If the User ID you entered had already existed, you would have to select a different User ID to signup the organizational shared end user account.
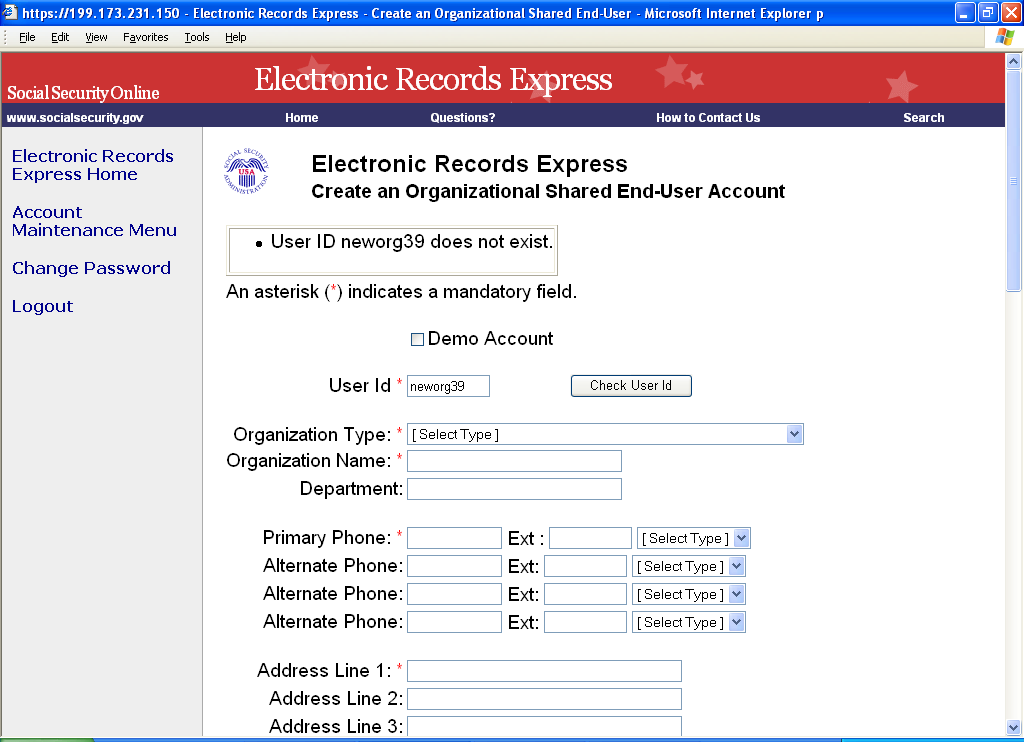

Next you’ll continue to enter information into the web page:
Select an organization type from the drop down menu
Organization Name
Department
Primary telephone number
Select type of phone number from the dropdown menu(work, fax, cell, pager, other)
You may enter up to 3 additional alternate phone numbers for the organization
Enter the organization’s address
You will see a line separator and you should begin entering the sponsor’s information.
From the drop down list, select the primary DDS site the user will send evidence.
Select the sponsor from the drop down list.
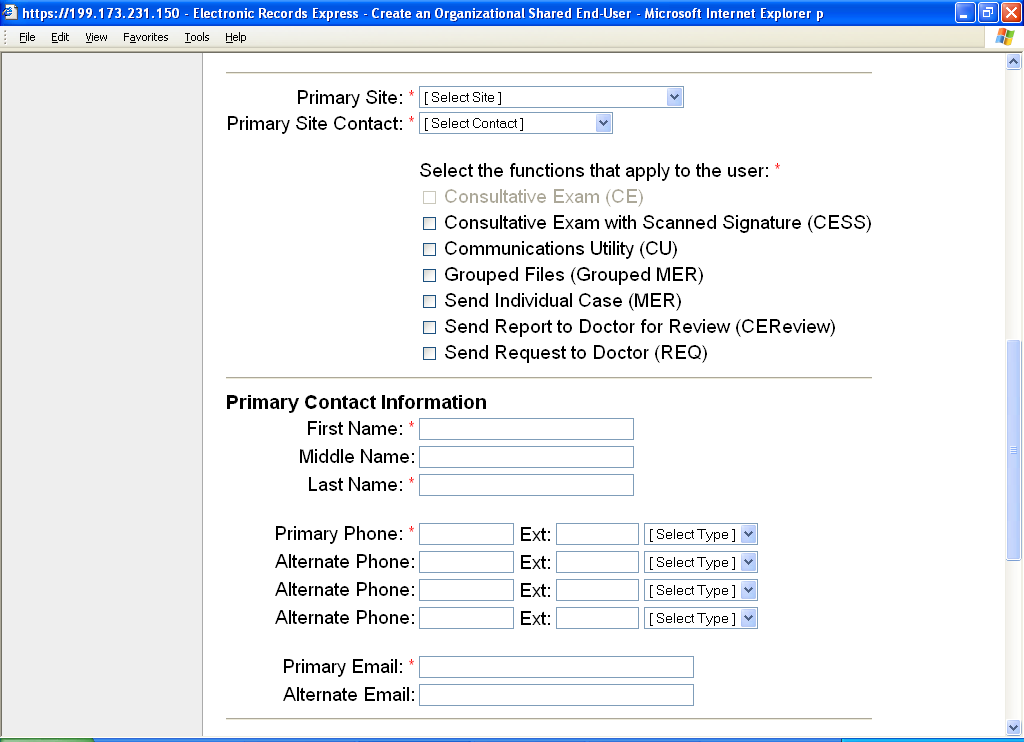


The next step is extremely important. You will be selecting the website utilities that the users will have access to. Please be sure to select all utilities the users need.
Note: The secure messaging option needs prior approval from the Electronic Records Express Project Manager.
Note: the Consultative Exam (CE) utility cannot be selected for an Organizational Shared End User account.
The CE selection is not available. CE
Providers must have an individual end user account and may not share
their login with anyone.

You’ll
see another line separator in the page. You will now enter
information for the organizational shared end user account’s
primary contact (name, phone, and email).
You’ll
notice another line separator and then you will enter information for
the organizational shared end user account’s backup contact.
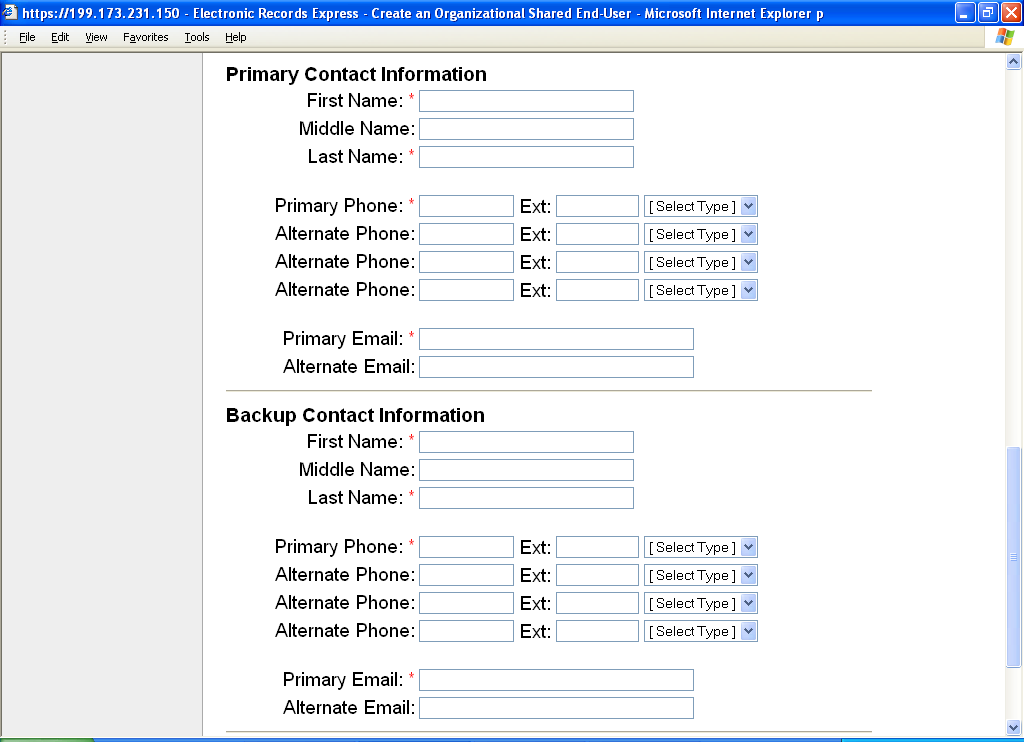


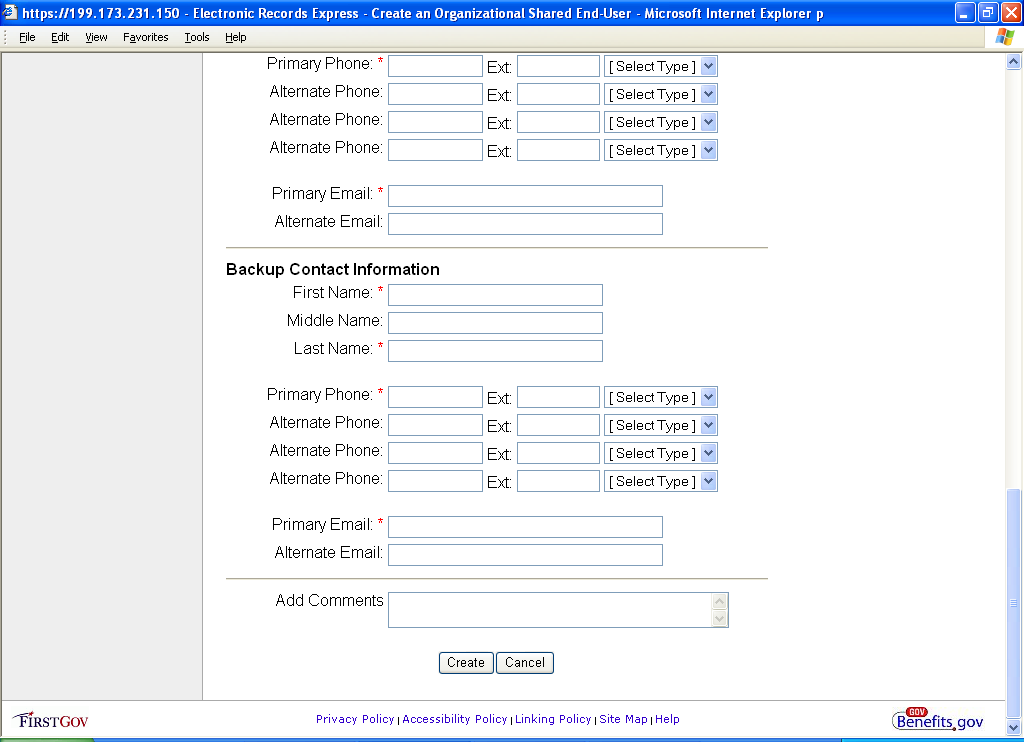
You may type in any comments in the “Comments” text box.
Click the Create button to continue to create the account. Click the Cancel button to cancel this account setup.
You will now see a summary page for the account.
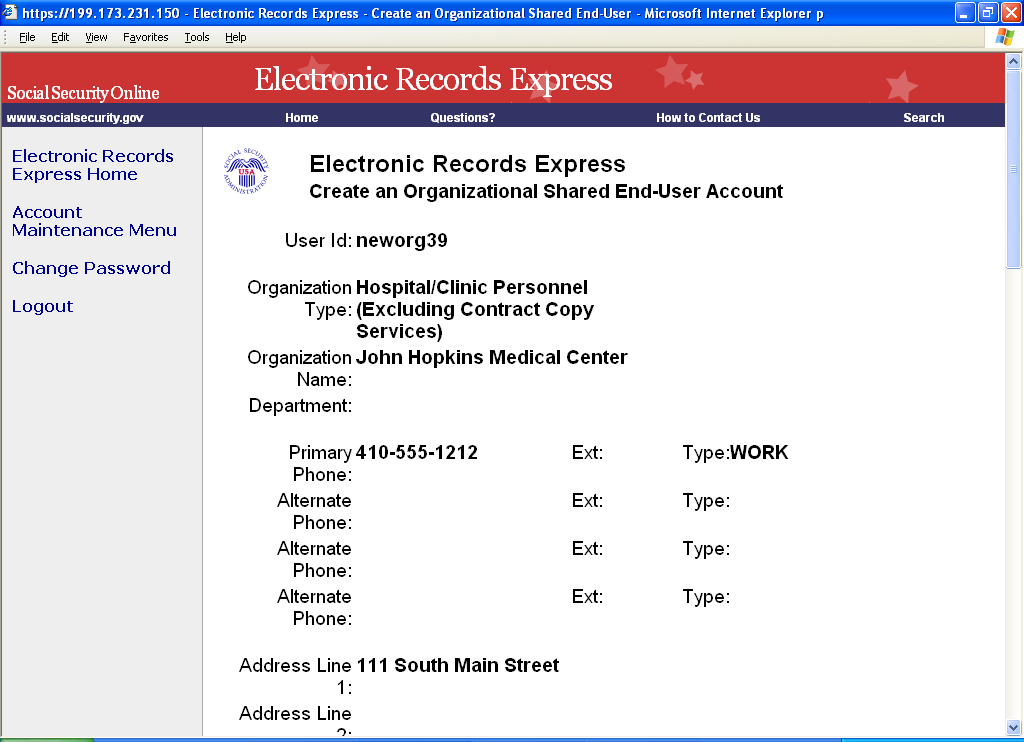
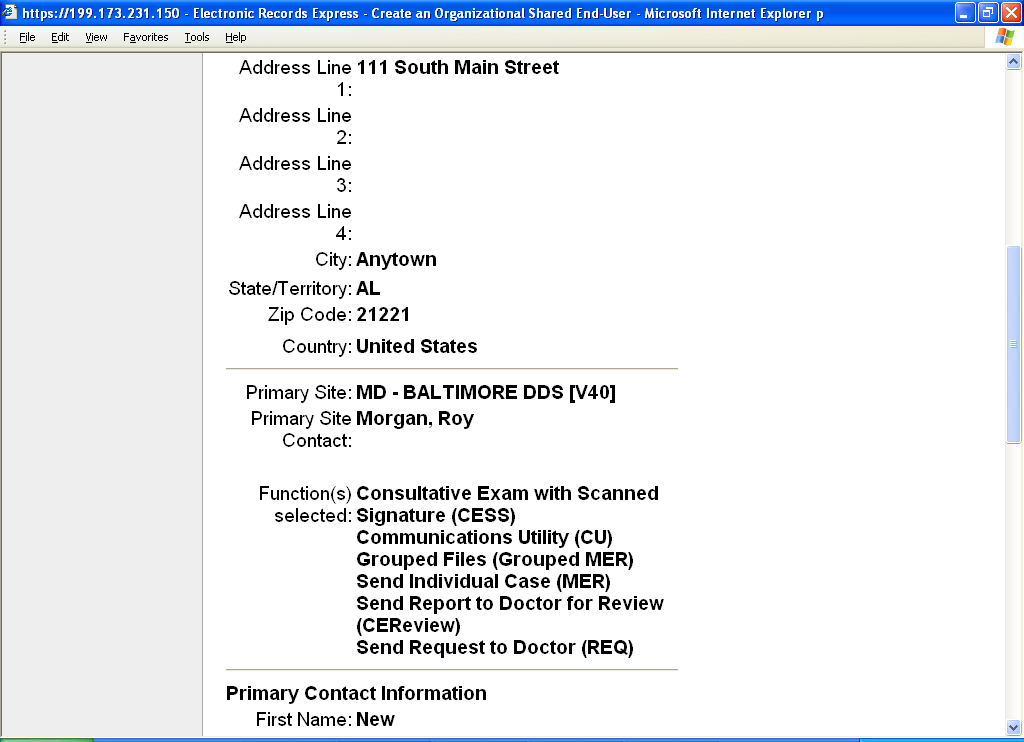
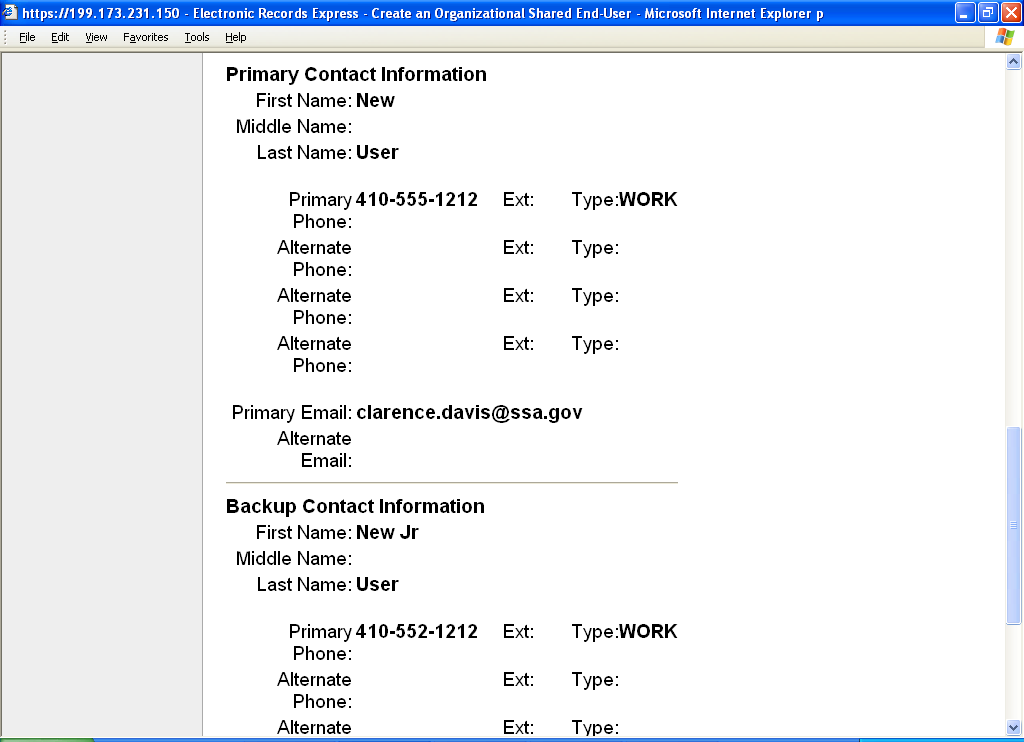
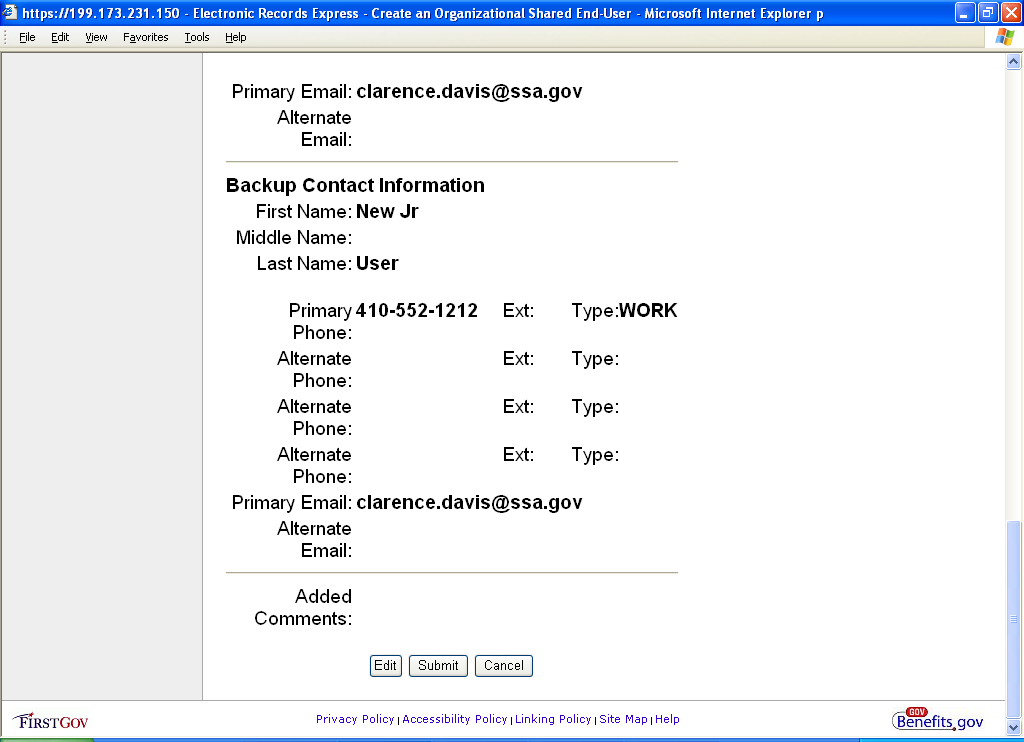
Click the Edit button to return to the prior screen to change any information you have entered. Click the Submit button to create the account. Click the Cancel button to cancel the account setup.
Clicking Submit will activate the new account. You will receive a confirmation screen similar to the one shown below:
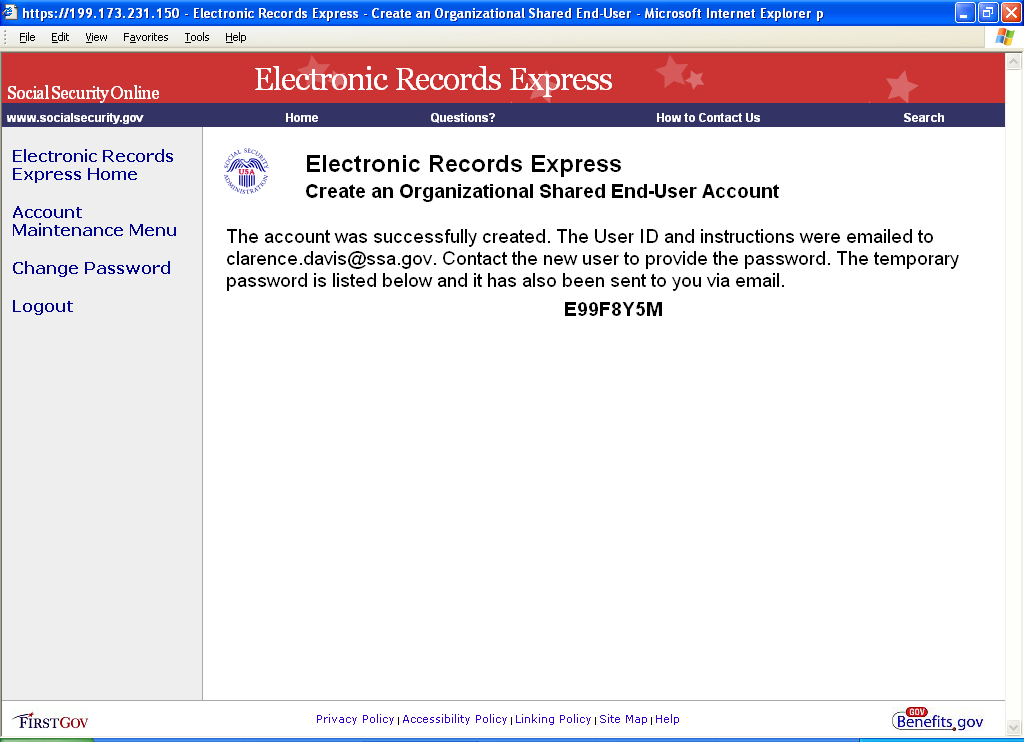
You will receive a confirmation email similar to the one shown below:

What happens now?
The User ID and instructions have been emailed to the primary contact’s email address that you provided.
The sponsor must contact the new user to provide the password. The temporary password is listed on the website confirmation screen and it has also been sent to you via your SSA email address.
Please be sure to explain to your new user that the password which was automatically generated by the website is valid for one time use only. The first time the new user logs into the website, he/she must change their password.
Your new user now has access to the Electronic Records Express website.
Search Accounts on Specified Criteria
From the Account Maintenance Menu, select the “Search on Specified Criteria” link.
You may enter many different types of information to find accounts. Search criteria include:
User ID
First name
Last name
Phone
Email
Primary DDS Site
You may select one of the radio buttons to:
Match all information entered
Match any information entered
Match information exactly

Next, you may check the boxes for the utility access the user(s) have. You may click a radio button to match either all or any of the selected functions.
You may also select the checkbox to include demo accounts in your search.
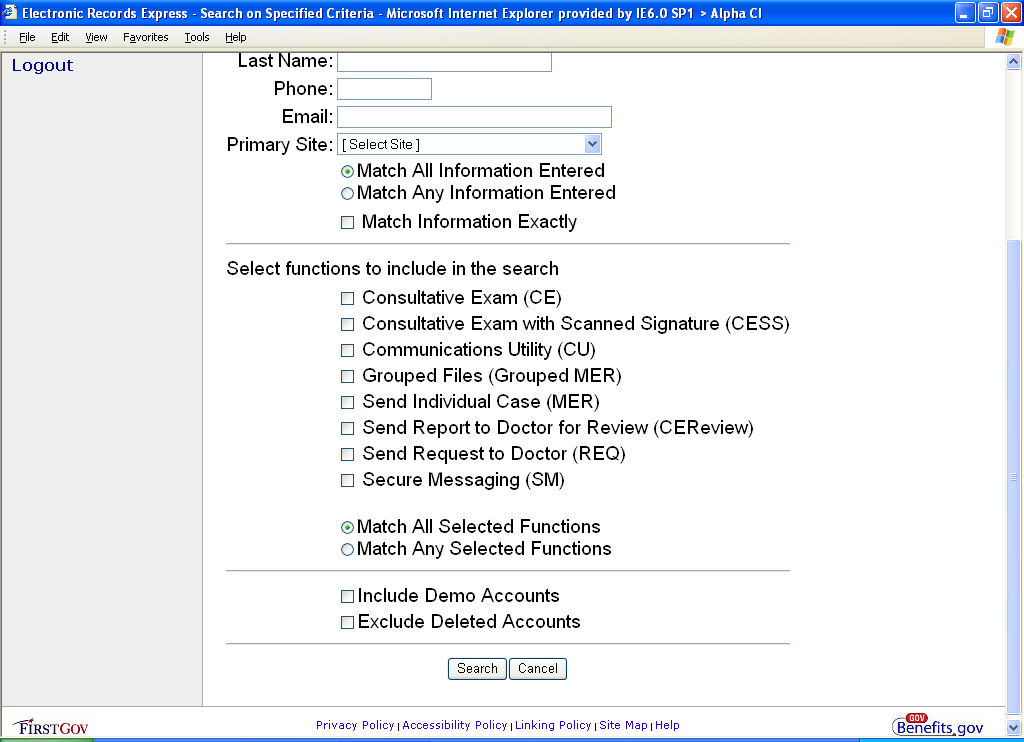
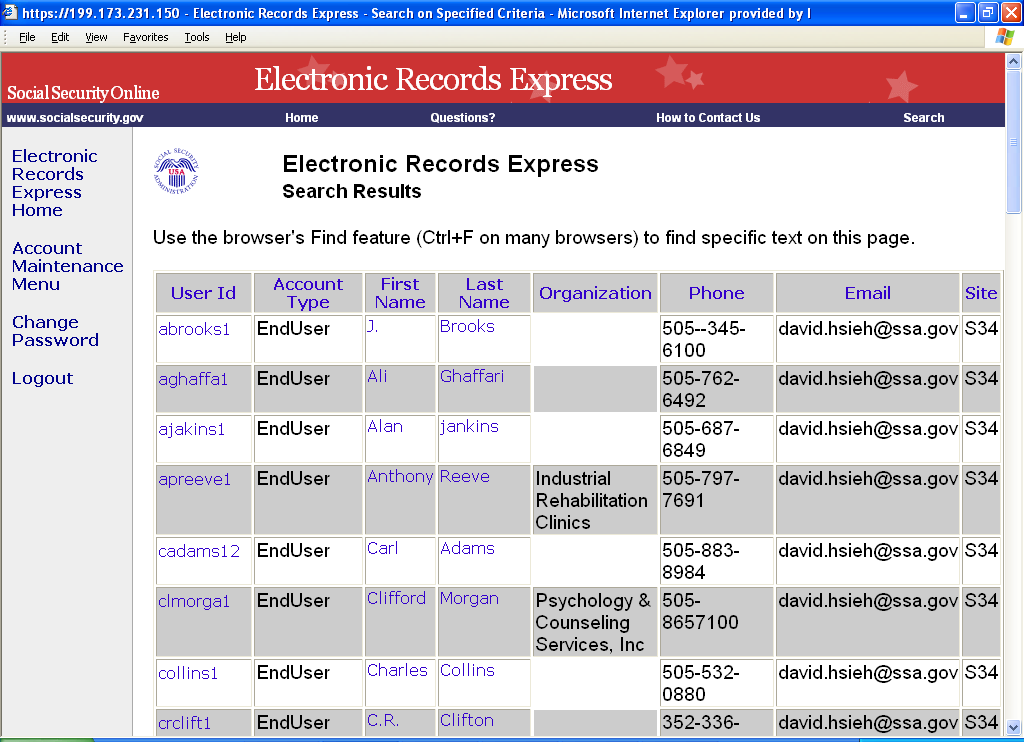
A search for users with Primary Site affiliation S34 yielded the results shown below. Please note that you may have to use the scroll bar at the bottom of your web browser to see the complete database.
List All Accounts Alphabetically by User ID
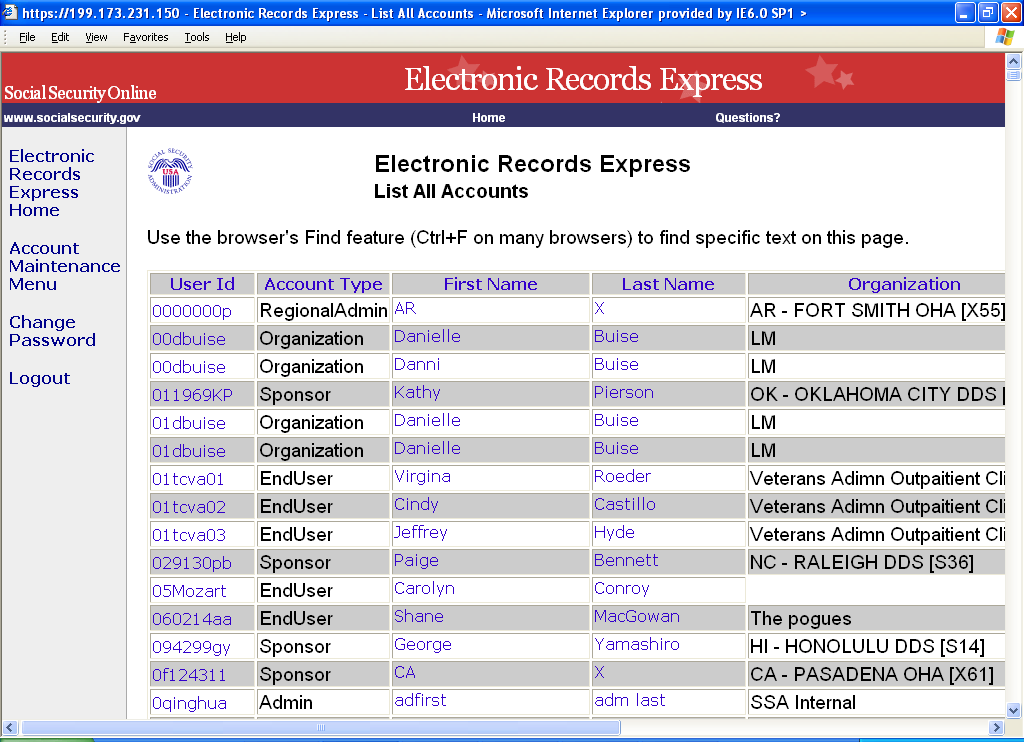
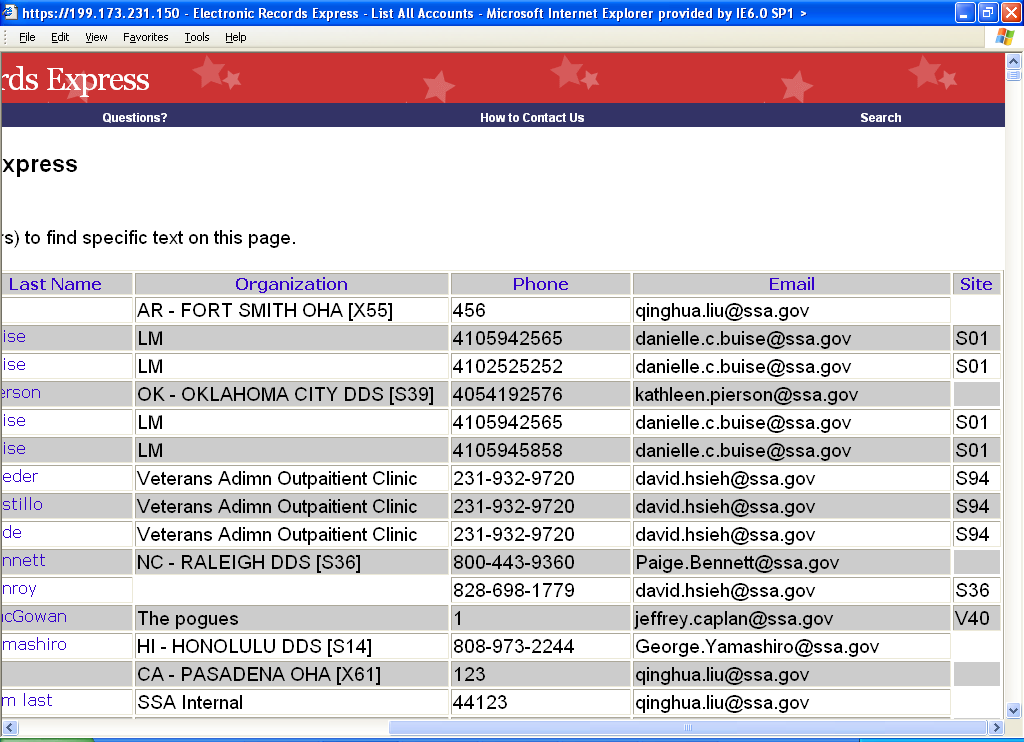
From the Account Maintenance Menu, select the link “List all accounts alphabetically by User ID”. The next page shown below illustrates the result of this search. The database of users is organized with the following information categories:
It may be necessary for you to use the scroll bar at the bottom of your web browser window to see the entire database.
You can select a category to sort the database. To do this, simply click a column heading across the top of the database.
Sorting the database may be useful if you are looking for a user’s last name, user ID, or Site (if you wish to list all users your site has signed up).


Modify an Account
To modify information in an existing account (individual end user or organizational shared end user), click on “Search on Specified Criteria” from the Account Maintenance Menu. Enter the information you know and search for the account.
A search performed with the last name “Davis” was entered and the following accounts were listed.
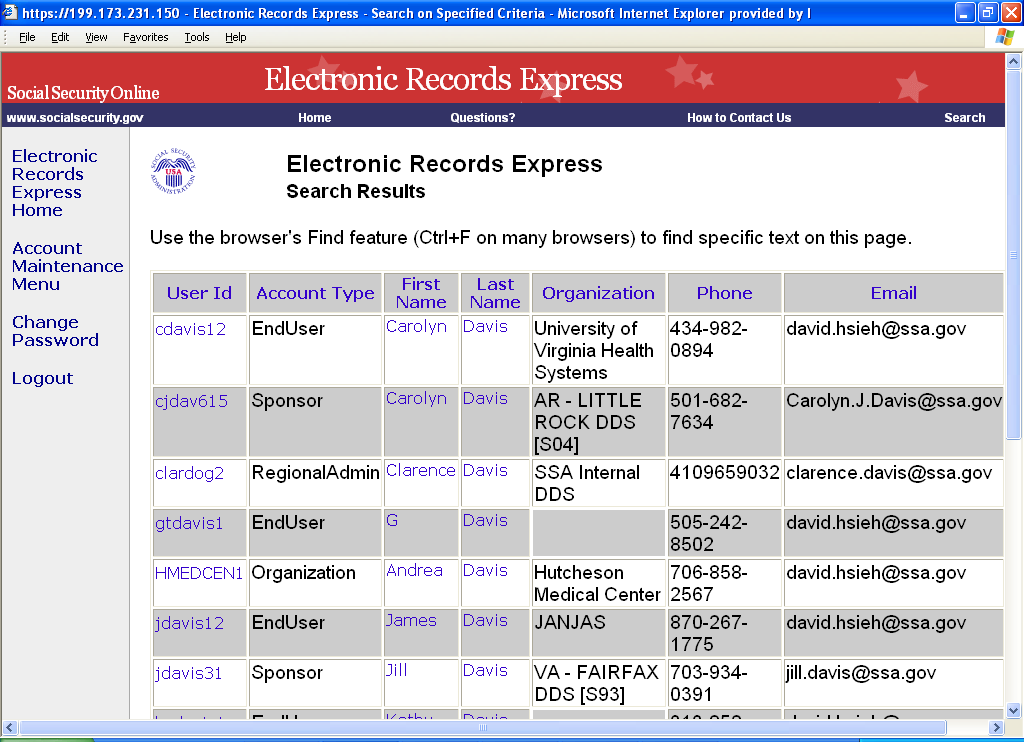
Click on the hyperlinked information (User ID, First Name, or Last Name) fields for the desired account. This will take you to the Account Summary page for the account.
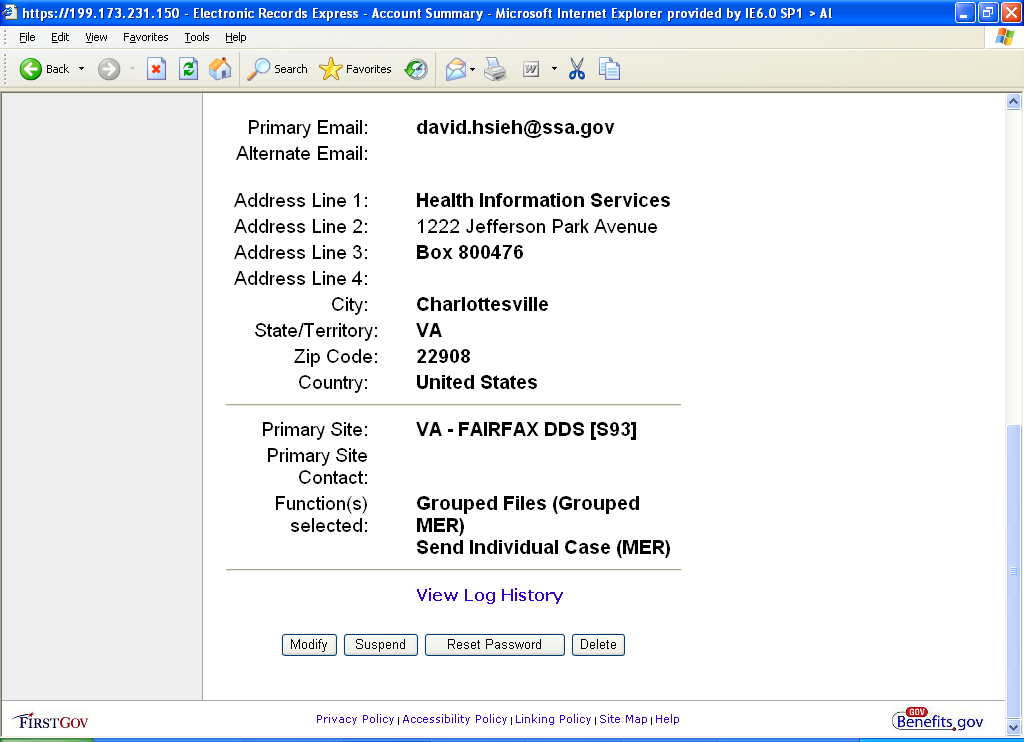
Scroll down to the bottom of the Account Summary page and click the Modify button. This brings up the Modify Account page which is laid out in the same format that was used to establish the account. You may find the information you want to modify and make changes.
Be sure to click the Modify button at the bottom of this page. You will then see a summary page for the account. After verifying the account information is accurate on the next screen, click the Submit button at the bottom of the page to activate your changes.
Suspend an Account
To suspend an existing account (individual end user or organizational shared end user), click on “Search on Specified Criteria” from the Account Maintenance Menu. Enter the information you know and search for the account.
A search for “newhosp9” in the User ID field yielded the following results:

Clicking on the hyperlinked information (User ID, First Name, or Last Name) fields for this account takes you to the Account Summary page for the account.
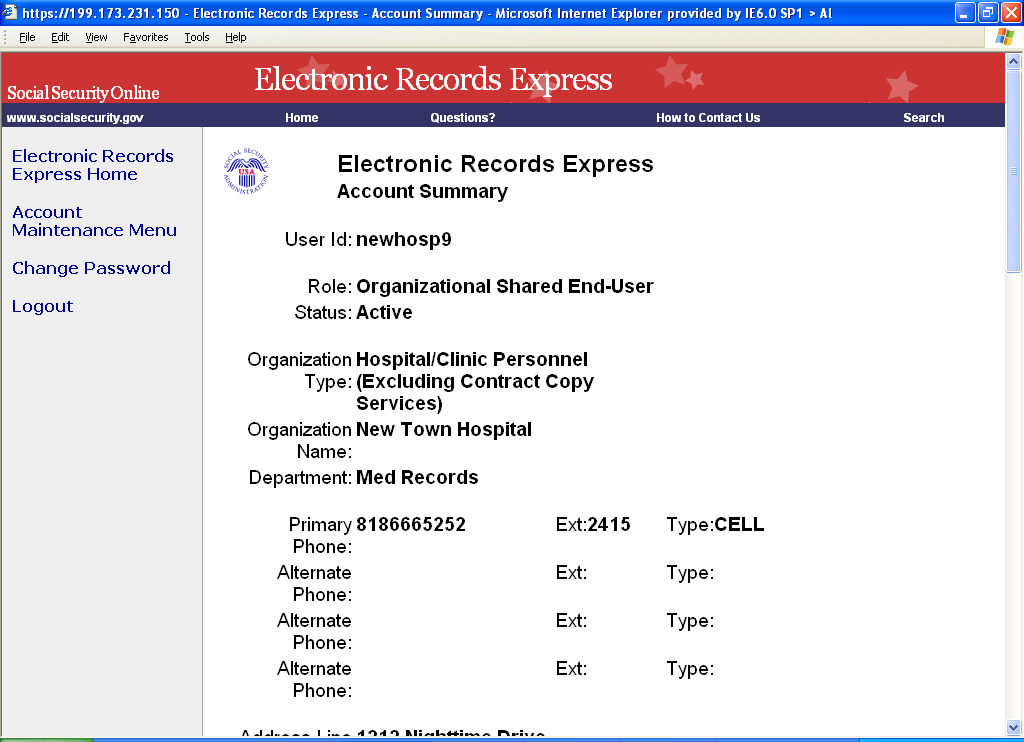
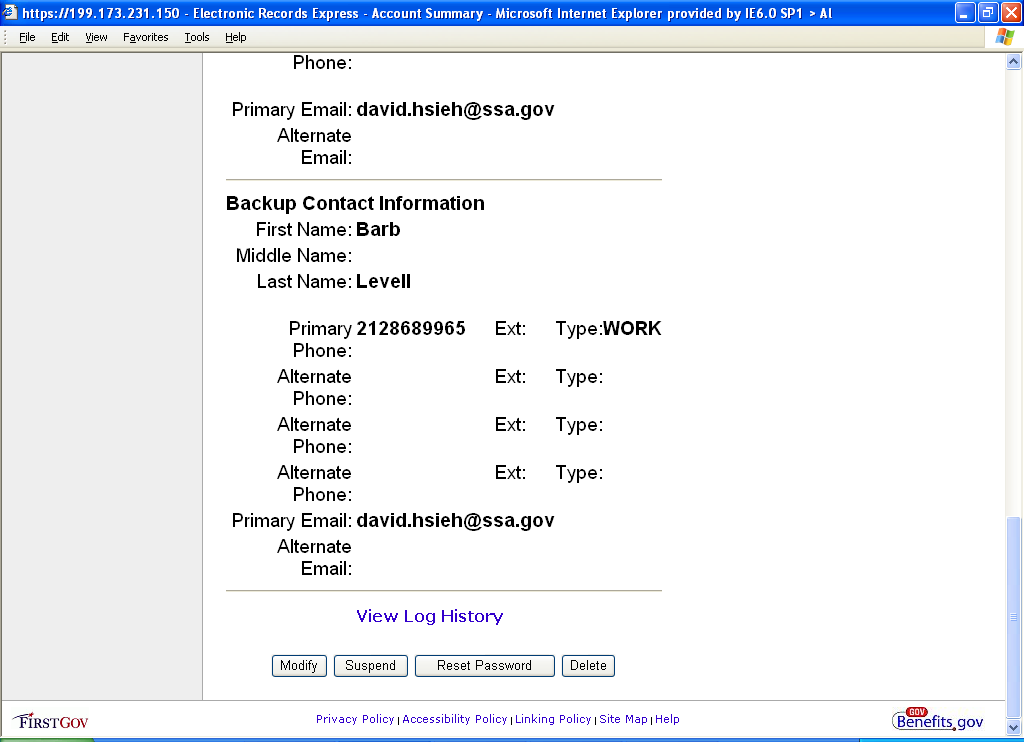
To suspend the account, scroll to the bottom of the Account Summary page and click the Suspend button.


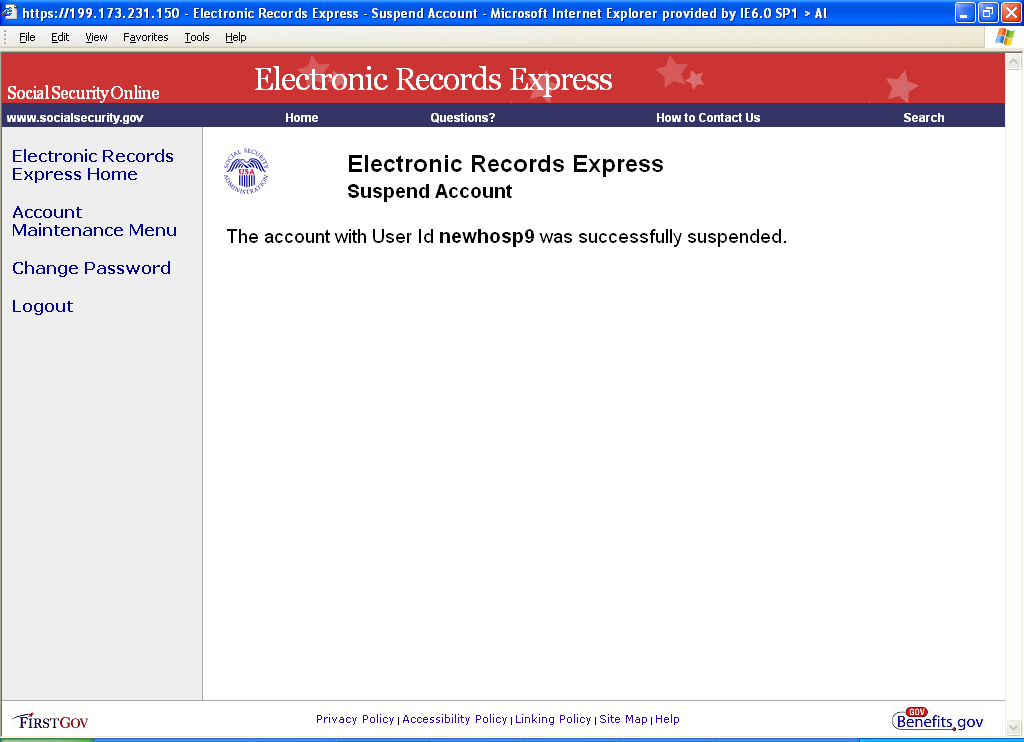
You will then receive confirmation that the account has been suspended.
Reactivating a Suspended Account
Access to the account can be restored at a later time if/when appropriate. To reactivate a suspended account, simply search for the account following the prior directions. The screen shot below of the Account Summary page shows that the account for “newhosp9” is suspended:


Scroll down to the bottom of the page and select the Reactivate button at the bottom of the Account Summary page.
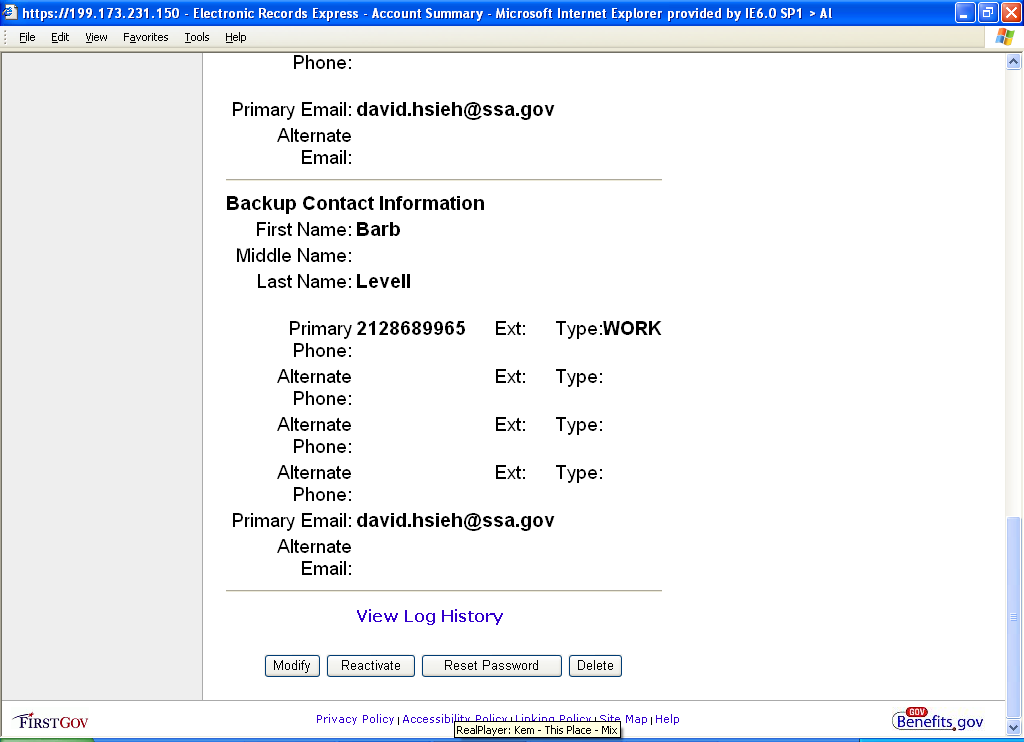

You will receive a confirmation page similar to the one shown below. The account may now be accessed once again by the user(s).

To reset an account’s password, click on “Search on Specified Criteria” from the Account Maintenance Menu. Enter the information you know, search for the account, and then select the account that you wish to reset the password on.
This brings you to the Account Summary page. Scroll to the bottom of the page and select the Reset Password button.

You will receive the new password after the web page refreshes.
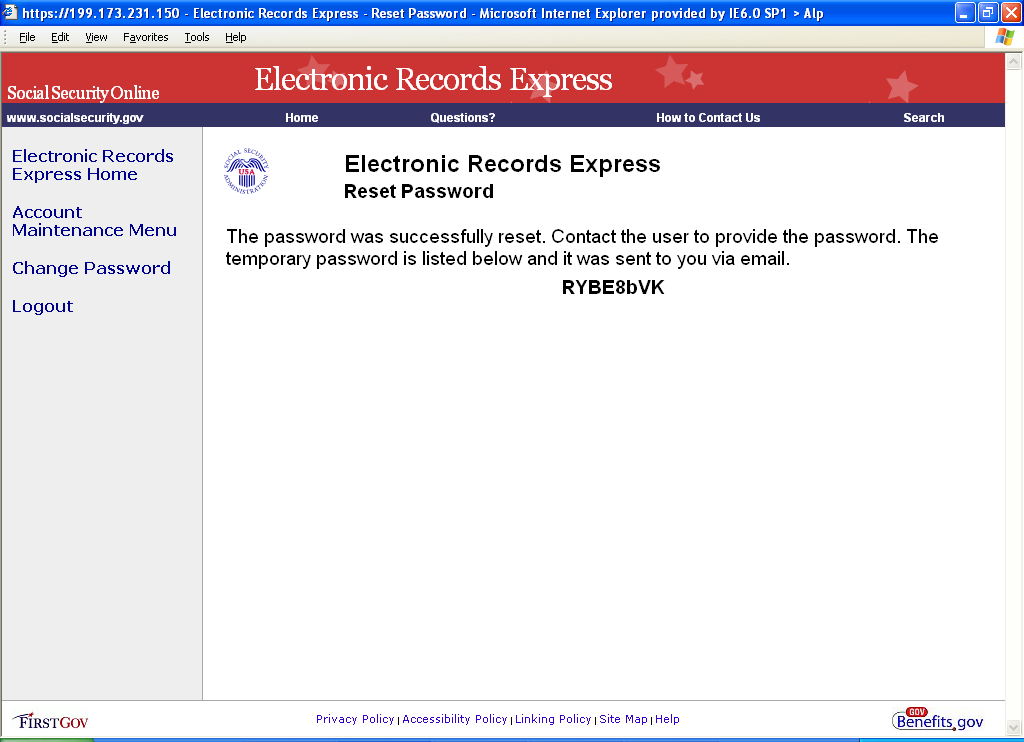
You, the sponsor, receive the following email which also contains the new temporary (one time use) password:
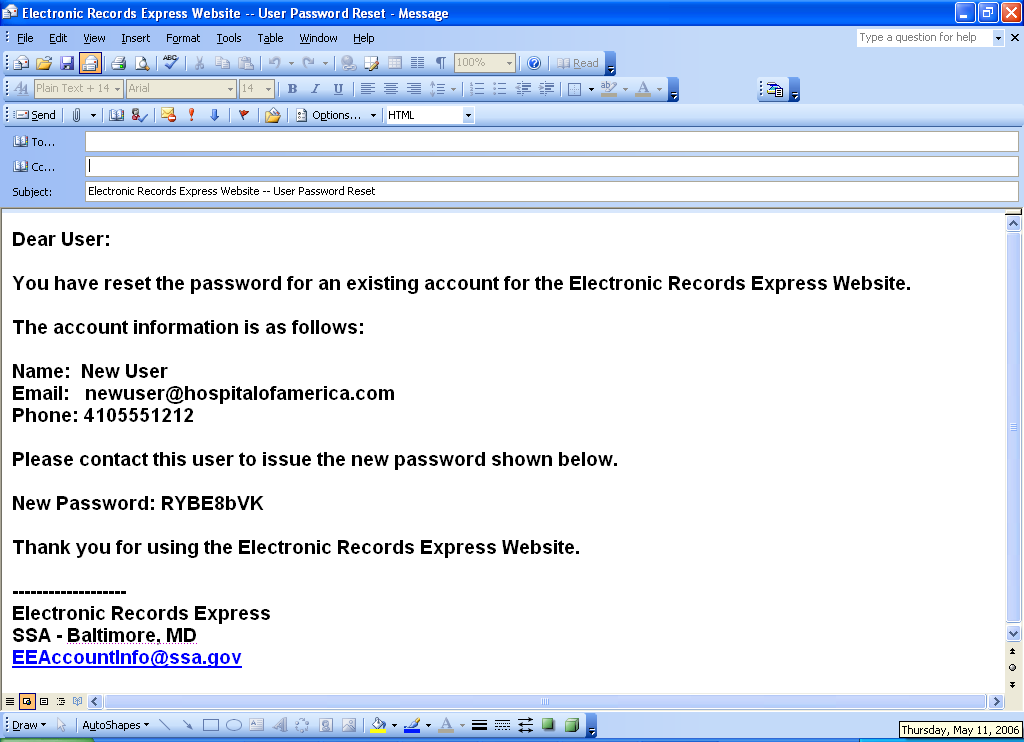
The user receives the following email to confirm that the sponsor has reset the password and will contact the user shortly to provide the new password:

Please note that you should not be deleting accounts at this time.
Deleting accounts permanently deletes all information including audit trails
The example shown below is provided as a courtesy only.
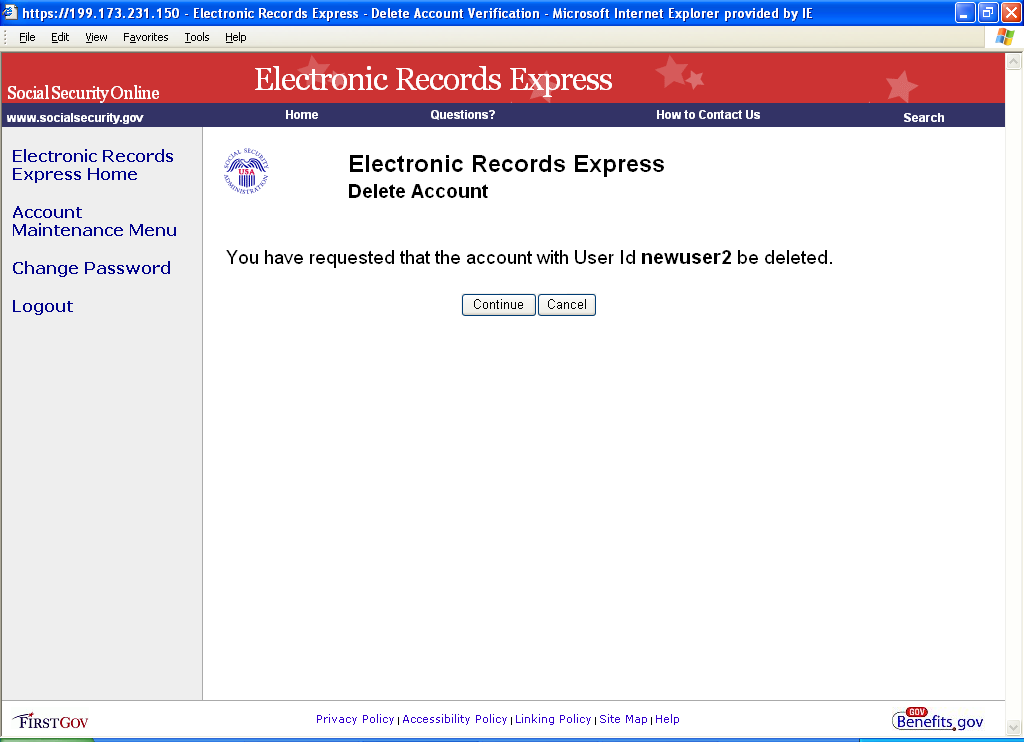
Search accounts by desired criteria. This example shows the “newuser2” account being deleted.
Click the Delete button at the bottom of the page.
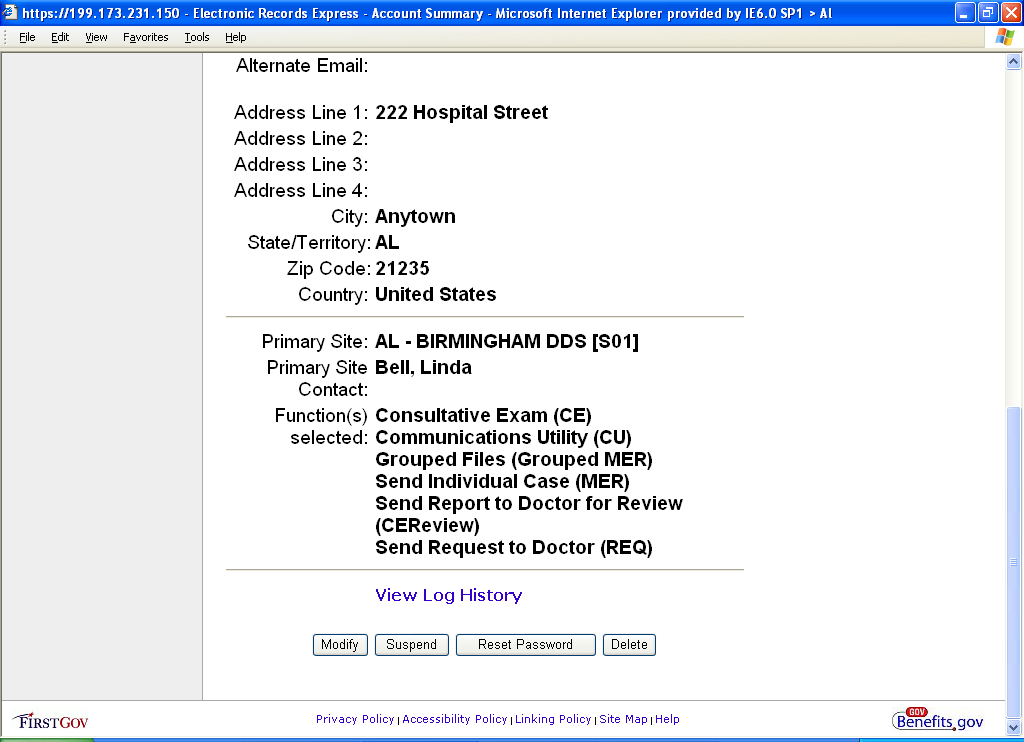
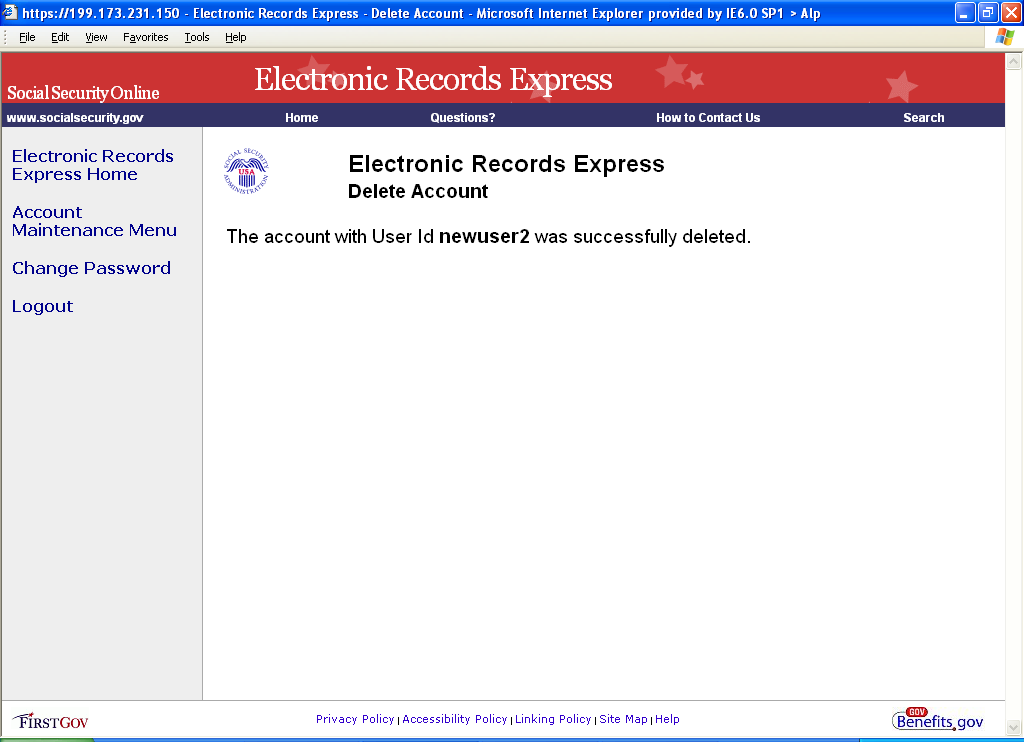
The next page asks you to confirm your request to delete the specified account. Click the Continue button to delete the account. Next you’ll receive a confirmation that the account was deleted.
Modifying Your Account
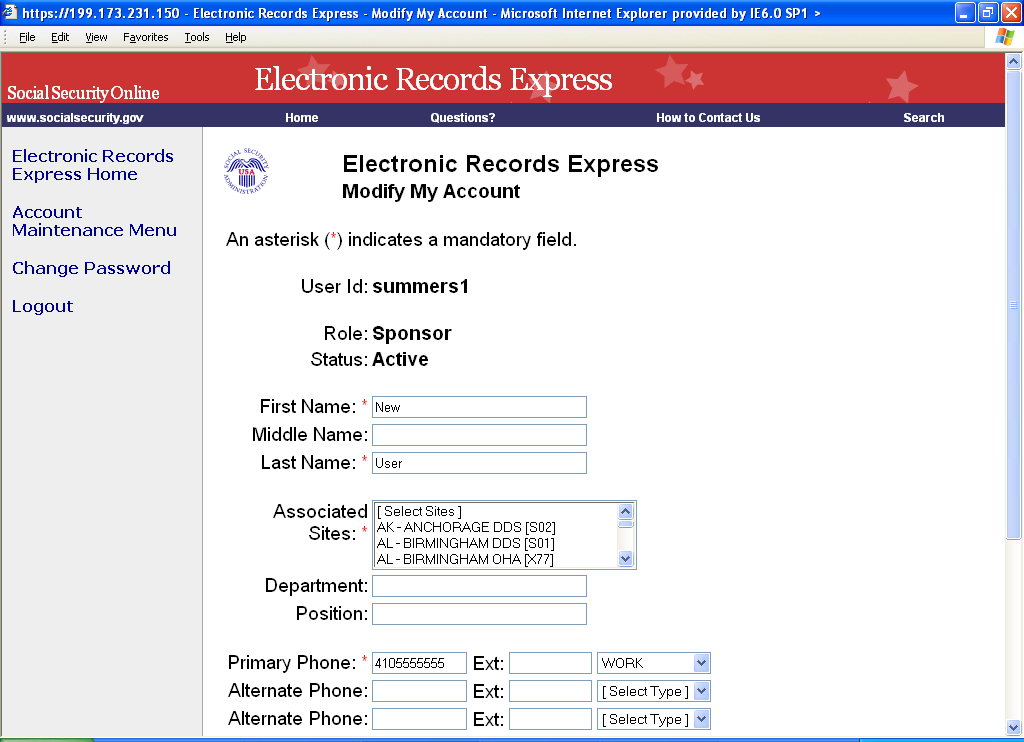
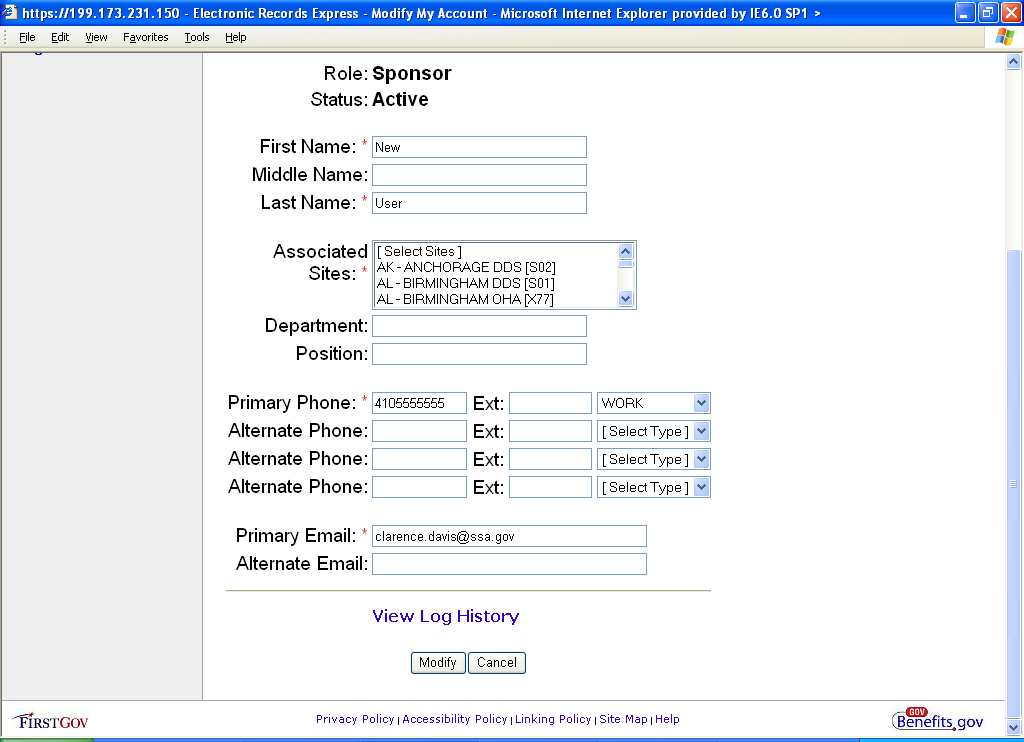
From the Account Maintenance Menu, click on “Modify My Account Information”. The screen shots below show the information you can modify on your account. Be sure to click the Modify button to activate your changes.
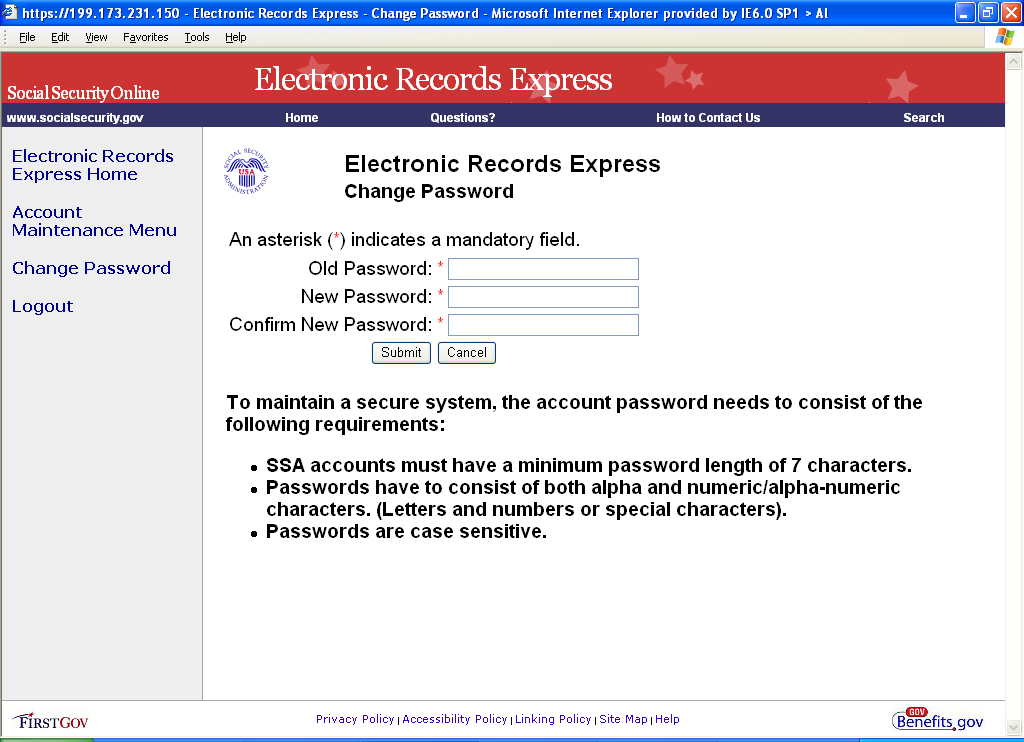
Changing Your Password
From the Account Maintenance Menu, click the “Change Password” hyperlink.
Enter the old password.
Enter the new password.
Enter the new password again to verify it was entered correctly.
Click the Submit button to submit your password change.

| File Type | application/msword |
| File Title | Automated User Account Setup |
| Author | 298726 |
| Last Modified By | Faye |
| File Modified | 2007-05-22 |
| File Created | 2007-05-22 |
© 2026 OMB.report | Privacy Policy