SBA Form 990-Contr Contractor's User's Manual
Surety Bond Guarantee Assistance
SBA Form 990's Contractor's Usser's Manual
Surety Bond Guarantee Assistance
OMB: 3245-0007

Contractor’s (Small Business) User’s Manual
SBG UnderWriting System (Surety Bond Guarantee)
Phase 2
eApplications
U.S. Small Business Administration
Version Number 2.4
May 2008
TABLE OF CONTENTS
1 General Information 4
1.2 Authorized Use Permission 4
1.3.1 Information 4
2 SYSTEM SUMMARY 7
3 GETTING STARTED 9
3.1 Request an SBA GLS User ID and Password 9
3.4 Access (System Selection) 15
4 Contractor Login 18
5 Contractor – Submitting the First Bond Once Initialized 19
5.1 First Bond – Business Information 20
5.2 First Bond – Principal Information 23
5.3 First Bond – Schedule of Work in Progress 27
5.3.1 Schedule of Work in Process (List) 29
5.3.2 List of Schedules 30
5.4 First Bond – Contract Information 31
5.5 First Bond – Job in Progress Information 33
5.6 First Bond – Agreements Information 35
6 Contractor – Submitting Subsequent Bonds 38
6.1 Subsequent Bond – Search 39
6.2 Subsequent Bond – New App Information 40
6.3 Subsequent Bond – Edit Information 41
6.3.1 Changing Data 42
6.3.2 Deleting Data 42
1.0 GENERAL INFORMATION
1General Information
1.1System Overview
The Surety Bond Guarantee (SBG) Electronic Application (E-app) system is a web application used to apply for SBA bond guarantees. Contractors can use the E-app System to enter SBG applications, completed required SBA forms, and forward information to their selected agents. The system is available 7 days a week – 24 hours a day.
1.2Authorized Use Permission
This is a Federal computer system and is the property of the United States Government. It is for authorized use only. Users (authorized or unauthorized) have no explicit or implicit expectation of privacy in anything viewed, created, downloaded, or stored on this system, including e-mail, Internet, and Intranet use. Any or all uses of this system (including all peripheral devices and output media) and all files on this system may be intercepted, monitored, read, captured, recorded, disclosed, copied, audited, and/or inspected by authorized Small Business Administration (SBA) personnel, the Office of Inspector General (OIG), and/or other law enforcement personnel, as well as authorized officials of other agencies, both domestic and foreign. Unauthorized use of, or exceeding authorized access to, this system is prohibited and may constitute a violation of 18 U.S.C. § 1030 or other Federal laws and regulations and may result in criminal, civil, and/or administrative action. By using this system, users indicate awareness of, and consent to, these terms and conditions and acknowledge that there is no reasonable expectation of privacy in the access or use of this computer system.
1.3Points of Contact
If you experience problems completing the application, please discuss the situation with your surety company agent. Assistance is also available from the two Surety Bond Area directors listed below, according to the state in which your business is located.
Mr. Darryl Bellamy
Area Office Director, Denver
Telephone: (303) 844-2607, Ext. 261
Assigned States:
Colorado |
Maine |
New Jersey |
New York |
Connecticut |
Maryland |
Ohio |
Pennsylvania |
Delaware |
Massachusetts |
South Dakota |
Puerto Rico |
District of Columbia |
Michigan |
Utah |
Vermont |
Illinois |
Minnesota |
Wyoming |
Virgin Islands |
Indiana |
Missouri |
North Dakota |
Virginia |
Iowa |
Montana |
Rhode Island |
West Virginia |
Kansas |
Nebraska |
New Hampshire |
Wisconsin |
Mr. Tom Ewbank
Area Office Director, Seattle
Telephone: (206) 553-0961
Assigned States:
Alabama |
Georgia |
Mississippi |
South Carolina |
Alaska |
Guam |
Nevada |
Tennessee |
Arizona |
Hawaii |
New Mexico |
Texas |
Arkansas |
Idaho |
North Carolina |
Washington |
California |
Kentucky |
Oklahoma |
|
Florida |
Louisiana |
Oregon |
|
1.4Terms and Abbreviations
EIN – Employer Identification Number
NAICS – North American Industry Classification System
GIA – General Indemnity Agreement
SYSTEM SUMMARY
2 SYSTEM SUMMARY
2.1System Configuration
The application is developed for use with a minimum browser of Microsoft IE 6.0 or a compatible browser. You must use high level encryption (128 bit) when configuring your browser. You must enable support for JAVA script and applets. There is no use of client side COOKIES. In general, the font type is 9pt. Arial-style sheets are not used. The application is best viewed on an 800x 600 resolution screen. To avoid scrolling, use a minimum 15" screen.
3.0 GETTING STARTED
3GETTING STARTED
The E-app system is accessed through the SBA General Login System (GLS). You must have an SBA GLS User ID and Password in order to submit applications and update information in the E-app system.
3.1Request an SBA GLS User ID and Password
To request an SBA User ID and Password, you should connect to the Internet and enter https://eweb.sba.gov/gls/dsp_login.cfm as the URL. The General Log-in screen will display.
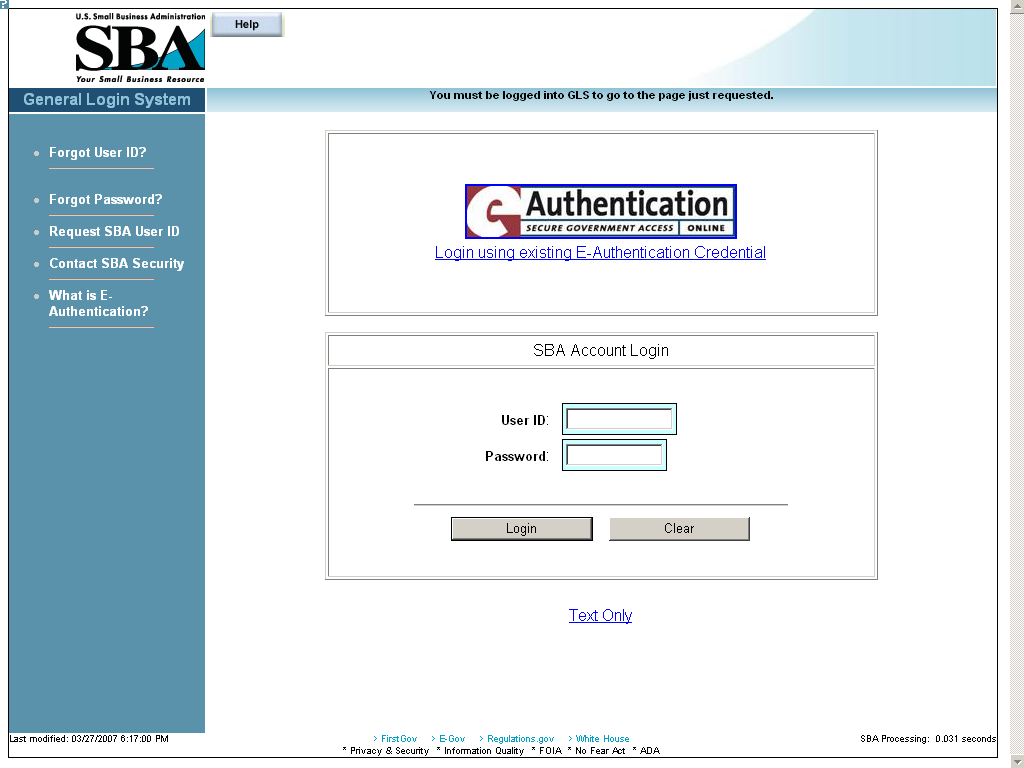
Click
on the
![]() hotlink from the left-hand navigation tree to access the Request
SBA User ID screen.
hotlink from the left-hand navigation tree to access the Request
SBA User ID screen.
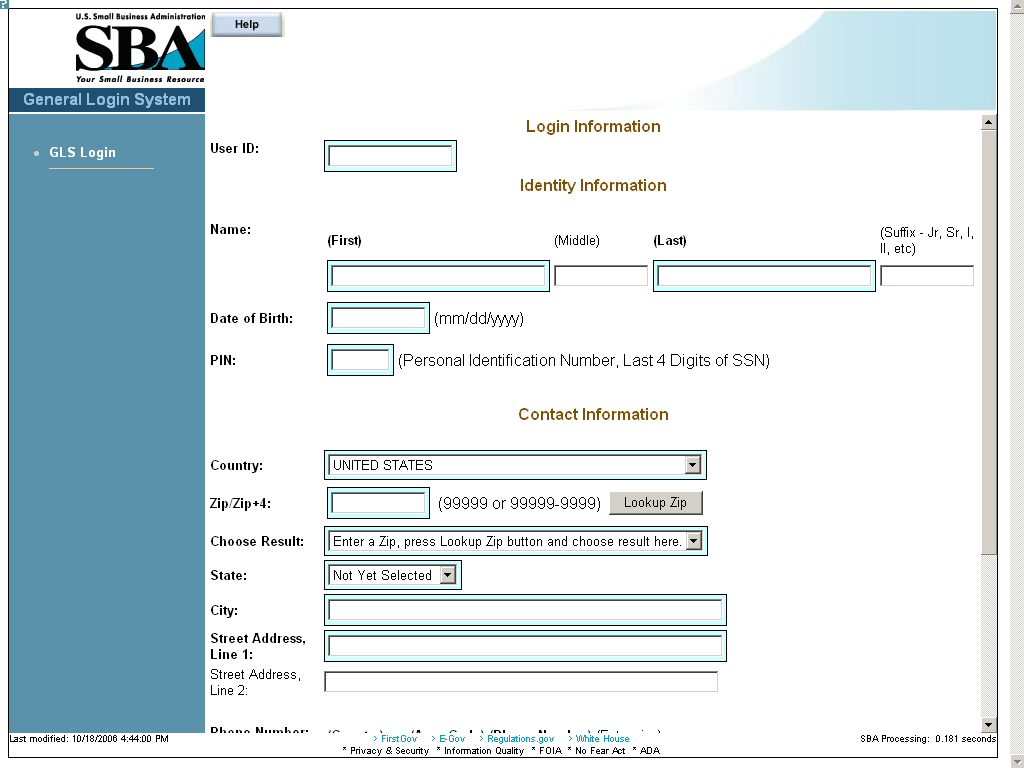
The Request SBA User ID screen is used to supply pertinent information to the SBA in order to obtain a User ID and Password.
Figure 1
Definition of Terms on Request SBA User ID screen
Login Information
User ID – This field is used to enter a User ID of your choice, which must be between 8 and 15 characters.
Identity Information
Name (First) – This field is used to enter your first name.
Name (Middle) – This field is used to enter your middle name, if any.
Name (Last) – This field is used to enter your last name.
Suffix – This field is used to enter a suffix, if any.
Date of Birth – This field is used to enter your date of birth.
PIN – This field is used to enter your PIN (Personal Identification Number) which is the last four digits of your social security number.
Note: In the future, if you forget your user ID or password, you will need your DOB and PIN to retrieve the login credentials.
Contact Information
Country – This drop-down list is used to enter the country of your address.
Zip/Zip+4 – This field is used to enter your zip/zip+4 code.
![]() – Use this pushbutton to
populate the “Choose Result”, “State”, and
“City” fields.
– Use this pushbutton to
populate the “Choose Result”, “State”, and
“City” fields.
Choose Result – Select your city from the drop-down list.
State – Select your state from the drop-down list.
City – This field is used to enter your city.
Street Address, Line 1 – This field is used to enter the first line of your street address.
Street Address, Line 2 – This field is used to enter the second line of your street address.
Phone Number:
Country – This field is used to enter the phone code of your country.
Area Code – This field is used to enter the area code of your phone number.
Phone Number – This field is used to enter your main phone number.
Extension – This field is used to enter your phone extension, if any.
E-Mail Address – This field is used to enter your e-mail address.
Re-enter E-Mail – This field is used to re-enter your e-mail address in order to check for accuracy.
![]() – Click on this pushbutton
to reset all the fields to their original values.
– Click on this pushbutton
to reset all the fields to their original values.
![]() – Click on this pushbutton
to clear (delete) all the fields on the screen.
– Click on this pushbutton
to clear (delete) all the fields on the screen.
![]() – Click on this pushbutton
to submit your user ID request. You will receive an e-mail that will
provide you with a temporary SBA GLS User Password. Use that password
to log back into GLS. You will then be required to change your
password.
– Click on this pushbutton
to submit your user ID request. You will receive an e-mail that will
provide you with a temporary SBA GLS User Password. Use that password
to log back into GLS. You will then be required to change your
password.
3.2Change Password
After
you complete and submit the information on the Request
SBA User ID screen
you will receive an e-mail with your ID and a default password. Using
the default password, log into the GLS system. On the General
Login System – Choose Function screen,
click on the
![]() pushbutton and the following screen will appear:
pushbutton and the following screen will appear:
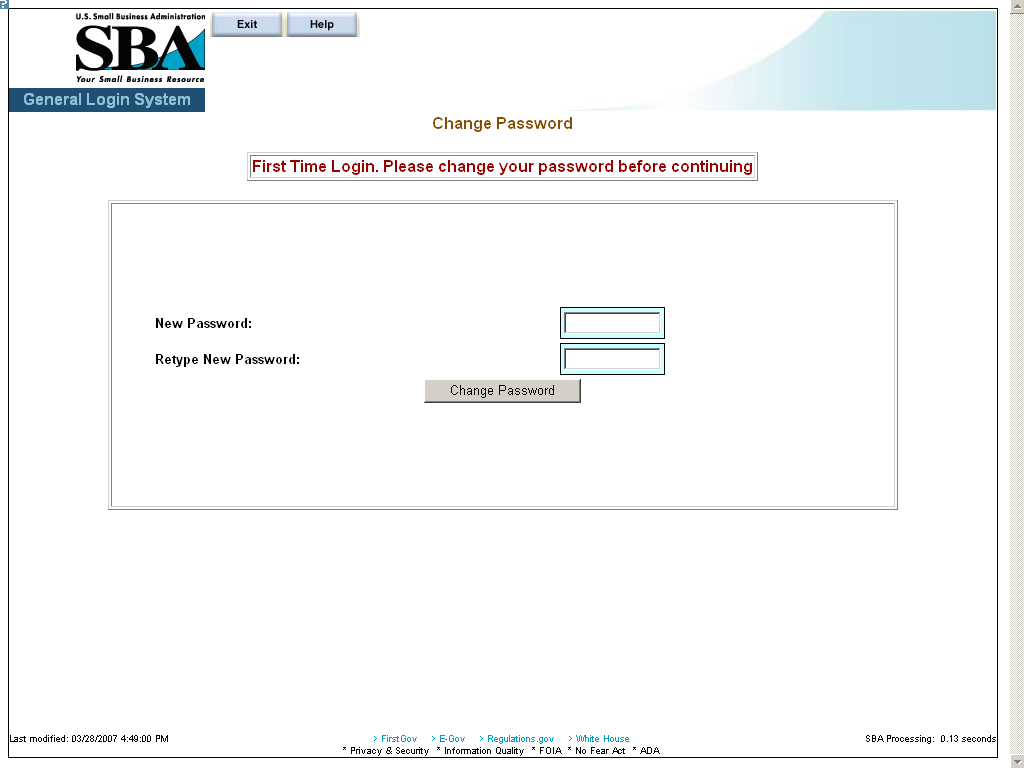
Figure 2
Definition of Terms on Change Password screen
New Password – Enter your new password in this field. It must have a minimum of eight characters and a maximum of 16 characters. The password must also contain at least three of the following four properties:
At least one upper-case letter (e.g. “A”, “B”, “C”… “Z”)
Lower-case letters (e.g. “a”, “b”, “c”, …“z”)
Numericals (e.g. “0”, “1”, “2”, …“9”)
Special characters (e.g. “{ }”, “[ ]”, “< >”, “:”, “?”, “$”, or “%”)
Retype New Password – Retype the new password in this field.
Click on the
 pushbutton to change the password and advance to the Welcome
screen.
3.3Profile
Use the Profile screen to enter contractor business ID information.
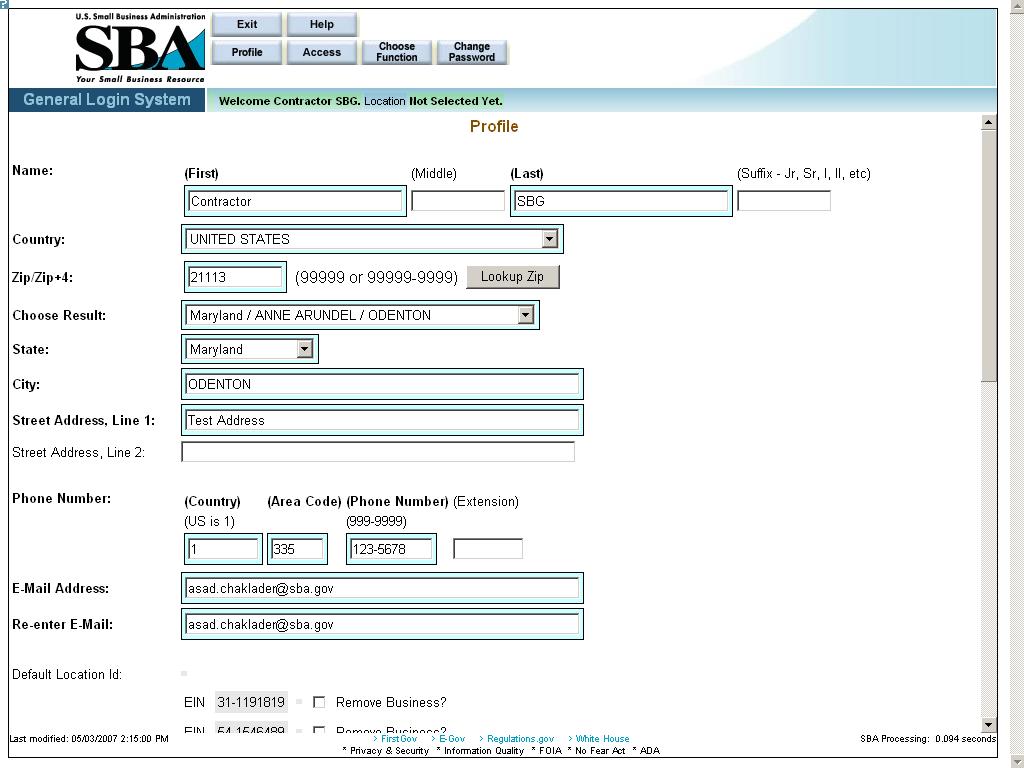
Figure 3 – Contractor Profile Window showing an active Business ID
Definition of Terms on Profile screen
First Name – Your first name
Middle Initial – Your middle initial, if any
Last Name – Your last name
Suffix – The suffix, if any
Country – The country where you reside.
Zip/Zip+4 – The zip code of your address. Click on
 after entering the zip code to populate the location options.
Choose Result – The result set generated by selecting the
 pushbutton.
State – The state where you reside.
City – The city where you reside.
Street Address, Line 1 – The first line of your street address
Street Address, Line 2 – The second line of your street address
Home Phone Number – Your home phone number (First enter the country code, then the area code, then the actual phone number, and finally the extension, if any.)
E-Mail Address – Your e-mail address
Re-enter E-Mail – Your e-mail address entered a second time. If they do not match, the system will return an error message.
Default Location ID – This display-only field shows the default location ID.
Business Information – This display-only field indicates whether there is any business information.
Add New Business? – Use these radio buttons to add a new business, if needed.
Note: The following three fields will only appear if “Yes” is selected in #17 “Add New Business?”
EIN/SSN – Enter the EIN/SSN in this field, then select the corresponding radio button to the right to identify the number you have entered.
DUNS – Enter the DUNS (Data Universal Numbering System) number. This number is used to identify businesses.
Click
on the
![]() pushbutton to reset values.
pushbutton to reset values.
Click
on the
![]() pushbutton to delete an entry. This will clear all the fields on the
screen.
pushbutton to delete an entry. This will clear all the fields on the
screen.
Click
on the
![]() pushbutton to submit
the information to the database and continue to the General
Login System – Choose Function screen.
pushbutton to submit
the information to the database and continue to the General
Login System – Choose Function screen.
3.4Access (System Selection)
Click
on the
![]() pushbutton (from
the Choose Function
screen) to reach the System
Selection screen
shown below. Use this screen to request access to the SBG e-app
system in the GLS system.
pushbutton (from
the Choose Function
screen) to reach the System
Selection screen
shown below. Use this screen to request access to the SBG e-app
system in the GLS system.
To request access, click on the “Surety Bond Guarantee System” (SBG/PSB) folder and select SBG Contractor Application.
Note: Once the request is submitted, it needs to be approved by the program office for activation.
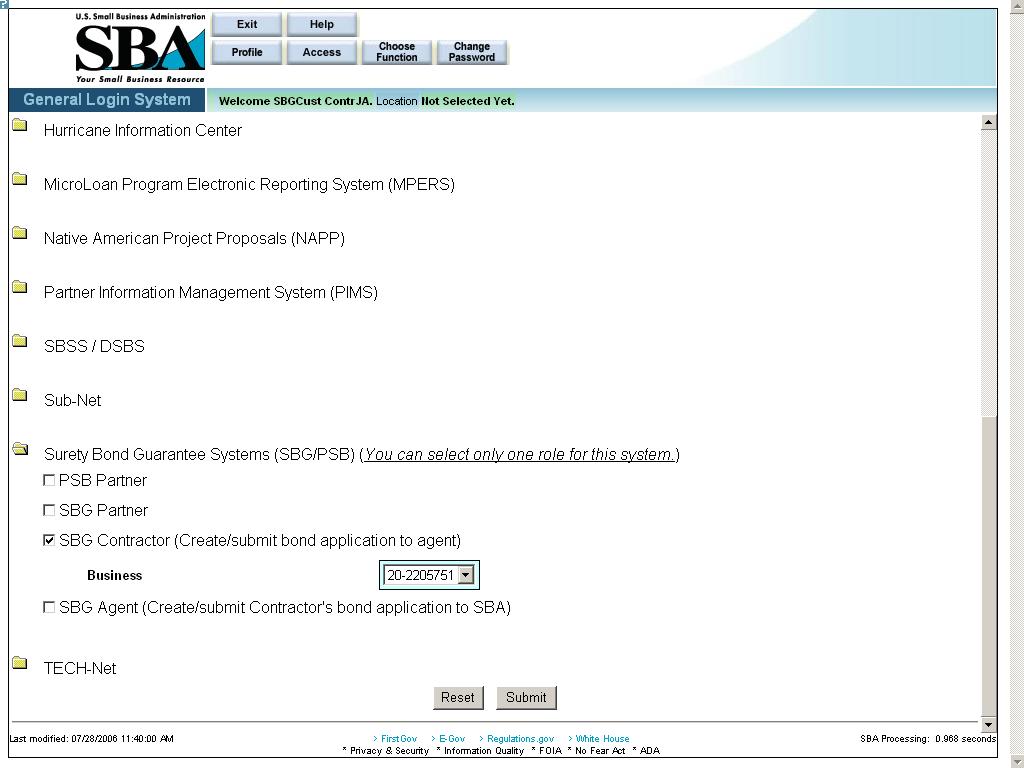
Figure 4 - Screenshot of the SBG Contractor Access request with a linked Business ID
![]() – Click on this pushbutton
to reset all the fields to their original values.
– Click on this pushbutton
to reset all the fields to their original values.
![]() – Click on this pushbutton
to submit the information to the database and forward it to the
approving authority. Once approved, you will receive an e-mail. At
this point, you are ready to apply for a bond.
– Click on this pushbutton
to submit the information to the database and forward it to the
approving authority. Once approved, you will receive an e-mail. At
this point, you are ready to apply for a bond.
3.5General Instructions
The following are guidelines that apply throughout the Web application:
The application includes a security process that requires prior identification and approval of users. Security routines are used to check for password aging - passwords must be changed every 90 days. Users are validated up front, to determine permission and access rights.
The application uses redundant emphasis; color-based prompting is applied to the input/view boxes and text formatting features are applied to the labels i.e. (Color & Bold or Color & Italics). Alternative descriptions are available for images and summaries/labels for tables and input/view boxes supporting most reader software.
a) Required Data = Blue background box & Bold Arial Label
b) Optional Data = White background box & Regular Arial Label
c) View Only Data = Gray background box & Regular Arial Label
The formatting and emphasis may change for a given screen field depending upon the type of bond selected (bid bond, final bond, etc.)
Both Browser and Application Server-side Data Validation occurs, in general:
a) At the Browser - simple validation within a screen is performed, i.e. numbers, text, and dates where required.
At the Server - Table lookup and Database validation, Complex Validation, and Cross editing between screens occurs.
The small question mark at the upper left-hand corner of the screen can be used to do the following:
Get information about Template Help (“SBA Look and Feel”)
Print
Show/Hide Navigation (hotlinks on the left-hand side of the screen) to view the full screen.
Close the menu
4.0 Using the System (Online)
4Contractor Login
Connect
to the Internet and enter “https://eweb.sba.gov/gls/dsp_login.cfm”
in the URL. Input your User ID and Password and click on the
![]() pushbutton. In the Welcome
screen, click on
the
pushbutton. In the Welcome
screen, click on
the
![]() pushbutton to accept the terms and conditions, or click on the
pushbutton to accept the terms and conditions, or click on the
![]() pushbutton to exit the system.
pushbutton to exit the system.
In the General Login System – Choose Function screen, select the Surety Bond Guarantee Applications hotlink.
Prior to inputting your first surety bond application, you must be associated with a participating surety bond agency or surety branch office. This is accomplished by the surety company agent entering your Employer Identification Number (EIN) in the system before you apply for a bond. This is called “contractor initialization”.
If you are not associated with an agent when you log in, the system will return the screen displayed below.
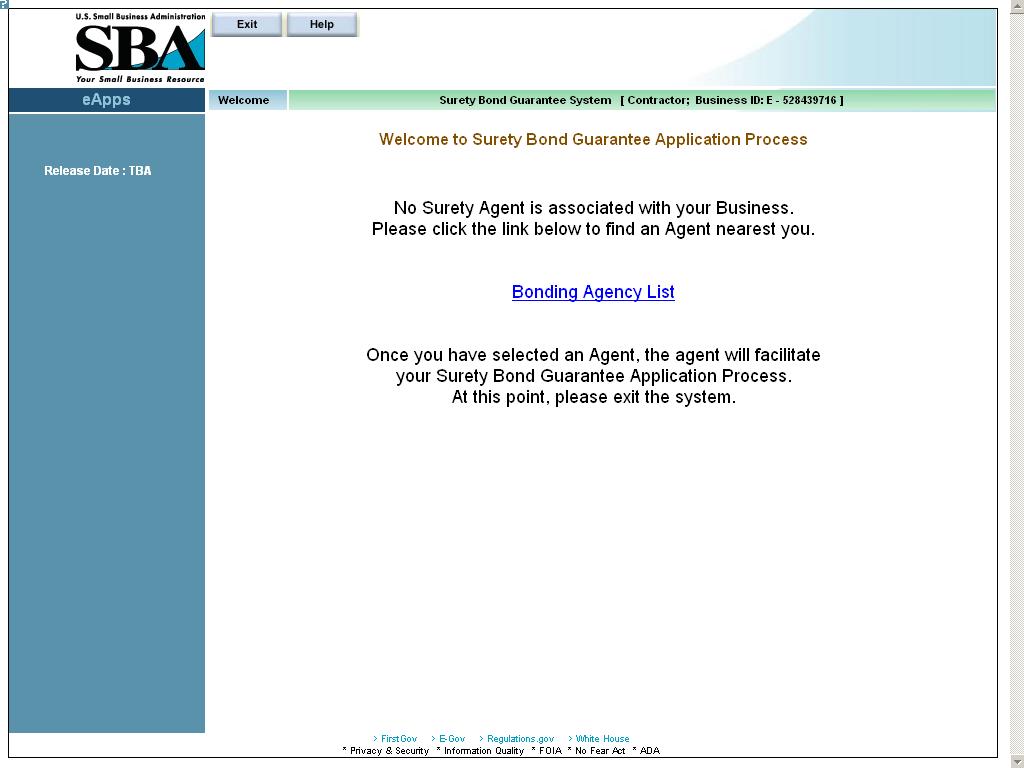
Figure 5 – Contractor that is not associated with a surety company agent.
Note: If needed, click on the link (Bonding Agency List) to locate and obtain contact information for a surety company agent. Once a surety company agent has agreed to work with the small business and apply for an SBA surety bond guarantee, the agent will then initialize you in the automated system. If you know the agent you wish to work with, you may contact the agent directly. (The Contractor Association process is covered in the Agent Users Manual.)
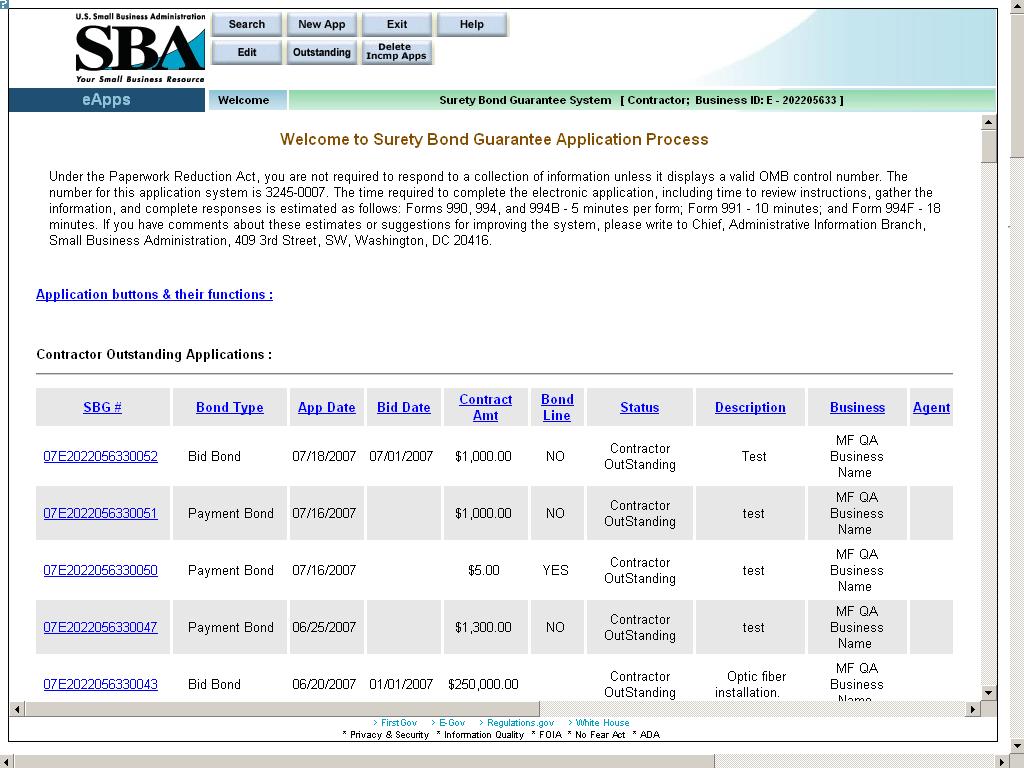
Figure 6 – Contractor that is associated with a surety company agent.
5Contractor – Submitting the First Bond Once Initialized
After the contractor has been associated with an agent (initialization), the Contractor Welcome screen will display when you log in.
The Contractor Welcome screen guides you through the setup and submission of your business and first bond information and indicates which steps must be completed. Note: This screen will not appear for subsequent bond applications. If you have any difficulties in completing the application, access either of the following:
OSG WebSite
![]() (SBG
User’s Manual)
(SBG
User’s Manual)

To input your first application, you must complete the following:
Step 1
Business Information
Principal Information
Schedule of Work in Progress
Step 2
Contract Information (Bid/Final Bond)
Agreements
Click on the Business Information hotlink to begin inputting your first application.
If you are inputting a subsequent application, you will need to complete the Schedule of Work in Process field, update the Business Information screen/the Principal Information screen (if any changes have occurred) and complete the steps in 2.
5.1First Bond – Business Information
Use the Business Information screen to enter the requested business information which is required prior to entering your first bond application. You can update the information on this screen anytime if changes occur.
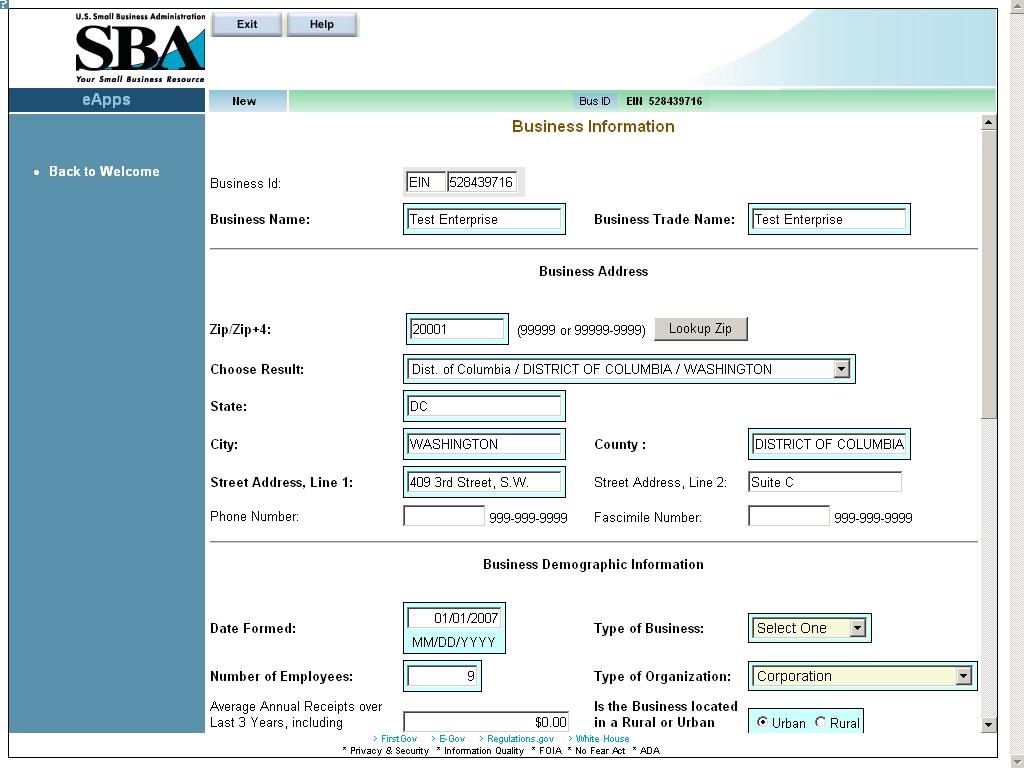
Definition of Terms on Business Information Screen
Business Id – The business Id; either EIN or SSN (display-only)
Business Name – The name of the business that is applying for the bond.
Business Trade Name – The name under which the entity conducts business.
Business Address
Zip/Zip+4 – The zip code. Enter the zip code and click on the
 pushbutton to populate the “State” and “City”
fields. For multiple locations within the same zip code, the “Choose
Result” drop-down list will be populated with options. Please
select the most appropriate location.
pushbutton to populate the “State” and “City”
fields. For multiple locations within the same zip code, the “Choose
Result” drop-down list will be populated with options. Please
select the most appropriate location.Choose Result – The result set generated by selecting the
 pushbutton. Select the most relevant option.
State – The state in which the business is located.
City – The city in which the business is located.
County – The county in which the business is located.
Street Address, Line 1 – The first line of the business street address.
Street Address, Line 2 – The second line of the street address.
Phone Number – The phone number of the business.
Facsimile Number – The facsimile number of the business.
Business Demographic Information
Date Formed – The date on which the business was formed.
Type of Business – Use the drop-down list to indicate the type of business it is (“Construction”, “Services”, etc.)
Number of Employees – The number of employees that are employed by the business.
Type of Organization – Use the drop-down list to indicate the legal type of organization the business is (“Cooperative”, “Corporation”, etc.)
Average Annual Receipts – The Average Annual receipts over Last 3 Years, including Affiliates, for the Business.
Is the Business located in a Rural or Urban area?
Are you currently debarred from doing business with the Federal Government?
Have you ever received SBA assistance under another business name? If so (Yes), enter name and business.
Business Name – Enter the name of the business under which you received SBA assistance. (Note: this field only displays if the “Yes” radio button is clicked in # 17.)
Have you ever defaulted on any previous surety bonds (SBA or other)?
Explain – Describe the circumstances surrounding prior defaults. (Note: this field only displays if the “Yes” radio button is clicked in # 19.)
Have you ever failed to complete a job?
Explain – Describe the circumstances surrounding the failure to complete a prior job. (Note: this field only displays if the “Yes” radio button is clicked in # 21.)
Is the contractor requesting SBA assistance?
Have you updated SBA form 994F (Schedule of incomplete work) in the last 3 months? (Note: this question will not appear on your first application.)
Small Business Certifications (Display-only; for SBA use):
Business 8A: Indicates whether or not the business has 8a status.
HubZone Certified: Indicates whether or not the business has HubZone certification status.
SBA Loan Information – This field will display any SBA loan information.
Click
on the
![]() pushbutton to save information.
pushbutton to save information.
Click
on the
![]() pushbutton to reset
all the fields to their original values.
pushbutton to reset
all the fields to their original values.
Once the business information is submitted, the screen below will display:

Click on the Principal Information link to continue inputting your application.
Use
the
![]() pushbutton to exit this screen.
pushbutton to exit this screen.
Use
the
![]() pushbutton to obtain screen advice.
pushbutton to obtain screen advice.
5.2First Bond – Principal Information
Use the Principal Information screen to enter the requested principal information which is required prior to entering your first bond application. You can update the information on this screen anytime if changes occur.
Note:
Principal information for each of the following individuals is
required:
Proprietor of a Sole Proprietorship
Partner of a Partnership
Officer, Director, or Holder of 20% or more of the ownership stake of a Corporation, LLC, or Development Company
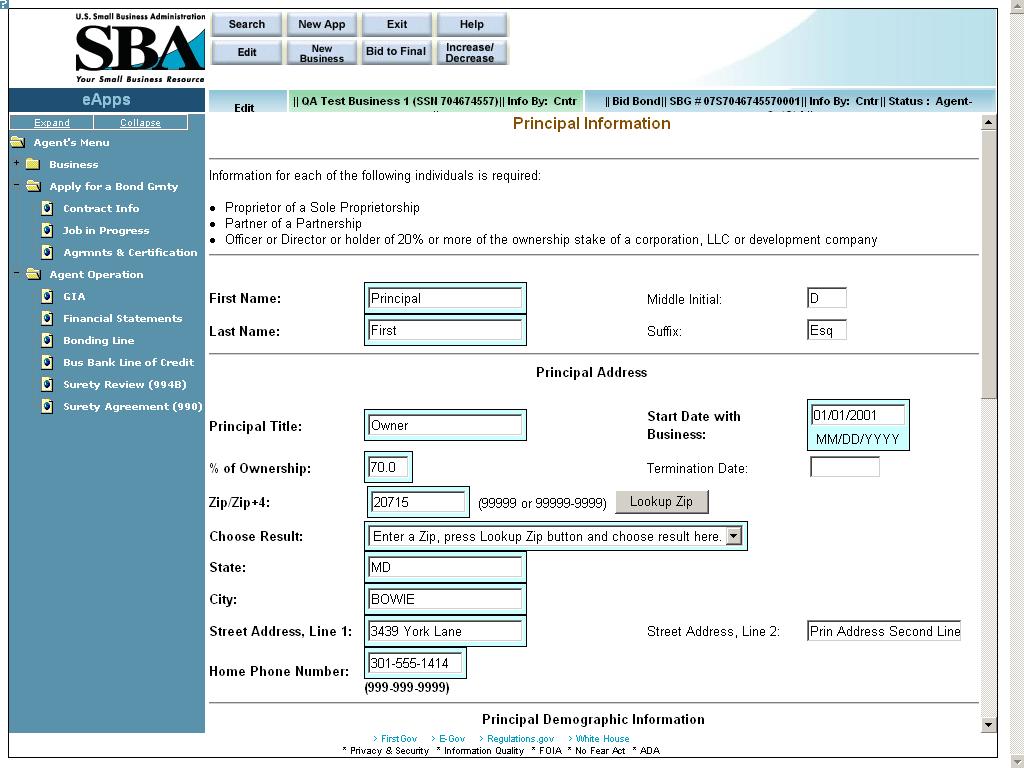
Definition of Terms on Principal Information Screen
Business ID – This display-only field shows the Business EIN
Principal SSN – The social security number associated with the principal.
First Name – The first name of the principal.
Middle Initial – The middle initial, if any, of the principal.
Last Name – The last name of the principal
Suffix – The suffix, if any, of the principal
Principal Address
Principal Title – The title of the principal.
Start Date with Business – The date that the principal became associated with the business.
% of Ownership – The percentage of ownership interest the principal has in the business. The termination date is taken into consideration for summing up all the %s. (The % should not exceed 100% cumulative for all active partners).
Termination Date – The date on which the principal terminated his/her association with the business. This has an effect on the % of ownership.
Zip/Zip+4 – The zip code of the principal’s address. Click on
 after entering the zip code to populate the location options.
Choose Result – The result set generated by selecting the
 pushbutton.
State – The state where the principal resides.
City – The city where the principal resides.
Street Address, Line 1 – The first line of the principal’s street address
Street Address, Line 2 – The second line of the principal’s street address
Home Phone Number – The principal’s home phone number
Principal Demographic Information
Date of Birth – The principal’s date of birth
Ethnicity – Use the drop-down list to indicate the principal’s ethnicity.
Country of Birth – Use the drop-down list to indicate the principal’s country of birth.
City of Birth – The principal’s city of birth
State of Birth – The principal’s state of birth
Veteran Status– Use the drop-down list to indicate the principal’s veteran status (“Non-Veteran”, “Service Disabled Veteran”, etc.)
Gender – Use the drop-down list to indicate the principal’s gender.
Handicap – The principal’s handicap status
US Citizen – Use the drop-down list to indicate the principal’s citizenship status.
Alien Registration # – If applicable, the principal’s alien registration number. This is mandatory information, if the principal is not a US Citizen.
Race – Select one (or more) checkboxes to designate the principal’s race. Select “Unanswered” if you do not wish to give an answer.
912 Responses (Use the accompanying drop-down lists to answer questions 29 – 31.)
Are you presently under indictment, on parole or probation?
Have you ever been charged with and or arrested for any criminal offense other than a minor motor vehicle violation? Include offenses which have been dismissed, discharged, or not prosecuted. (All arrests and charges must be disclosed and explained on an attached sheet.)
Have you ever been convicted, placed on pretrial diversion, or placed on any form of probation, including adjudication withheld pending probation, for any criminal offense other than a minor motor vehicle violation?
The following
links will display when editing an existing record. (Note: You must
select
![]() before printing the forms below.)
before printing the forms below.)
![]() –
Click on this hotlink to be
directed to another window where you will be able to view/print
the completed SBA Form 912 (Statement of Personal History). Please
print, sign, and mail the completed form to your agent.
–
Click on this hotlink to be
directed to another window where you will be able to view/print
the completed SBA Form 912 (Statement of Personal History). Please
print, sign, and mail the completed form to your agent.
![]() –
Click on this hotlink to be
directed to another window where you will be able to print SBA Form
413 (Personal Financial Statement). This form will be blank; you must
enter the details, print it, sign it, and mail it to your agent.
–
Click on this hotlink to be
directed to another window where you will be able to print SBA Form
413 (Personal Financial Statement). This form will be blank; you must
enter the details, print it, sign it, and mail it to your agent.
As you are required to complete a personal financial statement, you may use SBA Form 413 or a reasonable facsimile.
Once
![]() is selected, the screen below will display:
is selected, the screen below will display:
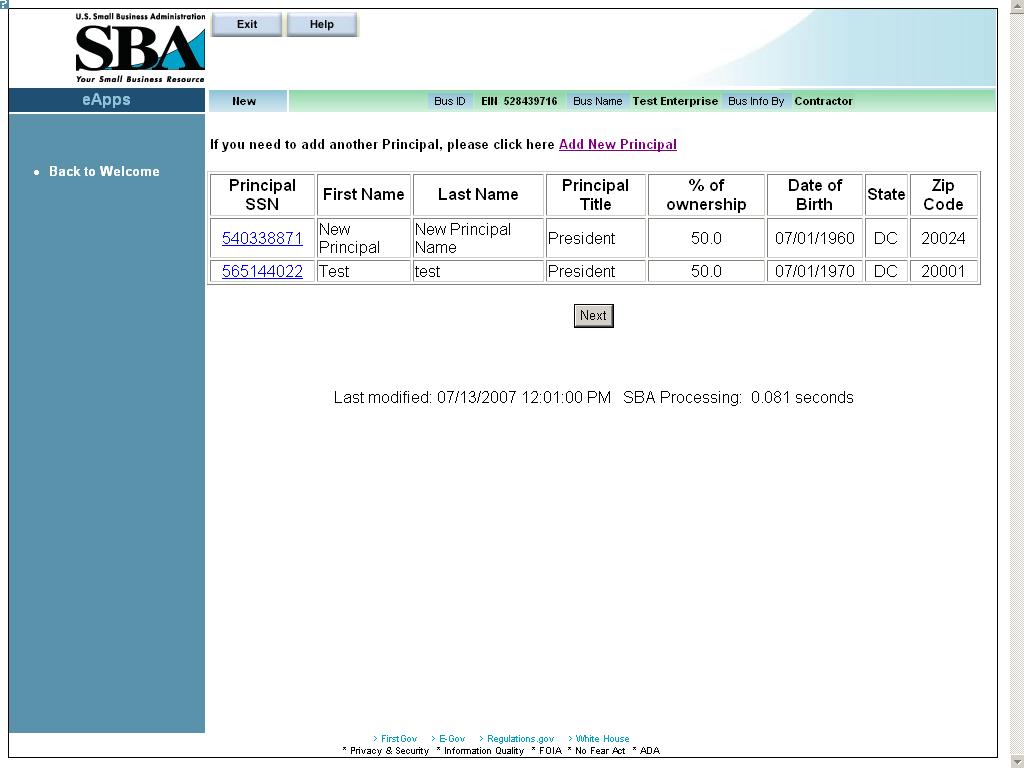
This screen shows the information that you have inputted for each principal. (The columns listed below are display-only with the exception of “Principal SSN”):
Principal SSN – Click on a hotlink in this column to return to the Principal Information screen where you can review the principal’s information and make changes, if necessary.
First Name
Last Name
Principal Title
% of Ownership
Date of Birth
State
Zip Code
Click
on the
![]() hotlink to add another principal.
hotlink to add another principal.
Click
on
![]() and you will return to the Welcome
screen below, if
this is your first
application. If this is not
your first application, you will be taken to the Schedule
of Work in Process screen.
and you will return to the Welcome
screen below, if
this is your first
application. If this is not
your first application, you will be taken to the Schedule
of Work in Process screen.
Once principal information is submitted, the screen below will display:
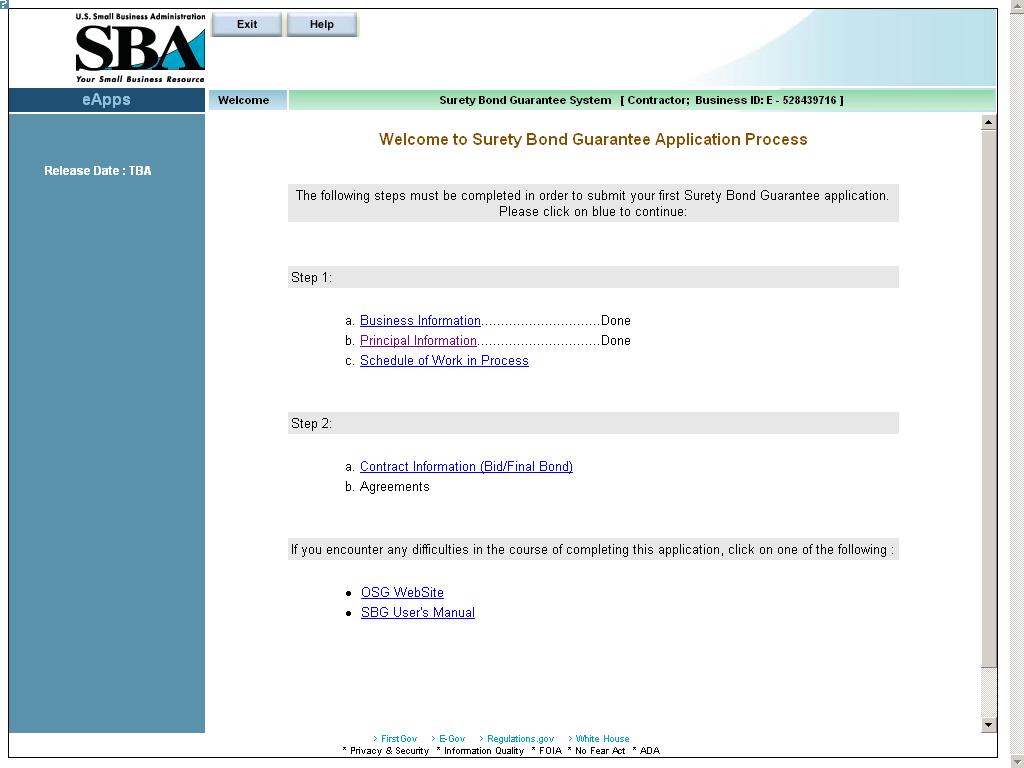
If you have any work schedules to be entered, you can click on the Schedule of Work in Process hotlink, or else you can click on the Contract Information (Bid/Final Bond) hotlink to continue inputting your application.
5.3First Bond – Schedule of Work in Progress
Use the Schedule of Work in Process screen to enter requested work in process information. You must enter the information for all jobs that you have started. The Schedule of Work in Process screen must be updated at least every three months, but can be updated anytime. Any approved SBA bonds will automatically populate the screen.
Note: To avoid scrolling, click on the extreme left margin to remove the navigation panel (blue panel) and increase screen surface area.
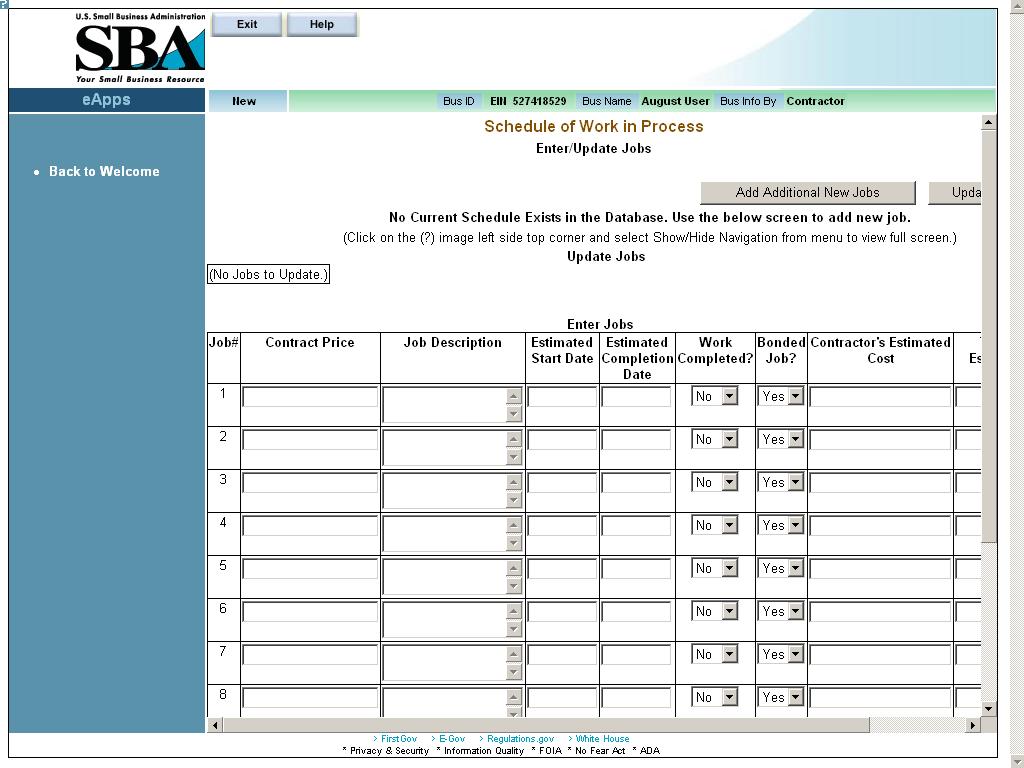
Definition of Terms on Schedule of Work in Process Screen
![]() – Click on this pushbutton
to add another row to the table for a new job. The screen initially
allows you to input eleven jobs in progress.
– Click on this pushbutton
to add another row to the table for a new job. The screen initially
allows you to input eleven jobs in progress.
Click on the
![]() – Click on this pushbutton
to save the information on the Schedule
of Work in Process screen.
You will return to the Welcome
to SBG screen.
– Click on this pushbutton
to save the information on the Schedule
of Work in Process screen.
You will return to the Welcome
to SBG screen.
Note:
For the first update, upon clicking on![]() ,
you will be taken to
the Welcome to SBG
screen. You should
then click on the “Schedule of Work in Process” hotlink
(Step 1 c) to proceed to the Schedule
of Work in Process (List) screen.
,
you will be taken to
the Welcome to SBG
screen. You should
then click on the “Schedule of Work in Process” hotlink
(Step 1 c) to proceed to the Schedule
of Work in Process (List) screen.
Click on the Contract Information (Bid/Final Bond) hotlink to continue inputting your application.
Input the following information for each job in process:
Table Information
Job# – The job number (display-only)
Contract Price – Enter the contract price.
Job Description – Enter a brief job description.
Estimated Start Date – Enter the estimated start date of the job.
Estimated Completion Date – Enter the estimated completion date of the job.
Work Completed? – Use the drop-down list to indicate if the work has been completed or not.
Bonded Job? – Use the drop-down list to indicate if the job is bonded or not.
Contractor’s Estimated Cost – Enter the estimated cost to you to complete the job.
Total Revised Estimated Cost to Complete – Enter your total revised estimated cost to complete.
Use the Schedule of Work in Process (List) screen to review the work in process information that you entered in the Schedule of Work in Process screen. Click on the Schedule of Work in Progress link on the Welcome screen to access.
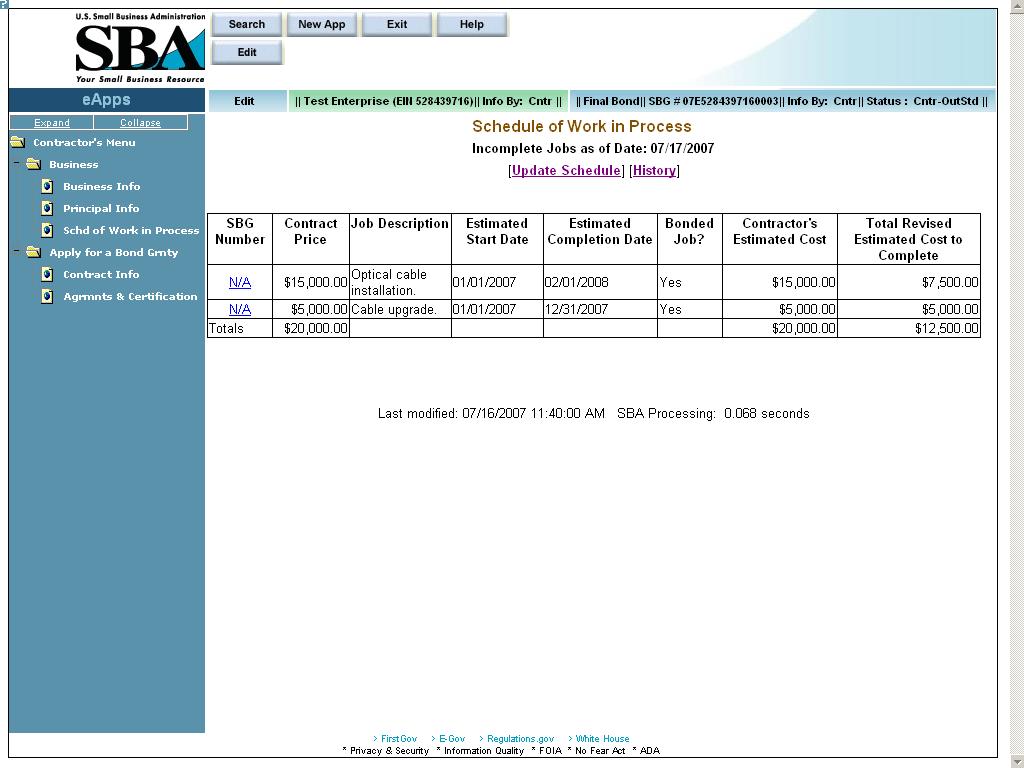
Definition of Terms on Schedule of Work in Process (List) Screen
![]() – Click on this pushbutton
to return to the Schedule
of Work in Process screen
to enter additional work in process information.
– Click on this pushbutton
to return to the Schedule
of Work in Process screen
to enter additional work in process information.
SBG Number – Click on a hotlink in this column to proceed to the View Details screen (display-only). Any approved SBA bonds will be listed automatically and the hotlink will be the SBG number (rather than “N/A”).
Contract Price, Job Description, Estimated Start Date, Estimated Completion Date, Work Completed?, Bonded Job?, Contractor’s Estimated Cost, and Total Revised Estimated Cost to Complete – All of these fields are display-only and show the information that was entered in the Schedule of Work in Process screen.
Use the List of Schedules screen to review all of the schedules that you have inputted.
This
screen is accessed by clicking on the
![]() hotlink in the
Schedule of Work in
Process screen.
hotlink in the
Schedule of Work in
Process screen.
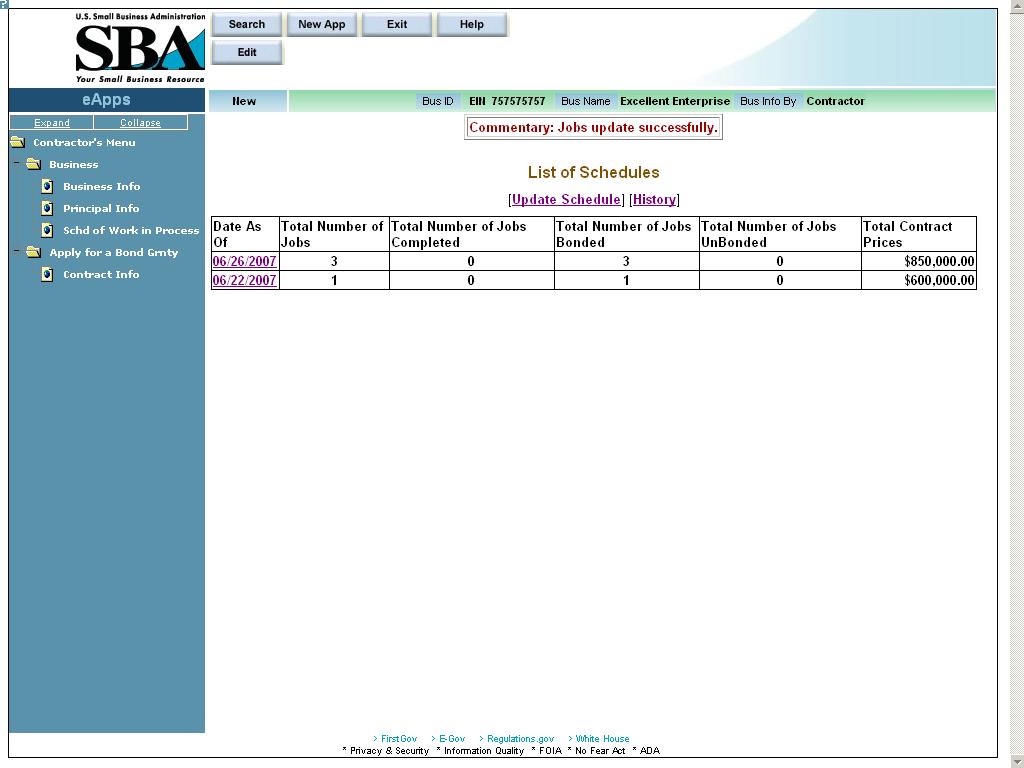
Definition of Terms on List of Schedules Screen
Date As Of – Click on a hotlink in this column to proceed to the Schedule of Work in Process (List) screen (display-only) for the date selected.
Total Number of Jobs, Total Number of Jobs Completed, Total Number of Jobs Bonded, Total Number of Jobs UnBonded, and Total Contract Prices – All of these fields are display-only and are a summary of information entered in the Schedule of Work in Process screen.
5.4First Bond – Contract Information
Use the Contract Information screen to enter the required information about the contract. You must complete this step for all bond applications.
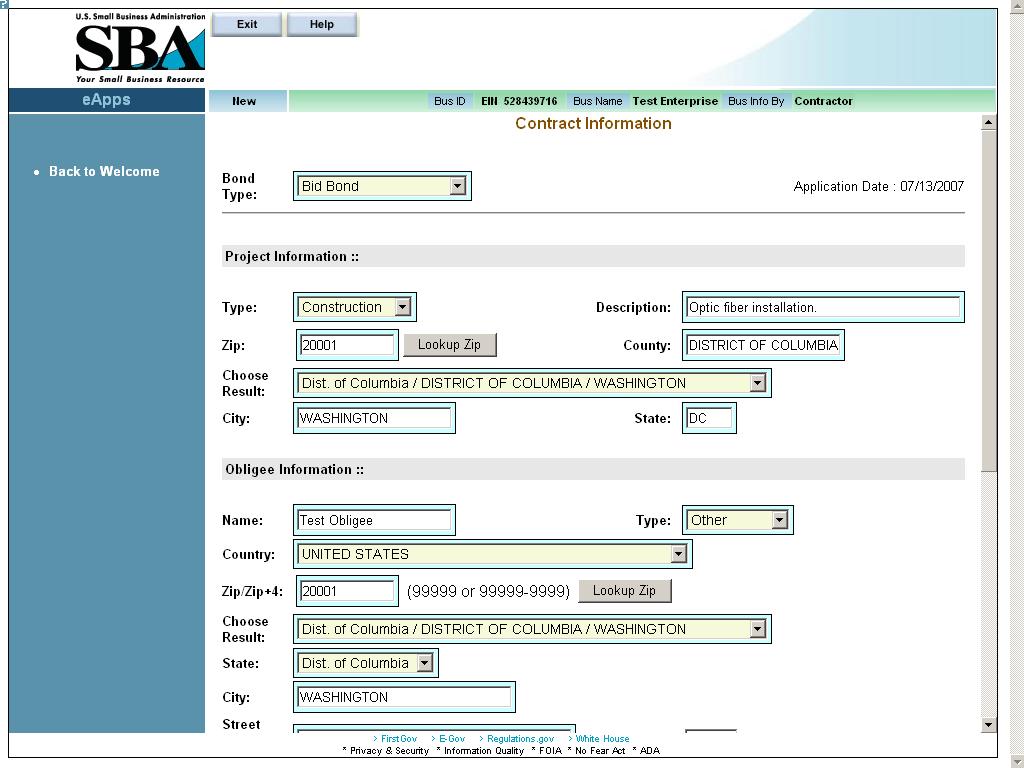
Definition of terms on Contract Information screen
Bond Type – Use the drop-down list to indicate the type of bond it is (i.e. payment and performance, bid, etc.). The field options will vary as a function of the bond type chosen.
Application Date – This display-only field indicates the date the application was made.
Contract Amount – The amount of the contract (Note: this should be less than or equal to $2 million.)
Start Date – The starting date of the contract
Completion Date – The date of the contract completion
Bid Date – The date that you are bidding on the contract. (visible for Bid Bond only)
Note – The Contract Amount, Start Date, and Completion date appear for both Bid Bonds and Final Bonds. However, for Bid Bonds, the field names have the word “Estimated” in front of them.
Project Information
Type – Use the drop-down list to indicate a description of the contract (“construction”, “services”, etc.).
Description – A description of the work to be performed.
Zip – Indicates the zip code where the contract will be performed.
 – Select this pushbutton
to populate the “County”, “Choose Result”,
“City”, and “State” fields.
– Select this pushbutton
to populate the “County”, “Choose Result”,
“City”, and “State” fields.County – This field is automatically populated after the
 pushbutton is selected. It indicates the county where the contract
will be performed.
pushbutton is selected. It indicates the county where the contract
will be performed.Choose Result – This field displays the results from selecting the
 pushbutton.
City – This field is automatically populated after the
 pushbutton is selected. It indicates the city where the contract
will be performed.
pushbutton is selected. It indicates the city where the contract
will be performed.State – This field is automatically populated after the
 pushbutton is selected. It indicates the state where the contract
will be performed.
Obligee/Owner Information
Name – The name of the obligee/owner
Type – Use the drop-down list to indicate the type of obligee (i.e. Federal, State, etc.)
Country – Use the drop-down list to indicate the country of the obligee.
Zip/Zip+4 – The zip code of the obligee
 – Select this pushbutton
to populate the “Choose Result”, “City”, and
“State” fields.
– Select this pushbutton
to populate the “Choose Result”, “City”, and
“State” fields.Choose Result: - The result set available after the
 pushbutton is selected.
State – This field is automatically populated after the L
 pushbutton is selected. It indicates the state of the obligee. If
necessary, the drop-down list can also be used to select the state.
pushbutton is selected. It indicates the state of the obligee. If
necessary, the drop-down list can also be used to select the state.City – This field is automatically populated after the
 pushbutton is selected. It indicates the city of the obligee.
Street Address, Line 1 – The first line of the obligee’s street address
Street Suffix – The suffix, if any, of the obligee’s street address
Street Address, Line 2 – The second line, if any, of the obligee’s street address
Applicant Information
Applicant is: Use the radio buttons to indicate whether you are the prime contractor or a subcontractor.
SubContractor’s percentage: – The percentage amount of the job that you are subcontracting out.
Project similar to previous work? – Use the radio buttons to indicate if you have performed similar work to this project.
Pertains to an 8(a) contract? – Use the radio buttons to indicate if this project is an 8(a) contract.
Liquidated Damages? – Use the radio buttons to indicate if this project has any liquidated damages. If you select “Yes”, this will enable the “Timeframe” drop-down list where you will select either “Daily”, “Weekly”, etc. and the “Dollar Amount” field where you will enter the monetary amount of the damages.
Contractor Job Started: – Use the radio buttons to indicate if you have started the job. If “Yes” is chosen, you will be directed to the Job In Progress screen when the
 pushbutton is selected. If “No” is chosen, you will be
directed to the Welcome
screen.
Click
on the
![]() pushbutton to reset values.
pushbutton to reset values.
Click
on the
![]() pushbutton to delete an entry. This will clear all the fields on the
screen.
pushbutton to delete an entry. This will clear all the fields on the
screen.
Click
on the
![]() pushbutton to save the data to the database and advance to the next
screen.
pushbutton to save the data to the database and advance to the next
screen.
5.5First Bond – Job in Progress Information
Use the Job in Progress Information screen to enter information about the job that you have already started.
Note: Job in Progress information is optional. You will be directed to this screen only if you answer “Yes” in the “Contractor Job Started” field (in the Contract Information screen). You must input information in all of the fields on this screen for each subcontractor or supplier that you have used on this job.
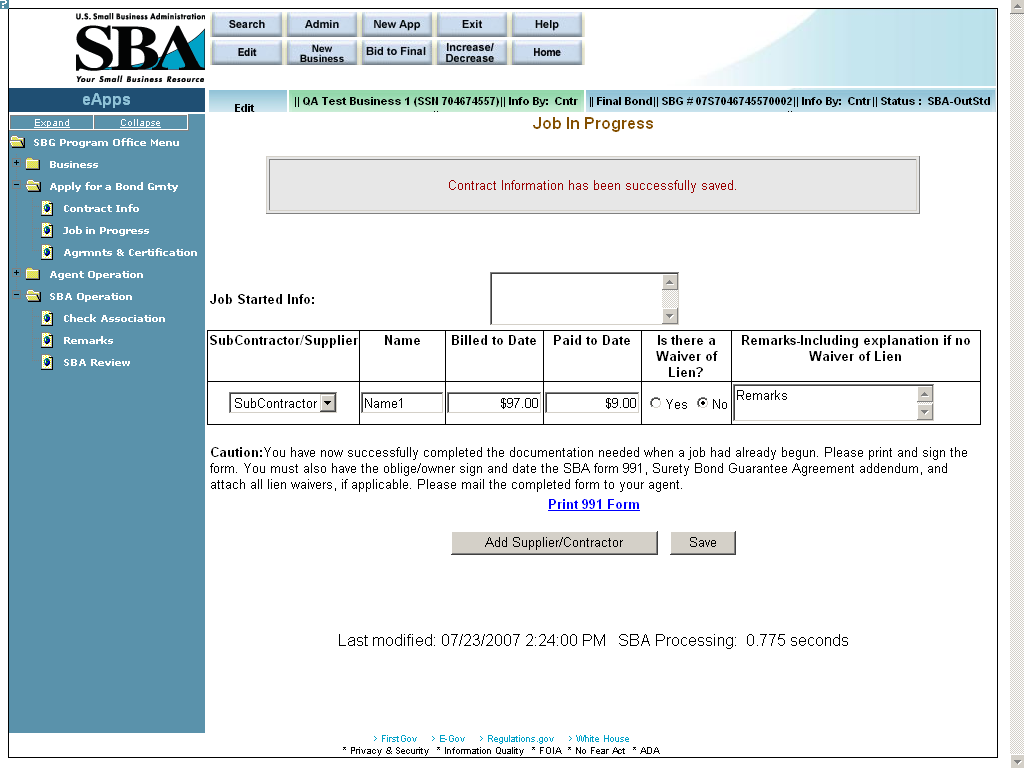
Definition of terms on Job in Progress screen
Job Started Info – Use this field to enter relevant comments.
Subcontractor/Supplier – Use the drop-down list to specify if the row pertains to a subcontractor or a supplier.
Name – Enter the name of the subcontractor or supplier.
Billed to Date –Enter the amount that the subcontractor or supplier has billed you to date.
Paid to Date – Enter the amount that you have paid the subcontractor or supplier to date.
Is there a Waiver of Lien? – Select the appropriate radio button to indicate a Waiver of Lien.
Remarks-Including explanation if no Waiver of Lien – Use this field to enter any relevant comments.
![]() –
Click on this hotlink and you
will be directed to another window where you can view/print the
completed SBA Form 991. You must print, sign, and date the SBA Form
991 (Surety Bond Guarantee Agreement Addendum) and have the obligee
sign and date. Attach all lien waivers and mail the completed form to
your agent.
–
Click on this hotlink and you
will be directed to another window where you can view/print the
completed SBA Form 991. You must print, sign, and date the SBA Form
991 (Surety Bond Guarantee Agreement Addendum) and have the obligee
sign and date. Attach all lien waivers and mail the completed form to
your agent.
![]() – Click on this pushbutton
to enter another supplier or subcontractor.
– Click on this pushbutton
to enter another supplier or subcontractor.
![]() – Click on this pushbutton
to save the information to the database and return to the Welcome
screen.
– Click on this pushbutton
to save the information to the database and return to the Welcome
screen.
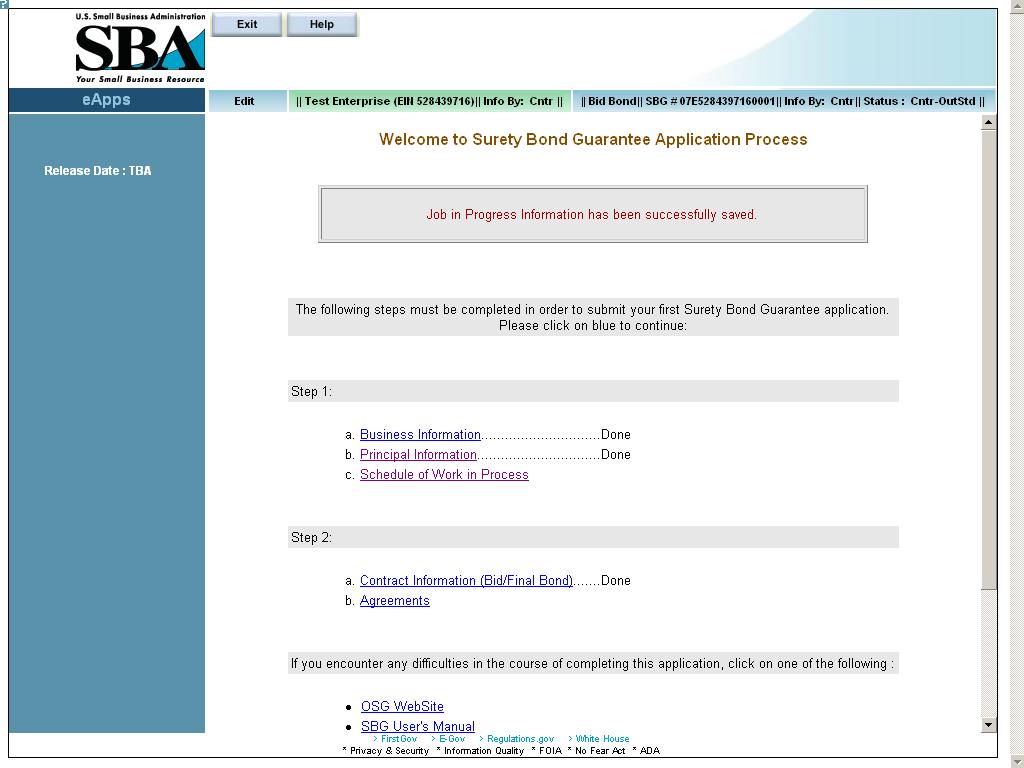
Once Job in Progress Information is submitted, the screen below will display:
5.6First Bond – Agreements and Certifications
Use the Agreements and Certifications screen to verify that you comply with the requirements set forth in the opening paragraph of the Agreements and Certifications screen (as displayed below).
Note: To save this application, you must answer “Yes” or “No” to all of the questions. However, if you answer “No” to any of the questions, the system will prevent you from continuing to process the application. In addition, you will not be able to submit the application to your agent.
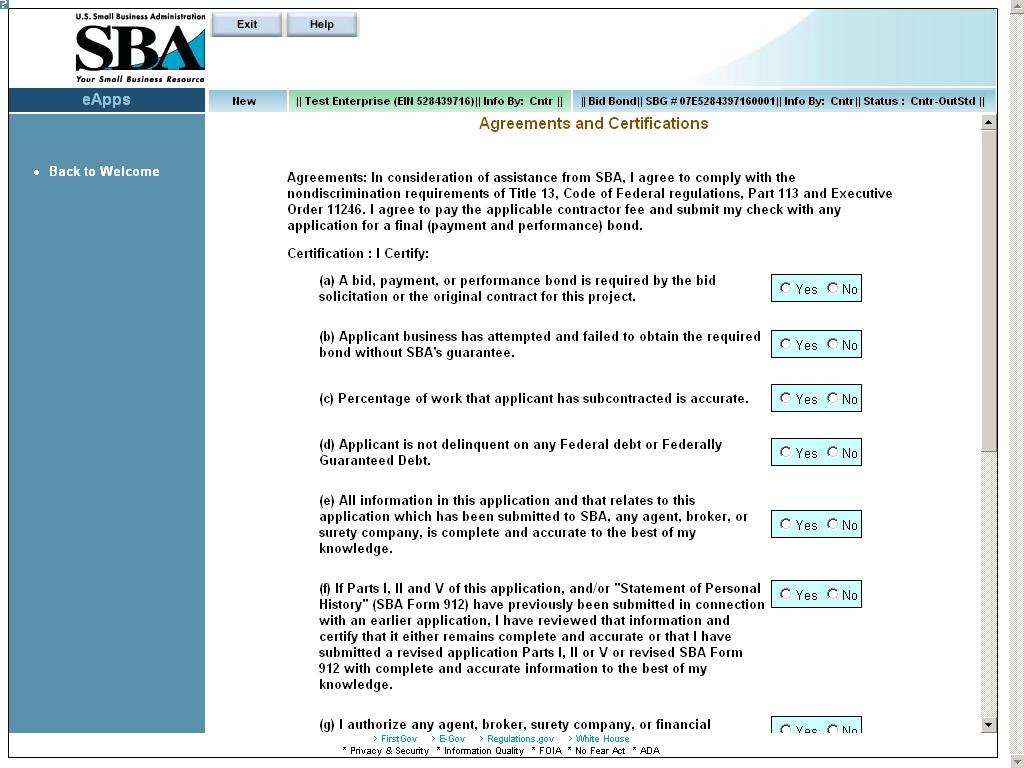
(a) A bid, payment, or performance bond is required by the bid solicitation or the original contract for this project.
(b) Applicant business has attempted and failed to obtain the required bond without SBA's guarantee.
(c) Percentage of work that applicant has subcontracted is accurate.
(d) Applicant is not delinquent on any Federal debt or Federally Guaranteed Debt.
(e) All information in this application and that relates to this application which has been submitted to SBA, any agent, broker, or surety company, is complete and accurate to the best of my knowledge.
(f) If Parts I, II and V of this application, and/or "Statement of Personal History" (SBA Form 912) have previously been submitted in connection with an earlier application, I have reviewed that information and certify that it either remains complete and accurate or that I have submitted a revised application Parts I, II or V or revised SBA Form 912 with complete and accurate information to the best of my knowledge.
(g) I authorize any agent, broker, surety company, or financial institution in possession of credit, financial or work experience information concerning the undersigned applicant and the applicant's business to release the same to SBA, in order that SBA may evaluate the same for the purpose of bond guarantee assistance.
Once you have entered all required data, you have two options, by clicking on the following buttons:
![]() – Click on this pushbutton
to save the entered data, but not submit the bond application to the
agent.
– Click on this pushbutton
to save the entered data, but not submit the bond application to the
agent.
![]() – Click on this pushbutton
to save and submit your application to your agent for review and
further action. Once you submit it to your agent, you will have only
VIEW access to your application and will
not be able to modify any bond data unless your agent returns it for
corrections. However, you can still
update business information, add/update principal information, and
add/update work in process schedules. The system will notify the
agent associated with your business via e-mail.
– Click on this pushbutton
to save and submit your application to your agent for review and
further action. Once you submit it to your agent, you will have only
VIEW access to your application and will
not be able to modify any bond data unless your agent returns it for
corrections. However, you can still
update business information, add/update principal information, and
add/update work in process schedules. The system will notify the
agent associated with your business via e-mail.
![]() – After you submit your
application to your agent, you must print out the SBA 994 form, sign
it, and mail it to your agent. Click on this pushbutton to print your
SBA 994 form, which will be populated with the information that you
inputted.
– After you submit your
application to your agent, you must print out the SBA 994 form, sign
it, and mail it to your agent. Click on this pushbutton to print your
SBA 994 form, which will be populated with the information that you
inputted.
Once agreements information is submitted, the screen below will display:
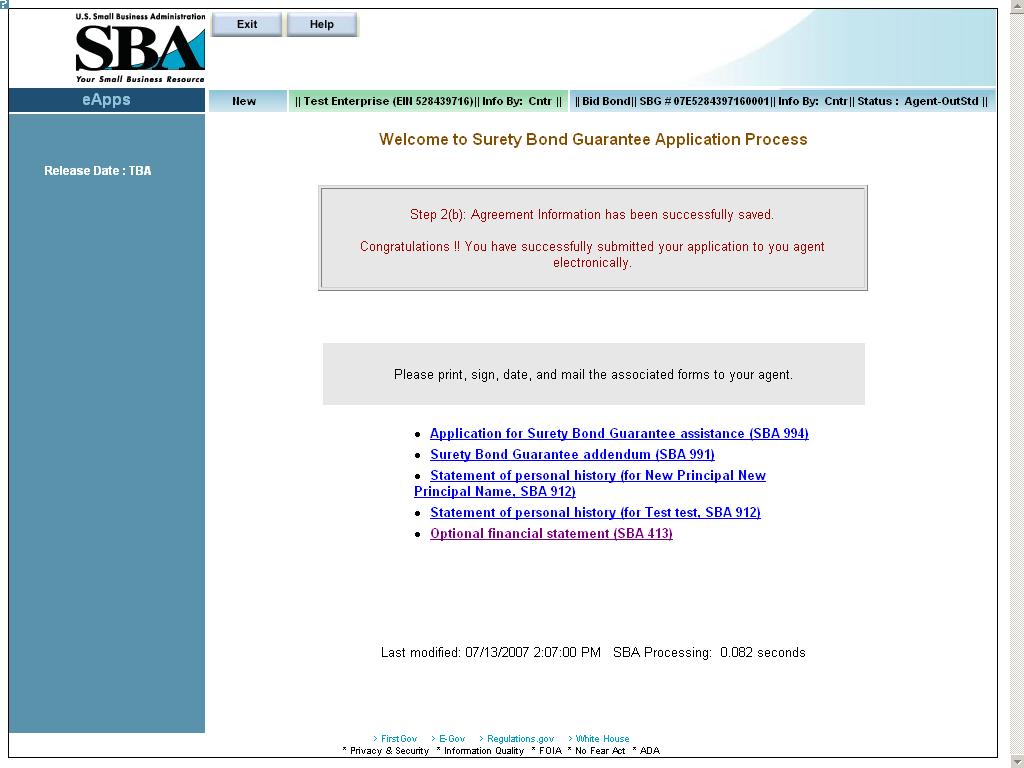
Click on the hotlinks to access the various SBA forms in .pdf.
6Contractor – Submitting Subsequent Bonds
After you have completed and submitted your first bond application to your agent, you will see the Contractor Welcome Surety Bond Guarantee Application screen below. This screen will list all bonds that you have entered but have not yet submitted to your agent (Contractor outstanding).

Click on the Application buttons and their functions link for a more detailed description of the following pushbuttons:
Use
the
![]() pushbutton to find an existing application. You can search using any
of the criteria.
pushbutton to find an existing application. You can search using any
of the criteria.
Use
the
![]() pushbutton to enter a new bond application.
pushbutton to enter a new bond application.
Use
the
![]() pushbutton to exit this screen.
pushbutton to exit this screen.
Use
the
![]() pushbutton to view the user manual.
pushbutton to view the user manual.
Use
the
![]() pushbutton to edit any existing outstanding bond information.
pushbutton to edit any existing outstanding bond information.
6.1Subsequent Bond – Search
When
you click on the
![]() pushbutton, the screen below will be displayed. Enter the criteria
for your bond search on the screen.
pushbutton, the screen below will be displayed. Enter the criteria
for your bond search on the screen.
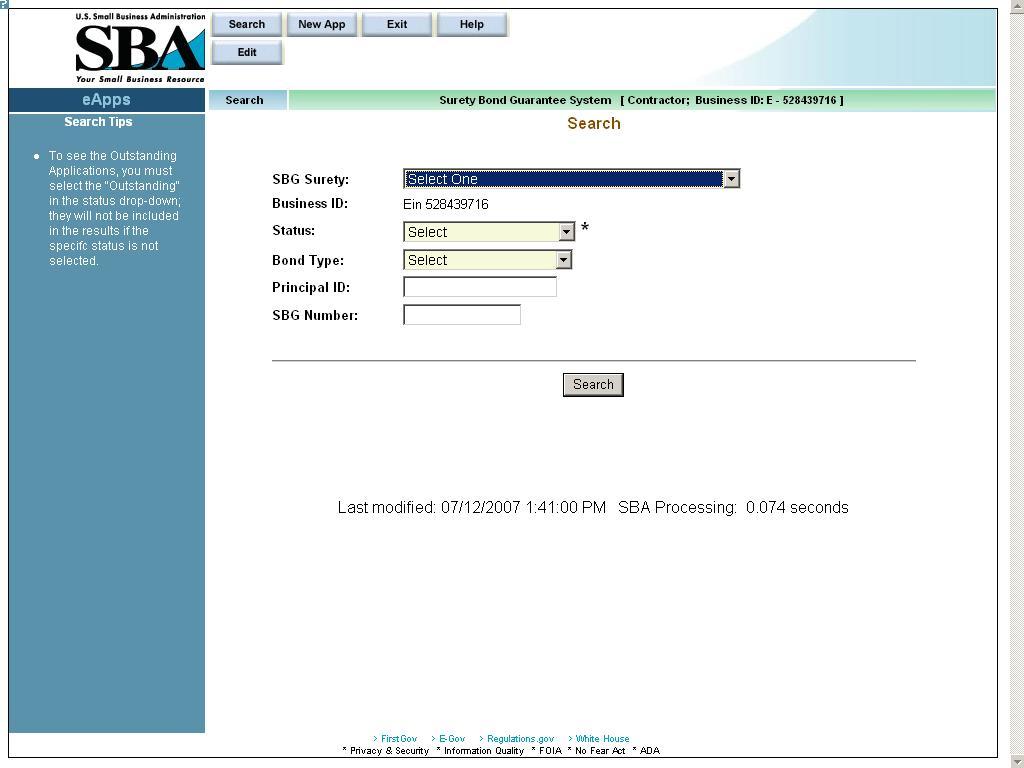
Definition of Terms on Subsequent Bond – Search Screen
SBG Surety – Use the drop-down list to select a surety.
Business ID – This field is pre-populated by the business ID that was linked to your profile.
Status – Use the drop-down list to select a status for the bond (e.g. “Active”, “Cancelled”, etc.). To retrieve only those applications that have been submitted to the agent, select “Agent OutStanding”.
Bond Type – Use the drop-down list to select a bond type (e.g. “Bid Bond”, “Payment Bond”, etc.)
Principal ID – Enter the Principal ID.
SBG Number – Enter the SBG Number.
After
you select your bond search criteria, click on
![]() pushbutton to query the database and report the results based on the
criteria that you picked.
pushbutton to query the database and report the results based on the
criteria that you picked.
6.2Subsequent Bond – New App Information
For subsequent applications, you must complete the Contract Information screen, the Job in Progress screen (if applicable) and the Agreements screen. After you save the information on each screen, the system will take you to the next screen for input.
To
enter a new application (after completing your first application),
click on the
![]() pushbutton and the Contract
Information screen
will display.
pushbutton and the Contract
Information screen
will display.
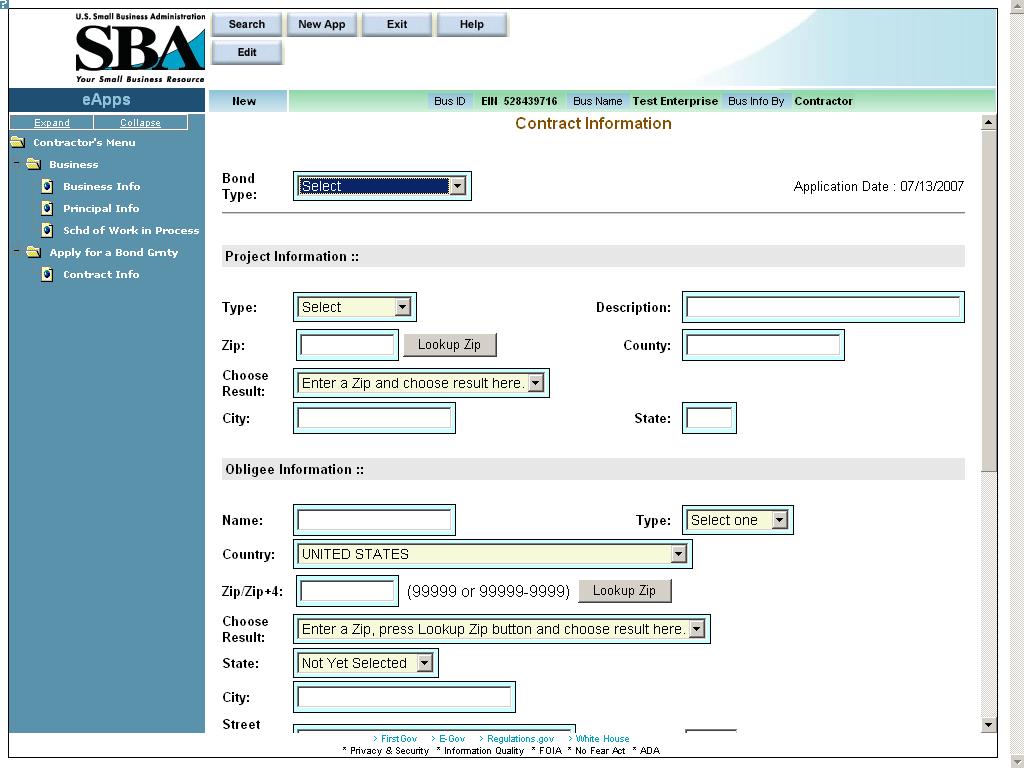
The Business Information section (Business Information screen, Principal Information screen) only need to be updated if there are any changes. The Schedule of Work in Process data needs to be updated at least once every 90 days.
6.3Subsequent Bond – Edit Information
To
edit an existing bond, select the
![]() pushbutton. A list of all bonds for your business that have a status
of “Contractor – Outstanding” will display. You may
edit any of these bonds by clicking on the hot link which will bring
you to the Contract
Information screen.
pushbutton. A list of all bonds for your business that have a status
of “Contractor – Outstanding” will display. You may
edit any of these bonds by clicking on the hot link which will bring
you to the Contract
Information screen.

Original View
Once
data has been updated, use the
![]() pushbutton to save the data to the database and advance to the next
screen. You may edit any of these bonds by clicking on the hot link.
pushbutton to save the data to the database and advance to the next
screen. You may edit any of these bonds by clicking on the hot link.
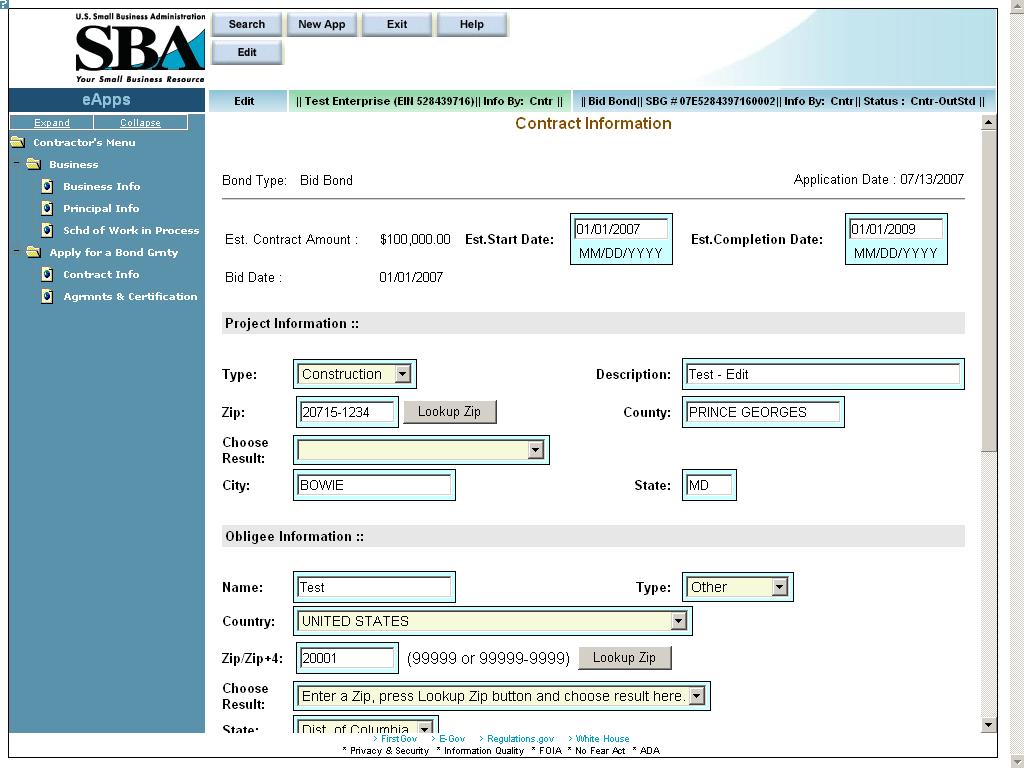
Revised View
The screen above displays contract information for the same bond after the Project Description and Zip Code have been changed.
Once an edit has been made, you must re-submit the bond through the Agreements and Certifications screen. For more information, please refer to section 5.6.
To
delete an entry, click on the
![]() pushbutton. This will clear all the fields on the screen. Then click
on the
pushbutton. This will clear all the fields on the screen. Then click
on the
![]() pushbutton. This will delete the data from database and you will be
taken to the next logical screen in the application. To delete data
from a single field, simply put spaces in that field and save the
data.
pushbutton. This will delete the data from database and you will be
taken to the next logical screen in the application. To delete data
from a single field, simply put spaces in that field and save the
data.
To
cancel any field entry, click on the
![]() pushbutton. This will
take you back to the previous screen.
pushbutton. This will
take you back to the previous screen.
| File Type | application/msword |
| File Title | SBG Phase 2 |
| Author | jdabdesl |
| Last Modified By | CBRich |
| File Modified | 2008-05-13 |
| File Created | 2008-05-13 |
© 2026 OMB.report | Privacy Policy