49 USC Section 5310-Capital Assistance Program for Elderly Persons and Persons w/Disabilities & Section 5311-Nonurbanize
49 USC Section 5310-Capital Assistance Program for Elderly Persons and Persons w/Disabilities & Section 5311-Nonurbanize
Distance training guide (final)
49 USC Section 5310-Capital Assistance Program for Elderly Persons and Persons w/Disabilities & Section 5311-Nonurbanize
OMB: 2132-0500
TEAM-Web Distance Training
SECTION 1- LOGGING INTO TEAM
This section provides information on how to log into TEAM.
Login:
1. Go to the following website by entering this into your web browser: http://ftaTEAMWeb.fta.dot.gov/
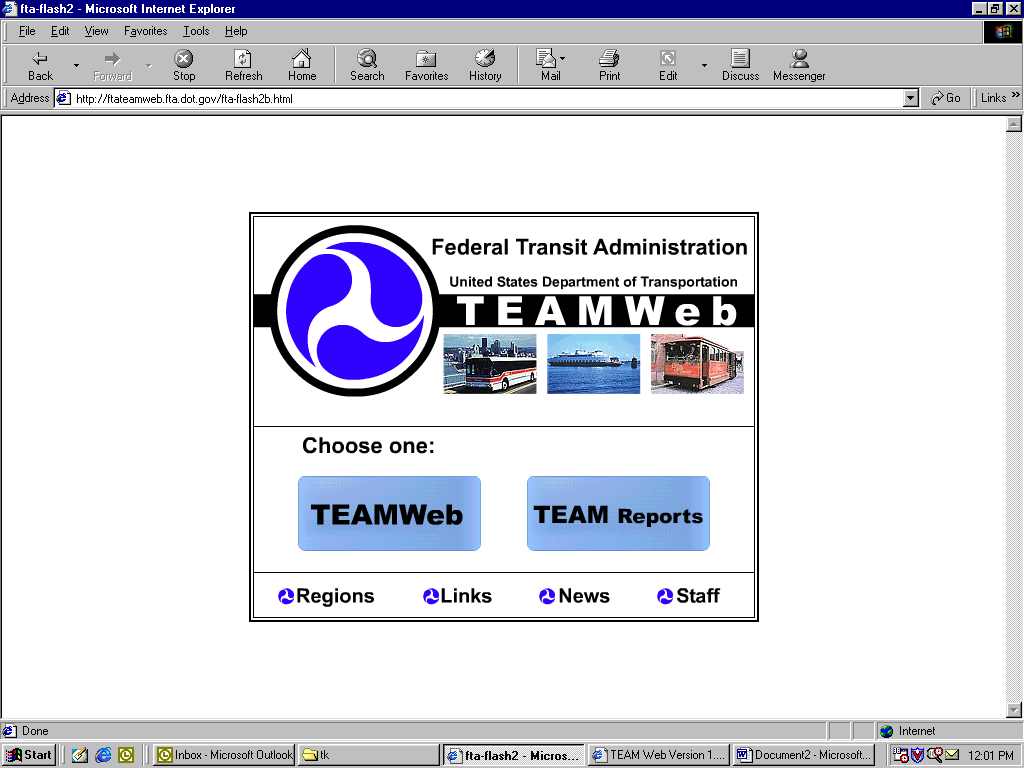
Figure1.1
2. Select TEAMWeb
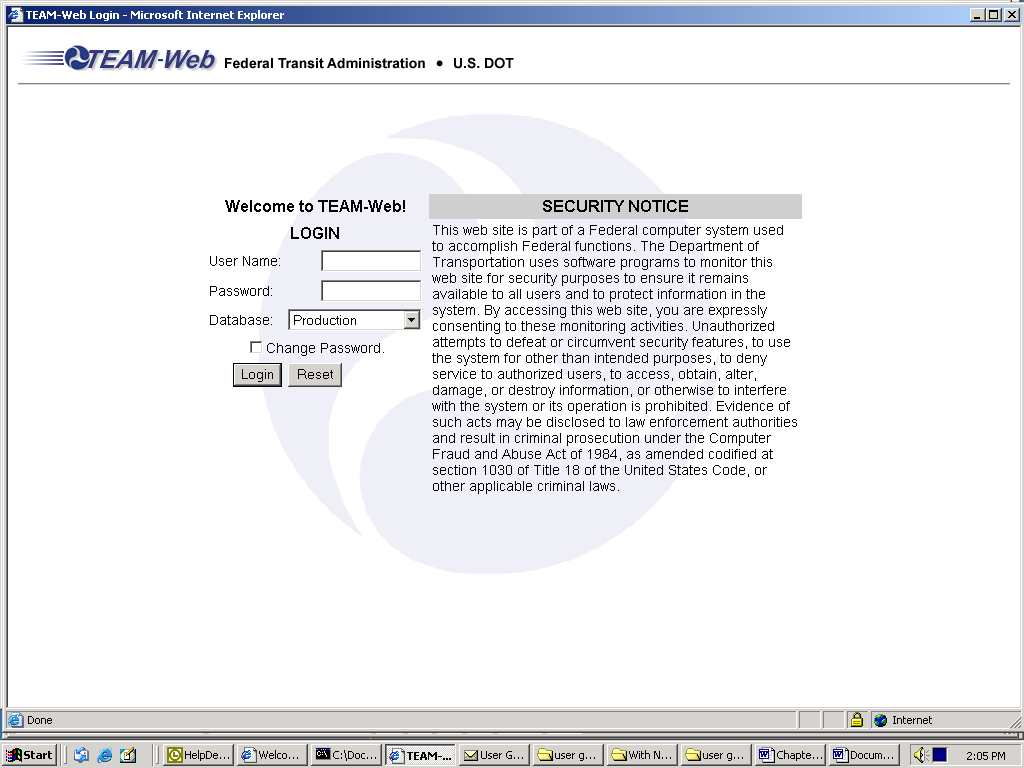
Figure 1.2 Login
3. When the TEAM Login window appears, type in your user name and password in the appropriate text boxes.
4. The system defaults to the PRODUCTION database, where you may create or manage a project. Since this is for training, change the database to TRAINING by using the drop down menu.
5. Click the Login button
Main Menu:
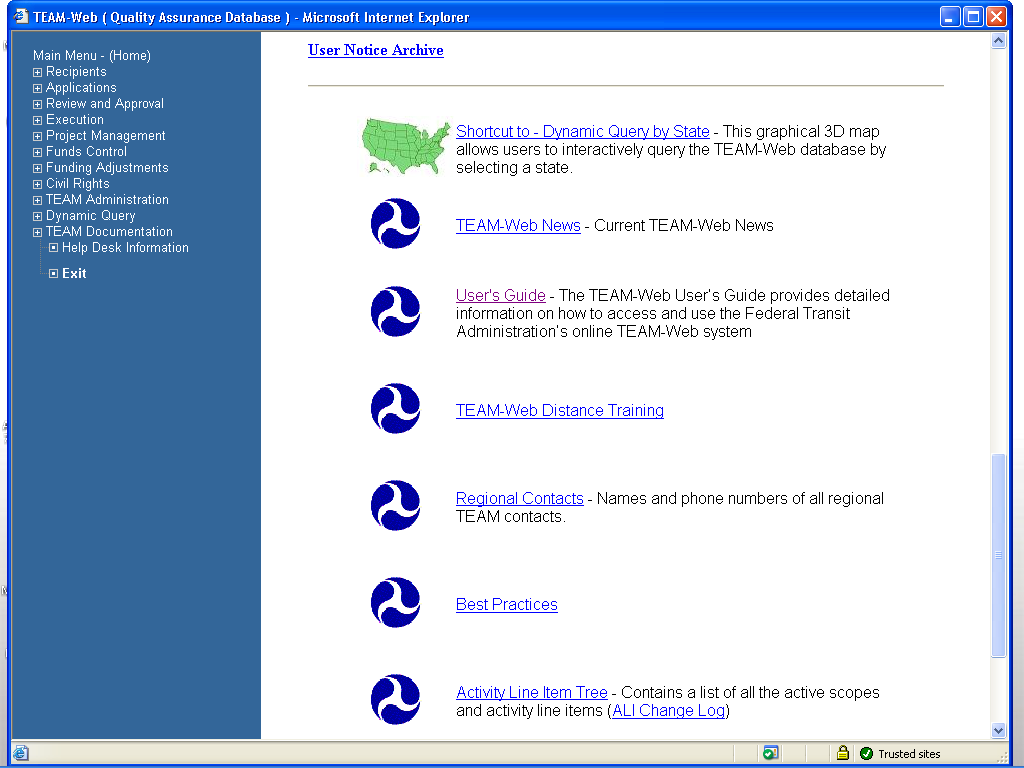
Figure 1.3
The TEAM-Web Main Menu (Home) page contains a list of TEAM-Web areas of functionality, located to the left of the screen. These areas will be discussed in detail through out this manual. To the right of the blue Main Menu list, you will also find links to various TEAM-Web related areas as well as current system notifications as necessary.
Important TEAM User Notices:
In this field all user notifications are posted. User notifications consist of new releases, updates, certification requirements, etc.
TEAM User Documentation and References:
This field consists of TEAM User access forms, Vender ID Number Request forms, Census information, User notice archive, as well as referencing tools.
Referencing tools:
Shortcut to - Dynamic Query by State - This graphical 3D map allows users to interactively query the TEAM-Web database by selecting a state.
TEAM-Web News - Current TEAM-Web News
User's Guide - The TEAM-Web User’s Guide provides detailed information on how to access and use the Federal Transit Administration’s online TEAM-Web system
TEAM-Web Distance Training – Distance training schedules, registration forms, course evaluation, and recipient training agenda.
Regional Contacts - Names and phone numbers of all regional TEAM contacts.
Best Practices – Procedures that should be followed when performing certain task.
Activity Line Item Tree - Contains a list of all the active scopes and activity line items
SECTION 2- ACCESS/ MODIFY RECIPIENT INFORMATION
Agencies that apply for FTA funds have their profiles set up within TEAM. Some of these information change from time to time, for example staffing changes etc. FTA expects that all information in the profile be updated regularly to reflect any changes. This section shows how to query and modify recipient data.
1. From the Main Menu, click on Recipients. The Query Recipients page (Figure 2.1) will appear.
Enter the Recipient ID: 1458.
Click on the Submit Query button.
4. The Recipient Query Results (Figure 2.2) will appear
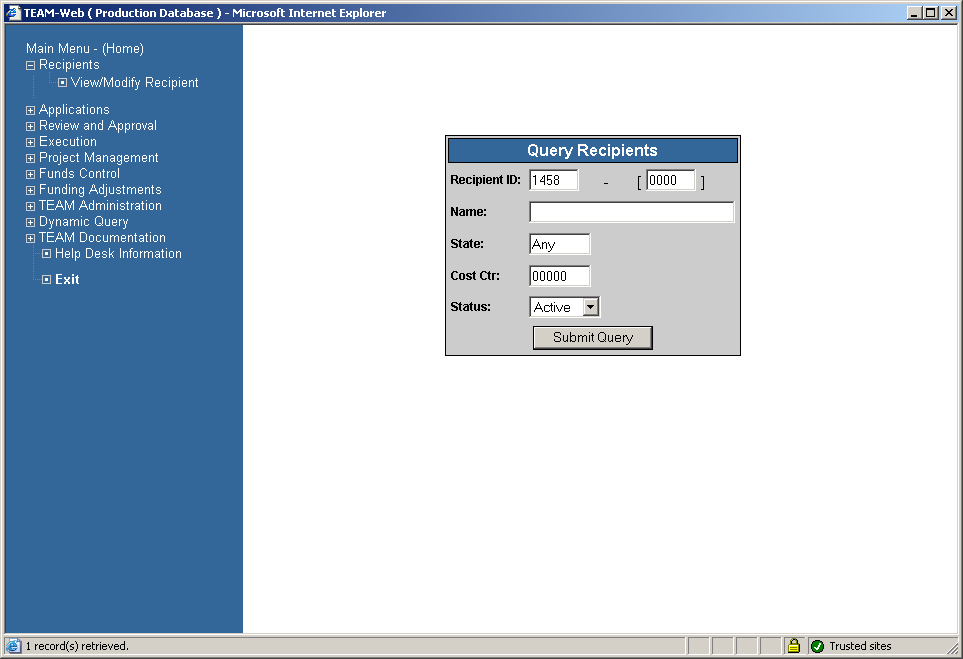
Figure 2.1 – Query Recipients Page
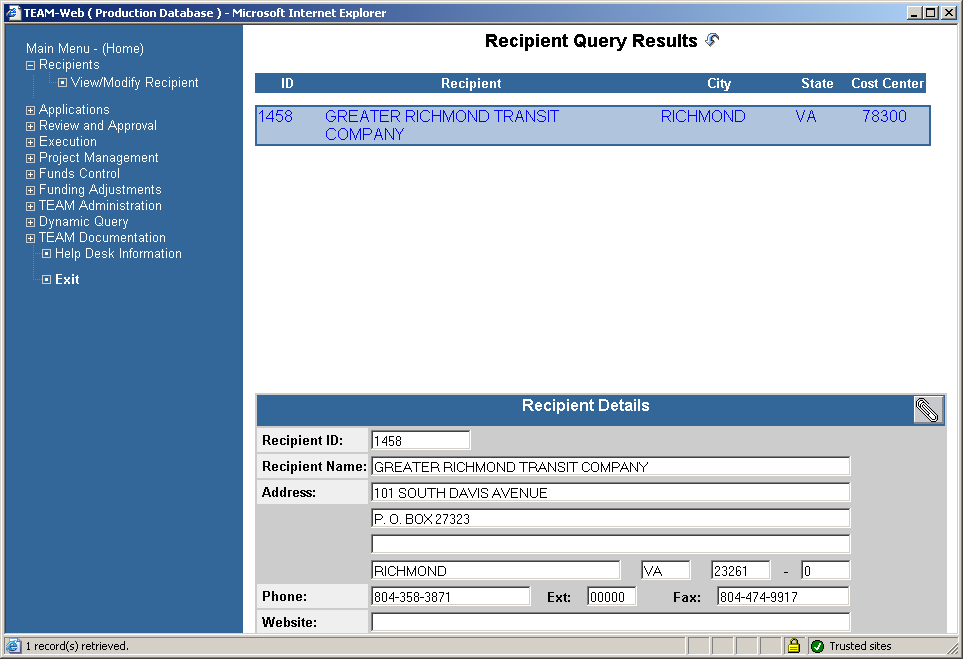
Figure 2.2: Recipient Query Results page
5
2-3
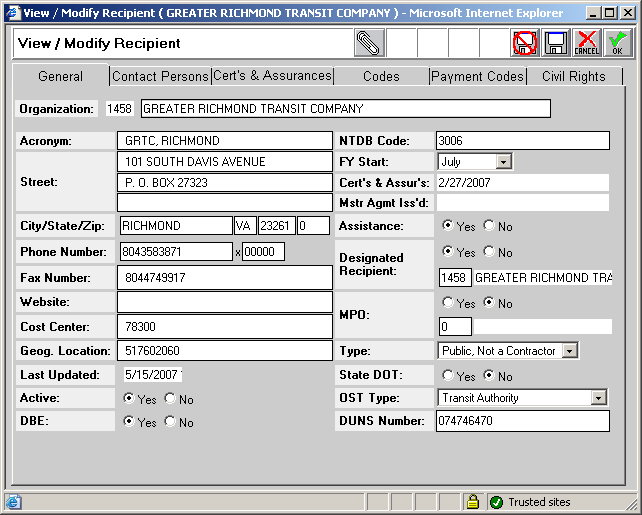
To update the entry fields, place the cursor in the
Figure 2.3 – General Tab
2.1 General Tab
To update the entry fields under the General Tab, place the cursor in the appropriate entry field and type in the new information. (Entry fields are white text boxes with a black border, and include fields for the Recipient’s street address, phone number, and Internet address).
2-5
2.2 Contact Persons Tab
Click on the Contact Persons tab and proceed to update information concerning the Recipient’s Officers and participating Unions.
2.2.1 When you select Officer titles from the dropdown menu (Figure 2.4), names and titles of the Recipient’s officers will be displayed in the table.
To display information about an Officer, click on the Officer’s name. The fields to the right of the table will become populated with that Officer’s contact information
The Recipient may add new titles by selecting: Add New Title at the bottom of the list. When the dialog box appears, enter the new title. Click on the OK icon.
The Recipient may also add a name to any title by selecting the “Add New” line below the title and typing the name in the entry fields to the right.
To update previously entered information, select the person’s name in the table and make changes in the entry fields to the right.
To retain changes, click on the Save icon. To delete changes, click on the Discard
icon.
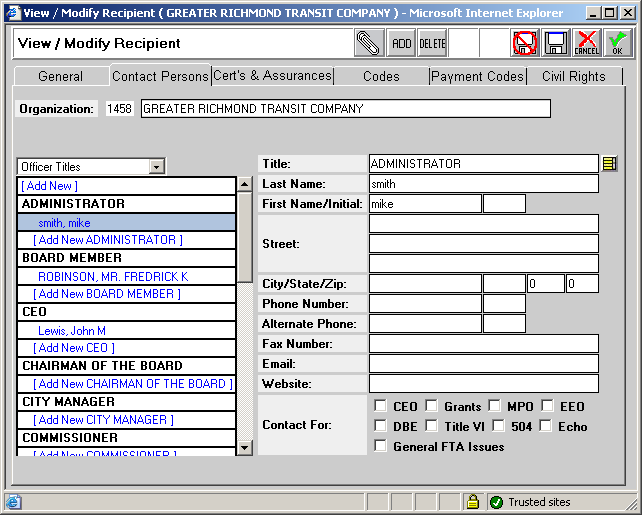
Figure 2.4 –Contact Persons Tab (Officer titles)
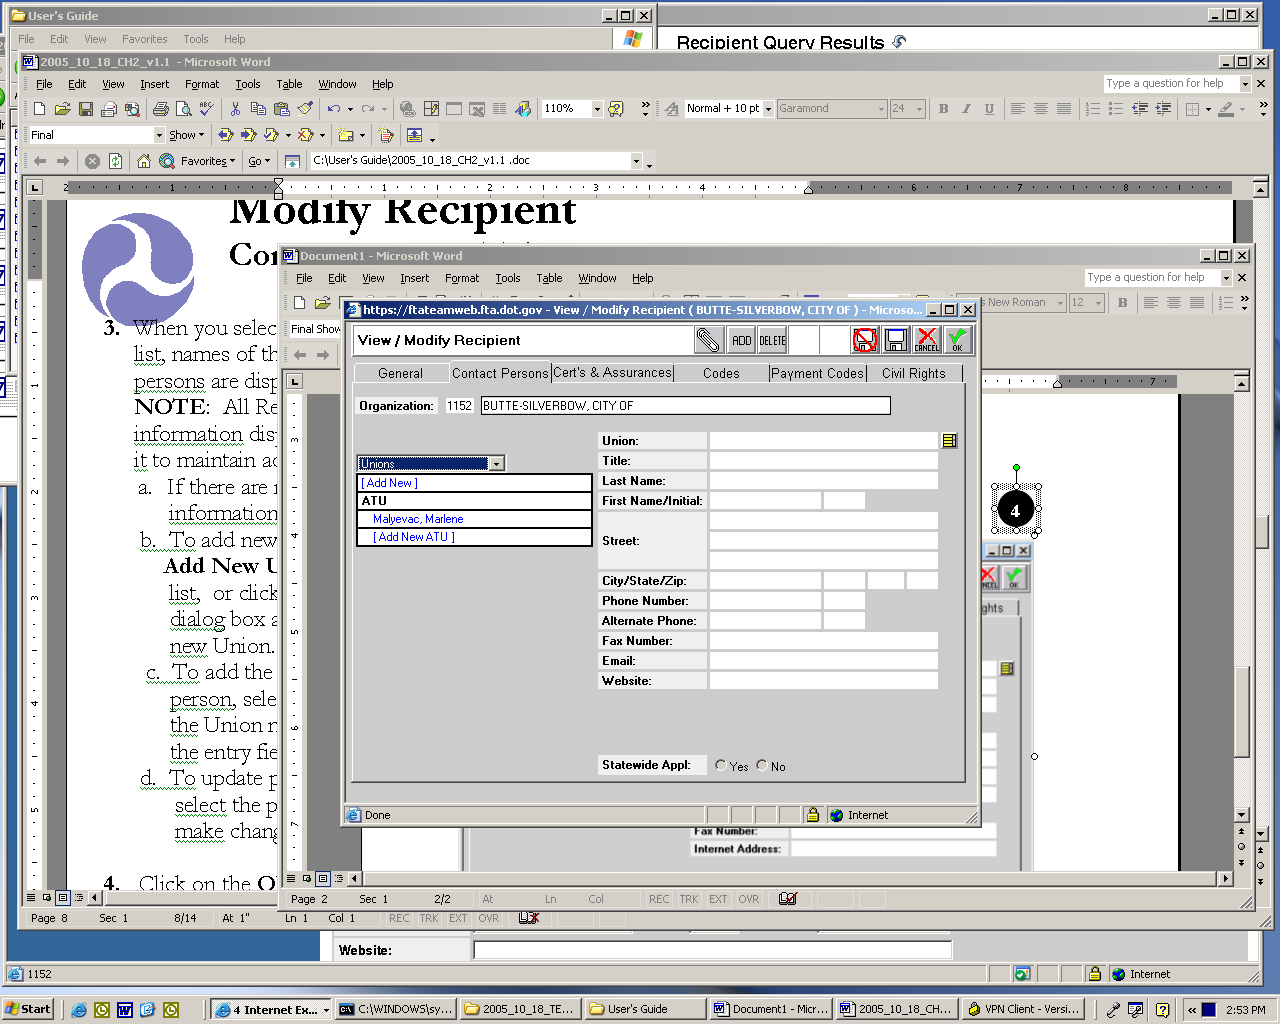
2.2.2 When you select Unions from the dropdown list (Figure 2.5), names of the unions and their contact persons are displayed. NOTE: All Recipients must ensure that the information displayed is correct and update it to maintain accuracy.
If there are no unions, enter that information in the first field to the right.
b. To add new Unions to this list, click in the Add New Union field at the bottom of the list, or click on the ADD icon. When the dialog box appears, type in the name of the
new Union. Click on the OK icon.
3. To add the name of a Union’s contact person, select the Add New line below
the Union name and type in that name in the entry fields to the right.
4. To update previously entered information, select the person’s name in the table make changes in the entry fields.
5. Click on the OK or Cancel icon to retain or delete your changes.
2-7
Figure 2.5– Contact Persons Tab (Unions)
2-8


2.3 Cert’s and Assurances Tab
Clicking on the Cert’s and Assurances Tab will show Figure 2.6
This window permits users to review the current status of a Recipient’s annual certifications and assurances. To access the text of a specific certification or assurance, click on the yellow icon in the row that contains that certification or assurance.
If no certification date appears in the “Cert Date” fields, the Recipient’s authorized official and attorney must electronically attest to the appropriate certifications and assurances by pinning the Certification Agreement on this window. (NOTE: In some cases, the Recipient’s authorized official may pin the document on behalf of the attorney.)
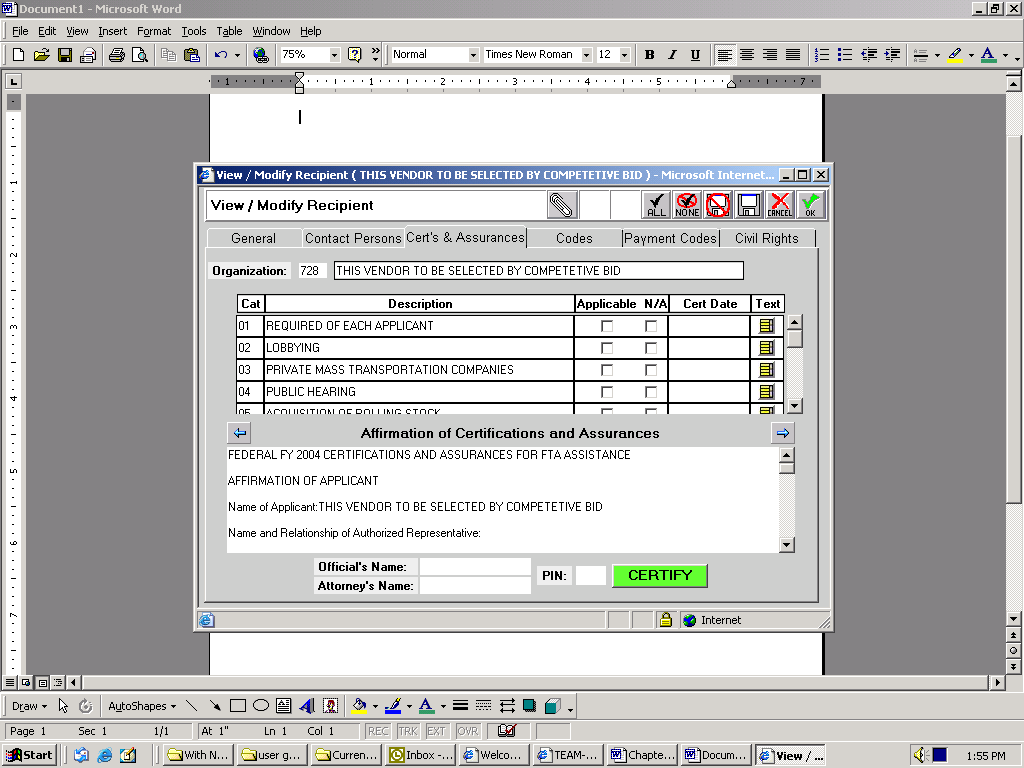
Figure 2.6– Cert’s and Assurances Tab
2-9
2.4 C
2-10
Clicking on the Codes Tab will show Figure 2.7 with tables of Urbanized Areas, SMSA Codes and Congressional Districts.
a. Urbanized Areas Table: This read-only table lists all the Urbanized Areas by name and ID that apply to this Recipient.
b. Congressional Districts Table: Recipients may add districts to this table with a State ID number and a District Code number.
c. Standard Metropolitan Statistical Area SMSA) Codes Table: A Recipient with the proper authority may add new SMSA codes.
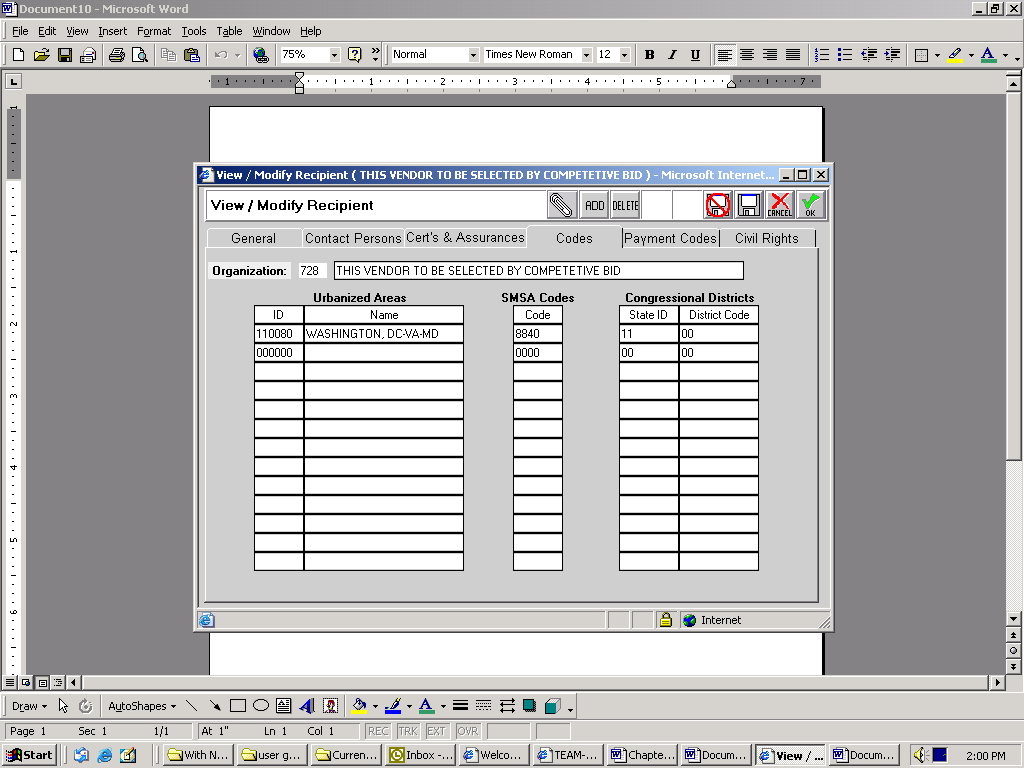
Figure 2.7– Codes Tab
2.5 Payment Codes Tab
This is for FTA use only and not even visible to the recipient. It is information on thmethod FTA will use and the Recipient’s Electronic Clearing House Operations (ECHO) control numbers used by FTA for internal accounting purposes.
2.6 Civil Rights Tab
Clicking on the Civil Rights Tab shows Figure 2.8. This is a read-only screen and displays information entered by FTA staff reflecting FTA’s understanding of the Recipient’s status with respect to various Civil Rights requirements, including EEO (hiring or minorities and women), Title VI (nondiscrimination in project benefits), and DBE (participation by disadvantaged business enterprise). (Omitted from this Civil Rights tab page is information pertaining to the Recipient’s status with respect to the Americans with Disabilities
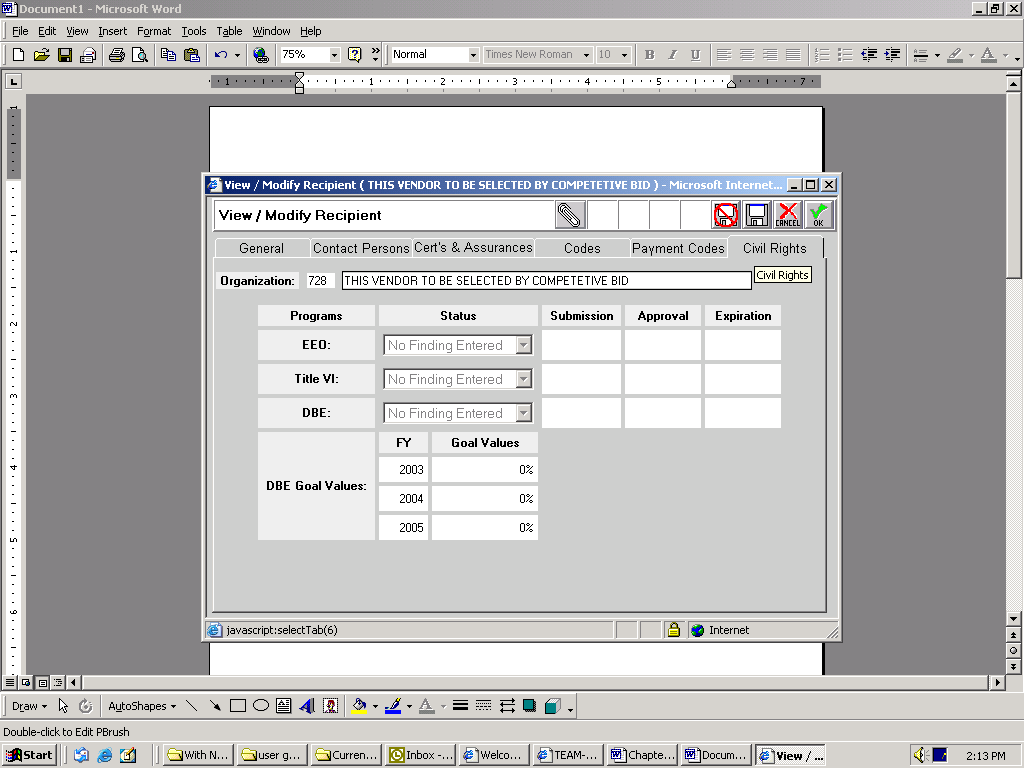
Figure 2.8-Civil Rights Tab
NOTE:
The term “Approved”, appearing in any window, merely
reflects FTA’s belief that there are no apparent, significant
deficiencies in the Recipient’s compliance with the given
requirements. FTA reserves the right to rescind the “Approved”
designation (or other designation) if circumstances so demand.
2-12
2.7 Attachment of Additional Files
To attach any additional information which cannot be filled in form, use the attach button (paper clip) on top of menu bar
When you click attach button a new window will pop up with list of folders, select the folder according to the subject of attachment (see Figure 2.9)
Once required folder is selected, either type in the complete name of the file to be attached or click Browse to locate exact path of file computer
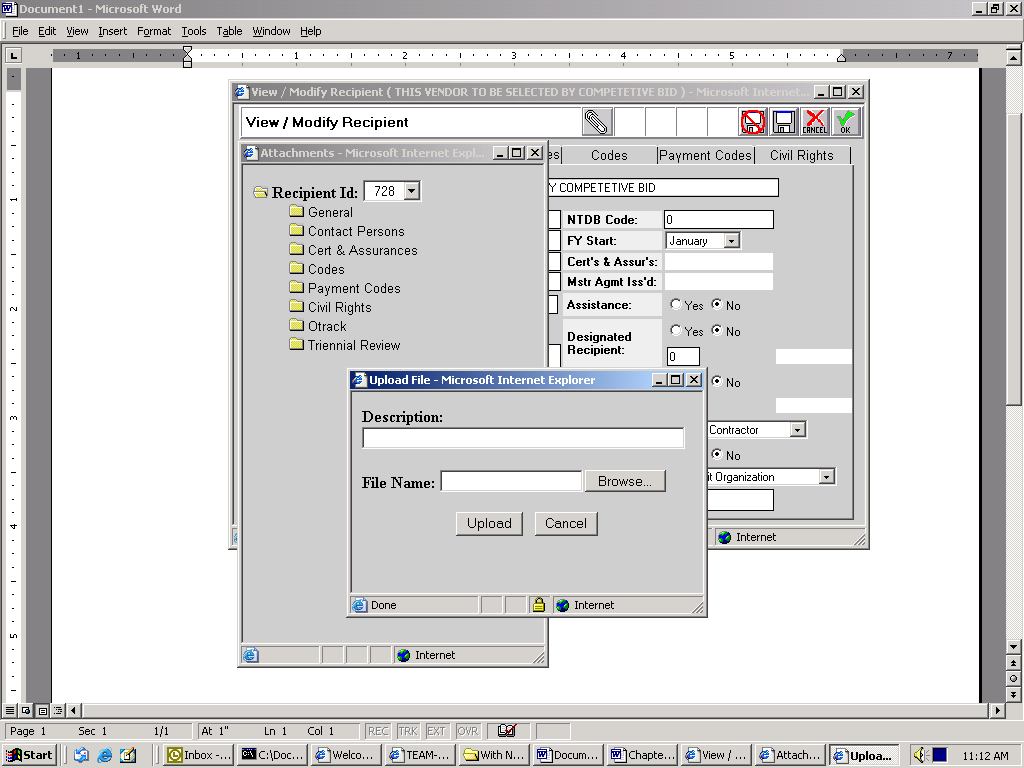
Figure 2.9 – File Attachments
Figure 2.9 –File Attachments
Figure 2.9 – Attachment of Additional Files
SECTION 3 –CREATING NEW PROJECTS/APPLICATIONS:
In this section, we begin the process of putting a Grant application together
Select the plus sign on the left side of the word application in the Main Menu. At this point a drop down menu will appear.
Select Create New Project from the drop down menu and Figure 3.1 will appear defaulting to the Project Details tab.
3.1 New Project Details Tab
1. For Project Number enter in your first and last name. An official project number will be assigned after the application is modified and reviewed.
2. Select a section of statute by clicking the drop down button and choosing 5307 from the menu.
3. Enter Training for Brief Description.
4. Enter today’s date into Program Date.
5. Fiscal Year should be the current year.
6. An Environmental Classification code must be selected. There are four classification codes to choose from. Select class 2 by clicking the radio button on the right side.
class 1 - Environmental Impact Statement |
class 2 - Categorical exclusion |
class 3 - Environmental Assessment |
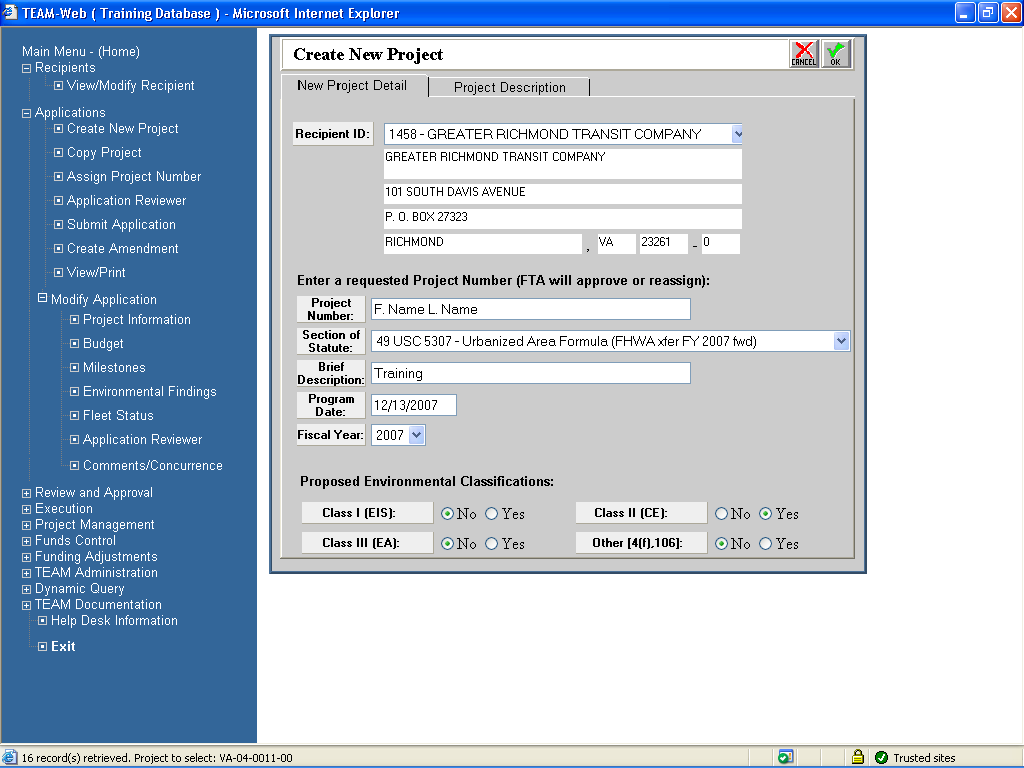
Figure 3.1 –New Project Details Tab
3.2 Project Description:
1. Recipient information will automatically be populated.
2. Under project description enter Training.
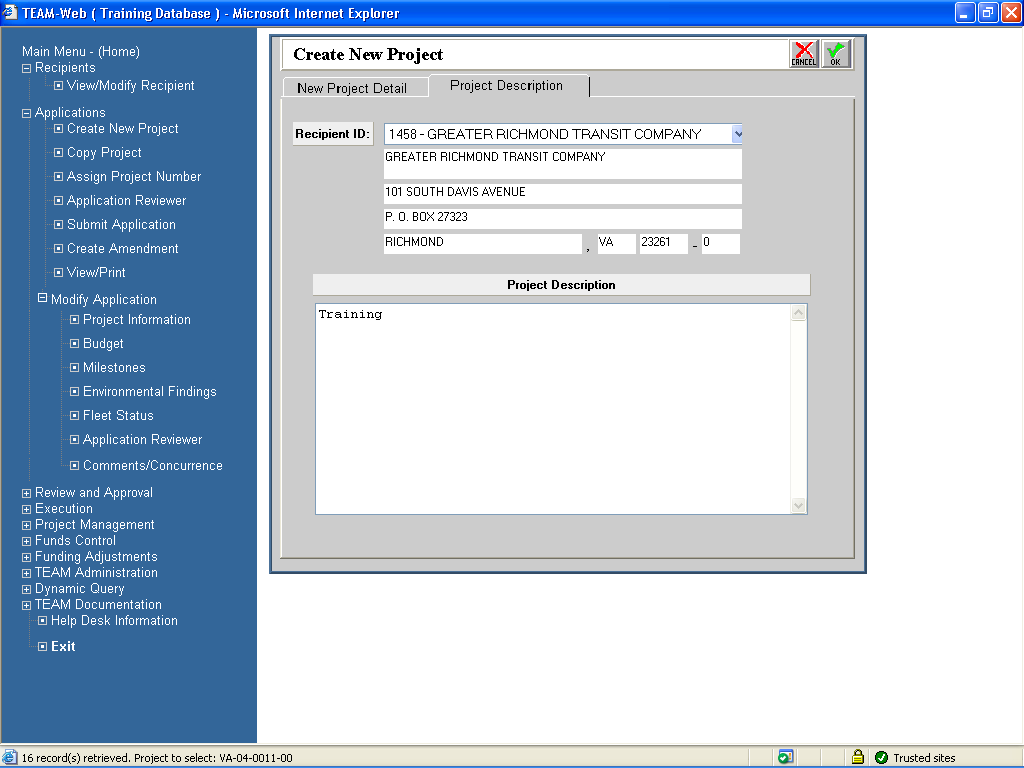
Figure 3.2 Project Description
3. Select Ok in the upper right corner to save and you will see Figure 4.1. The Project Details section at the bottom half of Figure 3.3 gives a summary of the current status of the project. This information changes as the application progresses.
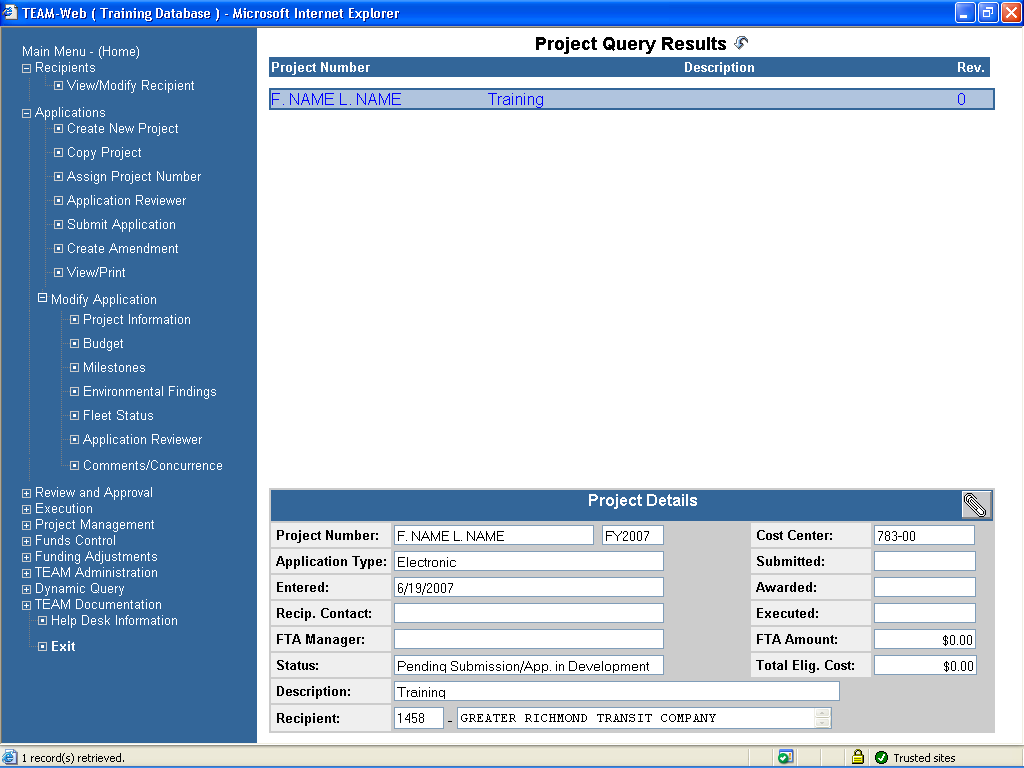
Figure 3.3
SECTION 4 - MODIFY APPLICATION
In this section, we are going to continue the development of the application by providing budget request information, milestone information and other details.
Proceed by selecting the plus sign on the left side of the on Modify Application and
Select Project Information. The Project Information screen will default to the General tab. See Figure 4.1. The Project Information screen also contains the Control Totals, UZA/Cong Dist., Earmarks and Security tab pages.
4.1 General Tab
In the General tab there several field that are automatically populated such as Recipient, Project, Project type, etc. Please review the information and make corrections if needed.
FTA Proj Mgr, Recipient contact, State appl id, and Est start/end must be completed manually. Project description can be modified in detail on this screen.
3. Click on the Control Totals Tab to go to the next screen
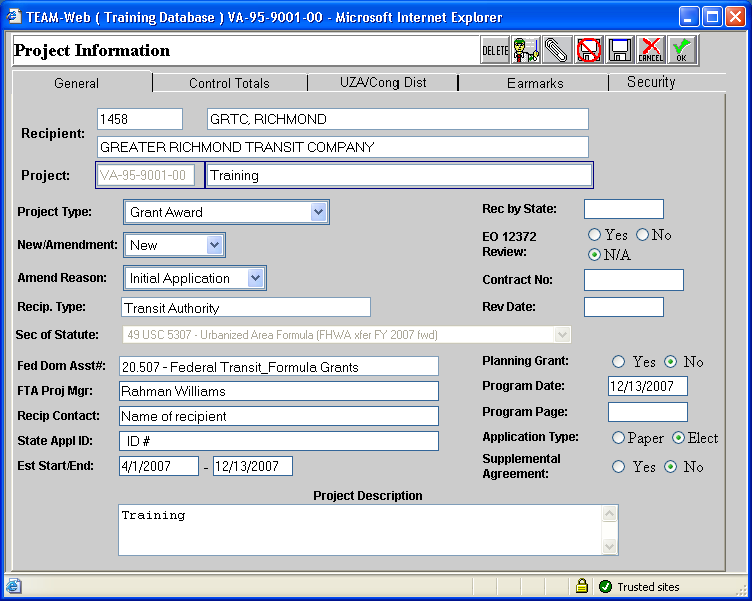
Figure 4.1 General

Figure 4.2 Control Totals
4.2 Control Totals Tab
Clicking the Control Totals Tab will show Figure 4.2. Budget totals for the project are entered in this screen.
Enter $8,780,000 for the Total FTA Amount. This is the amount to be provided to the grantee by FTA.
Enter $2,195,000 for the Total Local Amount. This is the amount provided by local contributors, anyone other than State or Federal contributions.
(Note: Gross Project Cost and Total Eligible Cost are automatically calculated. The project column is automatically populated as well.)
Click on UZA/Cong Dist Tab to go to the next screen
4.3 UZA/ Cong Dist Tab
Clicking the UZA/Cong Dist will show Figure 4.3. UZA codes can be added and deleted in this screen
1. The Urbanized Areas and Congressional Districts information on the UZA/Cong Dist tab can be updated as long as it exists in the recipient’s profile. Existing Entries in the Urbanized Areas and Congressional Districts tables may be deleted.
In order to delete a UZA you can highlight the UZA name and select the delete icon in the upper right corner.
Click on Earmarks Tab to go to the next screen
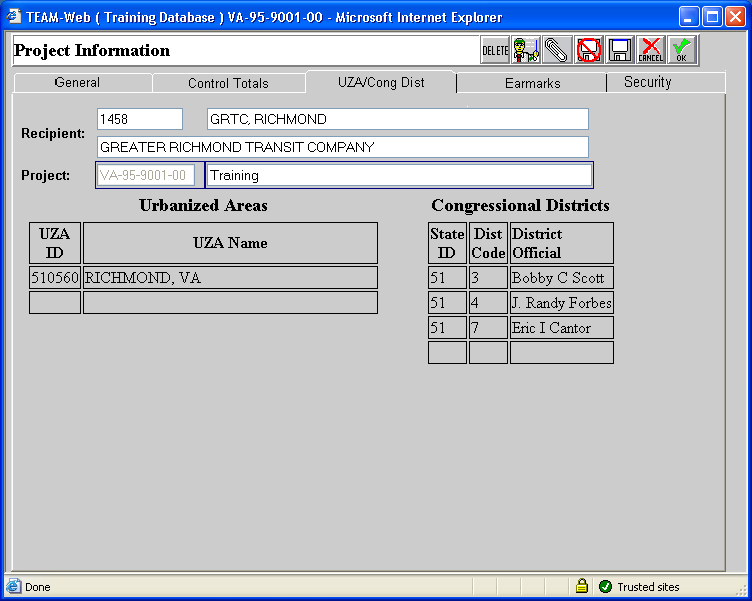
Figure 4.3 UZA/Cong Dist
4.4 Earmark tab
Clicking the Earmarks tab will show Figure 4.4.
1.Earmarks are funds that have been designated by congress to be used for specific projects. If there was earmarked money for this project, you would need to select the magnifying glass next to Earmark Details and select from a list of earmarks the name of the earmark to associate with the project. The other fields on the screen will automatically populate with the earmark details.
2. Click on the Security Tab to go to the next (Security screen)
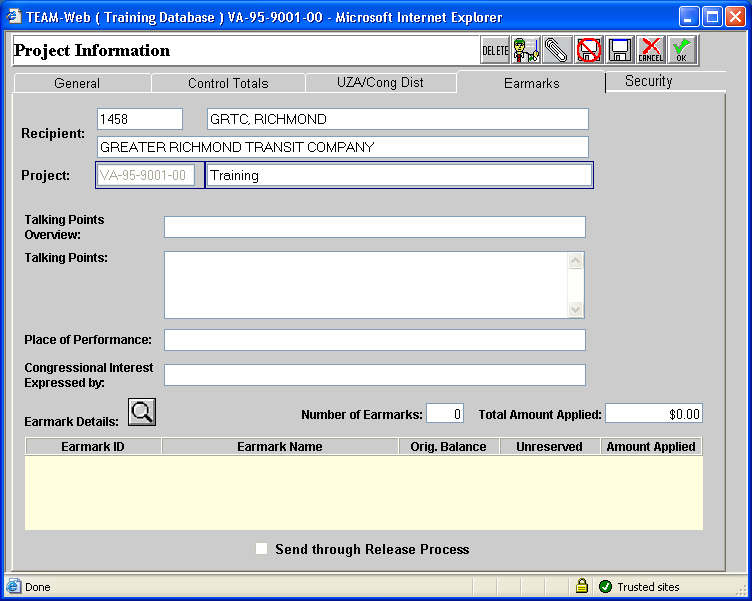
Figure 4.4 Earmarks
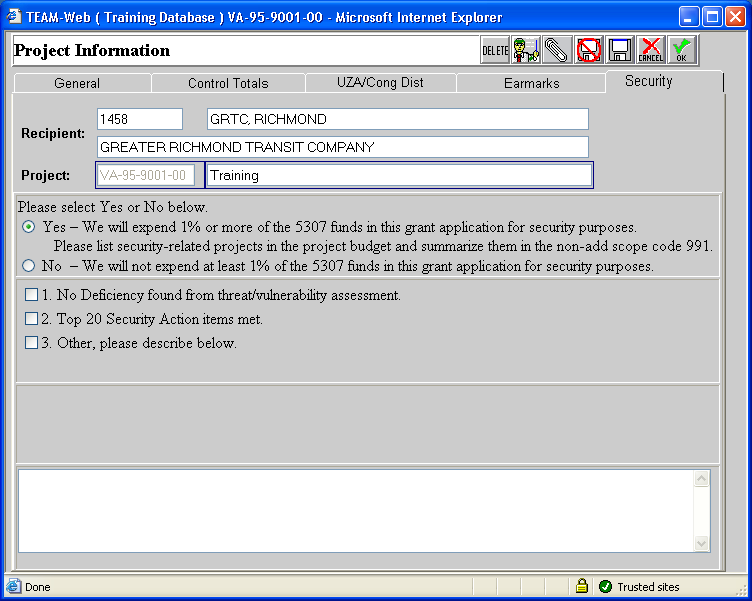
Figure 4.5 Security
4.5 Security Tab
Clciking on the Security Tab will show the information in Figure 4.5. It is in statute that any 5307 grant must spend at least 1% of their budget on security or provide some evidence otherwise.
Select the radio button next to Yes.
Select the OK button in the upper right corner.
Select Budget from the blue menu on the left side of the screen.
Provide any detailed description in the text section
In the Main Menu, click on Budget under Modify Application to proceed to the next step in the application process
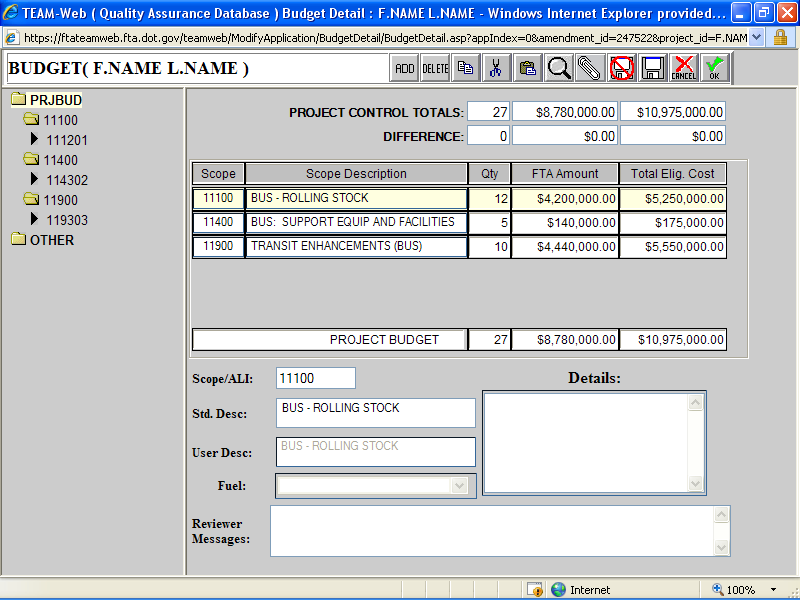
Figure 5.1 Budget
SECTION 5 BUDGET
In the Main Menu, click on Budget under Modify Application and this will show Figure 5.1 This is where you enter detail information on specific activities (Activity Line Items) for which the funds will be used.
Highlight PRJBUD
Select the magnifying glass from the menu in the upper right corner.
Note: A drop down menu will appear
Click the drop down menu to the right of the word Scope. This will give you a list of Scopes to choose from.
For the first scope choose 1110 Bus Rolling Stock.
Then from the list below proceed to select the ALI codes by clicking on the envelopes to the let of the codes. The first ALI code is as follows:
100000 Capital, 110000 Capital Bus, 111000 Bus Rolling Stocks, 111200 Buy Replacements – Capital Bus,111201 Buy Replacement 40 Ft Bus
Note: At this point ALI code 111201 should be highlighted.
In order to select this ALI code use the green directional key pointing to the right. Note: If a code has to be removed, highlight the code then use the green directional key pointing to the left.
Select OK to save the ALI code to your budget details
Repeat steps one though seven for the following Scopes:
-1140 Bus Support equipment and facilities, 100000 Capital, 110000 Capital Bus, 114000 Bus support Equip and facilities, 114300 Construction of Bus Support Equip and Facilities, 114302 Construction Maintenance Facility
- 1190 Transit enhancement, 100000 Capital, 110000 Capital Bus, 119000 Transit Enhancement (Bus), 119300 Construction, 119303 Construction Landscaping / Scenic Beautification
Note: All three ALI codes are on the left of the screen.
Highlight 111201 Replace 40ft Bus.
To the right of the screen enter in 12 under Qty for quantity, 4,200,000 for FTA Amount, and 5,250,000 or Total Eligible.
For ALI 111201 a fuel must be selected. Towards the bottom of the screen there is a drop down menu in which a fuel can be selected.
Highlight 114302 enter 5 for qty, 140,000 for FTA amount, and 175000 for total eligible
Highlight 119303 enter 10 for qty, 4,440,000 for FTA Amount, and 5,550,000 for Total Eligible
Note: Project Control Totals and Difference are automatically populated as the budget is entered. The Difference amounts will be 0 if the budget as entered correctly.
Select OK to save
In the Main Menu, click on Milestones under Modify Application to proceed to the next step in the application process
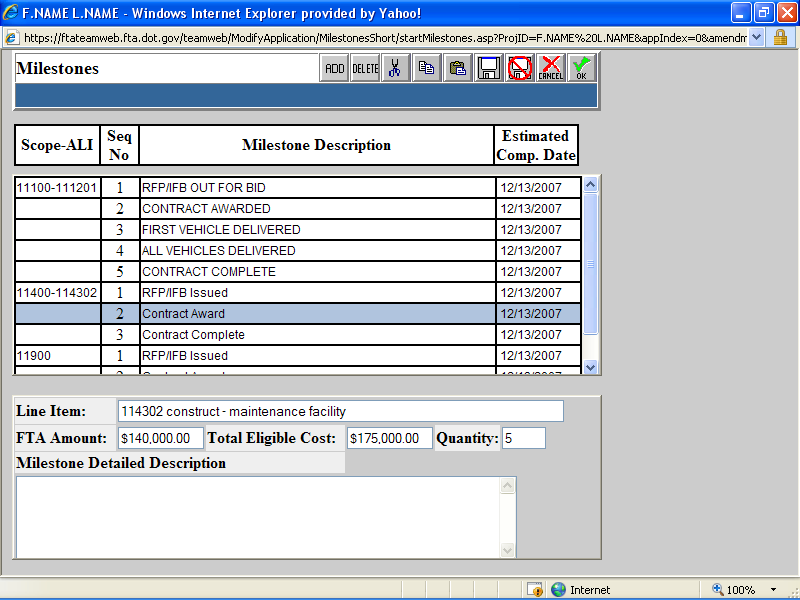
Figure 6.1 Milestones
SECTION 6-MILESTONES
In the Main Menu, click on Milestones under Modify Application and this will show Figure 6.1 This is where you enter milestone information on project activities. Depending on the type of project activities, some of the milestone information will be automatically populated. You may add additional milestones data.
For each milestone an estimated completion date must be given.
At the bottom of the screen a milestone detailed Description is recommended
Select OK to save information
In the Main Menu, click on Environmental Findings under Modify Application to proceed to the next step in the application process
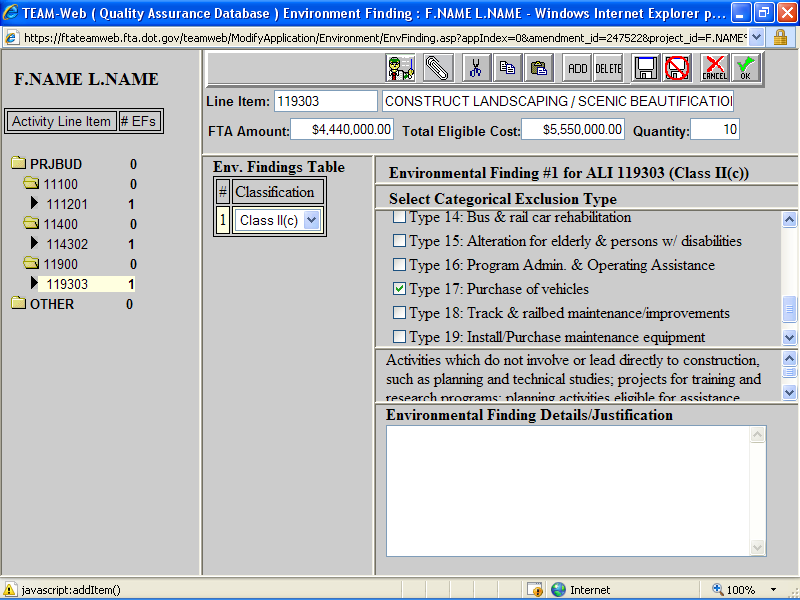
Figure 7.1 Environmental Findings
SECTION 7 – ENVIRONMENTAL FINDINGS
In the Main Menu, click on Environmental Findingss under Modify Application and this will show Figure 7.1 This is where you enter environmental information on project activities.
Highlight first ALI code 111201 under PRJBUD
Select ADD from the upper right corner
Select class2c (categorical exclusion that needs no documentation) from the drop down menu under Env. Findings.
Under Categorical Exclusion Type choose Type 17 purchase vehicles
Repeat step one through four for the other two ALI codes
Select OK to save info.
In the Main Menu, click on Fleet Status under Modify Application to proceed to the next step in the application process
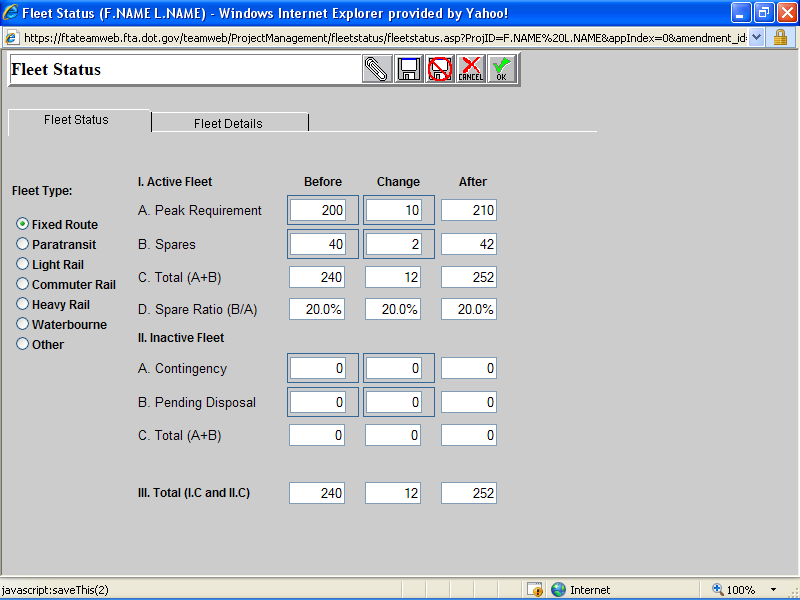
Figure 8.1 Fleet Status
SECTION 8- FLEET STATUS.
In the Main Menu, click on Fleet Status under Modify Application and this will show Figure 8.1 This is where you enter information on your fleet status.
1. Under Fleet Type select Fixed Route because we are purchasing buses.
2. In row A. Peak Requirement under Before enter 200 and under Change enter 10
3. In row B. Spares under Before enter 40 and under Change enter 2
Note: The column after and the rows C. Total (A+B), D. Spare Ratio and 3 Total automatically calculates.
4. Select the fleet details tab.
5. Add any comments pertaining to the fleet
6. Click Ok in the upper right corner.
7. In the Main Menu, click on Application Reviewer under Modify Application to proceed to the next step in the application process
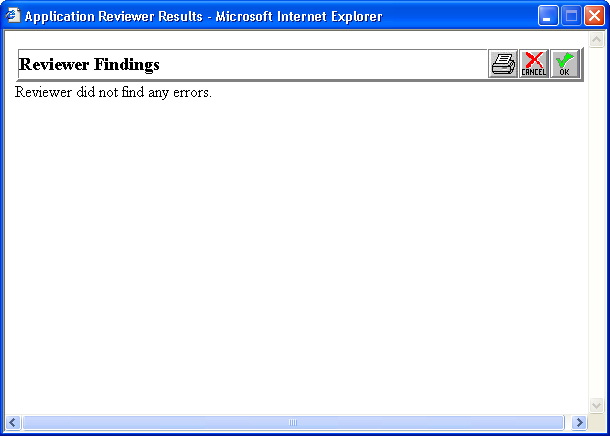
Figure 9.1 Application Reviewer
SECTION 9 – APPLICATION REVIEWER
In the Main Menu, click on Application Reviewer under Modify Application and this will show Figure 9.1
1. Review Findings should have no errors. If it does have errors it will tell you where they are located and you have to go in there and fix them before continuing.
2. Your application is complete at this point and you may request an official project number from FTA.
2. In the Main Menu, click on Comments/Concurrences under Modify Application to proceed to the next step in the application process

Figure 10.1 Comments/Concurrence
SECTION 10 – COMMENTS/CONCURRENCE
In the Main Menu, click on Comments/Concurrence under Modify Application and this will show Figure 10.1 This is where you can read any comments provided by FTA at any time during the application process. Application Status is also checked in this screen.
1. Select Ready for Proj # Assignment under Application Status.
2. Select OK
Note: A this point your application will be reviewed and assigned a project number, after which it is ready for submission.
3. In the Main Menu, click on Submit Application under the Applications drop down menu to proceed to the next step

SECTION 11- SUBMITTING AN APPLICATION
In the Main Menu, click on Submit Application under the Applications drop down and this will show Figure 11.1. Now you are ready to submit the application.
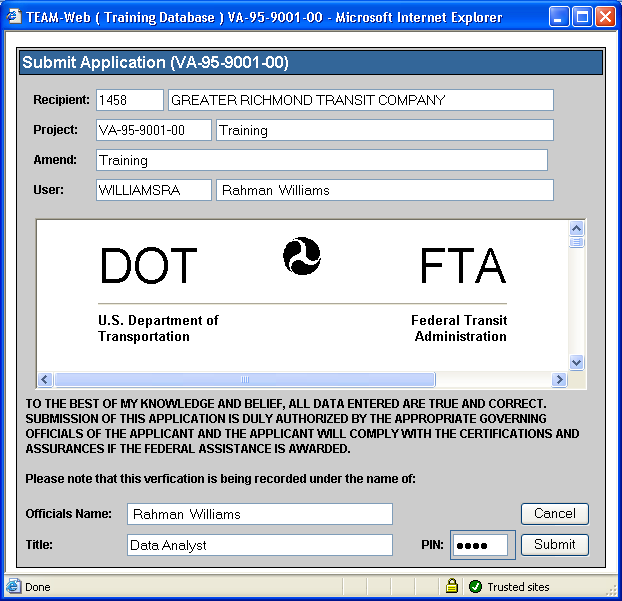
Figure 11.1 Submit Application
Note: The box in the middle of the screen contains all of the project information entered throughout the application process. Please review for any changes that need to be made prior to submitting.
1. In the lower right corn Enter PIN and select submit. You should see the screen in Figure 11.2.
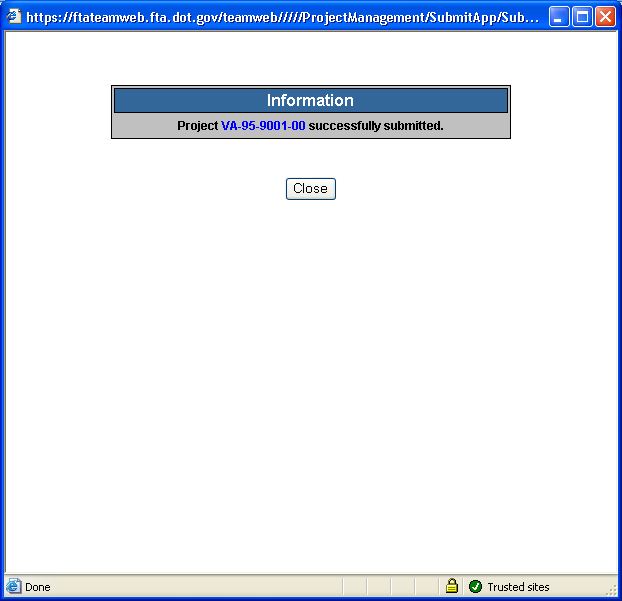
Figure 11.2
Note: Your project has been successfully submitted. If FTA has no issues with the submitted application and it gets all the necessary approvals and signoffs, then FTA will reserve and obligate funds for the project. The next step will be the Execution of the award.
2. In the Main Menu, select the plus sign next to execution and then select Execute Award to proceed to the next step.
SECTION 12 – EXECUTING THE AWARD
If you select the plus sign next to Execution from the Main Menu and then select Execute Award, you will see the screen shown in Figure 12.1, which defaults to the Summary tab. The summary tab gives you an overview of the project information.
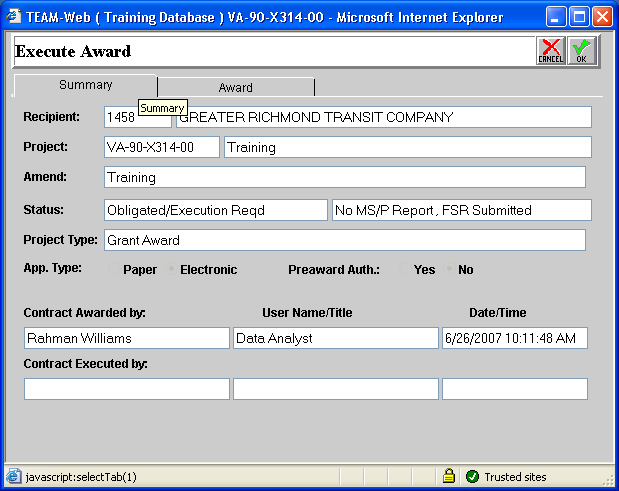
Figure 12.1 Summary
1. Select the Award tab (Figure 12.2)
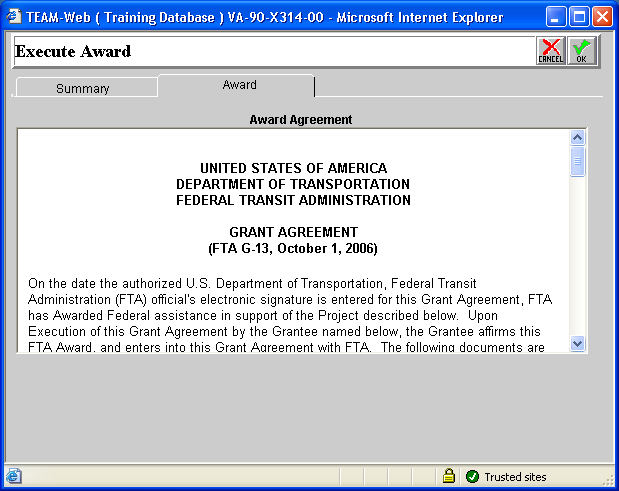
Figure 12.2 Award
Note: With in this tab there is a copy of the award agreement. This document should be looked over and examined for correctness. Once the award agreement is examined and the terms and conditions are understood it can be signed via PIN number.
1. Enter PIN number and select submit and that will complete the execution of the award. Execution of the award means that you have accepted the terms of the grant and can proceed to begin working on the project.
2. The next stage in the life of the project is Project Management, which should occur throughout the life of the project.
PROJECT MANAGEMENT
The Project Management phase of the grant/project primarily involves the submission of Financial and Milestone Reports throughout the life of the project. This is also where you make any revisions to the Project Budget as well as any changes to the Recipient Contact and FTA Project Manager.
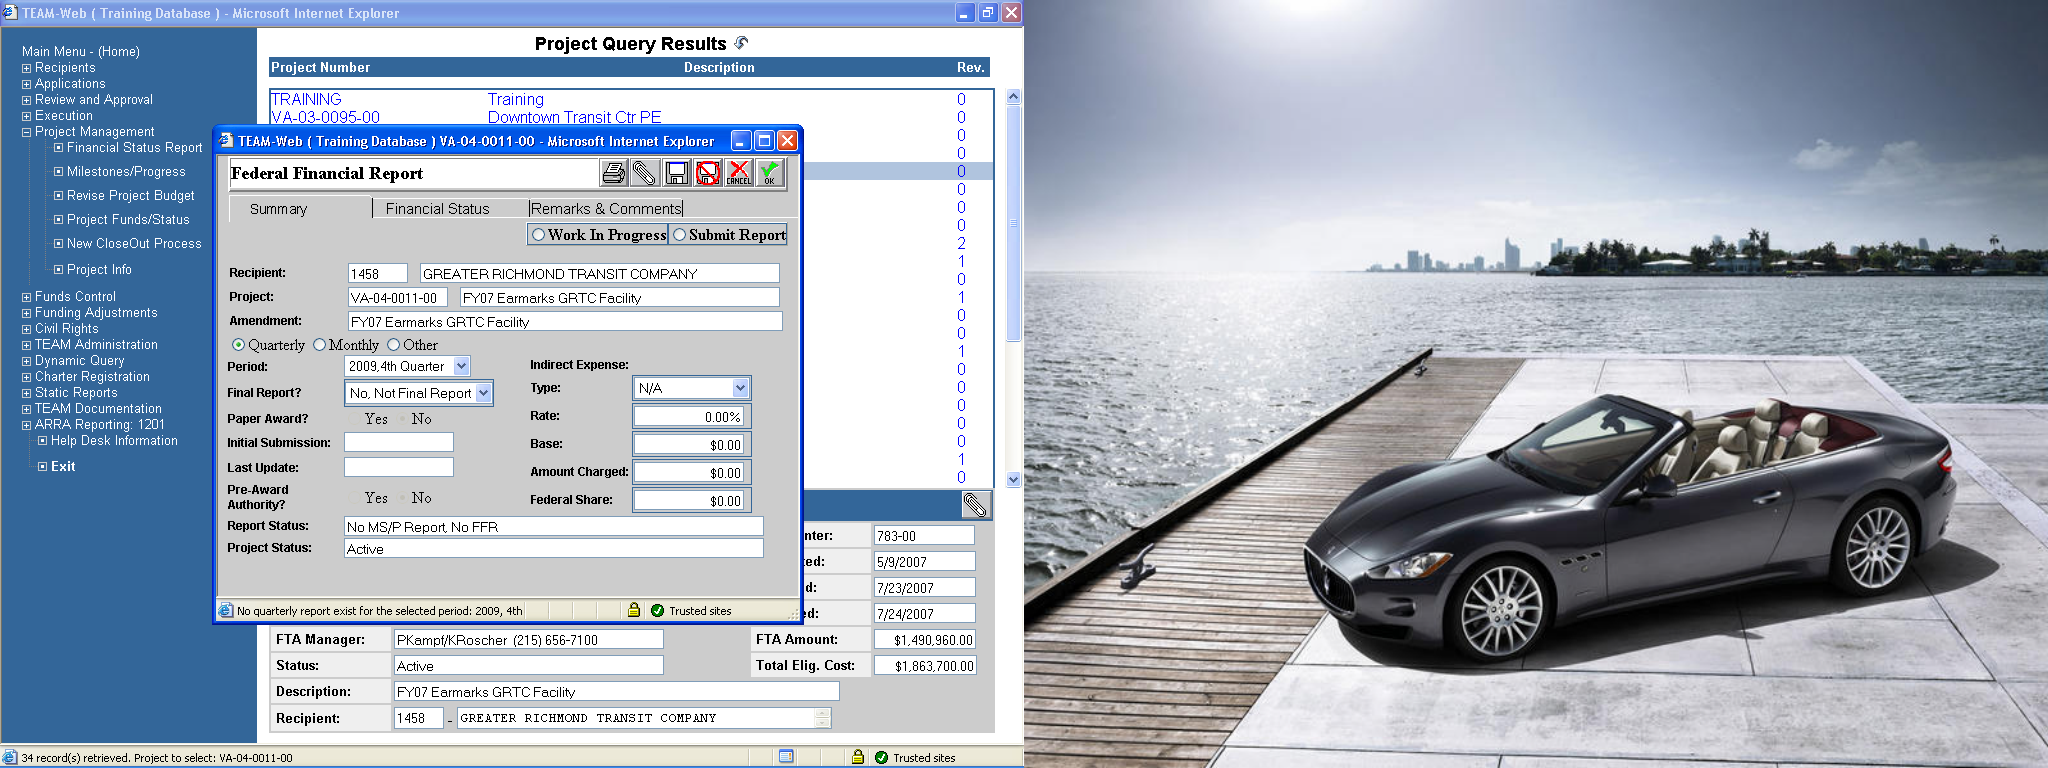
Figure 13.1 Summary
SECTION 13 –PROJECT MANAGEMENT/FEDERAL FINANCIAL REPORTING
1. Select the plus sign next to Project Management.
2. Select Federal Financial Report from the Project Management drop down menu.
(If your project is not available you must query by selecting the actual word Project Management. Enter your project number and submit query.)
13.1 Summary Tab
Note: The Summary tab shows a summation of a project as it relates to the Federal Financial Report.
1. Select the radio button next to Quarterly. This indicates the frequency at which this report will be submitted.
2. Next to Final Report use the drop down menu to select Yes, Final Report. Selecting Final Report is for the purposes of this training only. There are usually other interim reports before the final report.
3. Select Submit Report.
4. Select Financial Status tab to see Figure 13.2
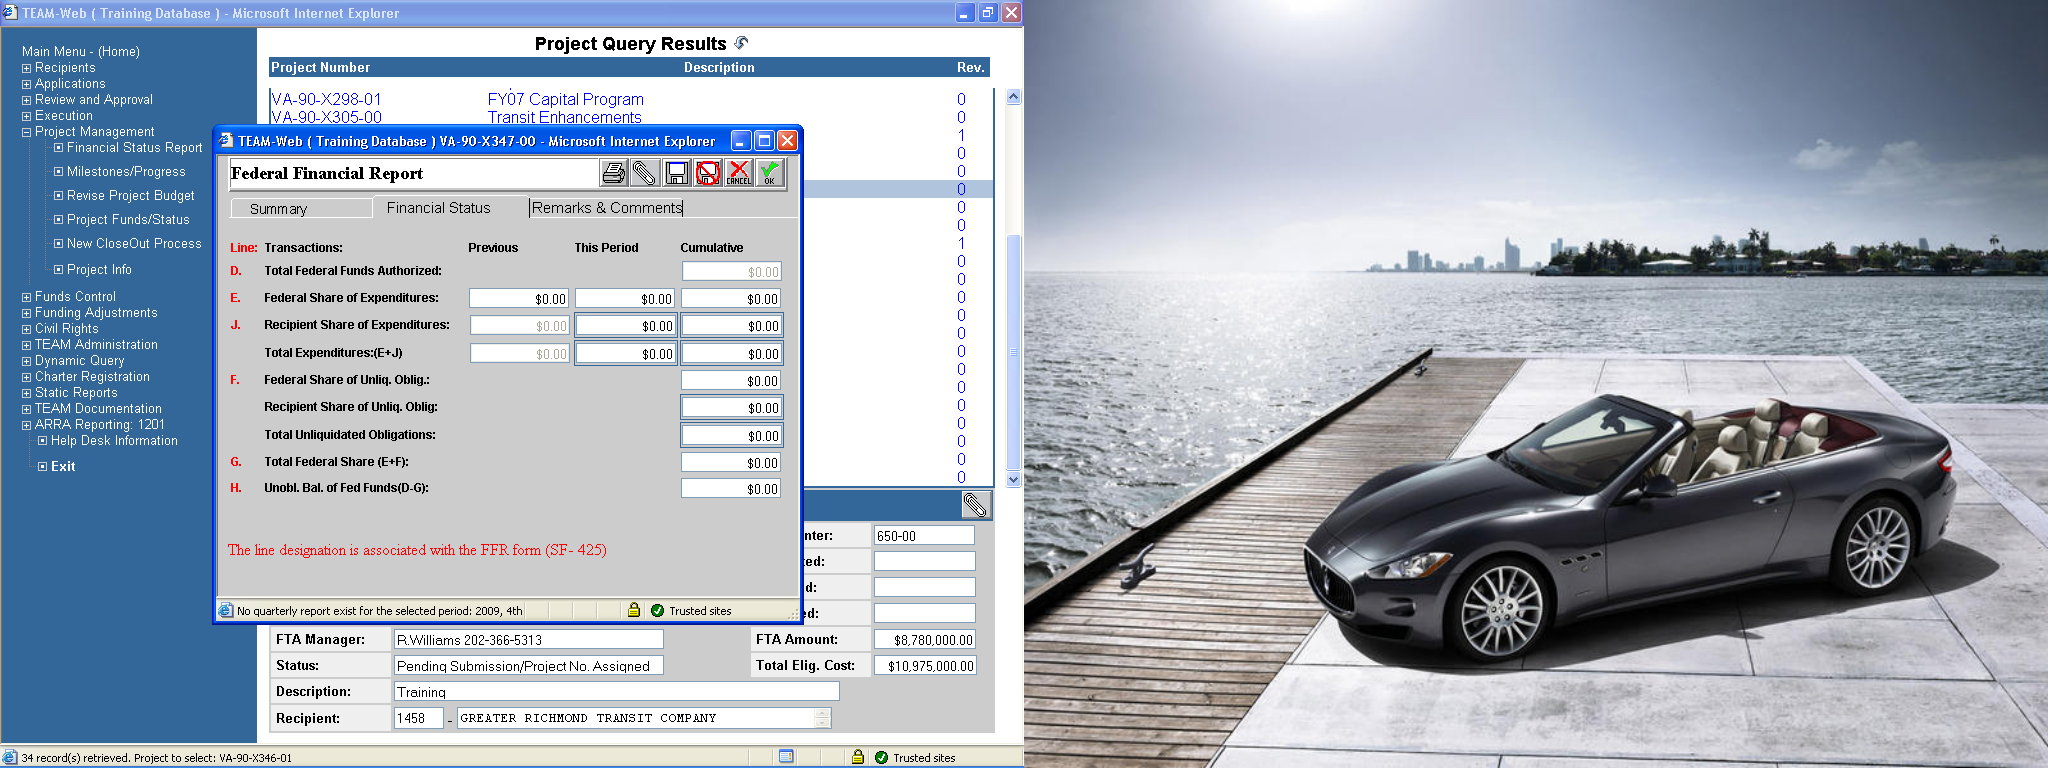
Figure 13.2 Financial Status
13.2 Financial Status Tab
1. In row J. Recipient Share of Expenditures This Period enter 2,195,000.
2. Select the Remarks & Comments tab to see Figure 13.3 and provide any detail comments.
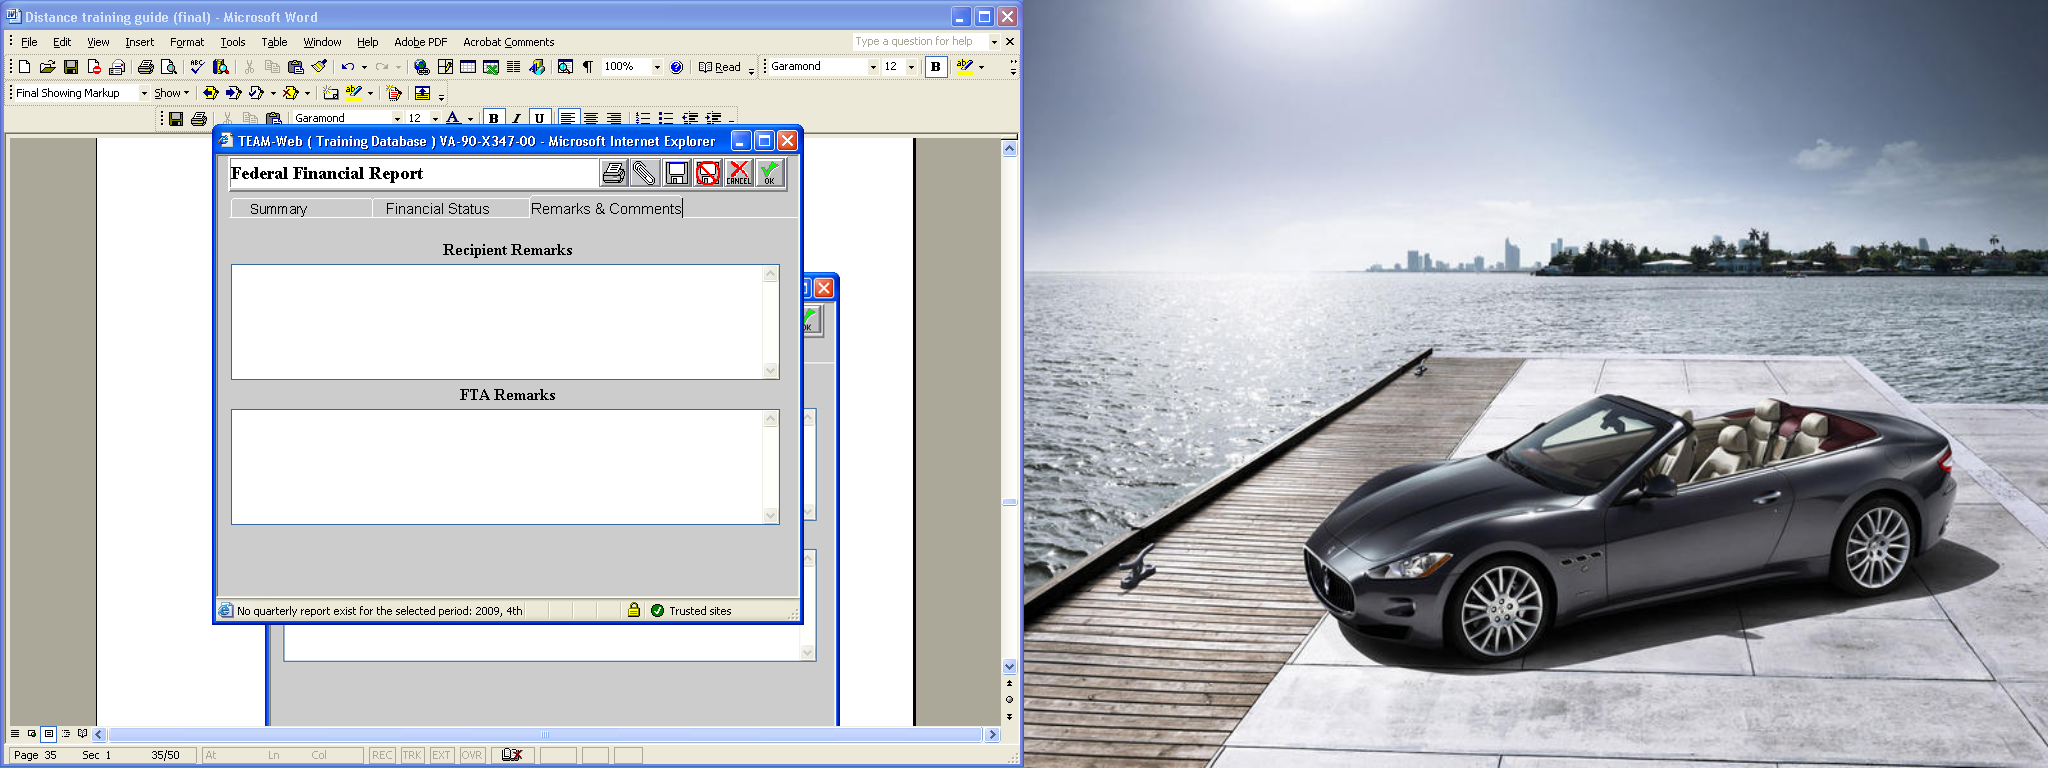
Figure 13.3 Remarks & Comments
13.3 Remarks & Comments Tab
. Selecting the Remarks & Comments tab shows Figure 13.3
1. Under Recipient Remarks enter any comments or remarks.
2. Select Ok.
3. Select Milestone Status Report from the Project Management drop down menu. to go to the Milestone Report screen
SECTION 14 –PROJECT MANAGEMENT/MILESTONE STATUS REPORTING
Selecting the Milestone Status Report from the Project Management drop down menu takes you to the Milestone Report screen. This is where you report milestone information. The screen initially defaults to the summary tab as shown in Figure 14.1.
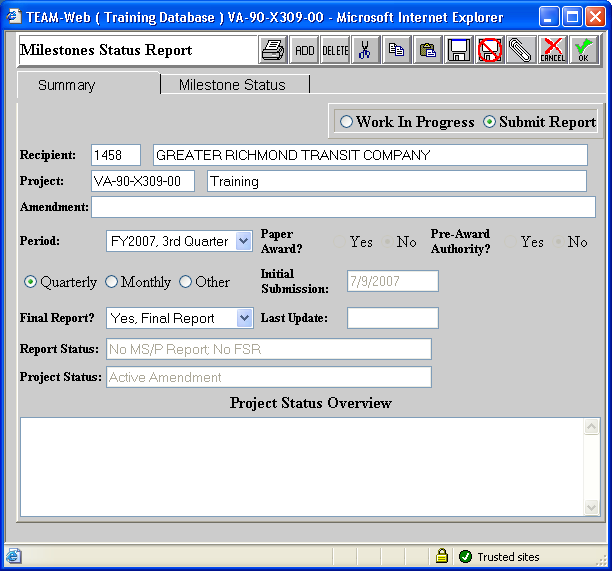
Figure 14.1 Summary
14. 1 Summary Tab
Note: The Summary tab shows a summation of a project as it relates to the Milestone Status.
1. Select the radio button next to Quarterly. This indicates the frequency at which this report will be submitted.
2. Next to Final Report use the drop down menu to select Yes, Final Report. Selecting Final Report is for the purposes of this training only. There are usually other interim reports before the final report.
3. In Project Status Overview enter in any information as it pertains to Milestones and the progress of a project.
4. Select Submit Report
5. Select Milestone Status tab.
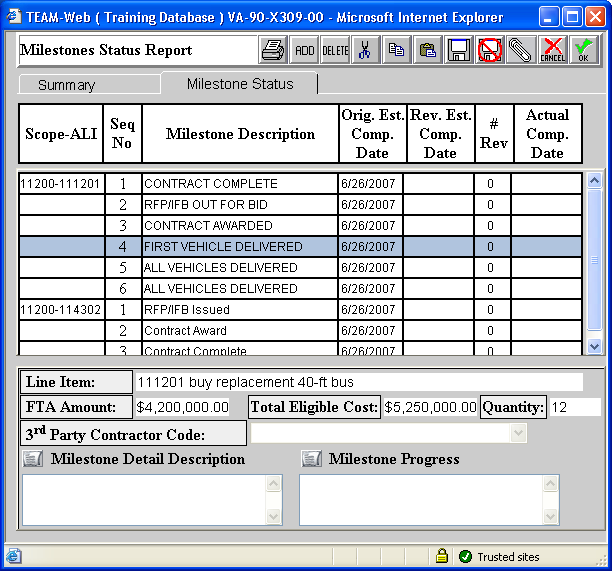
Figure 14.2 Milestone Status
14.2 Milestone Status Tab
Clicking on the Milestone Status tab will show Figure 14.2
1. Under Rev. Est. Comp. Date enter any revisions to the original estimated completion date if there is any to be made.
2. Under Actual Comp. Date enter the date of completion for any milestones.
3. Select Ok.
4.
SECTION 15 - PROJECT MANAGEMENT/PROJECT FUND STATUS
Selecting the Project Funds/Status from the Project Management drop down menu, will default to the Summary tab screen shown in Figure 15.1. All the screens under the Project Fund Status are read-only screens. Figure 15.2 shows the Project Funding tab information and Figure 15.3 shows the By Amendment tab information.
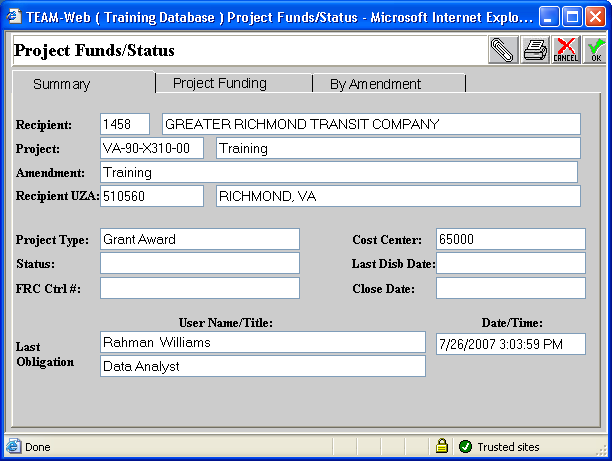
Figure 15.1 Summary
The summary tab is a general overview of the existing project.

Figure 15.2 Project Funding
2. The Project Funding tab gives a break down of the budget in the relative phases.
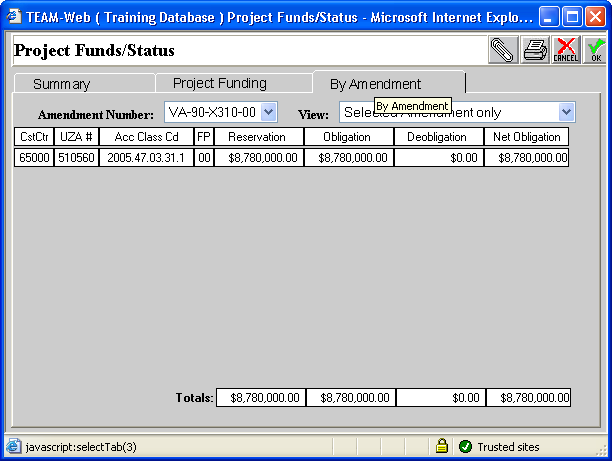
Figure 15.3 By Amendment
3. The By Amendment tab is similar to the Project Funding tab. This tab organizes budget information by amendment.
SECTION 16 - PROJECT MANAGEMENT/PROJECT INFO
Selecting the Project Info from the Project Management drop down menu will default to the screen shown in Figure 16.1. If there is ever a need to change the Recipient Contact information or/and the FTA Project Manager information, his is done in this screen.
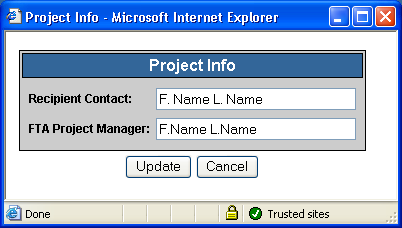
Figure 16.1 Project Info
Replace the Recipient Contact/FTA Project Manager with the new name in the desired field
Select update
SECTION 17 - PROJECT MANAGEMENT/PROJECT CLOSEOUT
Once, the project has been completed and the final financial status and final milestone reports have been submitted, you are then ready to close the project.
Select New Closeout Process from the Main Menu under Project Management to proceed to closeout. If your project is not already showing, you must query by selecting the actual word Project Management. Enter your project number and submit query. Then Select New Closeout Process. You will see Figure 17.1
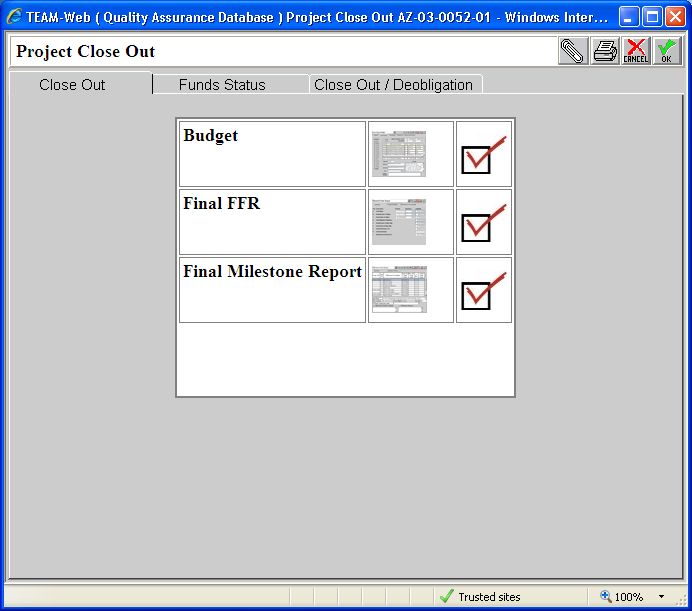
Figure 17. 1 Close Out
17.1- Close Out Tab
1. Select the screen shot in which there are errors present.
Note: Errors are indicated by an x.
2. Proceed to correct the problems by using the information provided.
3. Select Funds Status Tab.
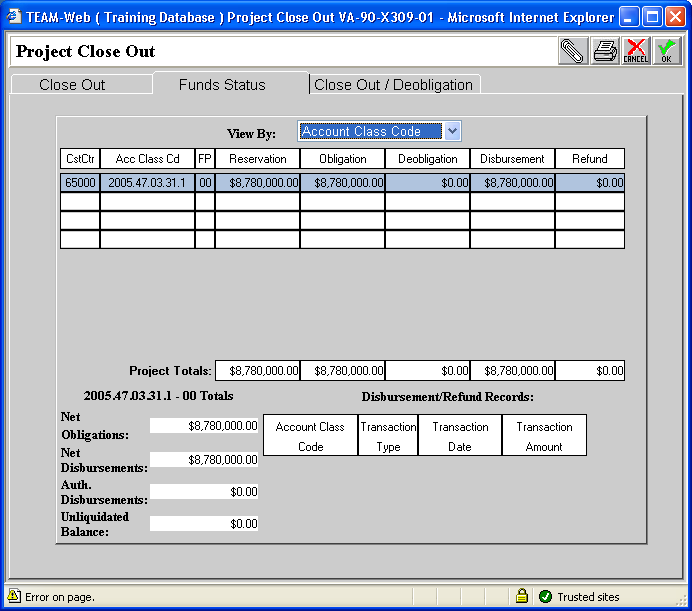
Figure 7.13 Funds Status
17.1 Fund Status Tab
Note: Funding Status can be organized by Account Class Code or by Cost Center by using the View By drop down menu. This is a read only screen.
1. After funds are reviewed select Ok.
SECTION 18 - PROJECT MANAGEMENT/REVISE PROJECT BUDGET
Budget revisions are some times necessary during the life of a project. Some of the circumstances under which budget revisions are done include revision of the Activity Line Item (ALI) quantities and redistribution of funds among the ALIs as long as there is no change in scope or total FTA amount.
Select Revise Project Budget from the Main Menu under Project Management. If your project is not already showing, you must query by selecting the actual word Project Management. Enter your project number and submit query. Then Select Revise Project Budget. This will default to the Summary Tab in Figure 18.1.
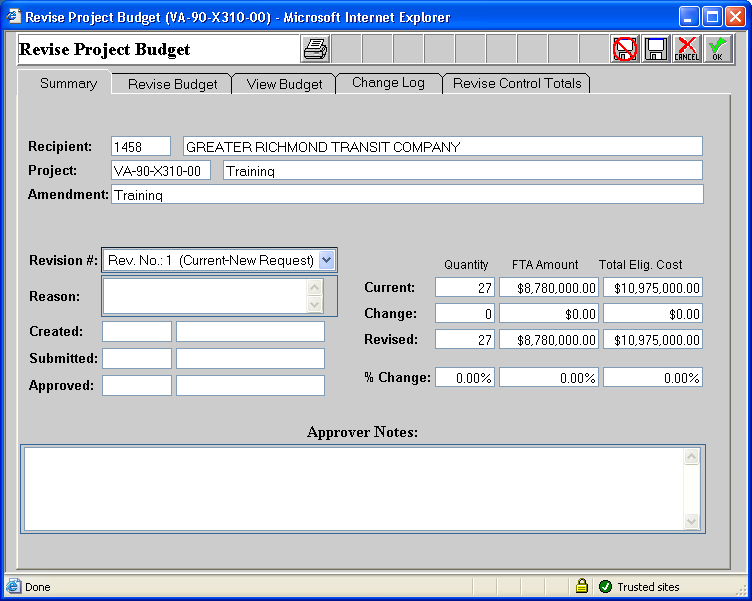
Figure 18.1 Summary
18.1 Summary Tab
From the Summary Tab screen in Figure 18.1:
Select the Revision # from the drop down menu.
Give a reason for this revision in the notation box next to Reason.
Approval notation should be made in Approver Notes.
Select Revise Budget Tab.
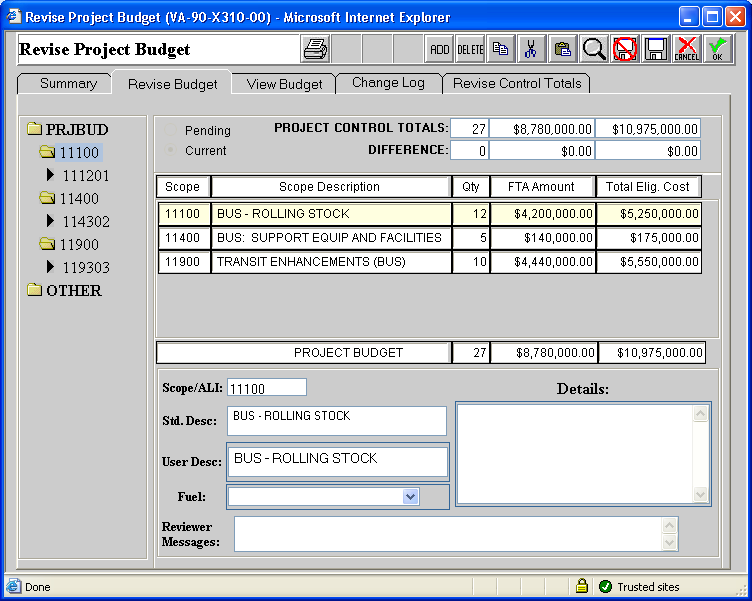
Figure 18.2 Revise Budget
18.2 Revise Budget Tab
Clicking on the Revise Budget Tab shows Figure 18.2.
Select the necessary Activity Line Item (ALI) under PRJBUD.
Make the changes to the FTA Amount and Total Eligible Cost.
Select View Budget.
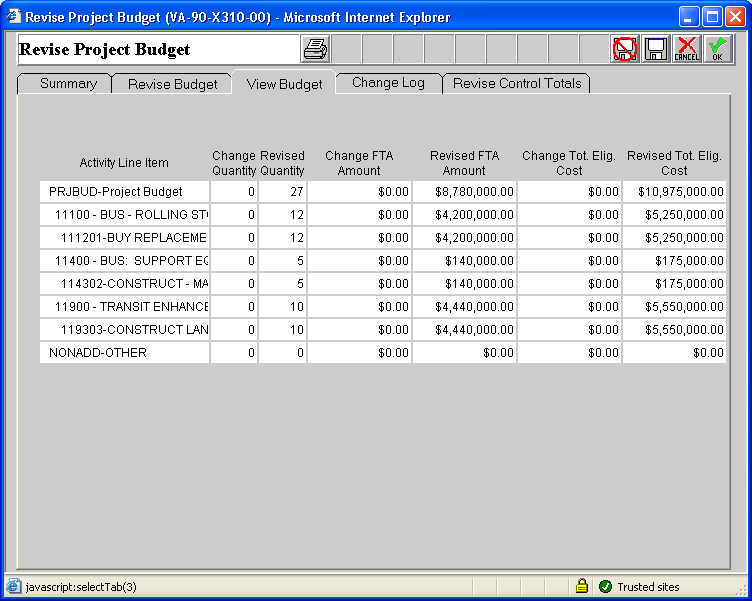
Figure 18.3 View Budget
18.3 View Budget Tab
Selecting the View Budget Tab shows Figure 18.3. This screen is a detailed read-only spread sheet that gives budget revision details. After reviewing select Change Log.
18.4 Change Log
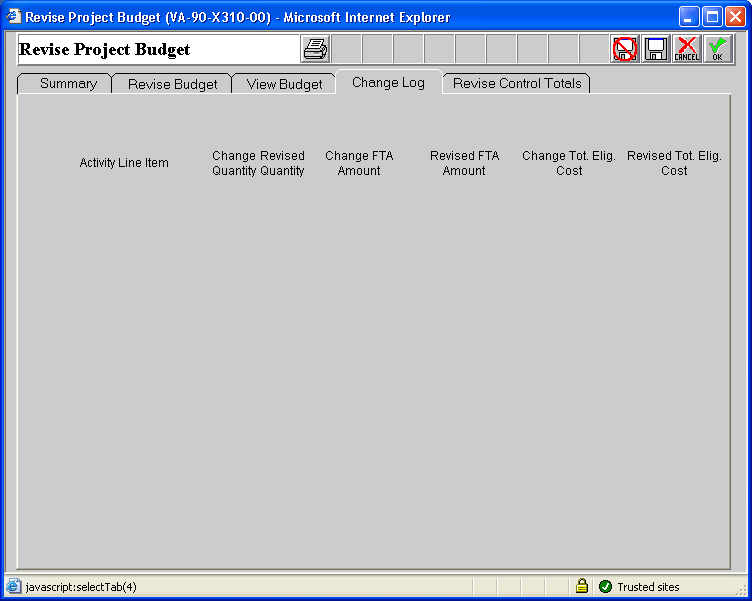
Figure 18.4
Note: The change log tab is were a log consisting of changes to a project are documented.
18.5 Revise Control Totals
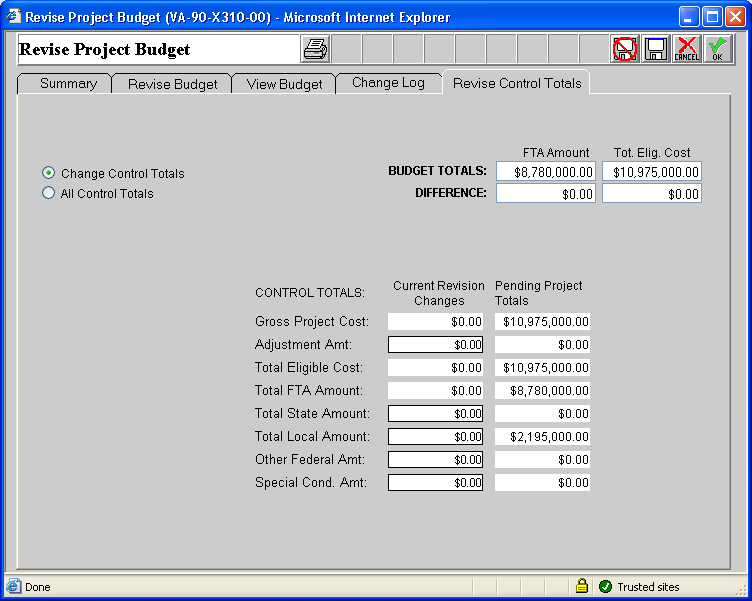
Figure 18.5 Revise Control Totals
Make the necessary adjustments to the control totals.
Select ok
SECTION 19–VIEWING AND REVISING PROJECT INFORMATION
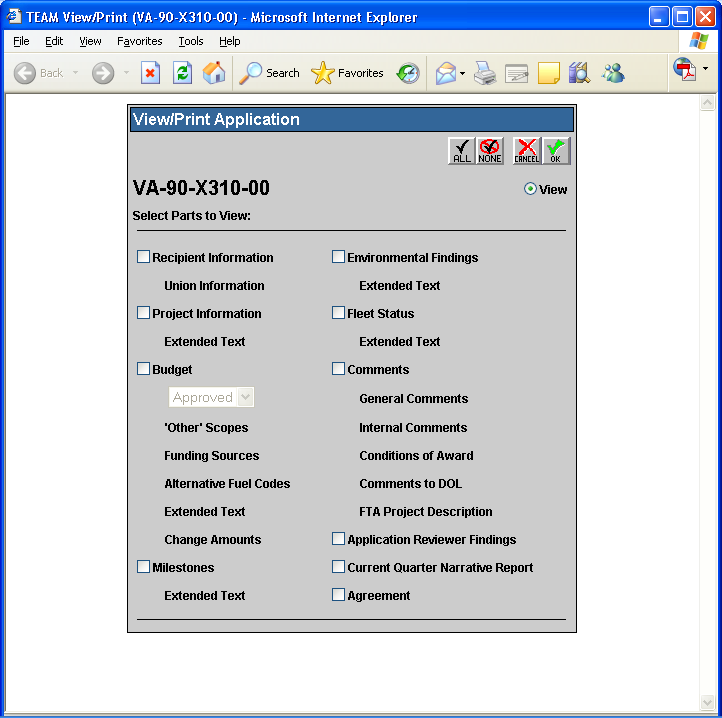
Figure 19.1 View/Print
Select View/Print from the main menu under Applications to see Figure 19.1.
Select All to view the document in its entirety or select the individual items you would like to view.
Select Ok to see Figure 19.2.
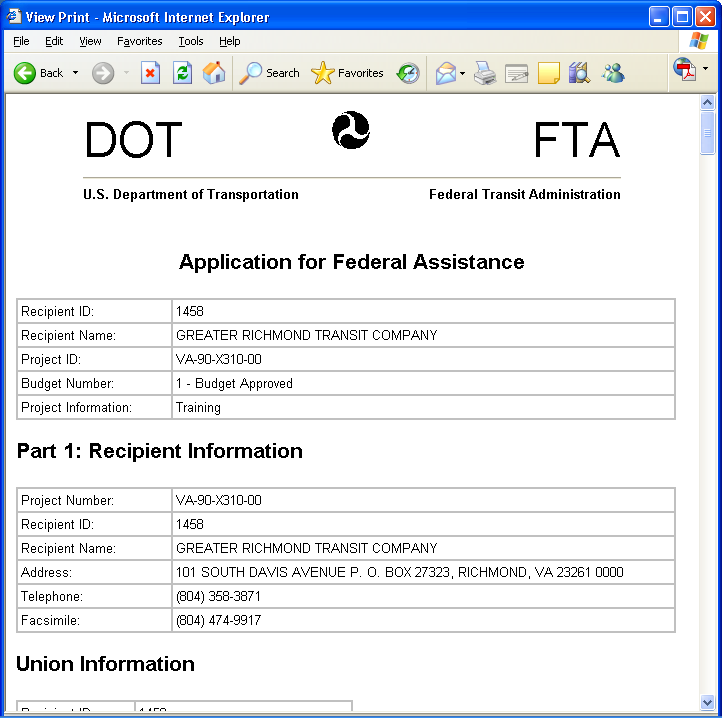
Figure 19.2 Application for Federal Assistance
Note: You can review all aspects of a project.
| File Type | application/msword |
| File Title | Login: |
| Author | rahman.williams |
| Last Modified By | sylvia.marion |
| File Modified | 2010-12-16 |
| File Created | 2010-12-16 |
© 2026 OMB.report | Privacy Policy