Chronic Care Improvement Program and Medicare Advantage Quality Improvement Project
Chronic Care Improvement Program and Medicare Advantage Quality Improvement Project
CMS-10209.QIP User Guide for OMB 05-31-12
Chronic Care Improvement Program and Medicare Advantage Quality Improvement Project
OMB: 0938-1023
Health Plan Management System Quality Improvement Project (QIP)
Last Updated (5/31/2012) |
Table of Contents
I. Getting Started 4
How to Access HPMS Home Page Using the Internet 5
How to Access HPMS Using the CMSNet 6
How to Access the HPMS Plan Reporting Module 8
II. Plan 11
III. Do 30
Appendix I: Contact Information.…...…………………………………………………………………………..59
Appendix II: Glossary of Terms.………………………………………………………………………………...60
Introduction
All Medicare Advantage Organizations (MAOs) must conduct a Quality Improvement Project (QIP) as part of their required Quality Improvement (QI) program. The QI program must include a health information system to collect, analyze, and report quality performance data as described in 42 CFR §422.516(a) and §423.514 for Parts C and D, respectively. The QIP will measure and demonstrate improvement in health outcomes and beneficiary satisfaction.
MAOs may conduct a single QIP for all non-special needs coordinated care plans offered under a contract. However, MAOs must identify a unique QIP for each Special Needs Plan (SNP) offered, including multiple SNPs of the same sub type. For example, if a MAO offers multiple Dual-eligible SNPs (D-SNPs) under a single contract, that MAO must identify a unique QIP for each D-SNP offered that appropriately addresses the target population.
MAOs must submit the QIP(s) to the Centers for Medicare & Medicaid Services (CMS) and report progress annually for review. CMS will release submission deadlines on an annual basis.
.
For CY 2012, CMS is requiring that each MA plan conduct a QIP focused on reducing hospital readmission rates. This project is to be implemented over a 3-year period. At this time, CY 2012 QIP submissions will include the Plan section only. The Do, Study, and Act sections will be submitted during a time period to be specified in the future based on the baseline data collected during 2012. Note that MAOs may submit other QIPs in addition to the QIP topic required by CMS. MAOs have the discretion to specify the expected timeframe for these additional QIPs depending on the topic selected, interventions involved, or other factors.
The Health Plan Management System (HPMS) QIP Module serves as the means for MAOs to submit and report on their QIPs to CMS. QIP reports will serve as a summary of a full QIP. The QIP module allows MAOs to report on the QIP throughout the entire life cycle of the QIP as defined below:
Plan (Chapter II) – describes the processes, specifications, and output objectives used to establish the QIP;
Do (Chapter III) - describes how the QIP will be conducted, the progress of the implementation, and the data collection plan;
Study (Chapter IV) – describes and analyzes findings against targets or goals and identifies trends over several PDSA cycles that can be utilized for the “Act” stage;
Act (Chapter V) – summarizes action plan(s) based on findings, describes, in particular, the differences between the actual and planned results, and provides information regarding any changes based on actions performed to improve processes and outcomes, including a short description of actions performed.
The module also gives MAOs the ability to Copy QIP sections from one plan to another, as long as certain conditions exist, and to Upload supporting documentation.
In addition, the Gates link is provided to the MAOs to access the latest QIP submission window (open/close) timeframes.
This document provides an overview and technical instructions for accessing HPMS and navigating through the QIP module. General information about the QIP and QI program requirements can be found on the CMS Quality website at www.cms.gov\quality. Please note that words available in the Glossary have been italicized. Please also note that Screen Prints (or screens) contained in this User’s Manual are not intended to display complete functionality and are for demonstration purposes only.
NOTE: The HPMS screenshots in this User Guide refer to the CY 2011 QIP module; however, please note that these screenshots are also applicable to the CY 2012 QIP module.
Accessing HPMS
The HPMS/QIP Module is hosted on a secure extranet site that users can access via the Internet using a Secure Sockets Layer (SSL) Virtual Private Network (VPN). Users can also access the HPMS/QIP Module by dial-up or CMSNet.
HPMS URLs:
For the CMS SSL VPN portal: https://gateway.cms.hhs.gov.
For CMSNet: https://hpms.cms.gov/
Contact the system administrator to access the CMSNet if the connection is not available.
CMS User IDs
Users must have a CMS-issued User ID and password with HPMS access in order to log into the system. Users will also need to associate their User ID with the contract numbers that they will work with in HPMS.
To obtain a new CMS User ID complete a CMS User ID request form, download and print from: http://www.cms.gov/InformationSecurity/Downloads/EUAaccessform.pdf?
This form includes a location for applicants to list the contract numbers to be associated with the requested User ID. Completed CMS User ID forms must be submitted to CMS at the following address:
CMS
Attn: Lori Robinson
7500 Security Boulevard
Mailstop C4-18-13
Baltimore, MD 21244-1850
If existing HPMS users need to associate a contract number to their current CMS User ID, please include the following information in an email to [email protected]:
User Name,
CMS User ID,
Current Contract Number(s), and
Contract Number(s) to be added.
All questions related to HPMS user access should be directed to [email protected].
How to Access the HPMS Home Page Using the Internet
Step 1
Open the web browser (e.g., Internet Explorer) and enter the CMS SSL VPN gateway address https://gateway.cms.hhs.gov in the Address field.
Step 2
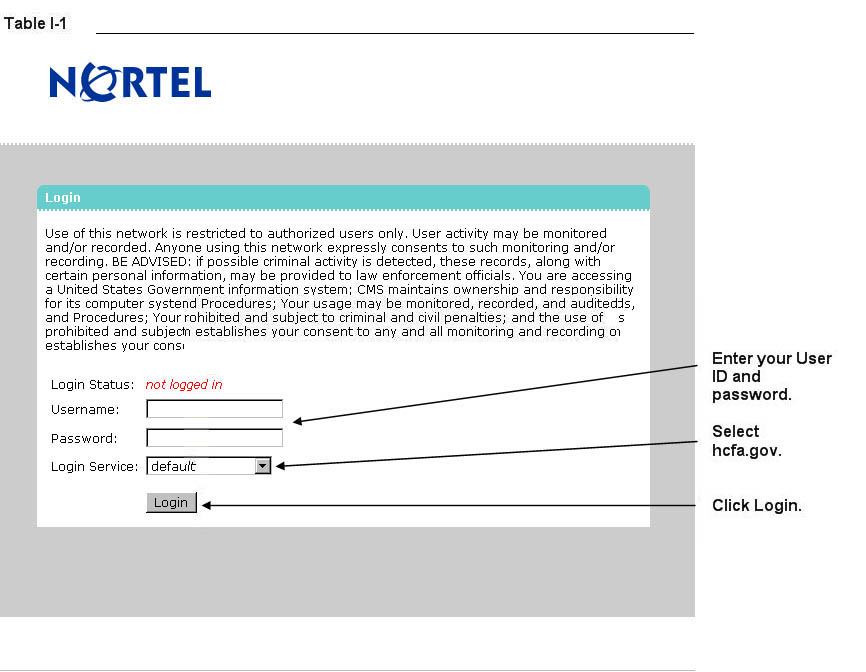
Enter the CMS User ID and password and select “hcfa.gov” as the login service. Click Login (Table I-1).
Step 3
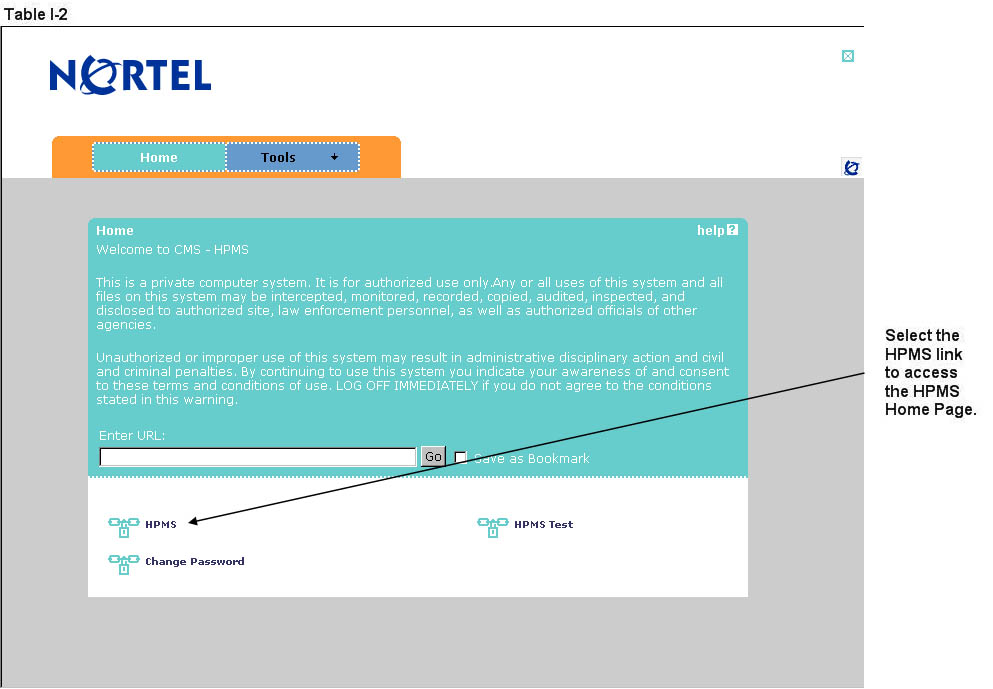
Select the HPMS link from the SSL VPN portal screen to access the HPMS Home screen (Table I-2).
How to ACCESS HPMS Using the CmsNet
Step 1
Open the web browser (e.g., Internet Explorer) and enter the CMSNet address https://hpms.cms.gov in the Address field.
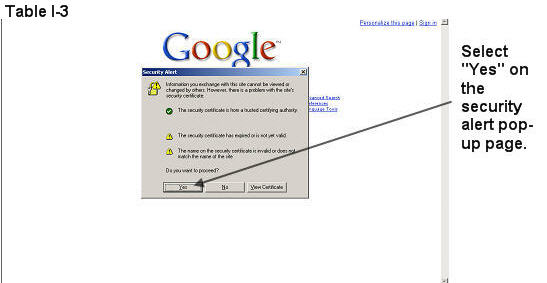
Select Yes on the Security Alert pop-up window (Table I-3).
Step 2
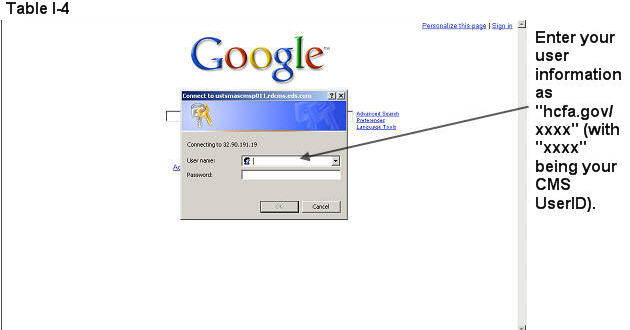
Enter the User Name as hcfa.gov/xxxx – where “xxxx” is the 4-digit CMS User ID. Enter the password and select OK (Table I-4) to access the HPMS Home screen.
Step 3
Select the HPMS link from the SSL VPN portal page to access the HPMS Home screen (Table I-2).
How to Access the HPMS Plan Reporting Module
All information requested as part of the HPMS QIP Module must be completed unless otherwise noted.
Step 1
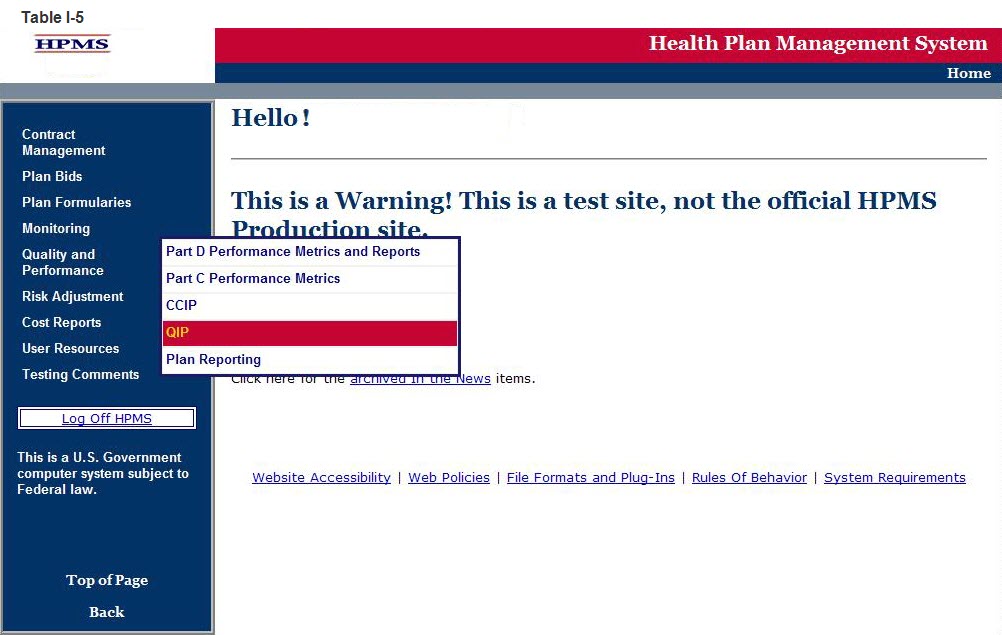
Select Quality and Performance on the Left Navigation Bar then select QIP on the fly-out menu (Table I-5) to get to the QIP Contract Year selection screen (Table I-6).
Step 2
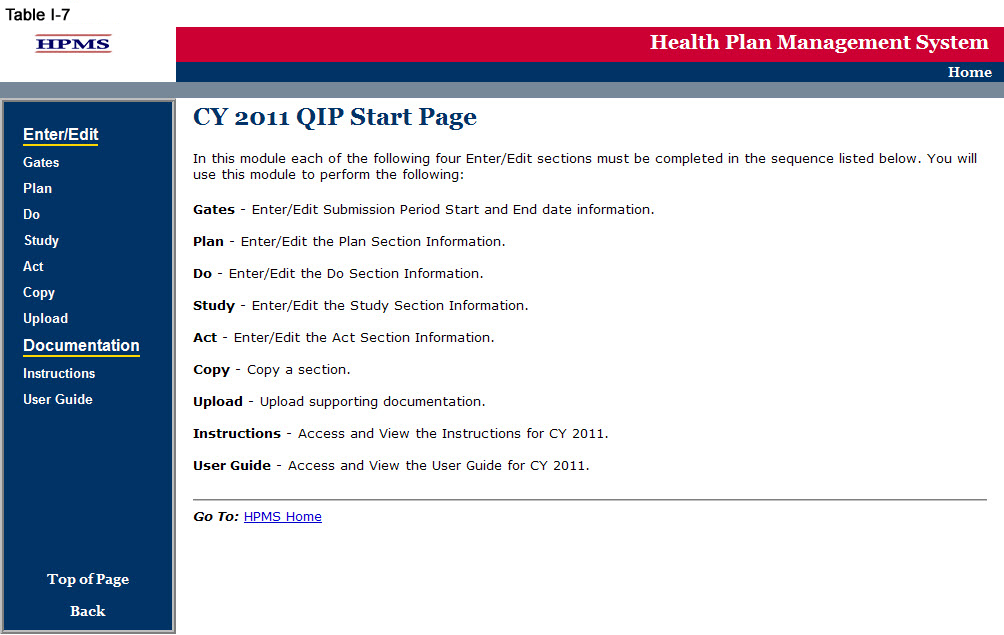
Select the contract year in the QIP Contract Year selection screen (see Table I-6) to get to the QIP Start Page screen (Table I-7).

GATE
The GATES link (Table I-7) allows users to view the latest QIP Submission window (gate open/closed) information.
Step 1
On the QIP Start Page (Table I-7) click on the Gates link on the Left Navigation Bar to get to the CY 2011 QIP - Gates screen (Table I-8). Note that on the sample screen in Table I-8, all components of the QIP cycle are indicated to be open for submittal during the dates shown.

The PLAN functionality allows users to describe the QIP and outline the expectations, basic approach, and intervention(s) that the user will further describe in the Do, Study, and Act sections. The ‘PLAN Section’ demonstrates an improvement opportunity (i.e. target goal), identifies what change(s) will be introduced (i.e. intervention), who will be involved (i.e. target audience), and the expected results (i.e. anticipated outcomes). The steps should include the development of a comprehensive, well-organized, consistent, and logical plan that is expected to improve health outcomes and enrollee satisfaction.
Please note the following information:
If the user is submitting a CY 2012 QIP, only the ‘PLAN Section’ will be available to fill out at this time. A CY 2012 QIP submission will be complete once the ‘PLAN Section’ has been completed since this is a new submission.
For CY 2012 QIP submissions, the user will not be able to edit the ‘PLAN Section’ once it has been approved by the respective CMS account manager.
The user will be unable to select a QIP topic from the ‘DO Section,’ ‘Study Section,’ and ‘ACT Section,’ if the ‘PLAN Section’ has not been completed. This is because topics that appear are aligned with those that are established by the user in the ‘PLAN Section.’
Step 1
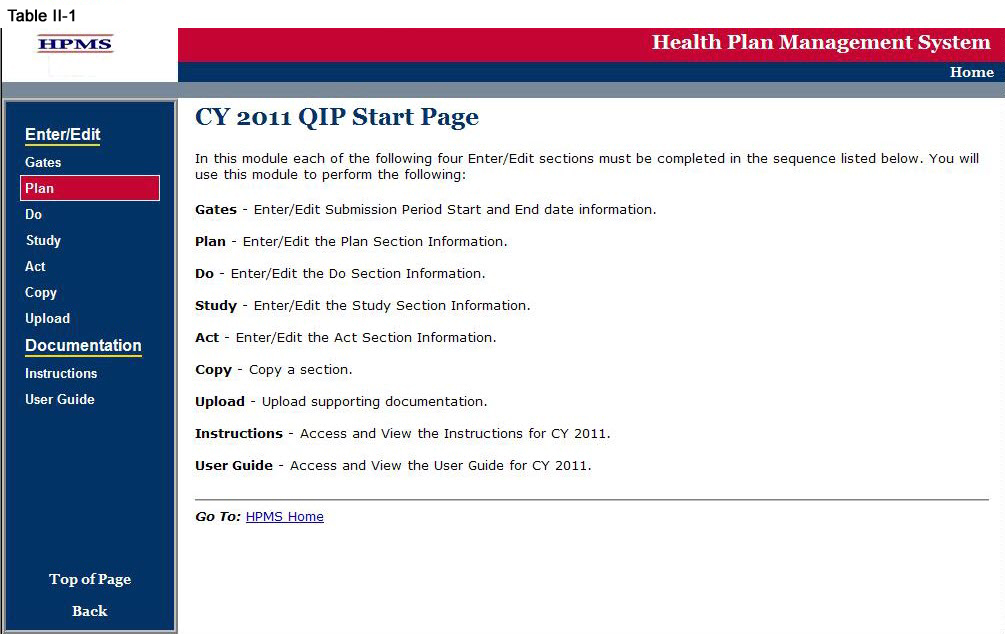
As shown in Table II-1, on the QIP Start Page click on the Plan link on the Left Navigation Bar to get to the Contract/Plan/Topic Selection screen. (See above Chapter I: Getting Started for help getting to the QIP Start Page.)
Step 2
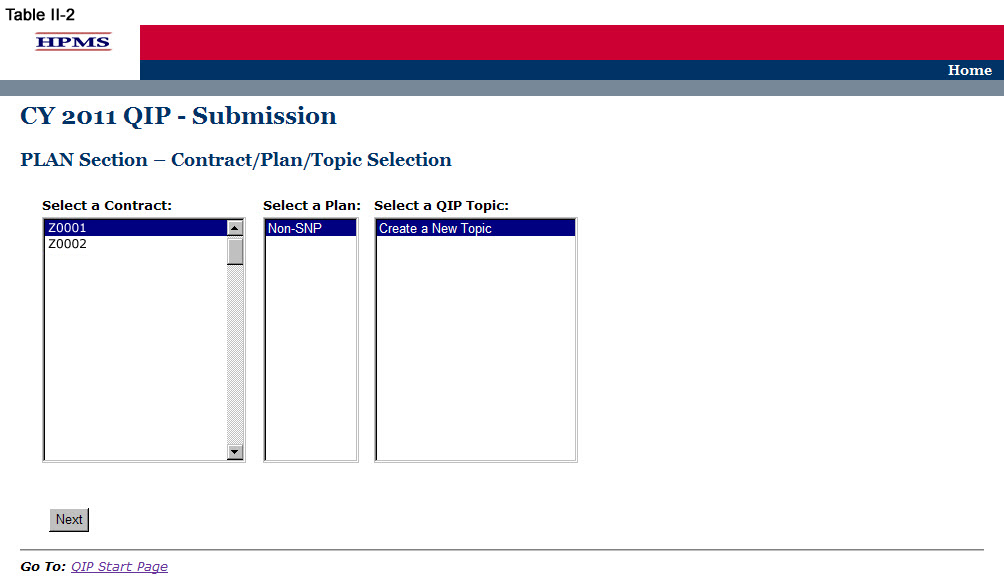
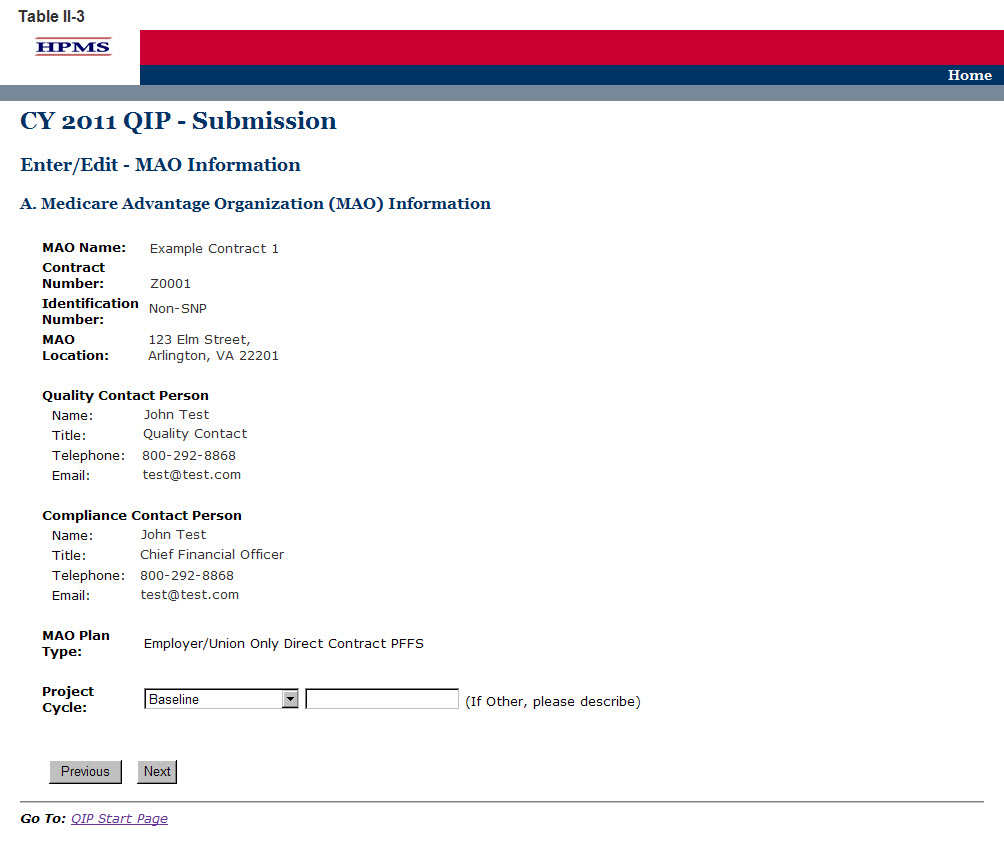
On the Contract/Plan/Topic Selection screen (Table II-2) first select a contract. Once the contract is selected, the screen will automatically refresh to show available plans. Users must create a unique QIP for each of the SNPs offered under a contract based on the SNP’s target population. The SNPs are identified by their plan number. However, users may create the same QIP for all of the non-SNP coordinated care plans offered under a contract. The non-SNP coordinated care plans under each contract are identified as ‘Non-SNP.’ Either select an existing topic or select ’Create a New Topic,‘ and then click Next, which will take the user to the MAO Information screen (Table II-3).
Step 3
The MAO Information screen (Table II-3) will default to MAO information that was already entered in HPMS for that particular plan. At the bottom of the screen use the dropdown box to select the appropriate ‘Project Cycle’ and then click Next to get to the QIP Topic screen.
The ‘Project Cycle’ dropdown box will consist of the following options to choose from:
Baseline – Select this option when submitting the initial QIP.
Year 1 – Select this option when submitting information after the first year (or baseline) of data has been collected. This will be the first submission to the Do, Study, and Act sections.
Year 2 – Select this option when submitting information after the second year of data has been collected.
Year 3 – Select this option when submitting information after the third year of data has been collected.
Other – Select this option for any additional years of study as applicable.
Note: If the information on the Quality Contact Person or the Compliance Contact Person is incorrect, the MAO must edit that contact information using the Set-Up Plans function in HPMS. Instructions on how to update contact information is contained in the Bid Submissions User’s Manual.
Step 4
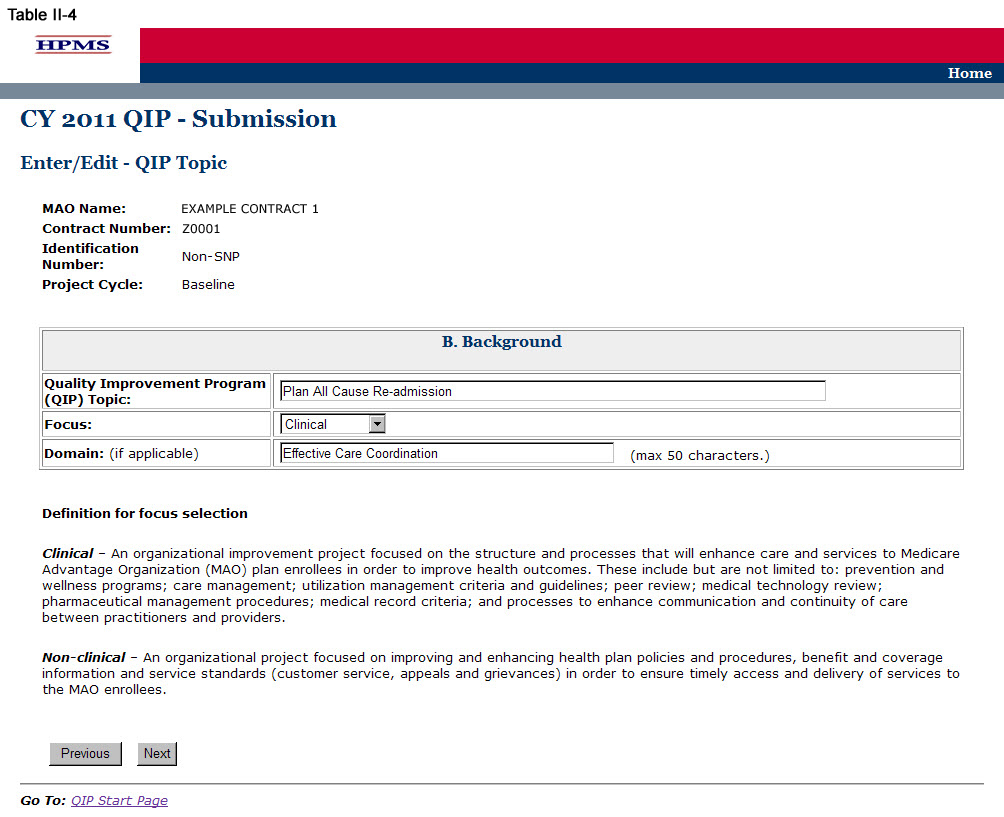
On the QIP Topic screen (Table II-4) enter the name of the QIP Topic, indicate whether the project Focus is ‘Clinical’ or ‘Non-Clinical’, and if applicable, enter the ‘Domain.’ Then click Next to get to the PLAN Section (C) screen.
The name of the QIP Topic must be unique for each QIP. A ‘Domain’ will represent an area of focus for the QIP, and serves as a basis for development of the QIP topic that aligns with the National Quality Strategy to help the MAO develop QIPs that will result in improved enrollee satisfaction and health outcomes.
Step 5
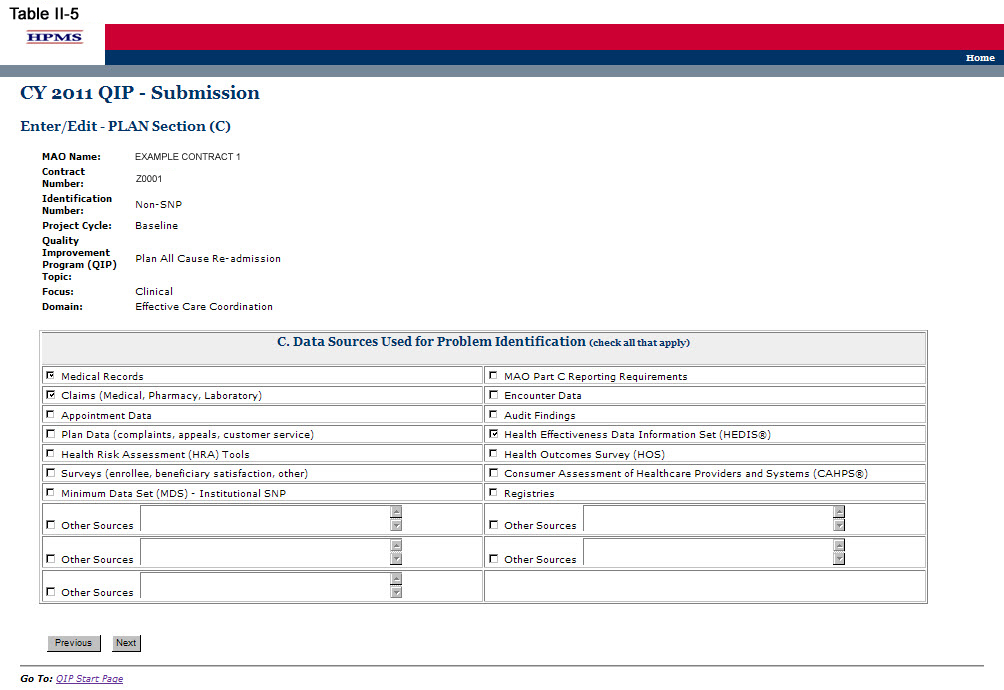
On the PLAN Section (C) screen (Table II-5) use the form displayed on the screen to describe the applicable data sources used for problem identification. Note the additional fields in which the user may include “other sources” of data that may apply. Then click Next, which will take the user to the PLAN Section (D) screen (Table II-6).
Step 6
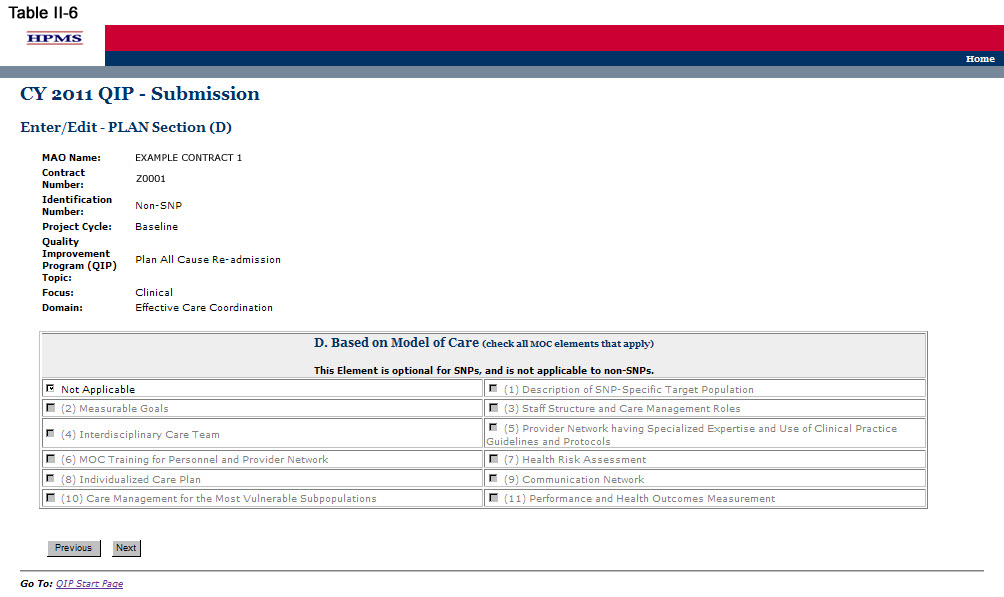
On the PLAN Section (D) screen (Table II-6) use the form displayed on the screen to describe any Model(s) of Care (MOC) elements the QIP is based on. Then click Next, which will take the user to the PLAN Section (E) screen (Table II-7).
Note: PLAN Section (D) is optional for SNPs, as the QIP may directly relate to the established MOC for that SNP. However, this component of the reporting module is not applicable to non-SNP plan types because the MOC is unique to MA SNP products. If a SNP elects to implement a QIP based on an element of its MOC, the user must complete this section and must identify the specific element of the MOC that the project is focusing on by checking all that apply. If the SNP’s QIP is not based on the MOC or if this is a non-SNP plan type, the user must select “Not Applicable.”
Step 7
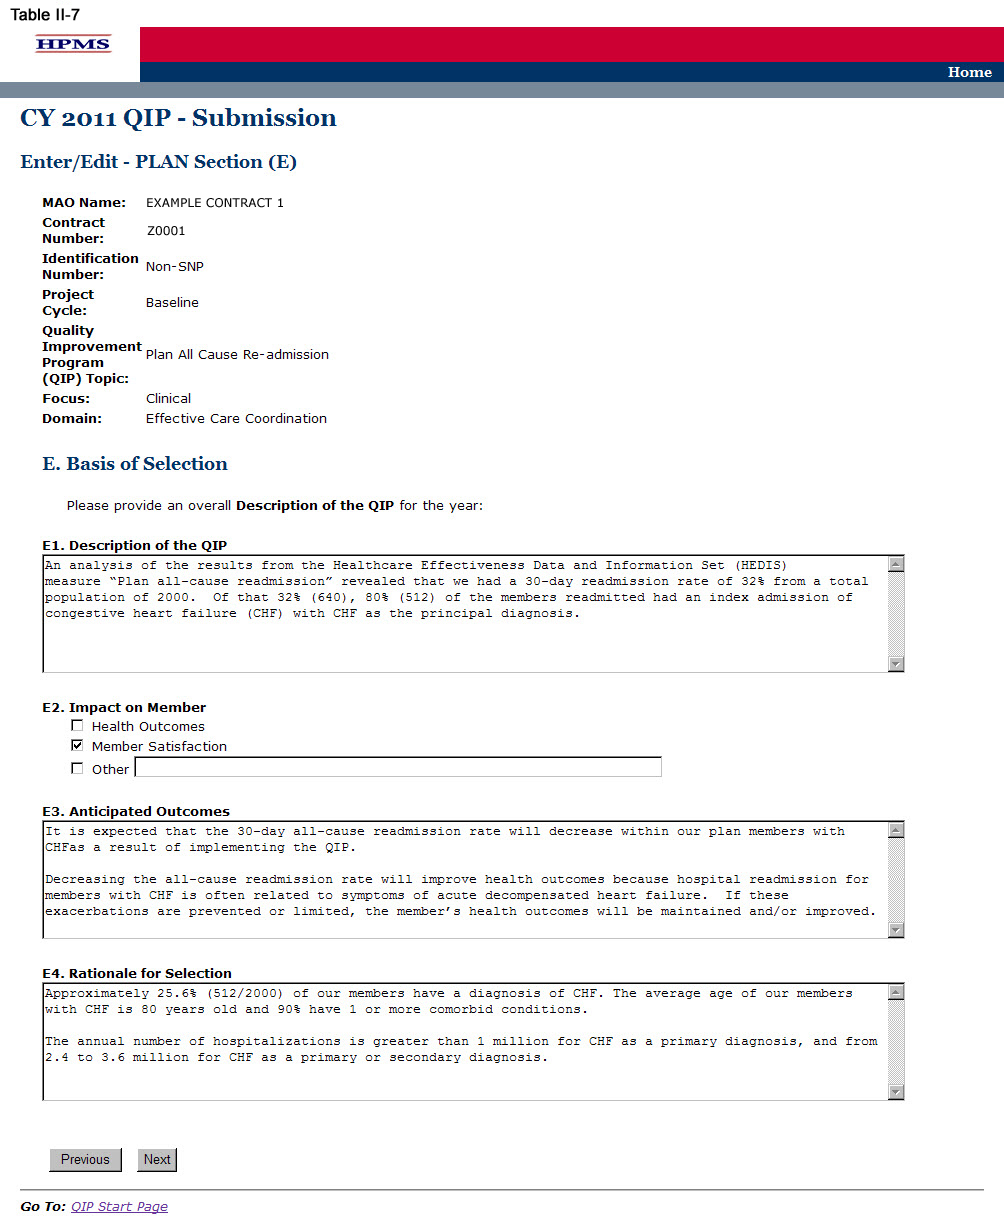
On the PLAN Section (E) screen (Table II-7) use the form displayed on the screen to describe the QIP, the member impact, the anticipated outcomes, and the rationale for the selection. Then click Next, which will take the user to the PLAN Section (F) screen (Table II-8).
In the “Description of the QIP” element (E1) provide a detailed and in-depth description of the QIP that includes: 1) the identified opportunity for improvement; 2) the methodology utilized by the plan to determine the opportunity for improvement; 3) the data source(s) utilized in determining the QIP; 4) an estimate of the number of MA plan individuals affected by the project; and, 5) the specific timeframes and percentages where applicable (Character Limit: 4,000).
In the “Impact on Member” element (E2), provide the intent of the QIP by selecting whether it impacts the MA plan population by improving health outcomes, improving member satisfaction, or both. (Check all that apply.) If “Other” is selected, describe the impact in the text field.
In the “Anticipated Outcome” element (E3), provide a detailed and in-depth description that is consistent with the overall goal of the project and includes: 1) the clinical and/or non-clinical outcomes the MA plan expects the project to achieve; 2) how the members will be positively impacted by the outcomes; 3) why the outcomes are expected; and 4) the evidence or benchmark that was used to determine the anticipated outcomes. This description should be consistent with the QIP topic and domain identified in Step 4 above (Character Limit: 4,000).
In the “Rationale for Selection” element (E4), provide a detailed and in-depth description that includes: 1) why the project chosen is appropriate for the MA plan’s target population; 2) the clinical significance and/or non-clinical significance of the project; 3) the incidence and/or prevalence of the opportunity for improvement within the MA plan’s target population; 4) the impact the issue is currently having on the MA plan population; and, 5) data, case studies, or specific examples that provide evidence of the project’s relevancy to the target population (Character Limit: 4,000).
Step 8
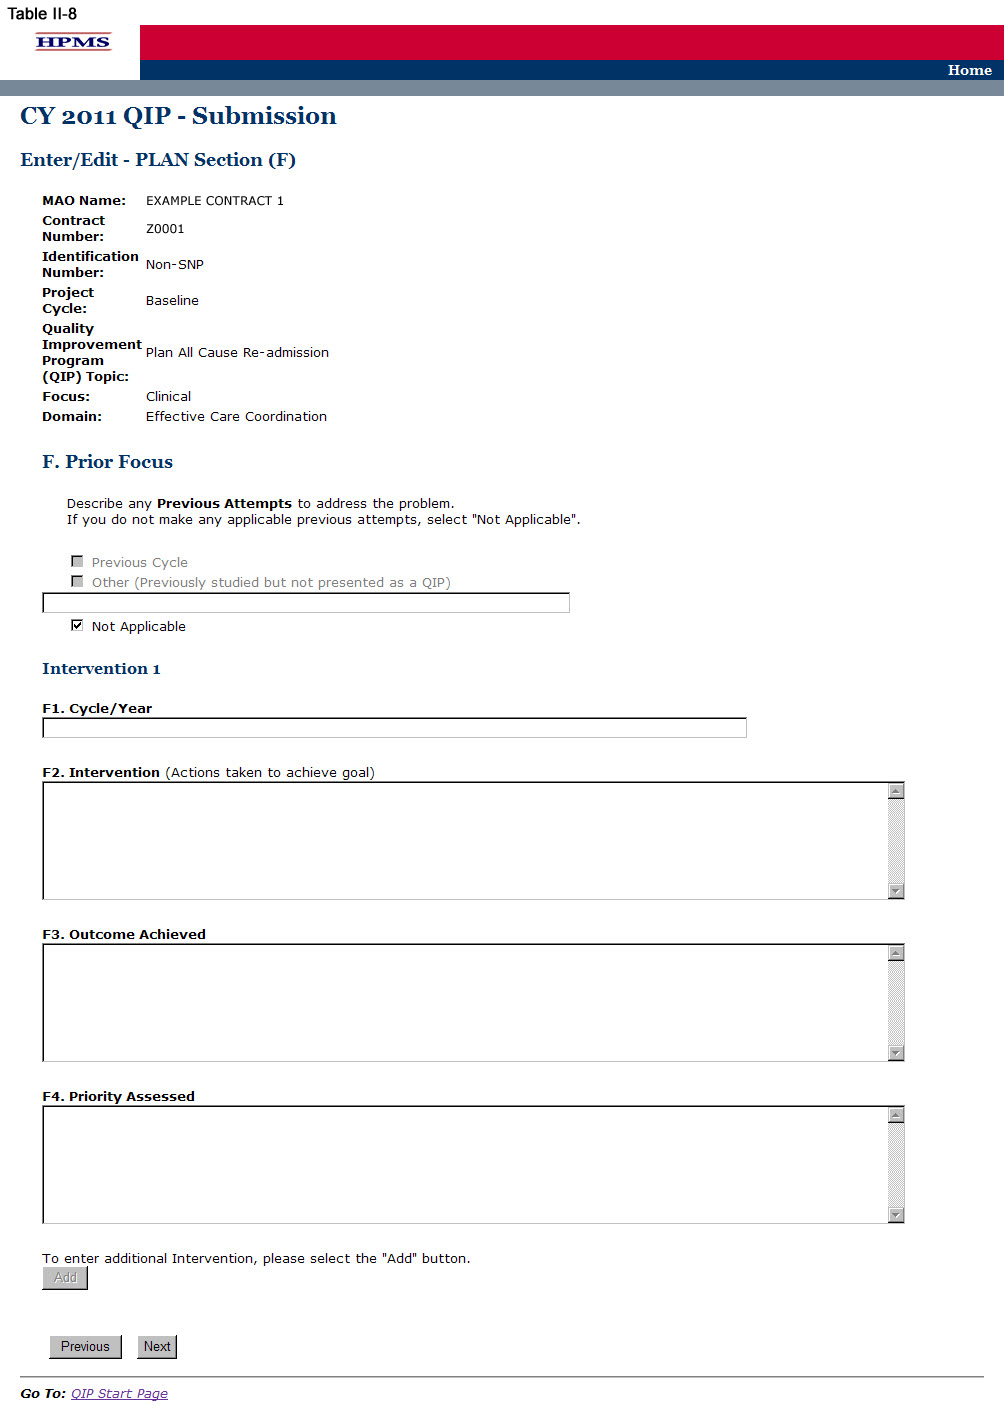
On the PLAN Section (F) screen (Table II-8) use the form displayed on the screen to describe any previous attempts to address the problem that the QIP will be addressing. Then for each intervention, provide information about the previous attempts; namely, the cycle/year, intervention, outcome achieved, and priority assessed.
Plan Section (F) may or may not be applicable. If the MA plan has made no previous attempts to address the identified topic (i.e. opportunity for improvement), the user must select “Not Applicable,” at which point all other fields will be in accessible. The user may then select Next to get to the PLAN Section (G1) screen (Table II-9).
In the “Cycle/Year” element (F1), provide the project cycle year in which the issue was previously addressed.
In the “Intervention” element (F2), provide a brief explanation of all interventions that were previously used to address the issue or achieve the goal. The MA plan may enter up to three interventions that related to the overall goal of the QI P (Character Limit: 4,000).
In the “Outcome Achieved” element (F3), provide a brief explanation of any clinical and/or non-clinical outcomes achieved from previous intervention(s) (Character Limit: 4,000).
In the “Priority Assessed” element (F4), identify the level of priority assessed that was given to each intervention used to address the issue. Identify the level of priority in terms of Low, Medium, or High where each is defined as follows:
Low priority does not require immediate attention.
Medium priority requires watching the issue for progression.
High priority requires immediate attention to resolve the issue.
After indicating the priority level, describe why the particular priority level was selected (Character Limit: 4,000).
Note:
The QIP module defaults to one intervention in this section. If necessary, the user can add more interventions by clicking Add near the bottom of the screen. Also, if additional interventions already exist for the QIP, the user can delete an intervention by clicking Delete.
If the QIP already includes more than one intervention, then upon clicking Next the user will go to the PLAN Section (F) screen for the second intervention (e.g Intervention 2). Continue entering all information and clicking Next as appropriate until information has been entered for all interventions. After entering all information, the user will proceed to the PLAN Section (G1) screen.
After entering all information for all interventions, click Next to get to the PLAN Section (G1) screen.
Step 9
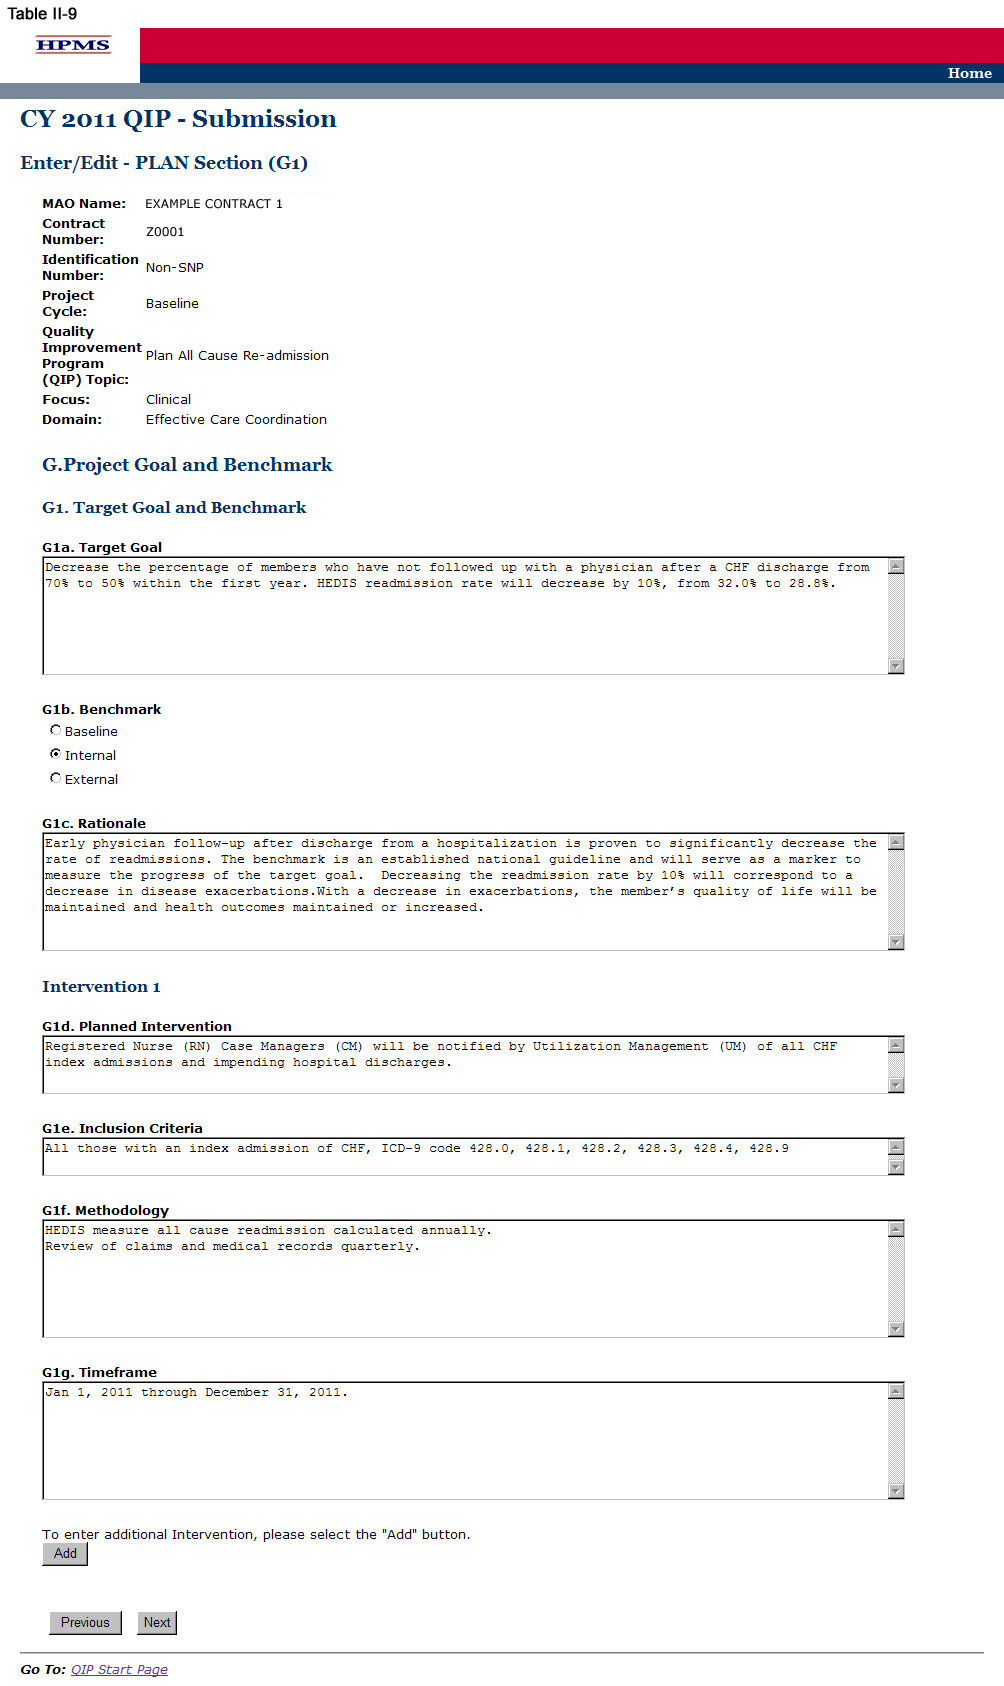
On the PLAN Section (G1) screen (Table II-9), use the form displayed on the screen to describe the target goal and benchmark. Then for each intervention, provide information about the planned intervention, inclusion criteria, methodology, and priority timeframe.
One goal for each QIP is identified regardless of the number of intervention(s). All interventions should be working towards achieving the same goal. Plans may submit up to three intervention(s) for their ‘Target Goal.’ In sections where interventions auto-populate, each intervention will be populated automatically. ‘Intervention’ will auto-populate from ‘Planned Intervention.’ Users cannot edit text that has been auto-populated from a different section.
In the “Target Goal” element (G1a), provide a detailed and in-depth description consistent with the ‘Basis for Selection’ section, including: 1) how the target goal will benefit the target population; 2) how the target goal is measurable; 3) how the target goal is attainable within the set timeframe; and, 4) numbers and/or percentages where applicable (Character Limit: 4,000).
In the “Benchmark” element (G1b), identify whether the benchmark being used is baseline, internal, or external. Plans will compare the results of their interventions to benchmark data in order to measure their effectiveness at the end of the reporting cycle. Baseline, internal, and external benchmarks are defined as follows:
Baseline Benchmark – Select this option if the MAO will use the data obtained at the end of the current reporting cycle as the standard comparison for subsequent reporting cycles in the QIP.
Internal Benchmark – Select this option if the benchmark data is from the MA plan’s own data sources (e.g., administrative data, claims data).
External Benchmark – Select this option if the benchmark data is obtained from sources outside of the MAO (e.g., national or regional benchmarks).
In the “Rationale” element (G1c), for the goal and the benchmark, provide a detailed and in-depth description that includes: 1) why the goal was chosen; 2) the evidence or method used to determine that the goal is appropriate to the QIP; 3) the benchmark that was chosen to measure the goal; and, 4) how the benchmark relates to the goal (Character Limit: 4,000).
In the “Planned Intervention” element (G1d), provide a detailed and in-depth description consistent with the goal of the project and includes: 1) an explanation of the planned intervention; 2) how the intervention is capable of achieving the goal; 3) how the intervention relates to the goal; and, 4) how the intervention is sustainable over time (Character Limit: 4,000).
In the “Inclusion Criteria” element (G1e), provide a detailed and in-depth description consistent with the overall objective of the QIP and includes: 1) the demographic and/or clinical characteristics of the target population; 2) the rationale for inclusion and exclusion of specific demographics; 3) the methodology the plan will use to identify members for inclusion and exclusion; 4) the evidence and/or observations that support the inclusion and exclusion rationale; and, 5) numbers and/or percentages where applicable (Character Limit: 4,000).
“Inclusion Criteria” must be provided for each intervention. If the “Inclusion Criteria” are the same for each intervention, the user is not required to repeat the information but must write “same as above” in the text box provided.
In the “Methodology” element (G1f), provide a detailed, in depth description consistent with the goal and intervention of the QIP and includes: 1) the description of the data that will be collected for the measurement; 2) how the data will be collected; 3) how the data is capable of measuring outcomes; and, 4) the systematic method and frequency of data collection. Measurement methodology is the means, technique, procedure, or method used to collect data and measure the effect of an intervention. MAOs should describe the methodology used for each unique intervention they plan to implement (Character Limit: 4,000).
In the “Timeframe” element (G1g), provide a detailed and in-depth description consistent with the overall QIP and includes: 1) exact beginning and ending dates for the measurement cycle; 2) an explanation of how the timeframe reflects an appropriate amount of time to complete the planned intervention; and, 3) the rationale for the expected timeframe. MAOs should ensure that they list timeframes specific to each intervention and that fit within their QIP project cycles (Character Limit: 4,000).
Note:
The QIP module defaults to one intervention in this section. If necessary, the user can add more interventions by clicking Add near the bottom of the screen. Also, if additional interventions already exist for the QIP, the user can delete an intervention by clicking Delete.
If the QIP already includes more than one intervention, then upon clicking Next the user will go to the PLAN Section (G1) screen for the second intervention (e.g. Intervention 2). Continue entering all information and clicking Next as appropriate until all applicable information has been entered for each intervention. After entering all information, the user will proceed to the PLAN Section (G2) screen.
Step 10
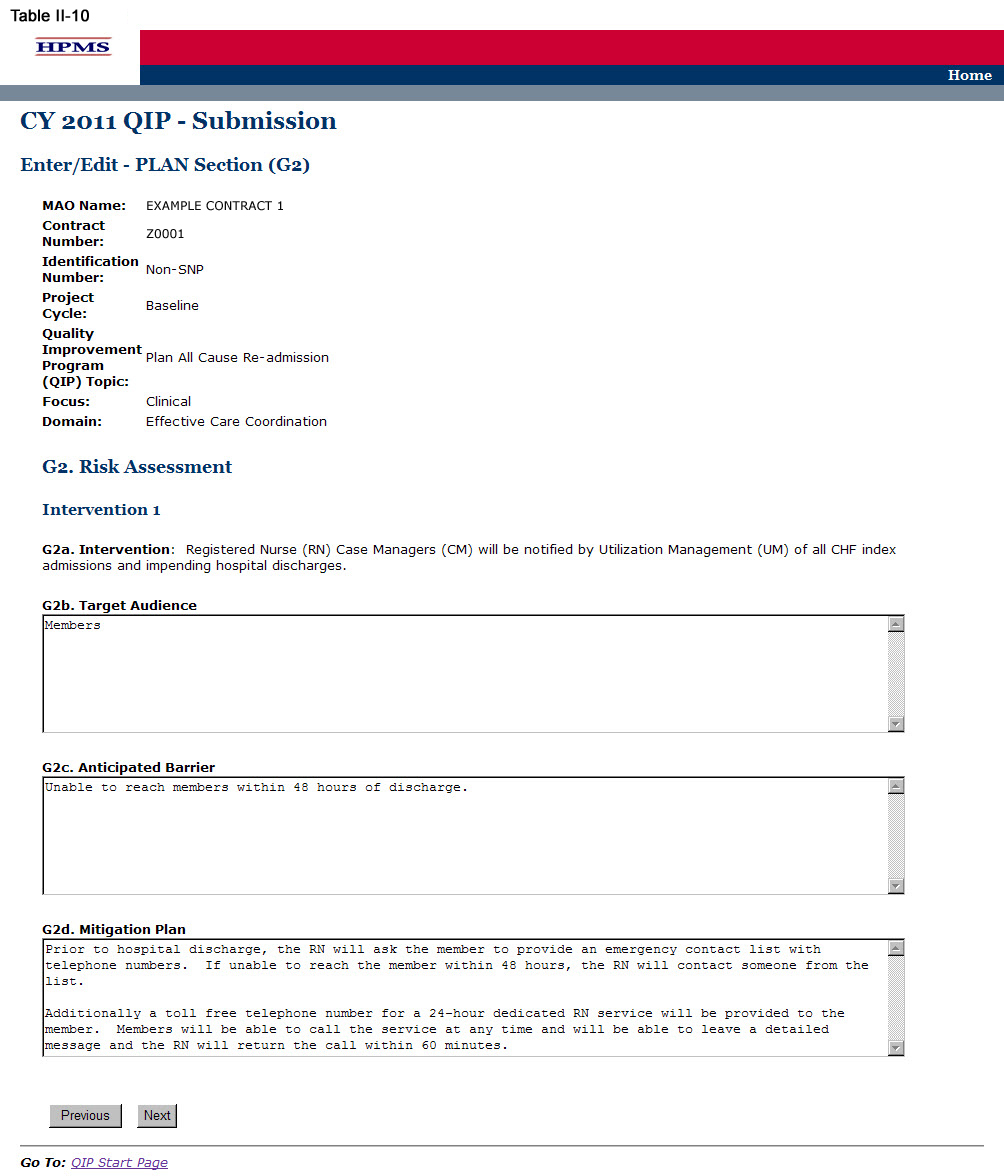
On the PLAN Section (G2) screen (Table II-10) use the form displayed on the screen to describe the risk assessment. Then click Next, which will take the user to the PLAN Section (H) screen (Table II-11).
In the “Target Audience” element (G2b), provide a detailed and in-depth description that is consistent with “Inclusion Criteria” and includes: 1) a description of the members potentially affected by the anticipated barrier to the intervention(s); 2) how the barrier could affect the different demographic groups within the target audience; 3) how members are expected to be affected; and, 4) numbers and percentages where applicable (Character Limit: 4,000).
In the “Anticipated Barrier” element (G2c), provide a detailed and in-depth description that includes: 1) the potential barrier to the success of the intervention; 2) why the barrier is anticipated; and 3) how the barrier could prevent or hinder the goal from being reached (Character Limit: 4,000).
A mitigation plan is an action plan designed to correct significant problems that could prevent the goal from being reached in a QIP. In the “Mitigation Plan” element (G2d), provide a detailed and in-depth description that includes: 1) the mitigation plan that will be implemented should the barrier occur; 2) how the plan is expected to mitigate the barrier; and, 3) how the barrier could prevent or hinder the goal from being reached (Character Limit: 4,000).
Note:
If the QIP already includes more than one intervention, then upon clicking Next the user will go to the PLAN Section (G2) screen for the second intervention (e.g Intervention 2). Continue entering all information and clicking Next as appropriate until information has been entered for all interventions. After entering all information, the user will proceed to the PLAN Section (H) screen.
Each ‘Intervention’ will auto-populate from ‘Planned Intervention.’ Users cannot edit text that has been auto-populated from a different section.
Step 11
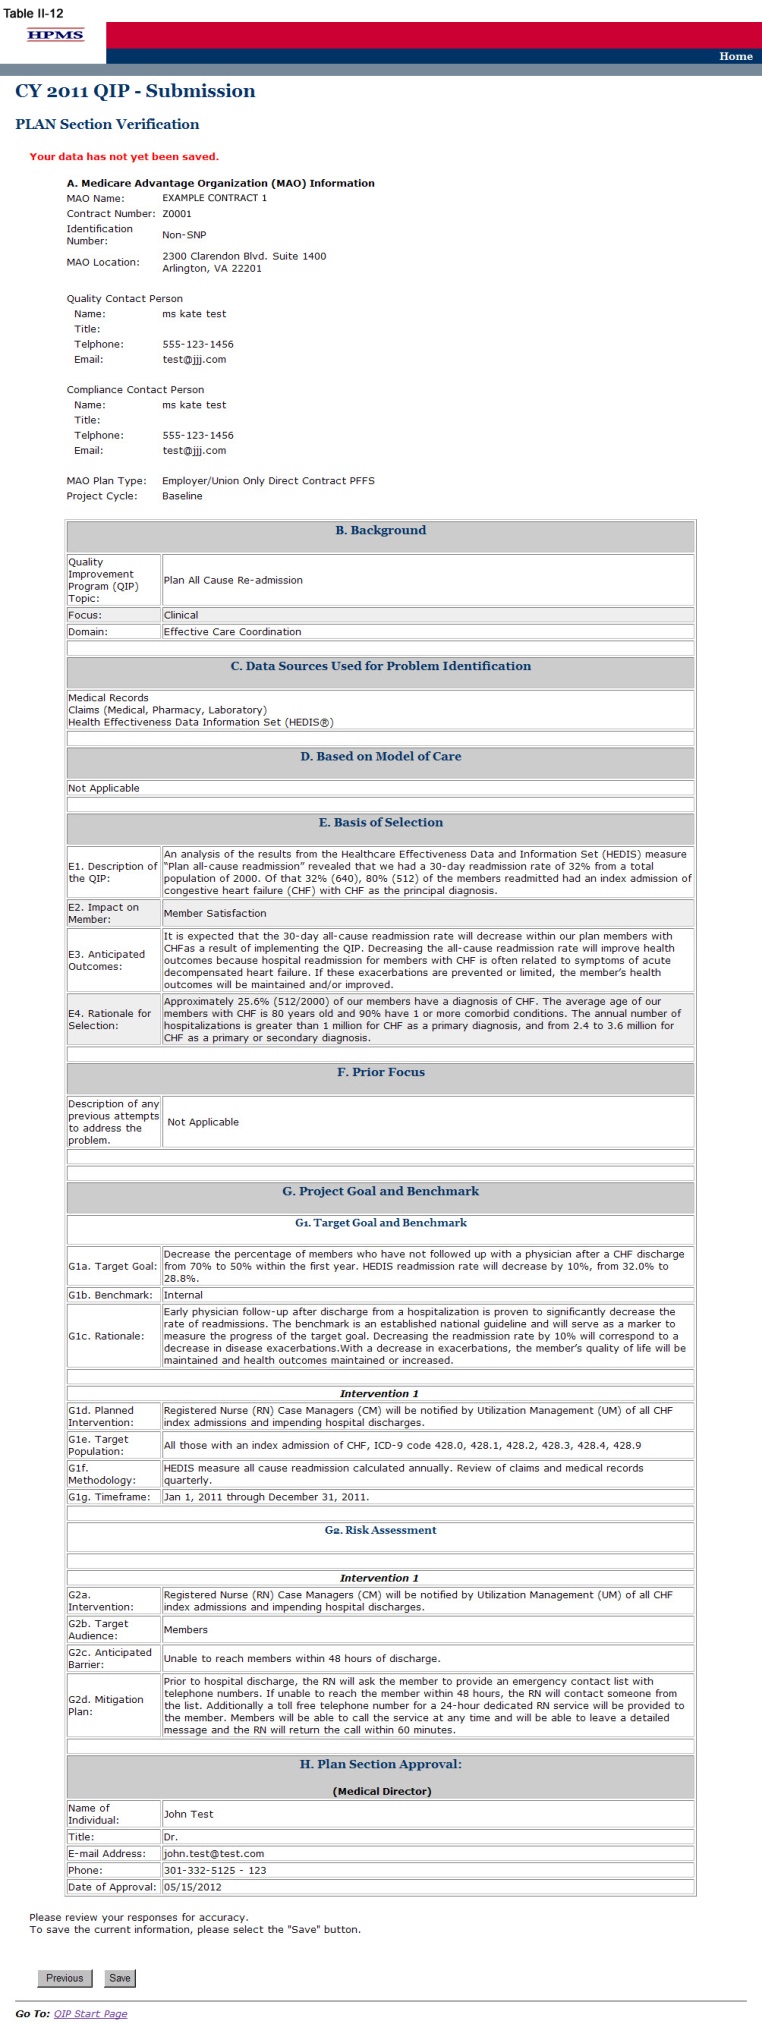
On the PLAN Section (H) screen (Table II-11) use the form displayed on the screen to provide contact information for the MAO Medical Director, a person designated by the Medical Director, or other person of authority that is approving the project. This section must be completed in full. Once the Medical Director or designee approves the QIP submission and clicks Next, the user is taken to the Verification screen (Table II-12).

Step 12
On the Verification screen (Table II-12) review all information for accuracy.
Once the user confirms that the information related to the PLAN Section is accurate, the user will select Save. Click Previous to return to the screens to edit any information. After clicking Save the user will be taken to the PLAN Section Submission Confirmation screen (Table II-13) that includes the following message: “Your data has been saved.”
Note: If this is the MAO’s initial QIP submission, the submission is complete at this step, as only the plan section is to be submitted for review by the MAO’s respective CMS Regional Office Account Manager.
CMS Regional Office Approval
Once the user has completed the PLAN Section, the user’s CMS Regional Office Account Manager (AM) will review the submission and determine whether it is approved or not. Each user will be notified of its approval status by the AM.
If an AM notifies the user of non-approval, the AM will provide the user with guidance and assistance on how to improve its submission. Once the user has worked with the AM to improve its submission, the user must re-submit the PLAN section. The user must re-enter information in the sections where the information has changed when resubmitting specific sections of the QIP.
Once the PLAN section is approved by the Regional Office AM, the user can begin to implement the QIP.

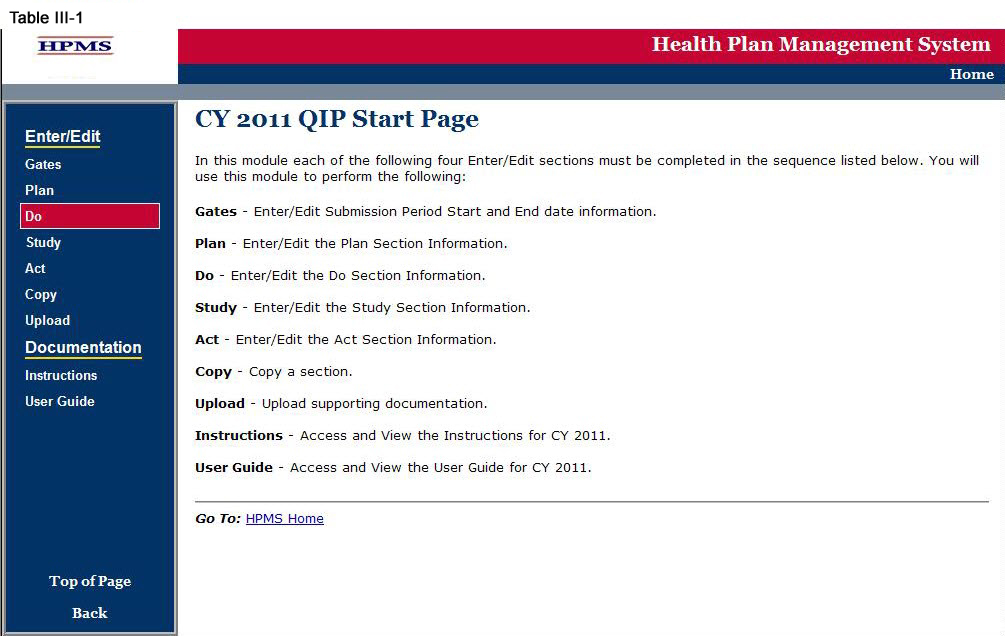
The DO functionality allows users to describe the steps the MAO will take to conduct the QIP and changes made to achieve the project goal. The ‘Do Section’ describes the initial results or findings, actual barriers encountered (if applicable), the risk mitigation approaches for the identified barriers, and the risk mitigation plan.
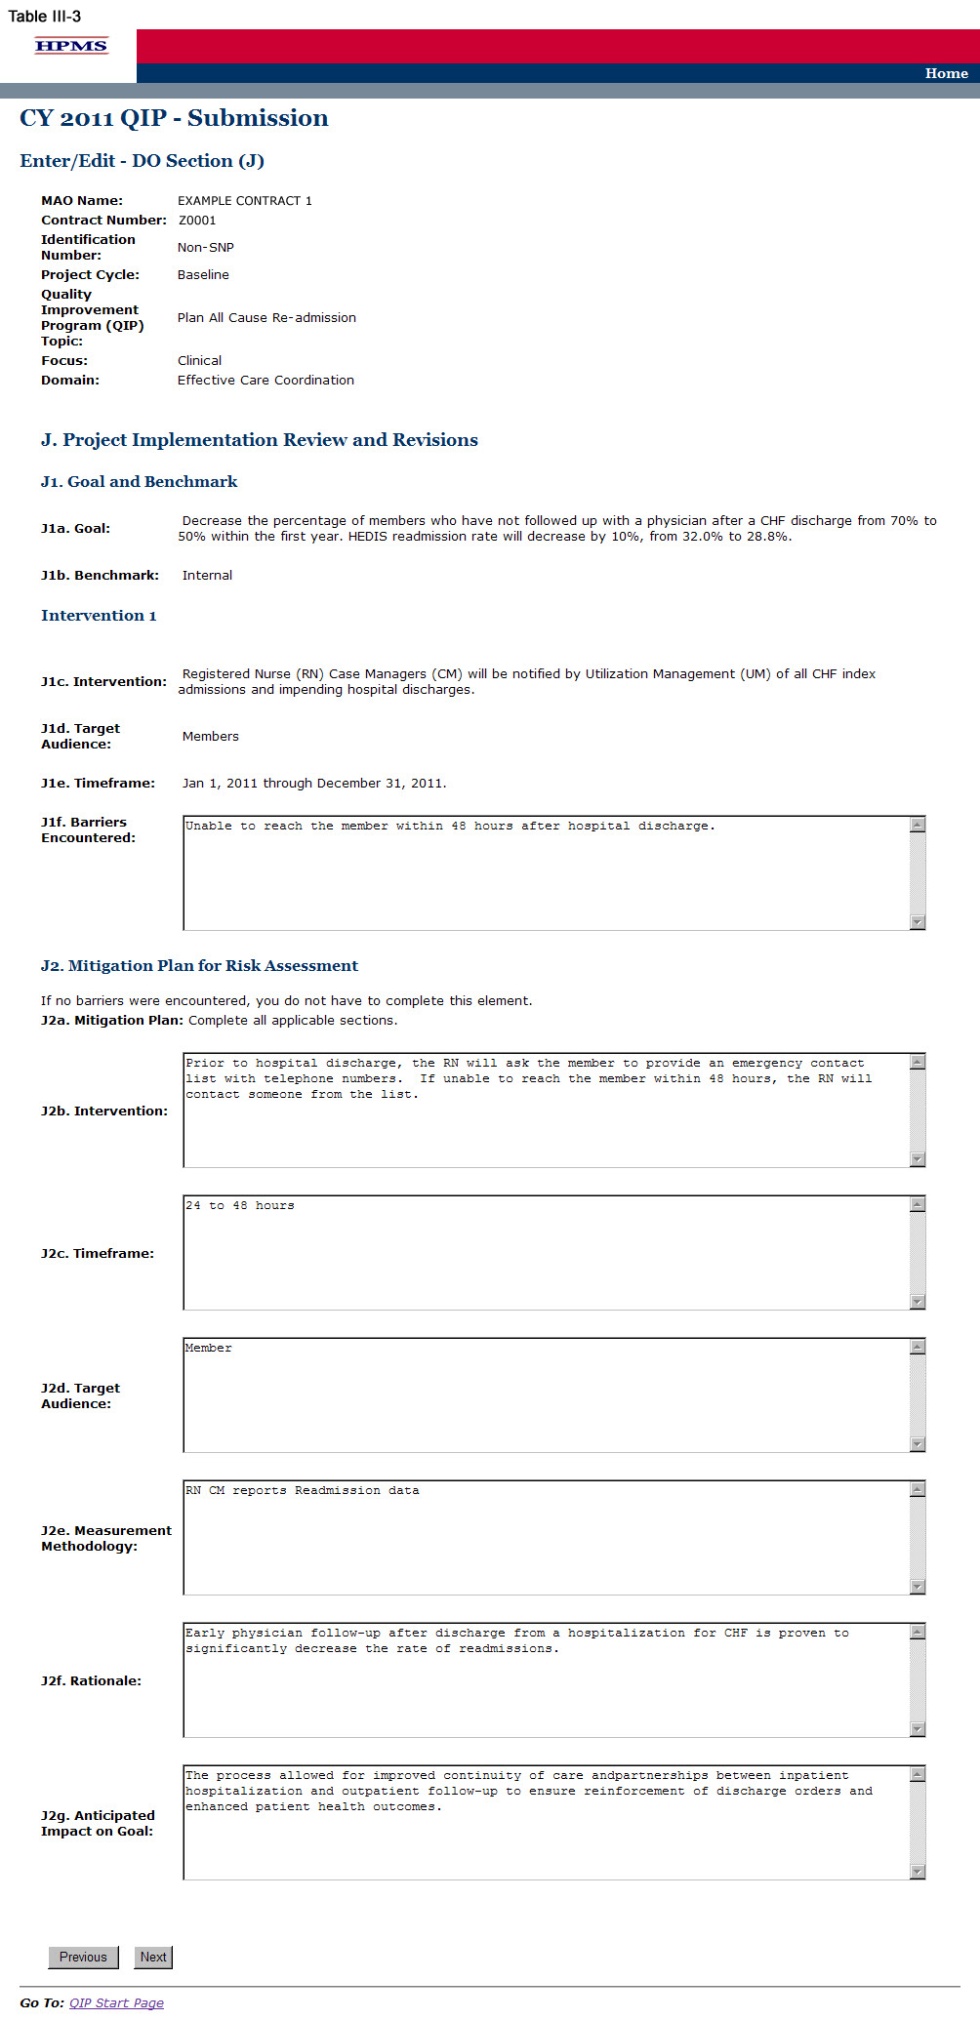
The “Mitigation Plan for Risk Assessment” element included in the ‘DO Section’ (Table III-3) addresses the actual barriers encountered during the implementation of the project and will only be implemented when a barrier is identified. For each barrier identified, a separate table for J2 (described in Step 3 below) must be completed. If a barrier is encountered, changes may need to be made to one or more of the following: intervention, timeframe, target audience, and/or measurement methodology.
Step 1
As shown in Table III-1, on the QIP Start Page click on the Do link on the Left Navigation Bar to get to the Contract/Plan/Topic Selection screen. (See above Chapter I: Getting Started for help getting to the QIP Start Page.)
Step 2
On the Contract/Plan/Topic Selection screen (Table II-2) first select a contract. Once the contract is selected, the screen will automatically refresh to show available plans. Users must create a unique QIP for each of the SNPs offered under a contract based on the SNP’s target population. The SNPs are identified by their plan number. However, users may create the same QIP for all of the non-SNP coordinated care plans offered under a contract. The non-SNP coordinated care plans under each contract are identified as ‘Non-SNP.’ Select an existing topic and then click Next, which will take the user to the DO Section (J) screen (Table III-3).

Step 3
On the DO Section (J) screen (Table III-3) use the form displayed on the screen to describe the barriers encountered and the mitigation plan for risk assessment. Then click Next to get to the Verification screen.
Sections J1a through J1e auto-populate from previously entered information the user provided in the ‘PLAN Section.’
In the J1f “Barriers Encountered” element (J1f), provide a detailed and in-depth description that includes: 1) the barriers encountered during the implementation of the project; 2) the impact the barriers had on reaching the goal; and, 3) the magnitude of the impact the barriers had on reaching the goal. If no barriers were encountered, state “No Barriers Encountered” (Character Limit: 4,000).
In the “Mitigation Plan” element (J2a), provide a detailed and in-depth description that provides the overall purpose of the mitigation plan for the barriers encountered during the implementation of the project and include: 1) why a mitigation plan is necessary; 2) how having a mitigation plan helps ensure the success of the project; 3) what factors went into the development of the mitigation plan; and 4) resources utilized to eliminate barriers (Character Limit: 4,000).
In the “Intervention” element (J2b), provide a detailed and in-depth description of the changes to the existing intervention or new intervention consistent with the goal of the project and implemented to address the barriers described in the “Barriers Encountered” section. The description must include: 1) how the intervention is capable of affecting change in order to achieve the goal; 2) the evidence or method used to determine that the revised or new intervention will impact the goal; 3) how the intervention is measurable; and, 4) how the intervention is sustainable over time. Note: This field is to be completed only if the Mitigation Plan involves making a change to the intervention (Character Limit: 4,000).
In the “Timeframe” element (J2c), provide a detailed and in-depth description of changes made to the timeframe based on the barriers described in the “Barriers Encountered” section. The description must include: 1) a timeframe consistent with the overall QIP; 2) an appropriate amount of time to complete the new or revised intervention; 3) exact beginning and ending dates for the measurement cycle; and 4) the rationale for the expected timeframe (Character Limit: 4,000). Note: This field is to be completed only if the Mitigation Plan involves making a change to the Timeframe.
In the “Target Audience” element (J2d), provide a detailed and in-depth description of the changes made to the target audience based on the barriers described in the “Barriers Encountered” section. The description must include: 1) the demographic and clinical characteristics of the target population; 2) the rationale for inclusion and exclusion of the demographics; 3) the methodology the plan will use to identify the MA plan members for inclusion and exclusion; 4) the evidence and/or observations that support the inclusion and exclusion rationale; and, 5) numbers and/or percentages where applicable (Character Limit: 4,000). Note: This field is to be completed only if the Mitigation Plan involves making a change to the target audience.
In the “Measurement Methodology” element (J2e), provide a detailed and in-depth description of the changes made to the measurement methodology from the “G1f. Methodology” section based on barriers described in the “Barriers Encountered” section. The description must include: 1) the specific, reliable data that will be collectedcollect for measurement; 2) how the data will be collected; 3) how the data is capable of measuring outcomes; and, 4) the systematic method and frequency of the data collection (Character Limit: 4,000). Note: This field is to be completed only if the Mitigation Plan involves making a change to the measurement methodology.
In the “Rationale” element (J2f), provide a detailed and in-depth description that corresponds with the applicable changes described above and includes: 1) why changes were made to the intervention, timeframe, target audience, and/or measurement methodology; 2) what is expected to be achieved with the changes made to each of these sections; 3) the factors or evidence considered when developing the Mitigation Plan that demonstrates its validity; and, 4) data source(s) and/or observations. Note: This field is to be completed only if there is a barrier encountered and there is a need to make changes to one or more of the following: intervention, timeframe, target audience, and/or measurement methodology (Character Limit: 4,000).
In the “Anticipated Impact on Goal” element (J2g), provide a detailed and in-depth description that includes: 1) the anticipated impact on the goal resulting from making the changes to the intervention, timeframe, target audience, and/or measurement methodology; and, 2) what the actual impact was on the goal due to such changes (Character Limit: 4,000). Note: This field is to be completed only if there is a barrier encountered and there is a need to make changes to one or more of the following: intervention, timeframe, target audience, and/or measurement methodology.
Note: If the QIP already includes more than one intervention, then upon clicking Next, the user will be taken to the DO Section (J) screen to input information for the second intervention. Continue entering all information and click Next as appropriate until information has been entered for all applicable interventions. After entering all information, the user will proceed to the Verification screen.
Step 4
On the Verification screen (Table III-4) review all information for accuracy. Then click Save to ensure all information entered by the user is saved before the user proceeds on to the next section of the QIP.
After clicking Save the user will be taken to the DO Section Submission Confirmation screen (Table III-5). Click OK to return to the Contract/Plan/Topic Selection screen.
.


IV. Study
The STUDY functionality allows users to describe the QIP topic and report the results of the project, as well as provide numerical data where applicable.
Step 1
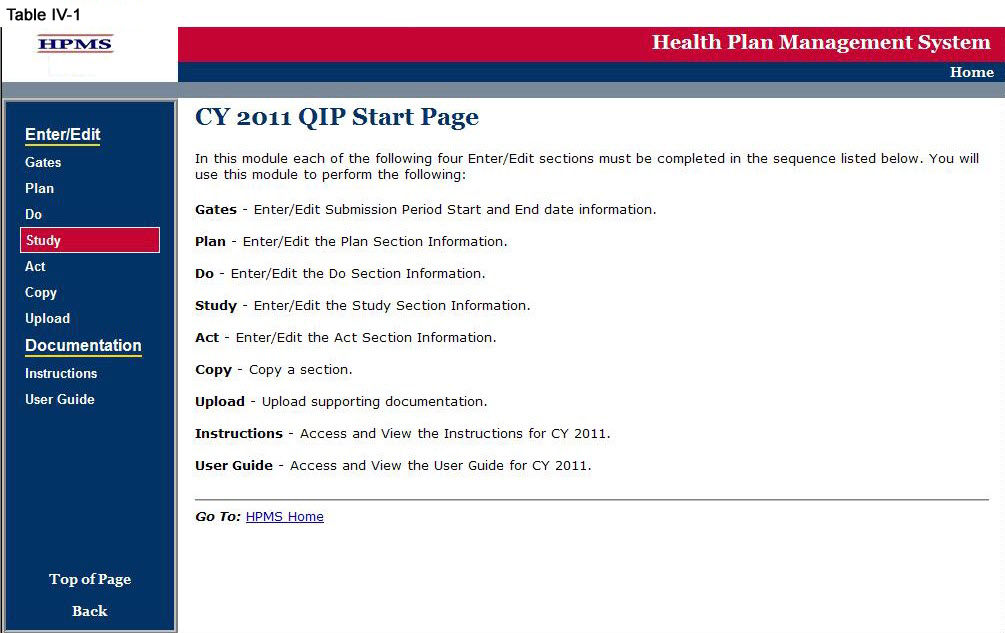
As shown in Table IV-1, on the QIP Start Page click on the Study link on the Left Navigation Bar to get to the Contract/Plan/Topic Selection screen. (See above Chapter I: Getting Started for help getting to the QIP Start Page.)
Step 2
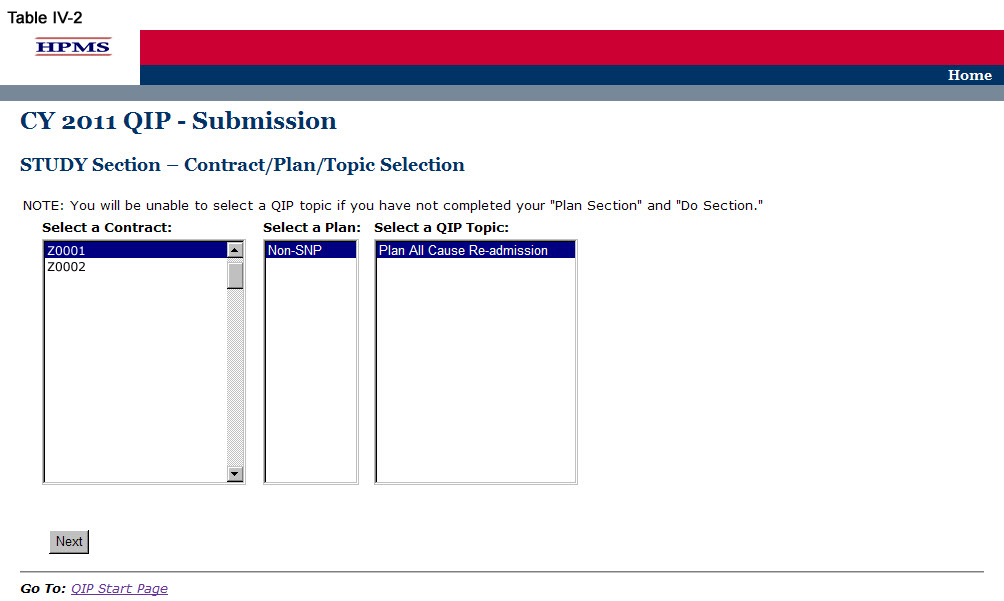
On the Contract/Plan/Topic Selection screen (Table II-2) first select a contract. Once the contract is selected, the screen will automatically refresh to show available plans. Users must create a unique QIP for each of the SNPs offered under a contract based on the SNP’s target population. The SNPs are identified by their plan number. However, users may create the same QIP for all of the non-SNP coordinated care plans offered under a contract. The non-SNP coordinated care plans under each contract are identified as ‘Non-SNP.’
Select an existing topic and then click Next, which will take the user to the STUDY Section (K) screen (Table IV-3).
Step 3
On the STUDY Section (K) screen (Table IV-3) use the form displayed on the screen to describe the QIP results for each intervention.
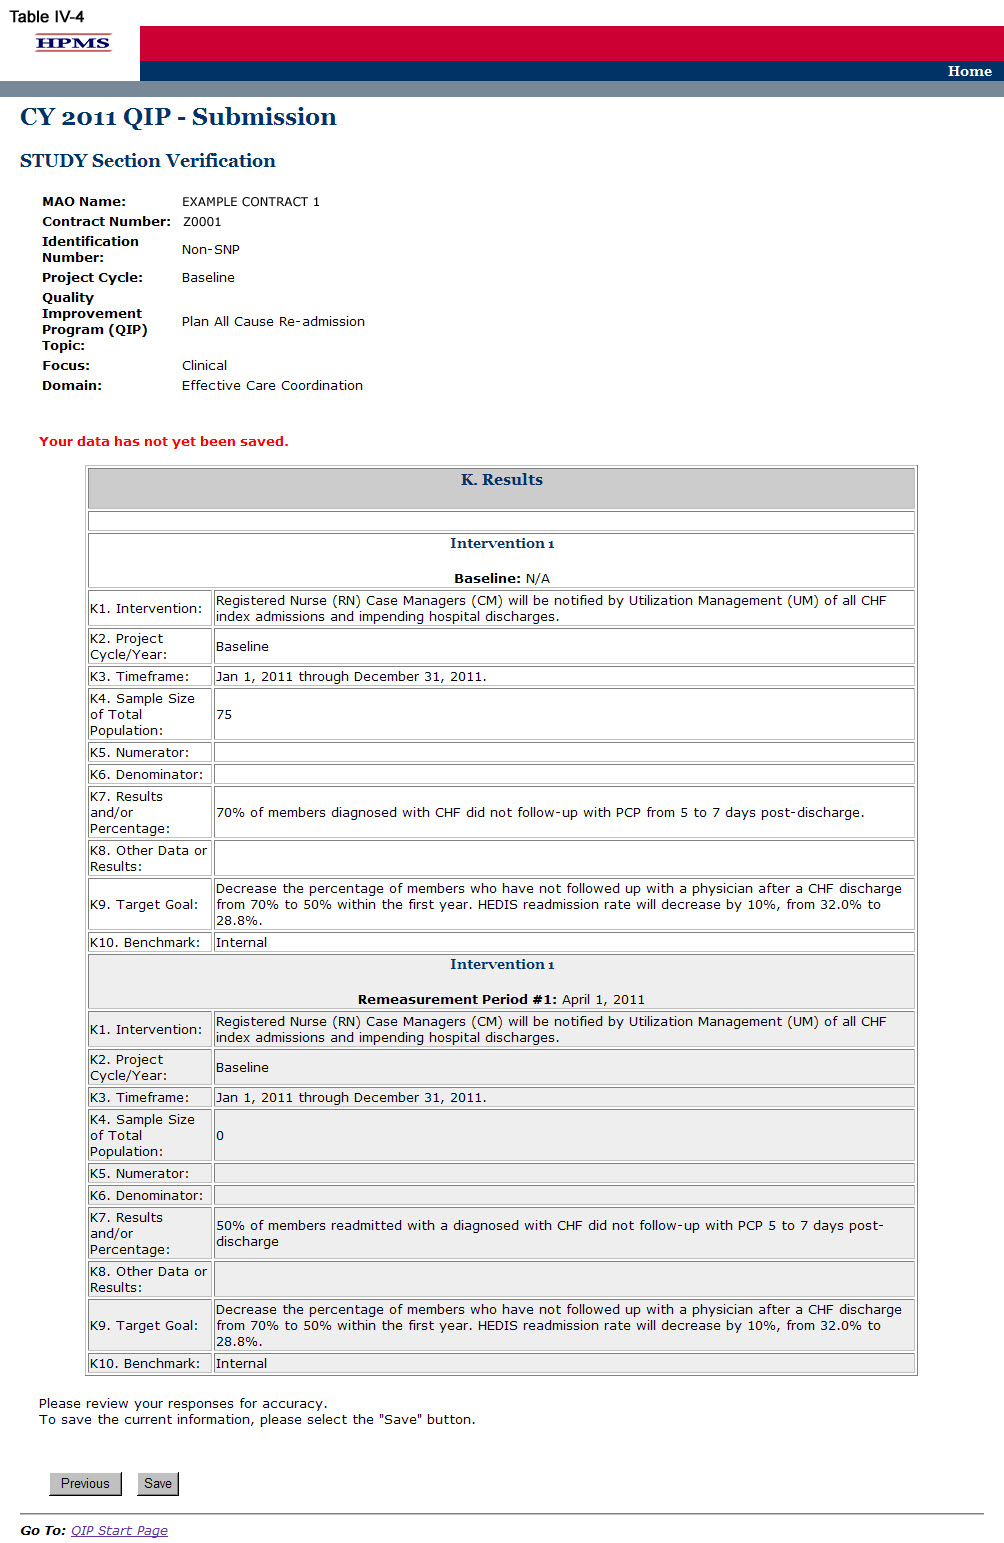
The intervention, timeframe, target goal, and benchmark all auto-populate from the information provided in the ‘PLAN Section.’ The sample size (or total population), results or percentage, and other data or results must be completed. The numerator and denominator sections must be completed if applicable. A separate results table will auto-populate for each intervention identified in the “Planned Interventions” element.
In the “Project Cycle/Year” element (K2), provide the project cycle/year unique to this QIP.
In the “Timeframe” element (K3), provide the dates for the “initial period” (i.e. the base year) in which the project was implemented. If the project is in its initial, or base, year, the MAO will not report a “re-measurement period.” For multi-year projects, the MAO should report re-measurement period dates that align with their current project cycle year.
In the “Sample Size or Total Population” element (K4), provide the sample size or percentage of total population that is reflective of the plain population. The data in this field must be reported as a whole number or percentage.
In the “Numerator” element (K5), provide the number of plan members and/or data that met the inclusion criteria. Please note that this field may be skipped if not applicable. The data in this field must be reported as a whole number or percentage.
In the “Denominator” element (K6), provide the number of plan members and/or data eligible to participate in the program. Please note that this field may be skipped if not applicable. The data in this field must be reported as a whole number or percentage.
In the “Results and/or Percentage” element (K7), provide the total percentage or results of the study. The data in this field must be reported as a whole number or percentage.
In the “Other Data or Results” element (K8), provide any additional data or results pertinent to the project. Please note that this field allows for text and can capture results that are not numerical.
Note:
The QIP module defaults to one intervention in this section. If necessary, the user can add more interventions by clicking Add near the bottom of the screen. Also, if additional interventions already exist for the QIP, the user can delete an intervention by clicking Delete.
If the QIP already includes more than one intervention, then upon clicking Next the user will go to the STUDY Section (K) screen for the second intervention. Continue entering all information and clicking Next as appropriate until information has been entered for all interventions. After entering all information, the user will proceed to the Verification screen.
After entering all information for all interventions, click Next to get to the Verification screen.

Step 4
On the Verification screen (Table IV-4) review all information for accuracy. Then click Save to ensure all information entered by the user is saved before the user goes on to the next section of the QIP.
After clicking Save the user will be taken to the STUDY Section Submission Confirmation screen (Table IV-5). Click OK to return to the Contract/Plan/Topic Selection screen.

V. Act
The ACT functionality allows users to describe the action plan based on QIP findings and ultimately captures the summary of findings or study conclusions. This includes information regarding achievement of the goal, root cause analysis for goals or progress not achieved if applicable, and the next steps for the QIP.
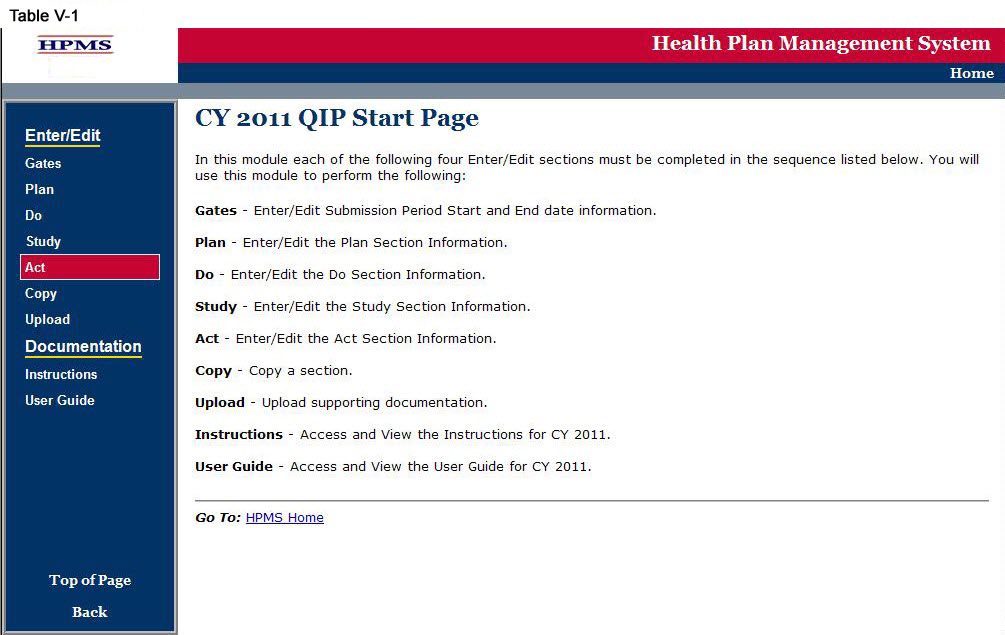
Step 1
As shown in Table V-1, on the QIP Start Page, click on the Act link on the Left Navigation Bar to get to the Contract/Plan/Topic Selection screen. (See Chapter I: Getting Started for help getting to the QIP Start Page.)
Step 2
On the Contract/Plan/Topic Selection screen (Table II-2) first select a contract. Once the contract is selected, the screen will automatically refresh to show available plans. Users must create a unique QIP for each of the SNPs offered under a contract based on the SNP’s target population. The SNPs are identified by their plan number. However, users may create the same QIP for all of the non-SNP coordinated care plans offered under a contract. The non-SNP coordinated care plans under each contract are identified as ‘Non-SNP.’ Select an existing topic and then click Next, which will take the user to the ACT Section (L) screen (Table V-3).

Step 3
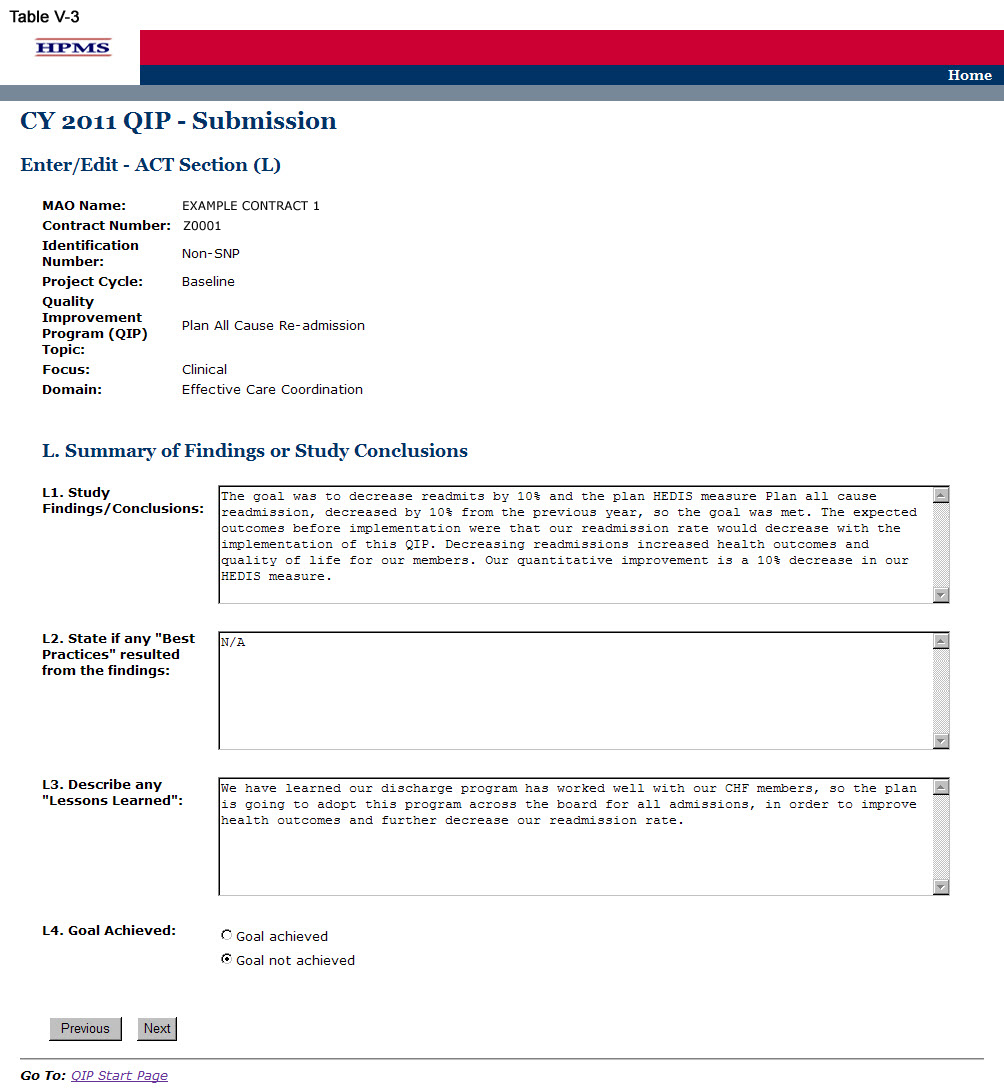
On the ACT Section (L) screen (Table V-3) use the form displayed on the screen to summarize findings or study conclusions. Then click Next.
In the “Study Findings/Conclusions” element (L1), provide a description of the analyzed results indicating achievement of the goal, utilizing the benchmark and anticipated outcomes, including: 1) documentation of quantitative change or improvement; 2) how the intervention relates to the improvement; 3) significance of the results; and, 4) an explanation of factors influencing comparability and validity of data (Character Limit: 4,000).
In the “State if any ‘Best Practices’ resulted from the findings” element (L2), provide a detailed and in-depth description of any identified best practices, including: 1) how the MAO determined that this is a best practice; 2) how it affected the project; and, 3) how the plan will share the details of the best practice with others (Character Limit: 4,000). If no best practices resulted from the findings, please indicate “Not Applicable” in the field.
In the “Describe any Lessons Learned” element (L3), provide a detailed and in-depth description of identified lessons learned, including: 1) how the lessons learned affected the project; 2) how the lessons learned affected the members’ health outcomes; and, 3) indicate whether the lessons learned can be applied to future projects and/or other departments (Character Limit: 4,000).
The MA plan is required to select either “Goal Achieved” or “Goal Not Achieved.”
Note:
If the user indicates that the QIP Goal was NOT met, the user will then be directed to the ACT Section (M) screen (Table V-4). (Go to Step 4)
If the user indicates that the QIP Goal was met, the user will then be directed to the ACT Section (O) screen (Table V-6). (Go to Step 6)
Step 4
If the user indicated on the ACT Section (L) screen that the QIP Goal was NOT met, the user will then be directed to the ACT Section (M) screen. On the ACT Section (M) screen (Table V-4) use the form displayed on the screen to explain the root causes behind the goal not being met. Then click Next, which will take the user to the ACT Section (N) screen.
The MAO must complete a root cause analysis if the user selected “Goal Not Achieved.” A root cause analysis is a formalized investigation and problem-solving approach focused on identifying and understanding the reasons why a goal was not met, progress was not made, or a specified outcome was not realized.
In the “Root Cause Analysis” element (M2), provide a detailed and in-depth description that includes: 1) why the goal was not achieved or progress was not made; 2) how the reason(s) for not attaining the specified goal was determined; and, 3) steps to take in order to correct the problem (Character Limit: 4,000).
In the “Action Plan” element (M3), select an action plan that addresses the root cause analysis. The action plan options include: “Revise intervention,” “Revise methodology,” “Change goal,” and “Other.” If “Other” is selected, provide a detailed description of the action plan in the space available (Character Limit: 4,000).

Step 5
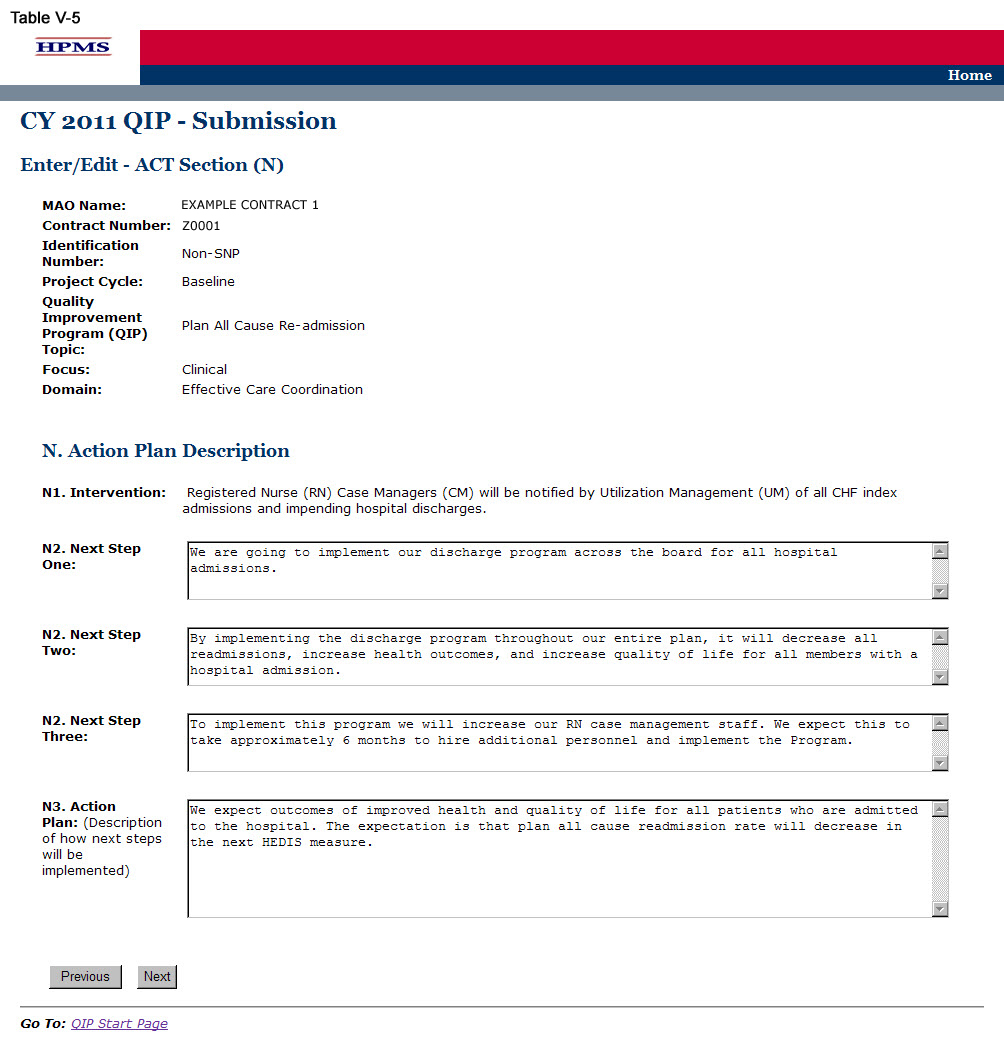
On the ACT Section (N) screen (Table V-5) use the form displayed on the screen to describe the action plan based on QIP results. Then click Next, which will take the user to the ACT Section (O) screen (Table V-6).
In the “Next Step One” through “Next Step Three” element (N2), provide a detailed and in-depth description that includes: 1) the next steps for the project based on the study findings or root cause analysis; 2) how the next steps will help achieve the goal; and, 3) a rationale for the next steps (Character Limit per field: 4,000).
In the “Action Plan” element (N3), provide a detailed and in-depth description of the implementation of the action plan, including: 1) how the next steps will be implemented; 2) the timeline for when the next steps will be implemented; and, 3) the expected outcomes resulting from the next steps (Character Limit: 4,000).
Step 6
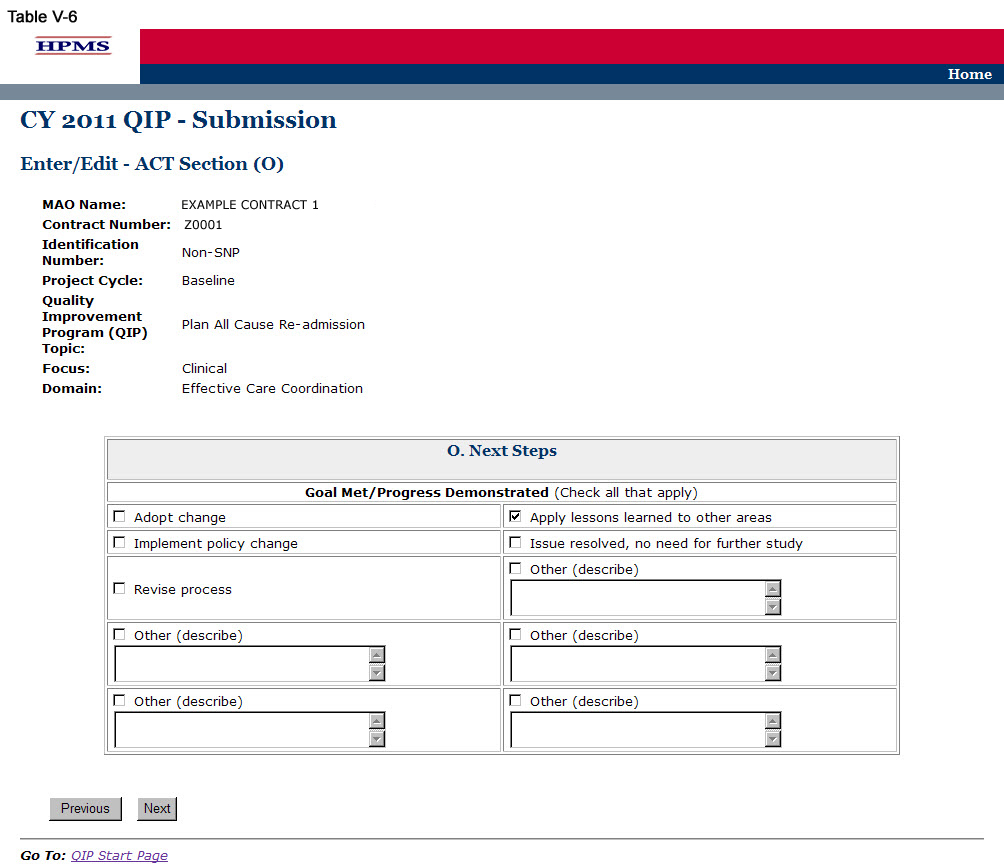
On the ACT Section (O) screen (Table V-6) use the form displayed on the screen to describe the next steps based on QIP results. Then click Next to get to the Verification screen.
Note: This section must be completed by both MAOs that selected “Goal Achieved” and those that selected “Goal Not Achieved.”
In the “Next Steps” element (O.), provide the next steps of the project by checking all that apply. If “Other” is checked, provide a detailed description of the next steps in the space available. If the QIP target goal has not been achieved, the plan must select “Other” and explain in the space available.
Step 7
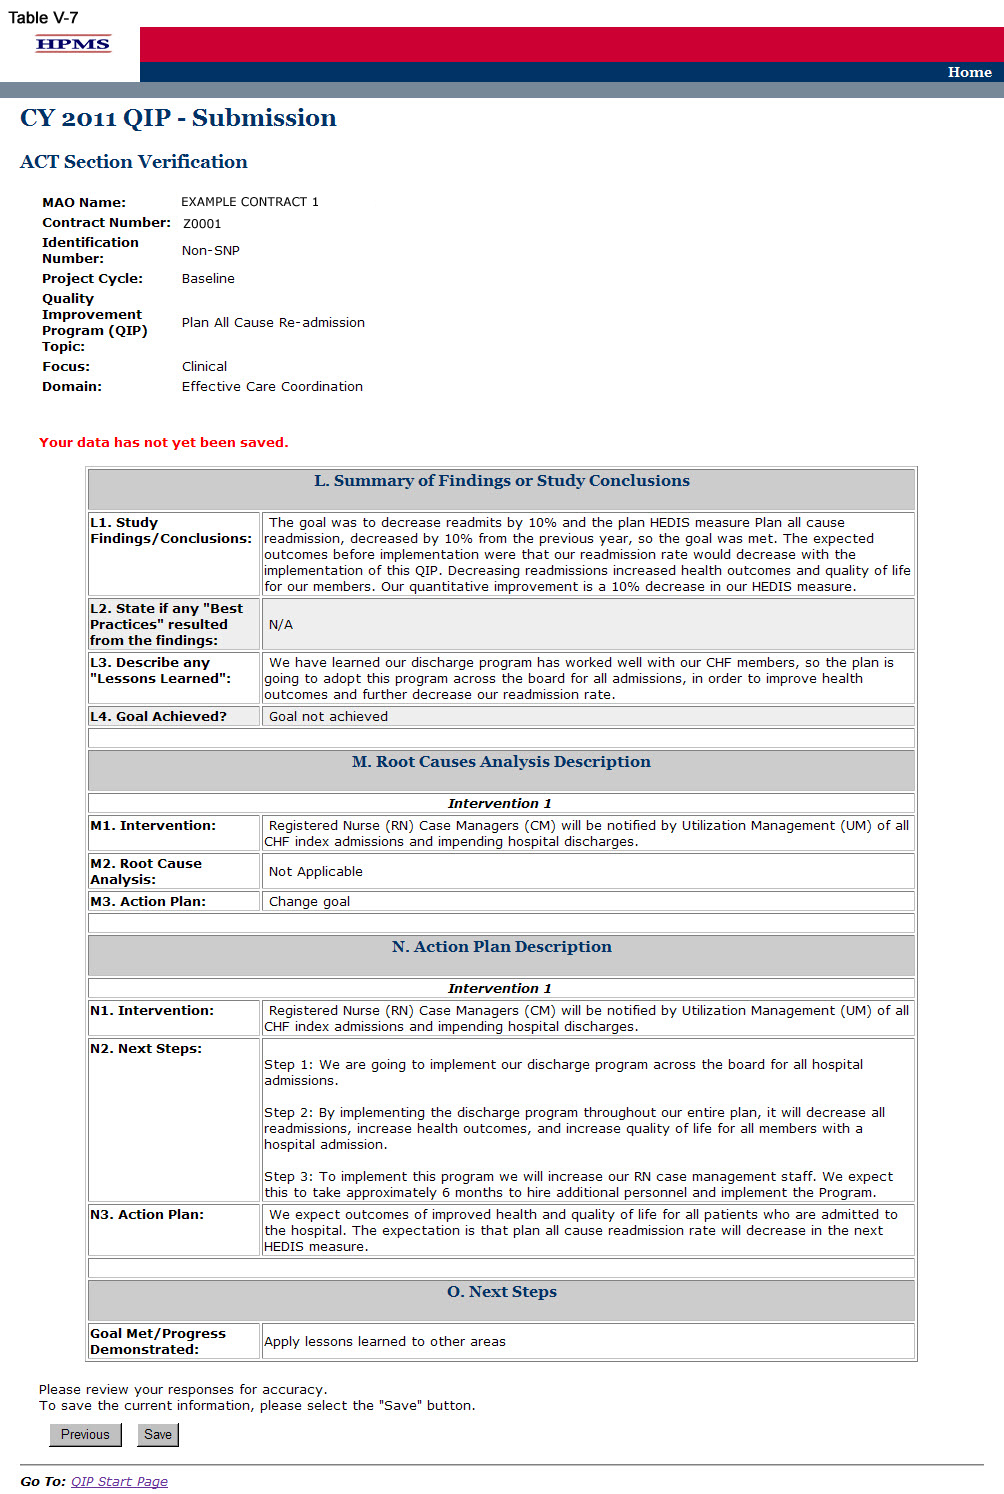
On the Verification screen (Table V-7) review all identified information for accuracy. Then click Save to go to the ACT Section Confirmation screen.
Step 8
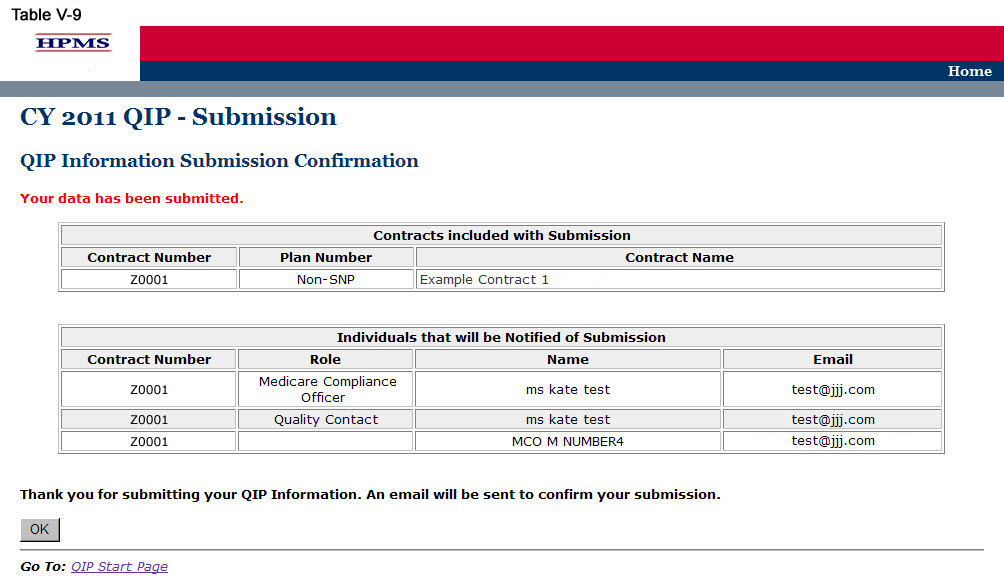
On the ACT Section Confirmation screen (Table V-8), click Submit to get to the Submission Confirmation screen (Table V-9).
Note:
Please ensure your QIP
Information is final prior to submission. Your QIP
Information cannot
be edited once the final QIP
is submitted.

VI. Copy
The Copy functionality allows users to Copy QIP sections from one plan to another, as long as certain conditions exist. In particular:
The PLAN section from one QIP may be copied to a second QIP if the second QIP has no PLAN section or only has a PLAN section and no other sections.
A section may be copied if, and only if, the auto-populated sections for both the source and target QIP Programs are an exact match.
When copying a section, the source and target sections cannot be for the same plan.
Step 1
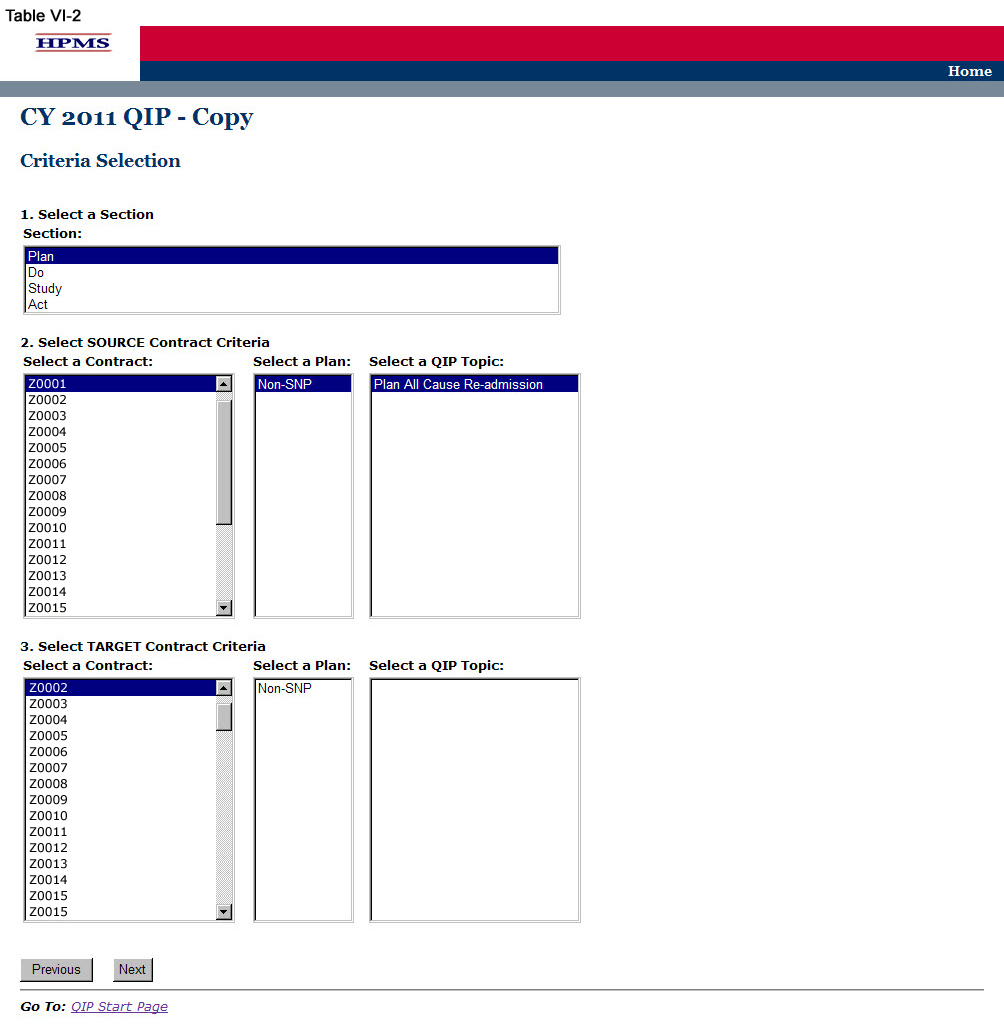
As shown in Table VI-1, on the QIP Start Page click on the Copy link on the Left Navigation Bar to get to the Criteria Selection screen. (See Chapter I: Getting Started for help getting to the QIP Start Page.)

Step 2
On the Criteria Selection screen (Table VI-2) first select a section to copy.
Once the appropriate section is selected, the screen will automatically refresh to show available SOURCE contracts.
Select the SOURCE contract and the screen will again automatically refresh to show available plans.
Select the SOURCE plan and available QIP topics will appear.
Select the SOURCE QIP topic to copy.
After selecting all SOURCE criteria, follow the same procedures to select the TARGET criteria. After selecting all TARGET criteria, click Next to get to the Copy Verification screen.
Step 3
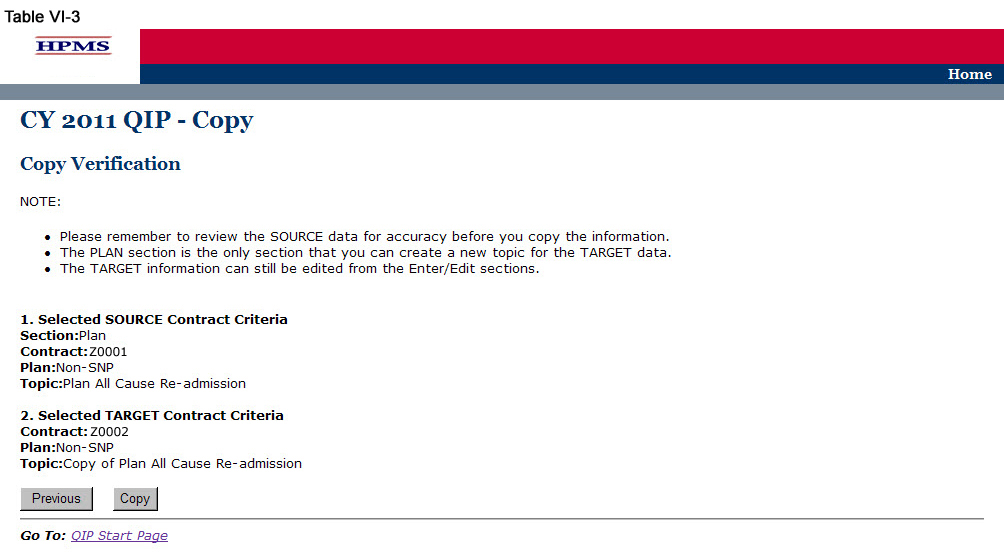
On the Copy Verification screen (Table VI-3) review all information for accuracy, and then click Copy to get to the Copy Confirmation screen.
The Copy Confirmation screen included the following notes:
Please remember to review the SOURCE data for accuracy before you copy the information.
The PLAN section is the only section that you can create a new topic for the TARGET data.
The TARGET information can still be edited for the Enter/Edit sections.
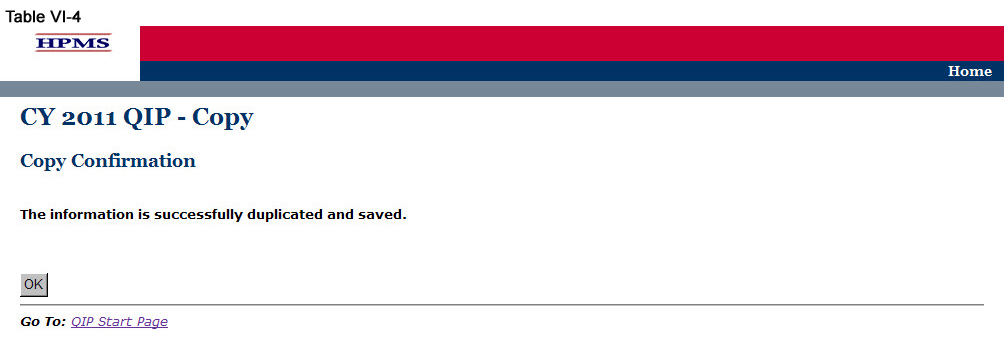
On the Copy Confirmation screen (Table VI-4) click OK to return to the Criteria Selection screen.
VII. Upload
Take the following steps to upload supporting documentation for the QIP. All files must be uploaded in .zip format.
Step 1
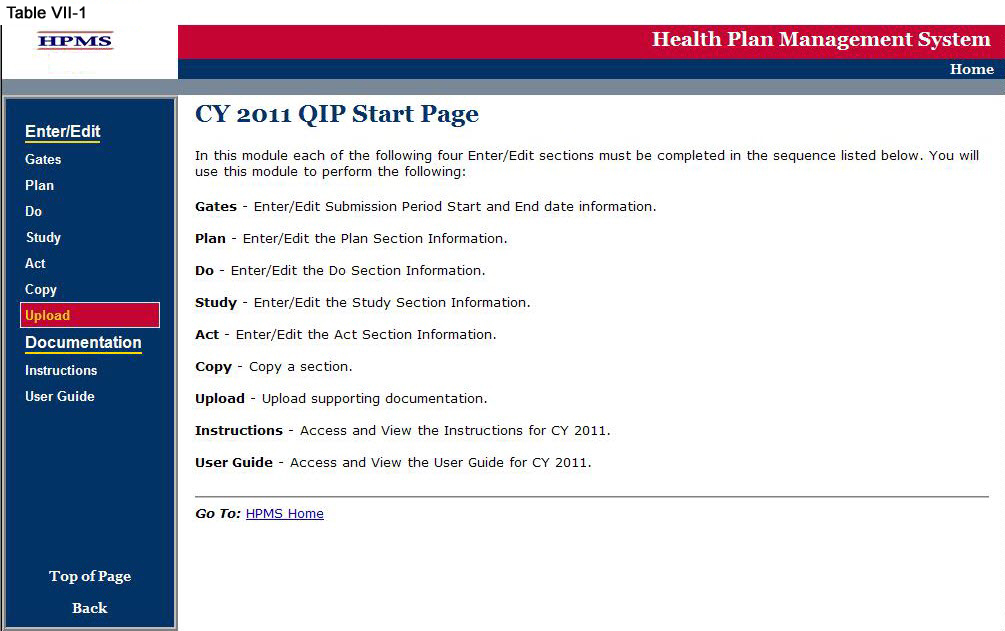
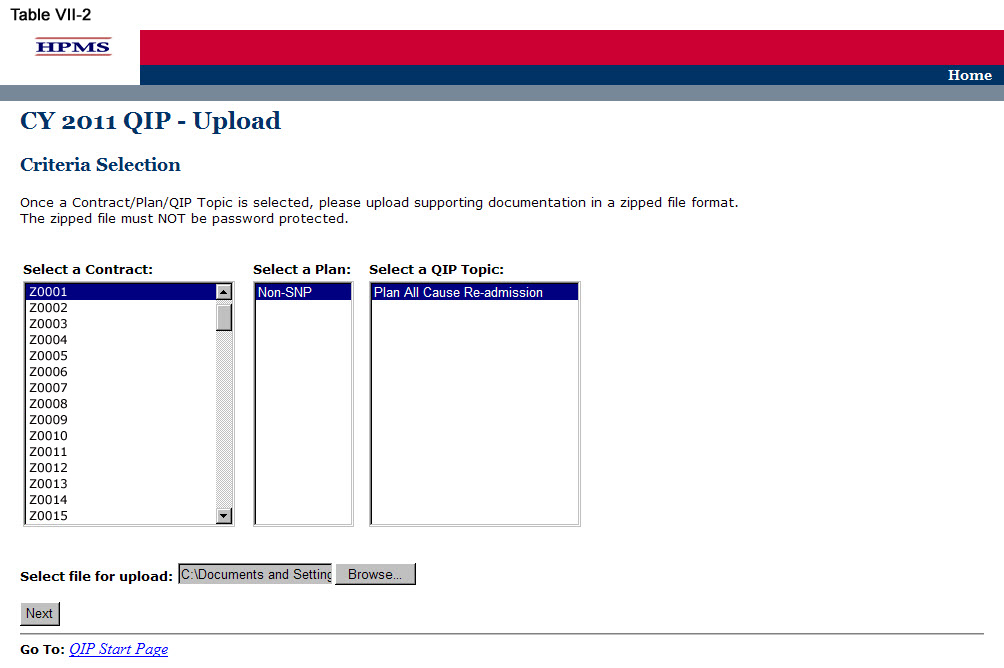
As shown in Table VII-1, on the QIP Start Page click on the Upload link on the Left Navigation Bar to get to the Criteria Selection screen (Table VII-2). (See Chapter I: Getting Started for help getting to the QIP Start Page.)
Step 2
On the Contract/Plan/Topic Selection screen (Table II-2) first select a contract. Once the contract is selected, the screen will automatically refresh to show available plans. Users must create a unique QIP for each of the SNPs offered under a contract based on the SNP’s target population. The SNPs are identified by their plan number. However, users may create the same QIP for all of the non-SNP coordinated care plans offered under a contract. The non-SNP coordinated care plans under each contract are identified as ‘Non-SNP.’ Select an existing topic.
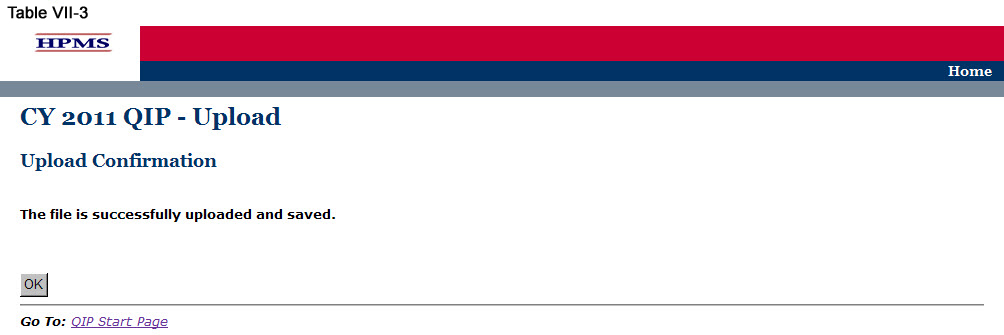
After selecting the contract, plan and topic, select Browse to locate the .zip file being uploaded. Then click Next, which will take the user to the Upload Confirmation screen (Table VII-3).
Appendix I: Contact Information
Subject Matter |
Name |
Phone |
Email Address / Web Address |
|
HPMS Help Desk |
800-220-2028
|
|
|
CMS Action Desk |
410-786-2580 |
N/A |
Appendix II: Glossary of Terms
Action Plan |
A defined or organized process or steps taken to achieve a particular goal or to reduce the risk of future events.
|
Barrier |
An obstruction or something that impedes; anything that prevents progress or makes it difficult to achieve the desired goal or expected outcome.
|
Baseline Year |
The year the program/project is first implemented.
|
Benchmark |
A point of reference by which something can be measured, compared, or judged. It can be an industry standard or internal baseline against which a program indicator is monitored and found to be above, below or comparable to the benchmark.
|
Best Practice
|
A best practice is known as an intervention, method, process, activity or incentive that has consistently demonstrated its effectiveness in achieving results that are superior to those achieved through other methods or interventions.
|
Chronic Care Improvement Program (CCIP)
|
A set of interventions designed to improve the health of individuals who live with multiple or sufficiently severe chronic conditions, and includes patient identification and monitoring. Other programmatic elements may include the use of evidence-based practice guidelines, collaborative practice models involving physicians as well as support-service providers, and patient self-management techniques. (Publication 100-16 Medicare Managed Care Manual, Chapter 5)
|
Domain |
Topics that align with the National Quality Strategy to help the Medicare Advantage Organization’s (MAO’s) develop QIPs that will result in improved enrollee satisfaction and health outcomes.
|
Inclusion and Exclusion Criteria |
Defined parameters used to determine whether an enrollee may or may not be eligible to participate in the program/project or particular intervention.
|
Intervention |
The Agency for Healthcare Research and Quality (AHRQ) defines intervention as “A change in process to a health care system, service, or supplier, for the purpose of increasing the likelihood of optimal clinical quality of care measured by positive health outcomes for individuals.”
|
Lessons Learned |
The knowledge or understanding that was gained as a result of a study.
|
Methodology |
The means, technique, procedure, or method used to collect data or measure the effectiveness of a program/project or intervention.
|
Models of Care (MOC)
|
A structured care management process and system that enables MA plans to provide coordinated care for special needs patients. (Publication 100-16 Medicare Managed Care Manual, Chapter 16b)
|
Plan, Do, Study, Act (PDSA) |
A quality improvement model that is cyclical in nature and includes planning, implementing, studying a change, and acting on the results of that change.
|
Priority
|
Precedence, especially established by order of importance or urgency.
After indicating the priority level, the MAO should describe why it chose that particular priority level.
|
Program/Project Cycle Year |
Cycle year refers to a logical sequence of activities to accomplish the program or project’s goals or objectives. The CCIP program cycle year and the QIP project cycle year each begin on an established date. Together, each cycle of PDSA is a full cycle year. Subsequent cycle years begin on the anniversary of the beginning of the first program or project year. The cycle year may be independent of the CMS review cycle. |
Quality Improvement Project (QIP) |
An organization’s initiative that focuses on specified clinical and non-clinical areas to improve enrollee satisfaction and health outcomes. (Publication 100-16 Medicare Managed Care Manual, Chapter 5) |
Risk Mitigation |
A timely action to correct and prevent significant suspected or identified systemic problems or barriers that could prevent the goal from being reached.
|
Root Cause Analysis |
A formalized investigation and problem-solving approach focused on identifying and understanding the reasons for why a goal was not met, progress was not made, or a specified outcome was not achieved.
|
Sample Size |
The selection of a representative subgroup of plan members or units from the whole plan population. Sample size is expressed numerically and must be large enough to provide a valid representation of the entire population.
|
Special Needs Plan (SNP) |
An MA coordinated care plan that limits enrollment to special needs individuals who are 1) institutionalized, 2) dually eligible for Medicare and Medicaid, or 3) diagnosed with a severe or disabling chronic condition. (Publication 100-16 Medicare Managed Care Manual, Chapter 16b)
|
Target Population/ Audience
|
A selected group of MA plan members that meet eligibility criteria for participation in a CCIP or QIP. |
|
|
|
|
|
|
|
|
|
|
|
|
|
|
|
|
| File Type | application/vnd.openxmlformats-officedocument.wordprocessingml.document |
| File Title | HEALTH PLAN MANAGEMENT SYSTEM |
| Author | Wendy |
| File Modified | 0000-00-00 |
| File Created | 2021-01-31 |
© 2026 OMB.report | Privacy Policy