Revision to Geographic Support System Initiative (Community TIGER)
Generic Clearance for Geographic Partnership Programs
Community TIGER_Partner Data Preparation Reference Document
Revision to Geographic Support System Initiative (Community TIGER)
OMB: 0607-0795
Community TIGER: Partner Data Preparation Reference Document
Community TIGER: Partner Data Preparation Reference Document 1
1.1 Purpose of this Document 3
1.3 Community TIGER Partner Toolbox Contents 5
1.4 Community TIGER and the Local Government Information Model 7
2. Migration of Partner Data into the Community TIGER Schema 9
2.1 Preparation for Migration 9
2.1.1 Overview of the Community TIGER data migration process 9
2.1.2 Source data inventory 10
2.1.3 Data Preparation and System Settings 10
2.2 Getting started with Data Interoperability and the Spatial ETL tool 13
2.2.3 Opening FME Workbench and the Spatial ETL Tool 14
2.2.4 Layout of FME Workbench and the Spatial ETL Tool 14
2.3. Modifying the ETL tool 17
2.3.1 Connect your data to the Road Centerline and Address Data ETL workflows 17
2.3.2 Connect your data to the RoadCenterline and AddressPoint or ADDRESSTABLE data writers 20
2.3.3 Editing the settings of transformers 21
2.4 Running the Spatial ETL Tool 27
2.5 Additional Data Interoperability Extension Resources 28
2.6 Migrating data with geoprocessing and editing tools 29
3. Data Validation and Quality Check 30
3.1 Running the Master Data Validation tool 30
3.2 Viewing validation results 30
3.3 Validation and Quality Check Descriptions 32
3.3.2 RoadCenterline Checks 32
3.3.3 Metadata Validation Checks 33
4. Packaging and Submission 76
4.2 Packaging files for delivery to the Census Bureau 78
1. Introduction
1.1 Purpose of this Document
As a part of the U.S. Census Bureau's Geographic Support System Initiative (GSS-I), the Census Bureau is currently beta testing a proof of concept of a new process and system for the acquisition and improvement of the following data from partners, via the Community TIGER platform.
Streets (RoadCenterline), and/or
Addresses (AddressPoint or AddressTable)
The purpose of this document is instruct to the Beta Test Partners in the preparation of their data holdings for upload into the Contribution Management System during the Community TIGER Proof of Concept Beta Test. This document provides user documentation on the standardized data model, data migration templates, validation checks, and additional tools and resources included within the Community TIGER partner toolbox. It also provides step-by-step instructions on how best to leverage these tools during the following recommended partner Community TIGER data preparation activities:
Download and installation of the Community TIGER partner toolbox
Data migration into the Local government data model format
Data evaluation, standardization, validation and editing processes for the migrated data
File packaging for upload into the Community TIGER system
The Community TIGER partner toolbox will be used by the partners to prepare their data for upload to the web based Community TIGER Contribution Management System (CMS). For the proof of concept, Census partners will be able to obtain the Partner Toolbox via email from Esri. If you do not have the toolbox, please contact Matt Bottenberg (Phone: 909 793 2853 ext, 1570 or Email: [email protected]).
The data provided by partners for the proof of concept beta testing will not be used or integrated with Census Bureau’s existing MTdb/MAF database.
Local Government Data Model: To share data with the Community TIGER program, and leverage the available data validation tools, web based contribution management platform, and streamlined workflows, the data must be delivered in the standardized Local Government data model. Migration tools are included within the partner toolbox.
Data validation: This step performs automated data integrity checks on address and street data prior to upload. These have been pre-configured to meet standardized Census Bureau defined guidelines for topology, representation, attributes, and metadata. Running the validation checks will help partners maximize the quality of their address and spatial data holdings, minimize the need for post-delivery data clean-up, maximize both the value of the submission to the Census Bureau and increase the potential feature updates incorporated within the MAF/TIGER update. This will also minimize the required turnaround time at the Census Bureau to incorporate your submissions into their published TIGER updates. Features with errors with value of 1 in the Severity field cannot be processed by the Census Bureau. The errors (severity “1”), include feature topological errors like, invalid geometries, overshoot/undershoot, duplicate geometries, etc and missing mandatory attribute fields.,
Schema validation: The schema validation tool ensures that the data submitted uses the required Local Government data model. Data that does not conform to the Local Government data model will not be loadable into the Contribution Management System.
Data packaging tool: Creates a final zip file for upload into the Contribution Management System
Partner Toolbox Software Requirements: The Community TIGER data preparation processes workflows require the following software components:
ArcGIS Desktop 10.1, Service Pack 1
Data Interoperability Extension for ArcGIS 10.1, Service Pack 1
ArcGIS Data Reviewer 10.1, Service Pack 1
Supported operating systems are:
Windows XP Professional Edition, Service Pack 3 (32-bit)
Windows 7 Ultimate, Enterprise, Professional or Home Premium
Note: Windows VISTA is not supported
Please contact Esri, if you do not currently have the required software components licensed and installed.
Contact details:
Matt Bottenberg, Sr. Project Manager
Esri Professional Services
380 New York Street, Redlands, CA 92346
Phone: 909 793 2853 ext, 1570
Email: [email protected]
1.3 Community TIGER Partner Toolbox Contents
The installation of partner toolbox, will create a folder in the location “C:\Program Files (x86)\Esri\Community TIGER Partner Tools”. This folder will contain multiple sub folders with information and tools as illustrated in the picture below. From this installation folder, the three circled folders are important for data preparation. Please note that the Toolboxes, bin, Python and ReviewerBatchJobs folders should not be moved from their installation locations.
DataModel folder:
CommunityTIGER_Template file geodatabase: this geodatabase contains the Community TIGER data schema for partner data. Within the geodatabase is a feature dataset which contains the RoadCenterline and AddressPoint feature classes into which partner data will be migrated. There is also a geodatabase table “ADDRESSTABLE” for partners who do not have geometric data for their addresses. Note that the geodatabase contains many domains which are used to limit the valid values for various fields inside the geodatabase.
Data Reviewer file geodatabase: This geodatabase is configured to be populated with results from the address and road centerline automated data validation and quality checks.
COMMUNITYTIGER_SCHEMA.XML: This XML file is used in the Schema Validation section (see section 4.1 below).
DataValidationReview.mxd: an ArcMap document that contains layers with pre-configured symbology to allow easier visualization of results from the Master Data Valdiation tool.

Documents folder:
Data Dictionary.xlsx: This spreadsheet file details the definitions of attribute table fields for the various feature classes and data elements within the Community TIGER partner data schema. The table includes information on which fields must be populated with data to conform with the required schema, as well as the field domains which dictate accepted values for various fields.
ETL Configuration Template.xlsx: This spreadsheet is used to create the value mappings between partner codes for various data fields and the required codes used in the Community TIGER data schema.
Partner Data Preparation Instructions.docx: Concise instructions for those more familiar with the various tools used and the Community TIGER program.
Partner Data Preparation Reference Document.docx: Refers to the present document. (Not visible in ArcCatalog as in the below image, but visible in Windows Explorer)
Toolboxes folder:
Community TIGER Partner Tools.tbx: ArcGIS toolbox containing various tools used in migration, data validation and data packaging. The below elements inside the toolbox will only be visible in ArcCatalog or the ArcMap ArcCatalog window. The toolbox should remain with the Toolboxes folder.
Step1_Migrate Data To CommunityTIGER Schema: Partners will use this tool to migrate their data into the CommunityTIGER_Template geodatabase. This tool is not visible in the toolbox unless the ArcGIS Data Interoperability Extension is enabled (see 2.1.3 below).
Step2_Master Data Validation: Will be used to validate data and metadata following migration into the template geodatabase.
Step3_Schema Compare: Prior to packaging the data for submission to the Census Bureau, the partner will run this tool to verify that the schema of the data to be submitted conforms to the Census schema. This tool refers toCOMMUNITYTIGER_SCHEMA.xml in the DataModel folder.
Step4_Create Data Upload Package: Final zip file creation tool, which allows the partner to zip the populated file geodatabase and configured toolset.
The tools can be run directly from the “Community TIGER Partner Tools\Toolboxes” folder; they don’t need to be copied elsewhere. If they are copied, the entire folder structure (“Community TIGER Partner Tools “) must be copied with it to maintain relative paths to Python scripts, etc. The tools can also be run from ArcToolbox: Right-click on ArcToolbox click “Add Toolbox…”, navigate to “C:\Program Files (x86)\Esri\Community TIGER Partner Tools\Toolboxes\Community TIGER Partner Tools.tbx”.
Depending on the partner’s computing setup, it is possible that the partner will not have edit permissions for the default location in which the Community TIGER Partner Tools folder is created. In such cases in particular, it is advised that the partner copy the entire folder to a location where the partner does have edit privileges.
Bin, Python and ReviewerBatchJobs folders:
These folders contain various files necessary to run the tools inside the Community TIGER Partner Tools toolbox. Their location relative to the Toolboxes folder should not be changed, or else multiple tools will not function.
1.4 Community TIGER and the Local Government Information Model
The Local Government Information Model is the common data model powering ArcGIS for Local Government, a collection of valuable resources created and maintained by Esri for local government GIS users. ArcGIS for Local Government includes a rich and growing suite of templates, maps, and apps to support common local government workflows. By operating from a standardized data model it supports data sharing between local and regional governments, state, and federal agencies such as the US Census Bureau.
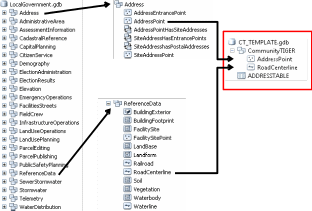
The Local Government Information Model is meant to support a wide variety of applications, the number of feature classes, attributes and other geodatabase elements. Organizations often selectively implement those parts of the model that fit their business needs. Community TIGER is built on a Community TIGER data model: A subset of the Local Government Information Model.
The graphic above illustrates the Community TIGER feature dataset and its feature classes from the Local Government Information Model, and a standalone ADDRESSTABLE, to support source address data stored only in tabular format.
2. Migration of Partner Data into the Community TIGER Schema
2.1 Preparation for Migration
2.1.1 Overview of the Community TIGER data migration process
Migrating source data to the Community TIGER Model will be an important pre-requisite step to leverage the available desktop and cloud Community TIGER tools, and web-based Contribution Management System. The topics in this section provide details on the migration process and explanations for the tools that can be utilized.
Import model to new geodatabase - You will need to import the model schema into a new, empty geodatabase using the local spatial reference of your choice. Instructions for importing the Local Government Information Model xml workspace can be found in the ArcGIS for Local Government Help.
Pre-migration data standardization - The Community TIGER data model consists of a geodatabase called CommunityTIGER_Template.gdb containing a feature dataset, within which there are RoadCenterline and AddressPoint feature classes. For contributors who do not have address point geometry, a separate AddressTable is also included in the geodatabase. While the geometry of contributor data is maintained as is, the Community TIGER data model requires that attribute data be located in pre-defined fields with specified names, and some field values are limited to a specified set of values (i.e., a “domain”).
It is recommended that partners review the enclosed data model provided in the Partner toolbox, and compare it the schema on their source data for potential consistency issues prior to initiating data migration and attribute mapping. If values in your data are not standardized, you may find it beneficial to take the time to standardize your data before performing the value mapping within the ETL tool.
Migrate source data to new geodatabase - Once your new, empty Community TIGER geodatabase is ready, you will populate it with your relevant source data. There are numerous ways to migrate source data into the CommunityTIGER data model. The workflow and tools you choose will be based on your source data, the layers you're contributing and your own personal preference. Options for migrating source data into the Local Government Information Model for contributing to Community TIGER fall into two basic categories:
Using the pre-configured Spatial ETL tool included as part of the Community TIGER Partner Tools toolbox: The ArcGIS Data Interoperability Extension provides access to a powerful software module called the FME Workbench. This software is used to create, edit and execute Spatial ETL (Extract, Transform and Load) Tools, which can perform data migration and transformation tasks for a wide array of data types. Contained in the Community TIGER Toolbox is a pre-configured Spatial ETL tool, designed to streamline the data migration task. A primary benefit of using the tool is that its configuration can be saved in a single convenient package, allowing the user to execute the same migration process in the future.
Using ArcGIS for Desktop geoprocessing and other editing tools - While more familiar to users, it can sometimes take more effort to build the workflows to use regular geoprocessing tools.
While this documentation focuses primarily on the first option, it also provides some suggestions for other approaches for performing the data migration. The choice of which method of data migration to use is entirely up to the contributor.
4. Perform data validation processes – In order to confirm that the data being contributed meets Census Bureau data quality standards, Master Data Validation and Schema Validation tools are provided. The Master Data Validation process reviews geometry, attribute and metadata quality, while the Schema Validation serves as a final check to ensure that the schema of the data has not been altered from the original template, and can thus be ingested into the Census Bureau’s databases.
2.1.2 Source data inventory
As a prospective contributor of authoritative content to the Community TIGER Program it is advisable to take an inventory of the data you wish to submit to the Census Bureau. This helps answer the following questions:
Is it time to provide a data submission to the Census Bureau? One of the benefits of Community TIGER is that is provides automated and interactive tools for authoritative partners to update TIGER at any time, based on your organizational workflows, operational needs and schedule. To assist making that determination, partners can undertake a sampled visual comparison of their authoritative street centerline data, relative to published TIGER streets.
Is my data in the required format with the necessary attributes to be processed via the Community TIGER program? The Data Dictionary spreadsheet within the Documents folder in Community TIGER Partner Tools defines the required attributes for address and road centerline data. It is also recommended that this spreadsheet be used to compare your source data to the Community TIGER data model. This will prove a useful preparatory step prior to commencing the data migration process.
2.1.3 Data Preparation and System Settings
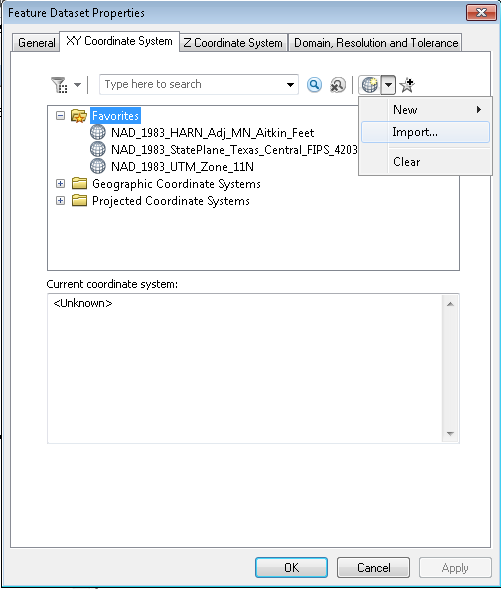
The contributor should first move the two geodatabases within /Community TIGER Partner Tools / DataModel/ to their preferred data processing location. The data model has been supplied without specifying any spatial reference. The contributor is asked to set the spatial reference of the feature dataset within CommunityTIGER_Template.gdb to the same spatial reference used for data they contribute.
Set the feature dataset to the spatial reference of source data
Right-click the feature dataset (i.e. “CommunityTIGER”) in CommunityTIGER_Template.gdb
Select Properties…
Click the XY Coordinate System tab
Either navigate to the coordinate system within the folder hierarchy, or import from an existing dataset by clicking the black triangle next to the globe icon to expose the drop-down menu, select “Import…” and navigate to the data whose spatial reference you want to import.
Enabling the Data Interoperability Extension
Spatial ETL Tools are edited using the FME Workbench, a software module which can only be used after the Data Interoperability Extension is enabled. The Spatial ETL tool included in the Community TIGER Toolbox will not even be visible within ArcMap or ArcCatalog unless the extension is enabled. To enable the Data Interoperability Extension, follow the below steps. Note that the FME Workbench is launched by selecting an ETL Tool and editing it. This can be done in either the ArcCatalog window or ArcMap or ArcCatalog itself. The user must enable the extension in the Esri program from which the Spatial ETL Tool is edited.
In either ArcMap or ArcCatalog navigate to the Customize menu item on the toolbar.
On the drop down list select Extensions

Make sure that the Data Interoperability Extension is checked on in the list of extensions available.

2.2 Getting started with Data Interoperability and the Spatial ETL tool
2.2.1 The Spatial ETL Tool
The Data Interoperability extension allows you to create powerful and sophisticated tools for populating your Community TIGER geodatabase from your source data files, regardless of their format. While new users of the extension may face an initial learning curve, the reward can be a meaningful decrease in the level of effort needed for the overall data migration process.
Community TIGER ETL Data Load Tool for Community TIGER partner data submissions has a relatively simple workflow that will transform and load source data into the CommunityTIGER_Template data model, regardless of their format. The tool is preconfigured so that the user simply has to edit two bookmarked sections contained within the tool to be used with the partner’s submission data for RoadCenterline features, and AddressPoint features or records.
2.2.2 Useful vocabulary
Spatial ETL Tool: a type of tool that can be added to an ArcGIS Toolbox which Extracts data from source datasets, Transforms the data, and Loads it into destination datasets. The Data Interoperability Extension grants access to these tools, and they are created with FME Workbench software. In the context of GIS, Spatial ETL Tools are often just called ETL Tools.
FME Workbench: The primary software tool in the Data Interoperability Extension. Workbench provides a graphical interface to create, edit and run Spatial ETL tools. It supports over 275 different data formats.
Reader: source dataset
Writer: destination dataset
Transformer: similar to a geoprocessing tool in ArcMap, a transformer is an FME Workbench object that carries out the restructuring of features from the source data to the destination data. FME contains over 400 different transformers.
Bookmark: an organizational device within the Workspace Canvas. They appear as boxes with colored boundaries and a title. A bookmark can be navigated to quickly by clicking its name in the Navigator window under “Bookmarks”.
ETL Workflow: a term used in these instructions to refer to the two series of transformers contained in the Spatial ETL tool, i.e., the Road Centerline ETL Workflow and Address Data ETL Workflow, each contained in a light brown bookmark.
2.2.3 Opening FME Workbench and the Spatial ETL Tool
Navigate to the location where the Partner toolbox has been stored.
Expand the toolbox by clicking on the plus (+) sign on the left side of the toolbox.

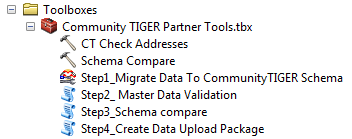
Right click on the spatial ETL tool, called “Step1_Migrate Data to CommunityTIGER Schema”, and select Edit.
This will open the FME Workbench with the preconfigured tool parameters for a Generic workspace.
Note: if you close the ArcMap or ArcCatalog session within which you launched, FME Workbench will also close. You will be given the option to save any changes made to the ETL tool.
2.2.4 Layout of FME Workbench and the Spatial ETL Tool
Once the FME Workbench has opened up (this is the “workspace”), you should see four windows appear.
On the left is the Navigator window which lists input and output datasets and various properties associated with the workspace.
On the upper-right is the Workspace Canvas window, where the ETL tool is manipulated graphically.
On the lower-right is the Log window. This will show log information when data is read into the tool or the ETL tool is run
On the lower-left is the Transformer Gallery, where the various transformer tools can be browsed and added to the Workspace Canvas.
To re-open one of these windows if it has been closed, click View on the FME Workbench toolbar, select Windows and click the window you want to expose.

The Workspace Canvas window contains two large light-brown boxes (“bookmarks”), containing the Road Centerline and Address Data ETL Workflows. You will likely need to zoom out to view the entire contents of the Workspace Canvas.
Within each of the ETL Workflow bookmarks are an additional two bookmarks. These light red bookmarks (see image below) contain elements that need to be configured by contributors, while those in the gray bookmark need not be configured.
Inside each of the light-red bookmarks are several transformers, tool elements which carry out particular data manipulation tasks.
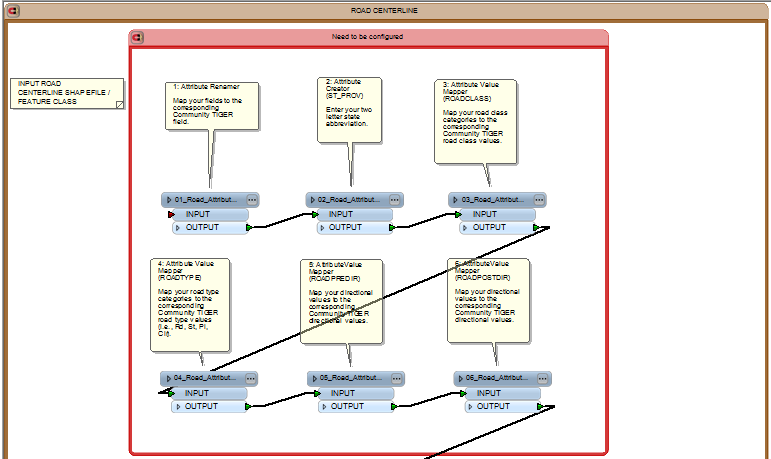
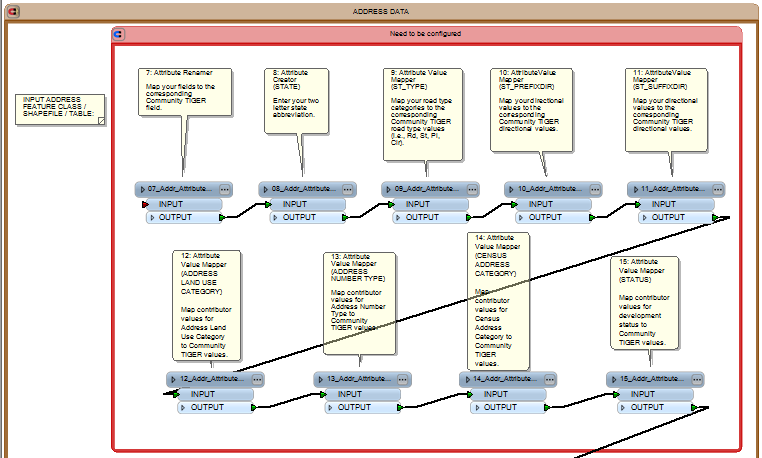
ETL Tools consist of Readers, Transformers and Writers, which our responsible for the extracting, transforming and loading (ETL) processes. A reader represents the link to one’s source data, while the writer represents the link to the output data. Readers are linked to writers via one to many intervening transformers. Each transformer has input and output ports, placed to facilitate workflows that proceed from left to right in the Canvas Workspace. The call-out balloons (called “Annotation”) seen here containing the name of the transformer and a description of the data manipulation the transformer performs.
2.3. Modifying the ETL tool
The modifications contributors must perform include connecting input and output datasets and configuring three types of transformers. This section provides detailed instructions on how to perform these modifications.
2.3.1 Connect your data to the Road Centerline and Address Data ETL workflows
In FME Workbench, a connection to input data is called a Reader. Below are instructions for how to add one’s data as a reader and connect it to the ETL workflows. It is recommended that you first test the migration tool with a subset of a few thousand records or fewer (road and address records combined), then when you are ready to migrate the full dataset, delete the readers for the test subset and add readers for the full dataset.
Note: Even though road centerline and address data of the same data type can be added as a single reader, it may be beneficial to add them as separate readers. When an ETL tool is executed, FME Workbench reads all data for a particular reader connection. If input datasets are large, this can be time-consuming. One can prevent Workbench from reading in both datasets by adding them as separate readers and right-clicking one of the readers in the Navigator window and selecting “Disable Reader”. The reader can later be enabled by right-clicking and selecting “Enable Reader”.
Adding source data as a reader:
Open the “Add Reader…” wizard
On the menu toolbar, click “Readers”
Select “Add Reader…”
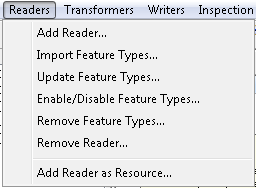
Select your source data’s file format
In the “Add Reader” dialog box, next to the “Format” field, click the ellipsis button.
Navigate to the format of your data.
Click OK.
If your data is in a geodatabase, select “File Geodatabase ArcObjects”. If your data is in shapefile format, click “Esri Shape”.

Specify the location of your source data
If your data is in a geodatabase, click the ellipsis button next to the “Dataset” field. Navigate to the .gdb folder. You may need to double click the folder to close the “Select Geodatabase” dialog box. Click OK.
If your data is in shapefiles, click the button with a plus sign next to the “Dataset” field. You can either add files or a directory.
Click OK.
You may have to wait a few moments for the tool to read the data into the ETL.
If you are adding multiple feature classes/shapefiles/etc. at once, select the appropriate files in the Feature Types window and click OK.
Reader icons corresponding to the feature classes/shapefiles you added will appear in the Canvas window.
To connect your data to the Road Centerline and Address Data ETL workflows
Each of the reader icons needs to be connected to its corresponding ETL workflow.
Connect the Road Centerline reader to the transformer labeled “Attribute Renamer” in the Road Centerline ETL workflow’s “Need to be configured” bookmark.
To connect, click the yellow triangle of the reader icon and drag to the red arrow on the left side of the “AttributeRenamer” transformer within the “Need to be configured” bookmark in pink. The arrows should turn green. (see image below)
Connect the Address Data reader to the same transformer in the Address Data ETL workflow.

To replace test dataset readers with readers for the full dataset, simply select the reader icon and delete it. Then follow the above steps to add readers for the full dataset.
2.3.2 Connect your data to the RoadCenterline and AddressPoint or ADDRESSTABLE data writers
Writers are the “output” equivalent of a reader. The writers are included in the Spatial ETL Tool. Address data can be accepted by Community TIGER as a feature class or a geodatabase table. There is one writer each for spatial and tabular outputs, and contributors need only provide one (see the lower left-hand corner of the Spatial ETL Tool). Since road centerline data can only be accepted in feature class format, there is only one Road Centerline writer (see the lower left-hand corner of the Road Centerline ETL Workflow). The ETL Tool is already configured for those contributors whose address data includes geometry. For those contributors who choose to provide data in tabular format, the connection between the Address Data ETL Workflow’s last transformer and the Address Data feature class writer must be deleted (right-click) and reconnected. The connection process is similar to that described at the end of section 2.3.1 above.
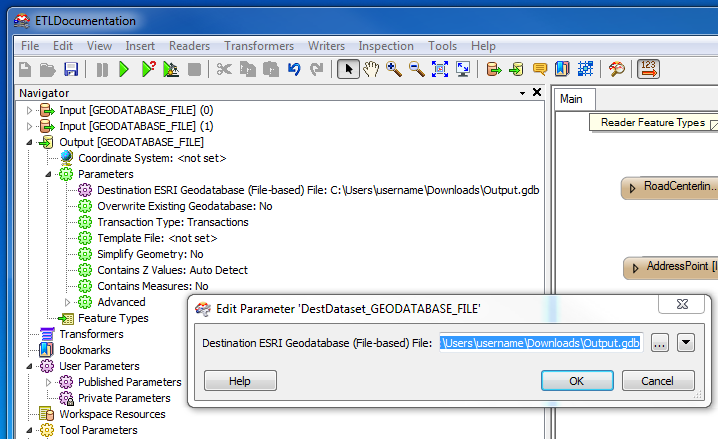
All contributors must then update the data connections for the writers. To do this:
In the Navigator window, locate the writer icon
 and
left-click the triangle to expose the writer’s settings.
Similarly, expand “Parameters”
Right click the first line, “Destination ESRI Geodatabase…”
Select “Edit Parameter Value…”
Click the ellipsis button to navigate to the location where you placed the geodatabase within the Community TIGER Partner Tools folder. Click OK.
2.3.3 Editing the settings of transformers
FME contains over 400 different transformers that perform a wide variety of geometric and attribute processing tasks. There are only three transformer types whose configuration needs to be edited. They are:
1. Attribute Renamer
2. Attribute Creator
3. Attribute Value Mapper
Both of the ETL workflows have one or more instances of each of these three types of transformers. General explanations how to configure each type is below. Note that each transformer that needs to be configured is labeled with a number.
Following an explanation of how to use the ETL Configuration Template, instructions for how to configure the three transformer types are given.
The ETL Configuration Template
Field names and codes used in the partner data likely do not match those used in the Community TIGER schema. Attribute Renamers and Attribute Value Mappers perform such value mapping. It is often easier to create the necessary value mappings in an external spreadsheet and load the values in rather than modifying mappings directly in the transformers. Community TIGER provides the ETL Configuration Template spreadsheet for this purpose.
The ETL Configuration Template contains a worksheet for each transformer that performs a value mapping. The numbers on the worksheet tabs correspond to numbers in the transformer labels. Partners need only fill in those worksheets for which they have data (e.g., if a partner’s data does not include a field for a street’s suffix direction, the worksheet “6 and 12” need not be filled in).
The Data Dictionary provides a comprehensive listing of fields in Community TIGER schema feature classes, as well as a metadata such as field definition and size. Fields that the partner must populate are highlighted in yellow, and have a value of “Y” in the field “Mandatory.” Fields that the Census Bureau would like to have populated if possible are labeled “Preferred.” The transformer pertaining to a particular field is listed in “Notes.” Several fields have restrictions on the values that can be used. The field “Domain” provides the particular list of permitted values. Click on the link to view the list.
Open the “Step1_Migrate data To Community TIGER Schema” ETL migration tool by right-clicking and selecting “Edit…”.
For an introduction to FME Workbench, see section 2.2 in the Reference Document.
Open the ETL Configuration Template.
For AttributeRenamer transformers (transformers 1 and 7) fill in the field “Partner_Field_Name”. For all other transformers, the relevant field to fill in is called “Partner_Code_Value”.

If there are Community TIGER values for which the partner does not have a corresponding value, delete the row.
Blank cells may cause errors when loading worksheets into the ETL migration tool’s transformers.
Configuring Attribute Renamer Transformers
The Attribute Renamer transformer changes the name of fields in its input data. Here the contributor decides which fields in their data correspond to fields in the CommunityTIGER_Template data model schema.
Mapping of data values from contributor data to the appropriate values in the CommunityTIGER_Template data model is accomplished with the Attribute Value Mapper transformers (see below). These instructions apply to the Attribute Renamer transformers in both the Road Centerline and Address Data ETL workflows.
To configure:
Open “ETL Configuration Template.xlsx”. It is advisable that make a copy of the spreadsheet prior to editing as described in the section 3.1.4.
Find the tab with the same number as the label above the transformer you are configuring.
Edit the field named “Partner_Field_Name”, enter the fields in your data which correspond to the field listed in the field “CommunityTIGER_Field_Name”. Consult the Data Dictionary spreadsheet to see which of your fields correspond to Community TIGER fields.
Delete any rows where there is no value in “Partner_Field_Name”
Click the properties button on the Attribute Renamer transformer (upper-right corner of the transformer)

Imported values from the spreadsheet will be appended to the Attribute Renamer’s field mapping table. Delete any unwanted records already in the field mapping table. Use the “minus” button in the lower left corner of the window. The keyboard shift key can be used to select multiple records at once.
Click Import…
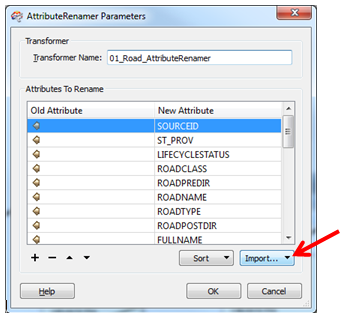
Choose Attribute Values Containing Names
Select Microsoft Excel for the format by clicking the ellipsis button next to the “Format:” field and navigating to “Microsoft Excel”.
Navigate to “ETL Spreadsheets.xlsx” by clicking the ellipsis button next to the “Dataset:” field.
Click Next.
Select the appropriate spreadsheet tab. Click Next.
Select “Partner_Field_Name” (for ‘Old Attribute’). Click Next.
Select “CommunityTIGER_Field_Name” (for ‘New Attribute’). Click Next.
Click Import.
The field mapping should have been imported.
Save edits.
Note: By default, FME Workbench automatically migrates data from any field in an input dataset that has the same name as a field in the output dataset, even if there is no such value mapping in the Attribute Renamer. To prevent this from happening, click the properties button of the reader icon to open the Feature Type Properties box. Click the User Attributes tab and uncheck the box in the column “Exposed” next to the appropriate field.
Configuring Attribute Creator Transformers
The Attribute Creator transformer adds a new field to the input of the transformer and assigns a default value. There are two Attribute Creator transformers in Road Centerline and one in Address Data.
To configure:
Click the transformer properties button (the ellipse button on the upper right of the transformer)
Click the cell under Value and edit appropriately.
Notes for specific transformers:
Attribute Creator (State) in both Road Centerline and Address Data: Please use two-letter state abbreviations.
Attribute Creator (Data Source Name) in Road Centerline: Please input the official name the Census uses to refer to your organization as the GIS data contributor.
Click OK.
Configuring Attribute Value Mapper Transformers
Some fields in the CommunityTIGER_Template schema are limited to a predetermined set of values (a “domain”). This transformer serves as a “crosswalk” table, which maps values in a particular field of the contributor’s data to the appropriate standardized values in the output CommunityTIGER_Template feature class. There are a total of eight Attribute Value Mapper transformers to configure. The description of what various domain values mean is given in the Data Dictionary spreadsheet in the Partner Data Package. It will be necessary to review the domain which applies to a CommunityTIGER_Template field referenced in an Attribute Value Mapper before configuring it. Instructions pertaining to all Attribute Value Mappers are given first. Below you will find additional instruction for individual Attribute Value Mapper transformers.
Note: the below instructions assume that the contributor will use tables created in the ETL Configuration Template and load those into the Attribute Value Mapper. It may be quicker to simply enter values manually, especially for transformers 12 through 15 in the Address Data ETL Workflow.
To configure:
Open “ETL Spreadsheets.xlsx” in the Documents folder.
Find the tab with the same number as the label above the transformer you are configuring.
In the field “Partner_Code_Value”, enter the values in your data which correspond to the values listed in the column “CommunityTIGER_Code_Value”. Consult the Data Dictionary spreadsheet in the Documents folder. The field “CommunityTIGER_Code_Value Description” gives the name or the meaning of the code. It is provided for reference. If multiple code values from your data map to a particular Community TIGER code value, add extra rows as needed. Be sure to use your full dataset (not a test dataset) to derive the list of values for Partner_Code_Value.

Delete any rows for which there is no value in “Partner_Code_Value”
Click the properties button on the Attribute Value Mapper transformer (upper-right corner of the transformer)
Imported values from the spreadsheet will be appended to the Attribute Value Mapper’s field mapping table. Delete any unwanted records already in the field mapping table. Use the “minus” button in the lower left corner of the window.
Click “Import…”

Click “Change…”.
Select Microsoft Excel for the format by clicking the ellipsis button next to the “Format:” field and navigating to “Microsoft Excel”.
Navigate to “ETL Spreadsheets.xlsx” by clicking the ellipsis button next to the “Dataset:” field.
Click OK.
Click Next.
Select the appropriate spreadsheet tab. Click Next.
As the “Key Attribute”, select “Partner_Code_Value”. Click Next.
As the “Value Attribute”, select “CommunityTIGER_Code_Value”. Click Next.
When scanning is complete, click “Finish”.
The field mapping should have been imported. The values in the left column are partner values, while the values in the right column are Community TIGER value.
Save edits.
Suggestion:
Create a summarize table for road types in your source data: One suggestion that can help reduce the difficulty of creating the list of ROADTYPES used in one’s source data is to create a summary file of the source field containing road types. This can be done by opening up the attribute table to either your roads or address data in ArcMap, right-clicking on the road types field and choosing “Summarize”. Then just choose an output location for the table and click OK. Inside the output table will be a list of the unique road types in the source data and a frequency count. This table can then be compared to the RoadType domain table within the Data Dictionary to create a table that can be imported into the Attribute Value Mapper.
Instructions pertaining to specific Attribute Value Mapper transformers (each is referred to by the name in parentheses on the label pointing to the transformer)
The following transformers pertain to CommunityTIGER_Template fields which must be populated with data in order to be considered a valid submission: “Road Type” and “Road Class” in Road Centerline, and “Road Type” in Address Data. The data in these fields must be present in the original contributor data and renamed appropriately in the Attribute Renamer transformer.
A default value of “Current” is assigned for records whose values are not mapped within the transformer “Status” in Attribute Value Mapper.
There are some transformers in the “Need to be configured” for which a contributor may not have data. For example, some cities may not use suffix directions in road names. In such a case, leave the transformer as is (a red exclamation point
 will display in the upper-right corner of the transformer). When
running the ETL tool an “Invalid Transformer Parameters”
warning will display. Click yes to dismiss the warning.
2.4 Running the Spatial ETL Tool
After finishing all necessary configuration steps and saving edits, the Spatial ETL data can be run to migrate contributor data to the CommunityTIGER_Template data schema.
Click the plain green triangle on the menu toolbar. If the cursor hovers over it, the text “Run or Resume Translation” should appear.

If the tool has been successful, a “Feature Written Summary” should appear at the end of the log in the Log window. Here you can verify that the correct number of features were read from contributor data and written to CommunityTIGER_Template.gdb.
Notes:
If the tool did not succeed, warnings and errors can be checked within the log file. Warnings are written in blue, errors in red. Log files can be saved to a user-defined location by right-clicking in the log window and selecting “Save to file…”. The log can be viewed with a simple text editor, although it may be more legible if opened with a formatting-enabled text editor or spreadsheet application.
If the tool is run again without editing writer locations, the data will be appended to the writer datasets.
As mentioned in greater detail in the note in section 2.3.1, it may be useful to temporarily disable the reading and writing of data from one of the input data sources (e.g., one’s address data may already be migrated correctly, but some edits need to be performed on the Road Centerline ETL Workflow). This can be done by right-clicking on the data source’s reader icon and selecting “Disable”. To allow reading from the reader again, right-click the icon and select “Enable”.
2.5 Additional Data Interoperability Extension Resources
FME Workbench help: Clicking the Help button on the FME Workbench menu bar opens up the ArcGIS Data Interoperability help. The FME Workbench functionality that the Community TIGER Spatial ETL tool exploits is only the tip of the iceberg, and much of the documentation here contains more detail than is necessary to configure the tool. The following sections may be of particular help to users:
Workbench Help > Getting Started with Workbench >
Workbench Help > Getting Started with Workbench > FME Workbench Help
Readers and Writers Reference
Loading Local Government data into the Esri Community Maps Program webinar - This free one hour webinar produced by Safe Software (makers of the Data Interoperability extension) details how to create a custom spatial ETL tool for migrating source data to a Local Government geodatabase for Community Maps contribution.
ArcGIS Data Interoperability Basics - This free one hour training seminar introduces the concepts and terminology of the Data Interoperability extension.
ArcGIS Online Help documentation - The ArcGIS Online Help contains comprehensive documentation for the Data Interoperability extension, including a full tutorial on "Transforming data with spatial ETL tools".
2.6 Migrating data with geoprocessing and editing tools
The Data Interoperability Extension is a powerful tool for performing these types of data migration tasks, because it allows you to combine multiple steps into a single workflow, supports many different formats, provides a log for post-migration quality control, and settings once configured can be saved for future migration activities. Furthermore, it has already been configured specifically for migration into the Community TIGER data schema.
However, if you do not choose to use the Data Interoperability Extension, you can achieve the same results by using ArcGIS Desktop geoprocessing tools such as the Simple Data Loader in ArcCatalog, and the Object Loader in ArcMap.
Data loaders - These tools allow you to populate feature classes in your Community TIGER geodatabase with source data from geodatabases, shapefiles, coverages or CAD files.
The Append tool - Like the data loaders, this tool populates an existing feature class with data from multiple input sources. It can also be used in a ModelBuilder model or Python script, which is useful if you are creating a batch process.
Data management tools - Tools in this toolbox can be used to process source data before loading into the Community TIGER geodatabase.
2.7 Post Migration QC
After running the Spatial ETL Tool, the following quality check activities are suggested.
Check the log window after running the tool. At the end of the log file, an accounting of records read and written is given. These can be compared to the features in the original data sources.
Open the migrated files within ArcMap or preview the files in ArcCatalog. Check that data has indeed been written to the expected fields. Visually check or check a sample of values in each field to which data was written.
Visually compare spatial data by overlaying data migrated into the Community TIGER geodatabase with the original source data.
3. Data Validation and Quality Check
It is strongly recommended that partners use the data validation and quality check tool included as part of the Community TIGER Toolbox. The results returned from the checks performed by the tool will assist partners in proactively identifying potential data quality issues, which will in turn maximize the quality of their data holdings, minimize downstream quality issues, make the submission process as efficient as possible, and maximize the proportion of features used to update the Census Bureau’s TIGER data. Uploaded data not fully conformant to the Community TIGER data model cannot be processed and delivered to the Census Bureau.
The tool “Master Data Validation” contains various data validation and quality checks for both the AddressPoint and RoadCenterlines feature classes. Results are written to the DataReviewer.gdb file geodatabase. After enabling the ArcGIS Data Reviewer Extension, contributors can open up a Data Reviewer session and view the features that were flagged by the tools. Contributors can confirm the validity of the flags and edit them within an ArcMap edit session.
3.1 Running the Master Data Validation tool
Directions:
In ArcCatalog, navigate to the Partner Toolbox and expand it.
Double-click the “Master Data Validation” script tool.
Navigate to the geodatabase containing your migrated data.
Navigate to the DataReviewer.gdb file geodatabase in the DataModel folder.
Click OK.
Depending on the number of features in your data and the number of features flagged, the tool could run for multiple hours. For smaller datasets, it may take just a few minutes.
3.2 Viewing validation results
It is recommended that contributors use the ArcGIS Data Reviewer Extension to view the results of the Master Data Validation tool. Data Reviewer provides a convenient and interactive visual interface to view results and document changes a contributor has made in response to the data issues flagged by the tool.
Reviewer records are ranked by their severity. Records with Severity of 1, ‘Errors’, are more serious than records with Severity of 3, ‘Warnings’. Errors should be addressed as the Census Bureau will most likely be unable to accept those features; Warnings should also be addressed, though the Census Bureau may still be able to accept features with Warnings.
Edits can be made with standard ArcMap editing tools. For more information about how Data Reviewer can be used to document changes addressing flagged features, see the entries “Updating the correction status for records” and “Updating the verification status for records” in ArcGIS 10.1 Help.
Run the Master Data Validation tool and ArcMap editing processes repeatedly as necessary to eliminate errors exist in the dataset.
To view results:
Enable the Data Reviewer Extension
Click Customize on the ArcMap main toolbar.
Choose Extensions.
Click the checkbox next to “Data Reviewer.”
Open up a Data Reviewer session
Add the Data Reviewer toolbar. Right-click on the ArcMap menu bar. Locate “Data Reviewer” and click it. The toolbar can be removed by clicking once more.
Click the Reviewer Session Manager icon (left-most icon on the toolbar).
Under Reviewer Workspace, click Browse…. and browse to the DataReviewer.gdb file geodatabase. Click OK.
Enter a user name. The entry in this field does not control access to the results. It serves to identify who made changes, if any, to the records in the Data Reviewer table.
Under “Session”, choose “Session 1 : Session 1” under in the ID drop-down menu.
Click “Start Session” at the bottom of the window.
Click “Close”.
View Errors and Warnings
Click the table icon (second from left) on the Data Reviewer toolbar.
The Reviewer Table should appear. Note that this table can be docked or undocked from its initial location.
Find the Attribute column entitled ‘REVIEWSTATUS’ and click and drag it into the box above the Reviewer Table that says “Drag a column header here to group by that column”
Click the plus sign next to any group to expand it.
Find the Attribute column entitled ‘SEVERITY’ and click and drag it into the box above the Reviewer Table that says “Drag a column header here to group by that column”
Manipulating records within the Data Reviewer table:
Groups can be viewed by pressing the “plus” icon to expand the groups. Multiple field headings can be dragged to the top of the table to create nested groupings. To undo the groupings, drag the icon of the field name back down into the table.
Double click on individual records to zoom to their features.
To select entire groups of features with the same Errors or Warnings, expand the group by clicking on the “plus” icon next to it, while holding down Ctrl, click on the topmost record, scroll to and click the last record. All of the records should be selected. Right-click on the records and click on ‘Select Feature Geometry’
View Errors and Warnings in DataValidationReview.mxd
Navigate to DataValidationReview.mxd.
If necessary, source the layers in the table of contents to the feature class of the same name in the geodatabase containing your migrated data.
Note: features may have multiple errors and/or warnings associated with them. View the Data Reviewer table to confirm.
For further information about using the Data Reviewer table, see the ArcGIS 10.1 Help entry “A quick tour of Data Reviewer”, section “The Reviewer table”.
3.3 Validation and Quality Check Descriptions
This section will be expanded.
3.3.1 AddressPoint Checks

3.3.2 RoadCenterline Checks

3.3.3 Metadata Validation Checks
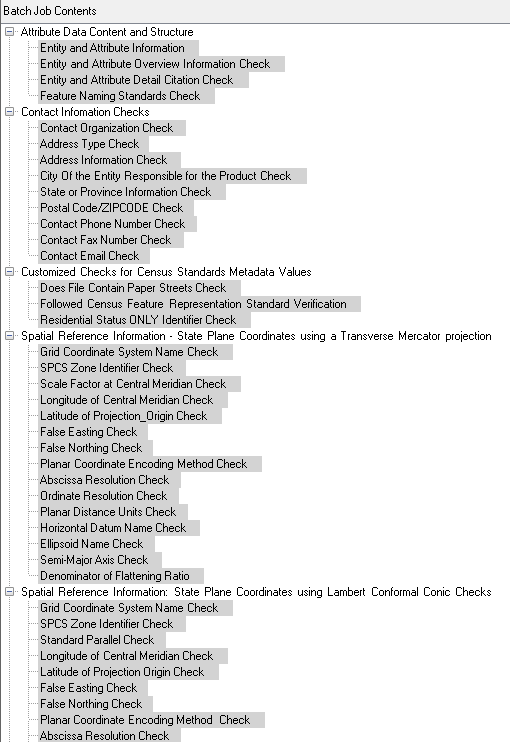
The US_Census_MetadataValidation batch job for ArcGIS Data Reviewer contains the following checks for the metadata associated to the submission features to assure that the metadata meets the US Census Bureau standards for quality and completeness in the Metadata standards (data about the data):
To open the metadata editor…
(additional instruction to be included here)

Address Data Content Guidelines
GEO Address Element |
Preferred GEO Address Element |
Minimum GEO Address Element (Option 1) |
Minimum GEO Address Element (Option 2) |
Minimum GEO Address Element (Option 3) |
Minimum GEO Address Element (Option 4) |
Minimum GEO Address Element (Option 5) |
House Number |
Y |
Y |
Y |
Y |
|
|
Primary Street Name |
Y |
Y |
Y |
Y |
|
|
Alternate Street Name(s)* |
Y |
|
|
|
|
|
City |
Y |
|
|
Y |
|
Y |
State |
Y |
|
|
Y |
|
Y |
ZIP Code |
Y |
|
Y |
|
Y |
|
Block |
Y |
Y |
|
|
|
|
Spatial Coordinates^ |
Y |
|
|
|
|
|
Building Name, ID* |
Y |
|
|
|
|
|
Unit* |
Y |
|
|
|
|
|
Mile Marker* |
Y |
|
|
|
|
|
Parcel ID* |
Y |
|
|
|
|
|
Rural Route Descriptor |
|
|
|
|
Y |
Y |
Rural Route ID |
|
|
|
|
Y |
Y |
Box Number |
|
|
|
|
Y |
Y |
*When available/appropriate.
^Longitude/Latitude in decimal degrees to precision of six decimal digits.
Italics represent non-city style addresses only.
Feature Data Content Guidelines
Metadata Content Guidelines
Metadata Values and Placement in the ArcGIS Metadata Template Guidelines
Source Provider/Origin of the file (Critical) (8.1)
This information should be placed at the following location:
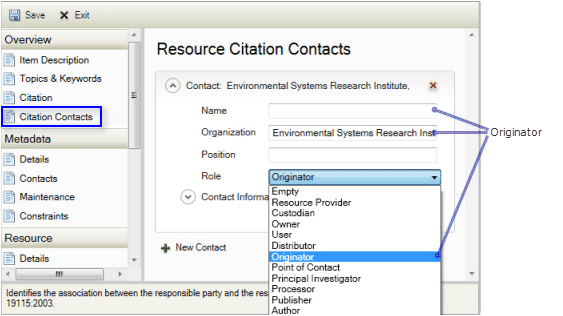
Fill in the appropriate Information.
Publication Date (The date the data was released) (8.2)
On the Citation page, the title you already provided appears at the top of the page. Click Dates. Click the calendar icon next to Published to select an appropriate publication date.

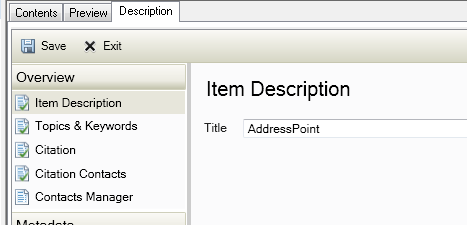
Title (The name of the product that is being released) (8.4)
For the item's citation only, the citation title can be edited in two locations, on both the Overview > Item Description page and the Overview > Citation page and these two locations are synchronized to display the same information.

Abstract (A brief summary of the product) (1.2.1)
Formatting may be used to enhance the appearance of descriptions that will be published to ArcGIS Online. However, this formatting is removed when content is exported to any standard-compliant metadata format.
Purpose (Reason why the data was developed) (1.2.2)

Beginning Date (The start date of the period the data covers) (9.3.1)
Place information in: Resource>Extents >Temporal Period Extent. Over time, more work is required to update outdated contact information than most of the other content in an item's metadata. When providing contact information, consider the longevity of the information.
Ending Date (The end date of the period the data covers) (9.3.3)

Currentness Reference (Basis on which the Beginning Date and Ending Date are determined ) (1.3.1)

Place a description in the Description box of the Extents dialog for the currentness reference.
Progress/Status (The state of the product. It can either be “Complete”, “In work” or “planned”) (1.4.1)
When an item's existing FGDC metadata is upgraded or imported to ArcGIS, the phrases provided in the Progress element and the Maintenance and Update Frequency element are both converted to coded values. Check the values of the Status element on the Resource > Details page and the Update Frequency element on the Resource > Maintenance page to make sure their values were set appropriately.
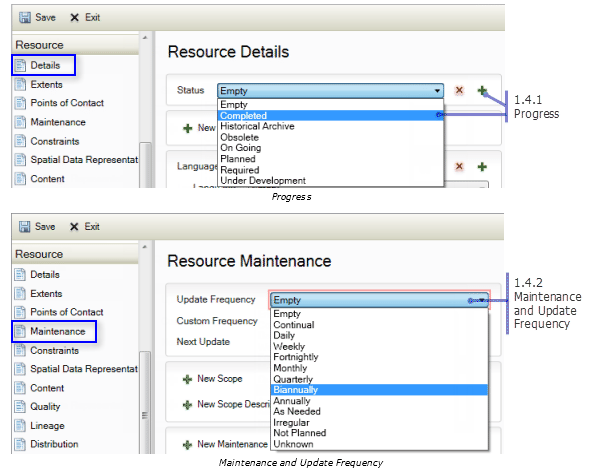
Maintenance and Update Frequency (The frequency with which changes are made to the data) (1.4.2)
West Bounding Coordinate (The western most coordinate of coverage in decimal degrees)(1.5.1.1)
It is not possible to define a bounding polygon for an item in the Description tab using this version of ArcGIS. However, if you have existing FGDC metadata that contains this information it will be upgraded and stored in the ArcGIS metadata format. It will be displayed along with the rest of the item's metadata and exported to FGDC-format XML files with the rest of the item's metadata content.
East Bounding Coordinate (The eastern most coordinate of coverage in decimal degrees)(1.5.1.2)
It is not possible to define a bounding polygon for an item in the Description tab using this version of ArcGIS. However, if you have existing FGDC metadata that contains this information it will be upgraded and stored in the ArcGIS metadata format. It will be displayed along with the rest of the item's metadata and exported to FGDC-format XML files with the rest of the item's metadata content.
North Bounding Coordinate (The northern most coordinate of coverage in decimal degrees)(1.5.1.3)
It is not possible to define a bounding polygon for an item in the Description tab using this version of ArcGIS. However, if you have existing FGDC metadata that contains this information it will be upgraded and stored in the ArcGIS metadata format. It will be displayed along with the rest of the item's metadata and exported to FGDC-format XML files with the rest of the item's metadata content.
South Bounding Coordinate (The southern most coordinate of coverage in decimal degrees)(1.5.1.4)
It is not possible to define a bounding polygon for an item in the Description tab using this version of ArcGIS. However, if you have existing FGDC metadata that contains this information it will be upgraded and stored in the ArcGIS metadata format. It will be displayed along with the rest of the item's metadata and exported to FGDC-format XML files with the rest of the item's metadata content.

Theme Keyword Thesaurus (A reference to a formally registered thesaurus. If none is used, the value is “none”)(1.6.1.1)
If keywords were not derived from a thesaurus, don't provide any information under the Thesaurus Citation heading. When ArcGIS metadata is exported to an FGDC-format XML file, a Thesaurus element with the value None will be added automatically if a Thesaurus Citation Title wasn't provided because this information is required by the FGDC CSDGM.
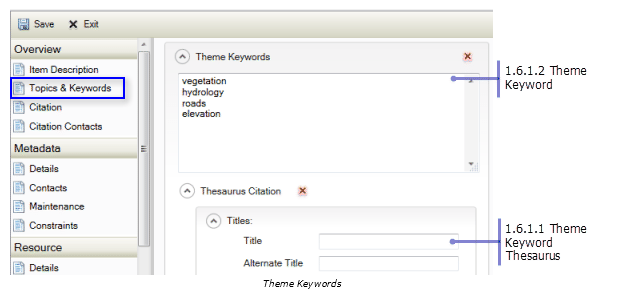
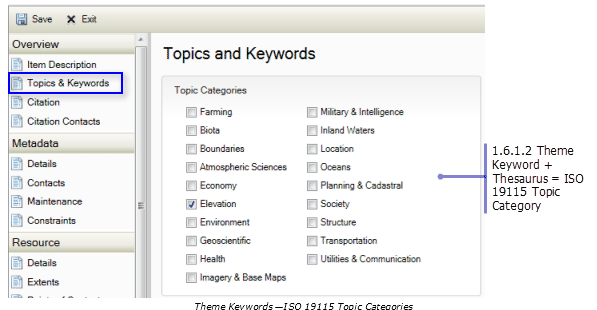
Theme Keyword (A common-use word or phrase to describe the product. An example would be “address”)(1.6.1.2)
In preparation for supporting international metadata standards, the FGDC has recommended collecting ISO 19115 topic category information in FGDC metadata as theme keywords using the thesaurus name ISO 19115 Topic Category. When existing metadata is upgraded, if a theme keyword section is found with this thesaurus name, those keywords will be imported as topic categories; otherwise, all keywords will be examined to see if any correspond with a topic category. When ArcGIS metadata is exported to an FGDC-format XML file, any topic categories provided on the Overview > Topics & Keywords page are included in the exported content as a separate set of theme keywords with the thesaurus name ISO 19115 Topic Category.
Place Keyword Thesaurus (A reference to a formally registered thesaurus. If none is used, the value is “none”)(1.6.2.1)
If keywords were not derived from a thesaurus, don't provide any information under the Thesaurus Citation heading. When ArcGIS metadata is exported to an FGDC-format XML file, a Thesaurus element with the value None will be added automatically if a Thesaurus Citation Title wasn't provided because this information is required by the FGDC CSDGM.
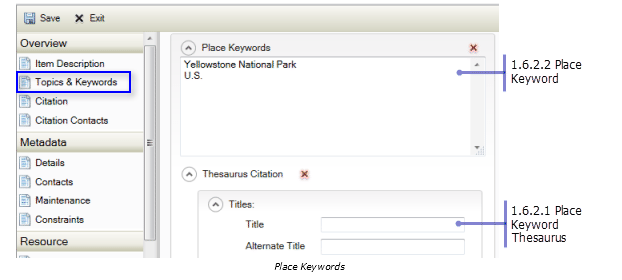
Place Keyword (The geographic name of a location described by the product)(1.6.2.2)
In preparation for supporting international metadata standards, the FGDC has recommended collecting ISO 19115 topic category information in FGDC metadata as theme keywords using the thesaurus name ISO 19115 Topic Category. When existing metadata is upgraded, if a theme keyword section is found with this thesaurus name, those keywords will be imported as topic categories; otherwise, all keywords will be examined to see if any correspond with a topic category. When ArcGIS metadata is exported to an FGDC-format XML file, any topic categories provided on the Overview > Topics & Keywords page are included in the exported content as a separate set of theme keywords with the thesaurus name ISO 19115 Topic Category.

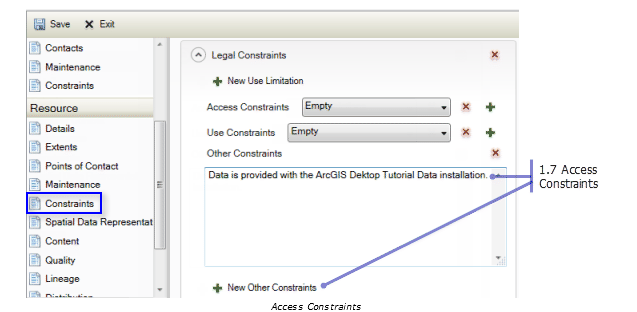
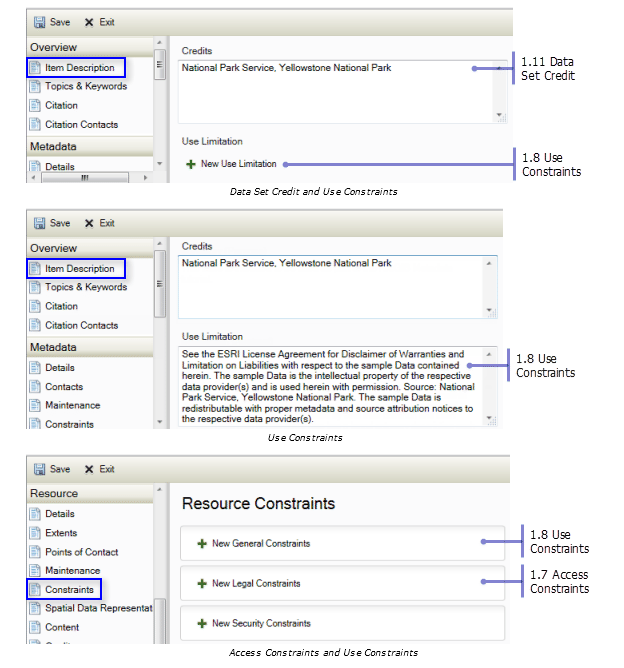
Access Constraints (Any legal restrictions on accessing the product)(1.7)
Both the Use Constraints and Data Set Credit elements can be edited on more than one page. Use Constraints can be edited on both the Overview > Item Description page and the Resource > Constraints page. Credits can be edited on both the Overview > Item Description page and the Resource > Details page.
Use Constraints (Any legal restrictions on using the product)(1.8)
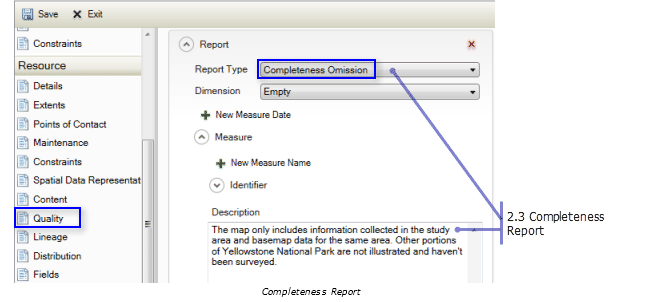
Describe the item's quality by providing different types of data quality reports. On the resource > Quality page, choose the appropriate Report Type to identify the manner in which the item's quality is being assessed. The terminology used in ArcGIS metadata is a little different than the terminology used in the FGDC CSDGM, but the meanings are the same. To provide Logical Consistency information, provide Conceptual Consistency as the Report Type. For Completeness Report, provide Completeness Omission as the Report Type.

Logical Consistency Report (Details of the tests performed on the data)(2.2)
Place information in: Resource>Quality>New Report>Conceptual Consistency Report. This is where the information for “Residential ONLY address data included” in the partner datasets will be reported. Under the Description heading the information should be typed in as “Residential ONLY address data included” if there are no other types of address data in the ADDRESSLANDUSECATEGORY field.

Completeness Report (information about omissions, selection criteria used to develop data)(2.3)
Place information in: Resource>Quality>New Report>Completeness Omission Report. This is where the information for the Partner’s submission of data for RoadCenterline features will be reported as “Followed US Census Feature Representation Standards” will be will be reported, as well as the Type of Data Compilation used. Then the Process used for the data compilation can be reported in the Process Description Section under Lineage.
Process Description (An explanation of how the data was processed)(2.5.2.1)
Add a Data Source to a process step to identify the resources that were used in or produced by the operation that was performed. Place Information In: Resource>Lineage>New Process Step>Process Description. This is where the data compilation Description will be placed. Place the Statement for the type of data compilation used in the Statement text box, and the process description under New Process Step>Process Description, and if needed a Rationale.

Process Date (The date the process described under Process Description was completed)(2.5.2.3)
Place this information under Resource>Lineage>New Process Step>Process Date and Time.

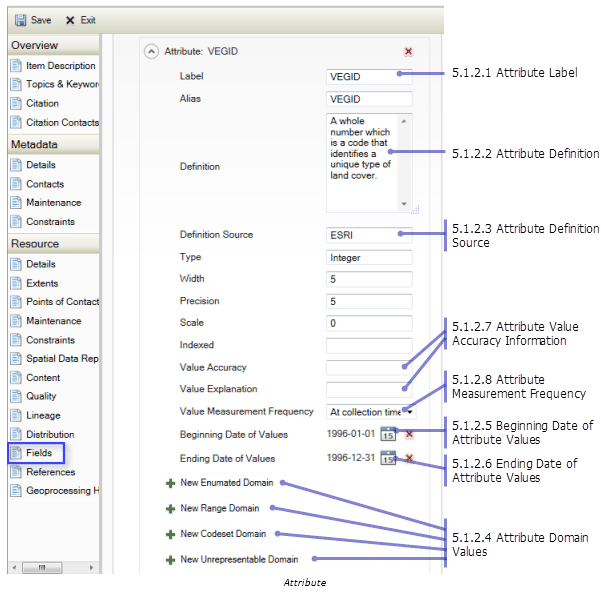
Attribute data content (data dictionary) and structure (Non-Critical)( 5.1.2.1- 5.1.2.8)
ArcGIS automatically maintains information about the item's attributes through the synchronization process. Attributes are added to the metadata if a field hasn't already been recorded in the metadata. If the item's metadata includes an attribute whose label doesn't match the name of a field in the data, it will be removed from the item's metadata. In general, there should be no need to add or remove attributes. When existing FGDC-formatted metadata is upgraded, the original title for the item is replaced by the item's name in ArcGIS. This is a known issue with metadata synchronization. A workaround is to copy the original FGDC title under the FGDC Metadata (read-only) heading in the metadata display by highlighting text and pressing CTRL-C. Start editing the item's metadata, and paste it into the title element in the ArcGIS metadata editor.
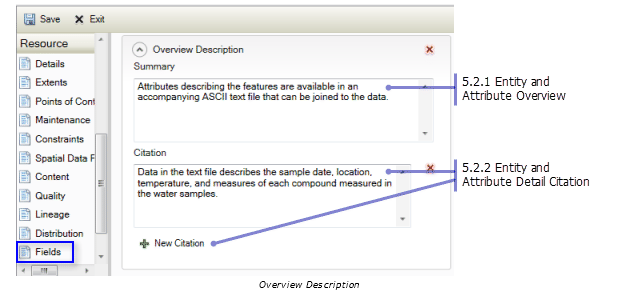
Entity and Attribute Overview (A detailed summary of the entity types, attributes and values in the address and/or feature file)(5.2.1)
Entity and Attribute Detail Citation (A reference to the complete description of the entity types and values)(5.2.2)
Contact Organization (The name of the entity that is responsible for the product)(10.2.1)
Areas for information for contacts: Overview>Citation Contacts>New Contact…Metadata Section>Contacts>New Contact…Resource Section>Points of Contact>New Contact.
The name of the entity that is responsible for the product. In ArcGIS metadata you can't specify if the person or the organization is the primary point of contact. Generally speaking, the organization is always the primary contact. When an organization’s name has been provided it will always be considered the primary contact when the item's metadata is exported to an FGDC-format XML file.
Address Type (The type of address described by the Address element. This is usually ‘mailing’) (10.4.1)
In ArcGIS metadata, only one address can be provided for a contact.
Address (The street address of the entity that is responsible for the product)(10.4.2)
Areas for information for
contacts: Overview>Citation Contacts>New Contact>Contact
Information>Address also Metadata Section>Contacts>New
Contact>Contact Information>Address also Resource
Section>Points of Contact>New Contact>Contact
Information>Address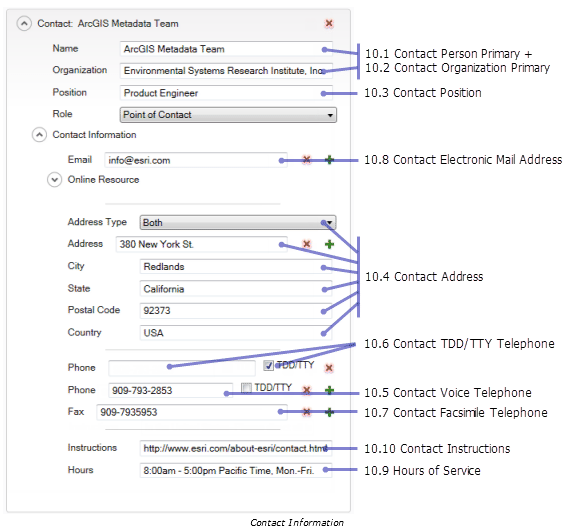
City (The city the entity that is responsible for the product is located in)(10.4.3)
State or Province (The state the entity that is responsible for the product is located in)(10.4.4)
Postal Code (The ZIP code of the entity that is responsible for the product)(10.4.5)
Contact Voice Telephone (The voice telephone number for the entity that is responsible for the product)(10.5)
Contact Facsimile Telephone (The fax number for the entity that is responsible for the product)(10.7)
Contact Electronic Mail Address (The email address for the entity that is responsible for the product)(10.8)
Metadata Date (The date the metadata file was created)(7.1)
The date of an item's metadata is automatically updated by ArcGIS when it is synchronized and when edits are saved. However, if the metadata was authored at another time and you are merely transcribing or upgrading the metadata you may want to provide that date instead. Once the metadata date has been changed manually it won't be updated by ArcGIS when the item's metadata is synchronized or when future edits are saved. You will always have to manually change the date using the Date Stamp element on the Metadata > Details page.
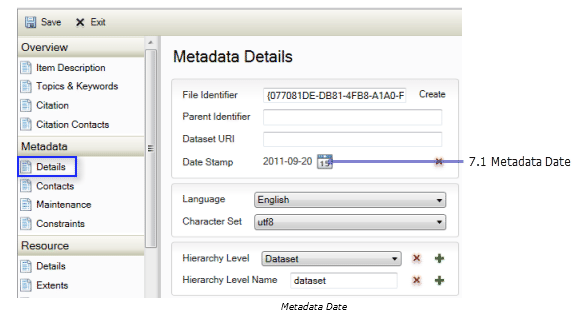
Metadata Review Date (The date when the metadata was last reviewed)(7.2)
Record the date when the metadata was last reviewed in the Maintenance Note element on the Metadata > Maintenance page. Specify the phrase Last metadata review date: followed by the date in the FGDC date format: yyyymmdd. When the item's metadata is exported to an FGDC- format XML file, the date following the phrase will be extracted and stored in the FGDC Metadata Review Date element.
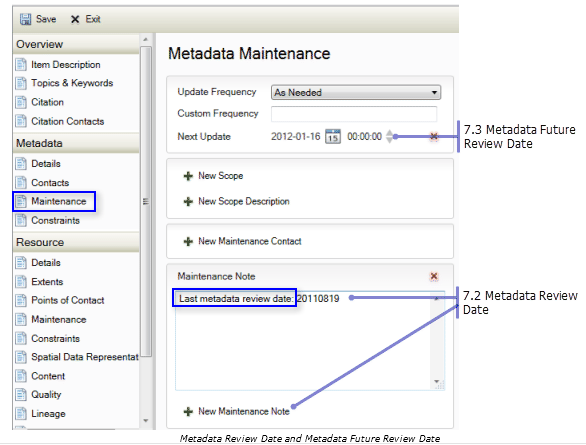
Metadata Standard Name ( always Content Standard for Digital Geospatial Metadata)(7.5)
In ArcGIS, the metadata standard or profile that is being adhered to is determined by the metadata style that has been selected. Therefore, you can't provide content for the Metadata Standard Name and Metadata Standard Version elements in the Description tab. When ArcGIS metadata is exported to an FGDC-format XML file, these elements are added automatically by the ArcGIS to FGDC translator with the appropriate values for that style.
Metadata Standard Version (always FGDC-STD-001-1998)(7.6)
Both the above elements are automatically synchronized to FGDC translator with the appropriate values for that style.
Spatial Reference Information* - unprojected coordinates - Latitude Resolution (The minimum difference between two adjacent latitude values expressed in Geographic Coordinate Units of measure)(4.1.1.1)
ArcGIS automatically synchronizes the item's spatial reference in its metadata if this information has been set in the item itself. Full details of the spatial reference are recorded in an ArcGIS-specific format. This information can't be edited. Detailed spatial reference properties as defined in the FGDC CSDGM can't be provided manually with the current version of ArcGIS. In general, there should be no need to modify the synchronized information. When an item's metadata is exported to an FGDC-format XML file, the synchronized properties of the spatial reference are extracted and formatted correctly according to the FGDC CSDGM, if they exist.
Spatial Reference Information* - unprojected coordinates –Longitude Resolution (The difference between two adjacent longitude values in Geographic Coordinate Units expressed in coordinate units of measure)(4.1.1.2)
Spatial Reference Information* - unprojected coordinates -Geographic Coordinate Units (Units used for the Latitude Resolution and Longitude Resolution elements)(4.1.1.3)
Spatial Reference Information* - unprojected coordinates -Horizontal Datum Name (Either “North American Datum of 1927” or “North American Datum of 1983”)(4.1.4.1)
Spatial Reference Information* - unprojected coordinates -Ellipsoid Name (Either “Clarke 1866” or “Geodetic Reference System 80”)(4.1.4.2)
Spatial Reference Information* - unprojected coordinates -Semi-Major Axis (The radius of the equatorial axis of the ellipsoid in meters)(4.1.4.3)
Spatial Reference Information* - unprojected coordinates -Denominator of Flattening Ratio (The denominator of the ratio of difference between the equatorial and polar radii)(4.1.4.4)
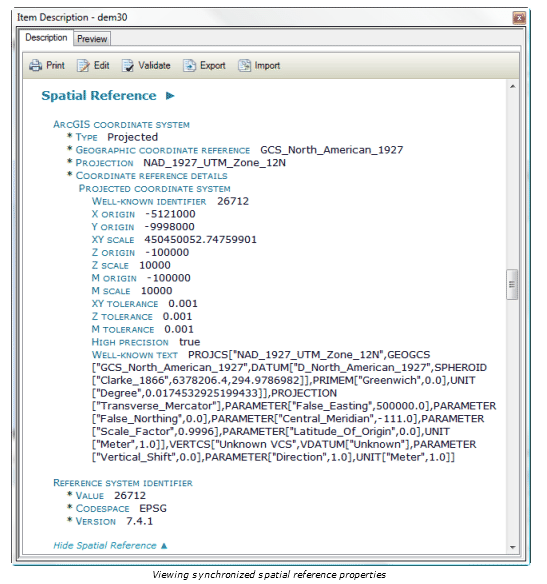
Spatial Reference Information - State Plane Coordinates using a Lambert Conformal Conic projection - Grid Coordinate System Name (Either “State Plane Coordinate System 1927”, or “State Plane Coordinate System 1983”)(4.1.2.2.1)
Spatial Reference Information - State Plane Coordinates using a Lambert Conformal Conic projection - SPCS Zone Identifier (Identifier for the State Plane Coordinate System zone)( 4.1.2.2.4.1)
Spatial Reference Information - State Plane Coordinates using a Lambert Conformal Conic projection -Standard Parallel (A line of constant latitude, expressed in decimal degrees, at which the surface of the Earth and the plane intersect. This may be used 1 or 2 times)( 4.1.2.1.23.1)
Spatial Reference Information - State Plane Coordinates using a Lambert Conformal Conic projection -Longitude of Central Meridian (The line of longitude at the center of the Lambert Conformal Conic Projection in decimal degrees)( 4.1.2.1.23.2)
Spatial Reference Information - State Plane Coordinates using a Lambert Conformal Conic projection -Latitude of Projection Origin (The latitude chosen as the origin of the coordinates for the map projection) (4.1.2.1.23.3)
Spatial Reference Information - State Plane Coordinates using a Lambert Conformal Conic projection -False Easting (The value added to all “x” values in the coordinates for a map projection)( 4.1.2.1.23.4)
Spatial Reference Information - State Plane Coordinates using a Lambert Conformal Conic projection -False Northing (The value added to all “y” values in the coordinates for a map projection)( 4.1.2.1.23.5)
Spatial Reference Information - State Plane Coordinates using a Lambert Conformal Conic projection -Planar Coordinate Encoding Method (Method used to represent horizontal positions within the coordinate system. Either “coordinate pair”, ”distance and bearing” or “row and column”)( 4.1.2.4.1)
Spatial Reference Information - State Plane Coordinates using a Lambert Conformal Conic projection -Abscissa Resolution (The minimum distance between “X” values of two adjacent points in the planar data set. This is the “fuzzy tolerance”)( 4.1.2.4.2.1)
Spatial Reference Information - State Plane Coordinates using a Lambert Conformal Conic projection -Ordinate Resolution (The minimum distance between “Y” values of two adjacent points in the planar data set. This is the “fuzzy tolerance”)( 4.1.2.4.2.2)
Spatial Reference Information - State Plane Coordinates using a Lambert Conformal Conic projection -Planar Distance Units (The units of measure used to define the Coordinate Resolution)( 4.1.2.4.4)
Spatial Reference Information - State Plane Coordinates using a Lambert Conformal Conic projection - Horizontal Datum Name (Either “North American Datum of 1927” or North American Datum of 1983”)( 4.1.4.1)
Spatial Reference Information - State Plane Coordinates using a Lambert Conformal Conic projection - Ellipsoid Name (Either “Clarke 1866” or “Geodetic Reference System 80”)( 4.1.4.2)
Spatial Reference Information - State Plane Coordinates using a Lambert Conformal Conic projection - Semi-Major Axis (The radius of the equatorial axis expressed in meters)( 4.1.4.3)
Spatial Reference Information - State Plane Coordinates using a Lambert Conformal Conic projection - Denominator of Flattening Ratio (The denominator of the ratio of difference between the equatorial and polar radii)( 4.1.4.4)
ArcGIS automatically synchronizes the item's spatial reference in its metadata if this information has been set in the item itself. Full details of the spatial reference are recorded in an ArcGIS-specific format. This information can't be edited. Detailed spatial reference properties as defined in the FGDC CSDGM can't be provided manually with the current version of ArcGIS. In general, there should be no need to modify the synchronized information. When an item's metadata is exported to an FGDC-format XML file, the synchronized properties of the spatial reference are extracted and formatted correctly according to the FGDC CSDGM, if they exist.

Spatial Reference Information - State Plane Coordinates using a Transverse Mercator projection - Grid Coordinate System Name (“Universal Transverse Mercator”)( 4.1.2.2.1)
Spatial Reference Information - State Plane Coordinates using a Transverse Mercator projection - SPCS Zone Identifier (Identifier for the State Plane Coordinate System zone)( 4.1.2.2.4.1)
Spatial Reference Information - State Plane Coordinates using a Transverse Mercator projection - Scale Factor at Central Meridian (a multiplier for reducing a distance obtained from a map by computation or scaling to the actual distance along the central meridian)( 4.1.2.1.23.17)
Spatial Reference Information - State Plane Coordinates using a Transverse Mercator projection - Longitude of Central Meridian (The line of longitude at the center of the Lambert Conformal Conic Projection in decimal degrees)( 4.1.2.1.23.2)
Spatial Reference Information - State Plane Coordinates using a Transverse Mercator projection - Latitude of Projection_Origin (The latitude chosen as the origin of the coordinates for the map projection)( 4.1.2.1.23.3)
Spatial Reference Information - State Plane Coordinates using a Transverse Mercator projection - False Easting (The value added to all “x” values in the coordinates for a map projection)( 4.1.2.1.23.4)
Spatial Reference Information - State Plane Coordinates using a Transverse Mercator projection - False Northing (The value added to all “y” values in the coordinates for a map projection)( 4.1.2.1.23.5)
Spatial Reference Information - State Plane Coordinates using a Transverse Mercator projection - Planar Coordinate Encoding Method (Either “coordinate pair”, “distance and bearing” or “row and column”)( 4.1.2.4.1)
Spatial Reference Information - State Plane Coordinates using a Transverse Mercator projection - Abscissa Resolution (The minimum distance between “X” values of two adjacent points in the planar data set. This is the “fuzzy tolerance”)( 4.1.2.4.2.1)
Spatial Reference Information - State Plane Coordinates using a Transverse Mercator projection - Ordinate Resolution (The minimum distance between “Y” values of two adjacent points in the planar data set. This is the “fuzzy tolerance”)( 4.1.2.4.2.2)
Spatial Reference Information - State Plane Coordinates using a Transverse Mercator projection - Planar Distance Units (The units of measure used to define the Coordinate Resolution)( 4.1.2.4.4)
Spatial Reference Information - State Plane Coordinates using a Transverse Mercator projection - Horizontal Datum Name (Either “North American Datum of 1927” or North American Datum of 1983”)(4.1.4.1)
Spatial Reference Information - State Plane Coordinates using a Transverse Mercator projection - Ellipsoid Name (Either “Clarke 1866” or “Geodetic Reference System 80”)(4.1.4.2)
Spatial Reference Information - State Plane Coordinates using a Transverse Mercator projection - Semi-Major Axis (The radius of the equatorial axis expressed in meters)(4.1.4.3)
Spatial Reference Information - State Plane Coordinates using a Transverse Mercator projection - Denominator of Flattening Ratio (The denominator of the ratio of difference between the equatorial and polar radii)(4.1.4.4)
ArcGIS automatically synchronizes the item's spatial reference in its metadata if this information has been set in the item itself. Full details of the spatial reference are recorded in an ArcGIS-specific format. This information can't be edited. Detailed spatial reference properties as defined in the FGDC CSDGM can't be provided manually with the current version of ArcGIS. In general, there should be no need to modify the synchronized information. When an item's metadata is exported to an FGDC-format XML file, the synchronized properties of the spatial reference are extracted and formatted correctly according to the FGDC CSDGM, if they exist.

*Provide information for one of the three common Spatial Reference systems listed above (unprojected coordinates, State Plane Coordinates using a Lambert Conformal Conic projection, or State Plane Coordinates using a Transverse Mercator projection). Refer to the FGDC CSDGM if the Spatial Reference system you use is not listed.
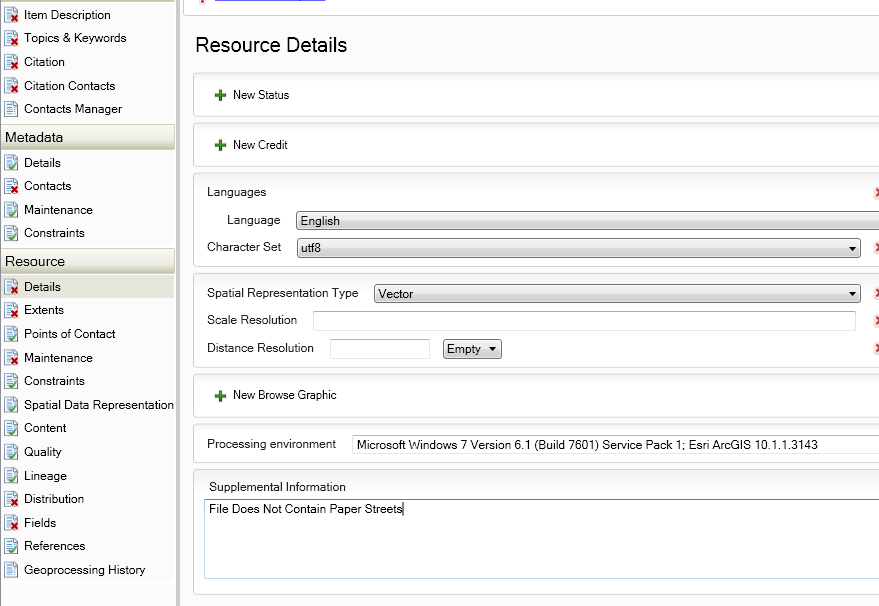
Does the file contain paper streets (Non-Critical)(1.2.3)
Add this data to the Supplemental Information Section in the Resource Details. Add the code to be checked by the Metadata Validation Check in ArcGIS Data Reviewer.
File Contains Paper Streets – means that the file contains Planned development RoadCenterline data that does not exist yet in the actual real world data.
File Does Not Contain Paper Streets – means that the file does not contain these Planned development features.
Feature Naming Standards (Non-Critical)(5.1.1.2)
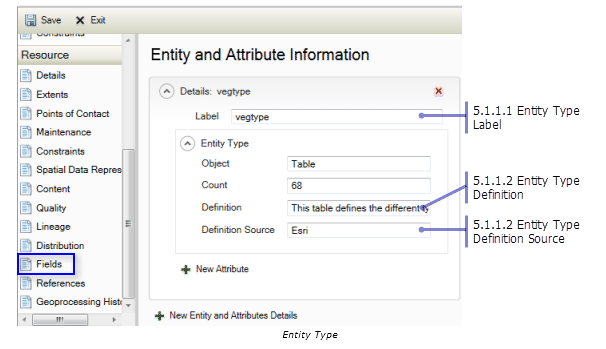
Information for Feature Naming Standards should be placed under the Resource Section/Fields/Entity and Attribute Information/Entity Type Definition section. Provide detailed information on the Feature, table, or dataset.
File format (Non-Critical)(3.2)
The type of digital spatial data that an item contains is described using the Spatial Representation Type element on the Resource > Details page, if appropriate. When an item's metadata is exported to an FGDC-format XML file, the value Vector is exported in the Direct Spatial Reference Method element for all types of vector data including point and multipoint datasets; in ArcGIS, all vector data is handled in the same manner regardless of the geometry type that is used to represent features. The value Raster is exported in the same element for all types of rasters. This element is automatically synchronized to FGDC translator with the appropriate values for that style.
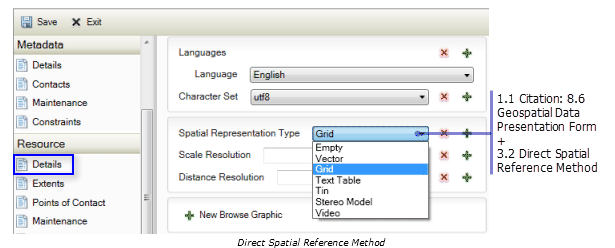
How was the data compiled (Non-Critical)(2.3 and also 2.5.2)
Place Information in: Resource>Quality>New Report>Completeness Omission Report with the Description describing the process of Data Compilation, then in Resource>Lineage>New Process Step>Process Description: explain the process.
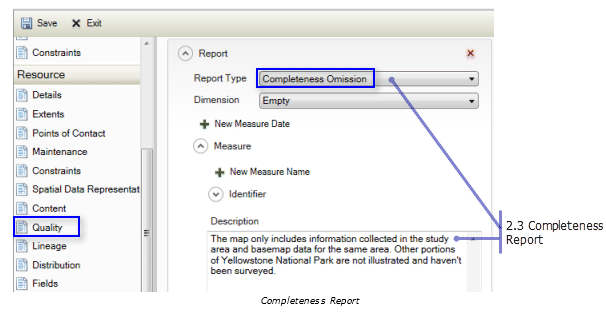

Date of last update (Non-Critical)(7.2)
Place information for the last time the Metadata was reviewed in: Metadata Section>Maintenance>New Maintenance Note> Type the specific phase “Last metadata review date: “, followed by the date in the FGDC date format: yyyymmdd. When the item's metadata is exported to an FGDC-format XML file, the date following the phrase will be extracted and stored in the FGDC Metadata Review Date element. YYYYMMDD
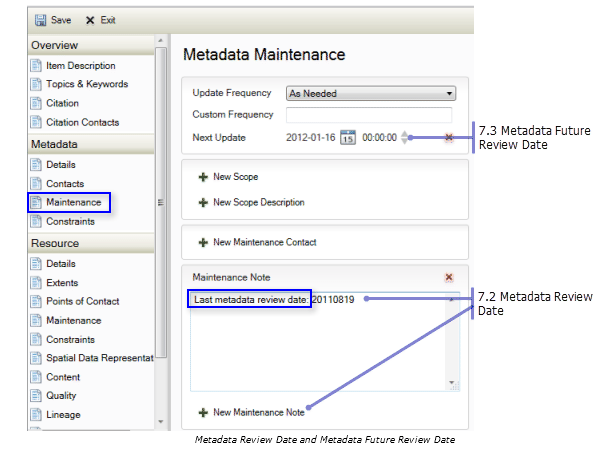
Positional Accuracy Standards (Non-Critical)(2.4.1 and 2.4.2)
To provide either Horizontal Positional Accuracy or Vertical Positional Accuracy information, select Absolute External Positional Accuracy as the Report Type on the Resource > Quality page.
For Horizontal Positional Accuracy information, select horizontal as the Dimension of data to which the quality report applies. The ArcGIS metadata editor allows any type of value to be provided in the Value element. However, in the FGDC CSDGM, only Real numbers are allowed in this element.

For Vertical Positional Accuracy information, select vertical as the Dimension of data to which the quality report applies. The ArcGIS metadata editor allows any type of value to be provided in the Value element. However, in the FGDC CSDGM, only Real numbers are allowed in this element.

Update frequency/Date/Time Stamp field (Non-Critical)(1.4.2)
When an item's existing FGDC metadata is upgraded or imported to ArcGIS, the phrases provided in the Progress element and the Maintenance and Update Frequency element are both converted to coded values. Check the values of the Status element on the Resource > Details page and the Update Frequency element on the Resource > Maintenance page to make sure their values were set appropriately.
There is a field called LastUpdated on each feature in a Feature Class with the information regarding the specific feature’s last update date and LastEditor with the last person to edit the data.
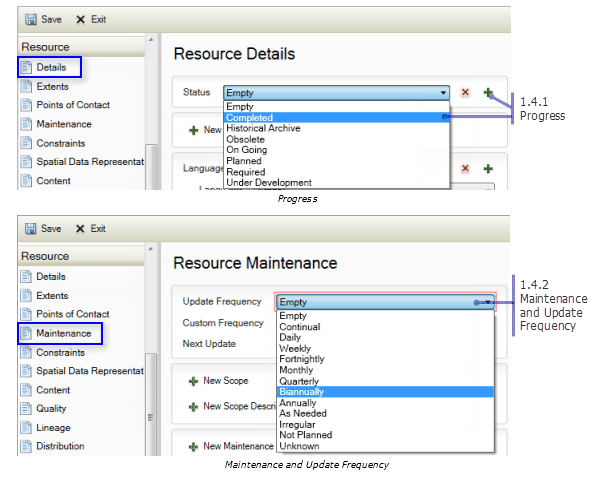
Residential Status Identifier (Critical)(2.2)
For Address Points and Address Table Only: Type Residential ONLY Address data included, in the Description text box of the dialog if all features contained in the data are specifically Residential Properties.
Type the phrase “Residential ONLY Address data included.” into the Quality>New Conceptual Consistency Report> Description area of the dialog.
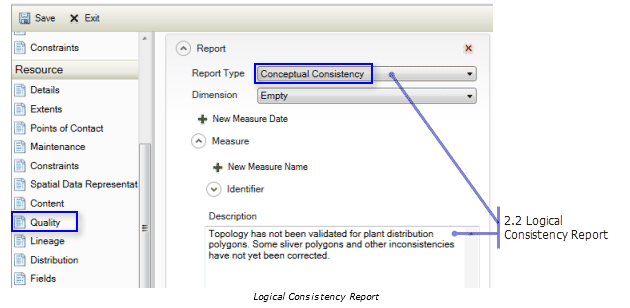
Followed Census Feature Representation Standards (Critical)(2.3)
For RoadCenterline Feature Class Only: This information is recorded on the Quality page in the Report section. Set the Report Type to “Completeness Omission”. Under the Description heading, type the information—Followed US Census Feature Representation Standards, or Did Not Follow US Census Feature Representation Standards.
The review report generated by the data review checks is available as a Data Reviewer Table (for contributors who are using the Data Reviewer extension) and a formatted spreadsheet. The report presents the information on the individual features and attributes that failed the checks and assigns each a severity code:
Severity 1 - Errors (conditions that must be corrected to prevent data load issues, and/or issues that will cause the Census Bureau to reject the submission data).
Severity 3 - Warnings (conditions that should be corrected, possibly during update period, but will not prevent data loading or cause rejection of the data submission).
Severity 5 - Messages (conditions that may need to be addressed but are not critical and will not prevent data loading or negatively impact the map cache.
Examples of DR results….
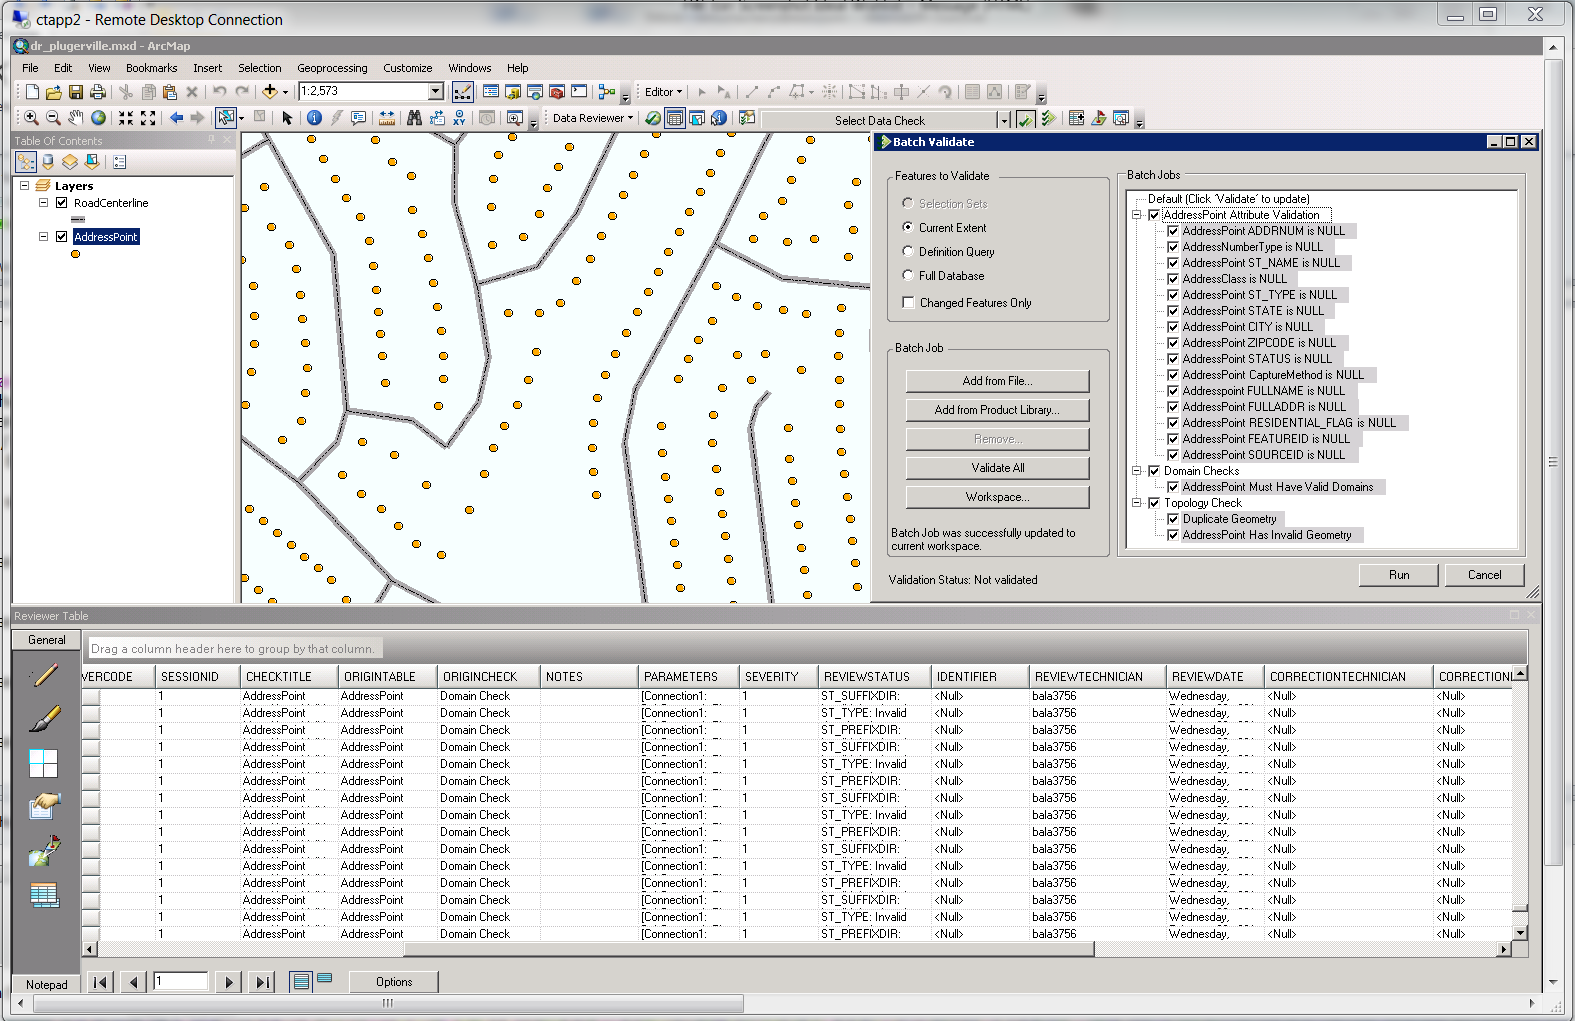
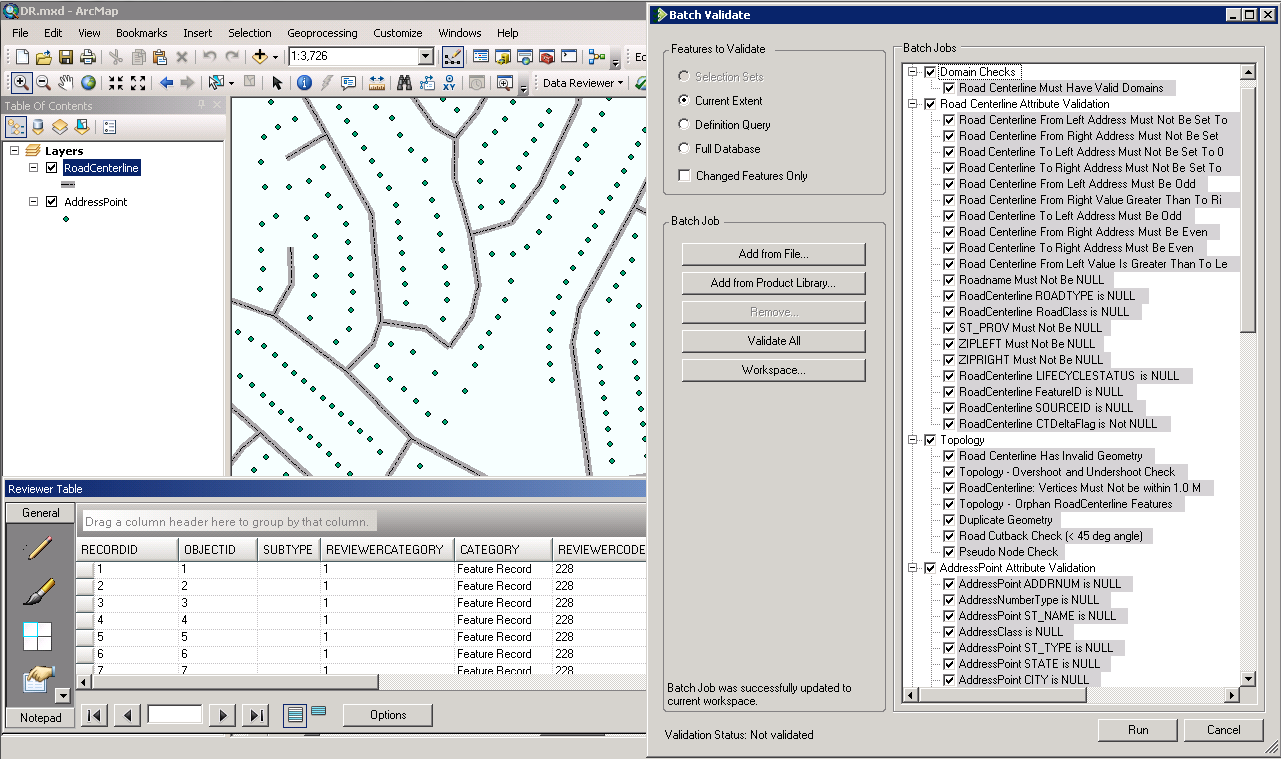
4. Packaging and Submission
4.1 Schema Validation
The Schema Compare tool checks for schema differences between the migrated and validated partner data and the Community TIGER standard schema. This tool should be executed just before data packaging. Any identified schema differences should be edited.
Double click the “Step3_Schema compare” tool.
Set the Migrated data fGDB as the first parameter.
Set the Scratch folder, where the Schema Compare results will appear.
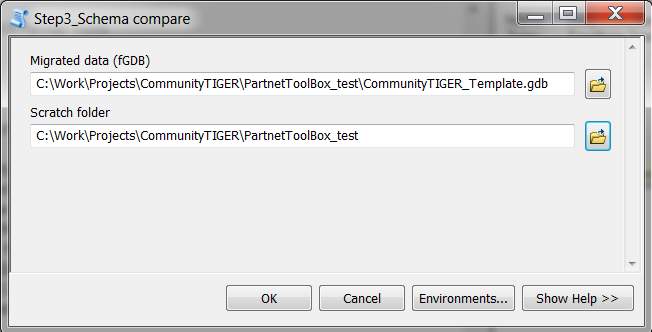
Click OK.
Once processing is complete, the Schema Compare tool’s results will be created in the folder and displayed in the geoprocessing log, as highlighted in the graphic below.
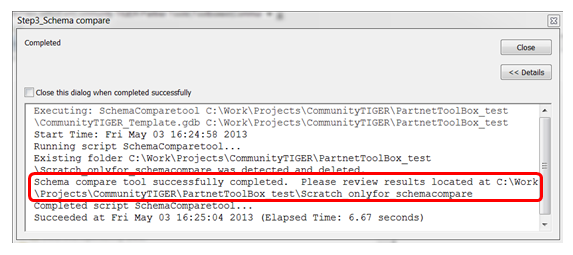
Open the file, <scratch folder>\Scratch_onlyfor_schemacompare\SchemaCompare\difference.htm. If differences are found, they will be displayed in the files as illustrated in the picture below:
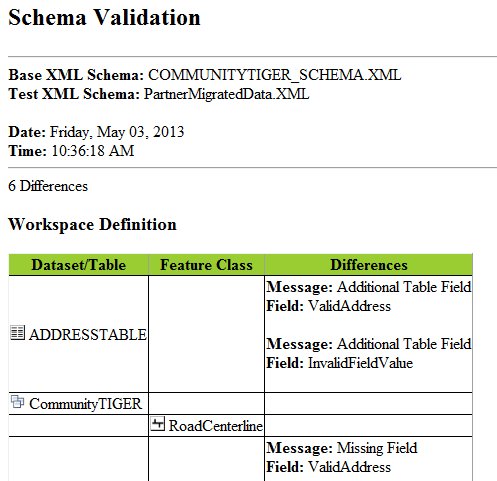
Fix any differences if found and re-run the tool as necessary. Fixes may include:
Delete feature classes or tables that not listed in the data dictionary.
Delete attribute fields that are listed in the data dictionary.
Delete additional domains or domain values.
Note: If you happen to see differences in spatial coordinate system, it can be ignored as long as the correct input spatial reference system is set for the dataset (refer to section 3.1.1).
4.2 Packaging files for delivery to the Census Bureau
This is the last step in data preparation. This tool will create a zip file containing the prepared file geodatabase in the Community TIGER schema and the toolbox containing the configured ETL tool. This zip file will be uploaded using the Contribution Management System.
Close out of any open ArcCatalog and ArcMap sessions to eliminate any file locks.
Reopen ArcCatalog and navigate to the Toolboxes folder.
Double click “Step4_Create data upload package” in the toolbox.
Set the output zip file name. The date and time will be appended to this name to ensure that the file’s name is unique.
Browse to the location of the CommunityTIGER_Template geodatabase containing the migrated data.
Browse to the toolbox by browsing the location. This toolbox will be archived in the Contribution Management System for future use in case the partner misplaces the configured ETL tool.

Click OK.
This output file will be uploaded into the Contribution Management System.
| File Type | application/vnd.openxmlformats-officedocument.wordprocessingml.document |
| Author | George Oliver |
| File Modified | 0000-00-00 |
| File Created | 2021-01-31 |
© 2026 OMB.report | Privacy Policy