Questionnaires, Time Diary, Heart Monitoring
Stress and Cortisol Measurement for the National Childrens Study (NICHD)
Attach 22. Electronic Diary Coordinators Manual
Questionnaires, Time Diary, Heart Monitoring
OMB: 0925-0671
ELECTRONIC DIARY PROCEDURES
Table of Contents
A) One Time Set-Up
Setting Up New Phone
Dropbox
Setting the Time on the Phone
B) Study Visit Preparation
Custom Times Questionnaire
C) During Baseline Study Visit
When participant arrives and verifies custom times:
1. Enter Subject / Study ID
2. Set Wake & Sleep Times
3. Set Blocked Times
4. Review Schedule
5. Select Start for Diary to begin
6. Add reminder in Calendar for Actiheart device change on day 3 at 8pm.
Participant Training
1. General Instructions for the Android Phone
2. Teach Wake Up Saliva Widget
3. Practice Electronic Diary
D) During Follow-Up Visit
Upload data
A) ONE TIME SET-UP
Programming New Phones
Turn Power on.
Some phones will have English text when turned on. Others will have German text. For the phones that need to be changed to English, please follow the instructions for switching the language below.
To keep screen lit while setting up. From the home screen select the following:
Applications
Settings
Sound & Display (new phones will say “Display”).
Screen Timeout
2 minutes
Press the Home button (bottom middle of the phone) to save & exit screen.
Switching language on brand new phone from German to English
Swipe screen to unlock
Tap Menu (Applications)
Ein-stellungen (Settings)
Gebietsschema Und Text
Gebietsschema
English )United States)
Select Locale (English United States)
Now all of the phones text will be in English.
Setting the time on the phone
From the home screen
Select “Applications”
Tap “Settings”
Tap “Date & Time”
Unselect “Automatic”
Unselect “Use 24 hour format”
Select “Time Zone”
Tap “Pacific Time”
Select Date Format
“MM/DD/YYYY
Press the back button to exit.
Now the time and date format will coincide with the EMA program.
Setting-Up Dropbox
On the home screen
Tap “Market”
Screen will say: “Do you want to connect to Wi-Fi?
Select “Yes”
Set up your Google Account
Tap “Next”
The screen will say: “Already Have a Google Account?”
Tap “Sign-In”
Enter Username: uciemap
Enter Password: everlyne
Tap “done”
Tap “sign-in”
The screen will now say “Signing In… Finishing Up”…)
After completion you will end up back at the home screen.
Tap “Market”
Tap “Accept”
Tap the search icon (magnifying glass) on top right of screen.
Enter “dropbox” and press search icon again.
Tap “Dropbox” free application
Tap “install”
Tap “Ok” to accept permissions.
At the top of screen you will see icon that shows download occurring and a checkmark once completed. Pull down bar at top of screen to see successful download.
Dropbox is now installed.
Installing Electronic Diary Program (DHDRP)
Press the Home button now.
Tap “Applications”
Scroll over to Dropbox application
Click on “I’m already a dropbox user”
Type in email: [email protected]
Type in password: “everlyne”
Tap “log-in”
You are now logged in.
Tap “Photos” folder
Tap “DHDRP” folder
Tap & hold down “Dhdrp-1.53.apk”
Tap “Download”
Tap & hold down “Dhdrp-wakeup-1.8.apk”
Tap “Download”
Open “XML” folder
Tap & hold down Questions-Preg8.xml
Tap “Download”
Tap & hold down “Schedule-Pregnancy.xml
Tap “Download”
Open “Drawable” folder
For the following items, you will tap & hold down each file and then press download for each of them:
Blue_32x32.png
Gray_32x32.png
Green_32x32.png
Magenta_32x32.png
Orange_32x32.png
Purple_32x32.png
Red_32x32.png
White_32x32.png
Yellow_32x32.png
Splash-preg2.png
Salivaswab1.png
Now exit to the home page by pressing the “Home” button.
Tap “Applications”
Open “My Files”
Open “Dropbox” folder
Open “Photos”
Open “DHDRP” folder
Verify the DHDRP-wakeup-1.8.apk and dhdrp.1.53.apk files are there.
Next, open the “XML” folder
Verify “Schedule-Pregnancy.xml, Questions-Preg8.xml are present.
Press back button.
Open “Drawable” folder
Verify all of the colors for the diary questionnaire are present along with pregnant logo & saliva swab picture.
Now Press the Home button.
You are now at the home screen.
Press “Applications”
Open “My Files”
Open “Dropbox”
Open “Photos” folder
Open “Dhdrp” folder
Tap “dhdrp-1.53.apk”
Select “Install”
The screen will now say: “Application installed”
Press “open”
Now press the Back button.
Tap “dhdrp-wakeup-1.8.apk”
Select “Install”
The Screen will now say: “Application installed”
Press “Done”
Select the Home button.
You are now at the home screen.
Press “Applications”
Open “My Files”
Open “Dropbox”
Open “Photos”
Open “DHDRP” folder
Press the Menu button on the phone.
Select “More”
Press “Copy”
Press “Select All”
Press “Copy” again.
Select “DHDRP” folder
Then press “Paste Here”
Now Press the Home button.
At the Home page, select “Applications”
Scroll over a page & Select the “DHDRP” application.
You will see the program open.
The status will say: “Not Running”
Open the administrative section by slowly tapping on the green header 3 times.
The administration screen will say: “Enter password”
UCI will already be entered in that field.
Press “OK”.
You will now arrive at the screen to enter the subject ID and Study ID.
You will also verify the server URL, which should read: “https://uci-dhdrp.appspot.com/
You will now be ready to begin entering participant schedule customizations at this time.
When you have customized the participants schedule on the phone, please remember to select the “Start” icon at the bottom of the screen to begin data collection.
B) STUDY VISIT PREPARATION
Custom Times Questionnaire
What time do you normally go to sleep during the week?
![]()
What time do you normally go to sleep during the weekend?
![]()
What time do you usually wake up in the morning on weekdays?
![]()
What time do you usually wake up in the morning on the weekend?
![]()
Are there any specific times you would like the phone to remain silent? (e.g., during class, meeting at work, church, etc).
![]()
C) DURING BASELINE STUDY VISIT
When participant arrives and verifies custom times:
1. Enter Subject / Study ID
2. Set Wake & Sleep Times
3. Set Blocked Times
4. Review Schedule
5. Select Start for Diary to begin
6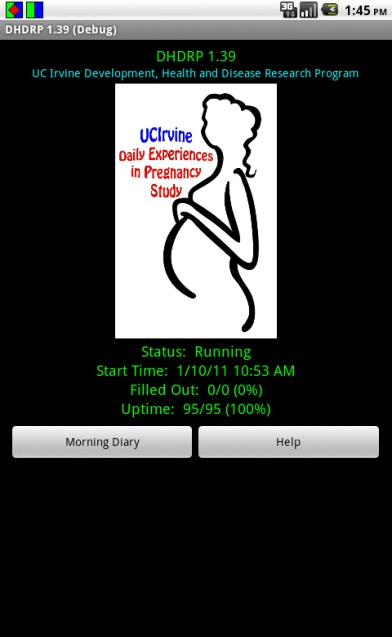 .
Add reminder in Calendar for Actiheart device change on day 3 at 8pm.
Accessing the Administrative Area
The EMA program screen can be reached in one of two ways:
Slide your finger downward from the top of the screen
and tap on the blue/green icon.
O
 pen
the applications pane from the home screen, then locate and tap on
the DHDRP icon.
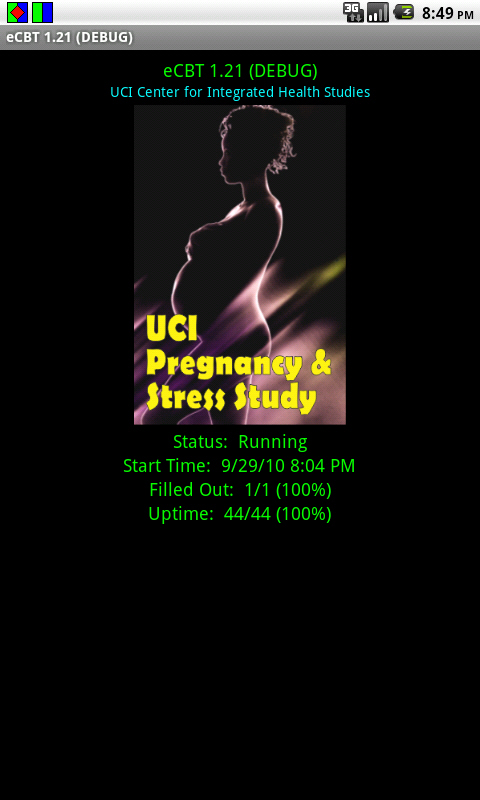
*Note the status to identify whether the DHDRP is:
“Running “
“Not Running “
“Suspended”
T
 o
access the administrative area of the diary program, slowly tap on
the green header (DHDRP and version number) three times.
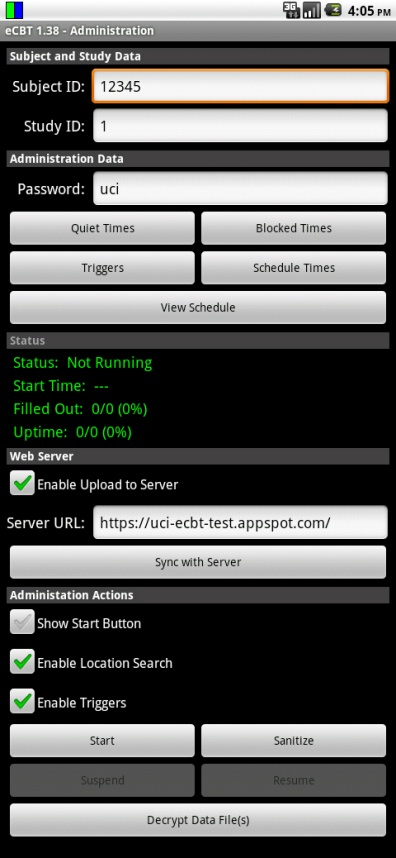
Enter the password. In this case, the password is “uci.” Click OK.
The layout of the Administrative portion appears as it does in this image.
Note the various fields that may be configured.
To enter or change information, use the on-screen keyboard. The on-screen keyboard will appear when you click in a blank field.
T
 ap
in the “Subject ID” or “Study ID” fields to
enter or modify the values.
To change the password, tap in the “Password” field and use the on-screen keyboard to make the necessary changes.
IMPORTANT: Be sure to make a note of the new password.
T

 o
initiate the diary using a start button, check “Show Start
Button.”
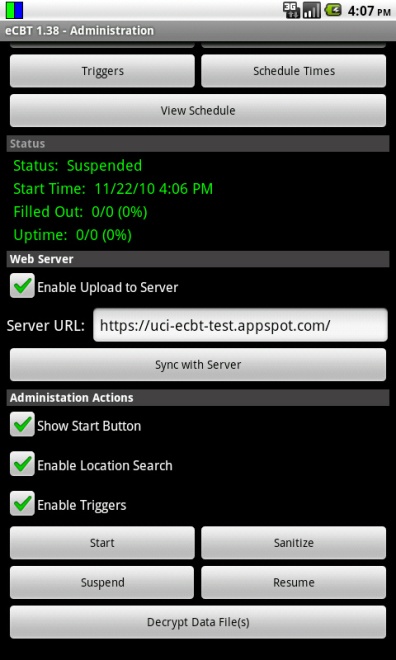
The start button will appear on the status screen.
By clicking on the Start button, the diary will be activated.
Two notifications will appear. The first indicates that the schedule has loaded and a second that a new study has started.
T
 he
diary can be suspended by clicking on the button labeled “Suspend”.
The diary can be re-initiated by pressing the “Resume” button.
IMPORTANT: Select “Suspend” then “Resume after making any changes in the administrative area.


Quiet Times
A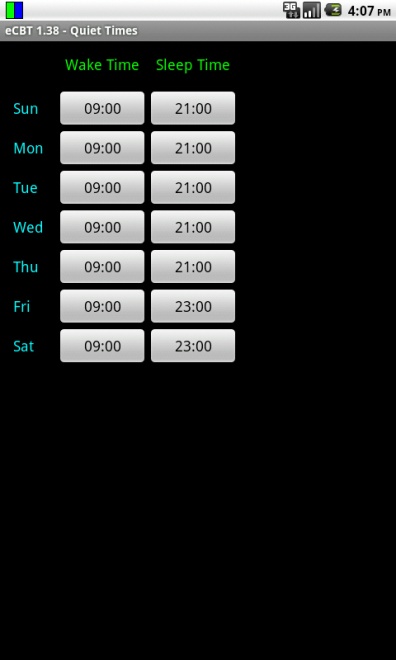 sk
the participant for her usual wake up and bed time. This information
will help you in setting the quiet times for this participant.
Quiet times specify the times during which the diary will not prompt. For each day, the diary will not prompt before the specified wake time, and will not prompt after the specified sleep time.
The clock for each day starts at 12:00 AM and continues through 11:59 PM. The diary is quiet from midnight to the wake time, is active between the wake and sleep time, then is quiet from the sleep time until midnight. The cycle repeats daily starting at midnight.
F
12-hour clock
24-hour clock
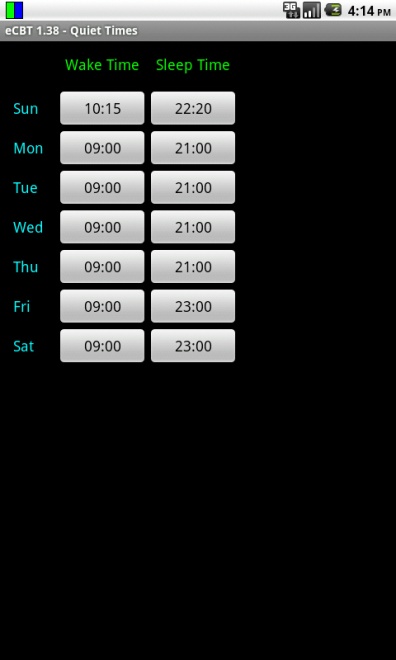
rom the main administrative area, click on “Quiet Times” to view and modify when the diary will start in the morning and end in the evening.

T
 o
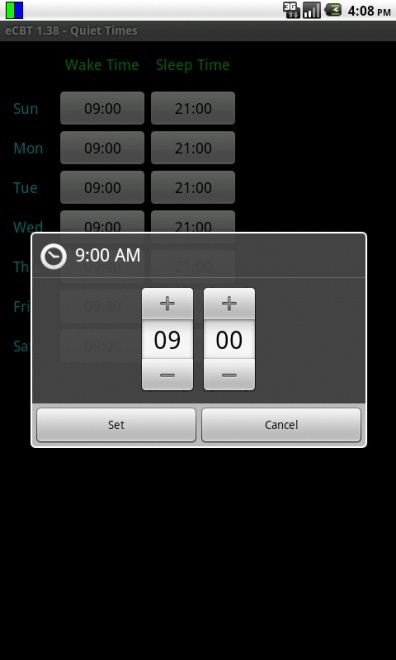
modify the time, press the + or – symbols for the hour and
minute. You can also click in the hour or minute box and use the
number pad or on screen keyboard.
N ote:
Time entry is done using a 24-hour clock. The 12-hour time value with
AM or PM is shown at the top of the window.
Here, the wake time has been changed from 9:00 AM to 10:15 AM.
W
 hen
the changes are complete, click “Set”. To discard any
changes, click on “Cancel”.
Before leaving the Quiet Times area, take the time to review the changes.

Press the device’s back button to return to the Administration screen.
Blocked Times
N ow,
you will want to ask the participant if there are certain times where
she would like to ensure the phone not to prompt (e.g., a standing
appointment she has, church, etc.)
B
 locked
times are used to prevent the EMA program from prompting at times
between wake and sleep time. For example, a blocked time can be
implemented to silence the phone while in a meeting, class, religious
activity, etc.
F
 rom
the main administrative area, click on “Blocked Times”
to view and modify any times when the diary should not prompt and
that are not encompassed by “Quiet Times”.
T
 o
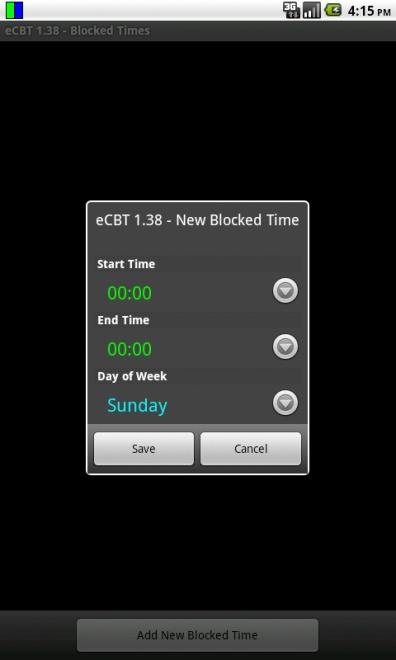
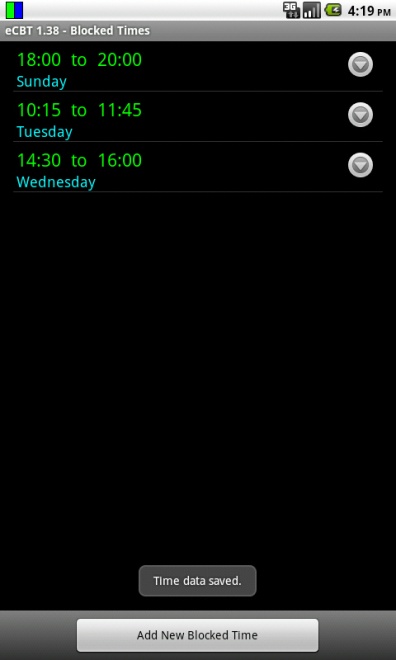
create a new Blocked Time, click on “Add New Blocked Time”.
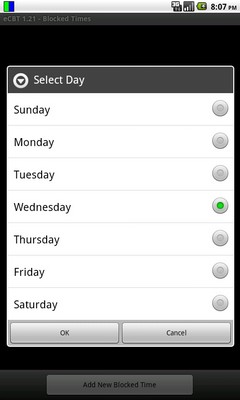
Click on the downward arrow to set when the Blocked Time should start and end, and for which day of the week the Blocked Time is desired.
U
 sing
+ and – symbols, set the hour and minute for the “Start
Time”. When finished, click “Set”. To discard
changes, click “Cancel”.
Using the + and – symbols, set the hour and minute for the “End Time”. When finished, click “Set”. To discard changes, click “Cancel”.

You can also click in the hour or minute box and use the number pad or on-screen keyboard.
Set the day of the week for the desired Blocked Time, then press “OK”.
R
 eview
the new “Blocked Time” before saving the changes.
Review all Blocked Times before returning to the main administration screen.
If the participant asks for a blocked time period where there would normally be a fixed saliva collection prompt, please remind her that she will still collect the sample regardless of the phone being silenced during the block.
P
 ress
the devices back button to return to the Administration screen.
Adding Custom Schedule Times
T his
function is helpful for example if the participant goes to sleep
before the time the evening diary is scheduled. If this is the case,
you can schedule a custom time for that event.
Custom Times allow for scheduling of specific diaries, such as the recurring diary main, Morning, or Evening, as well as any other question groups specified in the Question XML file.
From the main administrative area, tap on “Schedule Times.”
To create a new custom schedule time, tap on “Add New Schedule Time” at the bottom of the screen.
T
 hree
fields can be customized: the time, day, and name of the question
group.
Tap on the downward arrow to the right of the schedule time to set the time at which the desired question group will prompt.
Using + and – symbols, set the hour and minute. When finished, click “Set”. To discard changes, click “Cancel”.
Tap on the arrow to the right of the day(s) of the week to specify on which days the desired question group will prompt.
One or all days can be selected.
7. Select “OK” when done, or “Cancel” to discard the changes.
8. Tap on the arrow next to the “Question Groups” to specify which question groups will appear at the desired time.
Multiple question groups can be typed in, each seperated by a comma.
(e.g., main, Morning, Evening)
S
 elect
“OK” when done, or “Cancel: to discard changes.
Review the changes. Make any necessary corrections, then select “Save”, or “Cancel” to discard the changes.
When complete, the screen will flash “Schedule Loaded.”
Review all custom schedule times.
Schedule
From the Administrative screen, click on “View Schedule” to review when the diary will and will not prompt.
Quiet Times and Blocked Times are displayed in gray, while times when the prompt times are shown in color.
W hen
viewing the schedule, make sure to check that morning diaries occur
after wake time and that evening diaries occur before bed time.
To return to the main Administrative screen, use the phone’s back button.
Actiheart Device Change Calendar Reminder
You will now want to set a reminder for the participant to change their Actiheart device on day 3.
From the home screen:
Tap "Applications"
"Calendar”
Select the appropriate date (e.g., Feb 14).
Scroll to 8pm.
Tap to the right of 8pm (A blue rectangle will appear).
Tap on the blue rectangle.
You will now enter the event title "Change actiheart device".
Tap "Next" button.
Select "Next" again.
Next tap "Done".
Participant Training
General Instructions for the Android Phone
“We are asking you to provide us with an Electronic Diary over the next four days, which will consist of two weekdays, and two weekend days. You will be using an Android Smart Phone with Questionnaires embedded into a program that we call an electronic dairy. There are approximately fifteen sessions throughout the day where you will be asked to stop and take approximately two minutes to answer questions at an exact moment in time about your thoughts, feelings, and daily activities. The phone has been programmed to softly chime every hour when it is time for you to make these entries into your diary. The phone has been programmed to signal you only during your waking hours, and to turn off during your normal sleeping hours, so as not to disturb you. The phone is also programmed to remind you when it is time to collect each saliva sample throughout the day. There will be a total of seven saliva collections starting when you first wake up, a second sample 30 minutes after you wake up, a third sample 60 minutes after you wake up, a sample at 12 noon, 4pm, 8pm and bedtime over the same four day period. The phone has been programmed to remind you, with three soft chimes, as to these collection times. Please refer to this manual, to guide you, in the step-by-step process of operating your Android Phone, Electronic Diary Entries, and the Collection of Saliva Samples. Please remember we realize that the diary questions and response choices will not always exactly capture how you’re feeling or what is happening. In these situations, please complete the items in a way that best describes your situation despite the limitations of the phrasing.”
Teach Wake Up Saliva Widget
Immediately upon awakening
Unlock your phone by sliding your finger up from side to side.
Press the wakeup button
Press OK
Phone will instruct you to collect first Saliva sample of the day.
The phone will continue to alert you for the 2nd saliva sample collection in 30 minutes after the first, and the 3rd sample thirty minutes after the second.
*The phone now knows you are awake and will automatically alert you with a soft chime when it is time to fill out the dairy and (three soft chimes when it is time) to collect subsequent saliva samples.
Practice Electronic Diary
Phone is Chiming with One Soft Chime
It is now time to answer questions in your Electronic Diary, begin by
U

 nlocking
your phone by sliding your finger up from the bottom of the screen
to the top.
nlocking
your phone by sliding your finger up from the bottom of the screen
to the top.Touch Green/Blue bars in the upper left corner and slide finger to the bottom of the phone. This will display your Diary.
You have six minutes from the chime notification to start answering the questions.
Answering Diary Questions
You will be prompted approximately every hour answer diary questions; each session will take approximately 2 minutes. Read each question. If you’re having trouble deciding on how to answer, please go with your best guess, or your first impression.
Choose your answer then tap the Next button located at the bottom of the screen. The diary will record your answer and then advance to the next question.
Once you start answering the questions, the clock will allow you six minutes to finish all of the questions in the session.
Once you have pressed the next button, you will not be able to go back and change your answers to the previous questions.
If you miss a diary, or you are interrupted during a diary session, don’t worry, the phone will chime when the next scheduled session of questions are available to answer. The electronic diary will time stamp each dairy response for compliance evaluation, so incomplete or unanswered sessions will not be counted toward your total responses.
Once you have completed answering all the questions, the phone will revert to the main page.
How to Navigate thru the Diary Questions
T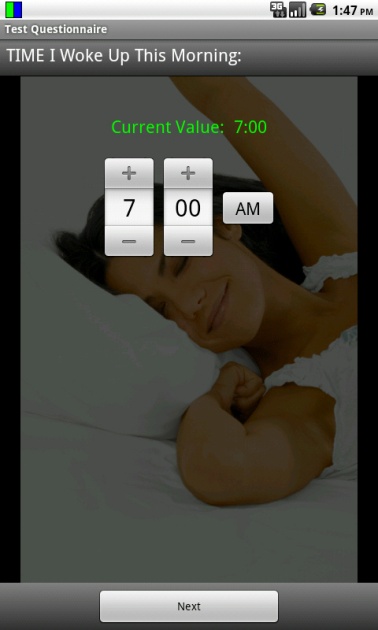 here
are four different types of screens that you will see when the diary
questions are presented. Please refer to the following examples on
how to navigate the different entries required for each.
Rolling Time
Enter the time by pressing the +/- signs. Tap next to record displayed value and to advance to the next question.
Note: You may tap in the number field to display keyboard/ number pad if you are more comfortable using a keypad to enter your answers.
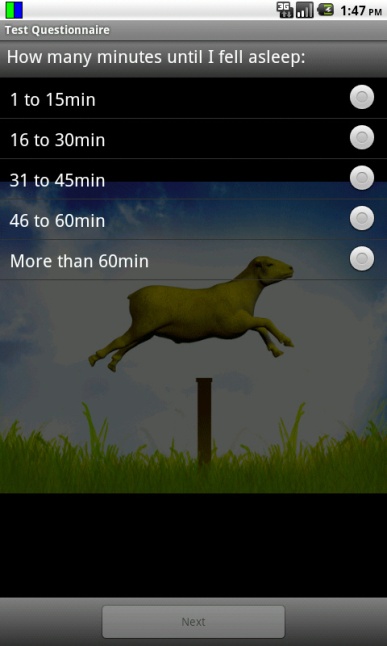
Multiple Choice:
Choose your answer by lightly tapping the radio button indicating the answer of your choice. Verify that your choice is correct. Press “Next” to record answer and to proceed to the next question.
M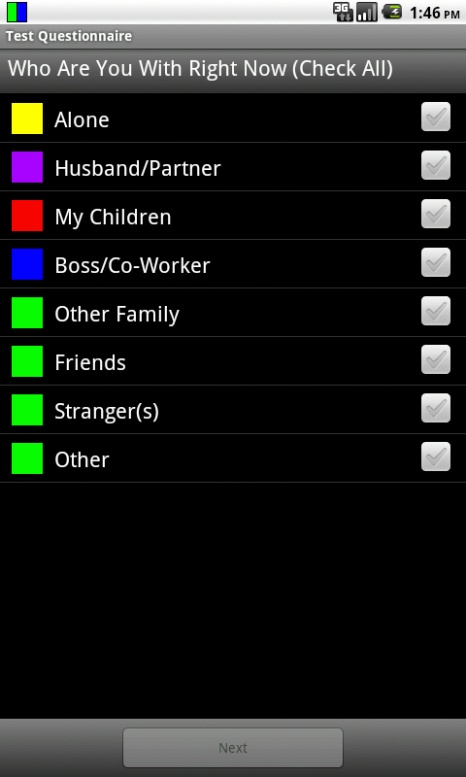 ultiple
Entries:
Some questions allow for multiple entries, choose all that apply then press the next button to proceed.

Sliding Bar:
For questions that use the sliding bar, lightly touch the sliding bar and move it to the right to increase value, and to the left to decrease value. Once your answer appears as the current value press next, this will record your answer and move to the next question.
Recharging the Electronic Diary
It is imperative to recharge your phone every evening, DO NOT allow the battery to discharge completely, this will cause a loss of programmed information in the phone, such as your sleep and wake time and many other factors that will cause difficulty with prompt times and diary processes. The battery generally has a life of approximately 16-18 hours.
Each evening connect the Electronic Diary to the wall outlet power adapter, and recharge overnight to maintain power.
We have also provided you with a travel adapter for your vehicle, while traveling, simply plug the adapter into your autos power source for continued power and charging.
If your battery is low, the device will emit a warning tone and display a low battery message.
Recharge your battery to continue using your device. The battery icon will be empty and turn red
If your phone automatically powers off, immediately plug the phone into the wall charger and press the power button located on the upper right side of the phone this will allow you to make entries into the dairy while the phone is charging.
Frequently Asked Questions
How do I know if the diary is turned on / working?
You will know that the diary program is actively running whenever you see the Diary Status Icon in the notification bar of your phone.
If the Diary Status Icon ever disappears, please notify the study team immediately so they can troubleshoot the problem. You may reach the on-call staff person at: (714) 940-1923
Why don’t I see the same questions each time?
Please do not be alarmed if the questions you see are not the same from prompt to prompt. You will actually be answering three different diaries:
M
 ain
Diary, which repeats several times throughout the day
 M

 orning
Summary, which asks questions about your sleep the night
before.
 E
 vening
Summary, which asks about your overall experiences for the day
How do I know when it’s time to complete a diary?
When it is time to fill out the diary, an audible alert will be played and the Notification icon will be displayed next to the Diary Status Icon.
How do I know if I answered the last question?
After you answer the last question, the phone will revert to the last screen you had open before you began the diary and will say: “Questionnaire completed”, saving results.
Can I choose when the diary prompts?
No. The diary is programmed to prompt randomly throughout the day. However, you’ll work with study staff to program the start time in the morning and end time in the evening. The staff can also program block out times in the middle of the day if there are specific times you won’t be able to answer the diary (e.g., commuting, weekly meeting, gym class, etc).
How do I get to the next question?
After selecting your response(s), please tap the “Next” button located at the bottom of the screen. The diary will then advance to the next question.
How many responses can I pick for each question?
Generally you can pick a single response per each question. However, if a question ends with “Check all”, you can pick as many choices as you’d like.
Can I go back and change my answers?
No. Once you tap the “Next” button you will not be able to go back and change your answers to any of the previous questions.
Can I turn off the diary notification sound?
No. Even if you set your phone to silent or “vibrate” mode, the diary notification sound will still signal. You can adjust the range of how loud the notification sound is by adjusting the volume level for “media settings” on your phone. Again, however, even if you set media volume to silent, the diary notification sound will still prompt. The only way to prevent the diary from prompting is either to have the staff pre-program the diary to be silent during certain time periods (e.g., standing weekly meeting, etc.) or turn off your phone.
Can I turn off the clicking sound that the diary makes every time I pick a response?
Yes. You can do this by un-checking the box “Audible Selection” (i.e., on your phone, go to Settings → Sound and Display → Audible Selection). This does not stop the diary notification sound.
What does “at the prompt” mean?
When a question says “at the prompt” you should answer it with regard to your circumstances at the moment you first heard the diary signaling that it was time to make an entry. Most of the “at the beep” questions will be about situational circumstances, such as who were you with or what you were doing. For example, if you were walking out of a work meeting with some co-workers when you first heard the diary prompt but you didn’t make the entry until you were alone in your office, you would answer that you were with your “co-workers” at the beep rather than “alone”.
What does “now” mean?
When a question says “now” you should answer it with regard to what is going on for you at the moment you’re answering that particular question. Most of the “now” questions will be about your mood. However, if the diary itself changed your mood, please rate your moods according to how you felt immediately before the prompt.
What if I miss an entry?
If you are unable to respond when prompted, the phone will record the missed entry. Just wait until the phone prompts you for the next session.
What do I do if the phone doesn’t prompt me for saliva but it is noon, 4pm, 8pm, or Bedtime?
Collect the saliva sample and remember the phone prompt is only a reminder. The afternoon scheduled saliva collection times will not change. They should be collected as we have previously discussed.
What happens if I get interrupted? Can I do some of the questions, and continue the rest later?
No. You have six minutes to complete all your questions in each session.
What are the times I will collect a saliva sample?
In the morning when you wake-up, 30 minutes later, 60 minutes after you wake-up, 12:00 noon, 4 pm, 8 pm, and bed-time.
Who should I call if I have any questions or issues with the research phone?
Please contact Everlyne Gomez, or your research coordinator at: 714-940-1923.
D) DURING FOLLOW-UP VISIT
Upload Data
When the participant returns the electronic diary, compliance must be verified. You will look at:
“Status”, “Start Time”, “Filled Out” (e.g. ¾ (75%), “Uptime” (e.g. 1219/1221 (99%)
The data must be downloaded to the computer.
Open DHDRP program
Enter Administrative page to open it. (Tap on green header 3 times).
Enter password: “uci” and press OK.
Next you will need to select “Decrypt Data File(s)”
Attach phone via USB chord to computer.
Pull down bar from top of phone screen.
Click on USB icon
Mount SD card to computer to enable data copying.
Open to view files on computer screen
Select “Dhdrp”
Now you will want to copy the participant’s HEX file and TXT file to the desktop HEX and TXT folders.
Open new excel workbook
On the top toolbar select the “Data” tab
You will see “Get external data on the left side of screen”…
Select “From Text”
You will now see the computer’s library pop up
Select: Desktop > TXT
Now select the correct SP file (e.g. date_participant ID_visit number).
Click “Import” button
You will now immediately see the Text Import Wizard pop up saying: “The text import wizard has determined that your date is delimited”.
Text Import Wizard – Step 1 of 3
Select radio button “delimited”
Text Import Wizard – Step 2 of 3
Select “Comma” and click “Next”
Text Import Wizard – Step 3 of 3
Leave column data format as “General”
Now Select “Finish”
You will see the Import Data pop up now which asks: Where do you want to put the data?
Please select the radio button for: “Existing worksheet”
Tap “Next” button.
After all the data is saved. You will have three types of data. A HEX file, a TXT file, and a CSV file.
Next you will need to un-mount the SD card from the computer. Open the DHDRP program and access the Administrative screen again. Scroll up to reach the bottom of the screen. Select “Sanitize”. The screen will now warn you that all data will be erased for that subject to confirm your choice.
*NOTE: Please triple check that you saved all data before you press the “sanitize” button on the phone.
You will now need to reload the DHDRP and wake up programs.
Open Dropbox from your computer desktop with the phone connected via USB cable. Mount SD card once again. When removable drive screen appears on the computer, please select “Open Folder to View Files”.
Open the “Photos” Folder > “DHDRP “>, “XML” >
Now Copy the latest version of “Questions” (e.g., Questions Preg8) and “Schedule-Pregnancy” from Dropbox to the phone’s XML folder.
| File Type | application/msword |
| Author | amartin |
| Last Modified By | hashemip |
| File Modified | 2012-07-16 |
| File Created | 2012-07-12 |
© 2026 OMB.report | Privacy Policy