Screenshots
screenshots.doc
Application and Re-certification Packages for Approval of Non- profit Organizations in FHA Activities
Screenshots
OMB: 2502-0540
1.1Step One Logging In (if you have already logged in you may skip this step)
All users of the system will be given a username and password to access the system. Using Internet Explorer, go to the following URL:
http://hudgis.uai.com/HUDNP
You should bookmark this page and/or add it to your bookmark toolbar for easy access in the future.
You should see the following login screen:
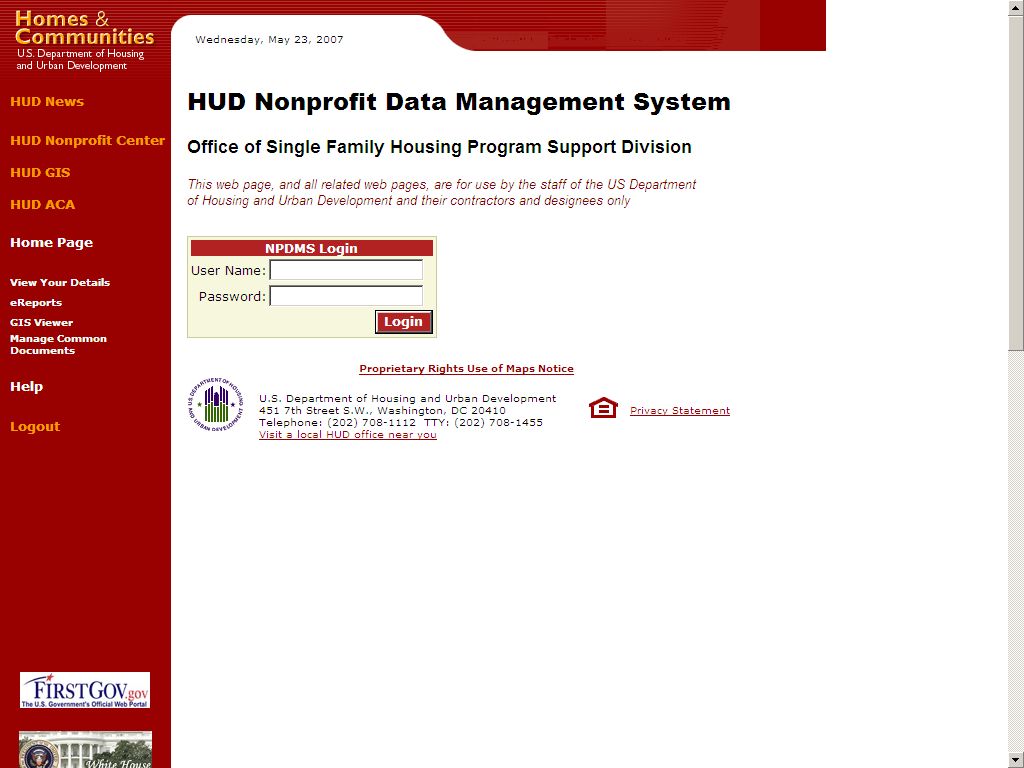
Figure 1
Enter the username and password that was assigned to you and click “Login”. You should see the main screen:
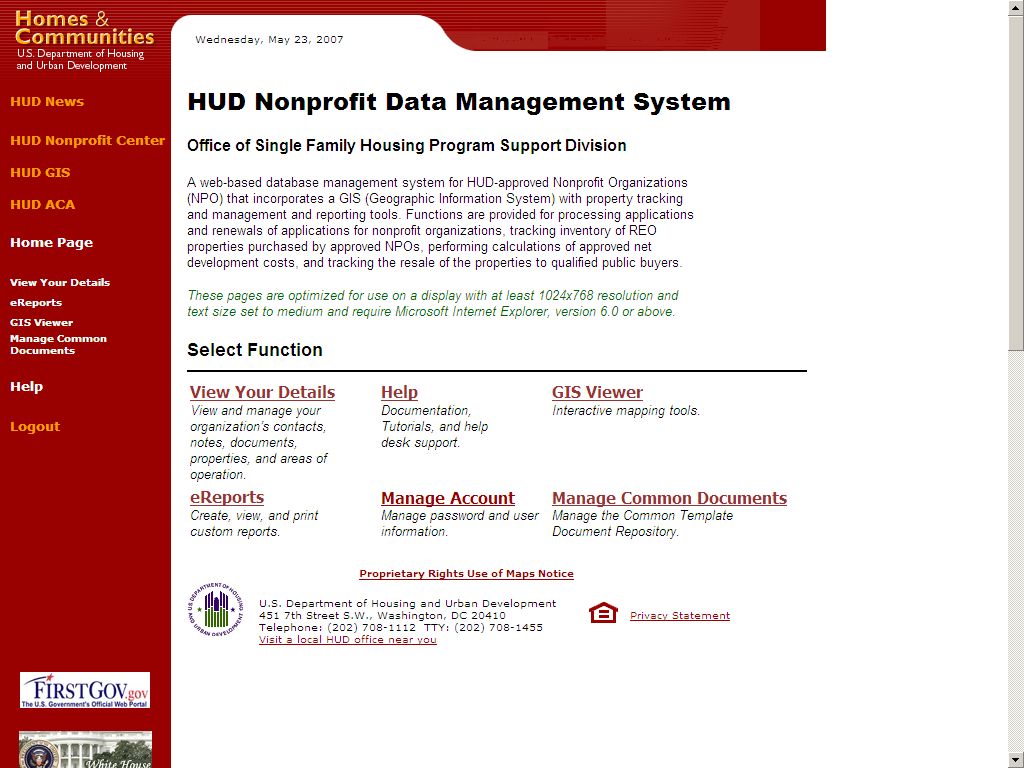
Figure 2
To logout of the application, click the “Logout” link on the left navigation bar. You will automatically be logged out after a certain period of inactivity, but it is a good idea to make a habit of logging out when you will be leaving your computer for an extended period of time or when you are using a shared computer system.
1.2Main Screen Description
The left side of the main screen is called the navigation bar. The links at the top are convenience links to other HUD sites. The next set of links allows the user to navigate around the other pages of the HUD NP application. The links are:
Home Page
View Your Details
eReports
GIS Viewer
Manage Common Documents
Help
Logout
These will be described in detail in later sections of this document. Note that the “Home Page” link will bring the user back to the main screen. The Main Screen contains the same 5 links as well as a Manage Account link that allows the user to update their contact information and change their password.
1.3Step Two Manage Account: Update HUDNP user information
Clicking on Manage Account takes the user to the screen below.
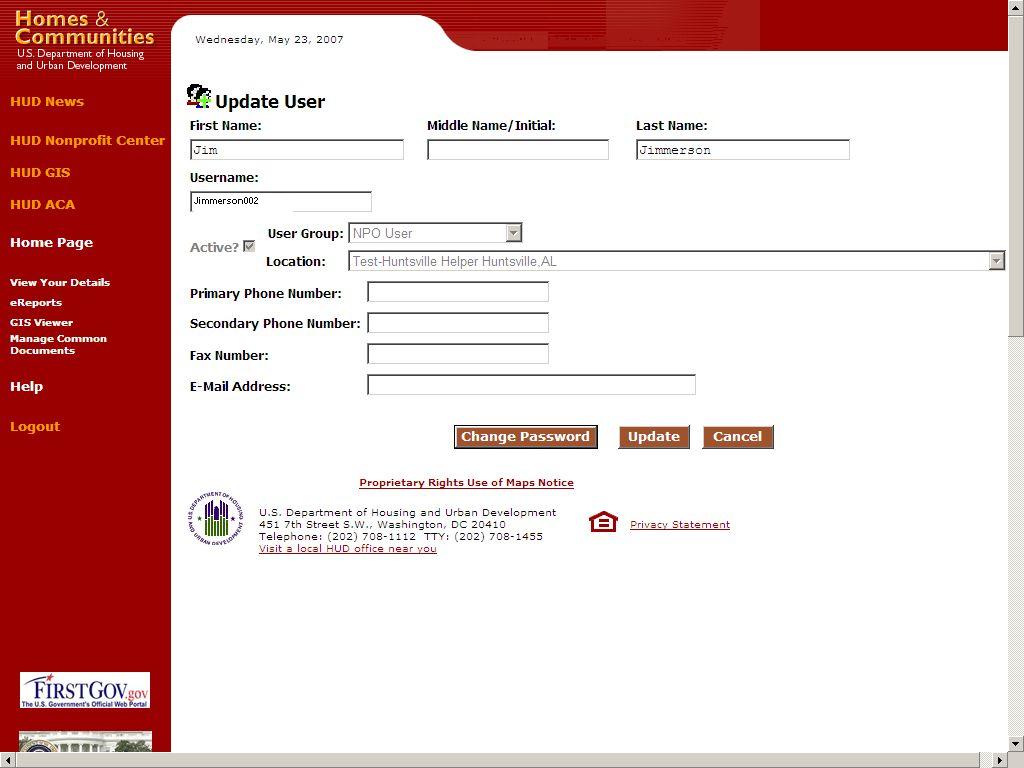
Figure 3
1.4Step Three View Your Details: View/update Your NPO’s information
When View Your Details is selected from the navigation bar, the following screen is shown:
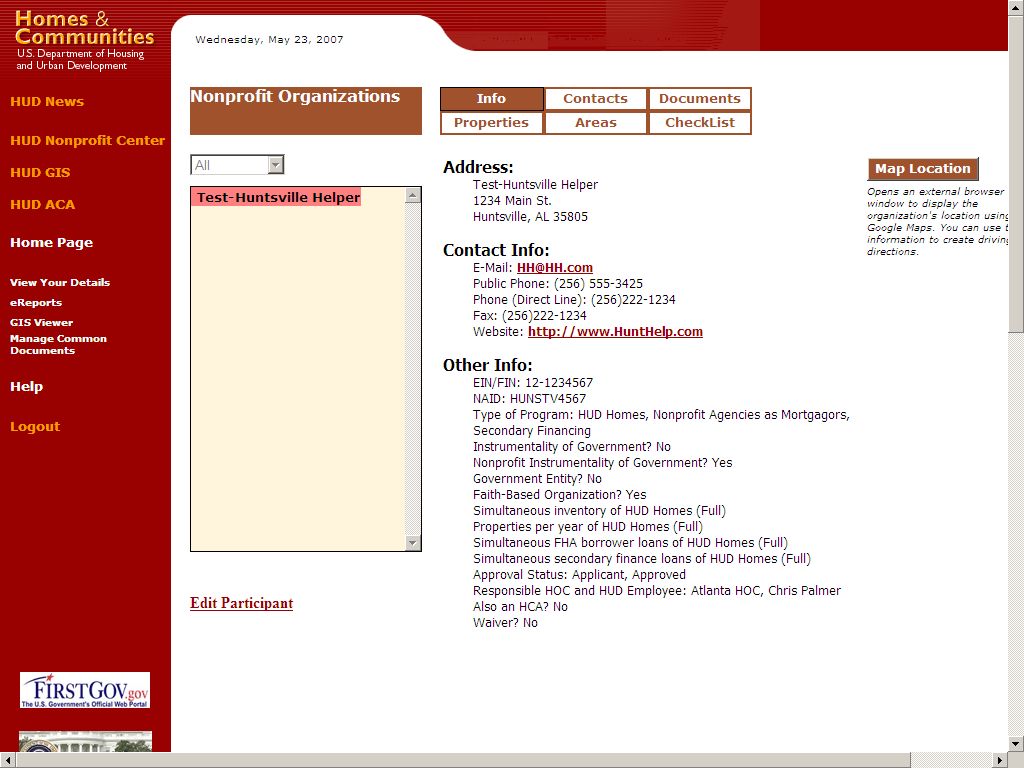
Figure 4
1.4.1Info Tab
The default tab is “Info”, which presents a summary of information regarding your NPO, including the main address, primary contact information, and information about the current status of your NPO’s agreements with HUD. Making sure this information is correct is very important as it is the information HUD will use to contact your Nonprofit, and this information will be posted on HUD’s public website (http://hud.uai.com/hudpls) to allow the general public access to your NP’s contact information
Refer to the previous figure #4 for a visual of the Info tab.
1.4.2Updating Your NPO’s Information
From the “Info Tab” screen, click “Edit Participant” on the lower left hand corner of the screen. An “Update Nonprofit Participant” screen as shown below in figure 5 will appear.
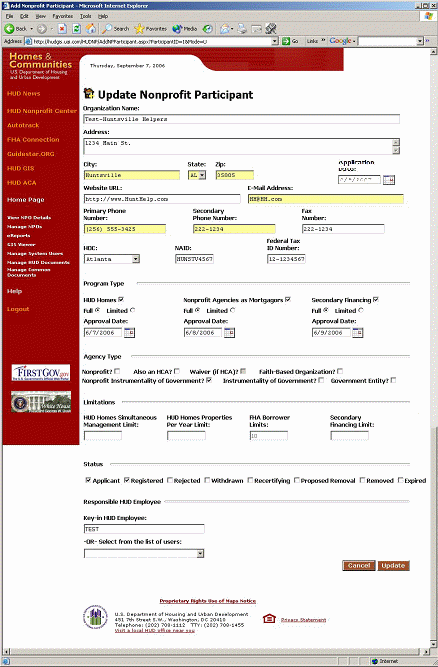
Figure 5
1.4.3Step Four-Contacts Tab: Update your NPO personnel contact information
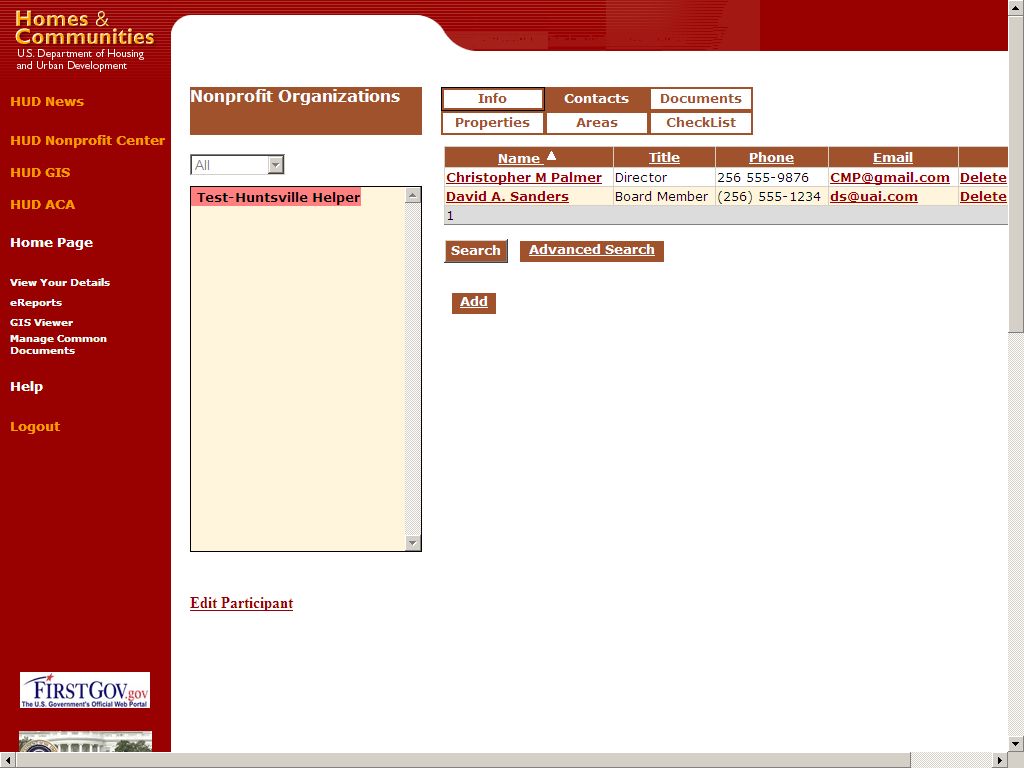
Figure 6
1.4.3.1Displaying/Editing Contact Details
To view the full details on a contact, or to edit the contact if you have the proper permissions, click on the name of the contact. The following page will be displayed:
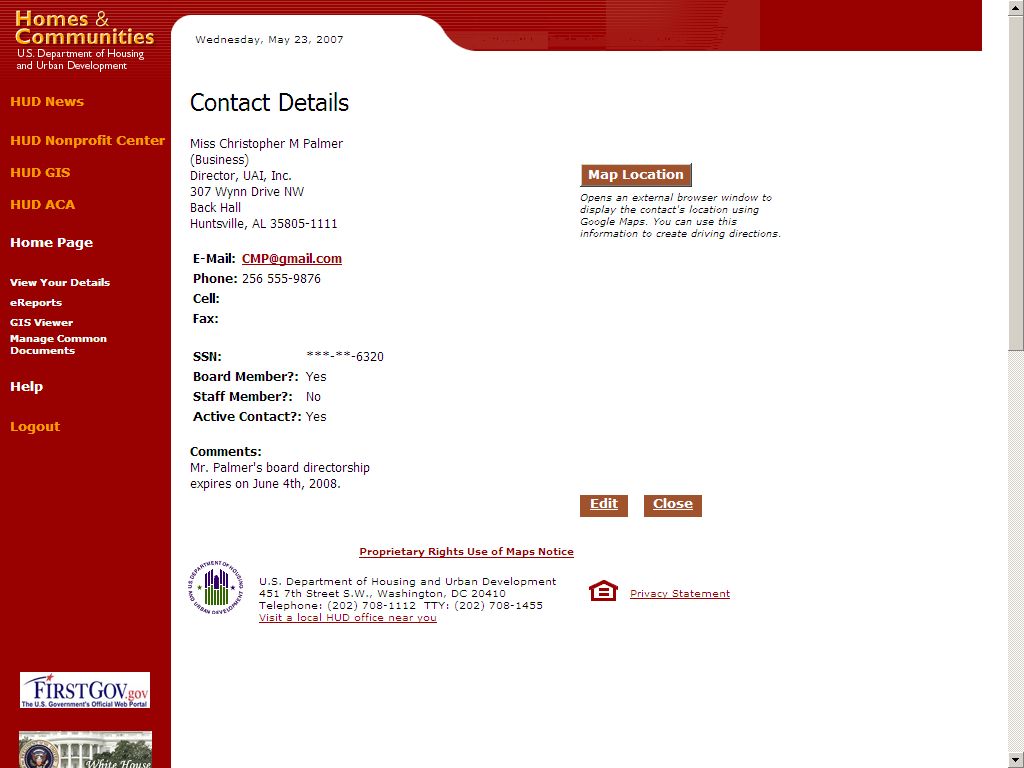
Figure 7
To update the fields for each contact, click the Edit button.
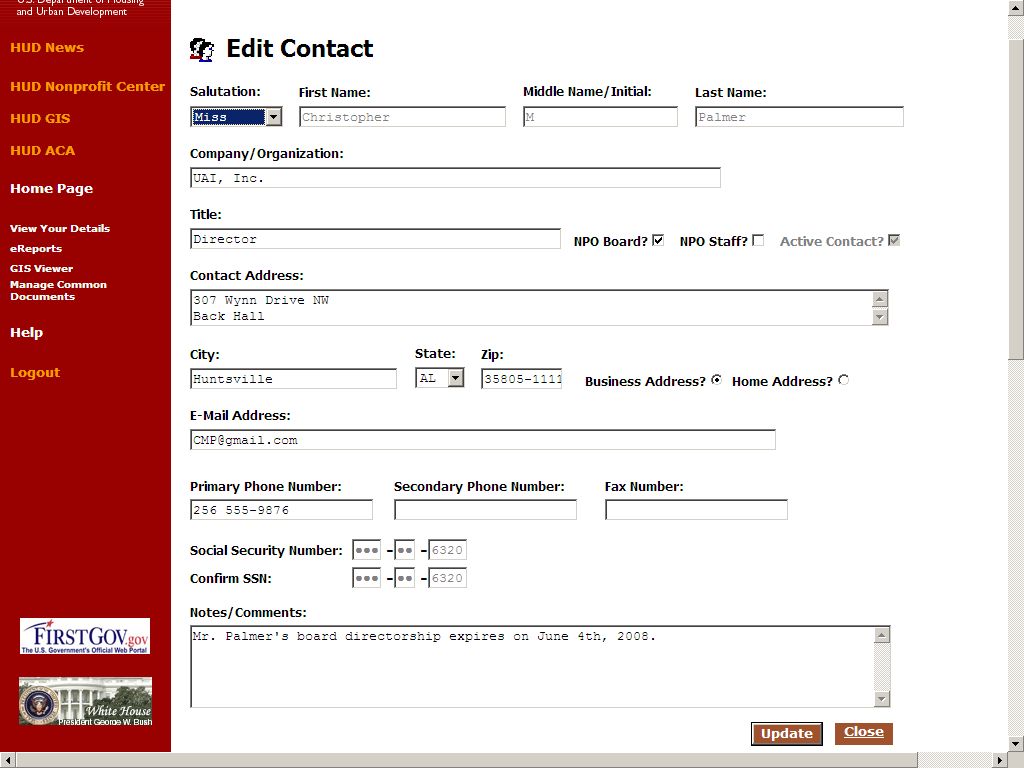
Figure 8
1.4.3.2Adding New Contacts
To add a new contact for your NPO, click the “Add” button at the bottom of the table of contacts. The following page will be displayed:
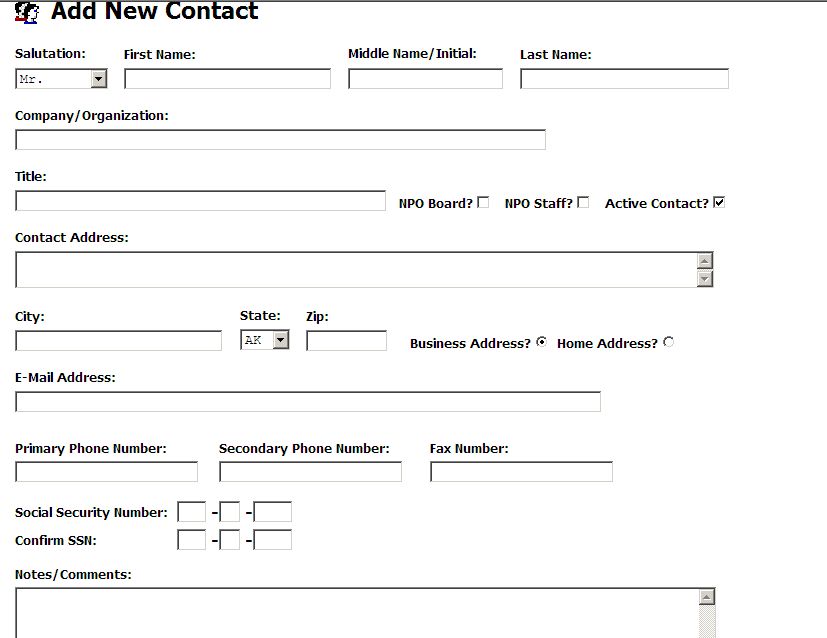
Figure 9
1.4.4 Step Five Using the Checklist Tab
The “Checklist” tab allows the applicant to see the status steps for your nonprofit organization to be approved and takes the organization through the approval process.
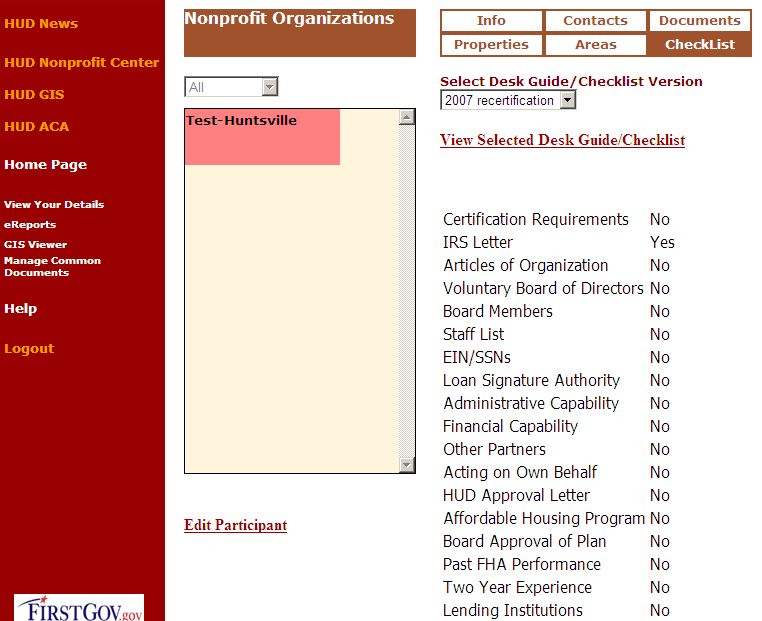
Figure 10
Figure 11
The following format should be used to Name each form that is uploaded to the Documents tab for the application, or reapplication process.
1.4.4.1View Selected Desk Guide/Checklist
Choose the appropriate checklist from the drop down list then click View Selected Desk Guide/Checklist. The following page will appear.
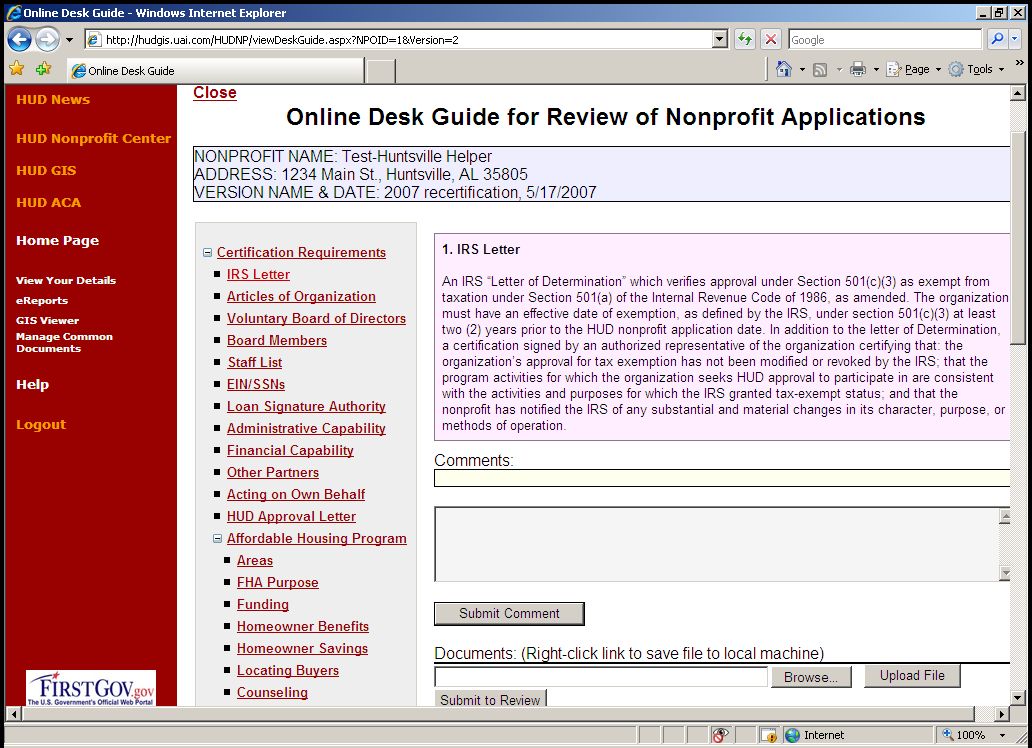
(Figure 12)
1.4.4.2Uploading documents to the Checklist.
To upload documents to the Checklist enter the full path to the file on your local computer (if known). If you don’t know the full path, click “Browse” and a standard Microsoft Windows file browser box will appear. Navigate to the folder containing the file and select the file. When the file is selected, click “Open” to return to the Upload Document window.
Enter an accurate description for the file, (see Official Checklist file names referenced below for help in naming items) and then click “Upload”. Depending on the size of the uploaded file, this may take a moment. When the file is uploaded, you will be returned to the document list.
1.4.4.3Official File Names for Saving and Uploading Application/Recertification Checklist items.
Agencies applying/re-certifying to become HUD-approved to participate in Single Family FHA activities should use the following file names to save and upload documents into NPDMS for review.
Certification Requirement - Supplemental Checklist – File Name: CoverSheet (e.g. CoverSheet.pdf, Coversheet.jpg, etc)
IRS Letter – File Name: IRSLetterwithCert
Articles of Organization – File Name: ArticlesIncorpwithCert
Voluntary Board of Directors – File Name: VoluntaryBoardCert
Board Members – File Name: BoardMembers
Staff List – File Name: StaffListwithResumes
EIN/SSNs – File Name: EINSSN
Loan Signature Authority – File Name: SignatoryAuthority
Administrative Capability – File Name: AdminCapQCPlan
Financial Capability – File name: FinancialCap
Other Partners – File Name: Partners
Affordable Housing Program - AHP
Acting on Own Behalf – File Name: ActingOwnBehalfCert
HUD Approval Letter – File Name: ApprovLtr
Board Approval of Plan - File Name: AHPApprov
Past FHA Performance – File Name: PastPerformance
Two Year Experience – File Name: AgencyExperience
Lending Institutions – File Name: Lender
Mortgage/Note Copies – File Name: MtgeNote
W-9, SAMS-1111 – File Name: W9SAMS1111
Photos and Floor Plans – File Name: PhotosFloorPlan
Lease Forms – File Name: LeaseForms
Application Certification - File Name: ApplicationCert
Recertification Requirements – File Name: RecertReq
Special Note: The Affordable Housing Program should be uploaded as one document under Item # 12 of the Affordable Housing Program and should be labeled AHP. The Affordable Housing Program narrative must address all items in the order they appear in Mortgagee Letter 02-01, Attachment 2.
1.4.5Deleting items that were uploaded

(Figure 13)
Once an item has been uploaded your NPO has the ability to delete the file as long as you have not submitted the application for review. Simply click on the Delete button to permanently remove the document. Once you have submitted the application for review your NPO will not be able to delete any documents. You may still upload additional information at the request of HUD, and your HUD contact may delete items but your NPO will not be able to delete.
1.4.6Submitting application/Recertification Checklist items for review.
![]()
(Figure 14)
Once your NPO has uploaded all items in the application/recertification checklist click on the Submit for Review button. This will lock your application and notify HUD that you are ready for your applicationnto be reviewed. You should also send an email to your HUD contact to let them know that you have submitted your application for review.
1.4.7Step Six Documents Tab: Storing documents related to your NPO
When the “Documents” tab is selected, the following screen will appear:
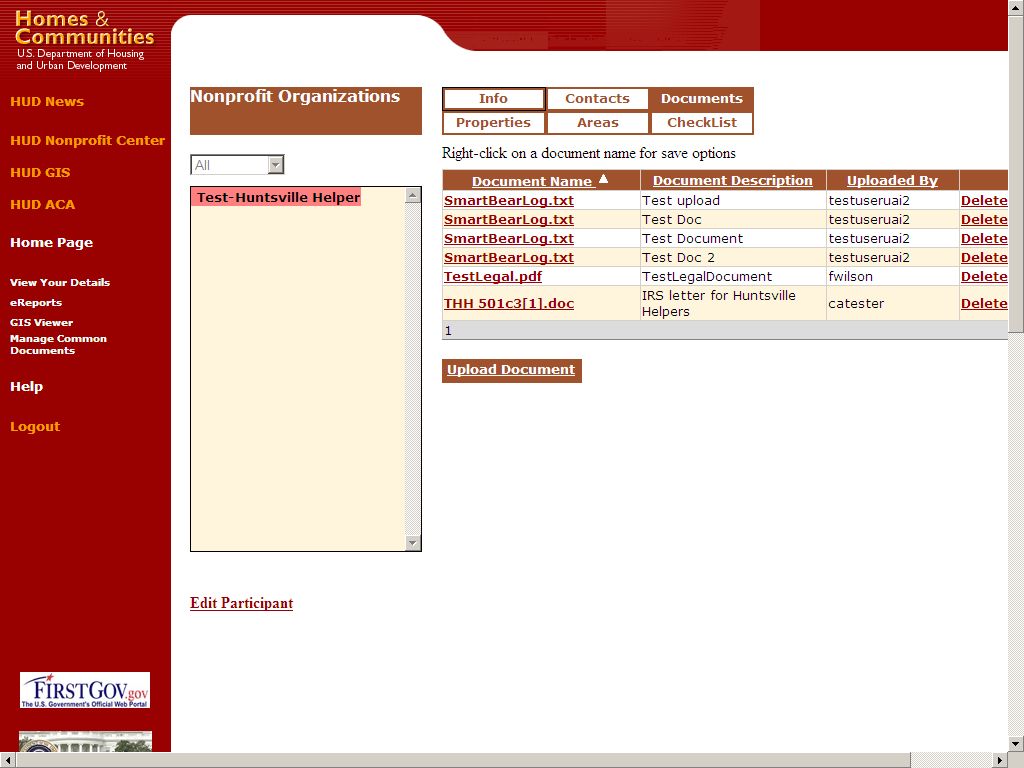
Figure 15
This is a list of all documents not listed in the checklist, or pertaining to a particular property that pertain to your NPO. The fields displayed include the Document Name, Document Description, and the username of the user who uploaded the file.
Files of any type may be uploaded into the system, but there is currently a limit of 4 megabytes per file. Files are stored in binary format with the original filename and file extension.
To view a document, click on the Document Name. You must have the proper client application on your machine to view the downloaded file.
1.4.7.1Uploading Documents
To upload a document, click the “Upload Document” link. The following screen will appear:
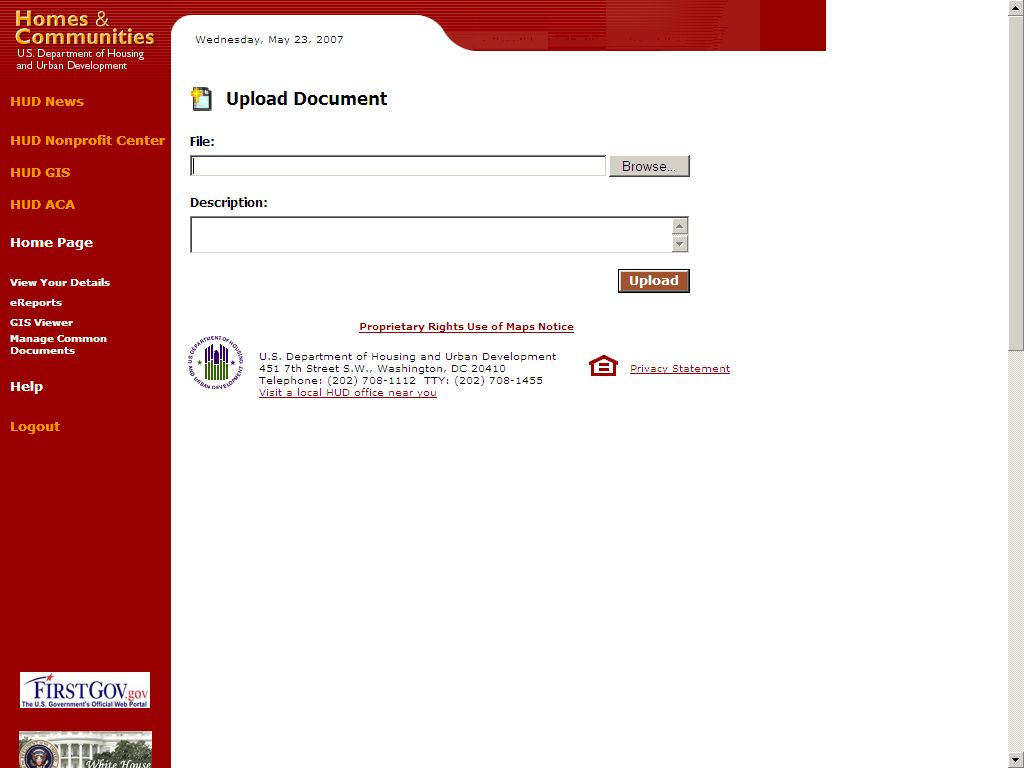
Figure 16
Enter the full path to the file on your local computer (if known). If you don’t know the full path, click “Browse” and a standard Microsoft Windows file browser box will appear. Navigate to the folder containing the file and select the file. When the file is selected, click “Open” to return to the Upload Document window.
Enter an accurate description for the file, (see Official Checklist file names referenced above in this document for help in naming items) and then click “Upload”. Depending on the size of the uploaded file, this may take a moment. When the file is uploaded, you will be returned to the document list.
1.4.8Step Seven-Areas: Verifying your areas of operation
For first time applicants the following section will be used to upload the list of Zip codes that you submit in your application. The areas will not take effect until HUD approves your areas of operation. For approved NPO’s clicking on the “Areas” tab, the following screen is displayed:
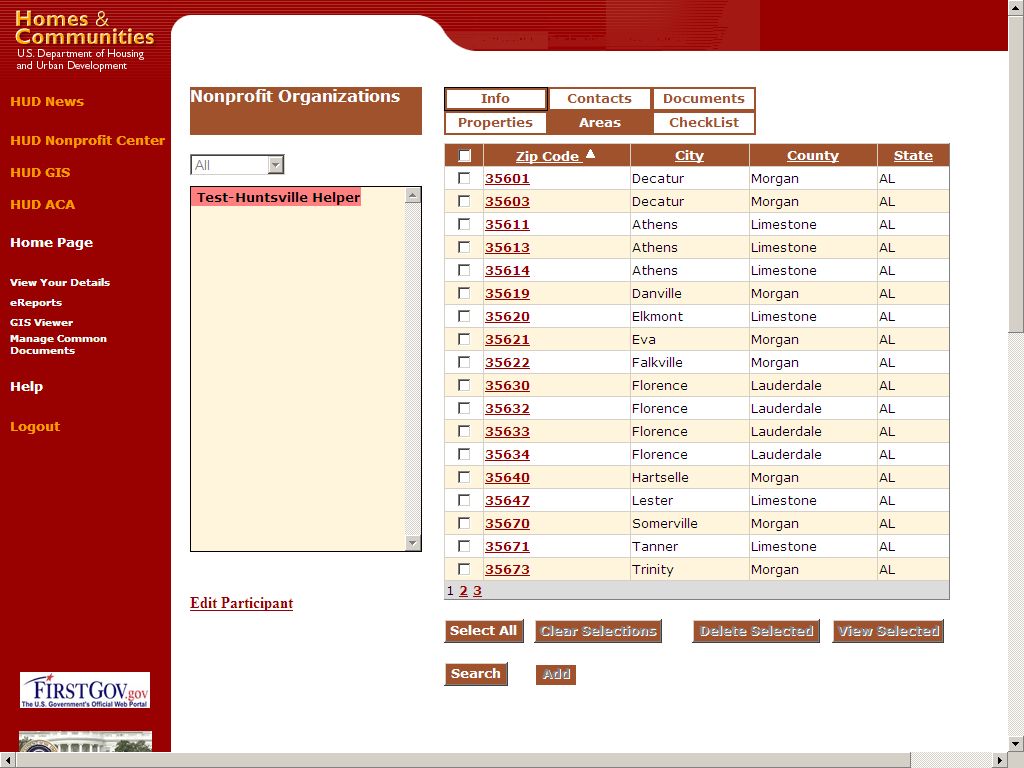
Figure 17
The Areas tab shows areas of operation for your NPO. The list shows each area’s zip code, city, county and state. Different areas can be selected using the checkboxes in the leftmost column. Clicking the “Select All” button will cause all areas to be selected. Clicking the “Clear Selections” button will cause all areas to be unselected.
The “View Selected” button will provide a visual representation of the selected areas of operation by displaying a map with the selected areas outlined, as shown below (Figure 18).
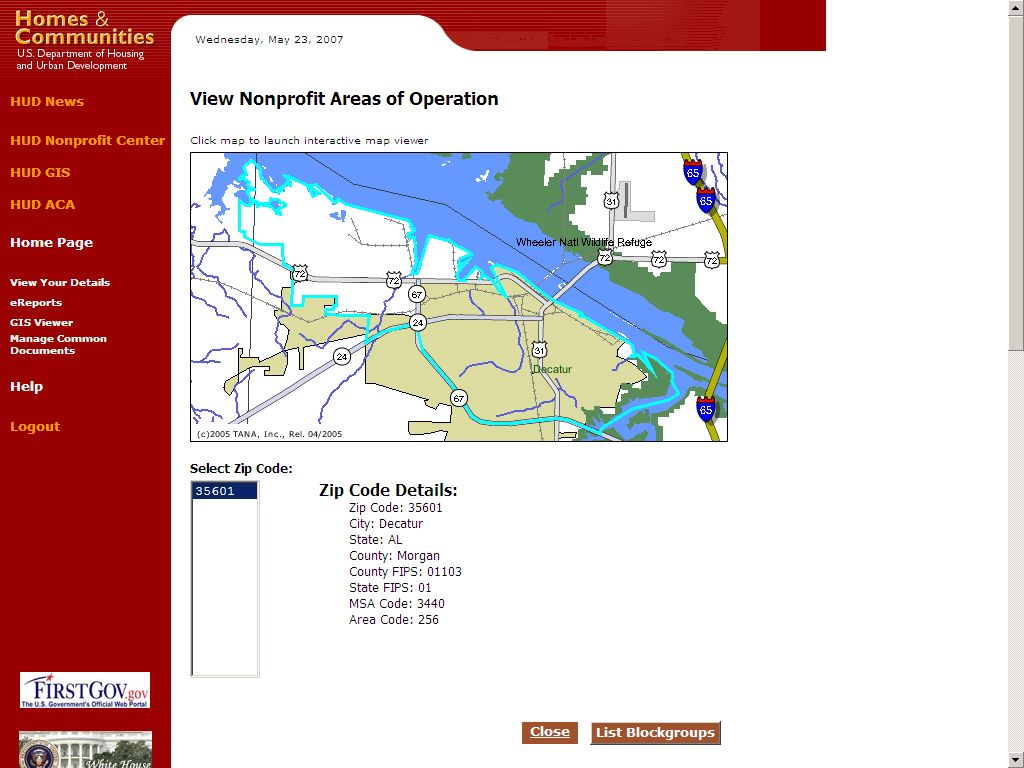
Figure 18
1.4.8.1Adding Zip Codes to your area of operation.
NPO’s that are applying for the first time will use this tool to upload the zip codes that were specified as their area of operation in the application/recertification checklist. NPO’s that are recertifying should use this tool to upload any new zip codes that they are applying to their area. NPO’s do not have permission to delete areas of operation from the list. If your listed area of operation is incorrect please contact your responsible HUD contact to delete incorrect Zip codes assigned to your area.
It is very important that NP’s verify that this list is accurate as it is used by M&M contractors to make properties available to your NPO, and by the general public to contact your NPO regarding properties or other services in your areas of operation.
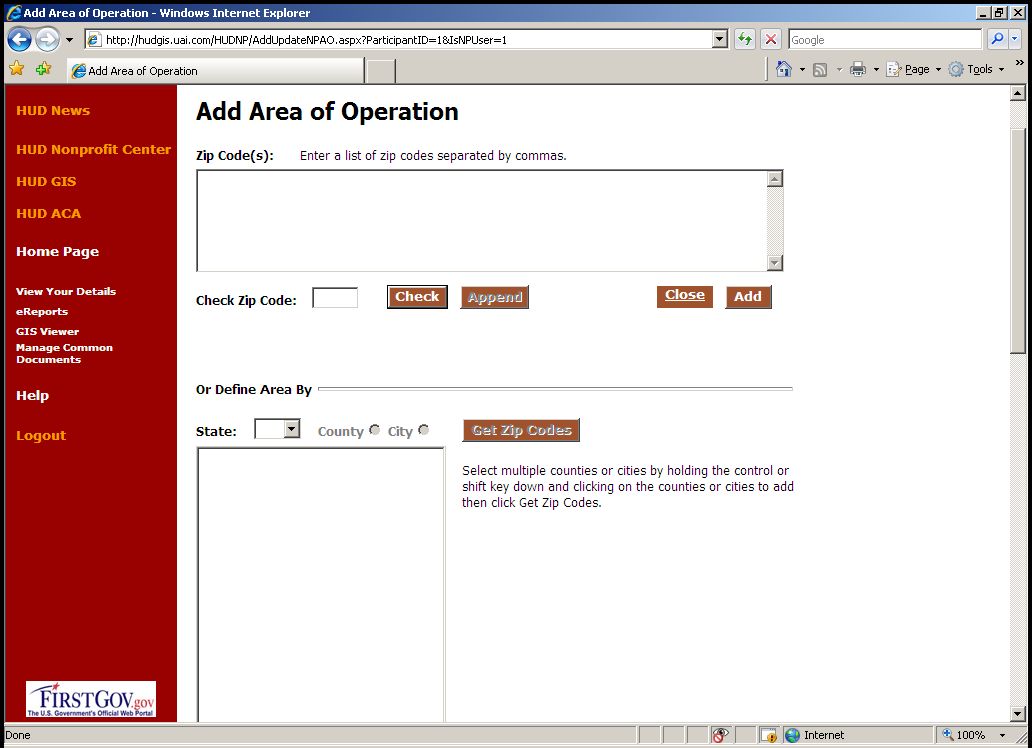
To add zip codes click on the add button and the following screen will appear.
(Figure 19)
There are four ways to add zip codes to your area of operation
You may enter a list of zip codes separated by commas directly into the box at the top of the page.
You may enter zip codes into the Check Zip Code box and click “Check” this will tell you if the selected zip code is a valid zip. Clicking “append” will add the valid zip to box at the top of the page
You may use the “Define Area by” section of the page to find zip codes by county or city within a state. Clicking on a state and county will return all zip codes in the county when you click “Get Zip Codes”, and add the selected zip codes to the box at the top of the page.
Clicking on a State and City will return all zip codes in the selected city when you click on “Get Zip Codes” and add the selected zip codes to the box at the top of the page.
Once you have entered all of your zip codes into the box at the top of the page click on the “Add” button to submit your zip codes to HUD for approval. After HUD has approved your zip codes they will appear on your area of operations list.
1.4.8.2Searching for Areas
From the Areas tab click the “Search” button at the bottom of the page and an input box will appear:
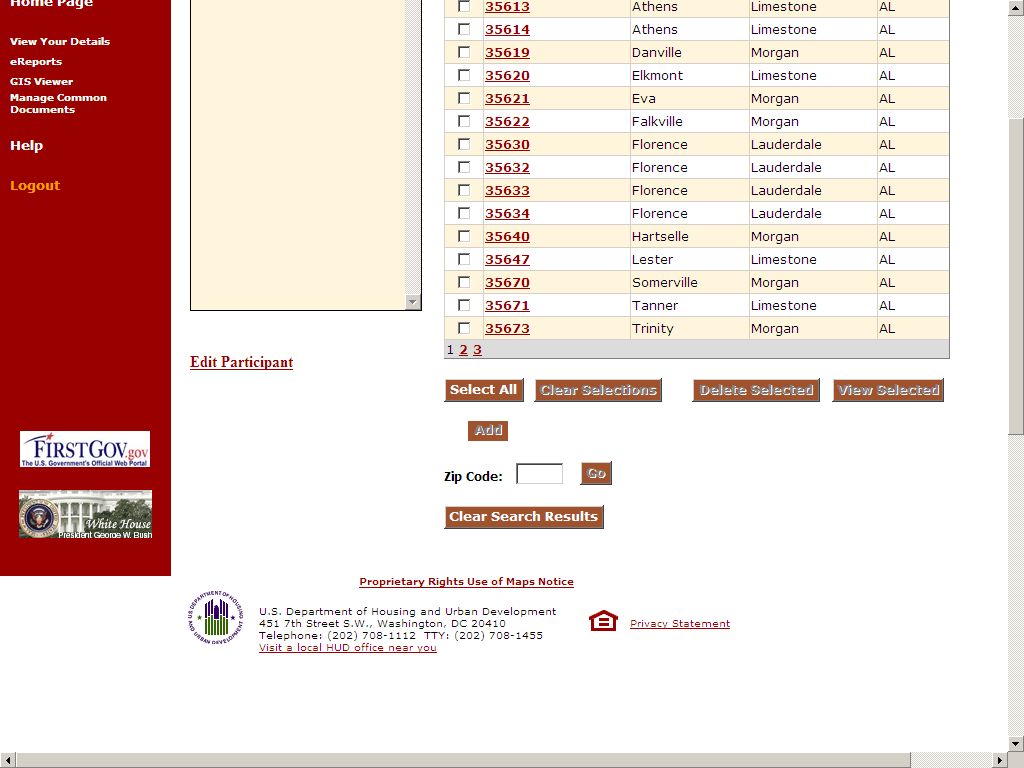
Figure 20
Enter a zip code or partial zip code (wild card) to search on and click “Go”. The list of zip code areas will be restricted to any entries that match the information provided. For example, if you enter “35” in the Zip Code field and click go, only the zip codes that begin with “35” will be shown. To clear the search results and return to the full list, click the “Clear Search Results” button.
1.4.8.3 Step 8 Updating Property information (for first time users who already have HUD properties this section is reprinted from the HUDNP Participants Guide for your convenience.
1.4.9Properties Tab
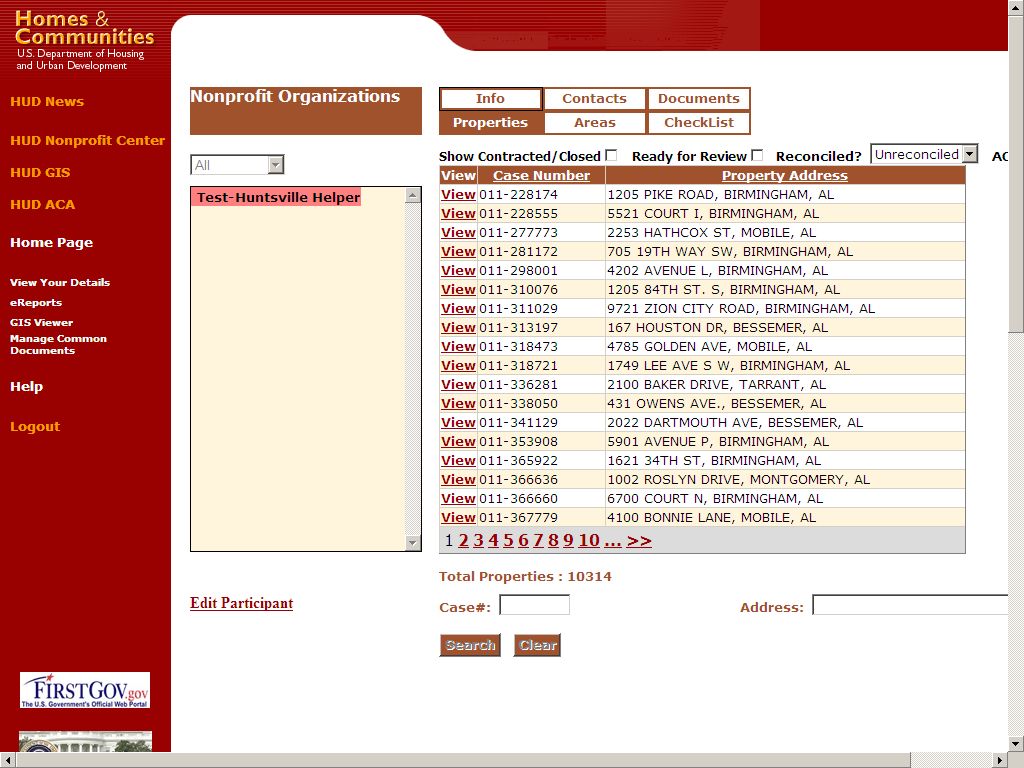
Figure 21
When the Properties tab is selected, a list of all REO properties that have been purchased by your NPO will be displayed.
The table of properties will include the SAMS/FHA case number and the property address.
This is the heart of the HUD Nonprofit program application. Every nonprofit organization that participates in the HUD Homes program is eligible to purchase properties that fall within their defined areas of operation. The Properties tab displays a list of the properties that have been purchased by the nonprofit organization.
By default, the list shows all properties that have been optioned and purchased by the nonprofit organization. You can toggle the “Show Contracted/Closed” checkbox to only display properties where the transaction has been closed.
If the nonprofit organization is also an Asset Control Area (ACA) participant, their ACA properties can be displayed by toggling the “ACA” checkbox. Details about ACA properties are not tracked within the HUDNP service.
By default, all properties are shown. By toggling the “Ready for Review” checkbox, the list can be restricted to properties that have had their development costs entered and are ready for review by HUD staff. Likewise, the “Reconciled?” dropdown allows you to filter the list of properties by their reconciliation status.
Reconciliation status and “Ready for Review” are set in the property details pages described below.
1.4.10Viewing the Properties Tab
To view the list of properties click the “Properties” tab. You will see the list of properties in a paged view, as follows:

Figure 22
The list shows 18 properties per page and shows the SAMS/FHA case number and the address of the property. To page through the list, click one of the page links at the bottom of the list. To advance to the last or first page, click on the double greater than “>>” or less than “<<” signs at the bottom of the list. The total number of properties is also displayed at the bottom of the list. If no properties are found for the nonprofit organization, a message will appear stating, “No properties found.” This can also appear when the search criteria for case number or address do not match any records.
1.4.10.1Search Properties
You can search through the list of properties by address or by case number. To search by case number, enter a complete case number, or a portion of the case number, in the “Case #” input box at the bottom of the screen and click “Search”. All properties matching that case number, or portion of a case number, will be shown in the list. To go back to the full list, click “Clear” to clear the search results.
Note: To search by case prefix, enter the dash character (-) as well as the 3-digit prefix number.
To search by address, enter any portion of the desired address in the “Address” input box, then click “Search”. The search automatically uses “wild-cards” on the search string, so “Main St” would return any properties with “Main St” as part of their addresses. To go back to the full list, click “Clear” to clear the search results.
Note: The street direction cannot be part of the street search (e.g., 307 Main Street North)
1.4.10.2View or Edit Property Details
From any of the property list views, clicking the “View” link on a property will present a detailed map and view of all the attributes for that property:
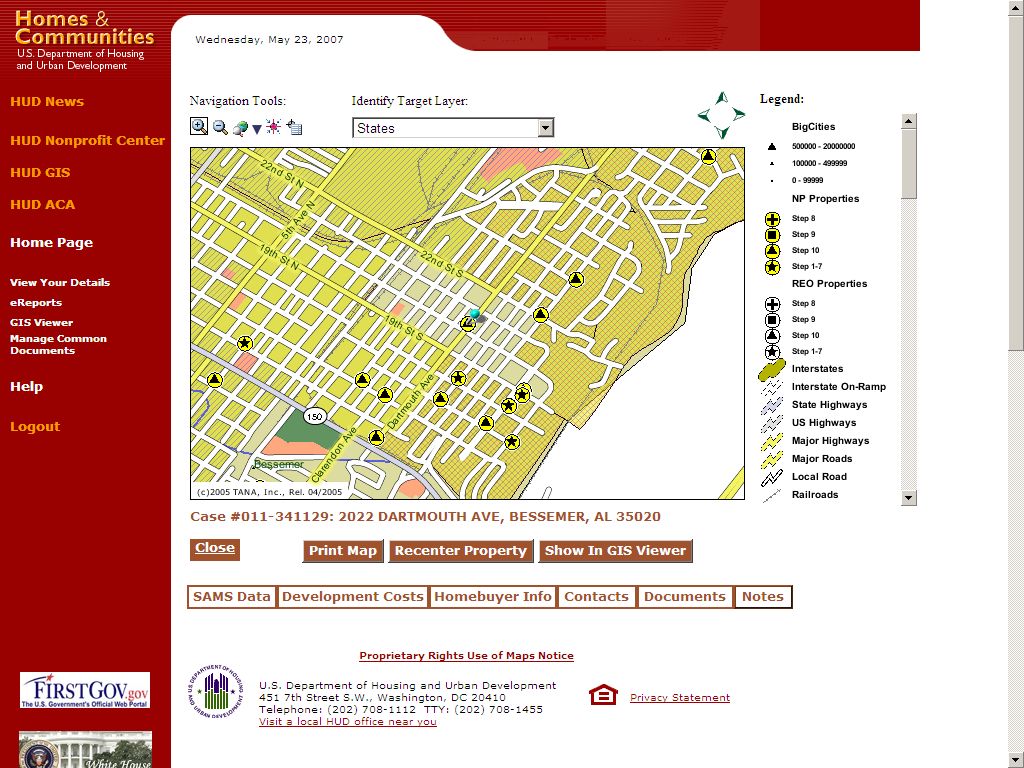
Figure 23
Property attributes that are derived from SAMS will be marked as viewable, but not editable (Grey in color). These are accessible by clicking on the SAMS tab.
Some fields are calculated as offsets from other fields. These calculated fields will also be marked as not editable (Grey in color).
Tabs to display detailed tabular information and related data are described below.
1.4.10.3SAMS Data
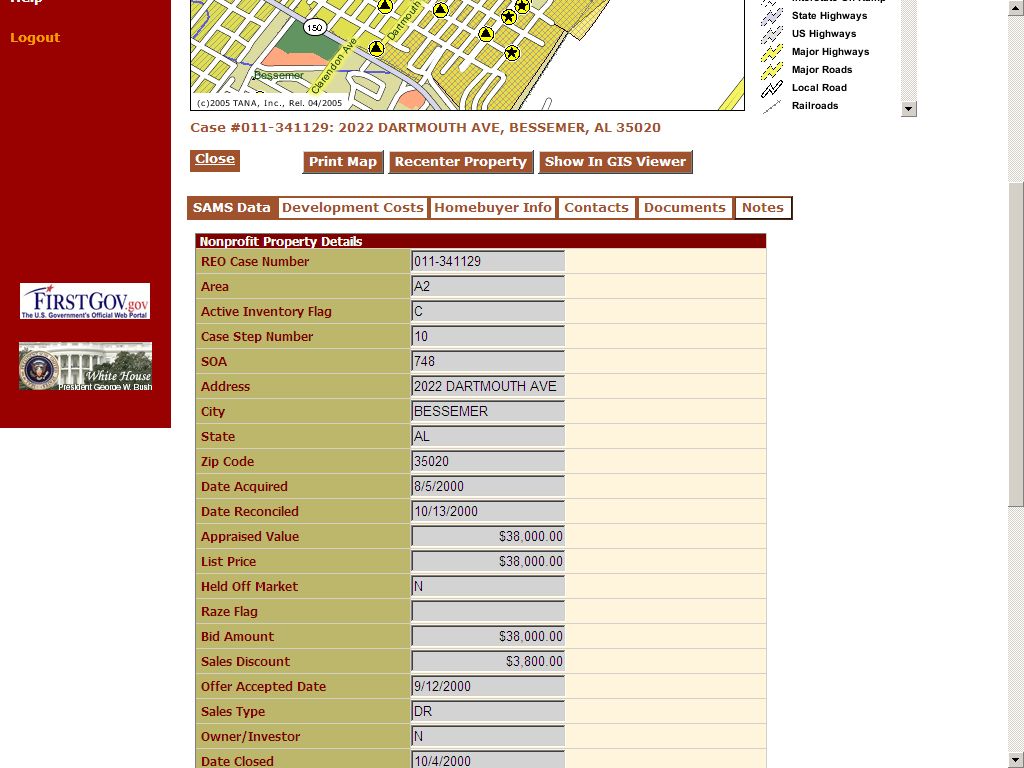
Figure 24
SAMS Data provides a read-only view of the property’s information from the SAMS system for reference purposes and is automatically updated nightly. If you see information that is incorrect in this table report it to your responsible HUD employee who will have to get it changed in the SAMS system. Once the information is changed in SAMS it will automatically update in the HUDNP system with the nightly update.
When any editable fields are changed, click “Update” to store the changes in the database.
1.4.10.4Development Costs
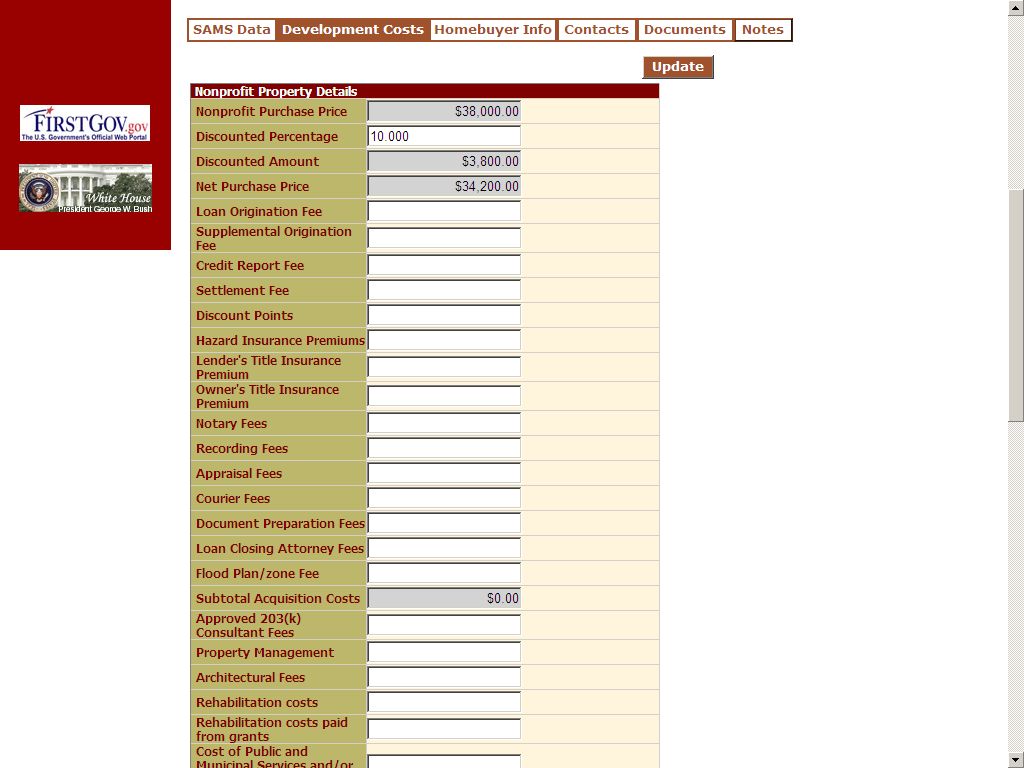
Acquisition Costs Figure 25
The Development Costs tab contains editable fields and some read-only fields. NP Organizations will use the editable fields in this tab to track operations and costs related to the particular property, such as Discounted Percentage, and various fees and costs.
When any editable fields are changed, click “Update” to store the changes in the database.
1.4.10.5Acquisition Costs
NP users are required to update the first section of the Development Cost tab with all the information related to the Acquisition of the property from HUD.
If you hover your mouse over the left column you will see tool tips appear with information regarding the line item your curser is above.
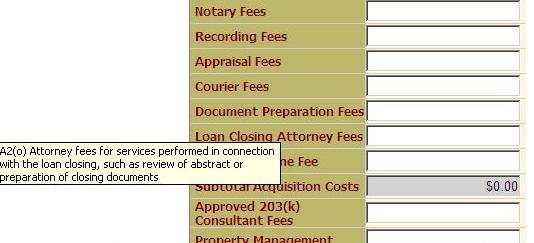
Figure 26
If you hover your mouse over the right column you will see tool tips with information regarding what to enter into the box your curser is above.

Figure 27
When any editable fields are changed, click “Update” to store the changes in the database.
1.4.10.6Rehabilitation and Holding Costs
The NP is required to update the second section of the Development Cost tab with all the information related to the Rehabilitation and Holding of the property.
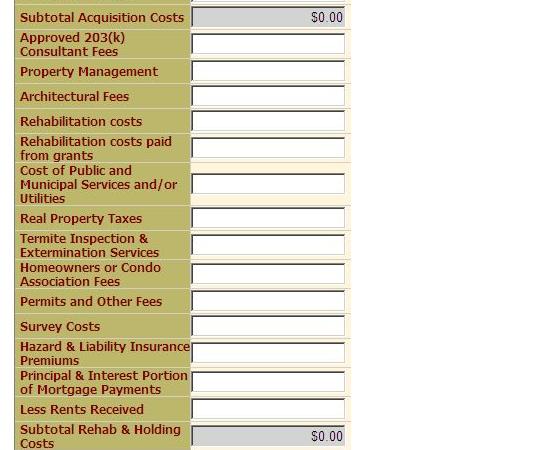
Rehabilitation and Holding Costs Figure 28
When any editable fields are changed, click “Update” to store the changes in the database.
1.4.10.7Selling Costs
The NP is required to update the third section of the Development Cost tab with all the information related to Selling the property.
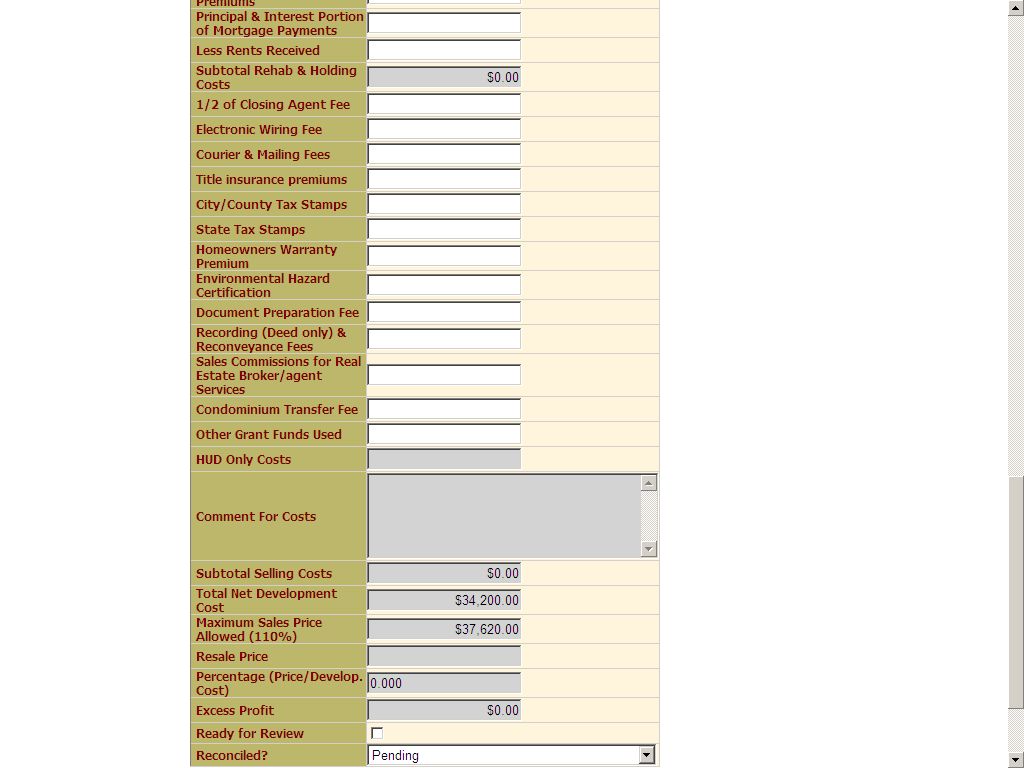
Selling Costs Figure 29
When any editable fields are changed, click “Update” to store the changes in the database.
1.4.10.8Homebuyer tab
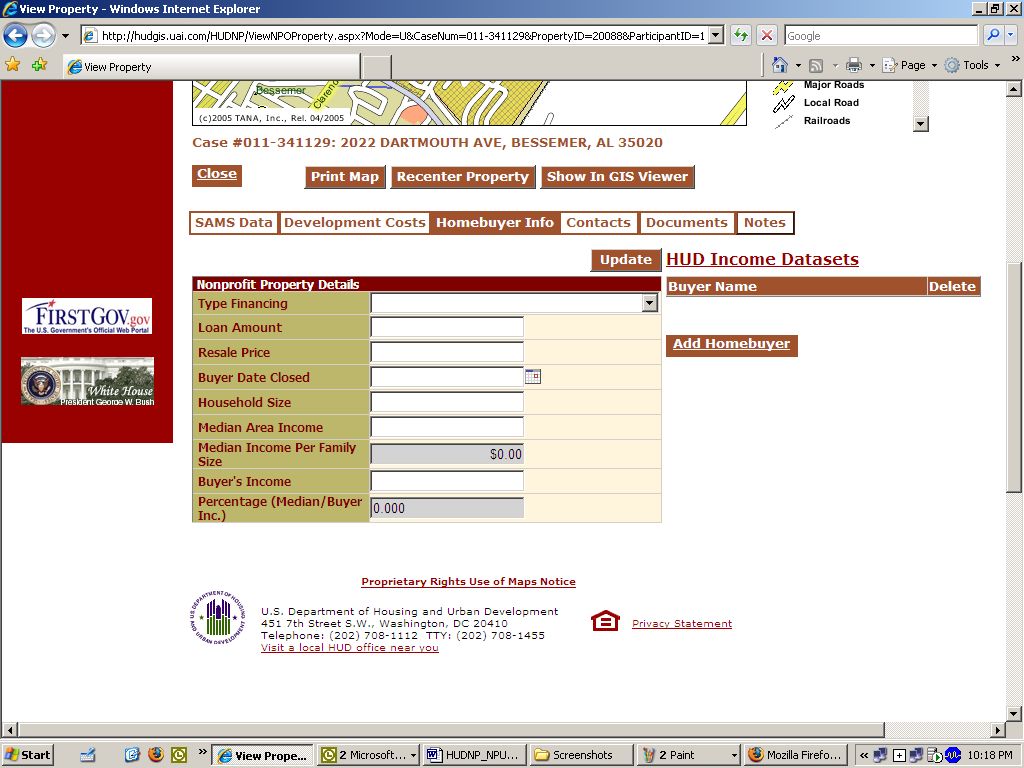
Figure 30
The Homebuyer tab allows the NP to enter information regarding anything associated with the buyer for the property (e.g., buyer’s income and household size). Map tips are available by hovering the mouse over either the description in the left hand column or the space in the right hand column.
When any editable fields are changed, click “Update” to store the changes in the database.
The HUD income Datasets link opens a new window and provides access to HUD’s data sets for family income limits.
Click on Add homebuyer to add information regarding homebuyers. You must enter information regarding all parties buying the home.
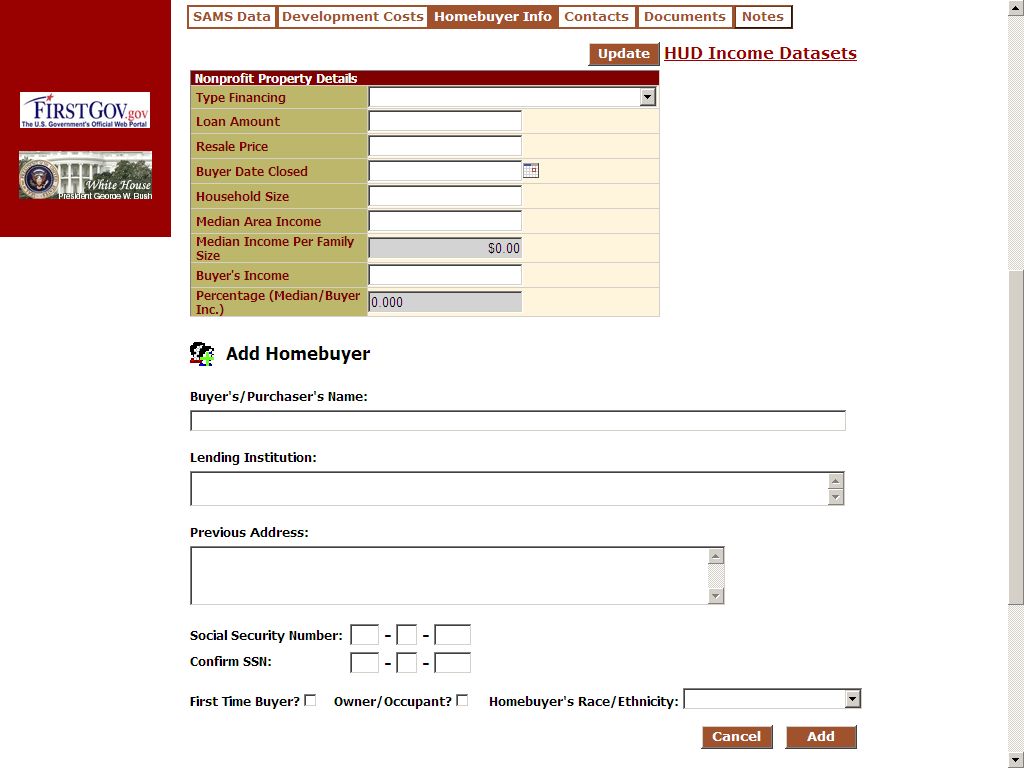
Figure 31
This tab also allows the user to enter additional homebuyers or remove homebuyers.
1.4.10.9Contacts
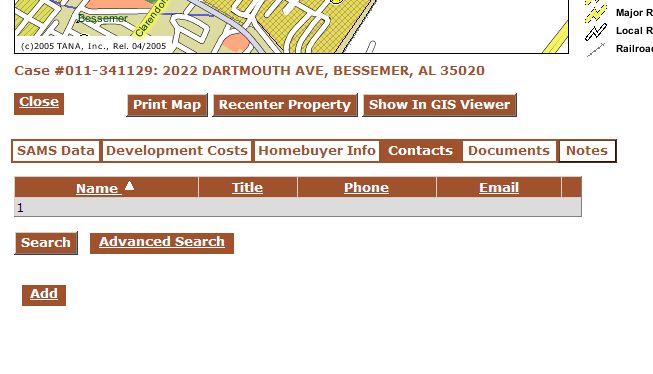
Figure 32
The Contacts tab allows the NP to keep information regarding contacts related to the property displayed. Examples of information you might wish to keep are contractors, inspectors, and other contacts.
When any editable fields are changed, click “Update” to store the changes in the database.
1.4.10.10Associating Documents with Properties
In the same way that documents can be uploaded and associated your NPO, documents can also be associated with properties. All supporting documentation regarding costs associated with the property including scans or electronic copies of inspection reports, deeds, repair estimates and costs should be uploaded in this area.
To view the documents associated with a property, click “Documents” on the property detail page:
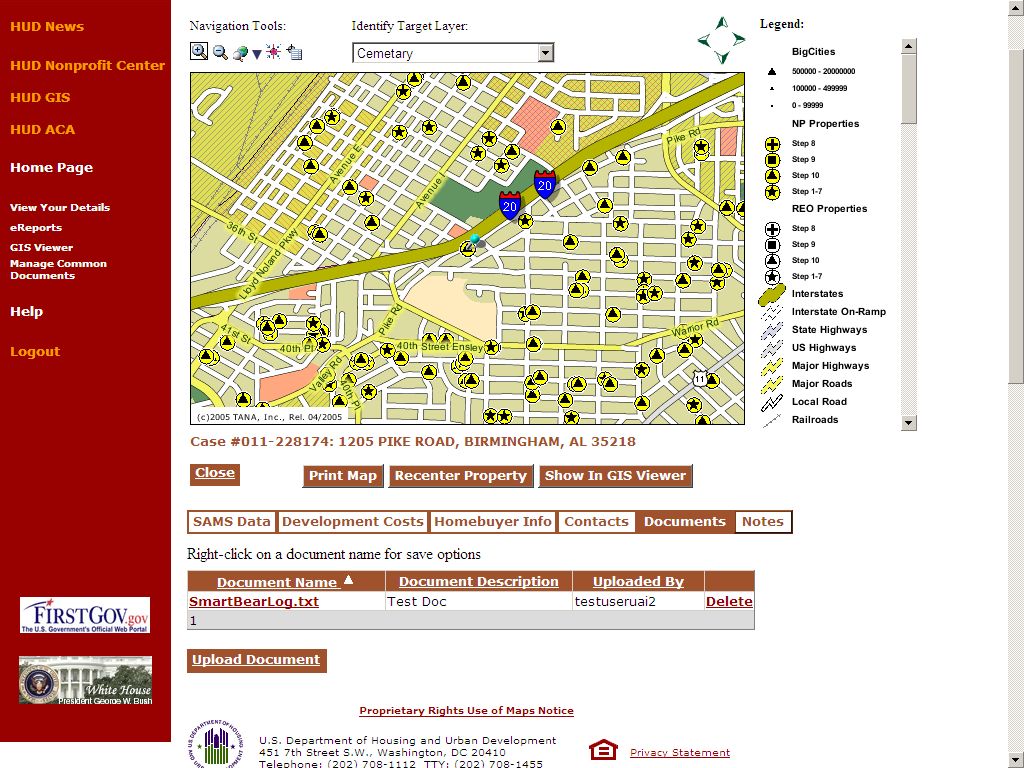
Figure 33
The process of viewing, adding, and deleting documents is the same as the documents tab processes described above.
1.4.10.11Support Documentation Official File Names
When completing Individual Property Reports Support Documentation should be saved and uploaded using the following Official File Names: Append each file name with the property case identification number (example Summarysheet #4539392)
Guidelines for Saving and Uploading Support Documentation
Summary Sheet – with information filled out –File name: SummarySheet
Net Development Calculation Worksheet (enclosed) File name: NDC Worksheet
HUD-9548 Sales Contract -File name: Sales Contract-9548
Purchase HUD-1 Settlement Statement -File name: HUD-1PurchaseSS
Resale HUD-1 Settlement Statement -File name: HUD-1ResaleSS
Median Income Certification Form (enclosed)-File name: Median Income Cert.
List of Property(s) Under Contract, if applicable- File name: PropertylistUC
List of Property(s) currently rented or leased to include dates and rental amount, if applicable –File Name: PropertylistRentals
List of business partners participating in the rehabilitation and resales of the subject properties-File Name: Businesspartners
Property Receipts Supporting Net Development Cost -File Name: (ReceiptPropertyCase#12332) Example: (ReceiptCase#1232) – should include the category in the name ConstSupplReceiptPropertyCase#12332, PaintSupplReceiptPropertyCase#12332, etc.
Invoices and Cancelled Checks- (Invoices and cancelled checks should be scanned and uploaded together. For example the invoice for taxes and the cancelled check use to pay the taxes would be uploaded together. The file name should display what type of invoice it is and the property case file number. File Name Example:TaxInvoiceCase#12322 –This upload would include the tax invoice and the cancel check for taxes paid only.
Work write up/specification. The file name should display the phrase WorkWUP and the case file number . File name example: WorkWUPCase#12332 – must include cost estimates
Any other supporting documentation. The file name should identify what it is and include the property case number. File name example: XXXXCase#32312.
This report is a requirement outlined in Notice H-94-74 (HUD) and Mortgagee Letters 00-8 and 02-01. As per Notice H-94-74 (HUD), participating units of government are also required to provide this information. If your agency did not purchase or sell any HUD Homes in a given calendar year, please state so in a negative report on agency letterhead signed by the Executive Director or appropriate government official and submit it to your local Homeownership Center by February 1st of each calendar year.
Upon completion of all data entry and documents, please notify your appropriate HOC representative (as noted in the DMS system) that the property is ready for review. (See figure 25)
1.4.10.12Notes Tab
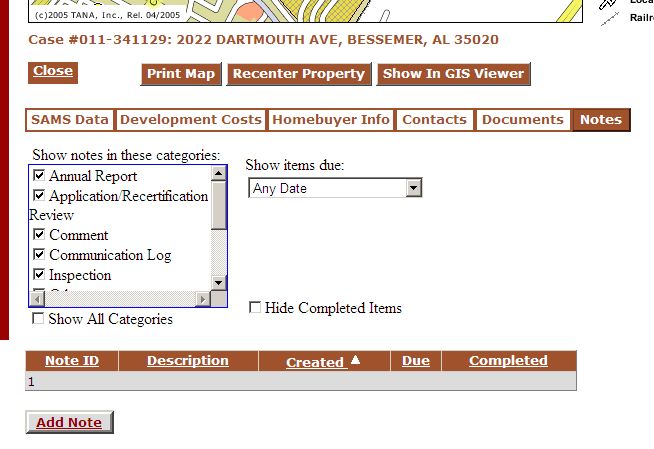
Notes Tab Figure 34
The Notes Tab allows NP’s and HUD personnel to permanently store notes by category regarding the associated property. The Categories include Annual Report, Application/Recertification Review, Comment, Communication Log, Inspection, Other, Purchase, Repair, Sales, To do, Violation. You can see all your notes in a tabular view, sort by clicking on a column header, or open a note by clicking on its Note ID. Notes are where you should store any explanation regarding expenses, repairs, or other items that you want in the record regarding this particular property.
To add a note click upon Add Note and fill in the information.
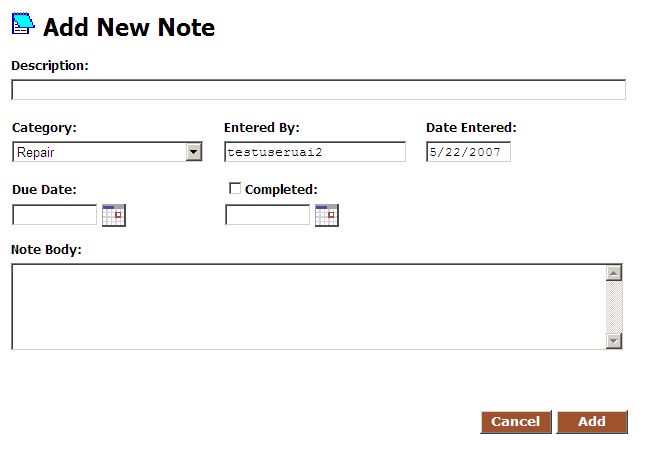
Notes Tab Figure 35
1.4.10.13Viewing the Interactive Map
When property details are viewed, the top portion of the screen shows a static map image illustrating the property location marked with a light blue-colored pushpin
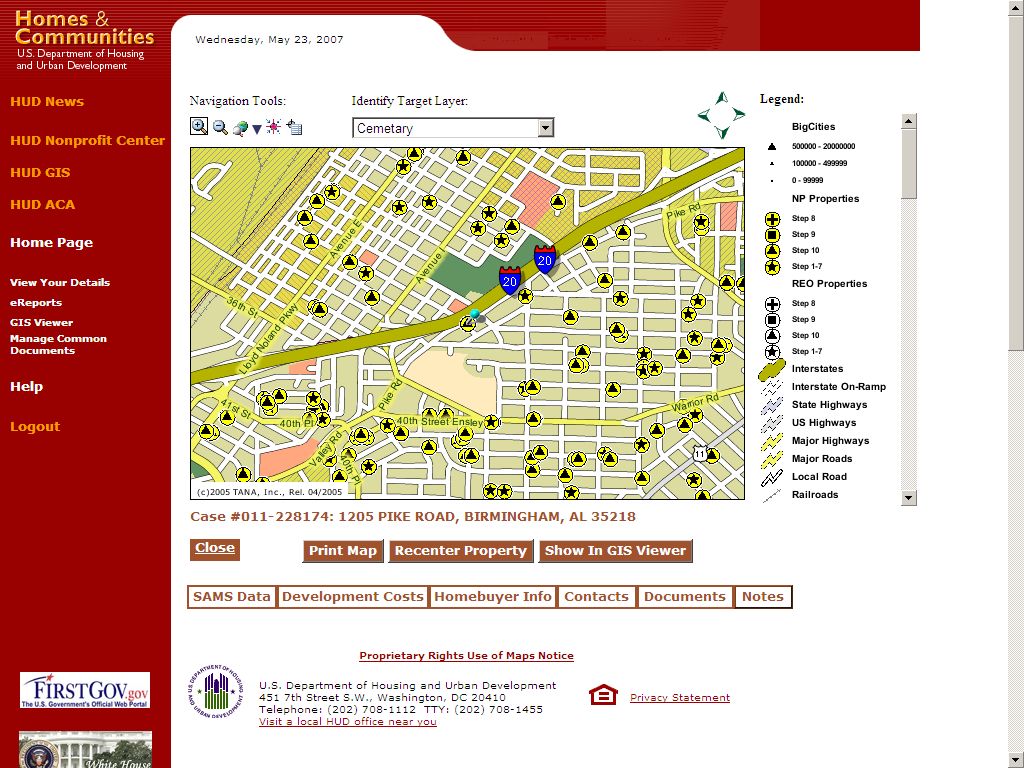
Figure 36
To view an interactive map that allows you to zoom, pan, and identify other surrounding features, click on the ”Show in GIS Viewer” button. A separate window will appear with the interactive map display
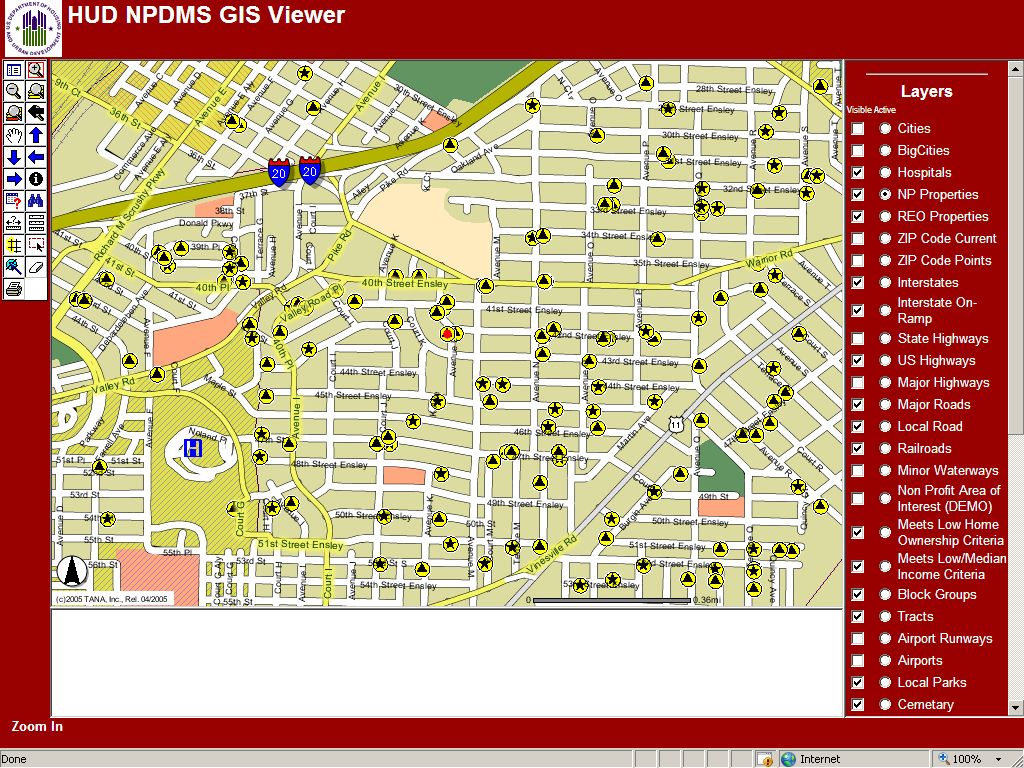
Figure 37
The property will be displayed as red dot within a yellow circle. The legend will have the layer for the nonprofit properties set as active and visible for subsequent identify operations.
Refer to the GIS Viewer map view documentation for details on using the interactive mapping tools (“Show in GIS Viewer” section below).
1.4.10.14Other Information
Other information regarding the use of this system and storing information about your properties may be found by clicking on Help and downloading the HUDNP Participants Guide
NPDMS
User’s Manual
| File Type | application/msword |
| File Title | C-OPC-22888 Users Guide |
| Subject | NPDMS |
| Author | Tom Wacaster |
| Last Modified By | H22309 |
| File Modified | 2007-11-01 |
| File Created | 2007-10-12 |
© 2026 OMB.report | Privacy Policy