Microloan Program Electronic Reporting System (MPERS) (MPERsystem)
Microloan Program Electronic Reporting System (MPERS) (MPERsystem)
MPERS Lender Users Manual v2 3
Microloan Program Electronic Reporting System (MPERS) (MPERsystem)
OMB: 3245-0352
O MB
Control# 3245-0352
Expiration Date 2/28/2012
LENDER’S
USER
MANUAL
Microloan Program Electronic
Reporting System (MPERS)
U.S. Small Business Administration
February 2013
SBA is collecting this information for the purpose of monitoring the performance of Microloan Program Intermediary Lenders. SBA is collecting this information pursuant to the rules and regulations establishing the Microloan Program in Section 7(m)(1)(A) of the Small Business Act (15 U.S.C. 636(m)(1)(a)).
The estimated burden for responding to this information collection is eighteen hours. You are not required to respond to this request for information unless it displays a current Office of Management and Budget (OMB) control number. If you have questions or comments concerning this estimate or other aspects of this information collection, please contact the U.S. Small Business Administration, Chief, Administrative Information Branch, Washington, DC 20416 and/or Office of Management and Budget, SBA Desk Officer, New Executive Office Building, Room 10202, Washington, DC 20503.
Table of Contents
1.2 Authorized Use Permission 6
3.3 Changing User ID and Password 15
4.0 USING THE SYSTEM (ONLINE) 4-17
4.1.3 Edit Loan (Loan Detail) 24
4.1.4 Add Additional Borrower 28
4.1.5 Edit Additional Borrower 30
4.1.9 Borrower Search Results 35
4.1.12 Reasons for No Change Certification 40
4.1.14 Reasons for No Change Certification 43
4.2 Using the Enhancements to the Microloan System (Intermediary) 45
4.2.1 Intermediary Dashboard 45
4.2.2 Enter Approved Annual Budget 48
4.2.3 Enter Annual TA Milestones 50
4.2.5 Submit Quarterly MRF / LLRF Report 53
4.2.6 Submit TA Quarterly Narrative Report 56
4.2.10 Manage Technical Assistance (TA) Data 66
4.2.13 Add New Loan (Select Participant screen) 72
4.2.14 Capture Outcomes Data for Microloans that have been Paid in Full (PIF) 73
Revision Sheet
Release No. |
Date |
Revision Description |
Rev. 1 |
5/29/2003 |
Initial release |
Rev. 1.1 |
5/24/2004 |
Additional insert to Section 1.1-System Overview of Lender’s Manual |
Rev. 2.1 |
03/2008 |
Updated screenshots to match current SBA look and feel standards. Updated added fields. |
Rev. 2.2 |
08/2011 |
Enhancements to MPERS: Updated section 1.1, 1.4 and 3.2 New sections 4.2 for Enhancements to MPERS Functionality Section 4.2 renumbered to 4.3 |
Rev. 2.3 |
02/2013 |
Updated with general edits |
|
|
|
|
|
|
1.0GENERAL INFORMATION
1.1System Overview
SBA is collecting this information for the purpose of monitoring the performance of Microloan Program Intermediary Lenders. SBA is collecting this information pursuant to the rules and regulations establishing the Microloan Program in Section 7(m)(1)(A) of the Small Business Act (15 U.S.C. 636(m)(1)(a)).
In order to verify that the statutory purpose of the Microloan Program is met, SBA must collect data relating to the small business concerns assisted by the program. The collection of business and personal information may implicate the Trades Secret Act and the Privacy Act respectively. However, the information collected will be protected to the maximum extent permitted by law, including the Freedom of Information Act, 5 USC 552 and the Privacy Act, 5 USC 552a.
Microloan Program data is collected via the Microloan Program Electronic Reporting System (MPERS). MPERS is a web-enabled system that is accessed through the General Login System (GLS) at https://eweb.sba.gov/gls/dsp_login.cfm. The menu is dynamically-built based on the user’s role. See Section 3.1 of this document for instructions on how to request access to a User ID and password for access to MPERS.
This system broadly keeps track of the following information about Microlenders, Microloans and Microborrowers:
Microlender Information – Lender Name, Address, Phone and Fax Numbers, Program Start Date, and Program End Date.
Microloan Information – Identifying information about loans that the Microlender makes. This includes Portfolio status information, percent of woman ownership in business, Loan Amount, Interest Rate and Terms, Number of Hours, Organization Type, NAICS Code, Urban/Rural Code, Number of Employees Created and Retained, SBA Loan Number and Lender Loan Number.
Microborrower Information – Identifying information about borrowers (businesses or people) who receive loans from Microlenders. This includes Tax Id number, Name, Address, Phone and Fax Numbers, Date the Business was formed, Veterans Status, and Ethnicity/Race.
Allows Microlenders to enter participant information.
Provides the ability for Microlenders to submit quarterly and Annual Audits online.
Provides the ability for Microloan Program Office staff to review and analyze, provide feedback and approve these reports online.
Captures Technical Assistance (TA)/ Training data in the MPERS system.
Online submission and review of TA / Training narrative quarterly.
Captures Participants who receive Technical Assistance in the system.
Online reporting of MRF/LLRF quarterly data.
Captures intermediary’s technical assistance milestones in the system.
Provides ability for Microloan Program Office to generate reports on TA / Training data.
1.2Authorized Use Permission
This is a Federal computer system and is the property of the United States Government. It is for authorized use only. Users (authorized or unauthorized) have no explicit or implicit expectation of privacy in anything viewed, created, downloaded, or stored on this system, including e-mail, Internet, and Intranet use. Any or all uses of this system (including all peripheral devices and output media) and all files on this system may be intercepted, monitored, read, captured, recorded, disclosed, copied, audited, and/or inspected by authorized Small Business Administration (SBA) personnel, the Office of Inspector General (OIG), and/or other law enforcement personnel, as well as authorized officials of other agencies, both domestic and foreign. Access or use of this computer by any person, whether authorized or unauthorized, constitutes consent to such interception, monitoring, reading, capturing, recording, disclosure, copying, auditing, and/or inspection at the discretion of authorized SBA personnel, law enforcement personnel (including the OIG), and/or authorized officials of other agencies, both domestic and foreign. Unauthorized use of, or exceeding authorized access to, this system is prohibited and may constitute a violation of 18 U.S.C. § 1030 or other Federal laws and regulations and may result in criminal, civil, and/or administrative action. Additionally, aggregated information provided in MPERS may be shared with Congressional offices based on statutory requirements to submit reports to Congress. By using this system, users indicate awareness of, and consent to, these terms and conditions and acknowledge that there is no reasonable expectation of privacy in the access or use of this computer system.
1.3Points of Contact
1.3.1Information
Individuals with questions or concerns regarding these instructions should contact the SBA Microenterprise Development Branch at 202-205-6485.
1.3.2Help Desk
Contact Name |
Department/Division |
Telephone Number |
E-mail address |
N/A |
Network Integration Branch |
202-205-6400 |
|
1.4Terms and Abbreviations
Annual Review: Review of audited financial statements performed by the Analyst every year.
Business information: Business Data elements of the participant that need to be captured by the system as recommended by the Aspen Institute.
Collateral Coverage Report: A system generated report that helps the analyst identify intermediaries that have not met its collateral requirements with their Quarterly Review.
Demographic information: Demographic Data elements of the participant that need to be captured by the system as recommended by the Aspen Institute.
GLS - General Login System –Controls access to MPERS; https://eweb.sba.gov/gls/dsp_login.cfm
Location ID - Identifies a physical address of a Partner or Microlender in PIMS; the primary Location ID is often times used in place of the Partner ID as a means of identifying a Partner
Grant: A Federal award of money or property in lieu of money (including cooperative agreements) to an eligible grantee that must account for its use.
Intermediary: SBA approved intermediary lender that makes microloans and provides technical assistance as part of the Microloan Program.
Loan Loss Reserve Fund (LLRF): LLRF is an interest-bearing Deposit Account which an Intermediary must establish to pay any shortage in the MRF caused by delinquencies or losses on Microloans.
Location ID: Identifies a physical address of a Partner or Microlender in PIMS. The primary Location ID is often used in place of the Partner ID as a means of identifying a Partner.
Microborrower - Small business concern that receives a Microloan
Microlender - SBA approved intermediary lender working in the Microloan Program
Microlender ID - SBA manually generated intermediary lender identification number utilized in the LAM system
Microloan - Loan under $50,000 made by an intermediary to a small business concern
Microloan Number - Also referred to as the Lender Loan Number; a unique number sometimes assigned by an intermediary used to identify a Microloan within its portfolio
MDB - Microenterprise Development Branch - Also referred to as the Program Office
Microloan Revolving Fund (MRF): MRF is an interest-bearing Deposit Account into which an Intermediary must deposit proceeds from SBA loans, its contributions from non-Federal sources, and payments from its Microloan borrowers and to which an Intermediary must disburse payments to SBA.
MIS: Microloan Intermediary application System, which will be used by new lenders to apply for approval to become an Intermediary by the SBA.
MLS – Microloan System
MPERS - Microloan Program Electronic Reporting System
MPPO - Microloan Program Participating Organization
MRF: Microloan Revolving Fund
MRF/LLRF Quarterly Report: Report entered by the Intermediary every quarter online for each SBA Loan that is outstanding with the SBA.
OISS – Office of System Support
Outcomes data: Data elements of the participant that need to be captured by the system during the check out as recommended by the Aspen Institute.
Partner ID - Identifies a Partner or Microlender in PIMS
PIMS - Partner Identification Management System
SBA – Small Business Administration
SBA Loan - Loan made by SBA to the Microlender
SBA Loan Number – Number generated by SBA LAM System used to identify an SBA Loan
Sequence Number - Unique number generated by MPERS that identifies microloan to Microborrower.
TA: Technical Assistance provided to SBA Microloan borrowers and prospective borrowers.
2.0SYSTEM SUMMARY
2.1System Configuration
The application is developed for use with a minimum browser of Microsoft IE 6.0 or a compatible browser. You must use high level encryption (128 bit) when configuring your browser. You must enable support for JAVA script and applets. There is no use of client side COOKIES. In general, the font type is 9pt. Arial-style sheets are not used. The application is best viewed on an 800x 600 resolution screen. To avoid scrolling, use a minimum 15" screen.
3.0GETTING STARTED
3.1Logging On
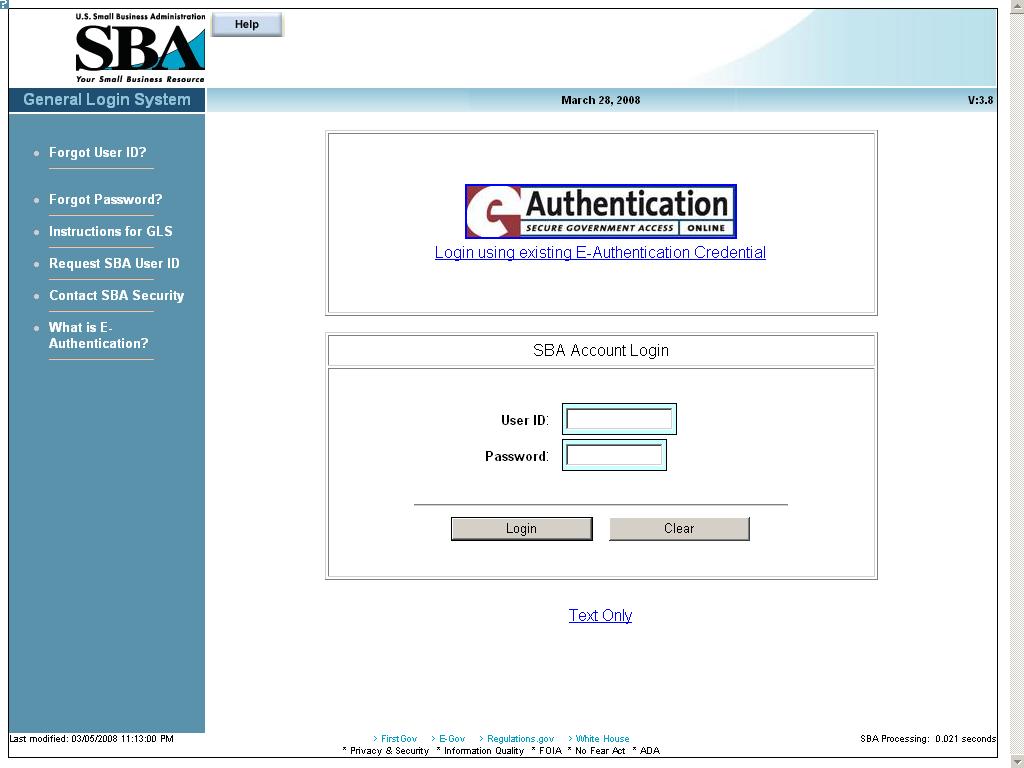
Connect to the internet and enter https://eweb.sba.gov/gls in the URL. You will be presented with the Log-In screen. Enter the User ID and Password provided to you by the Small Business Administration's Security Officer.
3.1.1Choose Function Menu
Not all items listed on this sample menu are available to all personnel. The menu will only display those items that you are authorized to use.
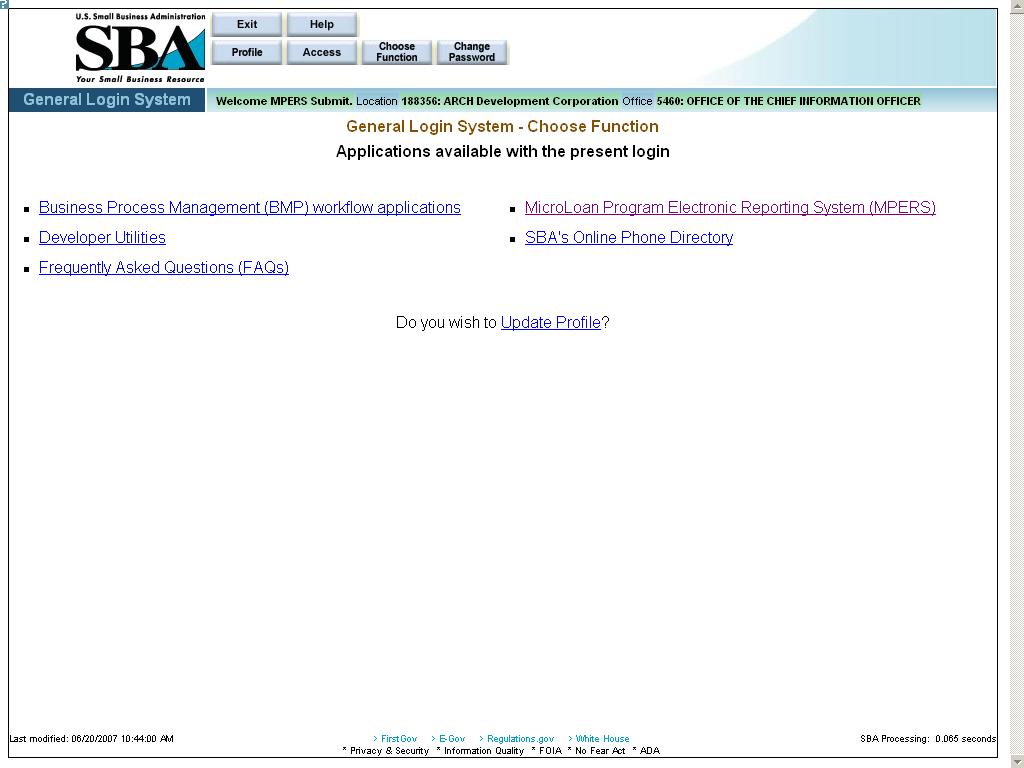
Microloan Program Electronic Reporting System (MPERS) Link - Allows a user the ability to enter the MPERS System.
Note: As a lender, you will be limited to viewing the results linked to the Location ID that you submitted to GLS.
3.2System Menu
3.2.1Lender Portfolio
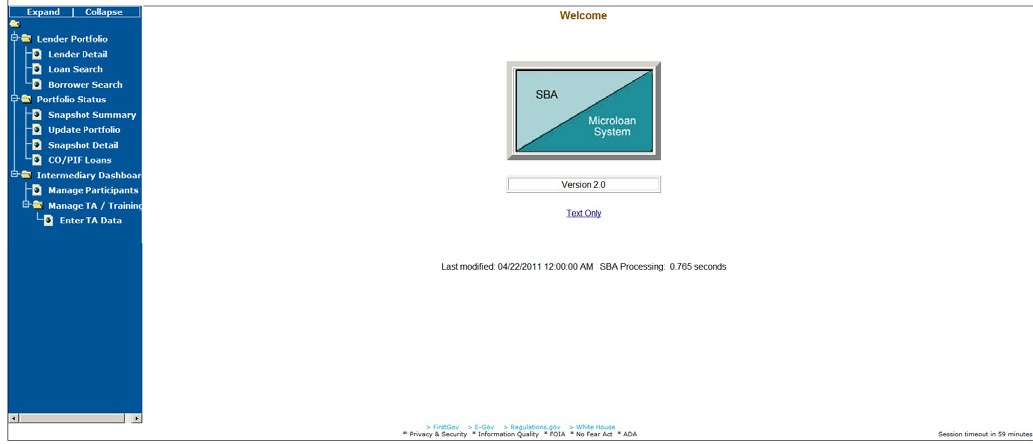
Lender Detail – Provides detailed information on a lender and displays a list of the lender’s loans.
Loan Search – Allows a user to search for a loan by Lender Loan Number, SBA Loan Number, Loan Sequence Number or by Loan Amount, Closing Date, and Complete or Incomplete status.
Borrower Search – Allows a user to search for a borrower by EIN/SSN Number, Borrower Name, or Trade Name.
3.2.2Portfolio Status
Snapshot Summary – Displays the portfolio summary information for a lender.
Update Portfolio – Displays the current status information for a lender’s portfolio and allows the lender to update the status information.
Snapshot Detail – Displays a snapshot of a lender’s portfolio.
CO/PIF Loans – Displays the Charged Off and Paid In Full Loans for a lender.
3.2.3Help
Displays information to help the user with the application in a new window.
3.2.4Exit
Allows the user to exit the application.
3.3Changing User ID and Password
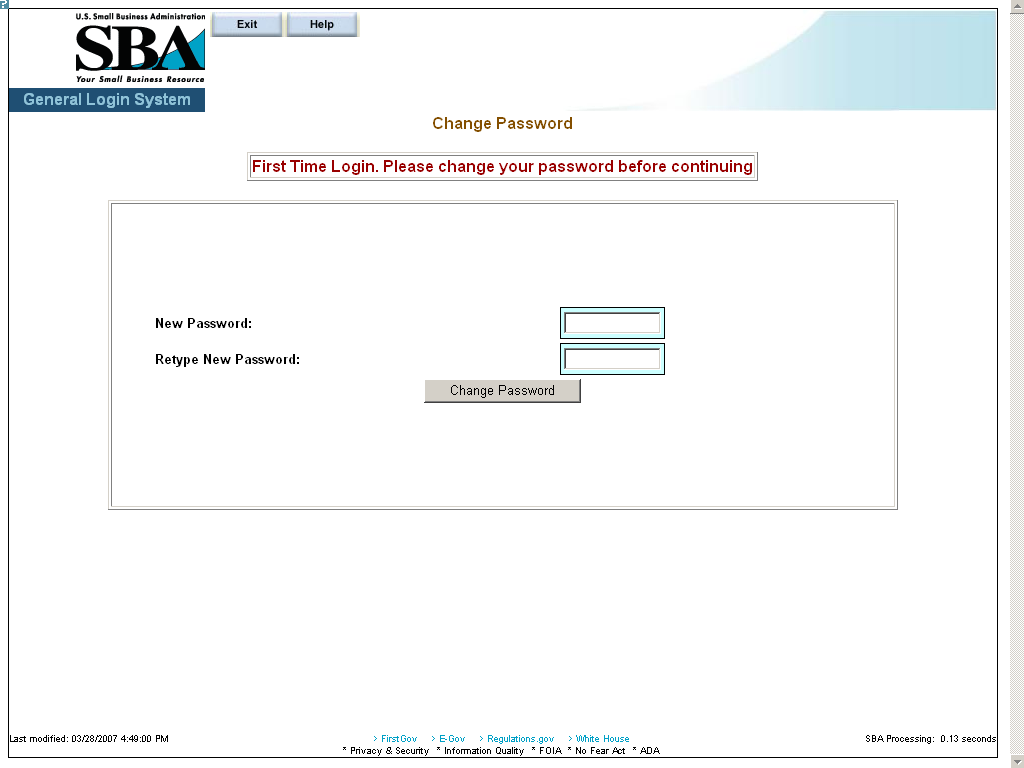
This screen provides the end user the ability to change the password provided to them, by the SBA’s Security Office.
3.4Exit System

To Exit the system, press the Exit pushbutton. You will be returned to the General Login System.
4.0USING THE SYSTEM (ONLINE)
4.1Lender Functions
4.1.1Lender Detail
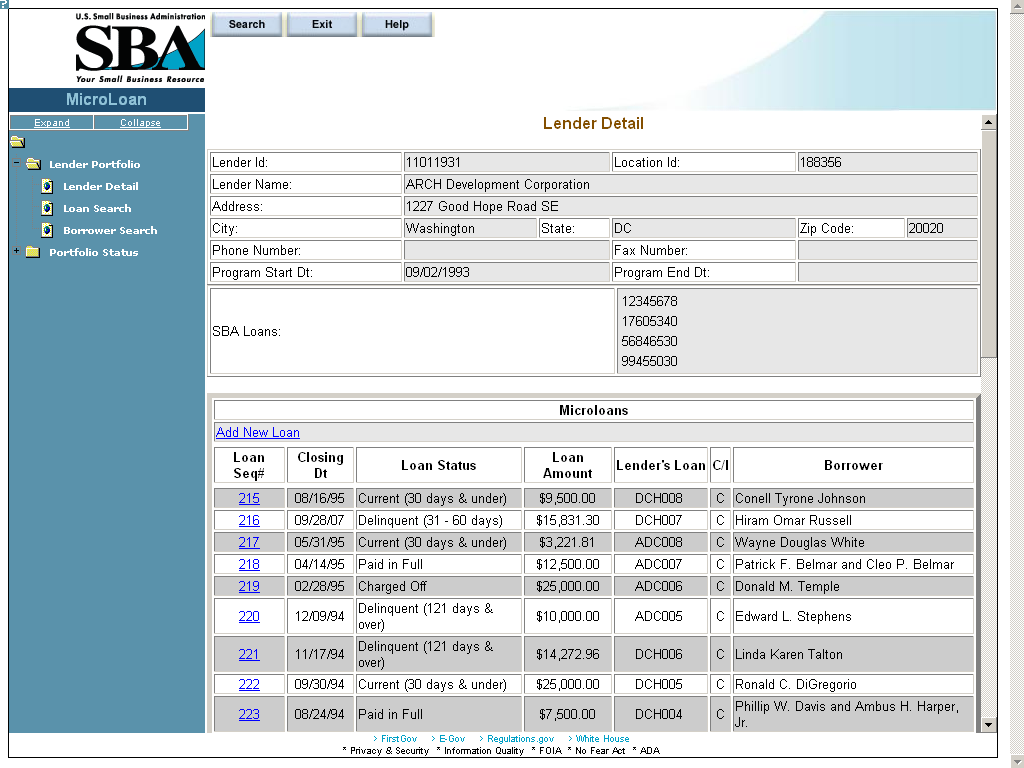
The Lender Detail screen displays the following information about the lender:
Lender ID
Location ID
Lender Name
Address
City
State
Zip Code
Phone Number
Fax Number
Program Start Date
Program End Date
SBA Loans
The user can create a
new loan by selecting the Add New Loan link.
The
Microloans table displays the following information about all loans
for the lender:
Loan Sequence Number - This is a link that will redirect the user to the Loan Detail screen.
Closing Date
Loan Status
Loan Amount
Lender's Loan (Number)
C/I – (“Complete” or “Incomplete” Loan)
Borrower (Name)
4.1.2Add New Loan
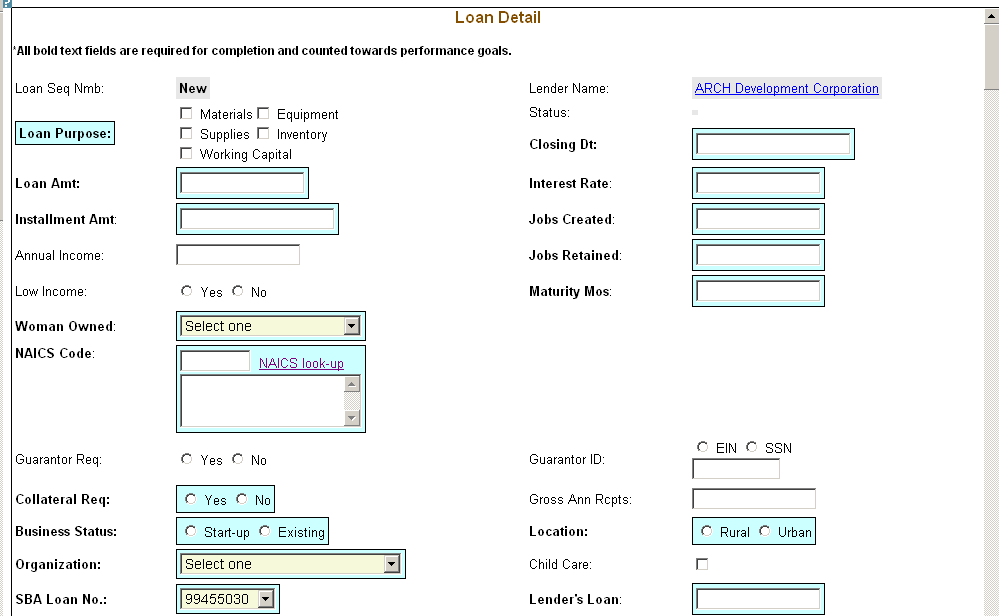
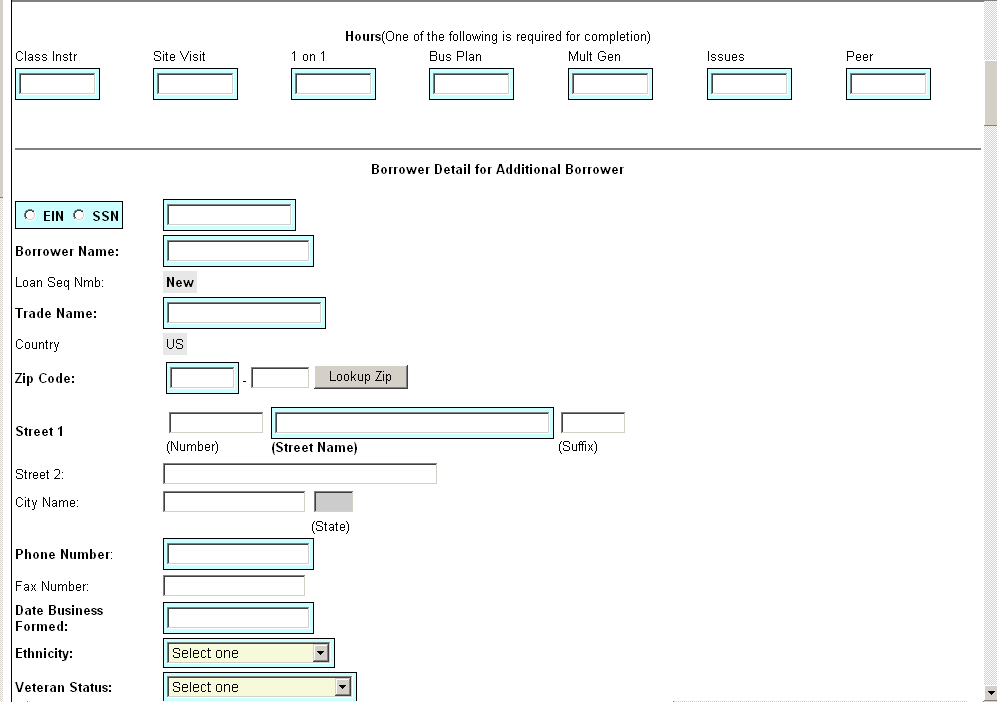

The following fields are available to create a new loan:
Loan Sequence Number
This field is pre-populated with the word “New”, signifying that this is a new loan and does not have a Loan Sequence Number.
Lender Name
This field is pre-populated with the name of the lender.
This is a link that will redirect the user to the Lender Detail screen.
Loan Purpose
Select one or more of the following options to describe the purpose of the loan:
Materials
Equipment
Supplies
Inventory
Working Capital
Status - Complete or Incomplete
Closing Date ** – Enter the closing date of the loan.
Loan Amount ** – Enter the amount of the loan.
Interest Rate – Enter the interest rate of the loan.
Installment Amount – Enter the loan installment amount.
Jobs Created – Enter the number of jobs created.
Annual Income – Enter the annual income.
Jobs Retained – Enter the number of jobs retained.
Low Income – Select one of these radio buttons to designate the low income status.
Maturity Months – Enter the number of maturity months.
Woman Owned – Use the drop-down list to designate the percentage that this business is woman-owned:
100% Female Owned
51 - 99% Female Owned
0 - 50% Female Owned
NAICS Code - The code description will display below the code. You can select the "NAICS look-up" link for help in selecting the NAICS Code.
Guarantor Req – Select one of these radio buttons to designate if a guarantor is required for this loan.
Guarantor ID - This field will only be displayed if yes has been selected for Guarantor Req.
Collateral Required – Select one of these radio buttons to designate if any collateral is required for this loan.
Gross Ann Rceipts – Enter the gross annual receipts.
Business Status – Select one of these radio buttons to designate the maturity of the business.
Location – Select one of these radio buttons to specify the location of the business.
Organization – Use this drop-down list to specify how the business is organized:
Sole Proprietorship
Partnership
Corporation
Limited Liability Company (LLC)
Joint Venture
Non–Profit Organization
Child Care – You can only select this checkbox if you also selected “Non-Profit Organization” from the “Organization” drop-down list.
SBA Loan Number ** – Use this drop-down list to specify the SBA loan number.
Lender’s Loan (Number) – Enter the lender’s loan number.
Borrower Detail for Additional Borrower:
EIN/SSN Number ** – Click on one of these radio buttons to identify the number that you are entering in the field to the right.
(Borrower ID) ** – Enter the borrower’s ID.
Borrower Name ** – Enter the borrower’s name.
Loan Sequence Number
This field is pre-populated with the word “New”, signifying that this is a new loan and does not have a Loan Sequence Number.
Trade Name – Enter the name under which the borrower is trading.
Country – This field will be grayed-out and display “US” if the address is in the United States. If the address is international, there will be a drop-down list, allowing you to specify the country.
Zip Code – Enter the borrower’s zip code.
Street 1, Number, Street Name, Suffix – Enter the borrower’s street address.
Street 2 – Enter the borrower’s additional street address.
City Name – Enter the borrower’s city. Note: This field automatically populates when the Zip Code is entered and the “Lookup Zip” pushbutton is selected.
State – This view-only field displays the state. Note: This field automatically populates when the Zip Code is entered and the “Lookup Zip” pushbutton is selected.
Phone Number – Enter the borrower’s phone number.
Fax Number – Enter the borrower’s fax number.
Date Business Formed – Enter the date on which the business was formed.
Ethnicity – Use the drop-down list to identify the borrower’s ethnicity.
Veteran Status - Use the drop-down list to identify the borrower’s veteran status.
Race ** – Select one or more of these checkboxes to denote the borrower’s race.
Note:
Fields which are bold and have two ** (asterisks) are required and must be completed in order for the system to submit the Microloan application to the database.
Any fields which are bold must be completed or else the loan cannot move to a “Complete” status (it will remain “Incomplete”).
![]() – Select this pushbutton to save the information on the screen
and submit it to the database.
– Select this pushbutton to save the information on the screen
and submit it to the database.
4.1.3 Edit Loan (Loan Detail)

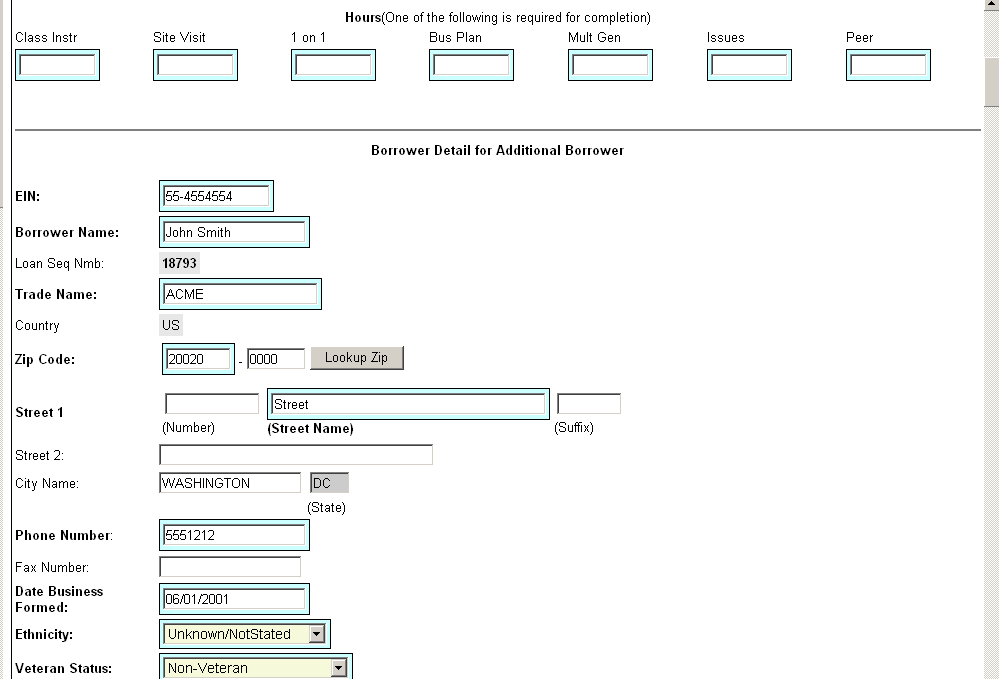

The following fields are available to modify an existing loan if the loan has a status of “Incomplete”:
Loan Seq Nmb (view-only)
This field is pre-populated with the Loan Sequence Number and cannot be modified.
Lender Name
This field is pre-populated with the name of the lender.
This is a link that will redirect the user to the Lender Detail screen.
Loan Purpose
Select one or more of the following checkboxes to edit the purpose of the loan:
Materials
Equipment
Supplies
Inventory
Working Capital
Status – “Complete” or “Incomplete” (view-only)
Closing Dt ** – Edit the closing date.
Loan Amt ** – Edit the amount of the loan.
Interest Rate – Edit the interest rate.
Installment Amt – Edit the installment amount.
Jobs Created – Edit the number of jobs created.
Annual Income – Edit the amount of annual income.
Jobs Retained – Edit the number of jobs retained.
Low Income – Use the radio buttons to edit the low income status indicator.
Maturity Mos – Edit the number of months to maturity.
Woman Owned – Use the drop-down list to select one of the following options to edit the woman-owned percentage:
100% Female Owned
51 - 99% Female Owned
0 - 50% Female Owned
NAICS Code - The code description will display below the code. The user can select the "NAICS look-up" link for help in selecting the NAICS Code.
Guarantor Req – Use the radio buttons to edit the guarantor required indicator.
Guarantor ID - This field will only display if “Yes” is selected for Guarantor Req.
Collateral Req – Use the radio buttons to edit the collateral required indicator.
Gross Ann Rcpts – Edit the amount of gross annual receipts.
Business Status - Use the radio buttons to edit the business status indicator: “Start-up” or “Existing”.
Location: Use the radio buttons to edit the location indicator: “Rural” or “Urban”.
Organization - One of the following options can be selected to edit the organizational structure:
Sole Proprietorship
Partnership
Corporation
Limited Liability Company (LLC)
Joint Venture
Non–Profit Organization
Child Care – You can only select this checkbox if you also selected “Non-Profit Organization” from the “Organization” drop-down list.
SBA Loan No. ** – Use the drop-down list to edit the SBA loan number.
Lender’s Loan No. – Edit the lender loan number.
The Borrower Detail for Additional Borrower section displays the following information about the primary borrower for the loan:
SSN/EIN Number ** – Edit the SSN or EIN number.
Borrower Name ** – Edit the borrower’s name.
Loan Seq Nmb
This field is pre-populated with the Loan Sequence Number and cannot be modified.
Trade Name – Edit the name under which the borrower is trading.
Country – This field will be grayed-out and display “US” if the address is in the United States. If the address is international, there will be a drop-down list, allowing you to specify the country.
Zip Code – Edit the borrower’s zip code.
Street 1 (Number, Street Name, and Suffix) – Edit the borrower’s street address.
Street 2 – Edit the borrower’s additional street address.
City Name – Edit the borrower’s city. Note: This field automatically populates when the Zip Code is entered and the Lookup Zip pushbutton is selected.
State – This view-only field displays the state. Note: This field automatically populates when the Zip Code is entered and the Lookup Zip pushbutton is selected.
Phone Number – Edit the borrower’s phone number.
Fax Number – Edit the borrower’s fax number.
Date Business Formed – Edit the date on which the business was formed.
Ethnicity – Use the drop-list to edit this category:
Hispanic or Latino
Not Hispanic or Latino
Unknown/Not Stated
Veteran Status - Use the drop-list to edit this category:
Non-Veteran
Service Disabled Veteran
Veteran
Unknown/Not Stated
Race ** - Use one or more of the following checkboxes to edit this category:
American Indian or Alaska Native
Asian
Black or African American
Native Hawaiian or Other Pacific Islander
Unanswered
White
Note:
If the loan is currently a complete loan, the user will not be able to modify the loan.
If the loan is currently an incomplete loan, any fields which are bold but are not preceded by two asterisks are required for the loan to be complete and counted towards performance goals. If any of these fields have not been filled in, the loan will be saved with a status of “Incomplete”.
The user will have the ability to edit the loan by modifying the appropriate field(s) and selecting the "Save" pushbutton if the loan has a status of “Incomplete”.
The user will have the
ability to add an additional borrower by selecting the "Add
Borrower" pushbutton. This will open the Borrower Detail
for Additional Borrower screen.
The user will
have the ability to view the loan information in a printable format
by selecting the "Print" button. This will display in a new
window.
Additional borrowers will also be displayed with
a link to the Borrower Detail for Additional Borrower
screen.
![]() – Select this pushbutton to save the information on the screen
and submit it to the database.
– Select this pushbutton to save the information on the screen
and submit it to the database.
![]() – Select this pushbutton to add the borrower whose information
you just edited.
– Select this pushbutton to add the borrower whose information
you just edited.
![]() – Select this pushbutton to delete the loan.
– Select this pushbutton to delete the loan.
![]() – Select this pushbutton to convert the information on the
screen to a printable format.
– Select this pushbutton to convert the information on the
screen to a printable format.
4.1.4Add Additional Borrower
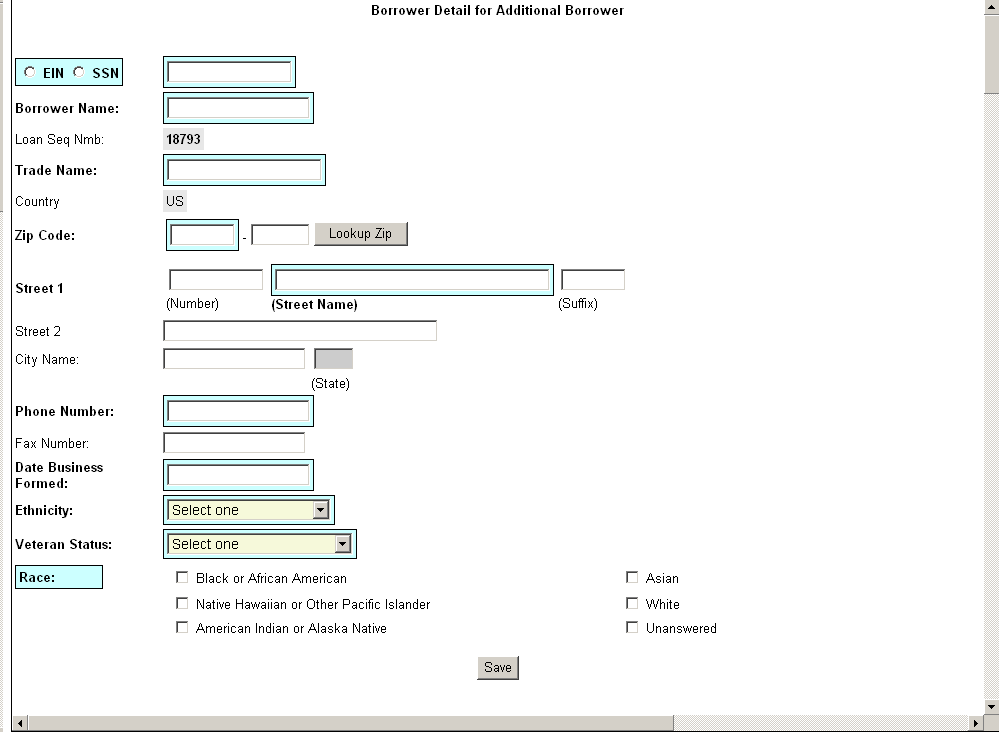
The following fields are available to create an additional borrower:
SSN/EIN Number ** – Click on one of these radio buttons to identify the number that you are entering in the field to the right.
Borrower Name ** – Enter the borrower’s name.
Loan Seq Nmb
This field is pre-populated with the Loan Sequence Number and cannot be modified.
Trade Name – Enter the name under which the borrower is trading.
Country – This field will be grayed-out and display “US” if the address is in the United States. If the address is international, there will be a drop-down list, allowing you to specify the country.
Zip Code – Enter the borrower’s zip code.
Street 1 (Number, Street Name, Suffix) – Enter the borrower’s street address.
Street 2 – Enter the borrower’s additional street address.
City Name – Enter the borrower’s city. Note: This field automatically populates when the Zip Code is entered and the Lookup Zip pushbutton is selected.
State – This view-only field displays the state. This field automatically populates when the Lookup Zip pushbutton is selected.
Phone Number – Enter the borrower’s phone number.
Fax Number – Enter the borrower’s fax number.
Date Business Formed – Enter the date on which the business was formed.
Ethnicity – Use the drop-down list to identify the borrower’s ethnicity.
Hispanic or Latino
Not Hispanic or Latino
Unknown/Not Stated
Veteran Status – Use the drop-down list to identify the borrower’s ethnicity.
Non Veteran
Service Disabled Veteran
Veteran
Unknown/Not Stated
Race ** - Select one or more of these checkboxes to denote the borrower’s race.
American Indian or Alaska Native
Asian
Black or African American
Native Hawaiian or Other Pacific Islander
Unanswered
White
Note:
Fields which are bold and have two ** (asterisks) are required and must be completed in order for the system to submit the Microloan application to the database.
Any fields which are bold must be completed or else the loan cannot move to a “Complete” status (it will remain “Incomplete”).
4.1.5Edit Additional Borrower
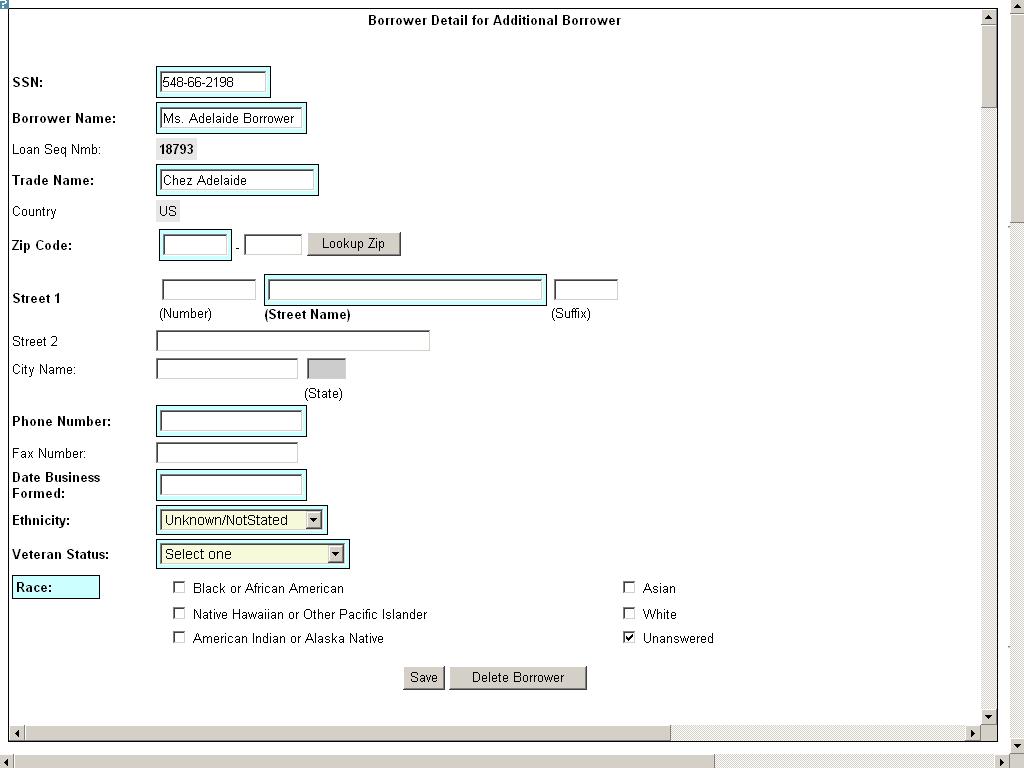
The following fields display for an additional borrower:
SSN/EIN Number ** – Edit this field that displays either the SSN or the EIN number that you originally assigned to the borrower.
Borrower Name ** – Edit the borrower name.
Loan Seq Nmb
This field is pre-populated with the Loan Sequence Number and cannot be modified.
Trade Name – Edit the name under which the borrower is trading.
Country – This field will be grayed-out and display “US” if the address is in the United States. If the address is international, there will be a drop-down list, allowing you to specify the country.
Zip Code – Edit the borrower’s zip code.
Street 1 (Number, Street Name, and Suffix) – Edit the borrower’s street address.
Street 2 – Edit the borrower’s additional street address.
City Name – Enter the borrower’s city. This field automatically populates when the Lookup Zip pushbutton is selected.
State – This view-only field displays the state. This field automatically populates when the Lookup Zip pushbutton is selected.
Phone Number – Edit the borrower’s phone number.
Fax Number – Edit the borrower’s fax number.
Date Business Formed – Edit the date on which the business was formed.
Ethnicity – Use the drop-down list to identify the borrower’s ethnicity.
Veteran Status – Use the drop-down list to identify the borrower’s veteran status.
Non-Veteran
Service Disabled Veteran
Veteran
Unknown/Not Stated
Race ** – Select one or more of these checkboxes to denote the borrower’s race.
American Indian or Alaska Native
Asian
Black or African American
Native Hawaiian or Other Pacific Islander
Unanswered
White
Note:
Fields which are bold and have two ** (asterisks) are required and must be completed in order for the system to submit the Microloan application to the database.
Any fields which are bold must be completed or else the loan cannot move to a “Complete” status (it will remain “Incomplete”).
4.1.6Loan Search
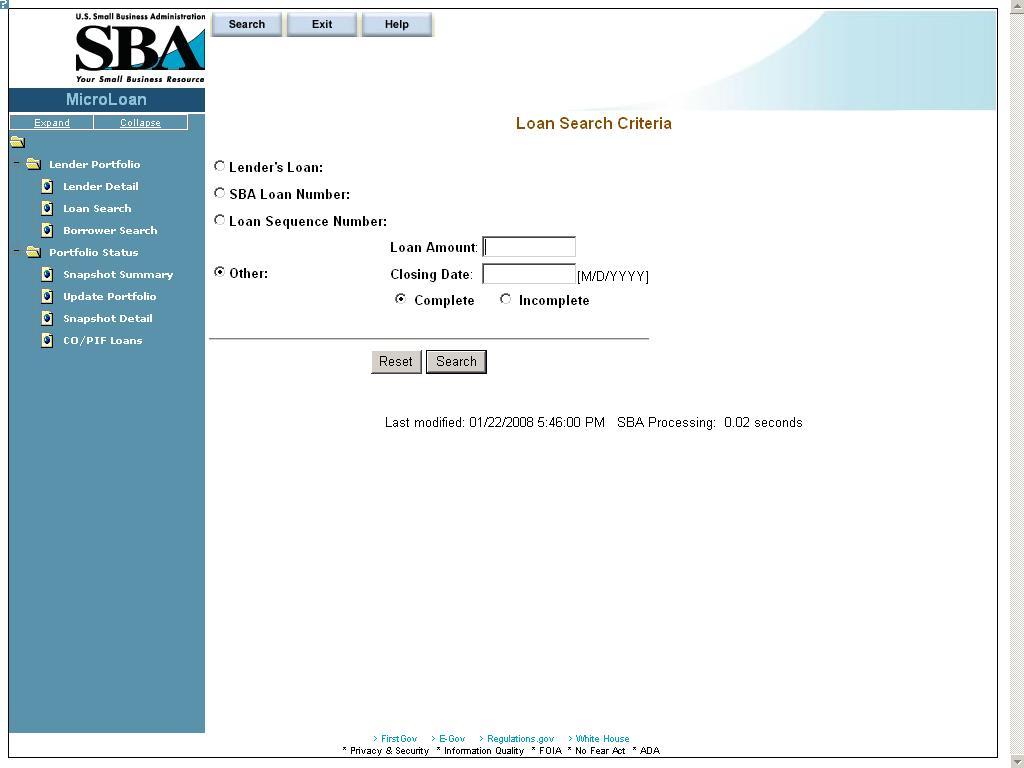
You can search for a loan by Lender Loan Number, SBA Loan Number, Loan Sequence Number, or Other Options.
To search by Lender Loan Number:
Select the Lender Loan Number radio button.
Enter the Lender Loan Number in the text field provided to the right.
Select the Search pushbutton.
To search by SBA Loan Number:
Select the SBA Loan Number radio button.
Enter the SBA Loan Number in the text field provided to the right.
Select the Search pushbutton.
To search by Loan Sequence Number:
Select the Loan Sequence Number radio button.
Enter the Loan Sequence Number in the text field provided to the right.
Select the Search pushbutton.
To search by other options:
Select the Other Options radio button.
Enter the Closing Date and/or Loan Amount in the fields provided to the right.
Select the “Complete" or "Incomplete” radio button.
Select the Search pushbutton.
If no loans match the search criteria, you will be notified and advised to try again.
4.1.7Loan Search Results
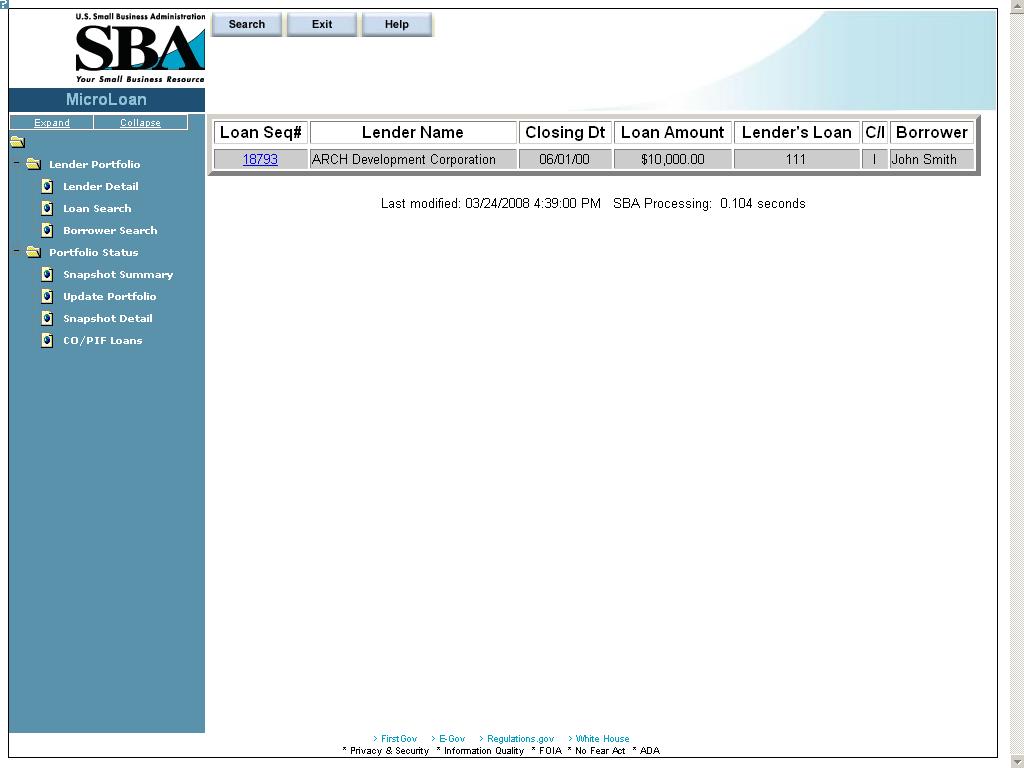
The loans will be listed with the Loan Sequence Number, Lender Name, Closing Date, Loan Amount, Lender’s Loan (Number), C/I (“Complete” or “Incomplete”), and Borrower Name displaying. To view a loan, select a link in the Loan Sequence Number column. This will open the Loan Detail screen for the selected loan number.
4.1.8Borrower Search
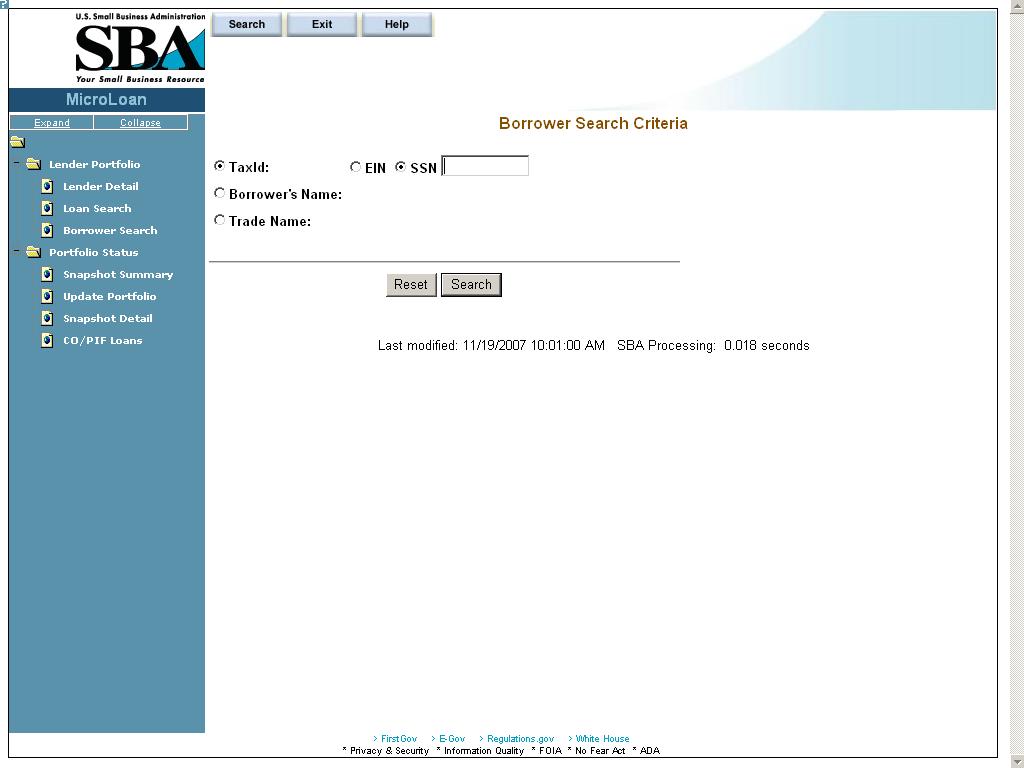
You can search for a borrower by Tax ID, Borrower Name, or Trade name.
To search by Tax ID:
Select the Tax ID radio button.
Select either the EIN radio button or the SSN radio button.
Enter the Tax ID in the text field provided to the right.
Select the Search pushbutton.
To search by Borrower Name:
Select the Borrower Name radio button.
Enter the Borrower Name in the text field provided to the right.
Select the Search pushbutton.
To search by Trade Name:
Select the Trade Name radio button.
Enter the Trade name in the text field provided to the right.
Select the Search pushbutton.
If no borrowers match the search criteria, you will be notified and advised to try again.
4.1.9Borrower Search Results
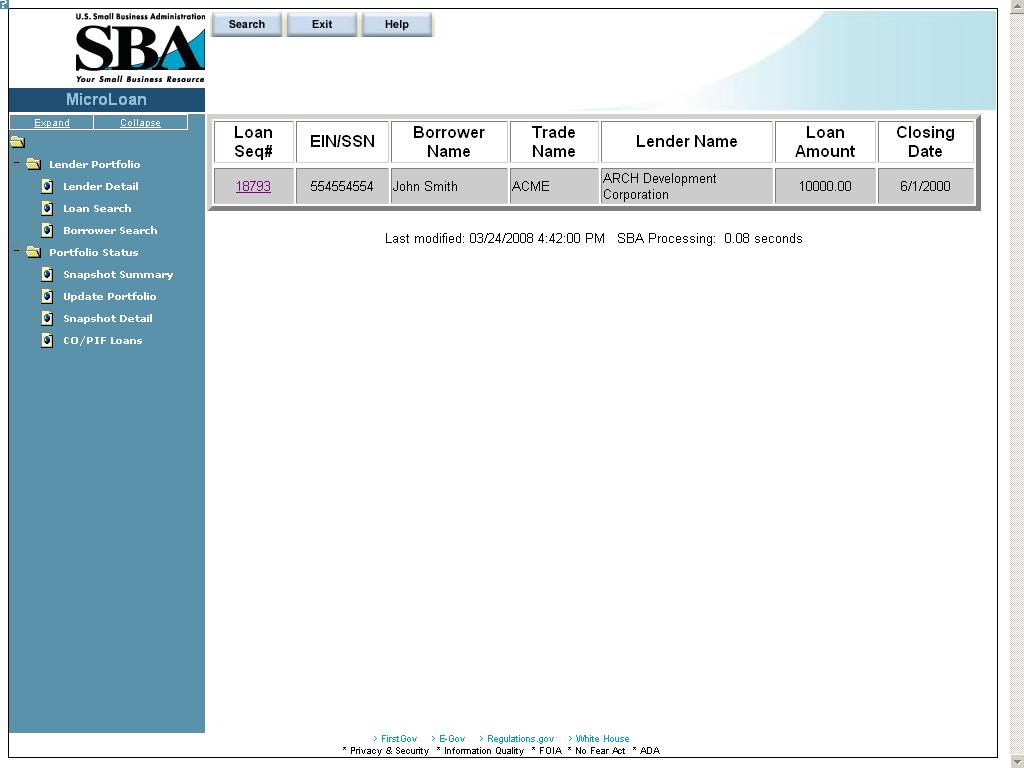
The loans will be listed with the Loan Sequence Number, EIN/SSN Number, Borrower Name, Trade Name, Lender Name, Loan Amount, and Closing Date displaying. To view a loan, select a link in the Loan Sequence Number column. This will open the Loan Detail screen for the selected loan.
4.1.10Snapshot Summary
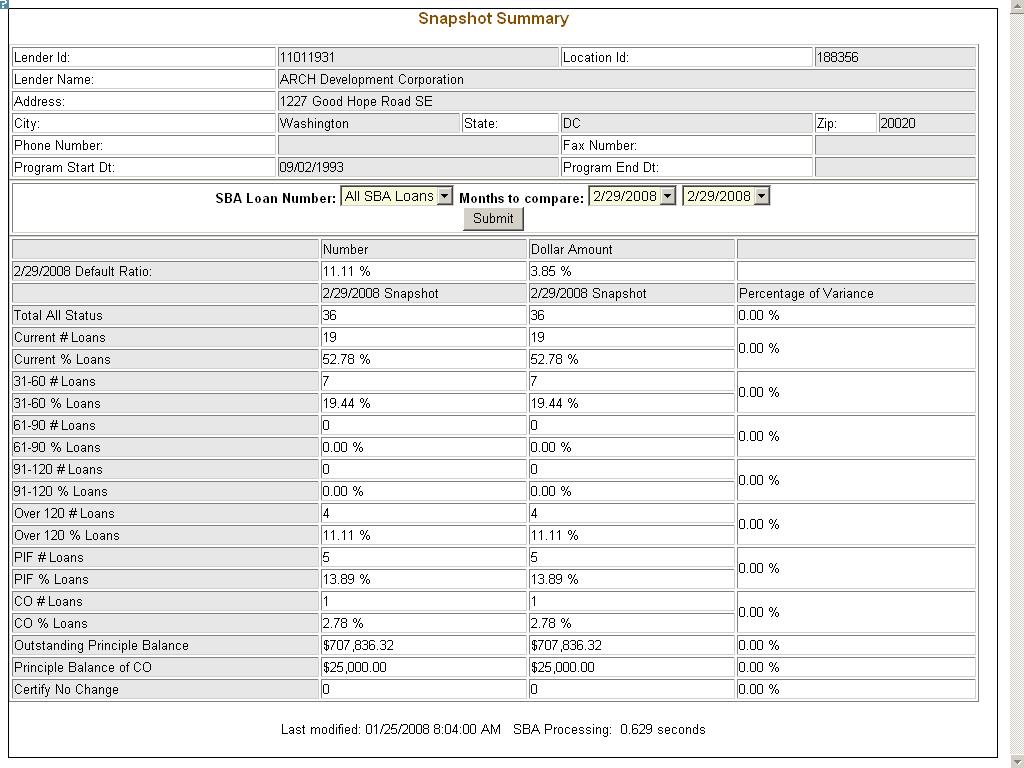
The Snapshot Summary screen displays the following information about the lender:
Lender ID
Location ID
Lender Name
Address
City
State
Zip
Phone Number
Fax Number
Program Start Date
Program End Date
Cumulative Net Default Rate
Total Dollars Loaned
Using the “SBA
Loan Number” drop-down list, you have the ability to select a
summary of all loans for a lender or loans for a specific SBA Loan
Number. Using the “Months to Compare” fields, you have
the ability to compare two dates to one another. Once you have set up
your parameters to compare, select the “Submit”
pushbutton.
The default ratio percentage for the number of
loans and the dollar amount of loans is displayed.
The
following information is displayed for each date:
Total All Status
Current # Loans
Current % Loans
31-60# Loans
31-60% Loans
61-90# Loans
61-90% Loans
91-120# Loans
91-120% Loans
Over 120# Loans
Over 120% Loans
PIF# Loans
PIF% Loans
CO# Loans
CO% Loans
Outstanding Principal Balance
Principal Balance of CO
Certify No Change
The user will have the ability to select from all available snapshot dates to compare two snapshots to one another.
4.1.11Update Portfolio
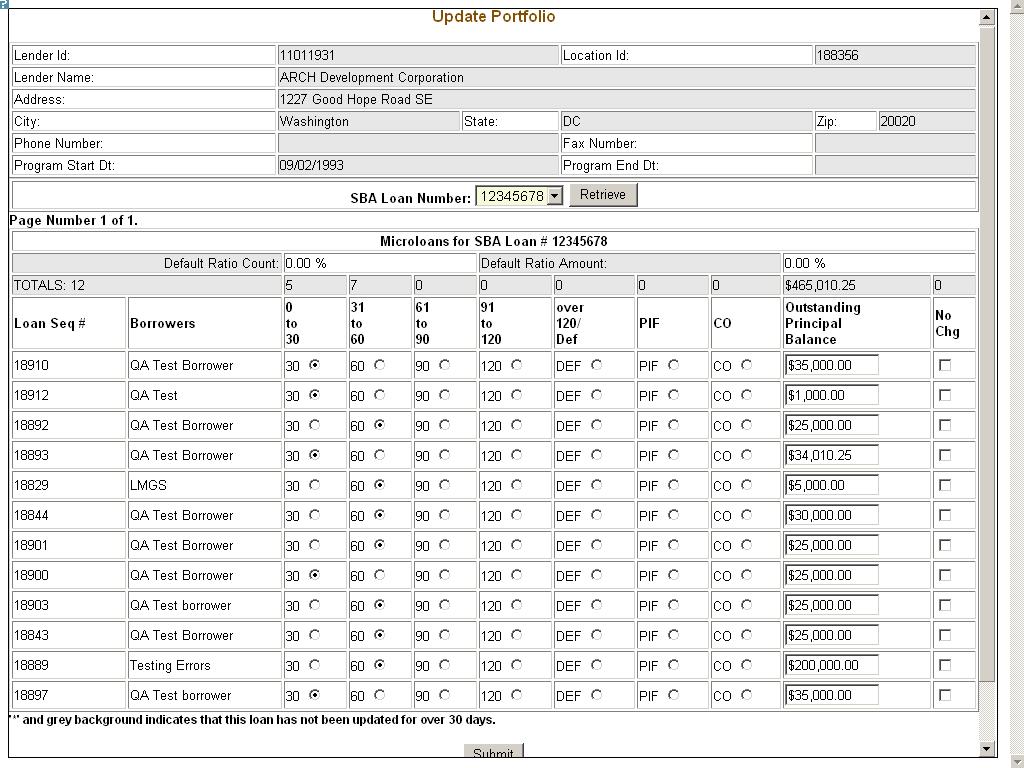
The Update Portfolio screen displays the following information about the lender:
Lender ID
Location ID
Lender Name
Address
City
State
Zip
Phone Number
Fax Number
Program Start Date
Program End Date
Cumulative Net Default Rate
Total Dollars Loaned
Using the “SBA
Loan Number” field, and the “Retrieve” pushbutton,
you have the ability to select an SBA Loan Number to display all
current loans.
Once you have chosen an SBA Loan Number and
selected the "Retrieve" pushbutton, the following
information will display concerning all microloans for the selected
SBA Loan Number which have not been paid in full or charged off prior
to the last snapshot:
Loan Seq#
Borrowers
Loan Status - these will be a series of radio buttons with the following options:
0 - 30
31 - 60
61 - 90
91 - 120
Over 120/Def
PIF
CO
Outstanding Principal Balance
No Chg
Any
loan which has not been updated in the last 30 days will display with
an asterisk preceding the Loan Sequence Number and the row background
color will be grey.
You will have the ability to update
the loan status, loan outstanding balance, or no change indicator and
then submit the changes
4.1.12Reasons for No Change Certification
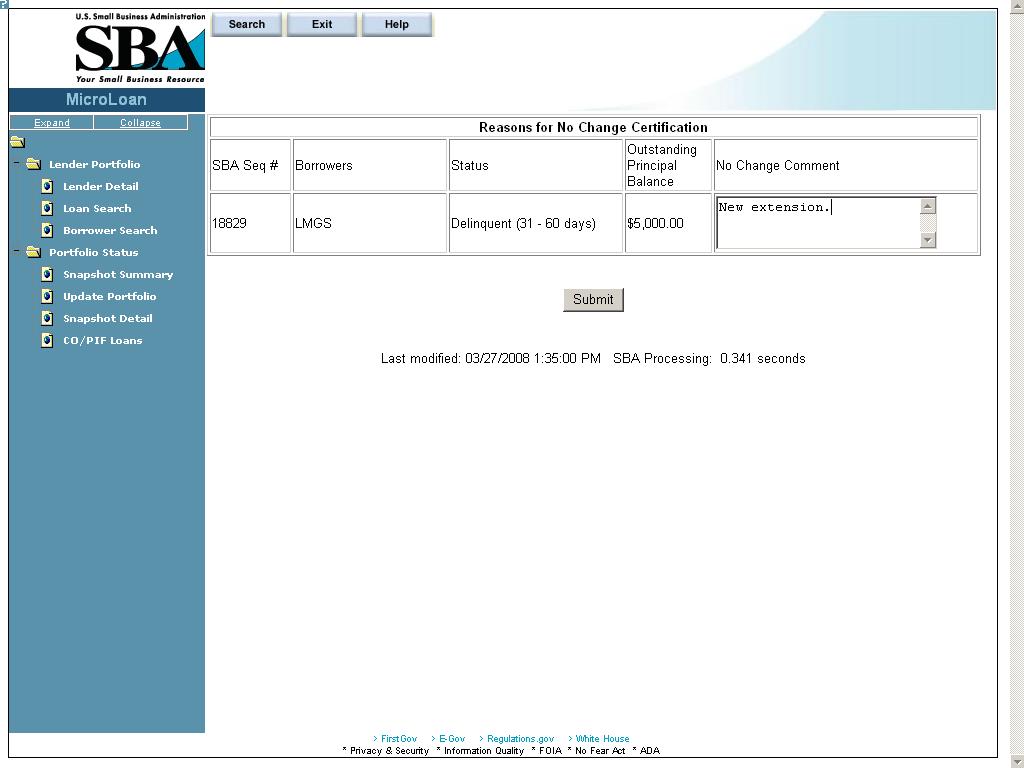
After submitting the changes, if the “No Change” checkbox was selected for one or more of the loans, the new screen above will display for you to enter or update a reason for all loans selected "certify no change". Once you have finished, you must select the “Submit” pushbutton to update the loans.
4.1.13Snapshot Detail
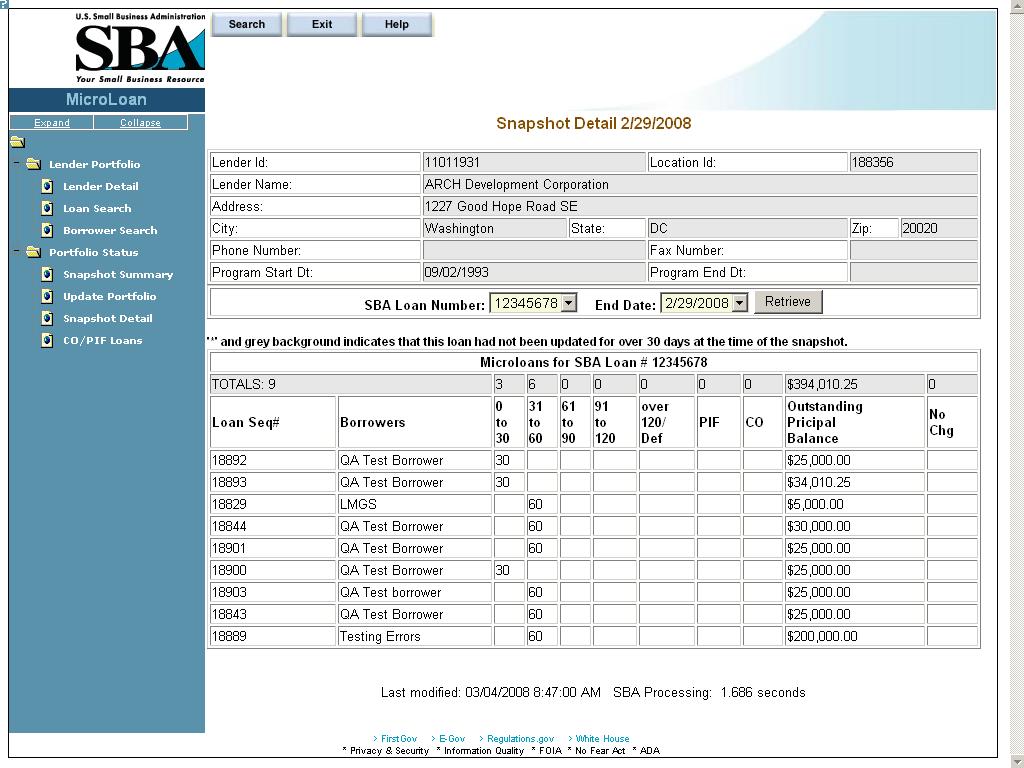
The Snapshot Detail screen displays the following information about the lender:
Lender ID
Location ID
Lender Name
Address
City
State
Zip
Phone Number
Fax Number
Program Start Date
Program End Date
Using the “SBA
Loan Number” and “End Date” fields, you have the
ability to select an SBA Loan Number and a date to display all loans
for that snapshot.
Once you have chosen an SBA Loan Number and
selected the "Retrieve" pushbutton, the following
information will display regarding all microloans for the selected
snapshot of the SBA Loan Number:
Loan Seq#
Borrowers
Loan Status
0 - 30
31 - 60
61 - 90
91 - 120
Over 120/Def
PIF
CO
Outstanding Principal Balance
No Chg
If any loans were certified “No Change”, you have the ability to select a link to display the reason for the certification.
4.1.14Reasons for No Change Certification
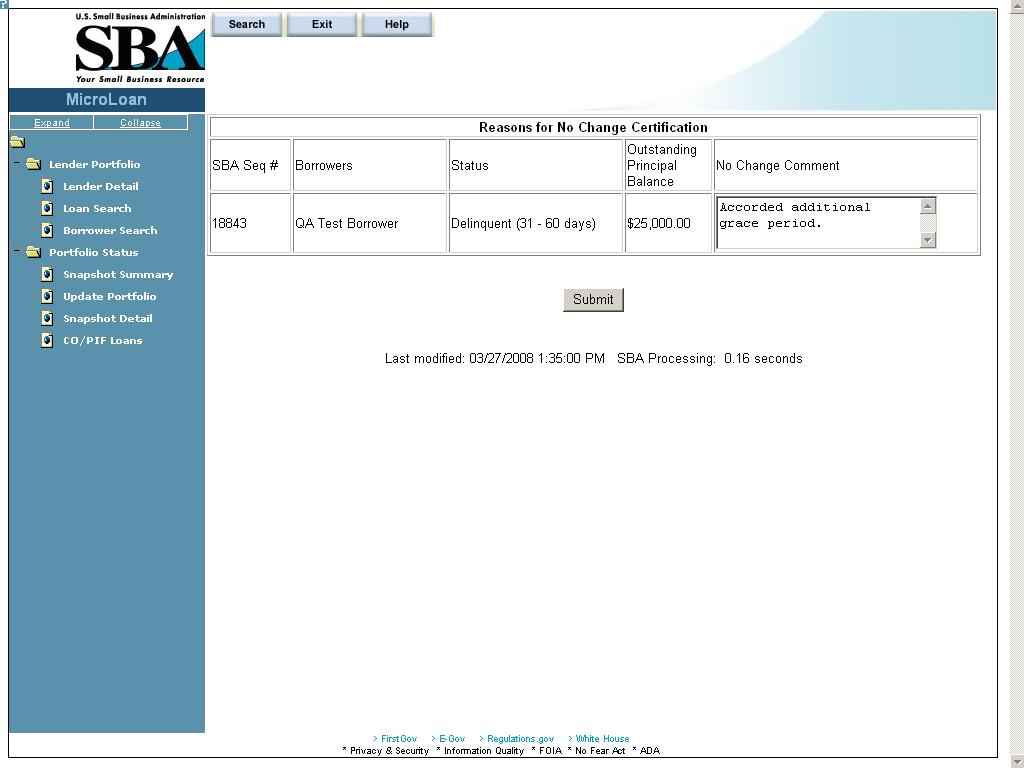
The Reasons for No Change Certification screen displays the following information:
SBA Sequence Number
Borrowers (Names)
Status
Outstanding Principal Balance
No Change Comment – Enter an explanatory comment.
Displays the reason for the No Change Certification.
4.1.15CO/PIF Loans
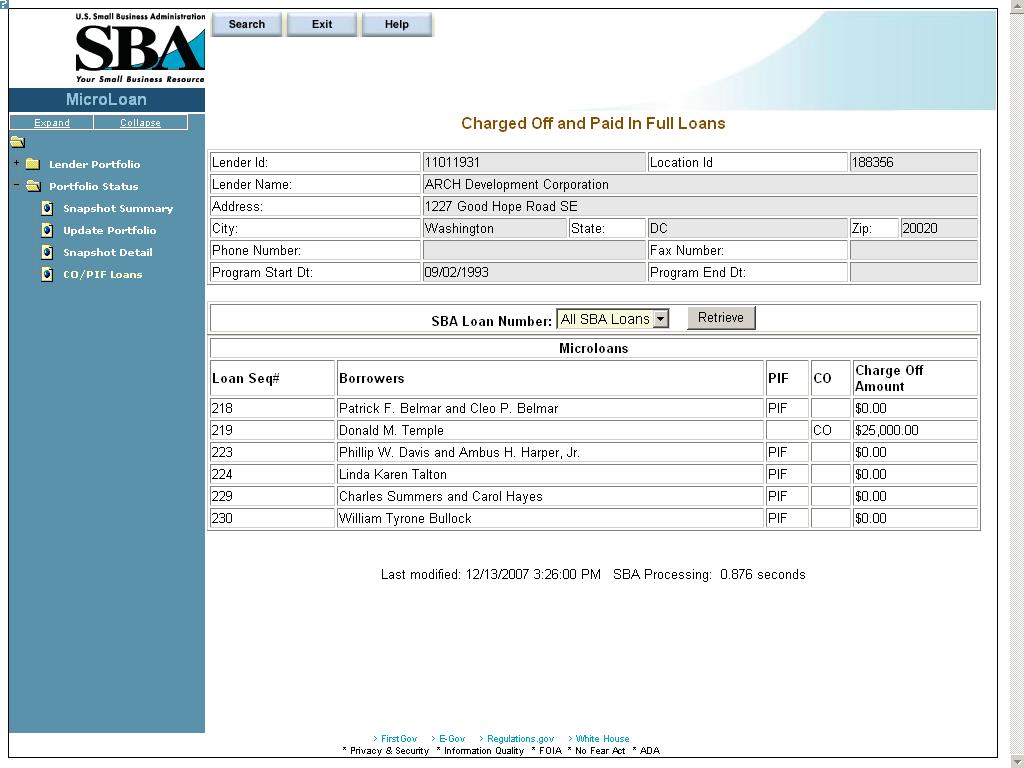
The Charged Off and Paid In Full Loans screen displays the following information about the lender:
Lender ID
Location ID
Name
Address
City
State
Zip Code
Phone Number
Program Start Date
Program End Date
Cumulative Net Default Rate
Total Dollars Loaned
The user will have the
ability to select an “SBA Loan Number” or to view
“Charged Off” and “Paid in Full Loans” for
the lender’s total portfolio.
The following
information will be displayed:
Loan Seq#
Borrowers
Loan Status
PIF
CO
Charge Off Amount
Recovery Amount
4.2Using the Enhancements to the Microloan System (Intermediary)
The following sections describe screens that an Intermediary will access to perform actions related to Microloan Program reporting requirements.
4.2.1Intermediary Dashboard
Use this screen to submit reports to Microloan Program Office and to view current status of reports in the Intermediary’s work queue. Records in the dashboard are created and managed by the system depending on the status of the report. This screen is accessible from the left-hand navigation menu.
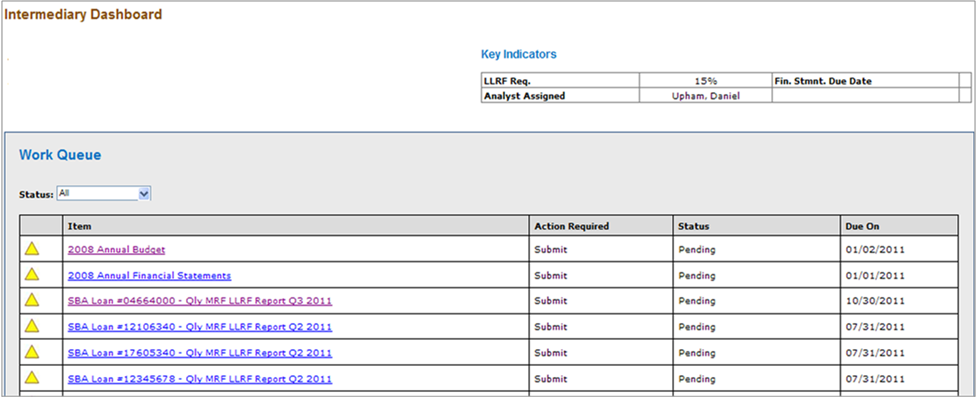
Definition of Terms on the Intermediary Dashboard Screen
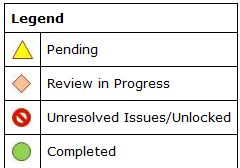
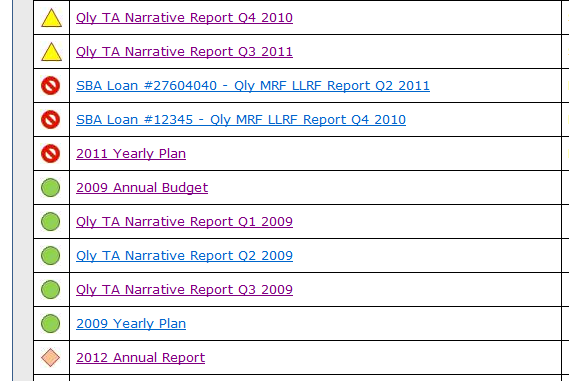
Status: Select the status to filter by. The status of the Report is defined below.
Value |
Definition |
Pending |
|
Review In Progress |
|
Unresolved Issues |
|
Unresolved Issues |
|
Unlocked |
|
Approved |
|
Action Required: Action that needs to performed on the selected report.
Icon Legend: Use the icon legend below to determine the status of reports
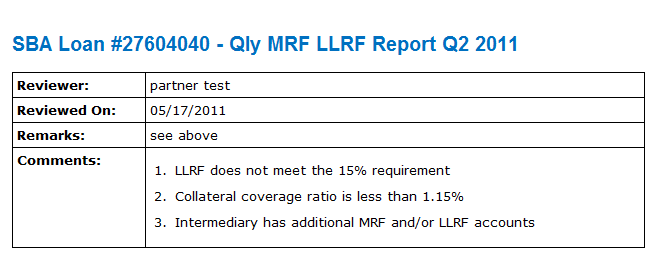
Unresolved Issues Link: Use this link to view Unresolved Issues / Unlock reports. A screen opens up as shown below.
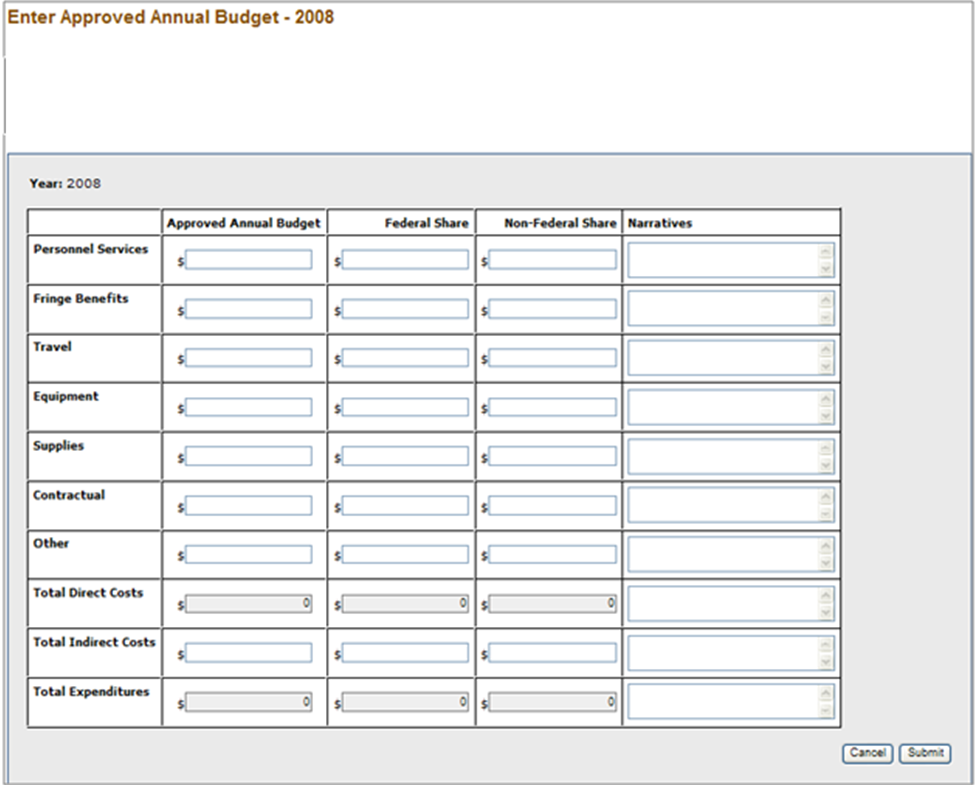
4.2.2Enter Approved Annual Budget
Use this screen to enter your approved annual budget for a particular grant year. This screen is accessible from the Intermediary dashboard. The Annual Budget report should only be submitted after the Intermediary has received an Approved Budget from the Office of Grants Management.
Definition of Terms on the Enter Annual Budget Screen
Personnel Services: (required)
Fringe Benefits: (required)
Travel: (required)
Equipment: (required)
Supplies: (required)
Contractual: (required)
Other: (required)
Total Direct Costs: (calculated field)
Total Indirect Costs: (required)
Total Expenditures: (calculated field)
Narratives: Enter narrative detail for each Budget line item greater than $0.
Approved Annual Budget: Enter the approved annual budget (required).
Federal Share: Enter the Federal Share of the approved annual budget (required).
Non-Federal Share: Enter the Non-Federal Share of the approved annual budget (required).
Submit: Updates database and submits Annual Budget to Microloan Program Office.
Cancel: Takes you back to previous screen.
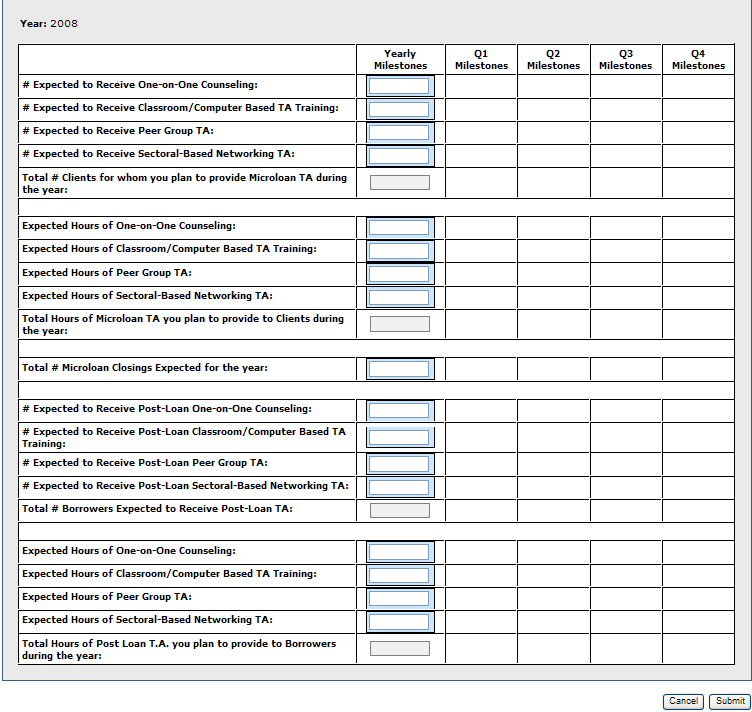
4.2.3Enter Annual TA Milestones
Use this screen to enter Technical Assistance Milestones for selected grant year. This screen is accessible from the Intermediary dashboard.
Definition of Terms on the Enter Annual TA Milestones Screen
Yearly Milestone: Enter the yearly milestone for each Technical Assistance activity (required).
Q1, Q2, Q3, Q4 Milestones: System calculated (read only).
Submit: Updates database and submits Annual TA Milestones to Microloan Program Office.
Cancel: Takes you back to previous screen.
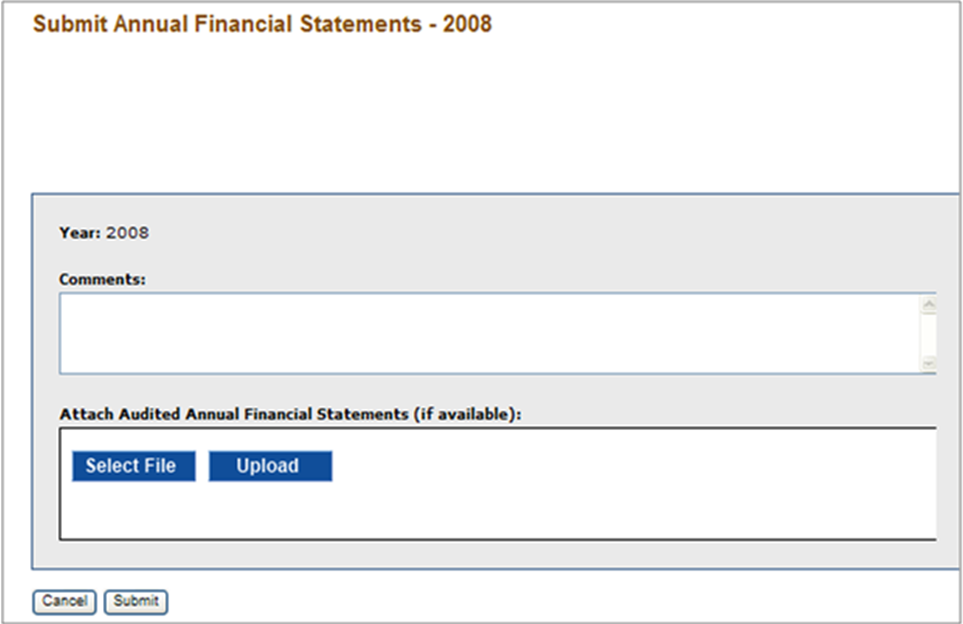
4.2.4Submit Annual Audit
Use this screen to submit the Annual Audit for selected year. This screen is accessible from the Intermediary dashboard.
Definition of Terms on the Submit Annual Audit Screen
Year: Year of the Annual Audit (read only).
Comments: Enter comments (required)
Attach Annual Audit: Attach your Annual Audit. Please note that the system requires a PDF upload and limits each upload to no more than 10 Mb. If the files are too large we, you can break up the files into smaller files. If file breakup is not possible, please email Analyst and include a comment to that effect in the submission.
Select File: Click this link first to select the annual audit in your computer directory.
Upload: Click the upload button to upload the annual audit. The file name will be displayed in the Attach Annual Audit window when the upload is complete.
Submit: Updates database and submits Annual Audit to Microloan Program Office.
Cancel: Takes you back to previous screen.
4.2.5Submit Quarterly MRF / LLRF Report
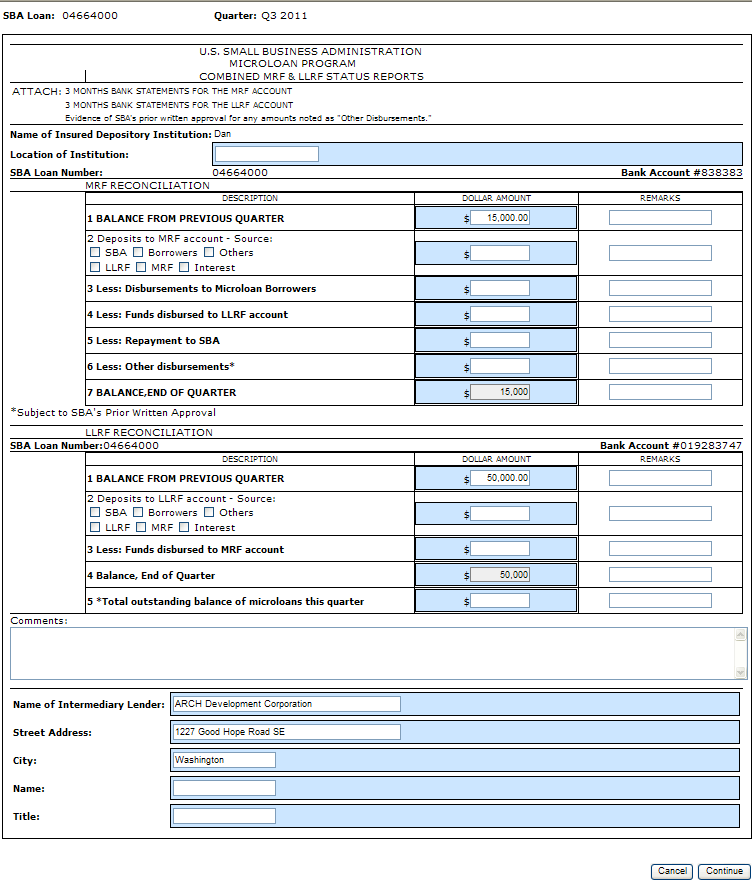
Use this form to submit the quarterly MRF/LLRF report for each active SBA loan. This screen is accessible from the Intermediary dashboard. At the end of each quarter, the Intermediary dashboard will contain one link for each SBA loan. This is a 2 step process as shown below:
Step 1: Enter MRF/LLRF data
Definition of Terms on the Enter MRF/LLRF Data entry Screen
SBA Loan Number: Pre-populated by system. Displays the SBA Loan Number for which the MRF/LLRF is being submitted (read only).
Quarter: Pre-populated by system. Displays the Quarter for which the report is being submitted (read only).
Name of Insured Depository Institution: Pre-populated by system (read only). If the depository institution is not pre-populated or is incorrect, contact the Microloan Program Office to submit the correct name of the depository institution.
Location of the Institution: Enter the city and state location of the Institution (required).
MRF Bank Account #: Pre-populated by system (read only). If incorrect, contact the Microloan Program Office to submit the correct bank account number.
MRF Reconciliation data: Enter MRF account information data in this section (required).
LLRF Bank Account #: Pre-populated by system (read only). If incorrect, contact the Microloan Program Office to submit the correct bank account number.
LLRF Reconciliation data: Enter LLRF account information data in this section (required).
Name of Intermediary Lender: Pre-populated (required)
Street Address: Pre-populated (required)
City: Pre-populated (required)
Name: (required)
Title: (required)
Step 2: Upload Bank Statements and Submit
Note: Upload one bank statement for each MRF Account and one bank statement for each LLRF account for each month of Quarter. In total, six bank statements should be uploaded and submitted for each MRF/LLRF Report. Note, the system allows only PDF documents for upload and the maximum size of each document cannot exceed 10Mb.
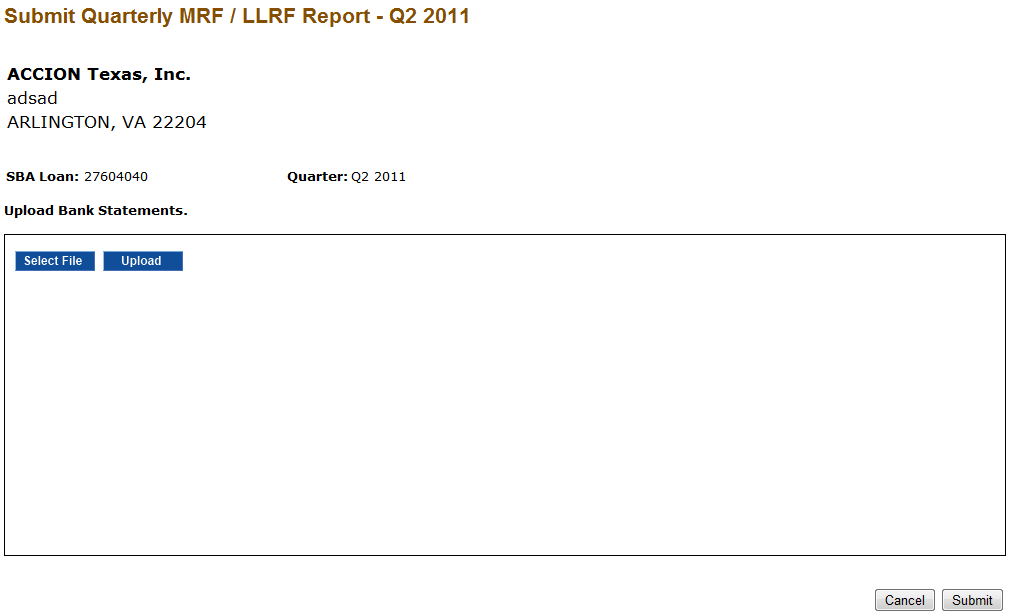
Definition of Terms on the Upload Bank Statements and Submit Screen
SBA Loan Number: The SBA Loan Number for which the MRF/LLRF is being submitted; pre-populated by system (read only)
Select File: Click this link first to select the bank statement from your computer directory for upload.
Upload: Click the upload button to upload the bank statement.
Submit: When you are done uploading bank statements, click the Submit button to submit the MRF/LLRF report and Bank Statements to the Microloan Program Office. The file name will be displayed in the Upload Bank Statements window when the upload is complete.
Cancel: Takes you back to the Intermediary Dashboard page.
4.2.6Submit TA Quarterly Narrative Report
Use this screen to submit the TA Quarterly Narrative report. This screen is accessible from the Intermediary dashboard. Please note that the TA Quarterly Narrative Report is a system generated report using TA data submitted through MPERS. Submission of the TA Quarterly Narrative Report is a 2 step process as shown below:
Step 1: The first step displays all the TA data entered for the quarter. Changes and / or deletions to TA records can be made in this step. Click the Generate button to build report.
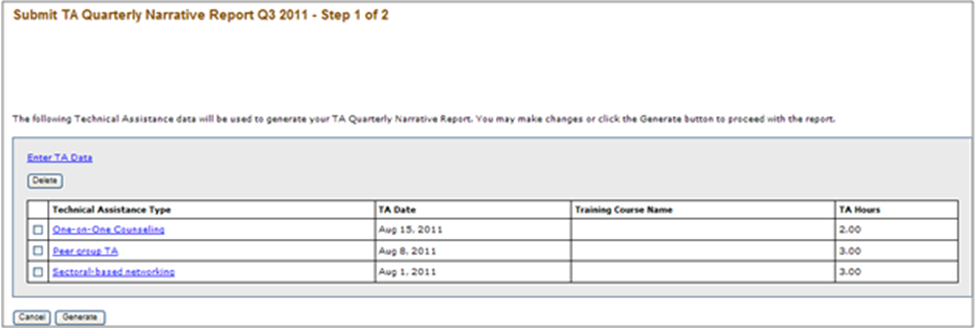
Definition of Terms on the Submit TA Quarterly Narrative Report Screen
Enter TA Data: Use this link to enter TA data. This function can also be accessed from the left hand navigation menu.
Technical Assistance Type: This is a link to the TA data. Click this link to change the TA data entered.
Delete: To delete TA data, select the check boxes in front of each applicable Technical Assistance Type and click the Delete button.
Generate: This button generates the TA Quarterly Narrative Report (see step 2 below).
Cancel: Reverts to previous screen.
Prerequisite for TA Narrative Report
Before a TA Narrative report is generated for selected quarter, the system checks for existence of an approved Annual Budget and Annual TA Milestones for the applicable year. If the validation fails, an error message is displayed:
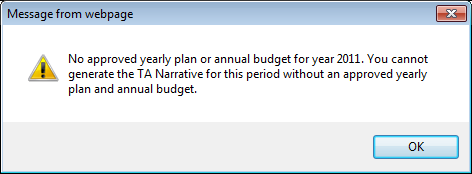
Step 2: Submit Report. This page has 4 sections as shown below:
Section 1: Quantitative Analysis of Milestones
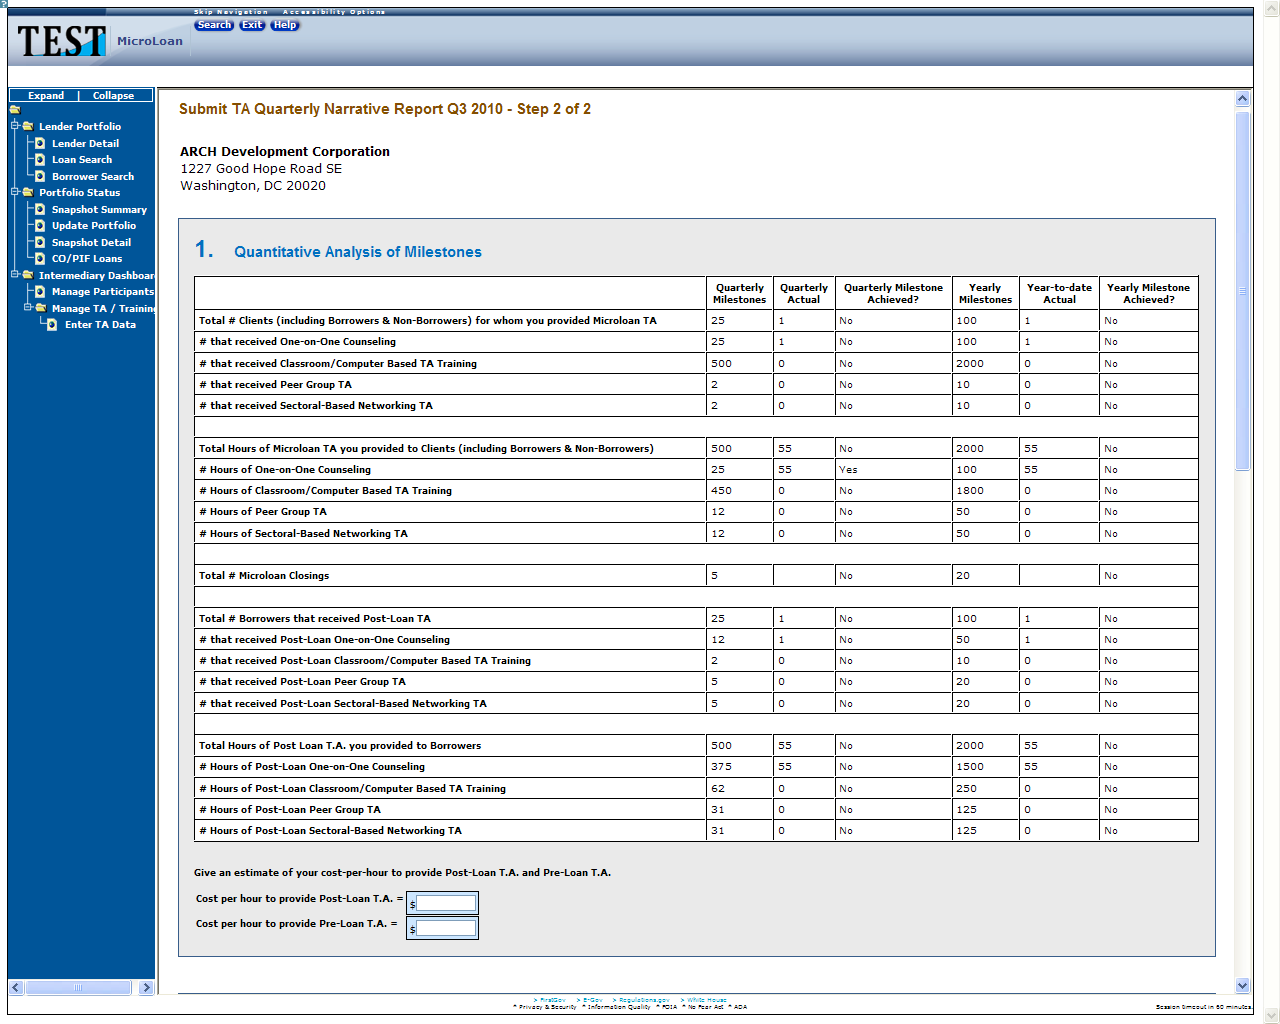
Definition of Terms in the Quantitative Analysis of Milestones Section
The Quantitative Analysis of Milestones is system generated and is read only. If changes are required to the Technical Assistance activity used to generate this report, please see Section 5.1.9 Manage Technical Assistance (TA) Data of this User’s Manual.
Cost per hour to provide Post-Loan TA = required; provide your best estimate.
Cost per hour to provide Pre-Loan TA = required; provide your best estimate.
Section 2: Narrative Analysis of Milestones
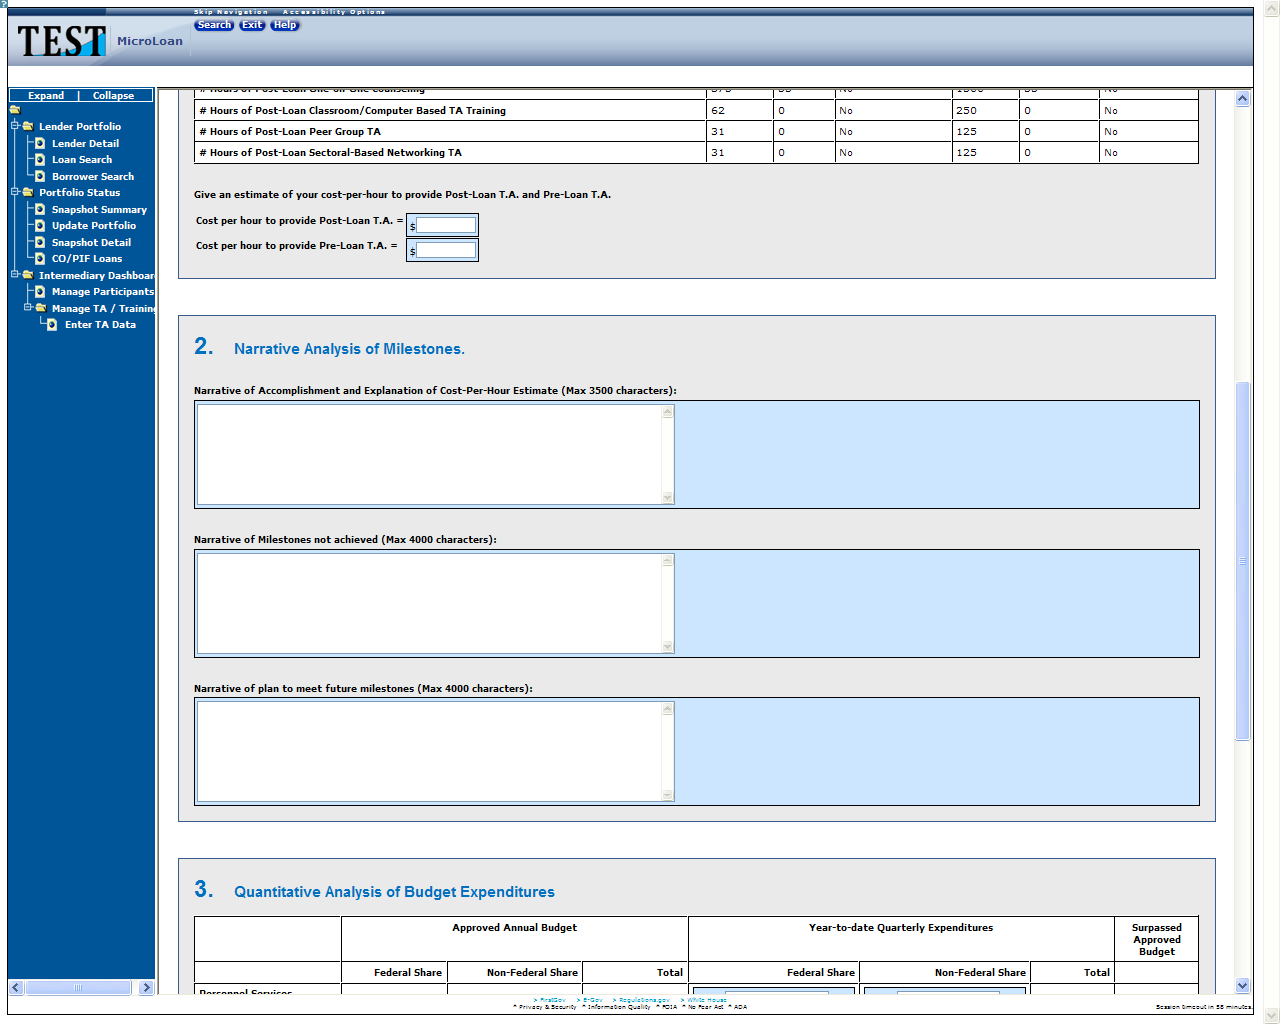
Definition of Terms in the Narrative Analysis of Milestones Section
Narrative of Accomplishment and Explanation of Cost-per-Hour estimate: Enter narrative (required).
Narrative of Milestones Not Achieved: Enter narrative (required).
Narrative of Plan to Meet Future Milestones: Enter narrative (required).
Section 3: Quantitative Analysis of Budget Expenditures
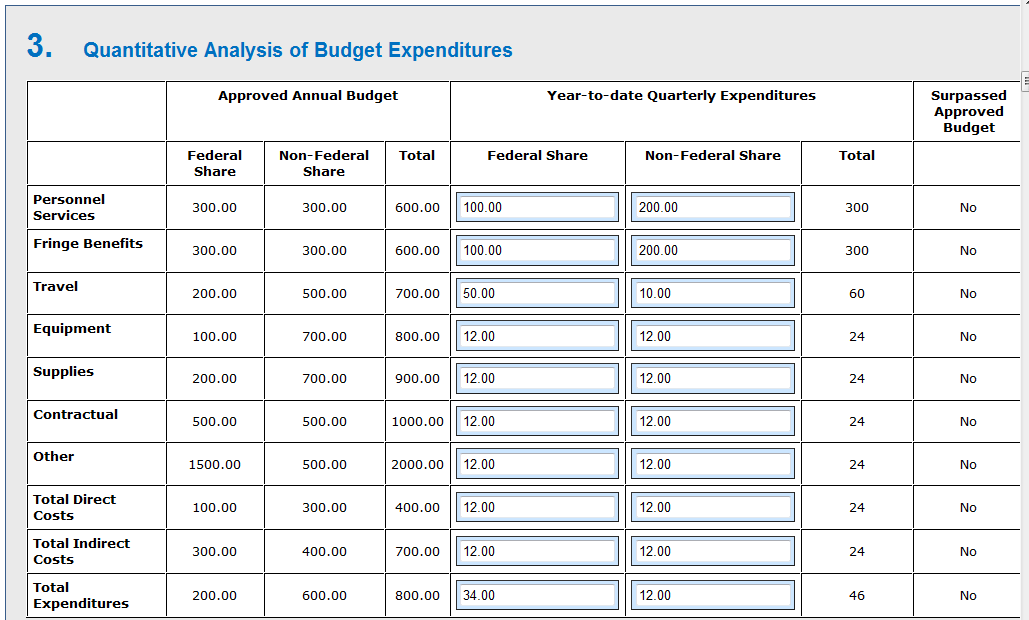
Definition of Terms in the Quantitative Analysis of Budget Expenditures Section
Approved Annual Budget: Lists the approved budget line items and amounts. This is from the Approved Annual Budget Report previously submitted (read only).
Federal Share (YTD Expenditures): Enter the Federal share of your year-to-date (YTD) expenditures for each budget line item (required).
Non-Federal Share (YTD Expenditures): Enter the Non-Federal share of your YTD expenditures for each budget line item (required).
Total Direct Costs and Total Expenditures: Calculated by system (read only).
Surpassed Approved Budget: Calculated by system (read only). If year-to-date expenditures exceed 10% of the approved Annual Budget, the system will identify the applicable category with a “Yes.” Expenditures that exceed 10% of the approved Annual Budget will require a request to modify the Approved Budget.
Section 4: Narrative of Budget Expenditures

Narrative of Budget Expenditures: Enter narrative justification and detail of each budget expenditure.
When finished with the required data and narrative entry, click Submit to send the report to the Microloan Program Office. Click Cancel to return to the previous screen. Note, selecting Cancel will delete any data entered up until this point.
4.2.7Manage Participants
Use this screen to manage the TA participants served by your organization that are funded by SBA TA funds. This screen is accessible from the navigation menu on the left hand of the screen.
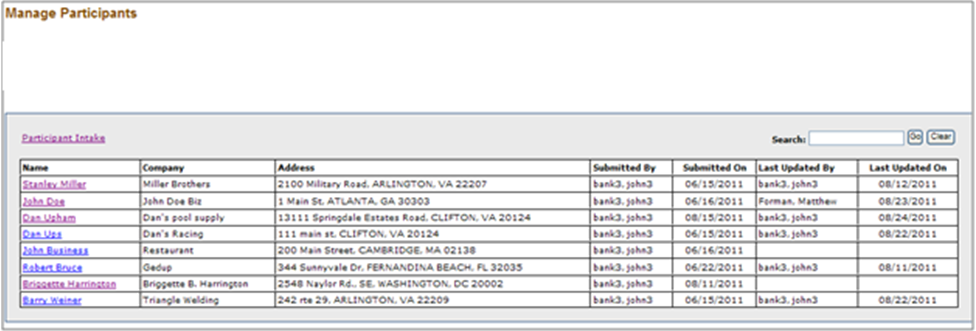
Definition of Terms on the Manage Participants Screen
Name: Click this link to edit participant details, such as demographic information or additional TA activities.
Participant Intake: Click this link to add a new participant.
Search: Enter the First Name, Last Name or Company of the participant that you wish to search (optional).
Go: Enter search parameter and click this button to search.
Clear: Clears the search box.
4.2.8Participant Intake
This screen can be used to enter a new participant’s information.
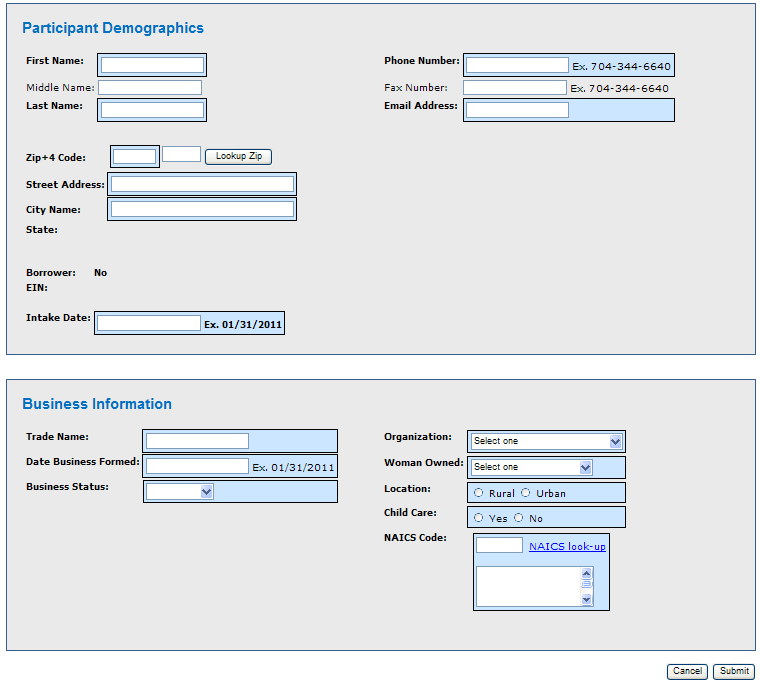
Definition of Terms on the Participant Intake Screen (Participant Demographics)
Participant Demographics
First Name (required)
Middle Name
Last Name (required)
Phone Number (required)
Fax Number
Email Address (required)
Zip+4 Code (required)
Lookup Zip: Click this link after entering the zip code to generate the City Name.
Street Address (required)
City Name (pre-populated from Lookup Zip)
State (required)
Borrower: The field is set to “Yes” when participant becomes a borrower (read only).
EIN: This field is displayed after a participant becomes a borrower (read only).
Intake Date: Enter the date the participant came to the organization for Technical Assistance (required).
Business Information
Trade Name: If business is in pre-startup phase and does not yet have a business name, enter the name of the borrower. If business is in startup or existing phase, enter the actual business name. (required)
Date Business Formed: Enter the Actual or Estimated date of business formation. (required)
Business Status: Select one of the following: (required)
Pre-Startup
Start Up
Existing
Organization: One of the following should be selected: (required)
Sole Proprietorship
Partnership or Corporation
Limited Liability Company (LLC)
Joint Venture
Non-Profit Organization
Woman Owned: One of the following should be selected: (required)
< 51% Female Owned
51 - 99% Female Owned
100% Female Owned
Location: One of the following should be selected: (required)
Rural
Urban
Child Care: Indicate whether business is a child care organization. Enter Yes or No (required)
NAICS Code: Enter NAICS code or click NAICS look-up to find NAICS code.
Submit: Updates database.
Cancel: Takes you back to previous screen.
4.2.9Edit Participant
Use this screen to edit participant information. This screen is accessible by clicking on the name of the participant on the Manage Participant screen.
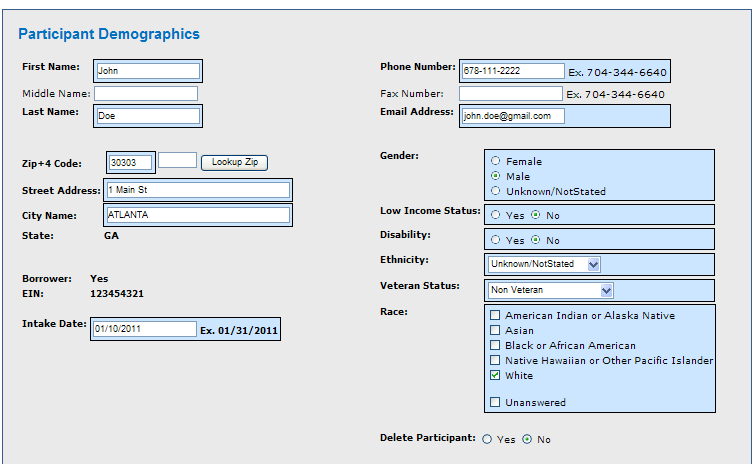
Edit Participant Continued
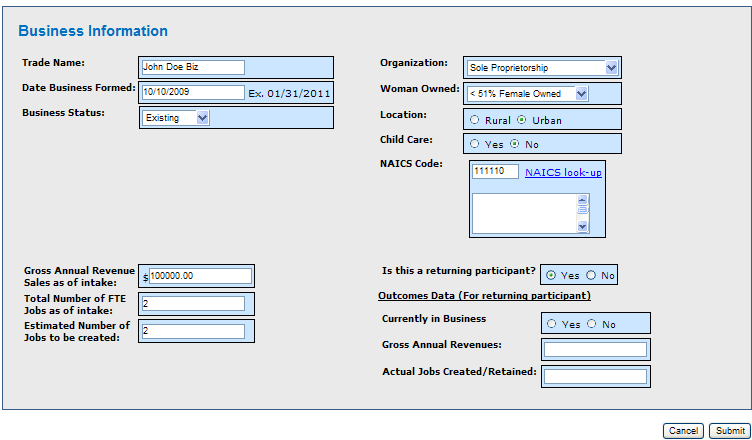
Definition of Terms on the Edit Participant Intake Screen
Refer to section 5.1.7 Participant Intake screen for definition of terms. See below for additional fields that are displayed for Borrower only
Gender: One of the following should be selected: (required for Borrowers only)
Male
Female
Unknown/Not Stated
Low Income Status: One of the following should be selected: (required for Borrowers only)
Yes
No
Disability: One of the following should be selected: (required for Borrowers only)
Yes
No
Ethnicity: One of the following should be selected: (required for Borrowers only)
Hispanic or Latino
Not Hispanic or Latino
Unknown/Not Stated
Veteran Status: One of the following should be selected: (required for Borrowers only)
Non Veteran
Service Disabled Veteran
Other Veteran
Race: One of the following should be selected: (required for Borrowers only)
American Indian or Alaska Native
Asian
Black or African American
Native Hawaiian or Other Pacific Islander
White
Unanswered
Additional fields based on the value selected for Business Status
Gross Annual Revenue Sales as of intake: (required for Start Up and Existing Businesses for Borrowers and Non-Borrowers)
Total Number of FTE Jobs as of intake: (required for Start Up and Existing Businesses for Borrowers only)
Estimated Number of Jobs to be created: (required for Start Up and Existing Businesses for Borrowers only)
Additional fields based on if this is a returning participant who is a Borrower.
Outcomes Data
Currently in Business: Enter Yes or No
Gross Annual Revenue: Enter the business’ gross annual revenue sales for the most recently completed year
Actual Jobs Created/Retained: Enter the actual jobs created/retained.
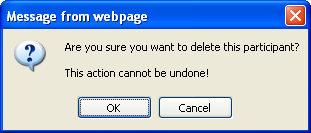
Delete Participant: Use this to delete a participant from your organization. You will see a message box as shown below asking for confirmation. Click OK to delete the participant or cancel to go back.
4.2.10Manage Technical Assistance (TA) Data
Use this screen to manage Technical Assistance data for Organization. This screen is accessible from the left hand navigation menu.
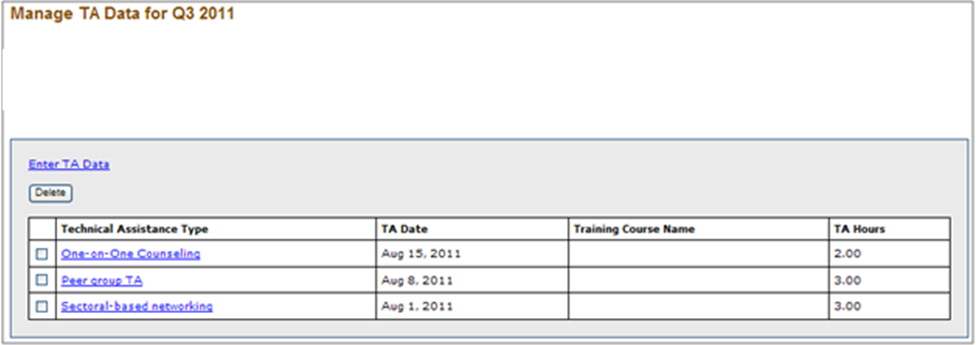
Definition of Terms on the Submit TA Quarterly Narrative Report Screen
Technical Assistance Type: Click this link to edit TA entered for the quarter in which the report will be generated.
Enter TA: Click this link to add new TA activities. You can also Enter TA by clicking on the Enter TA Data link in the left hand navigation menu.
Delete: To delete TA data and activities, select the check boxes next to the applicable TA item and click the Delete button.
4.2.11Enter TA Data
Use this screen to enter Technical Assistance data for Organization.
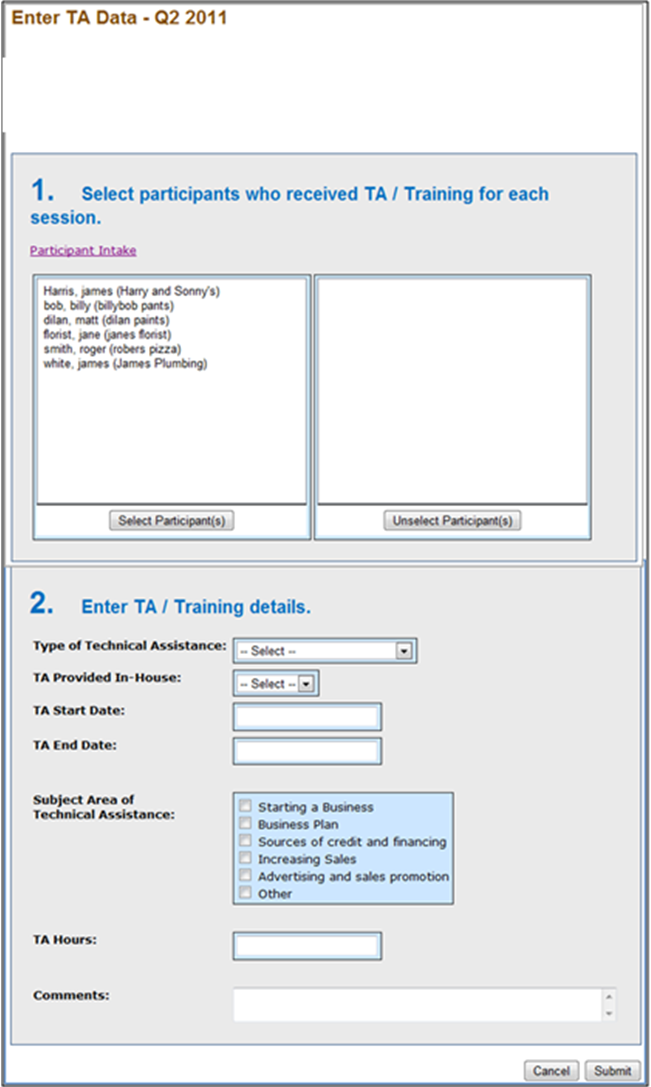
Definition of Terms on the Enter TA Data Screen
Select Participant(s): Select participant(s) who have received TA and click the Select Participant(s) button (required).
Unselect Participant(s): Use this to unselect participants from the TA session.
Type of Technical Assistance: One of the following types should be selected: (required)
One-on-One Counseling
Classroom / Computer-based
Peer group TA
Sectoral-based networking
TA Provided In-House: Enter Yes or No depending on whether you provided the TA directly (in-house) or relied on an outside consultant or organization to provide the training.
TA Start Date: Enter the Start date of TA.
TA End Date: Enter the End date of TA.
Subject Area of Technical Assistance: Select one of the following subject areas: (required)
Starting a Business
Business Plan
Sources of credit and financing
Increasing Sales
Advertising and sales promotion
Other
TA Hours: Enter hours you spent providing TA. Note that if providing classroom training, TA hours should be computed by multiplying the number of classroom participants by the hour(s) spent in class.
Comments: Enter comments, if any (optional).
Classroom / computer-based Training
Use this screen to enter TA data for Classroom / Computer based training. This screen is accessible by selecting the Classroom / Computer-based option in the Type of Technical Assistance drop down.
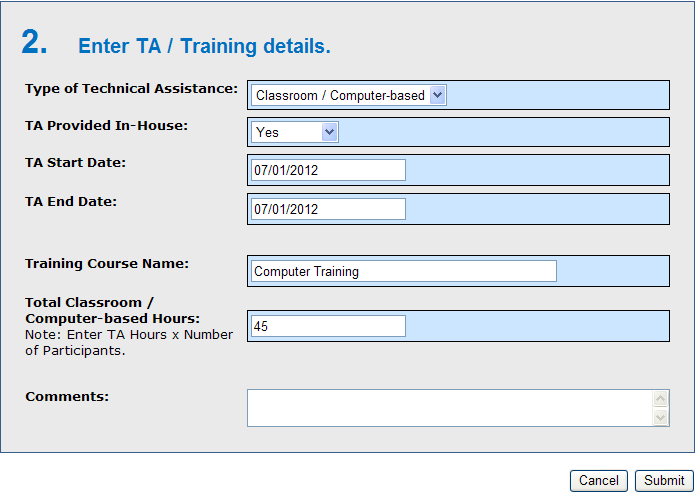
Definition of Terms on the Classroom / Computer-based TA data Screen
TA Provided In-House: Enter Yes or No depending on whether you provided the TA directly or relied on an outside consultant or organization to provide the training.
TA Start Date: Enter the Start date of TA.
TA End Date: Enter the End date of TA.
Subject Area of Technical Assistance: One of the following can be selected: (required)
Starting a Business
Business Plan
Sources of credit and financing
Increasing Sales
Advertising and sales promotion
Other
Total Classroom / Computer-based Hours: Enter hours you spent providing TA. Note that if providing classroom training, TA hours should be computed by multiplying the number of classroom participants by the hour(s) spent in class.
4.2.12Edit TA Data
Use this screen to edit TA data. This screen is accessible by clicking a TA record on Manage TA Data screen. The Manage TA data screen is accessible from the left hand navigation menu.
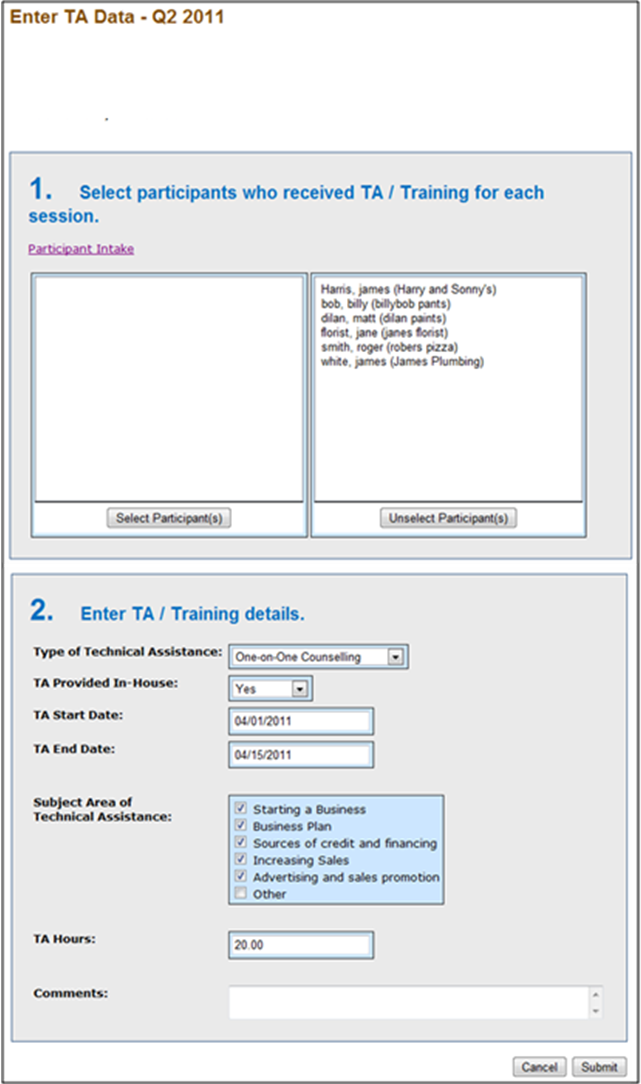
Definition of Terms on the Edit TA Data Screen
Refer to section 5.1.10 Enter TA Data screen for definition of Terms.
4.2.13Add New Loan (Select Participant screen)
Use this screen to select a participant for a new loan. The purpose of this screen is to select an existing participant and pre-populate the Add New Loan screen as it exists in MPERS today. This screen is accessible by clicking the Add New Loan link on the Lender Detail screen in MPERS.

Definition of Terms on the Add New Loan Screen
Choose Participant: Select the Participant from the drop down list.
Add the participant: Click this link to add the participant if the participant is not present in the participant drop down list.
Submit: Click this button to continue with Add New Loan functionality as it exists in MPERS.
Cancel: Takes you back to previous screen.
Note: You must choose a participant or add the participant to continue with the Add New Loan page.
4.2.14Capture Outcomes Data for Microloans that have been Paid in Full (PIF)
Use this screen to capture outcomes data for loans Paid in Full (PIF). This screen is displayed when you choose the PIF radio button on the Update Portfolio in MPERS.
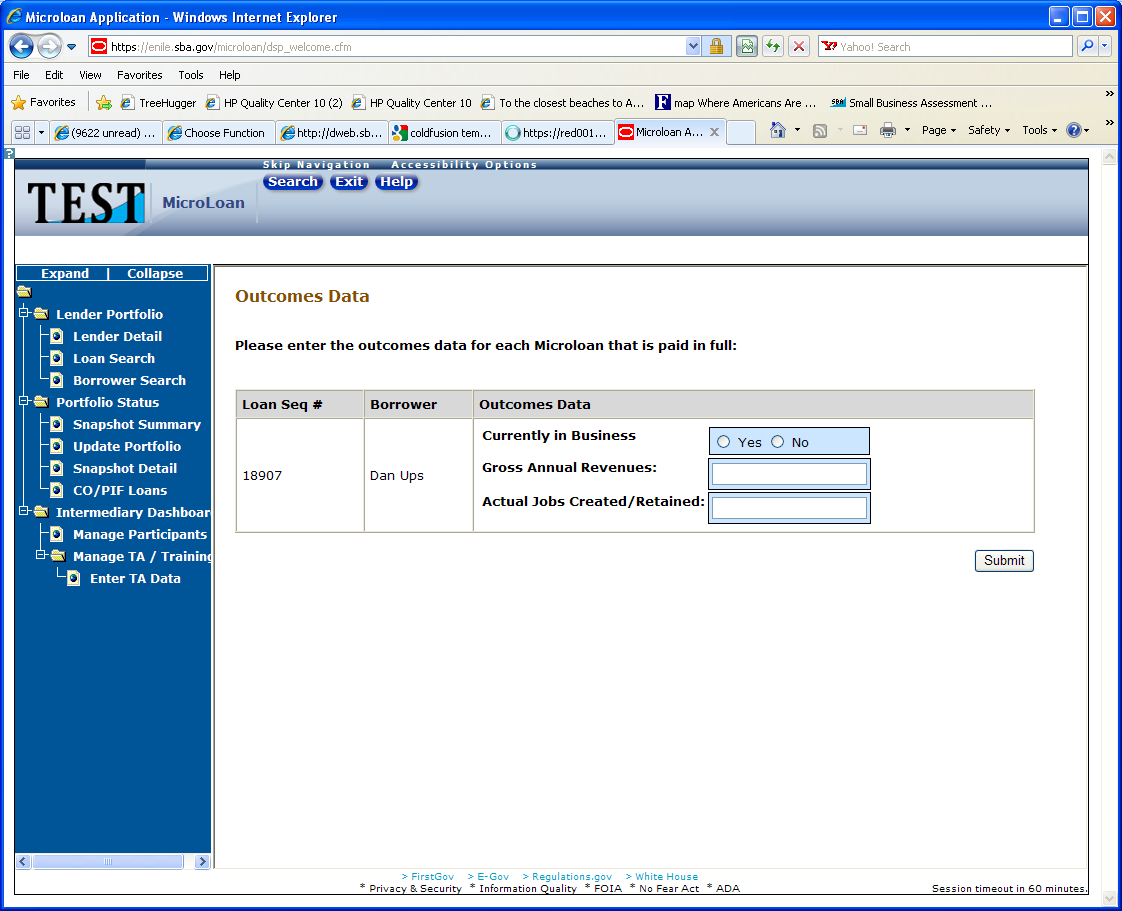
Definition of Terms on Outcomes Data Screen
Loan Seq #: This is the microloan number (read only). You will see one row of data for each microloan updated PIF.
Borrower: This is the Borrower for whom the loan is being paid in full (PIF).
Currently in Business: Indicate whether business is still in operation as of the time the loan is paid in full or charged-off. Enter Yes or No.
Gross Annual Revenue: Enter gross annual revenue of participant for the most recently completed year.
Actual Job Created/Retained: Enter number of actual jobs created/retained by the participant.
Submit: Click this button to continue with the update portfolio.
4.3Special Instructions for Error Correction
Pressing the “Save” button will cause the data on the screen to be validated. If there is an error, a message box will display, with information on the cause of the error. Correct the invalid data and press the “Save” button again.
User Manual
| File Type | application/msword |
| Author | jarinier |
| Last Modified By | Rich, Curtis B. |
| File Modified | 2013-04-23 |
| File Created | 2013-04-23 |
© 2026 OMB.report | Privacy Policy