Form 1 TEACH Grant Online System
Teach Grant Supplementary Data Collection
TeachWebApplication User Screens
Teach Grant Supplementary Data Collection
OMB: 1840-0819
TEACH Grant
User Screens

S![]()
ubmitted
by
CBMI
7518-M Fullerton Rd
Springfield, Virginia 22153
November 2013
Table of Contents
2 Main Page 3
3 Step 1 - Financial Aid Administrator and Data Entry Person Information..7
4 Step 2: Recipient Update 8
5 Review and Submit 12
1Introduction
The Office of Postsecondary Education (OPE) is requesting institutions that administered the TEACH grant program provide supplementary data to aid in analysis of the program’s activities. OPE uses a web-based reporting system to collect the data.
This document defines the web application’s capabilities with screen designs, data validations and error messages, and database table structures. The OMB Approval Number for the TEACH Grant On-line system is 1840-0819. The web application was developed in ColdFusion MX 9 and the database resides in an Microsoft SQL database. The document’s intended audience is the OPE management and staff.
2Home Page
Description
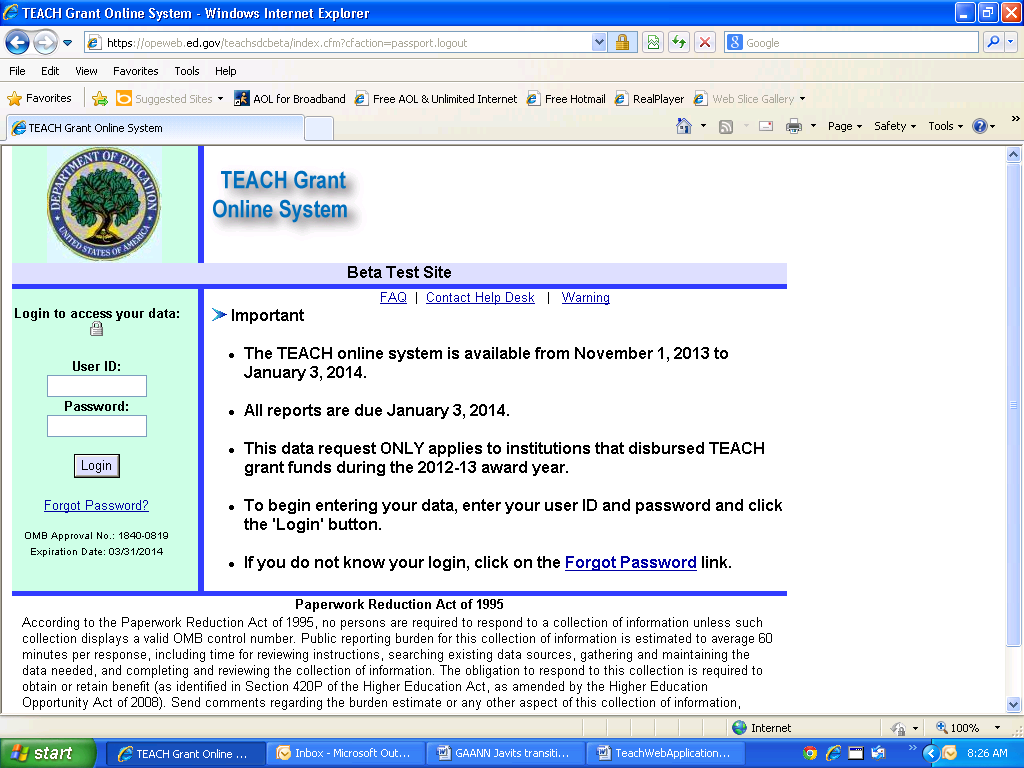
This page displays when the user enters the Teach Grant Online System URL, http://opeweb.ed.gov/teachsdc. It provides information about the submission due date, login and registration process. Links are provided for Registration, Forgot Password, First time user, Contact Help Desk, and Warning. This page allows users to log in to the TEACH Grant online program if they have already registered. All users must register in order to access the APR.
Once users are registered, they will enter their User ID and Password and click the Login button to log in to the system. If the users have three unsuccessful login attempts, the account will be locked. They will need to contact the Help Desk to have their account unlocked.
The Login page displays as follows:
2.1Contact Help Desk
Description
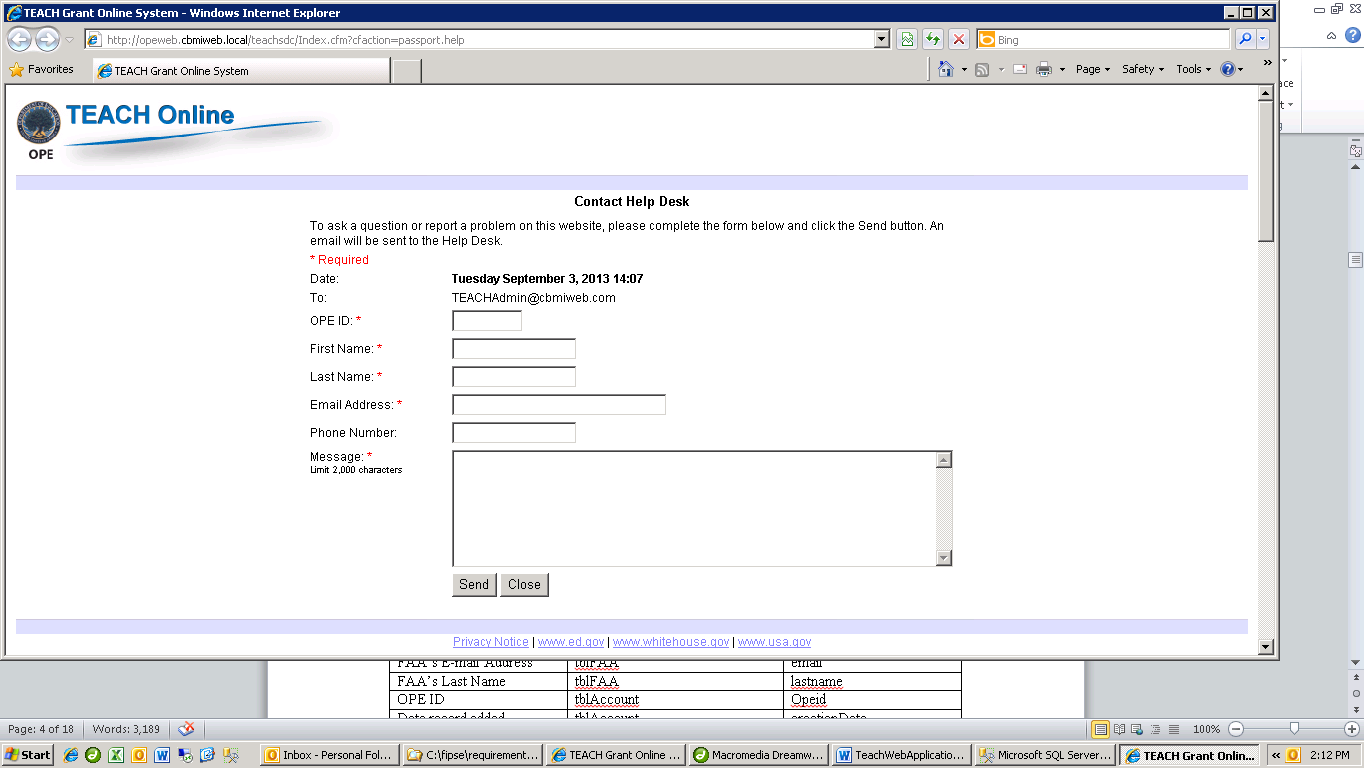
The Contact Help Desk screen displays when the user clicks the Contact Us link. The user enters the information on the page and clicks the Send button to send an email to the help desk. A help desk record will be logged when the message is sent.
The Contact Help Desk page displays as follows:
2.2First Time Log In
Description
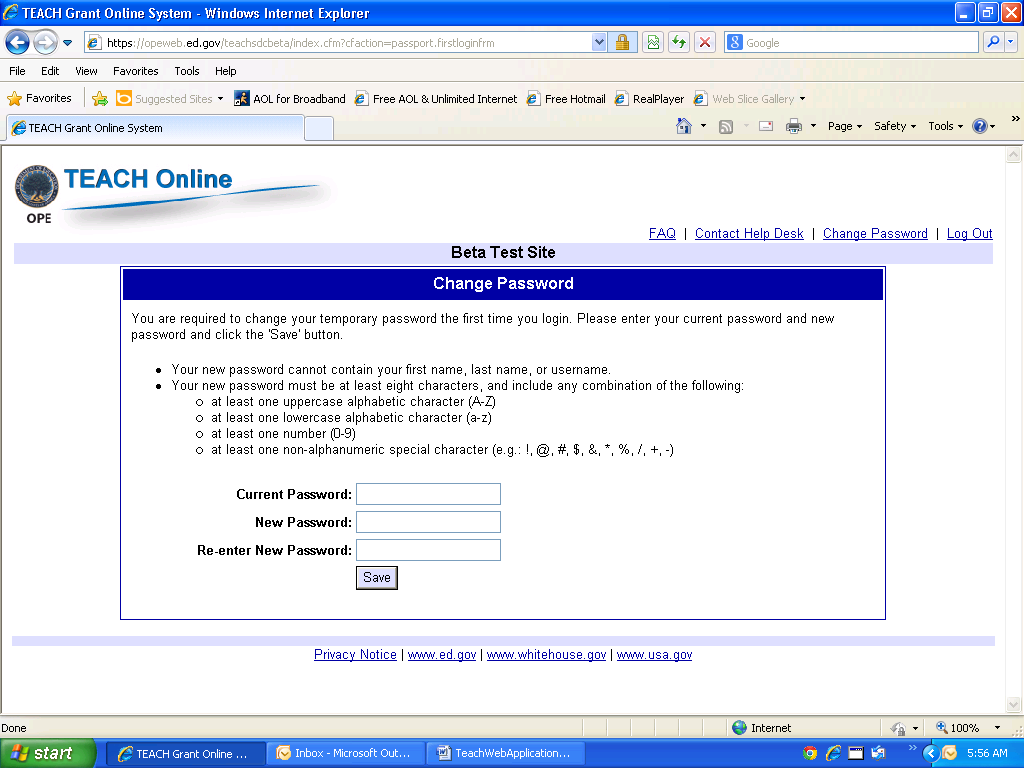
A user can begin the data collection process by logging in using the user id and temporary password provided via email. If this is the first time the user logs into the program, the First Time Login screen will display are requiring a change to the temporary password. The user must complete all information on this page and click the Submit button. The new password must meet all of the complexity rules – at least 8 characters and at least one upper case alpha, lower case alpha, number, and special character.
If the password is successfully changed, the login page will redisplay.
The Institution Confirmation page displays as follows:
The First Time Login page displays as follows:
2.3Forgot Password
Description
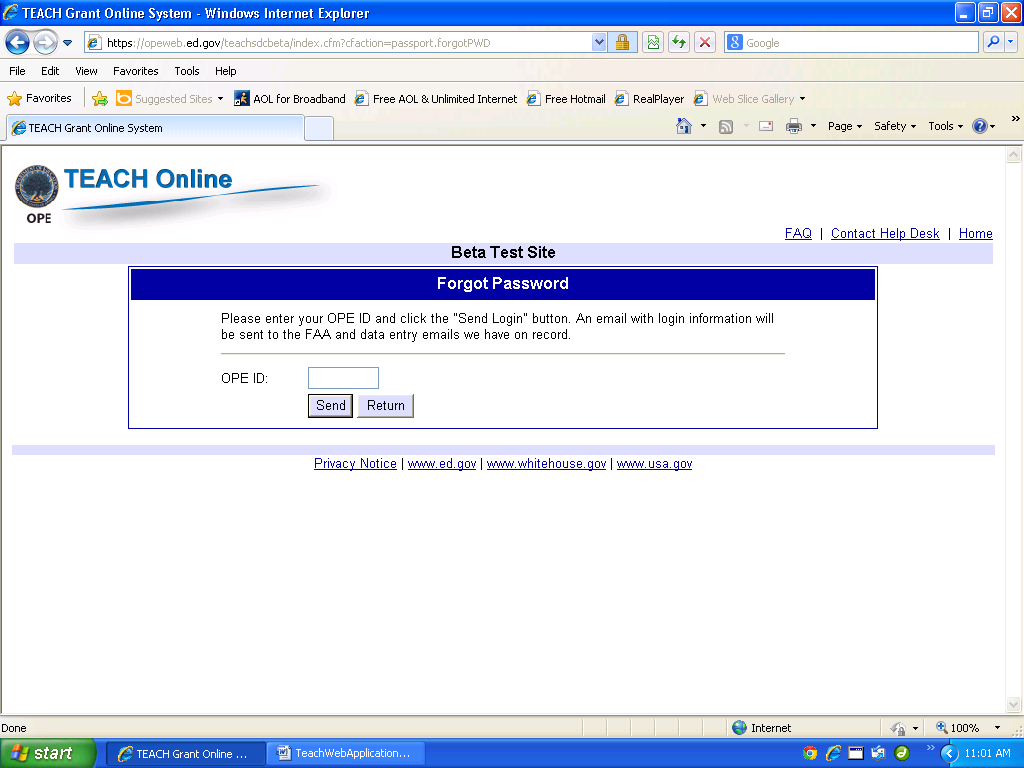
If the user has already registered but has forgotten the password, the Forgot Password page can be used to have the login information emailed. This page requires the OPE ID number and FAA’s email, first and last name to obtain a forgotten password. If the information provided matches the database records, the password is emailed to the FAA.
The Forgot Password page displays as follows:
2.4Successful Login
Description
The security Warning page displays after the user has logged into the system successfully. After clicking on the OK button, the user proceeds to the Institution Confirmation page.
The Warning page displays below:

Page Details
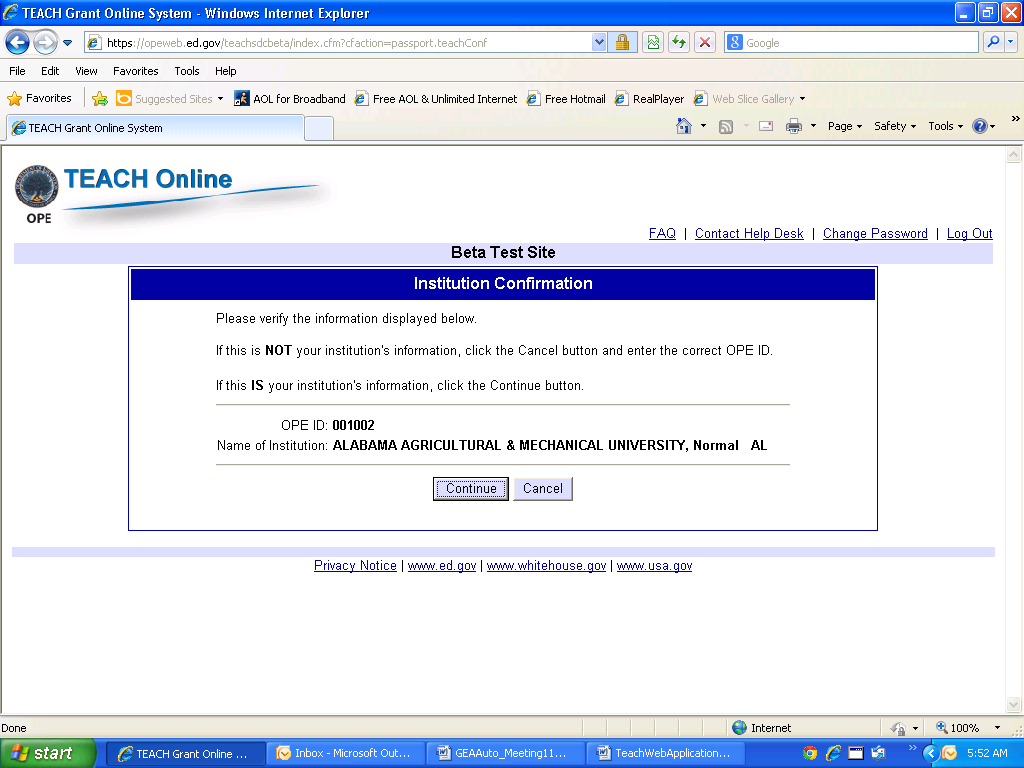
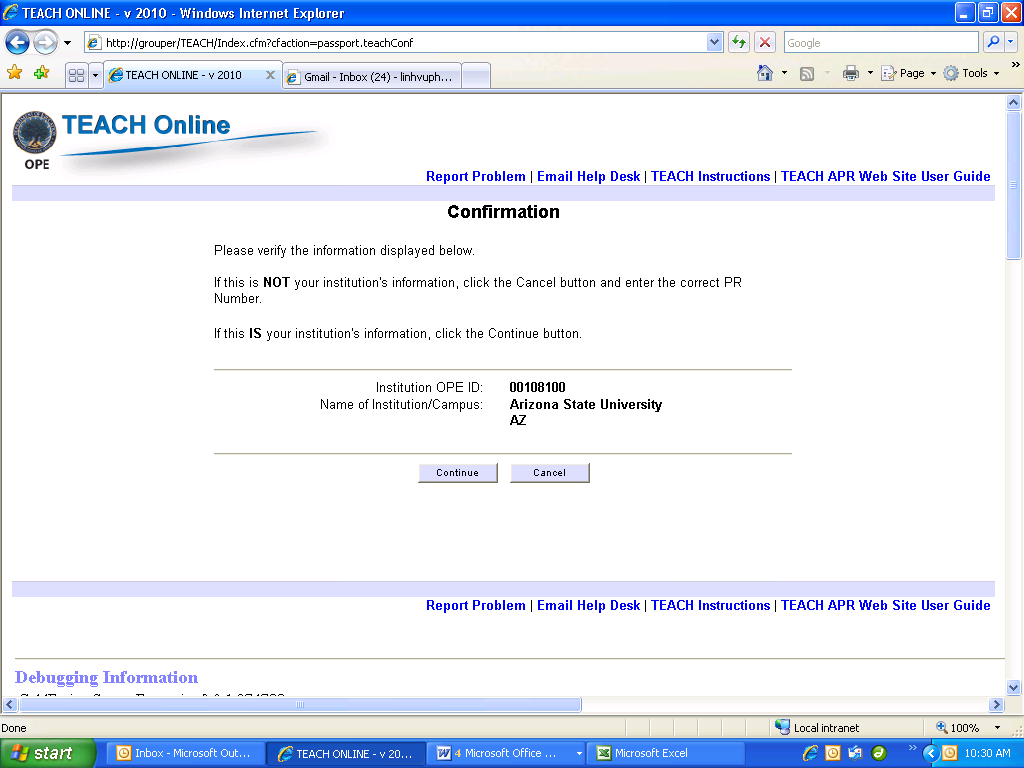
The user is next asked to verify the institution name and OPEID. This information is displayed from session variables. The user clicks the Continue button to begin their report.
The Confirmation page displays below:
Institution information from session variables is displayed at the top of every page after the user logins.
3Financial Aid Administrator and Data Entry Person Information
Description
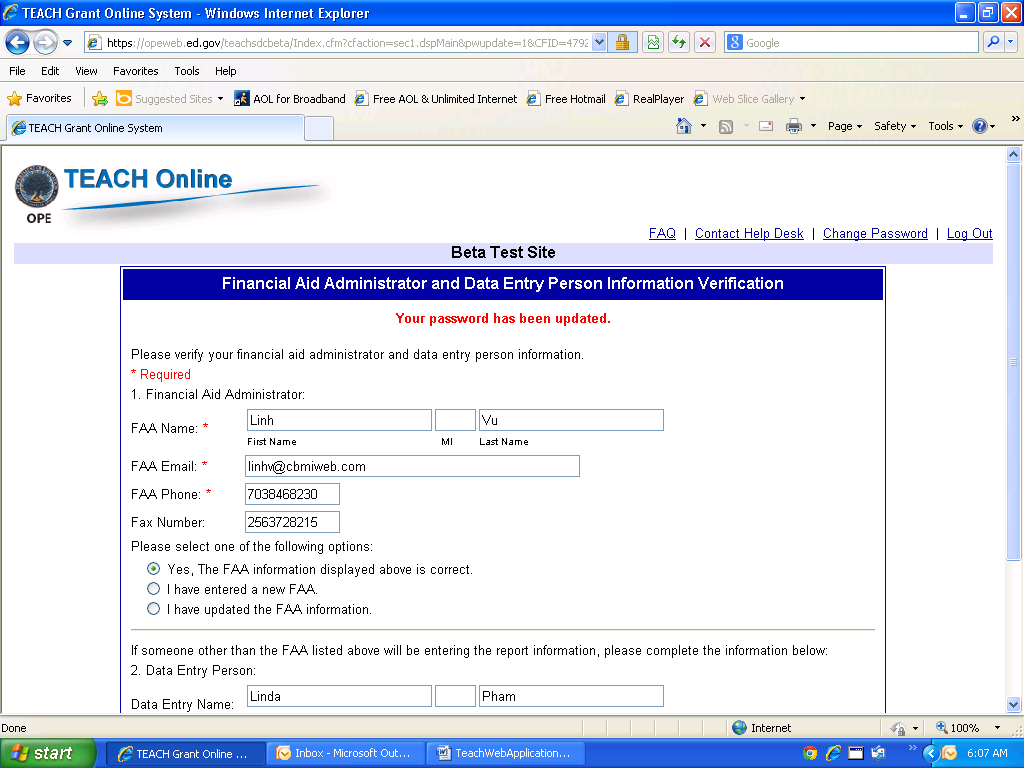
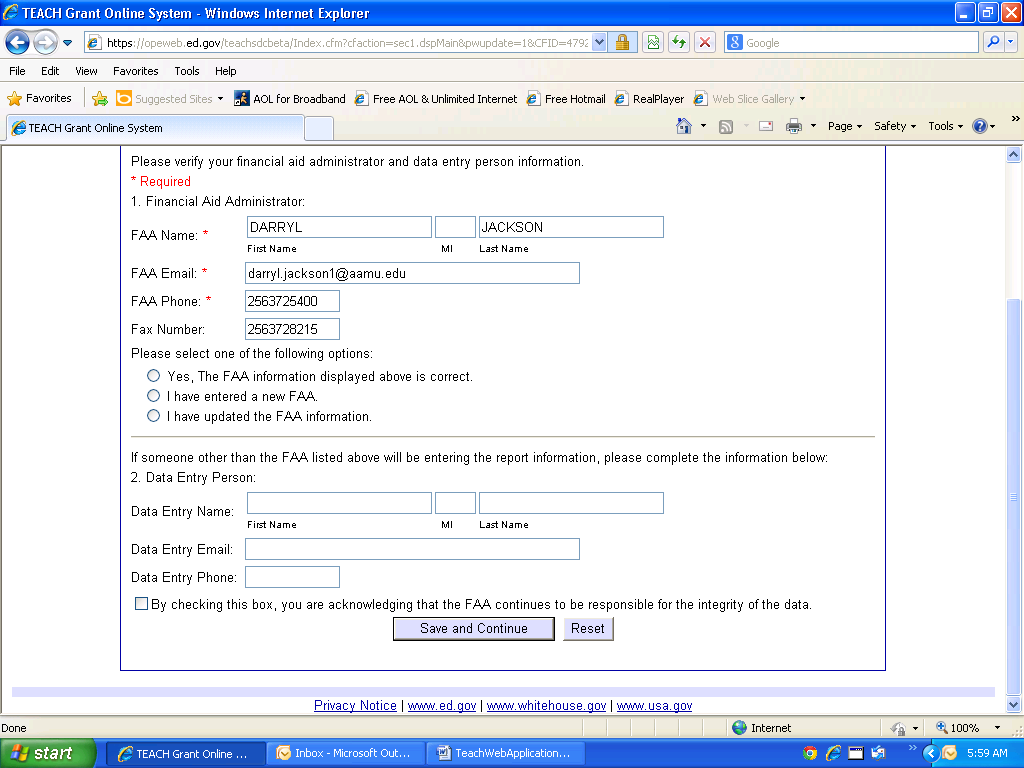
This page displays the FAA and the Data Entry Person and allows the user to update them. The fields are pre-populated from the database. Once data entry is complete, the user clicks on the Save and go to next step button.
The Update FAA page displays below:
4Recipient Update
4.1Main Page
Description
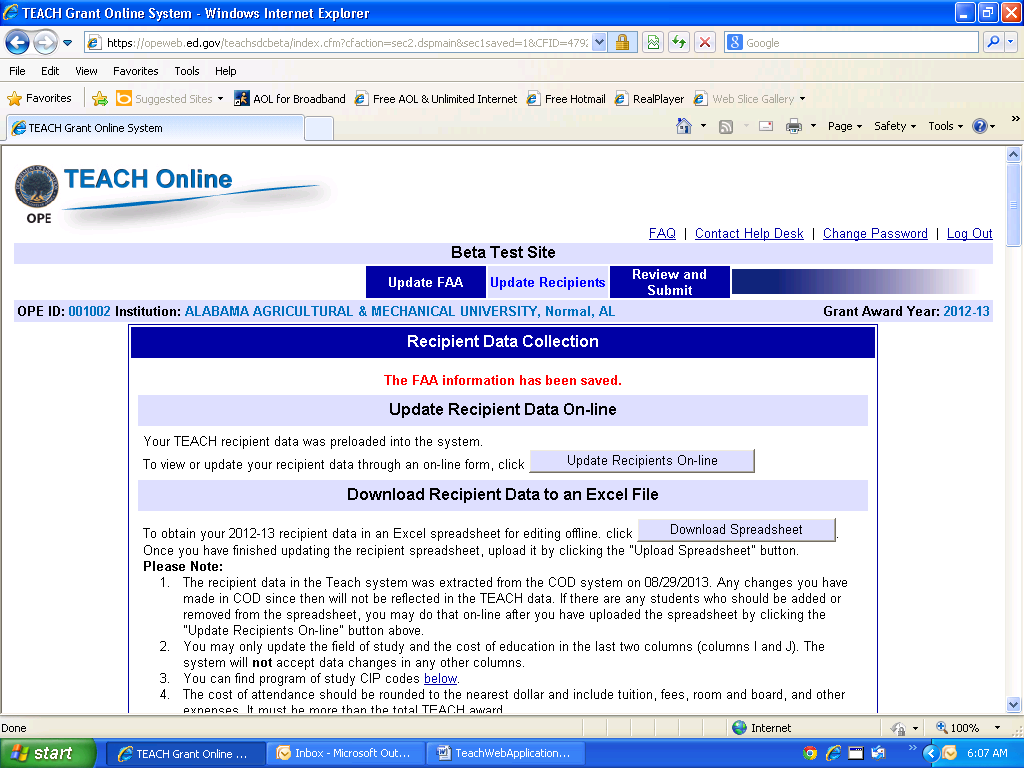
The Step 2 main page will display brief instructions for completing the TEACH data. The page provides a link for new users to start the recipient data collection process and options for returning users to continue reviewing recipient data or start a new process.
After the user clicks on the Recipient Update tab, the following screen displays:
Description
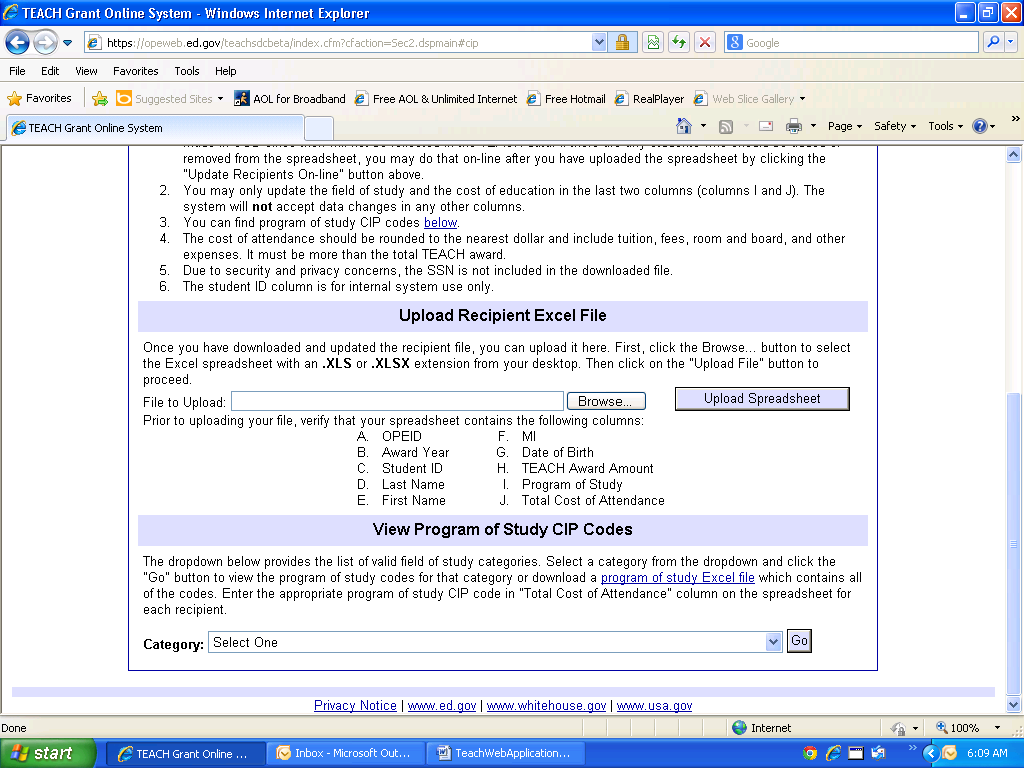
The Update Recipient Main page provides these options for starting the recipient data collection process:
Access the student data online through the web data entry form.
Download a spreadsheet of student data to an Excel file to enter the field of study and cost of attendance offline.
Upload a completed Excel file of student data.
Select a field of study code from the Category dropdown and click the Display Program of Study Code button. This page will redisplay with the CIP codes and program of study descriptions for the category to aid the user in entering student information.
When the user clicks the Download Data button, the following popup message displays:
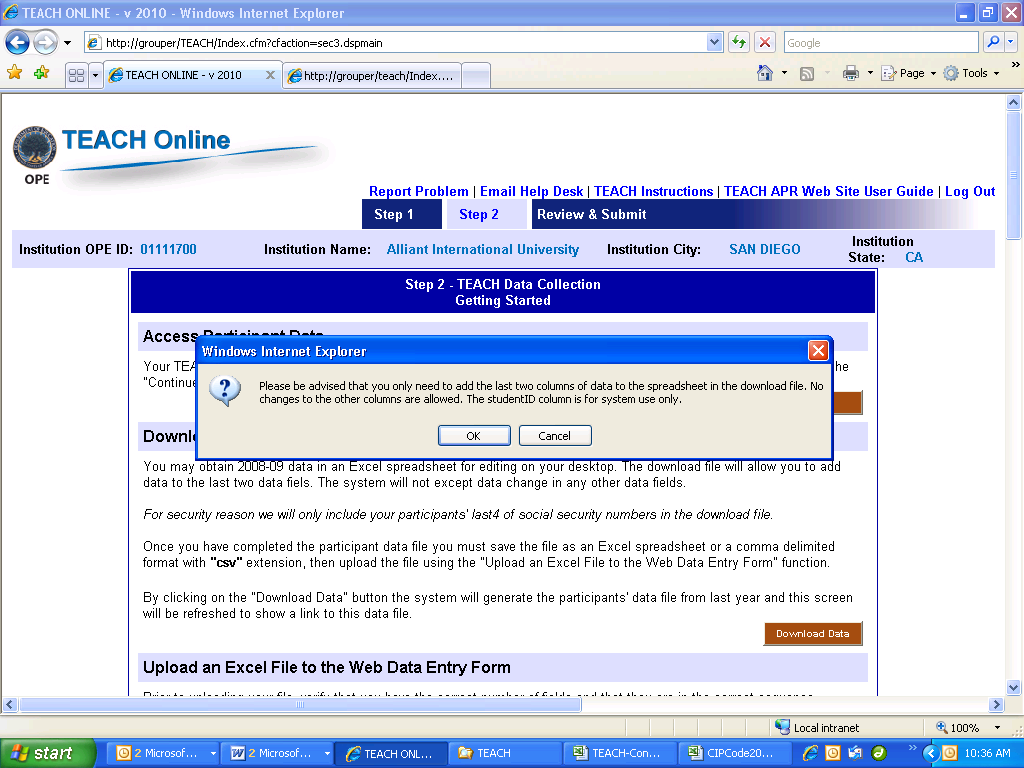
After the OK button is clicked, the student spreadsheet is generated and the screen redisplays with a link for the user to download the spreadsheet.
The Upload File function allows the user to upload the Excel spreadsheet after the user has finished entering the CIP code and the cost of attendance for each student. The user will click the Browse… button and select the file from their desktop and then click the Upload File button. When the button is clicked, the following pop-up message displays.
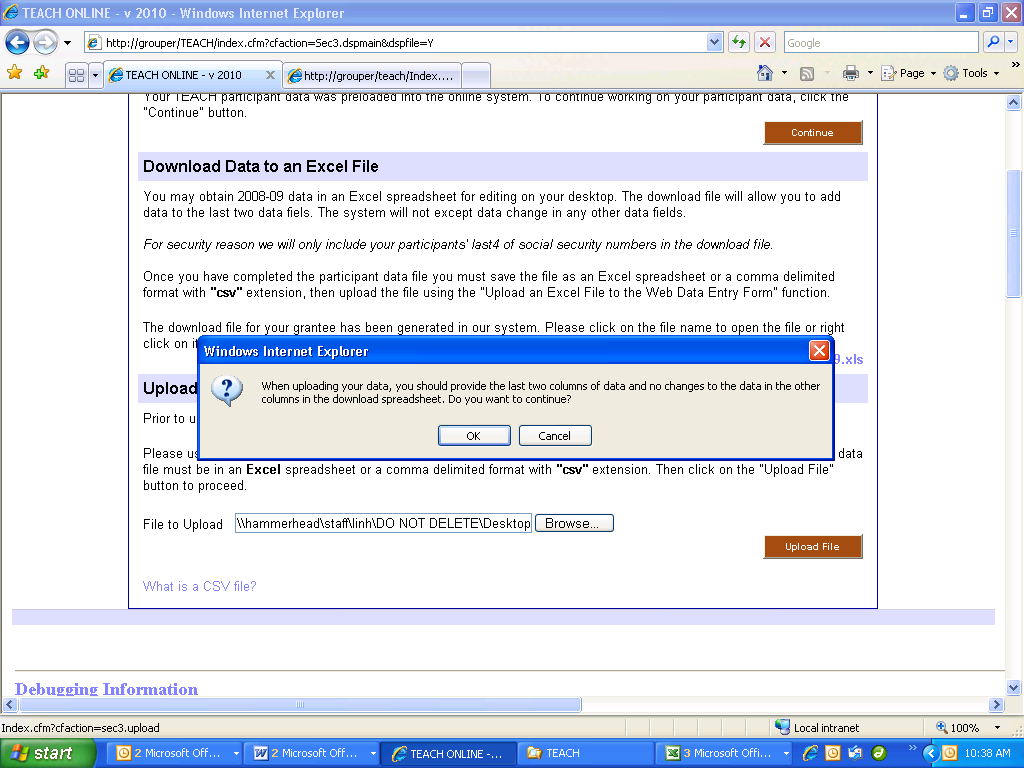
The file uploaded must have an .xls or .xlsx extension. The following edits are performed on the spreadsheet. If an error is found, an error page is displayed.
Spreadsheet Label |
Edit Check |
Error Message |
|
Blank File |
The data file you uploaded is blank. Please update the data file and try again."; |
|
No heading row |
The headings in your upload file cannot be read. Please update the data file and try again |
|
Wrong number of columns |
The upload file must have 11 columns of recipients data |
|
Wrong number of recipients |
Your institution has nn recipients, but there are nn recipient records in your upload file. |
|
Invalid Column Name |
|
Student ID |
Invalid Student ID |
|
Student Name |
Student ID Name mismatch |
|
OPEID |
Invalid OPEID |
The OPEID in your upload file is 000000. This is an invalid OPEID. |
Reporting Year |
Invalid Reporting Year |
TEACH on line system collects recipient data for reporting year |
Cost of Attendance |
Numeric Less than Award Amount |
You must enter a numeric value in field 7, Total cost of attendance for the year. Total cost of attendance cannot be less than the total TEACH award |
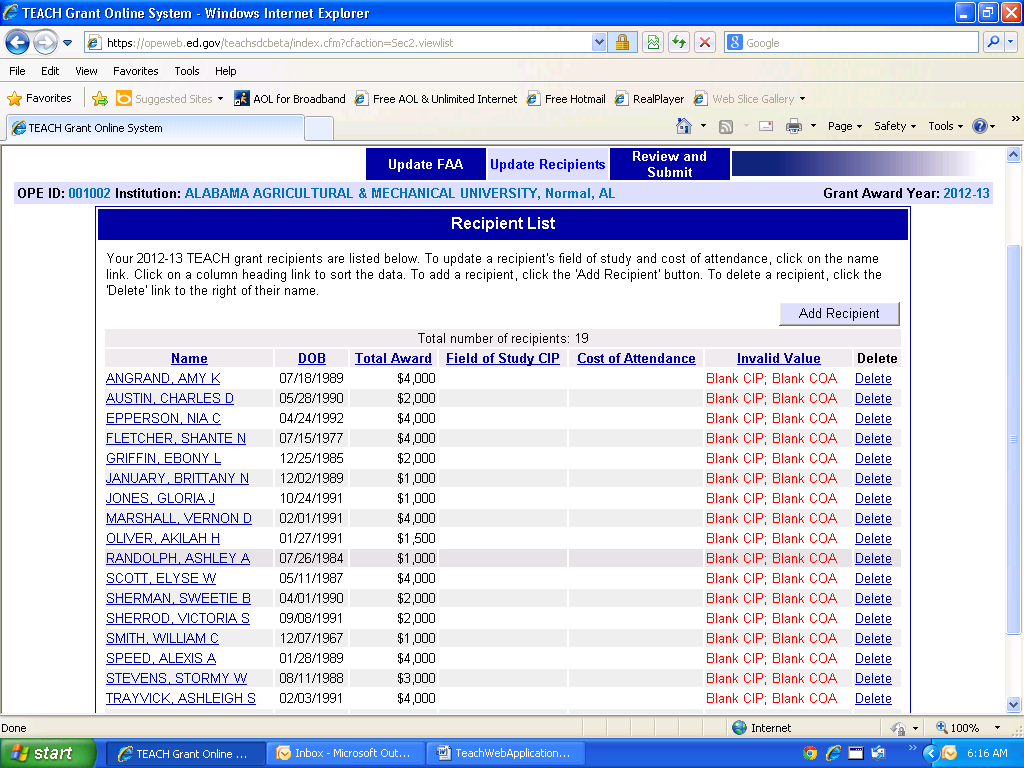
If there are no errors in the data, upon successfully uploading the file, the Table View screen is displayed, which allows the user to view the data and will also indicate all data errors that need to be fixed. See Section 4.2 for more information on the Table View screen.
4.2Update Recipient On-line Table View
Description
The Table View screen lists all the recipients for the institution with the Field of Study and Cost of Attendance entered on either the spreadsheet or the Web page. The total number of recipients displays. The recipient last name has a link to the update screen. The Invalid Format/Value Error column lists any fields that have errors in the format or value. The Data Validation Error column lists any fields that did not pass the cross-check validations. The Record Number column displays the record numbers from the spreadsheet uploaded, if any. The user must correct all the data errors displayed in the table before proceeding to the Review and Submit page to submit recipient data. The Table View page is sorted by data validation error, so all recipient records containing errors will be listed first. Users are able to sort by columns by clicking the link on the field headings.
The Student Table View page displays as follows:

![]()
4.3Recipient Information
Description
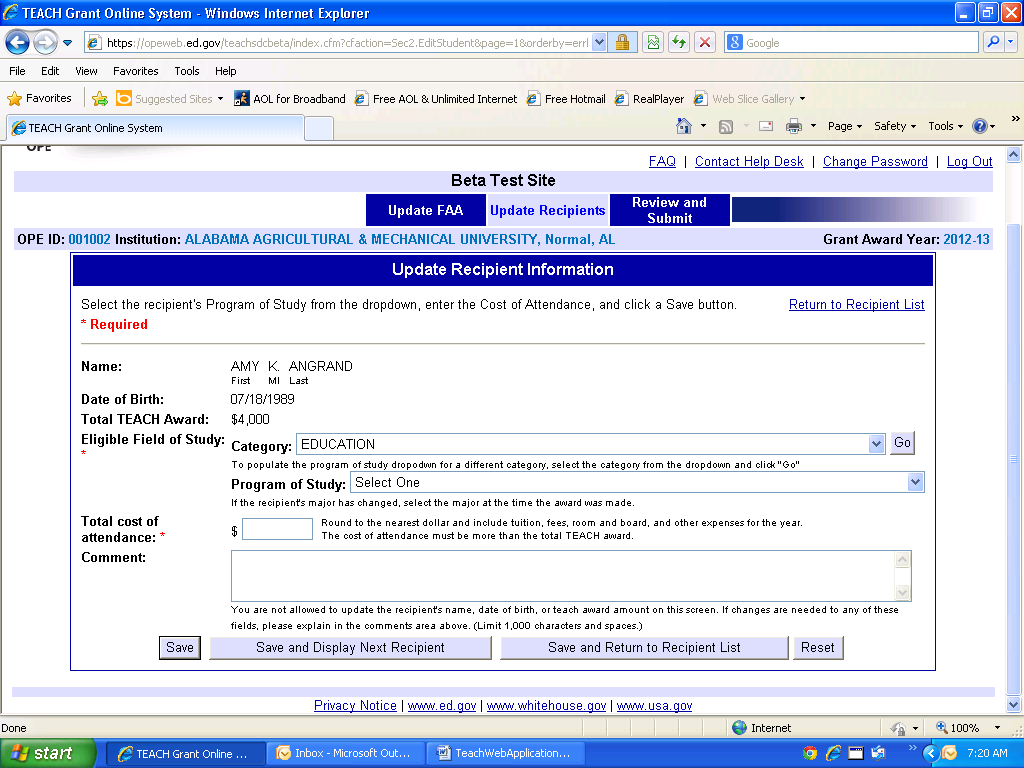
The Recipient Information page is used for entering the Field of Study and Cost of Attendance on-line. No other fields are updateable. The Field of Study Category defaults to ‘Education.’ The individual recipient data can be reviewed or edited one record at a time until all the data errors have been fixed. Data validation is enforced when the Save button is clicked. The Back to Table View button will take the user to the recipient list on the Table View page. A message will be displayed to save the recipient data before the page is redirected. The system provides instructions for certain fields in small popup windows. The user can display another recipient by clicking the Next or Prev links at the bottom of the table or by selecting a number from the page number dropdown list.
The Recipient Information page displays as follows:

5Review and Submit
Description
This
screen is used to submit the report. An "![]() "
below indicates that data entry is complete and all validation checks
have passed. Users will not be able to submit their information until
a Field of Study and a valid Cost of Attendance have been entered for
each recipient.
"
below indicates that data entry is complete and all validation checks
have passed. Users will not be able to submit their information until
a Field of Study and a valid Cost of Attendance have been entered for
each recipient.
Review
and Submit:
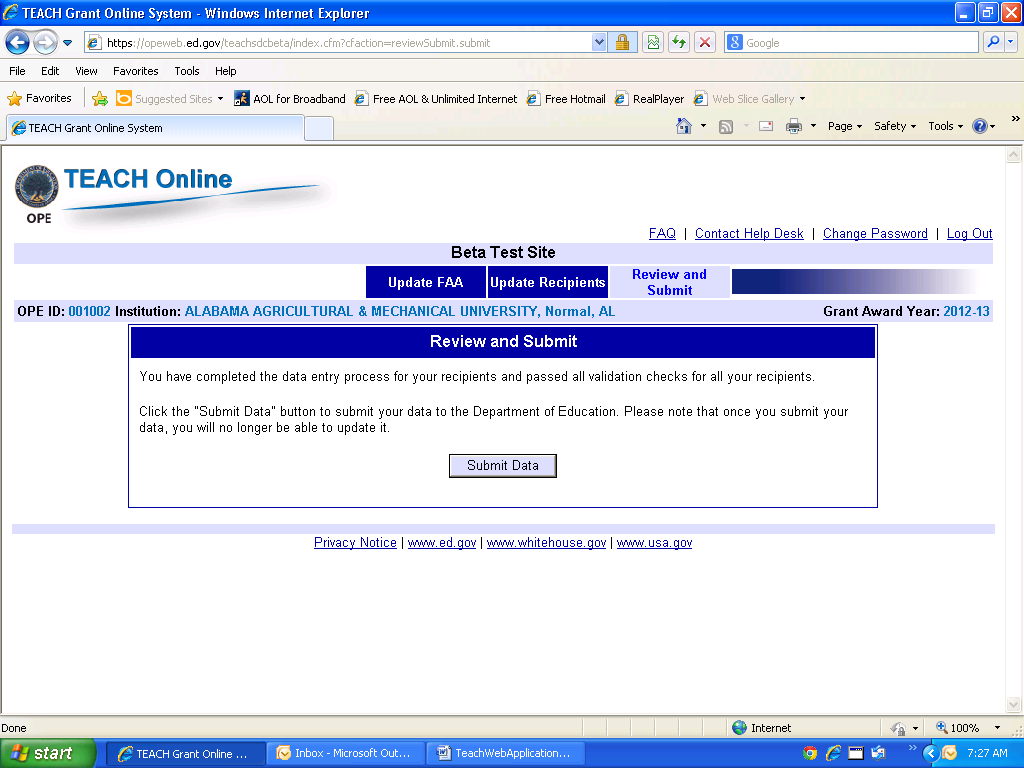
If there are no errors, a Submit button displays. The user can click this button to submit their report. When the report is submitted, a verification email will be sent to the FAA and the data entry person. All recipient records on the tblTempStudent table will be copied to the tblRecipient table.
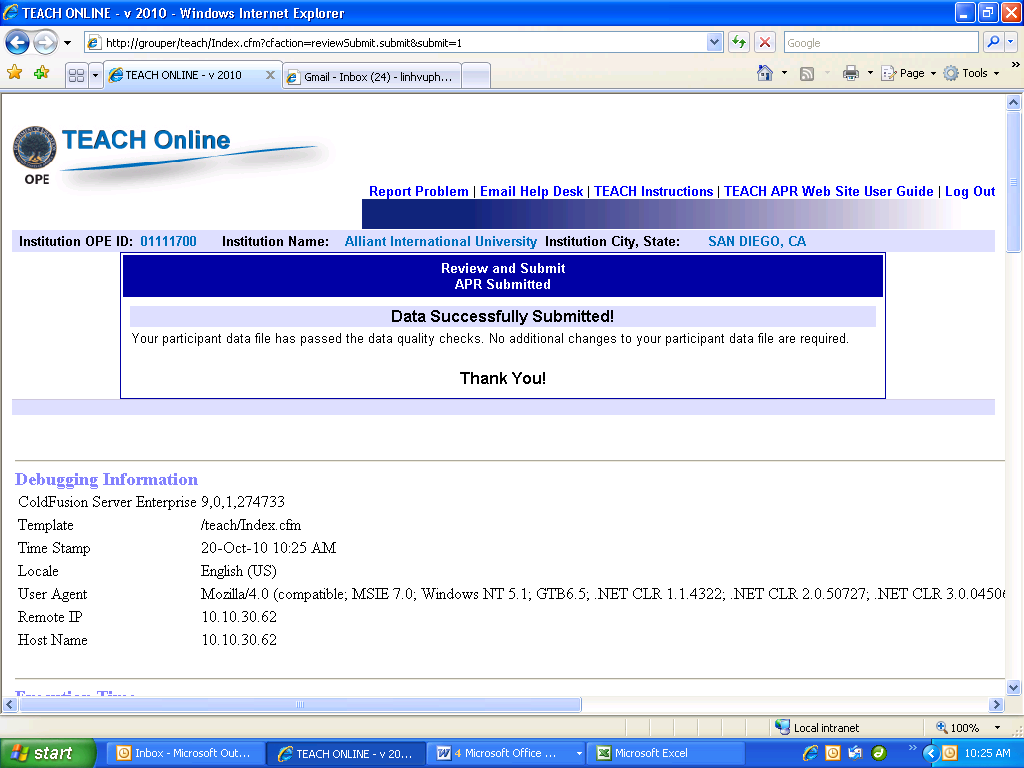
After the institution clicks the Submit button, the following screen will display:
| File Type | application/msword |
| File Title | TEACH Grant |
| Author | Linh |
| Last Modified By | Authorised User |
| File Modified | 2013-11-27 |
| File Created | 2013-11-27 |
© 2026 OMB.report | Privacy Policy
