Research, Education, and Extension Project online reporting tool (REEport)
Research, Education, and Extension project online reporting tool (REEport)
REEport User Manual (7-8-14)
Research, Education, and Extension Project online reporting tool (REEport)
OMB: 0524-0048

Table of Contents
General Workflow, Submission and Approval Processes 11
Requirements & Due Dates for all Project Types 13
NIFA Capacity Funded Projects 13
NIFA Non-Capacity Funded Projects (Including Competitive Grants) 14
Summary Chart of Due Dates for Capacity & Non-Capacity Projects 15
Getting Started: “I Need to Use REEport – Where do I go?” 17
Instructions for Site Administrators at LGUs 18
Logging In – First Time User Verification Process 18
Logging In – Returning Site Admins 21
What to do when you are asked to “Claim” a Non-Capacity Project 32
Finding, Editing, & Managing Projects 34
How to Submit Projects & Reports 35
Instructions for Project Directors & Other User Roles at LGUs 48
Logging In – First Time User Verification Process 48
Logging In – Returning Users 51
Finding, Editing, & Managing Projects 54
How to Submit Projects & Reports 55
Instructions for Independent Grantees (Not Part of an LGU) 68
Logging In to REEport for the First Time 68
Logging In – Returning Users 71
Finding, Editing, & Managing Projects 74
Due Dates for Submitting Reports 75
How to Submit Projects & Reports 76
Extensions & Continuation Awards 84
Making Changes to an Active Project 85
Submitting the Federal Financial Report (SF-425) 85
Submitting a Project Initiation – Data Content & Instructions 86
Non-Capacity Project Initiation 86
Capacity Project Initiation – Create a New Project 87
Helpful Hints for Entering Project Data: 88
Assurance Statements (Capacity Only) 111
First Level – Submit for Review 113
Second Level – Submit to NIFA 114
Submitting a Progress Report – Data Content & Instructions 117
Helpful Hints for Entering Progress Report Data 117
How to Submit a Progress Report 129
Submitting Project Changes (Capacity Projects Only) 131
Folder View Definitions & Workflow 131
Submitting a Final Report – Data Content & Instructions 136
Important Reporting Requirements on Final Reports 136
Helpful Hints for Entering Final Report Data 137
How to Submit a Final Report/Terminate a Project 137
Additional Training Resources 141
Technical Support & Information Services 142
Data Queries and Reporting 142
Paperwork Reduction Act – Statement of Public Burden
According to the Paperwork Reduction Act of 1995, an agency may not conduct or sponsor, and a person is not required to respond to a collection of information unless it displays a valid OMB control number. The valid OMB control number for this information collection is pending OMB approval. The time required to complete this information collection is estimated to average 4.6 hours for project initiation, 1.4 hours for financial report, 1.7 hours for progress report, and 1.7 hours for final report. These time estimates include the time spent reviewing instructions, searching existing data sources, gathering and maintaining the data needed, and completing and reviewing the collection of information.
Introduction
What is REEport?
REEport (Research, Education, and Extension project online reporting tool) is NIFA’s singular non-capacity grant (including competitive) and capacity grant project reporting system, building on and replacing the existing Current Research Information System (CRIS) web forms system (OMB Control Number: 0524-0042).
To skip to the “Getting Started/How To” sections of this manual, click here.
The United States Department of Agriculture (USDA), National Institute of Food and Agriculture (NIFA) administers several competitive, peer-reviewed research, education, and extension programs, under which awards of a high-priority are made. These programs are authorized pursuant to the authorities contained in the National Agricultural Research, Extension, and Teaching Policy Act of 1977, as amended (7 U.S.C. 3101 et seq.); the Smith-Lever Act (7 U.S.C. 341 et seq.); and other legislative authorities. NIFA also administers several capacity funded research programs. The programs are authorized pursuant to the authorities contained in the McIntire-Stennis Cooperative Forestry Research Act of October 10, 1962 (16 U.S.C. 582a-1-582a-7); the Hatch Act of 1887, as amended (7 U.S.C. 361a-361i); Section 1445 of Public Law 95-113, the Food and Agriculture Act of 1977, as amended (7 U.S.C. 3222); and Section 1433 of Subtitle E (Sections 1429-1439), Title XIV of Public Law 95-113, as amended (7 U.S.C. 3191-3201). Each capacity funded program is subject to a set of administrative requirements as set in the Administrative Manual for the McIntire-Stennis Cooperative Forestry Research Program; the Administrative Manual for the Hatch Research Program; the Administrative Manual for the Evans-Allen Cooperative Agricultural Research Program; and the Administrative Manual for the Continuing Animal Health and Disease Research Program.
Pursuant to the requirements established in 7 CFR Parts 3400 through 3430 pertaining to the aforementioned authorities, REEport is the vehicle through which NIFA performs its required data collection for research project initiation and progress reporting. This information collection is necessary in order to provide descriptive information regarding individual research, education, extension, and integrated activities and to document expenditures and staff support, as well as monitor the progress and impact of such activities.
Background
The primary objective in the development of the REEport data collection system was to take all the current technical capabilities of the CRIS Webforms System (which was previously run by the University of Vermont) and center them into a NIFA-run system that was physically housed on USDA/NIFA servers and monitored and kept up-to-date by NIFA Staff. In addition, the system was designed to expand upon the CRIS Webforms capabilities by allowing for an all-electronic workflow. Previously, although Site administrators and Project Investigators were able to enter and send their information to NIFA electronically, the electronic workflow stopped there. NIFA staff was then required to use a paper process to distribute projects proposals to National Program leaders for their review and decisions on project proposals (capacity only). Thus, REEport implementation marks the ability of NIFA staff to receive, distribute, and return to Site Admins/Project Directors (PDs) all research project data and associated approvals electronically. As part of this electronic workflow process, NIFA took great care to ensure a robust notification system that allows all persons connected to a project (Site Admin, Project Director, National Program Leader, NIFA Administrative Staff, other Site Administrative Staff) to receive automatic email notifications relevant to their involvement in the project approval and project progress monitoring process.
An additional factor in the designing and format of REEport was the Research Performance Progress Report (RPPR). The RPPR resulted from an initiative of the Research Business Models (RBM) Subcommittee of the Committee on Science (CoS), a committee of the National Science and Technology Council (NSTC). It is a new uniform format for reporting performance progress on Federally-funded research projects. Upon full implementation, the RPPR will be required to be used by agencies that support research and research-related activities for use in submission of interim progress reports. It is intended to replace other interim performance reporting formats currently in use by agencies. In anticipation of the RPPR’s implementation, NIFA based REEport’s format on the RPPR.
Benefits
As part of REEport’s implementation, NIFA transferred existing data in CRIS to REEport and then terminated the applicable component of CRIS. For the existing projects that reported to CRIS, the awardees began reporting to REEport. This transfer of data provided a seamless transition for awardees who had previously been using CRIS webforms and eliminated the need for them to re-enter any previously entered or approved project data.
REEport better addresses NIFA accountability and reporting needs by supporting limited use of program-specific data fields and the ability to upload documents such as portable document files (PDF) into reports.
With the implementation of REEport, NIFA formally eliminated the requirement to submit an annual Financial Report (old form AD-419) for non-capacity grants (Annual Financial Report data is still be required for capacity grant projects).
Pre-planned improvements to REEport include the ability to allow Hatch and Evans-Allen projects to be linked to planned programs in the Agricultural, Research, Extension and Education Reform Act of 1988 (AREERA) Plan of Work Information System, which will simplify the preparation of State Annual Reports. Each Hatch and Evans-Allen project in REEport will be linked to a Planned Program in the Plan of Work. Once this link is made, expenditures, FTEs, and possibly Knowledge Area Classifications can then roll up into the Plan of Work system, thus eliminating points of double reporting and discrepancies between the two systems.
Implementation of REEport facilitates the transition to the Research, Education, and Economics Information System (REEIS) as the primary source of information on the research, education and extension programs, projects and activities of the USDA and its partner institutions currently hosted by the CRIS system, including REEIS’ Leadership Management Dashboard.
For more up-to-date information on REEport, please visit the REEport Webpage on the NIFA website at: http://www.nifa.usda.gov/business/reeport_imp.html
The webpage includes software development updates, newsletters, reporting/data links, and other current information. NIFA also sends out newsletters and pertinent information via the REEportDeploy Lyris email list, which has been created from the CRIS and Plan of Work contacts lists. Interested parties may subscribe to the list by sending an e-mail message to [email protected] (skip the subject line and type subscribe REEportDeploy in the body of your message; be sure you receive an e-mail confirming your subscription).
Who uses REEport?
REEport is NIFA’s singular grant reporting system and is used by any person who receives funding through NIFA capacity grants or non-capacity research, extension, or education grants or state funded agricultural research grants. It is also used by administrative, financial, and other support personnel who manage the capacity and non-capacity projects at their universities or independent organizations.
This User Manual is intended to inform and instruct any person who is currently a REEport user or who has the potential to become one based on whether they or their associated institution is a grantee of a capacity or non-capacity grant from NIFA, if they are a grantee of another type of USDA funding, or if they are the grantee of state funding. To skip to the “Getting Started/How To” sections of this manual, click here.
The following is a list of those who might be considered a “REEport User”:
NIFA Non-Capacity (including competitive) Grantee
NIFA Capacity Grantee
State Funding Grantee
LGU Institution Site Administrator
Other Cooperating Institution (OCI) Project Director or Site Administrator (OCI=non-LGU College/University, private company/business, etc.)
A user in REEport is assigned one of five specific “roles.” Each role has a set list of permission, or “things they can do” in the system. The following table summarizes the roles and permissions:
Role Name |
Permissions in REEport |
Site Administrator |
|
Assistant Site Administrator |
|
Project Director (Often referred to as the PI, or “Principle Investigator”) |
|
Admin Support |
|
Reviewer |
|
Modules in REEport
Upon official deployment of REEport in 2012, there are three report types, supported by the software: Project Initiation, Progress Report, and Final Termination Report. These report types are housed in “modules,” which are sections in REEport where the reports are created, edited, and submitted. A fourth module is also available, called “Project Changes.” This module does not produce a report type, but it is a place where electronic changes to various data fields of an existing project may be edited. A fifth report type and module, Financial Report, is currently in development. Together, these five modules (resulting in four report types) support the federally required collection of research project data and associated progress, financial and impact/results reporting. These modules/reports are based on the forms previously used in the CRIS Webforms collection, known as the AD-416, AD-417, AD-419 and AD-421:
Project Initiation (combination of old AD-416/417)
Progress Report (old AD-421)
Financial Report (old AD-419)
Project Change (new change form not previously used in Webforms)
Final Termination Report (old AD-421)
(Note: the AD-421 was the exact same form used for both the progress report and final termination report; they are differentiated in REEport with separate names.)
What does NIFA mean by “module”?
Each
“module” can be thought of as a “type of report”
in REEport. A module in REEport is a section of the software that
is composed of multiple sub-sections or “screens” that
will walk you through the data fields that you must fill in before
submitting that particular “report type.” Example:
If you are in the “Project Initiation” section of
REEport, then you are entering data on various screens in order to
submit the “Project Initiation” form at the end of the
section. Thus, when you come to the end of the Project Initiation
section in REEport and you’ve entered all your data, you will
click “submit” in order to send your Project Initiation
Report/Form to the next stage.

Definitions of Modules
Project Initiation
The Project Initiation section in REEport takes the place of the old AD-416 and AD-417 Forms used in the CRIS Webforms system. For NIFA funded grantees, certain fields on the Project Initiation Form are pre-populated with information about the project based on what their Site Administrator has set up for them and/or based on data pulled from CREEMS (award data for non-capacity projects). This module is intended to gather all relevant research project proposal data for NIFA review. The information entered must be sufficient to explain the objectives of the project and how results will be achieved. Upon submission, the project initiation report from this module is routed electronically to a NIFA National Program Leader (NPL) for review. The NPL makes the decision to approve, defer, or decline the project.
Progress Report
The Progress Report section in REEport takes the place of the old AD-421 Form used in the CRIS Webforms system. This module is used to provide annual updates on the progress made for both capacity and non-capacity projects. Note that the REEport system forces you to submit all progress reports in sequential order. That means that the system only creates one Progress Report “shell” at time for a given project. It is only once you fill out that form (i.e. “shell”) and submit it that the next Progress Reporting “shell” for the next reporting period gets created by the system, and so on and so forth until all progress reports are submitted for the life of the project. Note that the final year of any project will not have a progress report. Rather, it will have a “Final Report” in which you will report major accomplishments and associated data for the DURATION of the project (see Final Report definition below).
A new feature of the Progress Report that differs from the AD-421 format is the reporting of Full Time Equivalents (FTEs; these used to be reported as part of the AD-419). In the Project Initiation module of any project, you are asked to ESTIMATE the total number of FTEs that will support the project over the DURATION of the project. In subsequent Progress Reports for that project, you will need to report the ACTUAL number of FTEs that supported the project just for that reporting period only. See the detailed instructions section of this manual for how to report FTEs; also, consult the help text in the REEport system.
Financial Report
The Financial Report section in REEport takes the place of the old AD-419 Form used in the CRIS Webforms system. Note that the implementation of REEport marks an official policy change of no longer requiring non-capacity grantees to report expenditures as do capacity grantees (to learn what a non-capacity grantee should submit for their financial report, click here). The only REEport users who need to submit Financial Reports are those who are grantees of any of the capacity research funds: Hatch, Hatch Multistate; Evans Allen, Animal Health, and McIntire Stennis, and Renewable Resources Extension. (Note: As of the first deployment of REEport, the Financial Report module has not yet been developed.)
Project Change
The Project Change section in REEport is used to make changes to Projects that are already in “Active” status. Some project changes require NIFA approval, and others do not. If a project does not require approval, a PD or Site Administrator is able to use this module to make their desired changes and click submit to make the changes permanent. If the project does require NIFA approval, the PD or SA must submit changes to NIFA and await NIFA approval before the changes become permanent. The Project Changes module also allows PDs and SAs to view the history of changes to a project at any time (a collection of all the changes that have been made to the project over its duration).
Final Report
The Final Termination Report section in REEport takes the place of the old AD-421 form used in the CRIS Webforms system. You will note that in the CRIS Webforms system, the exact same form, AD-421, was used for both Progress Reports and Termination Reports. In REEport, these two report types are differentiated by title and section in the software. While submission of a Progress Report provides required progress data, it does not change the status of the project; submission of a Final Report is what triggers the status of a project to change from “active” to “completed” (i.e. “terminated”).
Users will notice that the Final Report follows the exact same format as the Progress Report. However, there is a major difference that is extremely important to remember: The Final Report is a report pertaining to the DURATION of the project, not just a reporting period, which is what is covered by each of the previously submitted Progress Reports.
Example: A 3 year project runs from 10/12 through 9/15. There will be two progress reports submitted: one covering the reporting period from 10/12-9/13 and one covering the reporting period from 10/13-9/14. After those two Progress Reports have been submitted, a Final Report will be submitted that covers the entire 3 year project duration from 10/12-9/15. Thus, there will be no Progress Report for the period 10/14-9/15.
IMPORTANT NOTE: There is one major exception to the above rule on reporting against project duration – that is how you report FTEs. When reporting ACTUAL FTEs in the Final Report, you must report only FTEs that supported the starting from the most previously submitted Progress Report to the submission of the Final Report (i.e. a “reporting period’s” worth and not the project duration’s worth). In the above example, the FTEs you would report in the Final Report would cover the period from 10/14-9/15.
Policy Note: Final Reports must be submitted by all capacity and non-capacity grantees. Failure to submit this report may result in the PD being suspended from receiving any future grants from NIFA until the report has been submitted.
General Workflow, Submission and Approval Processes
REEport is designed as a singular reporting system that electronically manages all stages of non-capacity and capacity projects, from project initiation, to approval (applicable to capacity projects only), to termination. Within the life of any project, the system also manages the electronic workflow of making changes and resubmitting for approvals, sending documents back between organizations (to add information or correct mistakes) and storing copies of all versions of any project. At any point in time, depending on user role privileges, Project Directors, Site Admins, or NIFA personnel may use the system to view electronic data fields.
Generally speaking, all REEport documents follow this basic workflow:

Draft
> Submit for Review (at institution level)
> Submit to NIFA
> Project Status Changes per NIFA Decision
When thinking about the life of a project (not document level, as above), you can think of the workflow always beginning at project initiation and ending with project termination, as depicted below. Remember that the life of a project includes all the various reports/documents that are submitted into the system as part of a project’s requirements (capacity and non-capacity are differentiated below where applicable).
Project
Initiation Draft
>
Submit for Review at Institution Level
>
Submit to NIFA for Review
>
NIFA Decision Made (capacity only)
>
NIFA Decision Changes Project Status (Draft to
Active/Deferred/Declined)
Progress
Report Draft(s) filled out and submitted chronologically (as many as
required by length of the project)
>
Submit for Review at Institution Level
>
Submit to NIFA for Review
>
Project Status remains “active” throughout submission of
all progress reports
Project
Changes may be submitted at any time for an active project
(non-capacity
can only make classification changes)
>
Submit for Review at Institution Level
>
Submit to NIFA for Review
>
Project Status remains “active” throughout submission of
all project changes
Final
Report Draft is always available in REEport to submit at any time to
terminate the project (capacity only)
>
Submit for Review at Institution Level
>
Submit to NIFA for Review
>
Project Status changes to “complete” once Final Report
is submitted
(Note
that project status will also change to “complete” if
the project’s original end date has passed, even if the Final
Report has not been submitted and is overdue.)


Note that in the above diagram, the workflow basically repeats itself for a project that is in active status (both capacity and non-capacity); associated progress reports, project changes and the final report for an active project go through the same workflow and approval process.
It’s important to remember that the actual workflow at each institution and for each project varies based on the user roles, the project type, and privileges that have been set up. If you are a project director (PD) who is part of a NIFA partner institution (LGU) then you have a Site Admin that is in control of setting user privileges, such as the “submit to NIFA” capability. Make sure that all documents you submit for review at your institution level are actually submitted to NIFA in a timely manner. You should always follow through with your SA and ensure that your document is submitted officially submitted to NIFA. As a PD on a project, you will also receive email notifications from the REEport system alerting you when a major action has been taken on your project. Example: If you do not have submit-to-NIFA privileges, you will still receive an auto-email from REEport alerting you when your project has been submitted. You will also receive an email when a decision (approve, decline, defer) has been made on your project (capacity only).
Requirements & Due Dates for all Project Types
NIFA Capacity Funded Projects
A NIFA capacity funded project is any research project funded by one of the following five capacity funding lines:
Hatch (1862 LGUs only)
Hatch Multistate (1862 LGUs only)
Evans-Allen (1890 LGUs only)
McIntire-Stennis
Animal Health
Renewable Resources Extension
For capacity funded research, Project Initiation needs to be completed by any LGU Project Directors (PD) who has been granted authority by their parent LGU to use a portion of its (the institution’s) allocated capacity dollars (Hatch, Hatch Multistate, Evans Allen, McIntire Stennis, Animal Health, or Renewable Resources Extension) to perform approved research. The PD (or designated staff member; in some cases the institution allows the Site Administrator to input data on behalf the PDs) must complete Project Initiation in order to gain approval by NIFA to begin the research and to spend capacity dollars on that particular project.
Requirements and Due Dates:
Project Initiation
May be submitted at any time. Upon deployment of REEport, NIFA’s policy is that all capacity projects are reported on following the federal fiscal year. Thus, the overall reporting period for each progress report and final report must follow the federal fiscal year (FY).
Example: A project initiation is submitted and approved in February of 2012; the first progress report will cover the reporting period of February 2012 through September 2012 (end of FY) and will be due March 1, 2013 (see details below).
Progress Report
Due by March 1 annually for each reporting year of the project but may be submitted within 90 days leading up to March 1. Per the policy change noted above, capacity reporting must follow the federal fiscal year, so each Progress Report covers one federal fiscal year (or a portion thereof depending on the start date of the project).
If the project begins in the midst of the federal fiscal year, the progress reported on in the first Progress Report is the start of the project through the remainder of the federal fiscal year. All subsequent Progress Reports cover each full federal fiscal year.
NOTE: REEport works by automatically creating a Progress Report “shell” for any capacity project that was “approved” and obtained active status in a given fiscal year. This applies even if the project was only active for a short period of time. For example, a project that was approved and active only from 9/1/2013 through 9/30/2013 will have a Progress Report shell created for it and “due” by March 1, 2014. In theory, the progress report would be a report on only one month’s worth of work. At this time, NIFA does still require that PDs submit these reports. NIFA recognizes that such a short period of time may result in there being nothing to report. That is acceptable, and the PD should state “nothing to report” in any text fields which require text or utilize the “nothing to report” checkboxes if available.
Each subsequent year’s “shell” is created upon submission of the previous year’s Progress Report, so the first “real” report of progress in this scenario would come with the second Progress Report, due March 1, 2015.
Financial Report
Due by March 1 for each year of the project. Note that this is a policy change from the former AD-419’s, which were due via CRIS Webforms on February 1 each year.
Final Report
Due by March 1 on the final year of the project. The Final Report may also be submitted at any time during the life of project in order to terminate that project. However, it is important to note that the system will only accept the submission of the Final Report if the date of submission is within 90 days prior to the current end date listed on the active project. If a PD or SA wishes to submit a Final Report earlier than 90 days prior to the end date of the project, then they must submit a “Project Change” to change the end date of the project so that the proper 90 day window is created in relation to the day they want to submit the Final Report. To learn how to submit a project change, click here.
NIFA Non-Capacity Funded Projects (Including Competitive Grants)
A NIFA non-capacity funded project is any research project funded by a non-capacity funding line or competitive grant that has been awarded to a grantee through the grants.gov application and approval process. Once a non-capacity grant has been awarded, the grantee is notified by a NIFA Program Specialist or National Program Leader that they must use REEport to complete project initiation and subsequent progress and final reports.
In FY2012, NIFA instituted a Policy change: non-capacity grantees are no longer required to complete yearly Financial Reports (the old AD-419s). Thus, a non-capacity grantee only uses REEport for Project Initiation, Progress Reports, and Final Reports. The Federal Financial Report, the SF-425 must still be submitted to the Office of Grants and Financial Management; this is due annually based on the start date of the project. The SF-425 is sent as a PDF via email to the Awards Management Division at NIFA. Click here to learn more about this process.
Requirements and Due Dates:
Project Initiation
Should be submitted as soon as the PD receives official email notifying him/her that he/she must log into the REEport system to complete project initiation. While there is no due date for submission of the project initiation, PDs should be aware that they will not be awarded any funds until NIFA has received the project initiation via REEport.
Progress Report
Due no later than 90 days after the anniversary of the start date of the project but may be submitted up to 90 days prior to the anniversary date. The exception to this is continuation awards; progress reports for a continuation award must be submitted within the 90 days BEFORE the anniversary date in order to receive continued funding. The anniversary date is always one year from the date of submission of the project initiation OR from the start date indicated on the approved project initiation, whichever is later. The start date may be different from the submission date because a PD is permitted to future date the start of a non-capacity project.
Example: A PD submits a project initiation on 3/12 but enters a start date of 6/12. The anniversary date for the life of the project will then be 6/12.
Final Report
Due no later than 90 days after the anniversary date of the project but may be submitted at any time to terminate the project.
Summary Chart of Due Dates for Capacity & Non-Capacity Projects
|
Capacity Projects |
Non-Capacity Projects (incl. Competitive Grants) |
Project Initiation |
May be submitted at any time. |
As soon as notification of award is received; start date may be future dated. |
Progress Report |
March 1st (May be submitted up to 90 days prior.) |
No later than 90 days after the Anniversary Date (may be submitted up to 90 days prior). Continuation awards must be submitted within 90 days before the anniversary date. |
Financial Report |
March 1st |
Not required |
Final Report |
March 1st (May be submitted at any time to terminate the project.) |
No later than 90 days after the Anniversary Date (may be submitted at any time to terminate the project). |
State Projects
A State agricultural research project is any state funded project that receives funds from the state in which the research is being performed (and, in some cases, may receive other private or institution funds; they do NOT receive NIFA or federal funds for state projects). The sponsoring agency is always the State Agricultural Experiment Station that is electing to input such research data into REEport (it is not required nor used by NIFA).
Requirements and Due Dates:
In REEport, State projects are treated as capacity projects in that all the same modules available to fill out and submit into the system. However, there are no NIFA-set requirements or due dates for these modules, and the submission of any Project Initiation, Progress Report, Project Change, Financial Report, or Final Report does not require approval from NIFA. Upon submission of any of these form types, the form is automatically accepted into the system as final. No submitted report can be sent back for editing or rerouted in any way.
Important Policy Note:
State projects are permitted to be entered into the REEport system as a courtesy to NIFA partners and to provide them with a system for storing and tracking the projects they choose to enter. However, NIFA does not use, review, or perform any validation of state project data. Entering State projects is left to the discretion and control of the State Agricultural Experiment Station.
Getting Started: “I Need to Use REEport – Where do I go?”
The following three sections all contain similar information but are geared to the type of user who needs to log in to REEport to perform a particular action, whether it is site administration, entering project information on a new project, or reporting annual progress of an already active project. For your convenience, use one of the following three links depending on how you identify yourself:
I am a Site Administrator who needs to set up my site, edit users, enter/review project information and submit projects/reports.
GO TO > Instructions for Site Administrators at LGUs
|
I am a researcher or an administrative staff member at a NIFA Partner Institution (Land Grant University, but NOT a 1994 or Tribal College) who needs to enter, edit, or review project information for either capacity or non-capacity projects.
GO TO > Instructions for Project Directors & Other User Roles at LGUs
|
I am an independent grantee who is not affiliated with a Land Grant University and needs to enter project data on a non-capacity project that has been awarded by NIFA through the Grants.Gov process. (NOTE: This section should also be used for any researcher/grantee who is part of a 1994 or Tribal College.)
GO TO > Instructions for Independent Grantees (Not Part of an LGU)
|
Important Note: If you are a Project Director/Scientist/Administrative Staff who is part of a Land Grant University or NIFA partner institution, please make sure to utilize your Site Administrator as a resource when you have questions about using REEport. NIFA has provided training to the Site Admins regarding system functionality, how to edit/submit reports, what content should be included, etc. Your Site Admin should be your first point of contact for questions in addition to this manual and other training resources listed on the REEport Website.
Instructions for Site Administrators at LGUs
This section is written specifically for REEport users who are Site Administrators at Land Grant Universities (not including Tribal Colleges). It focuses on how to set up and manage a Site. If you are a faculty member or administrator at a Tribal College, please consult this section of the Manual.
A Site Administrator is the term REEport uses for the administrative person (or persons) who manage all the users, user roles, workflow permissions, project reviews and submissions, and other administrative actions for an institution’s “site.” A “site” in REEport is defined as a university business entity that receives NIFA capacity grants and wishes to centrally manage their REEport project submissions.
Site Administrators are responsible for setting creating user profiles for Project Directors who need to use REEport to enter project data for capacity funded projects. Only once a PD is set-up by a SA can he/she log into REEport to enter their project information. Site Admins should be aware also that there are only two other roles in REEport which have the ability to submit projects to NIFA: assistant site admins and project directors. For assistant site admins, the SA only needs to assign a person that role when creating their user account. For PDs, the SA must choose to give this permission under the “workflow” tab in their “Site Administration” module in REEport (see instructions below for “Setting up Your Site”) in order to enable this capability for PDs (the default for the PD role is that they may only submit up to the “institution review” level).
Logging In – First Time User Verification Process
All Site Admins must go through a verification process in the portal if they have not logged in before (i.e. if they are not a previous user of REEport or have not logged into the portal for other purposes, such as the POW system or to access the Leadership Management Dashboard). You will know if you are an unverified SA if you do not have a password, because only users who have set their own passwords are considered “verified.”
If you have never logged into the portal before and have not set your own password:
1. Click the “Reset Password” link.

2. Enter your email address and click “Send.”
3. You should see a confirmation message stating that an Activation link was successfully sent.

4. In the email you receive (should arrive within 10 minutes), click the link provided. The link will take you to a page where you can set your own password.
5. After setting your password, log into the portal with your email and newly set password.
6. Under “Active Applications,” click the “REEport” link. (All REEport users will have a slightly different link name since the name of the link associates them with a particular institution.)
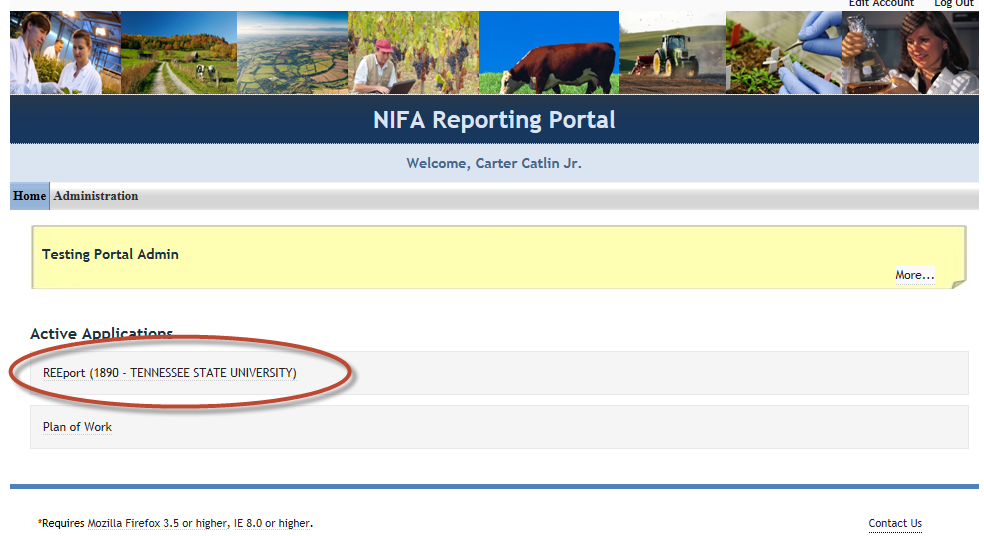
NOTE: If your site has already been accessed and “set up” previously by another Site Admin, then continue to step 6 below. However, if your site has never been accessed or “set up” before, you will automatically see the “Launch Wizard” after you click into your REEport Active Application link (screenshot below). The wizard simply guides you from page to page so that you know you are setting up all available configurations in order and not missing any. To use the wizard, simply continue clicking the “next” button that appears on the first page (screenshot 1) and then continue using the navigation buttons at the bottom of the subsequent screens (screenshot 2). Once you have completed the necessary site set up, you will have access to your home screen (Step 6 below). “Setting up Your Site” instructions are found on page 21 of this manual.
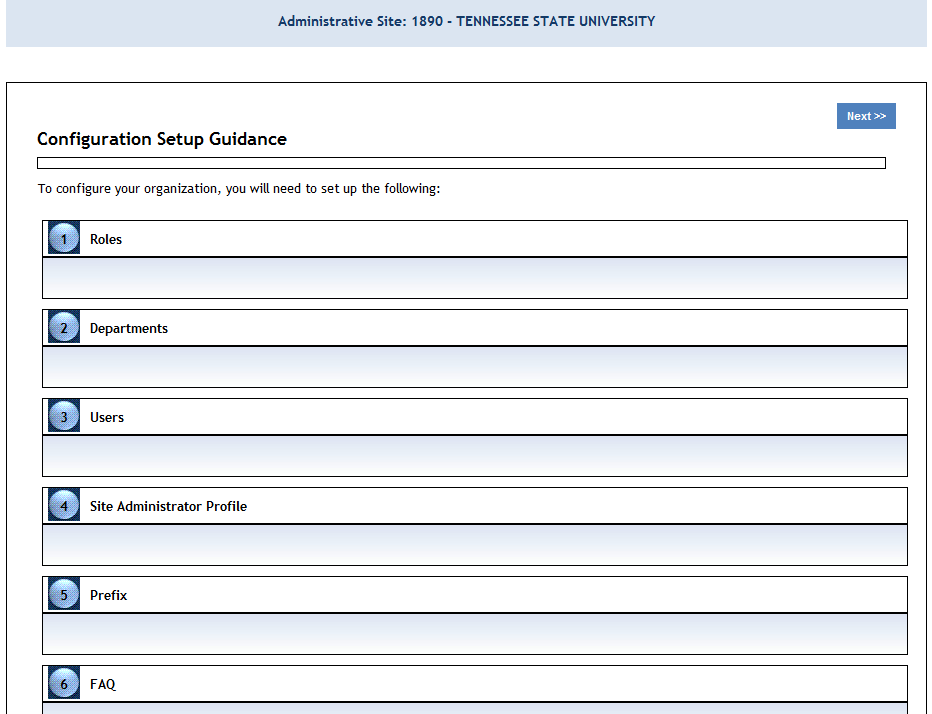
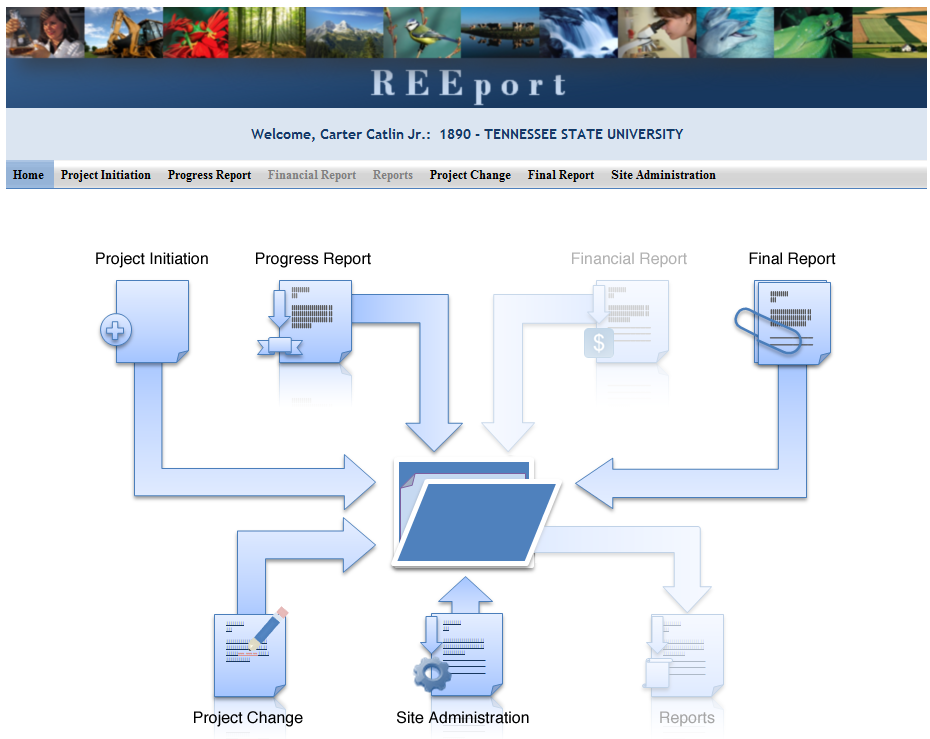
6. You will be brought to your REEport home page, where you have the ability to start new projects, and manage existing projects, and perform site administration functions for your institution(s).
Logging In – Returning Site Admins
1. At the portal login page, enter your email address and your password (set by you). Click “log in.

2. Click the “REEport” link that appears on your welcome page under “Active Applications. (All REEport users will have a slightly different link name since the name of the link associates them with a particular institution.)
Note: If you do not have a “REEport” link listed under your active applications, that means you have not yet been set up with a user profile; check with your organization’s other existing Site Administrator(s) (SA), if applicable. If you do not know who your SA is or do not have one, send an email to [email protected].

3. You will be brought to your REEport home page, where you have the ability to start new projects, manage existing projects, and perform site administration functions for your institution:

Setting up your Site
Roles
The roles page gives you a summary of what permissions/privileges are set up for which roles. In a future release of REEport, it may be possible for SAs to set and define their own user roles; in the current version of the system, only NIFA can set user roles. Following is the current list of user roles and what permissions each of them has:
Role Name |
Permissions in REEport |
Site Administrator |
|
Assistant Site Administrator |
|
Project Director (Often referred to as the PI, or “Principle Investigator”) |
|
Admin Support |
|
Reviewer |
|
Departments

On the Departments page, you have the ability to edit or add departments as your institution. To edit a department, simply click into the text field and make your desired edits. To add a new department, use the blue plus sign at the bottom of the page next to the last department listed. You will then need to enter the name of the department in the blank field (note that the department code says “will assign” which means REEport will automatically attach a code once you click “save.”

Users – How to Add, Deactivate, or Edit Users
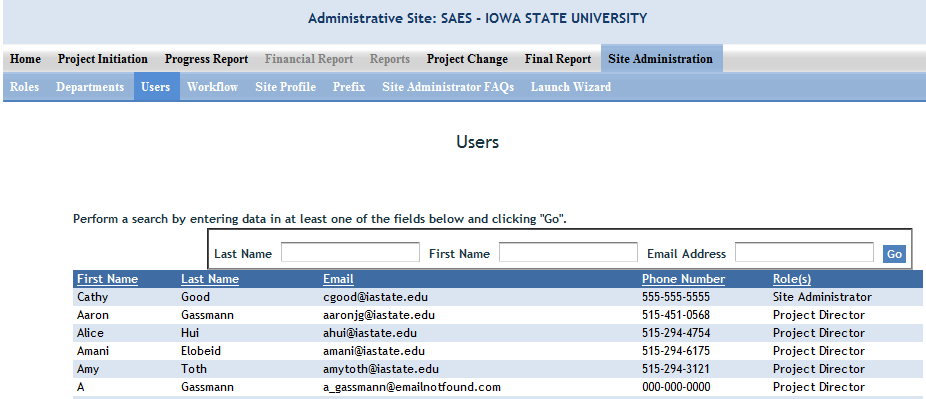
On the Users page you have the ability to view current users in the system and their assigned roles.
Hint: A quick way to find any existing user is to use the search option at the top of the screen; you only need to enter data into one of the three fields.
If you want to add a new user or deactivate or edit an existing user, you must do so through the “administration” section of the NIFA Reporting Portal (only SAs have access to administration). To get there from the User page, click the link for “portal” at the bottom of the page, as indicated here:

The above action will bring you to the administration section of the portal (note that right next to “administration” is “home,” which is what you’d click in order to go back into the REEport system.) Click the link for REEport in the administration section of the portal, as shown here:

Once you’ve done the above, the next screen will give you the ability to see a complete listing of all unverified, active, and inactive users at your institution.
To add a new user: Enter the email address that they will use for REEport and click “add user.”

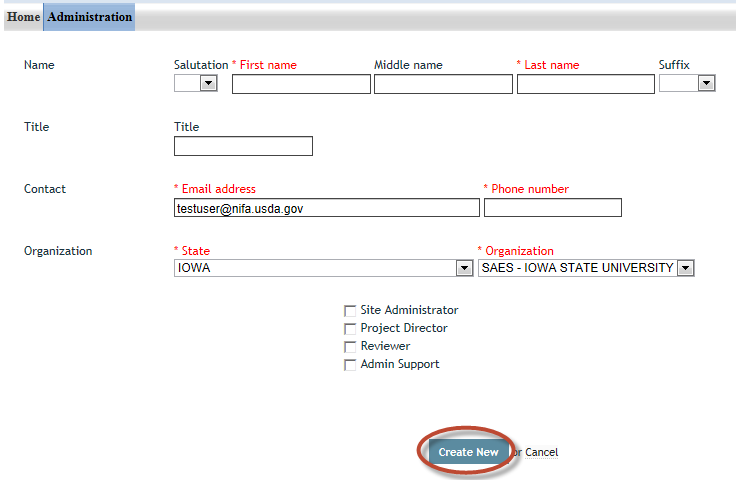
You will then be brought to a screen where you can enter all applicable information for that user (note that only some fields are mandatory; for the phone number, it is acceptable to use a dummy number, like 000-000-0000). You must click one of the check boxes to indicate which role this user should have. Make sure to click “create new” at the bottom.
Note that this user will not be able to log into REEport and enter data until he/she verifies the email address you have entered (see “logging on” instructions in the next section of this manual). Because of this, you will first see your new user listed in the “unverified users” listing on your administration page. Once he/she verifies him/herself, the user will show up in the “active users” listing.
T
 o
deactivate or edit existing users: REEport does not allow any
SA to completely delete the record of an existing user. However,
any user in the “Active Users” list may be deactivated
(and later reactivated if needed). To deactivate any user, simply
click deactivate next to the user’s name (red circle in
screenshot below). To edit an existing user, click the user’s
name as indicated by the red arrow:
After clicking on the user’s name, an SA has the ability to see and edit the entire user profile. Most notably, they have the ability to edit a user’s ROLE at this screen. As shown in the following screenshot, the SA may click “remove” to remove already assigned roles (red arrow) or use the drop down menu to add a new role (red circle). Make sure to click “save” at the bottom when finished (red circle).

Workflow

On the workflow section, you can choose what user roles have the ability to submit projects and associated progress reports, final reports to NIFA. If you want to make a workflow change to Project initiation, make sure the radio button at the top is clicked to “Project Initiation.” Likewise for “Progress Report. Note that you also have the ability to differentiate between non-capacity and capacity projects.
Important: Make sure to communicate with your PDs about what their privileges are. They should be aware that if they do NOT have “submit to NIFA” privileges, then any report they submit only means they’re submitting it for institution/SA review and making it available for the SA to submit to NIFA. If they DO have “submit to NIFA” privileges, then they need to know that they will need to go to the “pending submission to NIFA folder in the appropriate module to make the final submission of a project or progress report (essentially, they’ll need to click “submit” at two different levels).
Site Administrator Profile & Authorizing Signatures

O
 n
the Site Administrator Profile screen, you will see a secondary menu
bar appear at the top of the page. According to that menu bar you
may view/edit information for the following:
Site Administrator Profile: These fields are non-editable. They are prepopulated based on the SA’s account information in the NIFA portal. In order to change this information, you must use the “back to portal” feature on the very top right hand of the screen in REEport. Once at your portal homepage, click on the “edit account” link at the very top right hand of the screen.
Authorizing Signatures: This information is editable and should list the person at the institution who is the signatory authority on funds and the person who is the signatory authority for Assurance Statements.
Funding Sources: These fields are non-editable and simply show the funding sources available to your institution, as set by NIFA.

Message Board: You can use the message board to set messages that will automatically appear to your PDs when they access certain modules in REEport.

Prefix

The prefix is the combination of letters and/or numbers that will automatically be attached to the beginning of any project number that a user enters for a capacity project when completing a project initiation report. Note that if you desire to put hyphens between the prefix and the rest of the number, you/PDs will need to enter the hyphen as part of the project number in project initiation.
Site Administrator FAQs

This section of Site Administration lists a selection of the most frequently asked questions. This list will be updated periodically depending on the types of questions being sent in to NIFA.
Launch Wizard
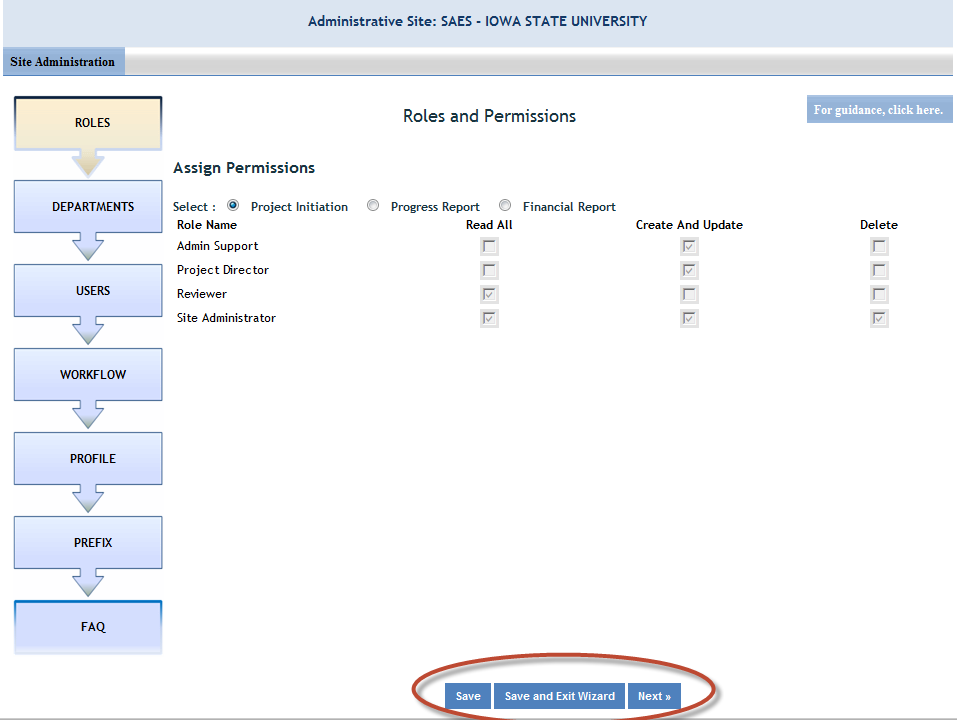
Users may choose this option to set up their sites instead of clicking into each of the individual sections listed above for ‘Site Administration’. The wizard simply guides you from page to page so that you know you are setting up all available configurations in order and not missing any. To use the wizard, simply continue clicking the “next” button that appears on the first page (screenshot 1) and then continue using the navigation buttons at the bottom of the subsequent screens (screenshot 2).
Screenshot 1:

Screenshot 2:
What to do when you are asked to “Claim” a Non-Capacity Project
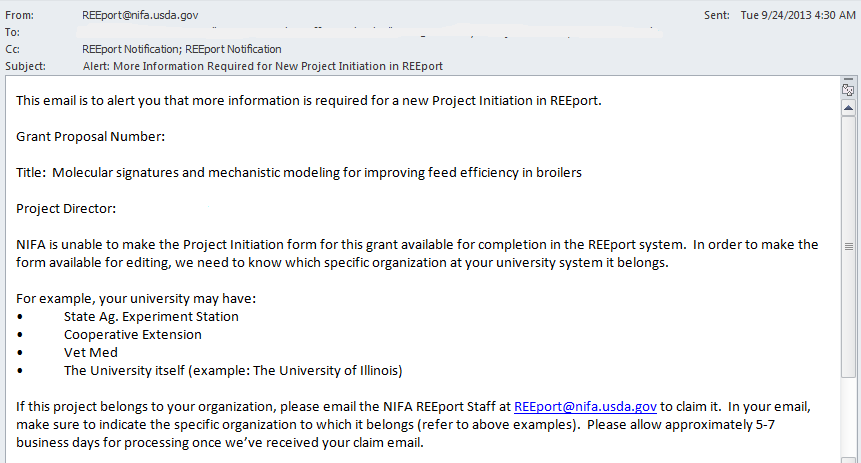
For non-capacity grants that come into the REEport system via the grants.gov application process, REEport is sometimes unable to determine which ‘site’ the project belongs to. If REEport does not have enough information to identify the site under which to put the project, it will send out an “alert” email asking for someone to claim the project. The email will be sent to any Site Administrators that are part of the parent university system (i.e. Ag Experiment Station, Vet Med School, Forestry School, etc.) and also to the Project Director and AOR listed on the project. NIFA needs one person to claim the project for their site by sending an email to [email protected] indicating the specific organization to which the project belongs. The “claim email” simply needs to state where the project belongs. For example: “This project belongs to the State Ag Experiment Station.”
A screenshot of a sample “alert” email that is sent out by the system is on the following page.
Navigating the Software
When moving from screen to screen in REEport, regardless of the module you’re in (i.e. Project Initiation, Progress Report, etc.) you have the ability to use the menu bar at the top and also to use the navigation buttons provided at the top and bottom of each screen.
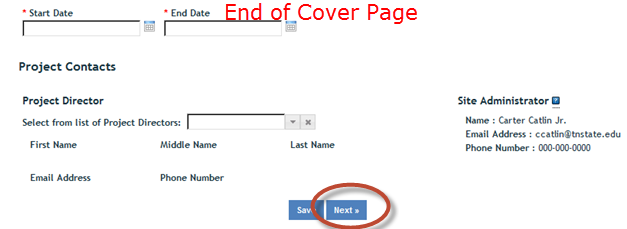
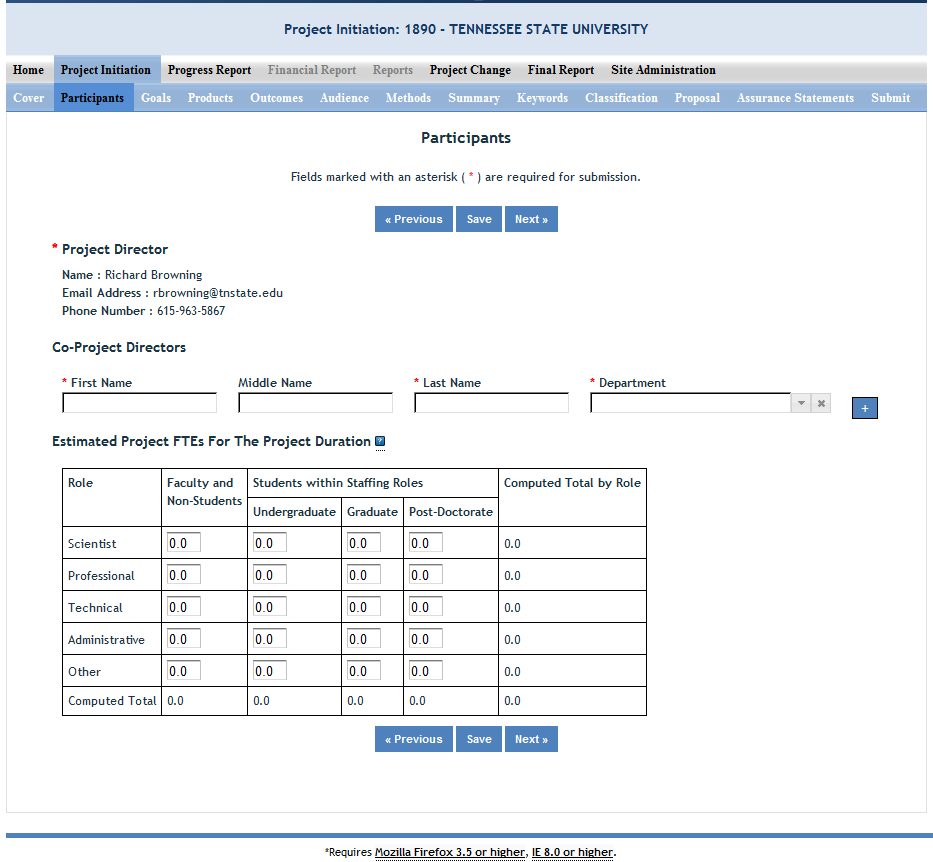
Example: When moving from “cover page” to “participants’ you can click “next,” which saves your work and moves you to the next page. Alternatively, you can click “save” which saves your work and keeps you on the cover page. To move to the Participants page, you could then click “Next” or “Participants” at the top of the menu bar. Both options are shown in these screenshots:
Option #1:
Option #2:

I
 mportant
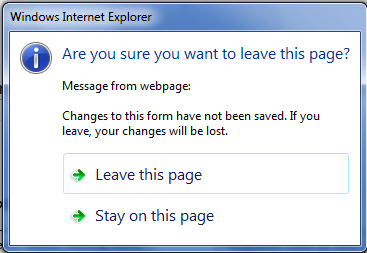
note if you choose option #2: Only the navigation buttons in
REEport will save your work for you. If you do not click save and
use the menu bar to move to the next screen (i.e. clicking
“participants” on the menu bar to move from cover page to
participants page) you will get the following message:
If you get this message, you MUST choose “stay on this page” so that you will have the option to save your work before moving to another page. If you choose “leave this page” your work will not be saved.
Other Helpful Hints:
All of the instructions provided in the REEport system are indicated by the
 icon.
This manual follows the same general help text found in the system,
but it is expanded in some areas.
No matter what module or screen you are on, you can always go back to your home screen (click “home” on the top menu bar” to view the large module icons and click any of them to enter those modules. You can also move from module to module by using just the top menu bar; you do not need to go back “home” first.
Finding, Editing, & Managing Projects
When navigating the software and moving from module to module and from project to project within those modules, it’s helpful to remember that every module is set up exactly the same in terms of HOW to find the project you want to work on.
O
 ption
#1: Your first option is to always use the search tool on the
home screen of each module. This option is most helpful when you
know the exact data to search for at least one of the fields
(accession number, proposal number, PD name, etc.); it’s also
helpful when you’re not exactly sure what status
the project is in and therefore wouldn’t know which folder to look in.
Option #2: Use the “expanded folder” views to see the list of projects in that particular folder. If you know, for example, there are three projects you want to work on, one capacity and two non-capacity that are all in project initiation, you might find it most helpful to expand the “draft” folder and find those three projects within that folder.

How to Submit Projects & Reports
Quick Links:
Final Report/Terminate a Project
Resubmitting a Deferred Project
Project Change Requests (Including Extensions on Capacity Projects)
Upfront Helpful Hints:
For guidance completing any REEport form, remember to use the embedded Help Text by clicking on the small blue icon
 located next to each field found within REEport.
There are various character limits on all fields in REEport, but the main one worth noting is for all the large text boxes with the built-in text editor; they have an 8,000 character limit, including spaces.
Depending on the type of grant you received, when completing REEport forms, there may be additional content guidance available from NIFA program staff. Program contacts (name, email, phone number) are listed on your NIFA Award Face Sheet.
Project Initiation
NON-CAPACITY PROJECTS (for capacity projects, skip to step 3): The life of your grant begins with the application process in Grants.gov. Once your grant is recommended for Award in NIFA’s internal grants system, you will receive an email notification that your Project Initiation form is awaiting completion in REEport. The email looks like this:

Once you’ve received the email above (and have verified your user account, if needed), log into REEport and go to your Project Initiation module as indicated in this screenshot:

Expand your “Project(s) in Draft Stage” folder. OR If you wish to start a capacity project, click the “create new project” button. Choose the funding source for your project; note that the funding source cannot be changed later without deleting the project and starting over again; skip to step 5.
Click the project you want to initiate; use any of the underlined links available – they will all bring you “into” your project so that you may enter data.

The first page you are brought to is the cover page of the project. For non-capacity projects, note that the cover page contains prepopulated, non-editable data that is imported from the grant application that you submitted through grants.gov. If any of this information is incorrect, it will need to be changed in NIFA’s internal grants system. Click here for more details on this process.
Proceed with entering data on the project initiation screens. For specific instructions for navigating these screens and how/what to enter for content, consult the How to Submit a Project Initiation section of this manual.
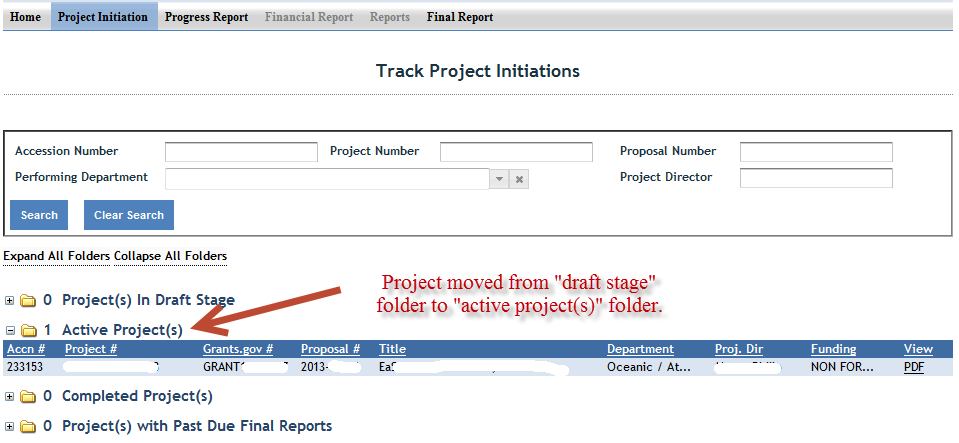
Once all your data have been entered, make sure to navigate to the “submit” screen of the project. Follow the instructions via the link in Step 6 for submitting capacity and non-capacity projects initiations. Upon successful submission to NIFA, all projects (both capacity and non-capacity) will appear in the “Active Projects” folder within your Project Initiation module.
Progress Report
Upfront Hints & Explanation of how Progress Reporting works:
Using the Progress Report module, an Annual Progress report is required to be completed and submitted for each year your project is active (except in the final year of the project, after which a Final Report is submitted that covers the entire project duration).
You will find that a Progress Report form has been automatically created for each active project that you have initiated into the REEport system. These are found in the Draft folder in your Progress Report module and are automatically set to report on the first year of the project.
Once the first year’s Progress Report is completed and submitted, REEport will automatically create a new reporting form for the second year, then the third year, and so on.
Policy Note: Missing the due date or failing to submit a given year’s progress report does not absolve a grantee of needing to submit the report, nor does it allow them to just continue on with submitting the next progress report (e.g. submitting the second year’s progress report when the first was never submitted.) REEport forces all Project Directors (or Site Admins) to submit the each year’s progress reports successively, starting with the first period of performance. Multiple progress reports can be submitted in one day if the PD needs to “catch up” with their required reporting.
Performing Periods for progress reporting:
For Capacity projects: Federal Fiscal Year, due March 1 each year.
For Non-Capacity Projects: annual and corresponds with the Anniversary Date of your grant. So, your first report is due within 90 days after the anniversary of the Start Date of your project. This continues for each subsequent progress report for each year the project is active.
A Progress Report cannot be submitted any earlier than 90 days prior to the anniversary of the start date of the project (non-capacity) or March 1 (capacity).
If you have been notified by NIFA program staff that your award will be receiving any type of extension or continuation on the same Award Number (applicable to non-capacity only), you must submit the progress report within 90 days BEFORE the anniversary date; make sure to adhere to the specific instructions sent to you by your Program Contact at NIFA; some programs require progress reports up to at least 60 days prior to the anniversary of the start date. Click here for more information on extension/continuation awards.
When & How to Submit a Progress Report
You will receive an email from the REEport system alerting you whenever you are 90 days away from the anniversary of the start date or March 1. This notifications means that the progress report can now be submitted at any time; progress reports are only accepted by REEport up to 90 days prior to the anniversary date or March 1. The actual due date of the report is 90 days AFTER the anniversary date or March 1. So, you have a 180 day window in which to submit your progress report.
Example for non-capacity grants: Project start date is September 1, 2012. REEport will send a notification email 90 days prior to September 1, 2013. The anniversary date is September 1, 2013. The Progress Report covering the period of performance from September 1, 2012 through August 31, 2013 is due no later than November 30, 2013.
When a project is active, REEport always makes available one Progress Report form in the Progress Report module for editing and submission. The period of performance prepopulated on the form will always be the oldest period of performance that has yet to be reported on. To access whatever current form is available to you, go to the Progress Report module as indicated:

Expand your “Progress Report(s) in Draft” folder.
C
 lick
the project you want to report on; use any of the underlined links
on available – they will all bring you to the same form for
editing and submission to NIFA.
The first page you are brought to is the cover page of the project; note that for non-capacity projects, the cover page contains prepopulated, non-editable data that is imported from what you submitted as part of your project initiation. If any of this information is incorrect, it will need to be changed in NIFA’s internal grants system. Click here for more details on this process. If it is a Capacity project and the cover page information needs to be updated, this can be done by submitting a Project Change request.
Proceed with entering data on the progress report screens. For specific instructions for navigating these screens and how/what to enter for content, consult the How to Submit a Progress Report section of this manual.
Note that for all data you enter, they should be applicable to the period of performance ONLY as listed on the cover page of the report.
Once all your data have been entered, make sure to click the “submit” button on the last screen. Note that LGUs have two levels of review, so the first submit button only submits the project for organizational (Site Admin) review; a second level of submission takes place within the “Pending submission to NIFA” folder. Refer back to the link in step 6 for more information on this.
Your progress report is reviewed by a NIFA National Program Leader (NPL). If the NPL deems the report unacceptable for any reason, he or she may request that the report be sent back to you within 90 days for editing and resubmission. Note that when this action is performed, the system will alert you that the report has been sent back; however, no comments on what to change will be included in the email. Your NPL reviewer will communicate with you outside of the REEport system so that you can make the proper edits and resubmit the report.
If your submitted progress report sits within REEport for 90 days after submission, your report is then considered final and no changes can be made, whether at the request of the NPL or by you.
Once a Progress report is submitted to NIFA, REEport automatically creates a form for the next period of performance for which a report will be due.
A progress report sitting in the draft folder may be edited by you, the PD, at any time, but it can only be submitted up to 90 days prior to the anniversary of the start date (i.e. the end of the period of performance).
If you are “catching up” on old, overdue reports, then any new forms created can all be edited and submitted within the same day because the anniversary dates for these periods of performance have already passed.
Final Report/Terminate a Project
Upfront Hints & Explanation of how Final Reporting works:
Using the Final Report module, a Final Report is required to be completed and submitted no later than 90 days after the end date of the project (non-capacity) or March 1 (capacity).
The Final Report may be submitted at any time, and doing so changes the project status to Completed. This is the only way to officially close out a project, even if you are terminating the project early.
You will find that a Final Report form has been automatically created for each active project that you have initiated into the REEport system. These are found in the Draft folder in your Final Report module and are automatically set to report on the PROJECT DURATION.
Policy Note: Missing the due date or failing to submit a Final Report (even in the case of a PD retirement, leaving the project, etc.) does not absolve an institution of needing to submit the report. Per the Terms & Conditions of NIFA awards, any PD/Institution with delinquent final reports may have future funds from NIFA withheld until the report is submitted.
In the final year of a current project, if you have been notified by NIFA program staff that your award will be receiving any type of extension or continuation on the same Award Number (non-capacity only), you should NOT submit the Final Report form from that module. Instead, you should submit the progress report form that is available to you in your progress report module. The Final Report form will remain in the system for the time when you project is actually ready to be terminated.
Note that the incorrect submission of a Final Report can be “undone” by NIFA, but NIFA staff cannot “convert” a Final Report to a Progress Report. Therefore, please be aware that you will need to go to the Progress Report module and manually re-enter all the data into the Progress Report form if this happens.
Click here for more information on extension/continuation awards.
When & How to Submit a Final Report
You will receive an email from the REEport system alerting you when you are 90 days away from end date of the project or March 1. This notification means that you are 180 days away from the due date of the Final Report.
Example for non-capacity: Project end date is September 30, 2014. REEport will send a notification email 90 days prior to September 30, 2014. The Final Report for the project must be submitted no later than December 29, 2014. Note that failure to submit the report by this date may result in withholding of future funds from NIFA.
When a project is active, REEport always makes available one Final Report form in the Final Report module for editing and submission. The period of performance prepopulated on the form is the PROJECT DURATION (start date to end date).

Expand your “Final Report(s) in Draft” folder.
C
 lick
the project you want to report on; use any of the underlined links
on available – they will all bring you to the same spot.
The first page you are brought to is the cover page of the project; note that the cover page contains prepopulated, non-editable data that is imported from what you submitted as part of your project initiation. If any of this information is incorrect, it will need to be changed in NIFA’s internal grants system (if project is non-capacity). Click here for more details on this process. For capacity project, a Project Change request should be submitted to change any of the cover page information.
Proceed with entering data on the final report screens. For specific instructions for navigating these screens and how/what to enter for content, consult the How to Submit a Final Report section of this manual.
Note that for all data you enter, they should be applicable to the DURATION OF THE PRJOECT.
Exception: FTE reports on the Participants page should be for the most previous year only.
Once all your data have been entered, make sure to click the “Submit” button on the last screen, your submit screen (use the link above in Step 6 for detailed screenshots of this process). Upon completing this action take note of the following:
Your final report is reviewed by a NIFA National Program Leader (NPL). If the NPL deems the report unacceptable for any reason, he or she may request that the report be sent back to you within 90 days for editing and resubmission. Note that when this action is performed, the system will alert you that the report has been sent back; however, no comments on what to change will be included in the email. Your NPL reviewer will communicate with you outside of the REEport system so that you can make the proper edits and resubmit.
If your submitted final report sits within REEport for 90 days after submission, your report is then considered final and no changes can be made, whether at the request of the NPL or by you.
Resubmitting a Deferred Project
Projects that are deferred by NIFA are most often deferred because the National Program Leader who reviewed the project has identified some changes that need to be made to the project before they will allow it to become active; usually this means that the proposed research is on target with NIFA’s portfolios/goals and is within the purview of the funding source it’s proposing to use, but the project write up needs some adjustments.
Resubmitting a deferred project is much like submitting a brand new project. The main difference is that you can find the deferred project in TWO different places – in your “drafts” folder as well as your “deferred projects” folder. The project can be accessed from either location, changes can be made, and you can click “submit” at the end in order to resubmit to NIFA for review.
Here are the steps and workflow for resubmitting deferred projects:
Navigate to the Project Initiation module.
Locate the project in either the “Drafts” folder or the “Deferred Projects” folder; the underlined links for the project in each location will bring your to the exact same spot. If you use the search function at the top of the screen, the search will return 2 results – one in each of the folders.
Click any of the underlined links for the project.
Make necessary edits to the project data (pay close attention to the comments by the NPL who request changes; these can be found on the cover page as indicated here:

After all edits have been made, navigate to the “submit” screen on the sub menu bar or by using the navigation buttons. Click the “submit for review” button. For further information and screenshots on the workflow for submitting projects for organizational review and then to NIFA, click here.
Note that there is no limit to the amount of times a project can be deferred and resubmitted. Upon resubmission, a deferred project is subject to the same review criteria and timeline as are new projects; as with new projects, the NPL can choose to approve, decline, or defer the resubmitted project. If the NPL chooses to defer is a 2nd (or more ) times, the project can always be located as a draft in either the drafts or deferred folder within the Project Initiation module for resubmission.
Project Change Requests (Including Extensions on Capacity Projects)
Capacity Projects
For a detailed description of this module in REEport, including explanation of the folder structure and workflow, click here.
Here is a summary of steps you must take to make changes to capacity projects:
Log into REEport and navigate to the “Project Change module.”
Click on the “Active Projects” folder to expand it and view all projects (or search for the project if necessary/desired).
Click on any of the underlined links of the project to which you wish to make changes.
Proceed with editing/updating data for the particular project.
Click “submit changes for review” on the last screen; this moves the project to the “Pending Submission to NIFA” folder.
Note: If you saved the changes you made but don’t click “submit” the project will only be moved to your “Pending Changes in Draft Stage” folder.
Within the “Pending Submisison to NIFA” folder, click on the project, navigate to the “submit” screem via the sub-menu bar and click “Submit to NIFA.”
If the change you made is one that requires NIFA approval, the change is subject to a 30 day review period before it may become final. If the change is automatic, the project will show in your “active projects” folder AND in your “changed projects” folder within your Project Initiation module.
See screenshot of folder structure:

The following is a list of which data fields do and do not require NIFA approval when submitting a project change in REEport:
Change is made automatically by REEport* |
Change requires NPL approval |
Project Number |
Performing Organization/Institution |
Project Title (not applicable to Multistates) |
Collaborating /Partnering Organizations |
Performing Department |
Collaborating/Partnering Countries |
Co-Project Director: Name, Department |
Proposed Start Date |
Collaborating/Partnering States (N/A to Multistates) |
Estimated Project FTEs |
Project Director: Name, E-mail, Phone |
Goals |
Proposed End Date: One time, one year extension, not exceeding 5 years of total project duration (and within Multistate Project duration range for Multistate Hatch Projects) |
Outputs |
Assurance Statement |
Outcomes |
|
Audience |
|
Methods |
|
Summary |
|
Keywords |
|
Classification (incl. Animal Health component, KA/SOI/FOS, Planned Programs) |
|
Project Proposal |
*Making Changes on Legacy projects originally initiated in CRIS Web Forms:
The above list of fields that are changed automatically by REEPort applies only to projects that were originally initiated/started in REEport.
For any project that was already active in CRIS Web Forms and brought into REEPort, the project will become subject to new data fields that REEport requires that CRIS Web Forms did not collect.
So, if you are trying to submit a Project Change for a project that was originally initiated in CRIS, even if the data are normally within a field that would not require NIFA approval, you must submit to NIFA for review. Here are additional instructions for this scenario:
INSTRUCTIONS ON SUBMITTING CHANGES ON LEGACY PROJECTS:
Locate the desired project in the “Active Projects” folder in the Project Changes module.
Make changes to the desire field(s).
For any open text box, you may choose to enter additional data for the project (will become a permanent part of the project record) OR you may choose to enter the phrase “Project Imported from CRIS; no new data to report.”
For any drop down menu, please choose the best applicable item.
Click submit at the end for organizatino review; don’t forget to click “submit” a second time to actually send the change to NIFA (see steps 5 and 6 above).
Following the above steps will result in the project being submitted to a NIFA NPL who will review the project changes and approve them, as the new data fields in REEPort are not required because legacy projects are “grandfathered” in to what the CRIS Web Forms system collected. NIFA’s policy is that project change approvals should occur within 30 days of submission.
Non-Capacity (Including Competitive) Projects
In the current version of REEport, changes cannot be made to project data on non-capacity (including competitive) projects once the Project Initiation form has been submitted to NIFA. This submission of the Project Initiation is what changes the project’s status from “draft” to “active.” An “active” status means that the data are now part of NIFA’s Current Research Information System database and are publicly searchable. There are, however, some basic fields that can be updated internally by NIFA, including the PD contact information and keywords. Please contact the “Program Contact” as listed on the Award Face Sheet of your grant to determine if changes should and can be made to an active project.
Note: A future version of REEport will allow PDs to log into REEport and make changes to project data; these changes will be subject to NIFA approval before becoming a permanent part of the project and being publicly available.
Instructions for Project Directors & Other User Roles at LGUs
REEport is accessed through the NIFA Reporting Portal at: http://portal.nifa.usda.gov.
If you are a Project Director at an LGU:
CAPACITY PROJECTS: Project Directors who are part of a Land Grant University and who wish to initiate capacity projects must be set up first by their Site Administrators (SA) in order to access REEport. Once their SA sets them up as a new user, the PD will receive an email from REEport asking them to verify themselves and set their password (see “Logging In – First Time User Verification Process” below).
NON-CAPACITY PROJECTS: Project Directors who wish to enter project data on Non-Capacity Projects (including Competitive Grants) fall into two categories: those who are part of an LGU or other NIFA partner institution (with an already existing “site” in REEport) and those who are independent Project Directors.
PDs who are part of an LGU: Only you and the SAs at your site have access to edit your project forms and associated progress reports; these forms are automatically created by REEport and prepopulated with certain data from your grants.gov application. In addition to entering project information on forms, your SA also can choose whether to give you “submit to NIFA” privileges.
PDs who are independent/not part of an LGU or partner institution: This applies to Non-Capacity Grantees only. You will be recognized by REEport as a PD for your specific project(s) based on the email address that you submitted as part of your grant application. For more specific information on editing and submitting forms as a PD at a non-partner institution, click here: Introduction for Independent Grantees (Not Part of an LGU).
If you are a faculty member, administrative person, or student supporting a project Director at an LGU:
There are two other user roles in REEport which require access to be granted by a Site Administrator. They are the “Admin Support” role and the “Reviewer” role. These two roles have various viewing and editing capabilities in order to support the overall workflow process, but neither have the “submit” capabilities of the Site Admin or Project Director. Please work with your Site Administrator to determine the level of access you need in REEport. If you already have the access you need, the remainder of this section of the manual will direct you on how to navigate the system and/or enter or review project data and content.
Logging In – First Time User Verification Process
All users must go through a verification process in the portal if they have not logged in before (i.e. if they are not a previous user of REEport or have not logged into the portal for other purposes, such as the POW system or to access the Leadership Management Dashboard). You will know if you are an unverified user if you do not have a password, because only users who have set their own passwords are considered “verified.”
If you are a Project Director or Authorized Organizational Representative (AOR) on a Non-Capacity project:
Whenever a new non-capacity project is brought into REEport from NIFA’s internal grants system, REEport sends out an email to the Project Director and AOR asking them to click an activation link that will grant them access to the Portal and ultimately, to their project; the activation link is valid for 36 hours. This only occurs if the PD/AOR have not previously been verified in the REEport system as the PD/AOR on a prior project.
The email looks like this:
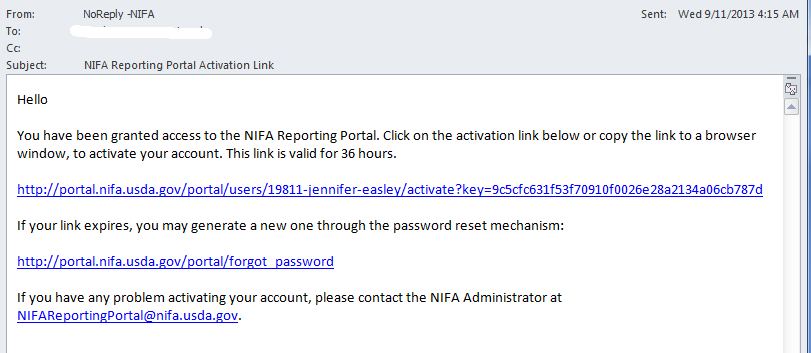
If you have the email with the activation link (which is good for 36 hours), then click that link and follow the prompts. If you no longer have the email, the 36 hours has passed, or you don’t remember receiving an email, follow the steps below.
Go to http://portal.nifa.usda.gov. Enter your email and leave password section blank. Click “log in.”

You will be asked to re-enter your email address and click “send email.”

In the email you receive (should arrive within 10 minutes), click the link provided. The link will take you to a page where you can set your own password.
Note: If you enter an email address that is not recognized as part of a valid user account, you will receive the below error message. This message usually occurs when the email you entered is not the email that your SA used to set up your new user account OR it is not the same email that you entered as part of your grants.gov application (if you are trying to access a non-capacity grant in REEport). If you receive this message, contact your Site Admin if you are trying to access a capacity project and confirm with them the correct email address; if you are trying to access a non-capacity project, contact [email protected].

After setting your password, log into the portal with your email and newly set password.
Under “Active Applications,” click the “REEport” link. (All REEport users will have a slightly different link name since the name of the link associates them with a particular institution.)

6. You will be brought to your REEport home page, where you have the ability to start new projects and manage existing projects:

Logging In – Returning Users
Go to http://portal.nifa.usda.gov. Enter your email address and your password (set by you the first time you logged into Portal. Click “Log In.”
If you do not remember your password: click the “reset password” link at the top of the portal login screen and follow the prompts.


Click the “REEport” link that appears on your welcome page under “Active Applications. (All REEport users will have a slightly different link name since the name of the link associates them with a particular institution.)
Note: If you do not have a “REEport” link listed under your active applications, then you have not yet been set up with a user profile; check with your Site Administrator, if you have one. If you do not have an SA, send an email to [email protected].

You will be brought to your REEport home page, where you have the ability to start new projects and manage existing projects.

Navigating the Software
When moving from screen to screen in REEport, regardless of the module you’re in (i.e. Project Initiation, Progress Report, etc.) you have the ability to use the menu bar at the top and also to use the navigation buttons provided at the top and bottom of each screen.
Example: When moving from “cover page” to “participants’ you can click “next,” which saves your work and moves you to the next page. Alternatively, you can click “save” which saves your work and keeps you on the cover page. To move to the Participants page, you could then click “Next” or “Participants” at the top of the menu bar. Both options are shown in these screenshots:
Option #1:

Option #2:


I
 mportant
note if you choose option #2: Only the navigation buttons in
REEport will save your work for you. If you do not click save and
use the menu bar to move to the next screen (i.e. clicking
“participants” on the menu bar to move from cover page to
participants page) you will get the following message:
If you get this message, you MUST choose “stay on this page” so that you will have the option to save your work before moving to another page. If you choose “leave this page” your work will not be saved.
Finding, Editing, & Managing Projects
When navigating the software and moving from module to module and from project to project within those modules, it’s helpful to remember that every module is set up exactly the same in terms of HOW to find the project you want to work on.
O
 ption
#1: Your first option is to always use the search tool on the home
screen of each module. This option is most helpful when you know the
exact data to search for at least one of the fields (accession
number, proposal number, PD name, etc.); it’s also helpful when
you’re not exactly sure what status
the project is in and therefore wouldn’t know which folder to look in.
Option #2: Use the “expanded folder” views to see the list of projects in that particular folder. If you know, for example, there are three projects you want to work on, one capacity and two non-capacity that are all in project initiation, you might find it most helpful to expand the “draft” folder and find those three projects within that folder.

Other Helpful Hints:
All of the instructions provided in the REEport system are indicated by the
 icon.
This manual follows the same general help text found in the system,
but it is expanded in some areas.
No matter what module or screen you are on, you can always go back to your home screen (click “home” on the top menu bar” to view the large module icons and click any of them to enter those modules. You can also move from module to module by using just the top menu bar; you do not need to go back “home” first.
How to Submit Projects & Reports
Quick Links:
Final Report/Terminate a Project
Resubmitting a Deferred Project
Project Change Requests (Including Extensions on Capacity Projects)
Upfront Helpful Hints:
For guidance completing any REEport form, remember to use the embedded Help Text by clicking on the small blue icon
 located next to each field found within REEport.
There are various character limits on all fields in REEport, but the main one worth noting is for all the large text boxes with the built-in text editor; they have an 8,000 character limit, including spaces.
Depending on the type of grant you received, when completing REEport forms, there may be additional content guidance available from NIFA program staff. Program contacts (name, email, phone number) are listed on your NIFA Award Face Sheet.
Project Initiation
NON-CAPACITY PROJECTS (For capacity pojects, skip to step 3): The life of your grant begins with the application process in Grants.gov. Once your grant is recommended for Award in NIFA’s internal grants system, you will receive an email notification that your Project Initiation form is awaiting completion in REEport. The email looks like this:

Once you’ve received the email above (and have verified your user account, if needed), log into REEport and go to your Project Initiation module as indicated in this screenshot:

Expand your “Project(s) in Draft Stage” folder. OR If you wish to start a capacity project, click the “create new project” button. Choose the funding source for your project; note that the funding source cannot be changed later without deleting the project and starting over again; skip to step 5.
Click the project you want to initiate; use any of the underlined links available – they will all bring you “into” your project so that you may enter data.

The first page you are brought to is the cover page of the project. For non-capacity projects, note that the cover page contains prepopulated, non-editable data that is imported from the grant application that you submitted through grants.gov. If any of this information is incorrect, it will need to be changed in NIFA’s internal grants system. Click here for more details on this process.
Proceed with entering data on the project initiation screens. For specific instructions for navigating these screens and how/what to enter for content, consult the How to Submit a Project Initiation section of this manual.
Once all your data have been entered, make sure to navigate to the “submit” screen of the project. Follow the instructions via the link in Step 6 for submitting capacity and non-capacity projects initiations. Upon successful submission to NIFA, all projects (both capacity and non-capacity) will appear in the “Active Projects” folder within your Project Initiation module.

Progress Report
Upfront Hints & Explanation of how Progress Reporting works:
Using the Progress Report module, an Annual Progress report is required to be completed and submitted for each year your project is active (except in the final year of the project, after which a Final Report is submitted that covers the entire project duration).
You will find that a Progress Report form has been automatically created for each active project that you have initiated into the REEport system. These are found in the Draft folder in your Progress Report module and are automatically set to report on the first year of the project.
Once the first year’s Progress Report is completed and submitted, REEport will automatically create a new reporting form for the second year, then the third year, and so on.
Policy Note: Missing the due date or failing to submit a given year’s progress report does not absolve a grantee of needing to submit the report, nor does it allow them to just continue on with submitting the next progress report (e.g. submitting the second year’s progress report when the first was never submitted.) REEport forces all Project Directors (or Site Admins) to submit the each year’s progress reports successively, starting with the first period of performance. Multiple progress reports can be submitted in one day if the PD needs to “catch up” with their required reporting.
Performing Periods for progress reporting:
For Capacity projects: Federal Fiscal Year, due March 1 each year.
For Non-Capacity Projects: annual and corresponds with the Anniversary Date of your grant. So, your first report is due within 90 days after the anniversary of the Start Date of your project. This continues for each subsequent progress report for each year the project is active.
A Progress Report cannot be submitted any earlier than 90 days prior to the anniversary of the start date of the project (non-capacity) or March 1 (capacity).
If you have been notified by NIFA program staff that your award will be receiving any type of extension or continuation on the same Award Number (applicable to non-capacity only), you must submit the progress report within 90 days BEFORE the anniversary date; make sure to adhere to the specific instructions sent to you by your Program Contact at NIFA; some programs require progress reports up to at least 60 days prior to the anniversary of the start date. Click here for more information on extension/continuation awards.
When & How to Submit a Progress Report
You will receive an email from the REEport system alerting you whenever you are 90 days away from the anniversary of the start date or March 1. This notifications means that the progress report can now be submitted at any time; progress reports are only accepted by REEport up to 90 days prior to the anniversary date or March 1. The actual due date of the report is 90 days AFTER the anniversary date or March 1. So, you have a 180 day window in which to submit your progress report.
Example for non-capacity grants: Project start date is September 1, 2012. REEport will send a notification email 90 days prior to September 1, 2013. The anniversary date is September 1, 2013. The Progress Report covering the period of performance from September 1, 2012 through August 31, 2013 is due no later than November 30, 2013.
When a project is active, REEport always makes available one Progress Report form in the Progress Report module for editing and submission. The period of performance prepopulated on the form will always be the oldest period of performance that has yet to be reported on. To access whatever current form is available to you, go to the Progress Report module as indicated:

Expand your “Progress Report(s) in Draft” folder.
C
 lick
the project you want to report on; use any of the underlined links
on available – they will all bring you to the same form for
editing and submission to NIFA.
The first page you are brought to is the cover page of the project; note that for non-capacity projects, the cover page contains prepopulated, non-editable data that is imported from what you submitted as part of your project initiation. If any of this information is incorrect, it will need to be changed in NIFA’s internal grants system. Click here for more details on this process. If it is a Capacity project and the cover page information needs to be updated, this can be done by submitting a Project Change request.
Proceed with entering data on the progress report screens. For specific instructions for navigating these screens and how/what to enter for content, consult the How to Submit a Progress Report section of this manual.
Note that for all data you enter, they should be applicable to the period of performance ONLY as listed on the cover page of the report.
Once all your data have been entered, make sure to click the “submit” button on the last screen. Note that LGUs have two levels of review, so the first submit button only submits the project for organizational (Site Admin) review; a second level of submission takes place within the “Pending submission to NIFA” folder. Refer back to the link in step 6 for more information on this.
Your progress report is reviewed by a NIFA National Program Leader (NPL). If the NPL deems the report unacceptable for any reason, he or she may request that the report be sent back to you within 90 days for editing and resubmission. Note that when this action is performed, the system will alert you that the report has been sent back; however, no comments on what to change will be included in the email. Your NPL reviewer will communicate with you outside of the REEport system so that you can make the proper edits and resubmit the report.
If your submitted progress report sits within REEport for 90 days after submission, your report is then considered final and no changes can be made, whether at the request of the NPL or by you.
Once a Progress report is submitted to NIFA, REEport automatically creates a form for the next period of performance for which a report will be due.
A progress report sitting in the draft folder may be edited by you, the PD, at any time, but it can only be submitted up to 90 days prior to the anniversary of the start date (i.e. the end of the period of performance).
If you are “catching up” on old, overdue reports, then any new forms created can all be edited and submitted within the same day because the anniversary dates for these periods of performance have already passed.
Final Report/Terminate a Project
Upfront Hints & Explanation of how Final Reporting works:
Using the Final Report module, a Final Report is required to be completed and submitted no later than 90 days after the end date of the project (non-capacity) or March 1 (capacity).
The Final Report may be submitted at any time, and doing so changes the project status to Completed. This is the only way to officially close out a project, even if you are terminating the project early.
You will find that a Final Report form has been automatically created for each active project that you have initiated into the REEport system. These are found in the Draft folder in your Final Report module and are automatically set to report on the PROJECT DURATION.
Policy Note: Missing the due date or failing to submit a Final Report (even in the case of a PD retirement, leaving the project, etc.) does not absolve an institution of needing to submit the report. Per the Terms & Conditions of NIFA awards, any PD/Institution with delinquent final reports may have future funds from NIFA withheld until the report is submitted.
In the final year of a current project, if you have been notified by NIFA program staff that your award will be receiving any type of extension or continuation on the same Award Number (non-capacity only), you should NOT submit the Final Report form from that module. Instead, you should submit the progress report form that is available to you in your progress report module. The Final Report form will remain in the system for the time when you project is actually ready to be terminated.
Note that the incorrect submission of a Final Report can be “undone” by NIFA, but NIFA staff cannot “convert” a Final Report to a Progress Report. Therefore, please be aware that you will need to go to the Progress Report module and manually re-enter all the data into the Progress Report form if this happens.
Click here for more information on extension/continuation awards.
When & How to Submit a Final Report
You will receive an email from the REEport system alerting you when you are 90 days away from end date of the project or March 1. This notification means that you are 180 days away from the due date of the Final Report.
Example for non-capacity: Project end date is September 30, 2014. REEport will send a notification email 90 days prior to September 30, 2014. The Final Report for the project must be submitted no later than December 29, 2014. Note that failure to submit the report by this date may result in withholding of future funds from NIFA.
When a project is active, REEport always makes available one Final Report form in the Final Report module for editing and submission. The period of performance prepopulated on the form is the PROJECT DURATION (start date to end date).

Expand your “Final Report(s) in Draft” folder.
C
 lick
the project you want to report on; use any of the underlined links
on available – they will all bring you to the same spot.
The first page you are brought to is the cover page of the project; note that the cover page contains prepopulated, non-editable data that is imported from what you submitted as part of your project initiation. If any of this information is incorrect, it will need to be changed in NIFA’s internal grants system (if project is non-capacity). Click here for more details on this process. For capacity project, a Project Change request should be submitted to change any of the cover page information.
Proceed with entering data on the final report screens. For specific instructions for navigating these screens and how/what to enter for content, consult the How to Submit a Final Report section of this manual.
Note that for all data you enter, they should be applicable to the DURATION OF THE PRJOECT.
Exception: FTE reports on the Participants page should be for the most previous year only.
Once all your data have been entered, make sure to click the “Submit” button on the last screen, your submit screen (use the link above in Step 6 for detailed screenshots of this process). Upon completing this action take note of the following:
Your final report is reviewed by a NIFA National Program Leader (NPL). If the NPL deems the report unacceptable for any reason, he or she may request that the report be sent back to you within 90 days for editing and resubmission. Note that when this action is performed, the system will alert you that the report has been sent back; however, no comments on what to change will be included in the email. Your NPL reviewer will communicate with you outside of the REEport system so that you can make the proper edits and resubmit.
If your submitted final report sits within REEport for 90 days after submission, your report is then considered final and no changes can be made, whether at the request of the NPL or by you.
Resubmitting a Deferred Project
Projects that are deferred by NIFA are most often deferred because the National Program Leader who reviewed the project has identified some changes that need to be made to the project before they will allow it to become active; usually this means that the proposed research is on target with NIFA’s portfolios/goals and is within the purview of the funding source it’s proposing to use, but the project write up needs some adjustments.
Resubmitting a deferred project is much like submitting a brand new project. The main difference is that you can find the deferred project in TWO different places – in your “drafts” folder as well as your “deferred projects” folder. The project can be accessed from either location, changes can be made, and you can click “submit” at the end in order to resubmit to NIFA for review.
Here are the steps and workflow for resubmitting deferred projects:
Navigate to the Project Initiation module.
Locate the project in either the “Drafts” folder or the “Deferred Projects” folder; the underlined links for the project in each location will bring your to the exact same spot. If you use the search function at the top of the screen, the search will return 2 results – one in each of the folders.
Click any of the underlined links for the project.
Make necessary edits to the project data (pay close attention to the comments by the NPL who request changes; these can be found on the cover page as indicated here:

After all edits have been made, navigate to the “submit” screen on the sub menu bar or by using the navigation buttons. Click the “submit for review” button. For further information and screenshots on the workflow for submitting projects for organizational review and then to NIFA, click here.
Note that there is no limit to the amount of times a project can be deferred and resubmitted. Upon resubmission, a deferred project is subject to the same review criteria and timeline as are new projects; as with new projects, the NPL can choose to approve, decline, or defer the resubmitted project. If the NPL chooses to defer is a 2nd (or more ) times, the project can always be located as a draft in either the drafts or deferred folder within the Project Initiation module for resubmission.
Project Change Requests (Including Extensions on Capacity Projects)
Capacity Projects
For a detailed description of this module in REEport, including explanation of the folder structure and workflow, click here.
Here is a summary of steps you must take to make changes to capacity projects:
Log into REEport and navigate to the “Project Change module.”
Click on the “Active Projects” folder to expand it and view all projects (or search for the project if necessary/desired).
Click on any of the underlined links of the project to which you wish to make changes.
Proceed with editing/updating data for the particular project.
Click “submit changes for review” on the last screen; this moves the project to the “Pending Submission to NIFA” folder.
Note: If you saved the changes you made but don’t click “submit” the project will only be moved to your “Pending Changes in Draft Stage” folder.
Within the “Pending Submisison to NIFA” folder, click on the project, navigate to the “submit” screem via the sub-menu bar and click “Submit to NIFA.”
If the change you made is one that requires NIFA approval, the change is subject to a 30 day review period before it may become final. If the change is automatic, the project will show in your “active projects” folder AND in your “changed projects” folder within your Project Initiation module.
See screenshot of folder structure:

The following is a list of which data fields do and do not require NIFA approval when submitting a project change in REEport:
Change is made automatically by REEport* |
Change requires NPL approval |
Project Number |
Performing Organization/Institution |
Project Title (not applicable to Multistates) |
Collaborating /Partnering Organizations |
Performing Department |
Collaborating/Partnering Countries |
Co-Project Director: Name, Department |
Proposed Start Date |
Collaborating/Partnering States (N/A to Multistates) |
Estimated Project FTEs |
Project Director: Name, E-mail, Phone |
Goals |
Proposed End Date: One time, one year extension, not exceeding 5 years of total project duration (and within Multistate Project duration range for Multistate Hatch Projects) |
Outputs |
Assurance Statement |
Outcomes |
|
Audience |
|
Methods |
|
Summary |
|
Keywords |
|
Classification (incl. Animal Health component, KA/SOI/FOS, Planned Programs) |
|
Project Proposal |
*Making Changes on Legacy projects originally initiated in CRIS Web Forms:
The above list of fields that are changed automatically by REEPort applies only to projects that were originally initiated/started in REEport.
For any project that was already active in CRIS Web Forms and brought into REEPort, the project will become subject to new data fields that REEport requires that CRIS Web Forms did not collect.
So, if you are trying to submit a Project Change for a project that was originally initiated in CRIS, even if the data are normally within a field that would not require NIFA approval, you must submit to NIFA for review. Here are additional instructions for this scenario:
INSTRUCTIONS ON SUBMITTING CHANGES ON LEGACY PROJECTS:
Locate the desired project in the “Active Projects” folder in the Project Changes module.
Make changes to the desire field(s).
For any open text box, you may choose to enter additional data for the project (will become a permanent part of the project record) OR you may choose to enter the phrase “Project Imported from CRIS; no new data to report.”
For any drop down menu, please choose the best applicable item.
Click submit at the end for organizatino review; don’t forget to click “submit” a second time to actually send the change to NIFA (see steps 5 and 6 above).
Following the above steps will result in the project being submitted to a NIFA NPL who will review the project changes and approve them, as the new data fields in REEPort are not required because legacy projects are “grandfathered” in to what the CRIS Web Forms system collected. NIFA’s policy is that project change approvals should occur within 30 days of submission.
Non-Capacity (Including Competitive) Projects
In the current version of REEport, changes cannot be made to project data on non-capacity (including competitive) projects once the Project Initiation form has been submitted to NIFA. This submission of the Project Initiation is what changes the project’s status from “draft” to “active.” An “active” status means that the data are now part of NIFA’s Current Research Information System database and are publicly searchable. There are, however, some basic fields that can be updated internally by NIFA, including the PD contact information and keywords. Please contact the “Program Contact” as listed on the Award Face Sheet of your grant to determine if changes should and can be made to an active project.
Note: A future version of REEport will allow PDs to log into REEport and make changes to project data; these changes will be subject to NIFA approval before becoming a permanent part of the project and being publicly available.
Instructions for Independent Grantees (Not Part of an LGU)
Independent grantees are part of “independent sites” in REEport. This means that the site is not an LGU/NIFA partner Institution and therefore has no central Site Administration (i.e. a Site Administrator cannot manage the site or the projects in it). This means that a Project Director at an Independent Site is solely responsible for editing and submitting his or her own forms via REEport to NIFA.
A note about AORs/Offices of Sponsored Programs:
Any person who is listed as the AOR on a grant will receive an email from the REEport system notifying them that they’ve been granted access and that they need to verify/activate their account. Once they’ve activated their account, they will be able to log into REEport and see any project on which they are listed as the AOR. However, this “view” is a read-only view. The AOR has no capability to edit the data on projects or associated progress reports and cannot submit forms on behalf of the PD to NIFA.
A note about Tribal Colleges:
In REEport, a NIFA “non-partner” site is considered any site that does not receive any of the following funding lines: Hatch/Hatch Multistate, Evans Allen, Animal Health 1433, McIntire Stennis, RREA. Under this definition, Tribal Colleges are considered “independent” sites in REEport; any Project Director at a Tribal College must edit and submit his or her own forms to REEport. The only other person who has access to “view” the forms is the AOR listed on the grant, but that is read-only access (i.e. they can click a PDF of the project within the system, but they cannot edit the data or submit the forms).
Logging In to REEport for the First Time
All users must go through a verification process in the portal if they have not logged in before (i.e. if they are not a previous user of REEport or have not logged into the portal for other purposes, such as the POW system or to access the Leadership Management Dashboard).
If you are a Project Director or Authorized Organizational Representative (AOR) on a Non-Capacity project:
Whenever a new non-capacity project is brought into REEport from NIFA’s internal grants system, REEport sends out an email to the Project Director and AOR asking them to click an activation link that will grant them access to the Portal and ultimately, to their project; the activation link is valid for 36 hours. This only occurs if the PD/AOR have not previously been verified in the REEport system as the PD/AOR on a prior project.
The email looks like this:

If you have the email with the activation link (which is good for 36 hours), then click that link and follow the prompts. If you no longer have the email, the 36 hours has passed, or you don’t remember receiving an email, follow the steps below.
Go to http://portal.nifa.usda.gov. Enter your email and leave password section blank. Click “log in.”

You will be asked to re-enter your email address and click “send email.”

In the email you receive (should arrive within 10 minutes), click the link provided. The link will take you to a page where you can set your own password.
Note: If you enter an email address that is not recognized as part of a valid user account, you will receive the below error message. This message usually occurs when the email you entered is not the email that you entered as part of your grants.gov application. If you receive this message, contact [email protected].

After setting your password, log into the portal with your email and newly set password.
Under “Active Applications,” click the “REEport” link. (All REEport users will have a slightly different link name since the name of the link associates them with a particular institution.)

6. You will be brought to your REEport home page, where you have the ability to start new projects and manage existing projects:

Logging In – Returning Users
At the portal login page, enter your email address and your password (set by you the first time you logged into Portal. Click “Log In.”
If you do not remember your password: click the “reset password” link at the top of the portal login screen and follow the prompts.


Click the “REEport” link that appears on your welcome page under “Active Applications. (All REEport users will have a slightly different link name since the name of the link associates them with a particular institution.)
Note: If you do not have a “REEport” link listed under your active applications, then you have not yet been set up with a user profile; check with your Site Administrator, if you have one. If you do not have an SA, send an email to [email protected].

You will be brought to your REEport home page, where you have the ability to initiate projects and submit associated progress and final reports.

Navigating the Software
REEport is designed in modules. For non-capacity grants, there are three modules you can use to submit forms: Project Initiation, Progress Report, and Final Report. When moving from screen to screen in REEport, regardless of the module you’re in (i.e. Project Initiation, Progress Report, etc.) you have the ability to use the menu bar at the top and also to use the navigation buttons provided at the top and bottom of each screen.
Example: In the Project Initiation Module, once you’ve clicked “into” a project, you will see a sub menu bar where you have a “cover” page and a “participants” page. When moving from “cover” to “participants” you can click “next,” which saves your work and moves you to the next page. Alternatively, you can click “save” which saves your work and keeps you on the cover page. To move to the Participants page, you could then click “Next” or “Participants” at the top of the menu bar. Both options are shown in these screenshots:
Option #1:

Option #2:


I
 mportant
note if you choose option #2: Only the navigation buttons in
REEport will save your work for you. If you do not click save and
use the menu bar to move to the next screen (i.e. clicking
“participants” on the menu bar to move from cover page to
participants page) you will get the following message:
If you get this message, you MUST choose “stay on this page” so that you will have the option to save your work before moving to another page. If you choose “leave this page” your work will not be saved.
Finding, Editing, & Managing Projects
When navigating the software and moving from module to module and from project to project within those modules, it’s helpful to remember that every module is set up exactly the same in terms of HOW to find the project you want to work on.
O
 ption
#1: Your first option is to always use the search tool on the home
screen of each module. This option is most helpful when you know the
exact data to search for at least one of the fields (accession
number, proposal number, PD name, etc.); it’s also helpful when
you’re not exactly sure what status
the project is in and therefore wouldn’t know which folder to look in.
Option #2: Use the “expanded folder” views to see the list of projects in that particular folder. If you know, for example, there are three projects you want to work on, one capacity and two non-capacity that are all in project initiation, you might find it most helpful to expand the “draft” folder and find those three projects within that folder.

Other Helpful Hints:
All of the instructions provided in the REEport system are indicated by the
 icon.
This manual follows the same general help text found in the system,
but it is expanded in some areas.
No matter what module or screen you are on, you can always go back to your home screen (click “home” on the top menu bar” to view the large module icons and click any of them to enter those modules. You can also move from module to module by using just the top menu bar; you do not need to go back “home” first.
Due Dates for Submitting Reports
Once a non-capacity grant has been selected for award, the grantee is notified by a NIFA Program Specialist or National Program Leader that they must use REEport to complete project initiation. Later, REEport is also the system through which Progress Reports and a Final Report should be submitted. Here is a Summary chart of report types and due dates:
|
Non-Capacity Projects (incl. Competitive Grants) |
Project Initiation |
As soon as notification of award is received; funds for the grant will not be released until NIFA has received the Project Initiation. |
Progress Report |
No later than 90 days after the Anniversary Date (may be submitted up to 90 days prior). Continuation awards must be submitted within 90 days before the anniversary date. |
Financial Report* |
Not required in REEport; Submit the SF-425 via email.* |
Final Report |
No later than 90 days after the Anniversary Date (may be submitted at any time to terminate the project). |
Click here to see more detailed descriptions of timelines and due dates for each of these report types.
*A note about financial reporting:
In FY2012, NIFA instituted a Policy change: Non-capacity grantees are no longer required to complete yearly Financial Reports (the old AD-419s submitted via CRIS Web Forms). Thus, a non-capacity grantee only uses REEport for Project Initiation, Progress Reports, and Final Reports. The Federal Financial Report, the SF-425 must still be submitted to the Office of Grants and Financial Management; this is due annually based on the start date of the project. The SF-425 is sent as a PDF via email to the Awards Management Division at NIFA. Click here to learn more about this process.
How to Submit Projects & Reports
Upfront Helpful Hints:
For guidance completing any REEport form, remember to use the embedded Help Text by clicking on the small blue icon
 located next to each field found within REEport.
There are various character limits on all fields in REEport, but the main one worth noting is for all the large text boxes with the built-in text editor; they have an 8,000 character limit, including spaces.
Depending on the type of grant you received, when completing REEport forms, there may be additional content guidance available from NIFA program staff. Program contacts (name, email, phone number) are listed on your NIFA Award Face Sheet.
Project Initiation
The life of your grant begins with the application process in Grants.gov. Once your grant is recommended for Award in NIFA’s internal grants system, you will receive an email notification that your Project Initiation form is awaiting completion in REEport. The email looks like this:

Once you’ve received the email above (and have verified your user account, if needed), log into REEport and go to your Project Initiation module as indicated in this screenshot:

Expand your “Project(s) in Draft Stage” folder.
Click the project you want to initiate; use any of the underlined links available – they will all bring you “into” your project so that you may enter data.

The first page you are brought to is the cover page of the project; note that the cover page contains prepopulated, non-editable data that is imported from your grant application that you submitted through grants.gov. If any of this information is incorrect, it will need to be changed in NIFA’s internal grants system. Click here for more details on this process.
Proceed with entering data on the project initiation screens. For specific instructions for navigating these screens and how/what to enter for content, consult the How to Submit a Project Initiation section of this manual.
Once all your data have been entered, make sure to click the “Submit to NIFA” button on the last screen, your submit screen. Upon completing this action take note of the following:
Submitting the project to NIFA automatically makes the project become active; the project will now appear in your “active projects” folder in the Project Initiation Module:

Except for data that were imported from your grants.gov application, data on the project initiation form cannot be edited once the project is submitted to NIFA; note that neither the NIFA Program Staff nor REEport Staff can make changes on your behalf.
Exception: For any data that were imported from the grants.gov application that need updating, this can be done at any time by contacting your Program Contact (email is best) as listed on your award face sheet. NIFA staff will then make the changes in our internal grants system, and the changes will be imported into your project in REEport.
Once NIFA receives your Project Initiation Forms via REEport, your award will be processed and funds will be made available to you for draw down.
Future Reporting Requirements: For any active project, REEport makes two other form types available for editing and submitting: A Progress Report (located in your “drafts” folder in the Progress Report module) and a Final Report (located in your “drafts” folder in the Final Report module). An annual Progress Report is due for each active year of the project, except for the final year, which is when a Final Report should be submitted to officially terminate the project. You will receive email notifications from the REEport system when these reports are coming up due. Please consult the Progress Report and Final Report sections of this manual for more information about submitting these reports.
Progress Report
Upfront Hints & Explanation of how Progress Reporting works:
Using the Progress Report module, an Annual Progress report is required to be completed and submitted for each year your project is active (except in the final year of the project, after which a Final Report is submitted that covers the entire project duration).
You will find that a Progress Report form has been automatically created for each active project that you have initiated into the REEport system. These are found in the Draft folder in your Progress Report module and are automatically set to report on the first year of the project.
Once the first year’s Progress Report is completed and submitted, REEport will automatically create a new reporting form for the second year, then the third year, and so on.
Policy Note: Missing the due date or failing to submit a given year’s progress report does not absolve a grantee of needing to submit the report, nor does it allow them to just continue on with submitting the next progress report (e.g. submitting the second year’s progress report when the first was never submitted.) REEport forces all Project Directors to submit the each year’s progress reports successively, starting with the first period of performance. Multiple progress reports can be submitted in one day if the PD needs to “catch up” with their required reporting.
Performing Periods for progress reporting correspond with the Anniversary Date of your grant. So, your first report is due within 90 days after the anniversary of the Start Date of your project. This continues for each subsequent progress report for each year the project is active.
A Progress Report cannot be submitted any earlier than 90 days prior to the anniversary of the start date of the project.
If you have been notified by NIFA program staff that your award will be receiving any type of extension or continuation on the same Award Number, you must submit the progress report within 90 days BEFORE the anniversary date; make sure to adhere to the specific instructions sent to you by your Program Contact at NIFA; some programs require progress reports up to at least 60 days prior to the anniversary of the start date. Click here for more information on extension/continuation awards.
When & How to Submit a Progress Report
You will receive an email from the REEport system alerting you whenever you are 90 days away from the anniversary of the start date of your project. This notifications means that the progress report can now be submitted at any time; progress reports are only accepted by REEport up to 90 days prior to the anniversary date of a project. The actual due date of the report is 90 days AFTER the anniversary date. So, you have n 180 day window in which to submit your progress report.
Example: Project start date is September 1, 2012. REEport will send a notification email 90 days prior to September 1, 2013. The anniversary date is September 1, 2013. The Progress Report covering the period of performance from September 1, 2012 through August 31, 2013 is due no later than November 30, 2013.
When a project is active, REEport always makes available one Progress Report form in the Progress Report module for editing and submission. The period of performance prepopulated on the form will always be the most historical period of performance that has yet to be reported on. To access whatever current form is available to you, go to the Progress Report module as indicated:

Expand your “Progress Report(s) in Draft” folder.
C
 lick
the project you want to report on; use any of the underlined links
on available – they will all bring you to the same form for
editing and submission to NIFA.
The first page you are brought to is the cover page of the project; note that the cover page contains prepopulated, non-editable data that is imported from what you submitted as part of your project initiation. If any of this information is incorrect, it will need to be changed in NIFA’s internal grants system. Click here for more details on this process.
Proceed with entering data on the progress report screens. For specific instructions for navigating these screens and how/what to enter for content, consult the How to Submit a Progress Report section of this manual.
Note that for all data you enter, they should be applicable to the period of performance ONLY as listed on the cover page of the report.
Once all your data have been entered, make sure to click the “submit” button on the last screen, your submit screen (use the link above in Step 6 for detailed screenshots of this process). Upon completing this action take note of the following:
Your progress report is reviewed by a NIFA National Program Leader (NPL). If the NPL deems the report unacceptable for any reason, he or she may request that the report be sent back to you within 90 days for editing and resubmission. Note that when this action is performed, the system will alert you that the report has been sent back; however, no comments on what to change will be included in the email. Your NPL reviewer will communicate with you outside of the REEport system so that you can make the proper edits and resubmit the report.
If your submitted progress report sits within REEport for 90 days after submission, your report is then considered final and no changes can be made, whether at the request of the NPL or by you.
Once a Progress report is submitted to NIFA, REEport automatically creates a form for the next period of performance for which a report will be due.
A progress report sitting in the draft folder may be edited by you, the PD, at any time, but it can only be submitted up to 90 days prior to the anniversary of the start date (i.e. the end of the period of performance).
If you are “catching up” on old, overdue reports, then any new forms created can all be edited and submitted within the same day because the anniversary dates for these periods of performance have already passed.
Final Report/Terminating a Project
Upfront Hints & Explanation of how Final Reporting works:
Using the Final Report module, a Final Report is required to be completed and submitted no later than 90 days after the end date of the project.
The Final Report may be submitted at any time, and doing so changes the project status to Completed. This is the only way to officially close out your grant, even if you are terminating the project early.
You will find that a Final Report form has been automatically created for each active project that you have initiated into the REEport system. These are found in the Draft folder in your Final Report module and are automatically set to report on the PROJECT DURATION.
Policy Note: Missing the due date or failing to submit a Final Report (even in the case of a PD retirement, leaving the project, etc.) does not absolve an institution of needing to submit the report. Per the Terms & Conditions of all NIFA non-capacity awards, any PD/Institution with delinquent final reports may have future funds from NIFA withheld until the report is submitted.
In the final year of a current project, if you have been notified by NIFA program staff that your award will be receiving any type of extension or continuation on the same Award Number, you should NOT submit the Final Report form from that module. Instead, you should submit the progress report form that is available to you in your progress report module. The Final Report form will remain in the system for the time when you project is actually ready to be terminated.
Note that the incorrect submission of a Final Report can be “undone” by NIFA, but NIFA staff cannot “convert” a Final Report to a Progress Report. Therefore, please be aware that you will need to go to the Progress Report module and manually re-enter all the data into the Progress Report form if this happens.
Click here for more information on extension/continuation awards.
When & How to Submit a Final Report
You will receive an email from the REEport system alerting you when you are 90 days away from end date of your project. This notification means that you are 180 days away from the due date of the Final Report, according to the Terms & Conditions of your award.
Example: Project end date is September 30, 2014. REEport will send a notification email 90 days prior to September 30, 2014. The Final Report for the project must be submitted no later than December 29, 2014. Note that failure to submit the report by this date may result in withholding of future funds from NIFA.
When a project is active, REEport always makes available one Final Report form in the Final Report module for editing and submission. The period of performance prepopulated on the form is the PROJECT DURATION (start date to end date).

Expand your “Final Report(s) in Draft” folder.
C
 lick
the project you want to report on; use any of the underlined links
on available – they will all bring you to the same spot.
The first page you are brought to is the cover page of the project; note that the cover page contains prepopulated, non-editable data that is imported from what you submitted as part of your project initiation. If any of this information is incorrect, it will need to be changed in NIFA’s internal grants system. Click here for more details on this process.
Proceed with entering data on the final report screens. For specific instructions for navigating these screens and how/what to enter for content, consult the How to Submit a Final Report section of this manual.
Note that for all data you enter, they should be applicable to the DURATION OF THE PRJOECT.
Exception: FTE reports on the Participants page should be for the most previous year only.
Once all your data have been entered, make sure to click the “Submit to NIFA” button on the last screen, your submit screen (use the link above in Step 6 for detailed screenshots of this process). Upon completing this action take note of the following:
Your final report is reviewed by a NIFA National Program Leader (NPL). If the NPL deems the report unacceptable for any reason, he or she may request that the report be sent back to you within 90 days for editing and resubmission. Note that when this action is performed, the system will alert you that the report has been sent back; however, no comments on what to change will be included in the email. Your NPL reviewer will communicate with you outside of the REEport system so that you can make the proper edits and resubmit.
If your submitted final report sits within REEport for 90 days after submission, your report is then considered final and no changes can be made, whether at the request of the NPL or by you.
Extensions & Continuation Awards
Non-Capacity projects (including competitive grants) in REEport cannot be extended by the PD via the REEport System. Any type of extension, including no-cost extensions and continuation awards are documented within NIFA’s internal grants processing system. Such extensions are then auto-filled into the “end date” field on the project in the REEport system and on all associated Progress and Final Reports.
What to do if your project is getting extended:
If you have requested and received approval for a no-cost extension OR if you have been notified that you will be receiving a continuation award for your project, you MUST fill out a progress report for the year that was originally designated as the final year of your project.
Upon logging into REEport, you should navigate to the Progress Report Module and locate the draft form for your project in the “drafts” folder. Fill out all required fields and submit the Progress Report. For more information on submitting a progress report, click here.
The end dates shown on your forms in REEport are non-editable because they are controlled and auto-filled by NIFA’s internal grants processing system. You do not need to be concerned if you are editing forms that have not yet been updated to reflect the new end date you have been notified of; this information will get updated in REEport on all forms retroactively once NIFA’s grants management personnel make the appropriate change in our internal system.
Make sure NOT to submit a final report. Even though a draft form for this report WILL be visible to you in REEport (in the “Final Report” module), it should only be used in the FINAL year of your project, meaning the year that has just been added to your project as part of the extension/continuation.
Note: For continuation awards, this principle will apply each year that you receive continuation funds. Thus, you may “skip” the final report multiple years in a row and only fill out progress reports until you reach the final year of the project.
Note: If you do incorrectly submit final report, NIFA will be able to send it back to you so that it is put back in draft status and can be submitted when it is actually required. However, the information you entered into the form is not transferable or “changeable” to becoming a progress report. You will need to re-enter all data into the Progress Report form manually (copying and pasting is suggested where applicable).
Making Changes to an Active Project
In the current version of REEport, changes cannot be made to project data on non-capacity (including competitive) projects once the Project Initiation form has been submitted to NIFA. This submission of the Project Initiation is what changes the project’s status from “draft” to “active.” An “active” status means that the data are now part of NIFA’s Current Research Information System database and are publicly searchable. There are, however, some basic fields that can be updated internally by NIFA, including the PD contact information and keywords. Please contact the “Program Contact” as listed on the Award Face Sheet of your grant to determine if changes should and can be made to an active project.
Note: A future version of REEport will allow PDs to log into REEport and make changes to some project data; these changes will be subject to a NIFA review process before becoming a permanent part of the project and being publicly available.
Submitting the Federal Financial Report (SF-425)
Non-Capacity projects in REEport are not required to have “Financial Reports” (those in the REEport system format) submitted against them. However, for each active year of a project, the Federal Financial Report (SF-425) must be submitted to the Awards Management Division at NIFA. The details of this report are outlined in the Terms & Conditions of your award. The report form can be found at https://www.whitehouse.gov/omb/grants_forms and should be sent via email to [email protected].
Submitting a Project Initiation – Data Content & Instructions
Project Initiation is the report that must be submitted to NIFA in order for any non-capacity or capacity project to become officially active.
For non-capacity: Even if an award has been recommended, the Project Director of that project will not receive their funds until the NPL Program Contact receives the project initiation through REEport.
For capacity projects: A PD is not allowed to spend capacity funds (capacity building grant already awarded to the institution) on their research until his/her project proposal has been submitted and approved through the proper channels at their employing institution. Once the proposal has been approved, the PD must submit a project initiation through REEport to gain NIFA NPL approval (along with an attachment of the original proposal). Only once the NPL approves the project and puts it in “active” status is the PD allowed to spend capacity funds on that research.
Important Policy Note on Capacity Projects: Start Dates on Capacity Projects CANNOT BE BACKDATED. REEport will only accept submission of a capacity project for review if the start date is the day of submission or later. Also, REEport will automatically change the start date for any project on which the NPL’s approval date is later than the originally requested start date. Example: A project that was submitted for review with a start date of October 1, but the NPL did not approve the project until October 15; thus, the start date on the project will change automatically to October 15.
To enter the project initiation module of REEport, click either of the two buttons shown here:


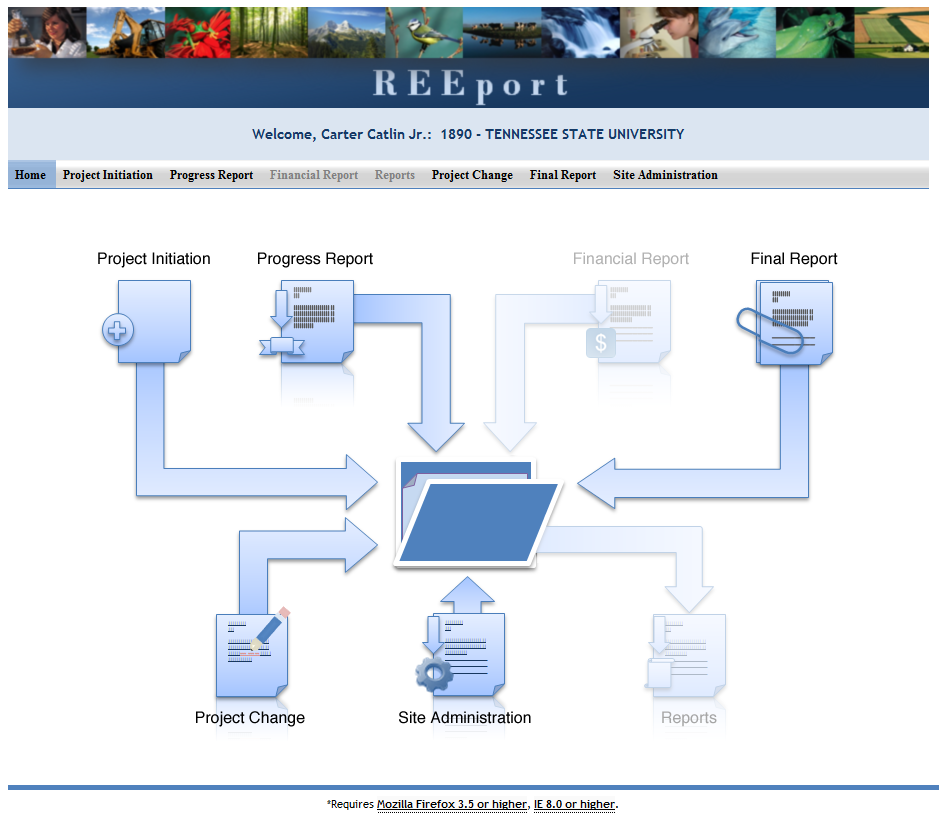
Non-Capacity Project Initiation
If you want to fill out the project initiation for a non-capacity project that you’ve been awarded, you can find that project either by typing in the proposal number and clicking search (option 1 below), or you can open your “Drafts” folder and click the project you want to work on (option 2 below).
Option #1: At the project initiation home screen, type you proposal number or PD name into the appropriate box and click search.


Option #2: Open the “drafts” folder and find the grant that you wish to complete project initiation on (this is most easily identified in a longer list by focusing on the “grants.gov#” column, the “proposal #” column, or the “title” column, as these are the columns that best differentiate non-capacity from capacity projects, especially if you are a PD or SA who has many projects to manage.
NOTE: At NIFA non-partner Institutions, the only user who has the ability to see a non-capacity project in REEport and edit/submit that project is the Project Director as listed on the original grant application that was submitted through grants.gov. The only other user role who can “see” the project in REEport is the AOR listed on the project; note that the AOR only has read-only access to the project, and hence, will only have the PDF available to them. The AOR cannot click “into” the project to enter data on it.


Capacity Project Initiation – Create a New Project
“Creating a New Project” applies to capacity projects only. You will need to create a new project any time there is a new capacity project that has been approved through your institution’s merit review process and needs NIFA approval before capacity funds can be spent on that project.
Click “Create a New Project” button:
Funding Source
Choose the funding type that will be the funding source of the new project (note that only capacity fund types available to a particular institution will appear in the drop down list and only one type may be selected). If you choose “Hatch Multistate” at this stage, you will also be asked to choose the correct Multistate project number for a drop down list.
Note on Hatch Multistates: A multistate project number will only appear in the drop down list if that particular site is listed as a participant on the multistate project in NIMSS. For example, in order for the project to show up as part of the SAES site’s drop down menu in REEport, at least one research participant that is part of the SAES must be listed on Appendix E of that multistate project in NIMSS. Also note that Extension participants who are listed on Appendix E in NIMSS are not transferred into REEport because an Extension participant is not allowed to spend Hatch Multistate funds; if a PD has a split appointment, then their designation in NIMSS needs to be under the SAES in order to be able to submit the state level project in REEport under the multistate umbrella.
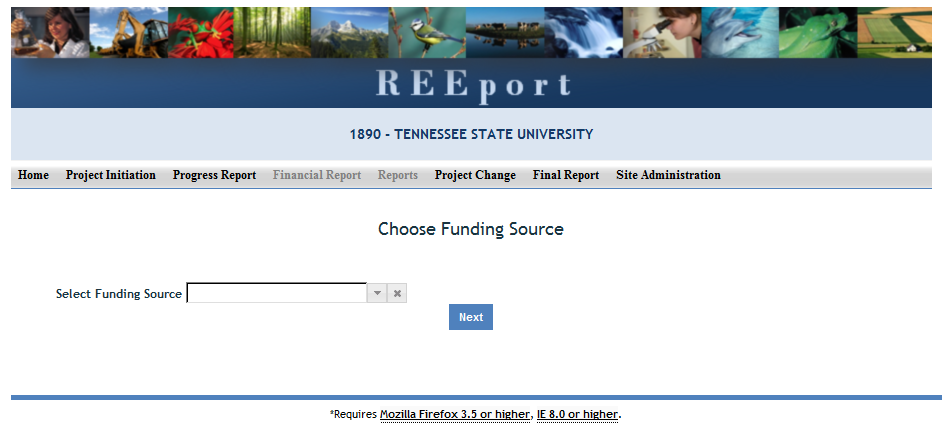
For Hatch Multistate only:

Helpful Hints for Entering Project Data:
After you’ve created or opened the project initiation you want to work on:
The first “page” (screen) you will come to after either opening a non-capacity draft or creating a new capacity project (or opening a capacity project already in draft) is the Cover page. The cover pages for non-capacity and capacity both cover the “vital stats,” if you will, of the project, but they do differ, so the following instructions and information cover the non-capacity cover page and capacity cover page separately.
Other Important tips:
For guidance completing any REEport form, remember to use the embedded Help Text by clicking on the small blue icon
 located next to each field found within REEport.
There are character limits on all fields in REEport, but the main one to be aware of is: for all the large text boxes with the built-in text editor, there is an 8,000 character limit, including spaces.
REEport does not accept graphics, charts, or other images pasted into any of the open text boxes.
No matter what module you are in, you can always go back to your home screen (click “home” on the top menu bar” to view the large module icons and click any of them to enter those modules. You can also move from module to module by using just the top menu bar; you do not need to go back “home” first.
Remember that whenever you enter data on a page, you MUST click one of the navigation buttons at the top or bottom of the page to save your work; while you are permitted to move from page to page within a module using the top menu bar (e.g. moving from “goals” to “products” by clicking those words in the menu bar) doing this will not save your work if you entered anything new on the page.
Review the screenshots in the Navigating the Software section of this manual for more details.
For Non-Capacity Projects only: Depending on the type of grant you received, when completing REEport forms, there may be additional content guidance available from NIFA program staff. Program contacts are listed on your NIFA Award Face Sheet.
Cover Page – Non-Capacity
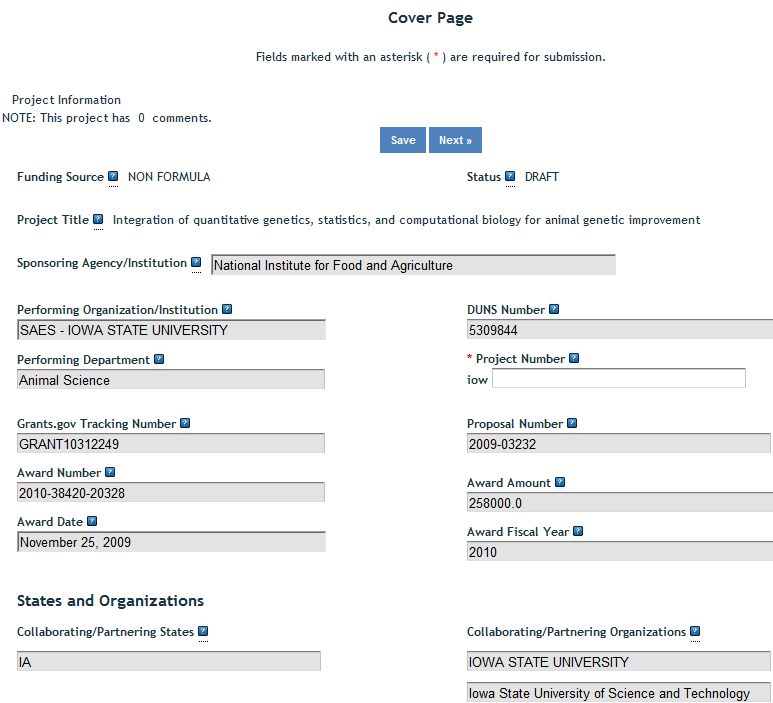

Funding Source
The funding source is prepopulated as "Non-Capacity" based on information contained in the grant application.
Status
The status of a project is assigned by the REEport system and starts at "draft." Various actions taken by the PD, the Site Admin, or NIFA personnel (NPL or NIFA Admin) will trigger the REEport system to automatically change the status as appropriate.
Summary of status definitions and action triggers for automatic change:
Draft - All project types start in project initiation in "draft" status. Even though a draft project maybe move into additional stages (i.e. your "Submitted" and "Pending Submission to NIFA" folders), the status of the project will not change until a decision action has been taken by a NIFA National Program Leader (NPL).
Active - This signifies a project that is has been approved by a NIFA NPL and is currently within the overall project duration dates (i.e. between the start date and end date of the project).
Declined - This signifies a project that has been declined by an NPL; it may not be resubmitted.
Deferred - This signifies a project that has been deferred by an NPL who has requested changes or additional information to be included in the project initiation; it may be resubmitted with appropriate changes in order for the NPL to render a final decision.
Complete - A project that is complete is one that has either been terminated via the submission of a Final Report or one that is currently outside of its overall project duration dates. This means that a project whose Final Report has not been submitted will still show a status of "complete" if the current calendar date is later than the end date of the project (note: projects in this situation are displayed in the "Final Report Past Due" folder).
Title
The project title is prepopulated based on the approved grant application.
Sponsoring Agency/Institution
The Sponsoring Agency/Institution is the organization that is funding the project. For all Capacity and Non-Capacity Projects, the sponsoring agency is NIFA. The exception to this is State projects; the sponsoring agency for these projects is prepopulated with "State Agricultural Experiment Station."
Performing Organization/Institution
The Performing Organization/Institution is the organization that employs the scientist(s) conducting the research.
DUNS Number
Universal Numbering System (DUNS) number is a unique nine-digit identification number provided by Dun & Bradstreet (D&B). For Non-Capacity Projects, NIFA automatically prepopulates this field with the DUNS number that was entered by the grantee in Grants.gov.
For more information on DUNS numbers, visit http://www.whitehouse.gov/sites/default/files/omb/grants/duns_num_guide.pdf.
Performing Department
The Performing Department is the entity/section at the Performing Organization/Institution to which the Project Director is assigned and performs most of his/her duties and research.
Project Number
The Project Number is an identifier (combination of letters and numbers) subject to the identification/numbering system used by the Performing Organization/Institution (PI). While it is recommended that Project Numbers be unique to only one project, NIFA does not prevent PIs from re-using project numbers. This most often happens when a given project has been terminated and a new project is being initiated that continues the research from the terminated project. Having the same project number enables the PI to track the research under that single identifier.
While PIs set their own requirements for project numbers (i.e. their preferred combination of letters and numbers) the Division Station Code, as shown above this field, will always automatically be appended by REEport as a prefix to the number entered.
Note: NIFA does NOT use project numbers to track projects or to perform data retrieval searches; accession numbers only are used for these activities.
Grants.gov Tracking Number
The Grants.gov tracking number comes directly from your Grants.gov application and is prepopulated by REEport.
Proposal Number
The Proposal Number is assigned by NIFA and prepopulated by REEport. It is not necessarily a unique identifier, as Proposal numbers are generally associated with the awarding of funds, and a single project over the course of its life may be awarded funding multiples times (i.e. continuation awards).
Award Number
The Award Number is a unique identifier that will never change; it is prepopulated by REEport.
Award Amount
The award amount for non-capacity (competitive grant) projects is prepopulated based on the approved amount of the grant awarded by NIFA.
Award Date
The award date is prepopulated by REEport and is the date on which the award of funds is made by NIFA to the grantee.
Award Fiscal Year
The award fiscal year is the fiscal year (FYs run from 10/1 through 9/30) in which the award of funds was made.
Collaborating/Partnering States
Collaborating/Partnering Institutions
Collaborating/Partnering Countries
For the above three categories, identify any other states/partnering institutions/countries that are significantly participating in this research project. A "significant" amount of participation to a project generally implies that the PD would not be able to realize the major objectives of a projects (at all or as effectively) without the participation and support of the other participating state(s).
Note: A "contribution" of effort and/or resources (i.e. SYs/PYs, materials) can be made regardless of whether or not the partnering entity is receiving or contributing actual monies towards the project.
Start Date
For non-capacity projects, the start date is prepopulated based on what NIFA has on file from the approved grant application. NIFA follows two rules when prepopulating this date: 1) The start of the project begins when the award of funds is made to the grantee OR 2) the start of the project begins on a future date that occurs after the award of funds is made because such future start date was originally approved with the grant application.
End Date
The project end date for non-capacity projects is prepopulated based on the approved grant award.
Project Director
Authorized Organization Representative
NIFA Program Contact
The above three fields are prepopulated based on the approved grant application.
Cover Page – Capacity
Following is a screenshot of the Cover Page of a capacity project. Below the screenshot are all the basic instructions for filling out the data fields, as well as descriptions of data fields that are prepopulated.

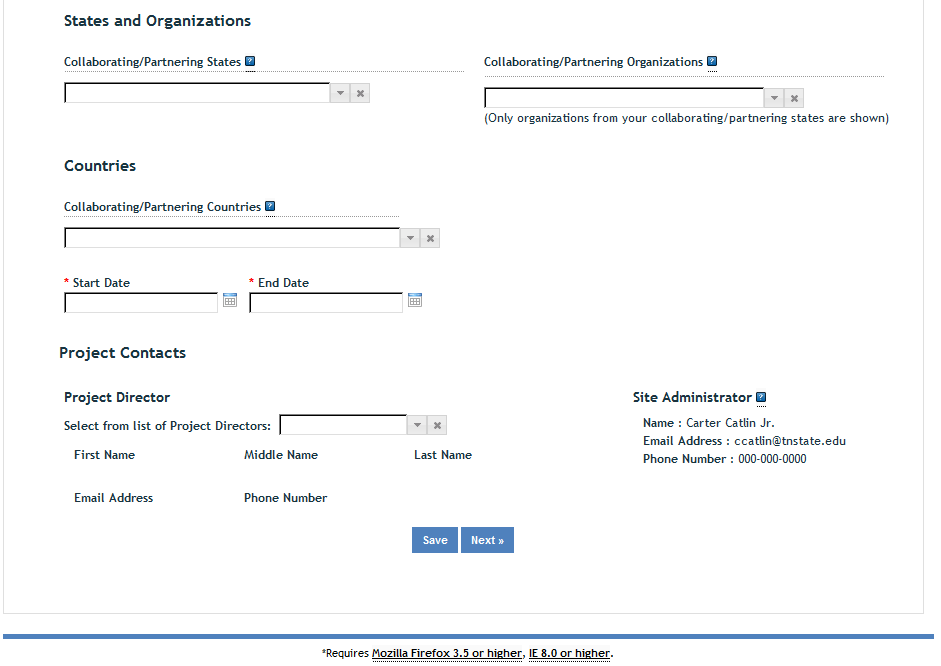
Funding Source
The funding source is prepopulated on this page based on what you chose when you clicked "create a new project." The options for capacity funding source are: Hatch, Hatch Multistate, Evans Allen, McIntire Stennis, Animal Health, and Renewable Resources Extension. Although it is not a NIFA capacity funding source, there is also the option for "State."
Status
The status of a project is assigned by the REEport system and starts at "draft." Various actions taken by the PD, the Site Admin, or NIFA personnel (NPL or NIFA Admin) will trigger the REEport system to automatically change the status as appropriate.
Summary of status definitions and action triggers for automatic change:
Draft - All project types start in project initiation in "draft" status. Even though a draft project maybe move into additional stages (i.e. your "Submitted" and "Pending Submission to NIFA" folders), the status of the project will not change until a decision action has been taken by a NIFA National Program Leader (NPL).
Active - This signifies a project that is has been approved by a NIFA NPL and is currently within the overall project duration dates (i.e. between the start date and end date of the project).
Declined - This signifies a project that has been declined by an NPL; it may not be resubmitted.
Deferred - This signifies a project that has been deferred by an NPL who has requested changes or additional information to be included in the project initiation; it may be resubmitted with appropriate changes in order for the NPL to render a final decision.
Complete - A project that is complete is one that has either been terminated via the submission of a Final Report or one that is currently outside of its overall project duration dates. This means that a project whose Final Report has not been submitted will still show a status of "complete" if the current calendar date is later than the end date of the project (note: projects in this situation are displayed in the "Final Report Past Due" folder).
Title
The project title is a succinct characterization of the focus and subject of study being performed. Do not include phrases such as "research on," "investigation of," etc. Do not use quotation marks or underscoring. Keep in mind that the title will be used for information retrieval searches, so including specific keywords that are as descriptive of the project as possible is important.
Sponsoring Agency/Institution
The Sponsoring Agency/Institution is the organization that is funding the project. For all Capacity and Non-Capacity Projects, the sponsoring agency is NIFA. The exception to this is State projects; the sponsoring agency for these projects is prepopulated with "State Agricultural Experiment Station."
Performing Organization/Institution
The Performing Organization/Institution is the organization that employs the scientist(s) conducting the research.
DUNS Number
Universal Numbering System (DUNS) number is a unique nine-digit identification number provided by Dun & Bradstreet (D&B). For Non-Capacity Projects, NIFA automatically prepopulates this field with the DUNS number that was entered by the grantee in Grants.gov.
For more information on DUNS numbers, visit http://www.whitehouse.gov/sites/default/files/omb/grants/duns_num_guide.pdf.
Performing Department
The Performing Department is the entity/section at the Performing Organization/Institution to which the Project Director is assigned and performs most of his/her duties and research.
Project Number
The Project Number is an identifier (combination of letters and numbers) subject to the identification/numbering system used by the Performing Organization/Institution. While it is recommended that Project Numbers be unique to only one project, NIFA does not prevent PIs from re-using project numbers. This most often happens when a given project has been terminated and a new project is being initiated that continues the research from the terminated project. Having the same project number enables the institution to track the research under that single identifier.
While PIs set their own requirements for project numbers (i.e. their preferred combination of letters and numbers) the Division Station Code, as shown above this field, will always automatically be appended by REEport as a prefix to the number entered.
Note: NIFA does NOT use project numbers to track projects or to perform data retrieval searches; accession numbers only are used for these activities.
Collaborating/Partnering States
Collaborating/Partnering Institutions
Collaborating/Partnering Countries
For the above three categories, identify any other states/partnering institutions/countries that are significantly participating in this research project. A "significant" amount of participation to a project generally implies that the PD would not be able to realize the major objectives of a project (at all or as effectively) without the participation and support of the other participating state(s).
Note: A "contribution" of effort and/or resources (i.e. SYs/PYs, materials) can be made regardless of whether or not the partnering entity is receiving or contributing actual monies towards the project.
Start Date
For all capacity projects, enter the date on which the research will begin being conducted and funds will begin being expended on this project. You may not backdate the start date for capacity projects. However, you may future date the start date for projects, as doing so provides you time to obtain the necessary approvals and await availability of personnel or materials to begin your research.
Policy Note: It is NIFA policy that no capacity funds can be expended on any project until the project is APPROVED by NIFA. For this reason, REEport will automatically make the start date reflect the requested start date OR the date of reviewer approval, whichever is later. This is applicable to all NIFA capacity funded projects, including Hatch Multistate projects, regardless of the start date listed on the “umbrella” multistate project in NIMSS.
Note about Planned Programs: If this is a Hatch, Hatch Multistate, or Evans Allen Project, you will be asked in the Classification section of this module to associate this project with one or more AREERA State Plan of Work Planned Programs; if you skip directly to that section without entering a start date on the cover page, the drop down list of Planned Programs will not be populated.
End Date
For capacity projects, the maximum duration of any project is five years. There are no extensions allowed for any project whose original length was approved at five years. However, one-year extensions are allowed and do not require NIFA approval for projects originally approved for 4 years or less. An additional one-year extension may be granted, with NIFA approval, for projects that were originally approval for 3 years or less. The Project Changes module must be used to request a project extension.
Example 1: A project is approved for 10/1/12-9/30/17. No extensions will be granted.
Example 2: A project is approved for 10/1/12-9/30/16. A one-year extension may be entered into REEport by the Site Admin without needing NIFA approval, which extends the project to 9/30/17.
Example 3: A project is approved for 10/1/12-9/30/15. A one-year extension may be entered into REEport by the Site Admin without needing NIFA approval, which extends the project until 9/30/16. An additional one-year extension may be requested from NIFA, and upon approval, will extend the project to 9/30/17.
Project Director
Select the Project Director for this project from the list provided. If you are a PD at a NIFA partner Institution (Land Grant University) and you do not see your name listed, you must contact your Site Administrator (SA; listed to the right).
Site Administrator
This is the REEport Site Administrator (Site Admin; SA) for your institution. Any questions regarding access to REEport and permission to enter and/or modify data should be directed to your Site Admin.
The following instructions for the remaining sections/pages in Project Initiation apply to both Capacity and Non-Capacity projects unless otherwise noted.
Participants

Project Director
The fields pertaining to the main Project Director are prepopulated on this page according to what is displayed on the Cover Page
Co-Project Directors
Enter the information for all Co-Project Directors (Co-PDs) who are participating on this project. To enter more than one Co-PD, click the "+" sign that appears after the first one has been added.
FOR NON-CAPACITY PROJECTS ONLY: Co-PDs are populated automatically in REEport based on your grants.gov application ONCE YOUR AWARD IS MADE. Depending on the timing of your submission of this project initiation and when NIFA makes your award, the Co-PDs may or may not already be populated on the form. If they are not, please continue with the submission of the project initiation as normal. Once you've received funds for your award, please check back on this project to ensure that your Co-PDs were imported into the project. If they were not, please email [email protected].
Estimated Project FTEs for the Project Duration*
An FTE is defined by the Government Accountability Office (GAO) as the number of total hours worked divided by the maximum number of compensable hours in a full-time schedule as defined by law. For most NIFA partners and places of employment a full-time schedule as defined by law equates to 2,080 hours of work (52 weeks multiplied by 40 hours per week). Thus, a person who works 40 hours per week for 52 weeks of a project's duration (i.e. 1 year of a project) equals 1 complete FTE. If that same person works a full time schedule on a 5 year project, that would be equal 5 complete FTEs.
INSTRUCTIONS: Enter the estimated Full-time equivalent(s) (FTE) that will support this project over the course of the project's duration. You may enter fractions and round to the nearest tenth. Make sure to separate the FTEs by type as indicated on the table provided: Faculty and Non-Students in the first column and Students with Staffing Roles in the subsequent three columns. Also ensure that the FTE categories are correctly populated, differentiating between the following:
*NOTE: Estimated Project FTEs are not required by the REEport system. If you leave these fields at zero, the system will still allow you to submit a project initiation. However, please be aware that for capacity projects, a NIFA reviewer can decide if he or she requires the estimated FTEs before approving a project. If the project is submitted with no estimate FTEs and the reviewer requires them, then the reviewer will defer the project and indicate such in his/her comments. The project can then be resubmitted with the appropriate FTE fields filled in.
Scientist: A research worker responsible for original thought, judgments, and accomplishments in independent scientific study. This includes investigation leaders and project leaders and portions of the time of supervising scientists or staff assistants who meet the preceding definition. Examples: Professor, Associate Professor, Assistant Professor, Scientist.
Professional: A professional does not qualify as a scientist under the preceding definitions but may still significantly contribute to research activities. Professionals usually hold one or more college degrees and have otherwise qualified for employments in a professional category. Generally, professionals have a high degree of research activity responsibility but do not hold principal investigator status or equivalent at the reporting institution. Examples: Department Head, Resident Director, Statistician, Analyst, Assistant Director, Dean.
Technical: Technical Staff are associated with research efforts in a technical capacity and do not participate in the investigative aspects of the research. Examples: Lab Assistant, Mechanic, Carpenter, Machinist, Skilled Tradesperson.
Administrative and Other: These are clerical and support staff who contribute to the non-technical support of the project. It is often difficult to assess an individual's clerical and labor support to any one project; they usually support groups of researchers of different projects in a broad manner, such as typing reports, managing bill payments, managing equipment and supplies, etc. Examples: Secretary, Data Entry personnel.
Goals

What are the Major Goals of this Project?
By “Major Goals” NIFA means the over-arching goals of the project AND the objectives that will be undertaken to achieve those goals.
Provide a clear, concise statement of the major goal(s) of this project. This should encompass a broad perspective of what purpose, service, major achievement, or milestone this project will provide. Following your goal statement, please list the objectives of the project using numbers for each in either list or paragraph format. Most goals have multiple objectives. Objectives are measurable, whereas goals are broad, general, and difficult to measure. There is no minimum or maximum number of objectives to include for a project, but all objectives should be specific and attainable within the duration of the project and with the available resources (refer back to your estimated FTEs for project duration and the amount of capacity funding that has been made available to you.)
Provide a clear, concise statement of the goals/objectives of the project. You may use paragraph format or bulleted or numbered lists. There is no minimum or maximum number of goals to include for a project, but all goals should be specific and attainable within the duration of the project and with the available resources (refer back to your estimated FTEs for project duration and the amount of capacity funding that has been made available to you). In general, goals should answer the question: What major achievements and milestones does the project hope to realize?
Products
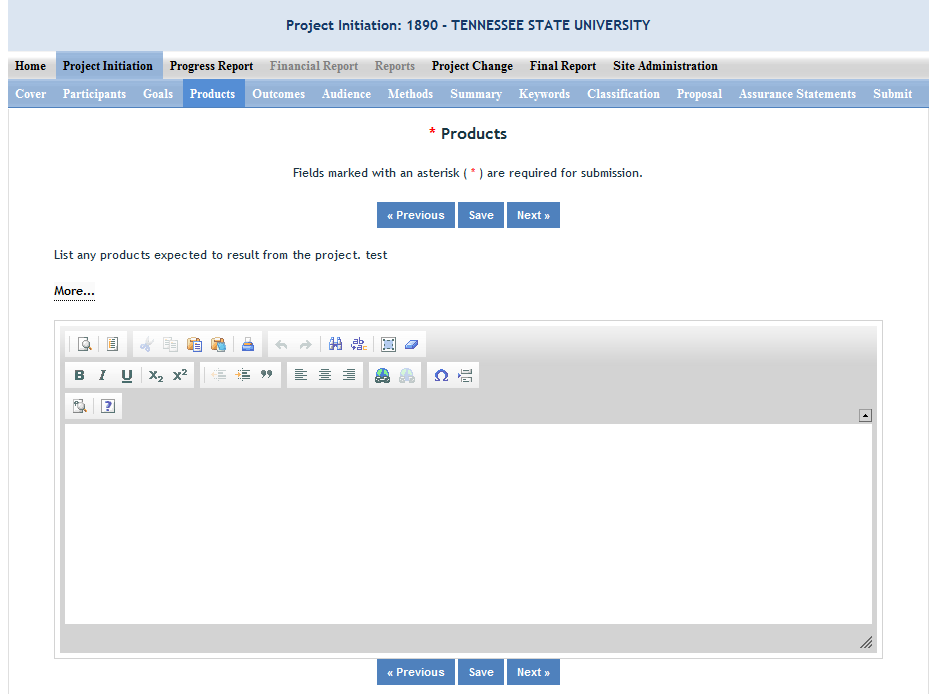
Identify the products/outputs that are planned as a result of this project. You may use paragraphs and/or lists. NIFA considers the terms “products” and “outputs” to be synonymous.
For the purpose of Project Initiation (the module you are in right now), you should include all products/outputs that are expected/estimated to result from the duration of this project.
Products/Outputs are activities, events, services, and products that reach people.
Activities include: conducting and analyzing experiments or surveys, assessments, facilitating, teaching, or mentoring.
Events include: conferences, demonstration sites, field days, symposia, workshops, and trainings.
Services include: consulting, counseling, and tutoring.
Products include: any publications; audio or video products; curricula; data or databases; equipment or instruments; patent applications; applications for Plant Variety Act protection; models; networks and/or collaborations fostered by the project or activity; physical collections or resources, new animal germplasm, or genetic maps; software; technology, methods, or techniques; train-the-trainer manuals; website(s) with the appropriate URL(s); information, skills, and technology for individuals, communities, and programs; or students graduated in agricultural sciences.
NOTE: When you complete future progress reports and your final report, you will be asked to differentiate between actual realized "products" (i.e. traditional standard outputs) and actual "other products." In those future reports, the only items that should be included in the "products" section are Publications, Patents, and Plant Variety Protection (PVP). All other products/outputs of the project should be reported under the "Other Products" section. Specific guidance for those sections in future Progress Reports can be found in the help text on those pages in the REEport system.
Outcomes

Provide a description of Expected Outcomes over the duration of the project. You may use paragraphs and/or lists.
NIFA considers the terms "outcomes" and "accomplishments" to be synonymous. Outcomes and accomplishments help lead to a project impact. An outcome/accomplishment is defined as a significant change in knowledge, action, or condition. Outcomes are generally short, succinct statements that start with phrases indicating the occurrence of change. Examples of such phrases are:
"Increase in the numbers of acres that..."
"Decrease in the amount of children that..."
"Increased profits from the sale of..."
Change in Knowledge: For a research project, a change in knowledge can be a breakthrough understanding in scientific knowledge. For education or extension projects, a change of knowledge occurs when recipients of an education or extension activity demonstrate significant learning/information gain in understanding.
Change in Action: A change in action occurs when a significant change in behaviors or practices results from the project’s activities.
Change in Condition: A change in condition occurs when a significant change in a condition of societal concern results from the project’s activities. If appropriate and available, outcomes should be supported with key, quantitative data, such as number of acres impacted, increased profits, or number of people impacted.
Audience
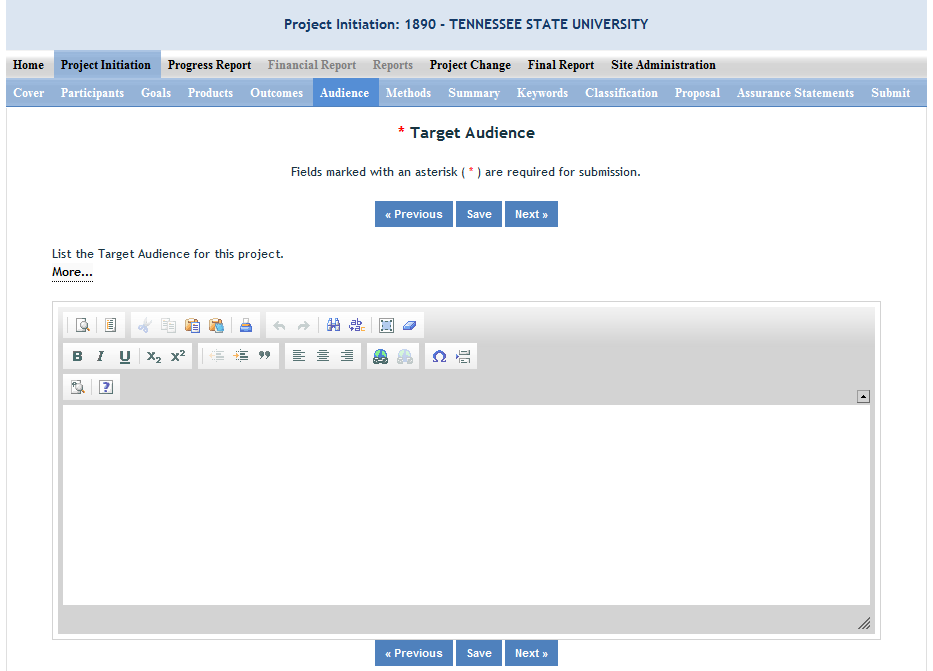
Provide a description of the target audience(s) that will be the focus of efforts over the course of this project.
The target audience(s) you describe on this project initiation should include all of the audiences you plan to reach over the course of the project, even if only for portions of your efforts during certain activities of the project.
Target audiences include individuals, groups, market segments, or communities that will be served by the project. Where appropriate, you should also identify population groups such as racial and ethnic minorities and those who are socially, economically, or educationally disadvantaged.
Efforts include acts or processes that deliver science-based knowledge to people through formal or informal educational programs. Examples include: formal classroom instruction, laboratory instruction, or practicum experiences; development of curriculum or innovative teaching methodologies; internships; workshops; experiential learning opportunities; extension and outreach.
Methods
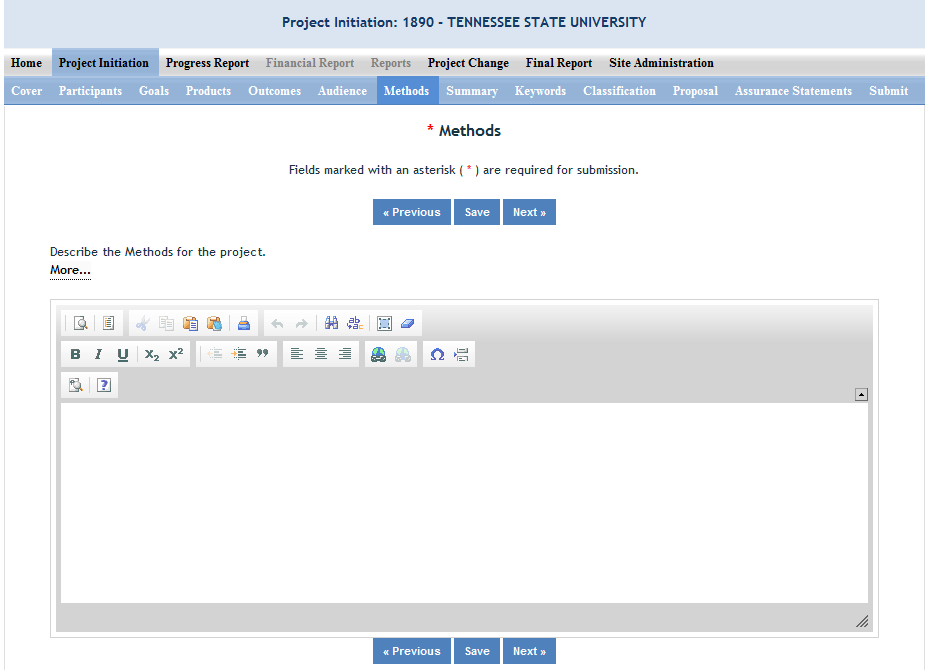
Describe the Methods for this Project:
Describe the ways in which the project will be conducted, with emphasis on the general scientific methods and any unique aspects or significant departures from usual methods. Include a description of how the results will be analyzed, evaluated, or interpreted. Describe the Efforts that will be used to cause a change in knowledge, actions, or conditions of a target audience. Include a description of how the output(s) will be Evaluated and/or quantified for its impact on the intended audience(s).
Defining "Efforts": Efforts include acts or processes that deliver science-based knowledge to people through formal or informal educational programs. Examples include: formal classroom instruction, laboratory instruction, or practicum experiences; development of curriculum or innovative teaching methodologies; workshops; experiential learning opportunities; extension and outreach.
Defining "Evaluation": Demonstrating that evaluation will be part of your project means that you describe the plan/steps to be used to evaluate or "measure" the success of the project. Provide a listing of the types of evaluation studies planned and types of data that will be collected, emphasizing key milestones and measurable or quantitative indicators of success. The project evaluation plan should relate milestones and indicators of success to expected project outcomes/accomplishments and impacts.
Summary
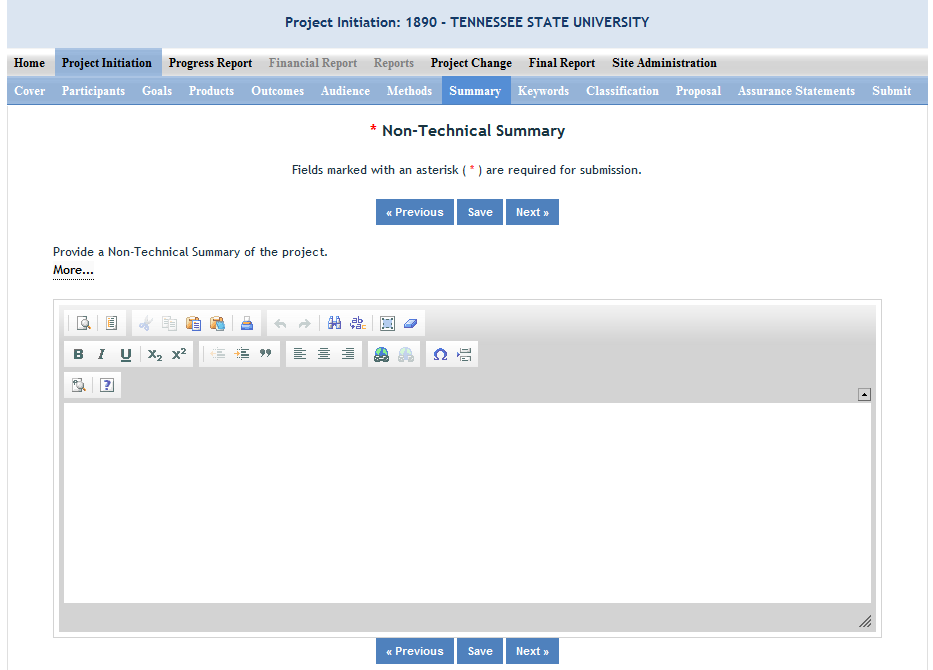
The non-technical summary is your opportunity to sum up the importance of your project in terms that general citizens can understand (i.e. citizens without scientific backgrounds). A good non-technical summary is composed of 1-2 succinct paragraphs that cover three main points:
1. What is the current issue or problem that the research addresses and why does it need to be researched? When answering this question consider a perspective that goes beyond the primary end-users of the science you are conducting. Why is this topic important to the larger community in terms of economics, community and environment as well as agriculture?
2. What basic methods and approaches will be used to collect and produce data/results and subsequently inform target audiences? This should be different from your objectives list. Do NOT copy and paste the same text here. This section should explain, in plain, non-technical language what you intend to do.
3. Through the methods mentioned above, what ultimate goals does the project hope to achieve and what is the general impact expected to be if this goal is met? What societal benefits may be realized?
In answering the above three questions, make sure to provide enough detail so that you are touching upon the main purpose of the project, the expected accomplishments, and anticipated benefits of the research.
This non-technical summary may be the most important section of your report. This will be accessed by legislators who make decisions about funding allocations, general public, community leaders, and taxpayers as well as government staff and other scientists.
Keywords

Instructions:
Add a new keyword field for each separate keyword or keyword phrase you want to use to describe the project. Examples of words are: Corn, Maize, Bioenergy. Example of phrases are: Native Plants, Climate Change, Food Safety.
The purpose of assigning keywords and key phrases to your project is to improve the retrieval capacity of project information on certain topic areas. The keywords you choose should be as all encompassing for your project's topic area as possible so that different keywords searched by various queries will still pull up your project information. For example, if your project is aimed at researching new wheat varieties, you will want to include more than the word "wheat" as a keyword. More helpful would words and phrases such as: wheat, wheat varieties, cultivar, grain.
HINT: If there are specific words or phrases that you have used repeatedly in other sections of your project initiation (i.e. in the non-technical summary, goals, products, etc.), then those same words or phrases should be in your keywords section.
Another way to think of keywords is that they should, collectively, resemble an abbreviated abstract of the project narrative. Keywords can be a word or phrase that represents a concept, and they can fit into three areas or levels: general concept, class or category of research, and specific subject/item of research.
General Level - Refers to overall objectives in the major fields of interest or disciplines. It is best to include at least two general level keywords. Examples: HARVESTING, MECHANIZATION.
Class Level - Refers to classes or categories of subjects or items, and to moderately broad concepts or areas of interest which conceptually group the specific entry keywords into like classes. It is best to enter at least 4 class level keywords/phrases. Examples are: MECHANICAL ENGINEERING, HARVESTING LOSSES, CROP DAMAGE
Specific Entry - Refers to the most specific concepts, subjects, or items under study. It includes the specific plant, animal, or microorganism; the specific equipment, processes, approach, technique, or system; and specific properties, reactions or functions. It is best to select at least 4-5 specific entry level keywords or phrase. Examples are: POTATOES, MECHANICAL HARVESTING, HARVESTING EQUIPMENT, BULK HANDLING, SKINNING, BRUISING.
Classification
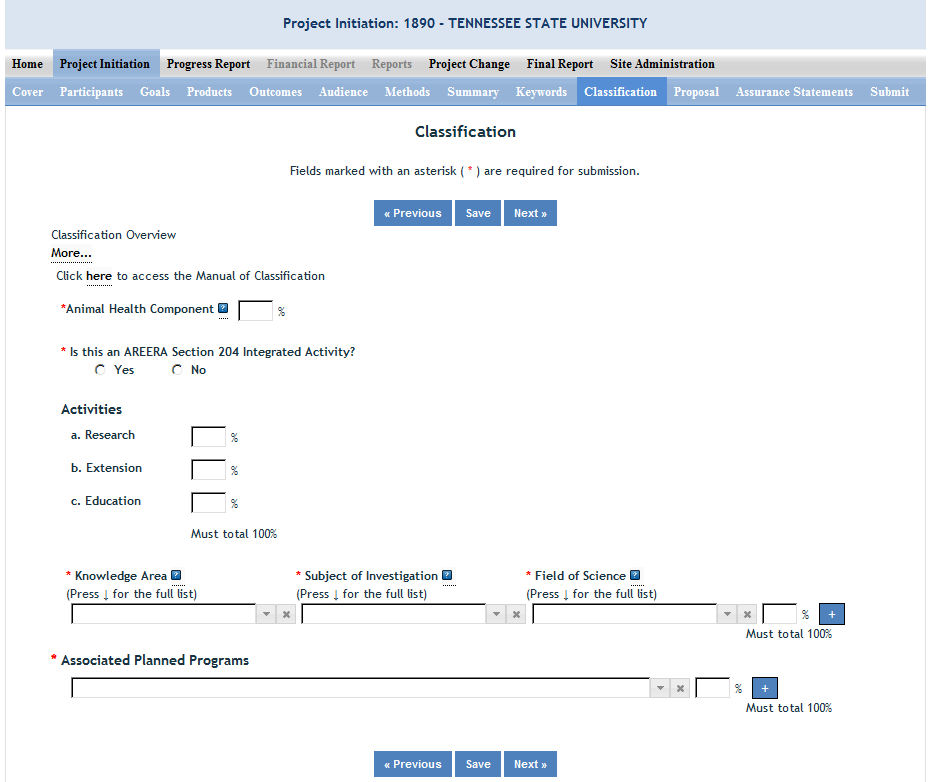
Classification Overview & Codes:
All projects entered in REEport must be classified according standard classification elements which consist of a series of three classification areas:
Knowledge Area (KA)
Subject of Investigation (SOI)
Field of Science (FOS)
Each project must have at least one line of classification; a classification "line" consists of one KA, one SOI, and one FOS. To allow for identification of multiple objectives on a single project, up to ten classification lines may be entered on a single project, and all lines must be assigned a percentage. No line may be less than 10%.
The available codes from which you may choose are defined in the Classification Manual which can be found here: http://cris.csrees.usda.gov/manualvii.pdf
Knowledge Area: An important and highly useful series of classifications is the classification by Knowledge Area (KA). The 79 knowledge areas comprising the KA classification are arranged into nine topic areas.
Subject of Investigation: This Subject of Investigation (SOI) series provides an additional facet for classification. It is generally the object of the research or activity: the class of plant, animal, organism, material, process, procedure, etc., under investigation.
Field of Science: The Field of Science (FOS) classification consists of a modified version of the fields of science used by the National Science Foundation for various government wide reports.
Projects receiving Animal Health capacity funds under Public Law 95-113 will automatically be classified 100% Animal Health; this field will be prepopulated with "100%" based on the fact that you already chose "Animal Health" as your funding source when beginning this project initiation.
Other types of projects (both capacity and non-capacity) demonstrating animal health research may include animal health percentages; that percentage is subject to the Project Director's discretion and should be entered in this field.
Note: If no portion of this project supports animal health research, you must enter "0" for the percentage; you may not leave the field blank.
AREERA Integrated Activity?
An integrated activity is defined as a jointly planned, funded, and interwoven activity between research and extension to solve a problem; this includes the generation of knowledge and the transfer of information and technology.
Hint: You should check “yes” for this question if this project is a Hatch or Hatch Multistate Project which is being supported by both Hatch funds (research component) and other funding that supports an extension component of the activity. Examples of acceptable combinations of funds: Hatch and Smith-Lever; Hatch and State extension funds; Hatch Multistate and State and Other (federal or private) funds.
Note: If you check "yes" for this question, you will be required to fill out the activity percentage fields that follow.
Activities
Once you enter any percentage for the "research" category, additional percentage box fields will appear up on the page asking you to classify the type of research (basic, applied, developmental) into percentages. The percentages on each section must always add up to 100%.
Note: If you checked "yes" that this project is an integrated activity pursuant to AREERA Section 204, then you must fill in these percentage fields.
If this project is a Hatch, Hatch Multistate, or Evans Allen project, this drop down menu is prepopulated with the Planned Programs that the Performing Organization (the 1862 or 1890 Land Grant University which employs the Project Director) currently has on file in its approved AREERA State Plan of Work. Please choose the Planned Program(s) which best serves as the "umbrella" under which this project would fall (i.e. this project supports or adds to achieving the overall goals/objectives of the Planned Program.) You may choose more than one Planned Program and assign appropriate percentages. If you choose only one, you must enter "100" for the percentage.
Note that if the drop down list is not populated with Planned Programs from which to choose, that means you have not entered and saved a start date for your project on the Cover page in this module.
By classifying this project under one of these "umbrella" Planned Programs, NIFA will be able to automatically calculate such items as funding amounts and classifications on behalf of the Land Grant so that they do not have to do so manually in their AREERA Plan of Work or Annual Reports of Accomplishment and Results.
Further information on Planned Programs:
To read about your specific Institution's Plan of Work and gain a better understanding of each of its Planned Programs, go to http://www.reeis.usda.gov/portal/page?_pageid=193,899531&_dad=portal&_schema=PORTAL&smi_id=44.
Enter your state and the current fiscal year, and make sure only the check box for "Plan of Work" is checked. Then click the "submit" button.
Proposal (Capacity Only)

Use the PDF upload capability in this section to upload a PDF of your Project Outline (original “project proposal” used in your institution’s review process).
Note: A proposal is not required for Multistate Hatch projects.
Assurance Statements (Capacity Only)
Important: All Capacity Fund Project PDs MUST answer Questions 1 and 2 and their subparts.
In the “more section” you will find the NIFA STATEMENT OF POLICY - Institutions receiving NIFA funding for research are responsible for protecting human subjects, and providing humane treatment of animals. To provide for the adequate discharge of this responsibility, NIFA policy requires an assurance by the institution’s Authorized Organizational Representative (AOR) that appropriate committees in each institution have carried out the initial review of protocols and will conduct continuing reviews of supported projects
Also note disclaimers on the bottom of page:
This
performing organization agrees to assume primary responsibility for
complying with the Animal Welfare Act (7USC, 2131-2156), Public Law
89-544, 1996, as amended, and the regulations promulgated there under
by the Secretary of Agriculture in 9 CFR Parts 1,2,3, and 4. In the
case of domesticated farm animals housed under farm conditions, the
organizations shall adhere to the principles stated in the Guide for
the Care and Use of Agricultural Animals in Agricultural Research and
Teaching
![]() ,
Federation of Animal Science Societies, 1999.
http://www.fass.org/docs/agguide3rd/Ag_Guide_3rd_ed.pdf
,
Federation of Animal Science Societies, 1999.
http://www.fass.org/docs/agguide3rd/Ag_Guide_3rd_ed.pdf
This performing organization agrees to assume primary responsibility for complying with both the intent and procedures of the National Institute of Health (NIH), DHHS Guidelines for Research Involving Recombinant DNA Molecules, as revised. A link to the guidelines can be found on the NIFA web site at: http://www.nifa.usda.gov/business/awards/assurance.html.
How to Submit a Project
First Level – Submit for Review
There are two levels of submission every project must go through. The first level is the “Submit for Review” level. At this level, either the SA or the PD has the capability to submit a project up to the “institution/site” level for review (review usually done by the SA). In most cases, the PD at a given institution will perform the submission at this level. Remember that any project found in the “Draft” folder at the Project Initiation home screen has not yet been submitted for review. The “Submit for Review” in Project Initiation looks like this:

The submitter (SA or PD) can tell that the project is at the first level of submission by the workflow status shown on the screen (red underline). Also, note the red arrow indicating that the project is being submitted “for review.” TO actually submit the project, make sure to click the “Submit for Review” button at the bottom of the screen (red circle).
NOTE: If there are missing or incorrect data fields in the project, a list of red correction items will show up on the Submit screen; each item needing to be fixed is a clickable link for easy access to that particular section.
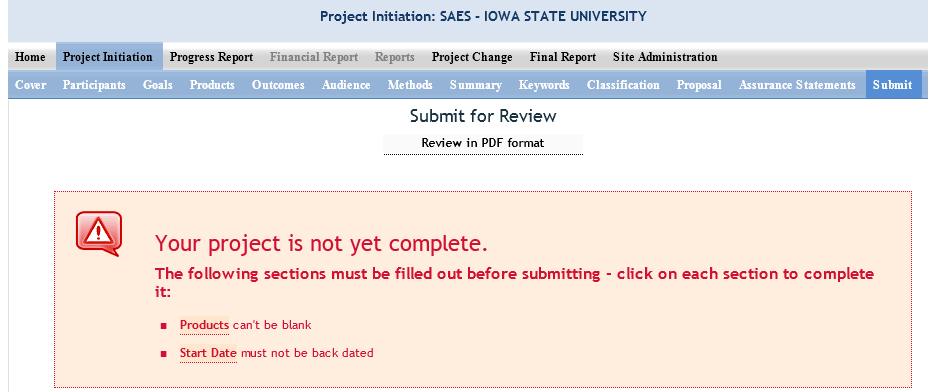
Once the project has been submitted for review, the resulting screen will notify you that you have successfully submitted the project; it will also show you that the project now exists in the “Pending Submission to NIFA” folder (red arrow):

Second Level – Submit to NIFA
All Site Admins have the ability to submit projects to NIFA. Site Admins may also choose to allow Project Directors to have the ability to submit projects to NIFA (they may differentiate on this capability between capacity and non-capacity projects; see Workflow in the Site Administration section of this manual). A project that is ready for submission to NIFA can only be found in the “Pending Submission to NIFA folder” (red arrow) at the Project Initiation home screen:

To review and submit the project you want, click the project title in the list of projects within the folder (red circle).
Once you’ve reviewed and have made any necessary changes to the project, go to the “Submit” section of the project.
NOTE: The top of the screen shows you that you are at the second level of submitting: “submit to NIFA” (red circle).
The “Workflow Status” section shows you that you are ready for submission (red underline)
You have the ability at this screen to either “Submit to NIFA” OR to “Send Back” (red arrows). Note that the “send back” option will send the project back to draft status where the PD can edit the project and resubmit for institution level review.
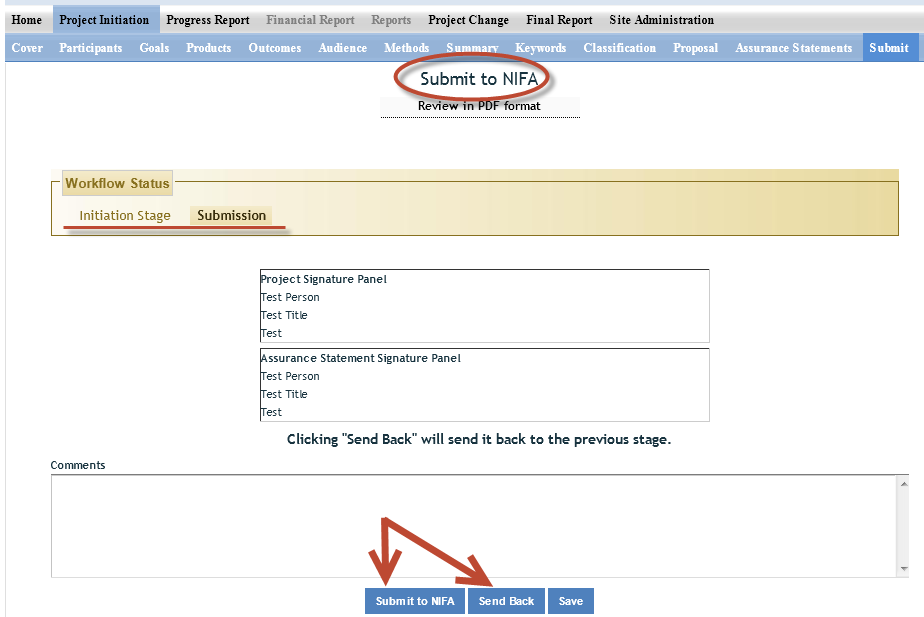
Submitting a Progress Report – Data Content & Instructions
At the Progress Report home page, you can search for progress reports that need to be filled out by using the search option at the top (fill in at least one of the search fields) or you can use the folder views to fill out and manage reports for various projects. Note that the “drafts” folder will show you every progress report “shell” that the system has created for the active projects that need them. It’s also important to remember that only one progress report shell/draft is created by REEport at a time. So, even if you have a five year project and will eventually be submitting four progress reports (the last year you only submit a Final Report), you will have only one shell/draft for the first progress report due for the first reporting period. After you submit that first progress report, the next one will be created by the system for the following reporting period, and so on and so forth.
NOTE: This applies even if you are late in submitting your reports (i.e. you are two reporting periods into the project and you have not submitted the progress report for the first reporting period; the system will still only have the first one waiting for you to fill out and submit and create the 2nd, 3rd, and 4th ones only upon submission of each of the previous reports.)
Helpful Hints for Entering Progress Report Data
After opening the progress report form you want to work on:
The first “page” (screen) you will come to is the Cover page. The cover pages for non-capacity and capacity both cover the “vital stats,” of the project and are prepopulated based on what was entered when the project was initiated. In order to make changes to any of this data, you must use the Project Changes module for Capacity projects. For Non-Capacity Projects, see further explanation here.
Other Important tips:
For guidance completing any REEport form, remember to use the embedded Help Text by clicking on the small blue icon
 located next to each field found within REEport.
There are character limits on all fields in REEport, but the main one to be aware of is: for all the large text boxes with the built-in text editor, there is an 8000 character limit, including spaces.
REEport does not accept graphics, charts, or other images pasted into any of the open text boxes.
Remember that whenever you enter data on a page, you MUST click one of the navigation buttons at the top or bottom of the page to save your work; while you are permitted to move from page to page within a module using the top menu bar (e.g. moving from “goals” to “products” by clicking those words in the menu bar) doing this will not save your work if you entered anything new on the page.
Review the screenshots in the Navigating the Software section of this manual for more details.
For Non-Capacity Projects only: Depending on the type of grant you received, when completing REEport forms, there may be additional content guidance available from NIFA program staff. Program contacts are listed on your NIFA Award Face Sheet.
Progress Report Home Page

Cover Page
The cover page in the progress report module is identical to that of project initiation (both capacity and non-capacity). It does not require you to add any additional information from what was already approved in the project initiation and is therefore completely prepopulated.
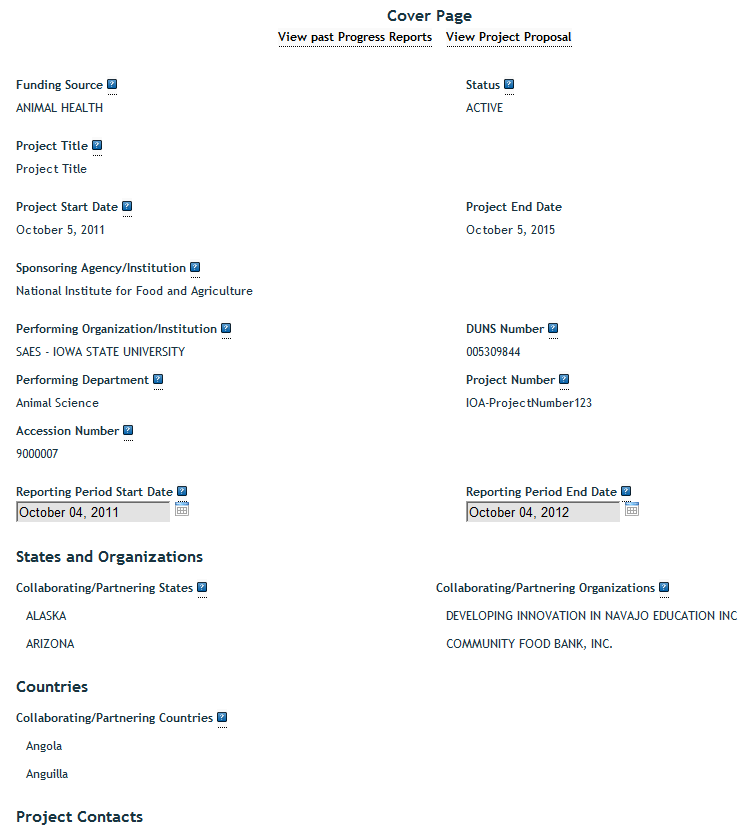
Participants

Note that there is a “nothing to report” box at the top of the page, above the “project director” field. You may click this box if there were no actual FTEs used to support this project for the reporting period being reported against.
Project Director and Co-Project Directors: Both of these fields are prepopulated with the information originally entered in project initiation; any changes would need to be made through the “Project Change” module.
Actual FTEs for the Reporting Period:
Enter the actual Full-time equivalent(s) (FTE) that supported this project over the course of this reporting period only (reporting period is one year or less; refer back to your cover page for the exact reporting period). An FTE is defined by the Government Accountability Office (GAO) as the number of total hours worked divided by the maximum number of compensable hours in a full-time schedule as defined by law. For most NIFA partners and places of employment, a full-time schedule as defined by law equates to 2,080 hours of work (52 weeks multiplied by 40 hours per week). Thus, a person who works 40 hours per week for 52 weeks towards a project equals 1 FTE. A person who works 20 hours per week towards a project for 52 weeks per year equals .5 of an FTE.
INSTRUCTIONS: You may enter fractions of FTEs rounded to the nearest tenth. Make sure to separate the FTEs by type as indicated on the table provided: Faculty and Non-Students in the first column and Students with Staffing Roles in the subsequent three columns. Also ensure that the FTE categories are correctly populated, differentiating between the following:
Scientist: A research worker responsible for original thought, judgments, and accomplishments in independent scientific study. This includes investigation leaders and project leaders and portions of the time of supervising scientists or staff assistants who meet the preceding definition. Examples: Professor, Associate Professor, Assistant Professor, Scientist.
Professional: A professional does not qualify as a scientist under the preceding definitions but may still significantly contribute to research activities. Professionals usually hold one or more college degrees and have otherwise qualified for employments in a professional category. Generally, professionals have a high degree of research activity responsibility but do not hold principal investigator status or equivalent at the reporting institution. Examples: Department Head, Resident Director, Statistician, Analyst, Assistant Director, Dean.
Technical: Technical Staff are associated with research efforts in a technical capacity and do not participate in the investigative aspects of the research. Examples: Lab Assistant, Mechanic, Carpenter, Machinist, Skilled Tradesperson.
Administrative and Other: These are clerical and support staff who contribute to the non-technical support of the project. It is often difficult to assess an individual's clerical and labor support to any one project; they usually support groups of researchers of different projects in a broad manner, such as by ordering supplies, typing reports, managing bill payments, performing janitorial work. Examples: Secretary, Typist, Repairman, Janitor, Data Entry.
Target Audience

The target audience(s) you describe on this progress report should include only those that the efforts for this reporting period were focused upon. This may mean you are only listing a subset of all of the original target audiences you listed in your project initiation.
Target audiences include individuals, groups, market segments, or communities that will be served by the project. Where appropriate, you should also identify population groups such as racial and ethnic minorities and those who are socially, economically, or educationally disadvantaged.
Efforts include acts or processes that deliver science-based knowledge to people through formal or informal educational programs. Examples include: formal classroom instruction, laboratory instruction, or practicum experiences; development of curriculum or innovative teaching methodologies; internships; workshops; experiential learning opportunities; extension and outreach.
Products
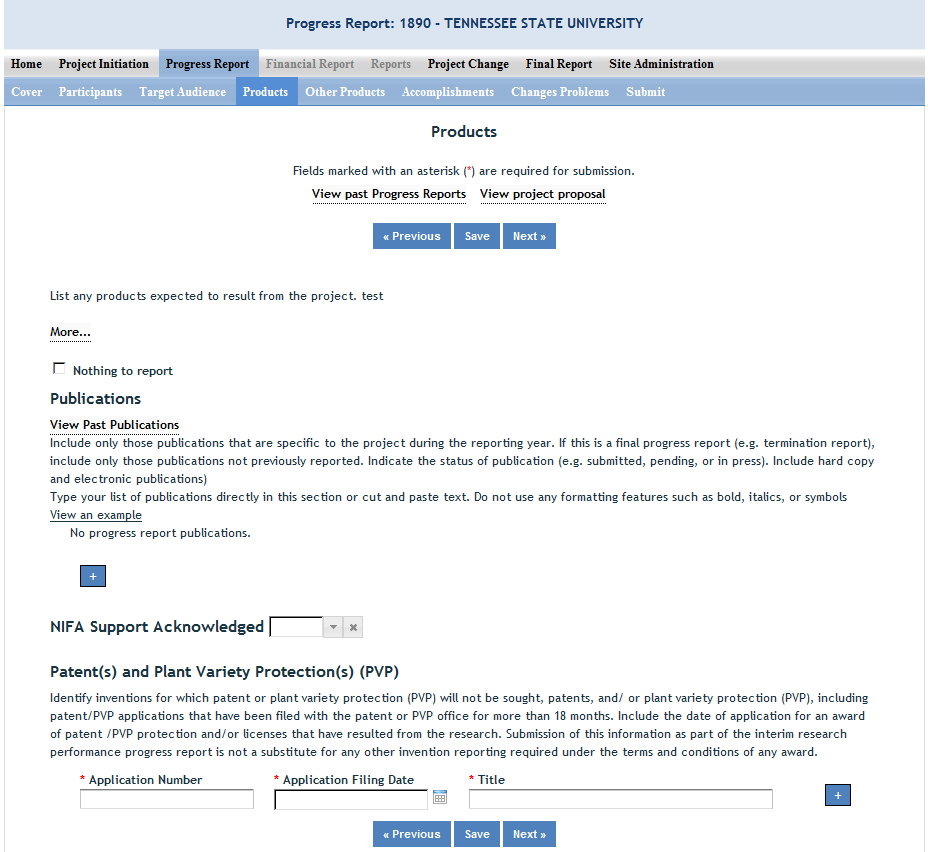
Publications:
Identify the standard products/outputs that have been achieved during this reporting period. This includes only publications, patents, and applications for plant variety protection (PVP). You will report other types of products/outputs on the "Other Products" page.
Report only the major publication(s) resulting from the work under this project/award. If this is NOT the first progress report you've submitted, do not include publications already included in any previously submitted progress report(s). There is no restriction on the number. However, agencies are interested in only those publications that most reflect the work under this project/award. See definitions below for the categories of publications.
Definitions:
Publications are the characteristic product of research. Agencies evaluate what the publications demonstrate about the excellence and significance of the research and the efficacy with which the results are being communicated to colleagues, potential users, and the public, not the number of publications.
Journal publications: Peer-reviewed articles or papers appearing in scientific, technical, or professional journals. Include any peer reviewed publication in the periodically published proceedings of a scientific society, a conference, or the like. A publication in the proceedings of a one-time conference, not part of a series, should be reported under “Books or other non-periodical, one-time publications.”
Books or other non-periodical, one-time publications: Any book, monograph, dissertation, abstract, or the like published as or in a separate publication, rather than a periodical or series. Include any significant publication in the proceedings of a one-time conference or in the report of a one-time study, commission, or the like.
Other publications, conference papers and presentations: Identify any other publications, conference papers and/or presentations not reported above.
Patent(s) and Plant Variety Protection(s) (PVP)
Identify inventions for which patents or plant variety protection (PVP) has been or will be sought. Include patent/PVP applications that have been filed with the patent or PVP office for more than 18 months. Include the date of application for an award of patent /PVP protection and/or licenses that have resulted from the research. Submission of this information as part of this Progress Report is not a substitute for any other invention reporting required under the terms and conditions of any award.
Other Products
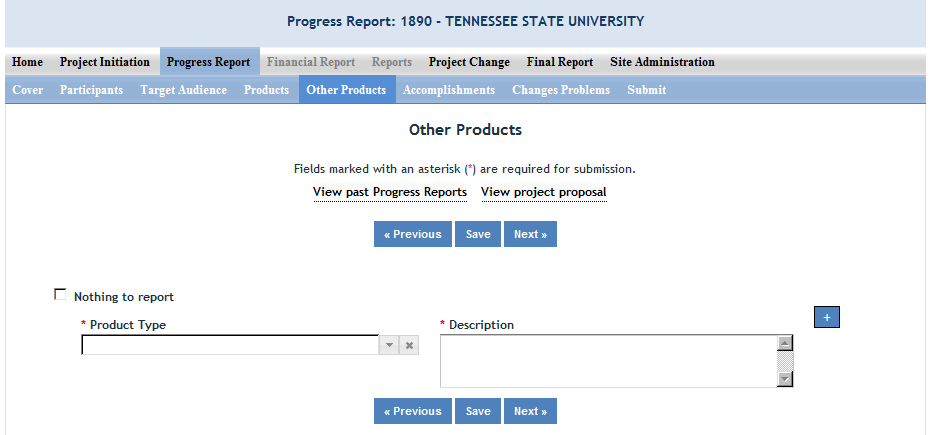
Enter the significant products/outputs achieved during the project duration as a result of the project's research, extension or education activities. NIFA considers the terms “products” and “outputs” to be synonymous. Do not include publications, patents, and plant variety protection applications; those should be included only on the "Products" page of this Progress Report.
Other Products/Outputs are activities, events, services, and products that reach people.
Activities include: conducting and analyzing experiments or surveys, assessments, facilitating, teaching, or mentoring.
Events include: conferences, demonstration sites, field days, symposia, workshops, and trainings.
Services include: consulting, counseling, and tutoring.
Products include: audio or video products; curricula; data or databases; equipment or instruments; models; networks and/or collaborations fostered by the project or activity; physical collections or resources, new animal germplasm, or genetic maps; software; technology, methods, or techniques; train-the-trainer manuals; website(s) with the appropriate URL(s); information, skills, and technology for individuals, communities, and programs; or students graduated in agricultural sciences.
Accomplishments
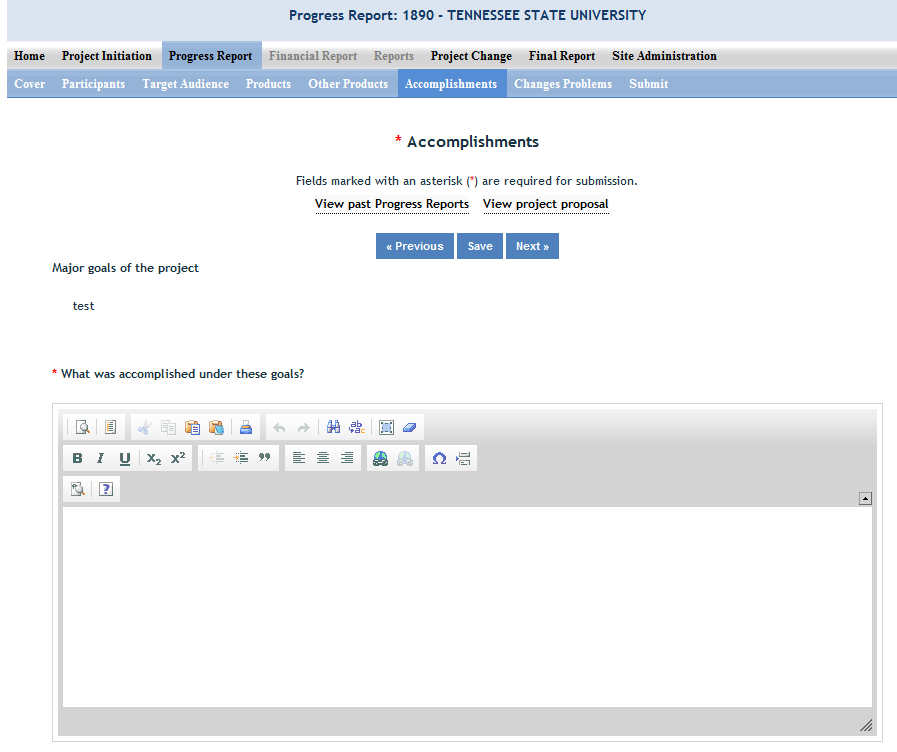
Note that at the beginning of this page you will see a listing of the “major goals of this project.” This listing is non-editable because it is prepopulated with what you entered as goals for the project in project initiation. Keep in mind that referring back to this listing is helpful when filling in the various fields on the accomplishments page, as anything reported on those fields should related directly back to the goals of the project.
Data Field/Box #1: What was accomplished under these goals?
At the beginning of this box, before information on goals and objectives, include a statement of 1 to 2 paragraphs describing the IMPACT of your project. This statement will be a primary tool for briefing leadership and legislators about what has been accomplished with the public funding invested in grant programs. Refer back to the non-technical summary you provided at the outset of your project. This impact statement should reflect the results and conclusion of your work that will provide benefits to broad audiences. It is imperative that this portion of your report be written in plain, non-technical language. Please do feel free to use numbers that will be meaningful to non-scientific audiences such as community leaders, politicians, taxpayers, and farmers. You will need to translate results of your work into lay terms – things that everyday people can relate to. Consider reporting things like changes in economics, community dynamics, environmental conditions, or agricultural norms.
How to accomplish this:
Revisit the logic model for your project if you have one. Impact statements should arise from the outcomes described in a logic model. A good impact statement in a final report has three elements:
1. State the issue in terms that will connect with a broad audience. Think back to what need you were seeking to address when you proposed the project.
2.Describe, in general terms, who did what, and the results. Specific quantitative values or trends help validate the impact.
3.Translate those results into broader outcomes in the real world. Engage your peripheral vision in order to remember how the work you are doing is important to the bigger picture and then explain that simply and directly.
After making your impact statement(s), report on each goal for the project. For each goal listed in your project initiation form (shown at the top of the page), report for this reporting period on:
1) Major activities completed / experiments conducted;
2) data collected;
3) summary statistics and discussion of results and
4) key outcomes or other accomplishments realized.
For the impact statement and #4 above, remember that impacts and key outcomes/accomplishments are defined as changes in knowledge, action, or condition.
A
change in knowledge occurs
when the participant (scientist, trainee, or citizen) learns or
becomes aware.
Examples of a change in new fundamental or applied knowledge significant enough to be included in a publication; methods and techniques; policy knowledge; improved skills; or increased knowledge of decision-making, life skills, and positive life choices among youth and adults.
A
change in action occurs when
there is a change in behavior or the participants act upon what they
have learned (adoption of techniques and methods or a change in
practice).
Examples
of a change in actions include: application and actual use of
fundamental or applied knowledge; adoption of new or improved
skills;
direct application of information from publications;
adoption and use of new methods or improved technologies; use of
skills by youth and adults in making informed choices; adoption of
practical policy and use of decision-making knowledge.
A
change in condition occurs
when a societal condition is changed due to a participant's action.
Examples of a change in conditions include: development of human resources; physical, institutional, and information resources that improve infrastructure technology transfer; management and behavioral changes and adjustments; quantified changes in descriptive statistics (trade balance, export sales, etc.); better and less expensive animal health; changes in conditions (e.g., wages, health care benefits, etc.) of the agricultural workforce; higher productivity in food provision; quantified changes in quality-of-life for youth and adults in rural communities; safer food supply; reduced obesity rates and improved nutrition and health; or higher water quality (e.g., increased water clarity) and a cleaner environment (e.g., measurably reduced pollution).
NOTE: Include a discussion of stated goals not yet met. As the project progresses, the emphasis in reporting in this section should shift from reporting activities to reporting accomplishments (such as in later Progress Reports or in the Final Report of this project).
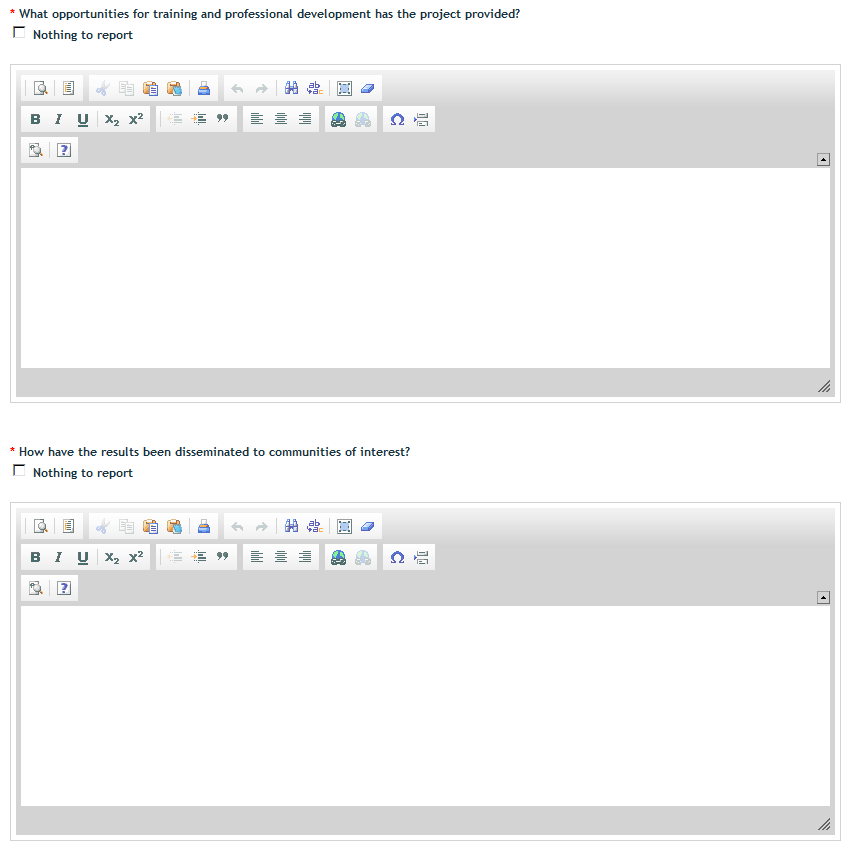
Data Field/Box #2: What opportunities for training and personal development has the project created?
(You may click the nothing to report box)
Describe opportunities for training and professional development provided to anyone who worked on the project or anyone who was involved in the activities supported by the project.
Training activities are those in which individuals with advanced professional skills and experience assist others in attaining greater proficiency. Training activities may include, for example, courses or one-on-one work with a mentor.
Professional development activities result in increased knowledge or skill in one’s area of expertise and may include workshops, conferences, seminars, study groups, and individual study. Include participation in conferences, workshops, and seminars not listed under major activities.
If the research is not intended to provide training and professional development opportunities or there is nothing significant to report during this reporting period, click the "nothing to report" box.
Data Field/Box #3: How have the results been disseminated to communities of interest?
(You may click the nothing to report box)
Describe how the results have been disseminated to communities of interest. Include any outreach activities that have been undertaken to reach members of communities who are not usually aware of these research activities for the purpose of enhancing public understanding and increasing interest in learning and careers in science, technology, and the humanities
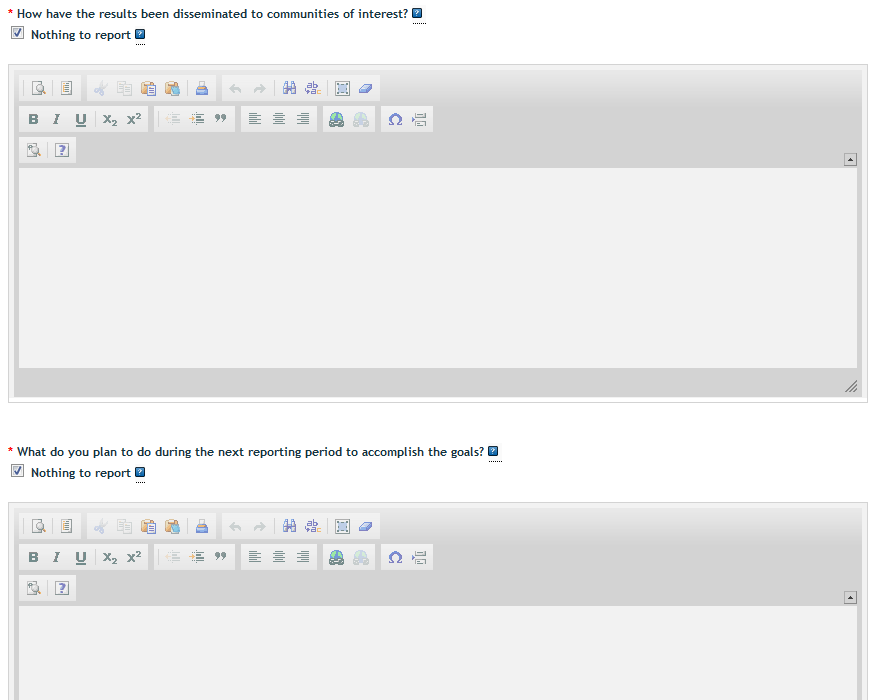
Data Field/Box #4: What do you plan to do during the next reporting period to accomplish the goals?
Describe briefly what you plan to do during the next reporting period to accomplish the goals and objectives.
If there are no changes to the agency-approved application or plan for this effort (i.e. nothing was submitted through the "project change" module), click the box for "nothing to report."
Changes/Problems
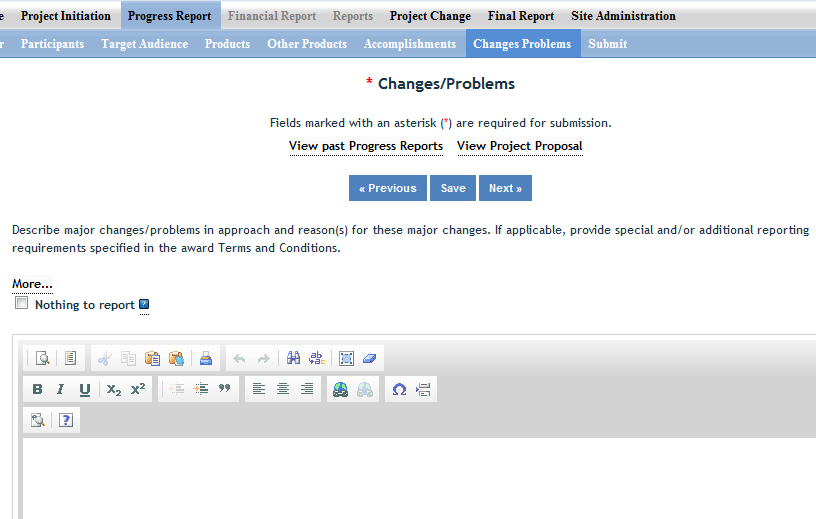
Describe major changes/problems in approach and reason(s) for these major changes. If applicable, provide special and/or additional reporting requirements specified in the award Terms and Conditions.
Major changes include:
major problems or delays that may have a significant impact on the rate of expenditure;
significant deviations from research schedule or goals;
unexpected outcomes;
or changes in approved protocols for the use or care of animals, human subjects, and/or biohazards encountered during the reporting period.
How to Submit a Progress Report
For users at a Land Grant University (not including Tribal Colleges):
The workflow rules and permission for submitting a progress report are identical to how Project Initiations are submitted at the institution level and then at the NIFA level. For detailed instructions on the submission process, go to How to Submit a Project in the Project Initiation section of this manual.
For Grantees at Independent Institutions/Organizations (including Tribal Colleges):
Proceed to the “submit” tab on the sub-menu bar. This is the last screen within the progress report form.
If you are satisfied with your report, click the “Submit to NIFA” button.
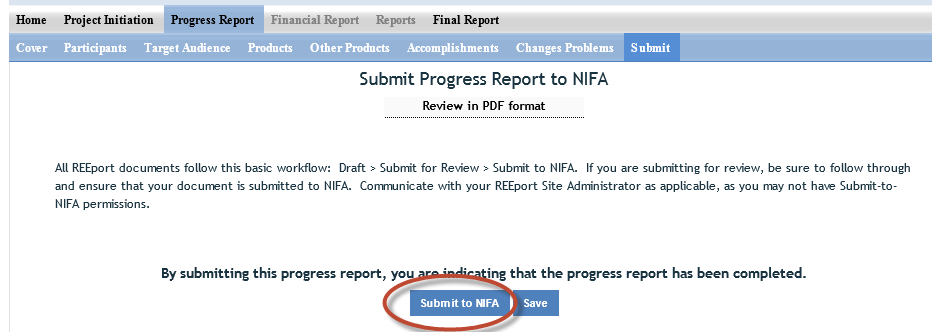
Upon successful submission, you will be brought back to the main screen of your Progress Report module where you will get the following message:
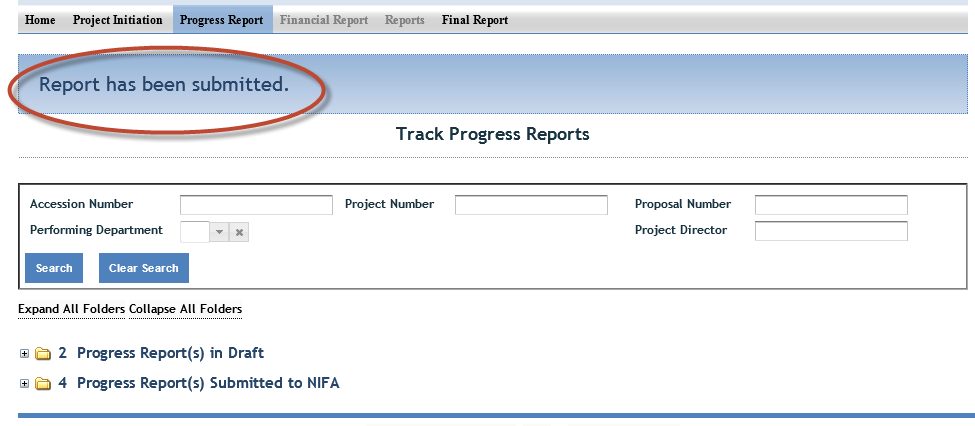
Submitting Project Changes (Capacity Projects Only)
Project Change is set up in a very similar manner to the Project Initiation module. The home screen for Project Change looks like the below screenshot, with a series of folders you can use to track any changes you desire to make to already active projects.

Steps to Submit a Project Change:
Log into REEport and navigate to the “Project Change module.”
Click on the “Active Projects” folder to expand it and view all projects (or search for the project if necessary/desired).
Click on any of the underlined links of the project to which you wish to make changes.
Proceed with editing/updating data for the particular project.
Click “submit changes for review” on the last screen; this moves the project to the “Pending Submission to NIFA” folder.
Note: If you saved the changes you made but don’t click “submit” the project will only be moved to your “Pending Changes in Draft Stage” folder.
Within the “Pending Submisison to NIFA” folder, click on the project, navigate to the “submit” screem via the sub-menu bar and click “Submit to NIFA.”
If the change you made is one that requires NIFA approval, the change is subject to a 30 day review period before it may become final. If the change is automatic, the project will show in your “active projects” folder AND in your “changed projects” folder within your Project Initiation module.
See screenshot of folder structure:
Folder View Definitions & Workflow
Upfront Helpful Hint: Anytime you make a change to a given project, regardless of the stage it’s in within the Project Changes module, you can click on the “changes” part of the sub-menu bar, and the system will show you a summary of all the changes that have been made on that project (i.e. what the “value was” and what the “value is now”. In addition, you can click on the “history” tab to see any past changs that occurred on the particular project. Examples are below.
Active Projects Folder: In the active projects folder, you may click on any active project in order to then click into any of the individiual pages (cover, participants, goals, classification, etc.; set up identical to project initiation module) to make changes. In order for any of your changes to take effect, you must go to the “submit” section, which is located at the end of the project change menu bar on the upper right hand corner.
Draft Stage Projects Folder: The Folder titled “Projects Pending Changes in Draft Stage” contains active projects on which changes have been made and saved in the REEport system but have not yet been “submitted.” Not until a PD or SA goes to the submit page at the end and clicks “submit changes for review” will the project changes be moved to the next stage.


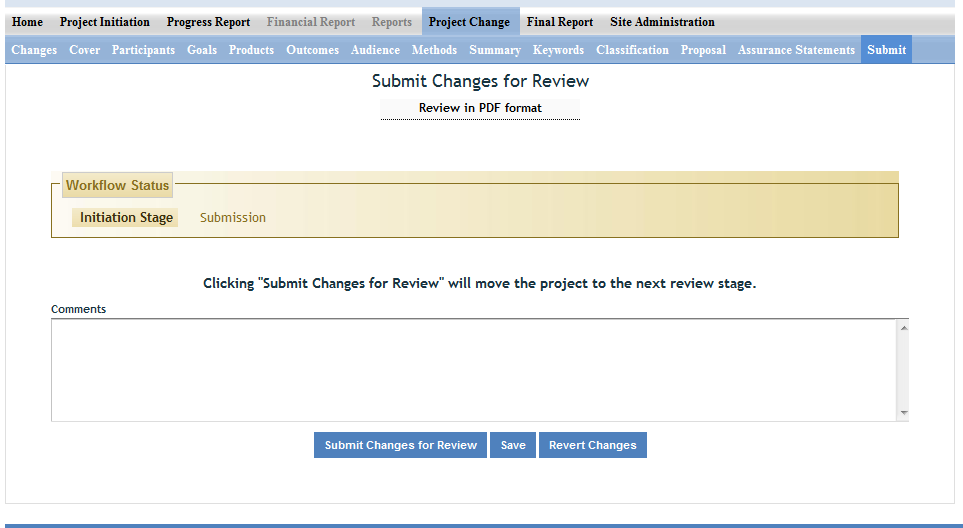

Pending Submission to NIFA Folder: The folder titled “Projects Pending Submission to NIFA” contains projects on which changes have been made by the Project Director (PD) or Site Admin (SA) and the PD/SA has clicked the submit button to move the project into the next stage. In order for the changes to actually be submitted to NIFA from this point, the SA (or PD if the SA has given them permissions) must go to the submit page and click “Submit to NIFA” to move the project into the “Projects Submitted to NIFA” folder and make the changes available for NIFA to review and approve (if applicable; some changes do not require approval.)

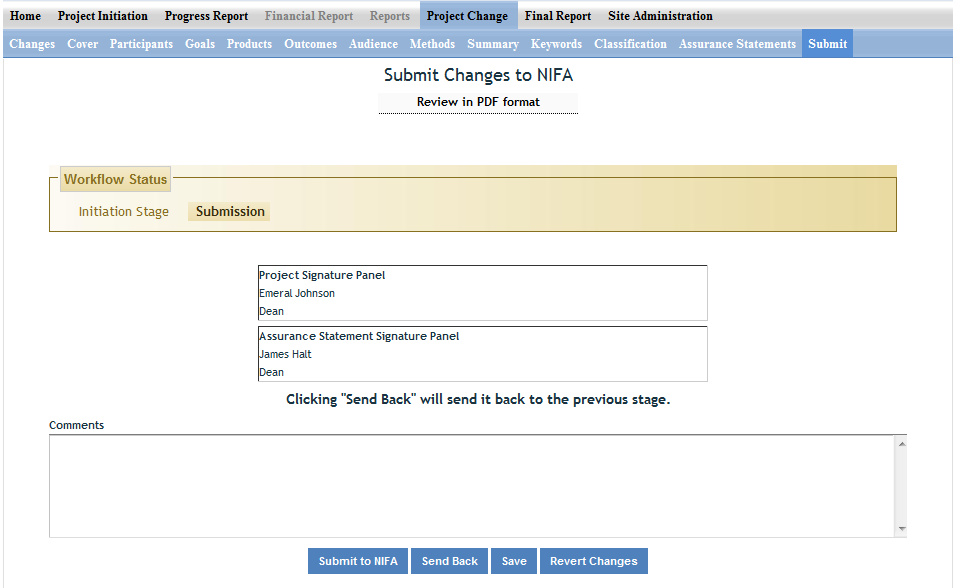
Projects Submitted to NIFA: In this folder are projects that contain submitted changes that are pending NIFA review/approval. Note that some project changes require NIFA NPL approval and some do not. If the submitted change does not require NPL approval, then the project will automatically be updated with the changes (once the PD/SA clicks submit). Once the changes are made to any project (whether they are automatic or were approved by an NPL), the project can be found in the “active projects” folder under the “Project Initiation” module. The project can ALSO be found under the “Changed Projects” folder if you want to see a side by side comparison of what was changed on the project.
Project Changes Summary screenshots:
Example #1:


Example #2:


The following is a list of which data fields do and do not require NIFA approval when submitting a project change in REEport:
Change is made automatically by REEport* |
Change requires NPL approval |
Project Number |
Performing Organization/Institution |
Project Title (not applicable to Multistates) |
Collaborating /Partnering Organizations |
Performing Department |
Collaborating/Partnering Countries |
Co-Project Director: Name, Department |
Proposed Start Date |
Collaborating/Partnering States (N/A to Multistates) |
Estimated Project FTEs |
Project Director: Name, E-mail, Phone |
Goals |
Proposed End Date: One time, one year extension, not exceeding 5 years of total project duration (and within Multistate Project duration range for Multistate Hatch Projects) |
Outputs |
Assurance Statement |
Outcomes |
|
Audience |
|
Methods |
|
Summary |
|
Keywords |
|
Classification (incl. Animal Health component, KA/SOI/FOS, Planned Programs) |
|
Project Proposal |
*Making Changes on Legacy projects originally initiated in CRIS Web Forms:
The above list of fields that are changed automatically by REEPort applies only to projects that were originally initiated/started in REEport.
For any project that was already active in CRIS Web Forms and brought into REEPort, the project will become subject to new data fields that REEport requires that CRIS Web Forms did not collect.
So, if you are trying to submit a Project Change for a project that was originally initiated in CRIS, even if the data are normally within a field that would not require NIFA approval, you must submit to NIFA for review. Here are additional instructions for this scenario:
INSTRUCTIONS ON SUBMITTING CHANGES ON LEGACY PROJECTS:
Locate the desired project in the “Active Projects” folder in the Project Changes module.
Make changes to the desire field(s).
For any open text box, you may choose to enter additional data for the project (will become a permanent part of the project record) OR you may choose to enter the phrase “Project Imported from CRIS; no new data to report.”
For any drop down menu, please choose the best applicable item.
Click submit at the end for NIFA Review.
Following the above 4 steps will result in the project being submitted to a NIFA NPL who will review the project changes and approve them, as the new data fields in REEPort are not required because legacy projects are “grandfathered” in to what the CRIS Web Forms system collected. NIFA’s policy is that project change approvals should occur within 30 days of submission.
Submitting a Final Report – Data Content & Instructions
The Final Report module is the module to use whenever a final report is due (in the last year of the project within 90 days after the anniversary of the start date for non-capacity and within 90 days of March 1 for capacity) or when a PD wants to terminate a project early. The REEport system creates a “shell” (i.e. “draft”) of the final report for any project that is put into active status. This means that the PD can submit a final report at any time during the life of the project in order to terminate it.
Note: For Capcity projects, the system will only accept the submission of the Final Report if the date of submission is within 90 days prior to the current end date listed on the active project. If a PD or SA wishes to submit a Final Report earlier than 90 days prior to the end date of the project, then they must submit a “Project Change” to change the end date of the project so that the proper 90 day window is created in relation to the day they want to submit the Final Report. To learn how to submit a project change, click here.
The Final Report home screen appears similar to the project initiation and progress report home screens. You can search for projects for which you want to submit a final report or you may use the folder views to see lists of projects for which a draft shell has been created by the system for you to fill out and submit. Note that there is a “final reports past due” folder where you can find a listing of the projects with Final Reports that are past due. In this folder, if you open up any of the PDFs of the project, you will note that the status says “complete.” This is because the REEport system automatically terminates any project that has passed its original end date, even if a Final Report has not been submitted. It is important for PDs to remember that this action does not absolve them from needing to submit a final report for any non-capacity or capacity projects; failure to submit the final report will result is his/her not being permitted to receive any future funding from NIFA (both competitive grants and non-capacity funds) until the report has been submitted (this applies even if the PD moves to another institution).
Important Reporting Requirements on Final Reports
IMPORTANT: Final
reports appear exactly the same as progress reports, with the same
data fields and questions.
However, the data entered in a final report should apply to the
PROJECT DURATION, not just the final reporting year (progress
reports only cover one reporting period/year). The
only exception to this rule is the FTEs on the Participants page
(see details below). In the Final Report, you should report FTEs
for the reporting period only, just the same you would as if you
were filling out a Progress Report for the final year of the
project. In
summary: FTEs in
the Final Report (on the Participants page) should be calculated
and reported for the FINAL REPORTING PERIOD/YEAR only. All
other data reported in the Final Report should apply to the PROJECT
DURATION.

Helpful Hints for Entering Final Report Data
After opening the final report form you want to work on:
The first “page” (screen) you will come to is the Cover page. The cover pages for non-capacity and capacity both cover the “vital stats,” of the project and are prepopulated based on what was entered when the project was initiated. In order to make changes to any of this data, you must use the Project Changes module for Capacity projects. For Non-Capacity Projects, see further explanation here.
Other Important tips:
For guidance completing any REEport form, remember to use the embedded Help Text by clicking on the small blue icon
 located next to each field found within REEport.
There are character limits on all fields in REEport, but the main one to be aware of is: for all the large text boxes with the built-in text editor, there is an 8000 character limit, including spaces.
Remember that whenever you enter data on a page, you MUST click one of the navigation buttons at the top or bottom of the page to save your work; while you are permitted to move from page to page within a module using the top menu bar (e.g. moving from “goals” to “products” by clicking those words in the menu bar) doing this will not save your work if you entered anything new on the page.
Review the screenshots in the “Navigating the Software” section of this manual for more details.
Data Fields
Because the help text and instructions for filling out the Final Report are identical for most of the data fields in Progress Report, you should refer to the Progress Report – Data field Definitions & Instructions section of this manual for guidance pertaining to the specific pages. The only page in the module that is different from Progress Report is the “Terminate” page. Instructions for how to terminate a project follow.
How to Submit a Final Report/Terminate a Project
The following pertains to users at a Land Grant University (not including Tribal Colleges; click here for terminating non-capacity grants at non-LGU institutions, including Tribal Colleges)
LGU affiliated users:
The terminate screen is the only difference between Final Report and Progress Report forms. The following screenshots show what happens when you submit a Final Report to NIFA in order to terminate a project.
Step 1:
After you have filled out all the appropriate fields in the Final Report, you can either click “next” from the Change/Problems page or you can save all your work and then click “Terminate” on the menu bar at the top. On the terminate page, you must click “submit for review” to move your Final Report to the next stage. This process is shown here:

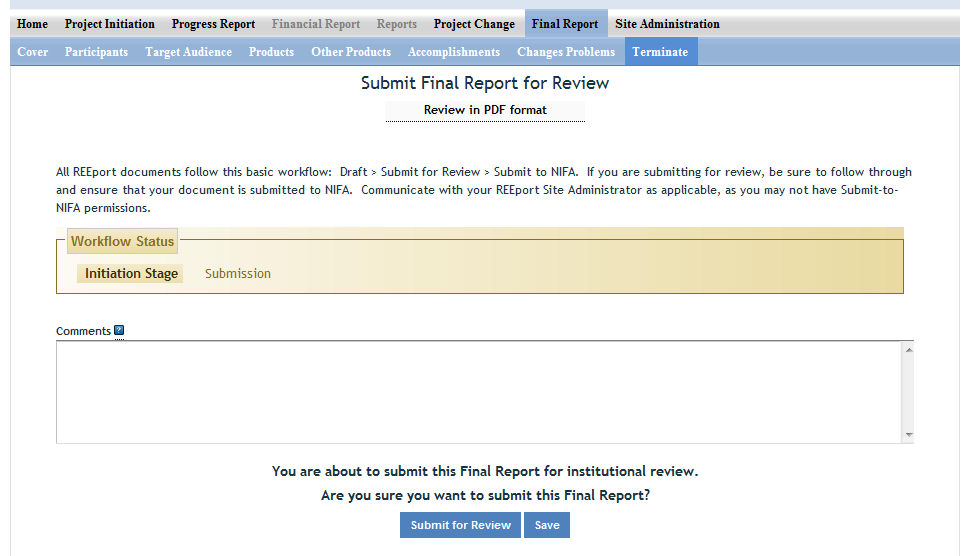
When you/PD click the “submit for review button”, provided that all the data fileds have been filled out correctly, you will get a message from the system that the report was submitted for insitution review (see below screenshot). This means that the report is now sitting in the “pending submission to NIFA” folder and needs to be sent officially to NIFA by someone who has “submit-to-NIFA” priviliges (at NIFA partner insitutions/LGUs, generally only Site Admins have this ability, but some Site Admins/Institutions grant submission privileges to PDs).


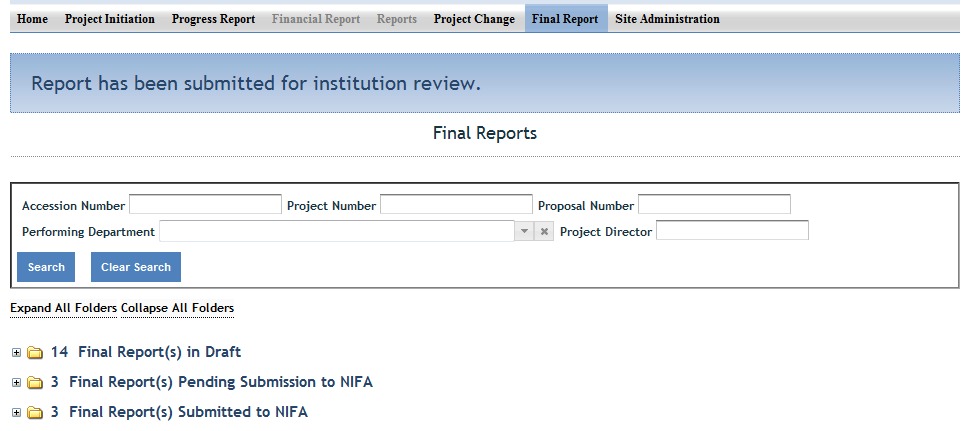
IMPORTANT: In order to officially submit a final report to NIFA, a PD (if privileges are assigned) or SA must access the project in the “Final Reports Pending Submission to NIFA” folder (as shown above by the red arrow). In that folder, open the project and perform any necessary reviews of the data; then go to the “terminate” section of the Final report (most easily accessed by clicking “terminate” on the menu bar).
Once on the “terminate” page you have the ability to enter any comments you wish to enter as part of the official record of the project. While they will not be viewable by the public, they will be viewable by the PD, SA, and all NIFA personnel. When you are ready to officially submit and terminate the project, click the “submit to NIFA” button on the bottom of the page (circled in red) below.

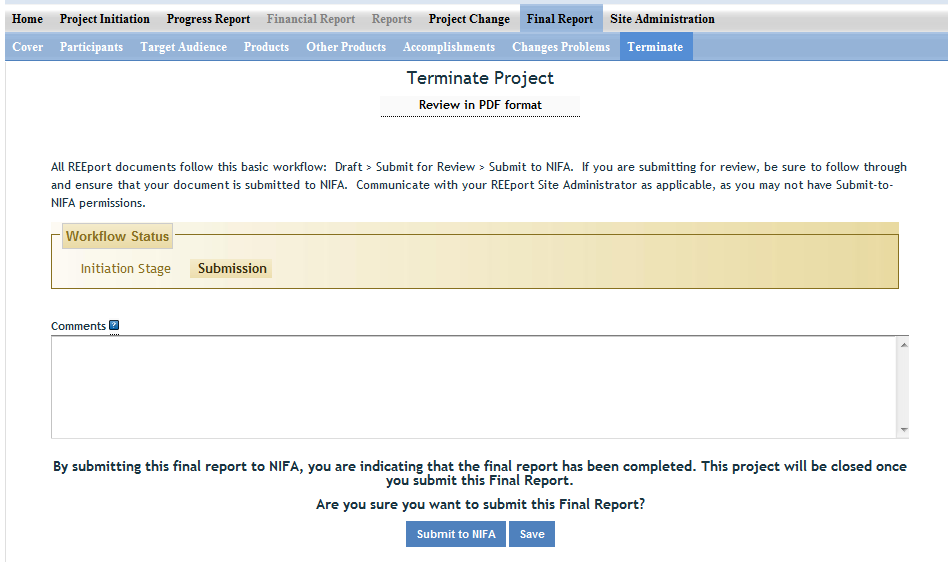
Non-LGU affiliated users:
The terminate screen is the only difference between Final Report and Progress Report forms. The following screenshots show what happens when you submit a Final Report to NIFA in order to terminate a project.
After you have filled out all the appropriate fields in the Final Report, you can either click “next” from the Change/Problems page or you can save all your work and then click “Terminate” on the menu bar at the top.
On the terminate page, click “Submit to NIFA” to terminate the project.
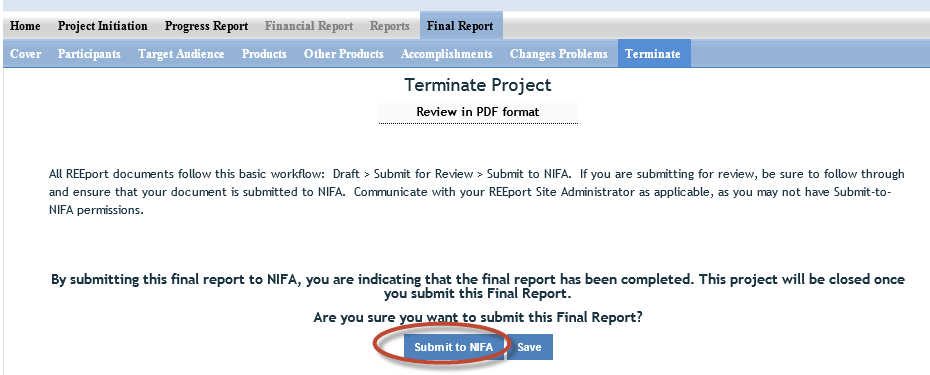
Upon successful submission, you will be brought back to the main screen of your Final Report module where you will get the following message:
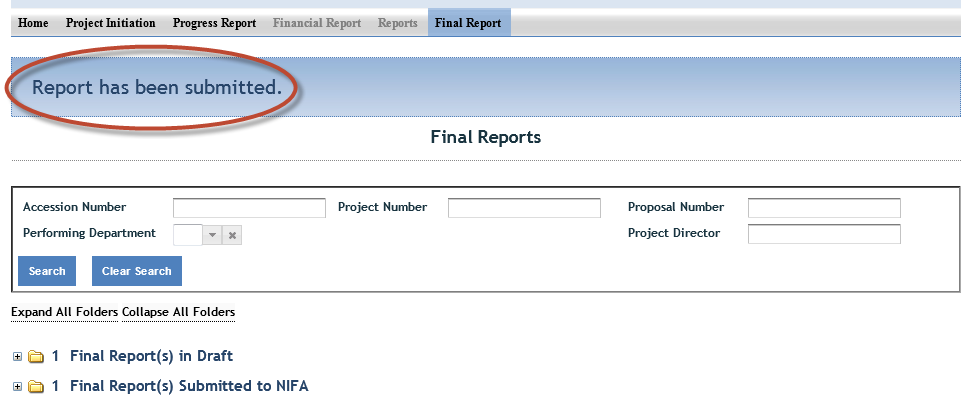
Additional Training Resources
The NIFA REEport Implementation webpage is your go-to source for accessing this manual and other training materials, including video tutorials, webinars, newsletters, and FAQs.
IMPORTANT FOR LGUs/NIFA PARTNERS: If you are a REEport user who is part of a Land Grant University or NIFA partner institution, please make sure to utilize your Site Administrator as a resource when you have questions about using REEport. NIFA has provided training to the Site Admins regarding system functionality, how to edit/submit reports, what content should be included, etc. Your Site Admin should be your “first line of defense” for questions.
The webpage is: http://www.nifa.usda.gov/business/reeport_imp.html
Technical Support & Information Services
REEport Customer Service
NIFA has a customer service team dedicated to supporting REEport users. The REEport customer service team is part of the Planning, Accountability and Reporting Staff (PARS) and can help users who have technical, data, and/or policy related questions or issues, such as:
User profile/set-up issues
Site Administration issues
Changing incorrect data
Technical problems with REEport application (i.e. can’t save, formatting issues, etc.)
Data-related questions (What do I put in which section?)
Policy-related questions (What are the due dates? What are the requirements for my report type?)
Extension requests
IMPORTANT FOR LGUs/NIFA PARTNERS: If you are a REEport user who is part of a Land Grant University or NIFA partner institution, please make sure to utilize your Site Administrator as a resource when you have questions about using REEport. NIFA has provided training to the Site Admins regarding system functionality, how to edit/submit reports, what content should be included, etc. Your Site Admin should be your “first line of defense” for questions.
REEport users may send an email to [email protected] or call the REEport Customer Service line at 202-690-0009.
Email Instructions: Please make sure to include your name, phone number, and institution. Also, include the Accession Number or Project Number if your question has to do with a specific project. Then, include a brief statement (1-3 sentences will suffice) about what your technical issue is (if you’re having a software problem) or what your question is regarding project data and/or associated policies.
Phone/Voicemail Instructions: Please be prepared with the above information and list it in your voicemail if your phone call is not immediately answered. This allows PARS the ability to research your issue and gather applicable information before returning your call.
Data Queries and Reporting
NIFA offers data query services to its partner institutions. All data entered through REEport are stored in a database that is searchable through various channels. The NIFA Planning, Accountability and Reporting Staff has team members who can help direct you to the most efficient means of searching the database depending on what your reporting needs are.
The information provided through REEport will help users (grantees, grantee institutions and NIFA) to keep abreast of the latest developments in agricultural, food science, human nutrition and forestry research and education; track resource utilization in specific target areas of work; plan for future activities; plan for resource allocation to research, education, and extension programs; avoid costly duplication of effort; aid in coordination of efforts addressing similar problems in different locations; and aid research, education, and extension workers in establishing valuable contacts within the agricultural community.
Acronym List
AR Annual Report of Accomplishments and Result (Annual Report in the POW process)
ARS Agricultural Research Service
CRIS Current Research Information System
ERS Economic Research Service
FTE Full Time Equivalent
FY Fiscal Year
NIFA National Institute of Food and Agriculture
PD Project Director
PI/PO Performing Institution/Performing Organization
POW Plan of Work
SA Site Administrator
SY Scientist Years
TY Technical Years
USDA United States Department of Agriculture
| File Type | application/vnd.openxmlformats-officedocument.wordprocessingml.document |
| File Title | REEport User Manual |
| Subject | Understanding NIFA Reporting Policies and Entering Data into the REEport System |
| Author | January 2013 |
| File Modified | 0000-00-00 |
| File Created | 2021-01-27 |
© 2026 OMB.report | Privacy Policy
