BA-9 (Internet) (p Report of Separation Allowance or Severance Pay Report
Railroad Separation Allowance or Severance Pay Report
Description of Proposed BA-9 Screens
Railroad Separation Allowance or Severance Pay Report
OMB: 3220-0173
Screen 1
PROPOSED
Form BA-9 (INTERNET)
Screen 2
RRB Employer Reporting System (ERS) Login Screen
Screen 3
ERS Main Menu Screen (Forms)

Screen 4
Form BA-9 (Selection Screen)
Screen 5
Form BA-9 (Initial Manual Entry Screen)
Screen 6
Form BA-9

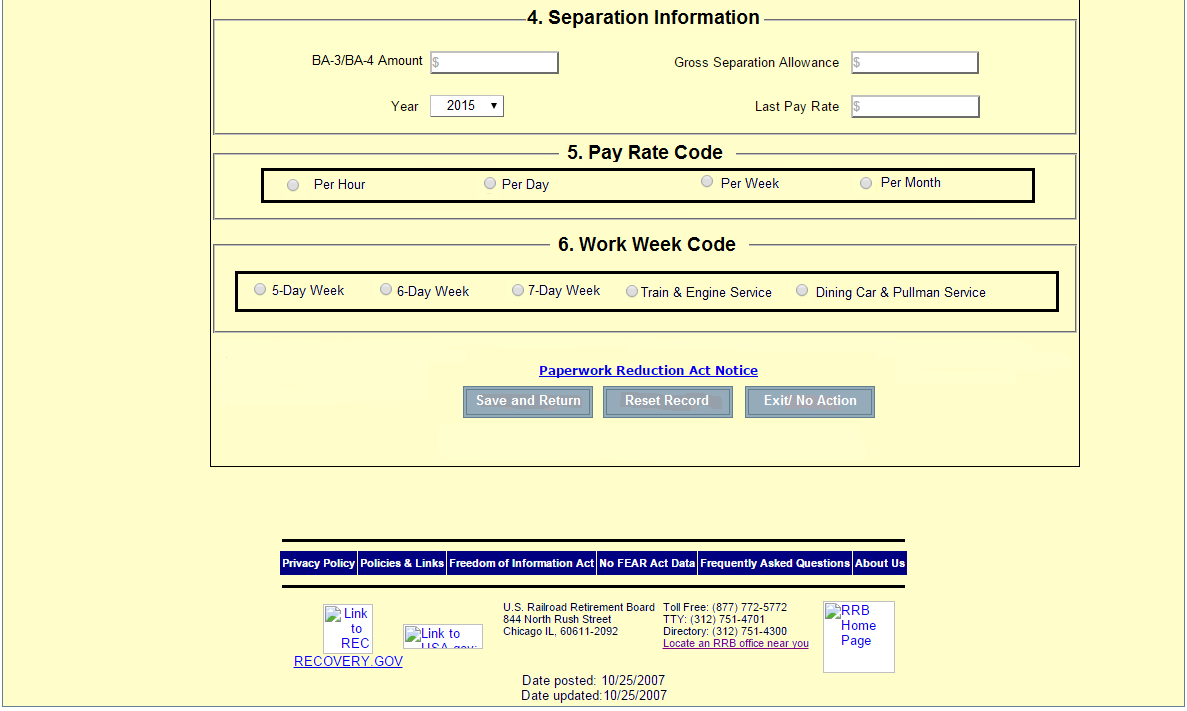
Screen 7
Item 1. |
Completion Instructions
Employee – Check Increase for an Initial Report or Increase Adjustment or Decrease for a Decrease Adjustment or Periodic Payment.
|
2. |
Separation Allowance or Severance Pay Reported
Note: If a separation allowance or severance payment was paid in more than one year, the amount subject to Tier II tax in each year should be entered on a separate report.
|
3. |
Maximums – Enter the date the employee separated and relinquished employment rights.
|
4. |
Separation Information
|
5. |
Pay Rate Code - Check the code corresponding to the period to which the rate of pay applies.
|
6. |
Work Week Code – Check the code corresponding to the employee’s normal work week.
Note: If the separation allowance or severance pay is being paid in installments over several years, complete Gross Separation Allowance, Last Pay Rate, Pay Rate Code, and Work Week Code ONLY for the first year the installment payments are reported. Show the gross amount of the separation allowance or severance payments (i.e., the total of all installment payments that will be made to the employee) in Gross Separation Allowance.
|
Screen 8
Paperwork Reduction Act Notice
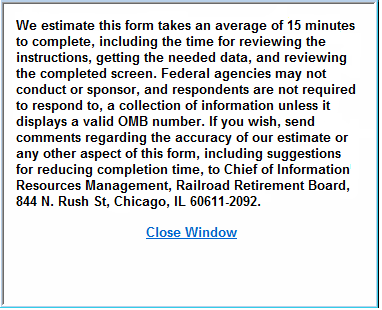
Screen 9
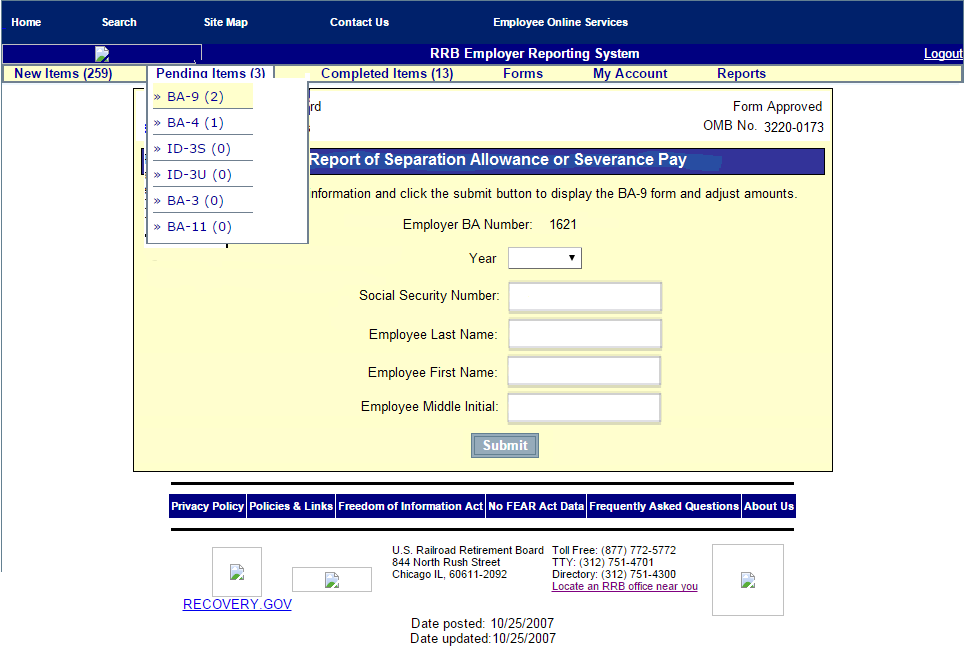
Form BA-9 (Initial Manual Entry Screen - Pending Items)
Screen 10
Form BA-9 (Pending Items Screen)
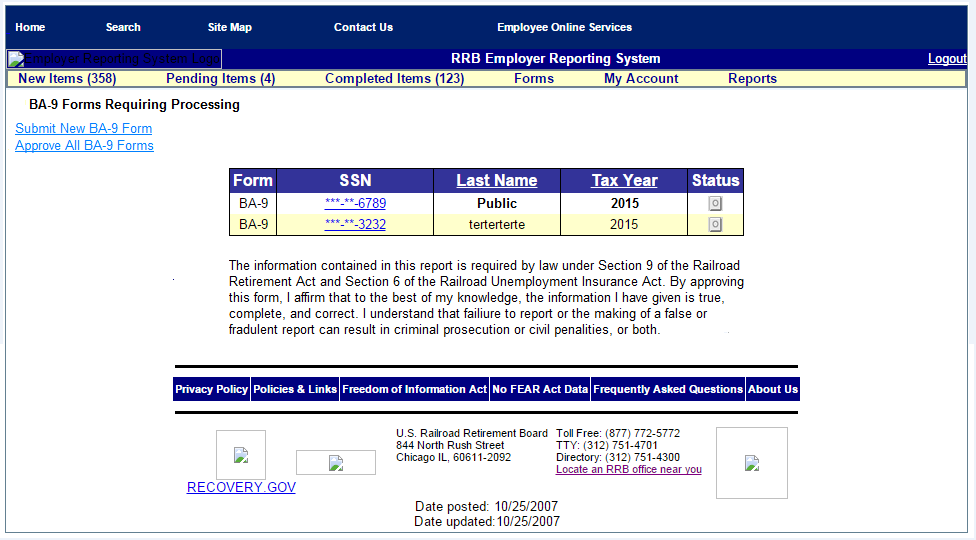
Screen 11
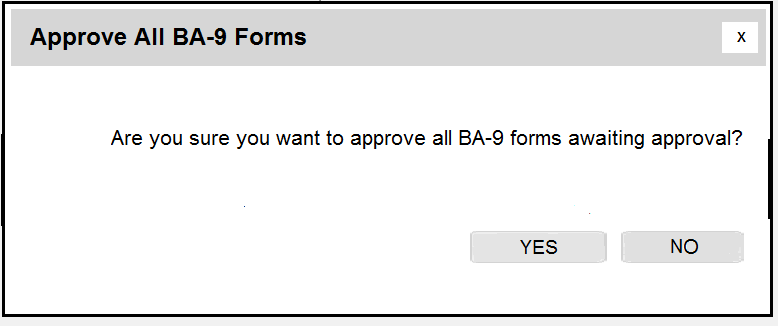
Message after Selecting Approve All BA-9 Forms
Screen 12
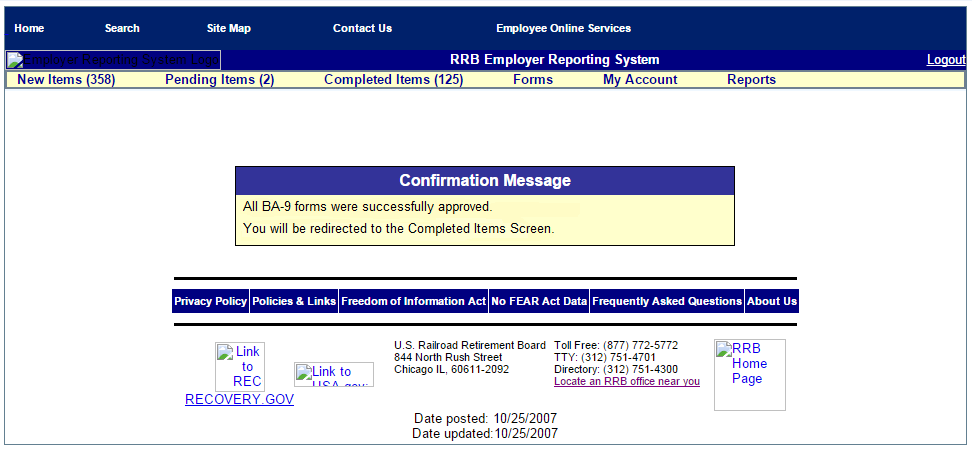
Approve All BA-9 Forms Confirmation Message
Screen 13
Form BA-9
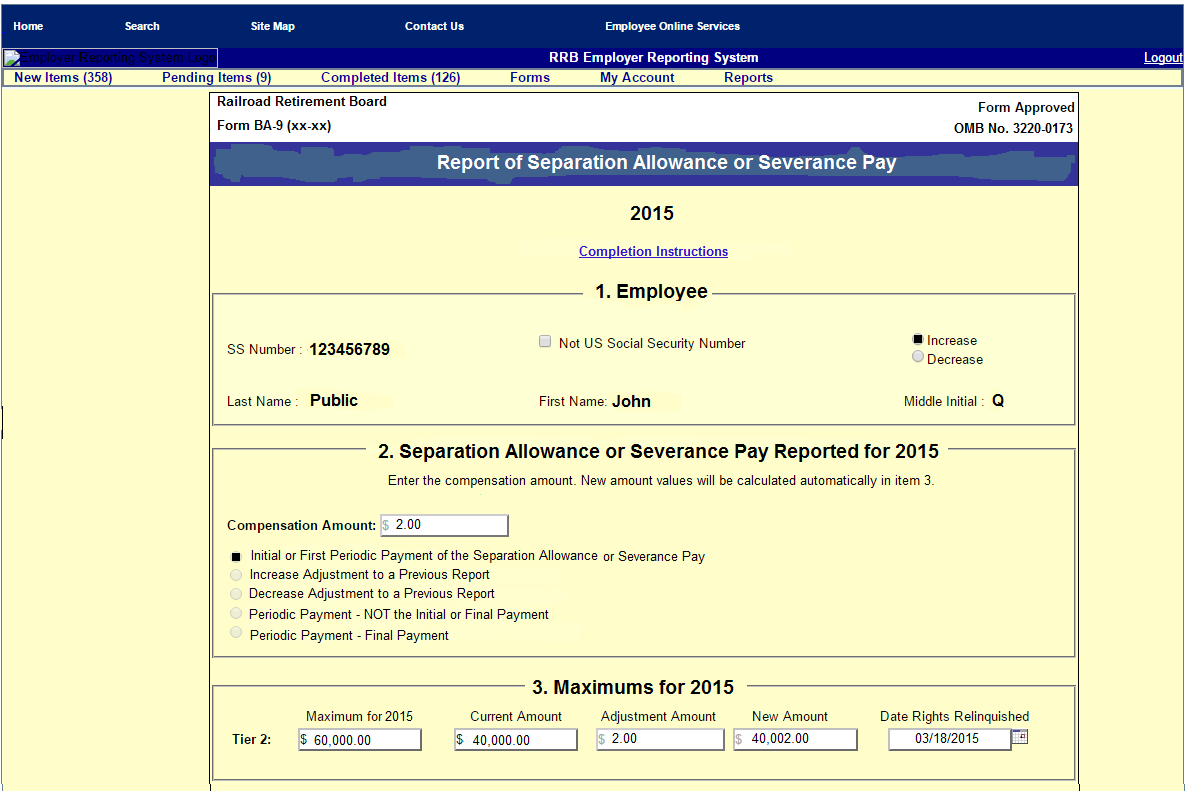
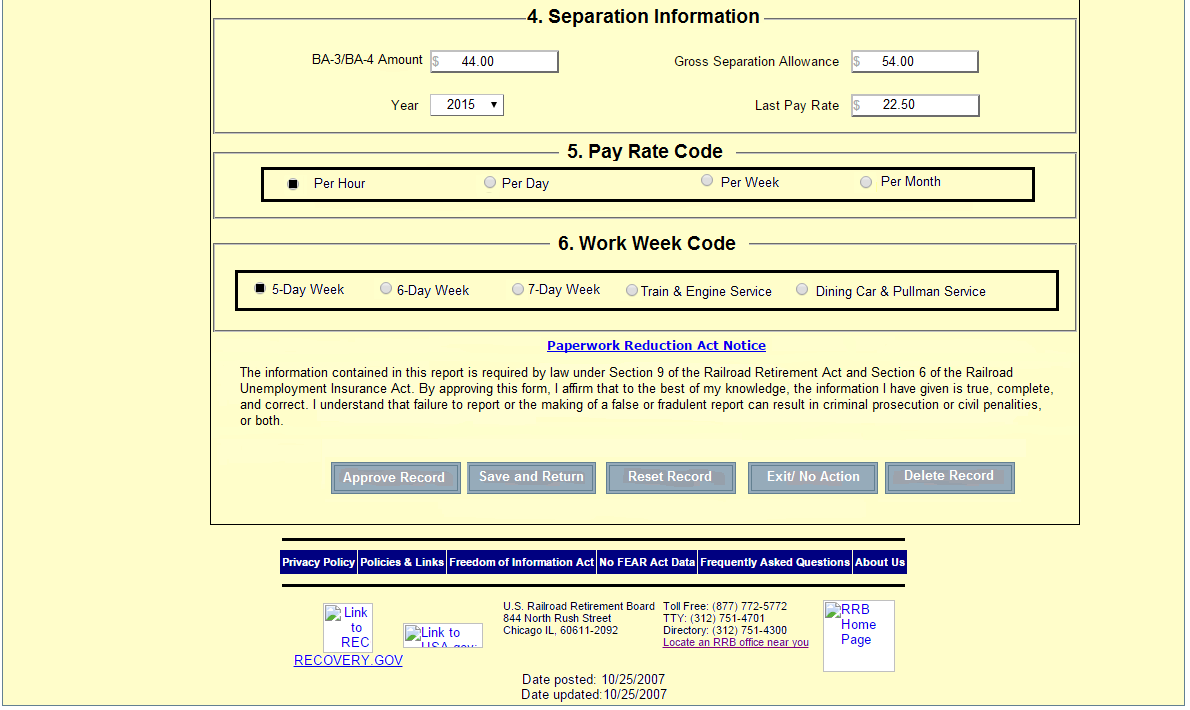
Individual Pending Record Screen
Screen 14
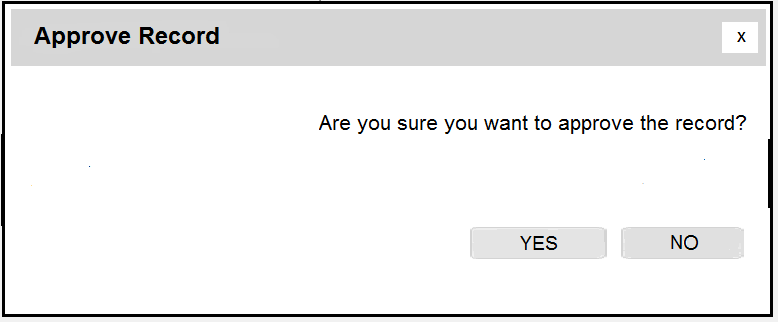
Message after Selecting Approve Record Button
Screen 15
Approve Record Confirmation Message

Screen 16
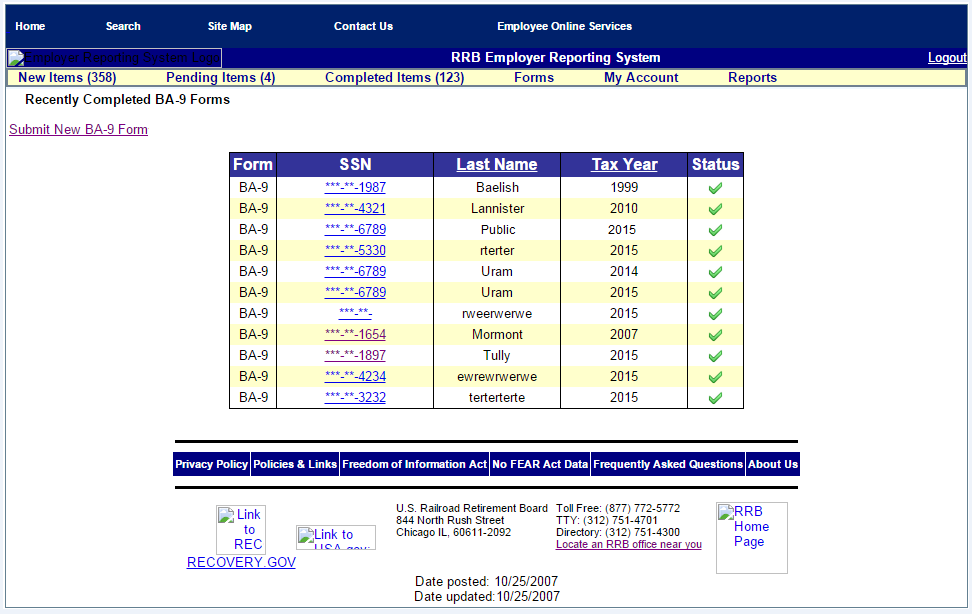
Completed Items Screen
Screen 17
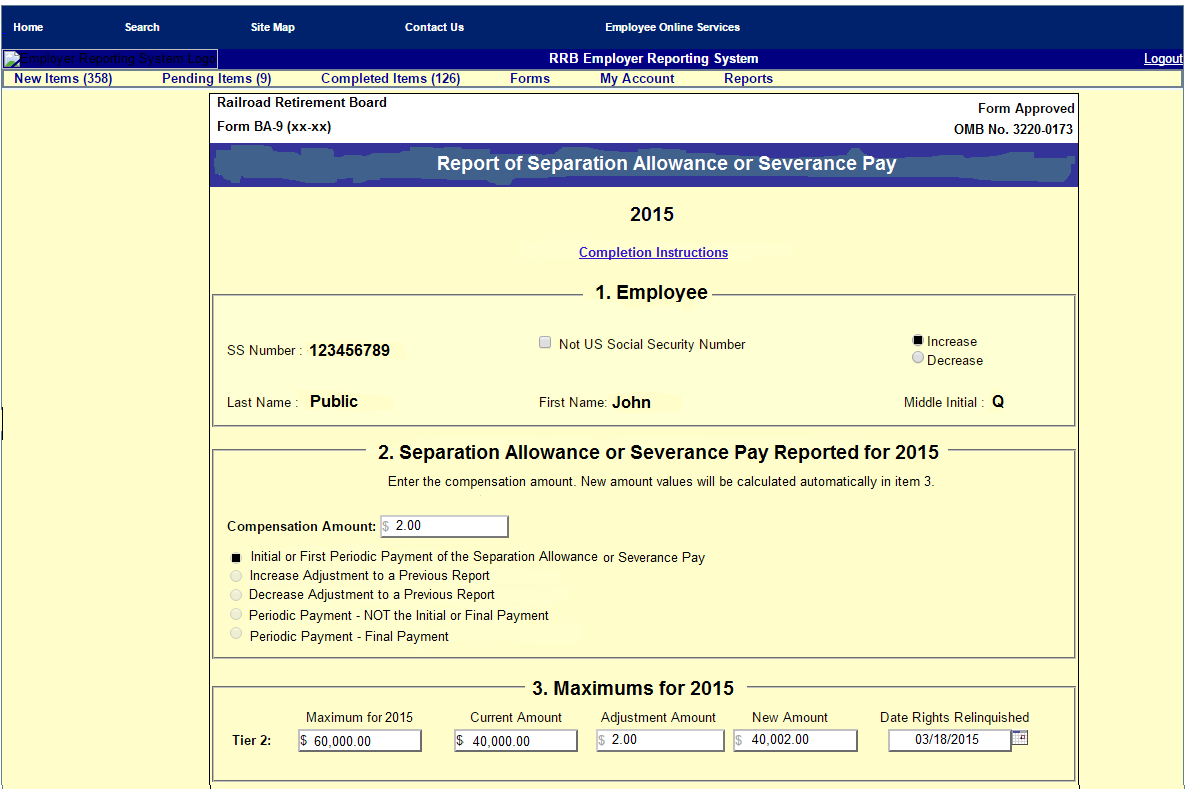
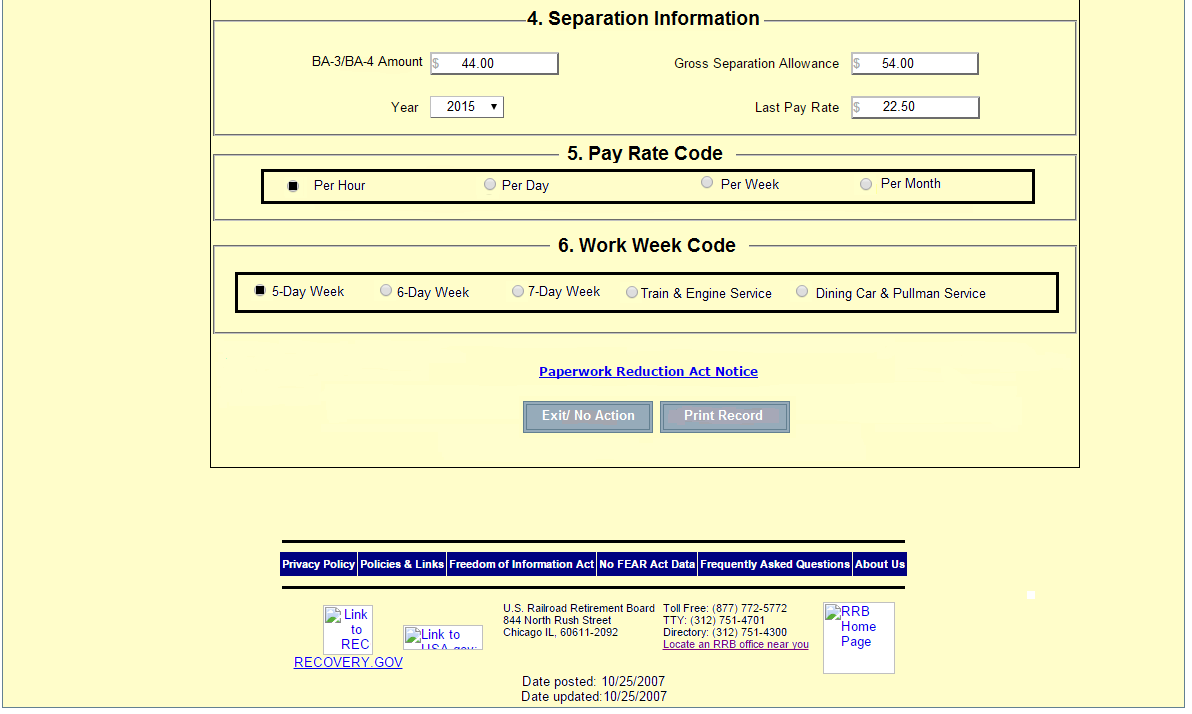
Form BA-9
Individual Completed Record Screen
Screen 18
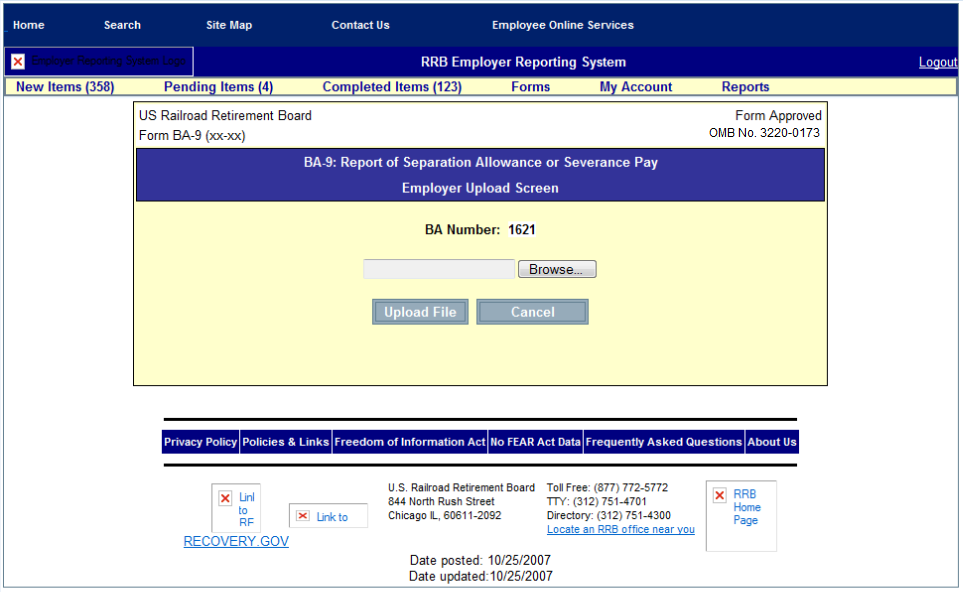
Form BA-9 (Employer Upload Screen)
Screen 19
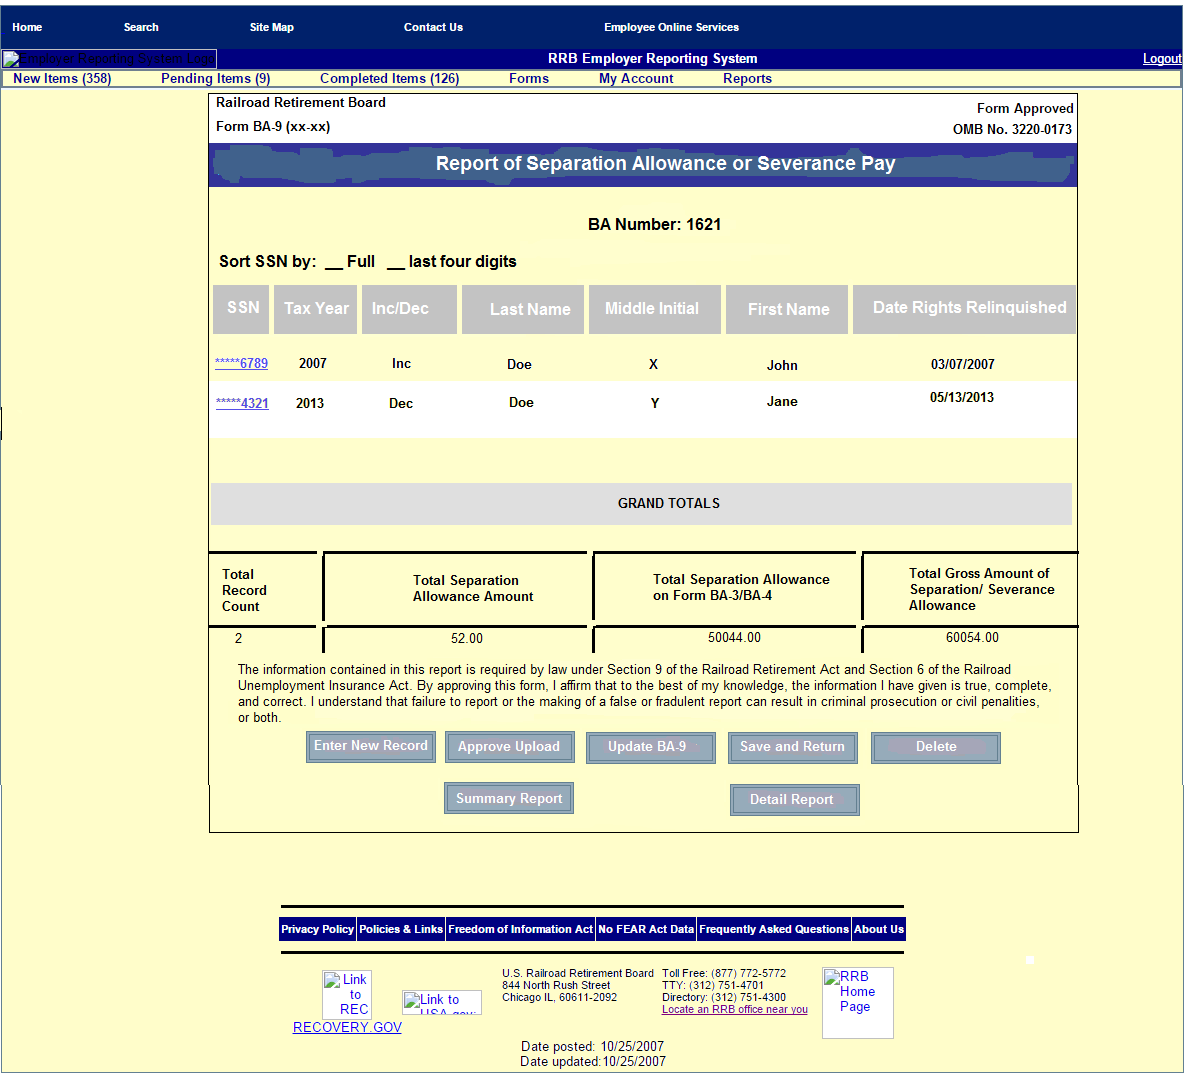
Form BA-9 (Upload Grand Totals Screen)
Screen 20
Message after Selecting Approve Upload Button

Screen 21
Approve Upload Confirmation Message

Form BA-9 (Internet)
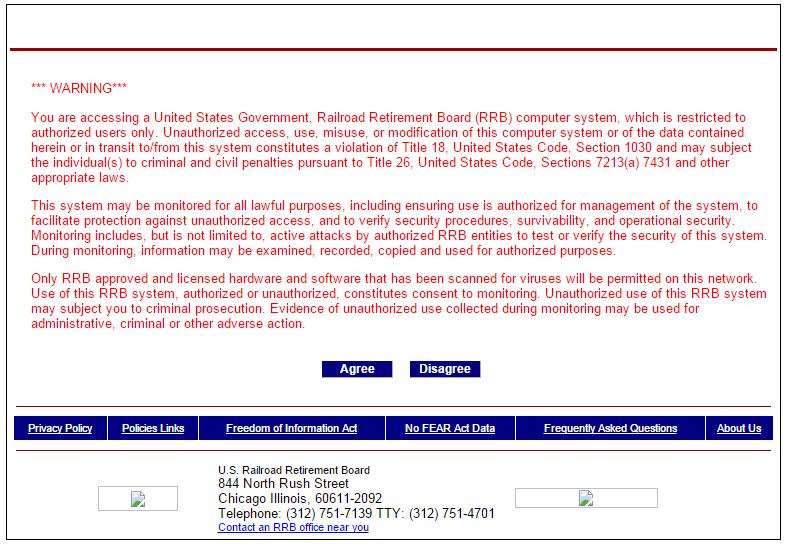
The proposed BA-9 (Internet), Report of Separation Allowance or Severance Pay, is not a form in the traditional sense but more of a process. Although it collects essentially the same information as the other approved versions of the BA-9, it consists of a series of screens, which collect the necessary information and provide for the required notices and certifications, as well as help messages designed to guide the user through the system and complete a successful transaction. The user accesses Form BA-9 (Internet) through the Employer Reporting System (ERS) on the RRB’s website (Screen 1).
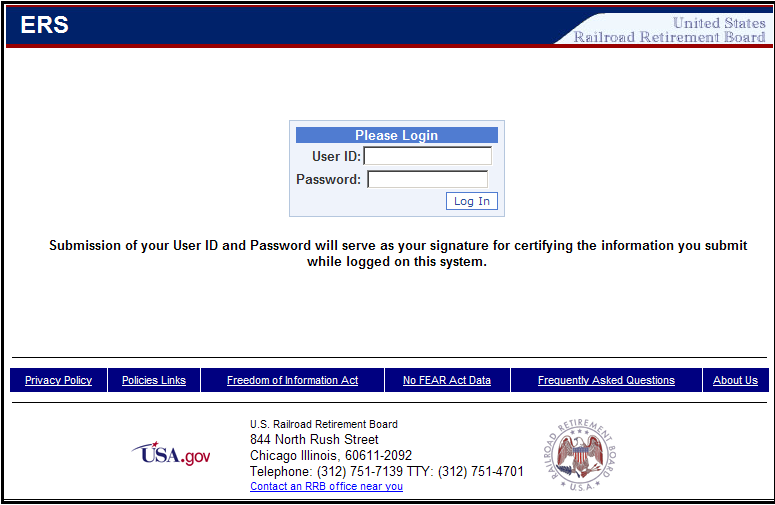
The combination of the user ID and password serve as the user’s signature for certifying the information submitted while logged into the system (Screen 2). In most cases, the user has “Update” authority only and can only enter the report information. A user with Approve authority must then approve the reports.
Upon logging into ERS, the user is brought to the Main Menu Screen and selects “BA-9” from the items listed under “Forms” (Screen 3).
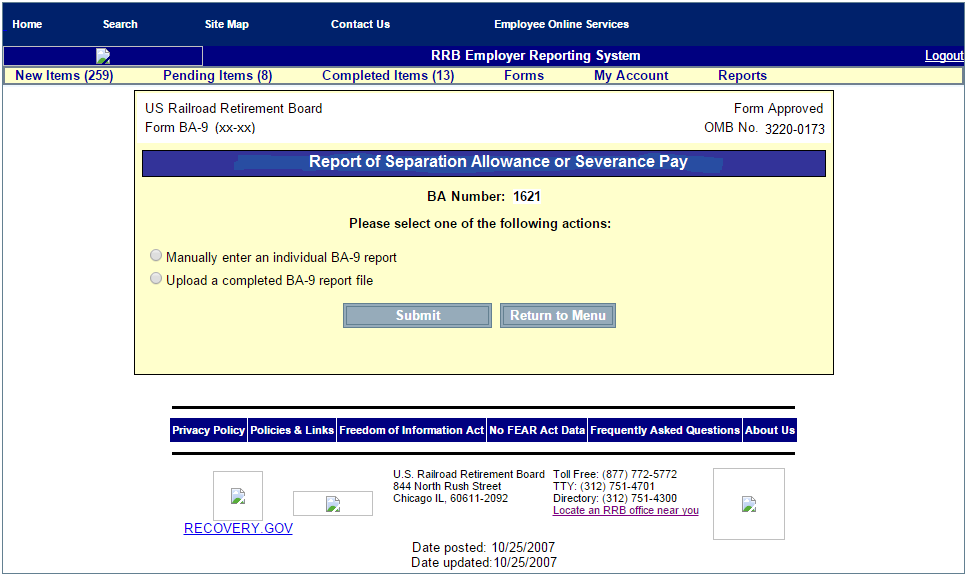
To assist in the completion of the BA-9 report, the user is presented with the “Selection Screen” (Screen 4), which consists of 2 options:
Option 1 – Manually Enter an Individual BA-9 Report
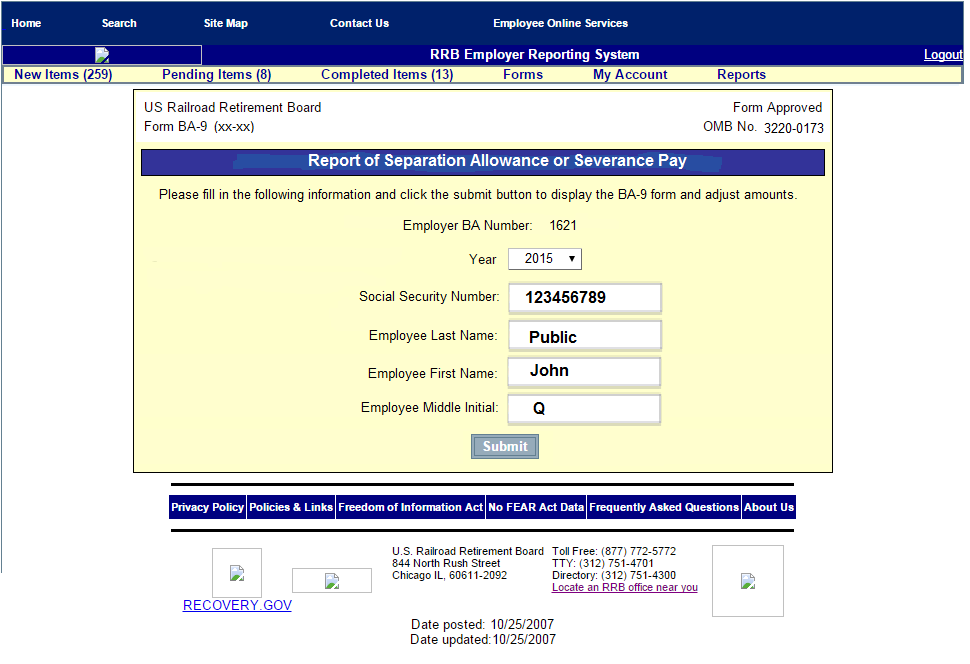
Pressing “Submit” on Screen 4 accesses the “Initial Manual Entry” screen (Screen 5) where the user selects the applicable tax year and enters the employee’s identifying information (social security number, last name, first name, and middle initial) before clicking “Submit” to access the BA-9 report screen (Screen 6). The RRB prefills the identifying information that was entered by the user on Screen 5 onto Screen 6.
The user accesses the Completion Instructions (Screen 7) and the Paperwork Reduction Act Notice (Screen 8) by clicking on links on the BA-9 Report screen (Screen 6).
The user completes Items 1-6 as follows:
Employee
The user checks “Increase” for an Initial Report or an Increase Adjustment or “Decrease” for a Decrease Adjustment.
Separation Allowance or Severance Pay Reported
Initial Report - The user selects “Initial or First Periodic Payment of the Separation Allowance or Severance Pay” and enters the amount of the separation allowance or severance pay subject to Tier II taxation.
Adjustment Report - The user selects the applicable adjustment (Increase Adjustment to Previous Report, Decrease Adjustment to Previous Report, Periodic Payment – Not the Initial or Final Payment, or Periodic Payment – Final Payment, and enters the net increase or decrease amount to be applied.
Note: If an allowance or payment is made to an employee who had already been credited with maximum earnings in that year and no tax is deducted, the user selects “Initial or First Periodic Payment” of the separation allowance and enters 0.00. If a separation allowance or severance pay was paid in more than one year, the amount subject to Tier II tax in each year must be entered on a separate report.
Maximums – The RRB prefills the Tier II “Maximum” and “Current Amount” (if available) for the applicable tax year. The “Adjustment Amount” prefills from the “Compensation Amount” in Item 2. The user enters the date the employee separated and relinquished employment rights and the system automatically calculates the new amount.
Separation Information
BA-3/BA-4 Amount – The user enters the amount of all or part of the separation allowance/severance payment that was credited compensation and included on Form BA-3, Annual Report of Creditable Compensation (3220‑0008), or credited to the day last worked on Form BA-4, Report of Creditable Compensation Adjustments (3220-0008).
Gross Separation Allowance – The user enters the total gross amount of the separation or severance allowance. This amount is not reduced for payroll deductions, for either Tier I or Tier II compensation maximums, or tax ceilings. If the amount is being paid in installments, the employer shows the sum of all the installments before deductions.
Year – The user selects the year for which the separation allowance/ severance payment was reported.
Last Pay Rate – The user enters the employee’s last pay rate. This amount is used to establish a disqualification period under the Railroad Unemployment Insurance Act.
Pay Rate Code – The user checks the code corresponding to the period to which the rate of pay applies (Per Hour, Per Day, Per Week, or Per Month).
Work Week Code – The user checks the code corresponding to the employee’s normal work week (5-Day Week; 6-Day Week; 7-Day Week; Train & Engine Service; or Dining Car & Pullman Service).
After completing the necessary items, the user has the option of clicking:
Save and Return - To save the information to “Pending Items,” where it will be approved later and return to the “Initial Manual Entry Screen (Screen 5) to enter another BA-9 report.
Reset Record - To reset the screen to clear or re‑enter any previous incorrect entries.
Exit/No Action - To return to the BA-9 “Selection” Screen (Screen 4) without saving any information.
Once the user hits “Save and Return” they are automatically returned to the “Initial Manual Entry Screen” (Screen 9). If they have completed all of their BA-9 entries, they can logout or click “Pending Items” on the tool bar and select “BA‑9” from the dropdown items to bring them to the “Pending Items” screen (Screen 10). They then have the option of clicking:
Submit New BA-9 Form – To redirect the user to the “Initial Manual Entry Screen” (Screen 5) where they can enter another record if necessary.
Approve All Records – That directs the user to Screen 11, which asks if they are sure they want to approve all BA-9 reports. Once they click “Yes,” they receive a confirmation message that the reports were successfully approved (Screen 12). If they click “No,” they are returned to the previous screen and the file remains in “Pending Items” (Screen 10) until approved. Note: Screen 10 contains the appropriate certification/fraud statement.
An employee’s social security number – Which accesses the “Individual Pending Record” screen (Screen 13) used to view, update, delete, or approve the information previously entered for the individual. This is especially useful when a user with approval authority enters only a single or few records.
If approving the information, the user is directed to Screen 14 that asks if they are sure they want to approve the individual BA-9 record. Once they click “Yes,” they receive a confirmation message that the record was successfully approved (Screen 15). The system then moves the item to “Completed Items” and the user to the “Completed Items” screen (Screen 16) where they can click on a record to view and/or print an individual’s completed record (Screen 17), or they can logout or access any of the menus on the toolbar. If they click “No,” on Screen 14, they are returned to the previous screen and the individual’s file remains in “Pending Items” (Screen 10) until approved. Note: Screen 13 contains the appropriate certification/fraud statement.
Option 2 - Upload a Completed BA-9 Report File
Pressing “Submit” on Screen 4 accesses the “Employer Upload” screen (Screen 18) where the user must press the “Browse” button to locate the file on their computer to upload to ERS. Before the upload, the electronic report file must be formatted with the correct record layout (Attachment 2). Pressing the “Upload File” button transfers the file to the “Upload Grand Totals” screen (Screen 19). The user then has the option of clicking:
Enter New Record - To create an individual BA-9 record and insert it into the uploaded BA-9 report file.
Approve Upload - To move the uploaded BA-9 report file to “Completed Items” (Screen 16).
After clicking on “Approve Upload,” a confirmation screen appears asking if the user is sure they want to approve the upload (Screen 20).
When “Yes” is selected a confirmation message appears that the “Upload Was Successfully Approved” (Screen 21) and the user is redirected to the “Completed Items” screen (Screen 16) were they can logout or access any of the menus on the toolbar.
Update BA-9 – Used by the Approver to update the BA-9 report after making a correction to the file previously entered by the approver’s designee.
Save and Return - To save the uploaded file to the “Employer Upload” screen (Screen 18) and return to the “Pending Items” screen (Screen 10); Note: The person uploading the record(s) usually does not have Approval authority and must send the uploaded records to “Pending Items” for final approval.
Delete - To delete the uploaded file and return to the “Selection” screen (Screen 4) where they can re-upload a new or corrected file, logout, or access any of the menus on the toolbar.
Summary Report - To print the information listed on the “Upload Grand Totals” screen (Screen 18).
Detail Report - To print all of the information contained in the uploaded file.
-
| File Type | application/vnd.openxmlformats-officedocument.wordprocessingml.document |
| Author | Roden-Sapyta Melodi A. |
| File Modified | 0000-00-00 |
| File Created | 2021-01-24 |
© 2026 OMB.report | Privacy Policy