Unemployment Insurance Data Validation Program
Unemployment Insurance Data Validation
ETA Operations Guide 411_FINAL 3.28.16
Unemployment Insurance Data Validation Program
OMB: 1205-0431
![]()
![]()
Unemployment Insurance
Data Validation
Operations Guide
ETA Operations Guide 411
U.S. Department of Labor
Employment and Training Administration
Office of Unemployment Insurance
November 2012
![]()
OMB No: 1205-0431
OMB Expiration Date: May 31, 2016
Estimated Average Response Time: 550 hours.
OMB Approval. The reporting requirements for ETA Handbook 361 are approved by OMB according to the Paperwork Reduction Act of 1995 under OMB No. 1205-0431 to expire May 31, 2016. The respondents' obligation to comply with the reporting requirements is required to obtain or retain benefits (Section 303(a)(6), SSA). Persons are not required to respond to this collection of information unless it displays a currently valid OMB control number.
Burden Disclosure. SWA response time for this collection of information is estimated to average 550 hours per response (this is the average of a full validation every third year with an estimated burden of 900 hours, and partial validations in the two intervening years), including the time for reviewing instructions, searching existing data sources, gathering and maintaining the data needed, and completing and reviewing the collection of information. Send comments regarding this burden estimate or any other aspect of this collection of information, including suggestions for reducing this burden to the U. S. Department of Labor, Employment and Training Administration, Office of Workforce Security (Attn: Rachel Beistel), 200 Constitution Avenue, NW, Room S-4519, Washington, D.C. 20210 (Paperwork Reduction Project 1205-0431).
Viewing the Report Validation Screen 40
Entering Validation Results for Non-random Samples (Minimum, Missing Subpopulations and Outliers) 53
Entering Validation Results for Random Samples 58
Viewing the Data Element Validation Report 63
Viewing Data Element Sorts in Tax 65
Entering Data Element Sorts Results 67
Frequency Distribution Screen 71
Viewing the Wage Item Validation Screen in Tax 75
Transmitting Population Results 84
Chapter 1
About This Operations Guide
This guide explains how to navigate the Benefits and Tax applications of the Data Validation (DV) State Web Software Version 4.2.5.
Technical Support
If any problems are encountered with the software, contact the Office of Unemployment Insurance (OUI) Technical Support Staff (Hotline) at 1-800-473-0188 or send an email to [email protected].
Typographic Conventions
This document uses the following typographic conventions.
Visual Cue |
Meaning |
1 2 |
Sequenced steps to follow when completing a task |
Black bold type |
Button |
Blue type |
Box title |
Purple underlined type |
Links on the software that you can click on |
Blue underline type |
Web or email address |
Italics |
Documents, screen names and menu options |
|
Indicates where to click on the software screen |
|
Note with additional information |
|
Tip |
Software Requirements
To use the Data Validation State Web Software you will need a computer with Internet Explorer Version 6.0 or later.
You will also need a user name and a password which you should obtain from your system administrator.
In order to perform data validation you need to load extract files into the software. Specifications on how to build these extract files are available in Appendix A, UI Benefits Record Layouts and Appendix B, UI Tax Record Layouts of this Operations Guide. All extract files to be loaded into the software must be copied to the “/opt/dv/data/” directory in your state SUN server. Extract file names must have a .txt extension and contain no spaces.
The Data Validation Program
Welcome to the world of data validation! This operations guide is both an introduction to the Data Validation automated system and a reference source for continual use.
States are required to file a series of standardized reports on their Unemployment Insurance (UI) operations with the Employment and Training Administration (ETA) of the U.S. Department of Labor (DOL). Reports covered by the data validation program are required on a monthly or quarterly basis.
These reports are used to establish the volume of activity conducted by state UI administrations and are a factor in establishing funding levels. They provide information about state compliance with UI requirements. They also provide information about the amount of benefits paid, the number of claimants served and other information useful in measuring the U.S. economy and projecting trends.
Since state programs differ significantly within established parameters and states utilize a variety of accounting and data processing arrangements, the issue of the comparability among state reports has emerged. State reporting requirements are standardized, but states use a variety of reporting procedures and must interpret reporting requirements within the context of their own laws and accounting conventions.
The UI Data Validation (DV) program was established in an attempt to identify and address discrepancies in reported numbers. The program requires that states recreate reported numbers independently from their reporting process and compare these numbers with actual numbers reported to DOL. States must address any discrepancies found that exceed the established tolerance error rate. The DV program also requires that states examine a sample of reported cases to verify that the correct information is being counted.
The Data Validation State Web Software facilitates the validation process and generates standardized outputs which document the state data validation results.
The data validation process is divided into two main validation processes: Report Validation (RV) and Data Element Validation (DEV). RV verifies that reported numbers in ETA reports are accurate, i.e., that the process which the state uses to count transactions is correct. DEV refers to the investigation of samples of records to establish that the information in individual records is accurate and conforms to federal reporting requirements, i.e., that the state is counting the right transactions.
The Benefits application uses random, missing, minimum and outliers samples for the DEV process. The Tax application uses minimum samples, formerly known as “File Integrity Validation” or FIV samples, which consist of two records per sub-population within an extract file. The sample frame for each sample consists of a set of specific sub-populations within an extract file. Records included in a sample are displayed along with the data elements to be validated in a data entry screen. Investigators review each record, identify any elements found to be erroneous, and data-enter this information into the system. In Tax, even one error causes a sample to fail.
The Tax application also provides a sort utility for Populations 1 – 4 as part of the DEV process. It tests whether any secondary codes or Employer Account Number values support the primary codes (such as A for Active or C for Contributory employers) used to classify extracted transactions. Sorts pass if fewer than 2% of the sorted of the sorted transactions involve discrepancies. Tax Population 5 has no sort utility.
The Tax application includes a Wage Item Validation component that requires validation of incoming information provided by employers pertaining to wages paid to individuals on a quarterly basis (wage Records). This information is not included in extract files. Validation of wage record information requires a review of incoming information and a comparison of reported numbers included in ETA 581 Report count with re-constructed counts. This information is key-entered into the software and forwarded to DOL.
Navigating the System
The DV software is a web-based application with certain characteristics that the user should be aware of.
Multiple users. The software supports multiple, concurrent users. However, it was not designed to allow, for example, update of a single table by multiple users at the same time.
Time Out. You will be automatically logged out from the application if you are inactive for more than 59 minutes. To maintain your session hit a keystroke or move your mouse. You should perform “save” operations frequently if there is a danger of work being lost due to inactivity. During the extract loading operation, the time-out parameter is set to four hours, to allow large extract files to be loaded without interruption.
Exit from Screens. The user can exit from a secondary window within the application through use of the “X” in the upper right corner of the window. Be aware that the “X” at the extreme upper corner of the screen will exit the user from the entire application. This will require the user to sign on again and may result in lost data.
Use of the Back button. The Internet browser has a Back button that allows the user to return to a previous screen. Users should be aware that use of this button may result in unexpected results. This problem can be avoided by using the links on the software screens that were designed to navigate to previous screens. For example, the Home link at the bottom of a screen will take you back to the Benefits Selection Criteria screen.
<Control End> and <Control Home>. <Control End> will take you immediately to the bottom of any screen and <Control Home> to the top.
Print Function. To print screens, use the print function on your browser or if available, the print button at the bottom of the screen. Some screen sizes exceed the width of a portrait print. In this case try the landscape option on your printer. You can also try copying the screen to Word, Excel or some other utility and print from there. System administrators should be able to assist you if you encounter problems.
Save and Save As Functions. Use the Save button to save data in the DV application. Data for a given population saved using the Save button are overwritten when a new extract file for that population is loaded. The Save As button allows you to save a screen shot of the current software screen outside the DV software. Screen shots saved outside the application are not affected by loading new extract files. The Save As button can be used to save screen shots of summary reports and DEV worksheets to satisfy audit requirements.
Help functions. The application has Help links on certain screens. Click on this link to display information relevant to the data or functions available on the screen.
Definitions
Certain terms used in the validation process have a specialized meaning within the context of the DV program:
Extract Files. These files consist of information extracted from state production databases. Each state UI transaction is represented as a row of comma-separated data fields that allow it to be identified as a countable transaction and classified into the report cells being validated. The extract files are used as input for the DV software.
Record Layouts. These documents provide detailed information on how to build the extract files. They can be found in the software (see Viewing the Record Layouts section) or in Appendix A, UI Benefits Record Layouts or Appendix B, UI Tax Record Layouts of this guide.
Module 3. State-specific document used to map the data elements in the record layouts and samples to elements in individual state systems.
Populations. Populations are sets of unique, non-overlapping types of transactions or statuses that relate to reportable benefits or tax operations. Benefits validation uses 15 such populations, of which 12 are transactions during a reporting period (e.g., Population 1, Weeks Claimed) and three are statuses at the end of a reporting period (e.g., Population 10, Age of Pending Lower Authority Appeals). Tax validation uses five populations. An extract file must be constructed for each population. Records in some populations may be used to validate counts from only one UI report (e.g. Benefits Population 1 records validate only Weeks Claimed on the ETA 5159 report); others are used to validate multiple reports (e.g., Benefits Population 4 records validate parts of four benefits reports.)
Subpopulation. Populations are divided into mutually exclusive subsets called subpopulations. Subpopulations are defined in such a way that they can be used to reconstruct report counts; some are used in the reconstruction of more than one reported count. Each record from a population extract file can be assigned to only one subpopulation. For example, in Benefits Population 1, UI weeks claimed records are assigned to Subpopulation 1.1 and UCFE weeks claimed records are assigned to Subpopulation 1.2.
Chapter 2
Logging On
To log on to the data validation software, follow the next steps.
Go to your state Unemployment Insurance Applications Menu screen, select Data Validation, and then select Validation Software.


On the Data Validation login screen, enter your User Name. Example: dv3
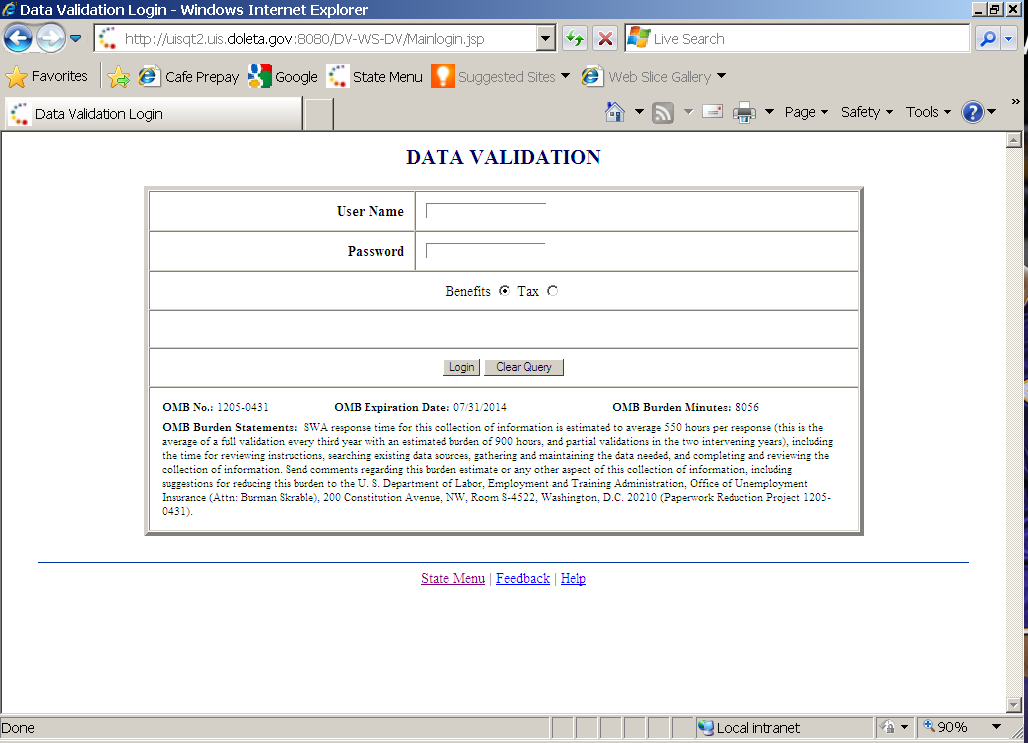


Screen shots in this operations guide might look different (fonts and colors) than your screen due to your desktop and browser settings.
Enter your Password.
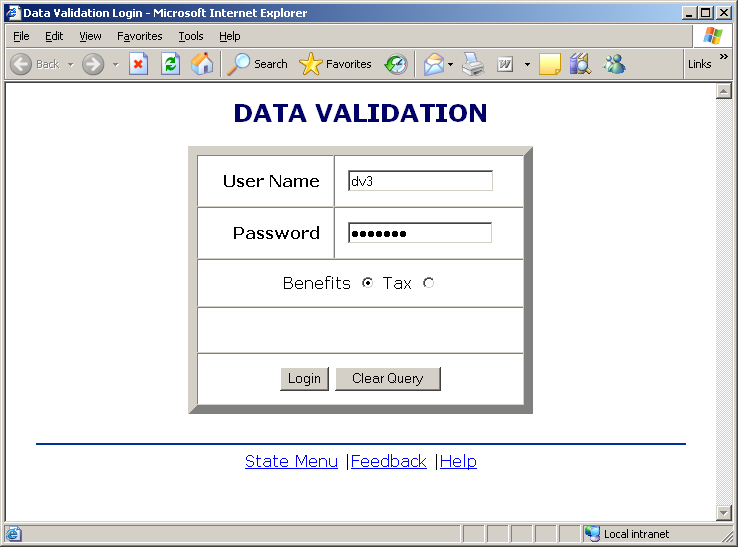


User name and password are assigned by your state system administrator.


Passwords are case-sensitive, i.e., the operator must use capital letters or special characters such as (#,*, or %) if these are part of the
password.
Select the application you want to log on to, i.e. Benefits or Tax (Benefits is selected by default)


Click on the Login button.


The State Menu link at the bottom of the screen returns you to the state menu. The Feedback link accesses contact information for technical problems. The Help link accesses information on all available functions on the screen.
You should see the Benefits Selection Criteria or the Tax Selection Criteria screen, depending on the application you selected.

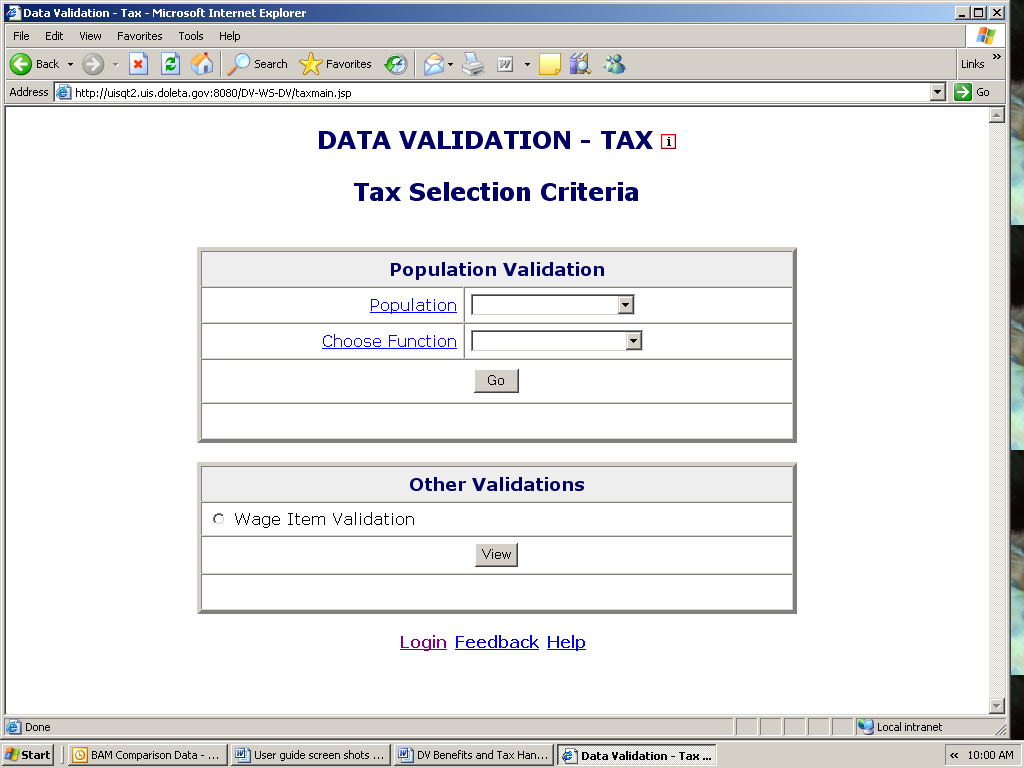
The Login link at the bottom of the screen will take you back to the login screen. Click on Population and Choose Function for additional information on these parameters.
Chapter 3
Viewing the Record Layouts
In order to use the data validation software, you need to have an extract file which contains the required data for the reporting period you want to validate. The data in the file should be extracted from your state production system in accordance to the specifications described in Appendix A, UI Benefits Record Layouts, or Appendix B, UI Tax Record Layouts of this guide. You will need 15 extract files; one for each benefit population, and 5 extract files; one for each tax population.
The record layouts, i.e. the extract file specifications, are also available in the software. To view them, follow the next steps.
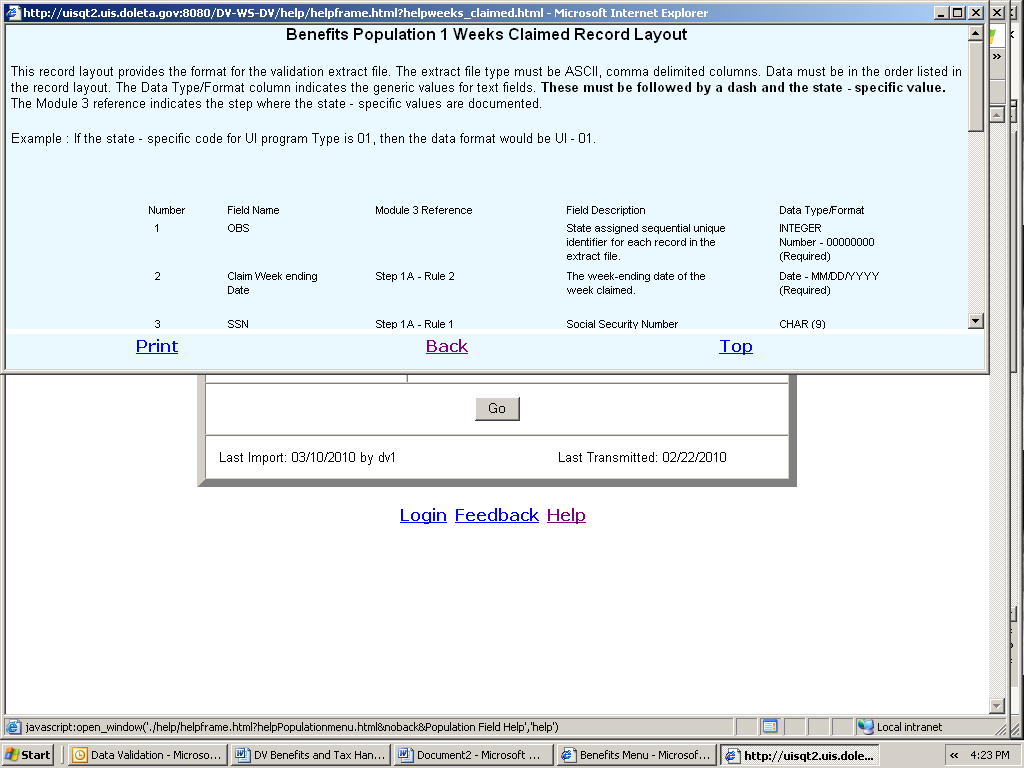
On the Benefits Selection Criteria or the Tax Selection Criteria screen, click on the Population link.


To see the record layout of a population click on the population’s link. (Benefits are used in the example; Tax will list valid Tax populations.)
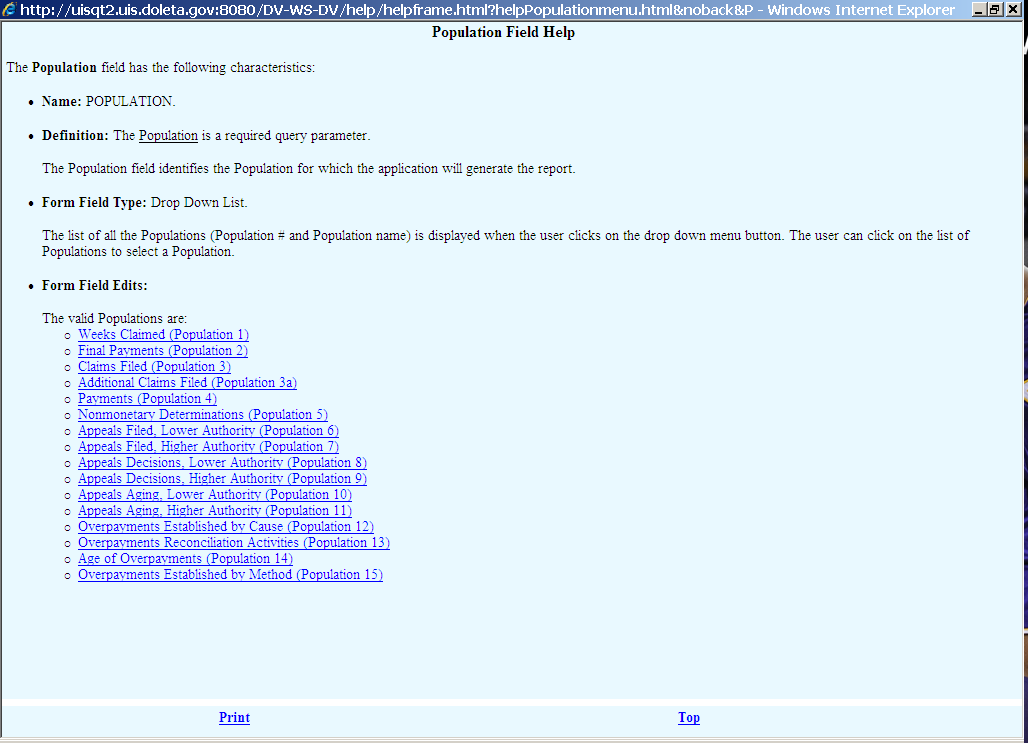

The record layout for the population will be displayed.
Chapter 4
Importing an Extract File
To use the data in an extract file to validate reported counts, you first need to import the file into the software. To import an extract file, follow these steps:
Select a population from the Population drop–down menu on the Benefits or the Tax Selection Criteria screen.


When you select a population, on the lower left corner of the screen you will see the last date this population was imported and which user imported it. If you have never imported this population it will display “Never”.
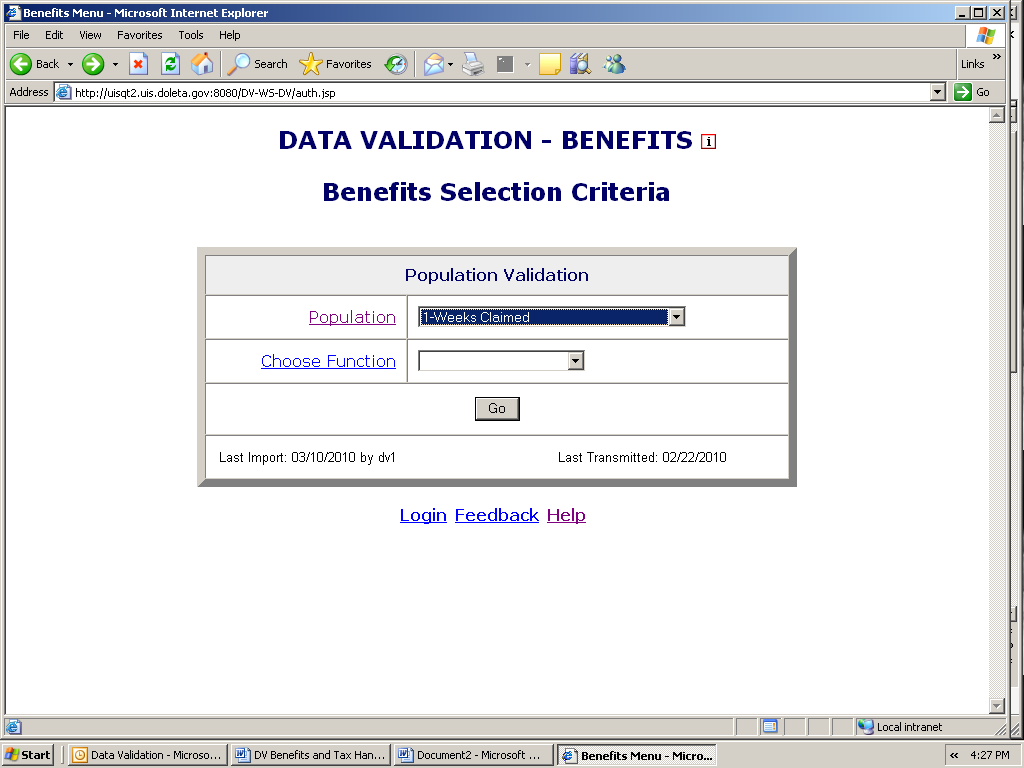


If you have already imported the population, you will see the last day it was imported and the user that imported it. You will also see the last date when validation results were transmitted to DOL. If validation results have not been transmitted to DOL you will see “Never”.
Select Import Data from the Choose Function drop-down menu and click Go.


When you select Import Data in Benefits, the fields Period Start Date, Period End Date and Import From Extract File will be displayed.
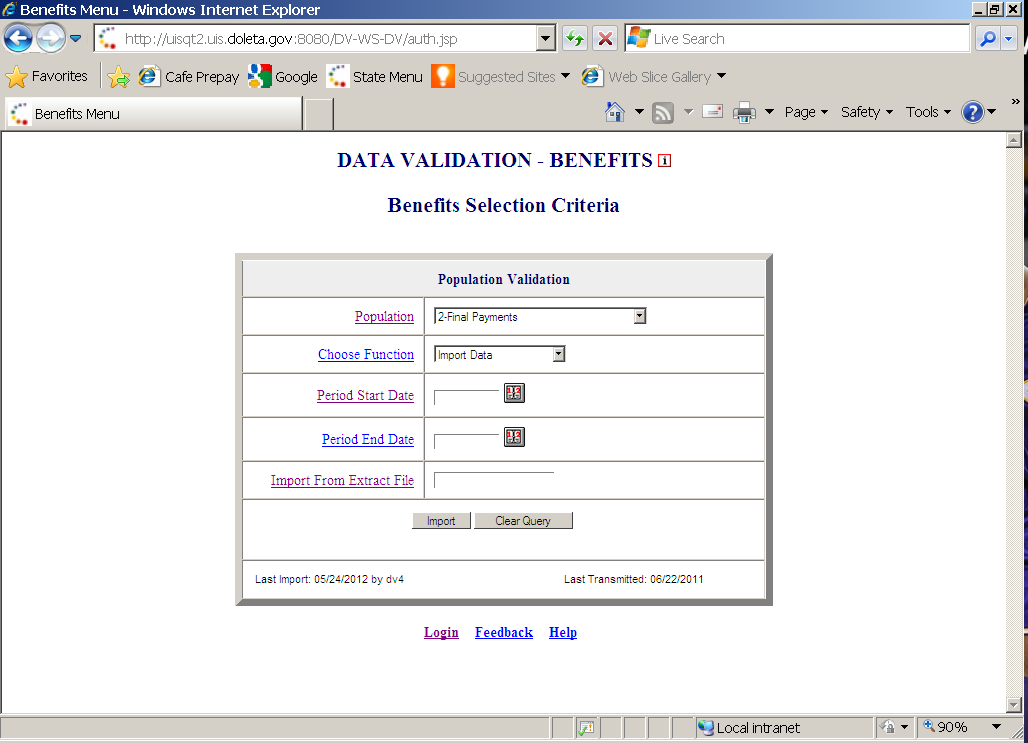

You can click on Period Start Date, Period End Date and Import From Extract File for additional information on these parameters.
When you select Import Data in Tax, the fields Report Quarter and Year, will be displayed.
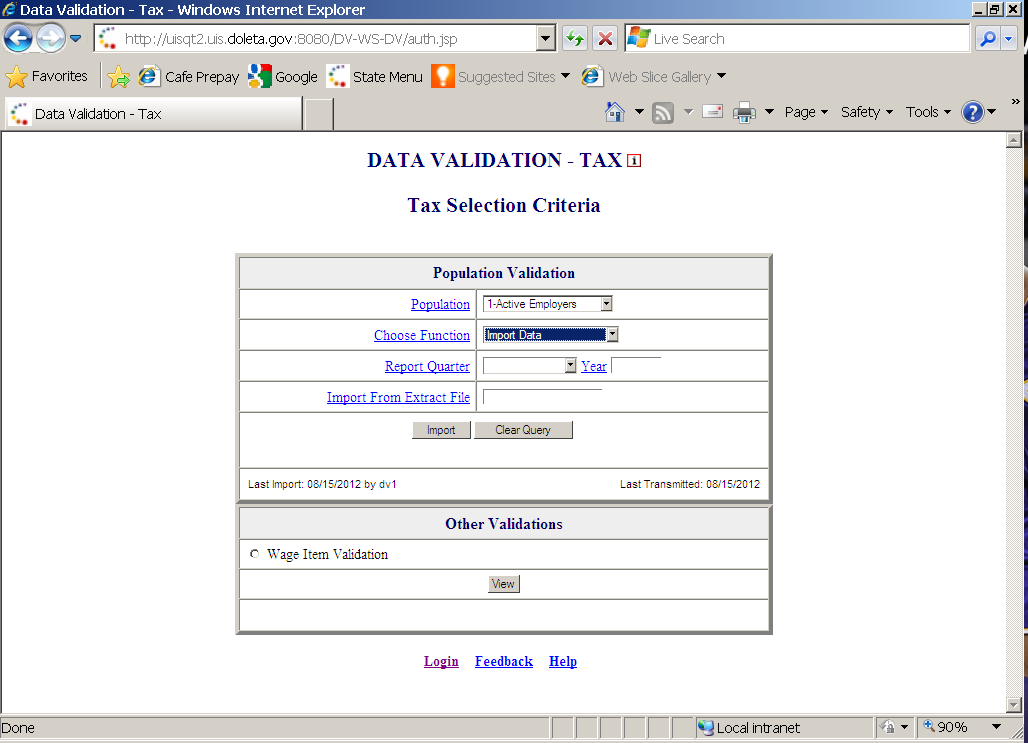

You can click on Report Quarter and Year for additional information on these parameters.
If you are loading Tax Population 2, the Tax Selection Criteria screen will also display boxes for Contributory and Reimbursing Dates. (These boxes do not display for other tax populations.)


The report due date is a state-designated date after which the state assesses penalty or late charges to employers. The software allows separate dates for contributory and reimbursing reports because some states have different due dates for contributory and reimbursing reports.
Enter the reporting period you want to validate.
In Benefits, you need to enter the Period Start Date and Period End Date using MM/DD/YYYY format. For example, January 1st, 2008 must be entered as “01/01/2008.”


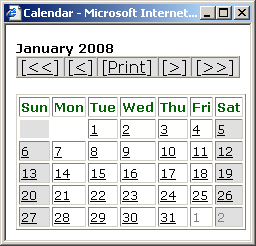
You can also click on the calendar icons on the right to select start and end dates from a calendar.
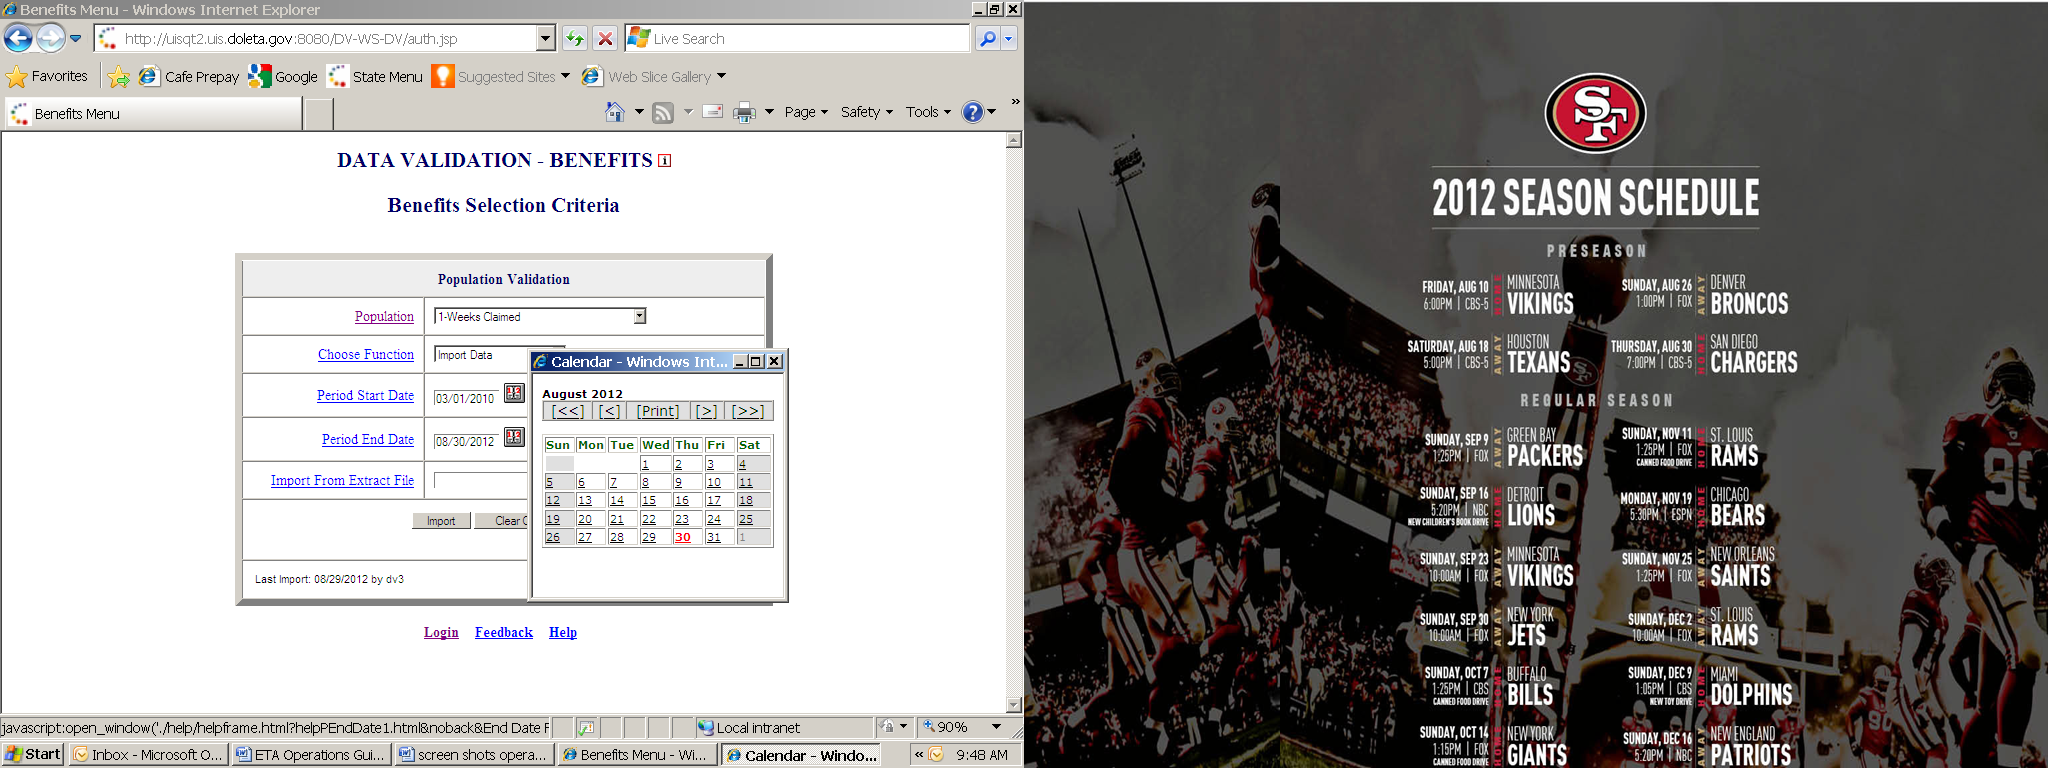

Use the double arrows on the calendar to scroll through years and the single arrows to scroll through months and then click on the day you want to use as start or end date.

In Tax, select the Report Quarter and insert Year corresponding to your extract file, using the drop-down menu next to Report Quarter and type in year using YYYY format.


For Tax Population 2, also enter report due dates, using MM/DD/YYYY format.
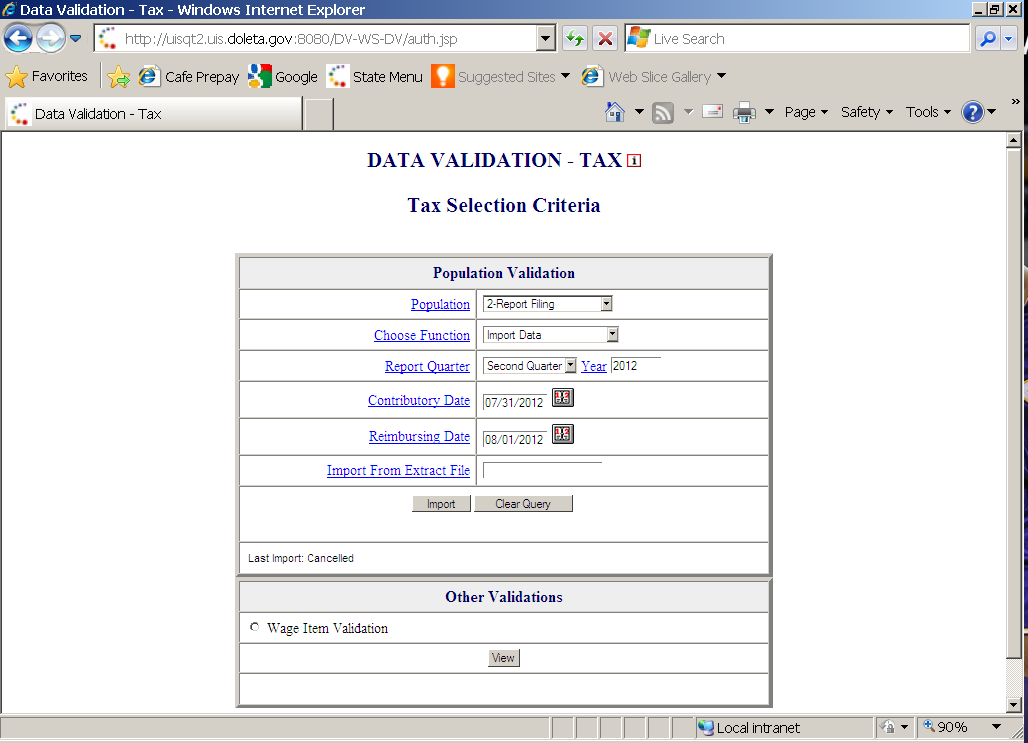

You can also click on the calendar icon on the right of each due date to select the report due date from a calendar, the same way you would select the reporting dates from the calendar in Benefits.


The time period entered or selected should be the same used to construct the extract file you are going to load.
I
![]() n
Benefits, the software allows you to load extract files that do not
conform to actual reporting time periods. This option is included
for diagnostic purposes only. You should only submit to DOL data
n
Benefits, the software allows you to load extract files that do not
conform to actual reporting time periods. This option is included
for diagnostic purposes only. You should only submit to DOL data
validation results that correspond to time periods which match the
time period covered by an actual report (e.g., the ETA 5159 Report
for January 1 – 31, 2008).

T![]() he
reporting dates are needed only for the import function. Once a
population is loaded, the user may choose any other function without
entering these dates.
he
reporting dates are needed only for the import function. Once a
population is loaded, the user may choose any other function without
entering these dates.
Enter the full path where the file is located and the name of the extract file into the Import From Extract File box (example: /opt/dv/data/pop1.txt).


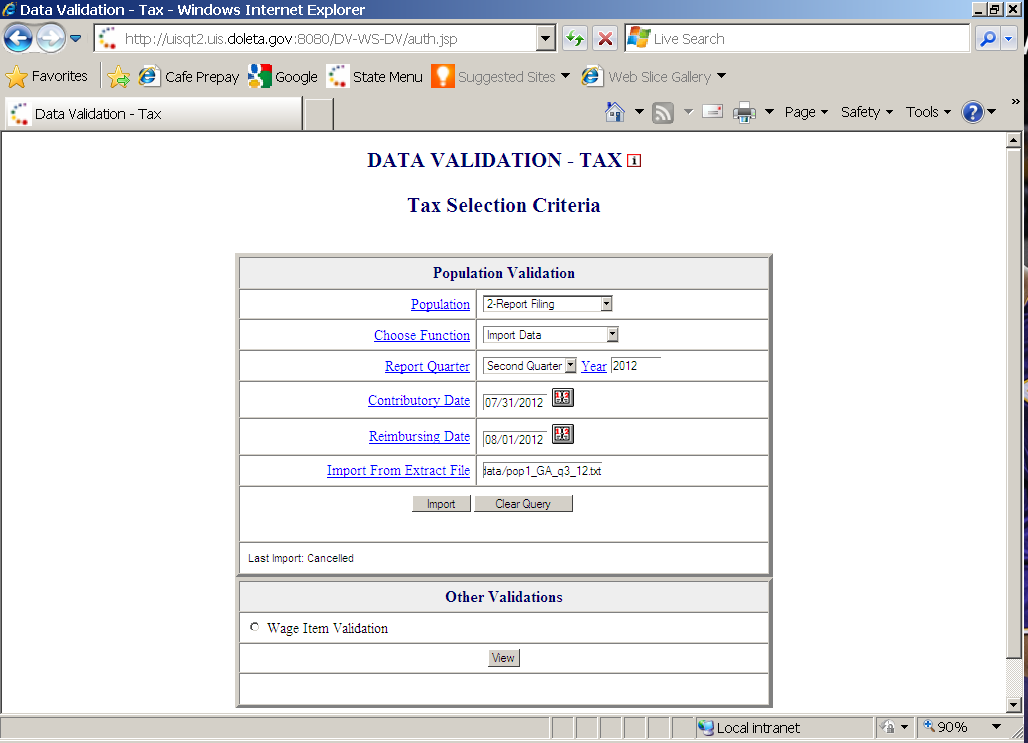
The Clear Query button on the bottom of the screen will reset the Benefits or Tax Selection Criteria screen.

A ll
extract files must be copied to the /opt/dv/data/ directory; hence
the path name will always be /opt/dv/data/filename.txt. This
directory was created on the Sun servers exclusively for data
validation use.
![]()

The software will only accept files in text format. File names cannot contain spaces and must end in “.txt”.
Click on the Import button to load the extract file into the system.


This will take you to the Import Messages screen for information on the loading procedure.
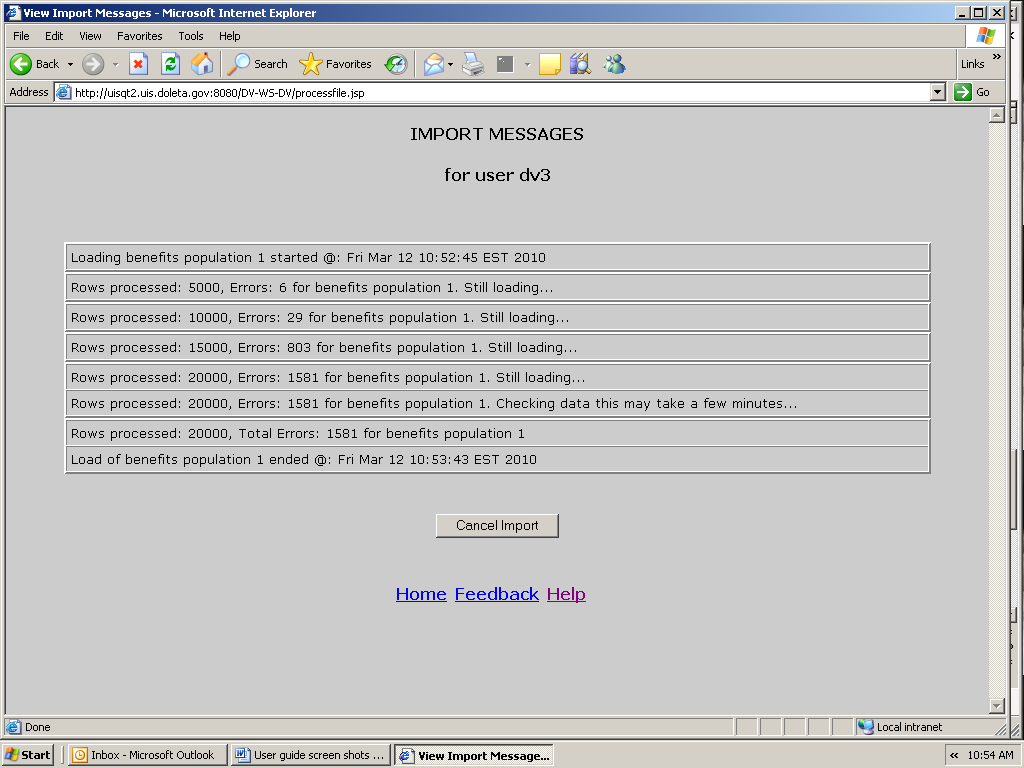
On this screen you can see which user is loading the population, the start and end times of the load, the number of errors found in the file, and the total number of rows processed (including records in error).
![]()

Incoming extract files are subjected to various tests to identify
1) Syntax errors, 2) logic errors, and 3) duplicate records.
For large files, a new import message line will appear for each 5,000
records.

L![]() oad
times vary depending on the number of records in the extract file.
The time-out parameter is set to 12 hours while the software is
loading to allow ample time for loading large files. Load times are
oad
times vary depending on the number of records in the extract file.
The time-out parameter is set to 12 hours while the software is
loading to allow ample time for loading large files. Load times are
affected by the size of the file, the population being loaded, and the
number of error conditions encountered during the load.

T![]() he
software allows different populations to be resident in the
application at the same time, but only one data set for each
population.
he
software allows different populations to be resident in the
application at the same time, but only one data set for each
population.

I![]() f
the same population is loaded a second time, the new data set will
over-write the former. Re-loading the same extract file will produce
identical results for report validation, but different samples.
f
the same population is loaded a second time, the new data set will
over-write the former. Re-loading the same extract file will produce
identical results for report validation, but different samples.
While the file is loading you can go back to the Benefits or Tax Selection Criteria screen and access screens for other populations. You cannot, however, load another population or access any of the screens of the population being loaded. A message in red will appear on the screen letting you know that the population is being loaded and the user that is loading it.


In addition, the Population drop-down menu will not display the population being loaded and the Choose Function drop-down menu will not display the Import function.
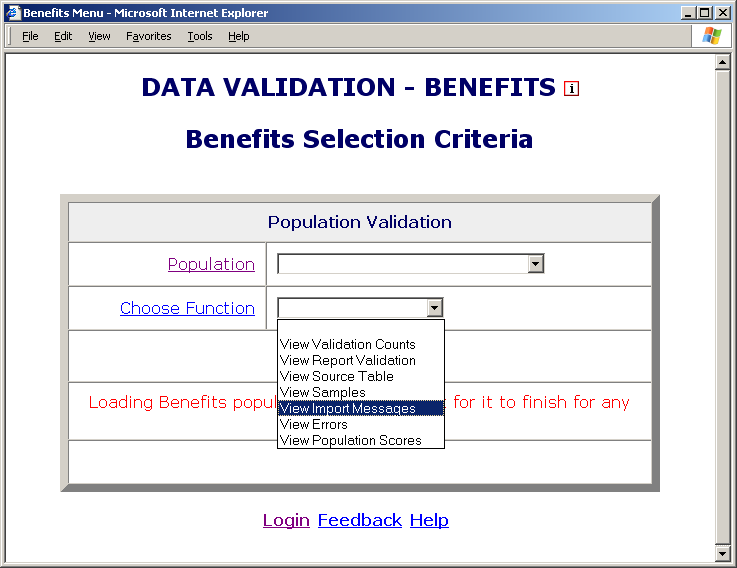
To return to the Import Messages, select View Import Messages from the Choose A Function drop-down menu on the Benefits Selection Criteria screen. You don’t need to select a Population.

M![]()
 essages
displayed on the Import Messages screen are available during
the loading operation, but are not available after the file has been
loaded and the user has left this screen. Information about
previous population loads is not available. Users have the option of
printing this screen when it is displayed, for future reference.

T![]() o
accurately validate Benefits Population 3 reported numbers, i.e., RV,
the extract file for Benefits Population 3a must also be loaded on
the software for the same reporting period. When the software
o
accurately validate Benefits Population 3 reported numbers, i.e., RV,
the extract file for Benefits Population 3a must also be loaded on
the software for the same reporting period. When the software
generates the RV for Benefits Population 3, it retrieves validation
counts for new and transitional claims from the Benefits Population 3
extract file and additional claim counts from the Benefits Population 3a
extract file. For more information, please refer to Appendix A, UI
Benefits Report Validation Specifications of the ETA Handbook 361- A
Benefits.
Cancelling a Load
To cancel a load in progress, follow the next steps.
To cancel a load in progress, click the Cancel Import button on the Import Messages screen.
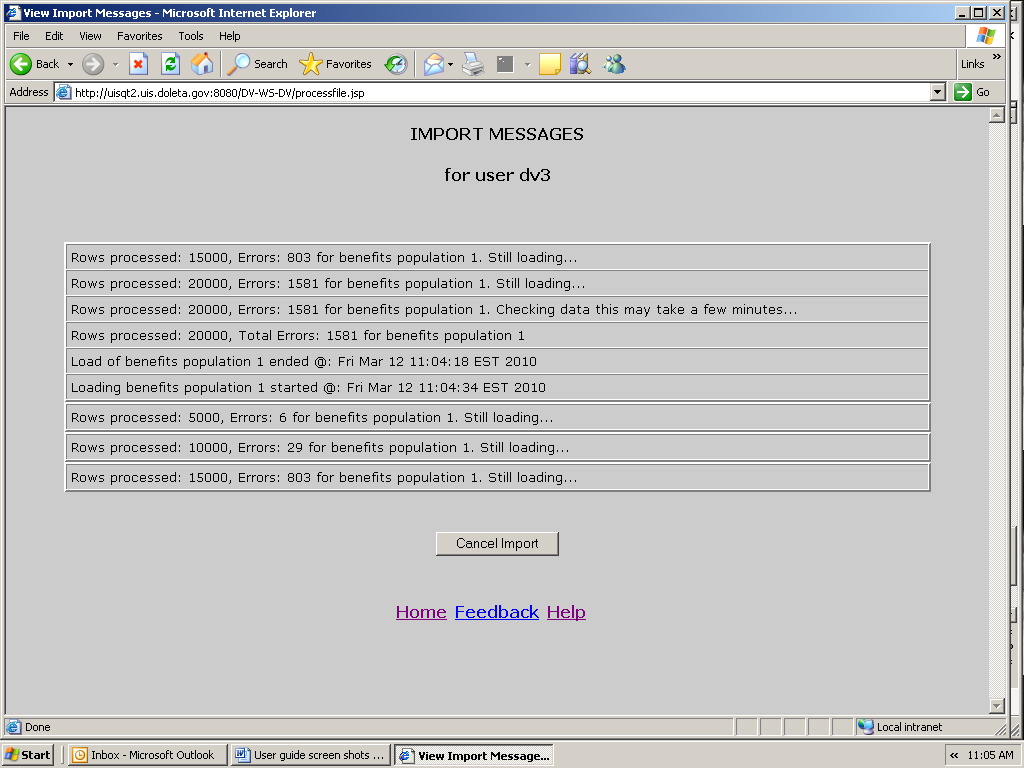

You should get a message saying that the load was cancelled and the time it was cancelled.
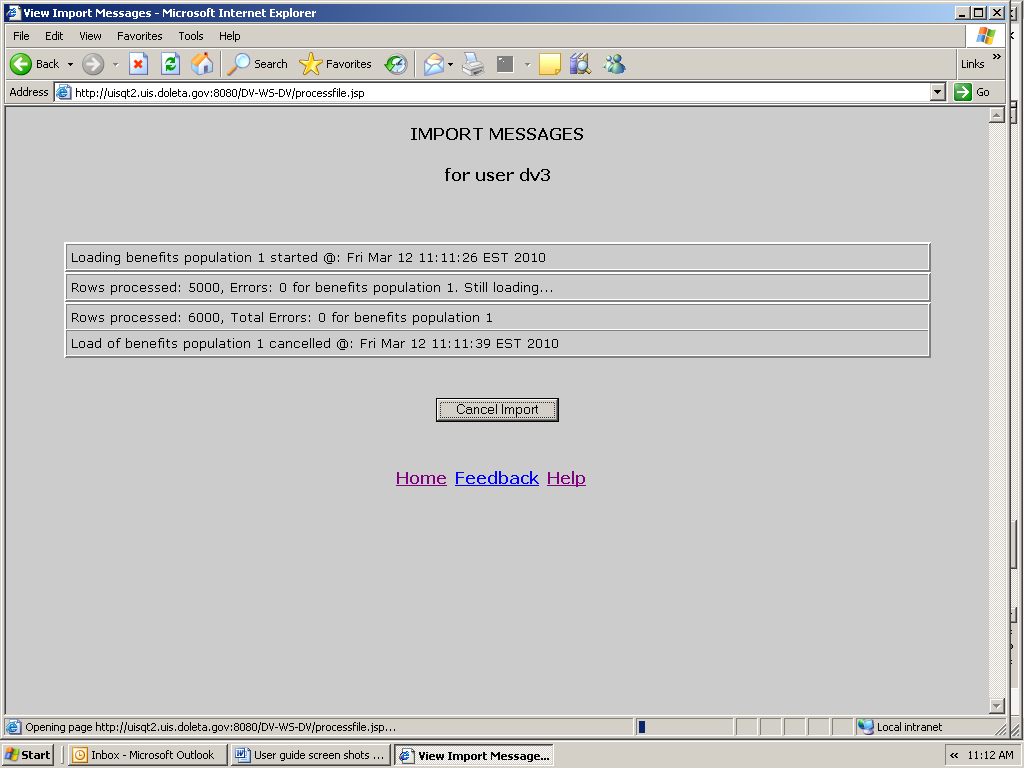

When you return to the Benefits or the Tax Selection Criteria screen, using the Home link, you will see a message in red indicating that the load was cancelled and the Last Import date will display “Cancelled.”
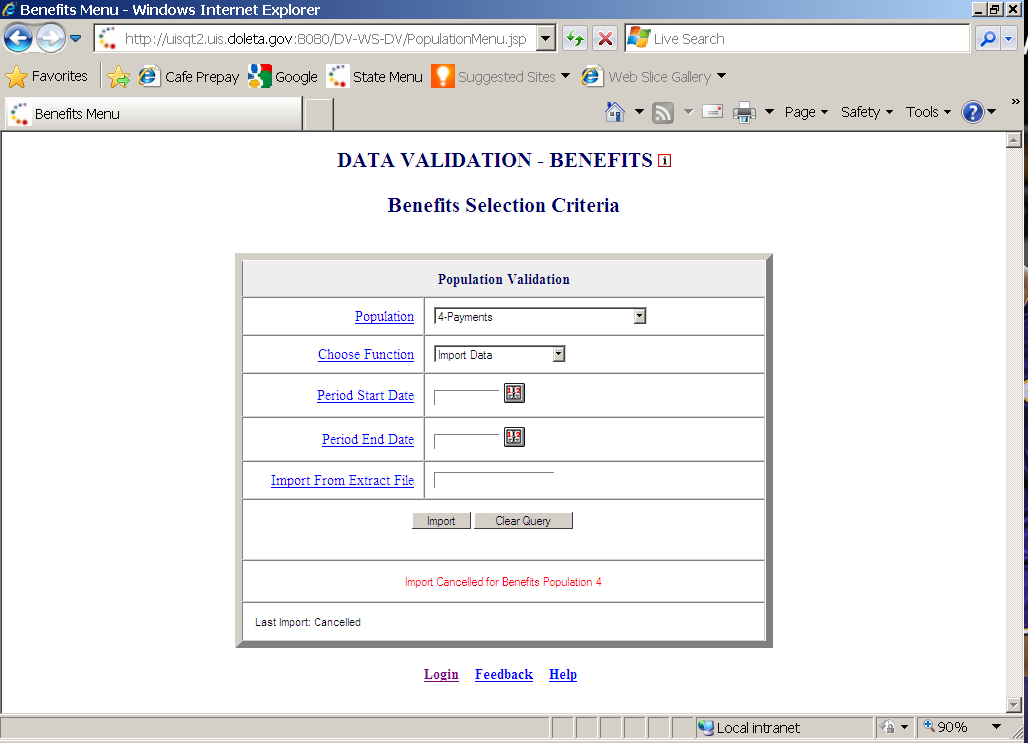


When you cancel a load, the only screen available for the population for which the load was cancelled is the Errors screen.

I![]() f
you are loading a large file and the number of errors is excessive,
you don’t need to wait until the load finishes, to check the
type of errors you are getting. Instead, cancel the load and check
the Errors
f
you are loading a large file and the number of errors is excessive,
you don’t need to wait until the load finishes, to check the
type of errors you are getting. Instead, cancel the load and check
the Errors
screen. You will be able to see the errors that were processed up to
the point where you cancelled the load.
Chapter 5
Viewing Errors
When extract files are loaded, the software reads each record to ensure that all fields are valid with reference to specifications provided in the ETA Handbook 361 Benefits and 361 Tax.
There are three kinds of error conditions detected during the import and loading process:
Syntax errors. This refers to records that are not formatted according to instructions in the population-specific record layouts. Example: alpha characters in the social security number field or dollars field.
Parsing errors. This refers to records that cannot be assigned to a subpopulation because the values in the fields do not match the required criteria for any of the subpopulations.
Duplicate records. This refers to records that are found to be duplicates based on the criteria described in Appendix C, UI Benefits Duplicate Detection Criteria or Appendix D, UI Tax Duplicate Detection Criteria, of this guide.
All records with errors are loaded to the Errors table. Records in the Errors table are not included in any of the validation screens and hence cannot be validated. You should inspect these records and determine whether the extract file was not constructed correctly or there is a problem in the state database from which the data was extracted. If the extract file was not constructed correctly, fix the file and load it again. If the problem is in your state database, for example a field is not being captured; your office needs to take steps to fix it. In your review, you must try to distinguish between (a) incorrectly built records that represent countable transactions, and (b) records that do not represent countable transactions. Examples of the latter are one of a set of two duplicate transactions and records with dates putting them out of range for validating the quarter you are trying to validate. Rebuild the file to correct errors of a type (a); you may eliminate errors of type (b) from the extract file or just ignore them as they do not enter into validation counts or appear in samples.
The Errors screen allows the user to view the records that were found to have errors during the loading operation. To view the Errors screen follow the next steps.
In the Benefits or Tax Selection Criteria screen, select the Population for which you want to see the errors table. Benefits screens will be displayed in the following examples.
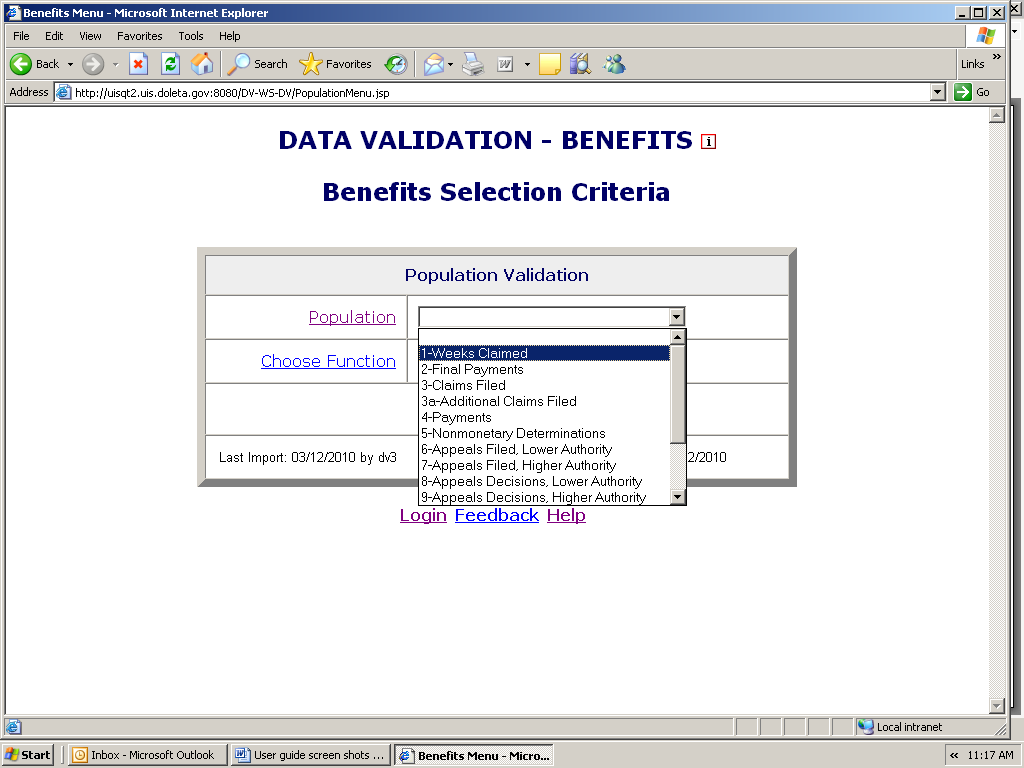

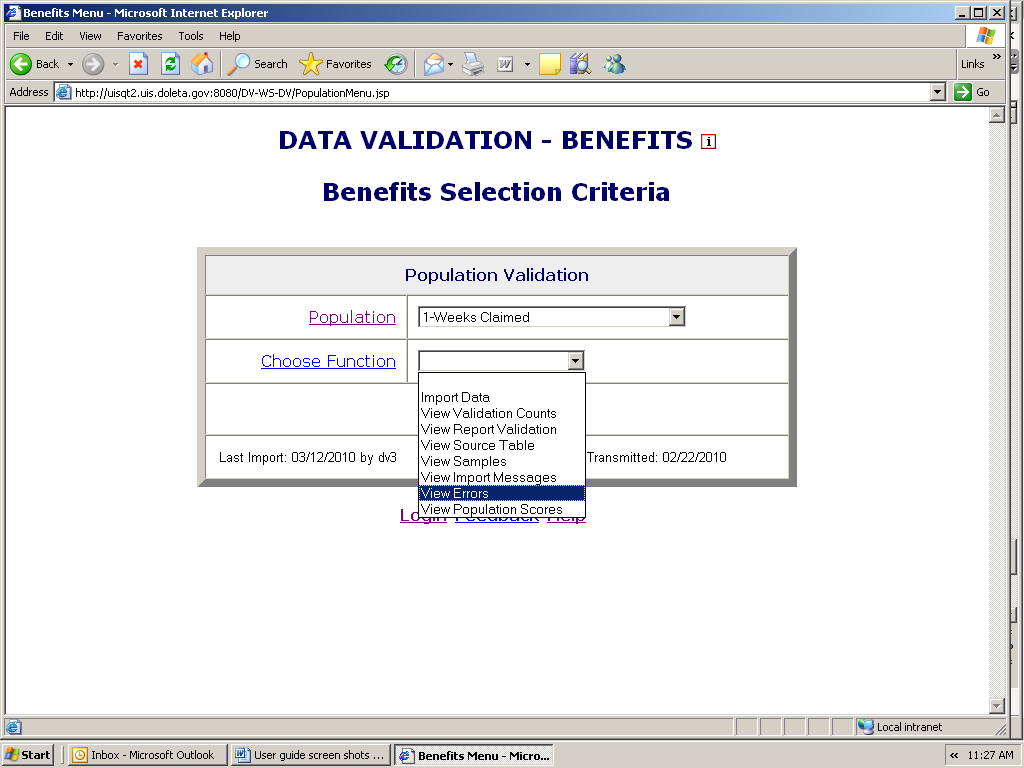
Select View Errors from the Choose Function drop-down menu and click Go.
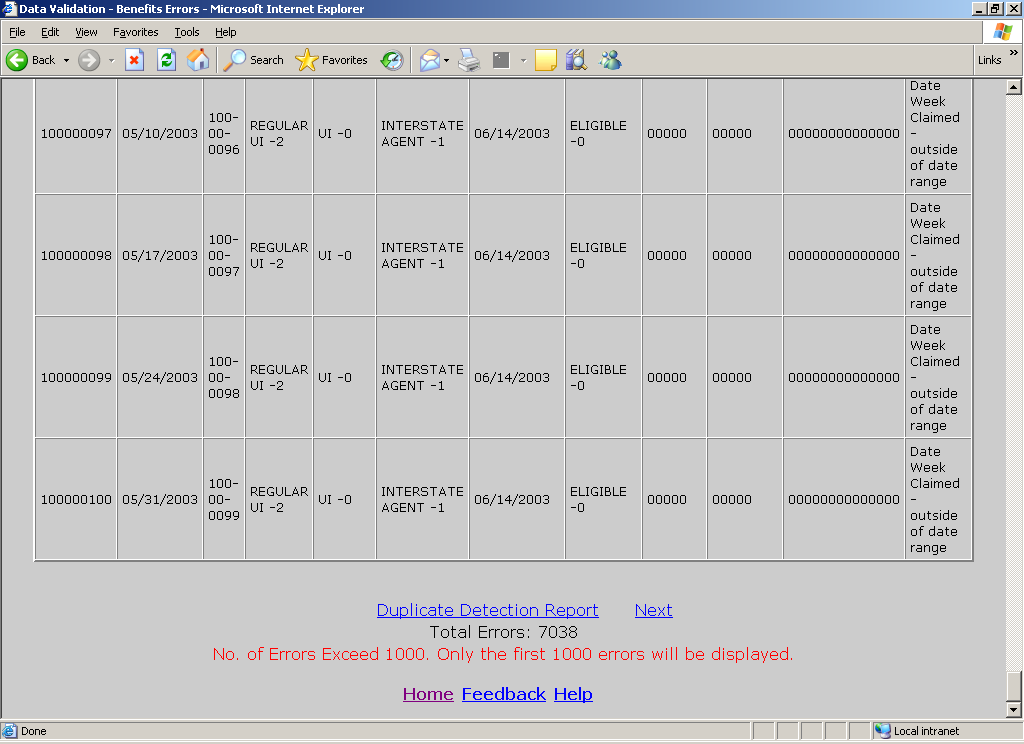
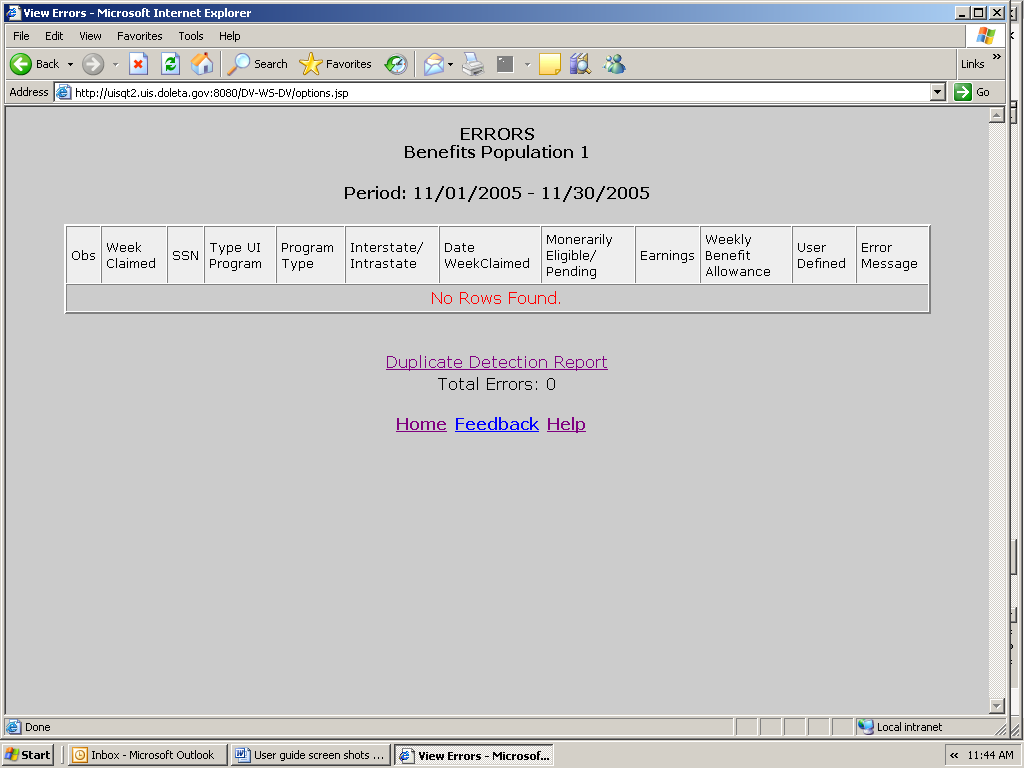
The Errors screen displays records with errors along with an error message for each record.

The Errors screen displays 100 records at a time. To see the next 100 records, click on the Next link at the bottom of the screen. This link is visible only when there are more than 100 records. If the loaded file contains more than 1,000 errors only the first 1,000 can be viewed, and the software will display a red message to inform you of this.

When a file with no errors is loaded, the Errors screen displays “No Rows Found” in red.

Viewing Duplicate Records
Duplicate errors are displayed in the Errors screen along with all other errors, but can be viewed separately by accessing the Duplicate Detection Report screen. To access this screen follow the steps below.
Click on the Duplicate Detection Report link at the bottom of the Errors screen.


The Duplicate Detection Report screen displays duplicates only.

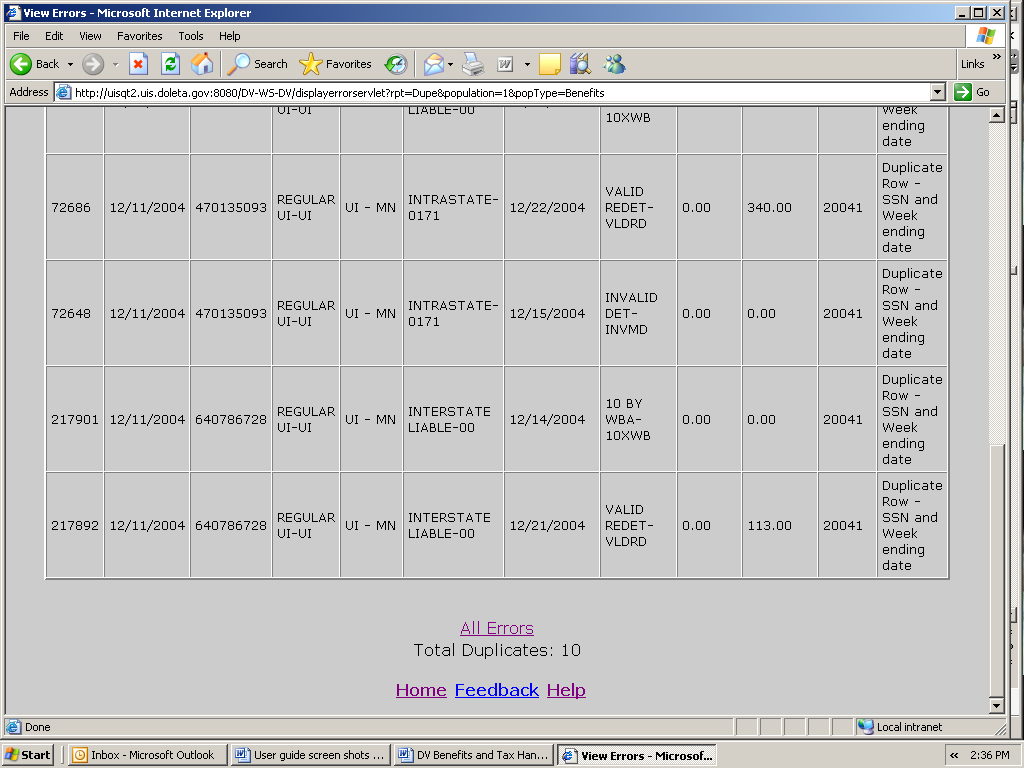
Like in the Errors screen, the screen displays only 100 records at a time. To see the next 100 records, click on the Next link at the bottom of the screen. This link is visible only when there are more than 100 records. If the loaded file contains more than 1,000 duplicates only the first 1,000 can be viewed, and the software will display a red message to inform you of this.
To go back to the Errors screen click on the All Errors link at the bottom of the screen.


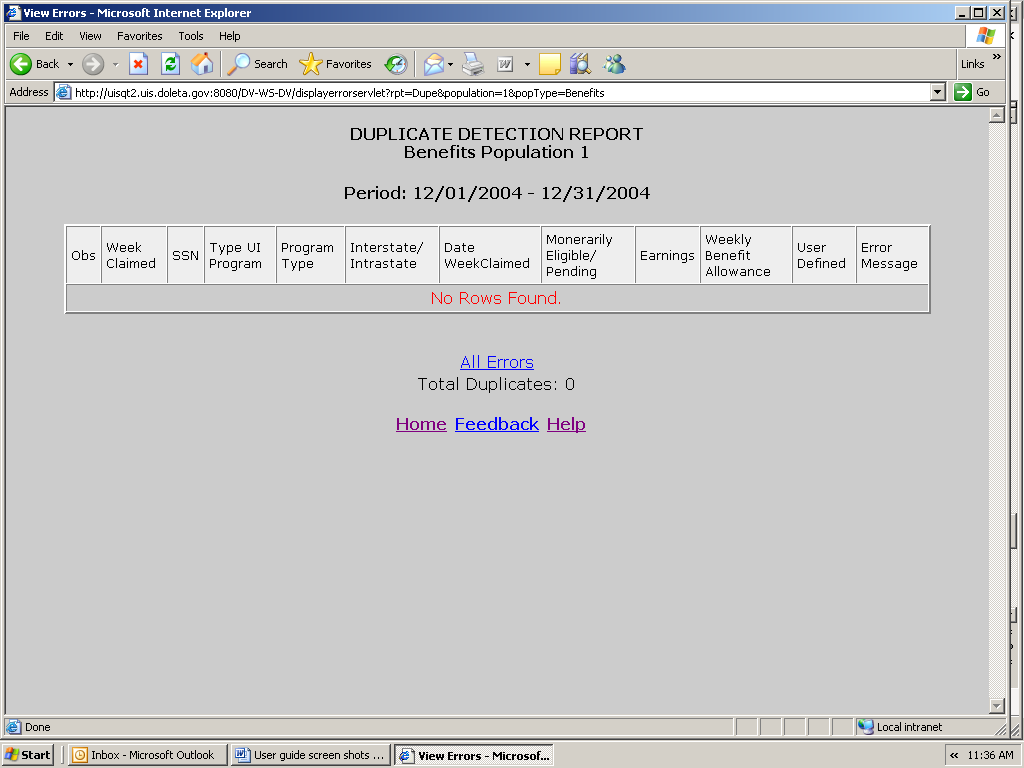
When a file with no duplicates is loaded, the Duplicate Detection Report screen displays “No Rows Found” in red.

Chapter 6
Viewing the Source Table
The Source Table displays all the records that were successfully loaded to the application. To access the Source Table follow the steps below.
From the Benefits or Tax Selection Criteria screen select a Population that has been loaded. Benefits screens will be displayed in the following examples.


Select View Source Table from the Choose Function drop-down menu and click Go.
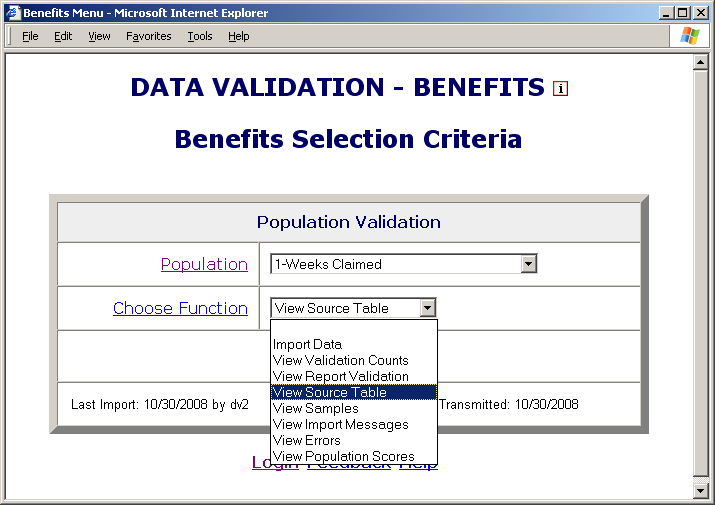

The Source Table screen contains all records parsed, but displays only 100 records at a time. At the bottom of the Source Table screen, you can see a count of the number of errors found during the loading process and the error rate. You can access the Errors screen from the Source Table screen by clicking on the Show Errors link at the bottom of the screen.
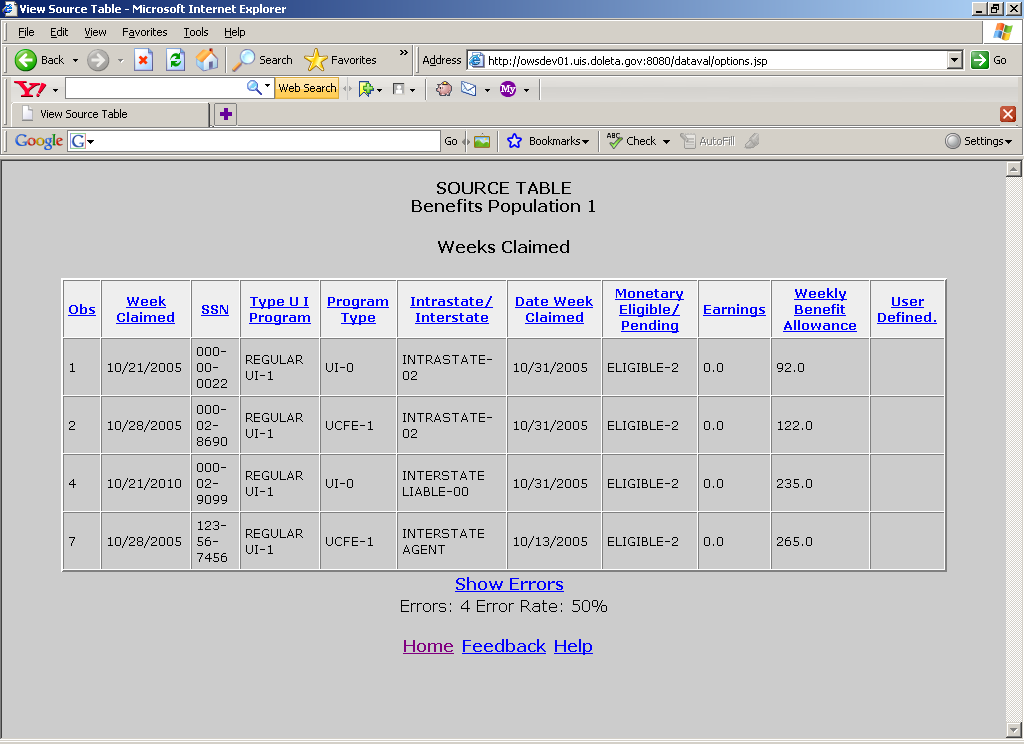
You can sort records by any field by clicking at the field header. Click once to sort in ascending order, and twice for descending. (Applies only to Benefits)


![]()
You can sort records by a field to quickly find records with outlier values. For example, sort on Weekly Benefit Allowance (WBA) to
find records with values exceeding the state established WBA.
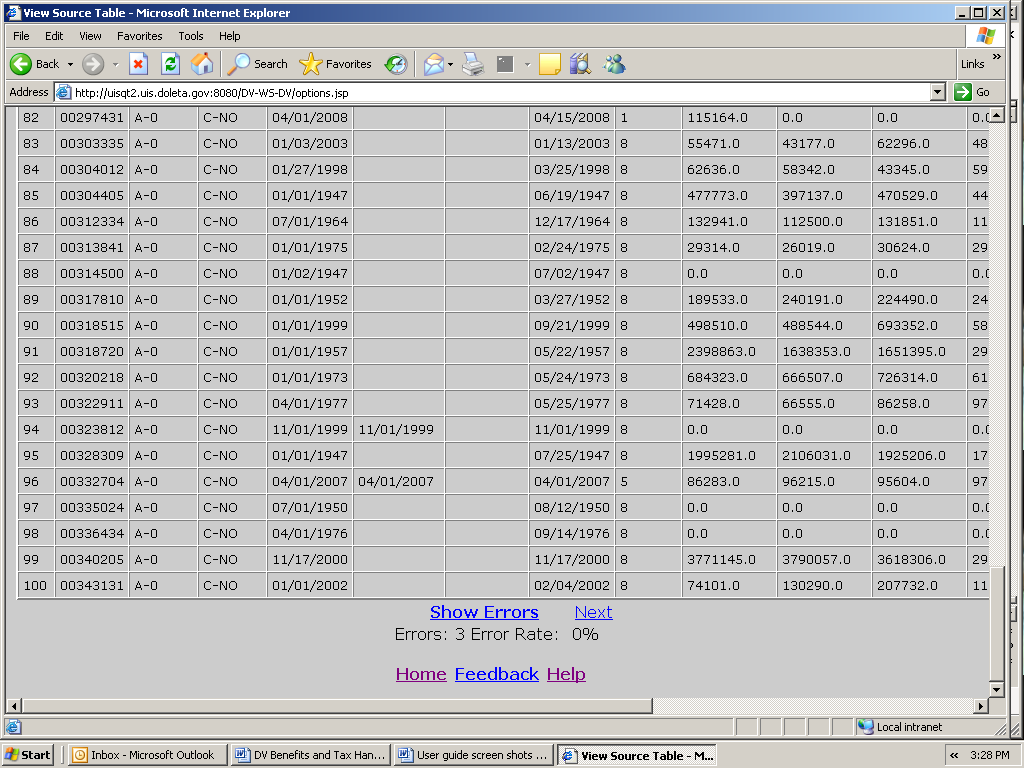
The Source Table screen displays 100 records at a time. To see the next 100 records, click on the Next link at the bottom of the screen. This link is visible only when there are more than 100 records. If the table contains more than 1,000 records only the first 1,000 can be viewed.
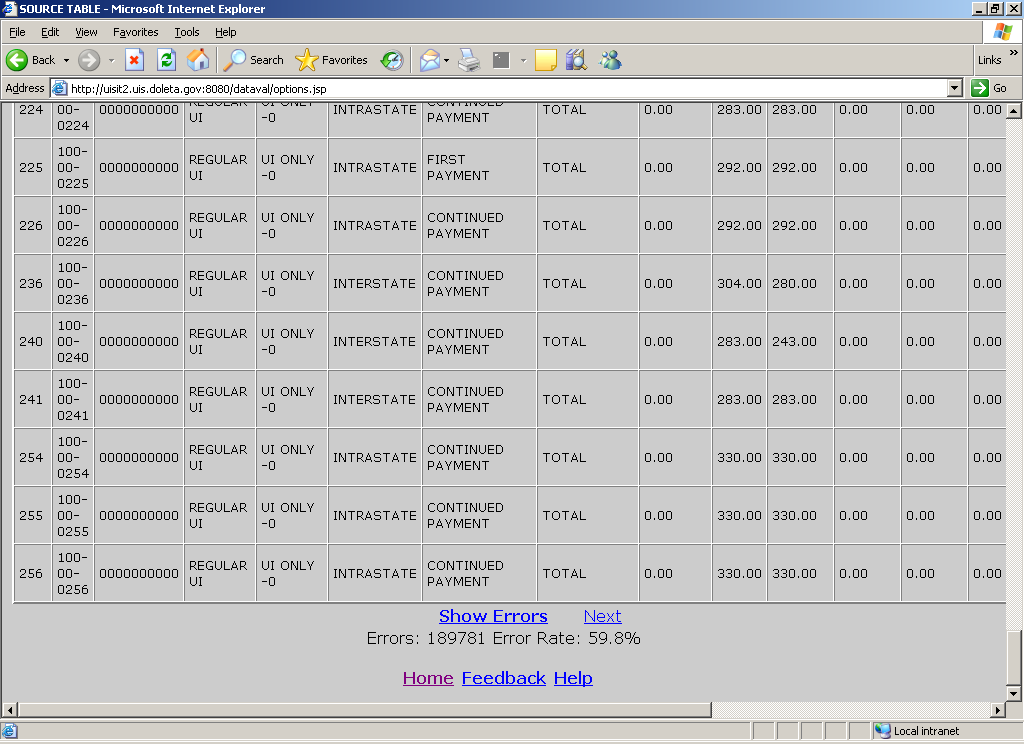

The Source Table screen shows the number of errors found during the loading process and the error rate at the bottom of the screen. You can access the Errors screen from the Source Table screen by clicking on the Show Errors link at the bottom of the screen.

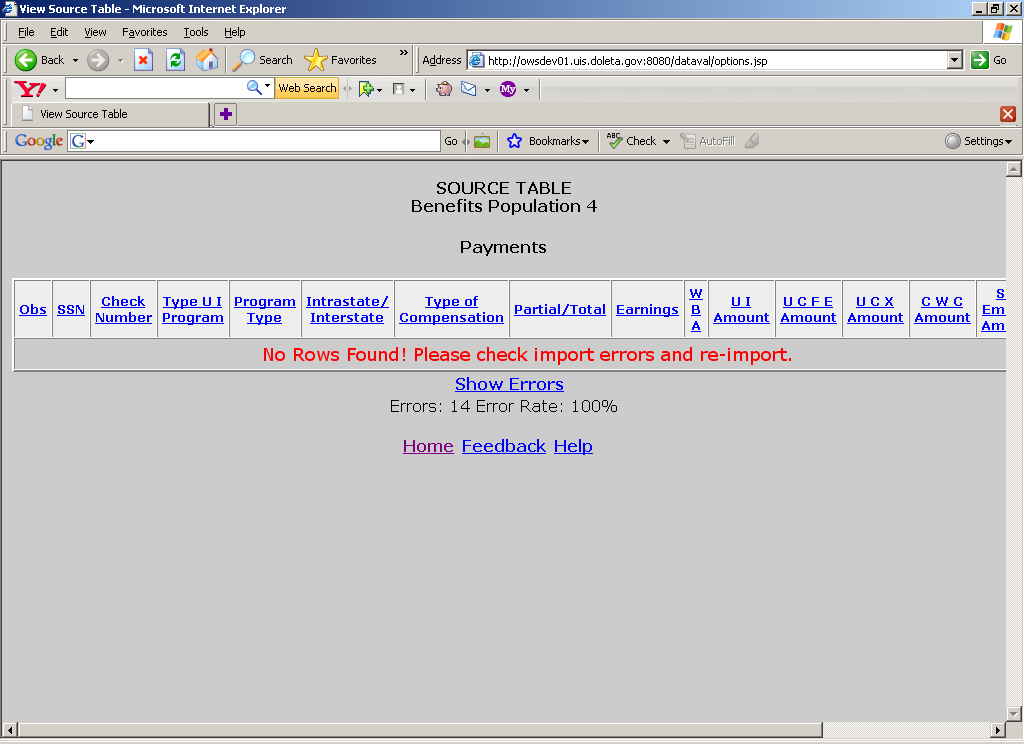
If no record was successfully loaded, the Source Table screen displays a warning message in red.

Chapter 7
Viewing Validation Counts
The Validation Counts screen displays all the subpopulations in the population and the number of records from the extract file that were assigned to each subpopulation. To view the Validation Counts screen, follow the next steps.
From the Benefits or Tax Selection Criteria screen select a Population that has been loaded. Benefits screens will be displayed in the following examples.
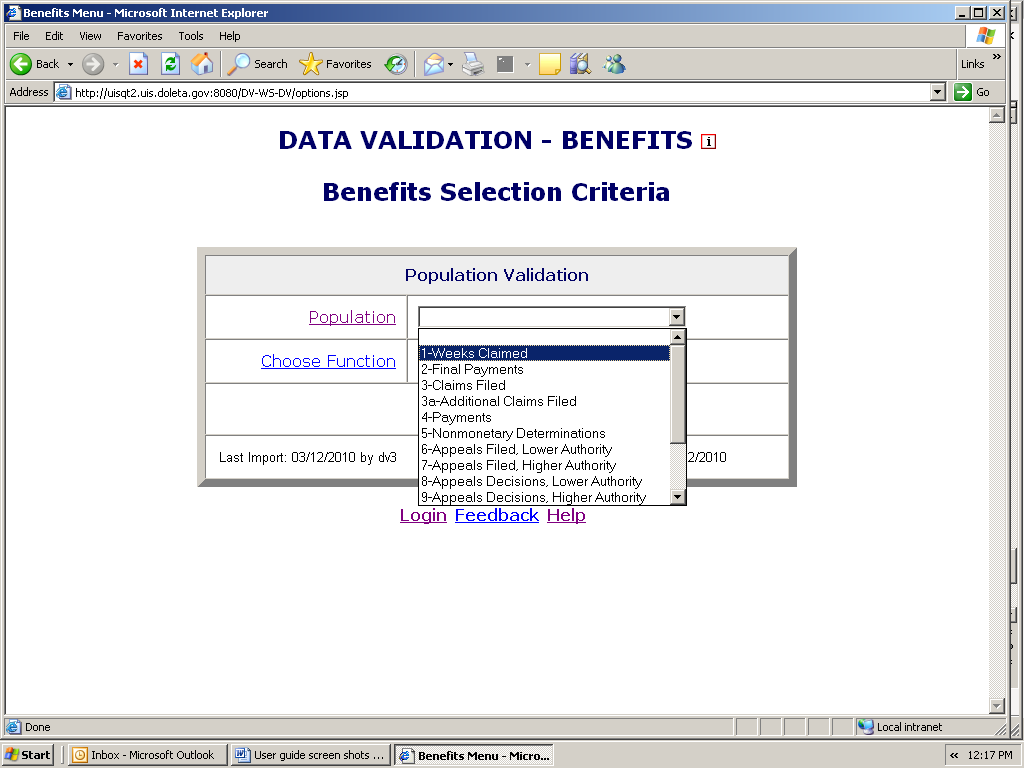

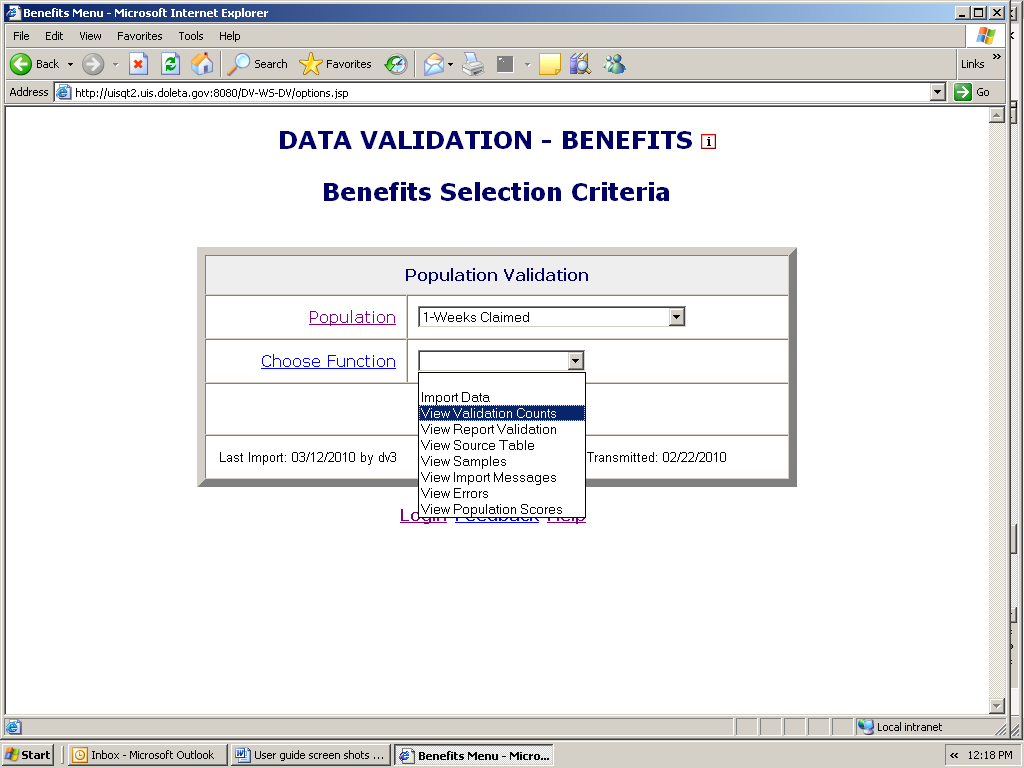
Select View Validation Counts from the Choose Function drop- down menu and click on Go.

The screen displays the subpopulations, the report cells for which they are used, the type of values expected for records in them, and the number of records assigned to each.
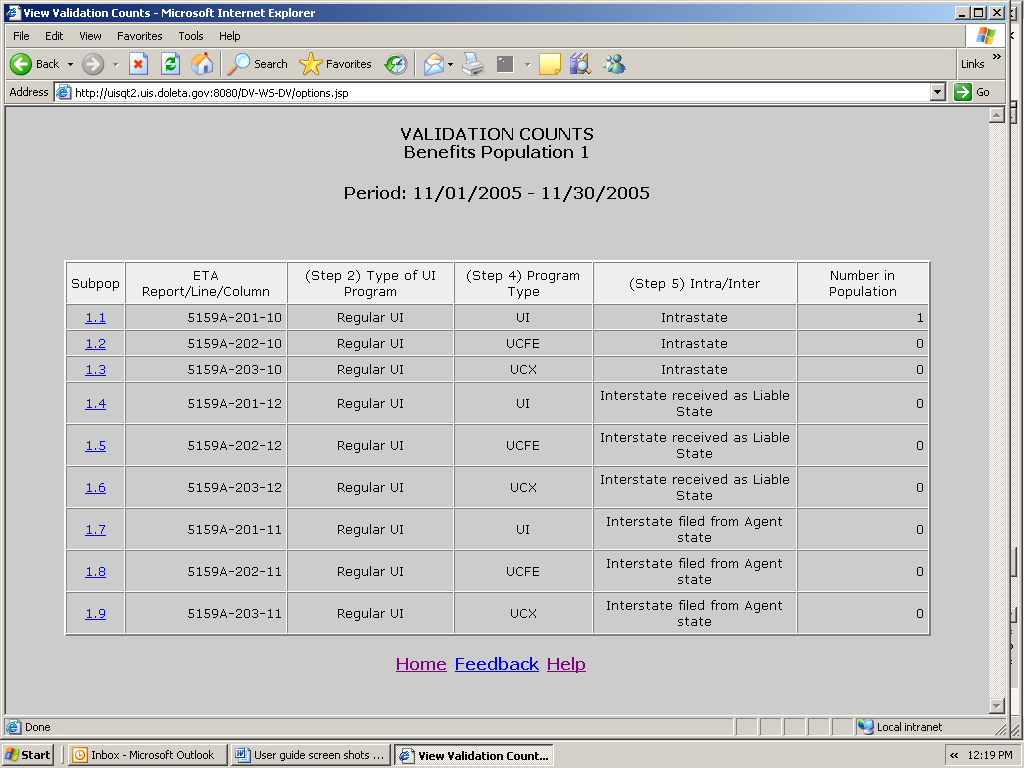

Click on the subpopulation number to view records that were parsed into that subpopulation.

You can sort records by any field by clicking at the field header. Click once to sort in ascending order, and twice for descending.
You can print the screen by clicking on the Print button at the bottom of the screen.
The screen displays 100 records at a time. To see the next 100 records, click on the Next link at the bottom of the screen. This link is displayed only when there are more than 100 records.


Click on the “X” in the upper right hand corner of the screen to close the screen and return to the Validation Counts screen.


Chapter 8
Viewing the Report Validation Screen
Report validation (RV) consists of establishing the extent to which reported numbers match report counts reproduced through the data validation process. This comparison process is automated and requires no additional input from state staff.
The software retrieves reported numbers from the state UI database and compares them to the validation numbers derived from the extract files. In Benefits, percent errors are displayed for each report cell, but pass/fail scores are displayed for groups. A group passes validation if the percent error is 2% or less, except for groups which contain report cells that are used for Government Performance and Results Act (GPRA) measures, which should have a percent error of 1% or less (i.e., Groups 4.01, 4.02 and 12.04). If all groups pass, the population passes report validation; otherwise, it fails; except in Populations 10 and 11, where there are individual report cells that must also pass in addition to the groups.
In Tax, percent errors are displayed for each report cell. A report cell passes validation if the percent error is 2% or less, except for cells which are used for Government Performance and Results Act (GPRA) measures, which should have a percent error of 1% or less (ETA 581, cells 11 and 61). If all cells pass, the population passes report validation; otherwise, it fails.
The Report Validation screen displays the results of report validation. To display the screen follow the steps below.
From the Benefits or Tax Selection Criteria screen select a Population that has been loaded. Tax screens will be displayed in the following examples, unless otherwise noted.


Select View Report Validation from the Choose Function drop-down menu and click on Go.
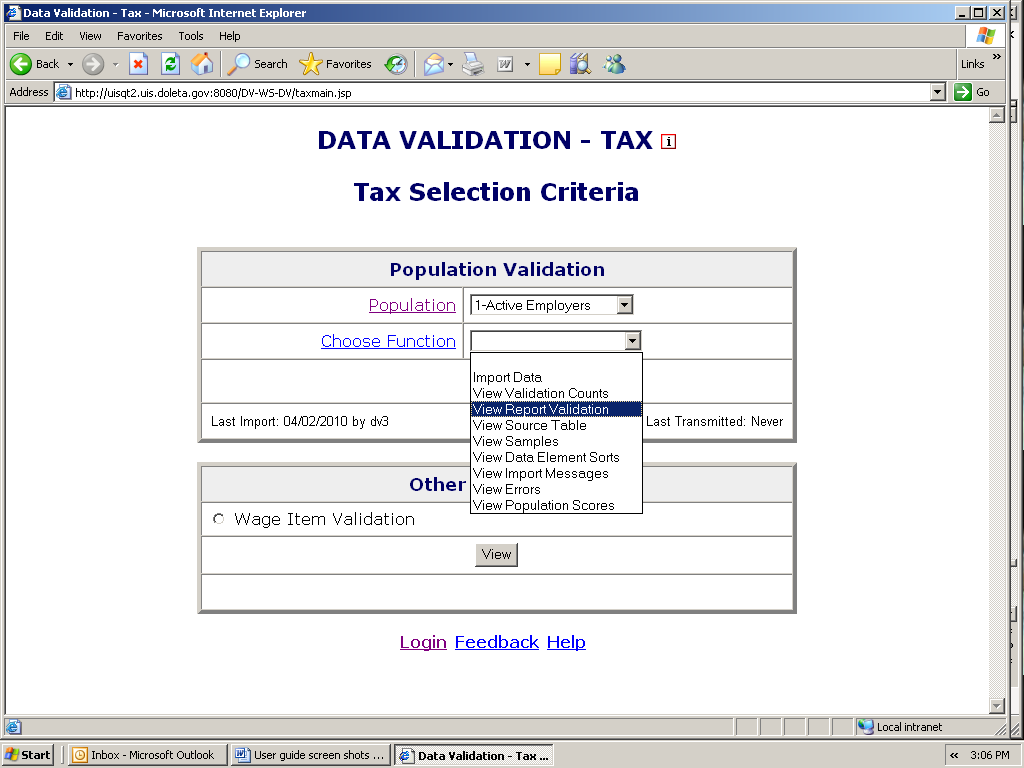

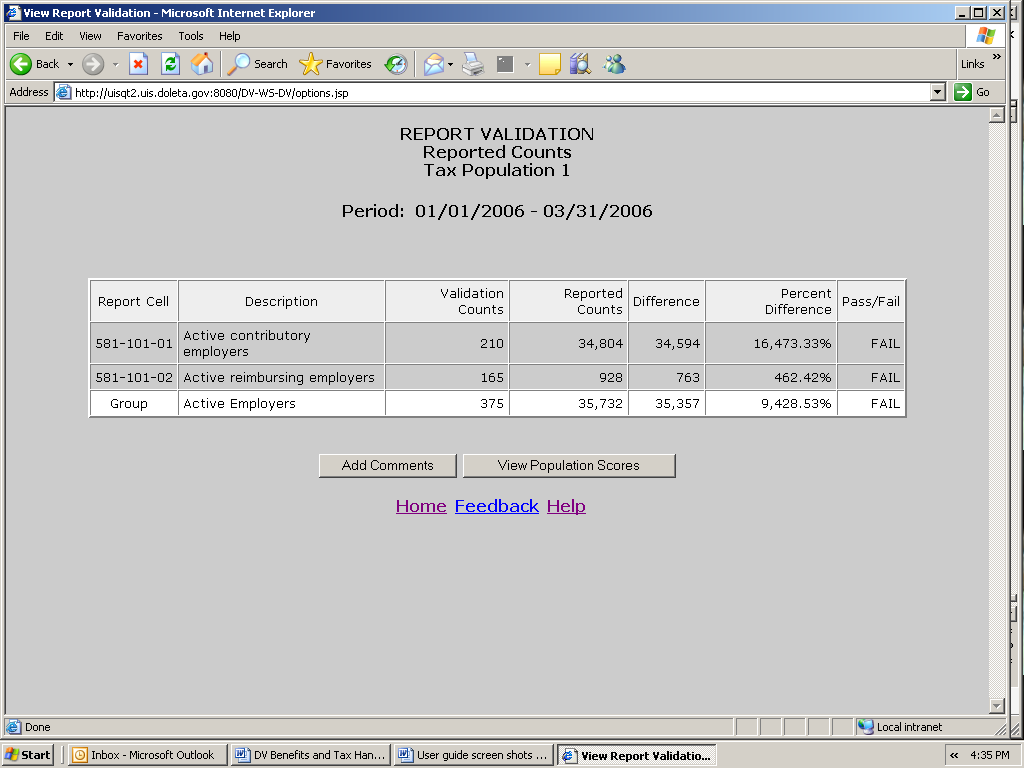
The Report Validation screen displays each report cell in the population, its description, validation count (derived from the extract file), reported count (retrieved from the UI database), count difference, and percent difference, cumulative counts for some groups of report cells, and pass/fail scores for items that are used to determine the score of RV. If any scored item fails, the RV fails.
In Benefits, at the right bottom corner of the Report Validation screen you can see the Report Validation Status of the population.
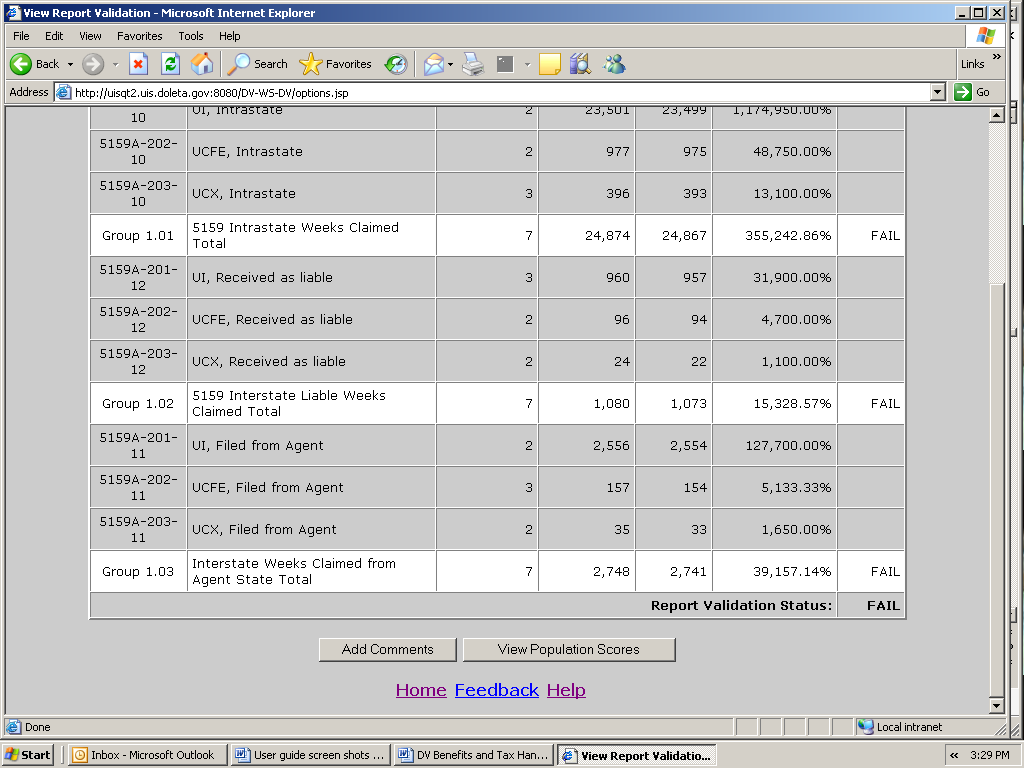

In Tax, the failure of even one count shown on the table will result in the RV Status to Fail, while in Benefits a failure in one group will result in the status to Fail.
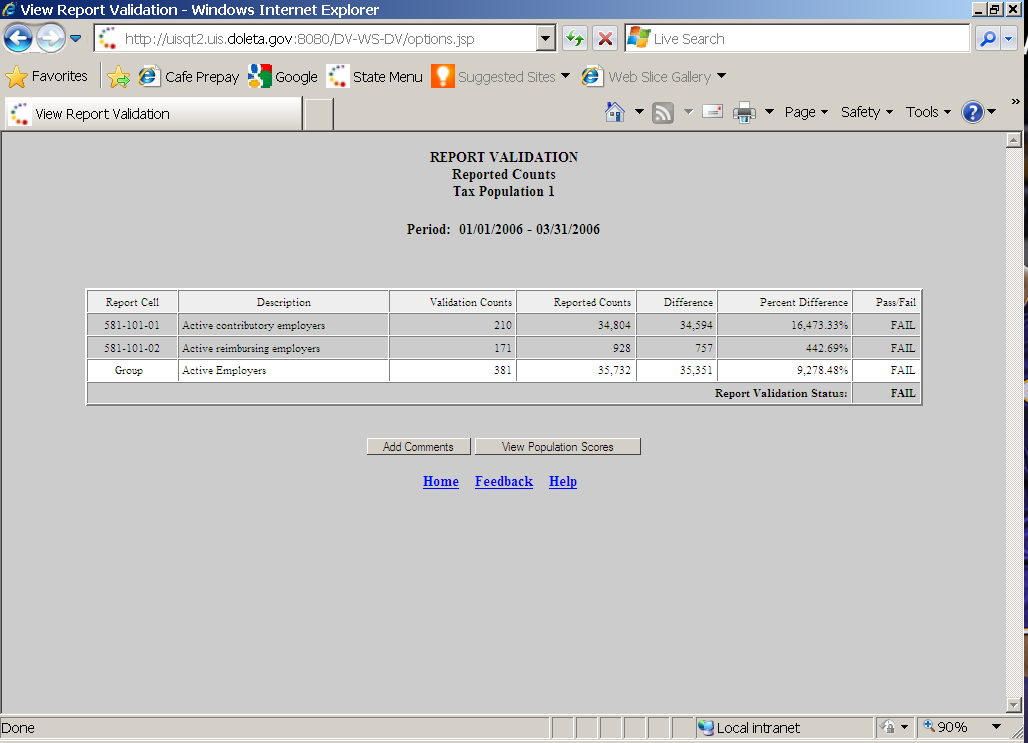
At the bottom of the screen there is a button to access the View Population Scores screen. Click on it to display the status of the RV and DEV, which are the two components used to calculate the population score. In Tax, DEV is composed of Sorts and Minimum samples, and in Benefits, it’s composed of all random samples for the population. For more information on this screen, see section on submitting results to DOL.
To save a screen shot of the Report Validation screen outside the software, follow the next steps.
Select Save As from the drop-down menu File on the top left corner of your browser.
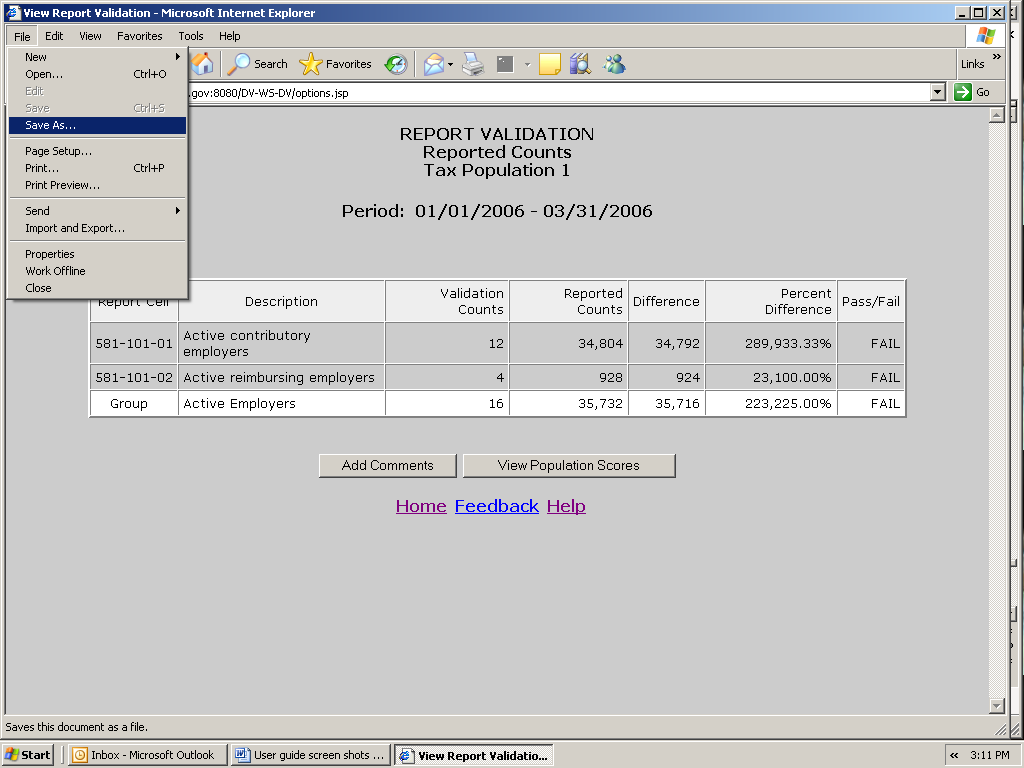

Select the location where you want to save the screen shot and write in the File Name box the name you want to give the file and click save.

Chapter 9
Viewing Samples
Data element validation (DEV) consists of the investigation of samples drawn from extract files to verify that the information in the records is accurate. Four kinds of samples are drawn: random, missing subpopulations, outliers, and minimum,
Random. These samples are drawn from specific subpopulations within extract files. These were designed as two-tier samples so that the second tier of the sample does not have to be investigated if the results of the investigation of the first tier are conclusive. The samples are either 30/100 or 60/200, where the first number indicates the size of the first tier and the second number the size of the whole sample. So, for example, in a 30/100 sample, 30 cases are investigated in the first tier and 70 on the second, for a total of 100 records. These samples pass with an error rate of 5% or less.
Missing subpopulations. These samples are dependent on the random samples. Each sample consists of one case from each subpopulation that is in the universe of the related random sample but was not selected in the random sample.
Minimum. These samples consist of two cases from each subpopulation included in the sample frame.
Outliers. These samples consist of 10 records with extreme values: the five largest and five smallest values for the variable of interest in the data set.
Benefits DV uses all four samples, and Tax DV only uses minimum, but Tax DEV also includes sorts. In Benefits only random samples are scored and submitted to DOL. The other samples in Benefits are included for diagnostic purposes, but failure of a non-random sample does not require corrective action. States should investigate them and keep a record of their results for auditing purposes.
Tax Data Element Validation (DEV) has two parts: Minimum Samples (previously known as File Integrity Validation (FIV) samples), and Data Element Sorts validation (refer to Chapter 10 for more information). The minimum samples are so small; that in order to pass this aspect of DEV all sampled records must be free of errors.
For both Benefits and Tax, the RV of a population is not valid unless the population passes all applicable DEV tests.
To view the samples of a population follow the next steps.
From the Benefits or Tax Selection Criteria screen select a Population that has been loaded. Benefits screens will be displayed in the following examples.
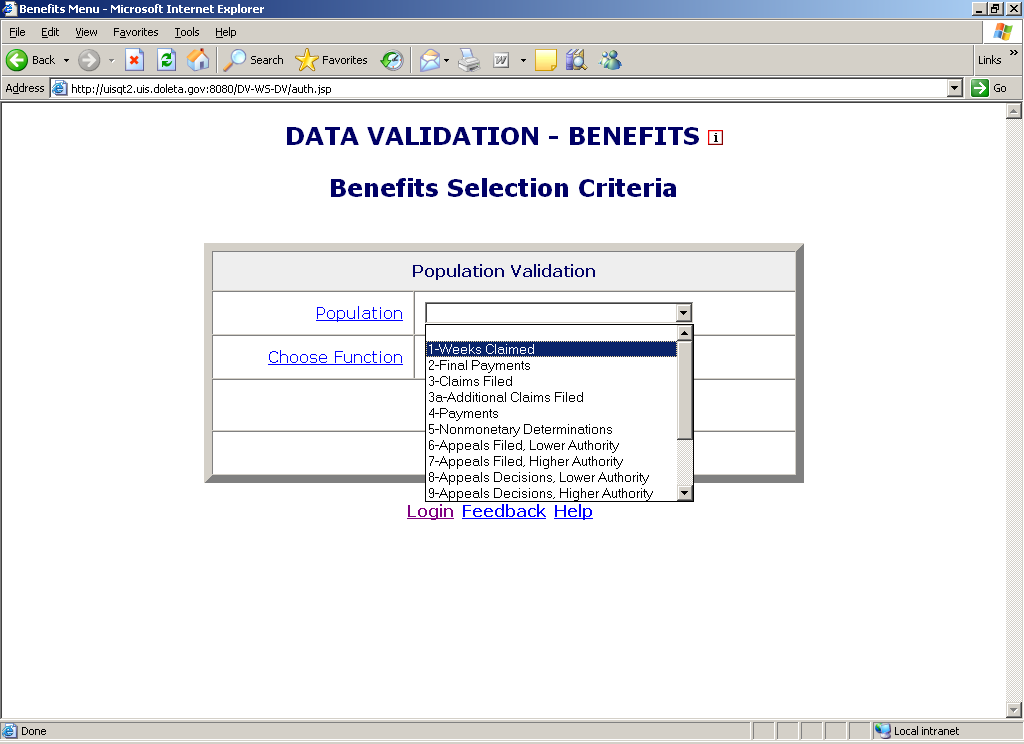

Select View Samples from the Choose Function drop-down menu and click on Go.
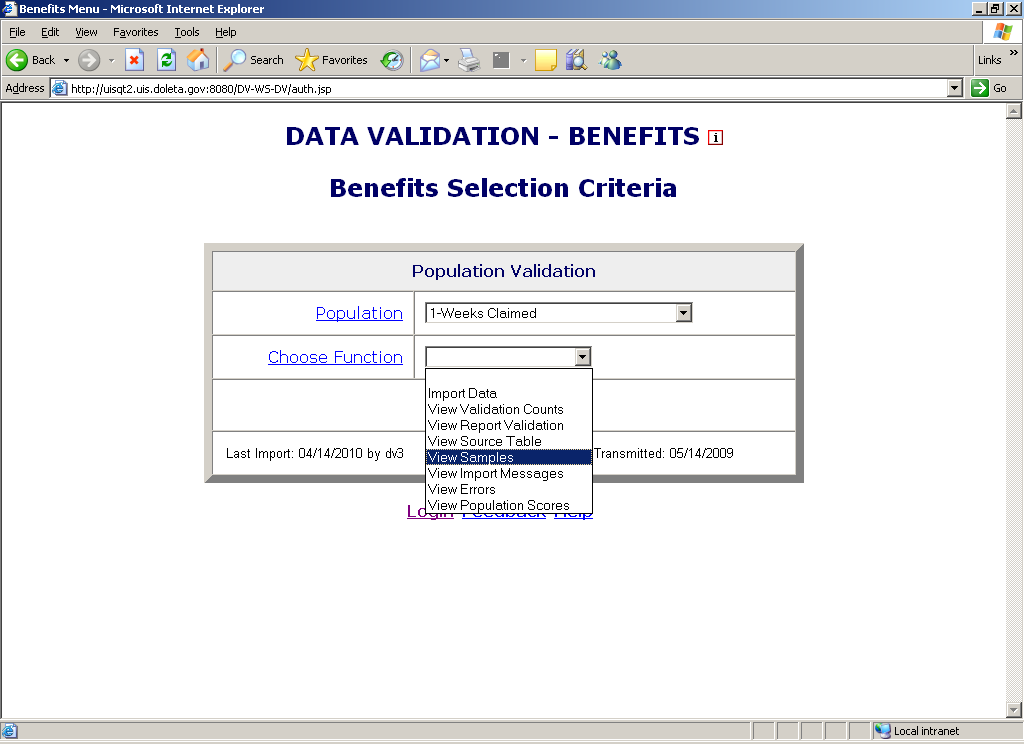

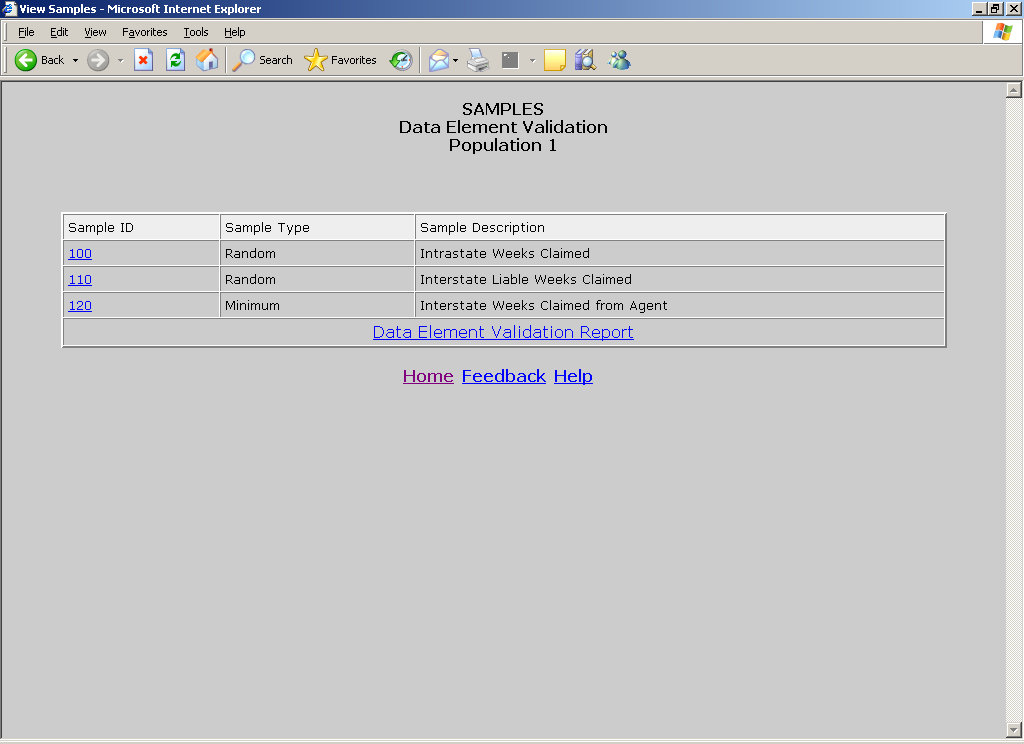
The Sample ID number on the Samples screen identifies the specific sample. Sample Type describes it as one of the four types of samples described above (random, minimum, outlier or missing subpopulations). Sample Description is a narrative explanation of the subpopulations included in the sample frame for each sample.
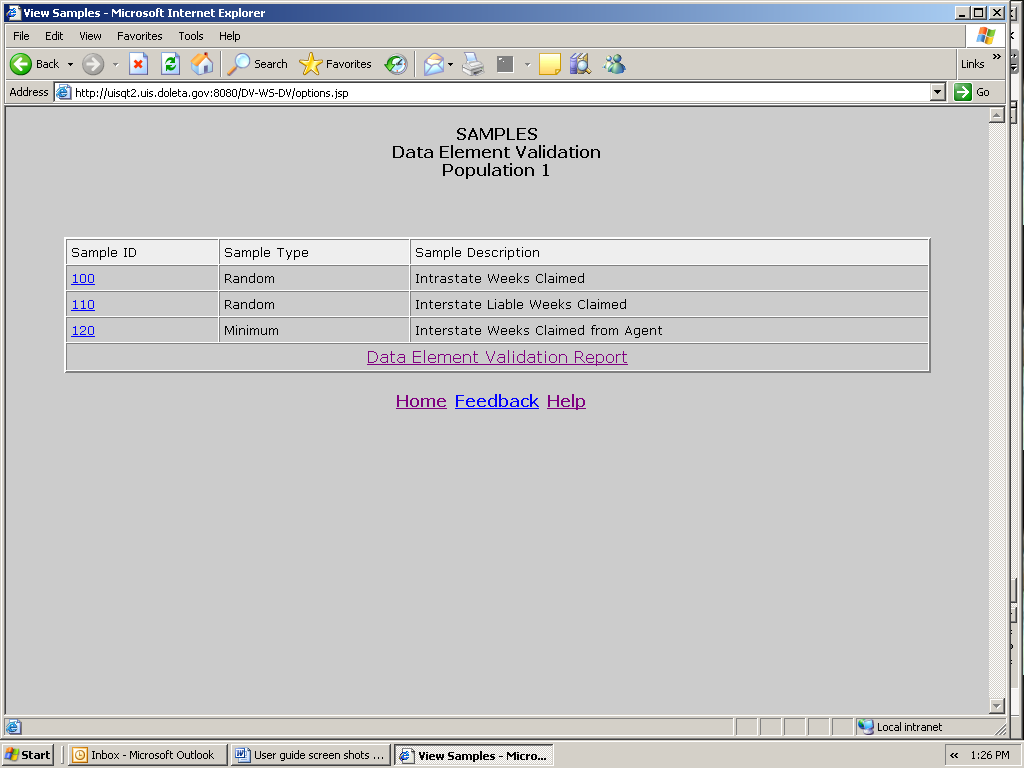
Click on the Sample ID of the sample you want to view.


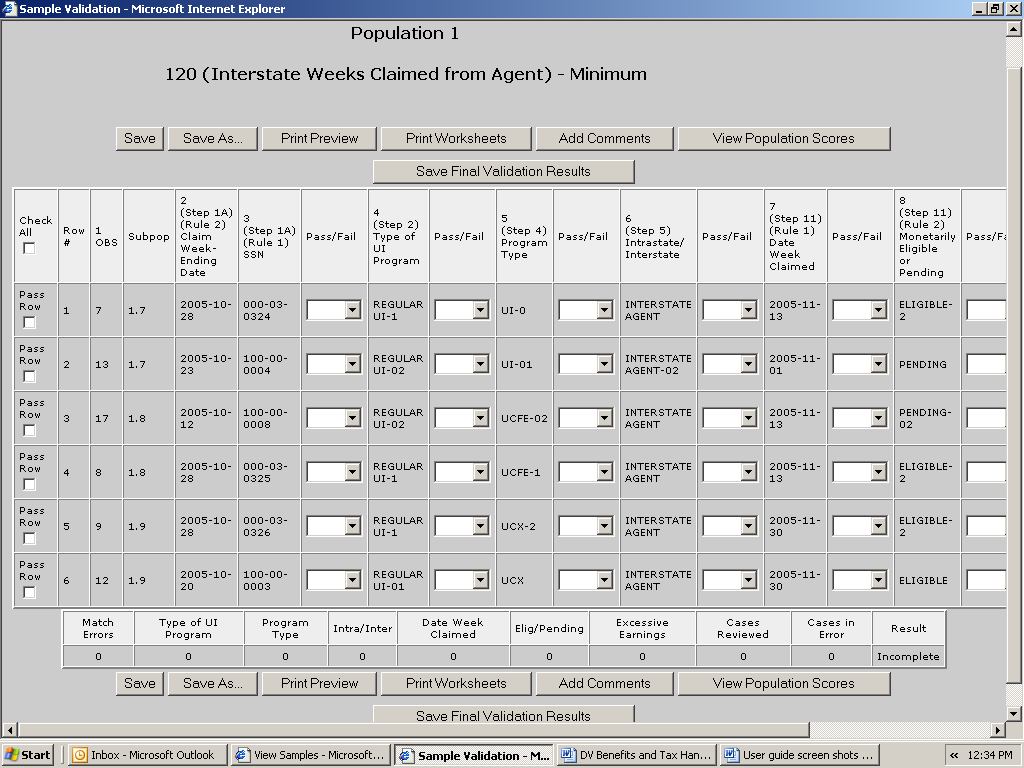
The Sample Validation screen displays the records selected in the sample that are to be investigated. The number and description of the sample are displayed at the top of the screen.

This screen is used to enter the results of the investigation. The step numbers on the headers of the columns refer to the steps in Module 3 of the data validation handbook.
Printing Sample Worksheets
Before you start investigating each record in a sample it is recommended that you print the worksheets for all records. You can annotate validation results in these worksheets and later enter all results in the Sample Validation screen. To print the worksheets follow the next steps. Benefits screens will be displayed in the following examples.
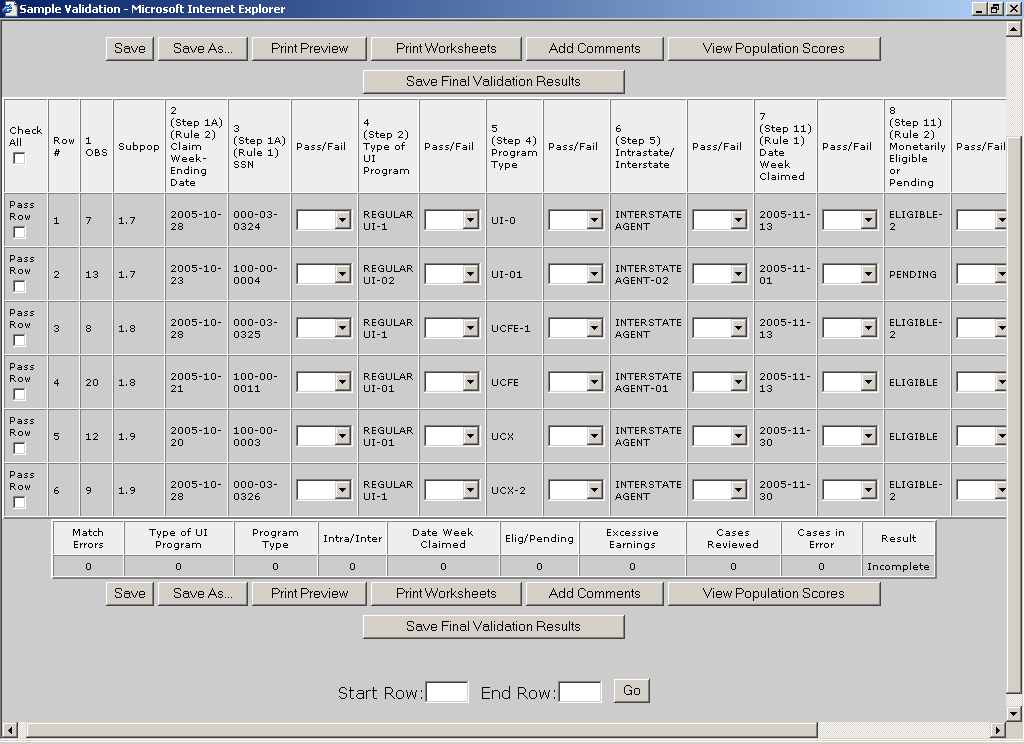
Click the Print Worksheets button. This button is displayed at the top and bottom of the Sample Validation screen. Click on either button.

Start Row and End Row boxes will be displayed at the bottom of the screen. Enter the range of rows that you want to print and click Go. For example, enter “1” in Start Row and “4” in End Row and click Go, to print sample worksheets for rows 1 to 4.

![]()

To print the worksheet of only one record, enter the row number of
the record in the Start Row and End Row boxes. For example, to print the record in the second row, enter “2” in both the Start Row
and End Row boxes.
The worksheets display the records with all fields and corresponding values in portrait orientation.

Scroll to the end of the screen and click on Print Preview.
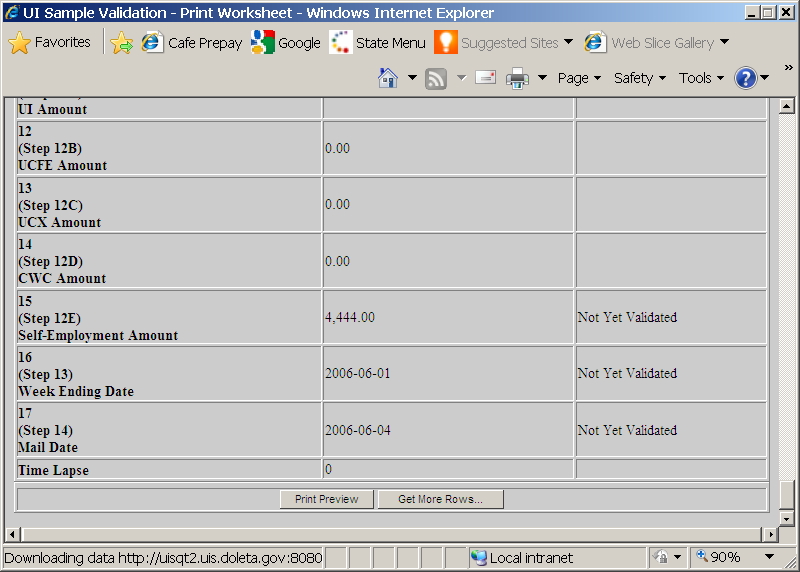

If instead of printing you want to add more records to print, click on Get More Rows. Start Row and End Row boxes will be displayed at the bottom of the screen. Enter the range of rows that you want to add and click Go.


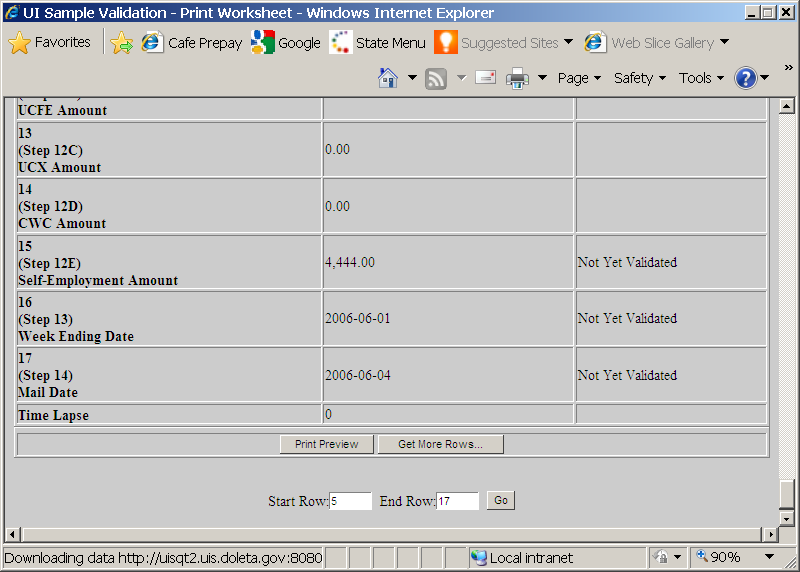

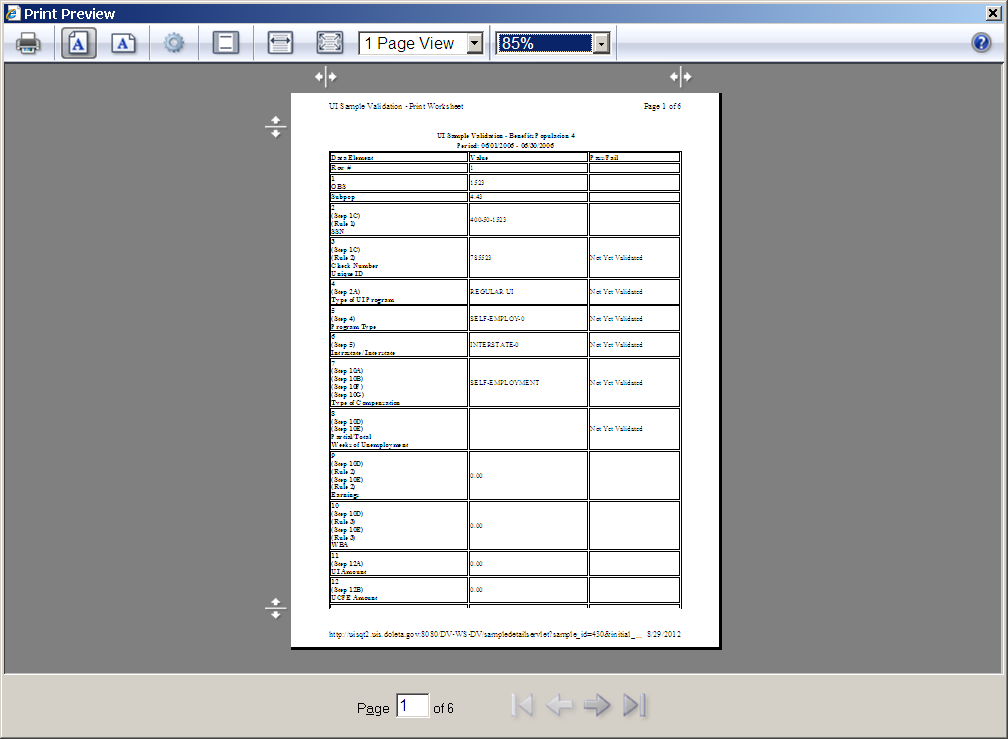
Then click on Print Preview.
Click the Printer symbol on the left top corner of the screen.

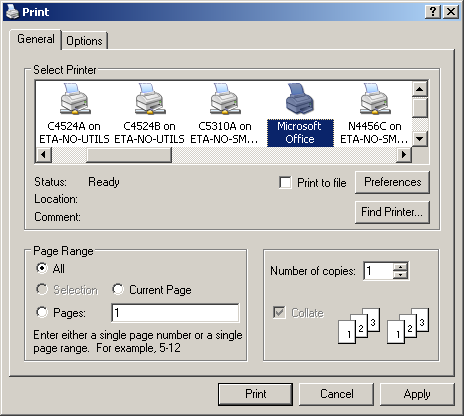
Select a printer and click Print.


Y![]() ou
can keep worksheets for samples you submit to the DOL as evidence of
the work done, in case you are subject to an Office of Inspector
General (OIG) audit.
ou
can keep worksheets for samples you submit to the DOL as evidence of
the work done, in case you are subject to an Office of Inspector
General (OIG) audit.
Entering Validation Results for Non-random Samples (Minimum, Missing Subpopulations and Outliers)
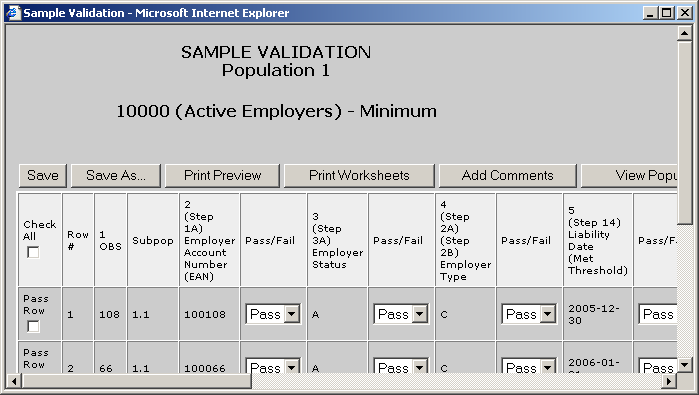
After you investigate each record, you need to enter the results of the validation into the software. To enter results for non-random samples, go to the Sample Validation screen of the sample you are investigating and follow the next steps.
For each data element, go to the box next to it, click on the drop-down menu and select pass or fail according to your findings. Tax screens will be displayed in the following examples, unless otherwise noted.


If all elements in a record have passed you don’t have to enter results individually for each data element. You can instead click on the Pass Row box at the beginning of the row and all boxes for that row will be filled with “Pass”.
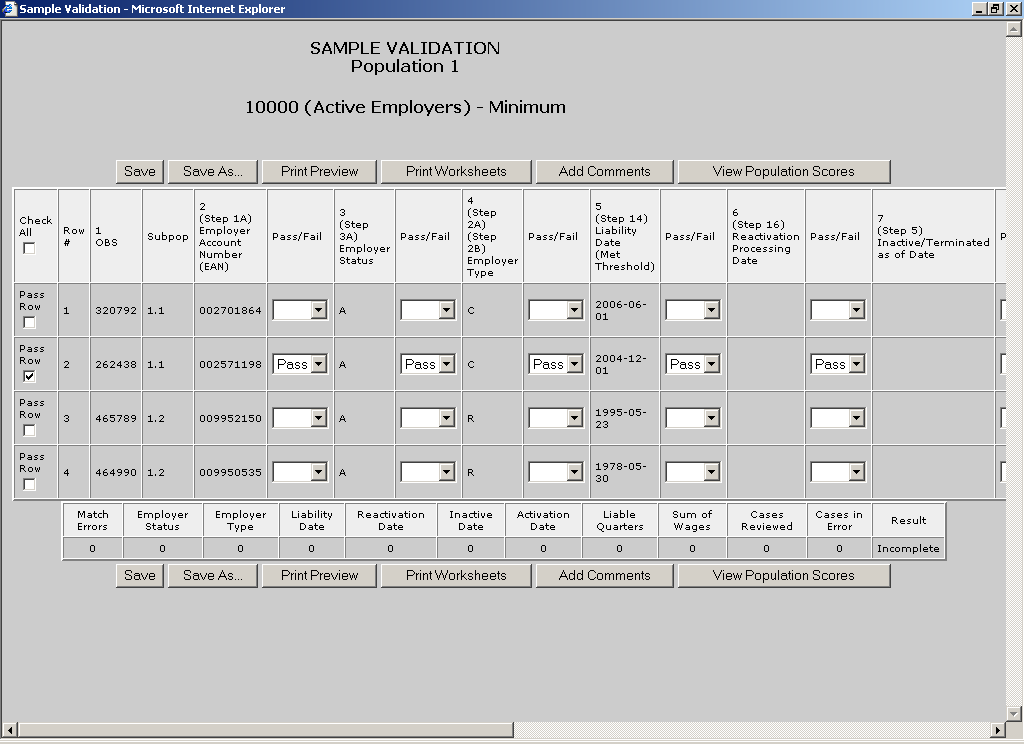


F![]() or
a record that has only a few elements failed and the rest of the
elements passed, you can select “Fail” for the elements
that failed and then check the Pass Row box
at the beginning of the row to change the
or
a record that has only a few elements failed and the rest of the
elements passed, you can select “Fail” for the elements
that failed and then check the Pass Row box
at the beginning of the row to change the
remaining blank boxes to “Pass”.
If all of the records within the sample have passed all data elements you can select the Check All box on the top left corner of the table to change all blank boxes to “Pass”.
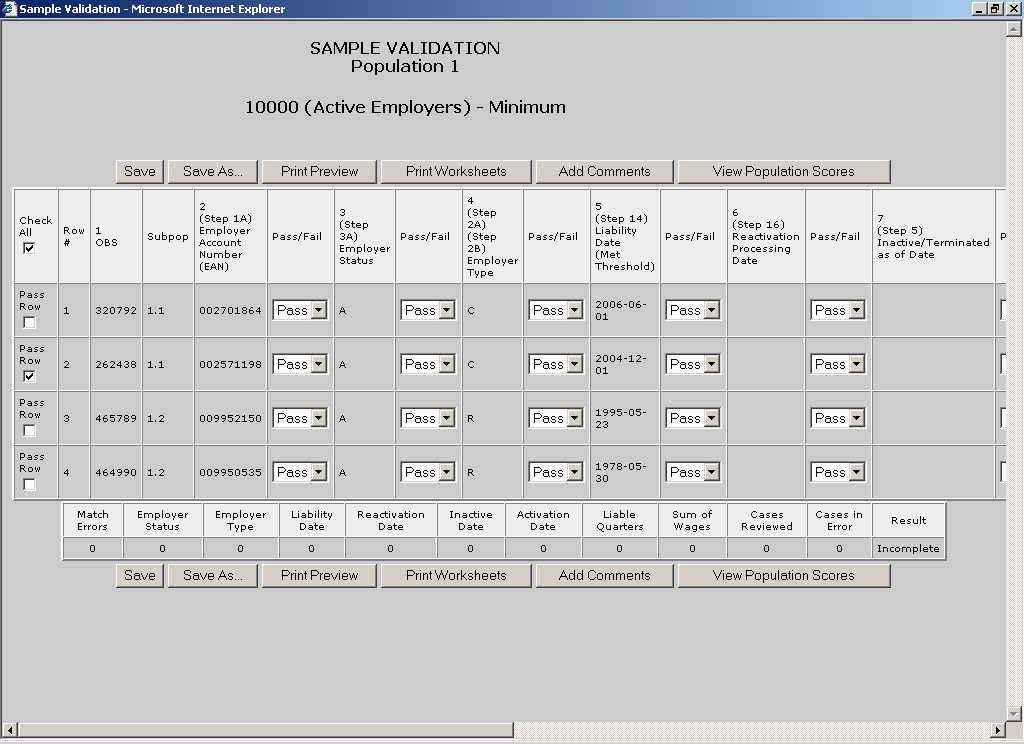


Y![]() ou
can enter “Fail” for the elements that have failed for
the whole sample and then click the Check All
box to change the remaining blank boxes to “Pass”.
ou
can enter “Fail” for the elements that have failed for
the whole sample and then click the Check All
box to change the remaining blank boxes to “Pass”.
Click Save to save all entered results. When you click Save the software will display a summary of your results at the bottom of the screen, including the number of cases reviewed and the number of cases in error.
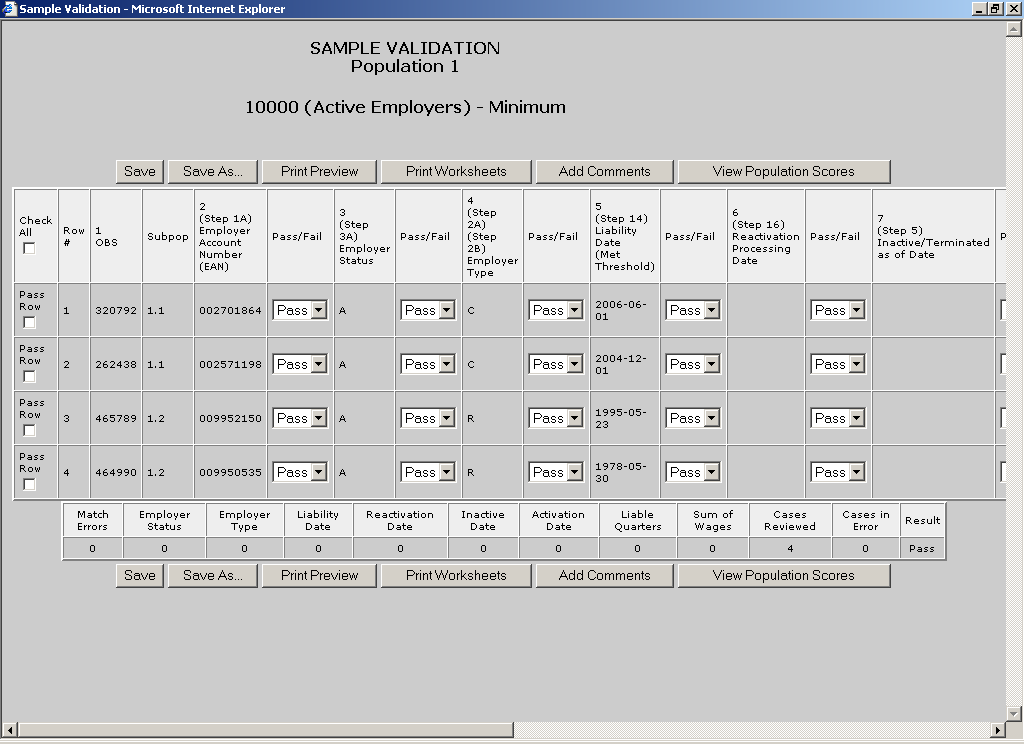

The Save button will save your results in the software. You can use this button to save partial results if you need to log out from the software. When you return to this screen, all results you have entered so far will be displayed. (for Taxes the Save button saves your data to your state’s database).
When you finish validating all records, click on the Save Final Validation Results (only appears on Benefits screen) button at the top or bottom of the screen, to save your data in your state’s database.


Click OK.
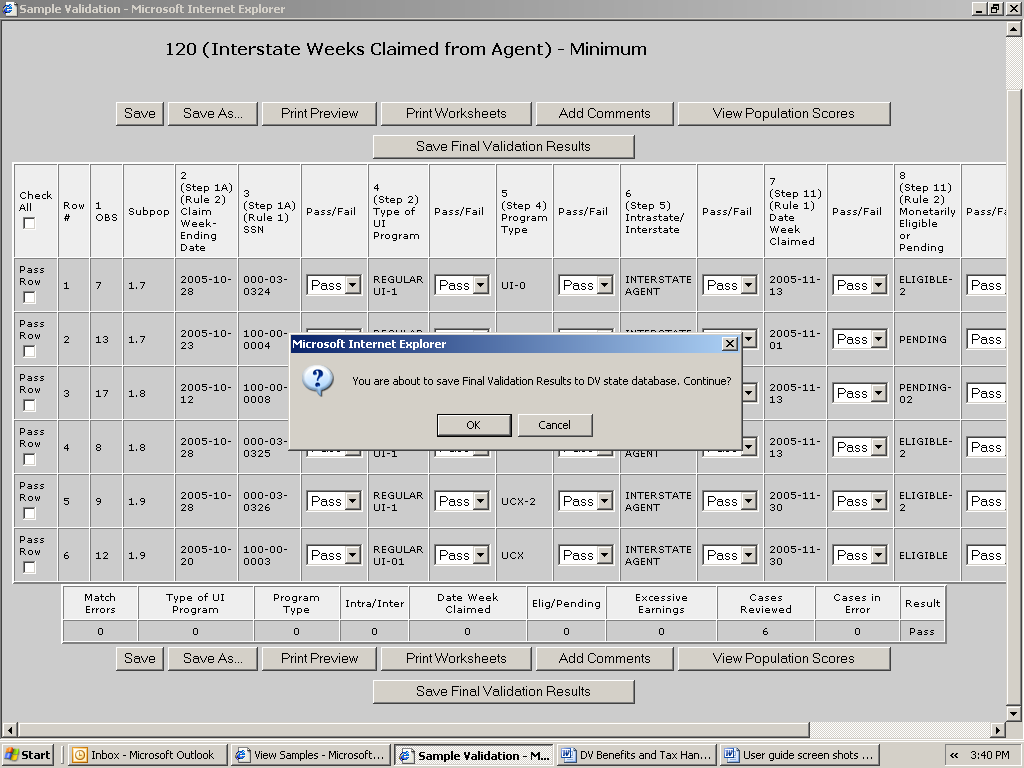

Click OK.
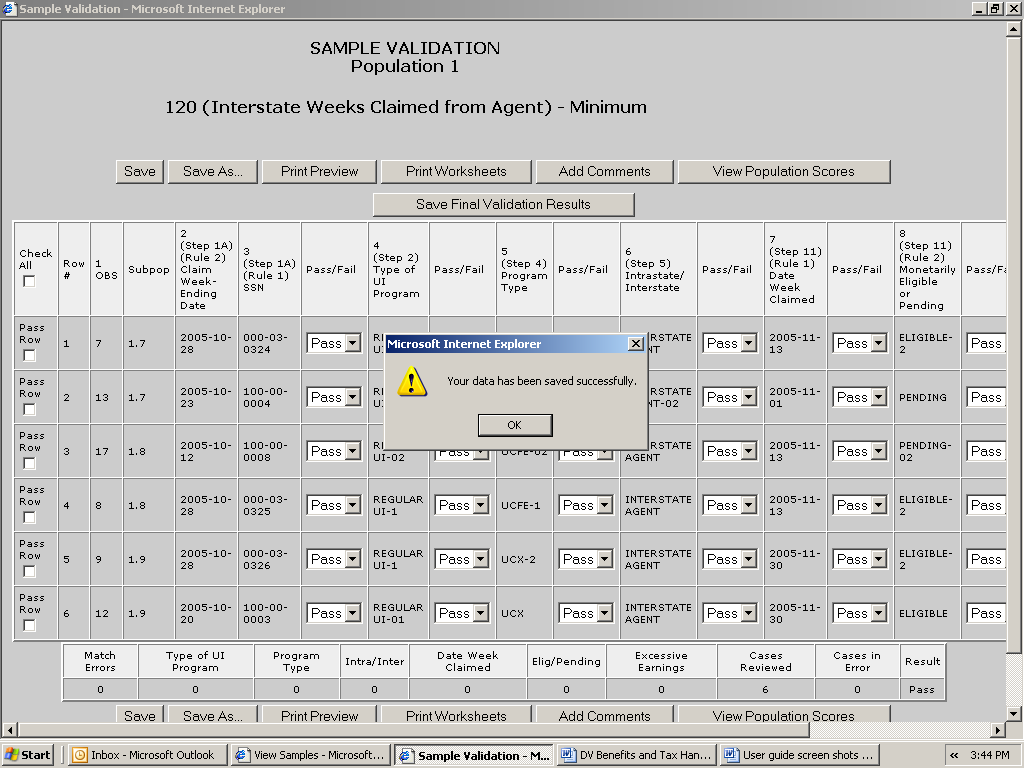

You can later access these data by querying your database, but the data will be erased from the software when the population is reloaded.
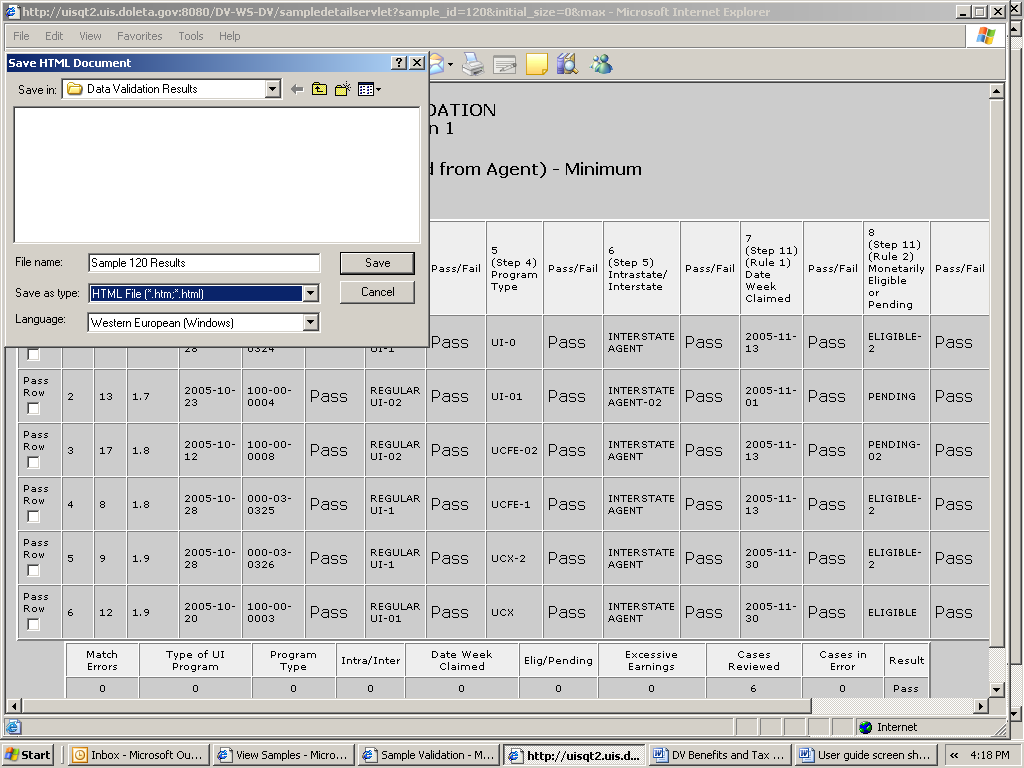
The Save As button displayed at the top and bottom of the screen can be used to save a screen shot of your results outside the software. To do this, follow the next steps.
Click on Save As.


Select the location where you want to save the screen shot and write in the File name box the name you want to give the file. Click on Save.

When you finish entering and saving your sample validation results, close the Sample Validation screen by clicking the X in the upper right-hand corner.

Click OK
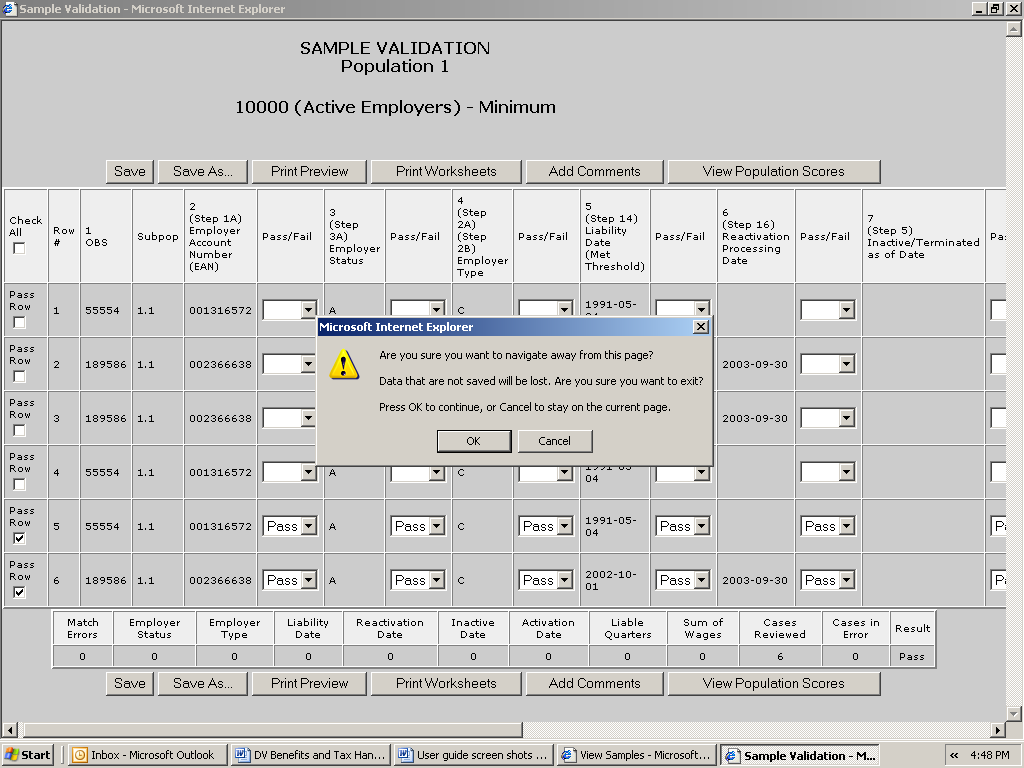

Entering Validation Results for Random Samples
When validating random samples (Benefits) you first have to validate records on the first tier of the sample. If the results are conclusive, you don’t need to validate the second tier (rest of the sample). If results are inconclusive you need to go to the second tier and enter results for the rest of the sample. To enter results for random samples follow the next steps.
First Tier
When you first open the Sample Validation screen for a random sample you will see the records in the first tier of the sample, i.e., the first 30 records for a 30/100 sample or the first 60 records for a 60/200 sample. Enter validation results for all records on the screen by following the instructions described in Step 1 of the previous section for non-random samples.

![]()

If the sample’s universe size is less than 100 for 30/100 samples or 200 for 60/200 samples, i.e., if the extract file has less than 100 or 200 records respectively from which to select that sample, you will see all records selected for the sample on the screen and you will not have to complete a second tier. The software will use the error rates in Table B.2 of the Benefits Handbook to score the sample.
Click Save. If the results are conclusive, the screen will display a summary of your results at the bottom of the page, along with a pass or fail score. You have finished the validation and don’t need to complete the second tier. If the sample universe is smaller than the 30- or 60-case tier one sample, the results will be conclusive regardless of the number of errors.
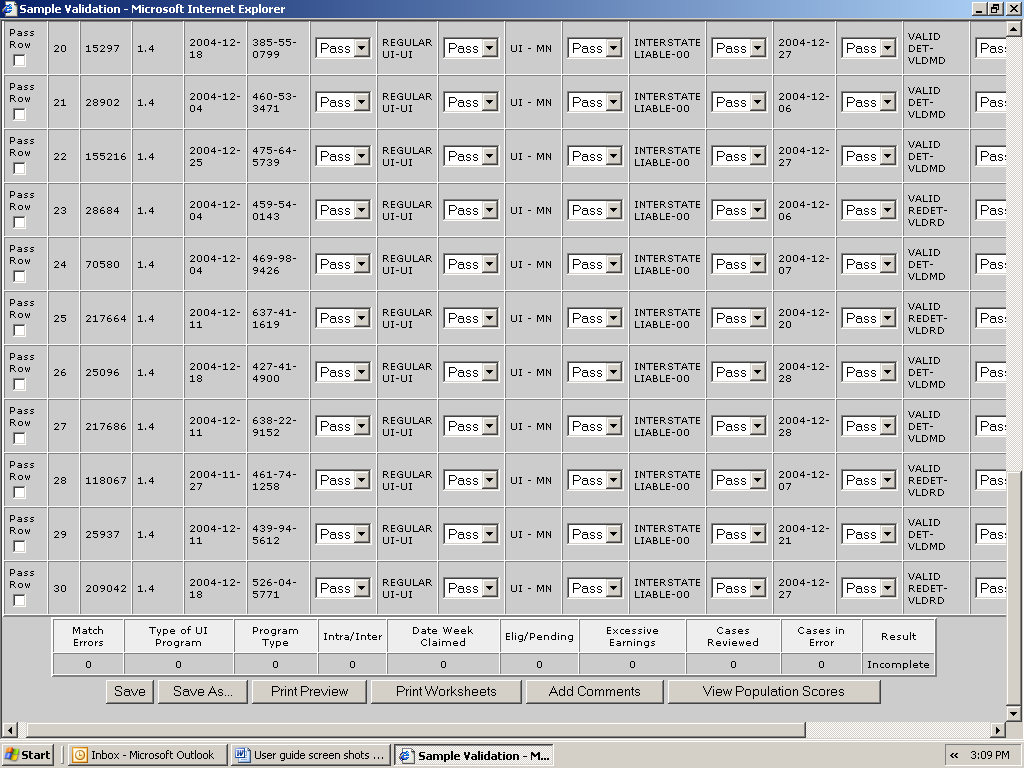

If the results are inconclusive, clicking on Save will bring up the following pop-up window informing you that you need to go to the second tier. Click OK.


![]()

If you need to exit the software before entering all your results, click Save before you do so, so that you don’t lose any of your results. Also, if you are inactive for more than 59 minutes (the
time-out limit), save your work before, to avoid losing your
results.
Second Tier
To go to the second tier, click on one of the Switch to Tier 2 buttons available at the top and bottom of the screen.
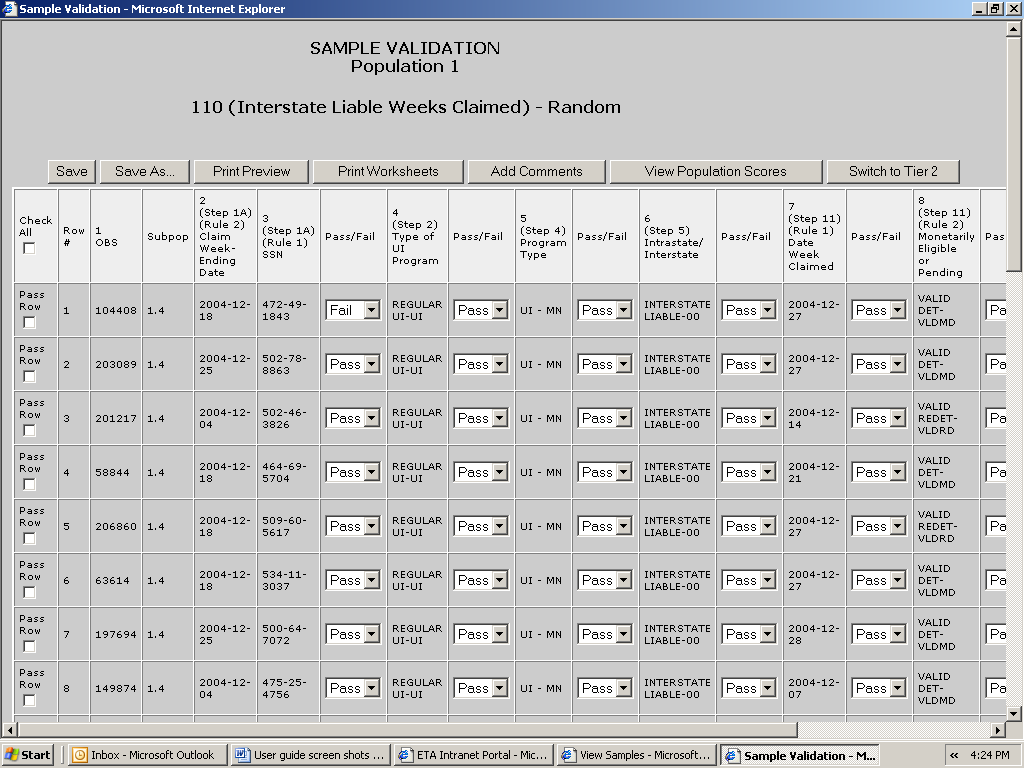

The first tier’s records are going to be disabled but still visible on the screen and the records for the second tier are going to be displayed.

If you want to edit results for any records on the first tier, you can click on either of the Back to Tier 1 buttons available at the top and bottom of the screen.
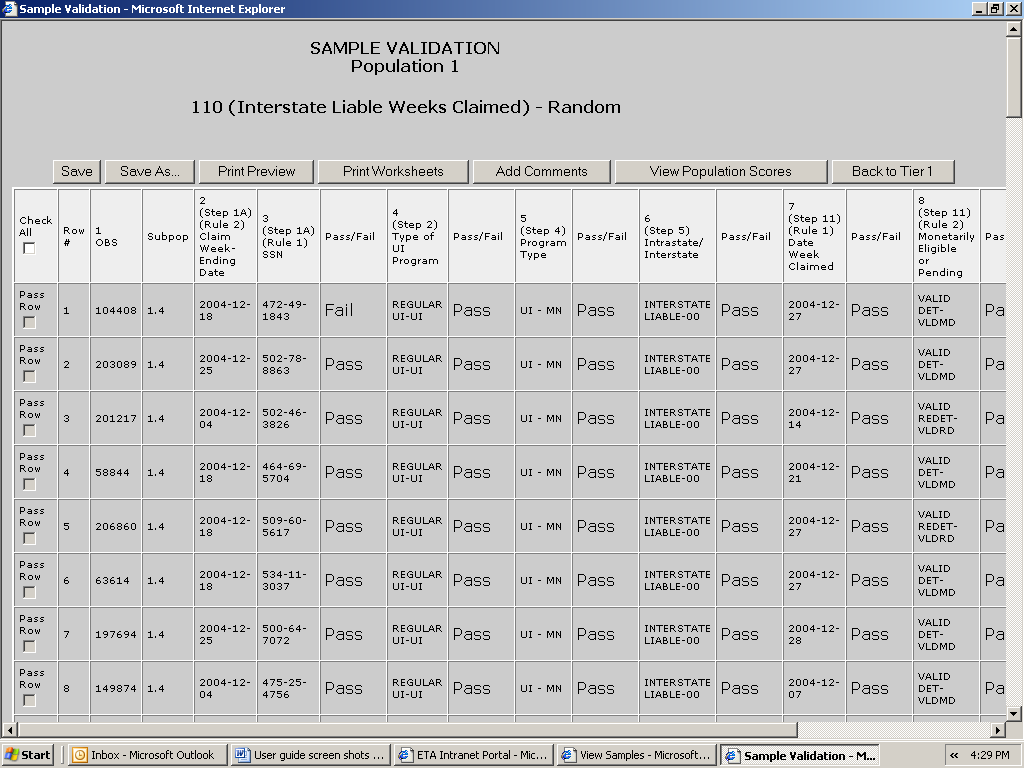

However, if you had entered any results for records on the second tier, you will lose them. The software will give you a warning before going back to tier 1. Click OK if you want to go to tier 1 or Cancel to return to Tier 2. Be aware that returning to tier 1 from tier 2 might take a long time.

Enter results for all records on the second tier the same way you entered results on the first tier. Follow the first tier instructions described under Step 1.
When you finish entering results click Save. A summary of your results will be displayed at the bottom of the page along with a pass or fail score.
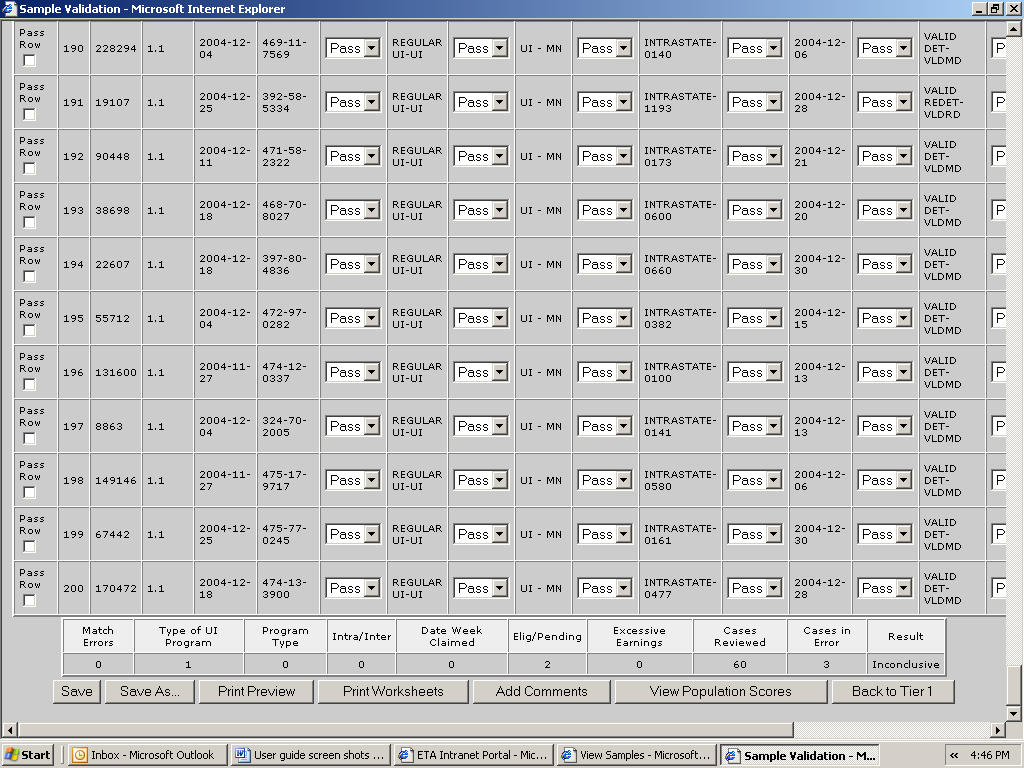

If you want to save a screen shot click Save As and follow the steps described in the previous section.
Viewing the Data Element Validation Report
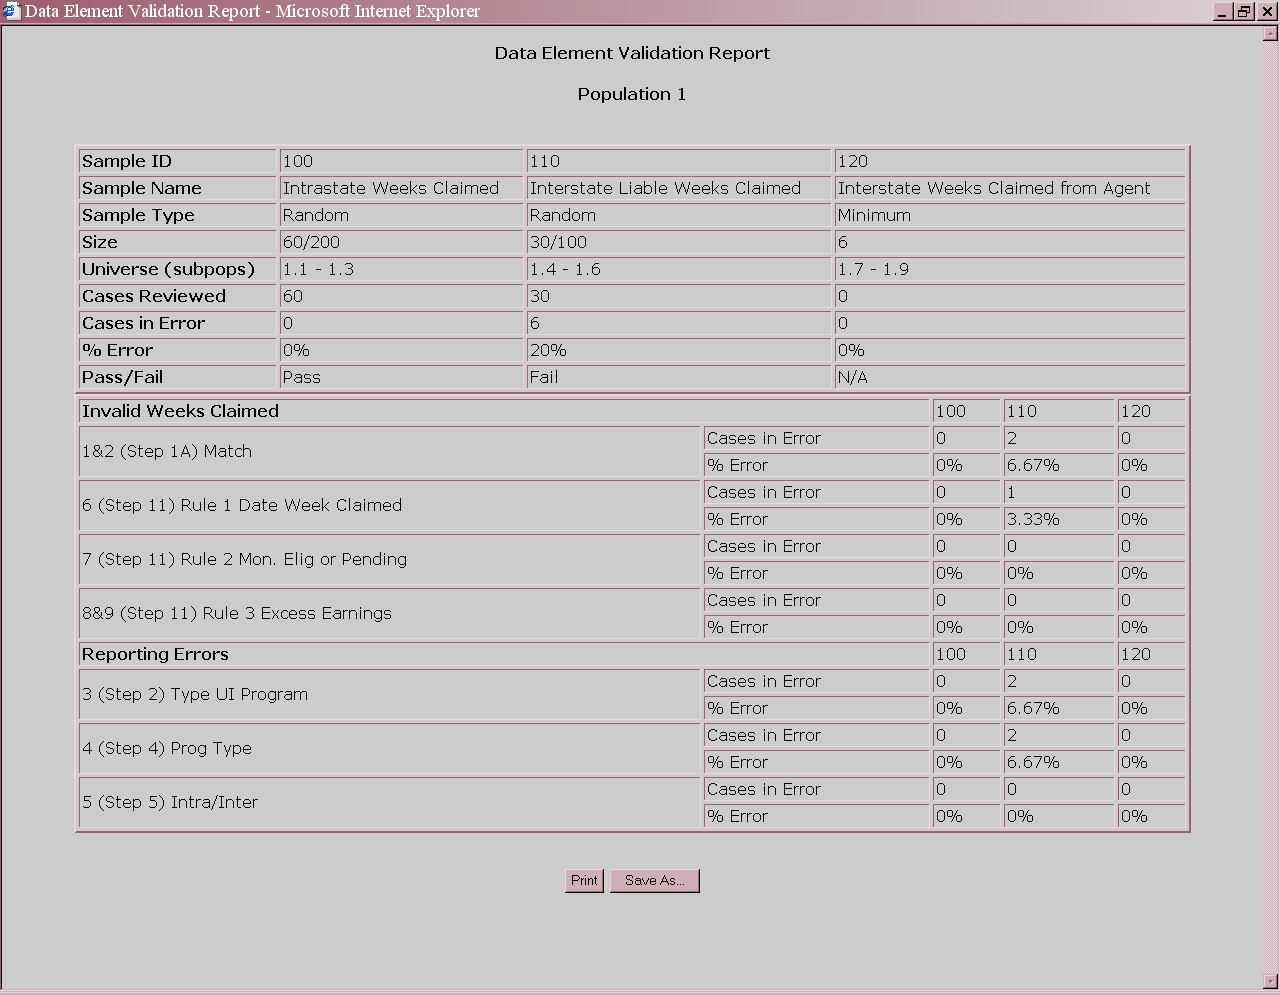
The Data Element Validation Report screen provides summary information about completed sample investigations for a given population. This report is for informational purposes only. It provides, for example, the number of cases in error and the derived percent of errors established through the sample investigation process. The report can be printed and/or saved outside the application, but there is no Transmit button for export to DOL. To access this screen follow the next steps.
Click on the link Data Element Validation Report screen located at the bottom of the Samples screen.

The screen will show results that you have entered for all samples. You can print this screen by clicking on Print and save it outside the software by clicking on Save As.
Chapter 10
Viewing Data Element Sorts in Tax
The purpose of data element sorts validation is to determine whether the generic primary codes used to assign transactions (e.g. C (Contributory) and R (Reimbursing) in Populations 1 and 2) are accurately supported by state-specific secondary codes or specific ranges of employer account numbers (EANs). If a state’s database does not have more than one state-specific code for a given generic code, or does not use EAN ranges, these tests do not apply. Also, these tests do not apply to Population 5.
A data element passes sort validation if no more than 2% of the sorted transactions include an incorrect state-specific code. For detailed information on data element sort validation check Module 2.3 of the tax handbook.
The following table illustrates the relationship between tax populations, sorts, and sub-populations. The Test Data Element column identifies the data element used by the software to perform the sort.
Tax Populations, Sorts and Sub-populations
Population |
Sort |
Subpopulations Examined |
Test Data Element |
1 |
S1.1 |
1.1 (Contributory Employers) |
EAN |
1 |
S1.2 |
1.2 (Reimbursing Employers) |
EAN |
1 |
S1.3 |
1.1 + 1.2 (All employers) |
Employer Status Indicator |
1 |
S1.4 |
1.1 (Contributory Employers) |
Employer Type Indicator |
1 |
S1.5 |
1.2 (Reimbursing Employers) |
Employer Type Indicator |
2 |
S2.1 |
2.1 – 2.8 (Contributory Employers) |
EAN |
2 |
S2.2 |
2.9 – 2.16 (Reimbursing Employers) |
EAN |
2 |
S2.3 |
2.1 – 2.8 (Contributory Employers) |
Employer Type Indicator |
2 |
S2.4 |
2.9 – 2.16 (Reimbursing Employers) |
Employer Type Indicator |
3 |
S3.1 |
3.1 – 3.3 (New Status Det.) |
Status Determination Type |
3 |
S3.2 |
3.4 – 3.6 (Successor Status Det.) |
Status Determination Type |
3 |
S3.3 |
3.7 (Inactivation Det.) |
Status Determination Type |
3 |
S3.4 |
3.8 (Termination Det.) |
Status Determination Type |
4 |
S4.1 |
4.1, 4.9 (Establishment Transaction) |
Transaction Type Indicator |
4 |
S4.2 |
4.2, 4.10 (Liquidation Transaction) |
Transaction Type Indicator |
4 |
S4.3 |
4.3, 4.4, 4.11, 4.12 (Uncollectible Transactions) |
Transaction Type Indicator |
The software has two different sorting methods to determine which employers or transactions are out of range: query and frequency distribution. The query is available for EANs and the frequency distribution for all other data elements. The next sections will explain each method in detail.
To access the Data Element Sorts screen follow the next steps.
From the Tax Selection Criteria screen select a Population that has been loaded.
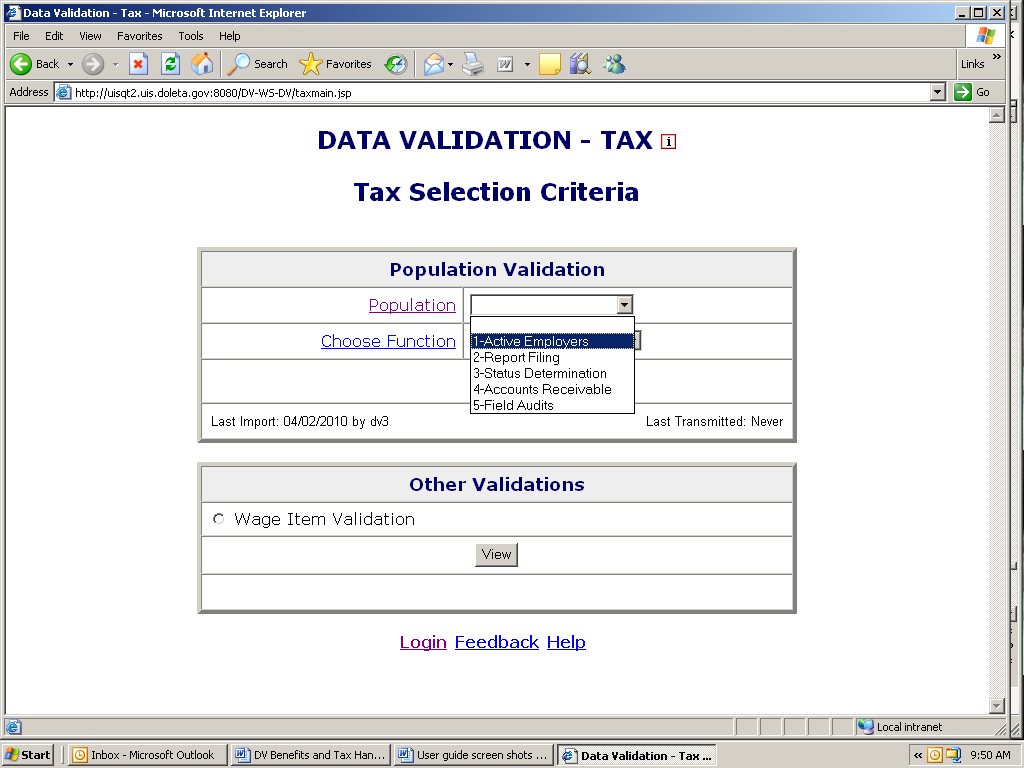

Select View Data Element Sorts from the Choose Function drop-down menu and click Go.
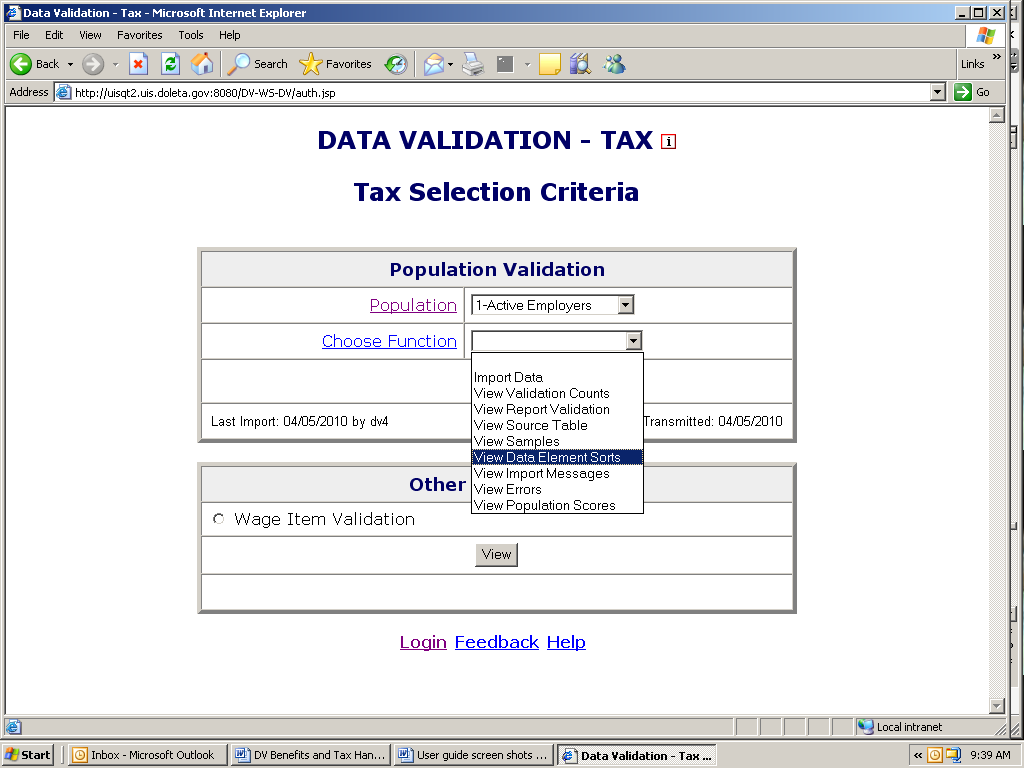

The Data Element Sorts screen displays each data element to be sorted, the corresponding step in Module 3 that is used to validate it, and the number of cases to be validated. Each data element has a sort number assigned to it, e.g., S1.1. The sort numbers are displayed as links that take you to the sorting function.
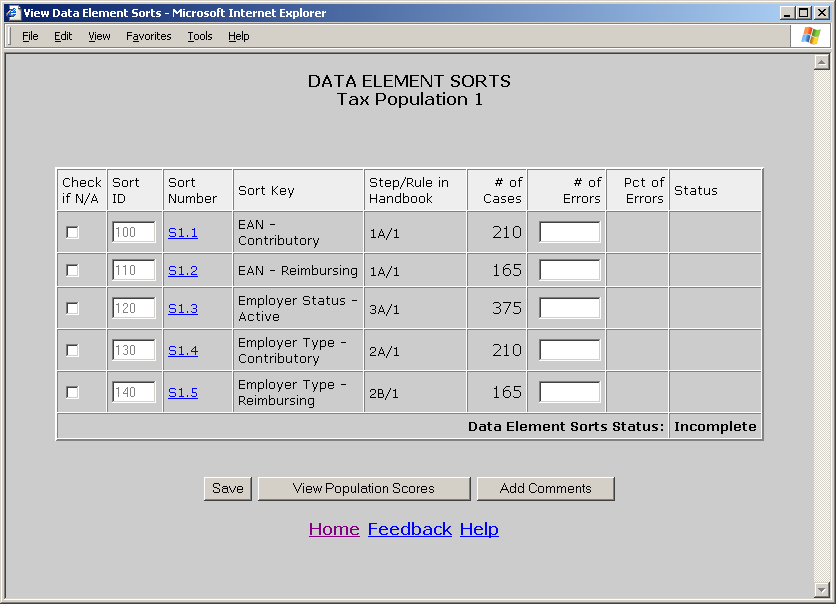
Entering Data Element Sorts Results
To enter results for data element sorts follow the next steps.
If your state does not have secondary codes for the data element, you cannot do sort validation for that data element. In that case, click on the N/A box next to the data element.
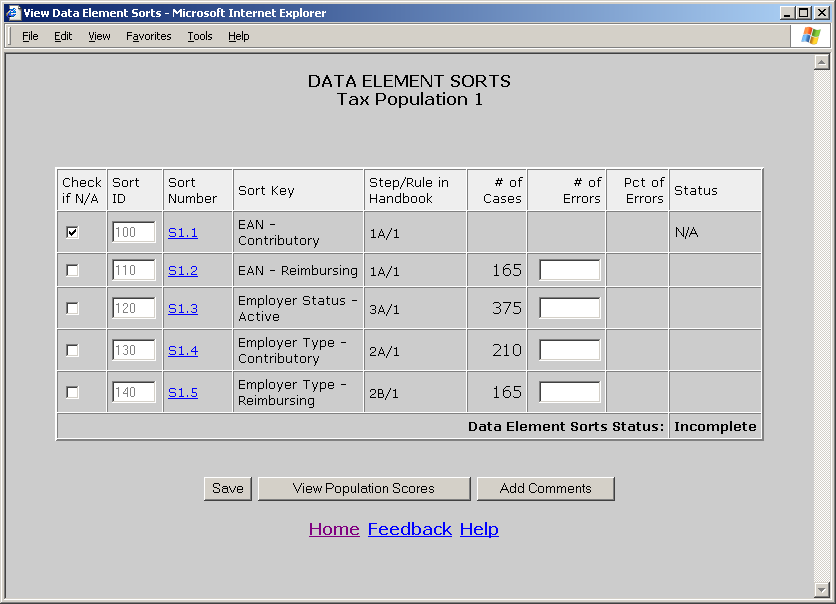

The data element is disabled and the Status column displays “N/A”.
If your state has secondary codes for the data element or assigns EAN ranges to contributory and reimbursing employers, click on the sort number link. For example, click on S1.1.
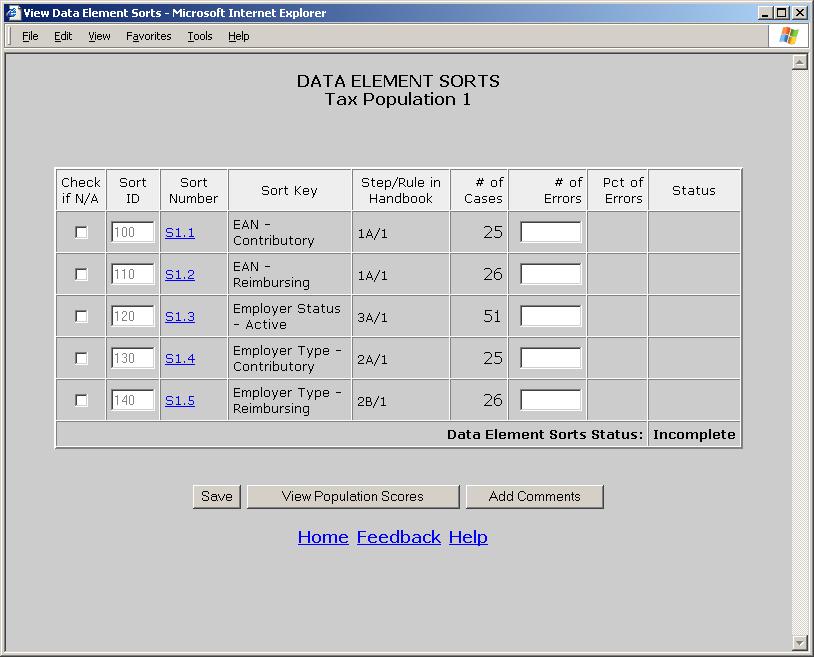

If the data element is EAN, you will get a query screen. For other data elements you will get a screen showing a frequency distribution of codes.
Query Screen
If your state assigns a certain range of EAN numbers to contributory employers and another range to reimbursing employers, you can query against the EANs in your extract file to determine if there are any numbers out of range.
Select the type of query you want to execute and the parameters for the query. The software offers three possible queries: starts with, ends with and is between.
Starts with retrieves all employers whose EANs begin with the sequence you identify. For example, to get all the records with an EAN starting with 3000, click the starts with option, and enter 3000 in the first box.
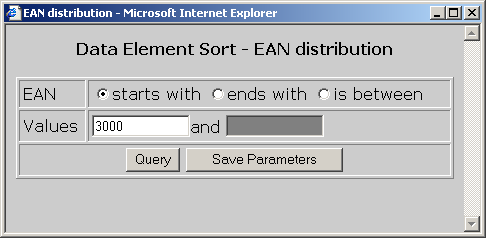
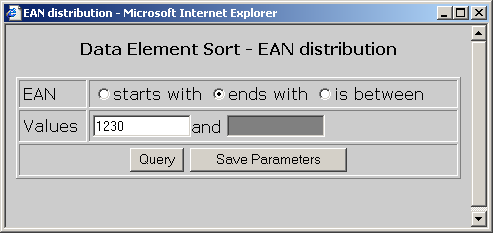
Ends with retrieves all employers whose EAN ends with the sequence you identify. For example, to get all the records with an EAN ending in 1230, click the ends with option, and enter 1230 in the first box.
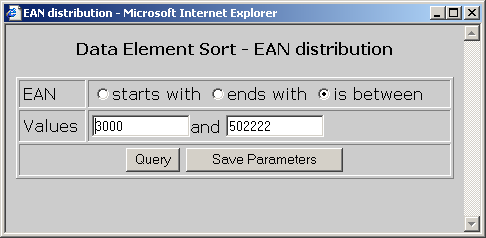
Is between allows you to specify a range starting with an EAN value in the first box and an ending value in the second box. The query returns the set of employers that falls within the specified range. For example, to get all the records with an EAN between 3000 and 502222, click the is between option, enter 3000 in the first box and 502222 in the second box.

You can save your parameters by clicking on Save Parameters.
Click on the Query button.


The software displays a screen with all records that satisfy the query parameters. At the bottom of the screen the total number of records retrieved is displayed.

![]() If
the number returned by the query exceeds 10,000, the
If
the number returned by the query exceeds 10,000, the
software displays the first 10,000, beginning with the lowest
EAN.
If you query for valid values, for example if your state’s EANs always start with 4, and you query for those records, then the records the software retrieves are all correct. In this case, compare the number of records retrieved with the number of cases in the Data Element Sort screen.
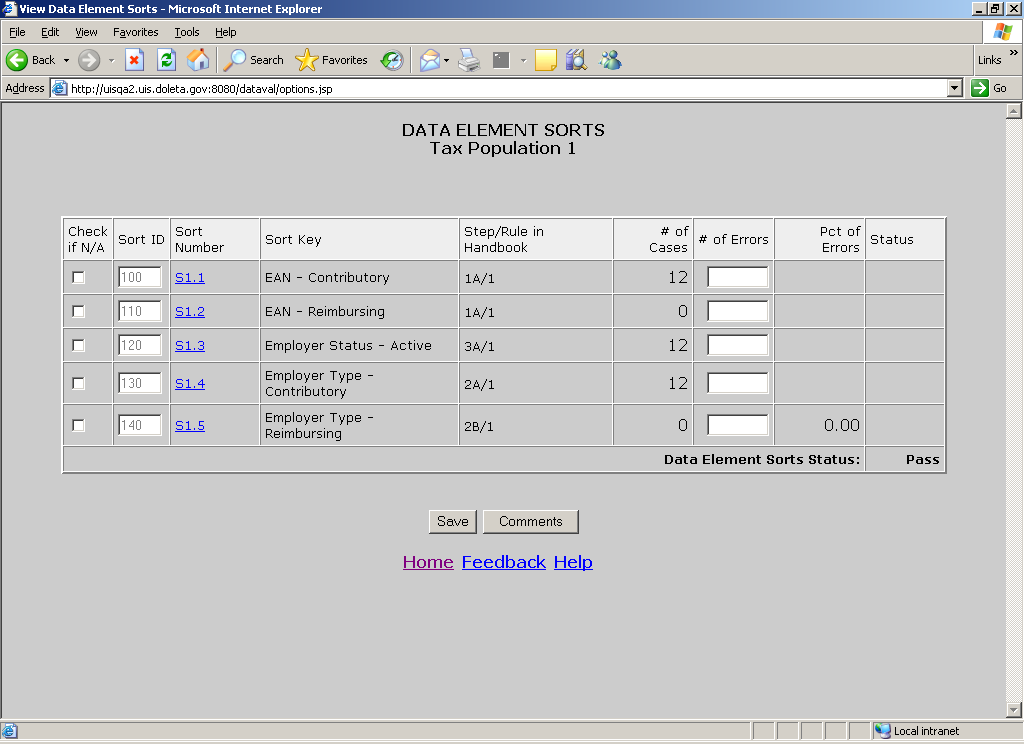

The difference between these numbers equals the number of records that have an incorrect EAN, i.e. the number of errors. For example, if you retrieved 4 correct records using the query and the number of cases is 12, then there are 8 records in error.
If you query for invalid values, for example if all EANs in your state can end in any digit but 9 and you query for all EANs ending in 9, then the total number of records retrieved equals the number of errors.
![]()

In some cases you might want to execute multiple queries to find the number of errors. For example, if the EANs in your state should be
between 007900000 and 007999999, then you can query for records
above the upper limit and below the lower limit of your state’s EAN
range, i.e., run a query for records beginning with 000000000 and
ending with 007899999 and another query for 008000000 and above.
Add the number of records returned by both queries to get the total
number of errors.
Frequency Distribution Screen
If your state has multiple codes for active employers, employer type, or types of transactions, you can determine which records have an incorrect code by looking at their frequency distribution of codes.
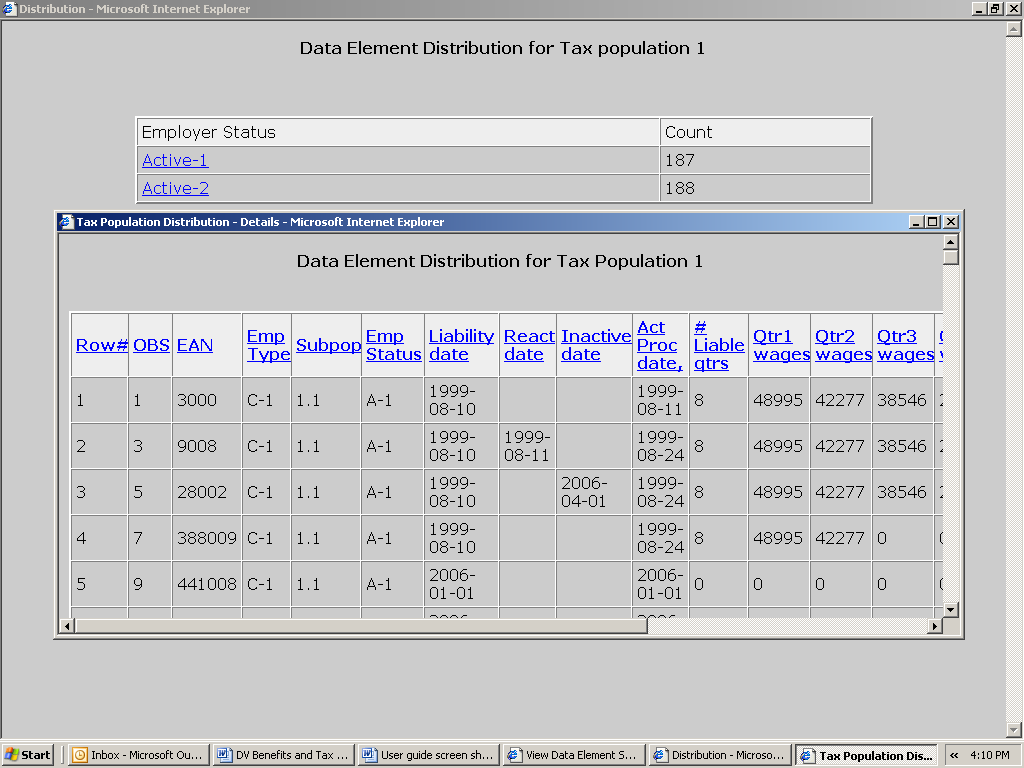
After you click on the sort number link of a data element that is not an EAN, a window will come up showing a frequency distribution of all codes. Look at all the codes and determine whether these are correct. Add up all the counts of incorrect codes to determine the total number of errors for the data element you are validating.
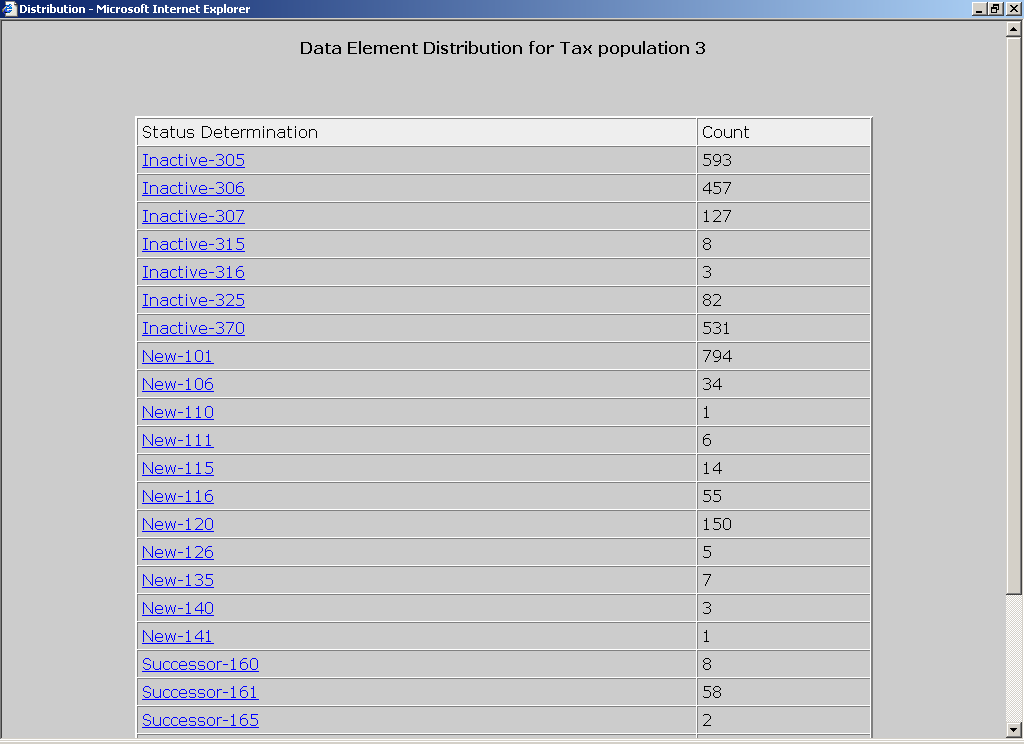
For example, in the previous screen, if you are validating Inactive codes and 315 and 316 are not Inactive codes in your state system, then you have a total of 11 (8+3) errors for Inactive.
To view all records that were counted for a code, click on the code link.


The software can only display the first 10,000 records.
After you determine how many errors you have for a data element, either
by querying or by using the codes frequency distribution, enter that number
in the Data Element Sorts screen. To do this, follow the next steps.
Enter the number of records in error for the data element you are validating, in the # of Errors field on the Data Element Sorts screen.


Click the Save button at the bottom of the screen.


You will get a pop up window confirming that you have saved the data. Click OK.


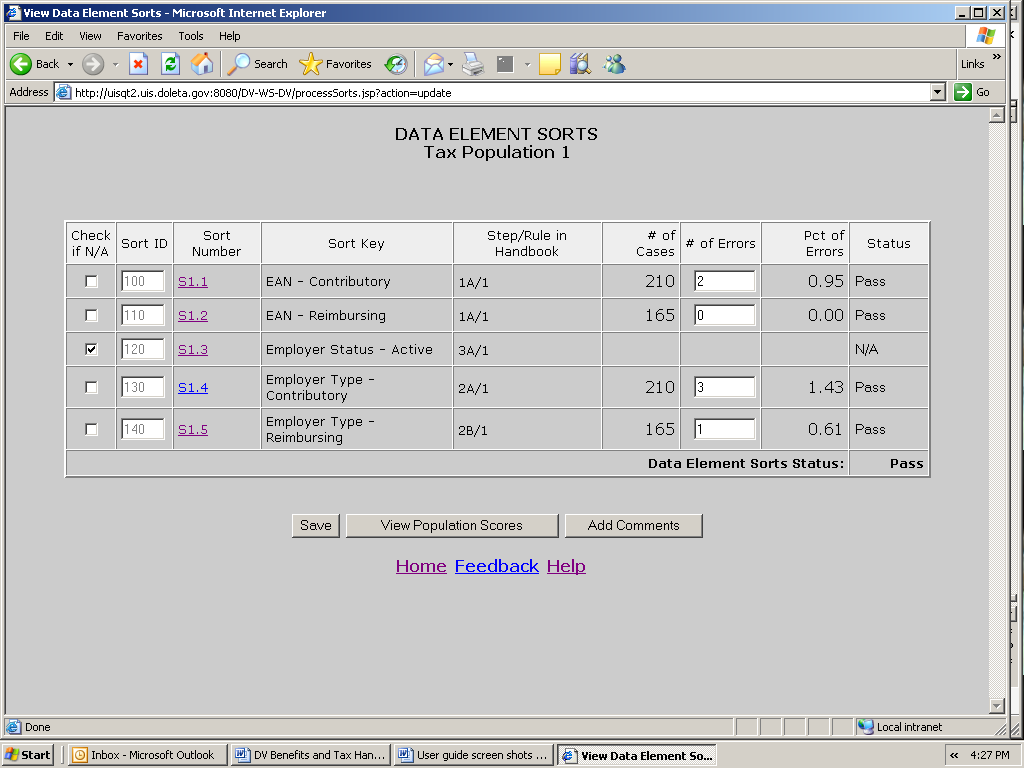
The software calculates the percentage of errors and determines whether the data element passed sort validation. It also calculates the Data Element Sorts Status.
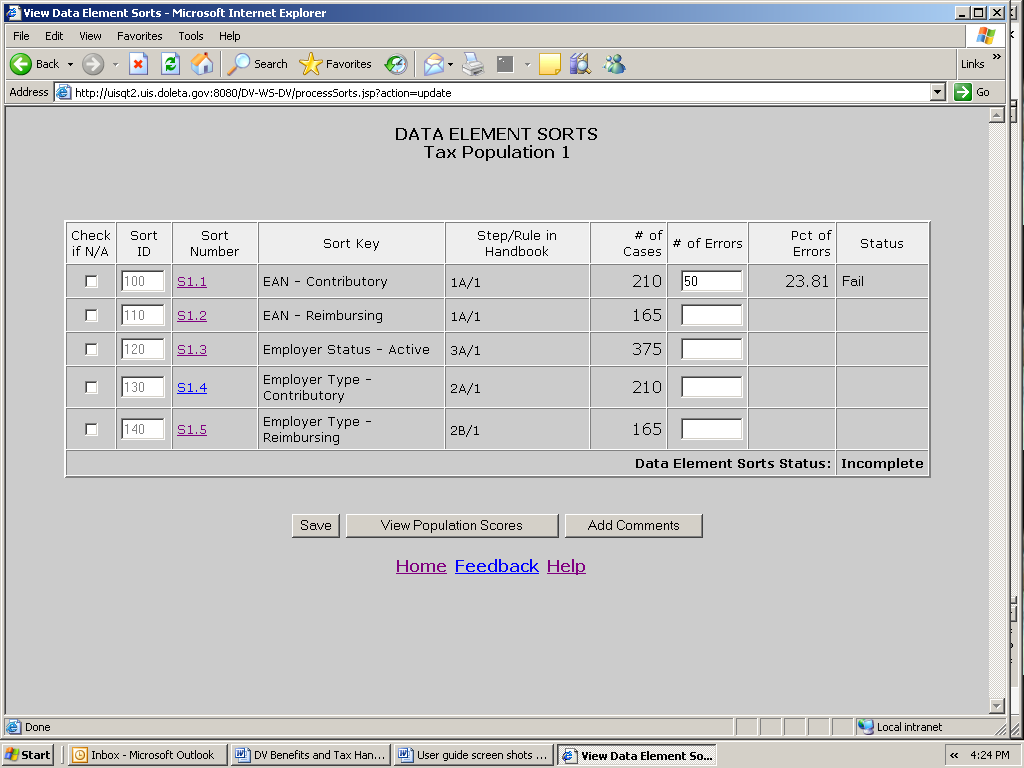


If you haven’t completed all the sorts, the status will display “Incomplete”. In order to submit results to the DOL, you first need to complete all sorts, by either entering the number of errors or checking the N/A box, and click Save.
When you complete and save all sorts for a population, the status field will display Pass or Fail.

Chapter 11
Viewing the Wage Item Validation Screen in Tax
Wage item validation consists of reviewing counts of wage record transactions which appear on the ETA 581 report to verify their accuracy. A wage record is the listing of an individual’s earnings in covered employment. Employers are required to provide this information to the Unemployment Insurance program four times per year.
To validate wage items you need to compare counts from the ETA 581 with reconstructed counts produced under controlled conditions. You should test that every wage item is counted and that the count does not include corrections (counted twice), incomplete wage records or duplicate records. You can find a detailed explanation in Module 5 of the ETA Handbook 361- Tax.
To enter wage item validation results into the software follow the next steps.
Select Wage Item Validation from the Other Validations box on the Tax Selection Criteria screen and click View.


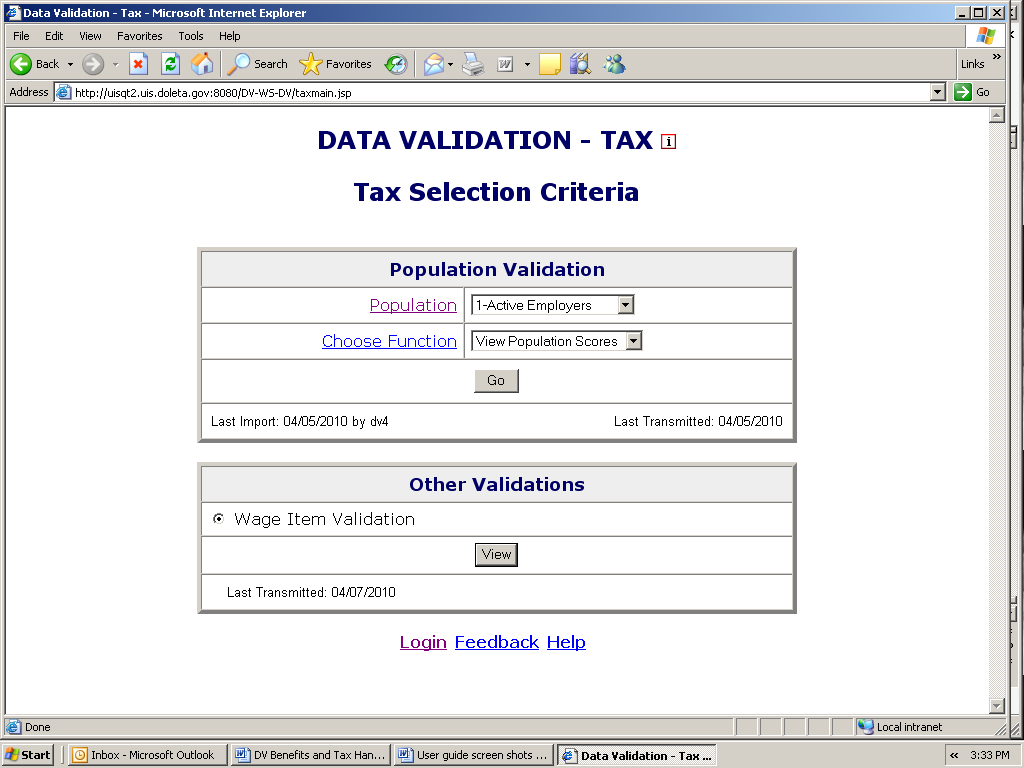
When you select Wage Item Validation, you will see the date results were last transmitted to the National Office at the bottom of the Other Validations box. If you have not transmitted any results, the Last Transmitted field will display “Never”.
Click on View to get to the Wage Item Validation screen.


If you have never entered results before you might get a screen with no wage items.

Select the quarter from the Report Quarter drop down menu, then input year (year must be 4 characters long).


If you have previously entered results, you will see them and you can edit or delete them. Wage items do not get overwritten when you load extract files and are not dependent on any population.
To add a wage item. Click on the Add Wage Item button located at the bottom of the screen.


In the Add Wage Items for Validation pop up window enter the information for the wage item you want to add and click Save.


Select the Mode Type; from the drop down menu this is a general description of the item you are validating.
Enter the Mode; this is a brief description of the item you are validating. If Mode Type is used more than once each Mode should have a unique name/description. For example, if CD/Diskette is selected twice as your Mode Type the Mode could be entered as CD1 and CD2 with a brief description like CD1 – First Month, CD2 Second Month.
Next, enter Sample Size; which cannot be zero or greater than 150. If Sample Size is less than 150 the software will automatically fill in the Cases Reviewed field with the same number as the Sample Size. If 150 is entered as the Sample Size, then for the Cases Reviewed field you must enter 50 if you are reviewing Stage 1 or enter 150 if you are reviewing Stage 2. Refer to UI DV Handbook 361, Tax for more information on when Stage 1 or Stage 2 are required.
Enter the recount for that category in the Validation Count field.
Enter the counts for the applicable time period that are reflected in
the ETA 581 Report in the Reported Count field.
When you save the item, the Wage Item Validation screen displays the item added and calculates the Difference between the Reported Count and Validation Count fields, and whether the item Passed or Failed validation.


Repeat this procedure to ensure that you have validated wage items for every mode your state’s employers use to submit them.
To update any field of a wage item other than the Mode Type and Mode fields, click on the field box you want to edit and edit the field. Then click the Save button at the bottom of the screen to save your changes.


You cannot update the Mode Type or Mode fields. Instead, you need to delete the wage item and add a new one with the correct Mode.
To delete a wage item click on the Delete button next to the wage item, located on the column Delete Wage Item?


A pop-up window will be displayed to confirm your request. Click OK to delete the item or Cancel if you don’t want to delete it.


After you finish entering your validation results, click the Save button at the bottom of the screen to save your work.


Chapter 12
Submitting Results to DOL
Adding Comments
You can add individual comments to your RV, samples, sorts, and wage items results before transmitting them to DOL by using the Comments buttons on the Report Validation, Sample Validation, Data Element Sorts, and Wage Item Validation screens. To add comments, follow the steps below. Tax screens will be displayed in the following examples.
From the Benefits or Tax Selection Criteria screen select the Population for which you want to add comments.


Select the screen for which results you want to add comments from the Choose Function drop-down menu and click on Go.


For adding comments to wage item validation results, select View Wage Item Validation from the Other Validations box on the Tax Selection Criteria screen and click View.


Click on the Add Comments button.
In the Report Validation screen, the Add Comments button is located at the bottom of the screen.

In the Sample Validation screen, the Add Comments button is displayed at the top and bottom of the screen. Click on either one.

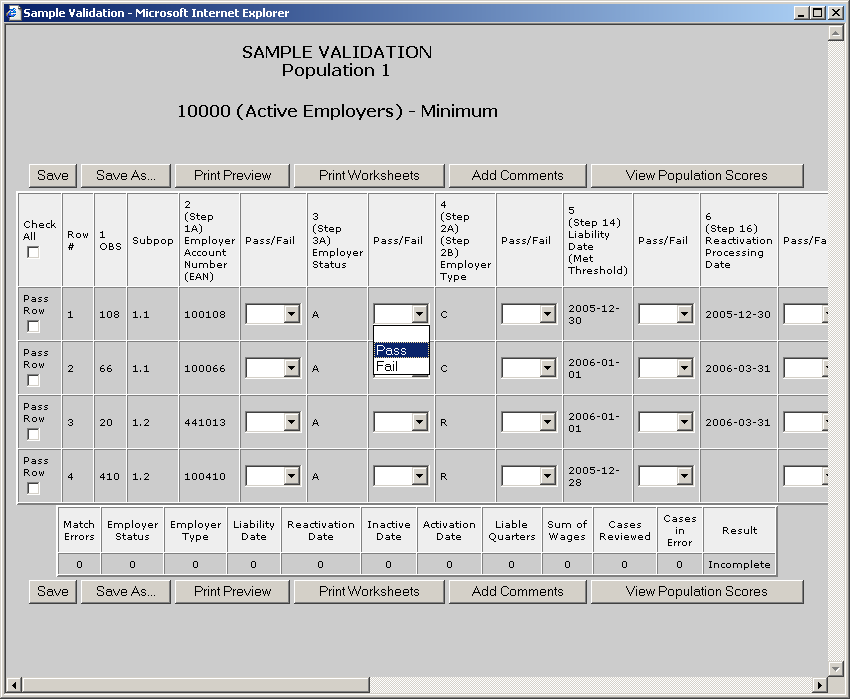
In both the Data Element Sorts and the Wage Item Validation screens, only available in Tax, the Add Comments button is displayed at the bottom of the screen.


Click on the Add Comment button to bring up the comment box.
Write your comments in the comment box and click Save. You have a limit of 512 characters. Only saved comments will be transmitted.
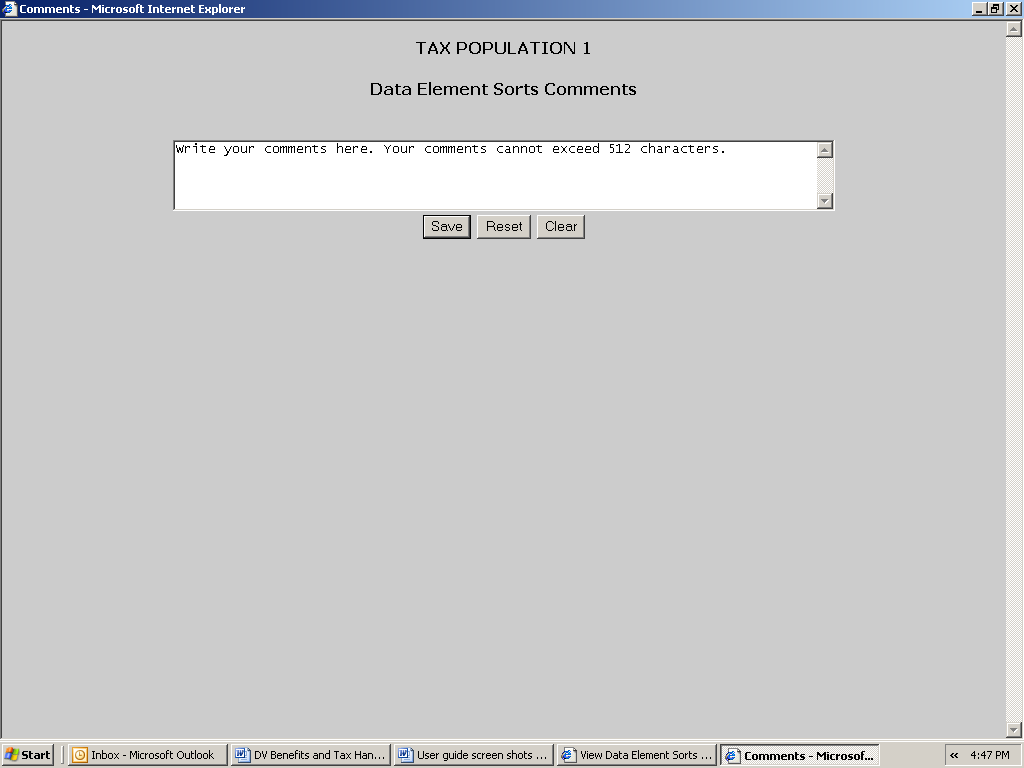

Close the comments window by clicking on the X located on the top right corner of the window.


The Clear button at the bottom of the Comments screen will erase the contents of the comment box. The Reset button will erase any additional comments written after the comments were last saved.
Transmitting Population Results
After you complete RV and DEV, you can transmit the results to DOL with or without comments. Only completed and conclusive sample investigations can be transmitted. Results are transmitted jointly for RV and DEV samples.

Y![]() ou
may choose not to submit the results of a validation exercise, but
keep in mind that any results resident in the software for a given
population will be lost when a new extract file for that population
is
ou
may choose not to submit the results of a validation exercise, but
keep in mind that any results resident in the software for a given
population will be lost when a new extract file for that population
is
imported it overwrites the prior data.

W![]() hen
you transmit results to DOL, only summary information and comments
are transmitted. Detailed information from individual records is not
transmitted to DOL. This means that sensitive
hen
you transmit results to DOL, only summary information and comments
are transmitted. Detailed information from individual records is not
transmitted to DOL. This means that sensitive
information, such as SSNs, stays at the state level.
You can forward RV and DEV results to DOL using the Transmit button at the bottom of the Population Scores screen. Submissions are transferred to DOL overnight, so they will be received the next day. To submit results along with comments saved, if any, follow the next steps.
From the Benefits or Tax Selection Criteria screen select the Population for which you want to submit results.


Select View Population Scores from the Choose Function drop-down menu and click on Go.
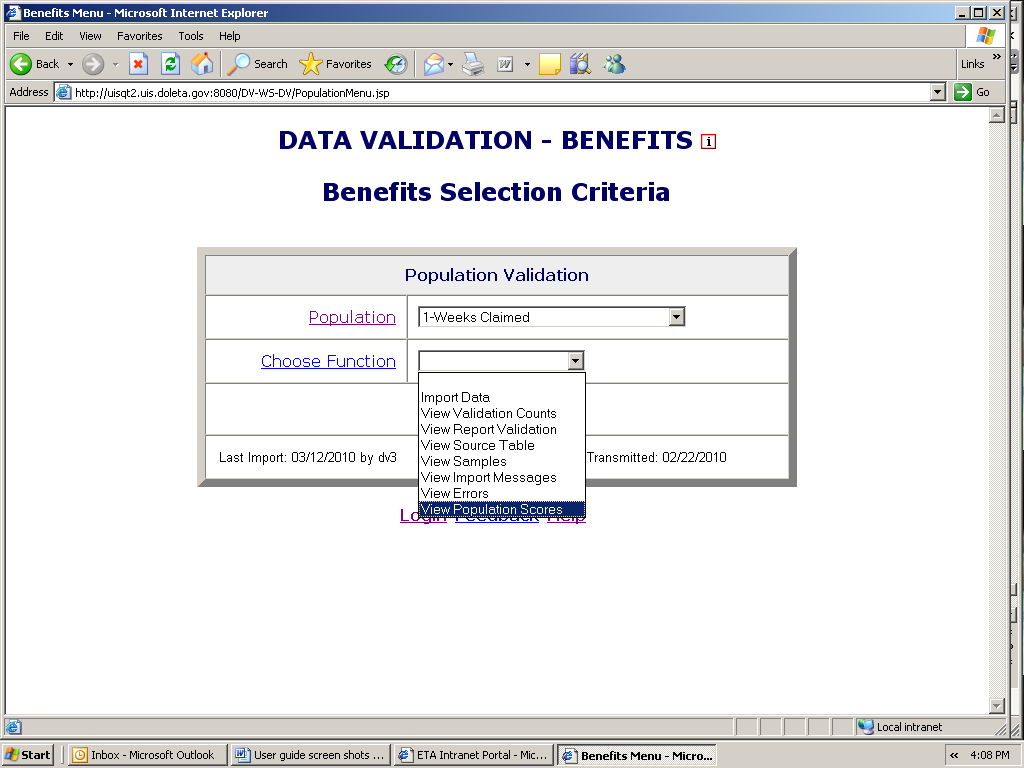

The Population Scores screen can also be accessed from the Report Validation, Sample Validation or Data Element Sorts (Tax only) screens by clicking on the View Population Scores button.
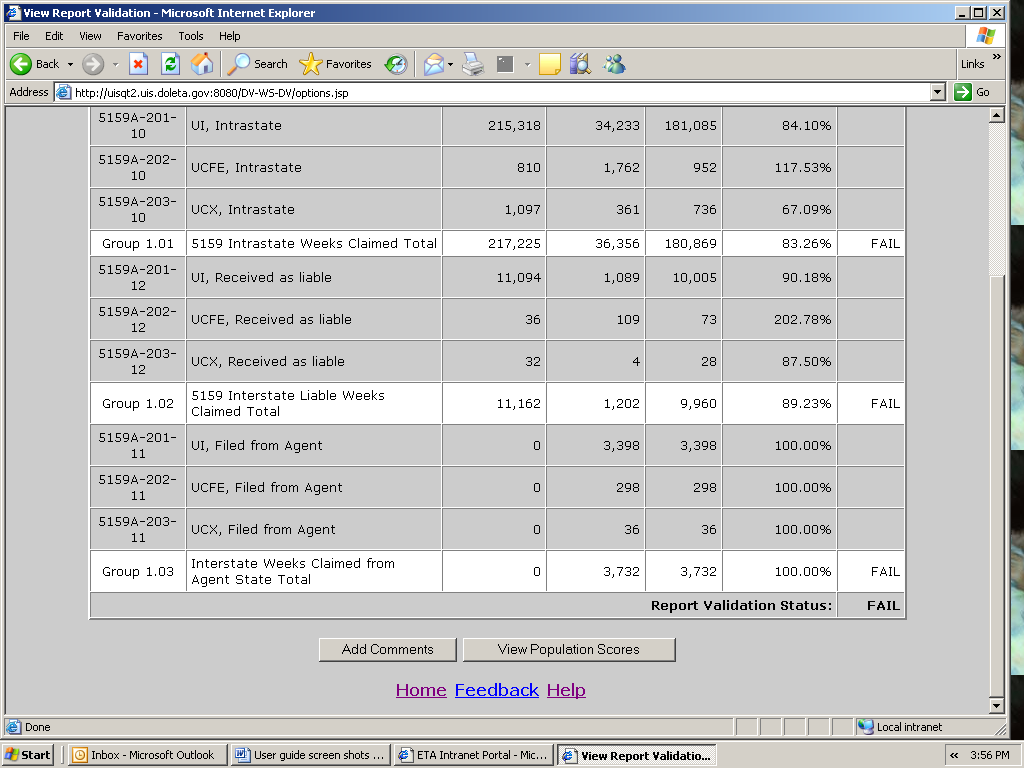


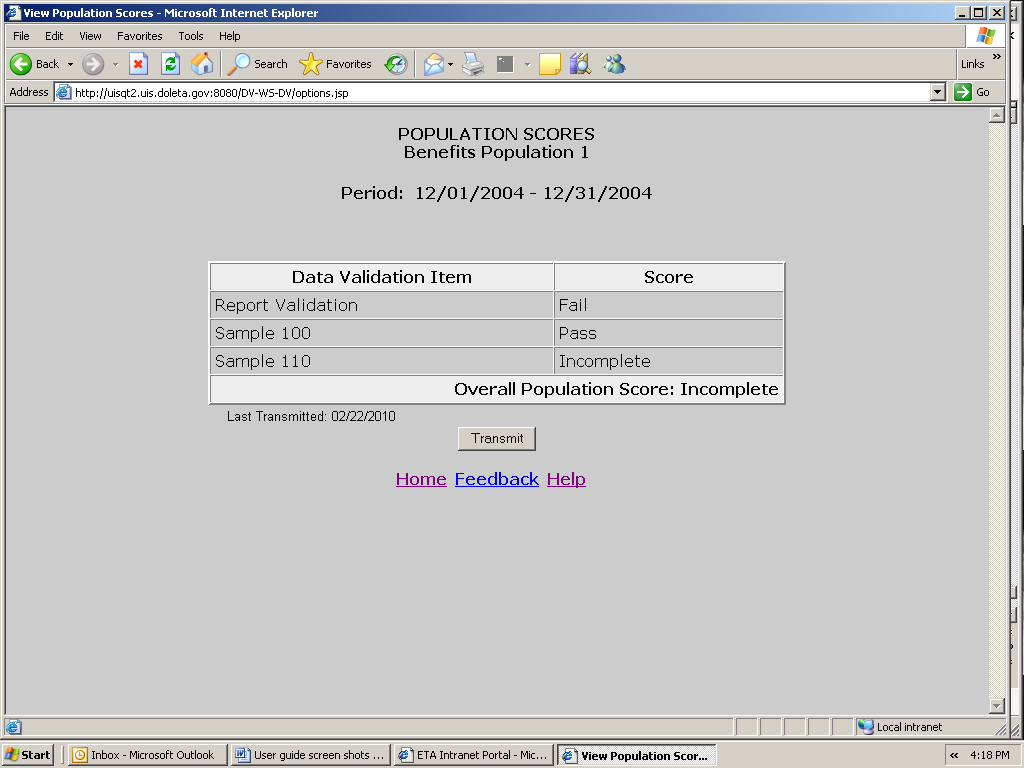
In Benefits, the Population Scores screen displays scores for the RV and all the random samples, and an overall score for the population. It also displays the date when results for the population were last transmitted to the National Office.
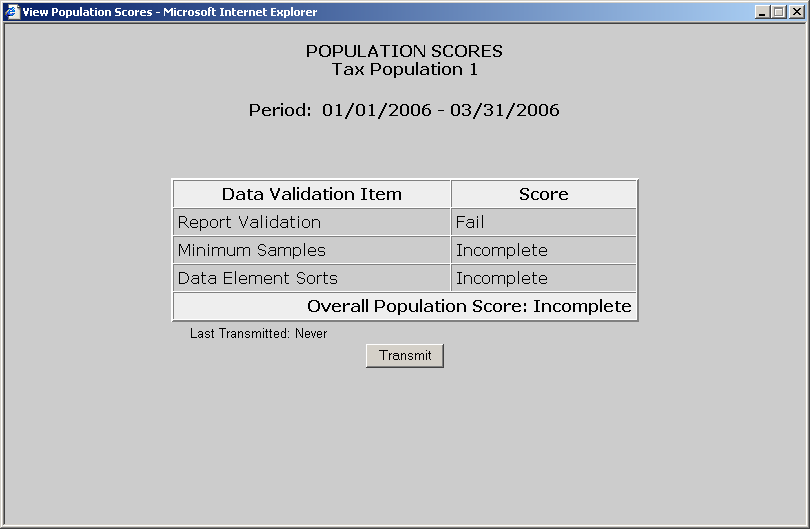
In Tax, he Population Scores screen displays scores for the RV, minimum sample, and sorts, and an overall score for the population. It also displays the date when results for the population were last transmitted to the National Office.
Click on the Transmit button located at the bottom of the screen.


You can only transmit results if you have completed DEV. If you haven’t, you will get the following message.


Click OK and complete all samples and sorts (if applicable). After you complete all DEV return to the Population Scores screen. Click on the Transmit button to submit your results.
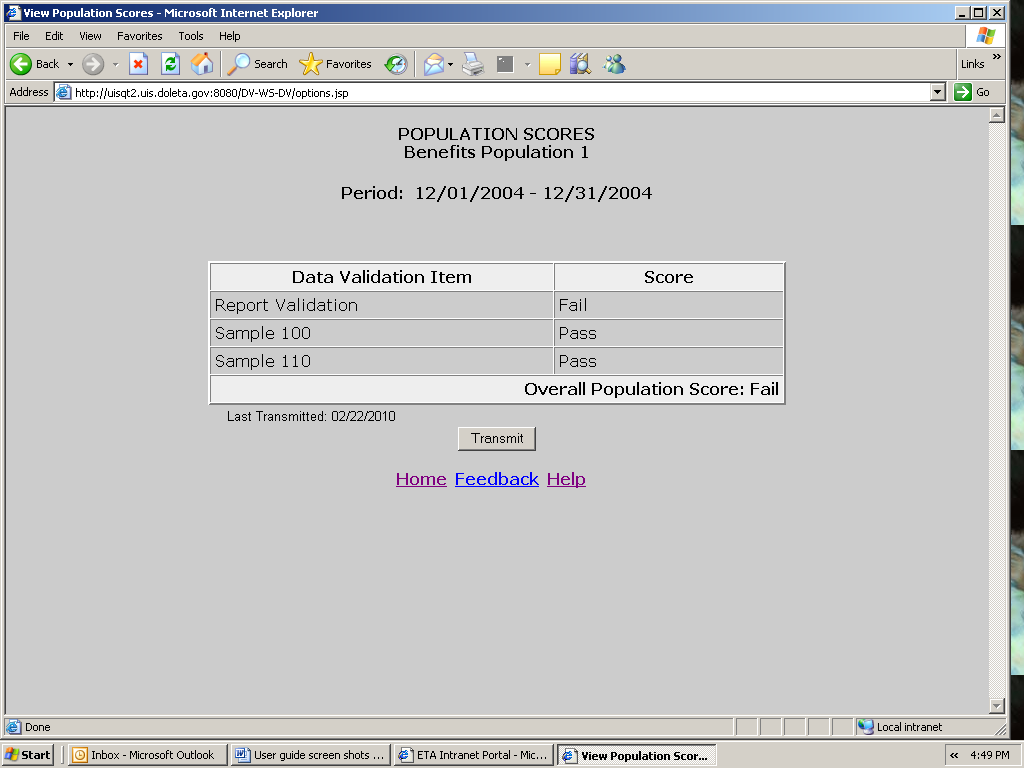

Click OK on the pop up window if you want to transmit the results. Click Cancel if you don’t.


You will get a message confirming that your results were submitted. Click OK.


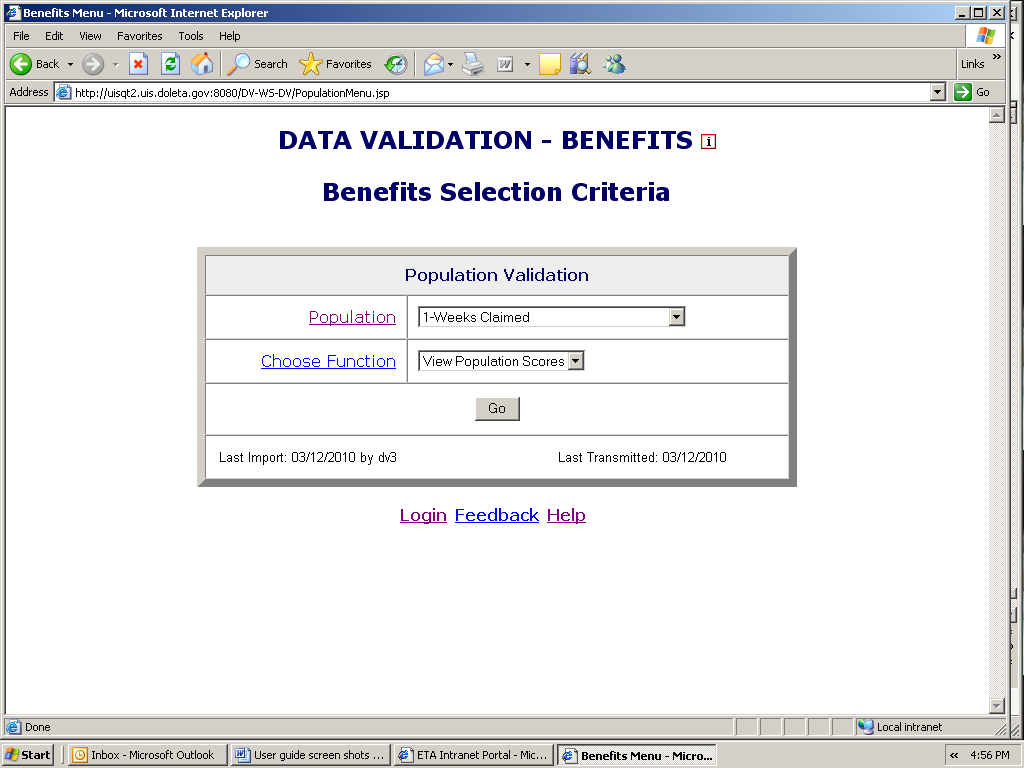
In the Population Scores of Benefits or Tax Selection Criteria screens, the Last Transmitted date should reflect the date when you last transmitted results for the population. If you have never submitted results the field would display “Never”.



Transmitting Wage Item Validation Results
You submit wage item validation results to DOL using the Transmit button at the bottom of the Wage Item Validation screen. To transmit wage item validation results follow the next steps.
Click on the Transmit button. The Transmit button is located at the bottom of the Wage Item Validation screen.


C![]() licking
the transmit button multiple times or closing the application before
the submission process is complete could cause problems with your
submission. Click only one time and wait until you get the window
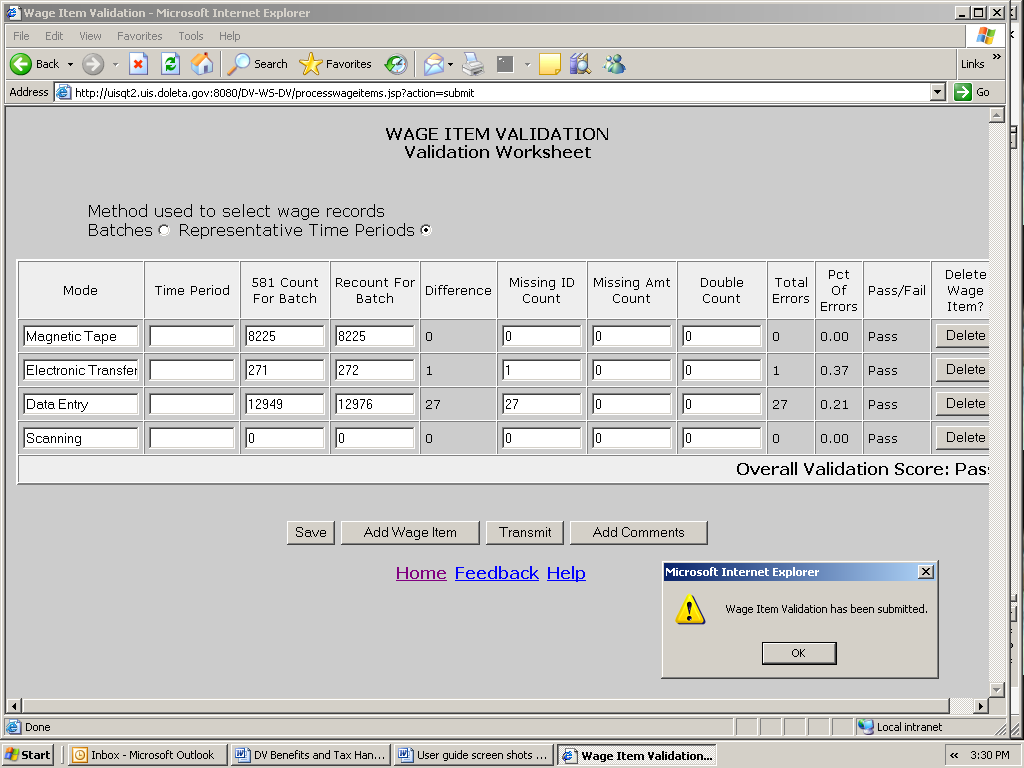
saying “Wage Item Validation has been submitted”.
licking
the transmit button multiple times or closing the application before
the submission process is complete could cause problems with your
submission. Click only one time and wait until you get the window
saying “Wage Item Validation has been submitted”.
Click OK on the pop up window if you want to transmit the results. Click Cancel if you don’t.
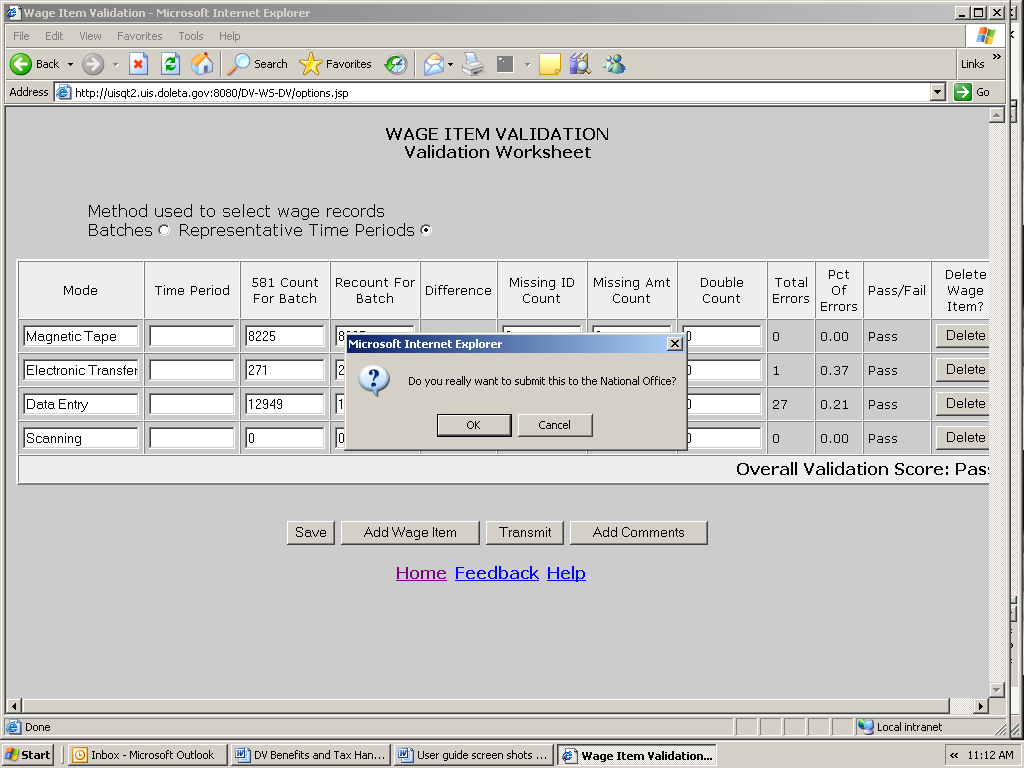

You will get a pop up window confirming your action. Click OK.

When you return to the Tax Selection Criteria screen, the Last Transmitted field at the bottom of the Other Validations box will be updated.

APPENDIX A
Explanation of ui benefits data formats
There are five types of data formats referred to in Appendix A.
1. Required. These fields cannot be blank. They may be mandatory dates and dollar values.
2. Text. These fields have text values that must be entered, such as UI, partial, voluntary quit, etc. All of the allowable generic text values for each field are listed in the record layout. The generic text values must be followed by a dash and the corresponding state-specific value.
3. Optional (these fields are gray in Appendix A). The software does not look at these fields at all. Any values can be entered or they can be left blank.
4. Must be blank. These are text or date fields where the presence of data indicates an error. Therefore, they must be left blank (such as monetary date where the subpopulation is for a claim with no monetary determination or a UCFE amount for a UI only payment).
5. Must be blank or 0. These are numeric fields where the presence of data other than “0” indicates an error.
Some values are abbreviated in the record layouts (Appendix A) but are shown in the report validation specifications (Appendix A) in their entirety for informational purposes.
Notes:
For most steps referenced in Appendix A column headers, Rule 1 is the indicator in the state system. However, if a state does not maintain the indicator specified in Rule 1, then the state programmer must review the other rules in that step in order to develop the required validation logic.
Unique ID is required for populations 2, 4, 6, 7, 8, 9, 10, and 11 and optional for populations 5, 12, 13, and 14 because not all states maintain the indicators for these four populations. There is no unique ID field for populations 1 and 3.
Federal Wages are required in certain situations. In population 4, for Joint UI/Federal payments UCFE amount and/or UCX amount is required. In population 4 for UCFE or UCFE/UCX payments, UCX amount is only required for joint UCFE and UCX claims. In populations 12, 13 and 14 federal amount is required for UI overpayments when there are also federal wages.
BENEFITS RECORD LAYOUT FOR POPULATION 1
This record layout provides the format for the validation extract file. The extract file type must be ASCII, comma delimited columns. Data must be in the order listed in the record layout. The data Format column indicates the generic values for text fields. These must be followed by a dash and the state-specific value. The Module 3 reference indicates the step where the state-specific values are documented.
Example: If the state-specific code for UI Program Type is 01, then the data format would be UI-01.
No. |
Field Name |
Module 3 Reference |
Field Description |
Data Format |
Data Type |
Constraint |
1 |
OBS |
|
State assigned sequential unique identifier for each record in the extract file. |
Number
- 00000000 |
INTEGER |
NOT NULL |
2 |
Claim Week-ending Date |
Step 1A - Rule 2 |
The week-ending date of the week claimed. |
Date
- MM/DD/YYYY |
DATE |
NOT NULL |
3 |
SSN |
Step 1A - Rule 1 |
Social Security Number |
Number
- 000000000 |
CHAR (9) |
NOT NULL |
4 |
Type of UI Program |
Regular UI: Step 2A - Rule 1 |
Regular UI claim. |
Text
- Regular UI |
CHAR (20) |
NOT NULL |
5 |
Program Type |
UI:
Step 4A - Rule 1 |
UI, UCFE, or UCX. |
Text
- UI |
CHAR (30) |
NOT NULL |
6 |
Intrastate/ |
Intrastate:
Step 5A - Rules 1 and 2 |
Intrastate, Interstate received as liable state, or Interstate filed from agent state. |
Text
- Intrastate |
CHAR (30) |
NOT NULL |
7 |
Date Week Claimed |
Step 11 - Rule 1 |
The date the week was claimed. |
Date
- MM/DD/YYYY |
DATE |
NOT NULL |
No. |
Field Name |
Module 3 Reference |
Field Description |
Data Format |
Data Type |
Constraint |
8 |
Monetarily Eligible or Pending |
Step 11 - Rule 2 |
Claimant is monetarily eligible for benefits when the week was claimed if: benefits have not been exhausted or monetary eligibility is pending, i.e. eligibility has not been finally determined. |
Text - EligiblePending(Optional) |
CHAR (30) |
|
9 |
Earnings |
Step 11 - Rule 3 |
Earnings for the week claimed except for interstate filed from agent state claims. |
Number
- 0000000.00 |
DECIMAL (9,2) |
|
10 |
WBA |
Step 11 - Rule 3 |
Weekly benefit allowance |
Number
- 0000000.00 |
DECIMAL (9,2) |
NOT NULL |
11 |
User |
|
User defined field. Can be used for any additional data element. Not mandatory. |
Text |
CHAR (100) |
|
BENEFITS RECORD LAYOUT FOR POPULATION 2
This record layout provides the format for the validation extract file. The extract file type must be ASCII, comma delimited columns. Data must be in the order listed in the record layout. The data Format column indicates the generic values for text fields. These must be followed by a dash and the state-specific value. The Module 3 reference indicates the step where the state-specific values are documented.
Example: If the state-specific code for UCFE is 5, then the data format would be UCFE-5.
No. |
Field Name |
Module 3 Reference |
Field Description |
Data Format |
Data Type |
Constraint |
1 |
OBS |
|
Sequential number, start at 1. Provides for a unique identifier for each record in the extract file. |
Number
- 00000000 |
INTEGER |
NOT NULL |
2 |
SSN |
Step 1C - Rule 1 |
Social Security Number |
Number
- 000000000 |
CHAR (9) |
NOT NULL |
3 |
Check
Number |
Step 1C - Rule 2 |
The check number or other unique ID. |
Number
- 0000000000 |
CHAR (30) |
NOT NULL |
4 |
Type of UI Program |
Regular UI: Step 2A - Rule 1 |
Regular UI claim. |
Text
- Regular UI |
CHAR (20) |
NOT NULL |
5 |
Program Type |
UI:
Step 4A - Rule 1 |
UI, UCFE or UCX. |
Text
- UI |
CHAR (30) |
NOT NULL |
6 |
MBA |
Step 9A and 9B - Rule 1 |
The maximum benefit allowance. |
Number
- 0000000.00 |
DECIMAL (9,2) |
NOT NULL |
7 |
WBA |
Step 7 - Rules 1 and 2 |
The weekly benefit allowance. |
Number
- 0000000.00 |
DECIMAL (9,2) |
NOT NULL |
8 |
Actual Weeks of Duration |
Step 9A - Rules 1 and 2 |
The number of actual weeks of duration of the claim. |
Number
- 00 |
INTEGER |
|
No. |
Field Name |
Module 3 Reference |
Field Description |
Data Format |
Data Type |
Constraint |
9 |
Maximum Weeks of Duration |
Steps 9B and 9C - Rule 1 |
The number of actual weeks of duration at the maximum or not. |
Text
- Y |
CHAR (20) |
|
10 |
Mail Date of Final Payment |
Step 10C - Rule 3 |
The mail date of the final payment. |
Date
- MM/DD/YYYY |
DATE |
NOT NULL |
11 |
Balance |
Step 10C - Rule 2 |
The balance left on the claim at the time of the final payment. |
Number - 0000000.00(Required) |
DECIMAL (9,2) |
NOT NULL |
12 |
User |
|
User defined field. Can be used for any additional data element. Not mandatory. |
Text |
CHAR (100) |
|
BENEFITS RECORD LAYOUT FOR POPULATION 3
This record layout provides the format for the validation extract file. The extract file type must be ASCII, comma delimited columns. Data must be in the order listed in the record layout. The data Format column indicates the generic values for text fields. These must be followed by a dash and the state-specific value. The Module 3 reference indicates the step where the state-specific values are documented.
Example: If the state-specific code for Transitional claim is T, then the data format would be TRANSITIONAL-5.
No. |
Field Name |
Module 3 Reference |
Field Description |
Data Format |
Data Type |
Constraint |
1 |
OBS |
|
State assigned sequential unique identifier for each record in the extract file. |
Number
- 00000000 |
INTEGER |
NOT NULL |
2 |
SSN |
Step 1B - Rule 1 |
Social Security Number |
Number
- 000000000 |
CHAR (9) |
NOT NULL |
3 |
Date Claim Filed/IB-4 Sent |
Step
3A - Rules 1 and 6 |
The date the claim was filed in person, by mail or telephone, or by other means. |
Date
- MM/DD/YYYY |
DATE |
NOT NULL |
4 |
Type of UI Program |
Regular UI: Step 2A - Rule 1 |
Regular UI claim. |
Text
- Regular UI |
CHAR (20) |
NOT NULL |
No. |
Field Name |
Module 3 Reference |
Field Description |
Data Format |
Data Type |
Constraint |
5 |
Type of Claim |
New: Step 3A - Rule 2Transitional: Step 3C - Rule 2Entering Self-Employment: Step 3D - Rule 2Additional: Step 3B - Rule 2Reopened: Step 3B - Rule 7New CWC claim:Step 3A - Rule 6New CWC claim filed in prior quarter: Step 3A - Rule 7New claim filed in prior quarter: Step 3A - Rule 5 |
New claim,Transitional claim,Entering self-employment,Additional claim,Reopened claim,New CWC claim,New CWC claim filed in a prior quarter, orNew claim filed in a prior quarter. |
Text - NewTransitional Entering Self-EmploymentAdditionalReopenedCWC NewPrior Qtr New CWCPrior Qtr New Claim(Required) |
CHAR (30) |
NOT NULL |
6 |
Program Type |
UI:
Step 4A - Rule 1 |
UI, UCFE or UCX. |
Text
- UI |
CHAR (30) |
|
No. |
Field Name |
Module 3 Reference |
Field Description |
Data Format |
Data Type |
Constraint |
7 |
Intrastate/ |
Intrastate:
Step 5A - |
Intrastate,
|
Text
- Intrastate |
CHAR (30) |
|
8 |
Date of Original Monetary |
Step
6A - Rules 1 and 2 |
Date the original determination was made on whether the claimant has sufficient base-period wages and/or employment to establish a benefit year. |
Date
- MM/DD/YYYY |
DATE |
|
No. |
Field Name |
Module 3 Reference |
Field Description |
Data Format |
Data Type |
Constraint |
9 |
Sufficient/ |
Sufficient
Wages: New |
The status of the new UI or CWC claim at the time the 218 report was run: Sufficient-new benefit year established; Sufficient-no new benefit year established; Insufficient; Sufficient-new CWC benefit year established. |
Text
- Insufficient |
CHAR (30) |
|
10 |
WBA |
Step 7 - Rules 1 and 2 |
Weekly benefit allowance is the maximum or less than maximum. |
Text
- Maximum |
CHAR (30) |
|
No. |
Field Name |
Module 3 Reference |
Field Description |
Data Format |
Data Type |
Constraint |
11 |
MBA |
Steps 8A and 8B - Rule 1 |
Maximum benefit allowance |
Number
- 0000000.00 |
DECIMAL (9,2) |
|
12 |
Potential Weeks of Duration |
Step 8A - Rule 1 |
The number of full weeks of benefits for which a claimant is determined to be eligible within a benefit year. |
Number
- 00 |
INTEGER |
|
No. |
Field Name |
Module 3 Reference |
Field Description |
Data Format |
Data Type |
Constraint |
13 |
Potential |
Step 8B - Rules 1 and 2 |
The duration of the benefit year is or is not the maximum for the State. |
Text
- Y |
CHAR (20) |
|
14 |
User |
|
User defined field. Can be used for any additional data element. Not mandatory. |
Text |
CHAR (100) |
|
BENEFITS RECORD LAYOUT FOR POPULATION 3a
This record layout provides the format for the validation extract file. The extract file type must be ASCII, comma delimited columns. Data must be in the order listed in the record layout. The data Format column indicates the generic values for text fields. These must be followed by a dash and the state-specific value. The Module 3 reference indicates the step where the state-specific values are documented.
Example: If the state-specific code for Additional Claim is A, then the data format would be ADDITIONAL-A.
No. |
Field Name |
Module 3 Reference |
Field Description |
Data Format |
Data Type |
Constraint |
1 |
OBS |
|
State assigned sequential unique identifier for each record in the extract file. |
Number
- 00000000 |
INTEGER |
NOT NULL |
2 |
SSN |
Step 1B - Rule 1 |
Social Security Number |
Number
- 000000000 |
CHAR (9) |
NOT NULL |
3 |
Date Claim Filed |
Step 3B - Rule 1 |
The date the claim was filed in person, by mail or telephone. |
Date
- MM/DD/YYYY |
DATE |
NOT NULL |
4 |
Type of UI Program |
Regular UI: Step 2A - Rule 1 |
Regular UI claim. |
Text
- Regular UI |
CHAR (20) |
NOT NULL |
5 |
Type of Claim |
Additional: Step 3B - Rule 2 |
Additional claim. |
Text
- Additional |
CHAR (20) |
NOT NULL |
6 |
Program Type |
UI:
Step 4A - Rule 1 |
Program type is UI, UCFE or UCX. |
Text
- UI |
CHAR (30) |
NOT NULL |
7 |
Intrastate/ Interstate |
Intrastate:
Step 5A - Rules 1 and 2 |
Claim is intrastate, or interstate received as liable. |
Text
- Intrastate |
CHAR (30) |
NOT NULL |
No. |
Field Name |
Module 3 Reference |
Field Description |
Data Format |
Data Type |
Constraint |
8 |
Unclaimed Week |
Step 3B - Rule 3 |
The week-ending date of the unclaimed week prior to the additional claim. |
Date
- MM/DD/YYYY |
DATE |
|
9 |
Separation Date |
Step 3B - Rule 4 |
The date of separation from an employer since the last claim was filed. |
Date - MM/DD/YYYY(Required) |
DATE |
NOT NULL |
10 |
Last Employer |
Step 3B - Rule 5 |
The name of the separating employer. |
Text |
CHAR (50) |
NOT NULL |
11 |
Separation Reason |
Step 3B - Rule 6 |
The reason for separation. |
Text |
CHAR (30) |
NOT NULL |
12 |
User |
|
User defined field. Can be used for any additional data element. Not mandatory. |
Text |
CHAR (100) |
|
BENEFITS RECORD LAYOUT FOR POPULATION 4
This record layout provides the format for the validation extract file. The extract file type must be ASCII, comma delimited columns. Data must be in the order listed in the record layout. The data Format column indicates the generic values for text fields. These must be followed by a dash and the state-specific value. The Module 3 reference indicates the step where the state-specific values are documented.
Example: If the state-specific code for Adjustment payment is 13, then the data format would be ADJUSTMENT-13.
No. |
Field Name |
Module 3 Reference |
Field Description |
Data Format |
Data Type |
Constraint |
1 |
OBS |
|
State assigned sequential unique identifier for each record in the extract file. |
Number
- 00000000 |
INTEGER |
NOT NULL |
2 |
SSN |
Step 1C - Rule 1 |
Social Security Number |
Number
- 000000000 |
CHAR (9) |
NOT NULL |
3 |
Check
Number |
Step 1C - Rule 2 |
The check number ID or other unique check ID. For offsets assign a unique ID number. |
Number
- 0000000000 |
CHAR (30) |
NOT NULL |
4 |
Type of UI Program |
Regular UI: Step 2A - Rule 1 |
Regular UI claim. |
Text
- Regular UI |
CHAR (20) |
NOT NULL |
5 |
Program Type |
UI:
Step 4A - Rule 1 |
Type of Program is UI only, UCFE, UCFE/UCX, UCX only, Joint UI/Federal, or Self-Employment. |
Text
- UI Only |
CHAR (30) |
|
No. |
Field Name |
Module 3 Reference |
Field Description |
Data Format |
Data Type |
Constraint |
6 |
Intrastate/ Interstate |
Intrastate: Step 5A - Rule 1Interstate Received as Liable State: Step 5B - Rule 1Intrastate CWC:Step 5E - Rule 1Interstate CWC:Step 5F - Rule 1 |
Intrastate, Interstate, Intrastate CWC, or Interstate CWC claim. |
Text - InterstateIntrastateIntrastate CWC Interstate CWC(Required except optional for UCFE only, UCFE/UCX, and UCX only adjustments) |
CHAR (30) |
|
7 |
Type of Compensation |
First:
Step 10A - Rule 1 |
First Payment, Continued Payment, Adjustment, Self-Employment, Prior Weeks Compensated. |
Text
- First Payment |
CHAR (50) |
NOT NULL |
8 |
Partial/Total |
Partial:
Step 10D - Rule 1 |
Week of partial or total unemployment. |
Text
- Partial |
CHAR (20) |
|
9 |
Earnings |
Step
10D - Rule 2 |
The earnings for the week claimed. |
Number
- 0000000.00 |
DECIMAL (9,2) |
|
No. |
Field Name |
Module 3 Reference |
Field Description |
Data Format |
Data Type |
Constraint |
10 |
WBA |
Step
10D - Rule 3 |
The weekly benefit allowance. |
Number
- 0000000.00 |
DECIMAL (9,2) |
|
11 |
UI Amount |
Step 12A - Rule 1 |
The amount of benefits paid from State Unemployment Funds. |
Number
- 0000000.00 |
DECIMAL (9,2) |
|
12 |
UCFE Amount |
Step 12B - Rule 1 |
The amount of benefits paid from Federal Funds. |
Number
- 0000000.00 |
DECIMAL (9,2) |
|
13 |
UCX Amount |
Step 12C - Rule 1 |
The amount of benefits paid from military funds. |
Number
- 0000000.00 |
DECIMAL (9,2) |
|
No. |
Field Name |
Module 3 Reference |
Field Description |
Data Format |
Data Type |
Constraint |
14 |
CWC Amount |
Step 12D - Rule 1 |
The amount of benefits paid for a combined wage claim payment. |
Number
- 0000000.00 |
DECIMAL (9,2) |
|
15 |
Self-Employ Amount |
Step 12E - Rule 1 |
The total dollars paid under the SEA program. |
Number
- 0000000.00 |
DECIMAL (9,2) |
|
16 |
Week End Date |
Step 13 - Rule 1 |
The week-ending date of the week compensated. |
Date
- MM/DD/YYYY |
DATE |
|
17 |
Mail Date |
Step 14 - Rule 1 |
The date on which the payment is actually mailed to the claimant. |
Date
- MM/DD/YYYY |
DATE |
NOT NULL |
18 |
User |
|
User defined field. Can be used for any additional data element. Not mandatory. |
Text |
CHAR (100) |
|
BENEFITS RECORD LAYOUT FOR POPULATION 5
This record layout provides the format for the validation extract file. The extract file type must be ASCII, comma delimited columns. Data must be in the order listed in the record layout. The data Format column indicates the generic values for text fields. These must be followed by a dash and the state-specific value. The Module 3 reference indicates the step where the state-specific values are documented.
Example: If the state-specific code for UI Program Type is 01, then the data format would be UI-01
No. |
Field Name |
Module 3 Reference |
Field Description |
Data Format |
Data Type |
Constraint |
1 |
OBS |
|
State assigned sequential unique identifier for each record in the extract file. |
Number
- 00000000 |
INTEGER |
NOT NULL |
2 |
SSN |
Step 1D - Rule 1 |
Social Security Number |
Number
- 000000000 |
CHAR (9) |
NOT NULL |
3 |
Issue
Number |
Step 1D - Rule 2 |
The unique issue number or other unique number assigned to the nonmonetary determination. |
Number
- 000000 |
CHAR (50) |
|
4 |
Type of UI Program |
Regular
UI: Step 2A - Rule 1 |
Regular UI claim or Workshare claim. |
Text
- Regular UI |
CHAR (20) |
NOT NULL |
5 |
Program Type |
UI:
Step 4A - Rule 1 |
UI, UCFE, or UCX. |
Text
- UI |
CHAR (30) |
|
No. |
Field Name |
Module 3 Reference |
Field Description |
Data Format |
Data Type |
Constraint |
6 |
Intrastate/ Interstate |
Intrastate:
Step 5A - Rule 1 |
Intrastate or interstate. |
Text
- Intrastate |
CHAR (30) |
|
7 |
Determination/ Redetermination |
Step 16A - Rule 1Step 16B - Rule 1 |
The decision made by the authority on an issue was a determination or redetermination. |
Text - Determination Redetermination (Required) |
CHAR (30) |
NOT NULL |
8 |
Type of Determination |
Step
17A - Rules 1 and 2 |
The determination was based upon facts related to an individual situation or to groups of similarly situated individuals. |
Text
- Single |
CHAR (20) |
NOT NULL |
No. |
Field Name |
Module 3 Reference |
Field Description |
Data Format |
Data Type |
Constraint |
9 |
Issue Types |
VL:
Step 18A - Rule 1 |
The
separating issue was voluntary leaving, |
Text
- VL |
CHAR (50) |
NOT NULL |
10 |
First Week Affected |
Step 19 - Rules 1 and 2 |
The week-ending date of the first week in a claim series to which a notice of nonmonetary determination applies. |
Date
- MM/DD/YYYY |
DATE |
|
11 |
Detection Date |
Step 20 - Rule 1 |
The earliest date that the agency is in possession of information indicating the existence of a nonmonetary issue. |
Date
- MM/DD/YYYY |
DATE |
|
No. |
Field Name |
Module 3 Reference |
Field Description |
Data Format |
Data Type |
Constraint |
12 |
Notice Date |
Step 21 - Rule 1 |
The date the determination notice is mailed or, if no notice is required, the date payment is authorized, waiting week credit is given, or an offset is applied. |
Date
- MM/DD/YYYY |
DATE |
NOT NULL |
13 |
Allow or Deny |
Step
23A - Rules 1 and 2 |
The outcome of the nonmonetary determination was an allow or a deny. |
Text
- Allow |
CHAR (20) |
NOT NULL |
14 |
User |
|
User defined field. Can be used for any additional data element. Not mandatory. |
Text |
CHAR (100) |
|
BENEFITS RECORD LAYOUT FOR POPULATION 6
This record layout provides the format for the validation extract file. The extract file type must be ASCII, comma delimited columns. Data must be in the order listed in the record layout. The data Format column indicates the generic values for text fields. These must be followed by a dash and the state-specific value. The Module 3 reference indicates the step where the state-specific values are documented.
Example: If the state-specific code for Single Claimant is N, then the data format would be S-N.
No. |
Field Name |
Module 3 Reference |
Field Description |
Data Format |
Data Type |
Constraint |
1 |
OBS |
|
State assigned sequential unique identifier for each record in the extract file. |
Number
- 00000000 |
INTEGER |
NOT NULL |
2 |
SSN |
Step 1E - Rule 1 |
Social Security Number |
Number
- 000000000 |
CHAR (9) |
NOT NULL |
3 |
Docket
Number |
Step 1E - Rule 2 |
The Docket Number of the lower authority appeal. |
Number
- 0000000000 |
CHAR (30) |
NOT NULL |
4 |
Appeal Level |
Step 24A - Rule 1 |
The appeal type was a lower authority appeal. |
Text
- Lower |
CHAR (20) |
NOT NULL |
5 |
Type
of Appeal |
Single:
Step 25A - Rule 1 |
The appeals case involves one or more than one claimant. |
Text
- S |
CHAR (20) |
NOT NULL |
No. |
Field Name |
Module 3 Reference |
Field Description |
Data Format |
Data Type |
Constraint |
6 |
Number of Claimants |
Step 25B - Rules 3 and 5 |
The number of claimants in a multiclaimant appeal.If the State stores a single record for a multi-claimant appeal with a field for the number of claimants, insert the number in this field. If the State stores a record for each claimant involved in a multi-claimant appeal, include all of the records in the file and insert a '1' in this field. |
Number => 1(Required for mutiple claimant appeals; optional for single claimant appeals) |
INTEGER |
|
7 |
Filed Date |
Step 32 - Rule 1 |
The date on which the appeal was filed. |
Date
- MM/DD/YYYY |
DATE |
NOT NULL |
8 |
User |
|
User defined field. Can be used for any additional data element. Not mandatory. |
Text |
CHAR (100) |
|
BENEFITS RECORD LAYOUT FOR POPULATION 7
This record layout provides the format for the validation extract file. The extract file type must be ASCII, comma delimited columns. Data must be in the order listed in the record layout. The data Format column indicates the generic values for text fields. These must be followed by a dash and the state-specific value. The Module 3 reference indicates the step where the state-specific values are documented.
Example: If the state-specific code for Higher Authority Appeal is B, then the data format would be Higher-B.
No. |
Field Name |
Module 3 Reference |
Field Description |
Data Format |
Data Type |
Constraint |
1 |
OBS |
|
State assigned sequential unique identifier for each record in the extract file. |
Number
- 00000000 |
INTEGER |
NOT NULL |
2 |
SSN |
Step 1F - Rule 1 |
Social Security Number |
Number
- 000000000 |
CHAR (9) |
NOT NULL |
3 |
Docket
Number |
Step 1F - Rule 2 |
The Docket Number of the higher authority appeal. |
Number
- 0000000000 |
CHAR (30) |
NOT NULL |
4 |
Appeal Level |
Step 24B - Rule 1 |
The appeal type was a higher authority appeal. |
Text
- Higher |
CHAR (20) |
NOT NULL |
5 |
Type
of Appeal |
Single:
Step 25A - Rule 1 |
The appeals case involves one or more than one claimant. |
Text
- S |
CHAR (20) |
NOT NULL |
No. |
Field Name |
Module 3 Reference |
Field Description |
Data Format |
Data Type |
Constraint |
6 |
Number of Claimants |
Step 25B - Rules 3 and 5 |
The number of claimants in a multiclaimant appeal. If the State stores a single record for a multi-claimant appeal with a field for the number of claimants, insert the number in this field. If the State stores a record for each claimant involved in a multi-claimant appeal, include all of the records in the file and insert a '1' in this field. |
Number => 1(Required for multiple claimant appeals; optional for single claimant appeals) |
INTEGER |
|
7 |
Filed Date |
Step 32 - Rule 1 |
The date on which the appeal was filed. |
Date
- MM/DD/YYYY |
DATE |
NOT NULL |
8 |
User |
|
User defined field. Can be used for any additional data element. Not mandatory. |
Text |
CHAR (100) |
|
BENEFITS RECORD LAYOUT FOR POPULATION 8
This record layout provides the format for the validation extract file. The extract file type must be ASCII, comma delimited columns. Data must be in the order listed in the record layout. The data Format column indicates the generic values for text fields. These must be followed by a dash and the state-specific value. The Module 3 reference indicates the step where the state-specific values are documented.
Example: If the state-specific code for UI Program Type is 01, then the data format would be UI-01.
No. |
Field Name |
Module 3 Reference |
Field Description |
Data Format |
Data Type |
Constraint |
1 |
OBS |
|
State assigned sequential unique identifier for each record in the extract file. |
Number
- 00000000 |
INTEGER |
NOT NULL |
2 |
SSN |
Step 1E - Rule 1 |
Social Security Number |
Number
- 000000000 |
CHAR (9) |
NOT NULL |
3 |
Docket
Number |
Step 1E - Rule 2 |
The Docket Number or other unique ID assigned to the appeal. |
Number
- 0000000000 |
CHAR (30) |
NOT NULL |
4 |
Type of UI Program |
Regular
UI: Step 2A - Rule 1 |
Regular UI claim or Workshare claim. |
Text
- Regular UI |
CHAR (20) |
NOT NULL |
5 |
Program Type |
UI:
Step 4A - Rule 1 |
UI, UCFE, or UCX. |
Text
- UI |
CHAR (20) |
NOT NULL |
6 |
Intrastate/ |
Intrastate:
Step 5A - |
Intrastate or Interstate. |
Text
- Intrastate |
CHAR (30) |
NOT NULL |
7 |
Appeal Level |
Step 24A - Rule 1 |
The appeal type is a lower authority appeal. |
Text
- Lower |
CHAR (20) |
NOT NULL |
No. |
Field Name |
Module 3 Reference |
Field Description |
Data Format |
Data Type |
Constraint |
8 |
Type of Appeal (Single or Multiclaimant) |
Single: Step 25A – Rule 1 Multi: Step 25B - Rule 1 |
The determination is based upon facts related to an individual situation or to groups of similarly situated individuals.
States which maintain a single record for multi-claimant appeals with a field for the number of claimants involved should insert a text prefix of 'M-1' for a multi-claimant appeal with only one record for the whole appeal.
States which maintain multiple records (one for each claimant) for a multi-claimant appeal should designate one of the records as the lead claimant. States should insert a text prefix of 'M-Lead’ in this field for the lead claimant record. Both of these types of records will be assigned to subpopulations 8.45 to 8.52 (lower) or 9.13 to 9.20 (higher). States which maintain multiple records should insert a prefix of 'M-Nonlead' in the multi-claimant field for the non-lead claimants. These records will be assigned to subpopulations 8.53 (lower) or 9.21 (higher). |
Text - S M-1 M-Lead M-Nonlead (Required) |
CHAR (20) |
NOT NULL |
No. |
Field Name |
Module 3 Reference |
Field Description |
Data Format |
Data Type |
Constraint |
9 |
Number
of |
Step 25B - Rules 3 and 5 |
The number of claimants involved in a multiclaimant appeal (could be one if separate records are provided for each participating claimant) |
Number
=> 1 |
INTEGER |
|
10 |
Appellant |
Claimant:
Step 26A - Rule 1 |
The appellant is the claimant, employer, or other than claimant or employer. |
Text
- Claimant |
CHAR (20) |
|
11 |
In Favor of Appellant |
In
Favor: Step 27A - Rule 1 |
The decision was or was not in favor of the appellant. |
Text
- Y |
CHAR (20) |
|
12 |
Filed Date |
Step 32 - Rule 1 |
The date on which the appeal was filed. |
Date
- MM/DD/YYYY |
DATE |
NOT NULL |
13 |
Decision Date |
Step 28 - Rule 1 |
The date the decision was mailed to the interested parties concerned. |
Date
- MM/DD/YYYY |
DATE |
NOT NULL |
14 |
Disposed of by Decision |
By
Decision: Step 30A - |
The appeals case was disposed of by a written ruling. |
Text
- Y |
CHAR (20) |
|
No. |
Field Name |
Module 3 Reference |
Field Description |
Data Format |
Data Type |
Constraint |
15 |
Issue Code |
VL:
Step 31A - Rule 1 |
The issue code of the appeal was voluntary leaving, misconduct, refusal of suitable work, able and available to work, other issues, or labor dispute. |
Text
- VL |
CHAR (30) |
|
16 |
User |
|
User defined field. Can be used for any additional data element. Not mandatory. |
Text |
CHAR (100) |
|
BENEFITS RECORD LAYOUT FOR POPULATION 9
This record layout provides the format for the validation extract file. The extract file type must be ASCII, comma delimited columns. Data must be in the order listed in the record layout. The data Format column indicates the generic values for text fields. These must be followed by a dash and the state-specific value. The Module 3 reference indicates the step where the state-specific values are documented.
Example: If the state-specific code for In Favor Of is F, then the data format would be Y-F.
No. |
Field Name |
Module 3 Reference |
Field Description |
Data Format |
Data Type |
Constraint |
1 |
OBS |
|
State assigned sequential unique identifier for each record in the extract file. |
Number
- 00000000 |
INTEGER |
NOT NULL |
2 |
SSN |
Step 1F - Rule 1 |
Social Security Number |
Number
- 000000000 |
CHAR (9) |
NOT NULL |
3 |
Docket
Number |
Step 1F - Rule 2 |
The Docket ID or other unique number assigned to the appeal. |
Number
- 0000000000 |
CHAR(30) |
NOT NULL |
4 |
Type of UI Program |
Regular
UI: Step 2A - Rule 1 |
Regular UI claim or Workshare claim. |
Text
- Regular UI |
CHAR(20) |
NOT NULL |
5 |
Program Type |
UI:
Step 4A - Rule 1 |
UI, UCFE, or UCX. |
Text
- UI |
CHAR (20) |
NOT NULL |
6 |
Intrastate/ |
Intrastate:
Step 5A - Rules 1 and 2 |
Intrastate or interstate. |
Text
- Intrastate |
CHAR (20) |
|
7 |
Appeal Level |
Step 24B - Rule 1 |
The appeal is a higher authority appeal. |
Text
- Higher |
CHAR (20) |
NOT NULL |
No. |
Field Name |
Module 3 Reference |
Field Description |
Data Format |
Data Type |
Constraint |
8 |
Type of Appeal (Single or Multiclaimant) |
Single: Step 25A - Rule 1Multi: Step 25B - Rule1 |
The determination is based upon facts related to an individual situation or to groups of similarly situated individuals.
States which maintain a single record for multi-claimant appeals with a field for the number of claimants involved should insert a text prefix of 'M-1' for a multi-claimant appeal with only one record for the whole appeal.
States which maintain multiple records (one for each claimant) for a multi-claimant appeal should designate one of the records as the lead claimant. States should insert a text prefix of 'M-Lead’ in this field for the lead claimant record. Both of these types of records will be assigned to subpopulations 8.45 to 8.52 (lower) or 9.13 to 9.20 (higher). States which maintain multiple records should insert a prefix of 'M-Nonlead' in the multi-claimant field for the non-lead claimants. These records will be assigned to subpopulations 8.53 (lower) or 9.21 (higher). |
Text - SM-1M-LeadM-Nonlead (Required) |
CHAR (20) |
NOT NULL |
No. |
Field Name |
Module 3 Reference |
Field Description |
Data Format |
Data Type |
Constraint |
9 |
Number of Claimants in Multiclaimant Appeal |
Step 25B - Rules 3 and 5 |
The number of claimants involved in a multiclaimant appeal (could be one if separate records are provided for each participating claimant) |
Number
=> 1 |
INTEGER |
|
10 |
Appellant |
Claimant:
Step 26A - Rule 1 |
The appellant is the claimant, employer, or other than claimant or employer. |
Text
- Claimant |
CHAR (30) |
|
11 |
In Favor of Appellant |
In
Favor: Step 27A - Rule 1 |
The decision was or was not in favor of the appellant. |
Text
- Y |
CHAR (20) |
|
12 |
Filed Date |
Step 32 - Rule 1 |
The date on which the appeal was filed. |
Date
- MM/DD/YYYY |
DATE |
NOT NULL |
13 |
Decision Date |
Step 28 - Rule 1 |
The date the decision was mailed to the interested parties concerned. |
Date
- MM/DD/YYYY |
DATE |
NOT NULL |
14 |
Disposed of by Decision |
By
Decision: Step 30A - |
The appeals case was disposed of by a written ruling. |
Text
- Y |
CHAR (20) |
|
No. |
Field Name |
Module 3 Reference |
Field Description |
Data Format |
Data Type |
Constraint |
15 |
User |
|
User defined field. Can be used for any additional data element. Not mandatory. |
Text |
CHAR (100) |
|
BENEFITS RECORD LAYOUT FOR POPULATION 10
This record layout provides the format for the validation extract file. The extract file type must be ASCII, comma delimited columns. Data must be in the order listed in the record layout. The data Format column indicates the generic values for text fields. These must be followed by a dash and the state-specific value. The Module 3 reference indicates the step where the state-specific values are documented.
Example: If the state-specific code for Lower Authority Appeal is 100, then the data format would be LOWER-100.
No. |
Field Name |
Module 3 Reference |
Field Description |
Data Format |
Data Type |
Constraint |
1 |
OBS |
|
State assigned sequential unique identifier for each record in the extract file. |
Number
- 00000000 |
INTEGER |
NOT NULL |
2 |
SSN |
Step 1E - Rule1 |
Social Security Number |
Number
- 000000000 |
CHAR (9) |
NOT NULL |
3 |
Docket
Number |
Step 1E - Rule 2 |
The Docket Number or other unique number assigned to the appeal. |
Number
- 0000000000 |
CHAR (30) |
NOT NULL |
4 |
Appeal Level |
Step 24A - Rule 1 |
The appeal was a lower authority appeal. |
Text
- Lower |
CHAR (20) |
NOT NULL |
5 |
Appeal Pending |
Step 30B - Rule 1 |
No decision has been made on an appeal. |
Text
- No Decision |
CHAR (30) |
|
6 |
Filed Date |
Step 32 - Rule 1 |
The date on which the appeal was filed. |
Date
- MM/DD/YYYY |
DATE |
NOT NULL |
7 |
User |
|
User defined field. Can be used for any additional data element. Not mandatory. |
Text |
CHAR (100) |
|
BENEFITS RECORD LAYOUT FOR POPULATION 11
This record layout provides the format for the validation extract file. The extract file type must be ASCII, comma delimited columns. Data must be in the order listed in the record layout. The data Format column indicates the generic values for text fields. These must be followed by a dash and the state-specific value. The Module 3 reference indicates the step where the state-specific values are documented.
Example: If the state-specific code for Higher Authority Appeal is 200, then the data format would be Higher-200.
No. |
Field Name |
Module 3 Reference |
Field Description |
Data Format |
Data Type |
Constraint |
1 |
OBS |
|
State assigned sequential unique identifier for each record in the extract file. |
Number
- 00000000 |
INTEGER |
NOT NULL |
2 |
SSN |
Step 1F - Rule 1 |
Social Security Number |
Number
- 000000000 |
CHAR (9) |
NOT NULL |
3 |
Docket
Number |
Step 1F - Rule 2 |
The Docket Number or other unique number assigned to the appeal. |
Number
- 0000000000 |
CHAR (30) |
NOT NULL |
4 |
Appeal Level |
Step 24B - Rule 1 |
The appeal was a higher authority appeal. |
Text
- Higher |
CHAR (20) |
NOT NULL |
5 |
Appeal Pending |
Step 30B - Rule 1 |
No decision has been made on an appeal. |
Text
- No Decision |
CHAR (30) |
|
6 |
Filed Date |
Step 32 - Rule 1 |
The date on which the appeal was filed. |
Date
- MM/DD/YYYY |
DATE |
NOT NULL |
7 |
User |
|
User defined field. Can be used for any additional data element. Not mandatory. |
Text |
CHAR (100) |
|
BENEFITS RECORD LAYOUT FOR POPULATION 12
This record layout provides the format for the validation extract file. The extract file type must be ASCII, comma delimited columns. Data must be in the order listed in the record layout. The data Format column indicates the generic values for text fields. These must be followed by a dash and the state-specific value. The Module 3 reference indicates the step where the state-specific values are documented.
Example: If the state-specific code for Fraud is F, then the data format would be FRAUD-F.
No. |
Field Name |
Module 3 Reference |
Field Description |
Data Format |
Data Type |
Constraint |
1 |
OBS |
|
State assigned sequential unique identifier for each record in the extract file. |
Number
- 00000000 |
INTEGER |
NOT NULL |
2 |
SSN |
Step 1G - Rule 1 |
Social Security Number |
Number
- 000000000 |
CHAR (9) |
NOT NULL |
3 |
Unique ID |
Step 1G - Rule 2 |
The unique ID of the overpayment. |
Number
- 0000000000 |
CHAR (30) |
|
4 |
Program Type |
UI:
Step 4A - Rule 1 EB: Step 4F – Rule 1 |
Type of program is UI, UCFE, or UCX or EB. |
Text – UI, UCFE, UCX, EB (Required) |
CHAR (30) |
NOT NULL |
5 |
Type of Overpayment |
Fraud:
Step 33A - Rule 1 |
The type of overpayment is Fraud, Nonfraud or Penalty. |
Text
- Fraud |
CHAR (20) |
NOT NULL |
No. |
Field Name |
Module 3 Reference |
Field Description |
Data Format |
Data Type |
Constraint |
6 |
Cause of Overpayment |
Multi
Claimant Scheme: Agency Employee Benefit Fraud: Step 34I – Rule 1 Reversal (JAVA): Step 34B – Rule 1 State Agency: Step 34C – Rule 1 Employer: Step 34D – Rule 1 Claimant: Step 34E – Rule 1 Other: Step 34F – Rule 1 and 3 Penalty: Step 34G – Rule 1
|
The cause of the overpayment was a fraud committed by Multi Claimant Scheme, Single Claimant, or Agency Employee; or a nonfraud by Reversals, State Agency Errors, Employer Errors, Claimant Errors, or Other cause. |
Text
– Multiclaimant; Single Claimant; Agency Employee;
Reversals; State Agency; Employer; Claimant; Other |
CHAR (30) |
|
7 |
Date Established |
Step 36 - Rule 1 |
The date that the overpayment was established. |
Date
- MM/DD/YYYY |
DATE |
NOT NULL |
8 |
UI Amount |
Step 37A - Rule 1 |
The amount of benefits paid from State Unemployment Funds. |
Number
- 0000000.00 |
DECIMAL (9,2) |
|
9 |
Federal Amount |
Step 37B - Rule 1 |
The amount of benefits paid from Federal Funds. |
Number
- 0000000.00
|
DECIMAL (9,2) |
|
10 |
EB Amount |
Step 37C – Rule 1 |
The amount of benefits paid through the permanent Extended Benefits (EB) program. |
Number – 000000000.00 (Required for EB claims; must be blank or 0 for UI or UCFE or UCX claims)
|
CHAR (100) |
|
No. |
Field Name |
Module 3 Reference |
Field Description |
Data Format |
Data Type |
Constraint |
11 |
Accumulated UI Amount |
Step 45A
|
The UI fraud or nonfraud overpayment amount that the UI claim has accumulated from previous quarters and that is used to calculate a High Dollar Overpayment. If in the previous quarter the claim was classified as a High Dollar Overpayment, then the accumulated amount is reset to 0. |
Number – 0000000.00 (Required for UI claims; must be blank or 0 for UCFE or UCX or EB claims) |
DECIMAL (9.2) |
|
12 |
Accumulated Federal Amount |
Step 45B |
The Federal fraud or nonfraud overpayment amount that the UCFE, UCX or joint claim has accumulated from previous quarters and that is used to calculate a High Dollar Overpayment. If in previous quarter the claim was classified as a High Dollar Overpayment, then the accumulated amount is reset to 0.
|
Number – 0000000.00 (Required for UCFE, UCX, or joint claims; must be blank or 0 for UI or EB claims) |
DECIMAL (9.2) |
NOT NULL |
13 |
Accumulated EB Amount |
Step 45C |
The EB fraud or nonfraud overpayment amount that the EB claim has accumulated from previous quarters and that is used to calculate a High Dollar Overpayment. If in previous quarter the claim was classified as a High Dollar Overpayment, then the accumulated amount is reset to 0.
|
Number
- 000000000.00 |
DECIMAL (9,2) |
|
14 |
Date of Original Monetary |
Step 6A – Rules 1 and 3 Step 6B – Rule 1 |
Date the original determination was made on whether the claimant has sufficient base-period wages and/or employment to establish a benefit year. |
Date – MM/DD/YYYY (Required) |
DATE |
NOT NULL |
No. |
Field Name |
Module 3 Reference |
Field Description |
Data Format |
Data Type |
Constraint |
15 |
User |
|
User defined field. Can be used for any additional data element. Not mandatory. |
CHAR (100) Text (Optional) |
|
|
BENEFITS RECORD LAYOUT FOR POPULATION 13
This record layout provides the format for the validation extract file. The extract file type must be ASCII, comma delimited columns. Data must be in the order listed in the record layout. The data Format column indicates the generic values for text fields. These must be followed by a dash and the state-specific value. The Module 3 reference indicates the step where the state-specific values are documented.
Example: If the state-specific code for Recovered Cash is C, then the data format would be CASH-C.
No. |
Field Name |
Module 3 Reference |
Field Description |
Data Format |
Data Type |
Constraint |
1 |
OBS |
|
State assigned sequential unique identifier for each record in the extract file. |
Number
- 00000000 |
INTEGER |
NOT NULL |
2 |
SSN |
Step 1H - Rule 1 |
Social Security Number |
Number
- 000000000 |
CHAR (9) |
NOT NULL |
3 |
Unique ID |
Step 1H - Rule 2 |
The unique ID of the overpayment. |
Number
- 0000000000 |
CHAR (30) |
|
4 |
Program Type |
UI:
Step 4A - Rule 1 EB: Step 4F – Rule 1 |
The program type is UI, UCFE, UCX or EB. |
Text
- UI EB |
CHAR (30) |
NOT NULL |
5 |
Type of Overpayments |
Fraud:
Step 33A - Rule 1 |
The type of overpayment is Fraud or Nonfraud. |
Text
- Fraud |
CHAR (20) |
NOT NULL |
No. |
Field Name |
Module 3 Reference |
Field Description |
Data Format |
Data Type |
Constraint |
6 |
Type of Reconciliation Activity |
Recovered Cash: Step 38A -Rule 1 Recovered Offset: Step 38B - Rule 1 State Income Tax Offset: Step 38C - Rule 1 By Other State: Step 38D - Rule 1 Write-Off: Step 38G - Rule 1 Waived: Step 38F - Rule 1 Additions: Step 38H - Rule 1 Subtractions: Step 38I - Rule 1 Other: Step 38E - Rule 1 Federal Income Tax Offset: Step 38J – Rule 1 |
The reconciliation activity was cash, benefit offset, state income tax offset, Federal Income tax offset, other states, write-off, waived addition, or subtraction. |
Text - Cash Benefit Offset State Tax Offset Federal Tax Offset By Other State Write-off Waived Addition Subtraction Other (Required) |
CHAR (30) |
NOT NULL |
7 |
Date of Reconciliation Activity |
Step 39 - Rule 1 |
Indicate the date of the Overpayment Activity. |
Date
- MM/DD/YYYY |
DATE |
NOT NULL |
8 |
UI Reconciliation Amount |
Step 40A - Rule 1 |
The reconciled amount of State Unemployment Funds. |
Number
- 0000000.00 |
DECIMAL (9,2) |
|
9 |
Federal Reconciliation Amount |
Step 40B - Rule 1 |
The reconciled amount of Federal Funds. |
Number
- 0000000.00 |
DECIMAL (9,2) |
|
No. |
Field Name |
Module 3 Reference |
Field Description |
Data Format |
Data Type |
Constraint |
10 |
EB Reconciliation Amount |
Step 40C – Rule 1 |
The reconciled amount of Extended benefits funds. |
Number – 0000000.00 (Required for EB) |
DECIMAL (9.2) |
|
11 |
User |
|
User defined field. Can be used for any additional data element. Not mandatory. |
Text |
CHAR (100) |
|
BENEFITS RECORD LAYOUT FOR POPULATION 14
This record layout provides the format for the validation extract file. The extract file type must be ASCII, comma delimited columns. Data must be in the order listed in the record layout. The data Format column indicates the generic values for text fields. These must be followed by a dash and the state-specific value. The Module 3 reference indicates the step where the state-specific values are documented.
Example: If the state-specific code for Nonfraud is NF, then the data format would be NONFRUAD-NF.
No. |
Field Name |
Module 3 Reference |
Field Description |
Data Format |
Data Type |
Constraint |
1 |
OBS |
|
State assigned sequential unique identifier for each record in the extract file.
|
Number
- 00000000 |
INTEGER |
NOT NULL |
2 |
SSN |
Step 1G - Rule 1 |
Social Security Number
|
Number
- 000000000 |
CHAR (9) |
NOT NULL |
3 |
Unique ID |
Step 1G - Rule 2 |
The unique ID of the overpayment.
|
Number
- 0000000000 |
CHAR (30) |
|
4 |
Date Established |
Step 36 - Rule 1 |
The date the overpayment was established |
Date
- MM/DD/YYYY |
DATE |
NOT NULL |
5 |
Program Type |
UI:
Step 4A - Rule 1 EB: Step 4F – Rule 1 |
The program type is UI, UCFE, UCX or EB.
|
Text
- UI EB
|
CHAR (30) |
NOT NULL |
No. |
Field Name |
Module 3 Reference |
Field Description |
Data Format |
Data Type |
Constraint |
6 |
Active Collection |
Yes or blank: Step 44A - Rule 1 No: Step 44B - Rule 1 Dropped: Step 44C - Rule 1 |
Indicate Y if overpayment is in process of recovery; use N if overpayment is no longer in process of recovery; use D if the established date is more than nine (9) quarters prior to the report quarter and the overpayment was in process of recovery in the quarter before the report quarter but recovery was dropped in the report quarter. |
Text – Y; N; D (Required for overpayments with balances more than 450 days past due; optional for other overpayment balances) |
CHAR (20) |
|
7 |
Type of Overpayments |
Fraud:
Step 33A - Rule 1 |
The type of overpayment is Fraud or Nonfraud. |
Text
- Fraud |
CHAR (20) |
|
8 |
UI Balance at End of Qtr |
Step 42A - Rule 1 |
The State Unemployment funds overpayment balance at the end of the quarter. |
Number
- 0000000.00 |
DECIMAL (9,2) |
|
9 |
Federal Balance at the End of Qtr |
Step 42B - Rule 1 |
The Federal funds overpayment balance at the end of the quarter. |
Number
- 0000000.00 |
DECIMAL (9,2) |
|
No. |
Field Name |
Module 3 Reference |
Field Description |
Data Format |
Data Type |
Constraint |
10 |
EB Balance at the End of Qtr |
Step 42C – Rule 1 |
The EB funds overpayment balance at the end of the quarter. |
Number – 000000000.00 (Required for EB; must be blank or 0 for UI, UCFE, UCX and joint claims)
|
DECIMAL (9.2) |
|
11 |
User |
|
User defined field. Can be used for any additional data element. Not mandatory. |
Text |
CHAR (100) |
|
BENEFITS RECORD LAYOUT FOR POPULATION 15
This record layout provides the format for the validation extract file. The extract file type must be ASCII, comma delimited columns. Data must be in the order listed in the record layout. The data Format column indicates the generic values for text fields. These must be followed by a dash and the state-specific value. The Module 3 reference indicates the step where the state-specific values are documented.
Example: If the state-specific code for Nonfraud is NF, then the data format would be NONFRUAD-NF.
No. |
Field Name |
Module 3 Reference |
Field Description |
Data Format |
Data Type |
Constraint |
1 |
OBS |
|
State assigned sequential unique identifier for each record in the extract file.
|
Number
- 00000000 |
INTEGER |
NOT NULL |
2 |
SSN |
Step 1G - Rule 1 |
Social Security Number
|
Number
- 000000000 |
CHAR (9) |
NOT NULL |
3 |
Unique ID |
Step 1G - Rule 2 |
The unique ID of the overpayment.
|
Number
- 0000000000 |
CHAR (30) |
|
4 |
Type of Overpayments |
Fraud: Step 33A – Rule 1 Nonfraud: Step 33B – Rule 1
|
The type of overpayment is Fraud or Nonfraud |
Text – Fraud; Nonfraud Must be blank if investigation establishes no overpayment (Required)
|
CHAR (20) |
|
No. |
Field Name |
Module 3 Reference |
Field Description |
Data Format |
Data Type |
Constraint |
5 |
Detection Method |
Wage/Benefit Crossmatch: Step 35A – Rule 1 IB Crossmatch: Step 35B – Rule 1 National Directory of New Hires: Step 35H – Rule 1 State Directory of New Hires: Step 35C – Rule 1 Multi-Claimant Scheme Systems: Step 35D – Rule 1 Special Project: Step 35E – Rule 1 Other Controllable: Step 35F – Rule 1 Noncontrollable: Step 35G – Rule 1
|
The Detection Method used to establish the overpayment was Wage/Benefit Crossmatch, IB Crossmatch, National Directory of New Hires (NDNH), State Directory of New Hires (SDNH), Multi-Claimant Scheme Systems, Special Project, Other Controllable, and Noncontrollable activity.
|
Text – Wage Crossmatch; IB Crossmatch; NDNH; SDNH; Multi-Claimant; Special; Other Controllable; Noncontrollable (Required) |
CHAR (30) |
NOT NULL |
6 |
Date Established |
Step 36 – Rule 1 |
The date the investigation was concluded or overpayment was established.
|
Date – MM/DD/YYYY (Required) |
DATE |
NOT NULL |
7 |
Overpayment Amount |
Step 37A – Rule 1 Step 37B – Rule 1 |
The amount of benefits paid from State and Federal Unemployment Funds
|
Number
– 000000000.00 |
DECIMAL (9.2) |
|
8 |
Overpayment Established by Investigation |
Step 46 – Rule 1
|
Whether a completed investigation established an overpayment.
|
Text – Y, N (Optional for Other Controllable and Noncontrollable)
|
CHAR (20) |
Conditionally Required |
9 |
User |
|
User defined field. Can be used for any additional data element. Not mandatory. |
Text (Optional)
|
CHAR (100) |
|
APPENDIX B
Explanation of ui TAX data formats
There are 6 types of data formats referred to in Appendix B.
1. Required. These fields cannot be blank. They may be mandatory codes, dates or dollar values. Required cells in Appendix A tables indicate the required code, date, or dollar value parameters, or display the word “Required.”
Required text fields have code values that must be entered, such as A, C, R, etc. All of the allowable generic values for each field are listed in the Data Type/Format column on the record layout. The generic values must be followed by a dash and the corresponding state-specific value.
2. Conditionally required. Data are included in these fields if the data are present in the state’s system. Applies to date and wages fields.
3. Optional. These fields are gray in Appendix B and the word “Optional” is displayed. The software does not look at these fields at all. Any values can be entered or they can be left blank.
4. Must be blank. These are text or date fields where the presence of data indicates an error. Therefore, they must be left blank (such as population 4 transaction date for balance subpopulations 4.7, 4.8, 4.15, and 4.16).
5. Must be blank or 0. These are numeric fields where the presence of data other than 0 indicates an error. In tax these are primarily wages fields in populations 4 and 5.
6. System generated. These fields are generated by the DV software and data should not be placed in these fields in the extract files. These fields are primarily time lapse and age fields.
Notes:
For most steps referenced in Appendix B column headers, Rule 1 is the indicator in the state system. However, if a state does not maintain the indicator specified in Rule 1, then the state programmer must review the other rules in that step in order to develop the required validation logic.
The extract file type is ASCII, comma delimited. Data must be in the order listed in the record layouts.
TAX RECORD LAYOUT FOR POPULATION 1
The record layout provides the format for the validation extract file. The extract file type must be ASCII, comma delimited columns. Data
must be in the order listed in the record layout. The Data Format column indicates the generic values for text fields. These must be
followed by a dash and the state-specific value. The Module 3 reference indicates the step where the state-specific values are
documented.
Example: If the state-specific code for an Active Employer is 01, then the data format would be A-01.
No. |
Field Name |
Module 3 Reference |
Field Description |
Data Format |
Data Type |
Constraint |
1 |
OBS |
|
Assign to each record. Use sequential numbers starting at 1. |
Number - 00000000 (Required) |
INTEGER |
NOT NULL |
2 |
EAN |
Step 1A |
Employer Account Number |
Number - 000000000 (Required) |
CHAR (20) |
NOT NULL |
3 |
Employer Status Indicator |
Step 3A |
Indicate that the employer is an active employer. |
Text
- A |
CHAR (20) |
NOT NULL |
4 |
Employer Type |
Step
2A |
Indicate whether the employer type is contributory or reimbursable. |
Text – C R (Required) |
CHAR (20) |
NOT NULL |
5 |
Liability Date (Met Threshold) |
Step 14 |
Indicate the most recent date on which the employing unit met the State law definition of a newly established or successor employer. |
Date - MM/DD/YYYY (Required) |
DATE |
NOT NULL |
6 |
Reactivation Processing Date |
Step 16 |
Indicate the date on which an employer account was updated on the State's system to reflect the reactivation of a previously inactivated or terminated employer. |
Date - MM/DD/YYYY |
DATE |
|
7 |
Inactive/Terminated "as of" Date |
Step 5 |
Indicate the effective date for the termination or inactivation status of the employer. |
Date - MM/DD/YYYY |
DATE |
|
8 |
Activation Processing Date |
Step 15 |
Indicate the date on which an account was established on the State’s system for an 'employer,' under the State unemployment compensation law. |
Date - MM/DD/YYYY (Required) |
DATE |
NOT NULL |
9 |
Number of Liable Quarters |
Step 7B |
Indicate the number of consecutive quarters between the date the employer was activated or reactivated on the State’s system and the quarter prior to the report quarter being validated. If the number of liable quarters is eight or more, the value should be reported as eight. If the employer was activated or reactivated during the report quarter, then the number of liable quarters is zero. |
Number – 0 1 2 3 4 5 6 7 8 (Required) |
INTEGER |
NOT NULL |
10 |
Wages in Quarter 1 |
Step 7A |
Total wages for the employer in the quarter prior to the report quarter. Enter 0.00 for either zero wage reports or reports that weren't filed. |
Number- |
DECIMAL (15,2) |
|
11 |
Wages in Quarter 2 |
Step 7A |
Total wages for the employer in the second quarter prior to the report quarter. Enter 0.00 for either zero wage reports or reports that weren't filed. |
Number- |
DECIMAL (15,2) |
|
12 |
Wages in Quarter 3 |
Step 7A |
Total wages for the employer in the third quarter prior to the report quarter. Enter 0.00 for either zero wage reports or reports that weren't filed. |
Number - 0000000000000.00 (Conditionally Required) |
DECIMAL (15,2) |
|
13 |
Wages in Quarter 4 |
Step 7A |
Total wages for the employer in the fourth quarter prior to the report quarter. Enter 0.00 for either zero wage reports or reports that weren't filed. |
Number - 0000000000000.00 (Conditionally Required) |
DECIMAL (15,2) |
|
14 |
Wages in Quarter 5 |
Step 7A |
Total wages for the employer in the fifth quarter prior to the report quarter. Enter 0.00 for either zero wage reports or reports that weren't filed. |
Number - 0000000000000.00 (Conditionally Required) |
DECIMAL (15,2) |
|
15 |
Wages in Quarter 6 |
Step 7A |
Total wages for the employer in the sixth quarter prior to the report quarter. Enter 0.00 for either zero wage reports or reports that weren't filed. |
Number - 0000000000000.00 (Conditionally Required) |
DECIMAL (15,2) |
|
16 |
Wages in Quarter 7 |
Step 7A |
Total wages for the employer in the seventh quarter prior to the report quarter. Enter 0.00 for either zero wage reports or reports that weren't filed. |
Number - 0000000000000.00 (Conditionally Required) |
DECIMAL (15,2) |
|
17 |
Wages in Quarter 8 |
Step 7A |
Total wages for the employer in the eighth quarter prior to the report quarter. Enter 0.00 for either zero wage reports or reports that weren't filed. |
Number - 0000000000000.00 (Conditionally Required) |
DECIMAL (15,2) |
|
18 |
User Field |
|
User defined field. Can be used for any additional data element. |
Text (Optional) |
CHAR (100) |
|
TAX RECORD LAYOUT FOR POPULATION 2
The record layout provides the format for the validation extract file. The extract file type must be ASCII, comma delimited columns. Data
must be in the order listed in the record layout. The Data Format column indicates the generic values for text fields. These must be
followed by a dash and the state-specific value. The Module 3 reference indicates the step where the state-specific values are
documented.
Example: If the state-specific code for Contributory Employer Type is A, then the data format would be C-A.
No. |
Field Name |
Module 3 Reference |
Field Description |
Data Format |
Data Type |
Constraint |
1 |
OBS |
|
Sequential number, start at 1 |
Number - 00000000 (Required) |
INTEGER |
NOT NULL |
2 |
EAN |
Step 1B |
Employer Account Number |
Number - 000000000 (Required) |
CHAR (20) |
NOT NULL |
3 |
Employer Report Quarter (ERQ) |
Step 1B |
Indicate the calendar quarter of business activity covered by an employer’s contributions report. |
Number - YYYYQQ (Required) |
CHAR (6) |
NOT NULL |
4 |
Employer Type |
Step
2A |
Indicate whether the employer type is contributory or reimbursable. |
Text – C
R |
CHAR (20) |
NOT NULL |
5 |
Received Date |
Step 9 |
Indicate the date of receipt by the agency of the contributions report from a subject employer. |
Date - MM/DD/YYYY (Conditionally Required) |
DATE |
|
6 |
Final Assessment Date |
Step 10 |
Indicate the date a final assessment becomes legally due and collectible. |
Date - MM/DD/YYYY (Conditionally Required) |
DATE |
|
7 |
Liability Date (Initial or Reopen) |
Step
4A |
Indicate the date on which an employing unit meets the State’s legal definition of an employer and is registered and required to file reports. |
Date - MM/DD/YYYY (Conditionally Required) |
DATE |
|
8 |
Liability
Date |
Step 14 |
Indicate the most recent date on which the employing unit met the State law definition of a newly established or successor employer. |
Date - MM/DD/YYYY (Conditionally Required) |
DATE |
|
9 |
Inactive/ |
Step 5 |
Indicate the effective date for termination or inactivation status of the employer. |
Date - MM/DD/YYYY (Conditionally Required) |
DATE |
|
10 |
Suspended "as of" Quarter |
Step 5 |
Indicate the specific ERQ for which the State has suspended the employer’s report filing requirement. |
Number - YYYYQQ |
CHAR (6) |
|
11 |
Inactivation |
Step 6A Step 6B Step 6C |
Indicate the processing date for the inactivation or termination status of the employer. |
Date - MM/DD/YYYY (Conditionally Required) |
DATE |
|
12 |
User Field |
|
User defined field. Can be used for any additional data element. |
Text (Optional) |
CHAR (100) |
|
TAX RECORD LAYOUT FOR POPULATION 3
The record layout provides the format for the validation extract file. The extract file type must be ASCII, comma delimited columns. Data
must be in the order listed in the record layout. The Data Format column indicates the generic values for text fields. These must be
followed by a dash and the state-specific value. The Module 3 reference indicates the step where the state-specific values are
documented.
Example: If the state-specific code for New Status Determination is NEW, then the data format would be N-NEW.
No. |
Field Name |
Module 3 Reference |
Field Description |
Data Format |
Data Type |
Constraint |
1 |
OBS |
|
Sequential number, start at 1 |
Number - 00000000 (Required) |
INTEGER |
NOT NULL |
2 |
EAN |
Step 1C |
Employer Account Number |
Number - 000000000 (Required) |
CHAR (20) |
NOT NULL |
3 |
Employer Type |
Step
2A |
Indicate whether the employer type is contributory or reimbursable. |
Text – C
R |
CHAR (20) |
NOT NULL |
4 |
Status Determination Type Indicator |
Step 11A Step 11B Step 11C Step 11D |
Indicate status determination type by New, Successor, Inactivation or Termination. |
Text – N S I
T |
CHAR (10) |
NOT NULL |
5 |
Time Lapse |
Step 12 |
Place a zero (0) in this field. (Software generates the time lapse) |
Number – 0 |
INTEGER |
|
6 |
Status Determination Date |
Step 13 |
Indicate the date of any recorded administrative action that establishes, modifies, changes, inactivates, or terminates an employing unit’s liability as an employer. |
Date - MM/DD/YYYY (Required) |
DATE |
NOT NULL |
7 |
Liability
Date |
Step 14 |
Indicate the most recent date on which the employing unit met the State law definition of a newly established or successor employer. |
Date - MM/DD/YYYY (Required) |
DATE |
NOT NULL |
8 |
End of Liable Quarter |
Step 14 |
Indicate the last day of the quarter in which the employing unit met the State law definition of a newly established or successor employer. States that do not have this should leave the field blank; the value will then be calculated by the software. |
Date - MM/DD/YYYY (Conditionally Required) |
DATE |
|
9 |
Activation Processing Date |
Step 15 |
Indicate the date on which an account was established on the State’s system for an 'employer,' under the State unemployment compensation law. |
Date - MM/DD/YYYY |
DATE |
|
10 |
Reactivation Processing Date |
Step 16 |
Indicate the date on which an employer account was updated on the State’s system to reflect the reactivation of a previously inactivated or terminated employer. |
Date - MM/DD/YYYY |
DATE |
|
11 |
Successorship Processing Date |
Step 17 |
Indicate the date on which an employer account was established or updated to reflect an acquisition by the employer which met the State law definition of successorship. |
Date - MM/DD/YYYY |
DATE |
|
12 |
Predecessor Account Number |
Step 18 |
Indicate the account number for an employing unit that has been acquired by another employer. |
Number - 000000000 |
CHAR (20) |
|
13 |
Inactivation Processing Date |
Step
6A or |
Indicate the processing date for the inactivation status of the employer. |
Date - MM/DD/YYYY |
DATE |
|
14
|
Termination Processing Date |
Step
6A or |
Indicate the processing date for the termination status of the employer. |
Date - MM/DD/YYYY |
DATE |
|
15
|
User Field |
|
User defined field. Can be used for any additional data element. |
Text (Optional) |
CHAR (100) |
|
TAX RECORD LAYOUT FOR POPULATION 4
The record layout provides the format for the validation extract file. The extract file type must be ASCII, comma delimited columns. Data
must be in the order listed in the record layout. The Data Format column indicates the generic values for text fields. These must be
followed by a dash and the state-specific value. The Module 3 reference indicates the step where the state-specific values are
documented.
Example: If the state-specific code for Receivables Established is R, then the data format would be E-R.
No. |
Field Name |
Module 3 Reference |
Field Description |
Data Format |
Data Type |
Constraint |
1 |
OBS |
|
Sequential number, start at 1 |
Number - 00000000 (Required) |
INTEGER |
NOT NULL |
2 |
EAN |
Step 1D |
Employer Account Number |
Number - 000000000 (Required) |
CHAR (20) |
NOT NULL |
3 |
Employer Type |
Step
2A |
Indicate whether the employer type is contributory or reimbursable. |
Text – C
R |
CHAR (20) |
NOT NULL |
4 |
Transaction Date |
Step 19A |
Indicate the date that a transaction was entered into the system. |
Date - MM/DD/YYYY |
DATE |
|
5 |
Established Q/Date |
Step 19B |
Indicate the date that a past due contribution was entered into the system. |
Date - MM/DD/YYYY (Required) |
DATE |
NOT NULL |
6 |
Employer Report Quarter (ERQ) |
Step 1D |
Indicate the calendar quarter of business activity covered by an employer’s contributions report. |
Number - YYYYQQ |
CHAR (6) |
|
7 |
Due Date |
Step 20 |
Indicate the date after which the State imposes interest and penalty for late payment. |
Date - MM/DD/YYYY |
DATE |
|
8 |
Transaction Type/Indicator |
Step 21A Step 21B Step 21C |
Indicate the transaction type code for receivables established, liquidated, declared uncollectible or removed. Use a code of B for records of account balances at the end of the RQ. |
Text – E L U R B (Required) |
CHAR (20) |
NOT NULL |
9 |
Amount Established in RQ |
Step 22 |
Indicate the amount of contributions or payments determined to be past due during the report quarter. |
Number - 0000000000000.00 |
DECIMAL (15,2) |
|
10 |
Amount Liquidated |
Step 23 |
Indicate the amount of receivables liquidated during the report quarter. |
Number - 0000000000000.00 |
DECIMAL (15,2) |
|
11 |
Amount Uncollectible |
Step 24 |
Indicate the amount of receivables declared uncollectible during the report quarter. |
Number - 0000000000000.00 |
DECIMAL (15,2) |
|
12 |
Amount Removed |
Step 25 |
Indicate the amount of receivables removed during the report quarter. |
Number - 0000000000000.00 |
DECIMAL (15,2) |
|
13 |
Balance at End of RQ |
Step 26 |
Indicate the total amount of past due contributions as of the last day of the report quarter being validated. For aging, States should capture a separate record for each employer report quarter that has a balance, rather than an aggregate balance. |
Number - 0000000000000.00 |
DECIMAL (15,2) |
|
14 |
Age of Receivable |
Step
27A |
Indicate the age of receivable in days for receivable balances at the end of the report quarter. |
Number – 0000000000000 (Optional) |
INTEGER |
|
15 |
User Field |
|
User defined field. Can be used for any additional data element. |
Text (Optional) |
CHAR (100) |
|
TAX RECORD LAYOUT FOR POPULATION 5
The record layout provides the format for the validation extract file. The extract file type must be ASCII, comma delimited columns. Data
must be in the order listed in the record layout. The Data Format column indicates the generic values for text fields. These must be
followed by a dash and the state-specific value. The Module 3 reference indicates the step where the state-specific values are
documented.
Example: If the state-specific code for a Large Employer is Y, then the data format would be L-Y.
No. |
Field Name |
Module 3 Reference |
Field Description |
Data Format |
Data Type |
Constraint |
1 |
OBS |
|
Sequential number, start at 1 |
Number - 00000000 (Required) |
INTEGER |
NOT NULL |
2 |
EAN |
Step 1E |
Employer Account Number |
Number - 000000000 (Required) |
CHAR (20) |
NOT NULL |
3 |
Audit ID # |
Step 1E |
Indicate the audit identification number. |
Number - 00000000 (Required) |
CHAR (20) |
NOT NULL |
4 |
Employer Size |
Step 28A Step 28B |
Indicate whether the employer size is large or small. |
Text – L
S |
CHAR (20) |
NOT NULL |
5 |
Change Audit |
Step 29A Step 29B |
Indicate whether an audit resulted in a discovery of wages, contributions or employees not previously reported. |
Text – Y
N |
CHAR (20) |
|
6 |
Audit Completion Date |
Step 30 |
Indicate the date the audit was completed and recorded or posted as such. |
Date - MM/DD/YYYY (Required) |
DATE |
NOT NULL |
7 |
Total Wages Pre-Audit |
Step 31A |
Indicate the full amount of pre-audit total wages reported for quarters audited. |
Number - 0000000000000.00 (Required) |
DECIMAL (15,2) |
NOT NULL |
8 |
Total Wages Post-Audit |
Step 31B |
Indicate the full amount of total wages recorded in audit summaries for audited quarters. |
Number - 0000000000000.00 (Required) |
DECIMAL (15,2) |
NOT NULL |
9 |
Total Wages Under-Reported |
Step 31C |
Indicate the full amount of under reported total wages discovered as a result of the audit. |
Number - 0000000000000.00 |
DECIMAL (15,2) |
|
10 |
Total Wages Over-Reported |
Step 31D |
Indicate the full amount of over reported total wages discovered as a result of the audit. |
Number - 0000000000000.00 |
DECIMAL (15,2) |
|
11 |
Total Wages Reconciliation Amount |
Step 31E |
Place a zero (0) in this field. (Software generates amount) |
Number – 0 |
DECIMAL (15,2) |
|
12 |
Taxable Wages Pre-Audit |
Step 32A |
Indicate the full amount of pre-audit taxable wages reported for quarters audited. |
Number - 0000000000000.00 (Optional) |
DECIMAL (15,2) |
|
13 |
Taxable Wages Post-Audit |
Step 32B |
Indicate the full amount of post-audit taxable wages for quarters audited. |
Number - 0000000000000.00 (Optional) |
DECIMAL (15,2) |
|
14 |
Taxable Wages Under-Reported |
Step 32C |
Indicate the full amount of under reported taxable wages discovered as a result of the audit. |
Number - 0000000000000.00 |
DECIMAL (15,2) |
|
15 |
Taxable Wages Over-Reported |
Step 32D |
Indicate the full amount of over reported taxable wages discovered as a result of the audit. |
Number - 0000000000000.00 |
DECIMAL (15,2) |
|
16 |
Taxable Wages Reconciliation Amount |
Step 32E |
Place a zero (0) in this field. (Software generates amount) |
Number – 0 |
DECIMAL (15,2) |
|
17 |
Contributions Pre-Audit |
Step 33A |
Indicate the full amount of pre-audit contributions reported for quarters audited. |
Number - 0000000000000.00 (Optional) |
DECIMAL (15,2) |
|
18 |
Contributions Post-Audit |
Step 33B |
Indicate the full amount of post-audit contributions reported for quarters audited. |
Number - 0000000000000.00 (Optional) |
DECIMAL (15,2) |
|
19 |
Contributions Under-Reported |
Step 33C |
Indicate the full amount of under reported contributions discovered as a result of the audit. |
Number - 0000000000000.00 |
DECIMAL (15,2) |
|
20 |
Contributions Over-Reported |
Step 33D |
Indicate the full amount of over reported contributions discovered as a result of the audit. |
Number - 0000000000000.00 |
DECIMAL (15,2) |
|
21 |
Contributions Reconciliation Amount |
Step 33E |
Place a zero (0) in this field. (Software generates amount) |
Number – 0 |
DECIMAL (15,2) |
|
22 |
User Field |
|
User defined field. Can be used for any additional data element. |
Text (Optional) |
CHAR (100) |
|
APPENDIX C
BENEFITS DUPLICATE DETECTION CRITERIA
Population |
Reporting Rule |
Relevant Data Elements from Extract file |
Duplicate Detection Criteria |
Comments |
|
The same week of unemployment can only be claimed once. |
SSN, Claim Week-Ending Date (Field 2) |
Remove as duplicates all multiple records with the same SSN and Claim Week Ending Date. |
|
|
A Benefit Year normally has only one final payment, unless wages were added/returned after initial exhaustion. |
SSN, Mail Date, Check #/Unique ID |
Remove as duplicates all multiple records with the same SSN, check number/unique ID and mail date. |
The mail date criterion would falsely reject the unlikely but legitimate case of two Final Payments for separate claims that exhaust on the same day. In such a case, the validator can append an extra unique character to the Unique ID field value (e.g. -1, -2, -3) to each of the valid records, so that the software will not reject them. |
Population |
Reporting Rule |
Relevant Data Elements from Extract file |
Duplicate Detection Criteria |
Comments |
|
Report each legitimate claim once. Most claim types will be reportable only once in a quarter. Multiple UI New or Transitional claims may be legitimate; however, there can be only one claim with a sufficient monetary per SSN within the same quarter, unless a claim with a sufficient monetary that does not establish a benefit year (BY) is followed by one that does establish a benefit year. Although there can be more than one with an insufficient monetary, none may follow a claim with a sufficient monetary.
|
SSN (Field 2); Date Claim Filed, (Field 3); Program Type (Field 6); Claim Type, (Field 5); Sufficient / Insufficient” (Field 9) |
Remove as duplicates all multiple records with the same SSN, Date Claim Filed, and Claim Type.
Remove as duplicates
|
The duplicate detection function in Population 3 must distinguish (a) multiple claims that may be legitimately counted from (b) multiple instances of claims that may be counted only once (true duplicates). Situation (a) arises mostly for UI New and Transitional claims. To define legitimate UI New and Transitional claims, the decision was made to allow only one Sufficient determination that establishes a BY in the same quarter for the same claim type and not to allow an Insufficient claim to follow a Sufficient claim for the same SSN and claim type. Two claims with sufficient monetary determinations may occur in the same quarter as long as the claim that does not establish a BY precedes the one that does establish a BY. |
Population |
Reporting Rule |
Relevant Data Elements from Extract file |
Duplicate Detection Criteria |
Comments |
|
Every additional claim is associated with a week of unemployment and involves at least a 1-week break in the claims series due to intervening employment and separation from an employer. |
SSN, Date Claim Filed, Separation Date |
Remove as duplicates all multiple records with the same SSN, Date Claim Filed, and Separation Date.
|
SSN plus Separation Date represent “hard” or definitive criteria for duplicates. SSN and Date Claim Filed could be used as “soft” duplicate detection criteria that identify potential instances of duplication. If used, the validator must manually determine which claims are countable, taking a sample of all records of multiple instances of the same SSN and Date Claim Filed if the number of cases is considerably large.
|
Population |
Reporting Rule |
Relevant Data Elements from Extract file |
Duplicate Detection Criteria |
Comments |
|
There can only be one countable regular week compensated for a given week. Where there is a CWC payment, there is a separate count of one CWC payment per week. There is no rule limiting the number of adjustment checks. |
SSN, Intra/Interstate, Week-End Date (Field 16), Mail Date (Field 17) |
No duplicate check
|
A week compensated cannot be counted twice for the same week ending date. Since the week can be counted both as a regular week and a CWC week, the software performs the check separately for both groups. Because states may issue multiple adjustment checks as needed to correct a claimant’s prior benefits, no duplicate detection is needed for multiple adjustments. |
Population |
Reporting Rule |
Relevant Data Elements from Extract file |
Duplicate Detection Criteria |
Comments |
|
Count every monetary determination once. |
SSN, Unique ID, Issue Type (Field 9), Notice Data (Field 12). |
Remove as duplicates all multiple records with the same SSN, Unique ID, Issue Code, and Mail Date.
|
Records with the same SSNs, Issue Code and Mail Date, but no Unique ID, should be manually checked to determine whether they are duplicates. |
|
Count every appeal once. |
SSN, Docket #/Unique ID |
Remove as duplicates all multiple records with the same SSN and Docket Number/Unique ID. |
If the same SSN and docket number appears more than once only one record should be included in the extract file. |
|
Count every appeal once. |
SSN, Docket #/Unique ID |
Remove as duplicates all multiple records with the same SSN and Docket Number/Unique ID. |
If the same SSN and docket number appears more than once, only one record should be included in the extract file. |
Population |
Reporting Rule |
Relevant Data Elements from Extract file |
Duplicate Detection Criteria |
Comments |
|
Count every appeal once. |
SSN, Docket #/Unique ID |
Remove as duplicates all multiple records with the same SSN and Docket Number/Unique ID. |
If the same SSN and docket number appears more than once, only one record should be included in the extract file. |
|
Count every appeal once. |
SSN, Docket #/Unique ID |
Remove as duplicates all multiple records with the same SSN and Docket Number/Unique ID. |
If the same SSN and docket number appears more than once, only one record should be included in the extract file. |
|
Count every appeal once. |
SSN, Docket #/Unique ID |
Remove as duplicates all multiple records with the same SSN and Docket Number/Unique ID. |
If the same SSN and docket number appears more than once, only one record should be included in the extract file. |
|
Count every appeal once. |
SSN, Docket #/Unique ID |
Remove as duplicates all multiple records with the same SSN and Docket Number/Unique ID. |
If the same SSN and docket number appears more than once, only one record should be included in the extract file. |
Population |
Reporting Rule |
Relevant Data Elements from Extract file |
Duplicate Detection Criteria |
Comments |
|
Count each overpayment only once. |
SSN, Date Overpayment Established, Unique ID |
Remove as duplicates all multiple records with the same SSN, Date Overpayment Established, and Unique ID.
|
Records with the same SSN and Date Overpayment Established, but no Unique ID, should be manually checked to determine whether they are duplicates. |
Population |
Reporting Rule |
Relevant Data Elements from Extract file |
Duplicate Detection Criteria |
Comments |
|
Count each transaction only once. |
SSN, Unique ID, Activity Type, Date of Activity |
Remove as duplicates all multiple records with the same SSN, Unique ID, Date of Activity, and Activity Type.
|
Records with the same SSN, Date of Activity, and Activity Type, but no Unique ID, should be manually checked to determine whether they are duplicates. |
Population |
Reporting Rule |
Relevant Data Elements from Extract file |
Duplicate Detection Criteria |
Comments |
|
Count each overpayment once. |
SSN, Unique ID |
Remove as duplicates all multiple records with the same SSN and Unique ID.
|
Records with the same SSN but no Unique ID should be manually checked to determine whether they are duplicates. |
APPENDIX D
TAX DUPLICATE DETECTION CRITERIA
Population |
ETA 581 Reporting Rule |
Relevant Data Elements from Extract File (by Field Number) |
Data Validation Duplicate Detection Rule Applied to Extract File |
Comments |
1. Active Employers |
Count each employer once. Multi-unit employers are counted as one employer. |
2. Employer Account Number (EAN) |
If the EAN is identical in two or more records, all of those records are rejected. |
As long as EANs are only assigned at the parent level, this should identify units from the same multi-unit employer. |
2. Report Filing |
Each employer owes only one report for each employer report quarter (ERQ). This report is counted a maximum of 3 times – timely, secured, and resolved. If an employer submits reports for multiple ERQs at the same time, only the report for the ERQ immediately preceding the report quarter (RQ) is countable as timely (if applicable) and secured. Only the report for the ERQ two quarters prior to the RQ is countable as resolved. Reports from multi-unit employers are counted as one report. |
2. EAN 3. Employer Report Quarter (ERQ) |
If the EAN and ERQ are identical in two or more records, all of those records are rejected. |
As long as EANs are only assigned at the parent level, this should identify units from the same multi-unit employer. |
Population |
ETA 581 Reporting Rule |
Relevant Data Elements from Extract File (by Field Number) |
Data Validation Duplicate Detection Rule Applied to Extract File |
Comments |
3. Status Determinations |
Each status determination transaction should be counted only once.
Individual EANs may appear more than once. For example, there might be two transactions listed for a single EAN if an employer acquires two businesses at different times during the quarter, resulting in two successorship determinations.
Multiple determinations may be legitimate, as long as they do not reflect clerical errors. |
2. EAN
4. Status Determination Type Indicator
6. Status Determination Date
12. Predecessor Account Number |
If the status determination type indicator is:
NEW (subpops 3.1 – 3.3), and the EAN and status determination date are identical in two or more records, all of those records are rejected.
SUCCESSOR (subpops 3.4 – 3.6), and the EAN and status determination date and predecessor account number are identical in two or more records, all of those records are rejected.
INACTIVATION or TERMINATION (subpops 3.7 and 3.8), and the EAN and status determination date are identical in two or more records, all of those records are rejected. |
|
Population |
ETA 581 Reporting Rule |
Relevant Data Elements from Extract File (by Field Number) |
Data Validation Duplicate Detection Rule Applied to Extract File |
Comments |
|
No transaction should be listed more than once. |
2. EAN
4. Transaction Date
5. Established Date 6. Employer Report Quarter (cont.)
7. Due Date (reimb.)
8. Transaction Type
9. Transaction Amount (established)
10. Transaction Amount (liquidated)
11. Transaction Amount (uncollectible)
12. Removed Amount
13. Balance at End of Report Quarter |
If the transaction type is:
E (subpops 4.1 and 4.9), and the EAN, transaction date, established date, ERQ (cont.) or Due Date (reimb.), and amount established are identical in two or more records, all of those records are rejected.
L or U (subpops 4.2-4.4 and 4.10-4.12), and the EAN, transaction date, ERQ (cont.) or Due Date (reimb.), transaction type, and transaction amount are identical in two or more records, all of those records are rejected.
R (subpops 4.5-4.6, 4.13-4.14), and the EAN, ERQ (cont.) or Due Date (reimb.), and removed amount are identical in two or more records, all of those records are rejected.
B (subpop 4.7-4.8, 4.15-4.16), and the EAN, ERQ (cont.) or Due Date (reimb.), and balance are identical in two or more records, all of those records are rejected. |
Currently, the UI Tax DVWS does not check for duplicates in Population 4. State IT staff now is responsible for ensuring that the extract file does not include duplicate transactions. DVWS 1.1 will be modified to include the new duplicate detection criteria. |
Population |
ETA 581 Reporting Rule |
Relevant Data Elements from Extract File (by Field Number) |
Data Validation Duplicate Detection Rule Applied to Extract File |
Comments |
|
Each field audit should be counted once. |
2. EAN 3. Audit ID Number |
If the EAN and Audit ID Number are identical in two or more records, all of those records are rejected. |
|
![]()
| File Type | application/msword |
| File Title | Data Validation State Web Software |
| File Modified | 2016-03-27 |
| File Created | 2016-03-27 |
© 2026 OMB.report | Privacy Policy