Job Corps Placement and Assistance Record
Job Corps Placement and Assistance Record
Instructions ETA 678 (cts_tech_guide)
Job Corps Placement and Assistance Record
OMB: 1205-0035
Working with the Selected Student
After a
student has been selected, the student name and student ID display in
the header of the CTS application
window.
You may now
choose any of the options under Manage
Student
to perform that function with your selected
student.
Manage the student’s placement
Print the ETA 678 for the
student’s placement
View or update the student’s address
Print the ETA 640 student profile
Reissue a transition check for this student
Release a student’s transition check
Display the student’s SSN (Social Security Number) Review or update the student’s profile
Review the student’s case notes or add a new note
Review the student’s PCDP (Personal Career Development Plan) View the student’s follow-up survey data
Print a W-2 for the student
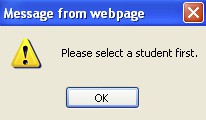
Note that if no student is currently selected, a dialog will display after clicking any option under the Manage Student menu.

Manage Student Placement
The Manage
Placement
function allows authorized staff to enter, edit, and maintain
placement records for a
selected student. Once a placement is
entered into CTS, the placement must be verified by one of the
following
CT staff:
The primary CT Specialist assigned to the student The CT Coordinator
The CT Manager
Once verified, only a CT Manager/CT Coordinator can approve a placement.

 Job
Corps Data Center 12


 Career
Transition System (CTS) Technical Guide
Approve a Placement
It is the responsibility of the CT Manager or CT Coordinator to approve placements. A placement may not be
approved until it is first verified. For a combination placement, both placements must be verified. If the timeframe for verification and approval elapses without the required actions being taken, the placement will automatically be invalidated. The timeframe is within 90 calendar days of the Reported Date, including holidays.
Tip:
It is highly recommended that placements be approved as soon as
possible. Waiting until the last available day to
approve a
placement can cause a rejection, because approvals are not recognized
in the system until the
following business day.
The approval date must be within 90 days from the Reported Date, which is the student’s first day on the job. CTS providers will have 90 days from the date the student began working to verify and approve the placement for it to be considered valid. Making approvals early ensures that the placements will be processed on-time and that the proper credits will be given.
1. Select the student. Then click Manage Student Manage Placement.
2. In the Student Placement List window, select a placement to view. The selected placement will be
highlighted in blue.
3. Click Edit Placement. The Student Placement Information window opens displaying 5 tabs. 4. Select the Approval Info tab.
5. OPTIONAL: Enter comments regarding the approval in the Comments field. Note that you may choose
to click Submit to save only the comments, if you will not be approving the placement at this time.
6. Click Approve to approve the student placement. Or click Not Approve to reject the placement.
(Clicking the Approve button will post the placement to SPAMIS.)
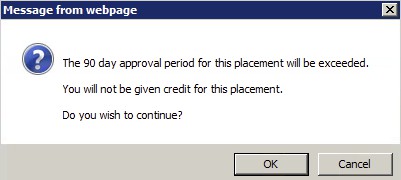
7. If the approval date is after the 90-day approval period, a warning message will display. The message
states that the approval period will be exceeded and you will not be given credit for the placement. It asks if you wish to continue. Clicking OK will cause the placement to be invalid.
8. Click the Close Window button.
Note:
On the ETA-678 form, after the placement status is Approved
or Not
Approved,
box 16, Initial Placement,
will automatically be filled in
with Yes or No indicating if this was the student’s initial
placement.

 Job
Corps Data Center 25


 Career
Transition System (CTS) Technical Guide
Print an ETA-678
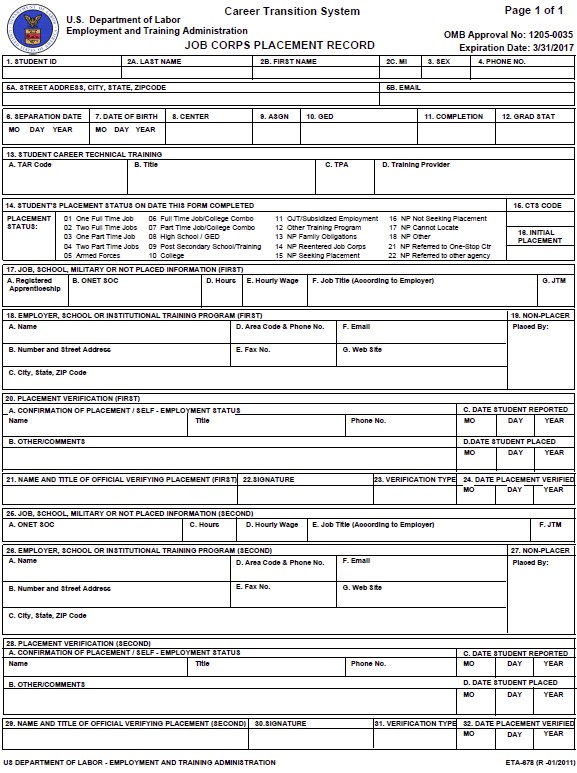
Select the Print 678 function to print the ETA-678 form, which documents a student’s placement.
1. Select the student to work with.
2. From the CTS main menu, click Manage Student.
3. Click Print 678 from the expanded menu. A small pop-up window opens with three radio buttons for
Form Type.
4. Select a Form Type option. The options are described in the following table.
-
Form Type
Description
Complete
Displays all the information for the selected student’s placement,
including verification and approval information if available.
Pre-headed
Displays all the student information on the form except for placement
information. Personal information, separation date, vocational
completion, and graduate status are all filled in. The placement fields
will be left blank.
Blank
Displays an ETA-678 form with none of the information filled in.
5. Click Report.
6. If you elected to print the complete form, then you must select the placement that you wish to print. Click
to highlight the placement and click the Print 678 button.
7. The ETA-678 form opens in Adobe Reader. The ETA-678 forms are generated individually using the
Print
678
function display the date/time stamp in the upper right corner
showing when the form was
generated. Forms generated via the
Print
678 Bulk
function will not include the date/time stamp.


 Job
Corps Data Center 26


 Career
Transition System (CTS) Technical Guide
Forms
Print an ETA-678
The Print 678 menu item allows CT staff to print an ETA-678 form for a student.
1. From the CTS main menu click Forms.
2. Click Print 678 from the expanded menu.
3. If you have a primary caseload, those students will automatically be listed for you to select from.
4. OPTIONAL: Click Advance Search to open the Student Search criteria screen. Input your criteria and
click Search to list the students.
5. Click any column heading to sort the list.
6. Click a student name. The selected student’s name will appear in the CTS header at the top of the screen. 7. Choose a Form Type option. The types are described in the table below.
-
Form Type
Description
Complete
Displays all the information for the selected student’s placement, including
verification and approval information.
Pre-Headed
Displays all the student information on the form except for placement
information. Personal information, separation date, vocational completion,
and graduate status are all filled in. The placement fields will be left blank.
Blank
Displays an ETA-678 form with none of the information filled in.
8. Click Report.
9. If you elected to print the complete form, a Student Placement List window will appear.
10. Click to highlight the placement that you wish to print.
11. Click the Print 678 button.
 Job
Corps Data Center 77


 Career
Transition System (CTS) Technical Guide
12.
The
ETA-678 form opens in Adobe Reader. When using the Print
678
function, the date/time stamp will
display in the upper right
corner showing when the ETA-678 form was generated.
(The forms generated via the Print 678 Bulk function will not include the date/time stamp.)
Print Form ETA-678 in Bulk for all Students During a Month
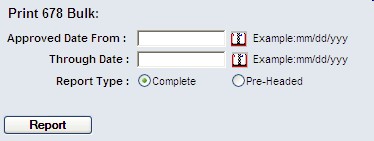
The Print 678 Bulk menu item allows CT staff to view and print all ETA-678 forms for placements approved within a specific time period. The pre-headed report, when printed in bulk, will contain 678’s for assigned students who separated during the specified date range.
1. From the CTS main menu, click Forms.


 Job
Corps Data Center 78


![]() Career
Transition System (CTS) Technical Guide
Career
Transition System (CTS) Technical Guide
2. Click Print 678 Bulk. The Print 678 Bulk screen appears.
3. Select dates from the pop-up calendars for Approved Date From and Through Date. The date range
must be within the span of 30 days. If your selected range includes too long a period, the following error message will display.
4. Choose a Report Type of Complete or Pre-Headed as described in the table below.
-
Report Type
Description
Students
Complete
The form displays all the information for the student’s
placement, including verification and approval
information.
Students with placements that
were approved during your
selected date range
Pre-Headed
The form displays all the student information except for
placement information. Personal information, separation
date, vocational completion, and graduate status are all
filled in. The placement fields will be left blank.
Students who separated during
the specified date range and are
assigned to a Specialist.
5. Click Report. The bulk report generates and displays in a PDF window. Each page of the PDF document
is a separate ETA-678 form.
The ETA-678 forms generated via the Print 678 Bulk function will not include the date/time stamp in the upper right corner. Instead, the page number will display in the upper right corner.
(On each form generated via the Print 678 function, the date/time stamp showing when the individual ETA-678 form was generated is displayed.)
Stop Payment
The Stop Payment request form allows authorized CT staff to print the form that students must complete to request a stop payment on a lost or destroyed check, so that the check can be re-issued by the JCDC Payroll department. Instructions for completing the form are provided on the first page of the form. To print the Stop Payment blank request form:
1. From the main menu, click Forms.
2. Click Stop Payment. The two-page form appears in a PDF window.
3. Click the Printer button in the PDF window to send the document to a printer.
Note: Students are required to submit a copy of their picture ID with the Stop Payment form.
Job Corps Data Center 79
Career Transition System (CTS) Technical Guide
Frequently Asked Questions |
Q: Will we still be required to keep hard copies of the information? A: There have been no changes to the PRH rules. If the PRH or your program manager requires hard copies, that will still be the case. |
Q: What happens if a placement is rejected? Where does it go then? A: If a placement is rejected, it stays in the database with a status of "not approved". The staff who have access to the student can see the placement as a rejected placement. |
Q: What if we want to resubmit a previously rejected placement? A: Once a placement has been approved or rejected, it can no longer be edited. You will need to create a new placement. View the rejected placement and click the Copy Placement button. This will create a duplicate placement. The copied placement will then have to be verified and approved according to PRH rules. |
Q: Does printing the ETA-678 mean the placement has been accepted? A: No. It has been saved in the data tables, but that does not imply that it has been accepted in SPAMIS. |
Q: How do you transition students into CTS? A: When a pre-separation is entered on a student in CIS, the student is automatically entered into the CTS phase and will begin showing up (tentatively) in the list of students. Pre-separated students will not show separation dates in the Manage Placement Student Search window. |
Q: Who will be able to update our Address Book? A: Anyone on your team. This includes invited staff as well as staff on your contract. |
Q: When I get to the Student Search list, the list result shows only the first 100 students. Is there a way to get to the rest of the list? A: It is best to restrict the Student Search by entering additional search criteria. For example, rather than “All” in the Case Load field, select “Primary”. Add other criteria, such as the first letter of the last name, or specify Placement Status. The more restrictive your search, the more likely it is that you will get your desired results. You can also click the column headings of the list result to reverse the order of the display. For example, if you click on the heading “Separation Date”, you will change the display from ascending to descending order. Then the more recently separated students (or those with no separation date, indicating they are pre-seps) will go to the top of the list. |
Q: I am a CT Manager. Can I invite staff to work with a student on another staff member's caseload? A: Managers and Coordinators can invite any staff (including staff not on their contract) to work with any active student on their contract. Specialists have the same ability, except they may issue invitations only for students on their primary caseload. |


 Job
Corps Data Center 89
| File Type | application/vnd.openxmlformats-officedocument.wordprocessingml.document |
| Author | Windows User |
| File Modified | 0000-00-00 |
| File Created | 2021-01-22 |
© 2026 OMB.report | Privacy Policy