Continuum of Care Homeless Assistance Grant Application-Continuum of Care Registration
Continuum of Care Homeless Assistance Grant Application Continuum of Care Registration
M20CoCRegistration2012v1 - 11 7 12
Continuum of Care Homeless Assistance Grant Application-Continuum of Care Registration
OMB: 2506-0182
e -snaps
Training Series
CoC
Registration:
Applicant Profile, CoC Registration,
and
CoC Review
Table of Contents
Overview of the Registration Process 1
Overview of this Training Module 3
What’s New in e-snaps in 2012 4
Adding and Deleting Registrants 8
Edit Registrant Information 11
Establishing a New CoC as an Applicant (Newly Established CoCs only) 13
Accessing the Applicant Profile 15
Exiting the Applicant Profile 17
2. Organization Information 19
Primary Contact Information 22
Alternate Contact Information 24
Homeless Referral Contact Information 27
Completing the Applicant Profile 38
Funding Opportunity Registration 43
Creating the CoC Registration Project 45
Accessing the CoC Registration 48
Before Starting Continuum of Care Registration 49
1. Continuum of Care Organization 50
2. Continuum of Care Claimed Geographic Area(s) 53
6. Capacity - Collaborative Applicant 60
7. UFA Capacity - CoC Responsibilities 61
8. UFA Financial Management 68
9. UFA Financial Management – Sub-recipient Management 70
Attachments for Collaborative Applicants 75
Attachments for Collaborative Applicants with a UFA designation 78
Submitting the CoC Registration 82
1. Approved CoC Type Designation 86
3. CoC Maximum Funding Need Amounts 88
Introduction
Welcome to the Continuum of Care (CoC) Registration training module. This module covers important information about accessing and completing the CoC Applicant Profile, CoC Registration, and CoC Review.
The entity registering for the CoC Competition and submitting the application for funding is the CoC Collaborative Applicant. Among Collaborative Applicants, there are some entities that can qualify and apply for designation and funding as a Unified Funding Agency (UFA).
Objectives
By the end of this module, you should be able to do the following:
Access e-snaps
Complete the CoC Applicant Profile
Access the CoC Registration
Complete and submit the CoC Registration
Review and either agree with or dispute the HUD CoC Registration Review
Overview of the Registration Process
As published in HUD's Notice of Fiscal Year (FY) 2012 Opportunity to Register and Other Important Information for Electronic Application Submission for the CoC Program Competition:
HUD requires each Continuum of Care (CoC) Collaborative Applicant (also known as the CoC Applicant) to register in advance of applying for the approximately $1.6 billion of funding under the FY2012 CoC Program Competition Collaborative Applicants must complete the annual registration using e-snaps, a web-based portal accessible at www.hud.gov/esnaps.
Each Collaborative Applicant must complete and submit a registration on behalf of the CoC in e- snaps. Registration in e-snaps allows the following:
(1) Collaborative Applicants to validate the CoC geographic area and merger status (if CoCs merged)
(2) HUD to apportion Preliminary Pro Rata Need (PPRN) dollars associated with the CoC’s geographic area
(3)Collaborative Applicants to identify grants that are eligible for renewal funding in the FY2012 CoC Program Competition and record the Annual Renewal Demand through the use of the Grant Inventory Worksheet (GIW)
(4) Collaborative Applicants to indicate intent to reallocate funds within the CoC and list the projects that are planned for reallocation during the FY2012 CoC Program Competition through the GIW
(5) HUD to calculate the Collaborative Applicant's Final Pro Rata Need (FPRN) amount for the FY2012 CoC Program Competition
(6) HUD to inform each CoC Applicant of the possible Permanent Housing Bonus amount available in the geographic area jurisdiction(s)
(7) HUD to inform each CoC of the possible amount available for CoC Planning funds
(8) Collaborative Applicants to confirm their intent to submit an application in the FY2012 CoC Program Competition on behalf of the CoC
STOP: |
Is there a new Primary Contact for the agency currently serving as the Collaborative Applicant, or has the agency serving as the Collaborative Applicant for the CoC changed? Please see the following resource on the e-snaps training page and contact the HUD HRE Virtual Help Desk located on the Homelessness Resource Exchange (HRE):
|
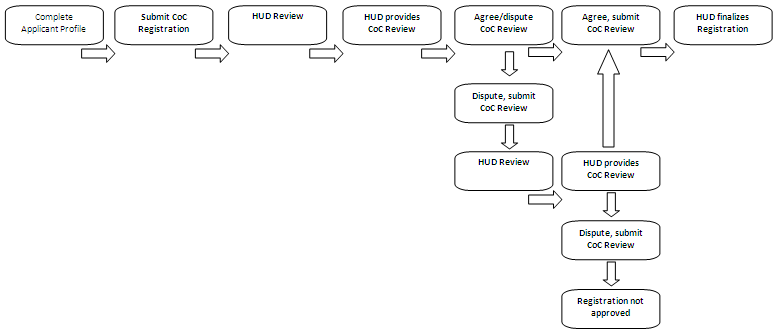
CoC Registration Flow Chart
The following flow chart depicts the CoC Registration process. After HUD announces the opening of the CoC Registration period, the entire process must be completed in 45 calendar days. HUD listserv announcements and webcasts will provide specific due dates.
As part of the Registration process, HUD needs Collaborative Applicants to update the CoC Applicant Profile to ensure that contact information and organizational documentation is up-to-date. Then, the Collaborative Applicant submits the Registration, HUD reviews it, and, through e-snaps, HUD provides the Collaborative Applicant with its determinations in the CoC Review. The Collaborative Applicant either agrees with or disputes the determinations, and then HUD finalizes the CoC Registration.
|
Overview of this Training Module
The organization of material in this training module corresponds with the different parts of CoC Registration, and the instructional steps follow the progression of screens in e-snaps.
Accessing e-snaps. All e-snaps users need usernames and passwords in order to log in to the online e-snaps system. In order to see an organization's Applicant Profile, CoC Registration, etc., the e-snaps user needs to be associated as a "registrant" with the organization's e-snaps account. This section identifies the steps to create user profiles and add/delete registrants.
CoC Applicant Profile. The Collaborative Applicant must review the Applicant Profile, update the information as needed, and click on the "Complete" button in order to proceed with the CoC Registration process. This section provides instructions on how to do so.
Accessing CoC Registration. After the CoC Applicant Profile is complete, Collaborative Applicants need to follow a series of steps in order to access the CoC Registration forms. The steps discussed in this section include registering the CoC for the FY2012 CoC Program Competition.
CoC Registration. After accessing the FY2012 Registration, Collaborative Applicants will complete a series of screens asking for information about the CoC. This section provides instructions for each screen. After all required information is provided the Collaborative Applicant will submit the CoC Registration for HUD review.
CoC Review. After the CoC Registrations are submitted, HUD reviews the registrations from each CoC and then sends a listserv message announcing when CoCs can log in to e-snaps and access the CoC Review on the "Submissions" screen. At this point, the Collaborative Applicant must review HUD's determination of its geographic area, maximum funding needs, and other items. This section provides instructions on how to agree with or dispute these determinations.
Next Steps. This section discusses what occurs after the Collaborative Applicant submits the CoC Review. Those that agree with and submit the CoC Review will then be finished with CoC Registration. Collaborative Applicants that dispute and submit the CoC Review will have their Registration reviewed a second time. The second review by HUD is the final determination and must be reviewed and submitted; after doing so, the CoC will then be finished with CoC Registration.
What’s New in e-snaps in 2012
There are several new items in e-snaps this year.
Terminology: "CoC Application" and "Project Application." The term "CoC Application" (formerly Exhibit 1) refers to the consolidated application packet submitted by the Collaborative Applicant in the FY2012 CoC Program Competition that includes the application for the Continuum of Care and the Project Listing that lists all Project Applications being submitted for funding consideration. The "Project Application" (formally Exhibit 2) includes the information submitted in the SF-424 forms as well as the application submitted by renewal and/or new applicants for funding consideration.
No Importing Data. This year, CoCs and Project Applicants will not be able to import data from the CoC Registration, CoC Application, or Project Application(s). All information will need to be
re-entered, except for some information that pre-populates from the Applicant Profile.Claiming geographic area(s). All Collaborative Applicants must notify HUD of the geographic area(s) included in the CoC. This notification is completed in e-snaps during registration. The CoC interim rule in §578.35 (d) states if more than one CoC claims the same geographic area, HUD will award funds to the Collaborative Applicant whose application has the highest total store. No projects will be funded from the lower scoring CoC. Projects that are submitted by more than one CoC will not be funded. HUD will not correct errors made by Collaborative Applicants that fail to claim a geographic area previously claimed in the past.
Applicant dropdown. When e-snaps users log in to the system, there is a new feature—an "Applicant" field with a dropdown menu at the top of the screen. This field identifies the organization's account in which the user is working.
e-snaps users with access to only one organization's account will see only one item in the "Applicant" dropdown menu. Others with access to multiple organizational accounts will have a list of applicants. This latter group includes staff persons who work on multiple applications (e.g., a staff person at an agency that serves as the Collaborative Applicant as well as a Project Applicant submitting one or more Project Applications).
This feature appears when working on the "Applicants," "Funding Opportunity," "Projects," and "Submissions" screens. Only the items (e.g., Projects) pertaining to the Applicant listed in the field appear on the screen. e-snaps users must ensure they are working in the correct Applicant account.Funding Opportunity Registration. Funding Opportunity Registration has been simplified this year. CoCs will now only need to select "Yes" that they are registering for the FY2012 CoC Program Competition, ensuring that the pre-populated applicant name is the correct.
Annual Renewal Demand (ARD). The Annual Renewal Demand (ARD) was previously known as Hold Harmless Need (HHN). The ARD is the CoC's total amount for all of the eligible grants that can be awarded on an annual basis when renewed. It includes funds only for those eligible activities (operating, supportive services, leasing, rental assistance, HMIS and administration) that were funded in the original grant (or the original grant as amended), less the non-renewable activities (new construction, acquisition, rehabilitation and any administrative costs related to these activities).
Collaborative Applicant. The Collaborative Applicant is the entity designated by the CoC to submit the registration and application in the CoC Program Competition on behalf of the CoC. The Collaborative Applicant is responsible for the coordination and oversight of the CoC planning efforts and has the authority to certify and submit the CoC homeless assistance funding application. This entity is also known as the CoC Applicant.
Unified Funding Agency (UFA). A Collaborative Applicant may apply for and receive a designation as a UFA and be eligible to receive UFA planning funds. All CoC Applicants, therefore, are Collaborative Applicants, while a subset of Collaborative Applicants may qualify to become UFAs, The e-snaps system uses the terms "CA" and "UFA" to distinguish between Collaborative Applicants without and with a UFA designation.
Accessing e-snaps
e-snaps contains the CoC Registration and CoC Application forms that are submitted electronically during the annual competition under the Continuum of Care (CoC) Registration Notice and Notice of Funding Availability (NOFA) for Homeless Assistance Programs.
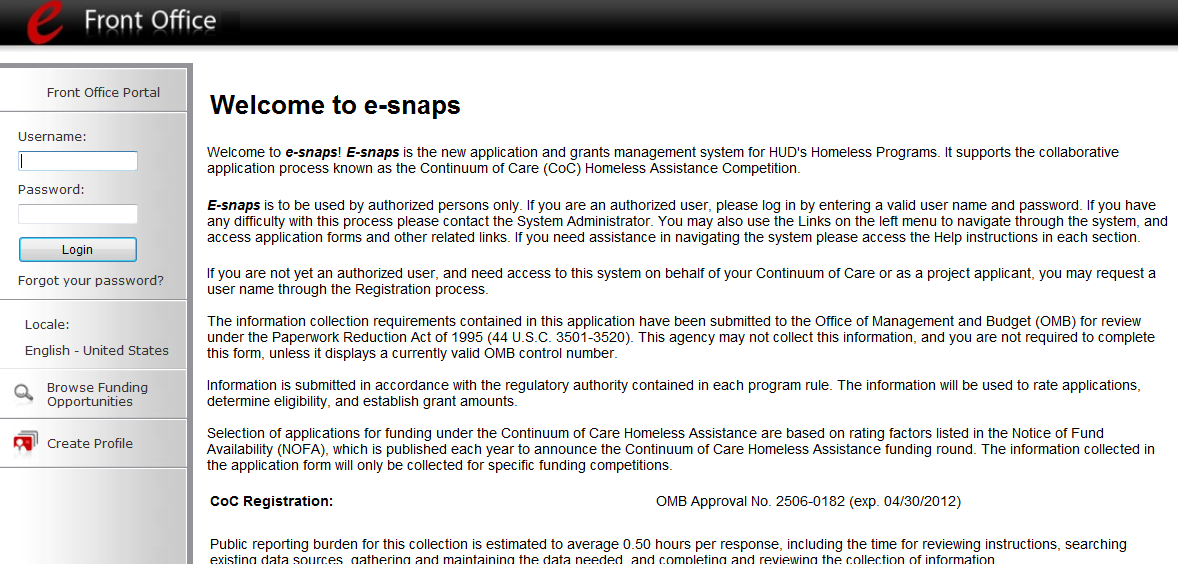
Log in here
Create a user profile here
|
NOTE: |
Each e-snaps user must have his or her own log-in credentials. Preferably, each organization will have two people with access to e-snaps – the Primary Contact and one or more additional staff persons. |
Existing Users
Step |
Description |
1. |
Direct your Internet browser to www.hud.gov/esnaps. |
2. |
On the left menu bar, enter the username and password. You will then enter the e-snaps system and arrive at the "Welcome" screen. |
3. |
If you forgot your password, select "Forgot your password?" under the "Login" button. |
New e-snaps Users
Step |
Description |
1. |
Create an e-snaps username and password by selecting the "Create Profile" link. |
2. |
Log in as instructed under Existing Users above. |
|
For a refresher on how to navigate through the e-snaps system, the "Introduction to e-snaps Features and Functions" training module is available on the e-snaps training page at: http://www.hudhre.info. |
Adding and Deleting Registrants
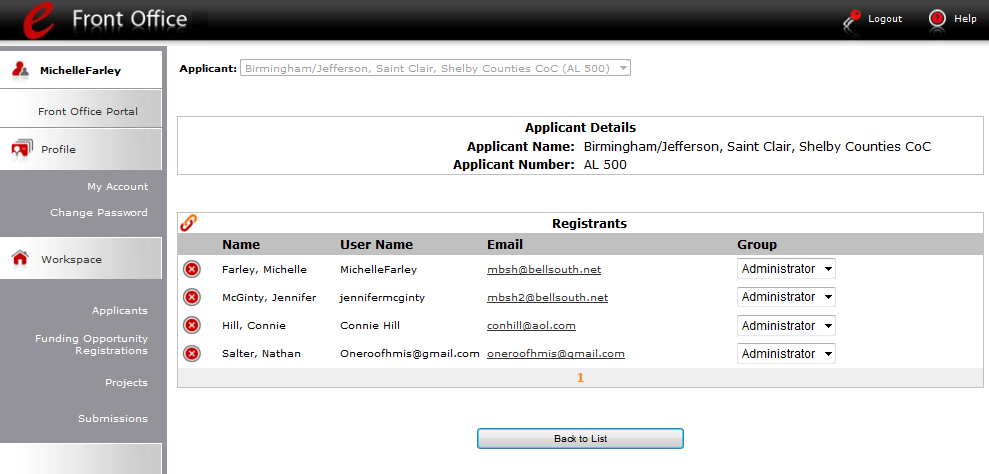
Having a user profile enables a person to access e-snaps. However, only people who have been associated with the organization as a Registrant (also referred to as registered users) have the ability to enter information in the Applicant Profile, Registration, and applications associated with the organization.
Anyone that currently has access to an organization’s e-snaps account (i.e., who can see the organization’s Applicant Profile, past Registrations and CoC Applications, etc.) can add or remove other Registrants by following the instructions provided below.
Select "Applicants"
Access Registrant screen
|
Step |
Description |
1. |
Select "Applicants" on the left menu bar. |
2. |
On the "Applicants" screen, click the "Registrant"
icon.
|
NOTE |
Before anyone can be added as a Registrant in e-snaps, the
individual must have an |
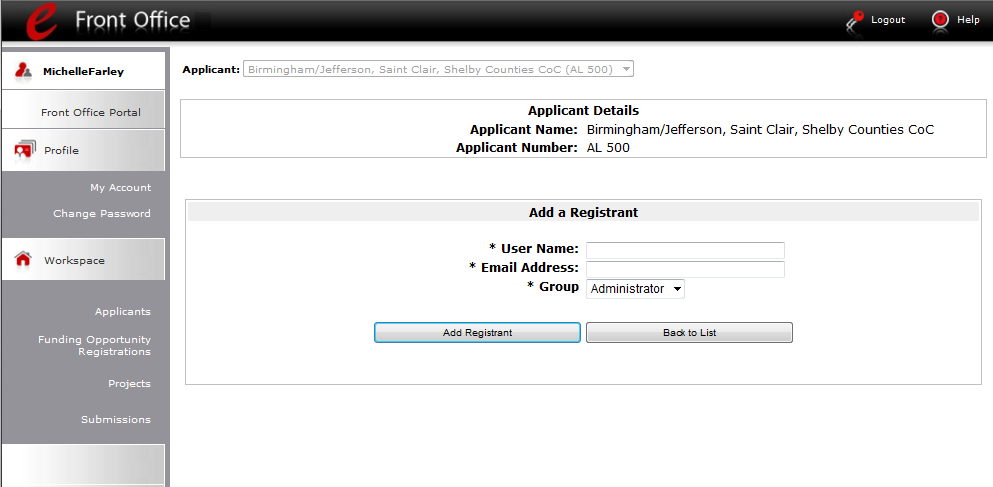
Add a Registrant
Add a Registrant
|
Step |
Description |
1. |
Select the "Add Registrant" icon.
|
Obtain and enter username
and email address
|
Step |
Description |
1. |
Enter the user name and email address of the registrant.
|
2. |
Select the "Add Registrant" button. |
3. |
Select the "Back to List" button to return to the "Registrants" screen, where you will see the person added to the list. |
4. |
On the "Registrants" screen, select the "Back to List" button to return to the "Applicants" screen. |
|
For information on how to add and delete users, refer to the Adding and Deleting Users module in the Reference Room tab on the e-snaps training page at: www.hudhre.info. |
Delete a Registrant
Deleting the user will remove, or dissociate, the user from the Applicant Profile. This person will still be able to access e-snaps, but will no longer be able to access the organization’s Applicant Profile, Registration, or applications.
"Delete" icon
|
Step |
Description |
1. |
Select the "Delete" icon |
2. |
Select the "Back to List" button to return to the "Applicants" screen. |
Edit Registrant Information
To edit a Registrant's information, delete the person first and then add the person again.
Step |
Description |
1. |
Select the "Delete" icon |
2. |
Follow the instructions above for adding the person again with the correct information. |
CoC Applicant Profile
Collaborative Applicants must complete the Applicant Profile before moving forward in the registration process. For the Applicant Profile to be complete, the Collaborative Applicant needs to ensure the data entered in the Applicant Profile is accurate and select the “Complete” button on the Submission Summary screen of the Applicant Profile. Only after doing so will a CoC be able to advance successfully in e-snaps to CoC Registration.
This section provides instructions on gaining access to the Applicant Profile and completing the forms.
NOTE: |
If the organization serving as the Collaborative Applicant is also a grantee, the organization will have a second Applicant Profile for the Project Applicant. There is a separate resource for completing the Applicant Profile as a Project Applicant. It will be posted on the e-snaps training page before the CoC Program Competition opens. |
Establishing a New CoC as an Applicant (Newly Established CoCs only)
This section pertains only to those organizations that are establishing a new Continuum of Care. HUD must approve the establishment of the new CoC and assign the CoC a number.
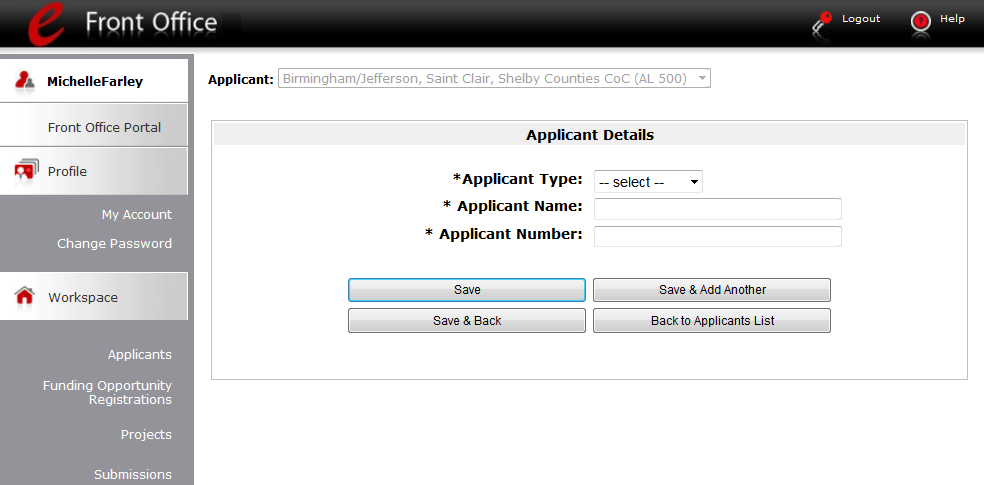
A Collaborative Applicant that is going to submit a CoC Application for a new CoC must establish the CoC as an Applicant in e-snaps, giving it an Applicant Number that corresponds with the CoC Number. Establishing the CoC as an Applicant will enable the Collaborative Applicant to complete a CoC Applicant Profile.
Select "Applicants"
Add the CoC as an Applicant
in e-snaps
New CoCs ONLY ---------------- Returning CoCs continue
in the training module
|
Step |
Description |
1. |
Select "Applicants" under "Workspace" on the left menu bar. |
2. |
The "Applicants" screen appears. |
3. |
Select the "Add" icon.
|
4. |
The "Applicant Details" screen appears. |
Name of the CoC (not the
organization)
CoC Number
|
Step |
Description |
1. |
Select "Organization" from the Applicant Type. Dropdown. |
2. |
Enter the CoC's official name, as assigned by HUD, in the "Applicant Name" field. |
3. |
Enter the HUD-assigned CoC Number in the "Applicant Number" field. |
4. |
Select "Save" to return to the "Applicants" screen. |
5. |
Continue with the next steps to access the Applicant Profile. |
NOTE: |
If you are the Collaborative Applicant for a new CoC and do not have a CoC number, please contact your local HUD Field Office. The contact information is available at: www.hudhre.info/index.cfm?do=viewCocContacts |
Accessing the Applicant Profile
e-snaps users will access the Applicant Profile on the "Applicants" screen.
Select "Applicants"
Access
Applicant Profile
|
Step |
Description |
1. |
After logging in, select the CoC Applicant name from the "Applicant" dropdown at the top of the screen. |
2. |
Select "Applicants" on the left menu bar. |
3. |
On the "Applicants" screen, locate the "Applicant Name" column.
|
4. |
Select the "Folder" icon
|
Understanding "edit-mode"
|
One of the requirements for CoC Registration is the completion of the Applicant Profile. In order to meet that requirement, the "Complete" button must be selected within the timeframe of the registration period. Therefore, when you log in the first time after the CoC Registration period opens, even if there is a statement "This e.Form has been marked as complete," you must put the forms in edit-mode and select the "Complete" button again. |
When the CoC Registration period opens and e-snaps users access the CoC Applicant Profile for the first time, the Applicant Profile may be marked as complete and an "Edit" button will appear on the "Submission Summary" screen, as shown in the screenshot below.
|
You need to put your Applicant Profile in edit-mode.
Step |
Description |
1. |
Select "Submission Summary" on the left menu bar.
|
2. |
Select the "Edit" button.
|
3. |
Continue with the instructions in the next section of the training module to review the Applicant Profile and select the "Complete" button. |
For some e-snaps users, the Applicant Profile may already be in "edit-mode," in which case a "Complete" button will appear on the "Submission Summary" screen. You can update the information. Continue with the instructions in the next section of the training module to review the Applicant Profile and select the "Complete" button.
Exiting the Applicant Profile
When working in the Applicant Profile, e-snaps users can return to the main screen by selecting the "Back to Applicants List" at the bottom of the left menu bar. This screen is where Applicant, Funding Opportunity Registration, Projects, and Submissions are located on the left menu bar.
Select "Back to
Applicants List"
|
1. Profile Type
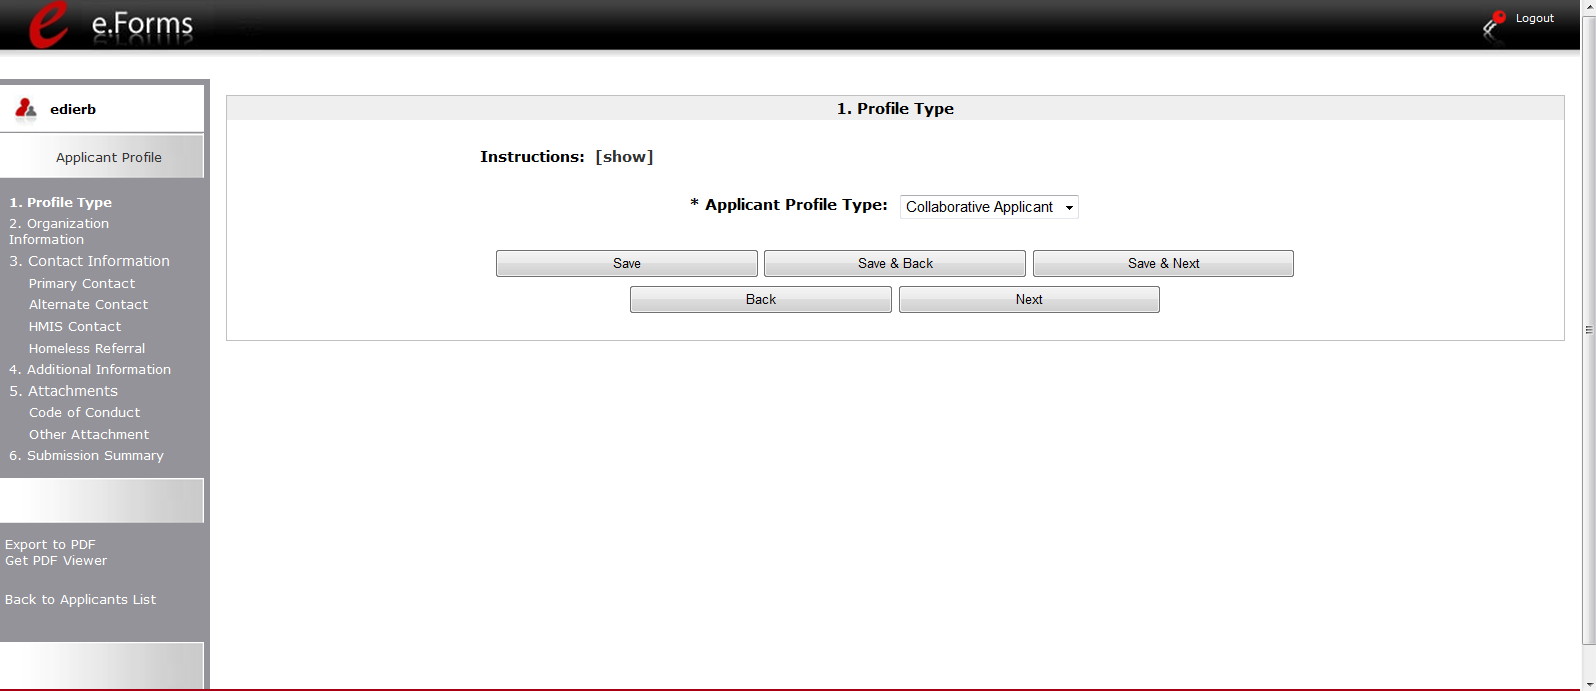
The "Profile Type" screen indicates whether the Applicant Profile is for a CoC or Project Applicant. In this module, you are creating a CoC Applicant Profile.
Select Collaborative
Applicant or UFA
|
Step |
Description |
1. |
Select "Collaborative Applicant" or "UFA" from the "Applicant Profile Type" dropdown menu. Nearly all entities completing the Applicant Profile will identify as Collaborative Applicants. |
2. |
Select "Save and Next." |
NOTE: |
Throughout e-snaps, you will see "Instructions" listed at the top left of most screens. Select "show" to open additional instructions for the screen. Select "hide" when you no longer need the instructions. |
2. Organization Information
The "Organization Information" screen is where you enter information about your organization.
Note the asterisks
throughout
|
Step |
Description |
1. |
Complete the required fields. |
2. |
Complete the optional fields, as appropriate. |
3. |
Select "Save and Next." |
The required fields include the following:
Legal Name of Organization
Organization Type
Select from the dropdown menu.
Note: If a Collaborative Applicant is a private or public nonprofit, it is required to provide documentation of its status. This documentation will be uploaded in the "Attachments" sections later in the Applicant Profile.
Employer or Tax Identification Number
Address – Street 1, City, State, Zip/Postal Code, and County
Identification as to whether the mailing address and organization address are the same.
Select "Yes" or "No" from the dropdown menu.
If "No," additional fields will appear into which the mailing address must be inserted.
The optional fields include the following:
Department Name
Division Name
Organization Type – Other field
Organization DUNS Number (and DUNS Extension, if applicable)
CoC lead agencies typically have a DUNS Number. If the agency has one, it should be included.
Address – Street 2, and County
3. Contact Information
There are four contact information screens in the Applicant Profile:
Primary Contact
Alternate Contact
HMIS Contact
Homeless Referral Contact
Primary Contact Information
The Primary Contact is the contact for the Collaborative Applicant. This person has the primary responsibility for ensuring that the Applicant Profile, Registration, and CoC and Project Applications are submitted to HUD. HUD will communicate with this person regarding the CoC Registration and CoC Application.
Note the asterisks
throughout
|
Step |
Description |
1. |
Complete the required fields. |
2. |
Complete the optional fields, as appropriate. |
3. |
Select "Save and Next." |
The required fields include the following:
Prefix
First Name and Last Name
Title
Phone Number and Fax Number
E-mail Address and Confirm E-mail Address
The optional fields include the following:
Middle Name
Suffix
Organizational Affiliation
Note: This field should be completed if the Primary Contact is affiliated with an organization other than the applicant organization.
Alternate Phone Number
Extensions for Phone Numbers
Alternate Contact Information
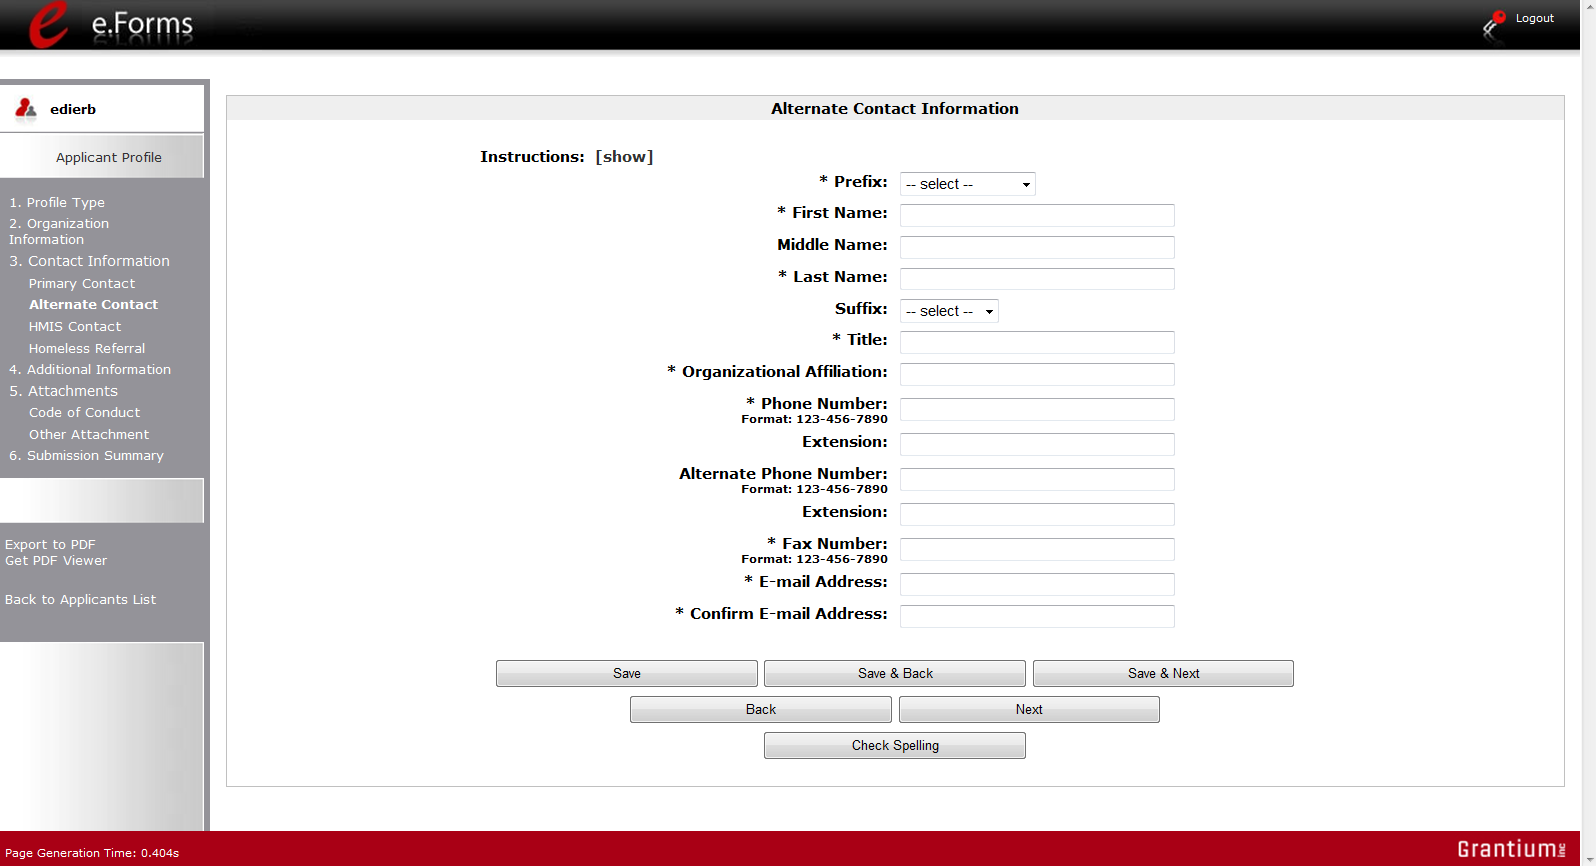
The Alternate Contact is the backup person to the Primary Contact. This person is responsible for ensuring that Applicant Profile, Registration, and CoC and Project applications are submitted to HUD in the event that the Primary Contact is unable to perform the function.
The required and optional fields for the Alternate Contact Information are the same as those for the Primary Contact Information.
Note asterisks throughout
|
Step |
Description |
1. |
Complete the required fields. |
2. |
Complete the optional fields, as appropriate. |
3. |
Select "Save and Next." |
HMIS Contact Information
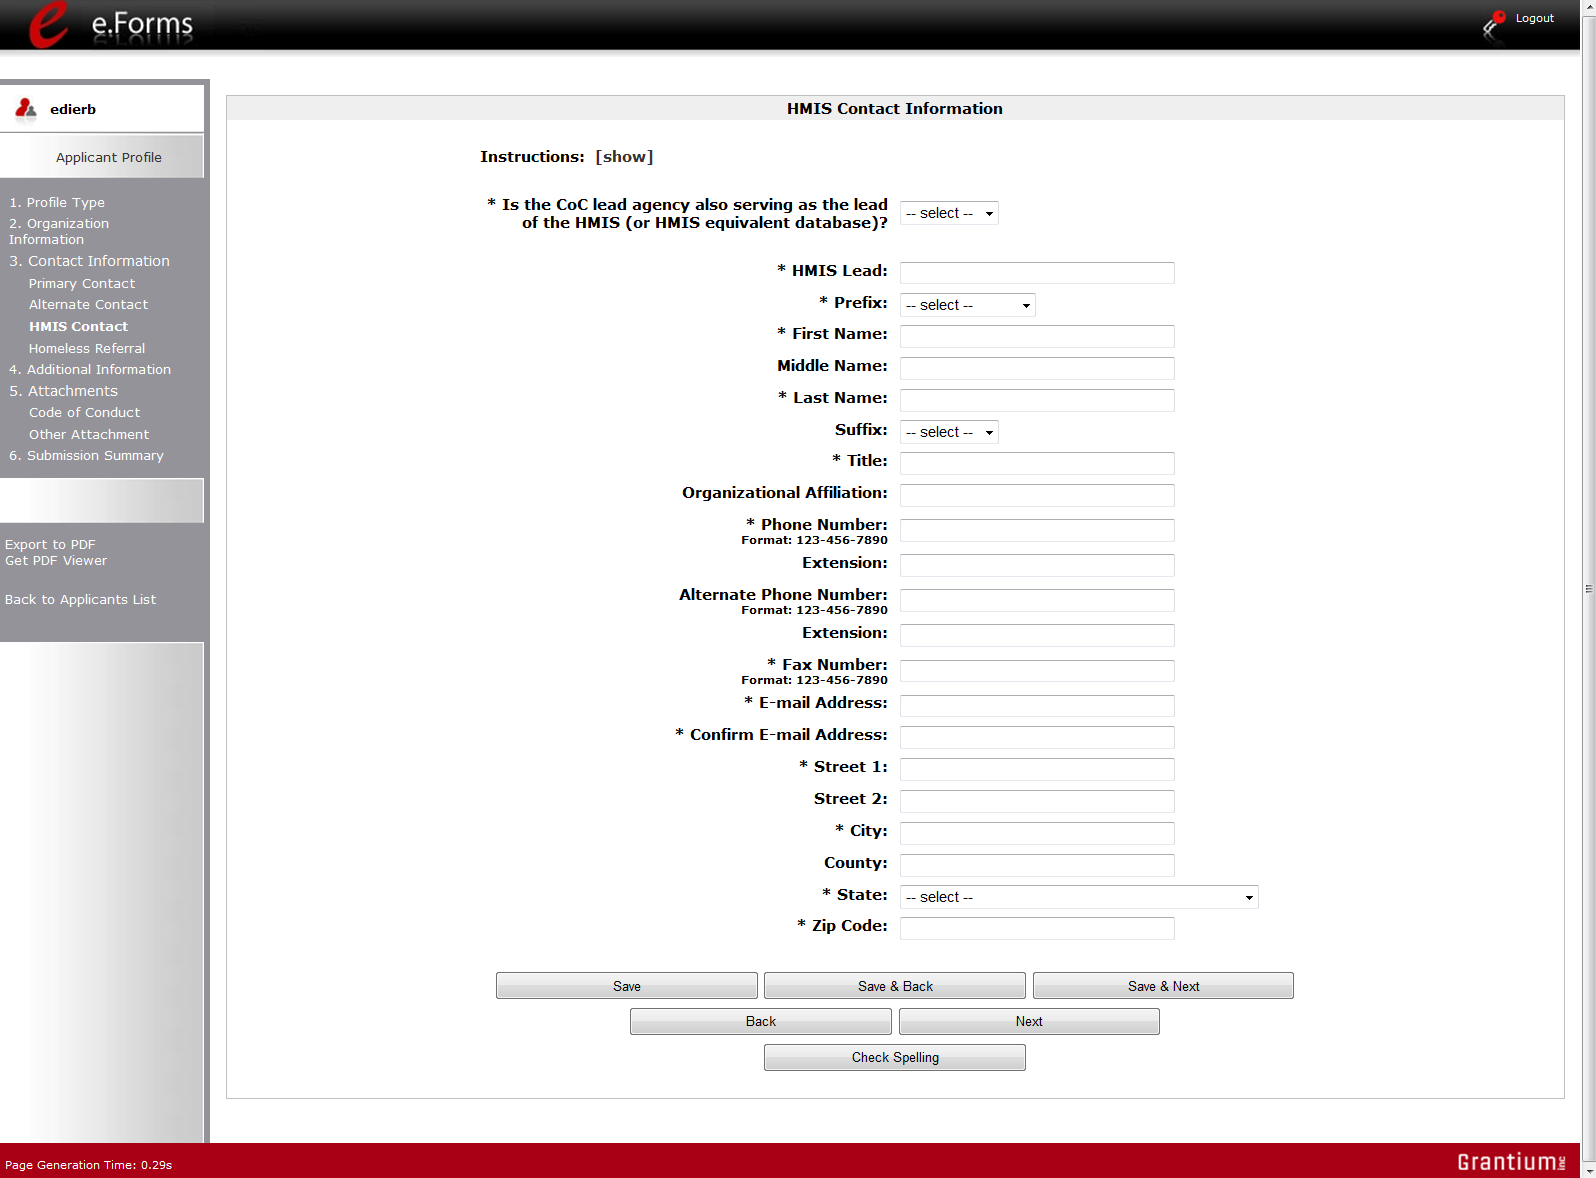
On the "HMIS Contact Information" screen, enter the person in the CoC who is responsible for HMIS.
Note the two specific HMIS items
|
The required and optional fields on the HMIS Contact Information screen are the same as those on the Primary Contact Information screen, with these additional required fields:
Indication whether the CoC Lead Agency also serves as the lead HMIS agency.
HMIS Lead Organization
Step |
Description |
1. |
Complete the required fields. |
2. |
Complete the optional fields, as appropriate. |
3. |
Select "Save and Next." |
Homeless Referral Contact Information
On the "Homeless Referral Contact Information" screen, enter the person in the CoC who is responsible for homeless referrals.
The required and optional fields for the Homeless Referral Contact Information are the same as those for the Primary Contact Information.
Note the asterisks
throughout
|
Step |
Description |
1. |
Complete the required fields. |
2. |
Complete the optional fields, as appropriate. |
3. |
Select "Save and Next." |
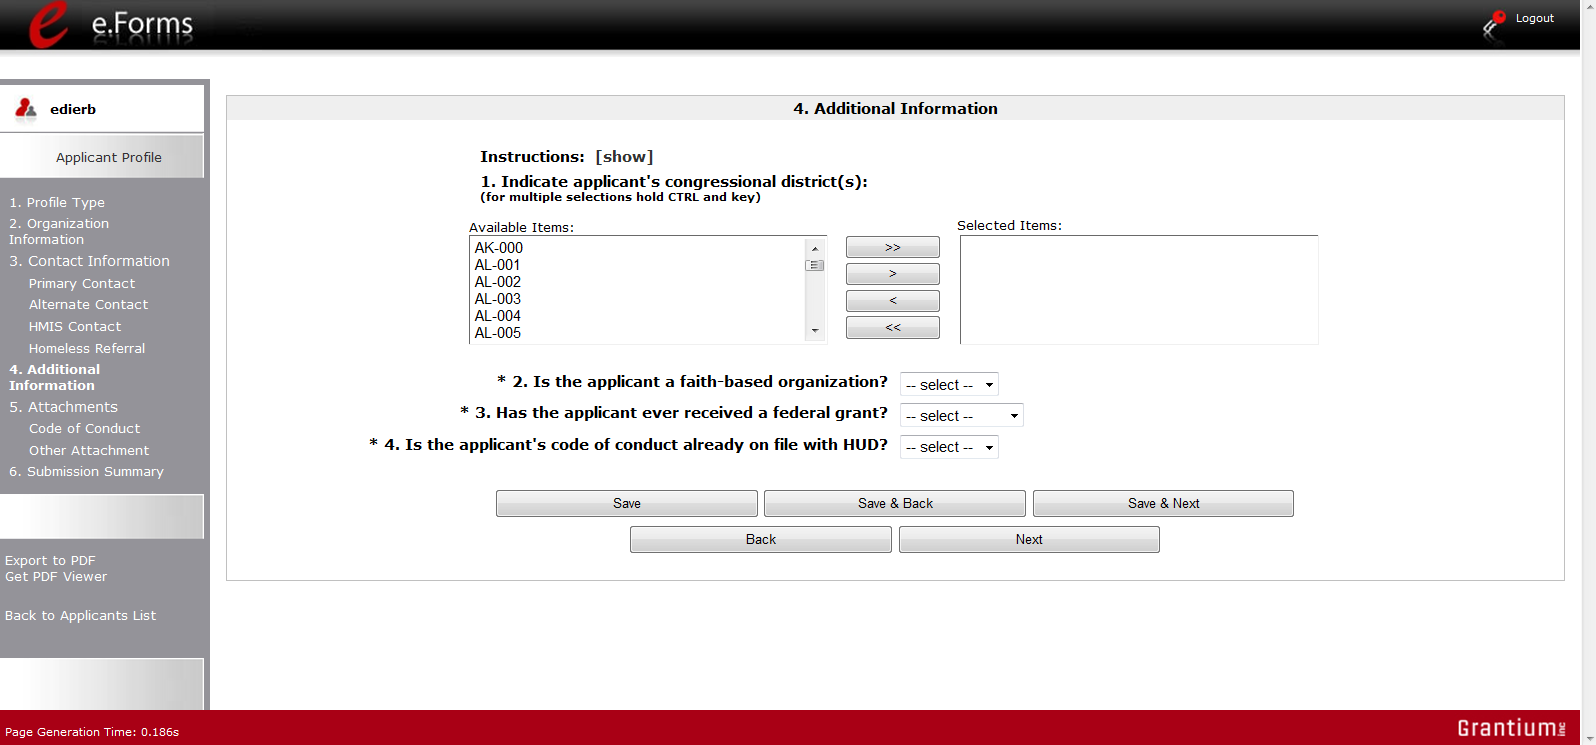
4. Additional Information
Complete the fields on the "Additional Information" screen.
This item lacks an
asterisk, but is required
|
Step |
Description |
1. |
Indicate the applicant's congressional district(s) by selecting the congressional district in the "Available Items" box on the left and moving it to the "Selected Items" box on the right.
|
2. |
Select "Yes" or "No" from the dropdown menu to indicate whether the applicant is a faith-based organization. |
3. |
Select "Yes," "No," or "Not Applicable," from the dropdown menu to indicate whether the applicant has ever received a federal grant. |
4. |
Select "Yes" or "No" from the dropdown menu to indicate whether the applicant's code of conduct is already on file with HUD.
|
5. |
Select "Save and Next." |
NOTE: Code of Conduct |
An applicant whose name is listed at HUD website http://www.hud.gov/offices/adm/grants/codeofconduct/cconduct.cfm is not required to submit another copy, unless the information has been revised. If you are uncertain about whether you need to upload the Code of Conduct document, HUD encourages you to upload it anyway. |
5. Attachments
There are three attachment screens in the Applicant Profile:
Applicant Code of Conduct
Nonprofit Documentation (This screen appears only for those who selected a Nonprofit Organization Type.)
Other Attachment
NOTE: |
Attachments that were uploaded to the Applicant Profile prior to the opening of CoC Registration may not be available. All required attachments must be uploaded before the Collaborative Applicant will be able to access the CoC Application once it becomes available in e-snaps. |
The instructions for uploading and deleting an attachment are the same for all screens. The steps are provided for the Applicant Code of Conduct on the next page and can be applied to the other attachments.
A screenshot has been provided for each attachment screen and the accompanying attachment details screen.
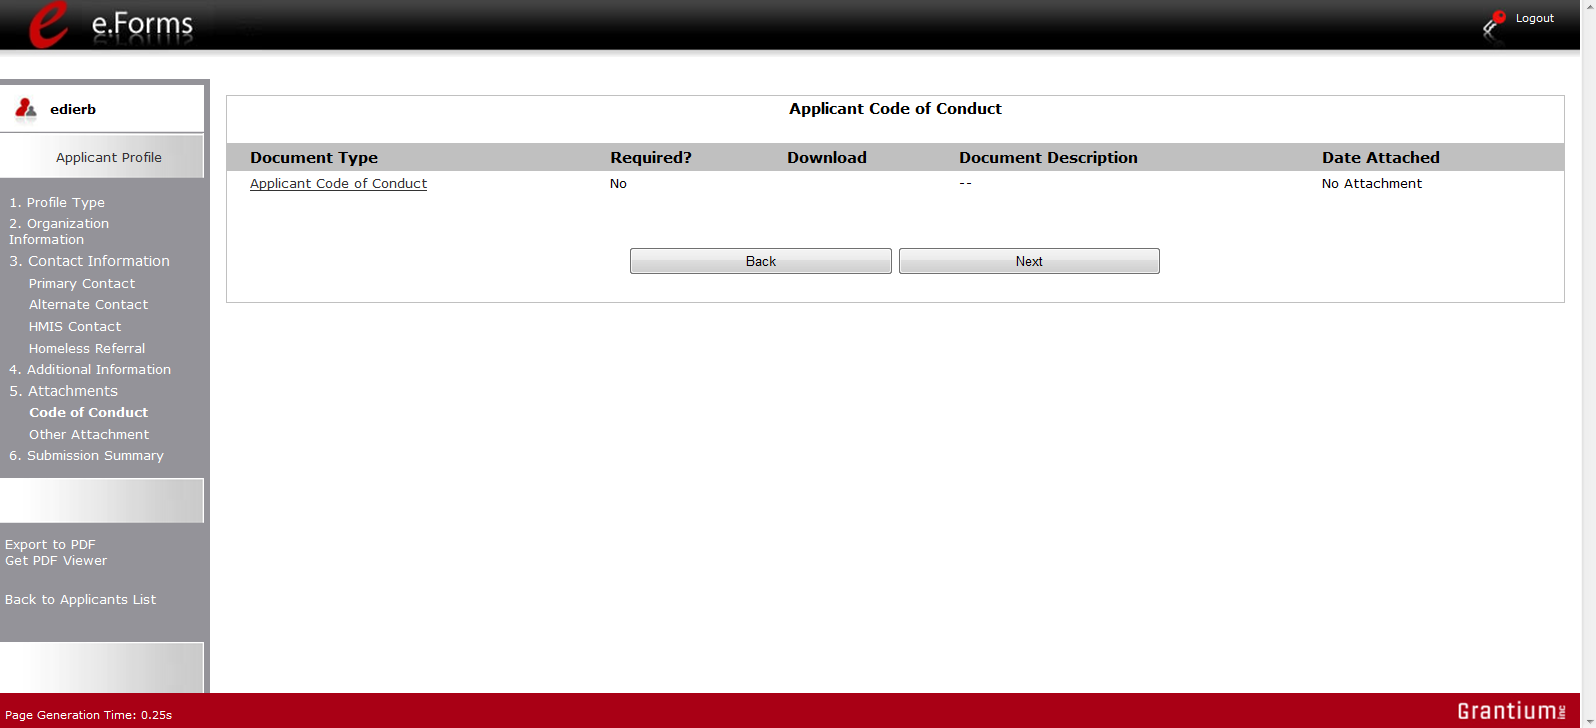
Applicant Code of Conduct
HUD must have a copy of the organization's Code of Conduct. The e-snaps system, however, does not require that the document be attached in the Applicant Profile in order for the applicant to proceed from the Applicant Profile to the next steps in the CoC Registration process.
An applicant that has a name listed at HUD's website www.hud.gov/offices/adm/grants/codeofconduct/cconduct.cfm is not required to submit another copy in e-snaps, unless the information has been revised.
If you are uncertain about whether you need to upload the Code of Conduct document, you are encouraged to upload it anyway.
The file format for the Code of Conduct must be one of the following: docx, ZIP*, xlsm, rtf, txt, doc, zipx, pdf, wpd, zip, xls, jpg, xlsx
The maximum file size for the Code of Conduct is 10 MB.
Attach the first five (5) pages of the Code of Conduct.
Select the link
|
Step |
Description |
1. |
Select the document name under "Document Type." |
2. |
The "Attachment Details" screen appears. |
Preferably, include the CoC
number and Form name in both Description and File Name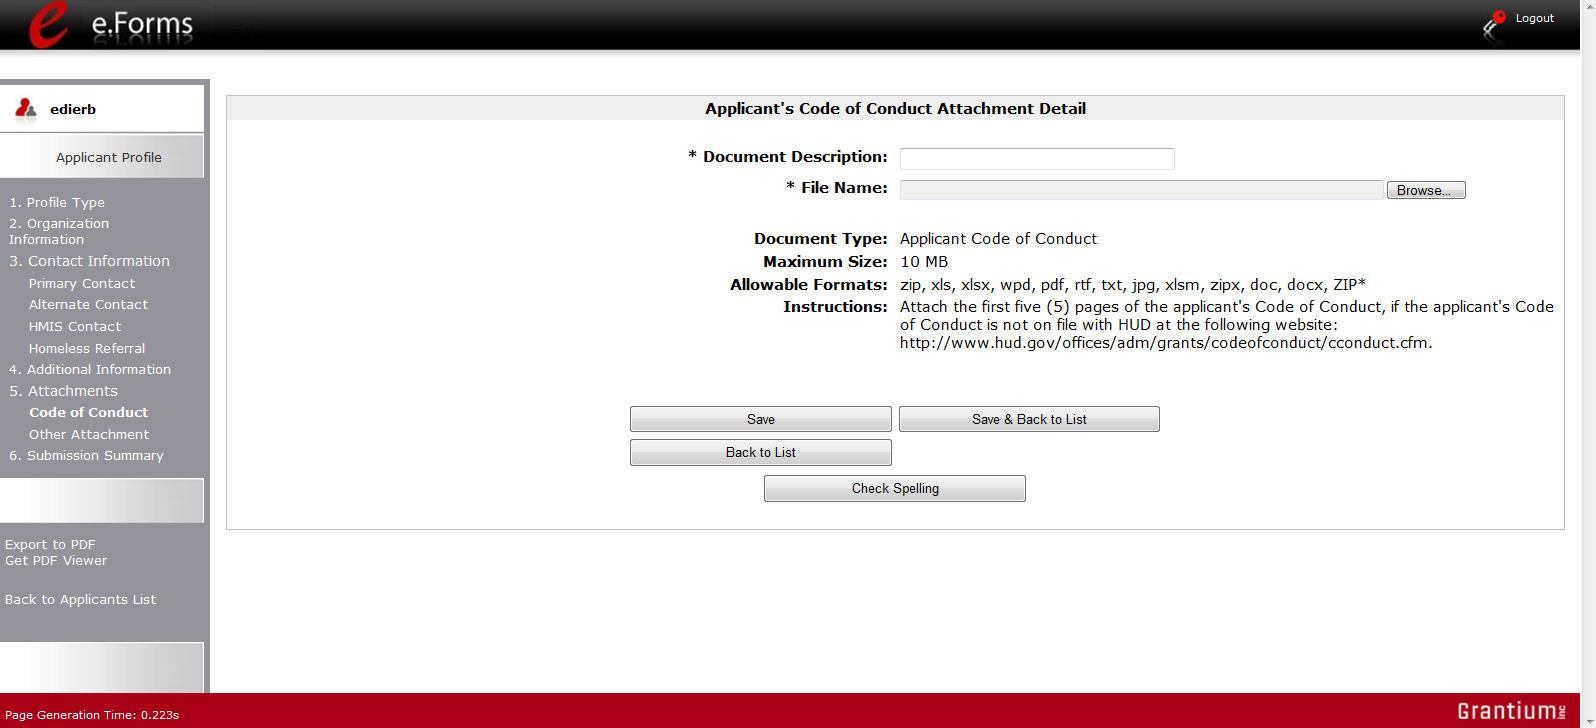

Step |
Description |
1. |
Enter the name of the document in the "Document Description" field. |
2. |
Select "Browse" to the right of the "File Name" field to upload the file from your computer. |
3. |
Select "Save & Back to List" to return to the "Attachment" screen. |
4. |
On the "Attachment" screen, select "Next." |
NOTE: |
To delete an uploaded attachment.
|
Nonprofit Documentation
The Nonprofit Documentation is a required form for nonprofit organizations. This screen will appear only for those who selected Nonprofit as the Organization Type that are provided for the Applicant Code of Conduct on the previous page.
The file format for Nonprofit Documentation must be one of the following: txt, doc, zipx, docx, ZIP*, pdf, wpd, zip, xls, jpg, xlsx, rft
The maximum file size for Nonprofit Documentation is 10 MB.
Select the link
|
The following sources are eligible attachments:
IRS letter or ruling showing 501(c)(3) status
Documentation showing certified United Way agency status
Certification from licensed CPA (see NOFA for conditions)
Letter from authorized state official showing applicant as organized and in good standing as a public nonprofit organization
Preferably, include the CoC
number and Form name in both Description and File Name
|
NOTE: Definition of Nonprofit |
Private nonprofit organization means an organization: (1) No part of the net earnings of which inure to the benefit of any member, founder, contributor or individual; (2) That has a voluntary board; (3) That has a functioning accounting system that is operated in accordance with generally accepted accounting principles, or has designated a fiscal agent that will maintain a functioning accounting system for the organization in accordance with generally accepted accounting principles; and (4) That practices nondiscrimination in the provision of assistance. A private nonprofit organization does not include governmental organizations, such as public housing agencies. |
Other Attachment
At this time, there are no other required or optional attachments.
|
6. Submission Summary
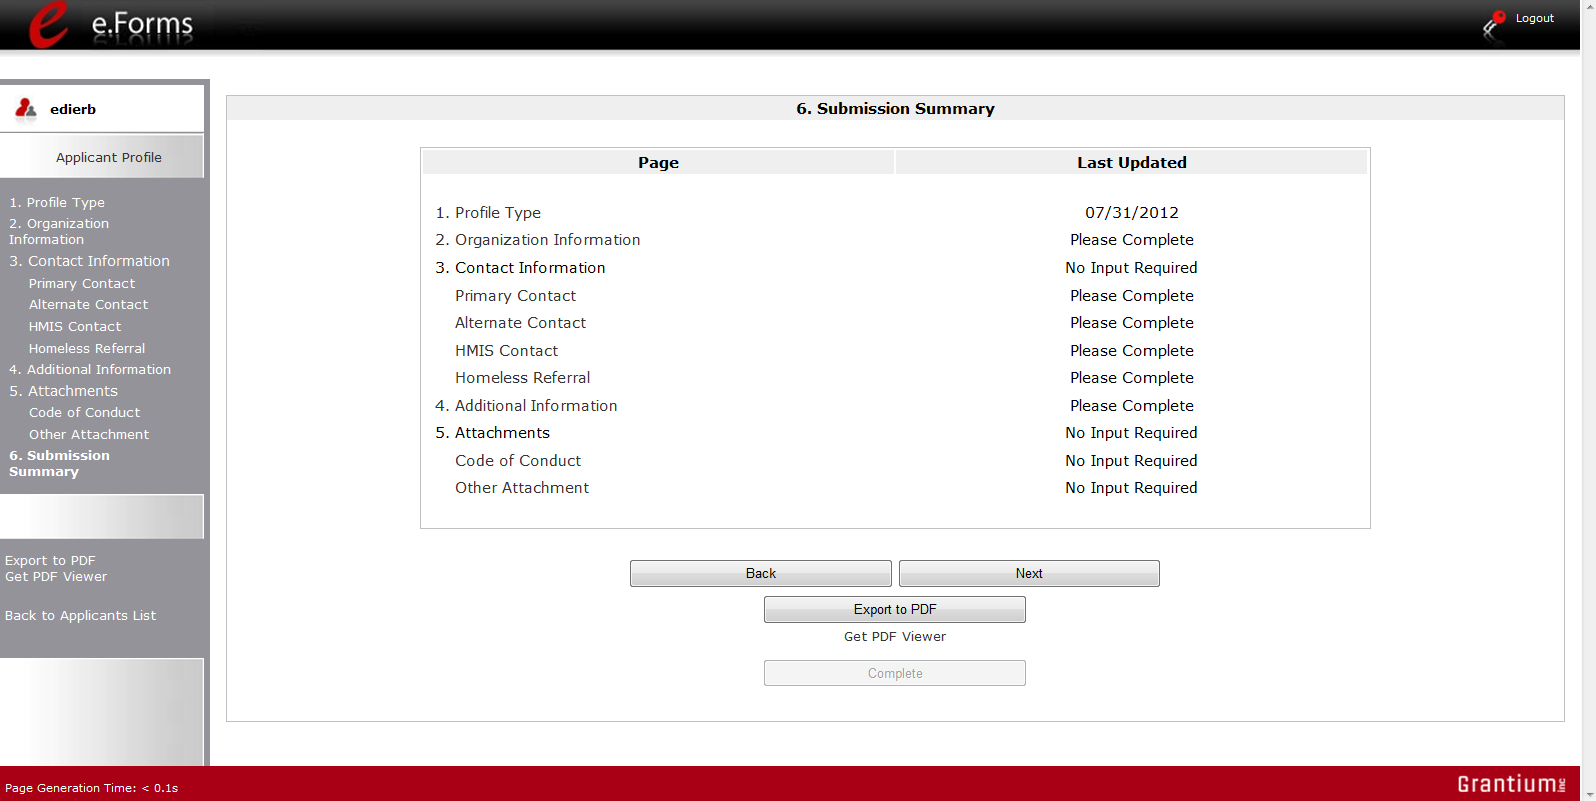
Once the required information has been entered and the required attachments have been uploaded, the Collaborative Applicant needs to select the "Complete" button on the "Submission Summary" screen.
The "Submission Summary" screen shows the CoC Applicant Profile forms.
In the "Last Updated" column, the system will identify the following:
A date if the screen is complete
"No Input Required" if there is no input required
"Please Complete" if more information is needed
e-snaps users can go back to any screen by clicking on the screen name in the left menu bar. Remember to select "Save" after any changes.
NOTE: No Input Required |
The "No Input Required" status on the Submission Summary indicates that additional information for that screen is not required for the applicant to proceed to the next step in the e-snaps system. In the context of this training module, the Collaborative Applicant may proceed to the next steps in the Registration process. HUD, however, may require the item prior to the awarding of program funds. |
The "Complete" button is located at the bottom of the screen under the navigation buttons. The "Complete" button will be active if all parts of the Applicant Profile are complete (and have a date) or state "No Input Required."
The following image shows the Applicant Profile "Submission Summary" screen with items that still require completion. Note that the "Complete" button is gray-shaded and you cannot select it.
Review "Last Updated"
column
Inactive "Complete"
button
|
Completing the Applicant Profile
The following image shows the Applicant Profile "Submission Summary" screen with all items completed. Note that the "Complete" button is active and can be selected.
Review "Last Updated"
column
Active "Complete"
button
|
Step |
Description |
1. |
Select the "Complete" button. |
2. |
The "Complete" button is replaced by an "Edit" button and text stating, "This e.Form has been marked as complete." |
The following image shows the completed Applicant Profile "Submission Summary" screen. Note that the "Complete" button no longer appears and "Edit" button now appears. The form is marked "This e.Form has been marked as complete."
Review "Last Updated"
column
"Edit" button
appears
|
Exporting to PDF
CoC lead agencies can obtain a hard copy of the Applicant Profile using the "Export to PDF" button located at the bottom of the screen under the navigation buttons.
Screen 1. Submission Summary
Select button to obtain a copy
of the Applicant Profile

Screen 2. Configure PDF Export.
Select Export to PDF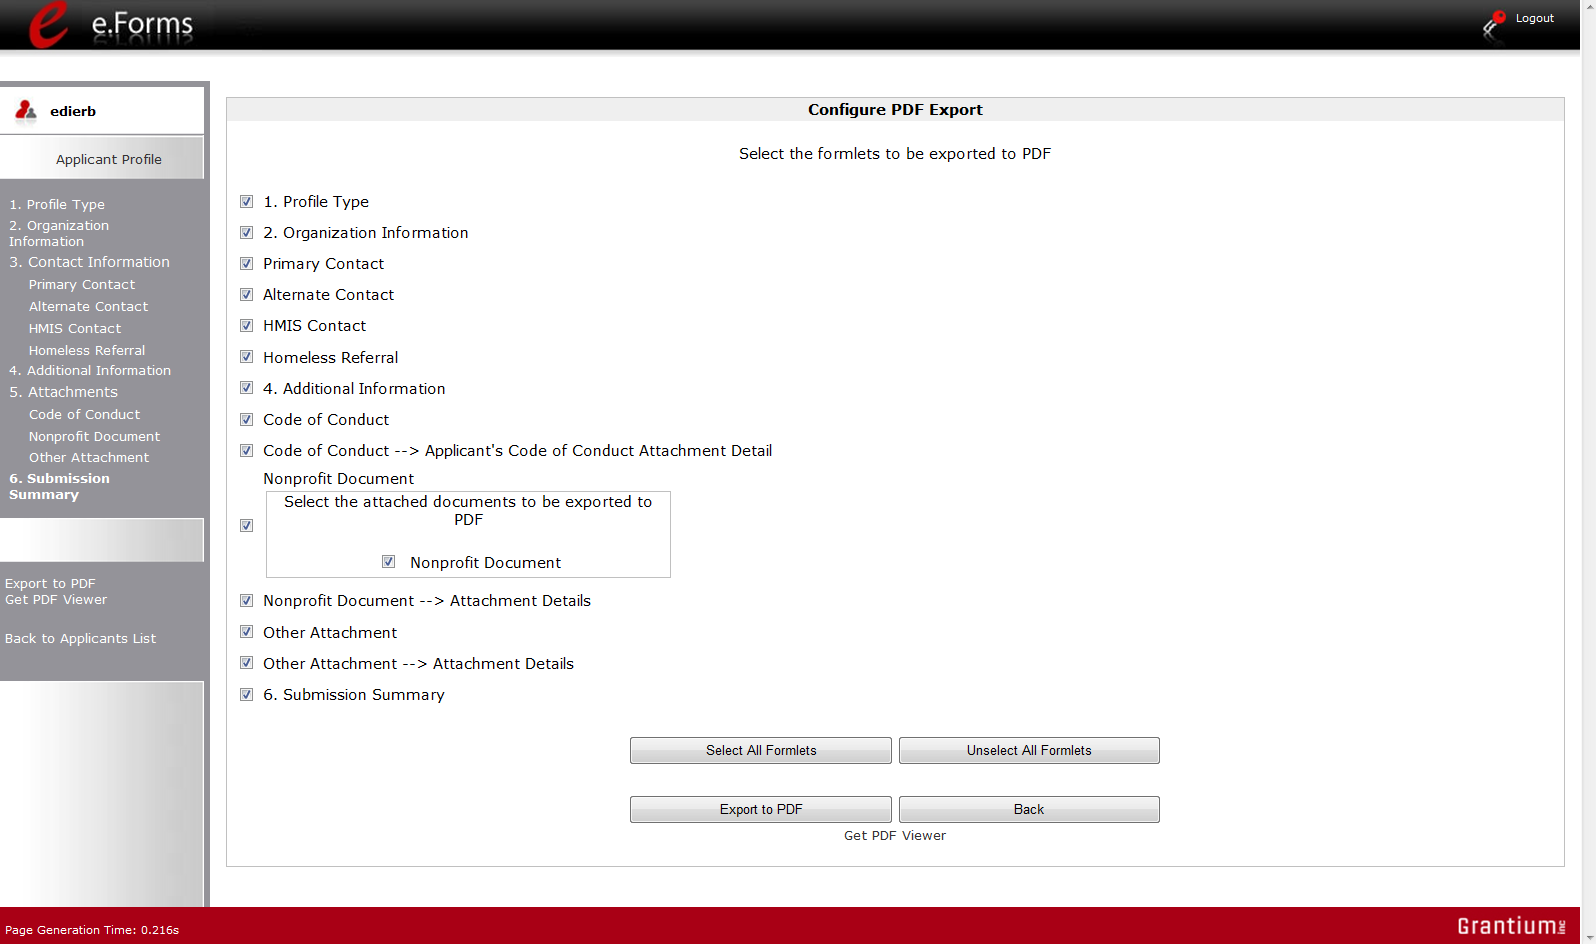

Step |
Description |
1. |
Select the "Export to PDF" button. |
2. |
On the "Configure PDF Export" screen, select the screen you would like included. |
3. |
Select "Export to PDF." |
Accessing CoC Registration
After the Applicant Profile is completed, CoC lead agencies can move to the next steps required to access the CoC Registration forms. This section covers the following:
Funding Opportunity Registration
Projects
Submissions
Funding Opportunity Registration
All Collaborative Applicants must register the CoC for the funding opportunity. During CoC Registration, registering for the funding opportunity indicates to HUD that the CoC will be applying for funds during the CoC Program Competition.
Confirm the correct
Applicant listed in the field
Select "Funding
Opportunity Registrations"
"Register" icon
Note Funding Opportunity
Name
SNAPS_CoC
Registration and Application FY2012
|
Step |
Description |
1. |
Select "Funding Opportunity Registrations" on the left menu bar. |
2. |
The "Funding Opportunity Registrations" screen appears. |
3. |
Select the "Register" icon
|
4. |
The "Funding Opportunity Details" screen appears. |
|
Step |
Description |
1. |
When the question appears asking if you want to register the applicant for the funding opportunity, select "Yes" to confirm that you want to register your CoC. |
2. |
The screen will then indicate that the CoC has been registered. |
3. |
Select the "Back" button to return to the "Funding Opportunity Registrations" screen. |
|
Remember, the "Applicant" field with the dropdown menu located at the top of the screen identifies the Applicant Profile in which you are working. Please ensure you are working in the correct one. |
Creating the CoC Registration Project
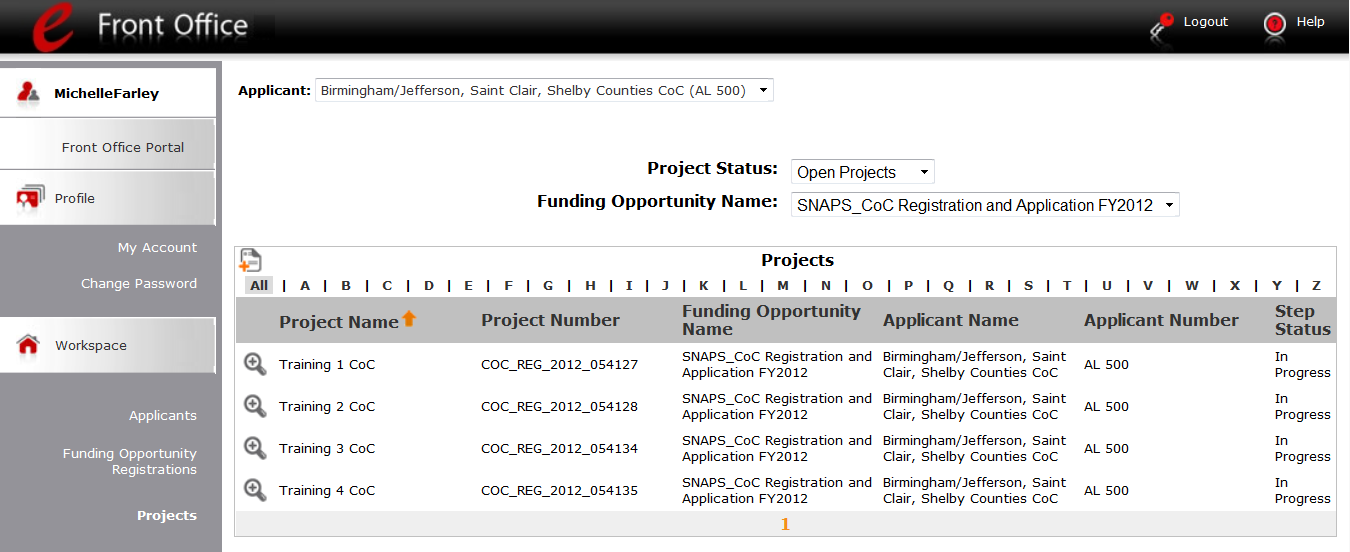
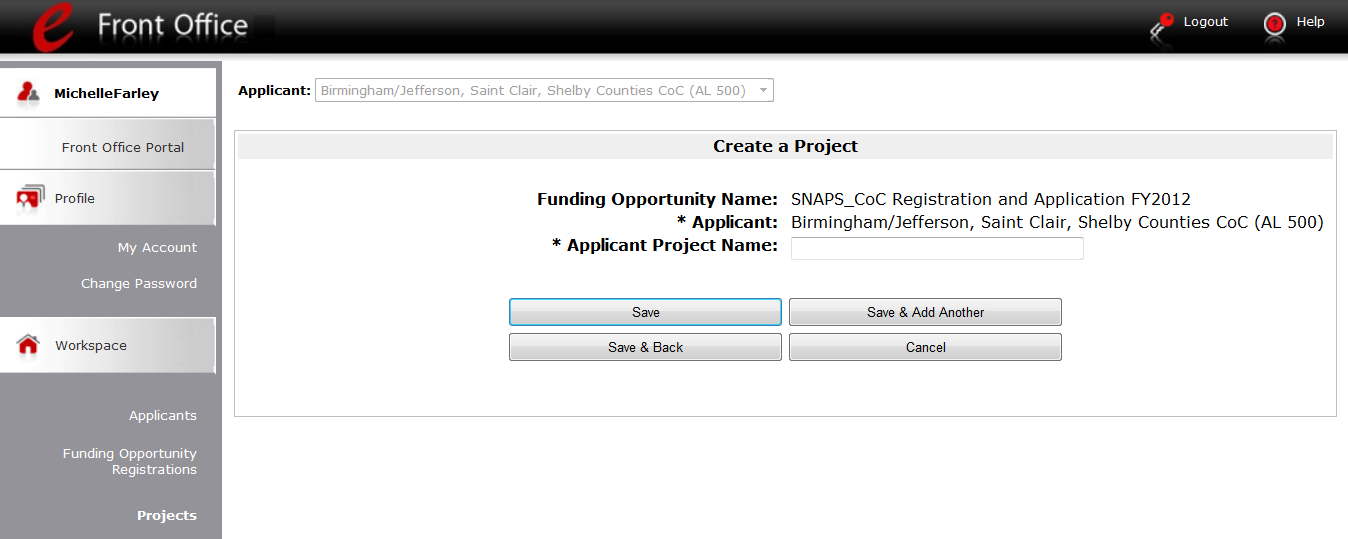
Collaborative Applicants must create a project for the CoC Registration in e-snaps on the "Projects" screen. Once the Collaborative Applicant "creates" the project, it will appear on this screen and the term "SNAPS_CoC Registration and Application FY2012" will appear under the "Funding Opportunity Name" column.
Select "Projects"
"Add" icon
appears after selection in dropdown menu.
|
Step |
Description |
1. |
Select "Projects" on the left menu bar. |
2. |
The "Projects" screen appears. |
3. |
Select "SNAPS_CoC Registration and Application FY2012" from the "Funding Opportunity Name" dropdown. |
4. |
The screen refreshes and an "Add" icon
|
5. |
Select the "Add" icon.
|
6. |
The "Create a Project" screen appears. |
|
Remember, there is no import feature this year. CoCs will not be able to import data from the CoC Registration or CoC Application that was submitted last year. All information for the CoC Registration will need to be re-entered, except for some information that pre-populates from the Applicant Profile. This pertains to the CoC Application (formerly called the Exhibit 1) as well. |
Example: PA-508 CoC Registration
FY2012 |
Step |
Description |
1. |
On the "Create a Project" screen, the Applicant Name will be populated. |
2. |
In the "Applicant Project Name" field, enter the CoC Number followed by the words "CoC Registration 2012."
|
3. |
Select "Save & Back" to return to the "Projects" screen. |
4. |
The project name is listed in the menu.
|
|
Remember, the "Applicant" field with the dropdown menu located at the top of the screen identifies the Applicant Profile in which you are working. Please ensure you are working in the correct one. |
Submissions
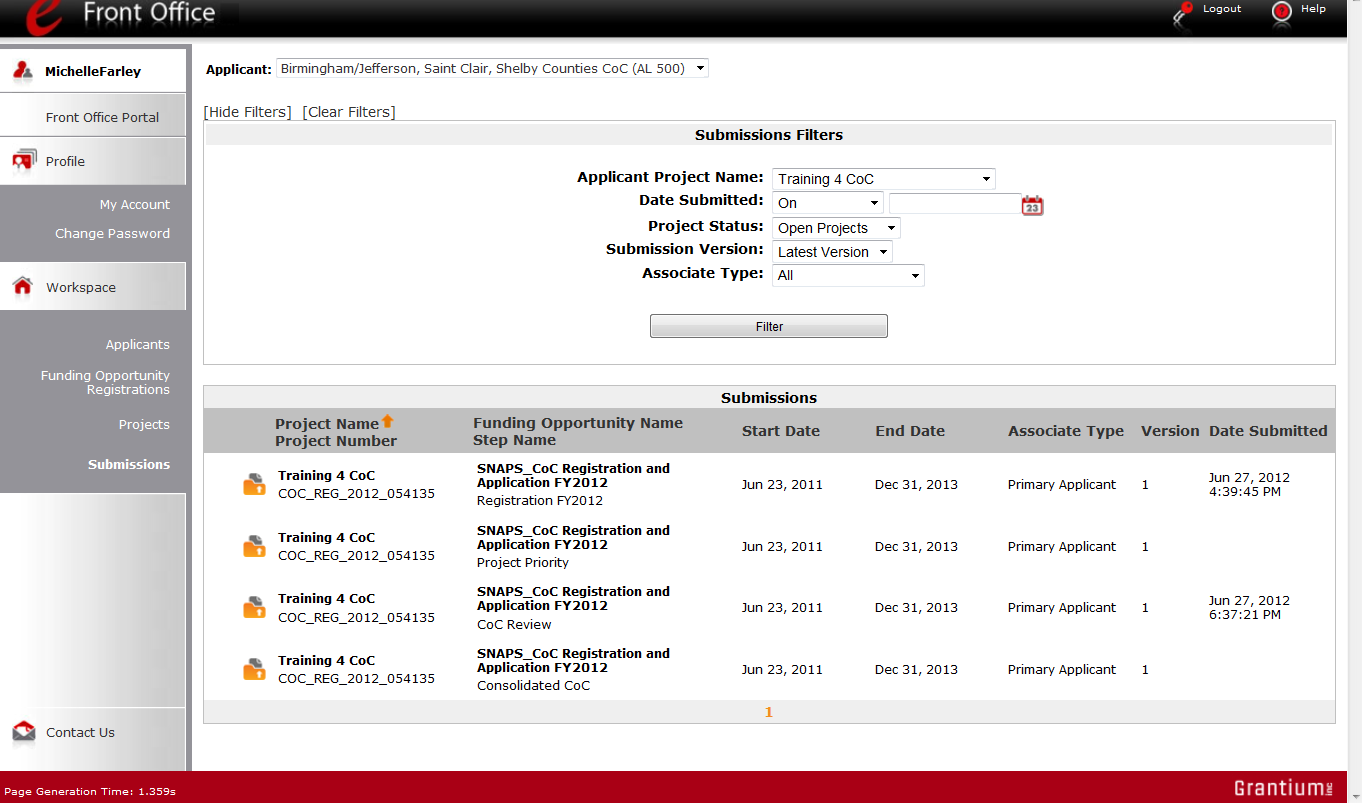
After completing the Applicant Profile, registering for the Funding Opportunity, and creating the CoC Registration project, CoC Collaborative Applicants may now enter the CoC Registration and complete the forms. You may access the CoC Registration forms through the "Submissions" screen.
Select "Submissions"
Use the Filters to find the
FY2012 Registration
|
Step |
Description |
1. |
Select "Submissions" on the left menu bar. |
2. |
The "Submissions" screen appears. |
3. |
Locate the CoC Registration project you established.
|
4. |
Continue with the instructions in the next section for the completing the CoC Registration. |
|
Remember, the "Applicant" field with the dropdown menu located at the top of the screen identifies the Applicant Profile in which you are working. Please ensure you are working in the correct one. |
CoC Registration
Completing the CoC Registration forms in e-snaps is a fairly straightforward process.
The following sections identify the steps for completing the forms.
NOTE: |
Some data may pre-populate from the Applicant Profile (i.e., e-snaps will bring it from the Applicant Profile). Review the pre-populated data. If it is not correct, you will need to edit the Applicant Profile making sure to select the "Complete" button after editing so that the data can be pulled forward again. |
Accessing the CoC Registration
Access the CoC Registration through the "Submissions" screen.
Select "Submissions"
Access CoC Registration


Step |
Description |
1. |
Select "Submissions" on the left menu bar. |
2. |
The "Submissions" screen appears. |
3. |
Select the "Folder" icon.
|
4. |
The "Before Starting" screen appears. |
Before Starting Continuum of Care Registration
Before you begin your FY2012 CoC Registration, review the following information highlighted on this "Before Starting Continuum of Care Registration" screen.
Read this screen
|
The CoC Registration process will be open for 45 calendar days from the date that e-snaps opens. HUD will assess and provide notice of approval for each registration submitted by the registration deadline.
The "Before Starting Continuum of Care Registration" screen also contains quick links to the following: HUD's Homeless Assistance Program Listserv, FY2012 CoC Registration Notice, the HUD Homeless Resource Exchange, and HEARTH training and resources.
Step |
Description |
1. |
Select "Next." |
NOTE:
|
When working in the CoC Registration, e-snaps users can return to the main screen by selecting "Back to Submissions List" at the bottom of the left menu bar. This screen is where Applicant, Funding Opportunity Registration, Projects, and Submissions are located in the left menu bar. |
1. Continuum of Care Organization
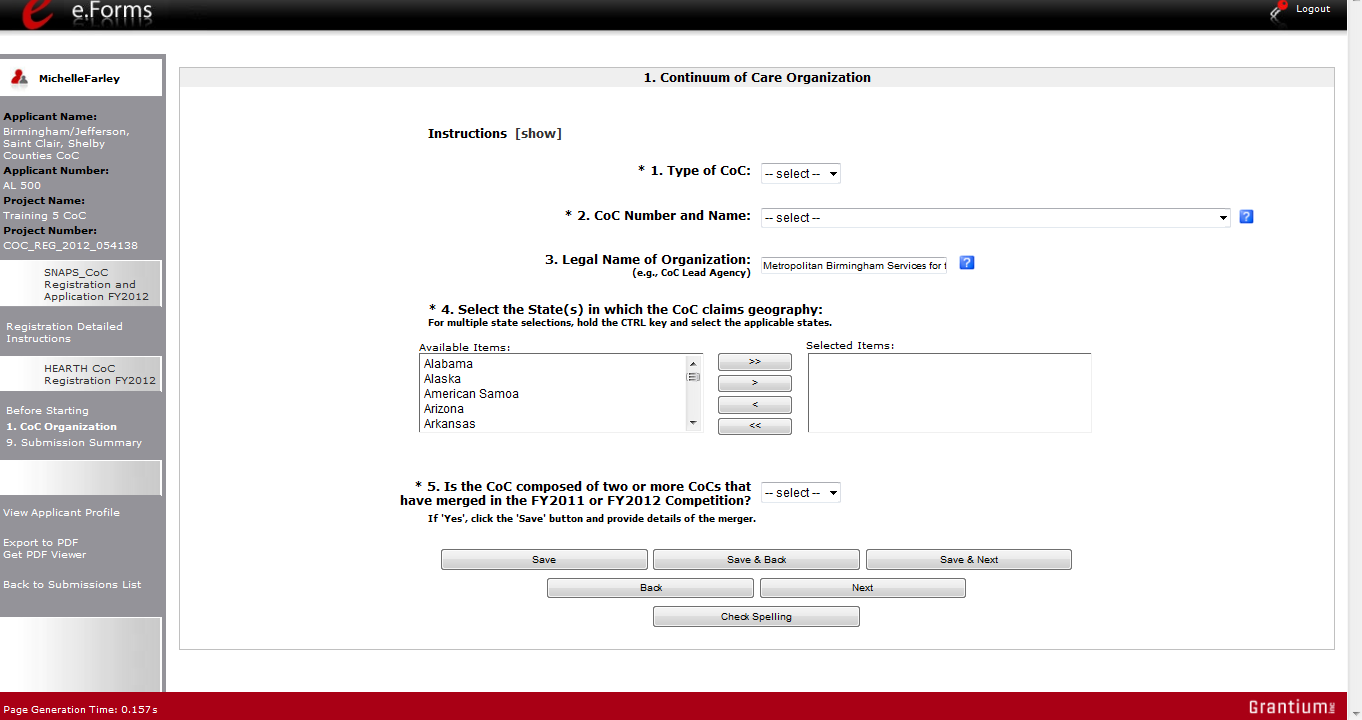
On the "Continuum of Care Organization" screen, enter data about the CoC.
If "Yes,"
|
NOTE: |
The left menu bar will populate with the appropriate forms AFTER selecting the Type of CoC. All CoCs will see screens for the UFA but only those applying to become UFAs need to complete them. Collaborative Applicants that are not applying for UFA designation should not complete these screens. |
Step |
Description |
1. |
Select the "Type of CoC" as either CA (Collaborative Applicant) or UFA (Collaborative Applicant applying for UFA designation). |
2. |
Select your "CoC Number and Name" from the dropdown. |
3. |
The "Legal Name of Organization" field should be pre-populated. |
4. |
Select the state(s) in which your CoC is located.
|
5. |
Select "Yes" or "No" to the question, "Is the CoC composed of two or more CoCs that have merged in the FY2011 or FY2012 Competition?"
|
6. |
Select "Save & Next." |
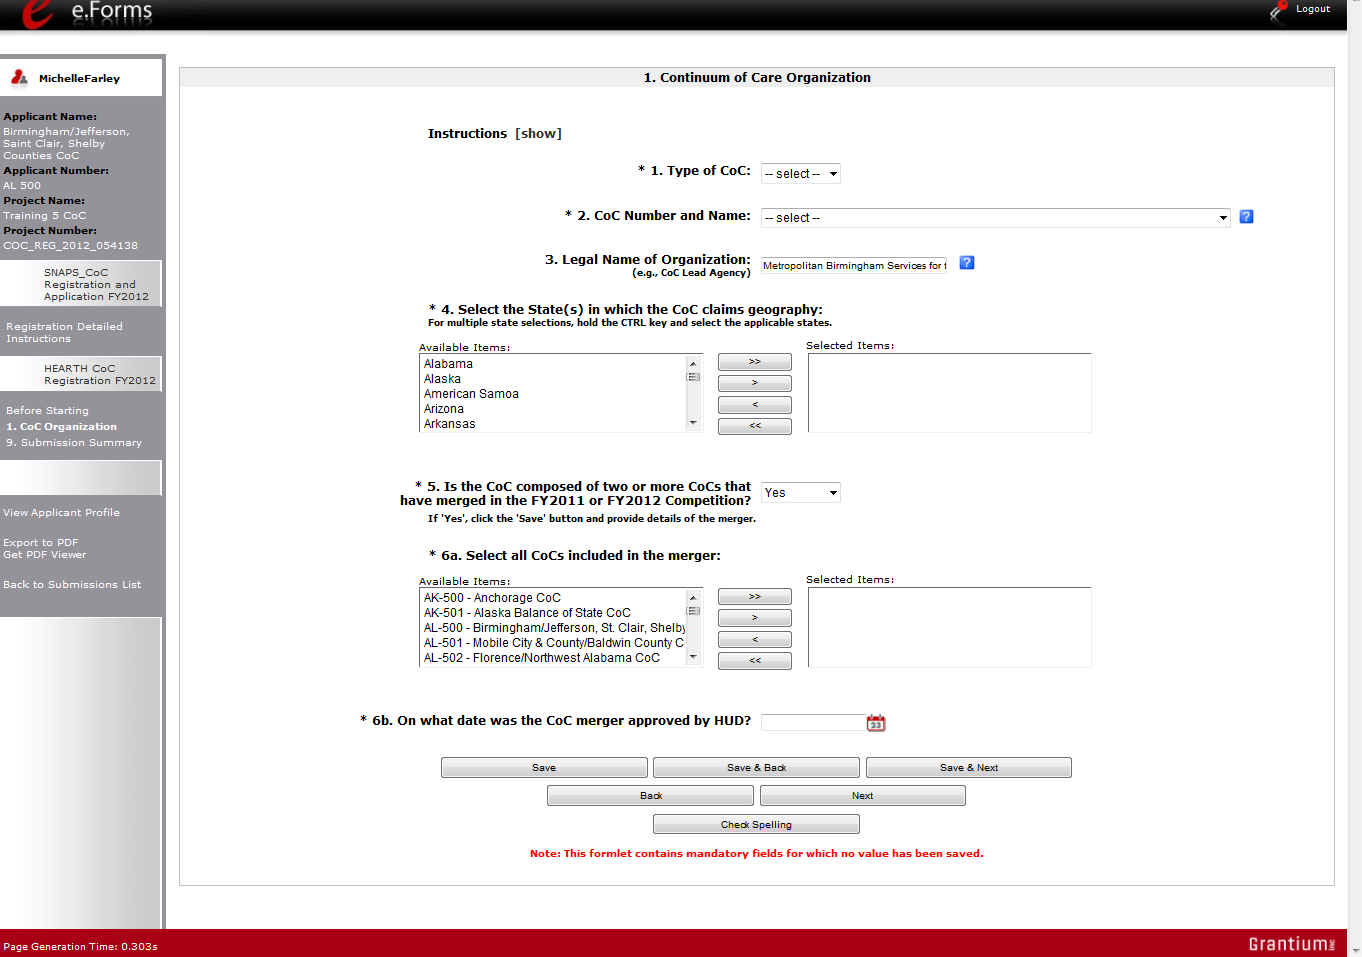
The following image shows the screen that appears when the answer is "Yes" to the question "Is the CoC composed of two or more CoCs that have merged in the FY2011 or FY2012 Competition?"
2 additional merger
questions
|
2. Continuum of Care Claimed Geographic Area(s)
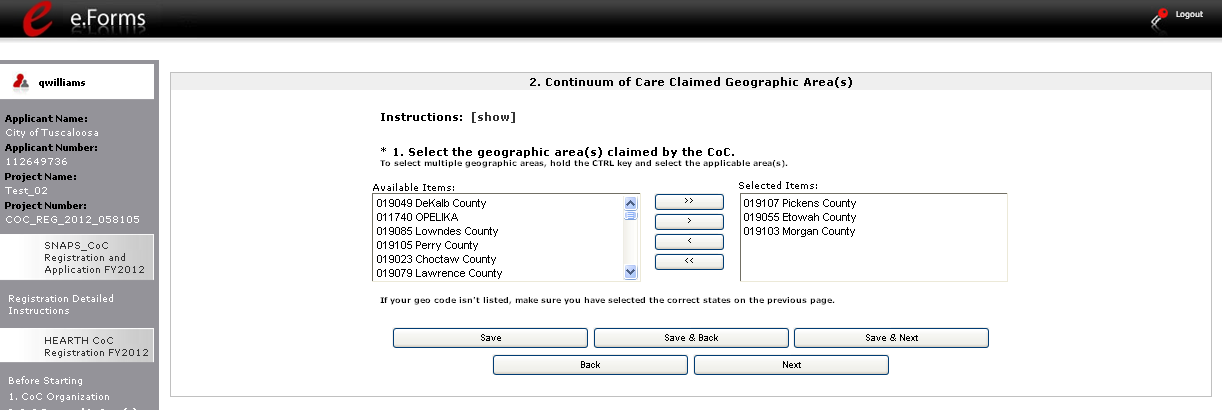
On the "CoC Claimed Geographic Area(s)" screen, claim the geographic area(s) that the CoC serves.
|
Step |
Description |
1. |
Select the geographic area(s) claimed by the CoC.
To select more than one CoC at once, press the Ctrl button on your keyboard as you make your selections and then select the single right arrow button to move the geographic areas into the "Selected Items" list. |
2. |
Select "Save & Next." |
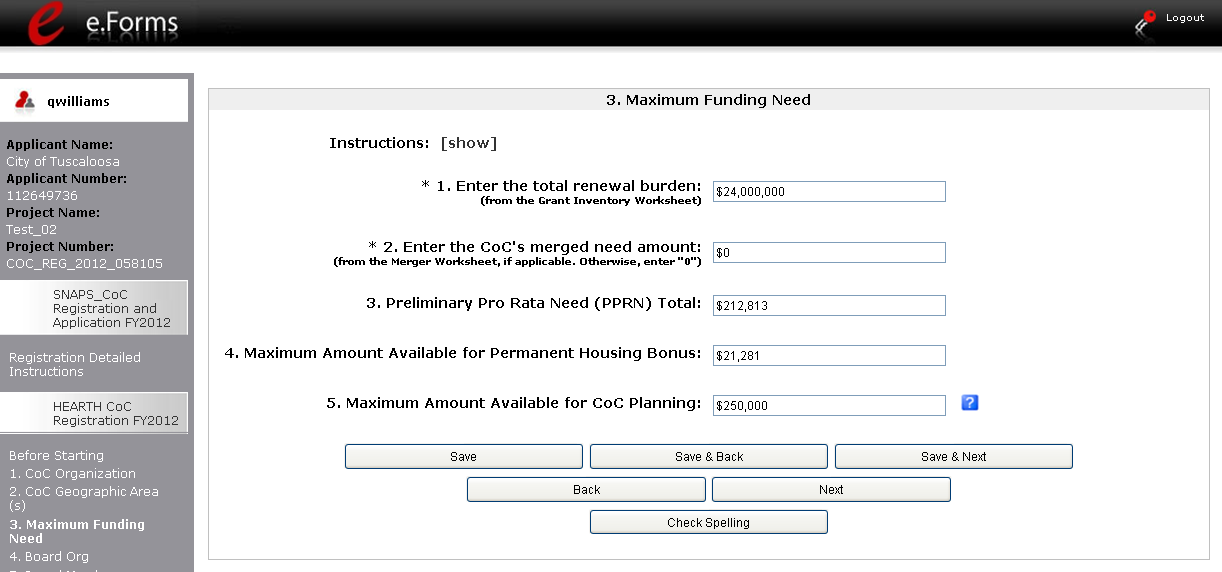
3. Maximum Funding Need
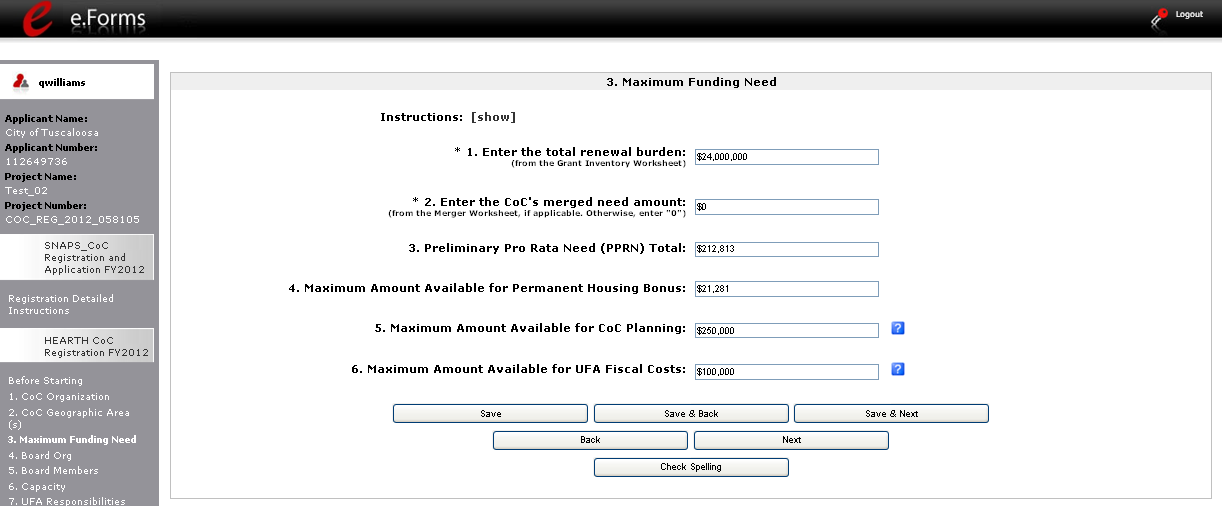
Collaborative Applicants will see five items on the "Maximum Funding Need" screen. Those applying to be designated as UFAs will see six items. Both should enter the Annual Renewal Demand (ARD) and then the merged need amount.
The Preliminary Pro Rata Need (PPRN) Total, maximum amount available for Permanent Housing Bonus, and maximum amount available for CoC Planning will be pre-populated and not editable.
The Maximum Amount Available for UFA Fiscal Costs will be pre-populated and not editable.
|
|
Step |
Description |
1. |
Enter the Annual Renewal Demand (ARD).
|
2. |
Enter the CoC's merged need amount, if applicable.
|
3. |
Select "Save & Next." |
NOTE: ARD |
|
4. Board Structure
Completion of the "Board Structure" screen is not required for CoC Registration, and whether and how you respond will not be used to determine whether you are awarded funding or the level of funding, but all Collaborative Applicants are encouraged to enter information regarding the CoC's board structure.
|
Step |
Description |
1. |
Select "Yes" or "No" to whether the CoC board meets the requirements at 24 CFR 578.5(b). If you select "No," you will have to enter in the 1b. text box what steps will be taken to fully implement the requirements at 24 CFR 578.5(b). |
2. |
Use the "Calendar" icon |
3. |
Select "Yes," "No," or "Not Applicable" to whether the board is formally recognized as a legal entity responsible for facilitating the homeless activities for the CoC community. |
4. |
Select "Yes," "No," or "Not Applicable" to whether the board has a written conflict of interest or ethical behavior guidelines. |
5. |
Select "At least annually," "At least semi-annually," "At least quarterly," "At least monthly," "At least semi-monthly," "At least weekly," or "Not applicable" to indicate the frequency of board meetings. |
6. |
Select "Chair" or "Co-Chairs" to indicate whether the board is led by one Chair or Co-Chairs. |
7. |
Select at least one, but up to all applicable check boxes for "Elected," "Appointed," "Volunteer," "Assigned," "Other," or "Not Applicable" that indicate the selection process of board leadership.
|
8. |
Enter a brief description in the #7. text box to describe the selection process of board leadership. The description should include why this process was established and how it works. |
9. |
Select "Save & Next." |
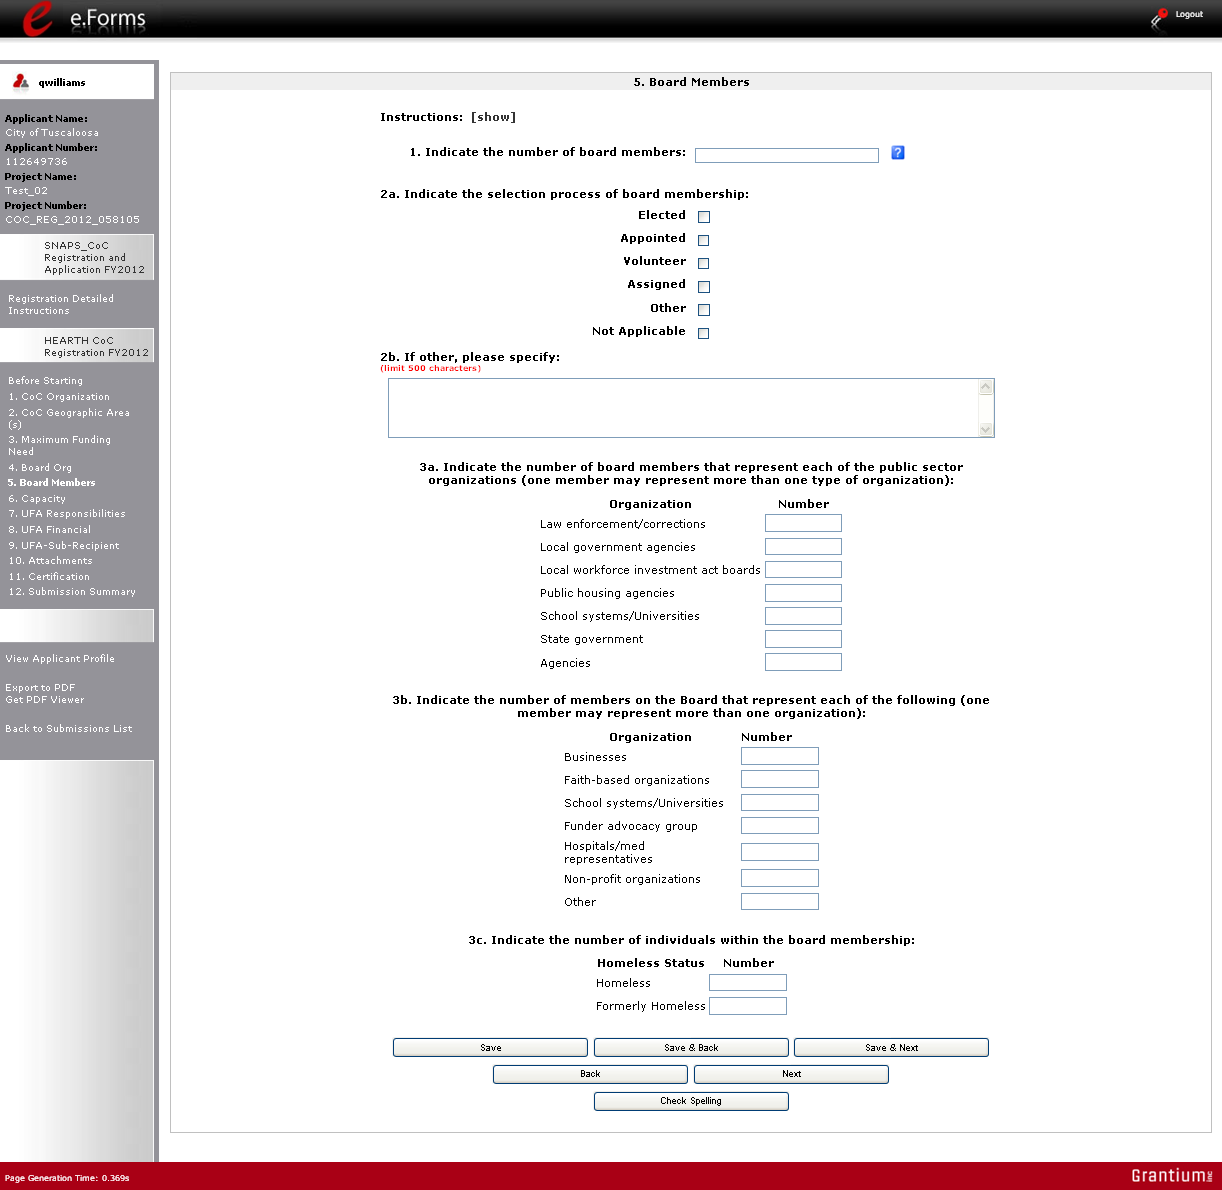
5. Board Members
Completion of the "Board Members" screen is not required for CoC Registration, and whether and how you respond will not be used to determine whether you are awarded funding or the level of funding, but all Collaborative Applicants are encouraged to enter information about the members of the CoC board.
|
Step |
Description |
1. |
Enter the total number of board members.
|
2. |
Select at least one, but up to all applicable check boxes for "Elected," "Appointed," "Volunteer," "Assigned," "Other," or "Not Applicable" that indicate the selection process of board membership.
|
3. |
Enter the number of board members that represent each of the public sectors (law enforcement/corrections, local government agencies, local workforce investment boards, public housing agencies, school systems/universities, state government, and agencies).
|
4. |
Enter the number of board members that represent each of the other organizations (business, faith-based organizations, school systems/universities, funder advocacy group, hospitals/med representatives, non-profit organizations, and other).
|
5. |
Enter the number (including "0") of individuals within the board membership who are homeless or formerly homeless. |
6. |
Select "Save & Next" |
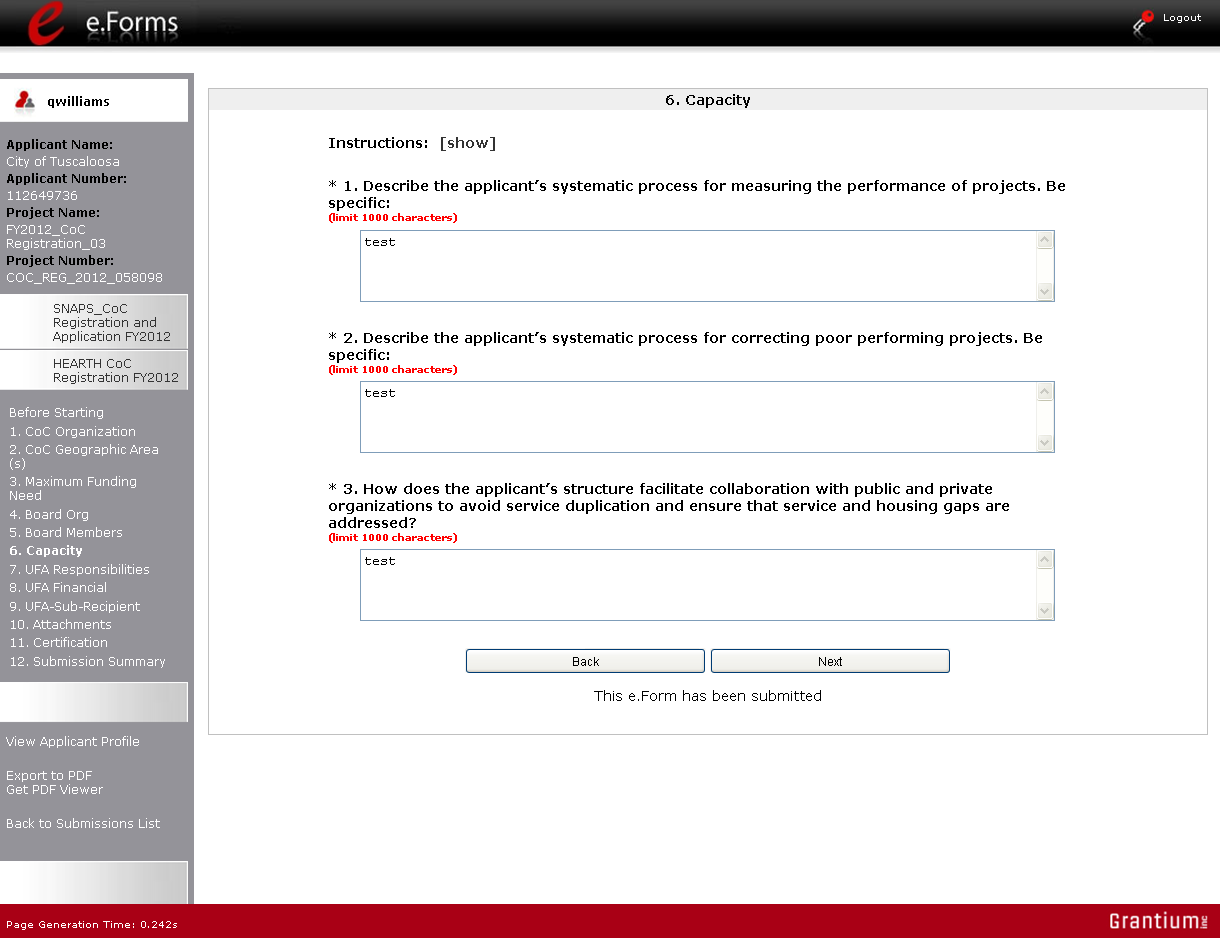
6. Capacity - Collaborative Applicant
On the "Capacity" screen, enter information about how the Collaborative Applicant measures and corrects performance, as well as collaborates with other organizations.
Select "show" for
more guidance
|
Step |
Description |
1. |
Enter text describing the applicant's systematic process for measuring the performance of projects. Be specific. |
2. |
Enter text describing the applicant's systematic process for correcting poor performing projects. Be specific. |
3. |
Enter text describing how the applicant's structure facilitates collaboration with public and private organizations to avoid service duplication and ensure that service and housing gaps are addressed. |
4. |
Select "Save & Next." |
NOTE: |
Select "show" next to Instructions at the top left of the screen for additional guidance on how to complete these fields. |
7. UFA Capacity - CoC Responsibilities
NOTE: |
Collaborative Applicants that are not applying for designation as a UFA should not complete the following screens:
7. UFA Capacity - CoC Responsibilities Instead, proceed to 10. Attachments. |
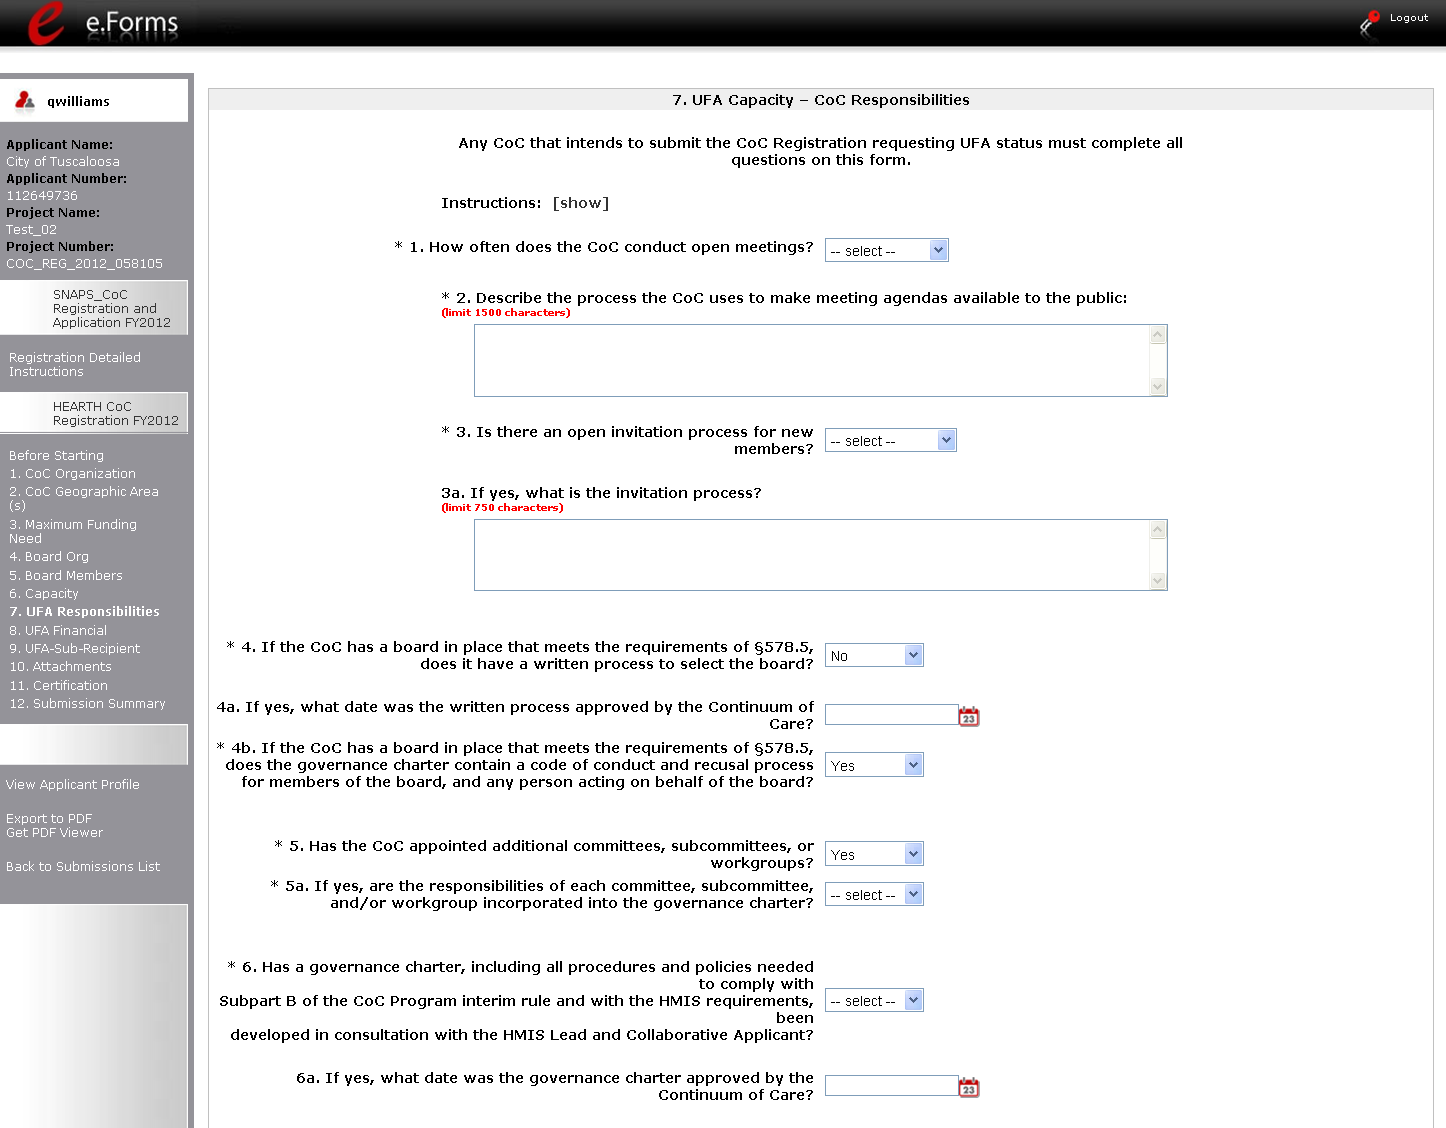
On the "UFA Capacity - CoC Responsibilities" screen, enter information about how the CoC meets its responsibilities related to CoC governance, written policies and meetings, HMIS, performance targets and monitoring, centralized or coordinated assessment systems, written standards, coordination with ESG recipients, and more. These questions are in the context of the CoC and are not UFA-specific.
|
Step |
Description |
1. |
Identify the frequency of open meetings by selecting "Bi-monthly," "monthly," "quarterly," "semi-annually," "annually," "biennially," or "never" from the dropdown menu. |
2. |
Enter text describing the process the CoC uses to make meeting agendas available to the public.
|
3. |
Select "Yes" or "No" from the dropdown menu to indicate whether the CoC has an open invitation process for new members.
|
4. |
Select "Yes" or "No" from the dropdown menu to indicate whether the CoC has a written process to select the board.
|
5. |
Select "Yes" or "No" from the dropdown menu to indicate whether the governance charter contains a code of conduct and recusal process for the board member and any person acting on behalf of the board. |
6. |
Select "Yes" or "No" from the dropdown menu to indicate whether the CoC has appointed additional committees, subcommittees, or workgroups.
|
7. |
Select "Yes" or "No" from the dropdown menu to indicate whether the governance charter, with all required procedures and policies, was developed in consultation with the HMIS Lead and Collaborative Applicant.
|
UFA Capacity - CoC Responsibilities (continued)
|
Step |
Description |
8. |
Select "Yes" or "No" from the dropdown menu to indicate whether performance targets have been established that are appropriate for the population and program type.
|
9. |
Enter text describing the process the CoC uses to monitor recipient and sub-recipient performance.
|
10. |
Enter text describing how the CoC assists poor performers to increase capacity.
|
11. |
Enter text describing the CoC’s current systemic process for measuring the performance of Emergency Solutions Grants and CoC Program projects within its geographic area.
|
12. |
Enter text describing the CoC’s systemic process for correcting poor performing projects.
|
UFA Capacity - CoC Responsibilities (continued)
|
Step |
Description |
13. |
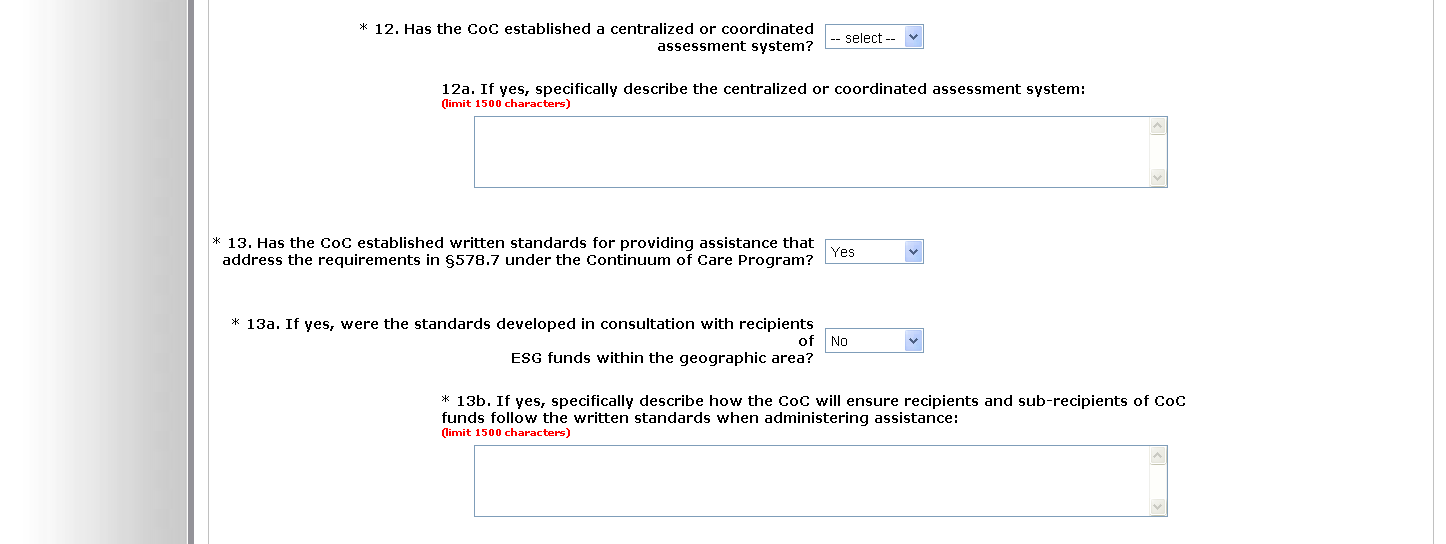
Select "Yes" or "No" from the dropdown menu to indicate whether the CoC has a centralized or coordinated assessment system.
|
14. |
Select "Yes" or "No" from the dropdown menu to indicate whether the CoC has written standards that address requirements at §578.7 under the Continuum of Care Program.
|
UFA Capacity - CoC Responsibilities (continued)
|
Step |
Description |
16. |
Select "Yes" or "No" from the dropdown menu to indicate whether there is a single HMIS for the CoC's geographic area. |
17. |
Select "Yes" or "No" from the dropdown menu to indicate whether the HMIS Lead is an eligible applicant.
|
18. |
Select "Yes" or "No" from the dropdown menu to indicate which plans have been reviewed. Plans include the following: Privacy Plan; Security Plan; and Data Quality Plan. |
19. |
For the plans that have been reviewed in Question 16, also
indicate the approval date using the calendar icon
|
19. |
Enter text describing the process the CoC utilizes to ensure that recipients and sub-recipients are consistently participating in HMIS.
|
20. |
Enter text describing the process the CoC utilizes to ensure the HMIS is administered in compliance with the requirements prescribed by HUD.
|
UFA Capacity - CoC Responsibilities (continued)
|
Step |
Description |
21. |
Select "Yes" or "No" from the dropdown menu to indicate whether the CoC has a comprehensive housing and service system. |
22. |
Indicate how frequently the CoC conducts sheltered point-in-time counts by selecting "Bi-monthly," "monthly," "quarterly," "semi-annually," "annually," "biennially," or "never" from the dropdown menu. |
23. |
Indicate how frequently the CoC conducts unsheltered point-in-time counts by selecting "Bi-monthly," "monthly," "quarterly," "semi-annually," "annually," "biennially," or "never" from the dropdown menu. |
24. |
Indicate how frequently the CoC conducts a gap analysis by selecting "Bi-monthly," "monthly," "quarterly," "semi-annually," "annually," "biennially," or "never" from the dropdown menu. |
25. |
Enter text describing the process for conducting the gap analysis.
|
26. |
Enter text describing how the CoC is participating in the applicable Consolidated Plan(s).
|
27. |
Enter text describing the process for consulting with ESG recipients to allocate ESG FY2011 and FY2012 funds.
|
28. |
Select "Yes" or "No" from the dropdown menu to indicate whether the CoC and ESG recipient developed a plan for joint reporting guidelines for ESG recipients and sub-recipients. |
29. |
Select "Yes" or "No" from the dropdown menu to indicate whether the CoC and ESG recipient developed performance measurements that will be used to measure ESG recipients and sub-recipients within the CoC’s geographic area. |
30. |
Select "Save & Next." |
8. UFA Financial Management
NOTE: |
Collaborative Applicants that are not applying for designation as a UFA should not complete 8. UFA Financial Management. Instead, proceed to 10. Attachments. |
On the "UFA Financial Management" screen, enter information about the financial management procedures and internal controls of the Collaborative Applicant applying for designation as a UFA. These entities must already be implementing these practices.
|
Step |
Description |
1. |
Enter text describing how the UFA records amounts budgeted for eligible costs. |
2. |
Enter text describing how the UFA records an obligation when contracts are executed. |
3. |
Enter text describing how recipients identify CoC Program expenditures. |
4. |
Enter text describing how the UFA identifies expenditures in its accounting records that clearly identify the use of CoC Program funds for eligible costs. |
5. |
Select "Yes" or "No" from the dropdown menu to indicate whether the UFA has procedures to ensure that CoC Program funds are drawn down from LOCCS within 45 days of a sub-recipient providing source documentation of eligible costs/expenditures. |
8. UFA Financial Management (continued)
|
Step |
Description |
6. |
Select "Yes" or "No" from a series of eight dropdown menus asking for information about the UFA's organization chart. The questions ask about the following:
|
7. |
Enter text describing how the UFA will show that it ensures that accurate information is collected and reported to HUD and that the systems and/or procedures comply with Federal policies and requirements. |
8. |
Select "Save & Next." |
9. UFA Financial Management – Sub-recipient Management
NOTE: |
Collaborative Applicants that are not applying for designation as a UFA should not complete 9. UFA Financial Management – Sub-recipient Management. Instead, proceed to 10. Attachments. |
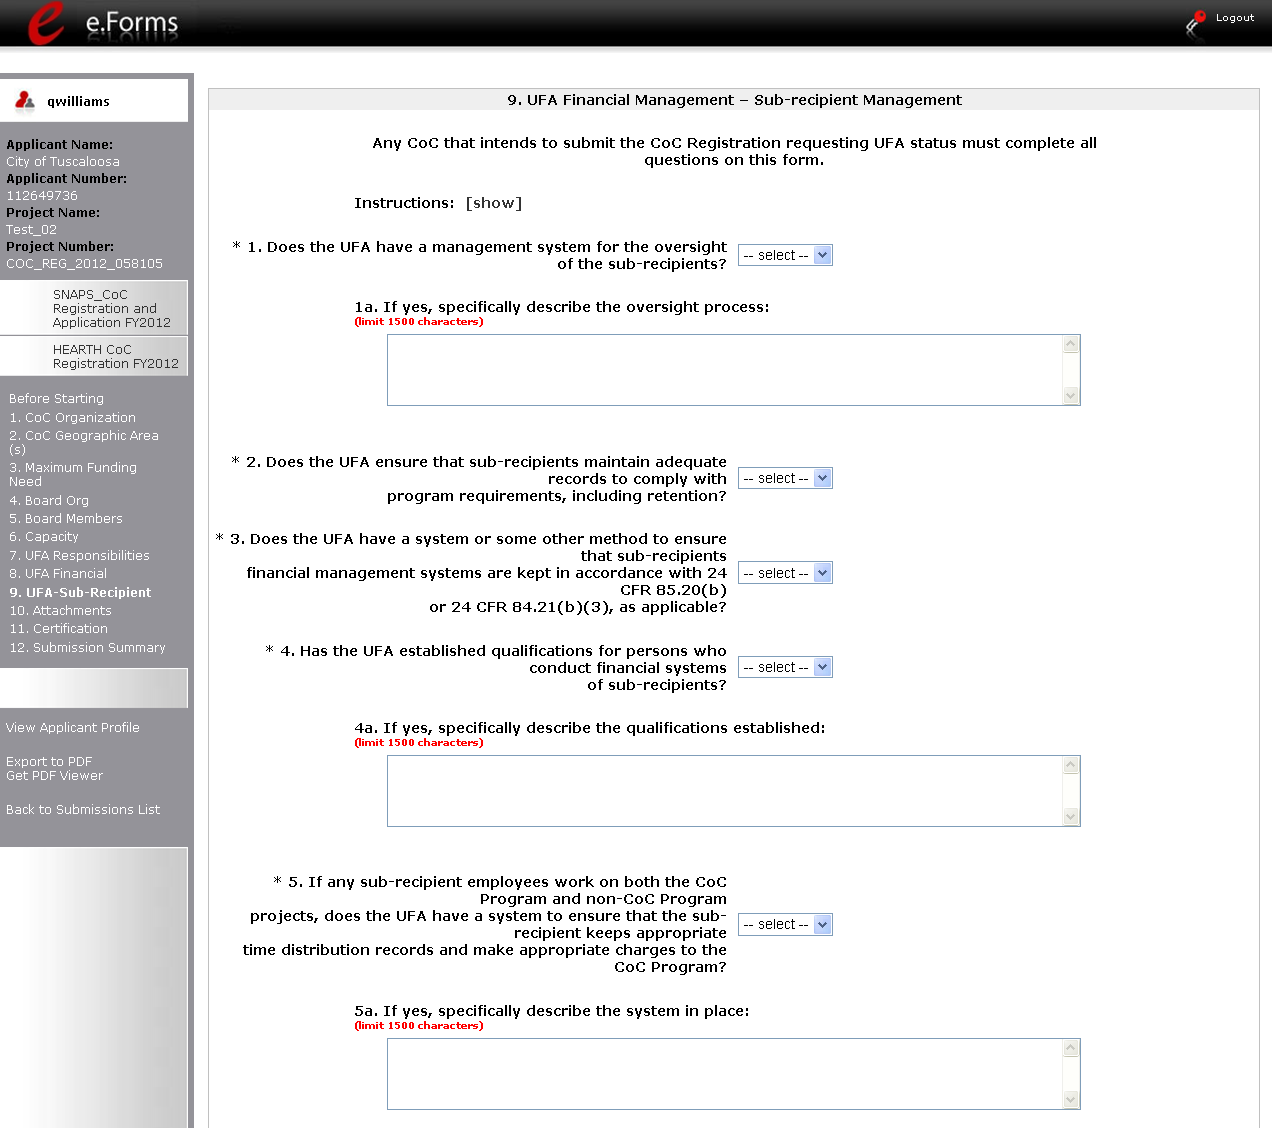
On the "UFA Financial Management - Sub-recipient Management" screen, enter information about the oversight of sub-recipients by the Collaborative Applicant applying for designation as a UFA. These entities must already be implementing these practices.
|
Step |
Description |
1. |
Select "Yes" or "No" to indicate whether the UFA has a management system for the oversight of sub-recipients.
|
2. |
Select "Yes" or "No" to indicate whether the UFA ensures that sub-recipients maintain adequate records to comply with program requirements, including retention. |
3. |
Select "Yes" or "No" to indicate whether the UFA has a system or method to ensure that sub-recipients financial management systems meet Uniform Financial Management requirements (24 CFR 85.20(b) for nonprofits and 24 CFR 84.21(b)(3) for government agencies). |
4. |
Select "Yes" or "No" to indicate whether the UFA has established qualifications for persons who conduct financial systems of sub-recipients.
|
5. |
Select "Yes" or "No" to indicate whether the UFA has a system to ensure that sub-recipients with staff working on both CoC Programs and other programs keep appropriate time distribution records and make appropriate charges to the CoC Program.
|
|
Step |
Description |
6. |
Select "Yes" or "No" to indicate whether the UFA has a system or method to ensure sub-recipient compliance with procurement and/or sub-contracting requirements at 24 CFR 85.36 or 24 CFR 84.40-48, as applicable.
|
7. |
Select "Yes" or "No" to indicate whether OMB Circular A-133 single audits required for any of the UFA’s sub-recipients.
|
8. |
Select "Yes" or "No" to indicate whether the UFA reviews the audits. |
9. |
Select "Yes" or "No" to indicate whether the UFA assesses performance for 100 percent of the sub-recipients each year. |
10. |
Select "Yes" or "No" to indicate whether the UFA has written procedures to ensure that “high risk” sub-recipients receive proper oversight and monitoring. |
|
Step |
Description |
11. |
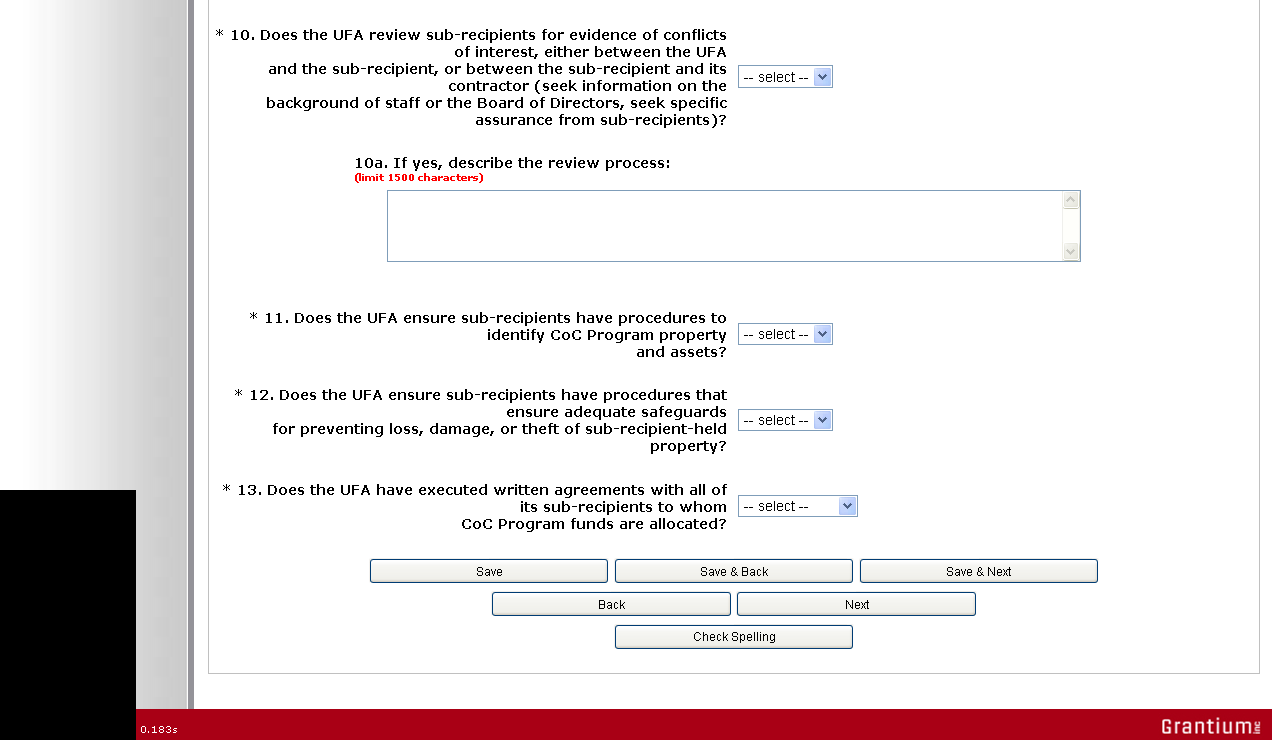
Select "Yes" or "No" to indicate whether the UFA reviews sub-recipients for evidence of conflicts of interest.
|
12. |
Select "Yes" or "No" to indicate whether the UFA ensures that sub-recipients have procedures to identify CoC Program property and assets. |
13. |
Select "Yes" or "No" to indicate whether the UFA ensures sub-recipients have procedures that ensure adequate safeguards for preventing loss, damage, or theft of sub-recipient-held property. |
14. |
Select "Yes," "No," or "Not Applicable" to indicate whether the UFA has executed written agreements with all of its sub-recipients that receive CoC Program funds. |
15. |
Select "Save & Next." |
10. Attachments
The number of attachments appearing on the "10. Attachments" screen is determined by the "Type of CoC" selected on the "1. CoC Organization" screen.
If "CA" is selected, there are 4 attachments, 1 of which is required.
If "UFA" is selected, there are 14 attachments, 11 of which are required.
The instructions for uploading and deleting an attachment are the same for all documents. The steps are provided for the Grant Inventory Worksheet and can be applied to the other attachments.
NOTE: |
This year, attachments that were uploaded in last year's CoC Registration will not be available. Everyone must upload the attachments again. If the attachment, by chance, is still on the screen, it is likely you need to delete the document and upload an updated one. |
Attachments for Collaborative Applicants
The "Attachment" screen for Collaborative Applicants that selected "CA" as the type of CoC has four items:
Grant Inventory. The HUD-approved Grant Inventory Worksheet to be uploaded in e-snaps will be provided to CoC Lead Agency by the local HUD CPD Field Office.
List of Board Leaders and Members. Collaborative Applicants are encouraged, but not required, to provide a list of the leaders and members on the Board. Whether you upload will not be used to determine whether you are awarded funding or the level of funding.
Merger Worksheet. If CoCs are merging, the Collaborative Applicant can submit the CoC Merger Worksheet that determines the Final Pro-Rata Need available to the merged CoC. This is not required and whether you upload will not be used to determine whether you are awarded funding or the level of funding, but HUD offers the tool for merging CoCs as an easy and accurate way to calculate the Final Pro-Rata Need.
Other Attachment(s). At this time, there are no additional attachments required.
Grant Inventory
For the CoC Registration process, you are required to upload the Grant Inventory Worksheet(s).
STOP: |
Any CoC mergers that have been reported to HUD BEFORE the FY2012 CoC Registration must submit one Grant Inventory Worksheet (GIW) workbook with all eligible renewals listed (including all of the merged CoCs projects) on the GIWs; however, CoCs that are contemplating merging need to submit separate GIW workbooks for each CoC. If you do not have any renewals, you must still upload a file in order to complete the CoC Registration process. HUD recommends that you state on a blank GIW that you have "no FY2012 renewals" in the GIW comment field and submit that document as a zip file. You can obtain the GIW from your local Field Office. HUD will ensure that all of the GIWs attached by the CoC match the finalized GIWs that the CoC reconciled with their HUD Field Office. |
Select a link
|
Step |
Description |
1. |
Select the document name under Document Type. |
2. |
The "Attachment Details" screen appears. |
|
|
Step |
Description |
1. |
Enter the name of the document in the "Document Description" field. |
2. |
Use the "Calendar" icon
|
3. |
Select "Browse" to the right of the "File Name" field to upload the file from your computer.
|
4. |
Select "Save & Back to List" to return to the "Attachments" screen. |
5. |
On the "Attachments" screen, select "Next." |
:
NOTE: |
To delete an uploaded attachment.
|
|
For instructions on how to zip a file that may be too large to upload, refer to the How to Zip a File document in the Resource Room section of the e-snaps training page on the HRE at http://esnaps.hudhre.info |
List of Board Leaders and Members
Collaborative Applicants are encouraged, but not required, to provide a list of the leaders and members on the Board. Whether you upload will not be used to determine whether you are awarded funding or the level of funding. Follow the directions that were presented earlier for attaching the Grant Inventory Worksheet.
Merger Worksheet
If CoCs are merging, the Collaborative Applicant can submit the CoC Merger Worksheet that determines the Final Pro-Rata Need available to the merged CoC. This is not required and whether you upload will not be used to determine whether you are awarded funding or the level of funding, but HUD offers the tool for merging CoCs as an easy and accurate way to calculate the Final Pro-Rata Need. Follow the directions that were presented earlier for attaching the Grant Inventory Worksheet.
Other Attachment(s)
At this time, there are no additional attachments required.
 Attachments
for Collaborative Applicants with a UFA designation
The "Attachment" screen for Collaborative Applicants that selected "UFA" as the type of CoC has 14 items:
Audit Policy and Procedures for sub-recipient
CoC Operations
Financial Management Systems
Governance Charter
Grant Inventory.
Housing and Service System Plan
List of Board Leaders and Members.
LOCCS Procedures
Merger Worksheet.
Monitoring Guide
Organizational Policies with Flowchart
Other Attachment(s).
Procurement Policy and Procedures
"High Risk" Procedures
The only attachments that are NOT required are the following:
List of Board Leaders and Members
Merger Worksheet
Other Attachments
See the previous section for information on the Grant Inventory Worksheet, the List of Board Leaders and Members, and the Merger Worksheet.
|
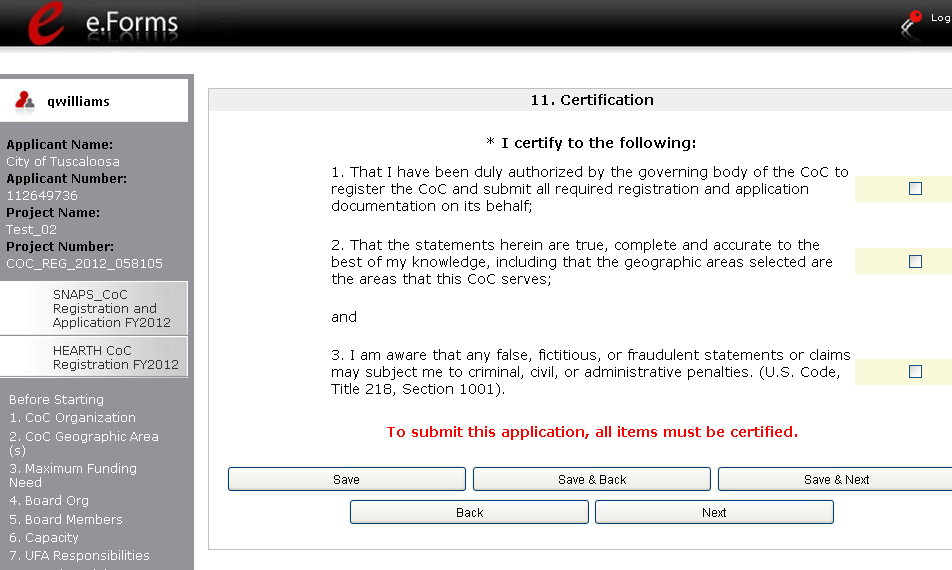
11. Certification
On the "Certification" screen, the CoC Primary Contact needs to certify that he or she is an authorized representative of the CoC and that data entered is truthful. It also serves as an acknowledgement that false statements may be subject to penalty.
Check all boxes
|
Step |
Description |
1. |
Read the certification statements and select each of the checkboxes. |
2. |
Select "Save & Next." |
12. Submission Summary
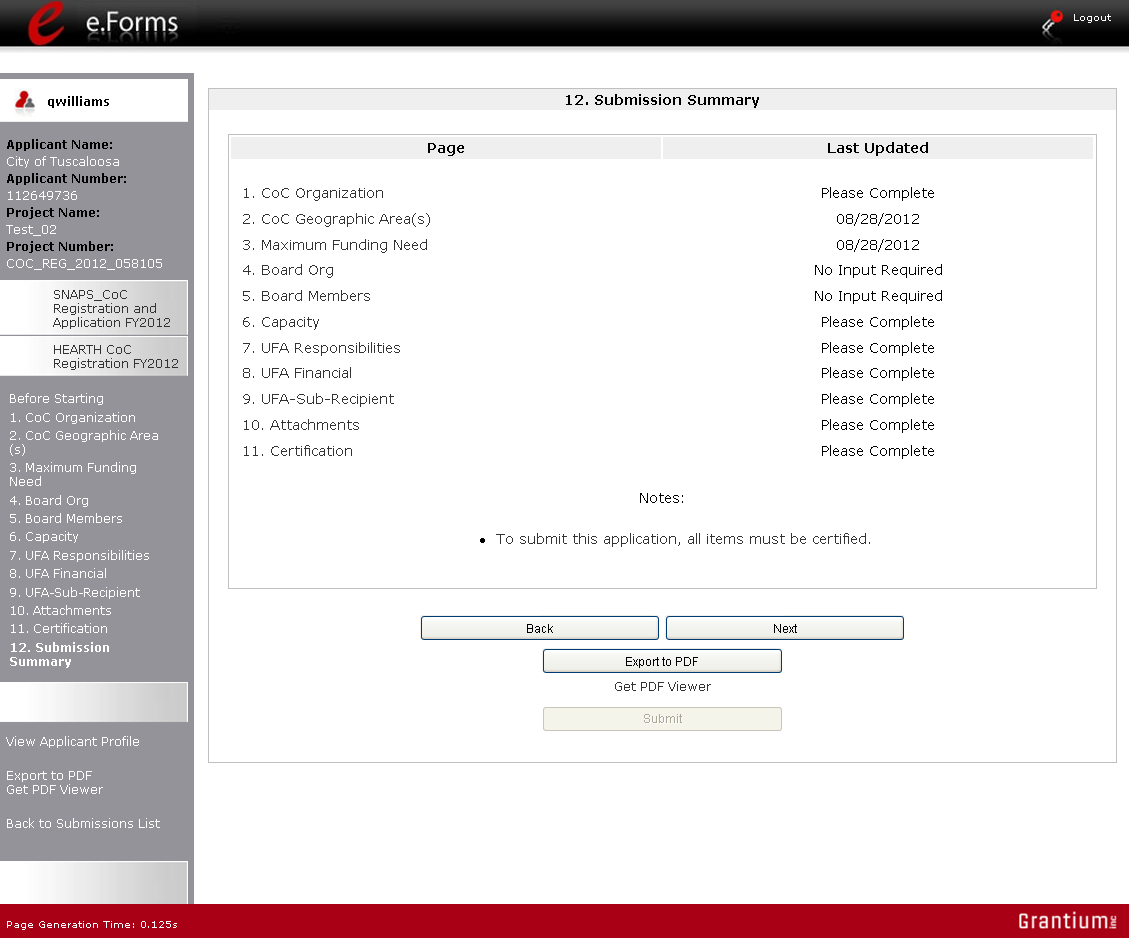
Once the required information has been entered and the required attachments have been uploaded, the Collaborative Applicant needs to select the "Submit" button on the "Submission Summary" screen.
The "Submission Summary" screen shows the CoC Registration forms. In the "Last Updated" column, the system will identify the following:
A date if the screen is complete
"Please Complete" if more information is needed
e-snaps users can go back to any screen by clicking on the screen name on the left menu bar. Remember to select "Save" after any changes.
The "Submit" button is located at the bottom of the screen under the navigation buttons. The "Submit" button will be active if all parts of the CoC Registration have a date in the "Last Updated" column.
The following image shows the "Submission Summary" screen with items that still need to be completed. Note that the "Submit" button is gray-shaded, and you cannot select it.
Inactive "Submit"
button
Review "Last Updated"
column
|
Submitting the CoC Registration
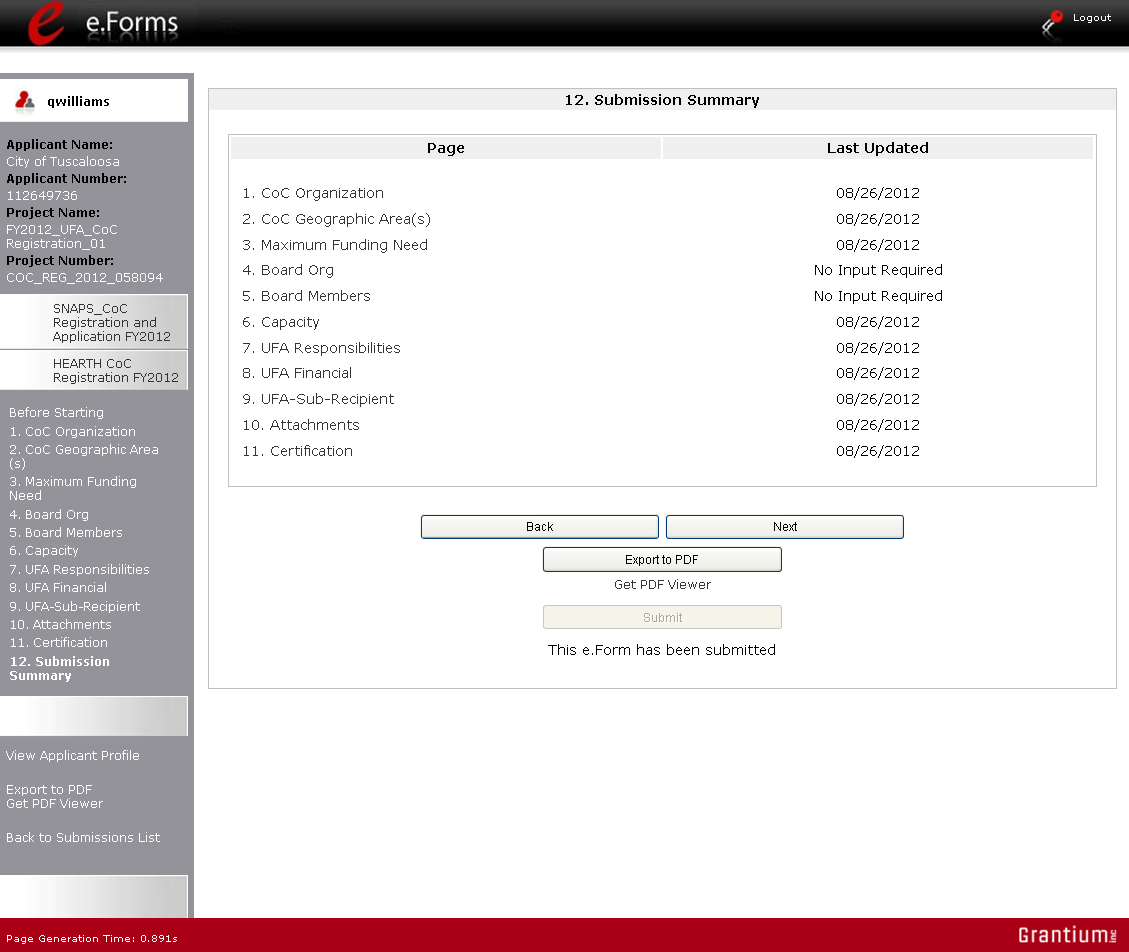
The following image shows the "Submission Summary" screen after the CoC Registration has been submitted. Note that the "Submit" button is gray-shaded. The form is marked "This e.Form has been submitted.
e.Form has been submitted
|
Step |
Description |
1. |
If you are not already on the "Submission Summary" screen, select it on the left menu bar. |
2. |
Select the "Submit" button. |
3. |
The "Submit" button will be grayed out. Below it there will be text stating, "This e.Form has been submitted." |
Exporting to PDF
CoC lead agencies can obtain a hard copy of the CoC Registration using the "Export to PDF" button located at the bottom of the Submission Summary screen under the navigation buttons.
Select button to obtain a
copy of CoC Registration |
Step |
Description |
1. |
Select the "Export to PDF" button. |
2. |
On the "Configure PDF Export" screen, select the screen you would like included. |
3. |
Select "Export to PDF." |
CoC Review
After the CoC Lead Agency submits the CoC Registration, the agency can make no changes to it. The next steps include the following:
HUD receives notification that the CoC Registration is ready for HUD review.
HUD staff persons review and approve, modify, or reject the claimed geographic area(s), maximum funding needs, and other data.
HUD will issue a listserv message notifying CoCs when they should log in to e-snaps and review HUD's determinations provided in the CoC Review.
The CoC Lead Agency reviews and agrees with or disputes HUD's determinations regarding the CoC type, geographic area(s), and funding needs amounts.
NOTE: Listservs |
A listserv is a distribution list enabling homeless service providers, Continuum of Care organizations, Technical Assistance providers, and other stakeholders to stay informed about HUD's homeless programs, competitions, awards, policy updates, and more. HUD has numerous lists to more effectively distribute information that is pertinent to a particular audience. Go to the HRE to join a listserv: http://www.hudhre.info/index.cfm?do=viewJoin Collaborative Applicants should encourage all Project Applicants to join one or more listservs as well. |
NOTE: Reference Submissions |
At the top of each screen of the CoC Review, you will see a
"Reference Submissions" box. In this box there is a
"Folder" icon
|
Accessing CoC Review
After HUD completes the review of the CoC Registrations submitted by the Collaborative Applicants, it will send out a listserv message notifying CoCs when they should log in to e-snaps and review HUD's determinations provided in the CoC Review. The CoC Lead Agency will look for the "SNAPS_CoC Registration and Application FY2012 / CoC Review" project on the "Submissions" screen.
Select "Submissions"
Access
Confirm the Applicant
|
Step |
Description |
1. |
Log in to e-snaps. |
2. |
Select "Submissions" on the left menu bar. |
3. |
Select the "Folder" icon
|
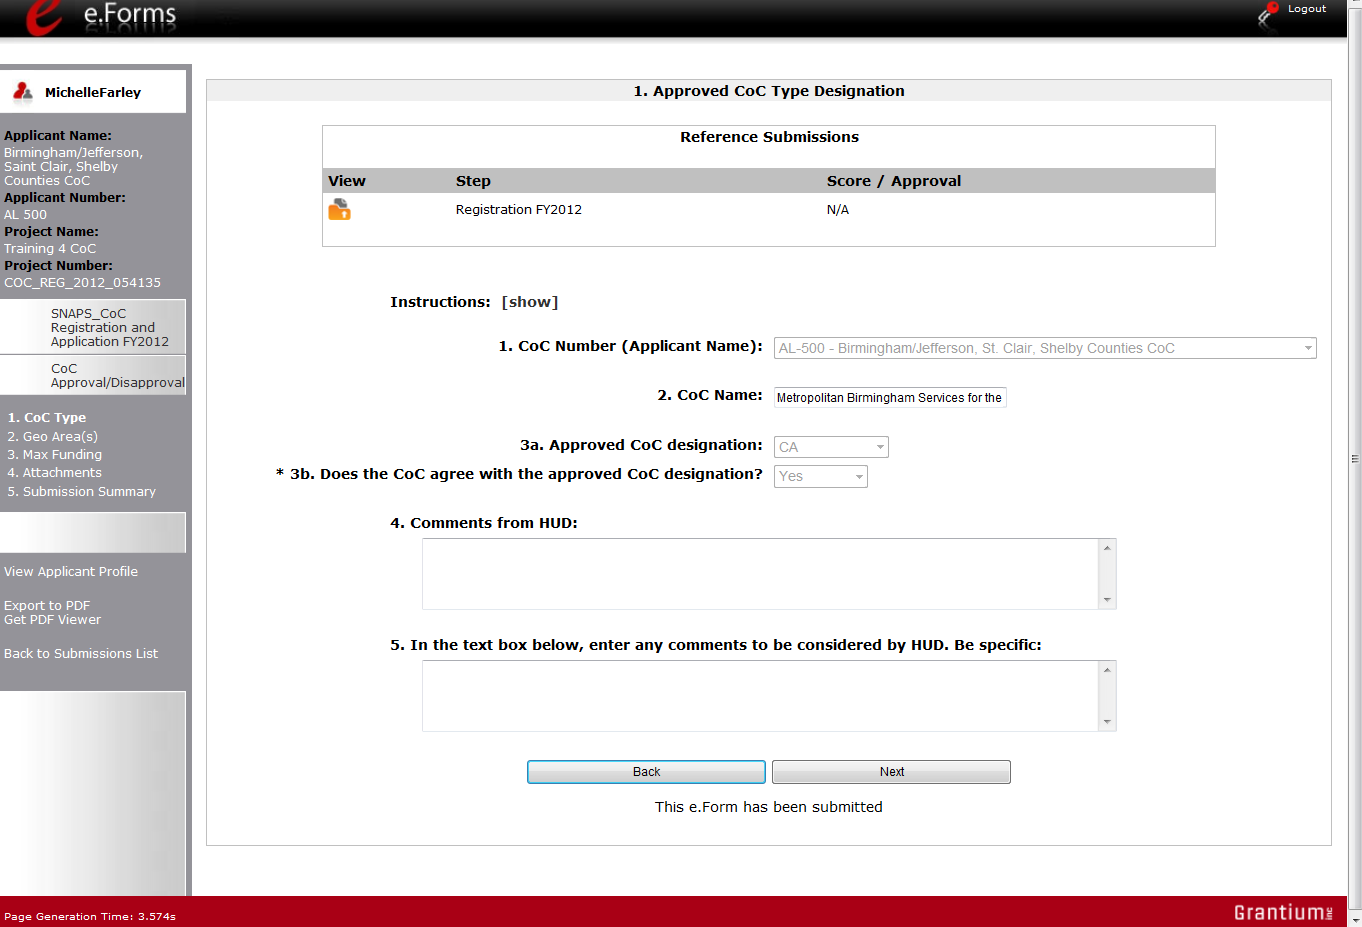
1. Approved CoC Type Designation
On the "Approved CoC Type Designation" screen, read the available HUD comments and indicate whether you agree or not with the approved CoC designation.
If needed, refer back to
CoC Registration
Select "Yes" or
"No"
|
Step |
Description |
1. |
Review HUD comments. |
2. |
Select "Yes" or "No" whether you agree with the approved CoC designation.
|
3. |
Select "Save & Next." |
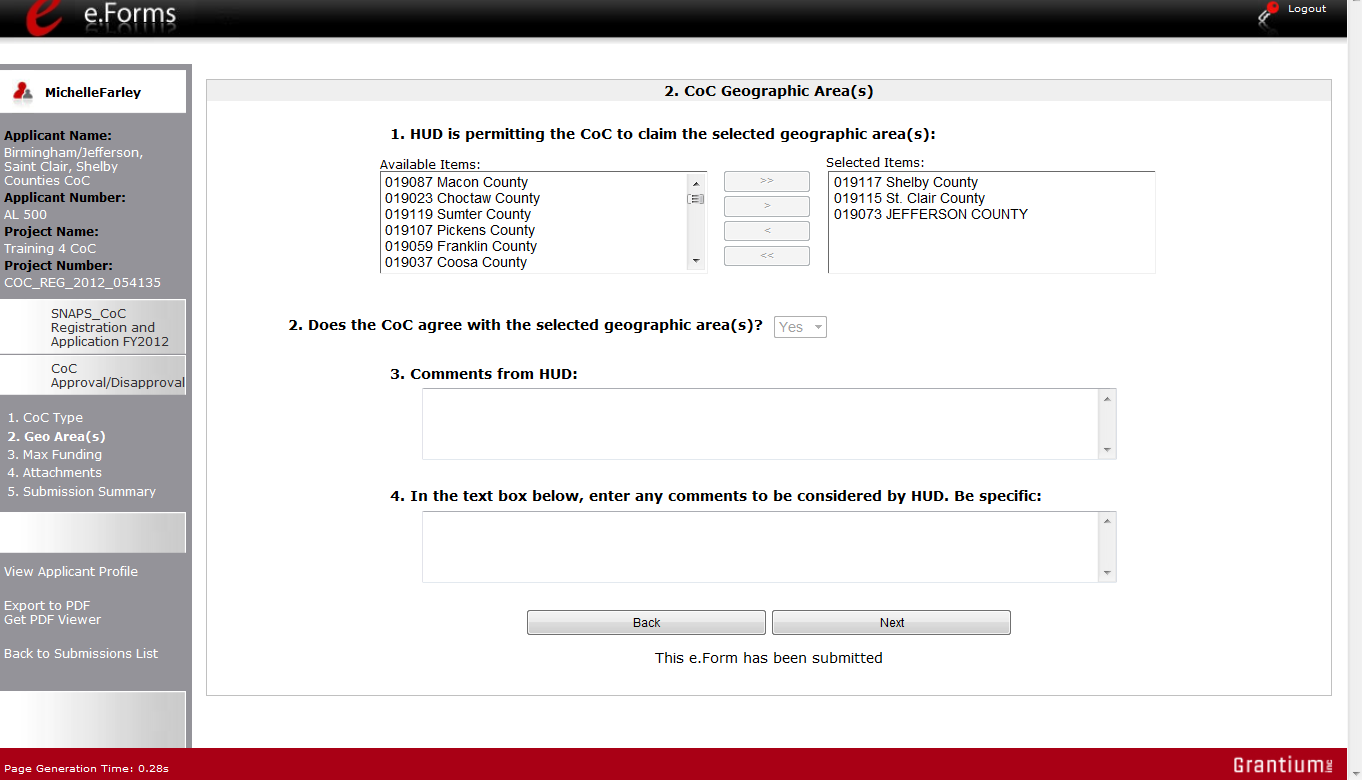
2. CoC Geographic Area(s)
On the "CoC Geographic Area(s)" screen, read the available HUD comments and indicate whether you agree or not with the geographic areas.
Select "Yes" or
"No"
|
Step |
Description |
1. |
Review HUD comments. |
2. |
Select "Yes" or "No" whether you agree with the geographic area(s).
|
3. |
Select "Save & Next." |
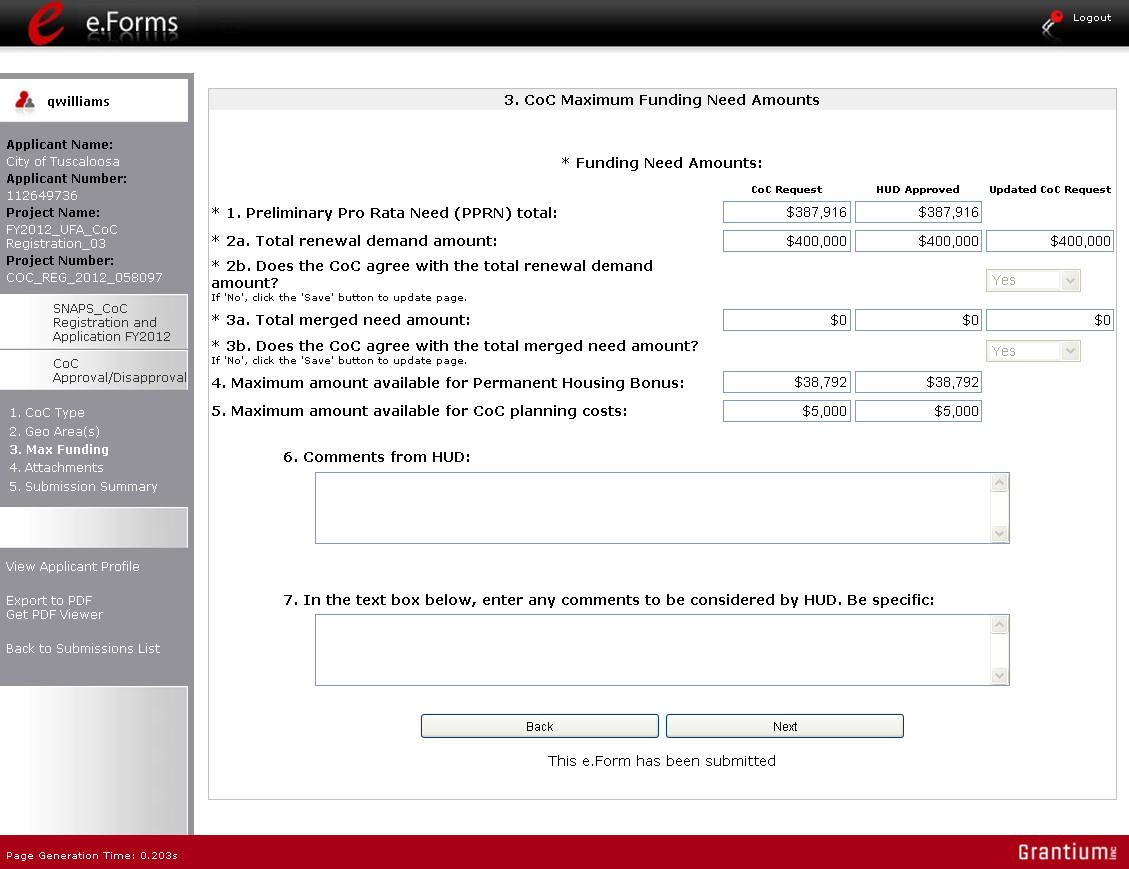
3. CoC Maximum Funding Need Amounts
On the "Maximum Funding Need Amounts" screen, read the available HUD comments and indicate whether you agree or not with approved funding amounts. Note that Collaborative Applicants and Collaborative Applicants that are applying for UFA designation have two slightly different screens. The instructions are the same for both types of applicants.
The following is the screen for Collaborative Applicants.
|
Step |
Description |
1. |
Review HUD comments. |
2. |
Select "Yes" or "No" whether you agree with the approved Annual Renewal Demand (ARD) amount.
|
3. |
Select "Yes" or "No" whether you agree with the approved total merged need amount.
|
4. |
Select "Save & Next." |
The following is the screen for Collaborative Applicants that are applying for UFA designation. On this screen, item 6 identifies the maximum amount available for UFA fiscal costs.
Select "Yes" or
"No" |
4. Attachments
On the "Attachments" screen, there is a place for attachments. Do NOT submit any attachments unless specifically asked to do so.
|
|
Step |
Description |
1. |
If an attachment is requested, upload it the same way that attachments were provided in the CoC Registration. |
5. Submission Summary
Once the Collaborative Applicant has completed the review, the Collaborative Applicant needs to select the "Submit" button on the "Submission Summary" screen.
The "Submission Summary" screen shows the CoC Review forms. In the "Last Updated" column, the system will identify the following:
A date if the screen is complete
"No Input Required" if there is no input required
"Please Complete" if more information is needed
e-snaps users can go back to any screen by clicking on the screen name on the left menu bar. Remember to select "Save" after any changes.
The "Submit" button is located at the bottom of the screen under the navigation buttons. The "Submit" button will be active if all parts of the CoC Review have a date or "No Input Required" in the "Last Updated" column.
e.Form has been submitted
|
Step |
Description |
1. |
If you are not already on the "Submission Summary" screen, select it on the left menu bar. |
2. |
Select the "Submit" button.
|
Exporting to PDF
CoC lead agencies can obtain a hard copy of the CoC Review using the "Export to PDF" button located at the bottom of the Submission Summary screen under the navigation buttons.
Select button to obtain a
copy of CoC Review
|
Step |
Description |
1. |
Select the "Export to PDF" button. |
2. |
On the "Configure PDF Export" screen, select the screen you would like included. |
3. |
Select "Export to PDF." |
Next Steps: Agreeing With or Disputing CoC Review
If the CoC Lead Agency agrees with all items in the CoC Review and submits it:
The Collaborative Applicant can no longer make changes to its CoC Review.
At some later time, HUD will publish the NOFA announcing the opening of the CoC Program Competition.
If the CoC Lead Agency disputes any part of the CoC Review and submits it:
HUD will again review the CoC Registration with the changes made by all parties.
After HUD has finished reviewing, an email will be sent to the CoC's registrant notifying them that the CoC Registration needs to be confirmed. This is the final determination by HUD.
The CoC will access the CoC Review Registration again, and select "Submit." (See steps beginning at Accessing HUD CoC Registration Review, above in this module.)
At some later time, HUD will publish the NOFA announcing the opening of the CoC Program Competition.
Only CoCs with a HUD-approved registration will have access to the FY2012 CoC and Project Applications.
Module Completion
Congratulations! Now that you have completed the e-snaps CoC Registration process online training module, select the web link that is http://esnaps.hudhre.info/modulecompletion.cfm?moduleID=M020 so that you may complete the form. After you complete the form, you may close this document. Note that additional training modules will be available to assist your CoC and individual Project Applicants in completing the CoC Application and Project Application. Please check the e-snaps training page at http://esnaps.hudhre.info/ for these modules beginning in Fall 2012.
| File Type | application/vnd.openxmlformats-officedocument.wordprocessingml.document |
| Author | 11500 |
| File Modified | 0000-00-00 |
| File Created | 2021-01-22 |
© 2026 OMB.report | Privacy Policy
