Performance Improvement Measurement System for the Office for the Advancement of Telehealth
Office for the Advancement of Telehealth (OAT) Telehealth Outcome Measures
OAT PIMS Instructions
Performance Improvement Measurement System for the Office for the Advancement of Telehealth
OMB: 0915-0311
Performance Improvement Measurement System
for the
Office for the Advancement of Telehealth
Telehealth

Version 4
Public Burden Statement: An agency may not conduct or sponsor, and a person is not required to respond to, a collection of information unless it displays a currently valid OMB control number. The OMB control number for this project is 0915-0311. Public reporting burden for this collection of information is estimated to average 7 hours per response, including the time for reviewing instructions, searching existing data sources, and completing and reviewing the collection of information. Send comments regarding this burden estimate or any other aspect of this collection of information, including suggestions for reducing this burden, to HRSA Reports Clearance Officer, 5600 Fishers Lane, Room 14N39, Rockville, Maryland, 20857.
Contents
Application Level Navigation 5
For Project Directors/Grantee Users: 6
Workflow Process - Process and Submit Report 7
Frequently Asked Questions (FAQ) 8
Configure Sites for this Reporting Period 11
Select Specialty Areas for this Reporting Period 12
Select Settings for this Reporting Period 13
Configure this Reporting Period 14
Form 1: Originating and Distant Sites 15
Form 2: Specialty and Services by Site 16
Form 3: Volume of Services, by Setting 17
Form 4: Patient Travel Miles Saved 18
Form 5: Other Uses of the Telehealth Network 20
Saving Data and using our Forms 22
Table of Figures
Figure 1: Configure Sites 12
Figure 2: Select Specialty Areas 13
Figure 3: Select Settings 14
Figure 4: Configure Reporting Period 15
Figure 5: Originating and Distant Sites 16
Figure 6 : Specialty and Services by Site 17
Figure 7: Specialty and Services by Site – Sub page 17
Figure 8 : Volume of Services, by Settings 18
Figure 9 : Patient Travel Miles Saved 19
Figure 10 : Other Uses of the Telehealth Network 20
Figure 11 : Diabetes 21
Figure 12 : Mental Health 22
Common
Email Notifications
The PIMS system will automatically send email notifications to system users at certain times during the reporting cycle. Examples of when email notifications will be sent by the application include:
If user's report is due user should receive an email.
If user is late in turning in a report user should receive an email.
If user turns in a report user should receive an email.
If any action – return or resubmit- happens to a report user should receive an email.
For some of the examples above, administrative users and help desk users will also receive emails to confirm administrative actions and track, monitor and manage system usage.
Reminders, Re-submission and Delinquent emails are also automatically generated by the system.
The system will automatically generate an email to all grantees whose reports are due 30 days prior to the due date for a given grant.
The system will automatically generate an email to all grantees whose reports are due 14 days prior to the due date for a given grant.
The system will automatically generate an email to all grantees whose reports are due 7 days prior to the due date for a given grant.
Submission Email Reminders: A one day before due date a reminder is also sent to all registered grantees in the system that have not made their annual report submissions. The project officers for the respective grantees must also be carbon-copied. Only reports that are due for that year should be included in the email. If a grant number is not associated with a PD, an email should be sent to the PO about the reminder, the grant #, the organization, and the fact that no PD has been associated with a grant number. System should also generate an email to all grantees who have not submitted the report by the due date.
Delinquency Email Reminders: Email messages to grantees whose reports are delinquent by 14 business days from the due date. This begins the initial submission delinquency cycle. Email messages to grantees who miss the calculated new due date (7 days after 14-day delinquent email); If a report submission is 14 business days delinquent, send an email to the PIMS Project Officer for the grant program. Thereafter, a delinquent email will be sent every 14 days until the matter is resolved.
Re-Submission Email Reminders: Email notification messages are sent to grantees whose re- submissions are delinquent. (Defined as 7 days after the due date). If the return date is after the report due date the grantee gets 7 days to resubmit after which a 7-day delinquent notice is sent. If the report is still due after 14 days of the return date. A 14-day delinquent notice is sent to the grantee. If the report is still due after 14 days of the return date an email is sent to the project officer. If the PD is registered, the system will notify the POs on all re-submission delinquent emails. If PD is not registered, no re-submission reminder is sent.
Users should navigate using the navigation buttons from within the application. Users are STRONGLY DISCOURAGED from navigating using the Internet Explorer Browser BACK-NEXT buttons.
Form Level Navigation
Tab: Moves you forward to the next field.
Shift +Tab: Moves you back to the previous field.
Display / Font: To change the size of the font, please use your browser settings. From view, please click on text size and modify the text size to your desired preference.
Next: Moves you forward to the next not completed form after saving the current one.
Cancel: resets the form to the original state. Clicking this link will clear the form from any recent change and bring back the form to the original state.
Print: This link provides the user the functionality to print all forms by clicking in the "Print PDF" link under PIMS Tools menu.
Save: This will save data in the form to the database.
Instructions - Help: This will display help and instructions specific to every form.
Application Level Navigation
Please use your mouse and click on the links in the top navigation bar to navigate within the application.
Users can click on the top navigation bar located in the top right of any form.
The top navigation links are available from any form.
Instructions: This link will take users to the PIMS help for the form currently being worked on.
Contact us: This link will allow users to send an email to HRSA Call Center.
Sign out: This will sign-off users from the system. Users are STRONGLY ENCOURAGED to close their browsers after logging out of the application.
PIMS Reports-level navigation is available within the PIMS Web-Interface System and allows users to navigate directly to any PIMS section and its associated forms by selecting a form within the PIMS Reports Navigation' sub-menu on the left-hand side. The PIMS Reports -level navigation sub-menu always appears in the left “margin” as a separate window on each screen. Users are encouraged to click the ‘Save’ button at the bottom of the page.
Please also note HELP link will be available from any form in the application.
Report Level Navigation
Please use the left-hand side navigation menu to navigate within the PIMS system at the report level.
Tools Menu allows users to print, view Grantee Information, validate reports and submit reports (Validate / Submit Report).
Validate / Submit Report: This link will allow users to apply business rules and validate the report. The link will also allow users to perform Workflow actions on reports. For example, Project Directors users will use this button to SUBMIT a report to Project Officers.
Data Collection Periods / Due Date: This link displays the data collection periods and report due date.
Print PDF: This link will allow users to generate a PDF format of all forms and save or print them as needed.
Grantee Information: This link displays the face page (cover-page) for a report. For example, Organization Name, Project Title, Director Name, Organization Address, Grant Numbers, etc.
Reports Navigation: This section of the left-hand side navigation menu allows users to enter data into different forms (tables). Please note there are many links within the help files provided in this PIMS HELP-MASTER; a) Some links will provide hyper-links to external pages; b) Some links will expand text within the same page, - click the link again to collapse; c) Some links will re-direct the user to another page -click the back button to return to the previous page; and d) Some links will display images - click the link again to collapse.
Print Reports (PDF)
Please note that the Print (PDF) link will allow users to print their report using the PDF function.
Users are REQUIRED to have adobe reader installed in their desktop in order to generate PDF reports.
To print a report user will click the Print PDF link
After the PDF file is generated users have the options of printing a hard copy of their report or saving the PDF file for later review and archiving purposes.
A link to print the Report is available to all users. All user roles should be able to print the report
Process Submit Report
Reports can be submitted at any time after the data collection period end date if all data has been entered and validation rules have been applied.
Several validation rules will apply to different grantees depending on the program.
Process / Submit Report allows users to change the status of a report (e.g. from Not Started, In Progress, Submitted, Change Requested, etc.).
Changing the status of a report also changes the access level (in general only PD / Grantees have read-write access).
For Project Directors/Grantee Users:
With a registered account, assign/verify your grant privileges and verify your organization.
Fill in all your grant progress / performance data.
Validate your report using the "Validate/Submit Report" link.
Clear Warnings and Errors.
Use comments sections (form level and report level) to communicate with your PO.
Submit your report (notice, reports can be submitted with warnings).
Print your Confirmation Screen and read your Submission Confirmation Email.
If your report is returned for corrections, you will see the report in your Portfolio.
The system will automatically set the report to "Change Requested" status.
Each form in your report which needs changes will be flagged in the Report Navigation.
Comments made by your Project Officer in regard to why the form is incorrect will display in red underneath the title of the form.
Make corrections, enter data, validate report and re-submit report.
If errors exist in your report, you will not be allowed to submit until you fix the errors
For Project Officers:
Check your Inbox regularly for new report submissions.
Start Here
This PIMS Web-Based Applications constitutes the portal from which both internal/external users can access information. The web-based electronic data collection is user-session based, allowing for rules, qualifiers, and the application of filters. This presents users with just the screens and forms they are required to submit, view, edit and report on based on their organizational relationships. As an authorized user you will be allowed to enter data into the PIMS database by grant number (s).
The Progress Report for Grants and forms/tables are designed to provide information about grantee activities. As such, it is an important management tool, contributing to data PIMS uses to report success achieving programmatic and crosscutting goals and in setting new goals for the future. The PIMS report also gives program officers information that helps them provide technical assistance to individual projects.
Please note that the information you are submitting is collected by PIMS and used to manage and track your grant. Selected information is used for congressional reporting. Specific information related to ORHP and Government Congressional reporting can be found in the bullets below:
The Government Performance and Results Act of 1993 GPRA requires ORHP and other Federal agencies to develop strategic plans, prepare annual plans setting performance goals, and report annually on actual performance compared to goals. The Annual Performance Plans, derived from a multi-year Strategic Plan, set performance goals for each fiscal year. Performance indicators are used to measure and assess the relevant outputs, service levels and outcomes.
Workflow Actions
The PIMS Workflow actions are mainly related to report administration. This section of the help places emphasis in actions like changing the status of a report, sending email notifications, changing roles to a user, etc. Workflow actions are performed by clicking the Validate / Submit Report; from this link depending on the role- users will be allowed to submit, review, return or clear PIMS reports.
Workflow Process - Process and Submit Report
A PIMS report goes through a series of statuses that describe where it is in the process, which user (s) can access it, what they can do with it and what are the next steps. The possible (example) statuses of a report are working, review, submitted, returned for corrections and approved.
Not Started status means that the grant has been funded, but no work has yet been done on the report.
In Progress status means that the report has been created and is currently in progress. The report can be changed, and data can be added when it is in working status. Data can be entered by the project director, or the grantee (on behalf of the project director.)
Submitted status means that the report was accepted by all applicable Grantees and Project Directors and is under review by the Project Officers. No more change can be made by the PD.
Change Requested/Returned status means the PO has returned the report back to the PD. PD must make corrections based on the PO's comments and proceed to make a report re-submission action.
Re-Submitted Once the user is done entering the report data and corrections after a report is returned, the report is submitted again to the PO/PC and its status changes to Re-Submitted.
NOTE: For Project Directors (PD) performing submissions to their Project Officers (PO). If your submission is successful a confirmation on the screen will alert you of the success in the action performed. Also, a cc email will be sent to the PD and the original notification of submission will be sent to the PO.
Workflow Action Confirmations
Workflow Action Confirmation is received via email by the sender/receiver. For example, if a PD submits the report for review to his PO; both the PD and PO are notified of the submission via email. Before the report is submitted Validation, rules will be applied for warnings and errors. Users will be allowed to submit reports with warning but not with errors as shown in example
Report Status
The most typical Report Statuses are listed below - Process and Submit Report Actions change the Status of Reports:
Not Started
In Progress
Submitted to Project Officer (PO)
Change Requested from PD
Resubmitted to Project Officer
Email Notifications
All notifications for any movement of the report in the Workflow have to be done via email. A template for this email needs to be generated. The template should include the user details and the Workflow action taken by the user. The email will be sent from the web system (no-reply email) to the concerned PO.
FAQ
Frequently Asked Questions (FAQ)
Question 1: What is EHB?
Q1 Answer: Grants Electronic Management System (EHB-GEMS); also referred as the Electronic Handbook (EHB). This can be accessed using the following link: https://grants3.hrsa.gov/2010/WebEPSExternal/Login.aspx
Question 2: Can multiple Project Directors (PDs) be assigned to a single grant within the EHB system? Q2 Answer: Only one user shall be allowed to add the grant to his/her portfolio as the PD for that grant/report. Only one PD can be assigned per grant.
Question 3: What are the PDs responsibilities within the EHB system?
Q3 Answer: PDs from the grantee organizations will register with the HRSA EHB system and add their grants to their portfolio. This ensures that only authorized individuals from the grantee organization obtain access to the grant data. The PD will also manage privileges (Start Submission, Edit Submission, View Submission, and Submit Submission) for subordinate users.
Question 4: If a Project Director leaves the grantee organization and he is the only one with control permissions for the grant portfolio, what happens?
Q4 Answer:
The PD should transfer permissions to the Authorizing Official before leaving an organization.
If the PD leaves before sharing the permissions, a request will need to be made to the HRSA Call Center.
Question 5: Why are race and ethnicity collected separately?
Q5 Answer: Due to a revision of the Office of Management and Budgets (OMB) Statistical Policy Directive 15 titled Race and Ethnic Standards for Federal Statistics and Administrative Reporting, it is required that all federally collected data have a minimum of five race categories: American Indian or Alaska Native, Asian, Black or African American, Native Hawaiian or Other Pacific Islander, and White and allow respondents to choose as many of these that apply. It also requires questionnaires to collect ethnicity data in a separate question from race. Ethnicity categories include "Hispanic or Latino" and "Not Hispanic or Latino."
Question 6: Why do we collect information about multiple-race combinations?
Q6 Answer: Utilizing a data collection tool with a multiple-race combination format provides grantees the opportunity to better capture the diversity within their programs. It also provides a more accurate picture of health professions students
Question 7: What reports do I have that are currently due?
Q7 Answer: In order to see which reports are due, log into the EHB system, look into your grant portfolio, and click on SUBMISSIONS. The reports that are due will be listed there.
Question 8: The Project Director left, the grant has ended, and the grantee cannot enter the EHB / PIMS. How can the grantee submit the report?
Q8 Answer: The grantee should contact the Call Center for assistance. The Call Center will assist the grantee through the change of PD and accessing the systems. Note that irrespective of the change in the PD, the grantee is required to submit the report.
Question 9: What is the next step after I have finished entering my PIMS data?
Q9 Answer: Once you are done entering PIMS data, it is advisable that you click on Validate/Submit report. The validate report function will apply business rules and ensure that the report is complete and that it complies with rules as set forth by the system. Next you can click "Submit" button after the Collection Period End Date.
Question 10: Why can’t I enter information on the Grantee Information Page?
Q10 Answer: This page is only editable from EHB
Question 11: May a grantee submit a paper copy or any other electronic format of the report?
Q11 Answer: NO. All grantees are required to key information into and submit the report through EHB/ PIMS system. The PIMS system does not have the capacity to receive any other electronic formats.
Question 12: When is my report due?
Q12 Answer: The Due Date is displayed on Top of all Grantee pages. The Due Date is greater than the Collection Period End Date.
Question 13: What are the data collection periods?
Q13 Answer: The data collection periods for each report are found at the top of each report in the PIMS system.
Question 14: How do I submit the report once I have completed it?
Q14 Answer: Click on the VALIDATE/SUBMIT REPORT LINK found in the tool box. A pop-up window will appear which contains:
Whether the report validation was successful or failed
If the validation was successful, an option to continue submission
Certification
Click the checkbox that certifies that you are authorized to submit the report and click SUBMIT TO PROJECT OFFICER.
Question 15: How do I add comments?
Q15 Answer: ADD COMMENTS in the text area provided on every form. This can only be done before the report is submitted to PO.
Question 16: Why I am automatically logged out of the system?
Q16 Answer: As a security precaution, your session is terminated after 30 minute(s) of inactivity. After you login, if no activity is detected in your account for 30 consecutive minutes, you are automatically logged out of the system. A warning message is displayed 1 minute before your session is about to be terminated. If you do not respond, you are logged out and a message is displayed asking you to login again. This is done to prevent unauthorized access to your account.
Question 17: How do I access my PIMS reports?
Q17 Answer: For EXTERNAL USERS, they will need to do the following:
Ensure that you are registered and created an account within the EHB system.
Log into the system at the following URL: https://grants3.hrsa.gov/2010/WebEPSExternal/Login.aspx
Click on the VIEW PORTFOLIO link in the left-hand menu
If the grant is not located there, add it to your portfolio
Once the grant is listed there, click the OPEN GRANT HANDBOOK link just to the right of grant listing
Click on PERFORMANCE REPORTS link in the left-hand menu
From the Performance Reports page, click on START REPORT (if the report was not started already)
If the report was started already, click on EDIT REPORT
You will then be directed to the PIMS system
Question 18: How do I print my report?
Q18 Answer: Printing is provided at the report level. From each individual form, please use the Print PDF link under Tools menu.
Question 19: How can I save an electronic copy my report?
Q19 Answer: From each individual form, please select the Print PDF link under Tools menu. The PDF file can be printed or saved to the user local computer.
Question 20: What happens after a report is submitted?
Q20 Answer: Once the report is submitted, the PIMS system will send an email notification and the report is then sent to the Project Officer.
Question 21: Will I be able to view my reports after they are submitted?
Q21 Answer: Once the report is submitted to HRSA, a link to view the Read-Only version of the PIMS report shall be available within the EHB grant portfolio.
Question 22: What do I do if I have validation errors when I try to submit?
Q22 Answer: If you get validation errors when you try to submit your report, print your list of validation errors and click "Cancel" or "Close this Window". Try to resolve all validation errors before submitting.
Question 23: I accidentally submitted the report to the Project Officer. How do I get the report back?
Q23 Answer: Contact the Project Officer and request that he or she return the report to you.
Grantee
Setup Options
In order to make this performance measurement tool relevant to your specific Telehealth system, you will configure the measurement tool to your specific needs. This makes the forms more manageable and removes forms that do not pertain to your unique system. To configure the forms for this reporting period, click on the setup options to Configure Sites, Select Specialty Areas, and Select Settings and select the categories you will use to describe the activity in your Telehealth system. For example, Select Specialty Areas ask you to indicate the specialties in which you provided Telehealth services during this reporting period. Once you indicate the relevant specialties, subsequent forms will only include your selected specialties
Configure Sites for this Reporting Period
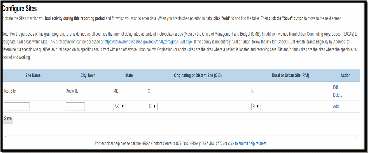
In this form, you will see listed all the sites that were active during your previous reporting period. Simply specify which of the sites remained active during the current reporting period and add any new sites.
To list a new site, enter the SITE NAME, CITY/TOWN, STATE and select options for ORIGINATING or DISTANT SITE (O/D), RURAL or URBAN SITE (R/U) and click the ADD link.
Indicate only the active sites and the site will be recorded as inactive, when you are done, click SAVE and you will be navigated to the Select Specialty Areas page.
Select Specialty Areas for this Reporting Period
In this form, you will indicate the medical specialties and services provided through your Telehealth system during this reporting period. You will see all the specialties listed, with those from your last reporting period checked; you can remove checks to inactivate specialties you no longer offer or add checks beside new specialties you have recently begun to offer. Please try to use the existing categories if possible, using the catch-all ‘other’ category for small numbers in other specialties that don’t fit into existing categories. If necessary, we will add a specialty for you, if it doesn’t fit into an existing category and you had a number of sessions.
Check the box in the left-most column to indicate each of the specialties/services in which you had activity during this reporting period. If you leave this box unchecked, it will be recorded as inactive and that specialty will not appear on any subsequent forms. When you are done, click SAVE and you will be navigated to the Select Settings page.
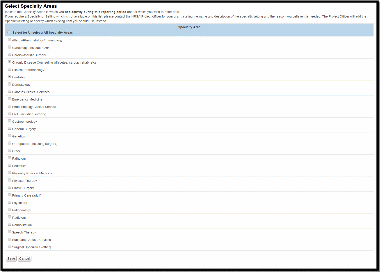
Figure 2: Select Specialty Areas
Select Settings for this Reporting Period
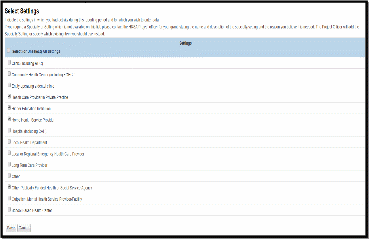
In this form, you will define the settings where patients received care through your Telehealth system. You will see all the settings listed. Please use the existing setting categories; if necessary, we will create a new setting for you, if it doesn’t fit into an existing category and you had several sessions there.
Check the box in the left-most column to indicate all the patient settings in which you had activity during this reporting period. If you leave the box unchecked, that setting will be recorded as inactive and will not appear in subsequent forms. When you are done, click SAVE and you will be navigated to the Configure report period page.
Definitions - Settings:
Clinic (including RHC)
Community Health Center (including FQHCs)
Entity operating a dental clinic
Health Care Provider in Private Practice
Higher Education Institution
Home Health Service Provider
Hospital (including CAH)
Local Health Department
Local or Regional Emergency Health Care Provider
Long Term Care Provider
Other
Other Publically Funded Health or Social Service Agency
Outpatient Mental Health Service Provider/Facility
School Based Health Center
Configure this Reporting Period
This form contains 3 questions regarding specific use of your system for supervising, monitoring. Please read definitions of these activities carefully and then answer each question to indicate whether your system was used for these functions, during this reporting period.
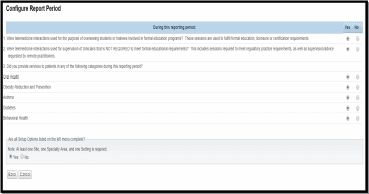
Figure 4: Configure Reporting Period
Form 1: Originating and Distant Sites
This form has two sections. The first section displays the Number of Each Type of Site in this Reporting Period that you have selected in the ‘Configure Sites’ page.
The second section allows you to choose a ‘Setting’ for all the sites you have selected in the ‘Configure Sites’ page. You will have ability to update the list of selected sites by clicking on ‘Modify the List if Needed’ link on the top of the second section.
After selecting the required setting, on the bottom of the page, you should change the STATUS of this form to COMPLETE by clicking the YES button at the bottom of the page. Then click SAVE.
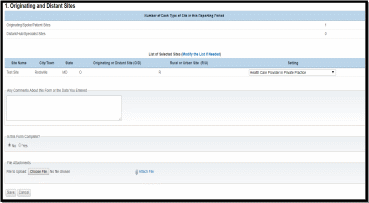
Figure 5: Originating and Distant Sites
Form 2: Specialty and Services by Site
This page will show you a list of the originating sites you are reporting on for this period, which you specified as active patient/patient data sites.
For each local community served by one of your patient/patient data sites, click on the site name link under the ‘Originating Site’ and complete the form that appears. Click Yes or No to answer each question: whether a specialty/service is available in the local community; whether this specialty is availability at the sites through telehealth. Finally, indicate how far one would have to drive from the local community to see a specialist in-person. (For services/specialties already available in the local community, the distance traveled should be 0, since no driving is required.) Google Maps may be helpful in determining miles between two points.
For each site, after inputting all the required options, on the bottom of the page, you should change the STATUS of this form to COMPLETE by clicking the YES button at the bottom of the page. Then click SAVE.

Figure 6 : Specialty and Services by Site
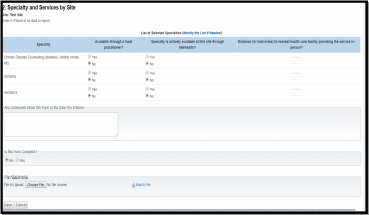
Figure 7: Specialty and Services by Site – Sub page
Form 3: Volume of Services, by Setting
In this form you should enter number of unique patients and number of encounters for each patient setting.
Definitions - Encounter Types:
Interactive/Real-Time Encounters (IN): Encounters are encounters that are live, two-way interactions between a person and a provider using audiovisual telecommunications technology.
Store-and-Forward Encounters (SF): This is also called asynchronous, are the transmission of health information through digital images or pre-recorded videos through electronic communication to a practitioner who uses the information to make an evaluation
After inputting all the required data, on the bottom of the page, you should change the STATUS of this form to COMPLETE by clicking the YES button at the bottom of the page. Then click SAVE.
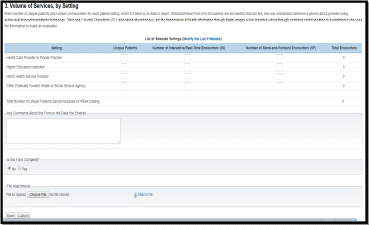
Figure 8 : Volume of Services, by Settings
Form 4: Patient Travel Miles Saved
This data sheet takes a systematic approach to measuring patient travel that is ‘saved’ or avoided through the use of telemedicine.
There is a link on this page to a Patient Travel excel spreadsheet. This is provided for your convenience. We suggest that you assemble your data by filling out a table like the one in the Patient Travel excel spreadsheet (right-click the link and choose "SAVE TARGET AS..." to download excel file). You will only be reporting the bottom row of totals in the website form, but your report will be more accurate if you assemble your data in this manner.
In the Patient Travel excel spreadsheet; enter the names of each consultant site (hub site) and each patient/patient data site (remote or originating site) in columns 1 and 2. For many programs, the Telehealth consultant site will be serving all your patient/remote sites; you should still list the consultant site/hub site in column 1.
Estimate the distance between the two (in miles) and enter this number into column 3. This information can be obtained by using Google Maps or other mapping resources.
Enter the number of patient care sessions between the two locations in column 5. For group sessions/clinics, each patient should be counted separately, as each would have had to travel to get care in-person. For simplicity (and to avoid collecting information from each patient) the distance a patient travels from their home to the remote site is intentionally omitted. Home patients should be excluded from this entire reporting sheet. Homecare data are collected in Form 11 on this website. Patients being stabilized prior to transport should be excluded as well, as their travel is not averted, only delayed.
Columns 4 and 6 in the Patient Travel excel spreadsheet will fill in automatically. You do not need to enter anything into these cells.
Once your Patient Travel excel spreadsheet or paper forms are complete and you have the 3 totals at the bottom, enter these into the website form. Do not send us Patient Travel excel spreadsheet; you may wish to file for your own records.
Definition:
Patient-Care Sessions include therapy and counseling (including nutritional, group, etc.) but NOT didactic education, community meetings or administrative sessions.
After inputting all the required data, on the bottom of the page, you should change the STATUS of this form to COMPLETE by clicking the YES button at the bottom of the page. Then click SAVE.
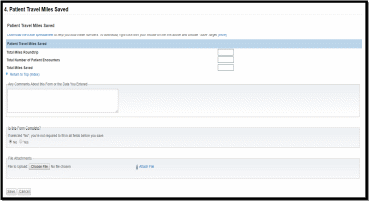
Figure 9 : Patient Travel Miles Saved
Form 5: Other Uses of the Telehealth Network
In this form you are asked to report on the many ways that communities leverage the availability of telecommunications, for purposes beyond clinical patient care. These other services are enabled by the availability of the infrastructure and demonstrate added value communities realize from having a telemedicine program. In order to complete this form, you will collect information on sessions and record them in the appropriate categories on this form. This form has two sections. The first section gathers information on Categories of Usage and the second section is on Formal and Informal Education.
After inputting all the required data, on the bottom of the page, you should change the STATUS of this form to COMPLETE by clicking the YES button at the bottom of the page. Then click SAVE.
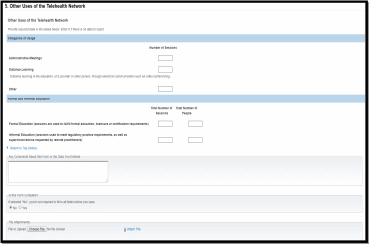
Figure 10 : Other Uses of the Telehealth Network
Form 6: Diabetes
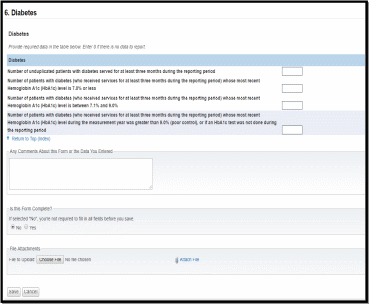
HRSA is interested in how many patients with diabetes are served by Telehealth and how many of the latter are in good glucose control. The standard for being in good glucose control is a Hemoglobin A1C test result of 7% or less.
For the first question, count the total number of patients with diabetes served for at least three months during the reporting period.
For the second question, count the total number of patients with diabetes (who received services for at least three months during the reporting period) whose most recent Hemoglobin A1c (HbA1c) level is 7.0% or less.
For the third question, count the total number of patients with diabetes (who received services for at least three months during the reporting period) whose most recent Hemoglobin A1c (HbA1c) level is between 7.1% and 9.0%.
For the fourth question, count the total number of patients with diabetes (who received services for at least three months during the reporting period) whose most recent Hemoglobin A1c (HbA1c) level during the measurement year was greater than 9.0% (poor control), or if an HbA1c test was not done during the reporting period.
After inputting all the required data, on the bottom of the page, you should change the STATUS of this form to COMPLETE by clicking the YES button at the bottom of the page. Then click SAVE.
Form 7: Mental Health
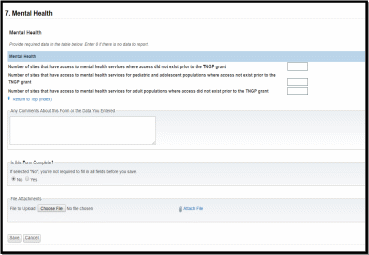
HRSA is interested in how many sites have access to mental health.
For the first question, provide the total number of sites that have access to mental health services where access did not exist prior to the TNGP grant.
For the second question, provide the total number sites that have access to mental health services for pediatric and adolescent populations where access not exist prior to the TNGP grant
For the third question, provide the total number of sites that have access to mental health services for adult populations where access did not exist prior to the TNGP grant
After inputting all the required data, on the bottom of the page, you should change the STATUS of this form to COMPLETE by clicking the YES button at the bottom of the page. Then click SAVE.
Saving Data and using our Forms
Optional Comments
Use this space to make any comments about this form or the data you entered. Generally, this field is only to alert us that you entered data in some irregular way or had to interpret your TM activity differently than we are asking. If you understand the form and have no trouble completing it, please leave the comments field blank.
Is this form complete?
All forms have a status associated with the form. This status is what shows up on the home page next to each of your forms. This status is also used by the OAT director to review the status of all programs with regard to completion of these forms.
In most cases, the person completing the forms is the one who specifies when a form is complete. You may enter data into the forms on several occasions over days or weeks, but until you feel you are done, please do not mark the form as complete.
You may save changes to your data, and return to make more changes another time, by indicating "no", the form is not complete and clicking "save changes to data". Only indicate "yes" the form is complete, when you are certain that you have finished entering data and do not intend to make any more changes to this form. This tells us that you are certain you are finished.
| File Type | application/vnd.openxmlformats-officedocument.wordprocessingml.document |
| Author | Divya Kota |
| File Modified | 0000-00-00 |
| File Created | 2021-01-13 |
© 2026 OMB.report | Privacy Policy