SC eGrants Instructions
eGrants Visual Instructions for Grantees with PM Visual Instructions Added (all Programs).docx
Senior Corps Grant Application
SC eGrants Instructions
OMB: 3045-0035
Senior Corps Grant Application eGrants Step-by-Step Instructions
Retired and Senior Volunteer Program (RSVP) Foster Grandparent Program (FGP) Senior Companion Program (SCP) for Competitive Applications Non-Competitive Administrative Renewals Continuation Applications
|
BEFORE GETTING STARTED
Before reviewing the eGrants step-by-step instructions: (1) Please ensure that you have fully read the Senior Corps Grant Application Instructions. The document addresses the instructions for applicants applying for competitive, continuation, or renewal grants.
For RSVP: See Grant Application Instructions Volume I.
For FGP and SCP: See Grant Application Instructions Volume II.
(2) If you have not already done so, please create your Organizational Profile in our eGrants system as all grantees must have an eGrants account before submitting an application.
Instructions for Logging into eGrants (for NEW and PREVIOUS Applicants)
Click
on the eGrants link to start your grant application
(https://egrants.cns.gov/espan/main/login.jsp).
The
next step depends on your status as a grantee whether you are a
current grantee or a new grantee. 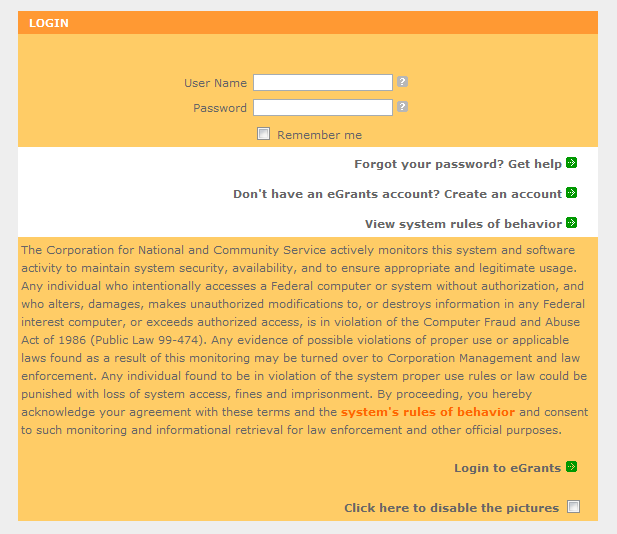
*Note: You may have to temporarily enable pop-ups in order to move forward with your grant application.
Current or Previous Grantees: Type in your grantee user name and password. Click the “Login to eGrants” link.
If you cannot remember your eGrants username or password, please contact the National Service Hotline at (800) 942-2677 (M-F, 8:00A.M. – 8:00P.M. Eastern Time). If you have an existing account, please do not open a new account, but work with the Hotline to gain access to your pre-existing grantee account.
Skip to Instructions for Starting a New Grant Application.
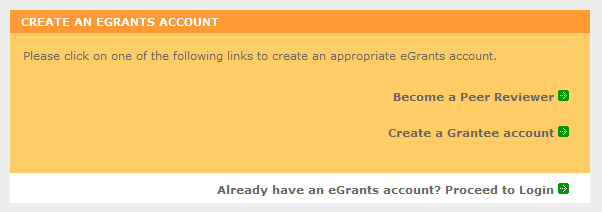
Potential/New Grantees: If you do not have a grantee account in eGrants, please establish your profile.
Click “Don’t have an eGrants account? Create an account” link.
C
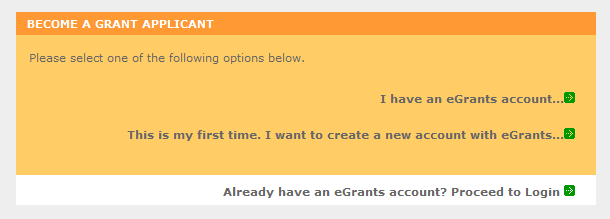 lick
on the “Create
a Grantee account”
link.
lick
on the “Create
a Grantee account”
link.Click on the “This is my first time. I want to create a new account with eGrants...” link.
Instructions for Creating an Organizational Profile (for NEW Applicants only)
PART I – FACESHEET Instructions: eGrants “Applicant” and “Application” Sections
Follow the prompts entering all requested information. There are 6 sections that will need to be completed in chronological order.
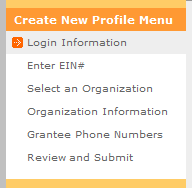
Login Information
Enter EIN #
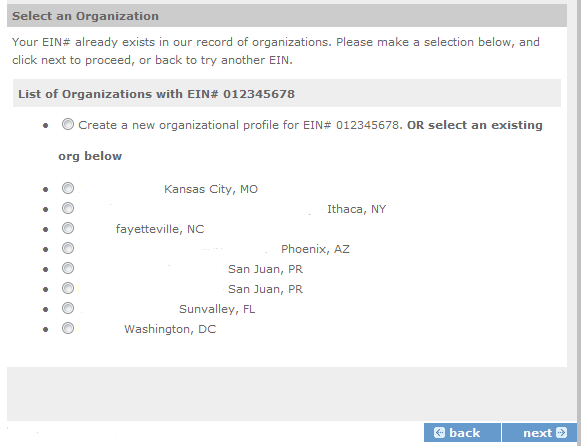
Select an Organization
Organization Information
Grantee Phone Numbers
Review and Submit
Note: Fields with a red asterisk (*) are required.
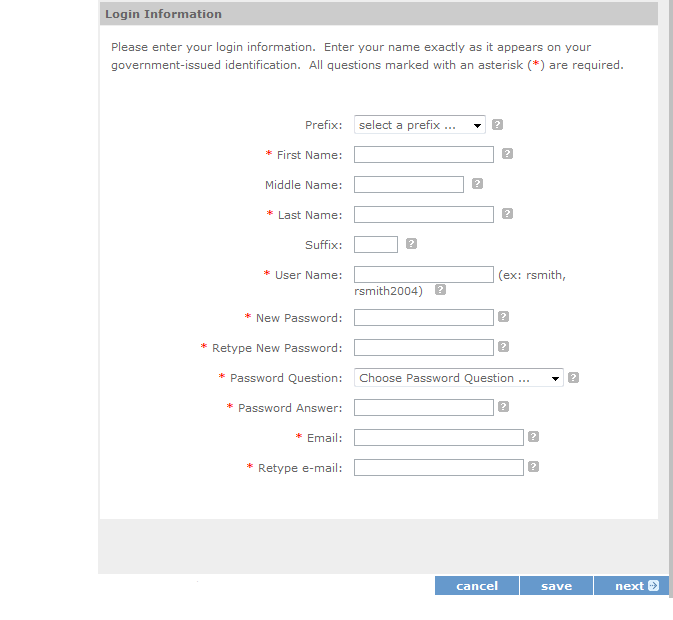
Login Information: Complete the requested fields to move to the next section. Click the “next” button once complete.
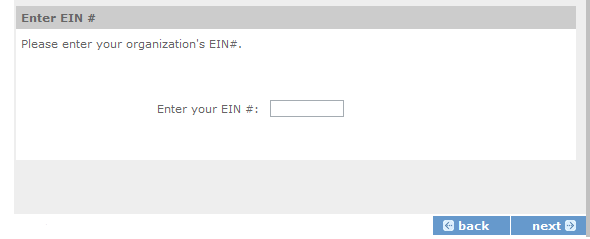
Enter EIN#: Enter your organization’s EIN # to move to the next section. Click the “next” button once complete.
Select an Organization: After you have typed in your EIN number, you will have 2 choices:
(a) Select the organizational profile you are submitting a grant application for OR…..
(b) Create a new organizational profile for your EIN number.
Click the “next” button once you have selected a radio button for a new organization or an existing one.
If an existing organizational profile is listed, please do not create a new organization. Instead, work with the Hotline to gain access to your pre-existing organization.
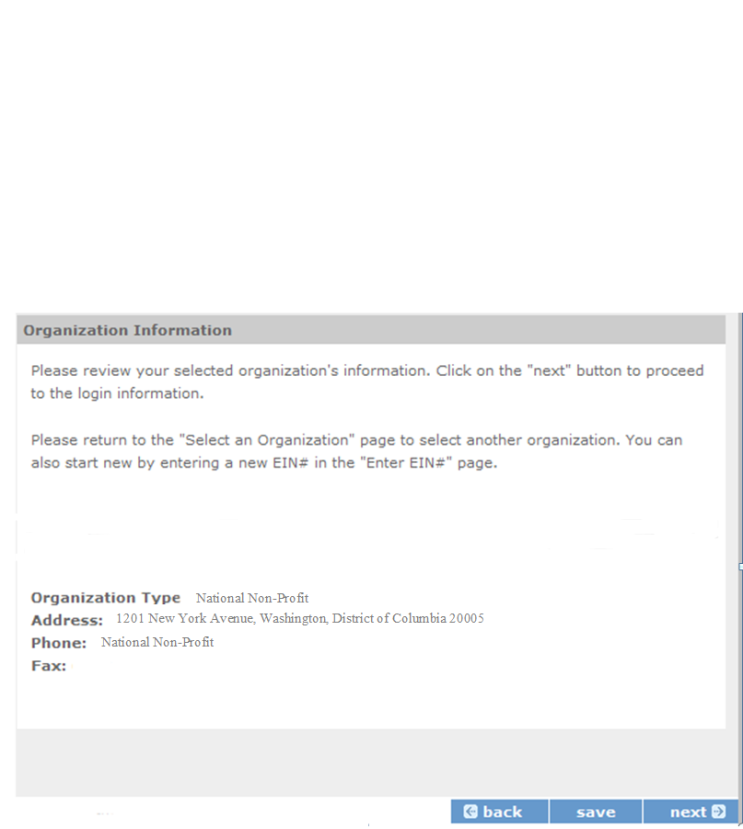
Organization Information: Depending on whether you created a new organizational profile or selected one in the previous screen, you will have one of the 2 screens appear.
Selecting an existing Organizational Profile:
I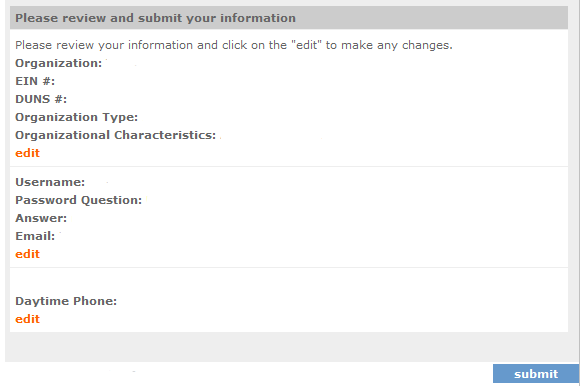 f
you have selected an account for an existing organization, you will
be able to review the organizational information. By clicking
submit, the grantee administrator for your organization (listed
below) will be notified about your account request. The grantee
administrator must grant you access before you can submit an
application in eGrants under the selected organization.
If a new employee of you organization needs to create an eGrants account (ex. Project Director, Authorized Representative, Bookkeeper) they would follow these same steps to create an account linked to you organization. Any eGrants accounts for employees who are no longer at the organization should be disabled.
OR
Creating a New Organizational Profile:
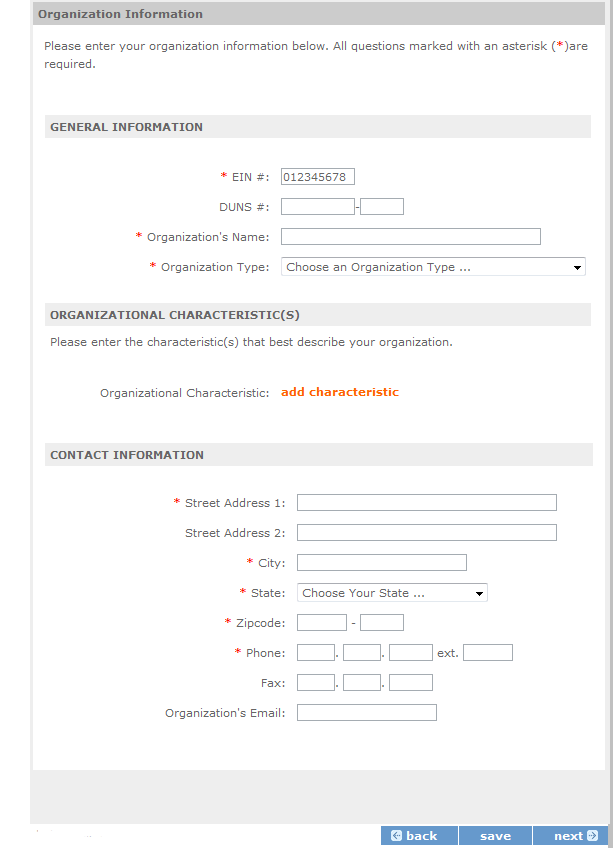
When creating a new organizational profile under the EIN number, you will need to complete all fields (General Information, Organizational Characteristics, and Contact Information) in order to move forward in the process. Click the “next” button once complete.
Note: The address field may recommend a different address, so please ensure you have entered the correct address to avoid a delay in processing your organizational profile.
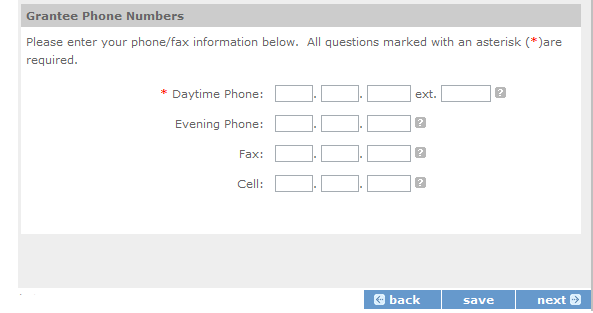
Grantee Phone Numbers: Enter at least 1 convenient daytime phone number for your organization. We recommend entering 2 numbers for emergency scenarios. Click the “next” button, once complete.
Review and Submit: Please review and verify that all information you are submitting is correct.

Instructions for Starting a New Grant Application for your Organization (for all Senior Corps Programs)
Log into eGrants using your username and password (https://egrants.cns.gov/espan/main/login.jsp)

RSVP: For competitive applications, please reference the Notice of Funding Opportunity.
FGP and SCP: For renewal applications, please reference instructions from your CNCS state office.
For continuation grants (year 2 or year 3) please reference the Grant Applications Instructions
and instructions from your CNCS State Office.
Click on the “New” link under Creating an Application
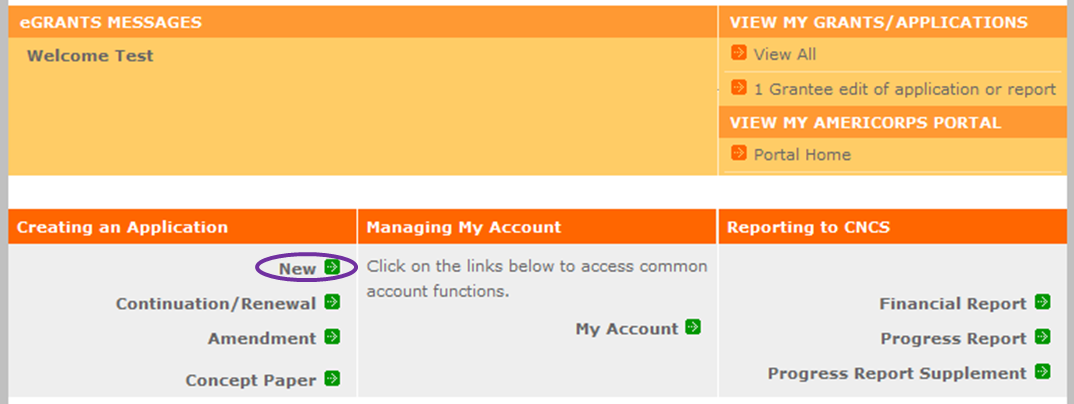
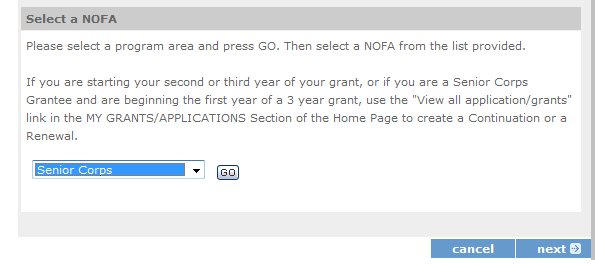
Select the program area “Senior Corps”. Click the “Go” button.
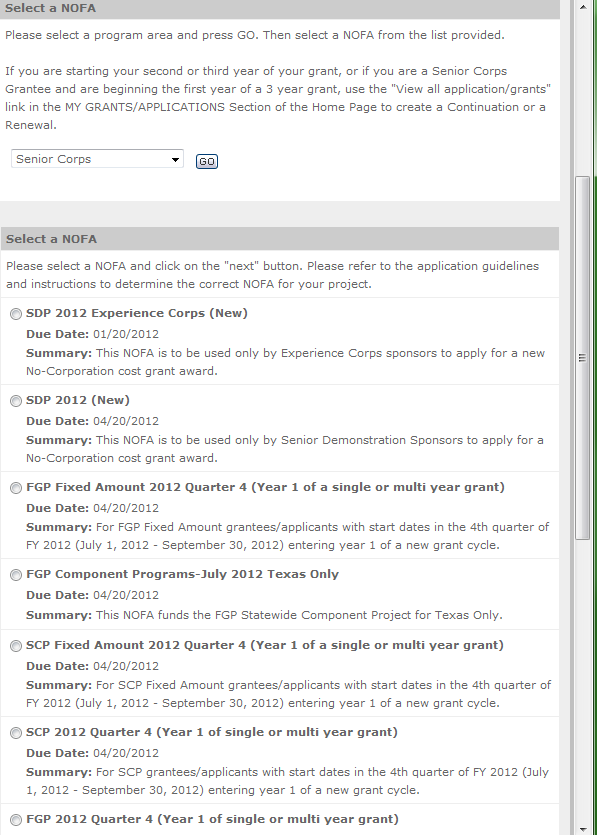
A list of NOFA options will appear. Select the appropriate NOFA and click the “next” link.
F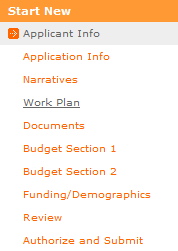 ollow
the prompts entering all requested information. There are 10
sections that will need to be completed.
Note: Fields with a red asterisk (*) are required.
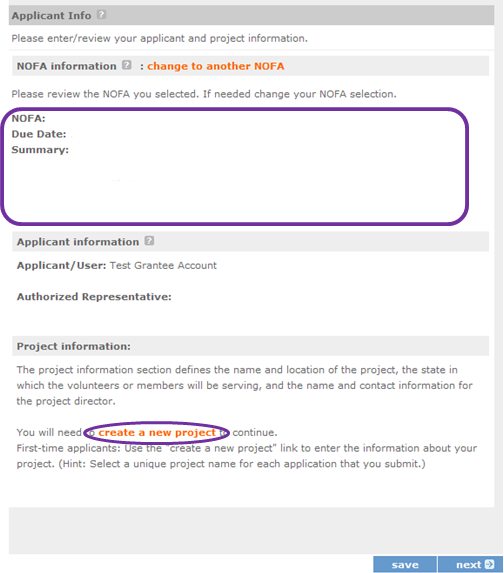
Review and verify that the NOFA you selected is the correct NOFA you are submitting an application for.
Near the bottom of the screen, click on the “create a new project” link.
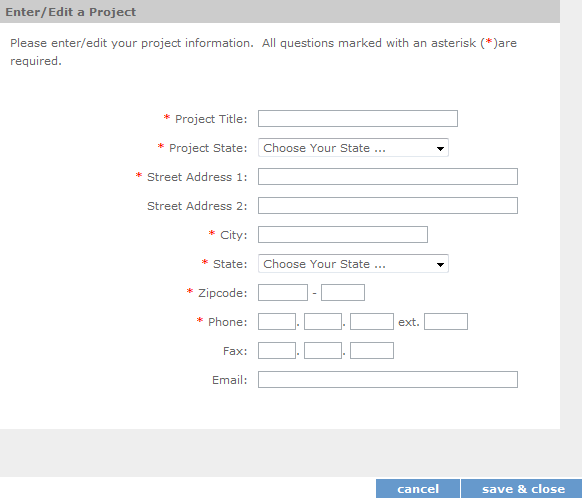
First-time applicants: Use the "create a new project" link to enter the information about your project. (Hint: Select a unique project name for each application that you submit.)
Enter the required fields for your project information. Once complete click ‘save & close’.
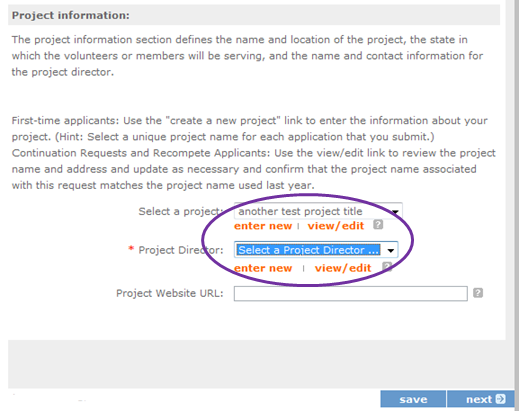
Continuation and Renewal Applicants: Use the view/edit link to review the project name and address and update as necessary and confirm that the project name associated with this request matches the project name used last year.
Enter or select your Project Director and Project Website URL (if applicable). Once complete, click the next button.

Please refer to the Senior Corps Grant Application Instructions on what information to enter.

Select the proposed Start and End Dates. This is a 3-year period, also known as the “project period”.
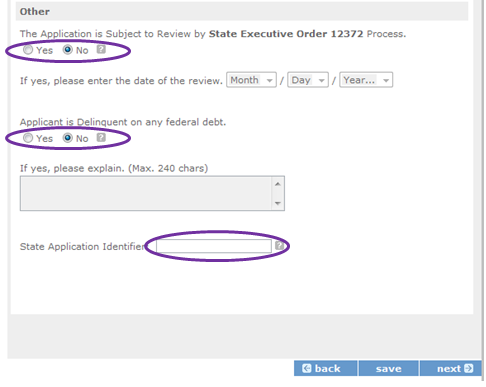
Here is where you would indicate whether this application is subject to review by the State Executive Order 12372 Process by checking the box. Please review the Grant Application Instructions for clarification on the Executive Order.
Check the appropriate box that applies to the applicant organization. Please review the Grant Application Instructions on what federal debt would include.
PART II – Project Narrative Instructions (eGrants “Narratives” Sections)
Please
refer to the Senior
Corps Grant Applications Instructions
for sections A through F.
The purpose of the program narratives is for you to provide a project plan with a clear and compelling justification for achieving results with the requested funds.
You may not exceed 25 double-spaced pages for the Narratives, including the Executive Summary as the pages print out from eGrants.
In the case of competitive grants, reviewers will not consider material submitted over the page limit, even if eGrants allows you to enter and submit text over the limit. From the Review and Submit page, print out your application prior to final submission to ensure it is not over the 25 page limit. This limit does not include the budget and performance measures.
Section A. Executive Summary

In this section, please provide a summary of your proposed or ongoing project. The Executive Summary must be no longer than one page.
NOTE: CNCS will post these summaries on www.nationalservice.gov in the interest of transparency and open government.
Section B. Strengthening Communities
Competitive RSVP grants and Renewal FGP & SCP grants must align with the Performance Measures Requirements. The requirements are listed in the eGrants Application Instructions and the Appendices. The unit of measure for performance measures requirements is “unduplicated [RSVP, FGP, or SCP] volunteers”.

Section C. Recruitment and Development

Section D. Program Management
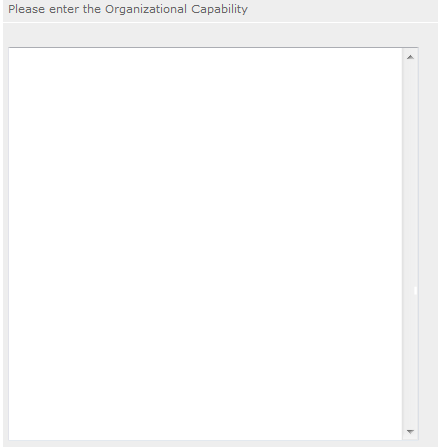
Section E. Organizational Capability
Section F. Other NOFA Requirements – Reference ONLY
This section is used, as needed, to address any additional program requirements that appear in the published Notice of Funding Opportunity (NOFO) or supplemental instructions. Refer to the NOFO for specifics.

PART III – Performance Measures and Work Plans – eGrants “Work Plan” Section

For RSVP Competitive applicants and FGP & SCP Renewals, this section must be completed.
For Continuation Applicants, you MUST UPDATE the continuation grant application to reflect any changes from previous submission to ensure that Performance Measures and Work Plans are aligned to the proposed activities and outcomes in the upcoming year.
Please refer to the Senior Corps Grant Application Instructions as you complete the Work Plans.
A: For RSVP applicants
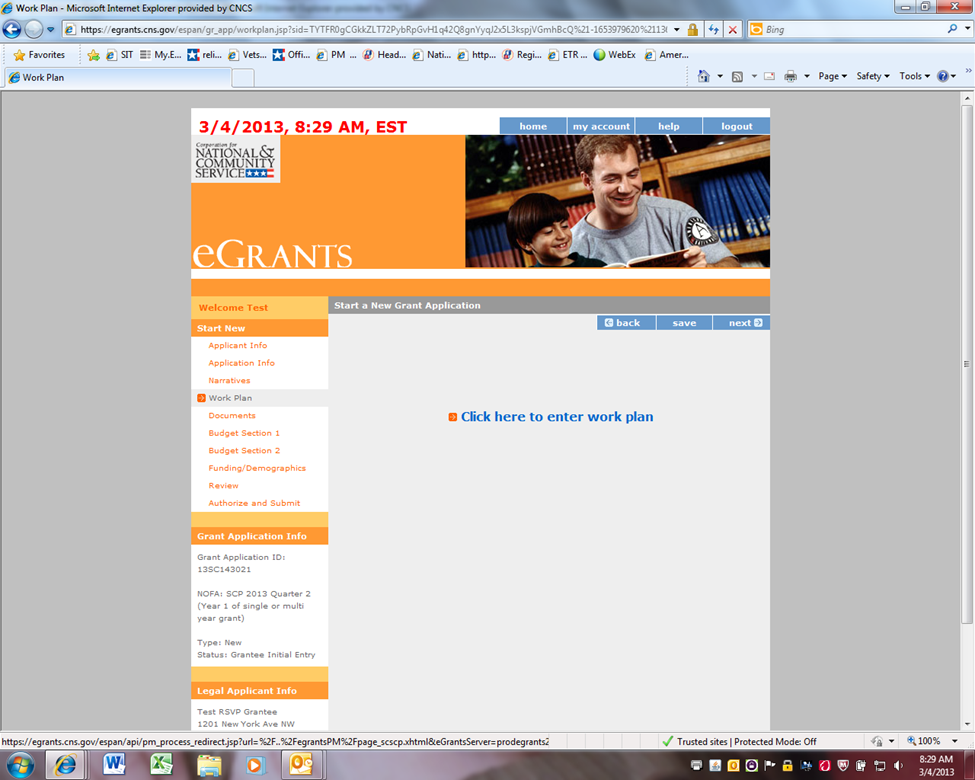
Click to enter the work plan Performance Measure Module.


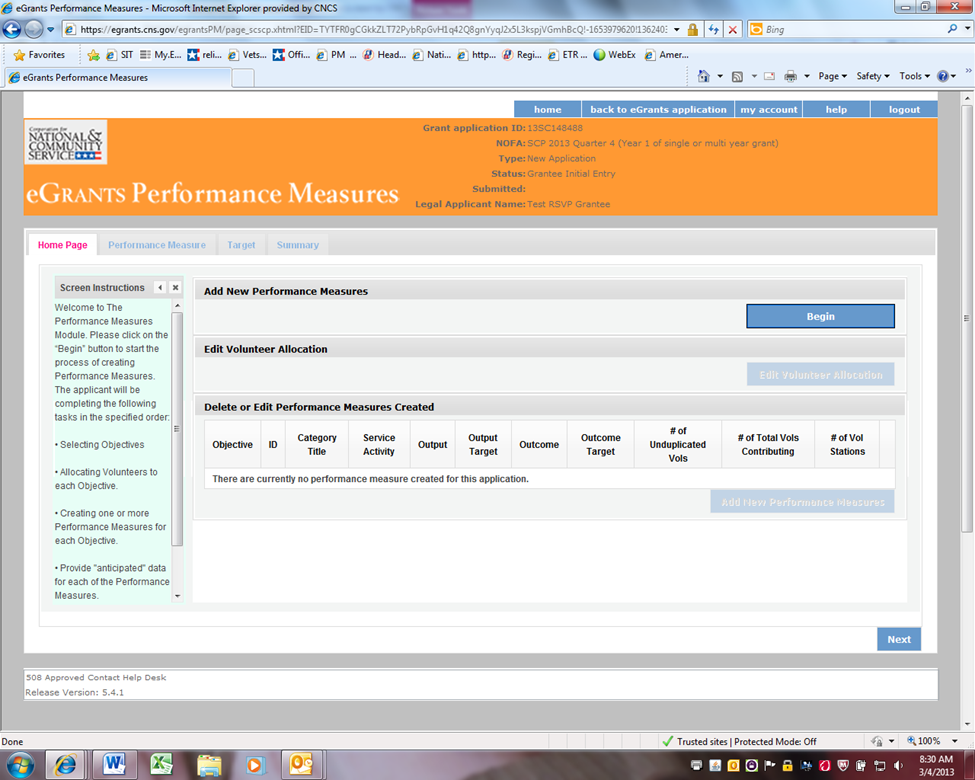
Click Begin to start entering work plans.

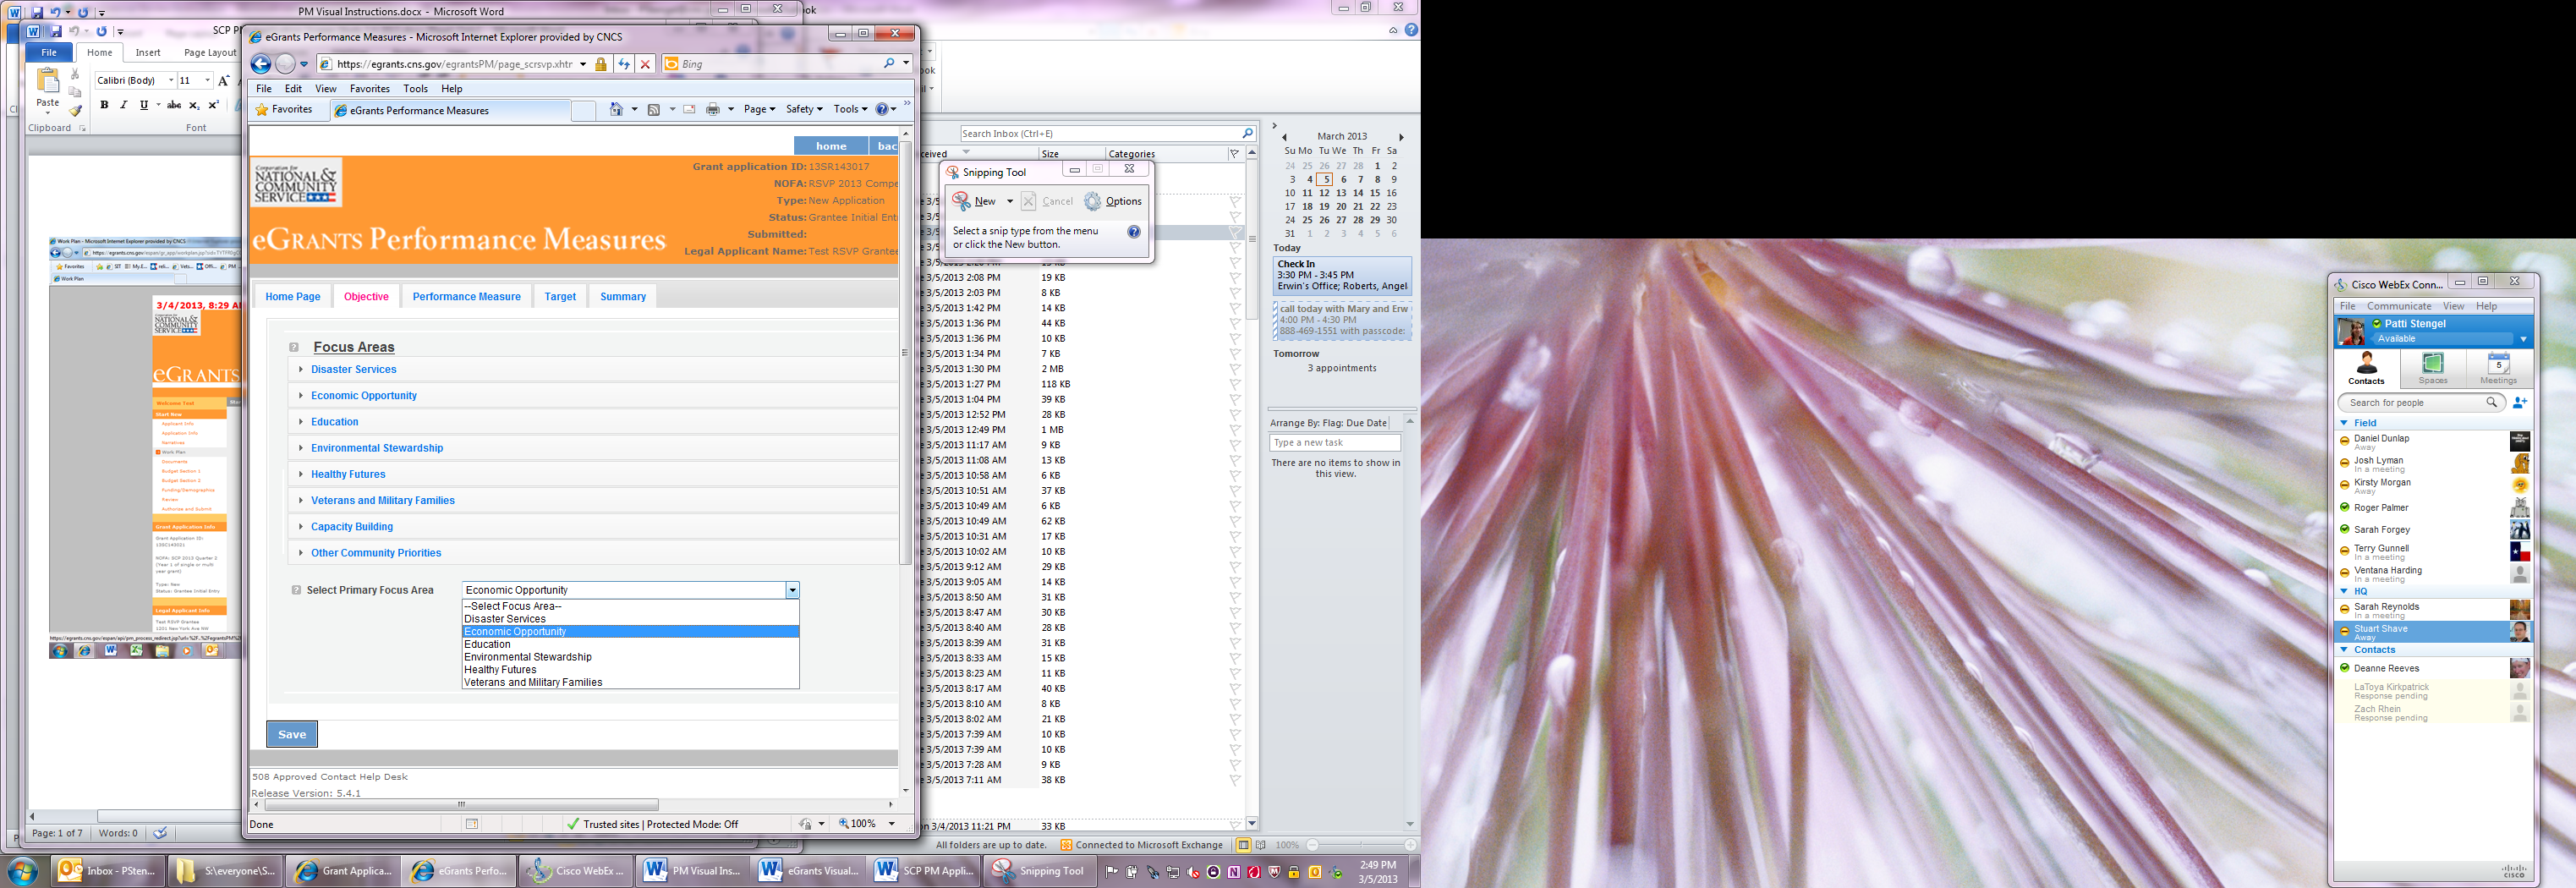
The Objectives tab displays the options for work plan development. The six CNCS Focus Areas are displayed: Disaster Services, Economic Opportunity, Education, Environmental Stewardship, Healthy Futures, and Veterans and Military Families. In addition, Capacity Building and Other Community Priorities may also be selected for work plan development.
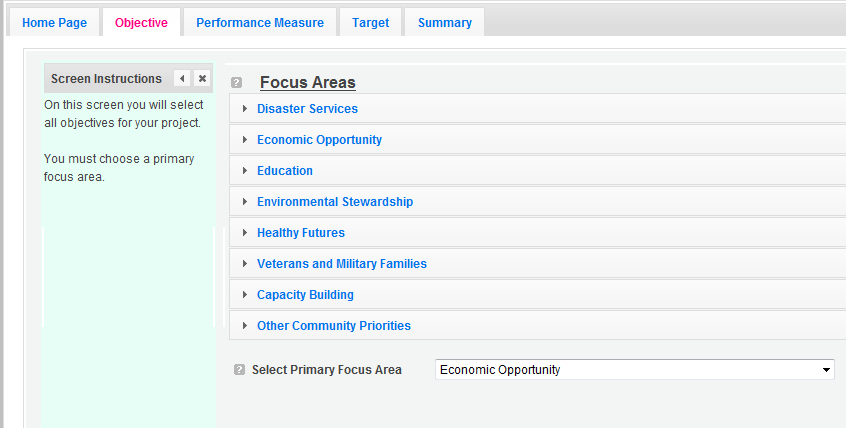
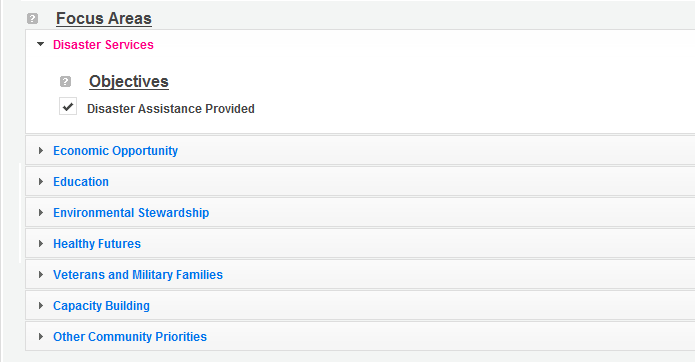
Clicking on each Focus Area will show specific objectives available for that Focus Area. Check the boxes next to each objective to create work plans in that particular objective. The objective option for Disaster Services is Disaster Assistance Provided.
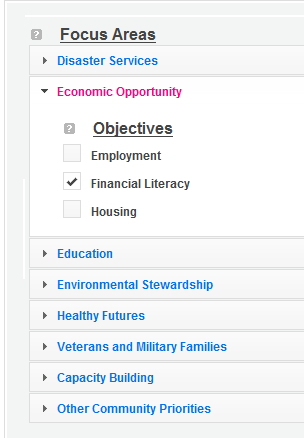
The objective options for Economic Opportunity are Employment, Financial Literacy, and Housing.
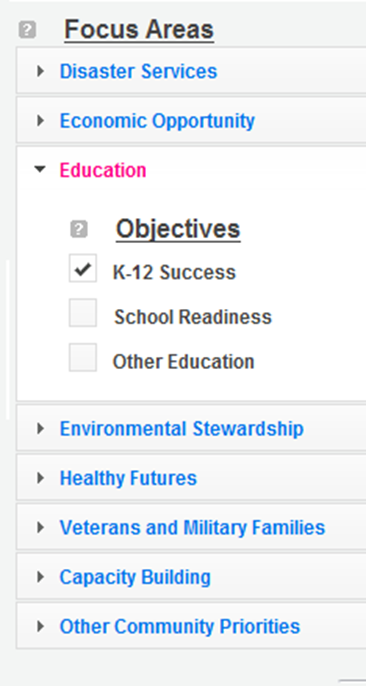
The objective options for Education are K-12 Success, School Readiness, and Other Education.
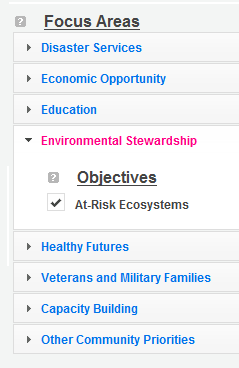
The objective option for Environmental Stewardship is At-Risk Ecosystems.
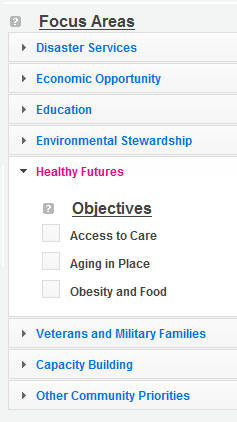
The objective options for Healthy Futures are Access to Care, Aging in Place, and Obesity and Food.
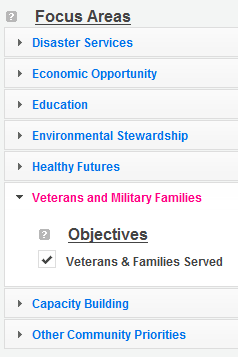
The objective option for Veterans and Military Families is Veterans & Families Served.
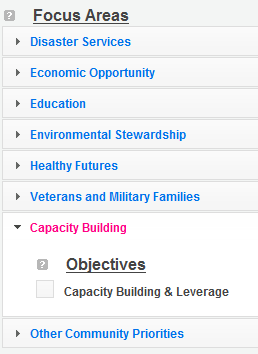
The objective option for Capacity Building is Capacity Building & Leverage.
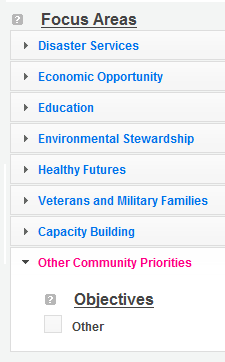
The objective option for Other Community Priorities is Other.
When all necessary objectives have been selected, choose a Primary Focus Area from the drop down list at the bottom. Only the Focus Areas that are part of the objectives that were previously selected will show up on this list. Then click Next or the Performance Measures tab to move to the Performance Measures tab.


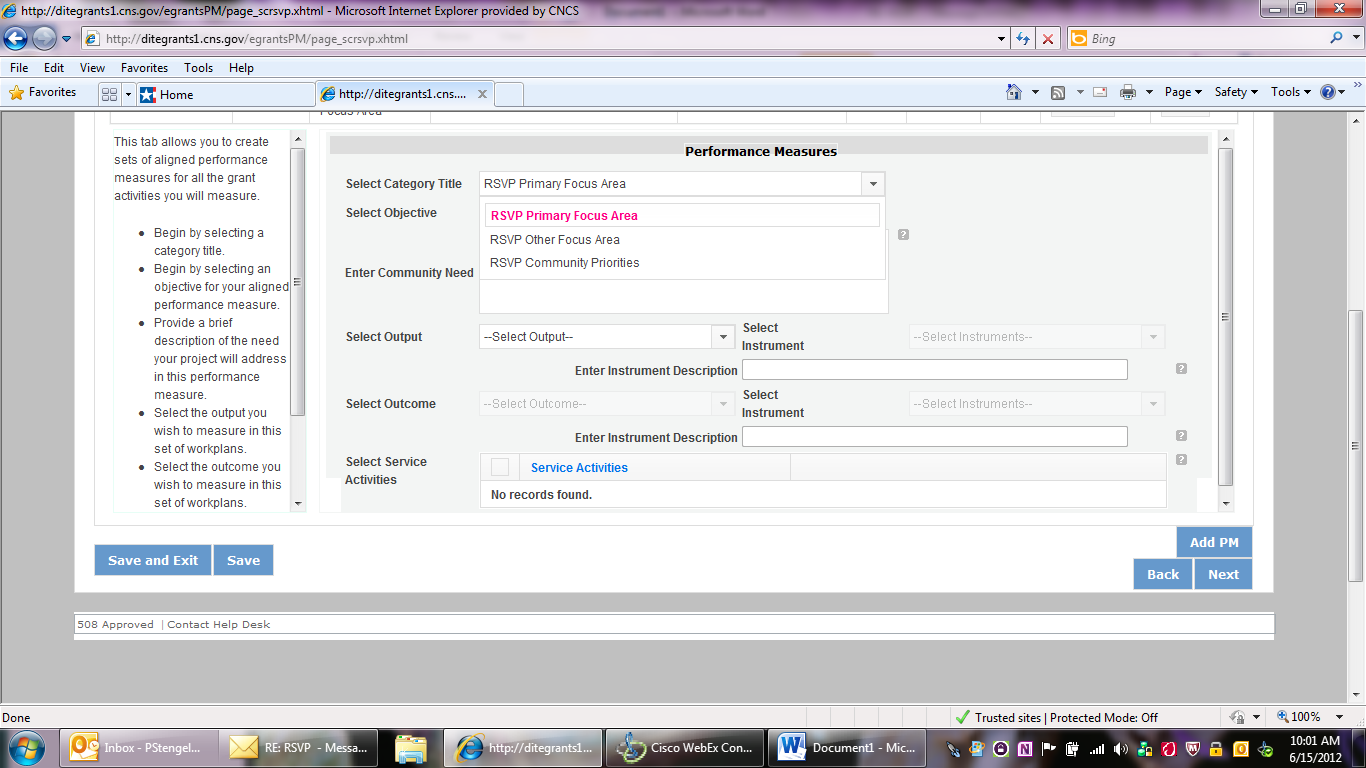
The Performance Measure tab allows you to create sets of aligned performance measures for all the grant activities you will measure. The work plans you will develop are for the objectives that were previously selected. Begin by selecting a Category Title from the drop down options.

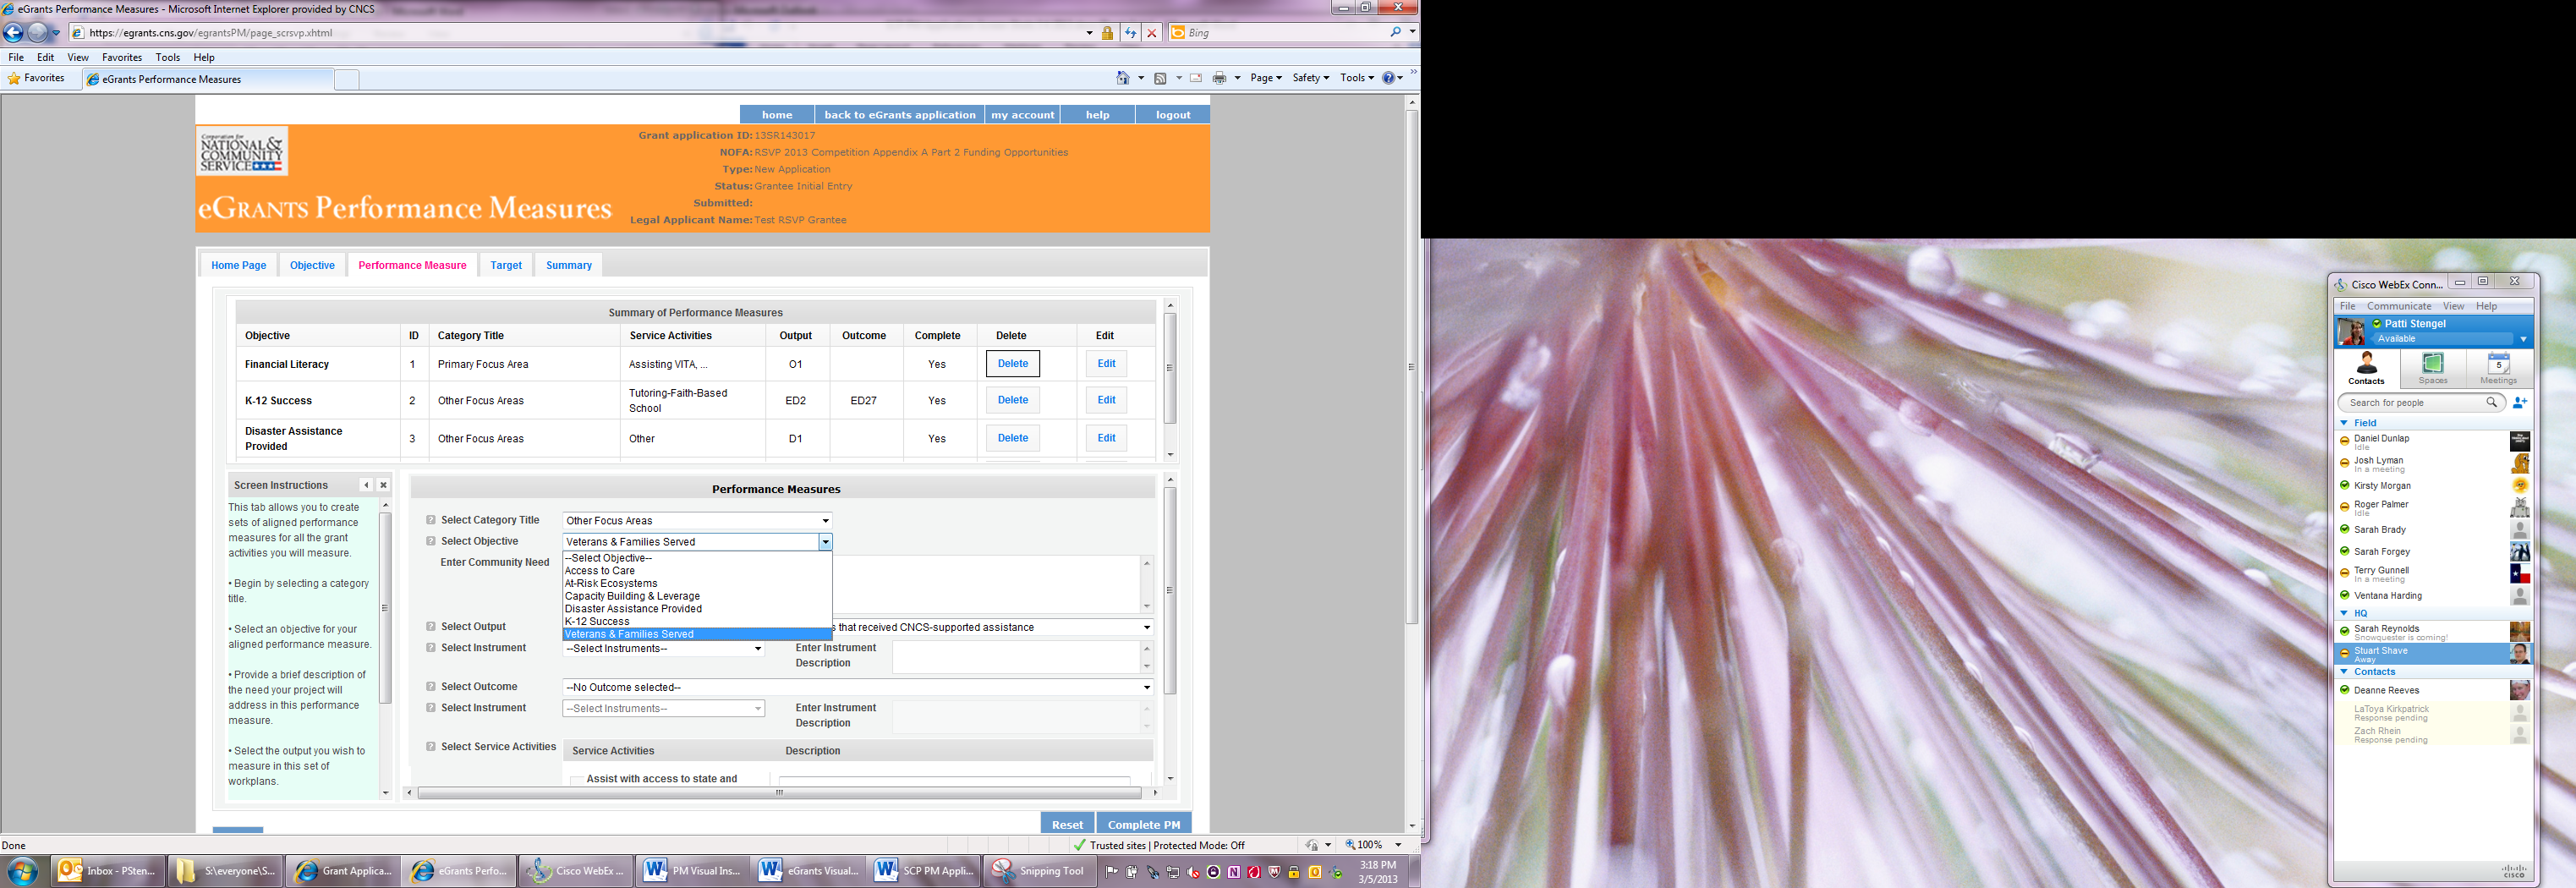
Select an objective for your aligned Performance Measure. The objectives dropdown list will generate based on the category title selected.

Provide a brief description of the need your project will address in this Performance Measure.


Select the output you wish to measure in this set of work plans. The output dropdown list will generate based on the objective selected.

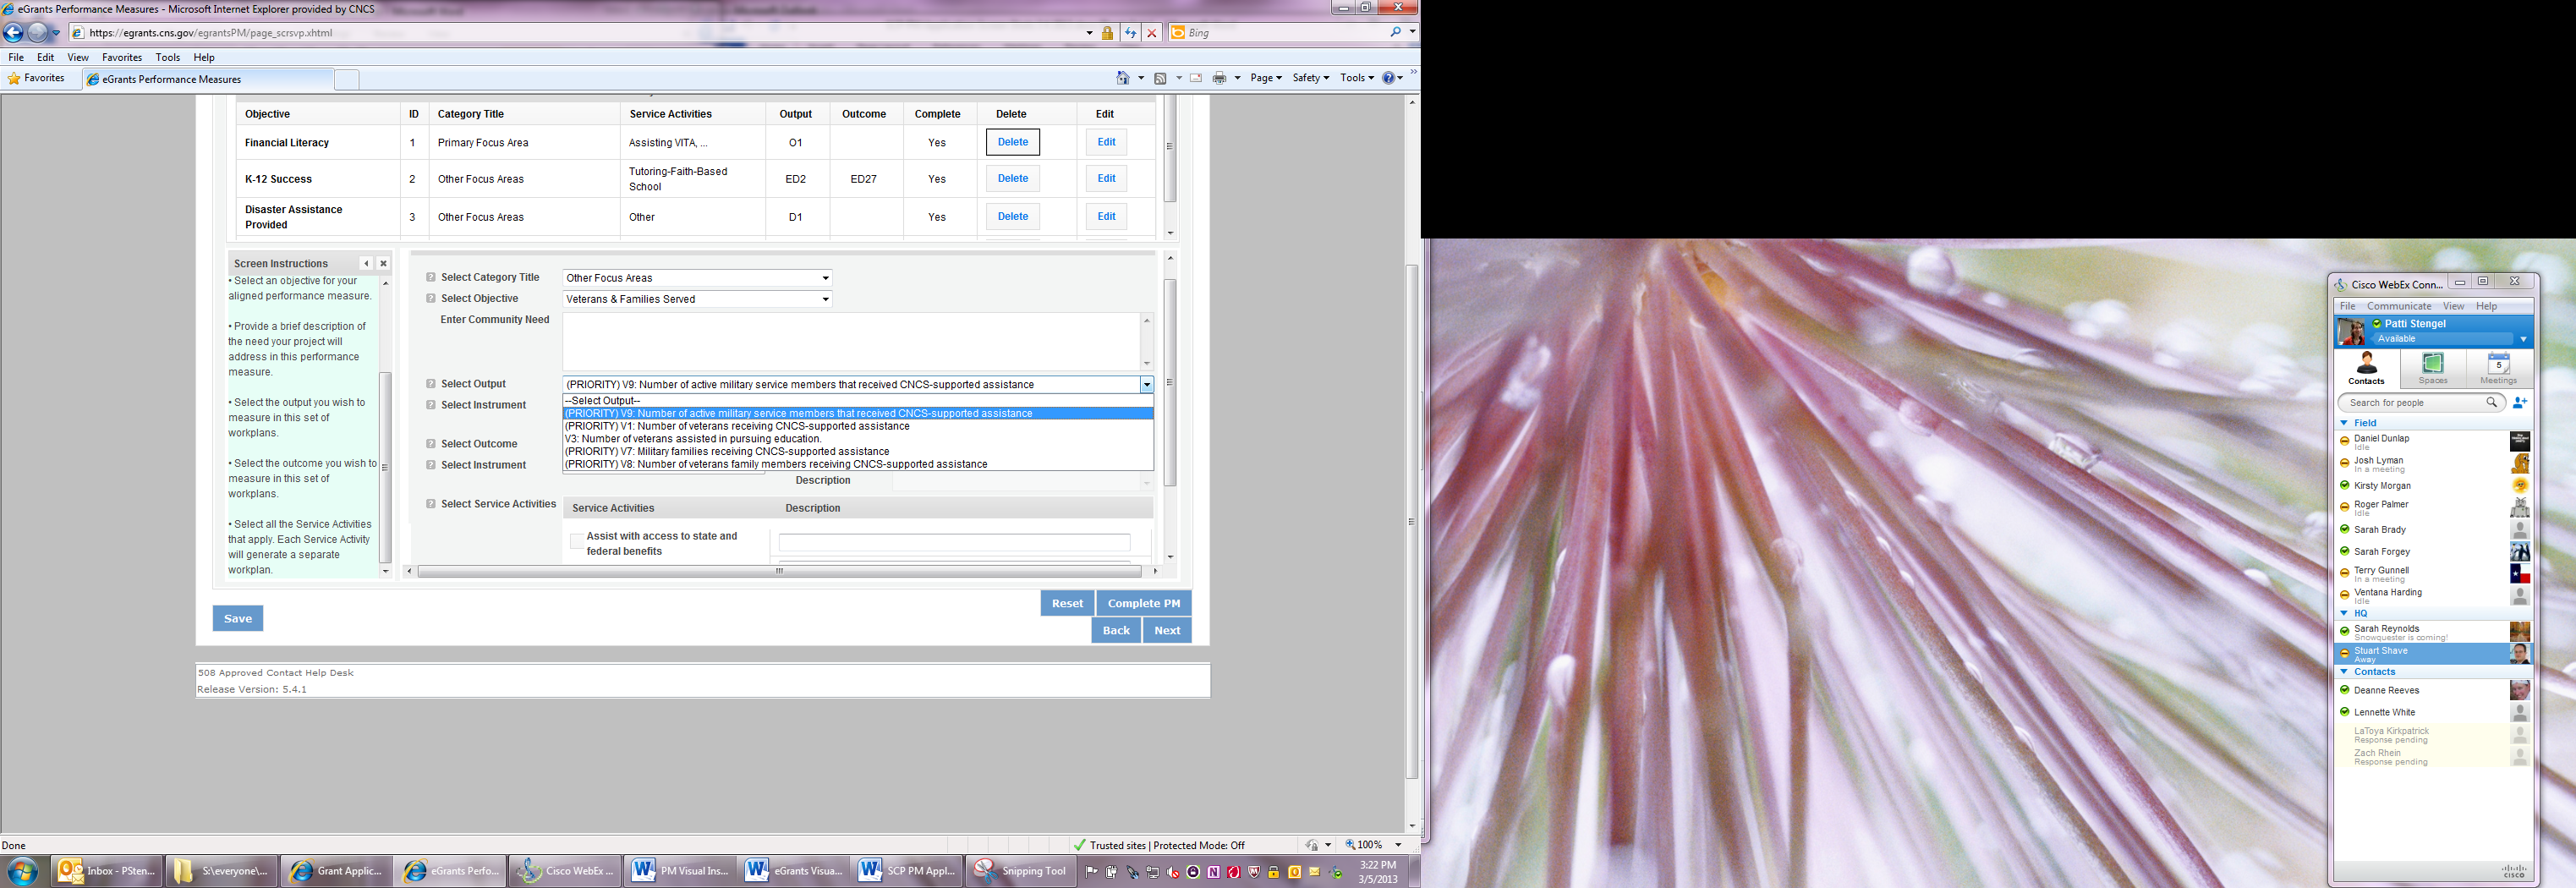
Select the instrument you plan to use to measure the output. The instrument dropdown list will generate based on the output selected. Enter an instrument description. Give the name of the instrument and briefly describe who will collect the data from whom, and when it will be collected.


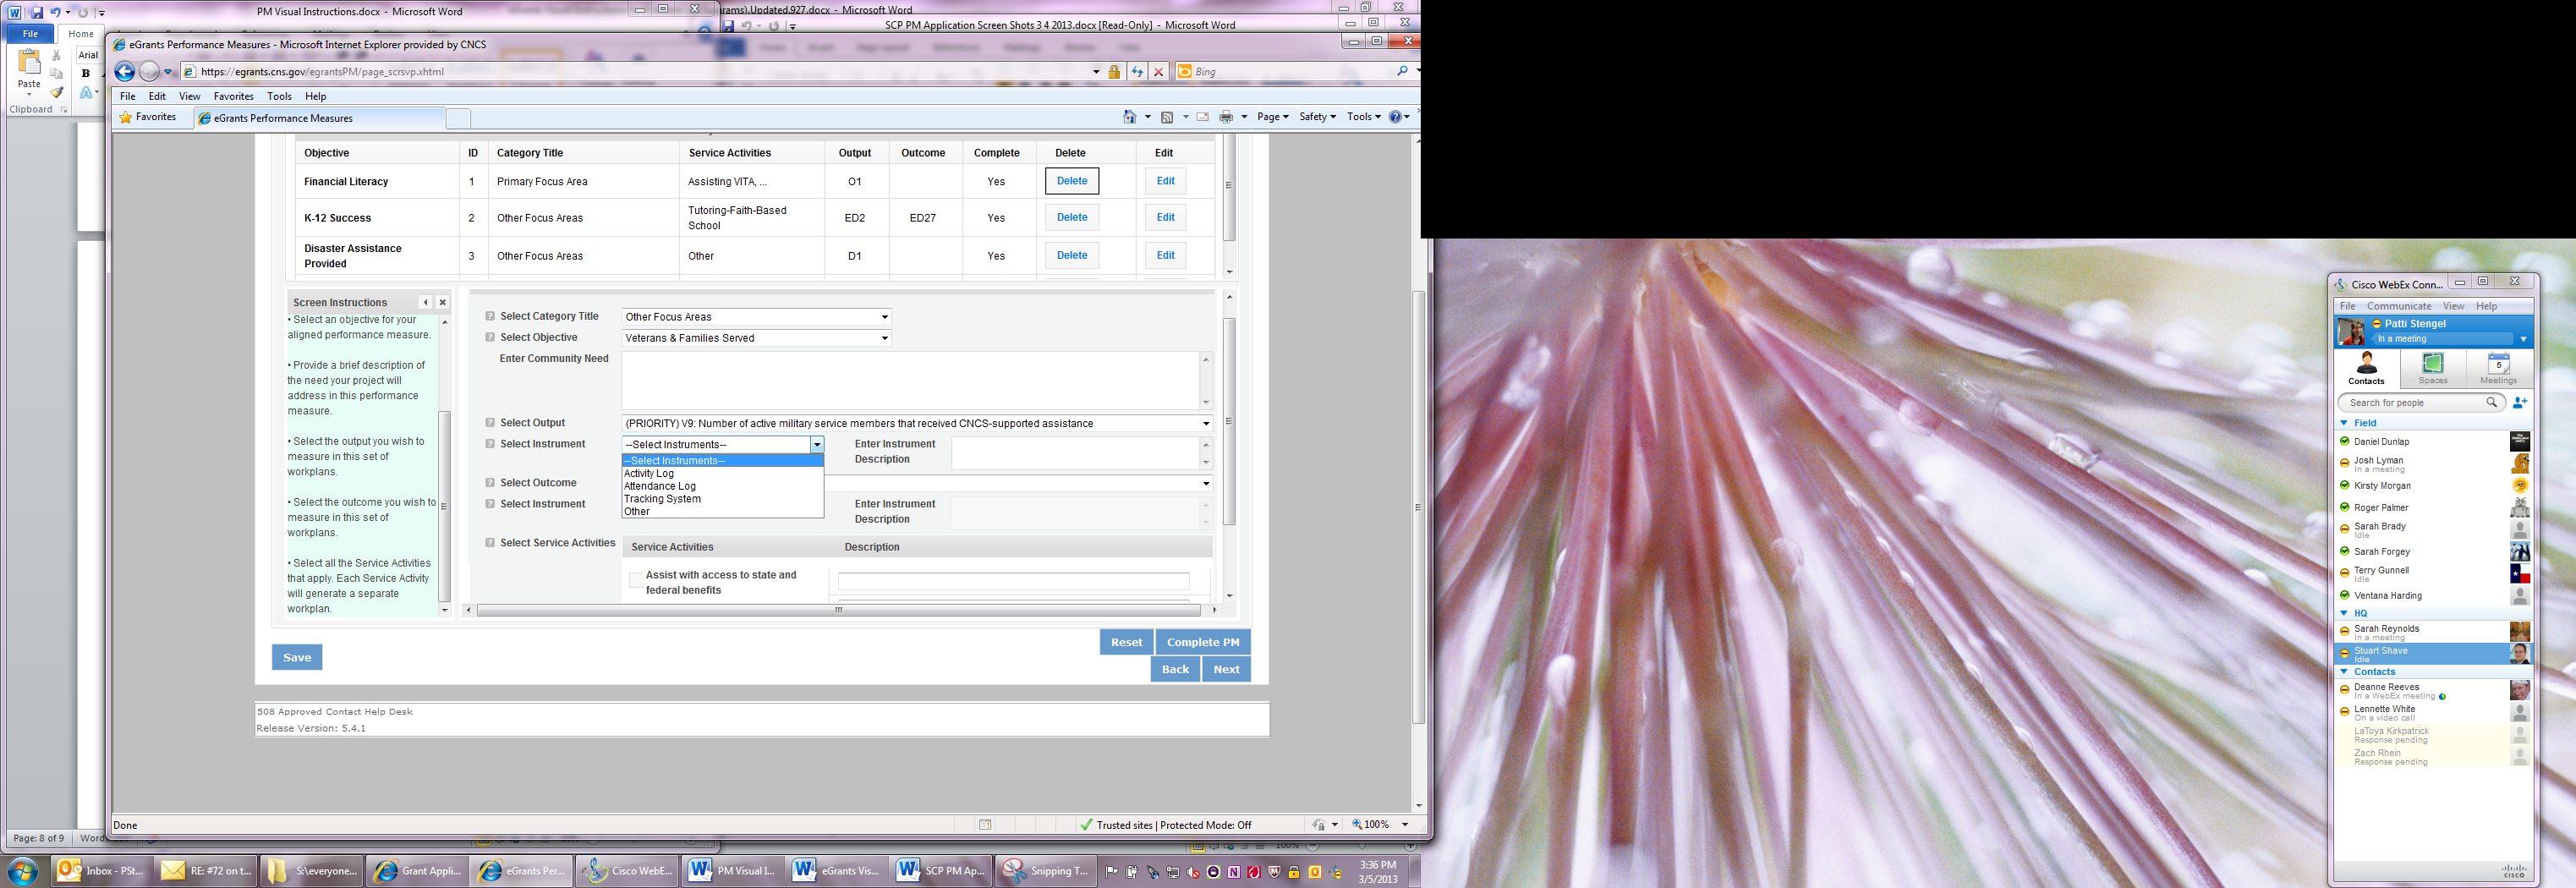
Select the outcome you wish to measure in this set of work plans. The outcome dropdown list will generate based on the output selected. If the output does not have corresponding outcomes available, outcome options will not be available in the dropdown list. If you do not plan to measure outcomes for the output selected, do not select an outcome from the dropdown list. Instead, skip ahead to select service activities.

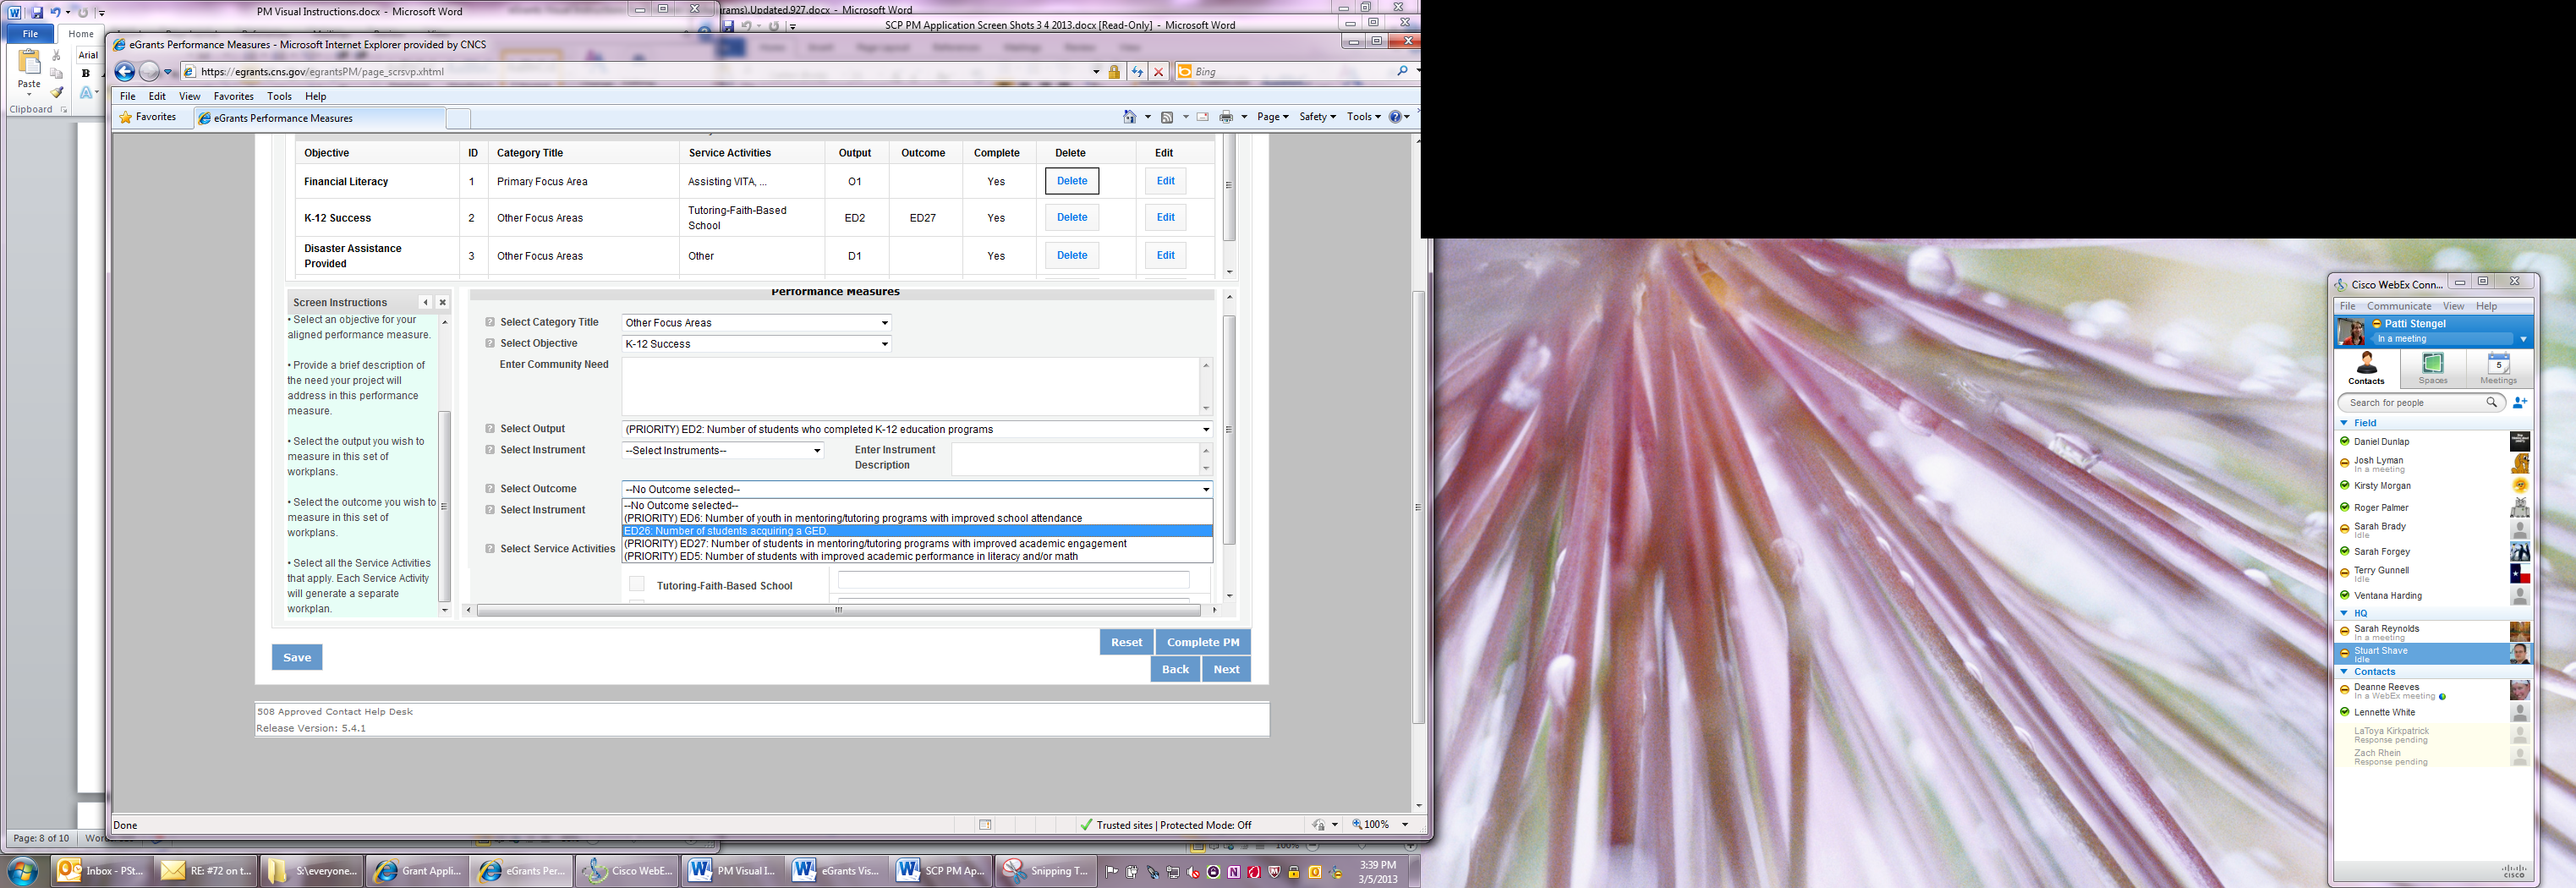
Select the instrument you plan to use to measure the outcome. The instrument dropdown list will generate based on the outcome selected. Enter an instrument description. Give the name of the instrument and briefly describe who will collect the data from whom, and when it will be collected.


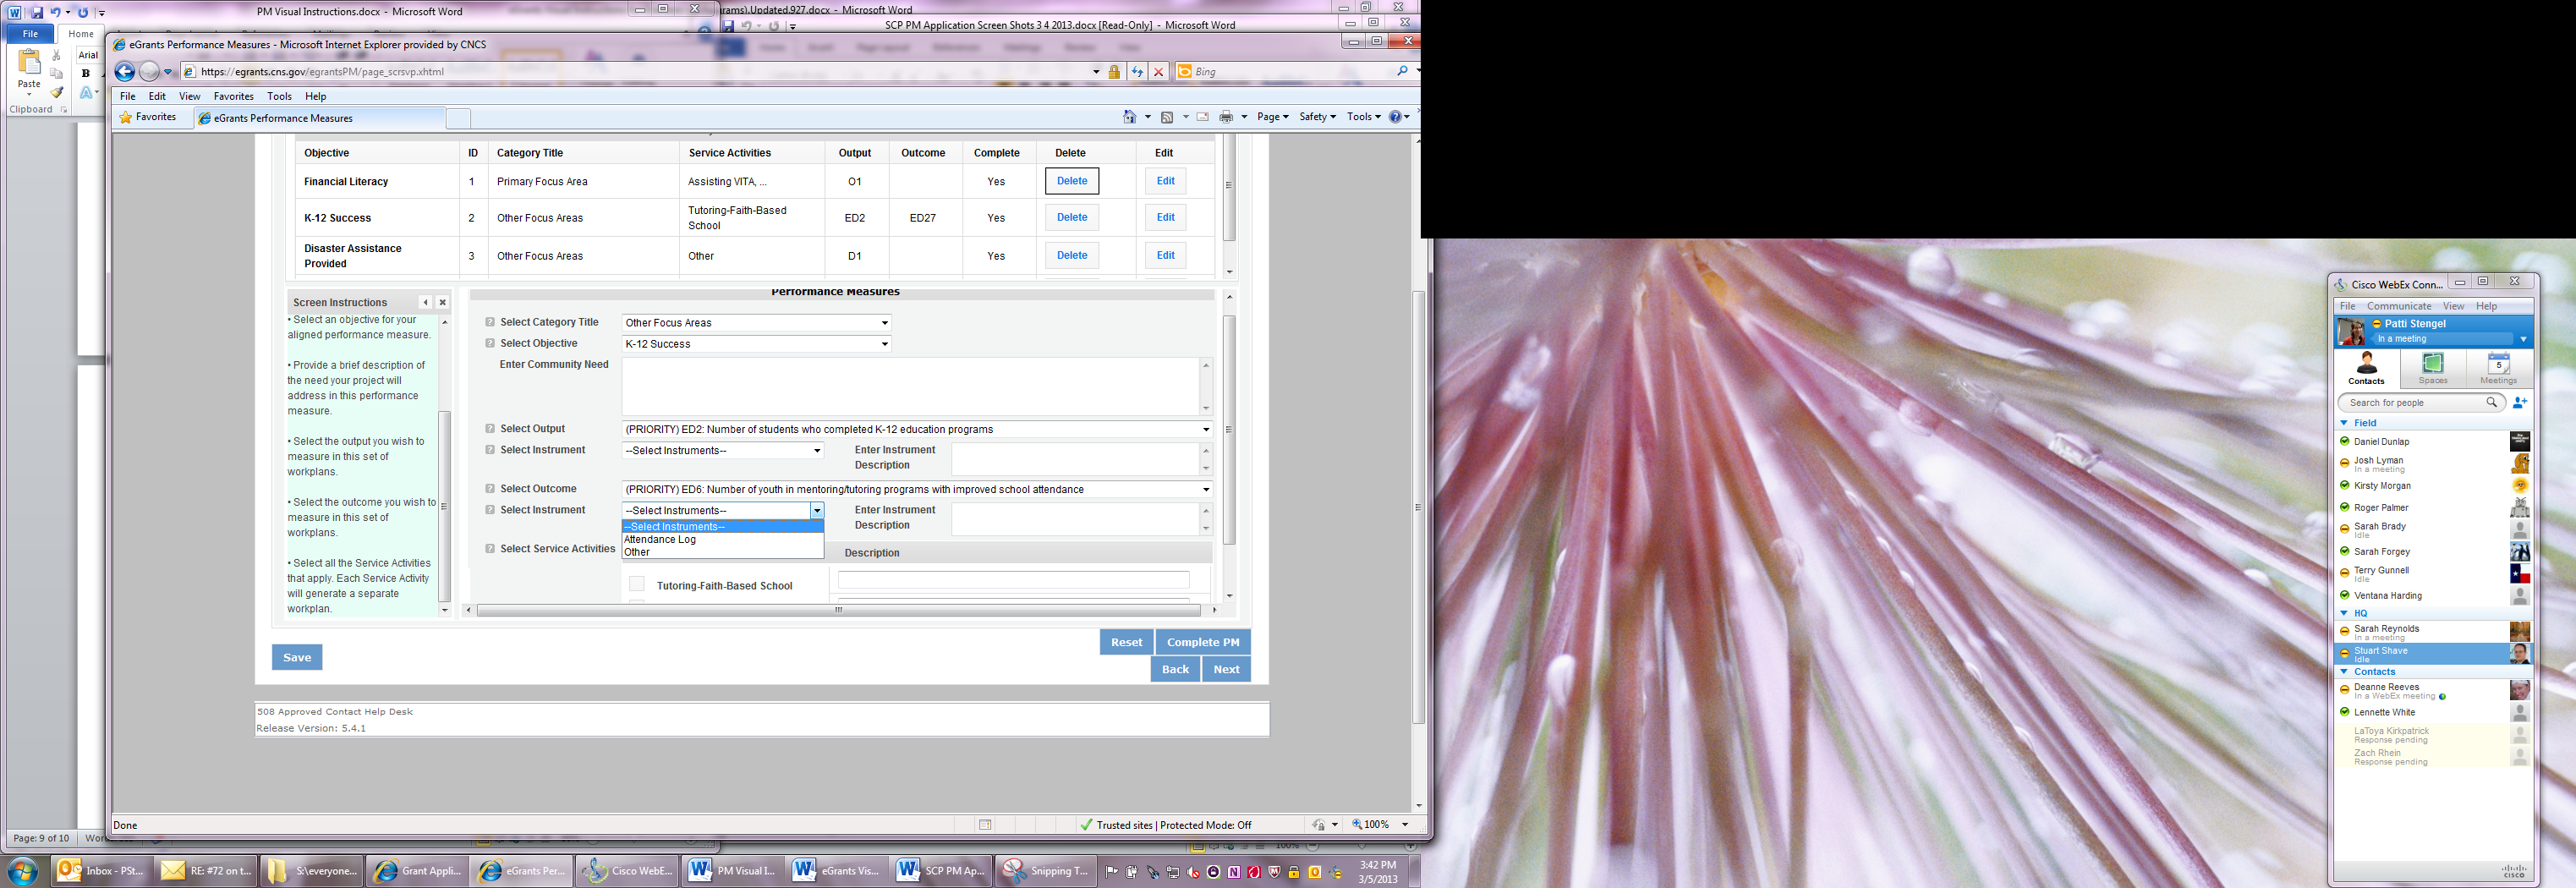
Select all the service activities that apply. The service activities that appear are generated based on the objective selected. Each service activity selected will create a new work plan. Enter a description of the service activity in the corresponding text box. The service activity description should explain what the RSVP volunteers are doing in a way that shows how they will achieve the outcome or output. Say who the beneficiaries are, and what the volunteers will be doing with the beneficiaries. Say how often volunteers will provide the service and for how long. Say where the service will take place.


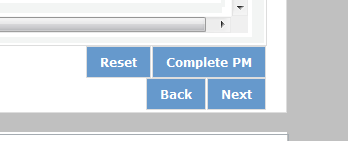

Click Complete PM after completing the information for each objective.
As work plans are completed for each objective, the objectives will appear at the top of the screen.


After all Work Plans have been completed, click Next or the Target tab to move to the Target tab. The Target tab allows Targets to be set for each work plan. First, enter the project’s total number of unduplicated volunteers in the volunteer calculator.


For every work plan, enter the output target, outcome target (if an outcome was selected), number of unduplicated volunteers, number of total volunteers contributing, and number of volunteer stations. Targets must be numbers, not percentages.
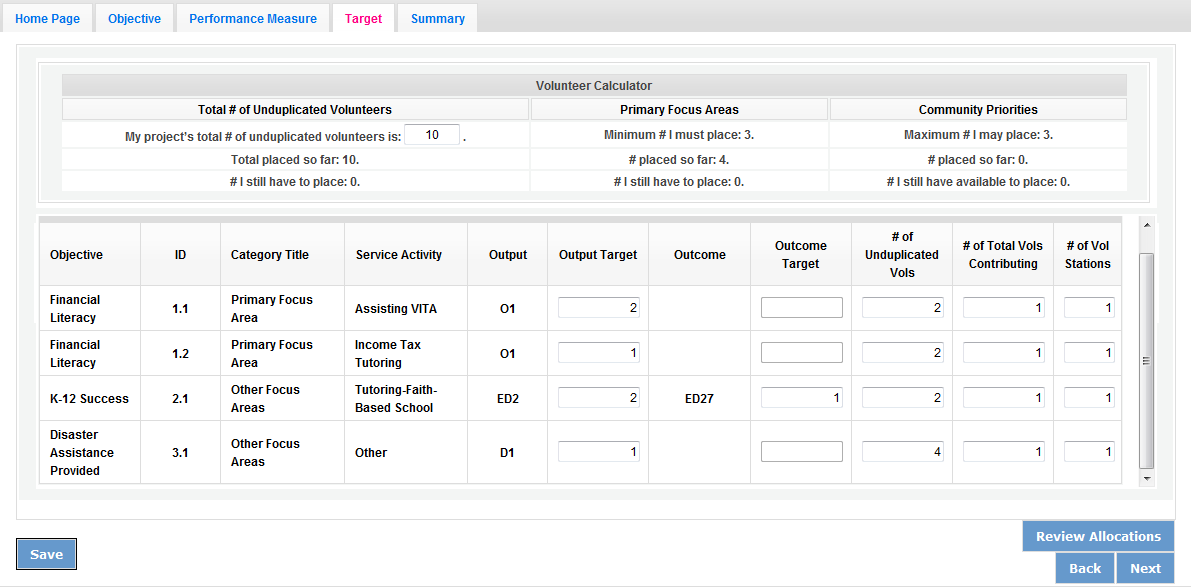
The Volunteer Calculator at the top of the screen will update accordingly to display the percentage of volunteers for the Performance Measure requirements. As you enter target numbers, click on Review Allocations to update the volunteer calculator. Once all Performance Measure requirements are met, the success notice will populate in the volunteer calculator.


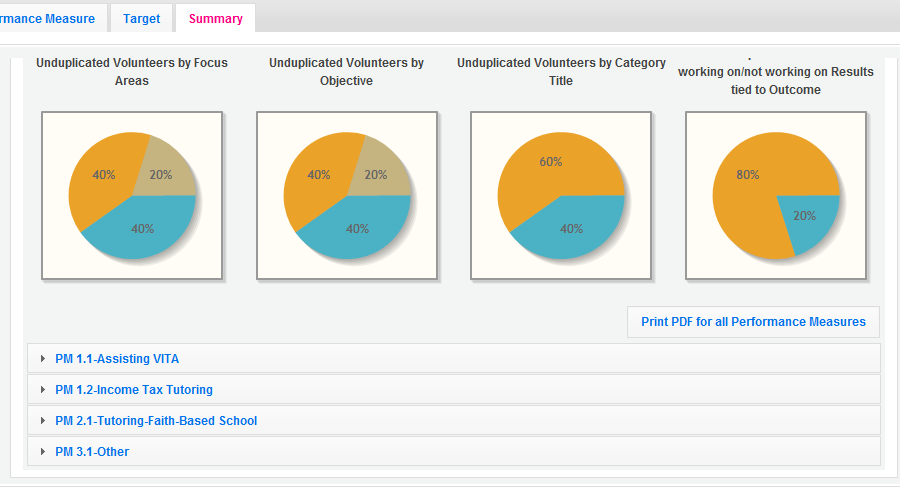
Click Next or the Summary tab to move to the Summary tab. This page provides a summary of all the information you have entered in the module. To print the entire summary, click Print PDF for all Performance Measures.

To print one performance measure, expand the measure and click Print This Measure.

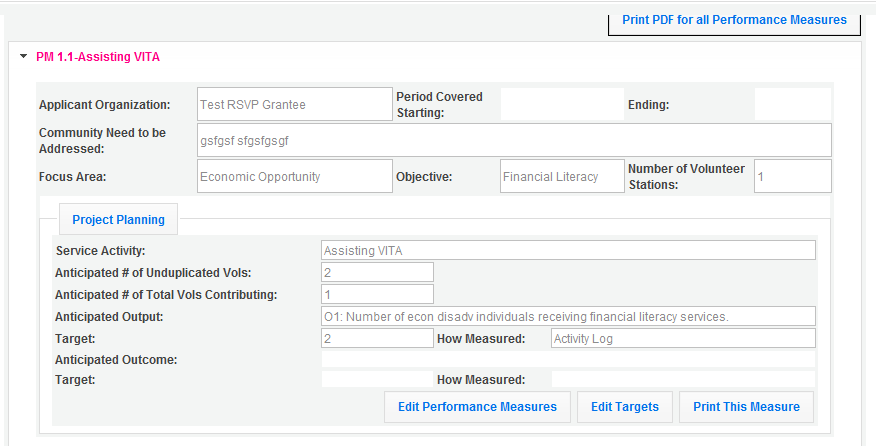
Click Edit Performance Measures to return to the Performance Measure tab.


Click Validate Performance Measures to validate the module prior to submitting your application.

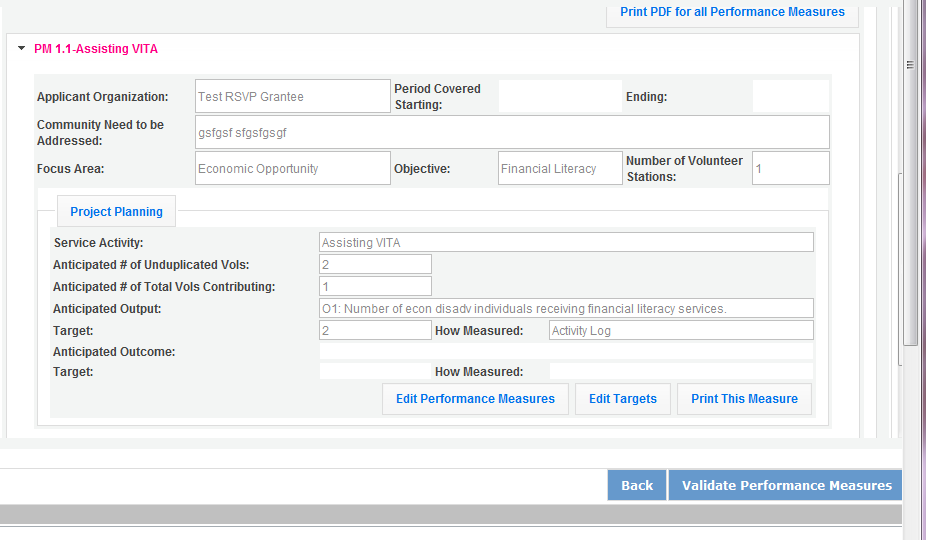
If all Performance Measures are validated successfully, the following message will appear.

Click Back to eGrants Application to return to the rest of the application and exit the Performance Measure module.

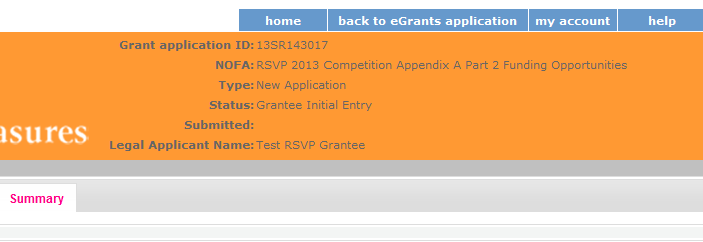
For Foster Grandparent Program Applicants
Click to enter the work plan Performance Measure Module.


Click Begin to start entering work plans.


The Objectives tab displays the options for work plan development. The CNCS Focus Areas for FGP are displayed: Economic Opportunity and Education.
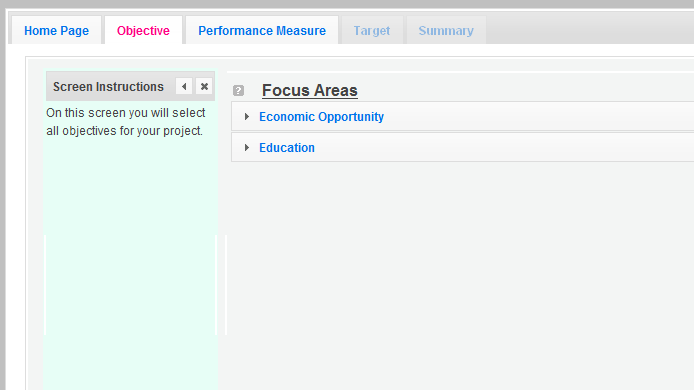
C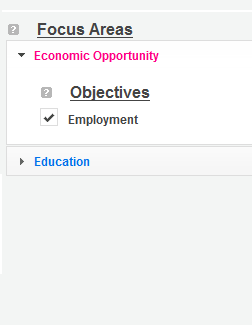 licking
on each Focus Area will show specific objectives available for that
Focus Area. Check the boxes next to each objective to create work
plans in that particular objective. The objective option for
Economic Opportunity is Employment.
T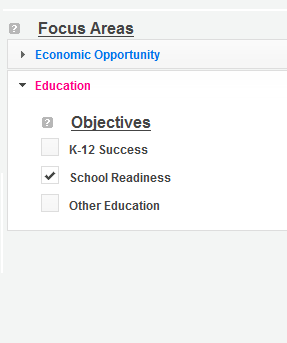 he
objective options for Education are K-12 Success, School Readiness,
and Other Education.
When all necessary objectives have been selected, click Next or the Performance Measures tab to move to the Performance Measures tab.


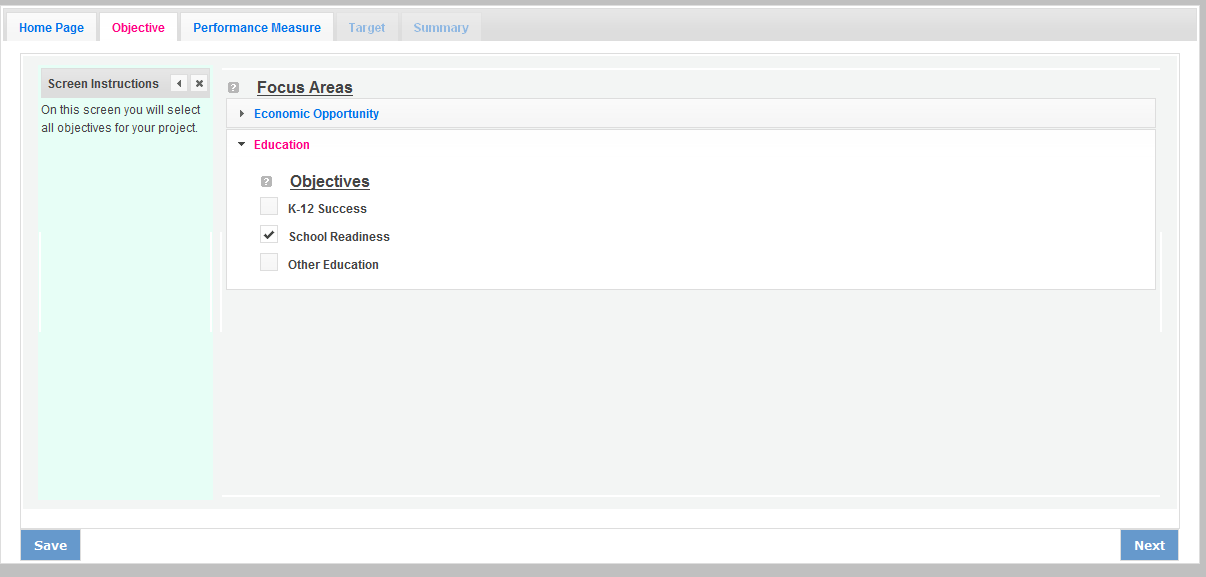
The Performance Measure tab allows you to create sets of aligned performance measures for all the grant activities you will measure. The work plans you will develop are for the objectives that were previously selected. Begin by selecting a Category Title from the drop down options.

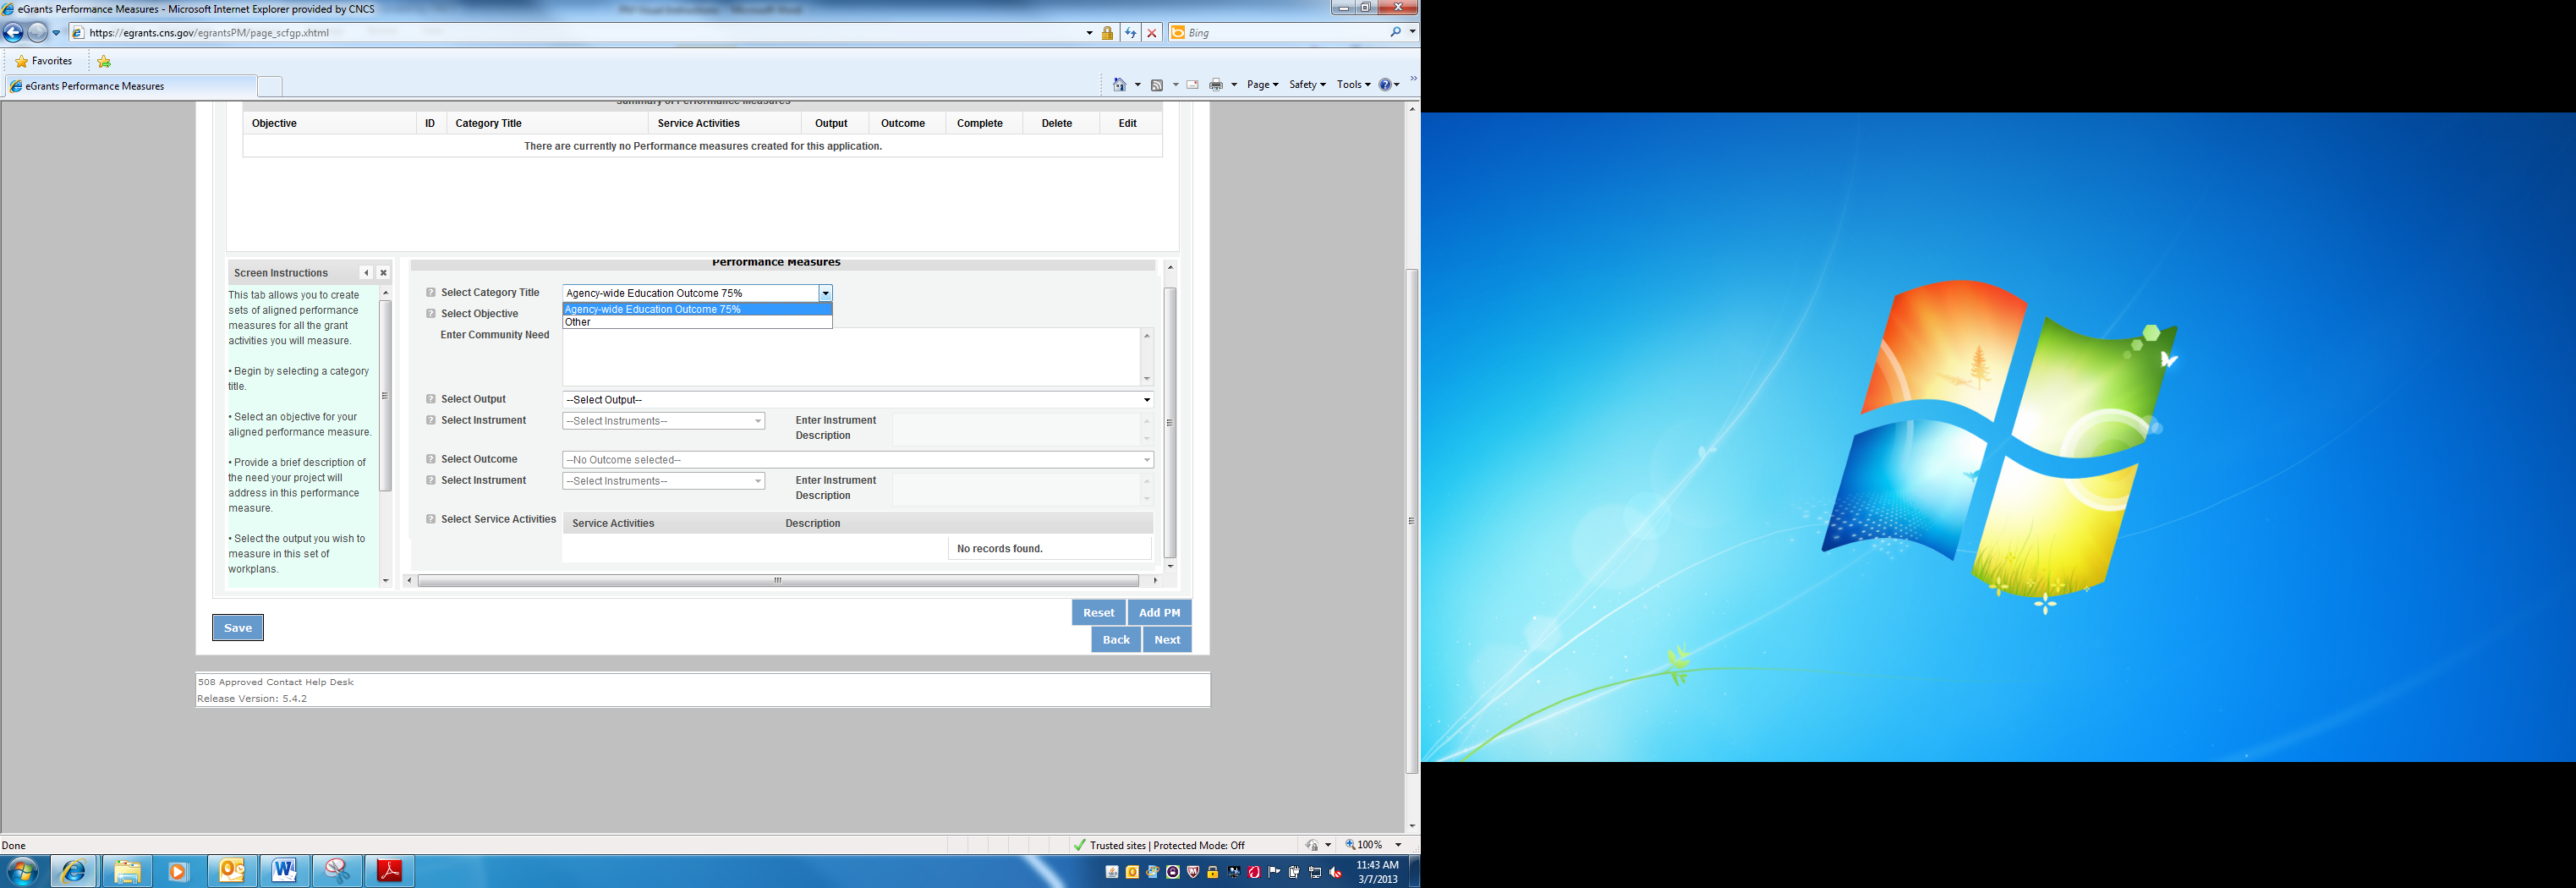
Select an objective for your aligned Performance Measure. The objectives dropdown list will generate based on the category title selected.

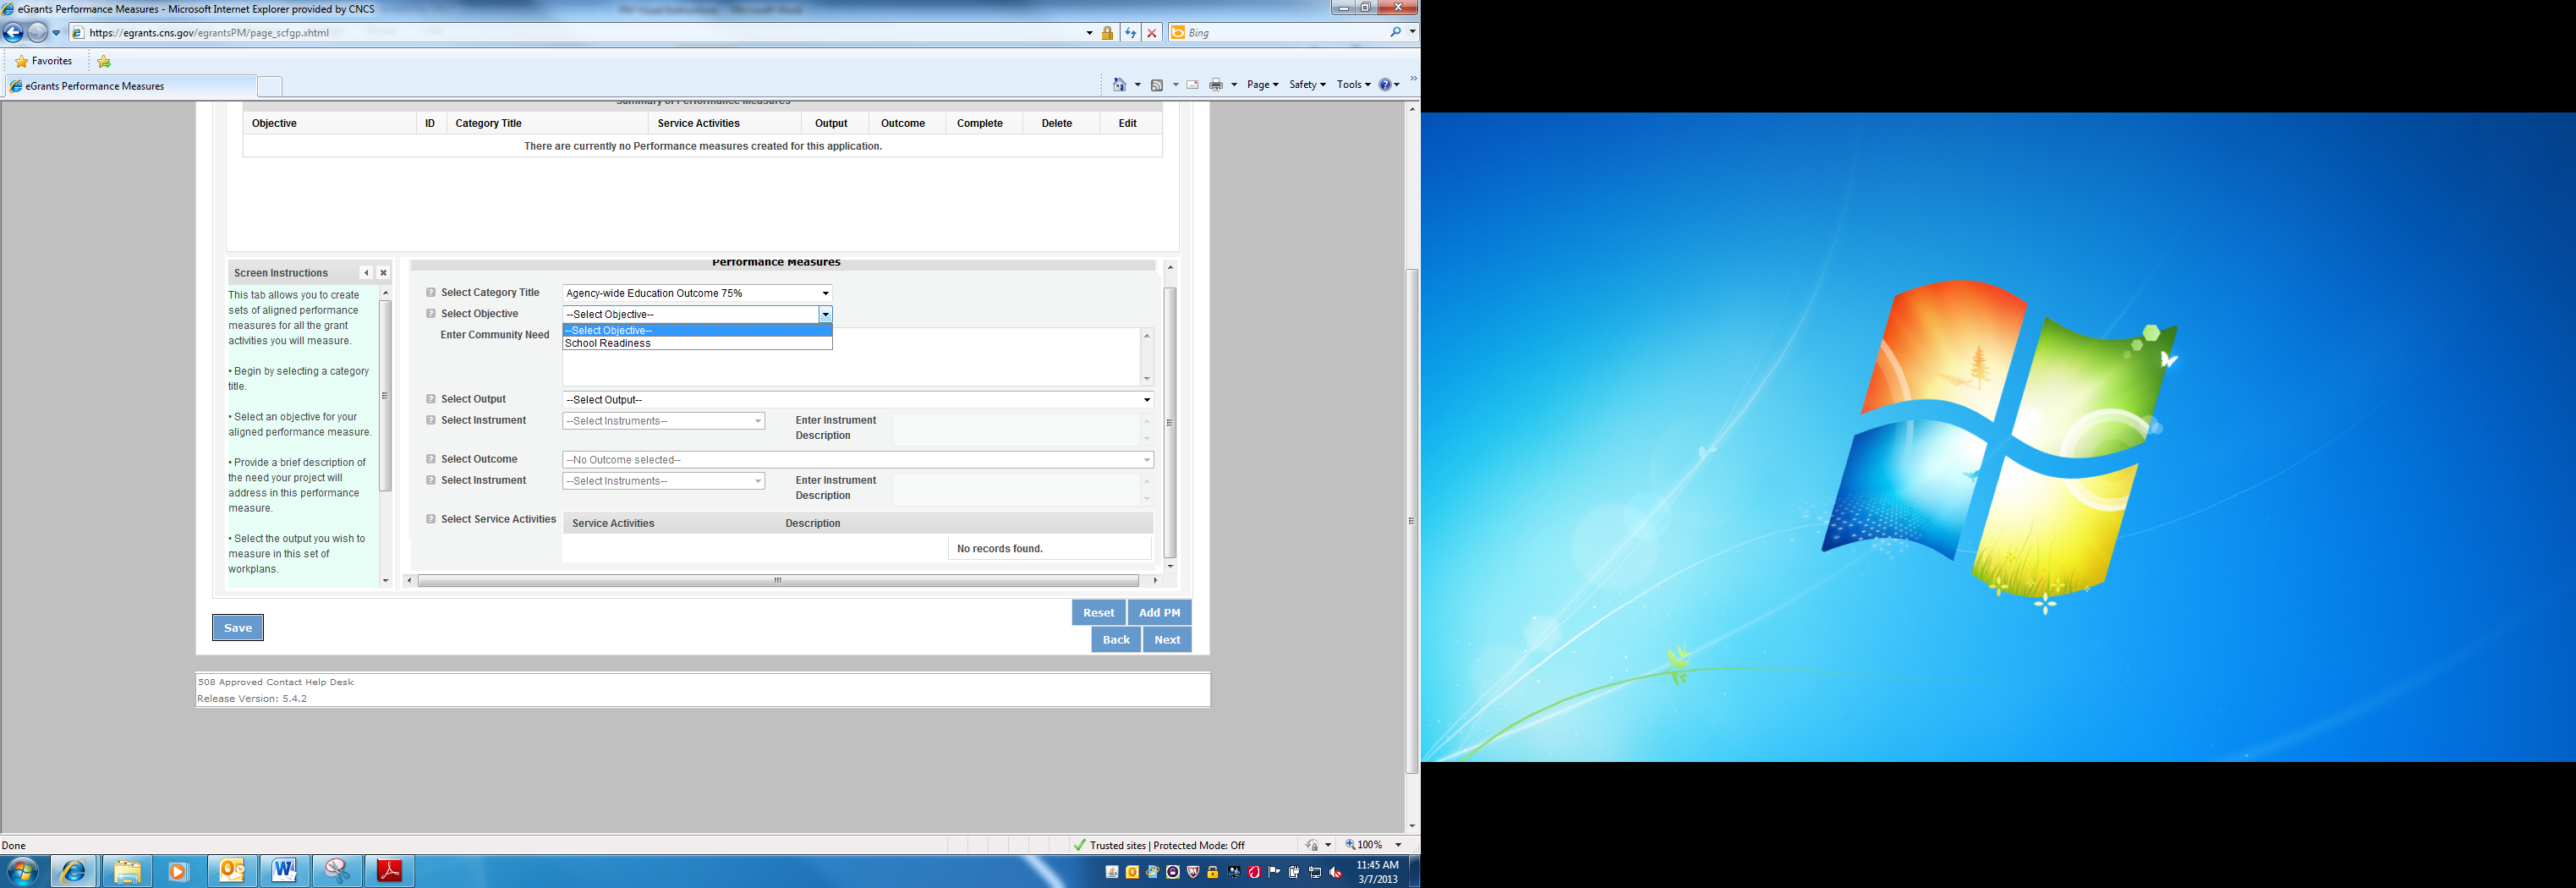
Provide a brief description of the need your project will address in this Performance Measure.


Select the output you wish to measure in this set of work plans. The output dropdown list will generate based on the objective selected.

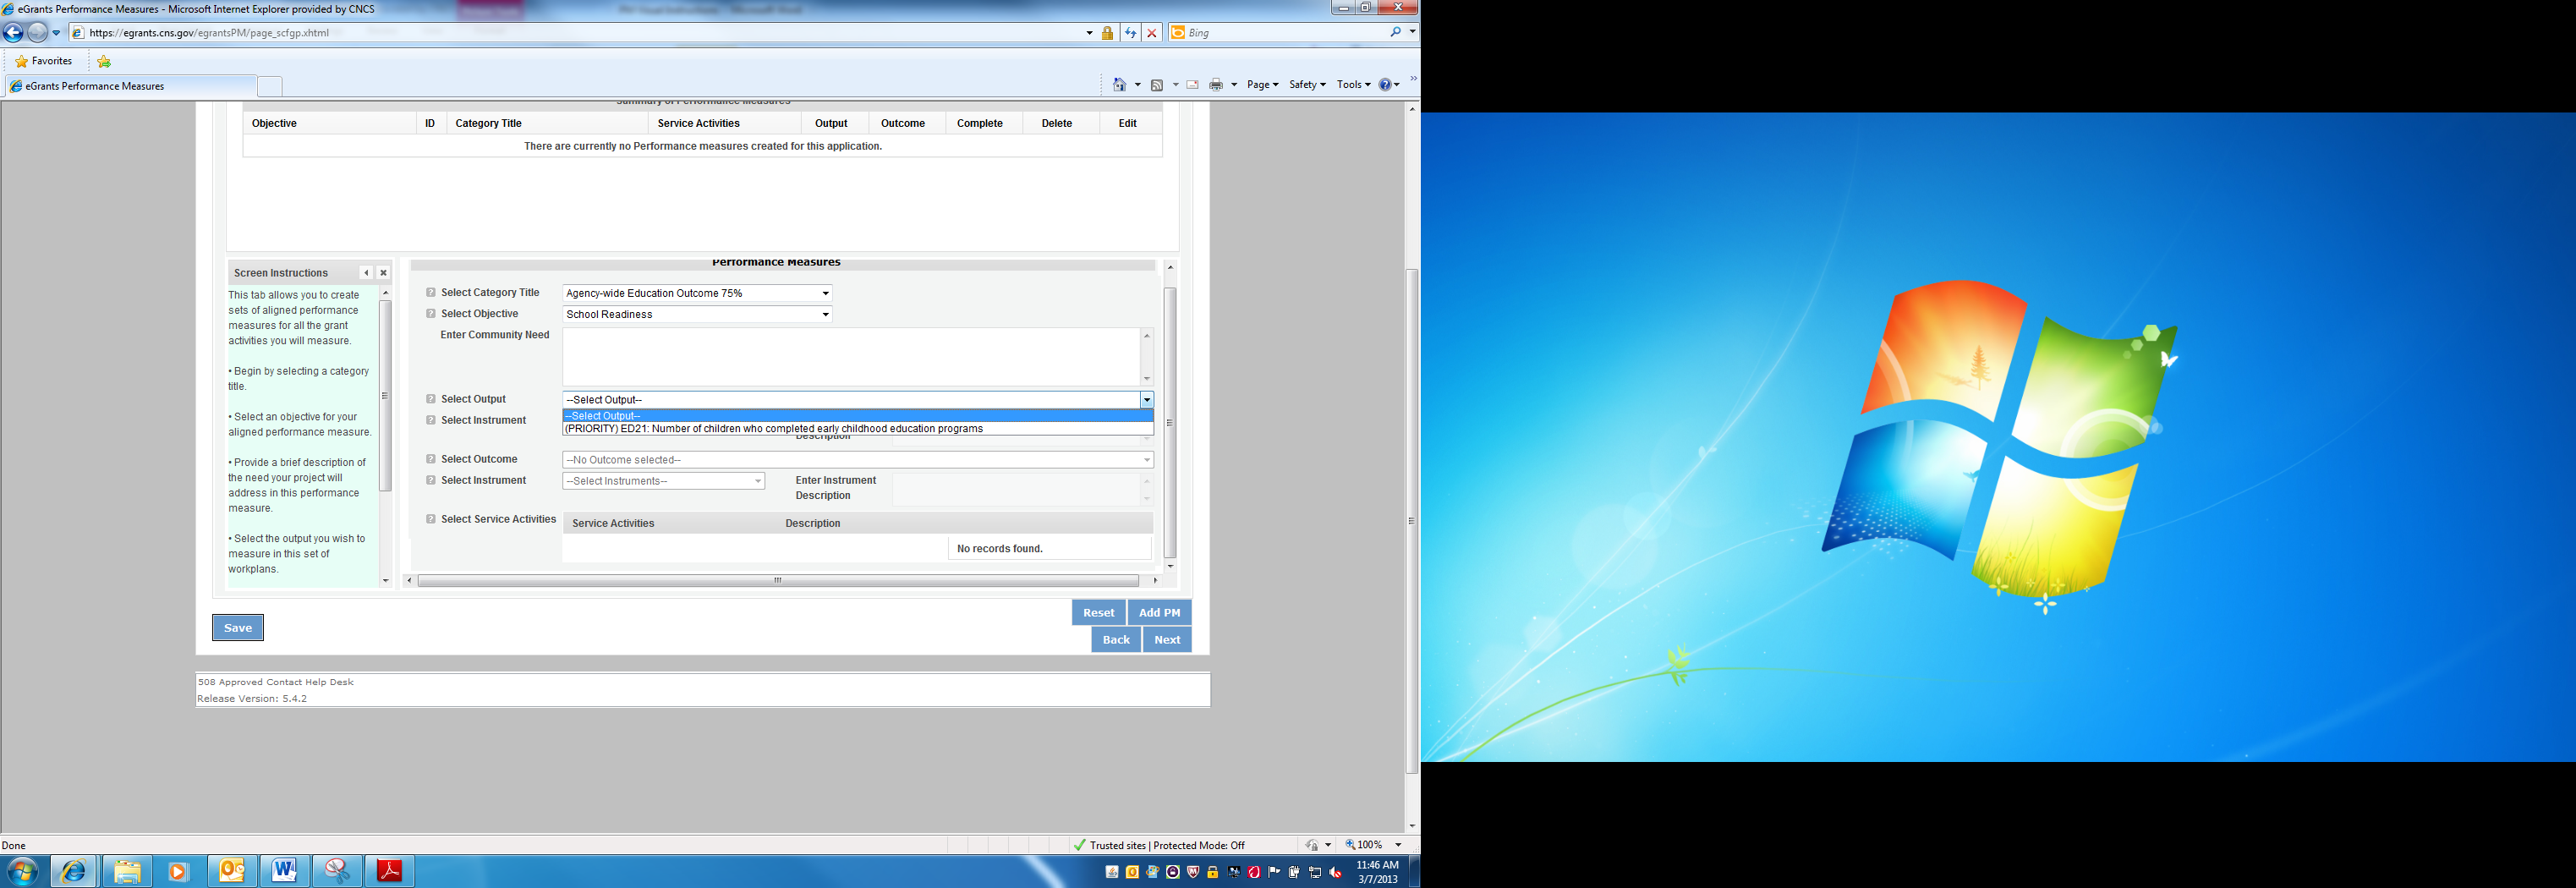

 Select
the instrument you plan to use to measure the output. The
instrument dropdown list will generate based on the output selected.
Enter an instrument description. Give the name of the instrument
and briefly describe who will collect the data from whom, and when
it will be collected.

Select the outcome you wish to measure in this set of work plans. The outcome dropdown list will generate based on the output selected. If the output does not have corresponding outcomes available, outcome options will not be available in the dropdown list. If you do not plan to measure outcomes for the output selected, do not select an outcome from the dropdown list. Instead, skip ahead to select service activities.

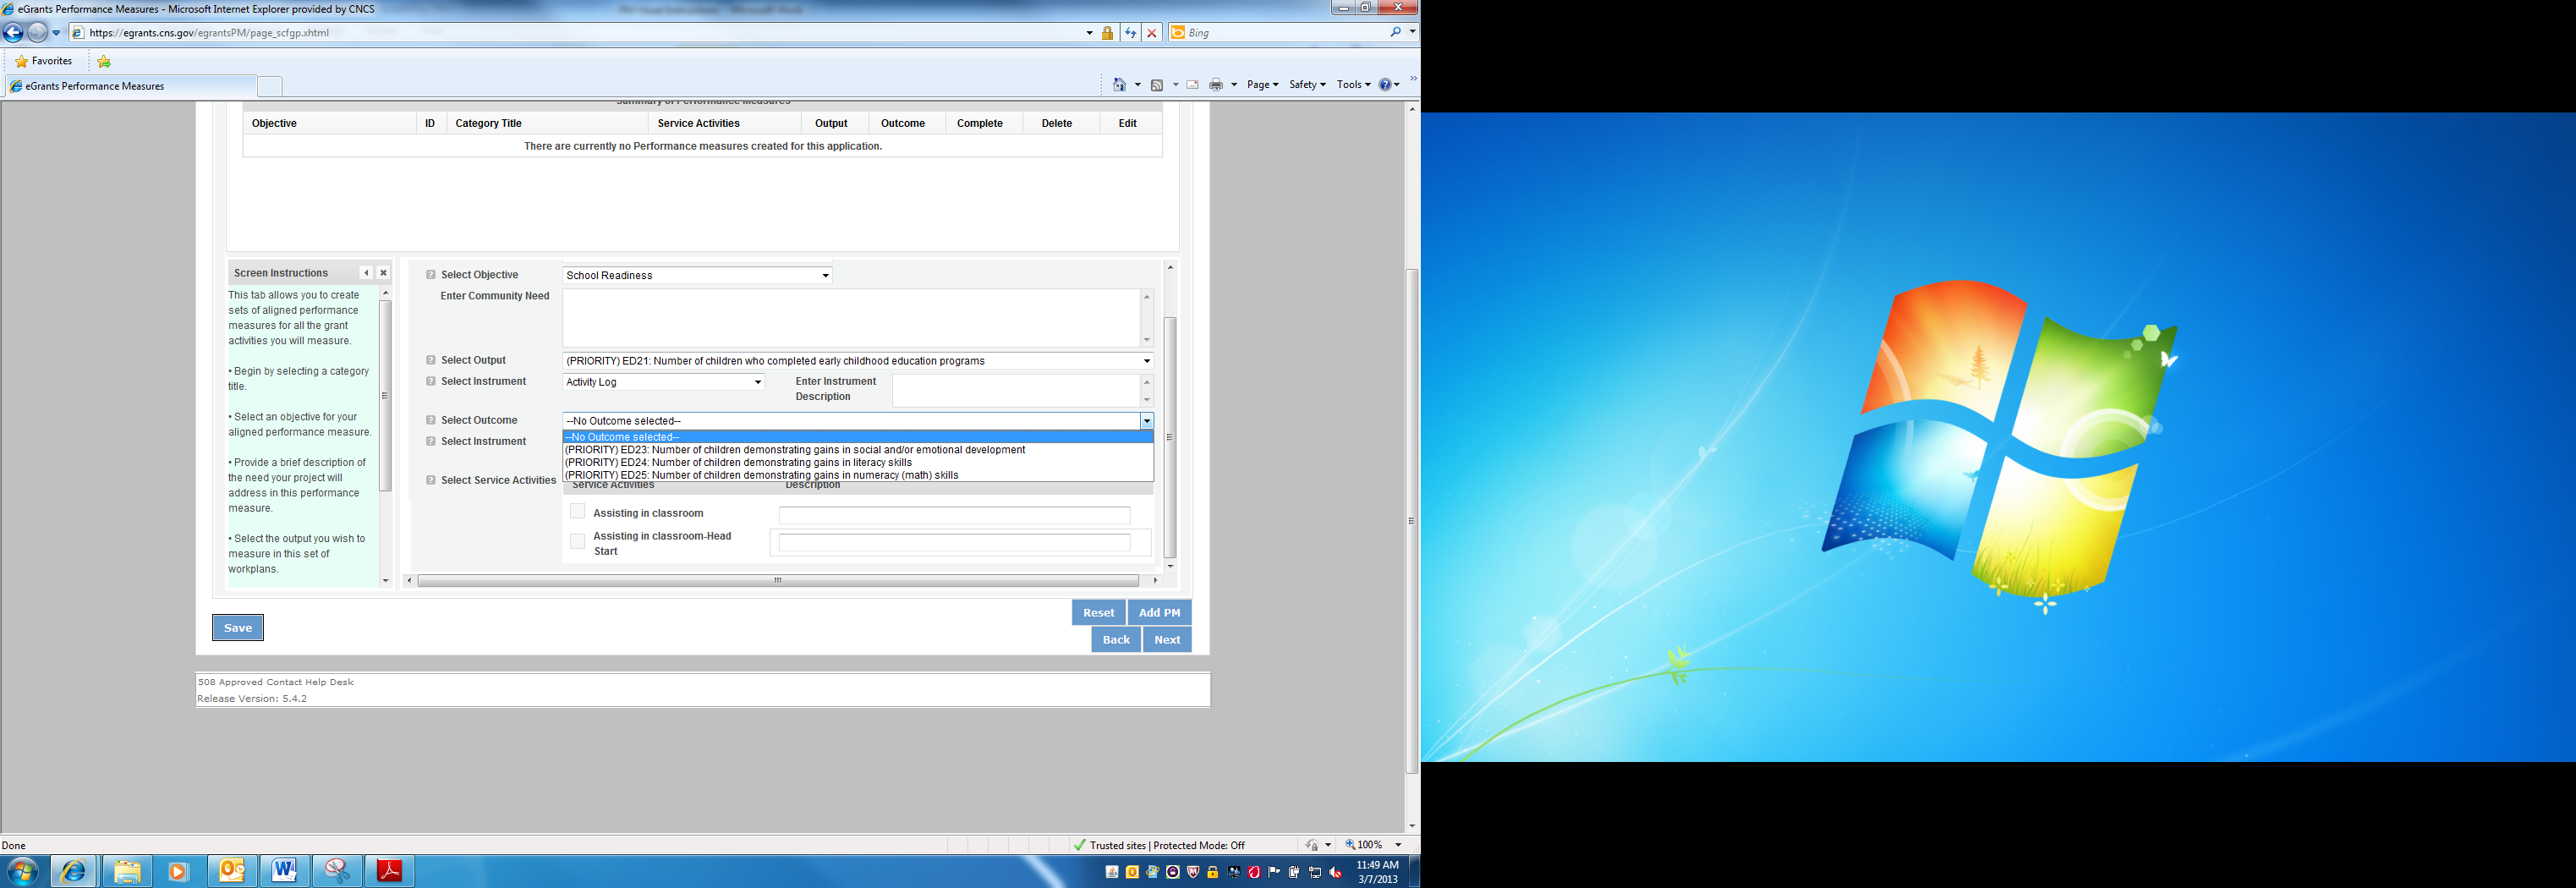
Select the instrument you plan to use to measure the outcome. The instrument dropdown list will generate based on the outcome selected. Enter an instrument description. Give the name of the instrument and briefly describe who will collect the data from whom, and when it will be collected.


Select all the service activities that apply. The service activities that appear are generated based on the objective selected. Each service activity selected will create a new work plan. Enter a description of the service activity in the corresponding text box. The service activity description should explain what the volunteers are doing in a way that shows how they will achieve the outcome or output. Say who the beneficiaries are, and what the volunteers will be doing with the beneficiaries. Say how often volunteers will provide the service and for how long. Say where the service will take place.


 C
C lick
Add PM after completing the information for each objective.
As work plans are completed for each objective, the objectives will appear at the top of the screen.


After all Work Plans have been completed, click Next or the Target tab to move to the Target tab. The Target tab allows Targets to be set for each work plan. First, enter the project’s total number of unduplicated volunteers in the volunteer calculator.


For every work plan, enter the output target, outcome target (if an outcome was selected), number of unduplicated volunteers, number of total volunteers contributing, and number of volunteer stations. Targets must be numbers, not percentages.
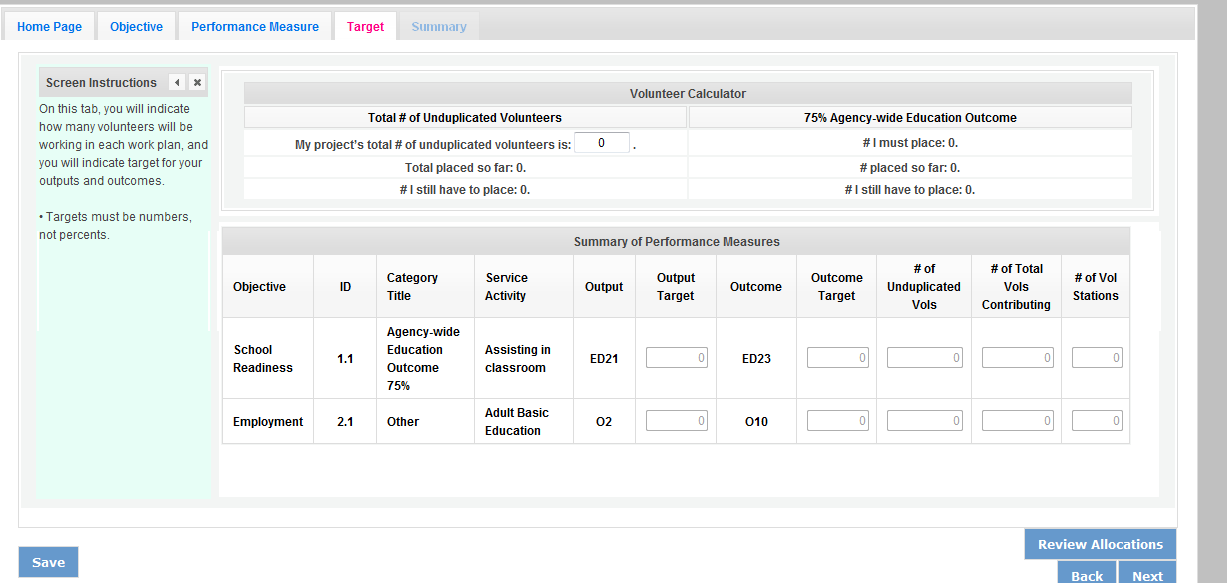
The Volunteer Calculator at the top of the screen will update accordingly to display the percentage of volunteers for the Performance Measure requirements. As you enter target numbers, click on Review Allocations to update the volunteer calculator. Once all Performance Measure requirements are met, the success notice will populate in the volunteer calculator.


Click Next or the Summary tab to move to the Summary tab. This page provides a summary of all the information you have entered in the module. To print the entire summary, click Print PDF for all Performance Measures.

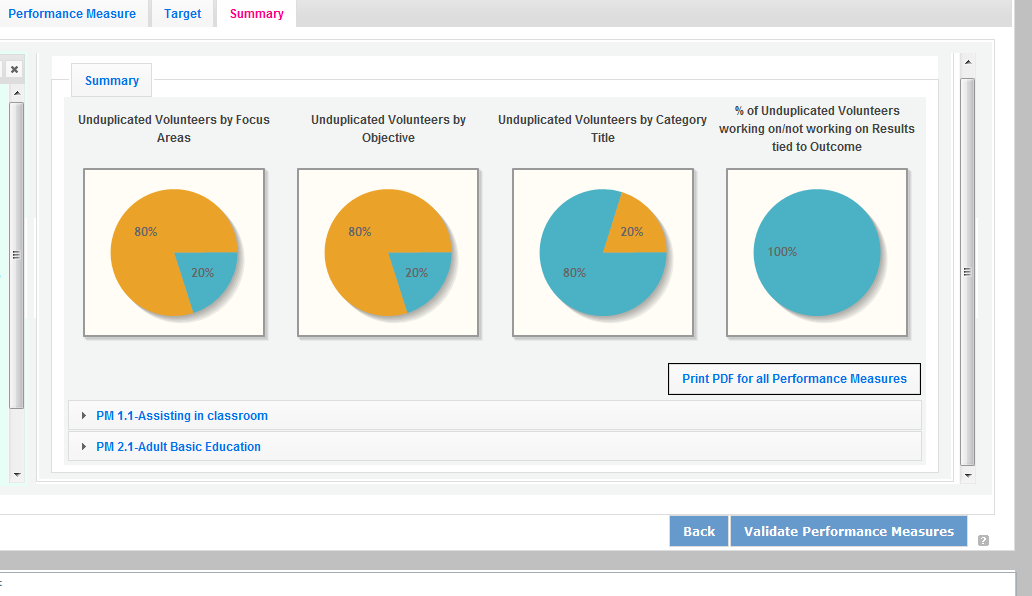
To print one performance measure, expand the measure and click Print This Measure.

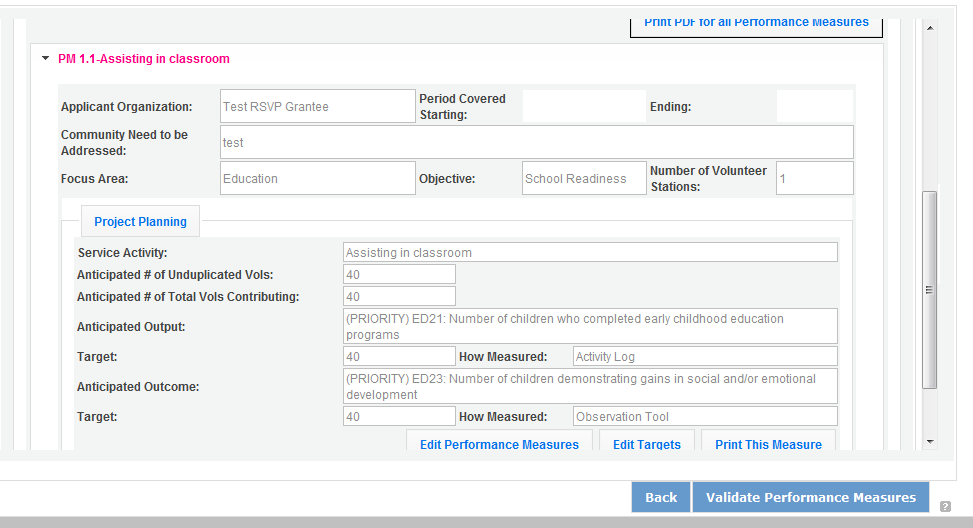
Click Edit Performance Measures to return to the Performance Measure tab.


Click Validate Performance Measures to validate the module prior to submitting your application.


If all Performance Measures are validated successfully, the following message will appear.

Click Back to eGrants Application to return to the rest of the application and exit the Performance Measure module.


For Senior Companion Program Applicants
Click to enter the work plan Performance Measure Module.


Click Begin to start entering work plans.


The Performance Measure tab allows you to create sets of aligned performance measures for all the grant activities you will measure. Begin by selecting a Category Title from the drop down options.

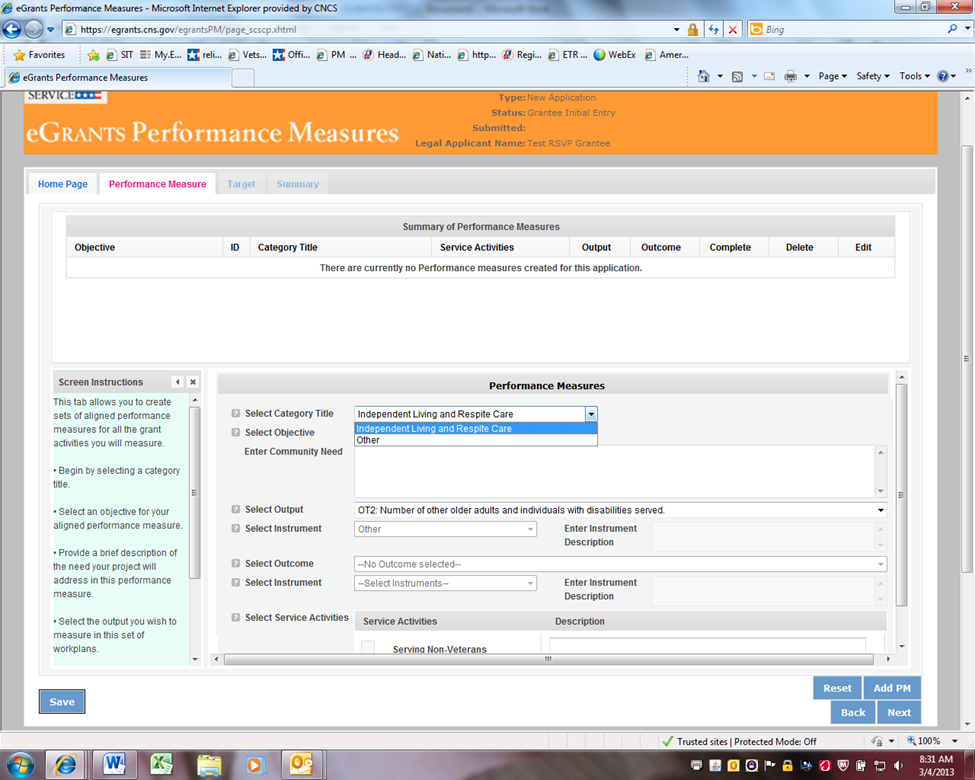
Select an objective for your aligned Performance Measure. The objectives dropdown list will generate based on the category title selected.

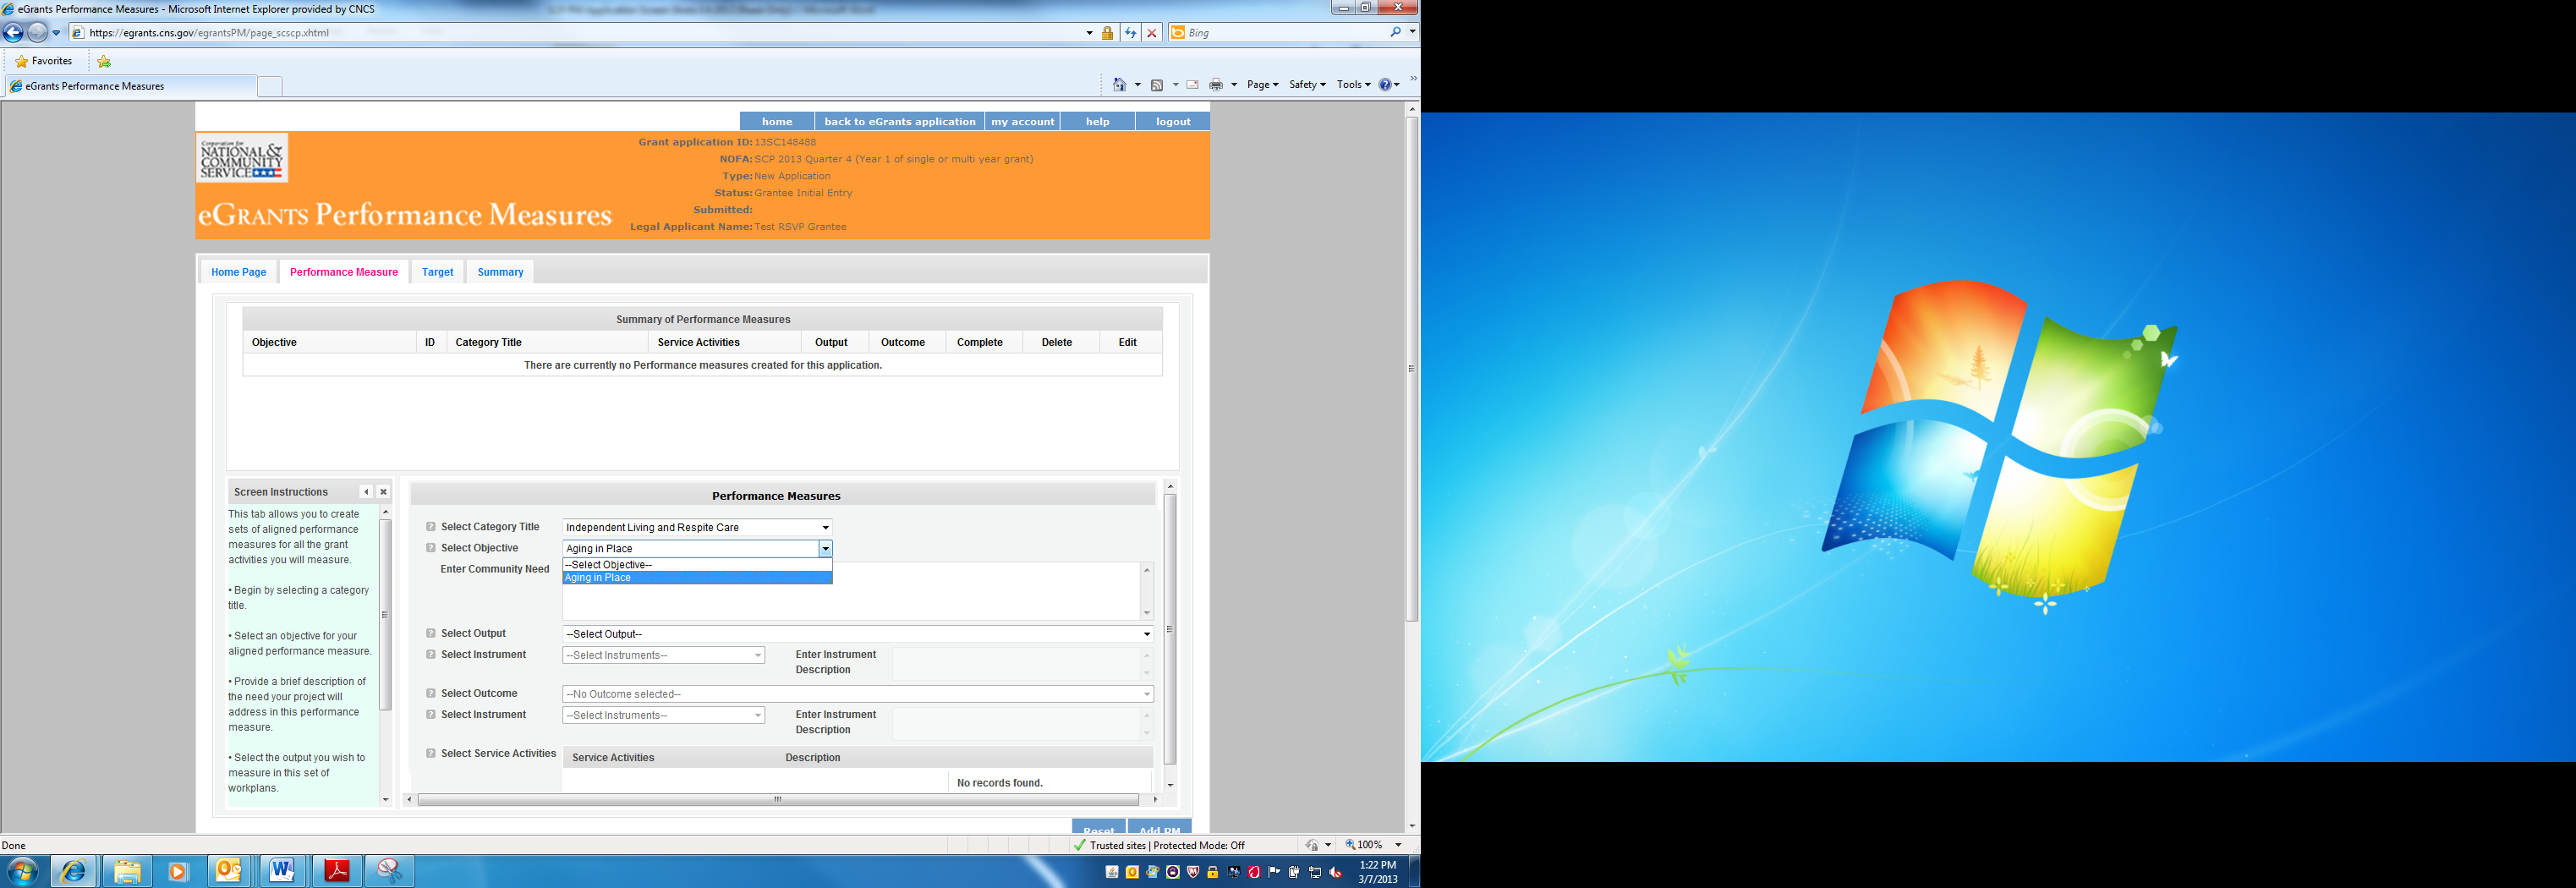
Provide a brief description of the need your project will address in this Performance Measure.

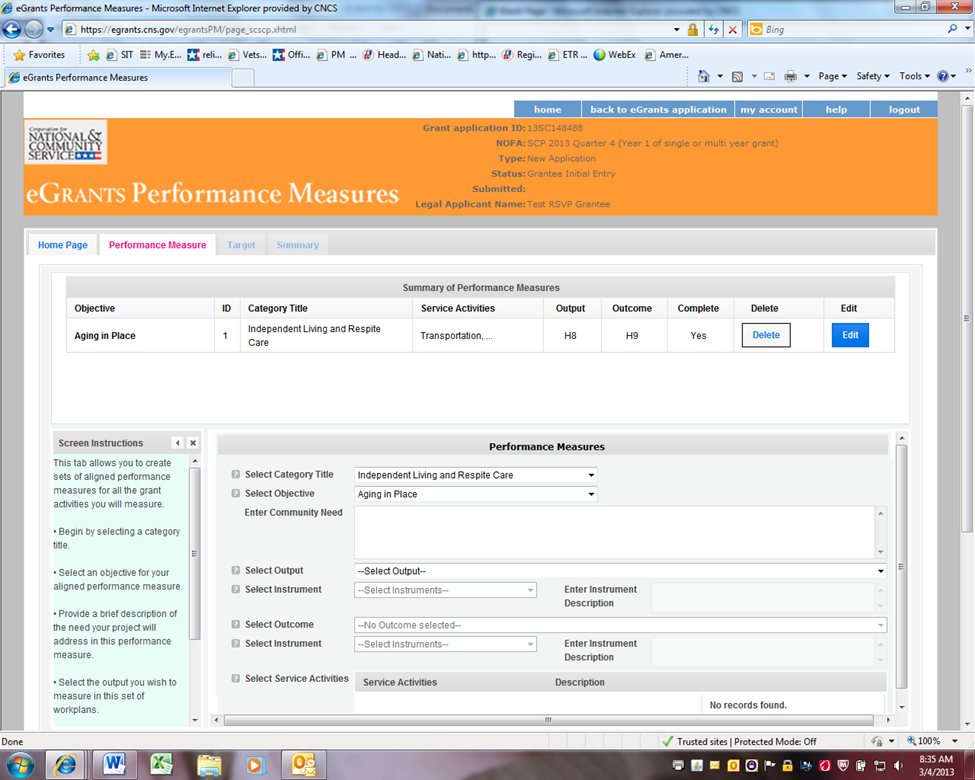
Select the output you wish to measure in this set of work plans. The output dropdown list will generate based on the objective selected.

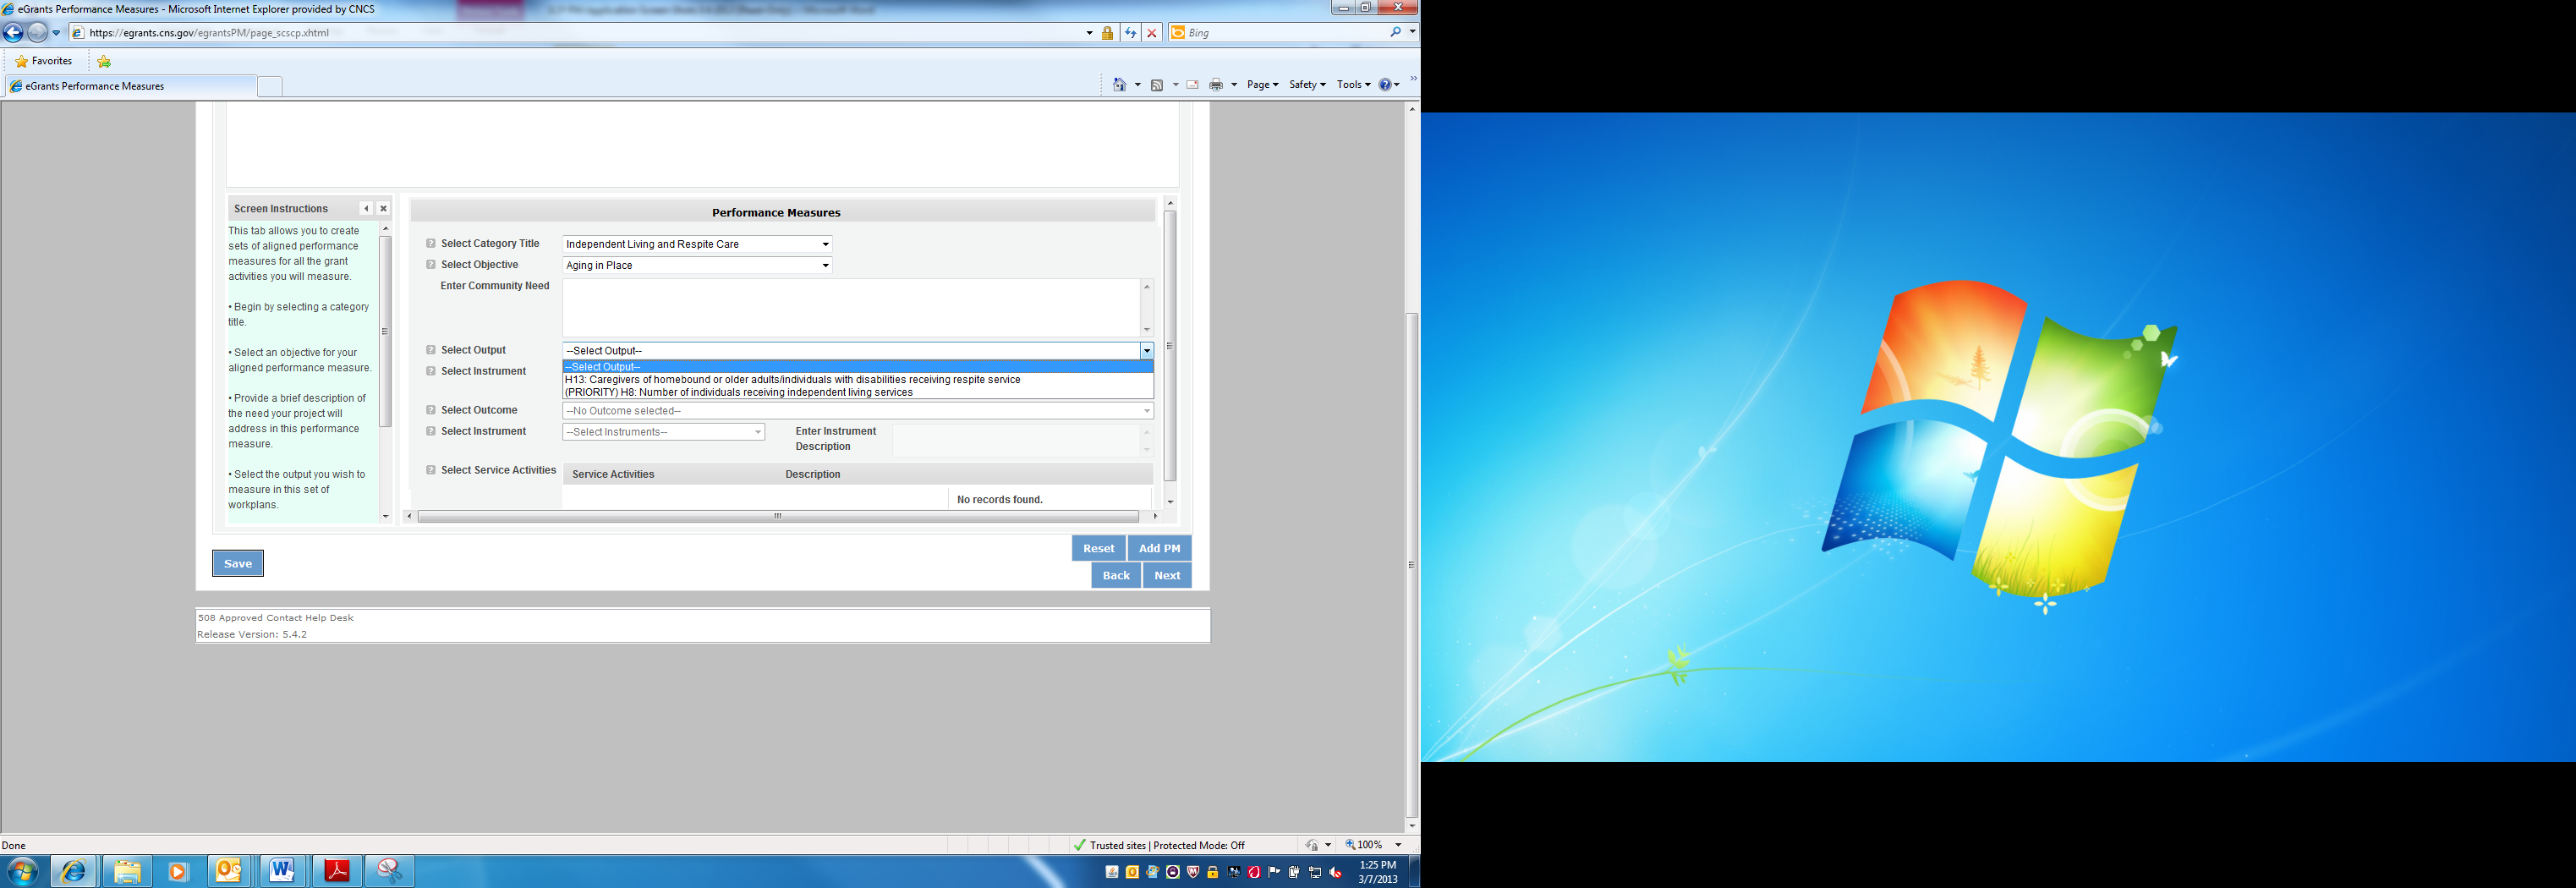
Select the instrument you plan to use to measure the output. The instrument dropdown list will generate based on the output selected. Enter an instrument description. Give the name of the instrument and briefly describe who will collect the data from whom, and when it will be collected.


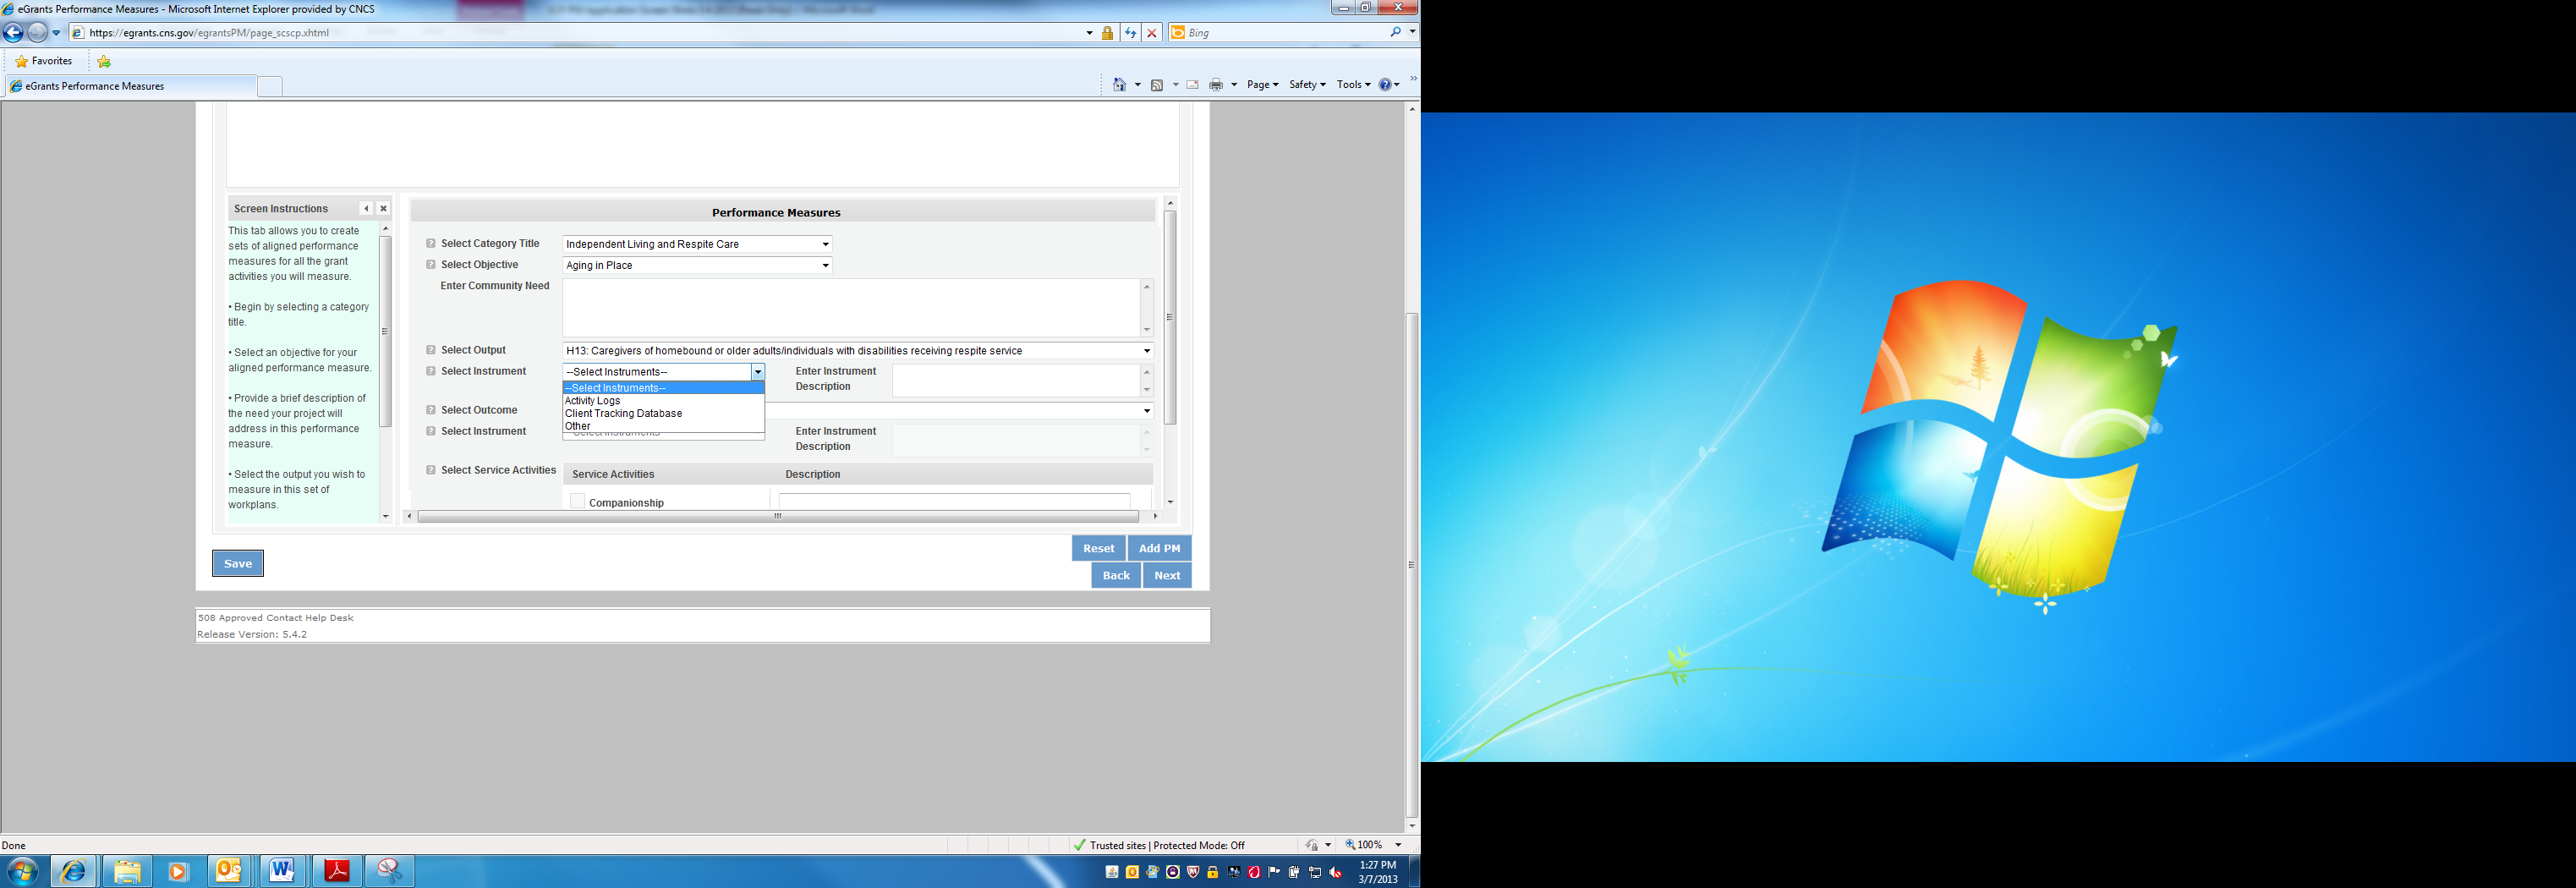
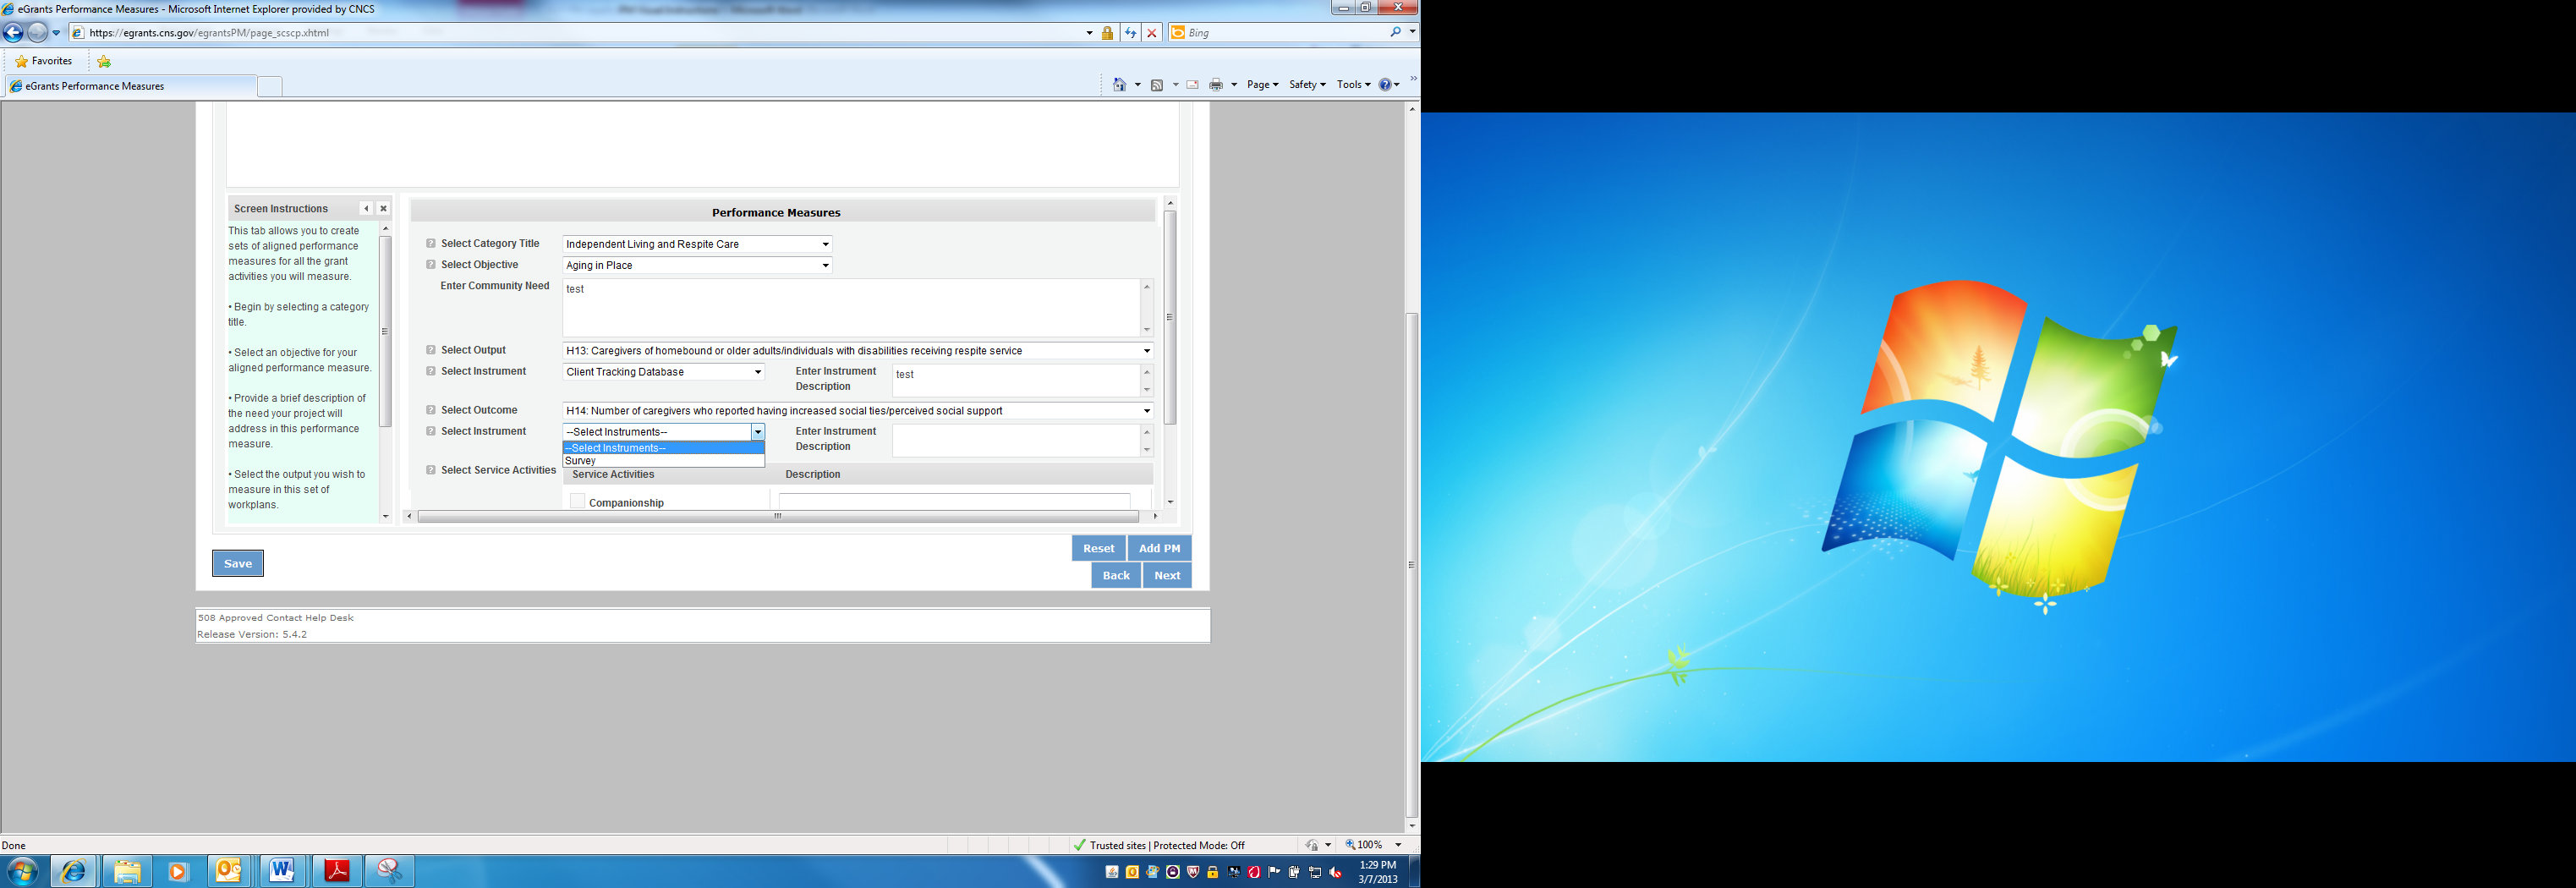
Select the outcome you wish to measure in this set of work plans. The outcome dropdown list will generate based on the output selected. If the output does not have corresponding outcomes available, outcome options will not be available in the dropdown list. If you do not plan to measure outcomes for the output selected, do not select an outcome from the dropdown list. Instead, skip ahead to select service activities.


Select the instrument you plan to use to measure the outcome. The instrument dropdown list will generate based on the outcome selected. Enter an instrument description. Give the name of the instrument and briefly describe who will collect the data from whom, and when it will be collected.


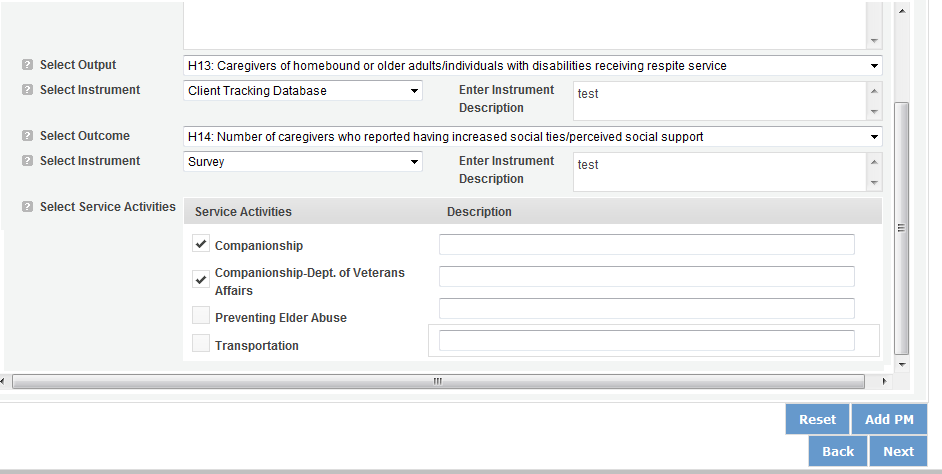
Select all the service activities that apply. The service activities that appear are generated based on the objective selected. Each service activity selected will create a new work plan. Enter a description of the service activity in the corresponding text box. The service activity description should explain what the SCP volunteers are doing in a way that shows how they will achieve the outcome or output. Say who the beneficiaries are, and what the volunteers will be doing with the beneficiaries. Say how often volunteers will provide the service and for how long. Say where the service will take place.


C lick
Add PM after completing the information for each objective.

As work plans are completed for each objective, the objectives will appear at the top of the screen.


After all Work Plans have been completed, click Next or the Target tab to move to the Target tab. The Target tab allows Targets to be set for each work plan. First, enter the project’s total number of unduplicated volunteers in the volunteer calculator.


For every work plan, enter the output target, outcome target (if an outcome was selected), number of unduplicated volunteers, number of total volunteers contributing, and number of volunteer stations. Targets must be numbers, not percentages.
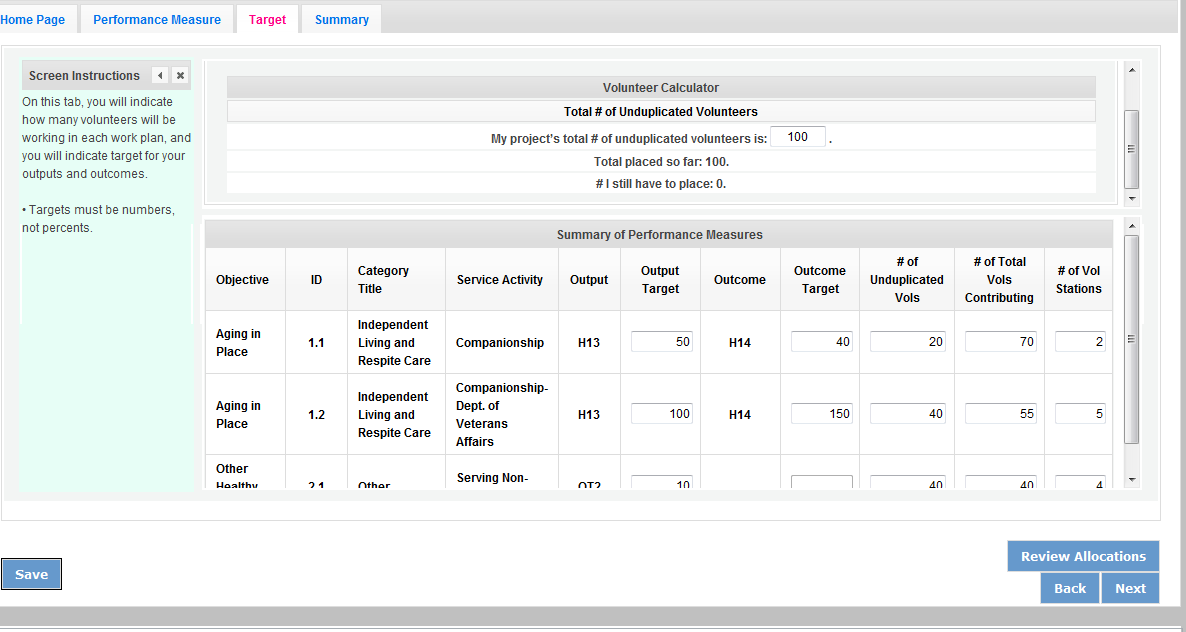
The Volunteer Calculator at the top of the screen will update accordingly to display the volunteers left to place for the Performance Measure requirements. As you enter target numbers, click on Review Allocations to update the volunteer calculator. Once all Performance Measure requirements are met, the success notice will populate in the volunteer calculator.


Click Next or the Summary tab to move to the Summary tab. This page provides a summary of all the information you have entered in the module. To print the entire summary, click Print PDF for all Performance Measures.

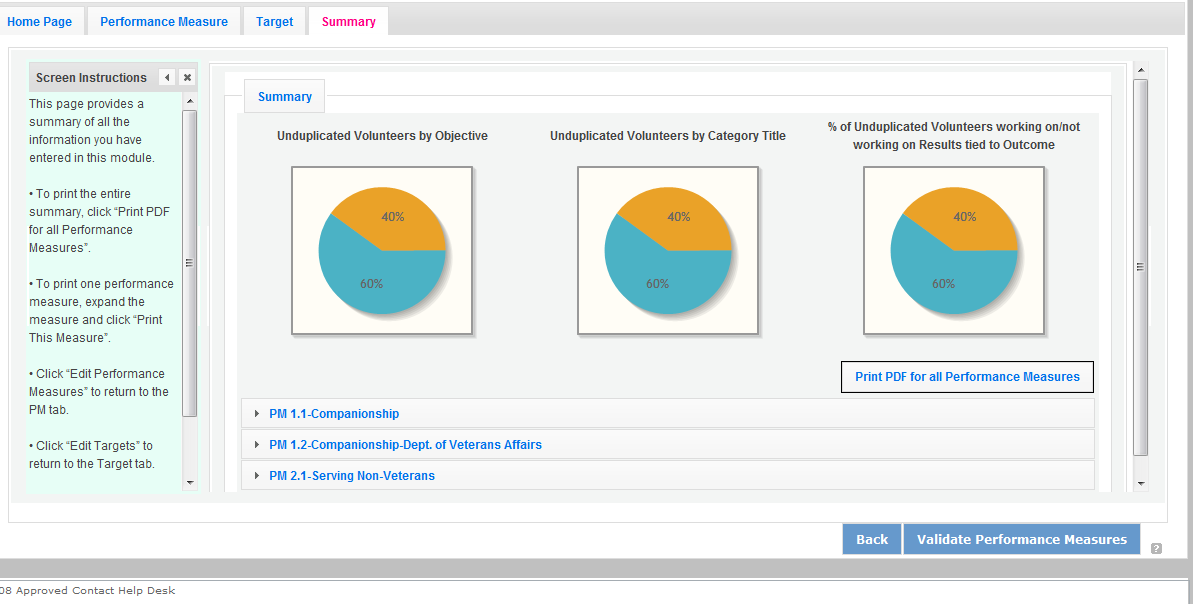
To print one performance measure, expand the measure and click Print This Measure.

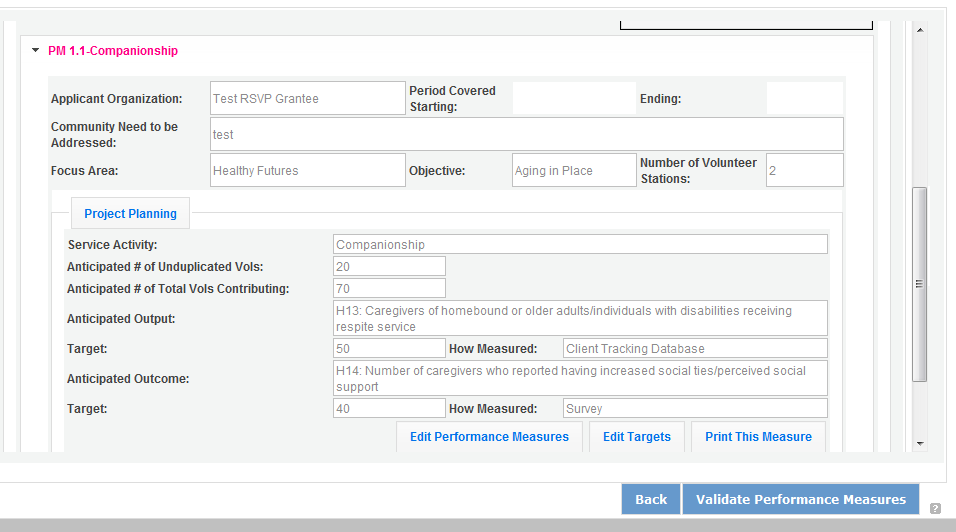
Click Edit Performance Measures to return to the Performance Measure tab.


Click Validate Performance Measures to validate the module prior to submitting your application.


If all Performance Measures are validated successfully, the following message will appear.

Click Back to eGrants Application to return to the rest of the application and exit the Performance Measure module.


PART IV - Required Supplemental Documents List (eGrants “Documents” Section)

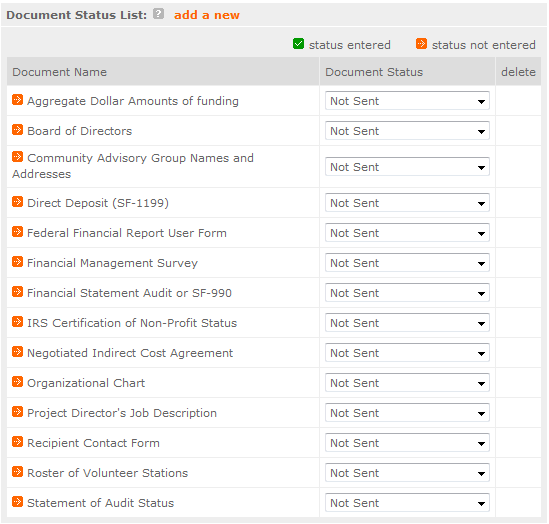
Document Statuses
Sent: means you have sent the document to CNCS
Not Sent: means you intend to send the document to CNCS, but have not yet done so. If Not Sent is selected, the application cannot be submitted in eGrants.
Not Applicable: means the document is not required for this application
Already on file at CNCS: means the document is already on file at CNCS because it was submitted with a previously awarded application.
PART V. – BUDGET Instructions: eGrants Budget Sections

Please refer to the Senior Corps Grant Application Instructions as you complete your budget.
Below are the instructions for each line item of the budget form. For each line item, you will have to document the CNCS Share, Grantee Share, and the Excess Amount.
Figure 1
CNCS Share |
Enter the amount of Corporation funding requested for each line item and the total |
Grantee Share |
Enter the amount of funds for the item that is expected to be covered by grantee funds or funds the grantee expects to receive from other sources, including cash and in-kind support. |
Excess Amount |
Enter any contributions in excess of required non-federal share in this optional section, as Stipulated in Section 224 of the Domestic Volunteer Service Act, as amended. |
Please note that you are required to put the total cost in all line items to identify the source of funds as appropriate.
Section I: Volunteer Support Expenses (for RSVP, FGP, and SCP applicants)
S ource
of Matching Funds
B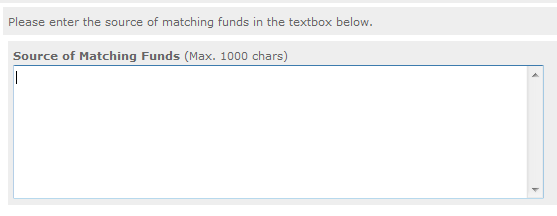 y
clicking the ‘Enter Source of matching funds’, you will
be asked to provide any source(s) of matching funds in the textbox
below.
Project Personnel Expenses

List the title of each staff position charged to the project. List all positions/titles that are either funded by CNCS, grantee share, or excess resources.
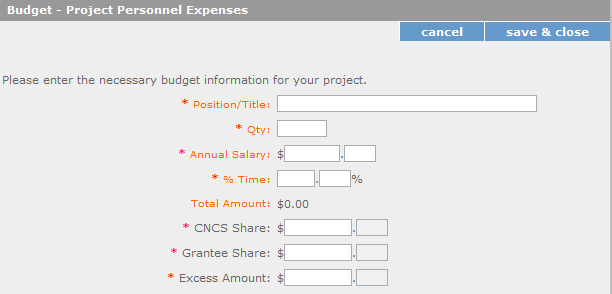
By clicking the ‘add a new budget item’ you will be taken to this screen.
For this screen you will need to enter the position title, the quantity, the full-time equivalent (FTE) annual salary, the percentage of time, and the CNCS, Grantee, and Excess Amount (refer to Figure 1 above).
Personnel Fringe Benefits
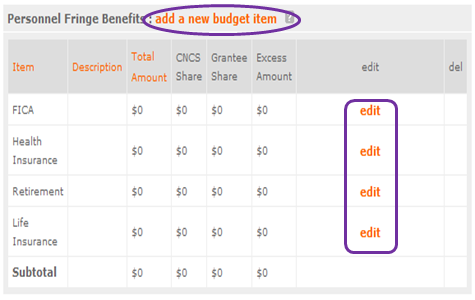
Enter in the appropriate column the cost of fringe benefits to which employees are entitled, calculated on the same percentage time indicated under line A for each individual. In the description, provide details concerning the benefits provided. (E.G., Retirement contributions for all staff working over 60% time, calculated at 5% of total annual salaries of $80,000 = $4,000).
O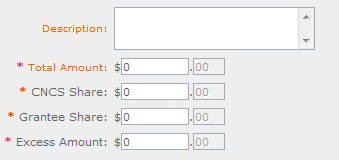 nce
you have clicked the ‘edit’ or ‘add a new budget’
link under Personnel Fringe Benefits, you will be able to enter a
short description of the calculations of the benefits.
Local Travel
E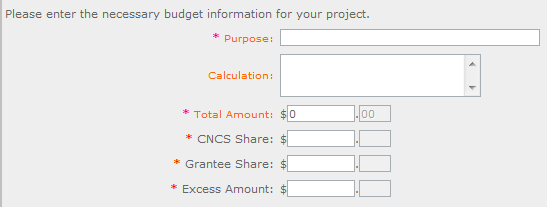
 nter
local travel costs, as appropriate in the budget. Briefly list the
purpose of anticipated local travel and the basis for cost
calculations.
Local travel is travel within the project service area.
For Local Travel
Long Distance Travel
E nter
long distance travel costs, as appropriate, in the budget. Briefly
list the purpose of anticipated long distance travel and the basis
for cost calculations.
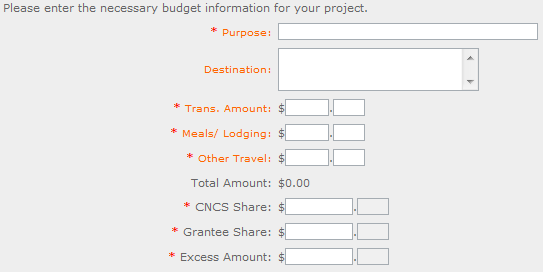
All travel outside the service area is long distance travel. For long distance travel, show the purpose for each trip and break out for each the cost of transportation, meals and lodging, and other travel costs.
For Long Distance Travel
Equipment
Enter the cost of equipment. Items costing more than $5,000 should be listed in this section.

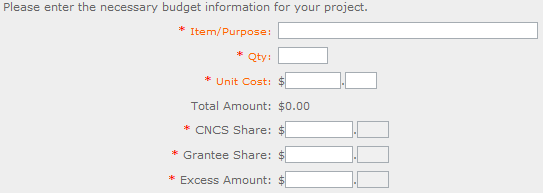
Supplies
B y
clicking here you will be able to list your supplies.
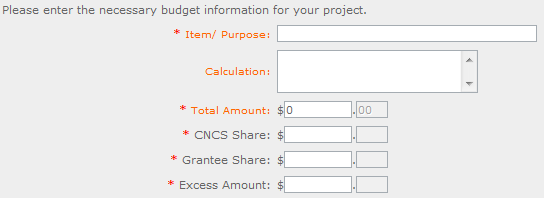
Enter your items to be purchased, the quantity of each, with their respective costs, and explain how each item will be used in the project. Itemize large items.
Contractual and Consultant Services

Enter the cost of contracts and consultants as appropriate.
I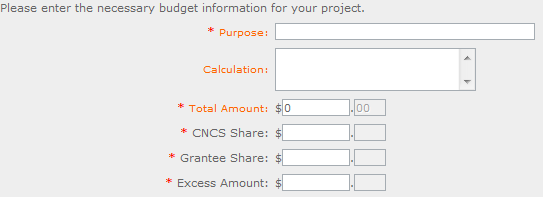 n
this section you will be able to itemize each contract or consultant
and provide a brief justification of the need for each.
Include here all services documented in a contract, such as clerical support, training consultants, equipment repair and maintenance, or bookkeeping services.
Other Volunteer Support Costs
Describe all other allowable Volunteer Support Expenses not included in the above categories, such as criminal history background checks, training, evaluation services, and other items and briefly describe.


F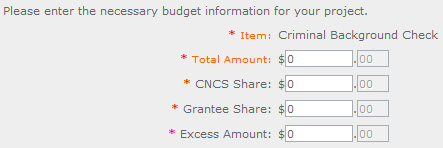 or
the Criminal Background check, you will have to click on the ‘edit’
link to add the appropriate costs to perform this action.
C riminal
Background checks are for all employees or other individuals who
receive a salary or similar payment from the grant (federal or
non-federal share).
For any additional Volunteer Support Costs, click on the ‘add a new budget item’ and complete the appropriate fields.
Indirect Costs
Enter indirect charges applicable to volunteer support expenses. A Negotiated Indirect Cost Rate Agreement must be in place with your cognizant federal agency.

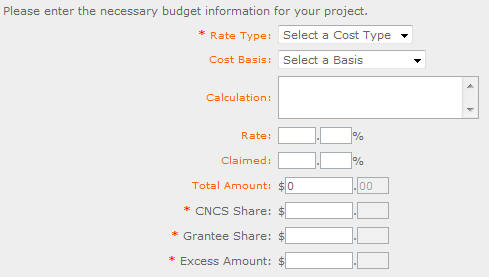
In this section, you will be able to describe the type of rate (provisional, predetermined, final, or fixed) in effect during the budget period, estimated amount of the base to which the indirect rate was applied, and total indirect expense.
Section II: Volunteer Expenses (for RSVP applicants)

Source of Matching Funds
B y
clicking the ‘Enter Source of matching funds’, you will
be asked to provide any source(s) of matching funds
Other Volunteer Costs (for RSVP)
In this section, you will enter in the respective categories the applicable costs and reimbursable expenses, as appropriate.
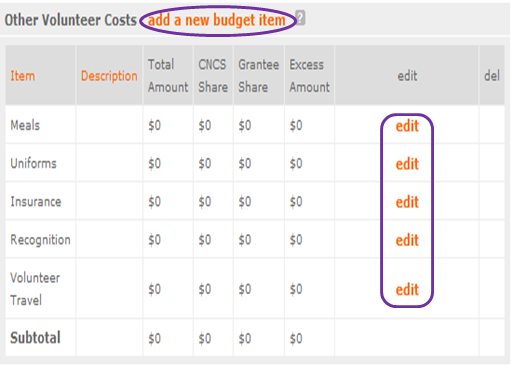
RSVP allowable costs and reimbursable expenses include: Volunteer Travel, Meals, Recognition, and Insurance. Volunteers may also be reimbursed for costs incurred while performing assignments – including transportation, equipment, supplies, etc. – provided such costs are described in the Memorandum of Understanding negotiated with the volunteer station where the volunteer is assigned and there are sufficient funds available to cover these expenses and meet all other requirements of the NGA.
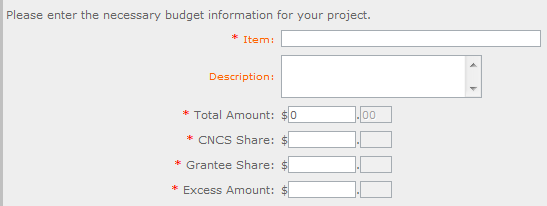
‘Add a new budget item’
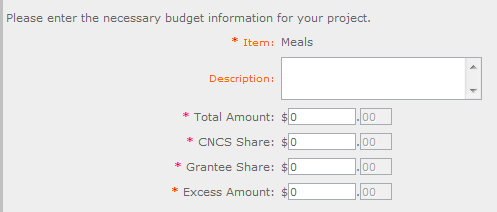
‘Edit’ the categories applicable to your organization.

This section provides the subtotals of the CNCS share, Grantee share and any excess amount that you have entered under the budget.

By validating your entire Budget section, you will be able to view or edit any errors on the list that pops up. To ensure you have validated the budget, the link will turn green with a check mark.
Section II: Volunteer Expenses (for FGP and SCP applicants)
S ource
of Matching Funds (for
FGP and SCP)
By clicking the ‘Enter Source of matching funds’, you will be asked to provide any source(s) of matching funds

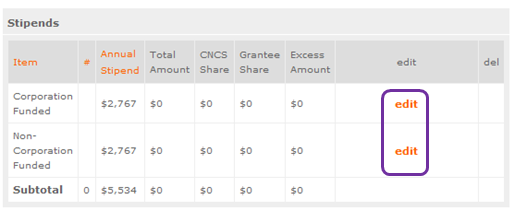
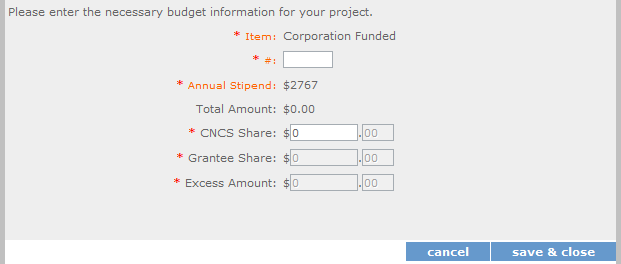
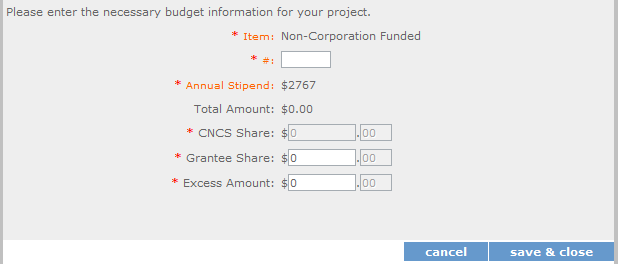
Stipends (for FGP and SCP)
In this section, you will enter in the respective stipends for both Corporation and Non-Corporation funded volunteer service years, as appropriate.
Other Volunteer Costs (for FGP and SCP)
In this section, you will enter in the respective categories the applicable costs and reimbursable expenses, as appropriate.
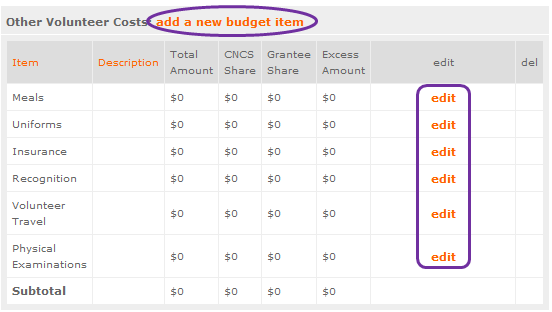
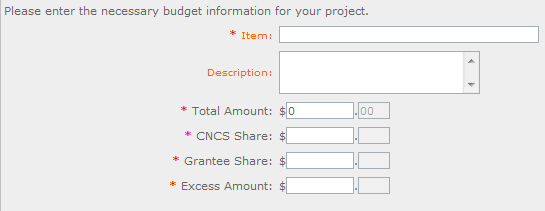
‘Add a new budget item’
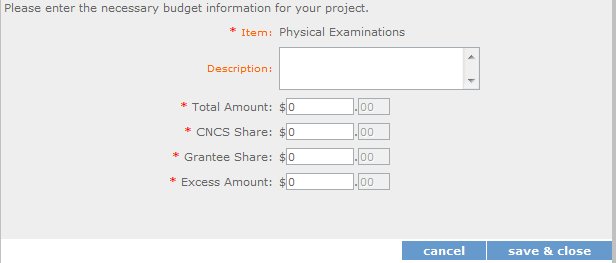
‘Edit’ the categories applicable to your organization.
T his
section provides the subtotals of the CNCS share, Grantee share and
any excess amount that you have entered in your Budget.

By validating your entire Budget section, you will be able to view or edit any errors on the list that pops up.
PART VI – FUNDING Instructions: Estimated Funding
Estimated Funding (for RSVP, FGP, and SCP)
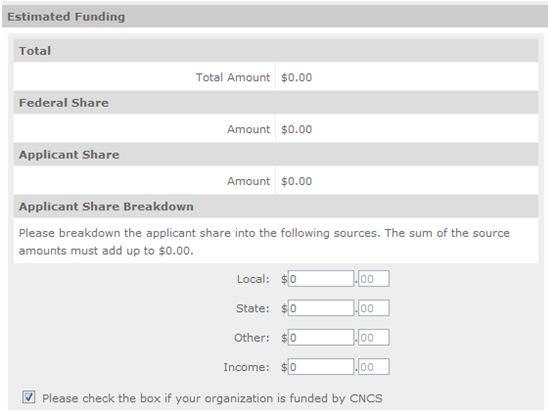
To complete the budget section, you will be required to provide the applicant share breakdown for the application. Please refer to the Grant Application Instructions for further instructions.
Review, Authorize and Submit (for RSVP, FGP, and SCP)

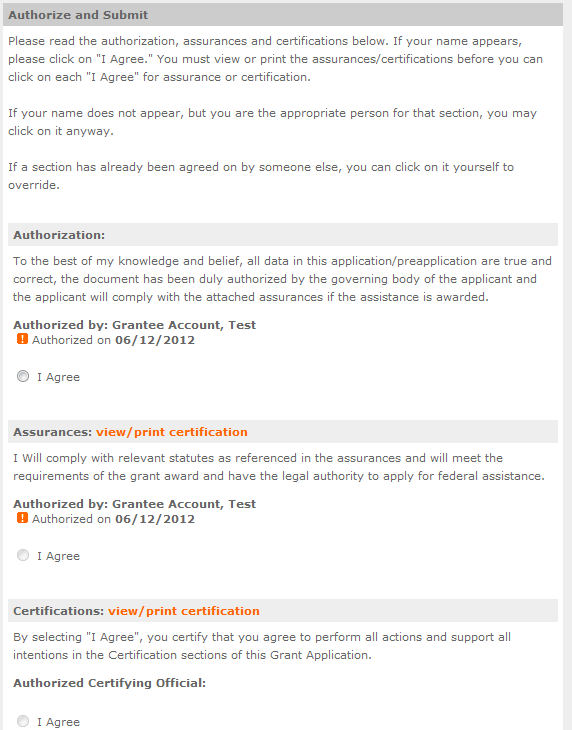
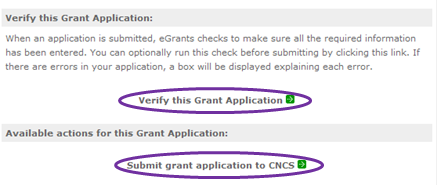
Under the “Review” and “Authorize and Submit” sections, you should review each section of your application. We strongly encourage you to print out your application prior to final submission to ensure is it not over the 25 page limit. This limit does not include the budget and performance measures.
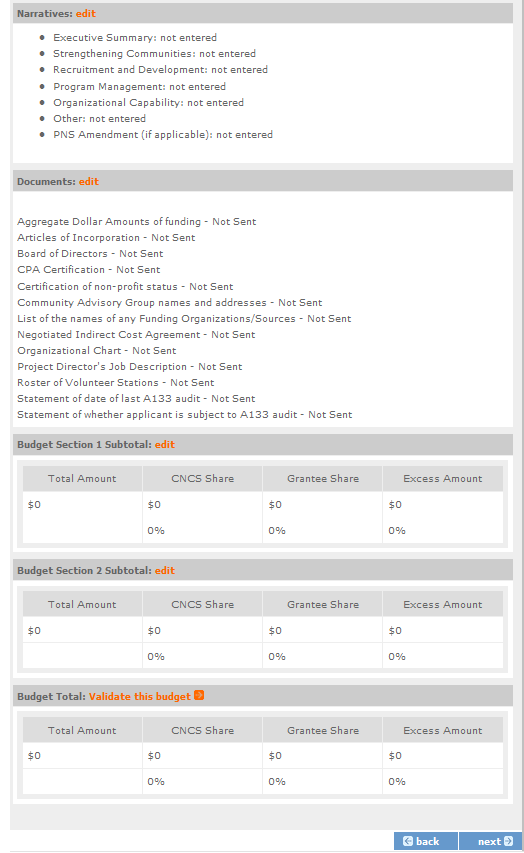
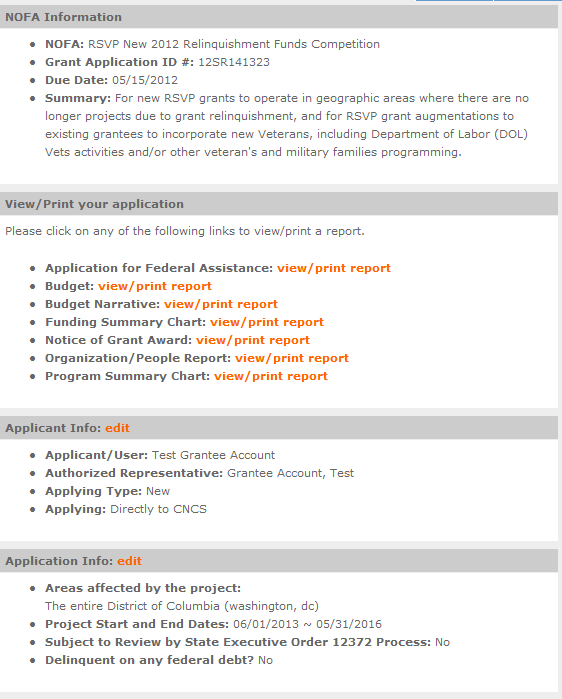
Now that you have reviewed and made any necessary changes to your application, you are now ready to authorize and submit your application.
The person who submits the application must be the applicant’s authorized representative. The authorized representative must be using eGrants under their own account in order to submit the application.

| File Type | application/vnd.openxmlformats-officedocument.wordprocessingml.document |
| Author | Becton, Tamika (Guest) |
| File Modified | 0000-00-00 |
| File Created | 2021-12-06 |
© 2025 OMB.report | Privacy Policy
