User Guide for submitting TSCA Section 4 Test Order Information
User Guide for submitting TSCA Section 4 Test Order Information
TSCA-sec4 Test Orders_CDX User Guide_OMB Review
User Guide for submitting TSCA Section 4 Test Order Information
OMB: 2070-0215
![]()
Section 4(a)(2) of the Toxic Substances Control Act User Guide |
United States Environmental Protection Agency Office of Pollution Prevention and Toxics |
EPA #: EPA 705-G-2021-3735
|
Section 4 of the Toxic Substances Control Act (TSCA) allows the United States Environmental Protection Agency (EPA) to require chemical manufacturers (including importers) and processors to develop information on existing chemicals and submit such information to EPA.
Under Section 4(a) (15 U.S.C. 2603(a)), pursuant to specific statutory requirements, EPA may issue an order requiring the development of information on a chemical.
This collection of information is approved by the United States Office of Management and Budget (OMB) under the Paperwork Reduction Act, 44 U.S.C. 3501 et seq. (OMB Control No. 2070-0033). Responses to this collection of information are mandatory for certain persons, as specified at 15 U.S.C. 2601 et. seq. An agency may not conduct or sponsor, and a person is not required to respond to, a collection of information unless it displays a currently valid OMB control number. The public reporting and recordkeeping burden for this collection of information is estimated to be 137 hours per response. Send comments on the Agency’s need for this information, the accuracy of the provided burden estimates and any suggested methods for minimizing respondent burden to the Regulatory Support Division Director, U.S. Environmental Protection Agency (2821T), 1200 Pennsylvania Ave., NW, Washington, D.C. 20460. Include the OMB control number in any correspondence. Do not send the completed form to this address.
This document presents the user guide for the Office of Pollution Prevention and Toxics (OPPT) Section 4 Test Order Submissions. The TSCA section 4 application is the electronic, web-based tool provided by Environmental Protection Agency (EPA) for the submission of data. As a Primary Authorized Official, you can create, modify, and submit. You can also delete data, create amendments, and download the Copy of Record (CoR).
For questions concerning the Toxic Substances Control Act (TSCA) Section 4 software requirements, please contact the Central Data Exchange (CDX) Help Desk at [email protected] or call 1-888-890-1995 between the hours of 8 am – 6 pm Eastern Standard Time (EST).
The contents of this document do not have the force and effect of law and are not meant to bind the public in any way. This document is intended only to provide clarity to the public regarding existing requirements under the law or agency policies. The statements in this document are intended solely as guidance to aid in complying with EPA regulation.
Date Issued: Month Day, 2021 1
1. Table of Contents 4
2. System Requirements 5
3. User Roles 5
3.1 Primary Authorized Official (AO) Functions 5
4. Accessing the Section 4 Application to submit a Test Order Response 7
5. Submit an Initial Response to a Test Order 11
Step 1: Individual Initial Response to Order 15
Step 1bc: Submitting an Extension Request 15
Step 2. Determine How to Respond to the Test Order 20
Option 1: Develop the Information 21
Option 2: Submit Existing Information 23
Option 3: Request an Exemption 26
Option 4: Claim that You Are Not Subject to the Order 28
Option 5: Cease the Manufacture or Processing of the Chemical 29
Option 6: Join a Consortium Response to Order 30
Step 3: Test Order Response Deadlines 41
Step 4: Submit Study Plans(s) and Final Study Report 41
Step 4a: Submitting a Draft Study Plan 41
Step 4b: Submitting a Final Study Plan 48
Step 4c: Submitting a Final Study Report 54
Step 5: Submitting a Response 57
6. Glossary 62
To use the Section 12(b) Export Notification application to submit a Section 12(b) form, the following are required:
An e-mail account
JavaScript enabled web browser
Internet access
Adobe Acrobat Reader 5.0 or higher
CDX username and password
2.1 Supported Browsers
One of the following supported browsers is required to access the Section 4 application:
Vendor supported versions of Internet Explorer (IE) or Edge
Go to the following link to download: https://support.microsoft.com/en-us/help/17621/internet-explorer-downloads
Vendor supported versions of Mozilla Firefox
Go to the following link to download: https://www.mozilla.org/en-US/firefox/new/
Vendor supported versions of Safari
Go to the following link to download: https://support.apple.com/downloads/
Vendor supported versions of Google Chrome
Go to the following link to download: http://www.google.com/chrome
2.2 Screen Resolution
Screen resolution should be set to 1024 x 768 or greater.
3.1 Primary Authorized Official (AO) Functions
This section describes how to:
Access the application
Navigate the Section 4 ‘Home’ screen
Assign Supports to complete a form
Start, complete, and submit an information for a Section 4 Test Order
Upload an extensible markup language (XML) file
Download a Copy of Record
Create an amendment
The Primary AO is responsible for the submission of main forms. As a Primary AO, you can create a new form. You are also responsible for submitting amendments, unlocking submissions, and deleting forms. You can assign Supports (or other authorized individuals) to edit and complete a form on your behalf. The Primary AO can be thought of as a primary company authorized official, specifically in regard to any sponsored individuals.
You can save the form at any point during the data entry process. The save functionality allows you to return to that same form at any point in the future. You can print the form at any point; however, the ‘Not for Submission’ watermark will be placed on the form anytime the form is printed prior to actual submission.
Figure 1, displays a table of the user role capabilities within the Section 4 application:
Table 1: Section 4 User Roles Matrix
Legend |
Primary AO |
Primary Support |
|
US/Non-US |
US/Non-US |
Primary Form |
|
|
Create Initial Response Form |
X |
|
Create Test Response Form |
X |
|
Submit Original ACM Forms |
X |
|
Generate Producing Company Unique ID |
X |
|
Edit Primary Form |
X |
X |
Submit an original Forms |
X |
|
Unlock Form Submission (Create an amendment) |
X |
X |
Submit an Amendment of a Form |
X |
|
Assign Supports |
X |
|
Download CoR |
X |
|
4.1 New Users
Register in CDX (https://cdx.epa.gov/).
To create a new CDX account, click on the green [Register with CDX] button.
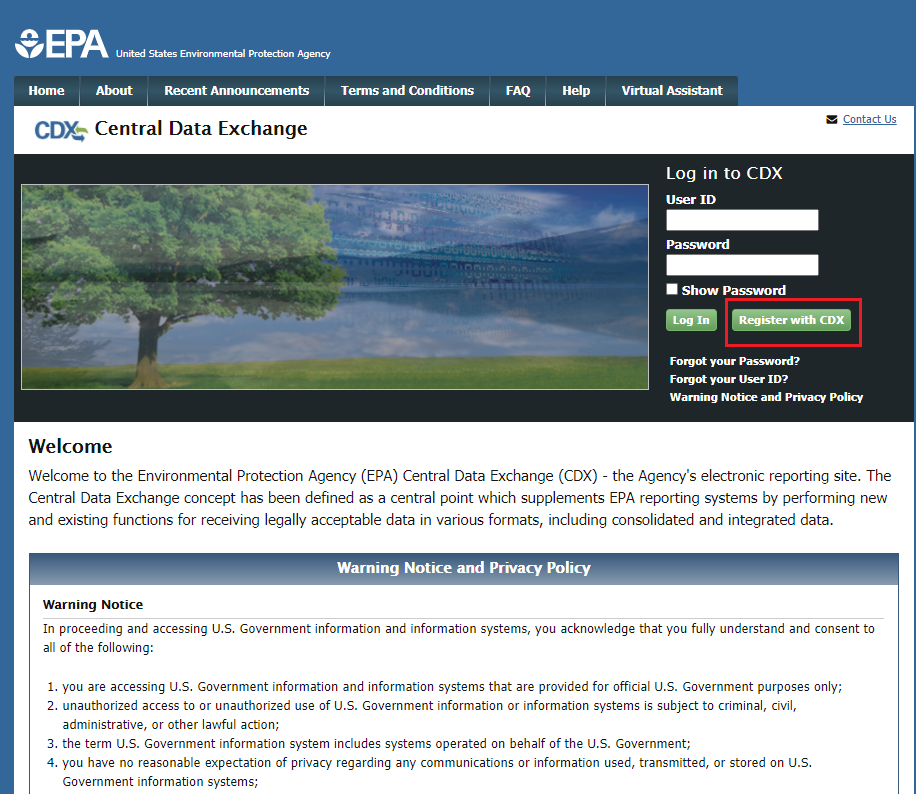 Follow
the steps provided by CDX to complete registration for Primary
Authorized Official role.
4.2 Existing Users
Log into CDX (https://cdx.epa.gov/).
For general questions about CDX, click the FAQ, Help, or Contact Us links at the top of the screen.
If you are already an existing CDX user, log in with your User ID and Password.

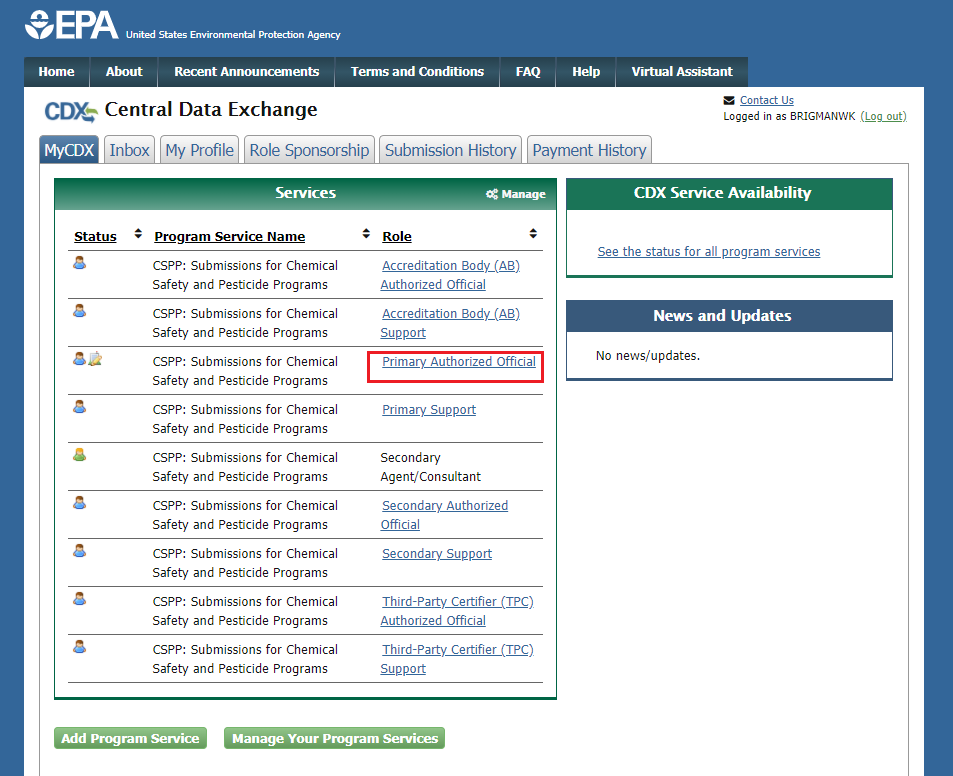
Select the Primary Authorized Official link, for CSPP: Submissions for Chemical Safety and Pesticide Programs.
If you maintain one organization, choosing the Primary Authorized Official Role will take you directly to the Chemical Information Submission System.
If you are associated with multiple organizations, choose the relevant Organization Name and Subsequent Program Client ID.
Select Proceed.
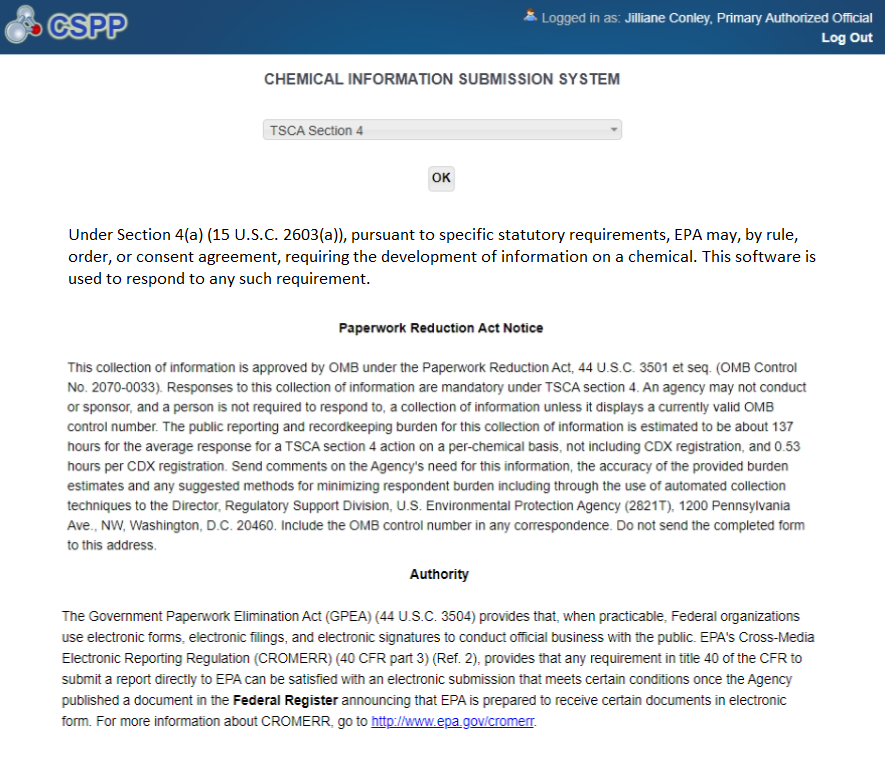
Select TSCA Section 4 from the drop-down menu and click the [OK] button.
Click the [Section 4 Orders] link on the Home page upper banner.

Manufacturers receiving a Test Order request must identify themselves as Manufacturer, Processor or both within the 30 days after the effective date of the order.
Select [Start New Submission] to prepare the Individual Initial Response. All manufacturers receiving a Test Order must complete this step regardless of how they intend to respond to the order.
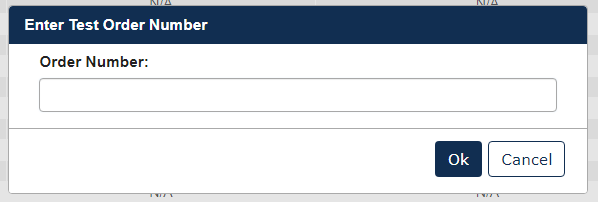
A text box will appear. Enter the Test Order number that was provided to your institution, then click [Ok].
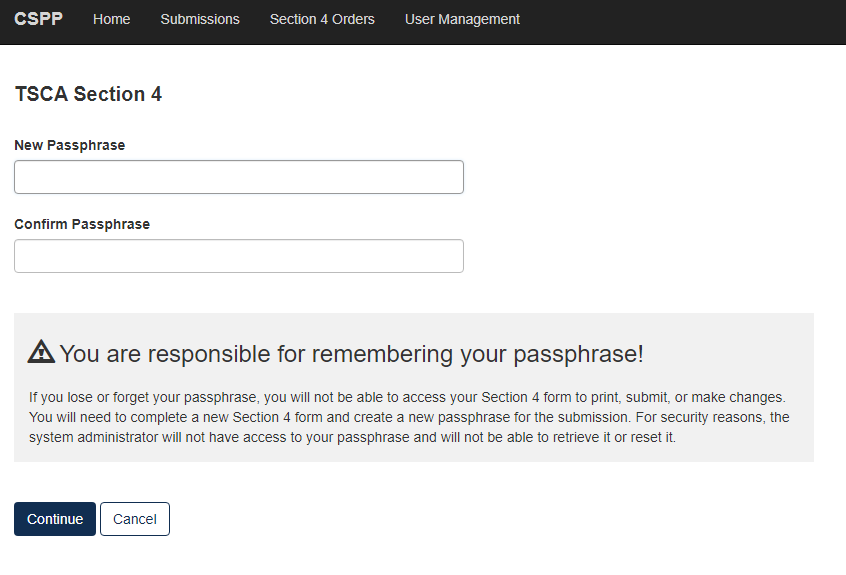
Choose a secure passphrase that can be remembered for the purposes of accessing the form while it is In Progress or the Copy of Record and Communications after submission is completed. The ‘Create Passphrase’ screen, allows you to create a passphrase and associate that passphrase with your newly created form.
The application uses the passphrase as an encryption key to protect the contents of the form. You are responsible for remembering the passphrase and distributing it to the appropriate individuals.
If you lose or forget your passphrase, you will not be able to access your submission to print, submit, or make changes. You will need to complete a new submission and create a new passphrase. For security reasons, the system administrator will not have access to your passphrase and will not be able to retrieve it or reset it.
New Passphrase: Enter a passphrase that is between 8 and 20 characters. For maximum security, your passphrase should contain a combination of letters and numbers. Your passphrase should not contain special characters (for example, +, ?, and *).
Confirm Passphrase: Enter the same passphrase that was entered into the ‘New Passphrase’ field. The same passphrase may be associated with multiple forms. The user can choose to have the same passphrase for all forms. Supports do not have the ability to start a new form or create a passphrase for a form.
Action Bar
The action bar is located at the top and bottom of the form on each screen. You can perform the following functions using the top action bar:
Home: Click the ‘Home’ link to navigate to the Section 4 ‘Home’ screen.
Help: Click the ‘Help’ link to generate a drop-down menu, which displays a link to the user guide.
User ID: Click the user ID link to log out of the application.
The following exhibits, show screen captures for the bottom action bar:
Save: Click the ‘Save’ link at any stage of completing a Section 4 Test Order submission to save the form. To generate and access links to other pages of the form within the navigation tree, you must click the ‘Save’ link within the action bar. After you click the ‘Save’ link, you will receive a message indicating that all data entered in the form has been saved successfully. The save function does not validate any entered data. Click the ‘Previous’ and ‘Next’ buttons on a form to save the data entered within a form. Click the ‘X’ button in the upper right-hand corner of the form in your browser to close the form without saving.

![]()
Preview: Click the ‘Preview’ link after uploading a minimum of one chemical to preview the form. After you click the ‘Preview’ link, you will be given the option to view a regular version of the PDF(s) or a sanitized version of the PDF(s). Choosing either option will download (a) watermarked PDF version(s) of each chemical identified within the form in a .zip file.

![]()
Validate: Click the ‘Validate’ link at any stage of completing a Section 4 Notice of Activity form. A ‘TSCA Section 4 Validation’ window generates when you click the ‘Validate’ link if you disable the pop-up blocker within your internet browser. The ‘Section 4 Validation’ pop-up window displays a report of all warning messages. Refer to Section 6 for more information on validating a form.

![]()
Submit: Click the ‘Submit’ link to submit a Section 4 form after completing all sections of a Section 4 form. After you click the ‘Submit’ link a pop-up message displays to confirm the submission process. The form validates during the submission process and displays any applicable warning or error messages. You can continue with the submission process only after clearing all validation errors. Upon successful submission of the form, the application generates and sends an email indicating the successful submission of the form to the submitter’s email address.

![]()
CDX Links: Click any of the ‘CDX Links,’ located at the bottom of each screen within the ‘CDX Links’ drop-down menu, at any stage of completing a Section 4 Test Order submission.
Click the ‘CDX Homepage’ link to navigate to the ‘CDX’ homepage.
Click the ‘MyCDX Homepage’ link to navigate to the ‘MyCDX’ page.
Click the ‘EPA Homepage’ link to navigate to the EPA Homepage.
Click the ‘Terms and Conditions’ link to navigate to the CDX Terms and Conditions screen.
Click the ‘Privacy Notice’ link to navigate to the CDX Privacy and Security Notice screen.

Step 1: Individual Initial Response to Order
Test Order Recipient submits the Individual Initial Response to Order
User should identify if they are responding to the order as a Manufacturer, Processor, or Both.
 The
answer provided will drive the Test required for the Test Order.
Note: The mockup below may change.
To complete the submission, go to Step 5: Submitting a Response.
 When
the Initial Response is completed, the user will see:
Step 1b: Submitting an Extension Request
To submit an Extension Request, click the calendar icon next to the due date in the [Current Action Due Date] column.
![]()
Choose a secure passphrase that can be remembered for the purposes of accessing the form while it is in pprogress or the Copy of Record and Communications after submission is completed.

Click the [Selected Tests] drop down, to choose which test(s) that is requesting an extension.

Click the blue [Attach Extension Document] link to upload appropriate documentation.

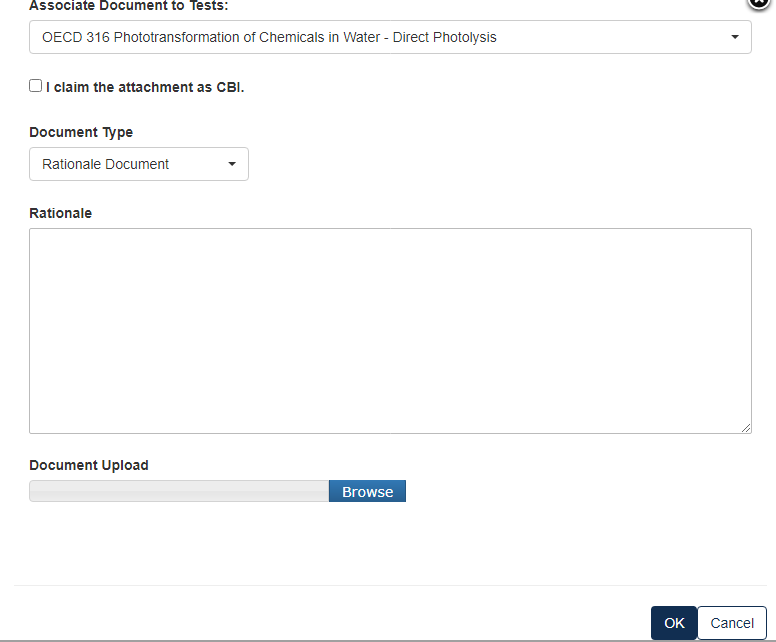
Select the Test to which the documents relate and select the [Document Type] drop down to indicate what documents are being uploaded.

For a Rationale Document:
For a Correspondence:
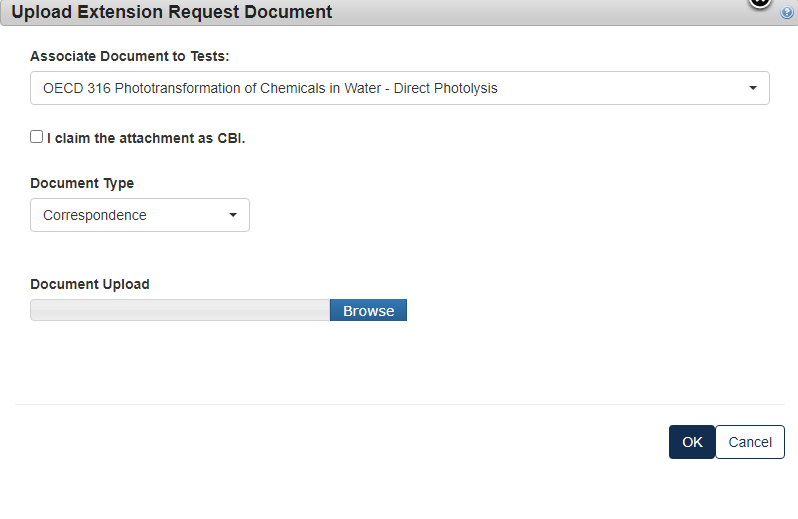
If the information is CBI, indicate by marking the checkbox and uploading a sanitized version as well.
Type in the dates that you are proposing to have as the new deadline. Click [Next] to continue.
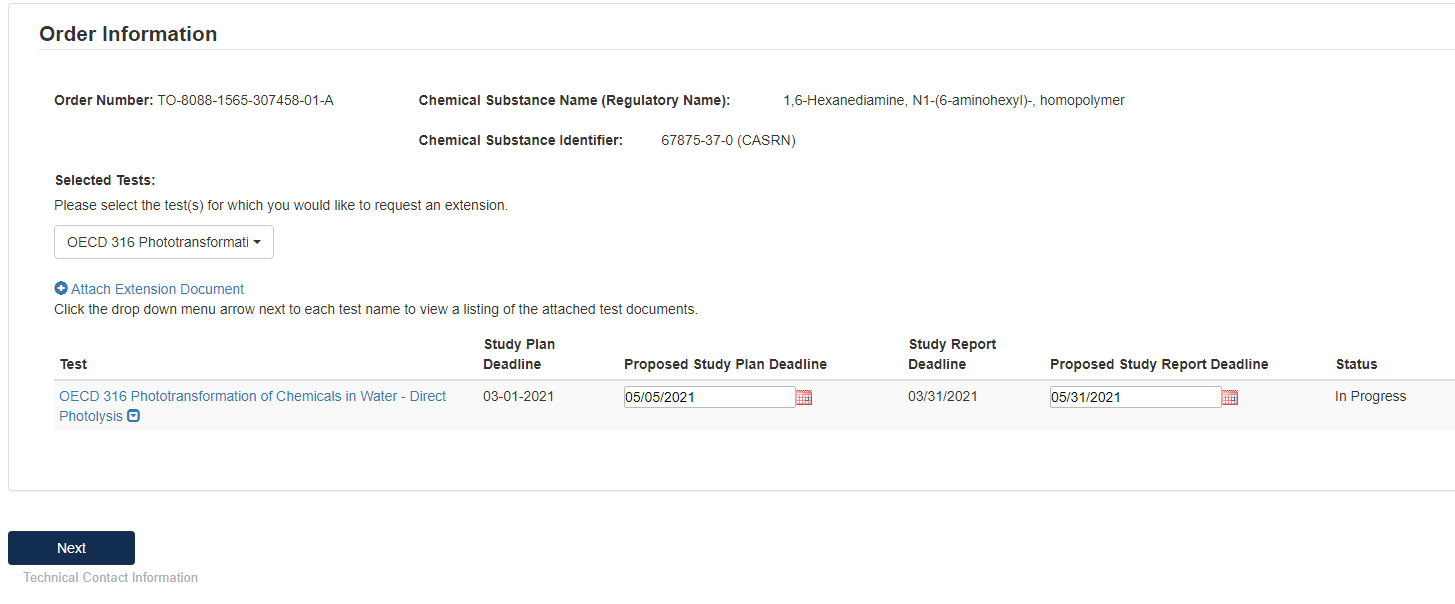
To complete the submission, navigate to Step 5: Submitting a Response.
When the Extension Request has been completed, it will show in the main queue.

If at any point a document has been completed, but has been opened to be edited, the Submission Type will turn blue and the lock icon will be unlocked.
![]()
When a communication from the EPA is received an envelope will show alongside the submission type under the Test Order number.

If you have submitted a Test Order to Join Consortium, once it is completed in your queue you will see:
![]()
To complete the submission, go to Step 5: Submitting a Response.
Step 2. Determine How to Respond to the Test Order
Manufacturers have six options from which to choose to comply with the Order. You will receive an e-mail from EPA that provides the CDX Order number you will use for purposes of responding to the Order. Consult the Order you received for details on each of these options.
The list of Test required will display based on your Individual Initial Response. If your Individual Initial Response was “Manufacturer” you will see test(s) required for Manufacturers only; if you selected “Processor” you will only see tests that are required when acting or responding as Processor. If the test is required for both or your response was Both, Manufacturer and Processor, you will see all the tests that are required for both.
For each test, select how you intend to respond to the Test Order. You can Develop Information, Submit Existing Information, or Request an Exemption; Claim That You are Not Subject to this Order; indicate that your company Ceased the Manufacture or Processing of the Chemical or Join a Consortium.
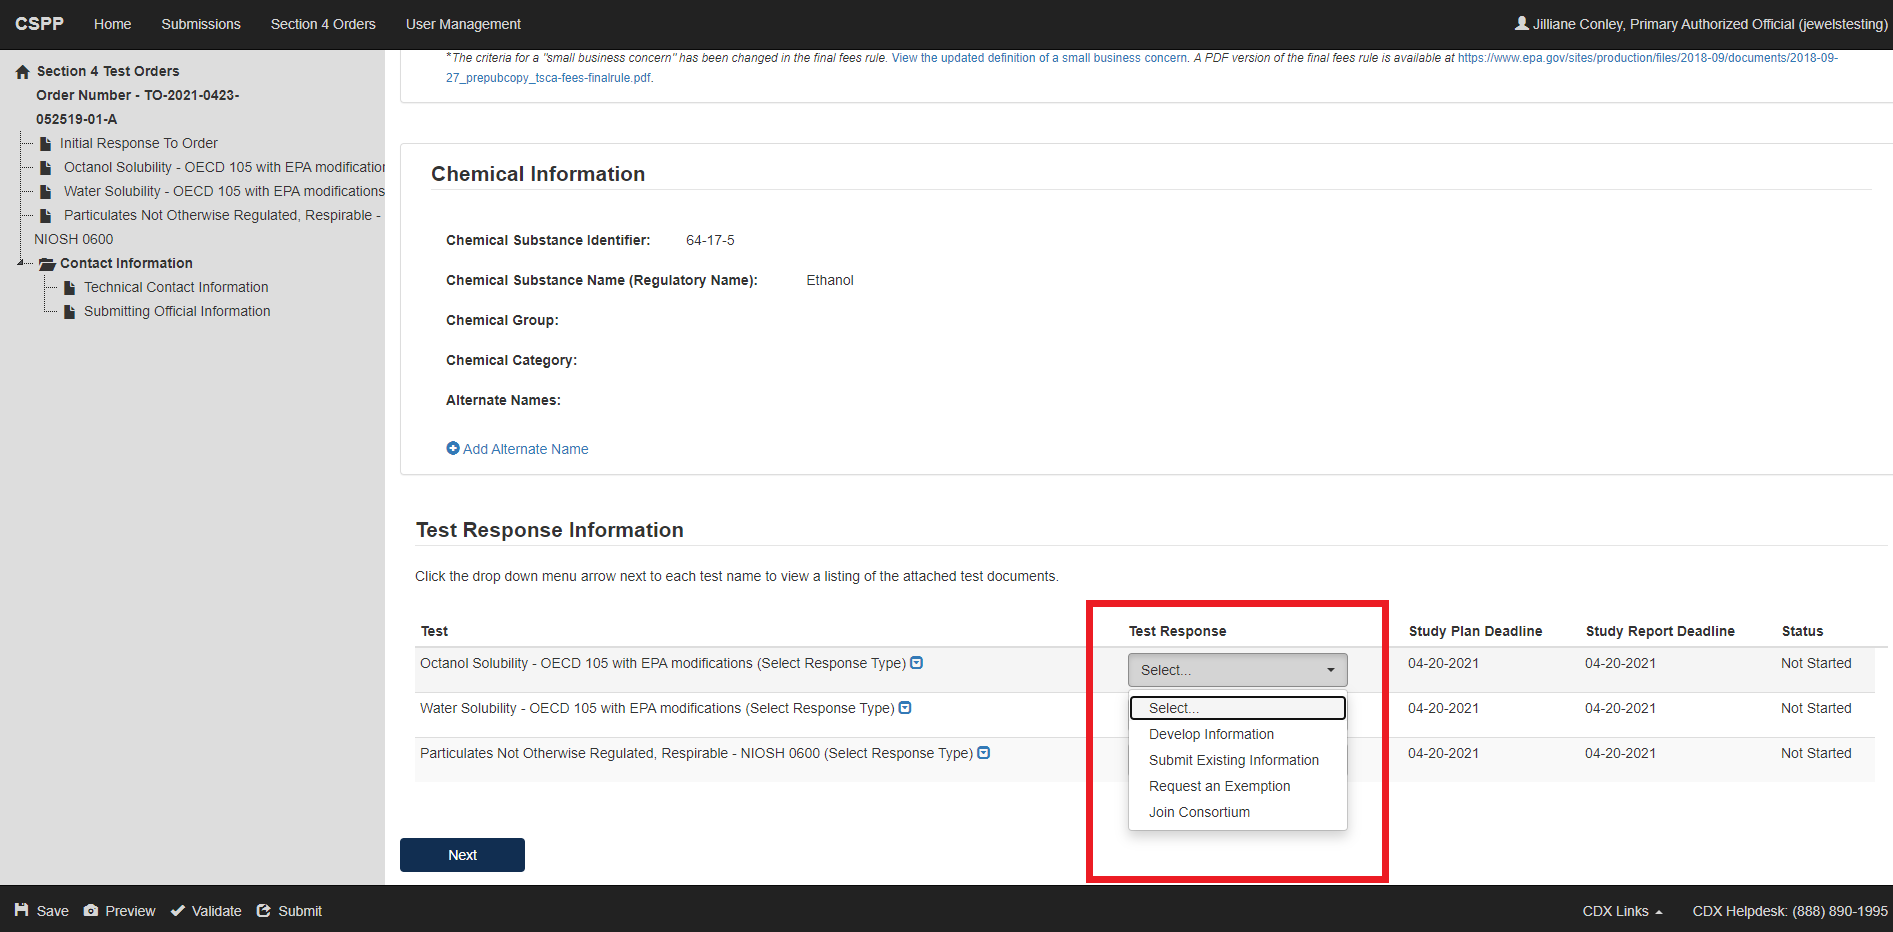 For
clarification in regards to these responses go back to Step 2.
Verify the Chemical Information that the test order applies to. Determine which selection applies best to each Test Response, select the appropriate value from the drop-down menu under the Test Response column. This step must be completed for each test.
Click [Next] to continue.
Option 1: Develop the Information
If you choose to develop information in response to the Order, you must select this option in the CDX portal form. The Order provides information on the required tests, required protocols/methodologies, and deadlines for the Order.
To submit a response as Develop Information:
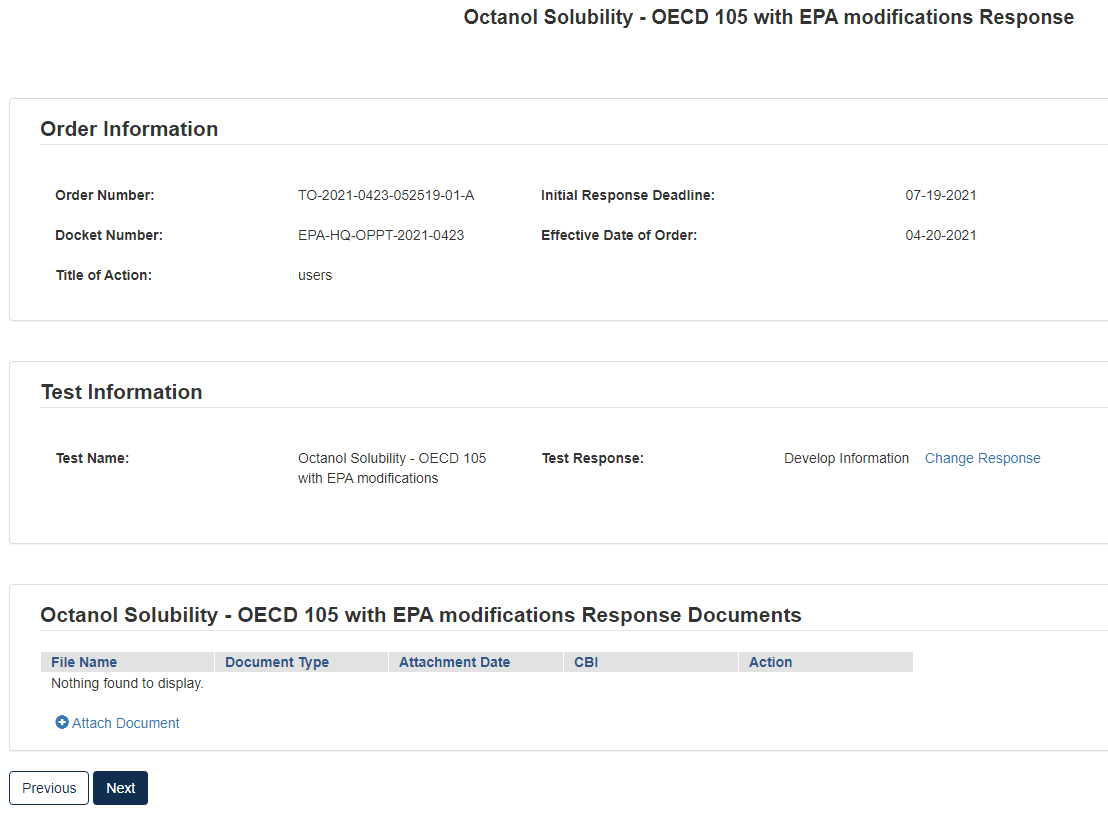
Click [Attach Document]
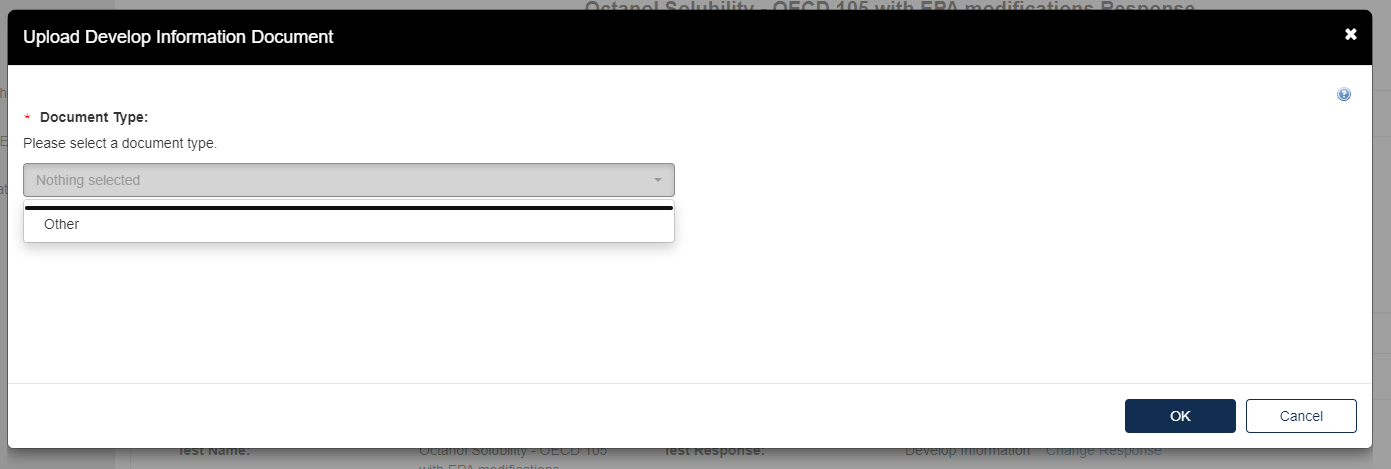
The Upload Develop Information Document pops up. Click the drop-down menu under Document Type and select Other.
Provide the Document Type Description. Fill out the information highlighted by the red asterisk.
If the attachment contains Confidential Business Information (CBI), indicate this by selecting the I claim the attachment as CBI checkbox, and upload a sanitized (marked up version that covers the information that is confidential) of the document as well.
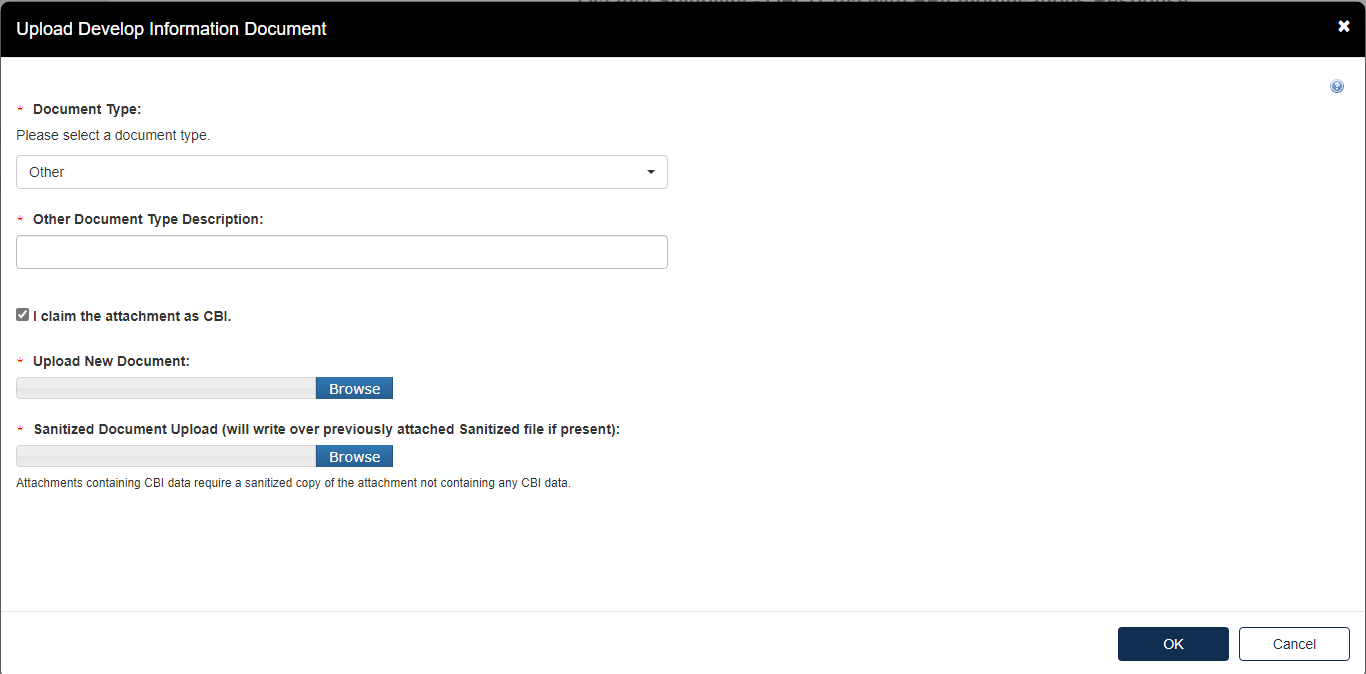
Click the [OK] button to continue.
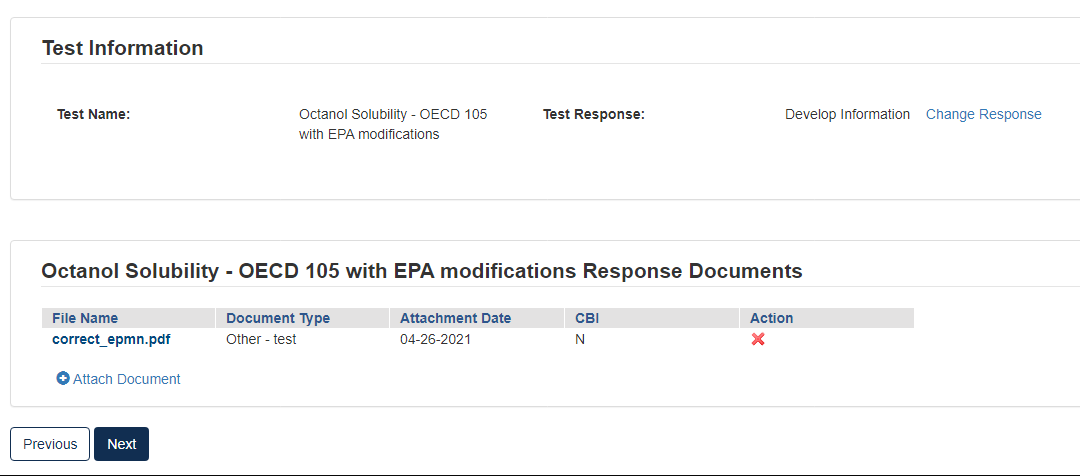
Click [Next] to continue.
To complete the submission, navigate to Step 5: Submitting a Response.
Option 2: Submit Existing Information
If you choose to respond to the Order by submitting an existing study and/or other relevant information that you believe EPA has not considered, your Initial Response in EPA’s CDX portal must include the study and/or other relevant information, along with supporting rationale that explains how the study and/or other relevant information meets part or all of the information described as necessary in the Order. See the Order for more details on this response option.
To Submit Existing Information:
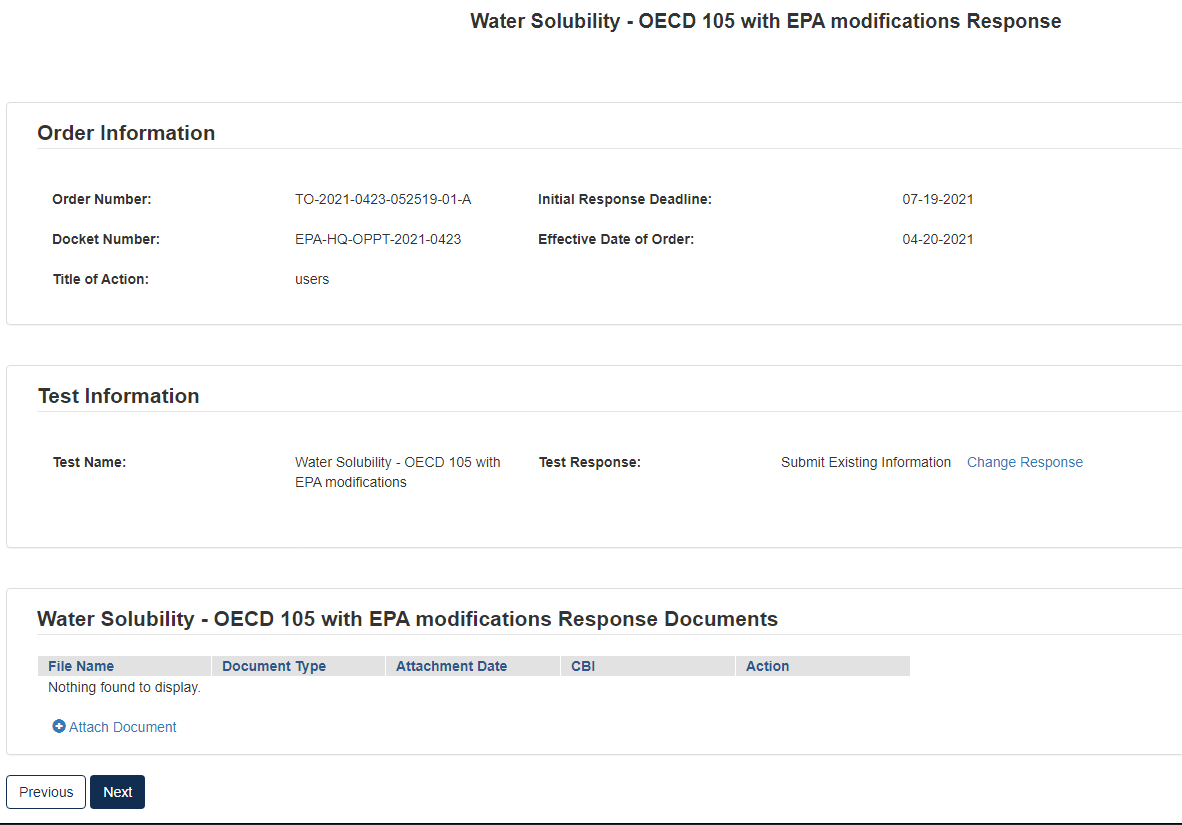
Click the blue [Attach Document] link

To attach a Study Report:
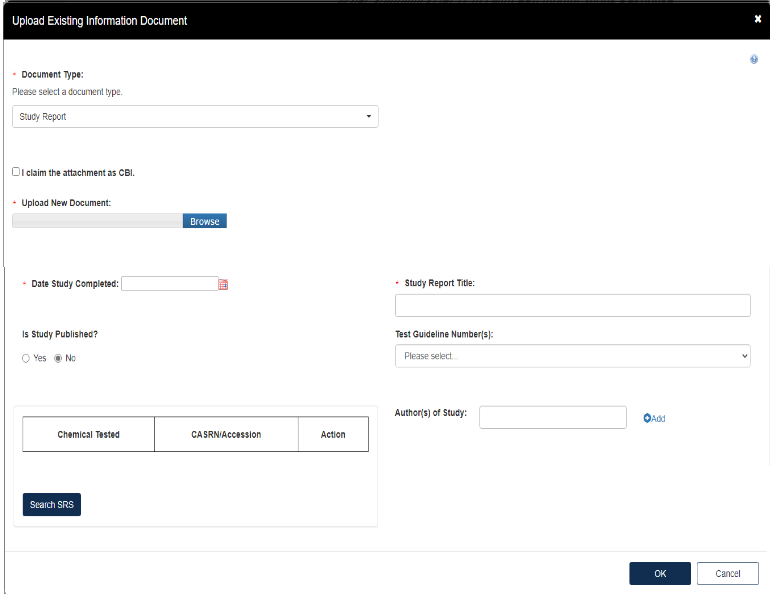
Fill out the information highlighted by the red asterisk.
If the attachment has CBI, indicate this, and upload a sanitized document as well.
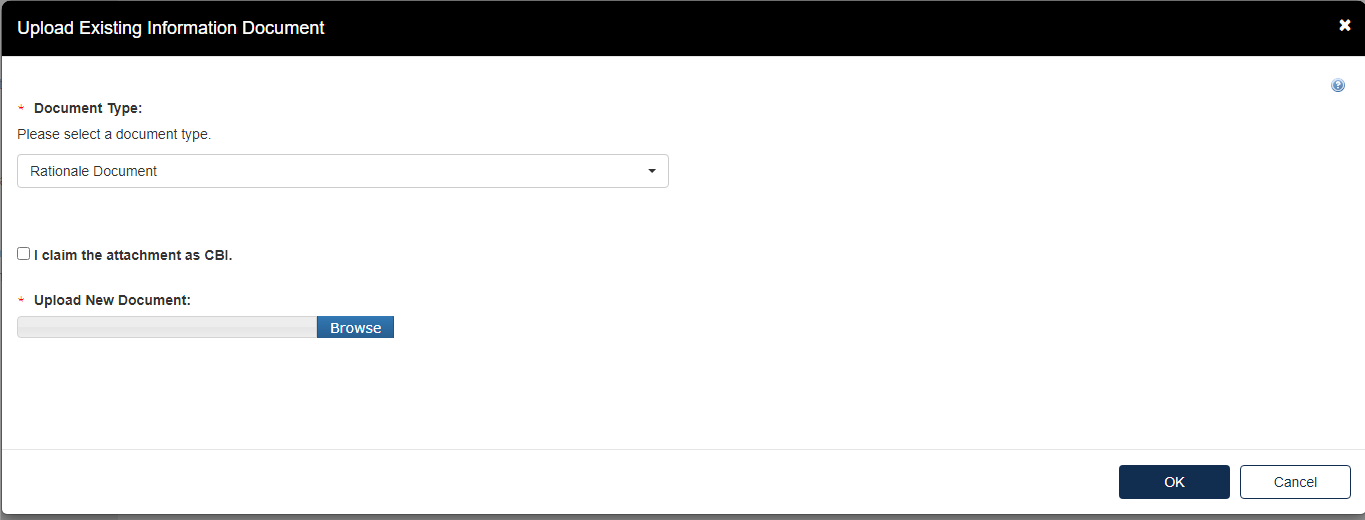
To add a Rationale Document:
Fill out the information highlighted by the red asterisk.
If the attachment has CBI, indicate this, and upload a sanitized document as well.
The type of test response that is indicated will affect what Response Documents are needed. If something is needed and not uploaded you will see the following alerts. You will not be able to progress until the appropriate documents are uploaded for each section.

When the correct documents have been uploaded, click [Next] to continue.
To complete the submission, navigate to Step 5: Submitting a Response.
Option 3: Request an Exemption
Any person required by the Order to conduct tests and submit information on a chemical may apply for an exemption from such requirement (TSCA section 4(c)(1)). EPA will grant an exemption provided information on an equivalent chemical has been submitted in accordance with a rule, order, or consent agreement under TSCA section 4(a), or is being developed in accordance with such a rule, order, or consent agreement, and submission of information by the exemption applicant would be duplicative of information which has been submitted or is being developed in accordance with such rule, order, or consent agreement. See the Order for more information on and requirements of this response option.
To submit a Request an Exemption:
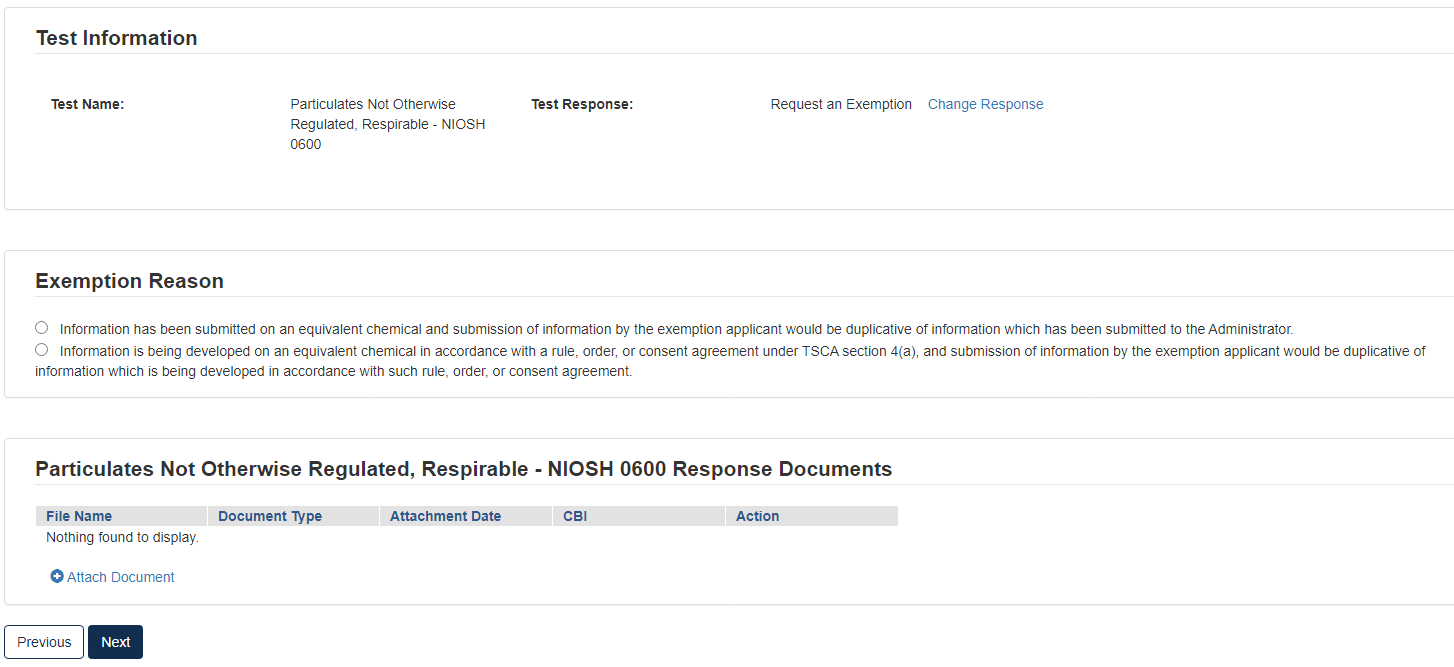
Click the appropriate radio button that coincides with the correct Exemption Reason
Click the blue [Attach Document] link.

Select the appropriate document type. Fill out the information highlighted by the red asterisk.
If the attachment has CBI, indicate this, and upload a sanitized document as well.
If no documents are uploaded, validation errors will prevent the user from moving forward.


Click [Next] to continue.
To complete the submission, navigate to Step 5: Submitting a Response.
Option 4: Claim that You Are Not Subject to the Order
You may claim that you are not subject to the Order if you do not manufacture or process the chemical(s) identified in the Order or you believe the Order was otherwise sent to you in error. An explanation of the basis for your claim, along with appropriate supporting information to substantiate that claim, must accompany your Initial Response in the CDX portal so that EPA can evaluate the claim. See the Order for an explanation of this response option and related requirements.
Option 5: Cease the Manufacture or Processing of the Chemical
If, within 90 days of the effective date of the Order, you intend to cease the manufacture, import or processing of the chemical(s) for which you are subject to by the Order, you may satisfy the requirements of the Order by certifying your intention to the Agency. The Order provides more information on this response option and requirements thereof.
The response chosen in Order Response Options will affect the following pages.
If your institution uses an Alternate Name for the chemical identified, click [Add Alternate Name] and a text box will appear to fill out.

To complete the submission, navigate to Step 5: Submitting a Response.
Option 6: Join a Consortium Response to Order
If you choose to form or join a consortium to share in the cost of developing the required information, you (as well as the other participants of the consortium) must individually in CDX, state your intention to participate in a testing consortium for each specific chemical and specific test.
For your obligations under the Order to be satisfied, the designated lead for the consortium must submit a consortium response to EPA through CDX for the consortium. The response must confirm the formation of the consortium, identify its member companies, and list the testing obligations that the consortium plans to fulfill on behalf of each company by indicating each specific test. The letter must also include contact information for the designated lead of the consortium, who must be domiciled in the U.S. The designated lead for the consortium must submit the Initial Response and required information on behalf of the consortium and its member companies by the deadlines listed the Order. After the results of the last required test of the Order is submitted and EPA accepts the information as complying with the Order, or EPA accepts existing information submitted by the Consortium, EPA will then provide notification of compliance with the Order to the Order Recipients and the designated lead of the consortium.
Even if you agree to jointly submit the information as part of a consortium, each Order Recipient is still required to comply with the Order and is individually liable in the event of any failure to comply with the Order. If the consortium fails to submit the information or meet any of the requirements of the Order on your behalf, you will be in violation of the Order unless you submit the required information or meet the requirement individually.
The Agency has provided a list of the manufacturers and processors that have received the Order at the top of the Order in the Summary Information section. This list of manufacturers and processors can be used to help Order Recipients form a consortium to jointly develop information, consolidate testing and share the cost of testing.
Select Join Consortium, then click [Start New Submission].
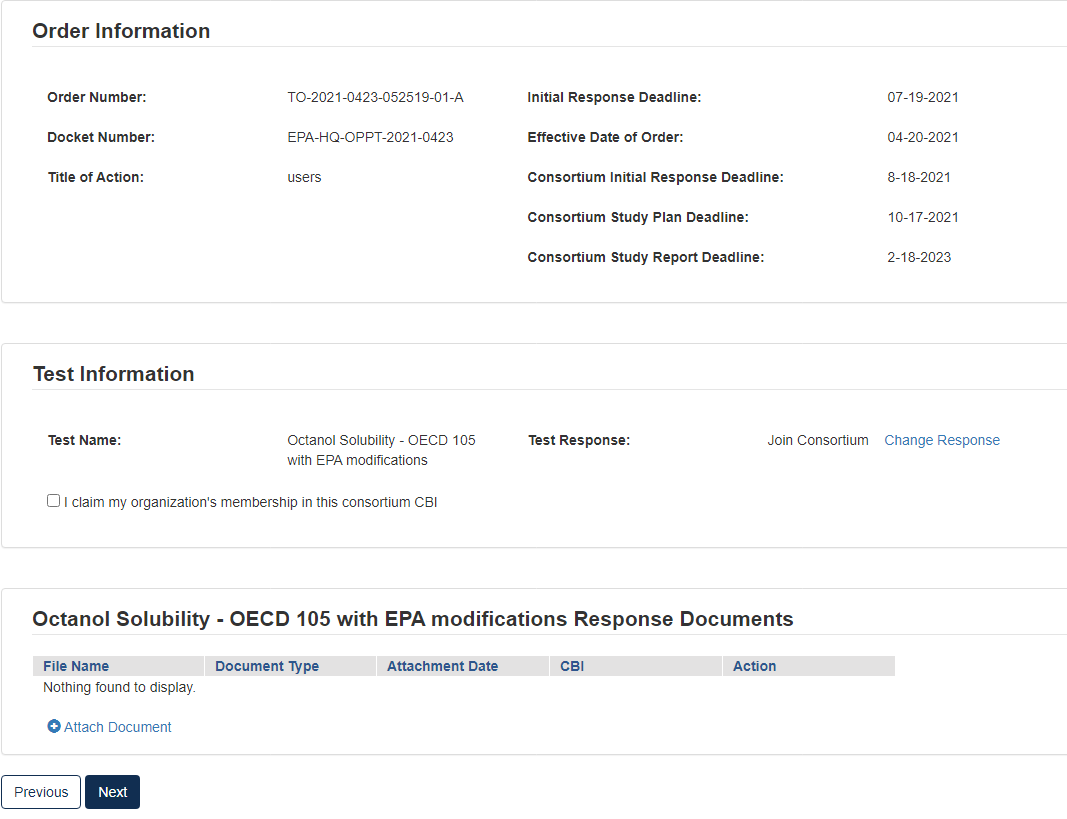
In Test Information, click the checkbox to claim membership.

If you wish to receive emails related to the consortium, click the related checkbox.
Click the blue [Attach Document] link.
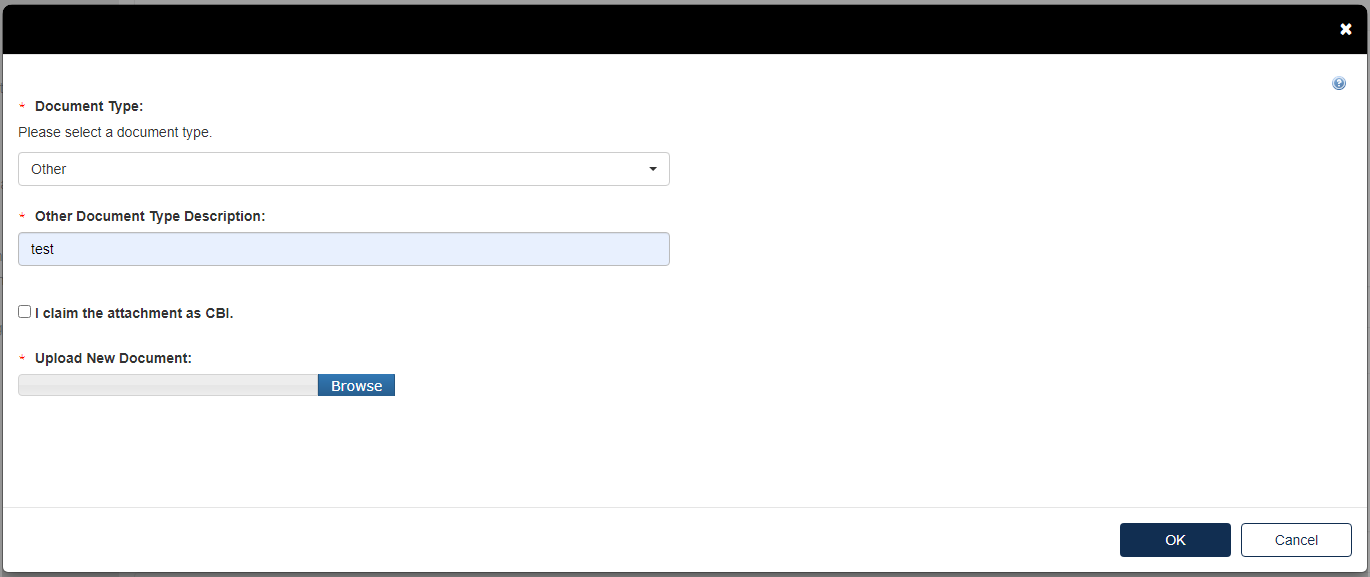
Select the Document Type drop down. Fill out the information highlighted by the red asterisk.
If the attachment has CBI, indicate this, and upload a sanitized document as well.
Click [OK].
Click [Next] to continue.
If at some point during a submission you wish to change the Test Response, all originally uploaded documents will be erased.
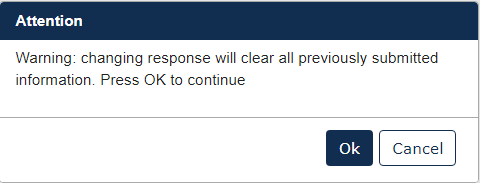
To complete the submission, navigate to Step 5: Submitting a Response.
Creating a Consortium Initial Response to Order
After submitting the Individual Initial Response, if you selected Join a Consortium follow the steps below to complete the submission.
For Consortium Initial Response to Order Submission Type:
Select Consortium Initial Response to Order, then click [Start New Submission]

Choose a secure passphrase that can be remembered for the purposes of accessing the form while it is in progress or the Copy of Record and Communications after submission is completed.

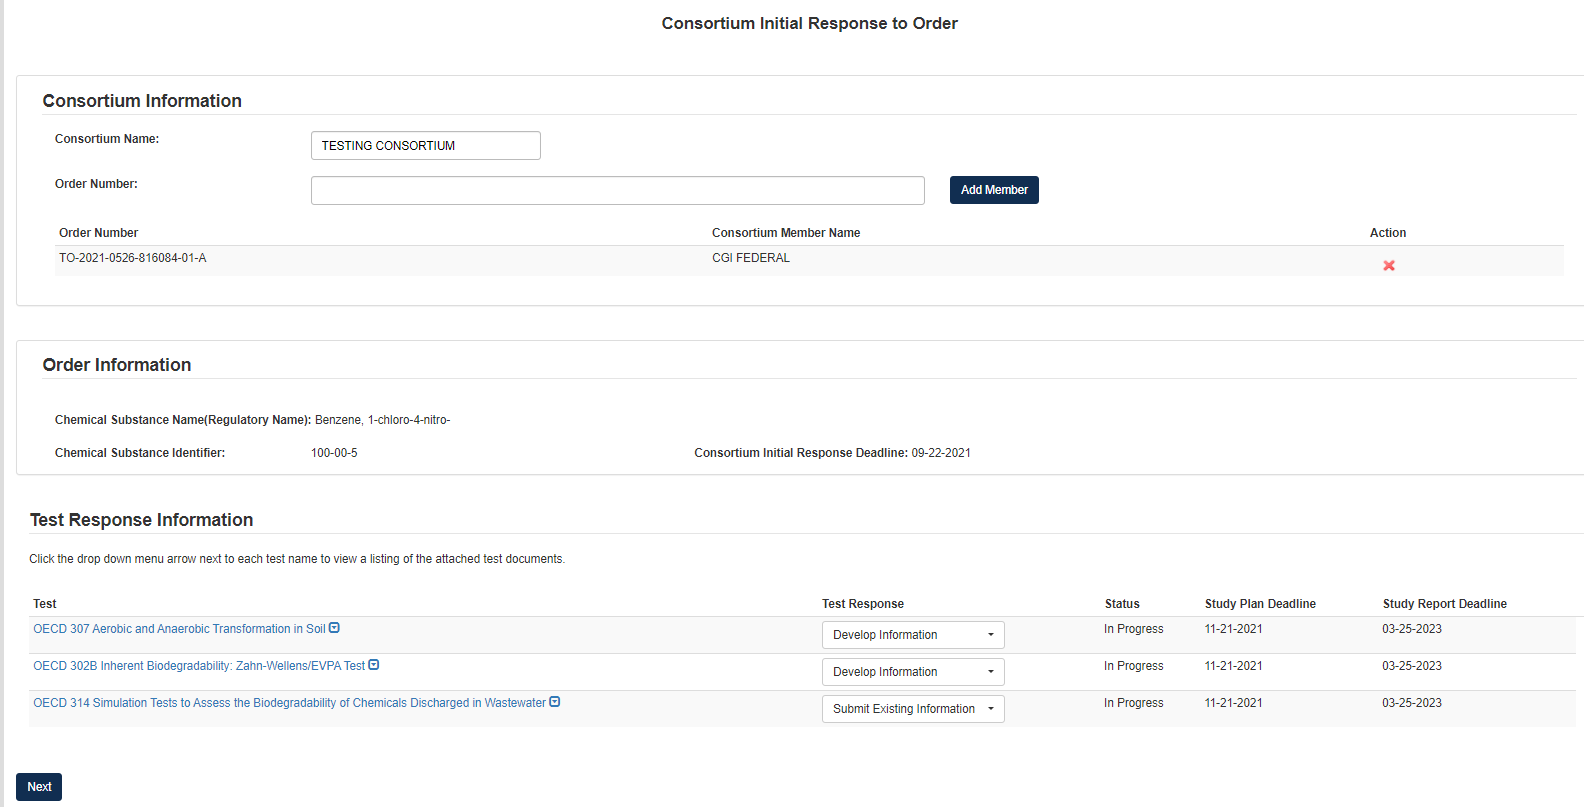
Fill out all relevant information on Consortium Initial Response to Order screen
Add Consortium Name and all Order Numbers associated with the Consortium in question.
Once the Order Number is added to the field, click [Add Member] to load the Member into the form
Add Test Responses via the drop-down list in the Test Response Information section.
These Test Response options include Develop Information and Submit Existing Information
Click [Next].
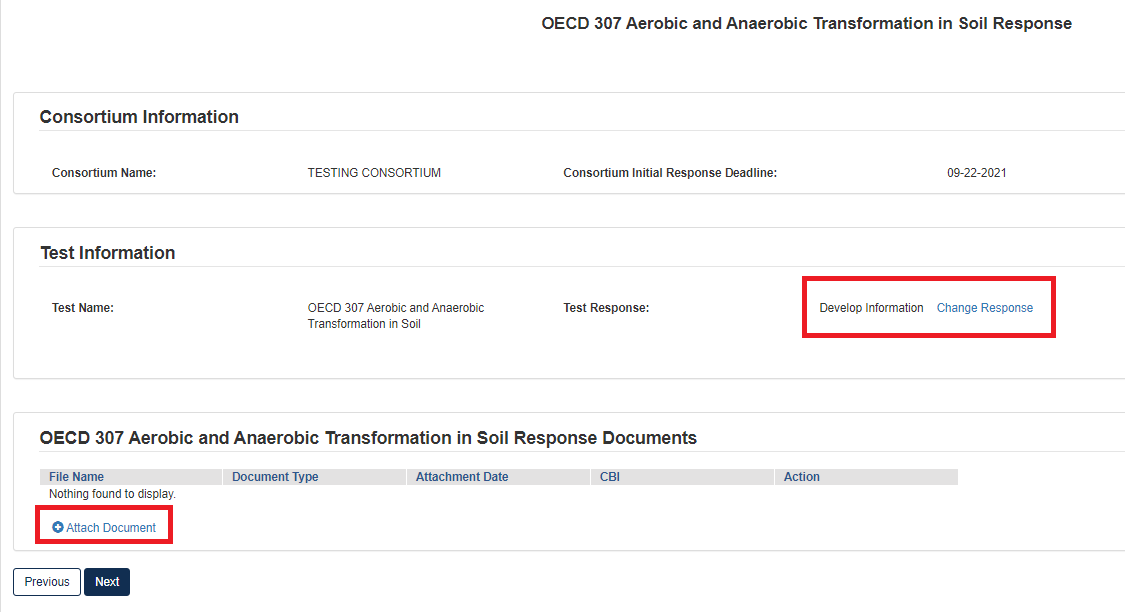
If Test Response is Develop Information:
Choose Develop Information, navigating to the Test Response will offer the choice to Change Response or Attach Document for responding to the Test.
Choosing [Change Response] will return the user to the Consortium Information page where they will be able to change their drop-down choice.
Clicking [Attach Document] will open a pop-up window for attaching a Test Response document.
Once in the pop-up window, choose Document Type and add Document Type Description.
Click [Browse] to upload attachment for response and click checkbox if claiming the attachment as CBI.
If attachment is claimed CBI, a sanitized version is required to be attached as well.
If the same attachment(s) will be used for other Test Responses in the Consortium, the user can check the box to Associate Documents to Other Tests.
If Test Response is Submit Existing Information:
Choose Submit Existing Information, navigating to the Test Response will offer the choice to Change Response or Attach Document for responding to the Test.
Choosing [Change Response] will return the user to the Consortium Information page where they will be able to change their drop-down choice.
Clicking [Attach Document] will open a pop-up window for attaching a Test Response document.
Once in the pop-up window, choose Document Type, which depending on choice will open different options.
If user selects Study Report as the Document Type, they will be required to upload an attachment and complete other fields related to the study being reported.
Fill out all required fields denoted by the red asterisk.
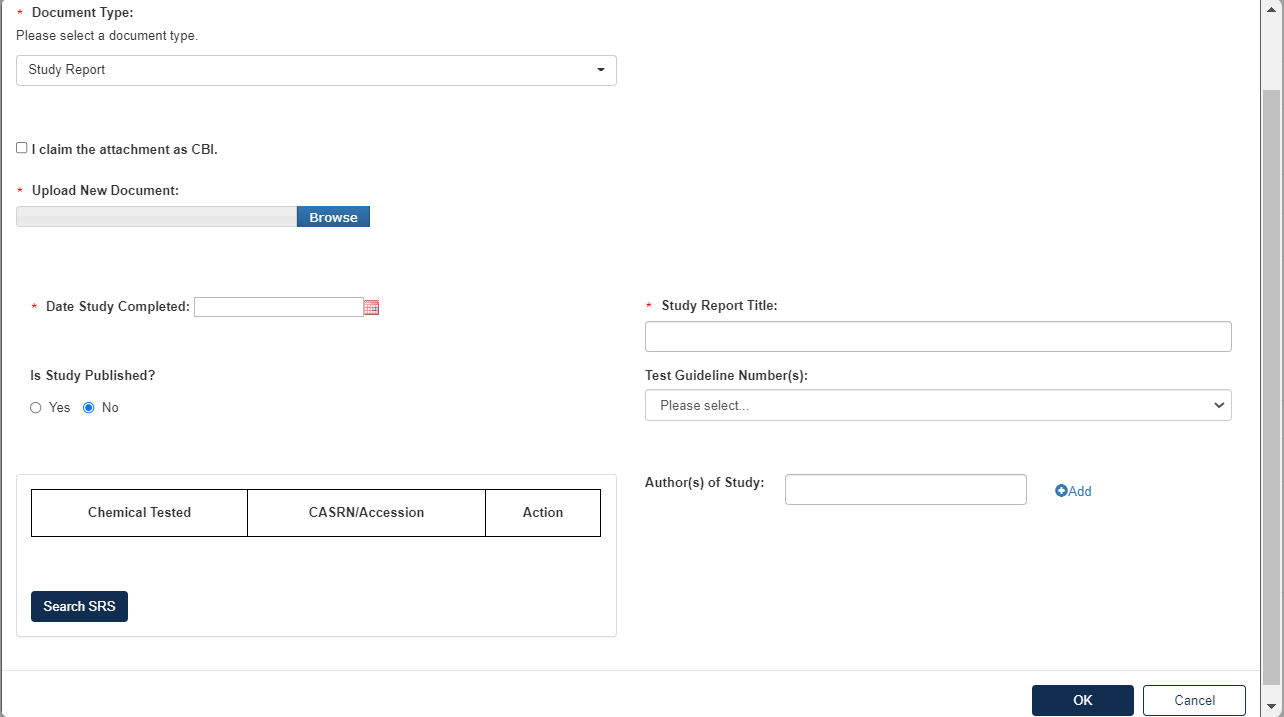
If the user selects Rationale Document, they will be required to upload the Rationale Document as an attachment to the Test Response.
Click [Browse] to upload attachment for response and click checkbox if claiming the attachment as CBI.
If attachment is claimed CBI, a sanitized version is required to be attached as well.
Click [OK] to exit pop-up window.
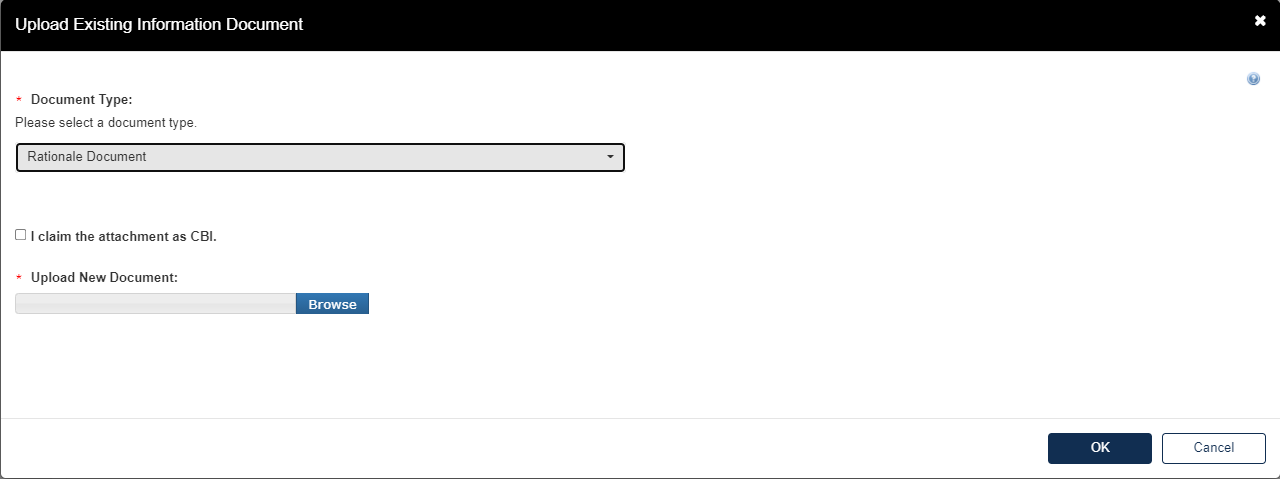
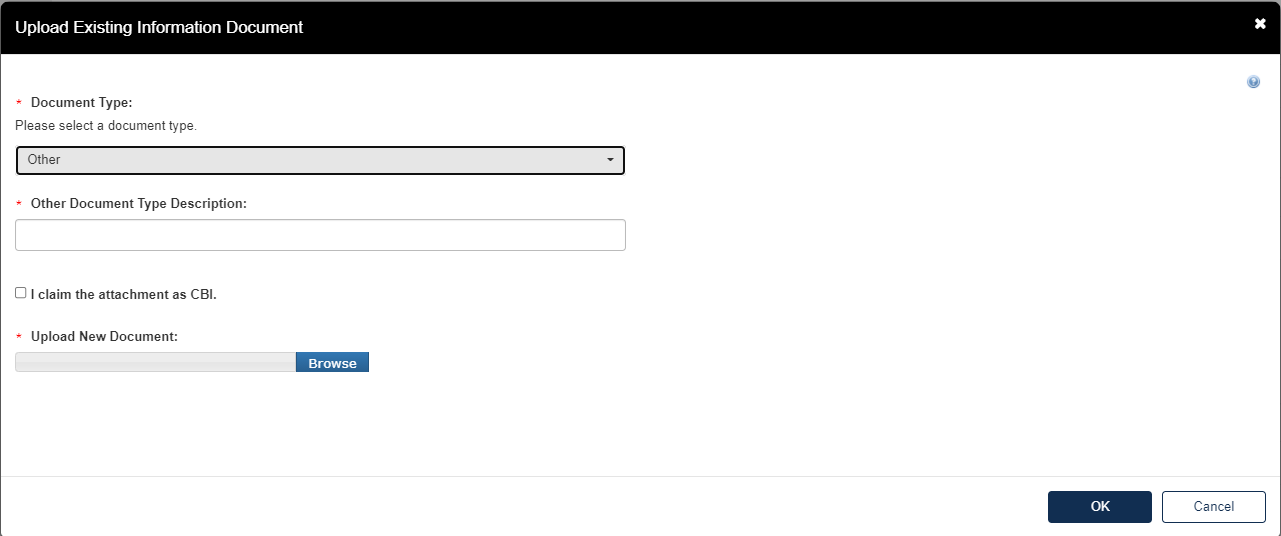
If the user selects Other, they will be required to upload an attachment to the Test Response.
Add Document Type Description for attachment.
Click [Browse] to upload attachment for response and click checkbox if claiming the attachment as CBI.
If attachment is claimed CBI, a sanitized version is required to be attached as well.
Click [OK] to exit pop-up window.
Once all Test Responses are completed, click [Next].
To complete the submission, navigate to Step 5: Submitting a Response.
Once the form has processed and migrated, the Current Action will become Submit Study Plan.
For Submit Study Plan:
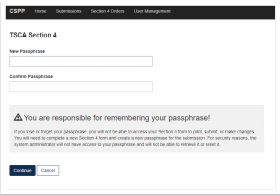
1. Choose a secure passphrase that can be remembered for the purposes of accessing the form while it is in progress or the Copy of Record and Communications after submission is completed.
For any Tests with previous answers of Develop Information, the user will need to respond to the Test in the Study Plan form
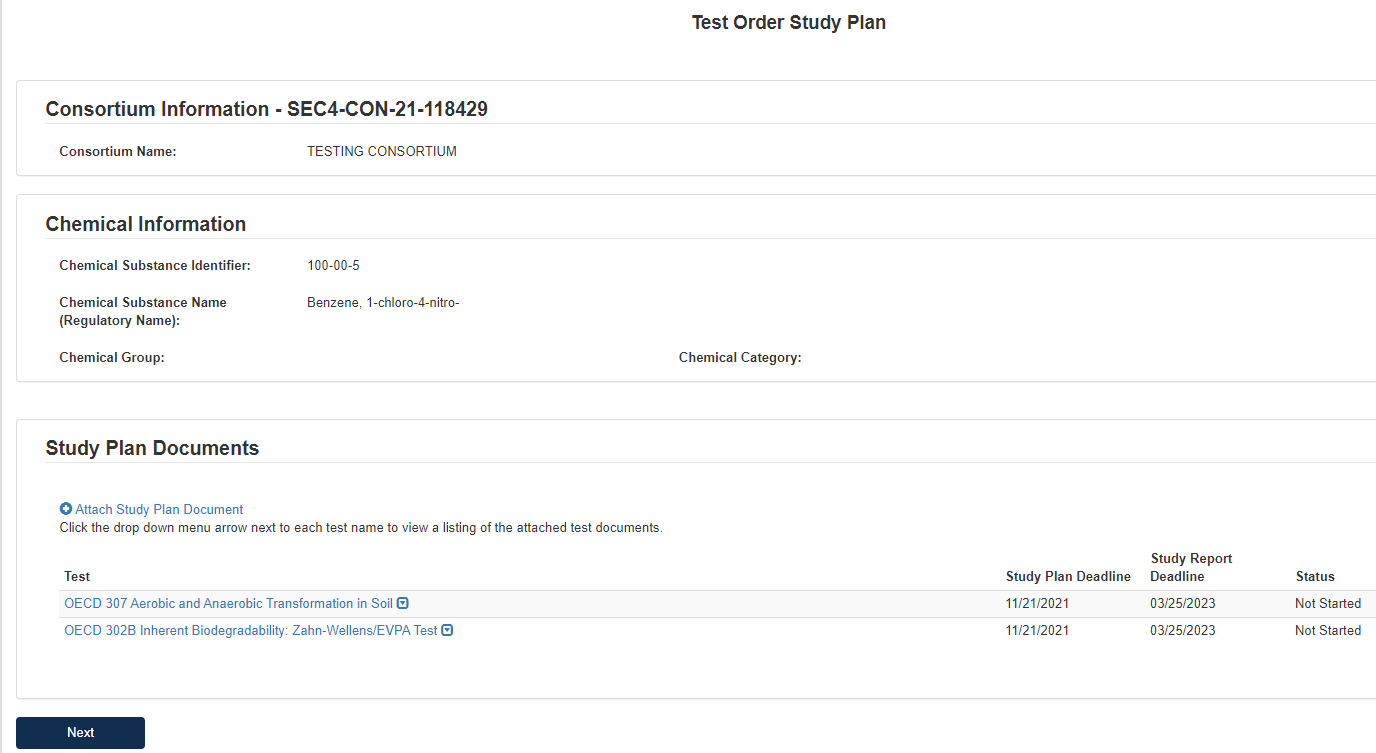
On the first page of the form, the user should click Attach Study Plan Document to open pop-up window for attachments.
Select Test(s) for Attachment in Associate Document to Tests drop-down list.
Select relevant Document Type from drop-down list.
Click [Browse] to upload attachment for response and click checkbox if claiming the attachment as CBI.
If attachment is claimed CBI, a sanitized version is required to be attached as well.
Click [OK] to exit pop-up window.
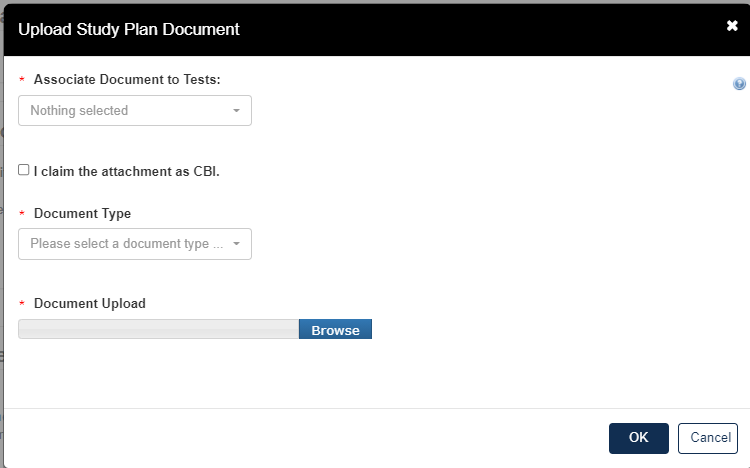
Once all Tests have Study Plan responses, click [Next].
To complete the submission, navigate to Step 5: Submitting a Response.
Once the form has processed and migrated, the Current Action will become Submit Study Report.
For Submit Study Report:
1. Choose a secure passphrase that can be remembered for the purposes of accessing the form while it is In Progress or the Copy of Record and Communications after submission is completed.

For any Tests in the previous Study Plan form, the user will need to respond to the Test in the Study Report form
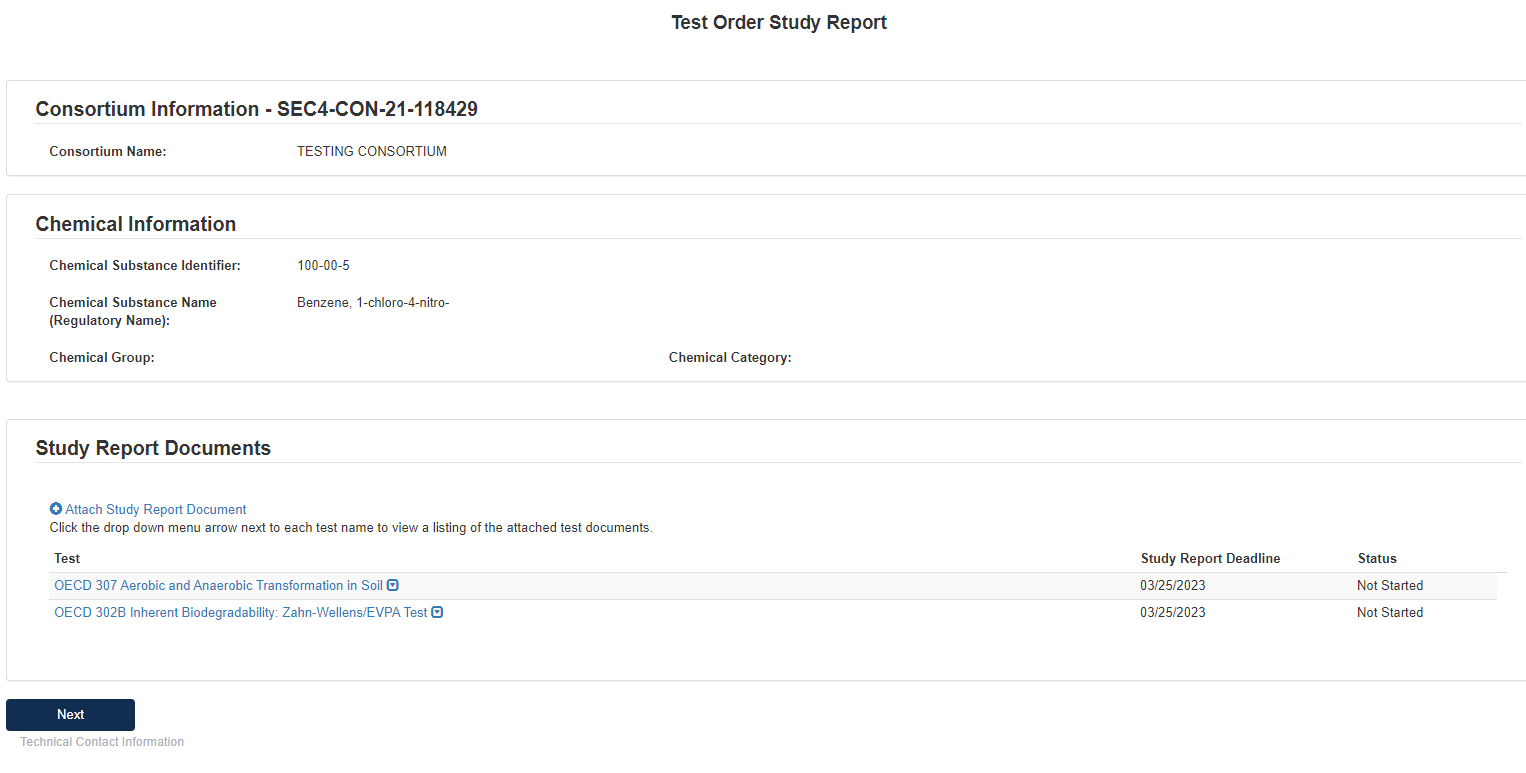
On the first page of the form, the user should click Attach Study Report Document to open pop-up window for attachments.
Select Test(s) for Attachment in Associate Document to Tests drop-down list.
Select relevant Document Type from drop-down list.
Click [Browse] to upload attachment for response and click checkbox if claiming the attachment as CBI.
If attachment is claimed CBI, a sanitized version is required to be attached as well.
If user selects Study Report as the Document Type, they will be required to upload an attachment and complete other fields related to the study being reported.
Fill out all required fields denoted by the red asterisk.
Click [OK] to exit pop-up window.
Once all tests have responses, click [Next].
To complete the submission, navigate to Step 5: Submitting a Response.
Step 3: Test Order Response Deadlines
Depending on the Order requirement, users will be subject to differing deadlines. please refer to the deadlines provided in the Order. Further, not all deadlines listed in the deadline will appear in the CDX application. Consult the Order for all deadlines and associated requirements.
Step 4: Submit Study Plans(s) and Final Study Report
After the Individual Initial Response to Order is completed, the next step is to Submit Draft Study Plan for the tests that are required based on the identification the user submitted to EPA on Step 1.
On the Home page, click the blue link Submit Draft Study Report in the Next Action column.
Choose a secure passphrase that can be remembered for the purposes of accessing the form while it is In Progress or the Copy of Record and Communications after submission is completed.

Click the blue Attach Study Plan Document link.
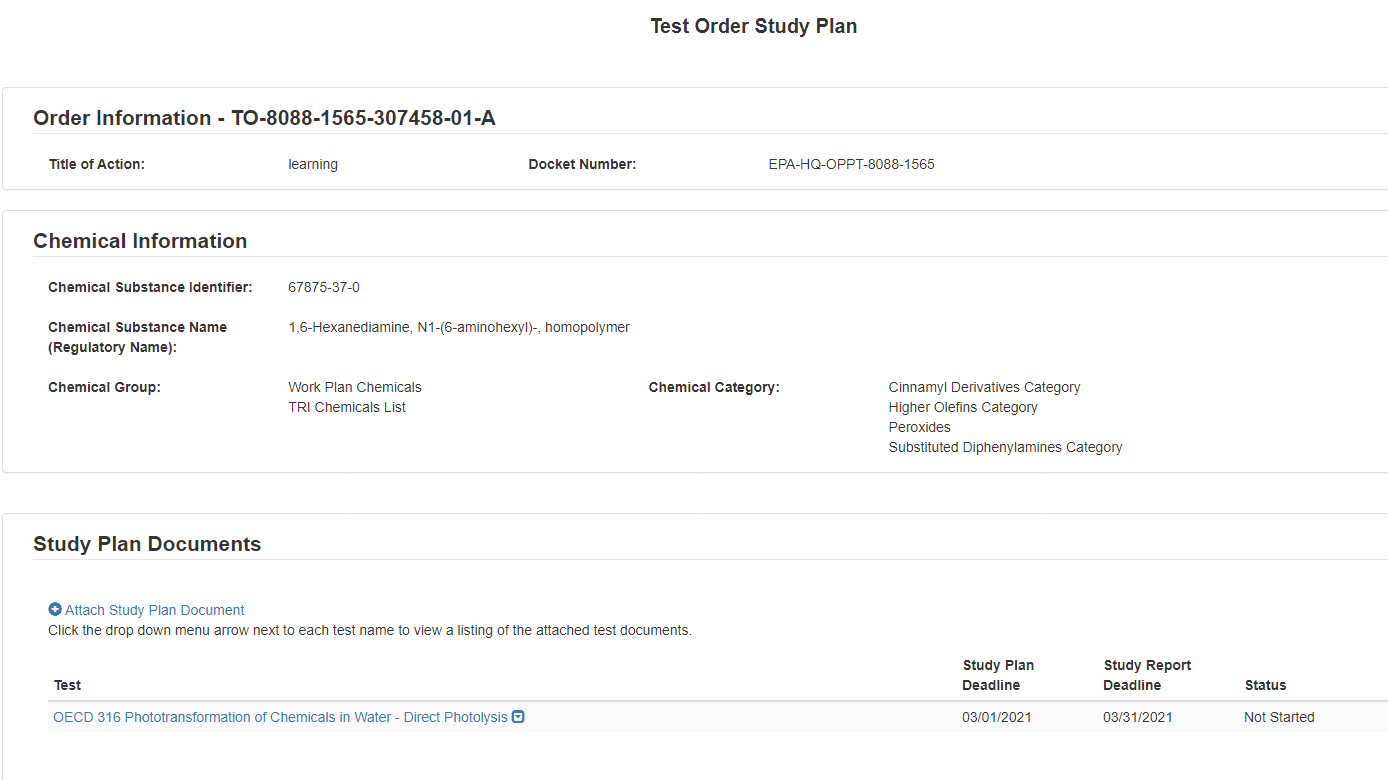
Click the [Associate Documents to Tests] drop down.
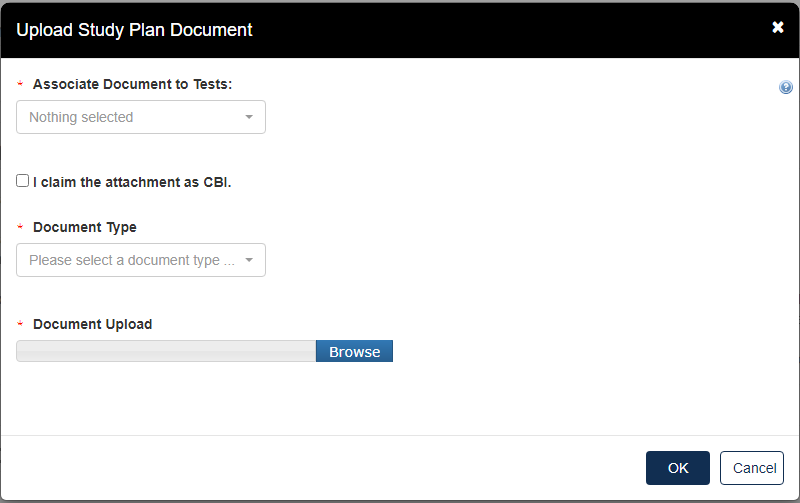
The dropdown menu will list options applicable to the test(s) associated with the documents.
Click the [Document Type] drop down to select the type of document that will be uploaded; Study Plan, Modification, Correspondence, or Study Plan – OHT Template File.
If the attachment has CBI, indicate this, and upload a sanitized document as well.
Click [OK].
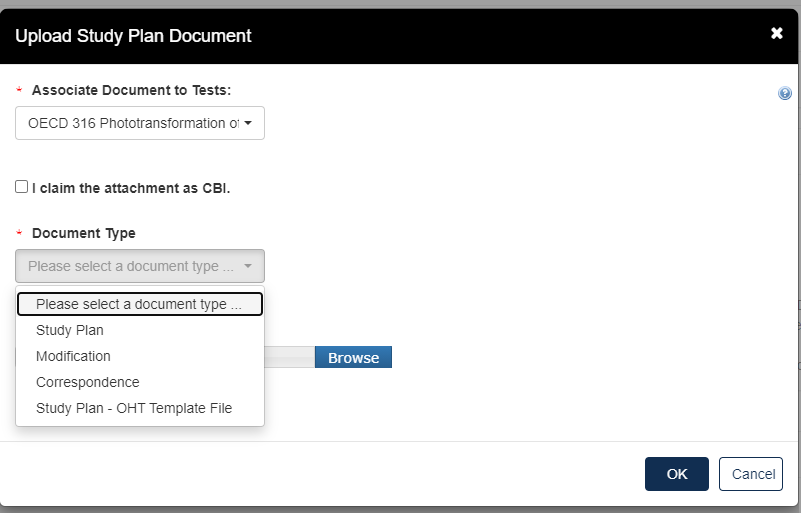
If no documents are uploaded, this alert will show

When documents are uploaded, the user is able to click the blue arrow button to see what has been uploaded, the type, the attachment date, and CBI information.

Click [Next] to continue.
To complete the submission, navigate to Step 5: Submitting a Response.
Step 4b: Submitting a Final Study Plan
After the Draft Study Plan have been submitted (Step 4a), the next action is to submit a Final Study Plan.
On the Home page, click the blue link Submit Draft Study Report in the Next Action column.
Choose a secure passphrase that can be remembered for the purposes of accessing the form while it is In Progress or the Copy of Record and Communications after submission is completed.

Click the blue Attach Study Plan Document link.

Click the [Associate Documents to Tests] drop down.

The dropdown menu will list options applicable to the test(s) associated with the documents.
Click the [Document Type] drop down to select the type of document that will be uploaded; Study Plan, Modification, Correspondence, or Study Plan – OHT Template File.
If the attachment has CBI, indicate this, and upload a sanitized document as well.
Click [OK].

If no documents are uploaded, this alert will show

When documents are uploaded, the user is able to click the blue arrow button to see what has been uploaded, the type, the attachment date, and CBI information.

Click [Next] to continue.
To complete the submission, navigate to Step 5: Submitting a Response.
Step 4c: Submitting a Final Study Report
Once the Final Study Plan has been completed a blue Submit Final Study Report will appear. Click the blue Submit Final Study Report to begin.
![]()
Choose a secure passphrase that can be remembered for the purposes of accessing the form while it is In Progress or the Copy of Record and Communications after submission is completed.

Under Study Report Documents, click the blue Attach Study Report Documents link.
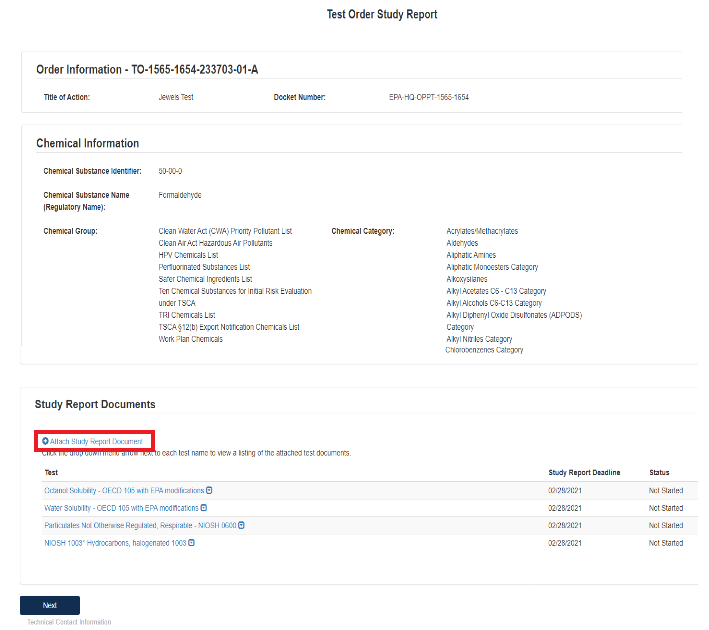
Click the Associate Documents to Tests: drop down to select the appropriate test.
Click the Document Type drop down to select the document type associated with the test.
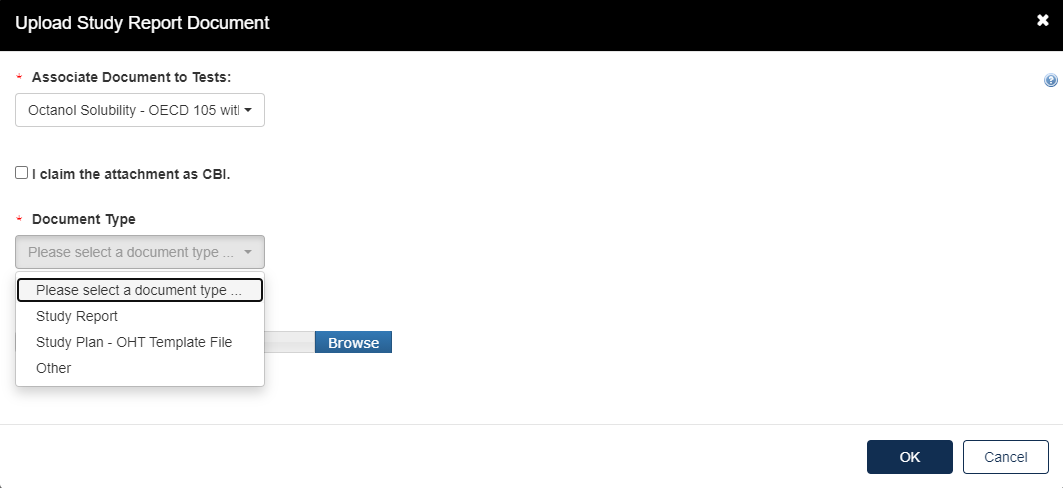
If nothing is uploaded a red alert message will appear.

For Document Type: Study Report, fill out the information highlighted by the red asterisk.
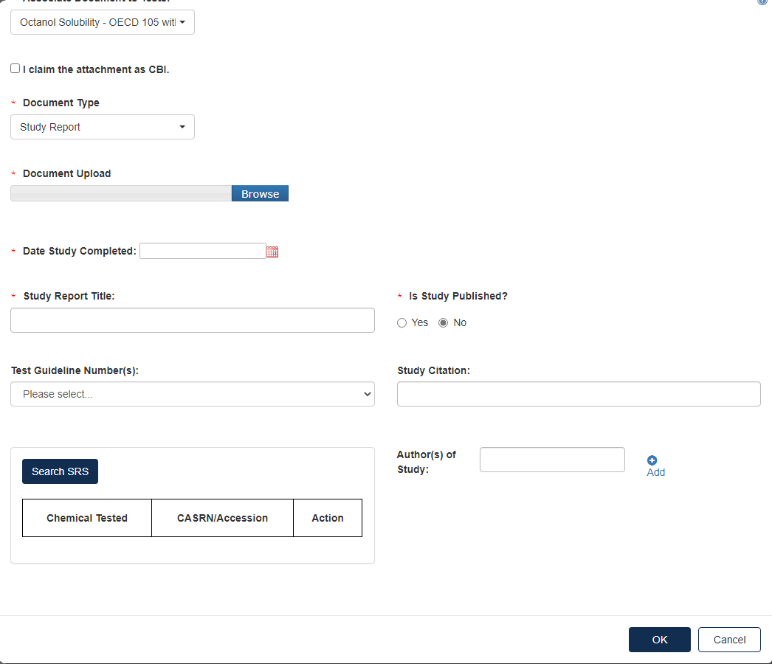
If the attachment has CBI, indicate this. Click [OK] to continue.
When the documents have been successfully uploaded, the Status will change to Passes Validation. Click [Next] to continue.

To complete the submission, navigate to Step 5: Submitting a Response.
When all submissions are completed, you will be able to download or unlock to edit the document from the main queue.

Step 5: Submitting a Response
The submission steps are common and required across all the different forms and stages of the response process. Please follow these steps to complete the submission process to EPA.
Technical Contact Information
Fill out all required Technical Contact Information denoted by red asterisk or click [Copy CDX Registration] to fill in with the information from CDX.
If Technical Contact Information is CBI, please check the CBI checkbox.
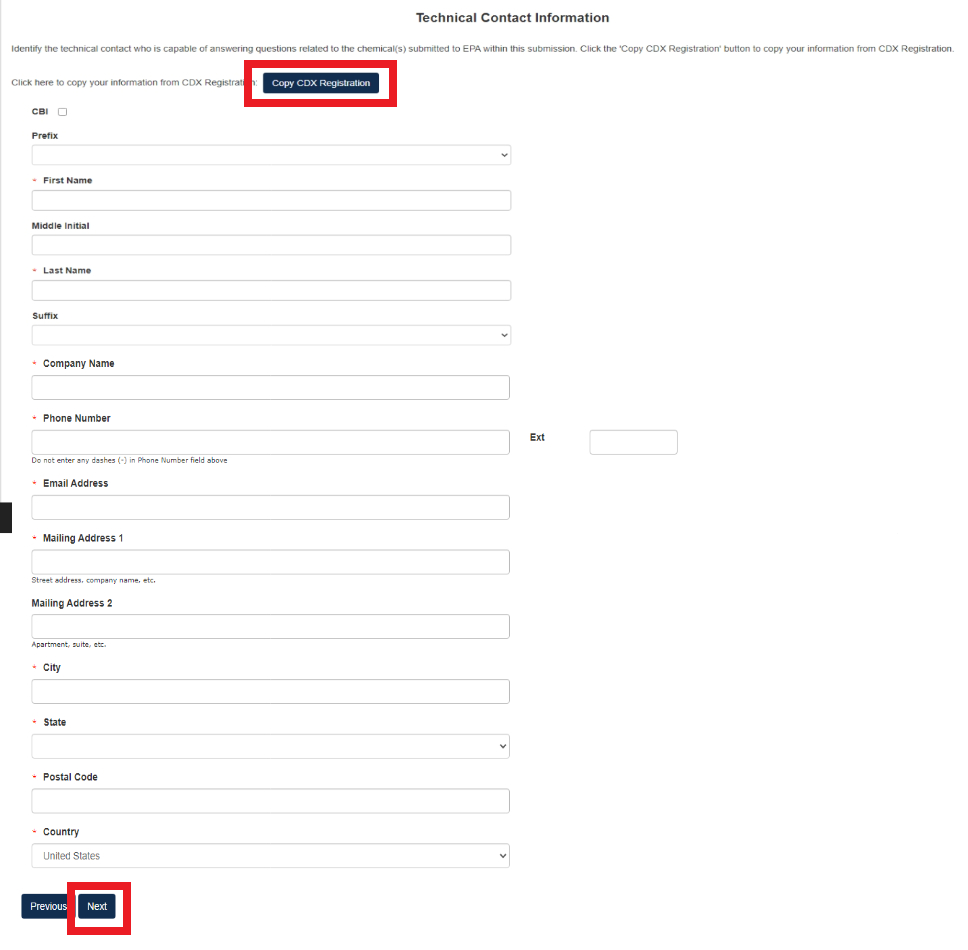
Click [Next] to continue.
Submitting Official Information:
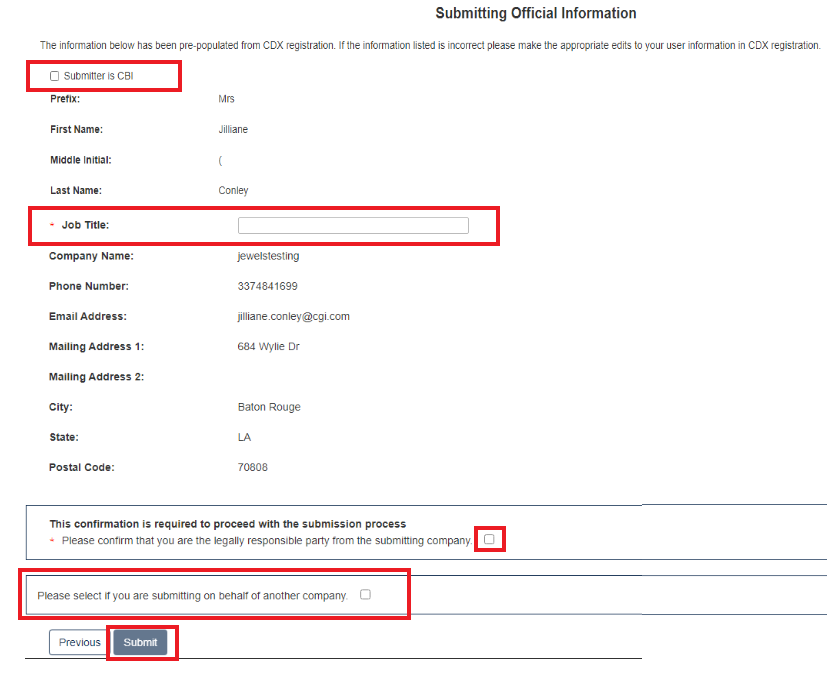
If this is CBI, indicate this by clicking the CBI checkbox.
Fill out Job Title of this page.
Click the checkbox to Confirm and Proceed.
If you are submitting on behalf of another company, indicate that by clicking the checkbox.
Click [Submit] to continue.
Instructions for Substantiating Confidential Business Information (CBI) Claims, if necessary.
If any CBI claims have been made, the [Continue] button on the Submitting Official Information page will display the CBI Substantiation page.
To add the corresponding substantiation documents, select the [Attach Document for CBI Substantiation] link.
To opt-out from providing the CBI Substantiation documents, check the Substantiation Opt.
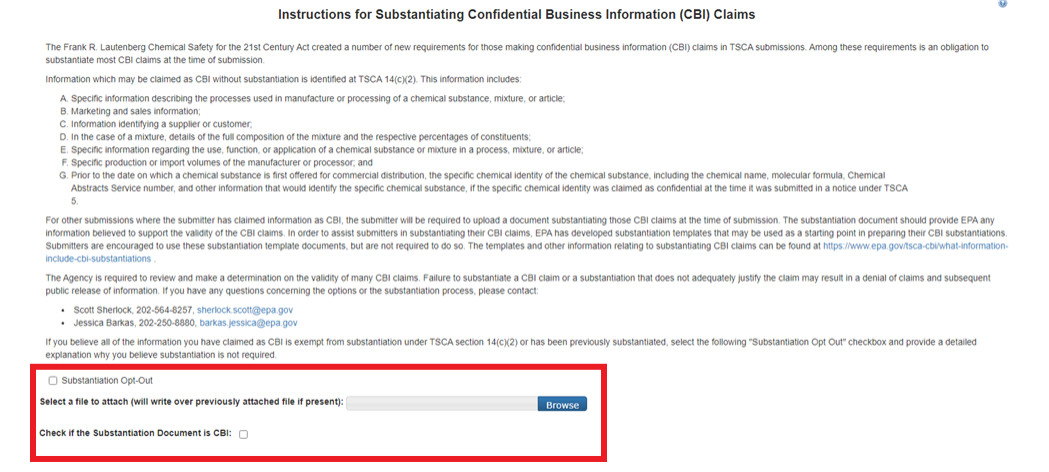
Once this has been completed, the buttons [Previous] and [Submit] will appear.
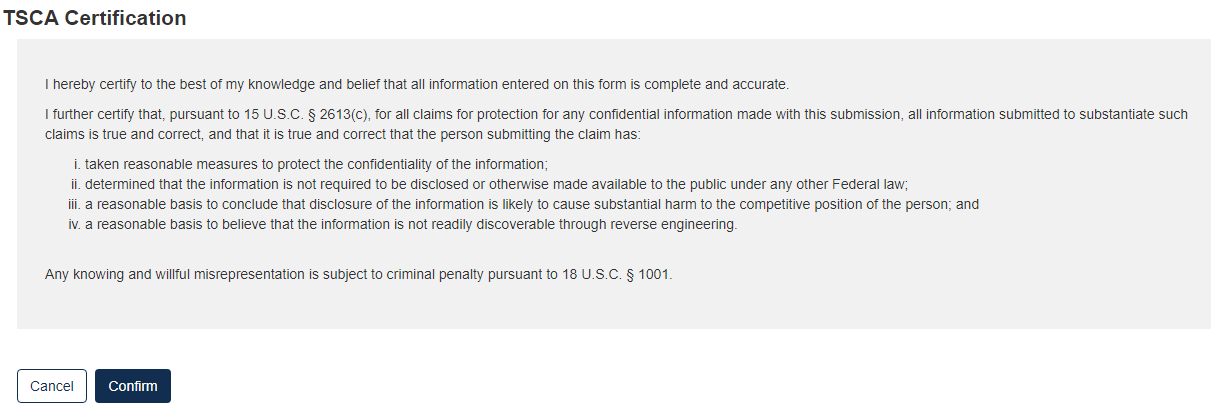
Click the [Confirm] button to begin the submission process.
The form validation will identify any errors in the form. Otherwise, No Validation Errors Found will display
Click the [PDF Generation] button to generate the PDF for the submission. The [Regular PDF] button will display any information marked as CBI while the [Sanitized PDF] button will provide such information, masked. The PDF(s) can be downloaded for external storage.

Click the [Sign, Encrypt and Submit] button to access the eSignature Widget

Click [Accept]
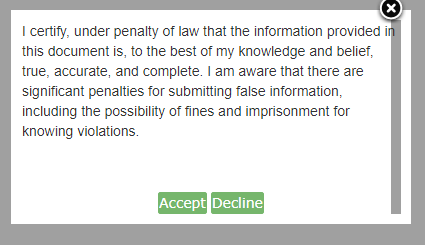
Complete the eSignature Widget.
Enter the Authentication Password and enter the Answer to the Verification Question.
Click the [Sign] button to complete the submission.
Click the [X] in the upper right corner of the eSignature Widget window to cancel the submission.


Click the [Home] button to return to the Section 4 Home Page.
Select Submissions at the top to view the Status of a submitted form.
© 2021 CGI Federal
| File Type | application/vnd.openxmlformats-officedocument.wordprocessingml.document |
| File Title | Section 4(a)(2) of the Toxic Substances Control Act User Guide |
| Subject | United States Environmental Protection Agency Office of Pollution Prevention an |
| Author | Brigman, William K |
| File Modified | 0000-00-00 |
| File Created | 2021-10-14 |
© 2026 OMB.report | Privacy Policy
