FMVSS No. 218 Motorcycle Helmets
FMVSS No 218 Motorcycle Helmets.docx
Motorcycle Helmets (Labeling)
FMVSS No. 218 Motorcycle Helmets
OMB: 2127-0518
§571.218 Standard No. 218; Motorcycle helmets.
S1. Scope. This standard establishes minimum performance requirements for helmets designed for use by motorcyclists and other motor vehicle users.
S2. Purpose. The purpose of this standard is to reduce deaths and injuries to motorcyclists and other motor vehicle users resulting from head impacts.
S3. Application. This standard applies to all helmets designed for use by motorcyclists and other motor vehicle users.
S4. Definitions.
Basic plane means a plane through the centers of the right and left external ear openings and the lower edge of the eye sockets (Figure 1) of a reference headform (Figure 2) or test headform.
Discrete size means a numerical value that corresponds to the diameter of an equivalent circle representing the helmet interior in inches (±0.25 inch) or to the circumference of the equivalent circle in centimeters (±0.64 centimeters).
Helmet positioning index means the distance in inches, as specified by the manufacturer, from the lowest point of the brow opening at the lateral midpoint of the helmet to the basic plane of a reference headform, when the helmet is firmly and properly positioned on the reference headform.
Impact site means the point on the helmet where the helmet shell first contacts the test anvil during the impact attenuation test.
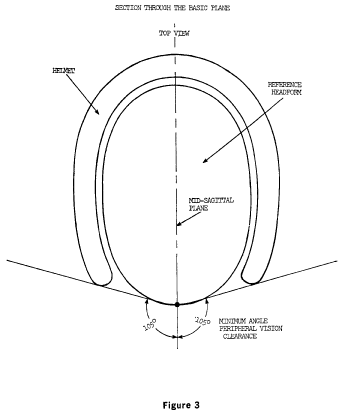
Midsagittal plane means a longitudinal plane through the apex of a reference headform or test headform that is perpendicular to the basic plane (Figure 3).
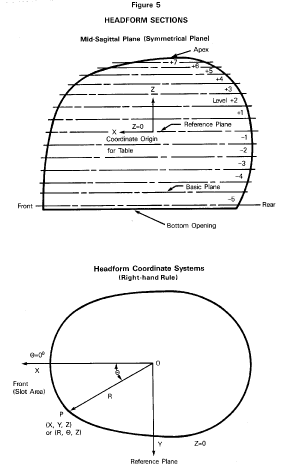
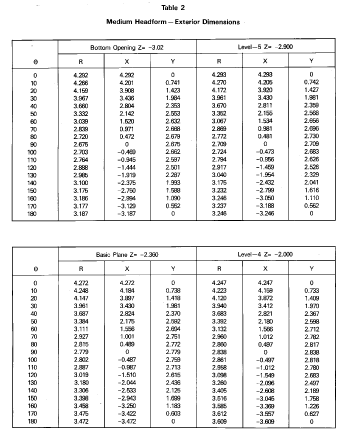
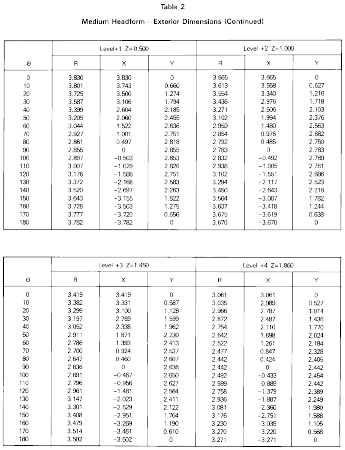
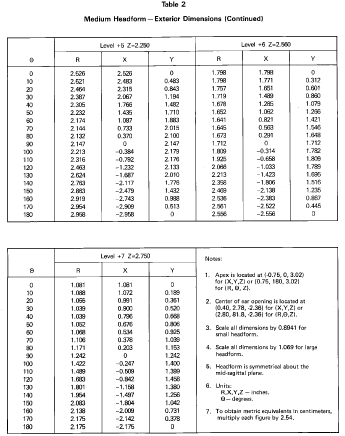
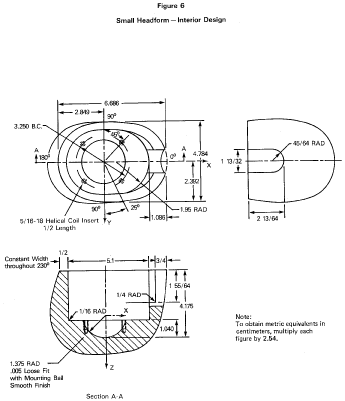
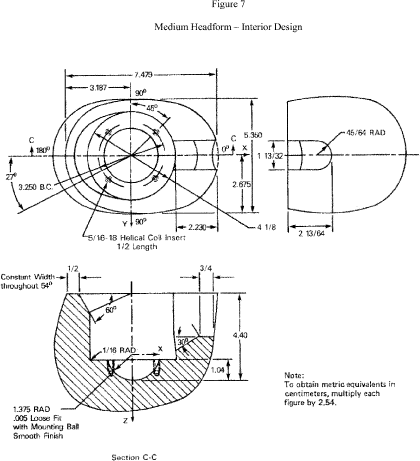
Reference headform means a measuring device contoured to the dimensions of one of the three headforms described in Table 2 and Figures 5 through 8 with surface markings indicating the locations of the basic, mid-sagittal, and reference planes, and the centers of the external ear openings.
Reference plane means a plane above and parallel to the basic plane on a reference headform or test headform (Figure 2) at the distance indicated in Table 2.
Retention system means the complete assembly by which the helmet is retained in position on the head during use.
Test headform means a test device contoured to the dimensions of one of the three headforms described in Table 2 and Figures 5 through 8 with surface markings indicating the locations of the basic, mid-sagittal, and reference planes.
S5. Requirements. Each helmet shall meet the requirements of S5.1, S5.2, and S5.3 when subjected to any conditioning procedure specified in S6.4, and tested in accordance with S7.1, S7.2, and S7.3.
S5.1 Impact attenuation. When an impact attenuation test is conducted in accordance with S7.1, all of the following requirements shall be met:
(a) Peak accelerations shall not exceed 400g;
(b) Accelerations in excess of 200g shall not exceed a cumulative duration of 2.0 milliseconds; and
(c) Accelerations in excess of 150g shall not exceed a cumulative duration of 4.0 milliseconds.
S5.2 Penetration. When a penetration test is conducted in accordance with S7.2, the striker shall not contact the surface of the test headform.
S5.3 Retention system.
S5.3.1 When tested in accordance with S7.3:
(a) The retention system or its components shall attain the loads specified without separation; and
(b) The adjustable portion of the retention system test device shall not move more than 1 inch (2.5 cm) measured between preliminary and test load positions.
S5.3.2 Where the retention system consists of components which can be independently fastened without securing the complete assembly, each such component shall independently meet the requirements of S5.3.1.
S5.4 Configuration. Each helmet shall have a protective surface of continuous contour at all points on or above the test line described in S6.2.3. The helmet shall provide peripheral vision clearance of at least 105° to each side of the mid-sagittal plane, when the helmet is adjusted as specified in S6.3. The vertex of these angles, shown in Figure 3, shall be at the point on the anterior surface of the reference headform at the intersection of the mid-sagittal and basic planes. The brow opening of the helmet shall be at least 1 inch (2.5 cm) above all points in the basic plane that are within the angles of peripheral vision (see Figure 3).
S5.5 Projections. A helmet shall not have any rigid projections inside its shell. Rigid projections outside any helmet's shell shall be limited to those required for operation of essential accessories, and shall not protrude more than 0.20 inch (5 mm).
S5.6 Labeling.
S5.6.1 On a label or labels separate from the certification label required by S5.6.2, each helmet shall be labeled permanently and legibly, in a manner such that the label(s) can be read easily without removing padding or any other permanent part, with the following:
(a) Manufacturer's name.
(b) Discrete size.
(c) Month and year of manufacture. This may be spelled out (for example, June 2010), or expressed in numerals (for example, 6/10).
(d) Instructions to the purchaser as follows:
(1) “Shell and liner constructed of (identify type(s) of materials).”
(2) “Helmet can be seriously damaged by some common substances without damage being visible to the user. Apply only the following: (Recommended cleaning agents, paints, adhesives, etc., as appropriate).”
(3) “Make no modifications. Fasten helmet securely. If helmet experiences a severe blow, return it to the manufacturer for inspection, or destroy it and replace it.”
(4) Any additional relevant safety information should be applied at the time of purchase by means of an attached tag, brochure, or other suitable means.
S5.6.2 Certification. Each helmet shall be labeled permanently and legibly with a label, constituting the manufacturer's certification that the helmet conforms to the applicable Federal motor vehicle safety standards, that is separate from the label(s) used to comply with S5.6.1, and complies with paragraphs (a) through (c) of this section.
(a) Content, format, and appearance. The label required by paragraph S5.6.2 shall have the following content, format, and appearance:
(1) The symbol “DOT,” horizontally centered on the label, in letters not less than 0.38 inch (1.0 cm) high.
(2) The term “FMVSS No. 218,” horizontally centered beneath the symbol DOT, in letters not less than 0.09 inches (0.23 cm) high.
(3) The word “CERTIFIED,” horizontally centered beneath the term “FMVSS No. 218,” in letters not less than 0.09 inches (0.23 cm) high.
(4) The precise model designation, horizontally centered above the symbol DOT, in letters and/or numerals not less than 0.09 inch (0.23 cm) high.
(5) The manufacturer's name and/or brand, horizontally centered above the model designation, in letters and/or numerals not less than 0.09 inch (0.23 cm) high.
(6) All symbols, letters and numerals shall be in a color that contrasts with the background of the label.
(b) Other information. No information, other than the information specified in subparagraph (a), shall appear on the label.
(c) Location. The label shall appear on the outer surface of the helmet and be placed so that it is centered laterally with the horizontal centerline of the DOT symbol located a minimum of 1 inch (2.5 cm) and a maximum of 3 inches (7.6 cm) from the bottom edge of the posterior portion of the helmet.
S5.7 Helmet positioning index. Each manufacturer of helmets shall establish a positioning index for each helmet he manufactures. This index shall be furnished immediately to any person who requests the information, with respect to a helmet identified by manufacturer, model designation, and size.
S6. Preliminary test procedures. Before subjecting a helmet to the testing sequence specified in S7., prepare it according to the procedures in S6.1, S6.2, and S6.3.
S6.1 Selection of appropriate headform.
S6.1.1 A helmet with a manufacturer's designated discrete size or size range which does not exceed 63⁄4 (European size: 54) is tested on the small headform. A helmet with a manufacturer's designated discrete size or size range which exceeds 63⁄4 , but does not exceed 71⁄2 (European size: 60) is tested on the medium headform. A helmet with a manufacturer's designated discrete size or size range which exceeds 71⁄2 is tested on the large headform.
S6.1.2 A helmet with a manufacturer's designated size range which includes sizes falling into two or all three size ranges described in S6.1.1 is tested on each headform specified for each size range.
S6.2 Reference marking.
S6.2.1 Use a reference headform that is firmly seated with the basic and reference planes horizontal. Place the complete helmet to be tested on the appropriate reference headform, as specified in S6.1.1 and S6.1.2.
S6.2.2 Apply a 10-pound (4.5 kg) static vertical load through the helmet's apex. Center the helmet laterally and seat it firmly on the reference headform according to its helmet positioning index.
S6.2.3 Maintaining the load and position described in S6.2.2, draw a line (hereinafter referred to as “test line”) on the outer surface of the helmet coinciding with portions of the intersection of that service with the following planes, as shown in Figure 2:
(a) A plane 1 inch (2.5 cm) above and parallel to the reference plane in the anterior portion of the reference headform;
(b) A vertical transverse plane 2.5 inches (6.4 cm) behind the point on the anterior surface of the reference headform at the intersection of the mid-sagittal and reference planes;
(c) The reference plane of the reference headform;
(d) A vertical transverse plane 2.5 inches (6.4. cm) behind the center of the external ear opening in a side view; and
(e) A plane 1 inch (2.5 cm) below and parallel to the reference plane in the posterior portion of the reference headform.
S6.3 Helmet positioning.
S6.3.1 Before each test, fix the helmet on a test headform in the position that conforms to its helmet positioning index. Secure the helmet so that it does not shift position before impact or before application of force during testing.
S6.3.2 In testing as specified in S7.1 and S7.2, place the retention system in a position such that it does not interfere with free fall, impact or penetration.
S6.4 Conditioning.
S6.4.1 Immediately before conducting the testing sequence specified in S7, condition each test helmet in accordance with any one of the following procedures:
(a) Ambient conditions. Expose to any temperature from 61 °F to and including 79 °F (from 16 °C to and including 26 °C) and any relative humidity from 30 to and including 70 percent for a minimum of 4 hours.
(b) Low temperature. Expose to any temperature from 5 °F to and including 23 °F (from −15 °C to and including −5 °C) for a minimum of 4 hours and no more than 24 hours.
(c) High temperature. Expose to any temperature from 113 °F to and including 131 °F (from 45 °C to and including 55 °C) for a minimum of 4 hours and no more than 24 hours.
(d) Water immersion. Immerse in water at any temperature from 61 °F to and including 79 °F (from 16 °C to and including 26 °C) for a minimum of 4 hours and no more than 24 hours.
S6.4.2 If during testing, as specified in S7.1.3 and S7.2.3, a helmet is returned to the conditioning environment before the time out of that environment exceeds 4 minutes, the helmet is kept in the environment for a minimum of 3 minutes before resumption of testing with that helmet. If the time out of the environment exceeds 4 minutes, the helmet is returned to the environment for a minimum of 3 minutes for each minute or portion of a minute that the helmet remained out of the environment in excess of 4 minutes or for a maximum of 12 hours, whichever is less, before the resumption of testing with that helmet.
S7. Test conditions.
S7.1 Impact attenuation test.
S7.1.1 Impact attenuation is measured by determining acceleration imparted to an instrumented test headform on which a complete helmet is mounted as specified in S6.3, when it is dropped in guided free fall upon a fixed hemispherical anvil and a fixed flat steel anvil.
S7.1.2 Each helmet is impacted at four sites with two successive impacts at each site. Two of these sites are impacted upon a flat steel anvil and two upon a hemispherical steel anvil as specified in S7.1.10 and S7.1.11. The impact sites are at any point on the area above the test line described in paragraph S6.2.3, and separated by a distance not less than one-sixth of the maximum circumference of the helmet in the test area. For each site, the location where the helmet first contacts the anvil on the second impact shall not be greater than 0.75 inch (1.9 cm) from the location where the helmet first contacts the anvil on the first impact.
S7.1.3 Impact testing at each of the four sites, as specified in S7.1.2, shall start at two minutes, and be completed by four minutes, after removal of the helmet from the conditioning environment.
S7.1.4 (a) The guided free fall drop height for the helmet and test headform combination onto the hemispherical anvil shall be such that the impact speed is any speed from 16.4 ft/s to and including 17.7 ft/s (from 5.0 m/s to and including 5.4 m/s).
(b) The guided free fall drop height for the helmet and test headform combination onto the flat anvil shall be such that the impact speed is any speed from 19.0 ft/s to and including 20.3 ft/s (from 5.8 m/s to and including 6.2 m/s).
S7.1.5 Test headforms for impact attenuation testing are constructed of magnesium alloy (K-1A), and exhibit no resonant frequencies below 2,000 Hz.
S7.1.6 The monorail drop test system is used for impact attenuation testing.
S7.1.7 The weight of the drop assembly, as specified in Table 1, is the combined weight of the test headform and the supporting assembly for the drop test. The weight of the supporting assembly is not less than 2.0 lbs. and not more than 2.4 lbs. (0.9 to 1.1 kg). The supporting assembly weight for the monorail system is the drop assembly weight minus the combined weight of the test headform, the headform's clamp down ring, and its tie down screws.
S7.1.8 The center of gravity of the test headform is located at the center of the mounting ball on the supporting assembly and lies within a cone with its axis vertical and forming a 10° included angle with the vertex at the point of impact. The center of gravity of the drop assembly lies within the rectangular volume bounded by x = −0.25 inch (−0.64 cm), x = 0.85 inch (2.16 cm), y = 0.25 inch (0.64 cm), and y = −0.25 inch (−0.64 cm) with the origin located at the center of gravity of the test headform. The rectangular volume has no boundary along the z-axis. The x-y-z axes are mutually perpendicular and have positive or negative designations in accordance with the right-hand rule (See Figure 5). The origin of the coordinate axes also is located at the center of the mounting ball on the supporting assembly (See Figures 6, 7, and 8). The x-y-z axes of the test headform assembly on a monorail drop test equipment are oriented as follows: From the origin, the x-axis is horizontal with its positive direction going toward and passing through the vertical centerline of the monorail. The positive z-axis is downward. The y-axis also is horizontal and its direction can be decided by the z- and x-axes, using the right-hand rule.
S7.1.9 The acceleration transducer is mounted at the center of gravity of the test headform with the sensitive axis aligned to within 5° of vertical when the test headform assembly is in the data impact position. The acceleration data channel complies with the SAE Recommended Practice J211/1, revised March 1995 (incorporated by reference, see §571.5) requirements for channel class 1,000.”
S7.1.10 The flat anvil is constructed of steel with a 5-inch (12.7 cm) minimum diameter impact face, and the hemispherical anvil is constructed of steel with a 1.9 inch (4.8 cm) radius impact face.
S7.1.11 The rigid mount for both of the anvils consists of a solid mass of at least 300 pounds (136.1 kg), the outer surface of which consists of a steel plate with minimum thickness of 1 inch (2.5 cm) and minimum surface area of 1 ft 2(929 cm2).
S7.1.12 The drop system restricts side movement during the impact attenuation test so that the sum of the areas bounded by the acceleration-time response curves for both the x- and y-axes (horizontal axes) is less than five percent of the area bounded by the acceleration-time response curve for the vertical axis.
S7.2 Penetration test.
S7.2.1 The penetration test is conducted by dropping the penetration test striker in guided free fall, with its axis aligned vertically, onto the outer surface of the complete helmet, when mounted as specified in S6.3, at any point above the test line, described in S6.2.3, except on a fastener or other rigid projection.
S7.2.2 Two penetration blows are applied at least 3 inches (7.6 cm) apart, and at least 3 inches (7.6 cm) from the centers of any impacts applied during the impact attenuation test.
S7.2.3 The application of the two penetration blows, specified in S7.2.2, starts at two minutes and is completed by four minutes, after removal of the helmet from the conditioning environment.
S7.2.4 The height of the guided free fall is 118.1 ±0.6 in (3 ±0.015 m), as measured from the striker point to the impact point on the outer surface of the test helmet.
S7.2.5 The contactable surface of the penetration test headform is constructed of a metal or metallic alloy having a Brinell hardness number no greater than 55, which will permit ready detection should contact by the striker occur. The surface is refinished if necessary before each penetration test blow to permit detection of contact by the striker.
S7.2.6 The weight of the penetration striker is not less than 6 pounds, 8 ounces and not more than 6 pounds, 12 ounces (2.95 to 3.06 kg).
S7.2.7 The point of the striker has an included angle of 60 ±0.5°, a cone height of 1.5 ±0.015 in. (3.8 ±0.038 cm), a tip radius of 0.02 ±0.004 in. (0.5 ±0.1 mm), and a minimum hardness of 60 Rockwell, C-scale.
S7.2.8 The rigid mount for the penetration test headform is as described in S7.1.11.
S7.3 Retention system test.
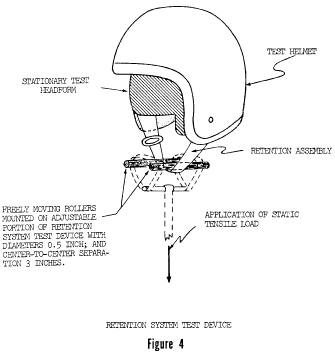
S7.3.1 The retention system test is conducted by applying a quasi-static tensile load at any rate from 0.4 to and including 1.2 inch/min (from 1.0 to and including 3.0 cm/min) to the retention assembly of a complete helmet, which is mounted, as described in S6.3, on a stationary test headform as shown in Figure 4, and by measuring the movement of the adjustable portion of the retention system test device under tension.
S7.3.2 The retention system test device consists of both an adjustable loading mechanism by which a quasi-static tensile load is applied at any rate from 0.4 to and including 1.2 inch/min (from 1.0 to and including 3.0 cm/min) to the helmet retention assembly and a means for holding the test headform and helmet stationary. The retention assembly is fastened around two freely moving rollers, both of which have a 0.5 inch (1.3 cm) diameter and a 3 inch (7.6 cm) center-to-center separation, and which are mounted on the adjustable portion of the tensile loading device (Figure 4). The helmet is fixed on the test headform as necessary to ensure that it does not move during the application of the test loads to the retention assembly.
S7.3.3 A 50-pound (22.7 kg) preliminary test load is applied to the retention assembly, normal to the basic plane of the test headform and symmetrical with respect to the center of the retention assembly for 30 seconds, and the maximum distance from the extremity of the adjustable portion of the retention system test device to the apex of the helmet is measured.
S7.3.4 An additional 250-pound (113.4 kg) test load is applied to the retention assembly, in the same manner and at the same location as described in S7.3.3, for 120 seconds, and the maximum distance from the extremity of the adjustable portion of the retention system test device to the apex of the helmet is measured.
Appendix to §571.218
Table 1—Weight Ranges for Impact Attenuation Test Drop Assembly
Test headform size |
Weight range1—lb kg) |
Small |
7.6-8.0 (3.4-3.6) |
Medium |
10.8-11.2 (4.9-5.1) |
Large |
13.2-13.6 (6.0-6.2) |
1Combined weight of instrumented test headform and supporting assembly for drop test.




[38 FR 22391, Aug. 20, 1973, as amended at 39 FR 3554, Jan. 28, 1974; 45 FR 15181, Mar. 10, 1980; 53 FR 11288, Apr. 6, 1988; 53 FR 12529, Apr. 15, 1988; 76 FR 28160, May 13, 2011; 77 FR 768, Jan. 6, 2012]
| File Type | application/vnd.openxmlformats-officedocument.wordprocessingml.document |
| Author | Kuppa, Shashi (NHTSA) |
| File Modified | 0000-00-00 |
| File Created | 2022-01-28 |
© 2026 OMB.report | Privacy Policy