Attachment B(b) Online Diary Specifications
Consumer Expenditure Surveys: Quarterly Interview and Diary
Attachment B(b) Online Diary Specifications
OMB: 1220-0050
CE Online Mobile Diary - Detailed Specifications (8.31.21) |
2021 |
1 General Specifications:
These specifications apply to all pages in the web/mobile instrument
Desktop Page Banner: The Census logo and survey name should appear at the top of every page of
the web version in place of the BLS logo.

Mobile Page Banner: The following banners should appear at the top of every page of the mobile version. The BLS logo should be replaced by the Census logo.
![]()
Save a record unless user selects ‘Back’. (All that is required to save an item is the date of purchase, business, category, and any ONE of the other fields.) When an item is not saved because a required field is empty, a popup should appear that says “Please enter the date, business, type of expense, and the total cost”. When an item is saved, a popup should appear that says “Item Saved”. Popup should automatically disappear in 5 seconds.
Diary should be able to record all purchases during the household’s two seven-day recording periods and should have a single username for each household.
BLS wants respondents to use their mobile devices (phones and tablets.)
Respondents should be able to switch between using a mobile device and a PC or laptop.
Respondents will record purchases by category, rather than by expense.
Respondents should be able to scroll vertically on the Welcome/Summary Screen if there are expenses entered and date dropdowns selected (depending on how many expenses are displayed).
Located in the banner of the Welcome/Summary Screen and the Add Expense Screen, add two gray buttons that will allow the user to toggle between Week 1 and Week 2. Whichever week they have active the button should be green. This toggle feature will only be available during Week 2.
For the Business variable, the grey prefill in the empty field should say “Enter Business Name”. The Business name will remain in the field until the user changes it or exits to the Summary screen. This is to allow ease of entry for multiple purchases made from a single business/outlet.
Range of dates should be derived as datebegin through datebegin plus 6 for the first week of the diary.
Range of dates should be derived as datebegin plus 7 through datebegin plus 13 for the second week of the diary.
A dollar sign ($) should appear to the left of every cost field.
There should be one set of credentials for each respondent/household.
Users who change their passwords should receive an Email stating their password was changed.
On the last day of the reporting period for each week (datebegin + 6 and datebegin + 13), BLS would like a new item added to the Summary screen for users who have logged in, but have not entered any expenses for that week. In this situation, they would like to have a checkbox added for respondents who did not have any expenses during the reporting week.
ADSD will provide the standard for background color scheme, font size, and font colors for all screens similar to or the same as what is provided in the screenshots throughout. ADSD will ensure that the application is 508 compliant, as applicable.
The colors used in Westat’s css file are listed below. If possible, these colors should be maintained or kept as consistent as possible.
@greyButton: #d5dfee;
@greyFooter: #d4dbe3;
@grey: #666666;
@greyDark:#414141;
@greyLight: #eaeaea;
@greySilver: #e5e9ee;
@navy: #022b57;
@navyLight:lighten(@navy, 25%);
@navyLighter: #bfcad5;
@blue: #2b60a8;
@blueLight:#8095ab;
@blueDark:darken(@blue, 20%);
@blueHeaderBar: #cad7e9;
@brown:#c0b399;
@brownDark:#776849;
@brownLight:#d6d1c8;
@black:#000000;
@green:#66bb6a;
@red: #bc0d07;
@white: #fff;
After 10 minutes, the screen displays a warning message regarding session expiration. It should read as follows,” Your session is about to expire. Press OK to keep working or you will be logged out. Time Remaining X:XX”, with the time remaining counting starting at 5 minutes.
After 15 minutes of non-active time, the screen displays a session expiration warning as follows,
“Your session has expired. Please reenter your Username and Password to continue.”
The application should time out after 15 minutes of inactivity. No information entered in current field
should be saved. To close the warning, user will need to hit the blue “Close” button. Once the user selects close, the timer is reset back to 15 minutes.
When the user saves the website as a bookmark, the description should be “CE Diary”
The user should be able to save partial information and be able go back to edit, complete, or delete the entry using the Welcome/Summary Screen.
In the Desktop Online Diary, it is important that a respondent can use the tab button to move between fields.
Normal 2019 placement and pick-up procedures used in the CE Diary Survey, including early and late placement dates, should be followed.
All text fields (such as OTLNAME or ITEMDESC) should allow the following characters:
All uppercase and lowercase English letters and numbers
Allow all special characters, including !@#$%^&*
Allow all brackets, including (){}[]
Allow all punctuation, including , . : ; ” ’ ?/
Allow all uppercase and lowercase Spanish letters
2 Detailed Specifications
2.1 Page Name/ID: Login
2.1.1 General Instructions
Layout: Vertical
Title and Subtitle:
Pre-Instructions: CE Diary (Heading)
Main Question Wording:
Username: ________
Password: ________
Post-Instructions:
Forget your password? (link) ‘Login’ button
Forgot your username? (link)
Special Instructions:
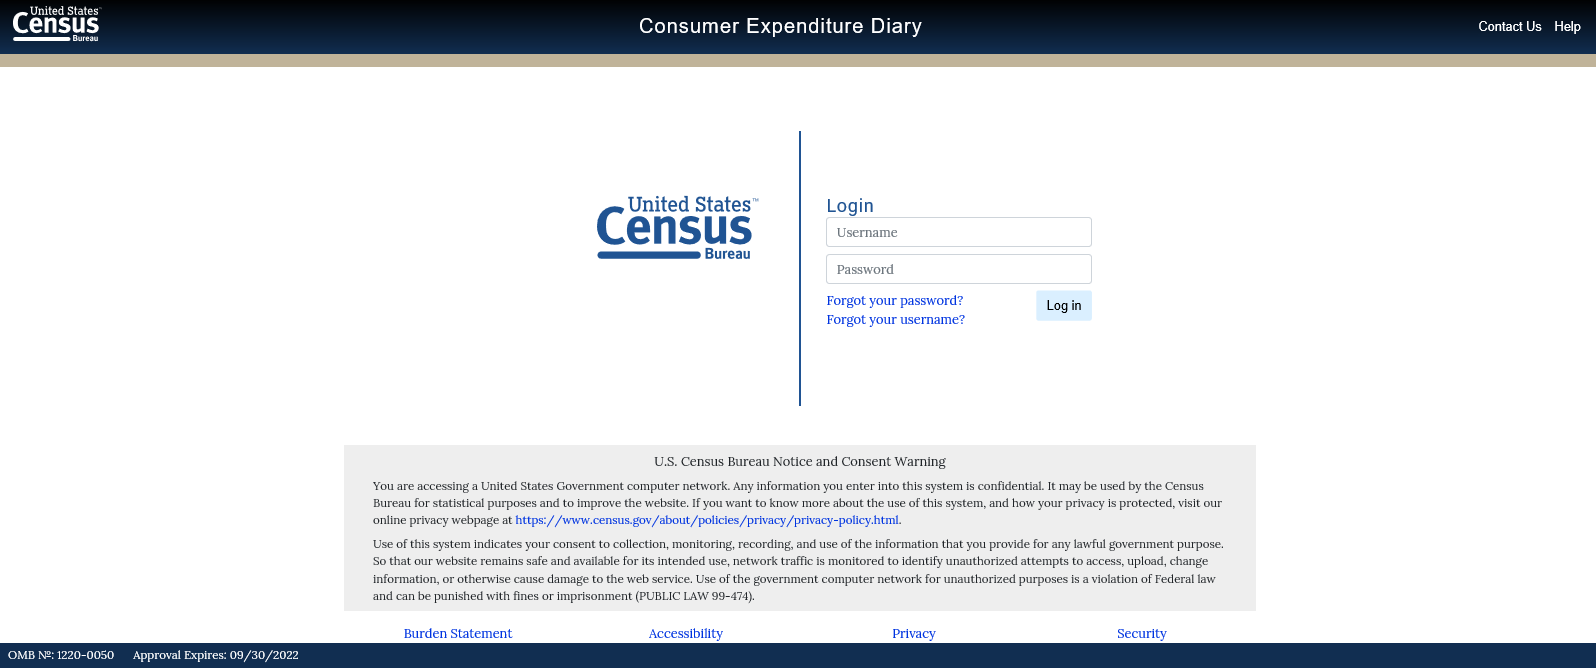
1. Include four boxes (links) at bottom of screen, “Burden Statement”, “Accessibility”, “Privacy” and “Security”.
Privacy button opens the URL <https://www.census.gov/about/policies/privacy.html> in a new window.
2. List OMB Number and Expiration Date (i.e. currently listed as “Approval Expires 9/30/2022) below those four boxes. OMB control number is 1220-0050 and the Expiration Date is MM/DD/YYYY.
3. Screen displays standard Census computer access warning at the bottom of screen.
4. List “Forgot your password?” below password box
5. List “Forgot your username?” below “Forgot your password?”
6. The Username fields are numbers and letters so the alphanumeric keyboard should automatically appear when user clicks in these fields.
7. After 5 unsuccessful attempts, lock out user and display: “For security reasons, your account has been locked. Please contact your Help Desk for assistance in unlocking your account.”
8. Display ‘Login’ button to the right of the Forgot your password and username links.
2.1.2 Online Layouts
2.1.2.1 Web Layout:
2.1.2.2 Mobile Layout:
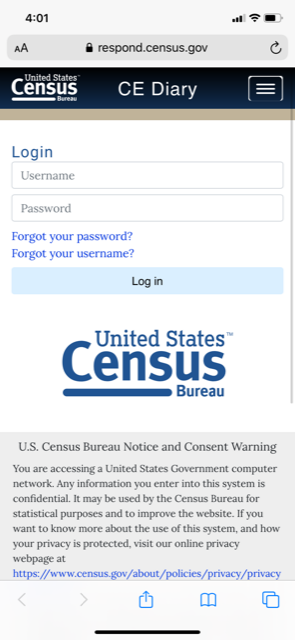
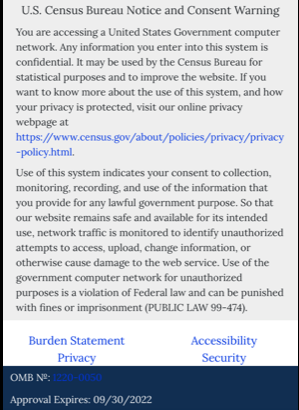
2.1.3 Data Elements
2.1.3.1 DataElement Name/ID: USER_ID
-
Label
USER_ID
Required
Yes
On entry
Tab Index
1
Type
Text
Allow numeric, character and special. Do not allow spaces.
Min Length
4
Max length
30
Read Only
No
Multiple Responses
No
Main Question Text
Title {mouse over text}
Answer Space Placeholder
Username
Answer Space Pre-text
Answer Space Post-text
Answer Option Values and Labels
Edits
Skip Pattern
All responses go to PASSWORD
Special Instructions
2.1.3.2 DataElement Name/ID: PASSWORD
-
Label
PASSWORD
Required
Yes
Tab Index
2
Type
Text
Allow numeric, character and special. Do not allow spaces.
Min Length
8
Max length
40
Read Only
No
Multiple Responses
No
Main Question Text
Title {mouse over text}
Answer Space Placeholder
Password
Answer Space Pre-text
Answer Space Post-text
Answer Option Values and Labels
Edits
Skip Pattern
<on click ‘Login’ Button>
1.<if first successful user/ID - pw entry> [goto Post_Login]
2.<else if subsequent successful logins> [goto Welcome/Summary Screen]
3. <else> display: “Login Failed.” (on the top of the Username box in red font)
Special Instructions
2.2 Page Name/ID: Burden
2.2.1 General Instructions
Layout: Vertical
Title and Subtitle:
Pre-Instructions: CE Diary (Heading)
Main Question Wording:
How long will the interview take?
We expect that it will take about 10 minutes per day to record your expenditures in the diary.
By law (Title 13, U.S. Code), we must keep your information confidential; we use it for statistical purposes only.
This
survey is collected under OMB control number 1220-0050. This
survey could not be conducted without a valid OMB control number.
If
you have comments regarding this survey, please send them to:
Division
of Consumer Expenditure Surveys
2 Massachusetts Avenue
N.E.
Room 3985
Washington, DC 20212
Post-Instructions: ‘Return to Diary’ button
Special Instructions:
Upon click of “Burden Statement” link, open new window with Burden Screen.
At the bottom of the screen there should be a ‘Return to Diary’ button that takes the user back to the previous screen.
2.2.2 Data Elements
2.2.2.1 DataElement Name/ID: Burden
-
Label
Burden
Required
Yes. Screen opens on clicking “Burden Statement” link
Tab Index
Type
Clickable
Min Length
n/a
Max length
n/a
Read Only
Yes
Multiple Responses
No
Main Question Text
n/a
Title {mouse over text}
Answer Space Placeholder
Answer Space Pre-text
Answer Space Post-text
Answer Option Values and Labels
Edits
Skip Pattern
<on click ‘Return to Diary’ button> [goto previous screen]
Special Instructions
2.3 Page Name/ID: Security
2.3.1 General Instructions
Layout: Vertical
Title and Subtitle:
Pre-Instructions: CE Diary (Heading)
Main Question Wording:
Data are Encrypted at all Times
Our secure servers use "HTTPS", Hypertext Transfer Protocol over Secure Socket Layer, to ensure the encrypted transmission of data between your browser and the U.S. Census Bureau. This means that instead of sending readable text over the Internet, both your browser and our server encode (scramble) all text using a security key. That way, personal data sent to your browser or data you send back are extremely difficult to decode in the unlikely event it was intercepted by an unauthorized party.
All browsers connecting to our secure server must use a minimum encryption key size of 128 bits. If you cannot connect to our secure server and you are using an older browser, please upgrade to a newer browser capable of using the required encryption key size. In addition to data being encrypted while transmitted, all data are strongly encrypted when stored on our servers (even if stored temporarily).
Third Party Identity Proofing
Our secure server uses a digital certificate (digital ID) issued by a trusted, third party Certificate Authority (CA) as proof of identity. The only way to be sure of a web site's authenticity is to view their digital ID. In this way, you can be assured that you are not being "spoofed" or tricked by an imposter. The digital ID will contain information such as:
The name of the organization that owns the web site (e.g., "U.S. Census Bureau")
The site's registered Internet name/address (e.g., "respond.census.gov/diary")
The name of the Certification Authority under which the digital ID was issued (e.g., "VeriSign Trust Network")
The method for viewing a web site's Digital Certificate/ID varies depending on the web browser. (For example, Mozilla's Firefox will display a clickable locked padlock icon in the lower right corner of your screen when in secure mode, Microsoft Internet Explorer shows a clickable locked padlock icon in the menu bar.) Please see your browser's ‘Help’ information for instructions on how to verify a web site's identity.
Post-Instructions: ‘Close’ button
Special Instructions:
Upon click of “Security” link, open new window with Security Screen.
At the bottom of the screen there should be a ‘Close’ button that closes the popup screen and returns the user back to the previous screen.
2.3.2 Data Elements
2.3.2.1 DataElement Name/ID: Security
-
Label
Security
Required
Yes. Screen opens on clicking “Security Link”
Tab Index
Type
Clickable
Min Length
n/a
Max length
n/a
Read Only
Yes
Multiple Responses
No
Main Question Text
n/a
Title {mouse over text}
Answer Space Placeholder
Answer Space Pre-text
Answer Space Post-text
Answer Option Values and Labels
Edits
Skip Pattern
<on click ‘Close button> [close popup and goto previous screen]
Special Instructions
2.4 Page Name/ID: Forgot_Password
2.4.1 General Instructions
Layout: Vertical
Title and Subtitle:
Pre-Instructions: CE Diary (Heading)
Main Question Wording:
Forgot Password
Please enter either the email address associated with your account or the username or your account.
Email or username: ______________________
Post-Instructions: Back(button) Submit(button)
Special Instructions:
Upon click of “Forgot Password” link, open new window with Forgot_Password Screen.
If the email matches an email provided and the user for that email address did not previously create a new password for this account, display: “That account doesn't have the required information for a password reset. Please call 877-744-1522 if you need assistance.” (in red text underneath Email or username field)Else if Email matches an Email provided, goto Security_Question Screen.
Else if the Email address does not match an Email provided, display: “That Email address does not match with any existing accounts. Please contact 877-744-1522 if you need assistance” (Error message in red text underneath Email or username field)
If Username matches a username provided and the user did not previously create a new password for this account display: “That Username cannot reset their password online. Please contact 877-744-1522 if you need assistance.” (Error message is in red text under the Email or username field)
Else If Username matches a Username provided and user has previously changed their password, goto Security_Question Screen.
Else if the username does not match a username provided, display: “That account doesn't have the required information for a password reset. Please call 877-744-1522 if you need assistance.” (on the top of the screen in a yellow box)
Display ‘Submit’ and ‘Back’ buttons below Username. The ‘Back’ button takes the user back to the previous screen.
2.4.2 Data Elements
2.4.2.1 DataElement Name/ID: FORGOT_EM
-
Label
FORGOT_EM
Required
Yes. Screen opens on clicking “Forgot your password”
Tab Index
1
Type
Text
Allow numeric, character and special. Do not allow spaces.
Min Length
4
Max length
50
Read Only
No
Multiple Responses
No
Main Question Text
Title {mouse over text}
Answer Space Placeholder
Email Address
Answer Space Pre-text
Answer Space Post-text
Answer Option Values and Labels
Edits
Skip Pattern
If the email matches an email provided and the user for that email address did not previously create a new password for this account, display: “That account doesn't have the required information for a password reset. Please call 1-877-744-1522 if you need assistance.” (on the top of the screen in a red box)
Else if Email matches an Email provided and user previously changed their password, goto Security_Question Screen.
Else if the Email address does not match an Email provided, display: “That Email address does not match with any existing accounts. Please contact 1-877-744-1522 if you need assistance” (on the top of the screen in a yellow box)
Special Instructions
Do not allow entry in both FORGOT_EM and FORGOT_UN.
2.4.2.2 DataElement Name/ID: FORGOT_UN
-
Label
FORGOT_UN
Required
Yes. Screen opens on clicking “Forgot your password”
Tab Index
2
Type
Text
Allow numeric and character.
Min Length
4
Max length
30
Read Only
No
Multiple Responses
No
Main Question Text
Title {mouse over text}
Answer Space Placeholder
Username
Answer Space Pre-text
Answer Space Post-text
Answer Option Values and Labels
Edits
Skip Pattern
If Username matches a username provided and the user did not previously create a new password for this account display: “That Username cannot reset their password online. Please contact 1-877-744-1522 if you need assistance.”
Else If Username matches a Username provided and user has previously changed their email, then goto Security_Question Screen.
Else if the username does not match a username provided, display: “That account doesn't match with any of our existing accounts. Please call 1-877-744-1522 if you need assistance.”” (on the top of the screen in a yellow box)
Special Instructions
Do not allow entry in both FORGOT_EM and FORGOT_UN.
2.5 Page Name/ID: Security_Question
2.5.1 General Instructions
Layout: Vertical
Title and Subtitle:
Pre-Instructions: CE Diary (Heading)
Main Question Wording:
Forgot Password
Please provide the answer to the security question you provided when you changed your password or username.
Security Question [Enter Security Question user selected on Change_Password / Username screen)
Answer _________________
Post-Instructions: Submit(button) Back(button)
Special Instructions:
Upon verification of email or username on Forgot_Password Screen or upon verification of email on Forgot_Username Screen, open new window with Security_Question Screen.
If security question answer matches the security question selected previously by the user, display: “A message has been sent to your Email address. Click on the link in that Email to reset your password” (on top of the screen in a green box)]
Else if security question answer does not match the security question selected previously by the user, display: “That answer does not match our records. Please try again or contact 877-744-1522 if you need assistance.”
If security question answer matches, close the current window and go back to previous window to attempt to login with new login info.
Display ‘Submit’ and ‘Back’ buttons below the security answer. The ‘Back’ button takes the user back to the previous screen.
2.5.2 Data Elements
2.5.2.1 DataElement Name/ID: Security_Ck
-
Label
Security Question
Required
Yes. Verification of email or username
Tab Index
Type
Text
Allow numeric, character and special. Do not allow spaces.
Min Length
4
Max length
50
Read Only
Yes
Multiple Responses
No
Main Question Text
Title {mouse over text}
Answer Space Placeholder
Answer Space Pre-text
Answer Space Post-text
Answer Option Values and Labels
Edits
Skip Pattern
Special Instructions
Enter Security Question user selected in Change_Password or Change_Username screen
2.5.2.2 DataElement Name/ID: Security_Ans_chk
-
Label
Answer
Required
Yes. Verification of email or username
Tab Index
1
Type
Text
Allow numeric and character.
Min Length
4
Max length
30
Read Only
No
Multiple Responses
No
Main Question Text
Title {mouse over text}
Answer Space Placeholder
Security Question Answer
Answer Space Pre-text
Answer Space Post-text
Answer Option Values and Labels
Edits
Skip Pattern
If Security_ans_chk is the same as security_ans then display message saying, “A message has been sent to your Email address. Click on the link in that Email to reset your password.”
If Security_ans_chk is the same as security_ans and Forgot_Username was clicked then display message saying, “We have sent an email to the email address you provided..”
Else if security_ans_chk is not the same as security_ans than display message saying, “That answer does not match our records. Please try again or contact 877-744-1522 if you need assistance.”
Special Instructions
If security_ans_chk is the same as security_ans and Forgot Password clicked, send password reset email to user’s email address.
If security_ans_chk is the same as security_ans and Forgot Username clicked, send username reset email to user’s email address.
2.6 Page Name/ID: Retrieve_Password
2.6.1 General Instructions
Layout: Vertical
Title and Subtitle:
Pre-Instructions: CE Diary (Heading)
Main Question Wording:
Retrieve Password
Please enter and confirm new password
Passwords must contain all of the following:
At least 8 characters
At least 1 uppercase letter
At least 1 lowercase letter
At least 1 number
At least 1 special character from the following: ! # $ * & ? ~
New Password - text box
Confirm New Password - text box
Post-Instructions: ‘Save’ button
Special Instructions:
This page will only be reached by personalized URL link sent to users in an email after successfully completing the Forgot_Password and Security_Question Screens.
All fields must be filled in before Password change can be accepted.
The headers “New Password” and “Confirm New Password” should be left justified.
Entries in new Password and Confirm New Password should be the same.
When the save button is selected and password criteria is met, a popup should appear that says “Your password has been changed”. Popup should automatically disappear in 3 seconds.
2.6.2 Online Layouts
2.6.3 Data Elements
2.6.3.1 DataElement Name/ID: New_PW
-
Label
New_PW
Field name
New_PW
Required
Yes. User clicks on Forgot Password link sent to their email.
Tab Index
1
Type
Text, manual entry
Min Length
8
Max length
40
Read Only
No
Multiple Responses
No
Main Question Text
New Password
Title {mouse over text}
Answer Space Placeholder
Answer Space Pre-text
Answer Space Post-text
Answer Option Values and Labels
Edits
Skip Pattern
Goto Confirm_PW
Special Instructions
2.6.3.2 DataElement Name/ID: Confirm_PW
-
Label
Confirm_PW
Required
Yes. User clicks on Forgot Password link sent to their email.
Tab Index
2
Type
Text
Min Length
8
Max length
20
Read Only
No
Multiple Responses
No
Main Question Text
Confirm New Password
Title {mouse over text}
Answer Space Placeholder
Answer Space Pre-text
Answer Space Post-text
Answer Option Values and Labels
Edits
Skip Pattern
<on click ‘Save’ button> if New_PW is not the same as Confirm_PW, then display message saying ‘Your New and Confirm Passwords do not match.’
Else if New_PW and Confirm_PW are the same, but New_PW does not fit the following criteria: at least 8 characters, at least 1 uppercase letter, at least 1 lowercase letter, at least 1 number, at least 1 special character from the following: ! # $ * & ? ~, then display message saying ‘Your new Password must meet the following criteria:
1. At least 8 characters
2. At least 1 uppercase letter
3. At least 1 lowercase letter
4. At least 1 number
5. At least 1 special character from the following: ! # $ * & ? ~.’
Else change Password to New_PW and display message saying ‘Your password has been changed’ Then, goto Login Screen.
Special Instructions
2.7 Page Name/ID: Forgot_Username
2.7.1 General Instructions
Layout: Vertical
Title and Subtitle:
Pre-Instructions: CE Diary (Heading)
Main Question Wording:
Forgot Username
Please enter either the email address associated with your account. Your username will be mailed to the email address you provided
Post-Instructions: Submit(button) ‘Back’ button
Special Instructions:
Upon click of “Forgot Username” link, open new window with Forgot_Username Screen.
At the bottom of the screen there should be ‘Submit’ and ‘Back’ buttons. The “Back’ button takes the user back to the previous screen.
If the email matches an email provided and the user for that email address did not previously create a new username for this account, display: “That account doesn't have the required information for a username reset. Please call 1-877-744-1522 if you need assistance.” (on the top of the screen in a red box)
Else if Email matches an Email provided, goto Security_Question screen.
Else if the Email address does not match an Email provided, display: “That Email address does not match with any existing accounts. Please contact 1-877-744-1522 if you need assistance” (Text appears in red under the Email entry box))
2.7.2 Data Elements
2.7.2.1 DataElement Name/ID: FORGOTUSERNAME
-
Label
FORGOTUSERNAME
Required
Yes. Screen opens on clicking “Forgot your username”
Tab Index
1
Type
Text
Allow numeric, character and special. Do not allow spaces.
Min Length
4
Max length
30
Read Only
No
Multiple Responses
No
Main Question Text
Title {mouse over text}
Answer Space Placeholder
Email Address
Answer Space Pre-text
Answer Space Post-text
Answer Option Values and Labels
Edits
Skip Pattern
If the email matches an email provided and the user for that email address did not previously create a new username for this account, display: “That account doesn't have the required information to recover a username. Please call 877-744-1522 if you need assistance.” (in red text below the Email entry screen)
Else if Email matches an Email provided and user previously changed their password, goto Security_Question Screen.
Else if the Email address does not match an Email provided, display: “That Email address does not match with any existing accounts. Please contact 877-744-1522 if you need assistance” (Text appears in red under the Email entry box)
Special Instructions
2.7b Page Name/ID: Retrieve_Username
2.7.1 General Instructions
Layout: Vertical
Title and Subtitle:
Pre-Instructions: CE Diary (Heading)
Main Question Wording:
Retrieve Username
Please enter and confirm new username
Username must be at least 8 characters
New Username - text box
Post-Instructions: ‘Save’ button
Special Instructions:
This page will only be reached by personalized URL link sent to users in an email after successfully completing the Forgot_Username and Security_Question Screens.
All fields must be filled in before Username change can be accepted.
The headers “New Username” and “Confirm New Username” should be left justified.
Entries in new Username and Confirm New Username should be the same.
When the save button is selected and username criteria is met, a popup should appear that says “Your username has been updated”. Popup should automatically disappear in 5 seconds.
2.7.2 Online Layouts
2.7.3 Data Elements
2.7.3.1 DataElement Name/ID: New_UN
-
Label
New_UN
Field name
New_UN
Required
Yes. User clicks on Forgot Username. Link sent to their email.
Tab Index
1
Type
Text, manual entry
Min Length
8
Max length
20
Read Only
No
Multiple Responses
No
Main Question Text
New Username
Title {mouse over text}
Answer Space Placeholder
Answer Space Pre-text
Answer Space Post-text
Answer Option Values and Labels
Edits
Skip Pattern
Goto Confirm_UN
Special Instructions
2.7.3.2 DataElement Name/ID: Confirm_UN
-
Label
Confirm_UN
Required
Yes. User clicks on Forgot Username. Link sent to their email.
Tab Index
2
Type
Text
Min Length
8
Max length
20
Read Only
No
Multiple Responses
No
Main Question Text
Confirm New Username
Title {mouse over text}
Answer Space Placeholder
Answer Space Pre-text
Answer Space Post-text
Answer Option Values and Labels
Edits
Skip Pattern
<on click ‘Save’ button> if New_UN is not the same as Confirm_UN, then display message saying ‘Your New and Confirm Usernames do not match.’
Else if New_UN and Confirm_UN are the same, but New_UN does not fit the following criteria: at least 8 characters, then display message saying ‘Your new Password must meet the following have at least 8 characters
Else change Username to New_UN and display message saying ‘Your username has been changed’ Then, goto Login Screen.
Special Instructions
2.8 Page Name/ID: Post_Login_Screen
2.8.1 General Instructions
Layout: Vertical
Title and Subtitle:
Pre-Instructions: CE Diary (Heading) ‘Help’ button ‘Logout’ Button
Main Question Wording:
Select the date you are scheduled to begin entering expenses into your Diary: _______ (calendar icon)
Email address (optional): ________
We will not share your email address with any 3rd parties. We ask for your email address only to send reminders regarding your participation in this survey.
Special Instructions:
The date selection should be a calendar displaying the possible start dates for the respondent based on the Earliest Placement Date (EPD) and the Latest Placement Date (LPD.) The dates displayed should be from the EPD+1 to the LPD+1.
Include a ‘Continue’ button below the email field.
Place a ‘Help’ button (for information) at the top right corner of the screen from this screen forward.
Place
a ‘Logout’
button at at the top right corder of the screen to the left of
‘Contact Us’.![]()
2.8.2 Data Elements
2.8.2.1 DataElement Name/ID: DateBegin
-
Label
DateBegin
Required
Yes. Screen opens after first successful user/ID - pw entry
Tab Index
Type
Calendar, Manual Entry
Min Length
8
MM/DD/YY format
Max length
8
MM/DD/YY format
Read Only
No
Multiple Responses
No
Main Question Text
n/a
Title {mouse over text}
Answer Space Placeholder
MM/DD/YY
Answer Space Pre-text
Answer Space Post-text
Answer Option Values and Labels
Edits
Skip Pattern
<on click ‘Continue’ button> 1. If DateBegin <> EMPTY or date selected is from EPD+1 to LPD+1 Goto EMAIL
2. Else display: “Please verify the responses marked below.” (on top of screen) and “Please provide a date between EPD+1 and LPD+1”” (above email address), where the dates are displayed in MM/DD/YY format.
Special Instructions
User can enter date in MM/DD/YY format or can click on calendar icon and click on relevant dates. Calendar icon should only allow the user to select the dates EPD+1 to LPD+1. This is from the 2nd date of the production month, to the first date of the next month. For example, 01/02/18-02/01/18.
2.8.2.2 DataElement Name/ID: EMAIL
-
Label
EMAIL
Required
Yes. Screen opens after first successful user/ID - pw entry
Tab Index
1
Type
Text
Allow numeric, character and special. Do not allow spaces. Allow empty
Min Length
0
Max length
50
Read Only
No
Multiple Responses
No
Main Question Text
Title {mouse over text}
Answer Space Placeholder
Email Address
Answer Space Pre-text
Answer Space Post-text
Answer Option Values and Labels
Edits
Skip Pattern
[goto Welcome_Summary]
Special Instructions
2.9 Page Name/ID: WelcomeSummary
2.9.1 General Instructions
Layout: Vertical
Title and Subtitle:
Pre-Instructions: CE Diary (Heading) CE Diary Help Logout
Main Question Wording:
Expenses Week 1(button) Week 2(button)
(List all seven dates for the relevant Diary week under the Expenses heading.)
(Show collapse/expand entry for particular day)
Post-Instructions: ‘Search’ button ‘Add Item’ button
Special Instructions:
Screen has header on top of page with Census logo to the left, “Consumer Expenditure Diary” in the middle, and ‘Logout’ and ‘Help’ links to the right
List of seven dates for the highlighted diary Week should be the dates DateBegin to DateBegin +6 for Week 1 and dates DateBegin +7 to DateBegin +13 for Week 2. Dates should be displayed with Day number as an icon (1-7), followed by the Day of the Week, Month (abbreviated), and day, and then followed by the number of items recorded that day [i.e. 1 Monday, Nov 27 (3)]. If the current date < DateBegin +7 then display Week 1 dates (DateBegin to DateBegin +6). If current date > DateBegin +6 then display Week 2 dates (DateBegin +7 to DateBegin +13).
Under the heading, Expenses should be left justified and the Week 1 and Week 2 buttons will be right justified. These buttons will allow the user to toggle between each week’s diary. The active week will be highlighted in green, while the other week will be gray. The week 1 button should be green while week 2 is gray unless the user selects week 2.
![]()
![]()
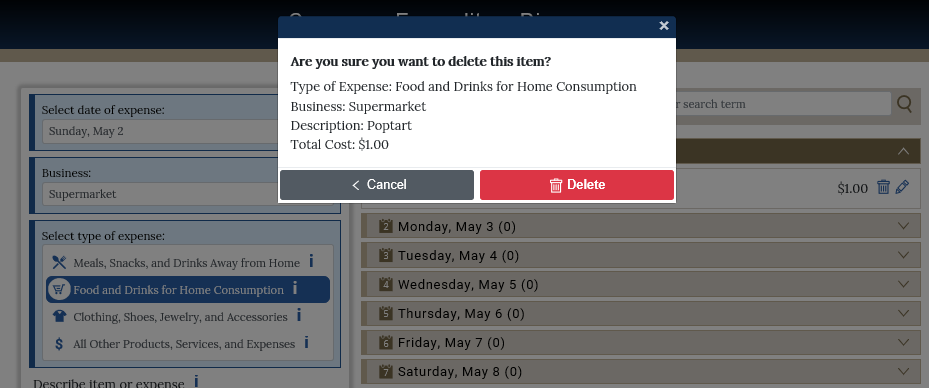
Once users have entered at least one expense, a delete option (i.e. a trash icon) and an edit button (a pencil icon) should appear to the right of each expense to the right of the cost.
Have an expandable/collapsible feature under each date, where if the user clicks to expand a specific date, all expenses made on that date will be listed underneath. Expenses will display Category Icon, ItemDesc (or Business if Category=Meals, Snacks, and Drinks Away from Home), Cost_Com, Delete (button), Edit (button). If there are no expenses made for that date, then display the message “No expenses reported”. ItemDesc/Business field should display up to 32 characters to avoid text wrapping. Cost_Com field should be capped at six digits in addition to the decimal point, and cents (i.e. $100,000.00). The Cost field should also be right justified. Each of the Cost_Com and ItemDesc/Business fields need to be sortable. The default sort should be where the most recent expenses should appear on top. The Cost field should be sorted as a value and not as text so that the ordering would appear as 3, 4, 5, 48 and not 3, 4, 48, 5.
2.9.2 Online Layouts
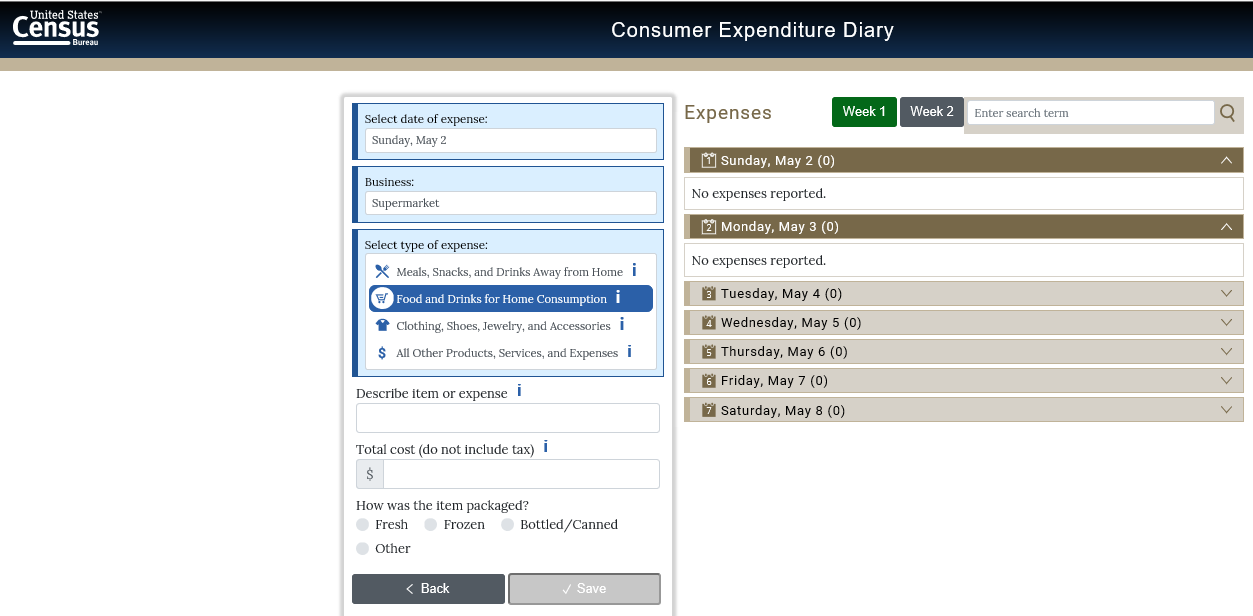
2.9.3 Data Elements
2.9.3.1 DataElement Name/ID: NoExpW1
-
Label
No Expenses Week 1
Field Name
NoExpW1
Required
If current date =/gt DateBegin+6 and no expenses entered from DateBegin through DateBegin+6 and respondent has already logged in at least once.
Tab Index
1
Type
Checkbox
.
Min
0
Max
1
Read Only
No
Multiple Responses
No
Main Question Text
You haven’t entered any expenses for Week 1 – DateBegin to DateBegin+6. (Dates are in Mon DD format. For example, “Week 1 – Jan 02 to Jan 08”).
If you had no expenses during this week, check here. (checkbox)
Title {mouse over text}
Answer Space Placeholder
Answer Space Pre-text
Answer Space Post-text
Answer Option Values and Labels
Edits
Skip Pattern
On Click in Checkbox, stay at WelcomeScreen.
Special Instructions
If checkbox is selected, output NoExpW1 as 1.
Dataset
FDAY
2.9.3.2 DataElement Name/ID: NoExpW2
-
Label
No Expenses Week 2
Field Name
NoExpW2
Required
If current date =/gt DateBegin+13 and no expenses entered from DateBegin+7 through DateBegin+13 and respondent has already logged in at least once.
Tab Index
1
Type
Checkbox
.
Min
0
Max
1
Read Only
No
Multiple Responses
No
Main Question Text
You haven’t entered any expenses for Week 2 – DateBegin+7 to DateBegin+13. (Dates are in Mon DD format. For example, “Week 2 – Jan 09 to Jan 15”).
If you had no expenses during this week, check here. (checkbox)
Title {mouse over text}
Answer Space Placeholder
Answer Space Pre-text
Answer Space Post-text
Answer Option Values and Labels
Edits
Skip Pattern
On Click in Checkbox, stay at WelcomeScreen.
Special Instructions
If checkbox is selected, output NoExpW2 as 1.
Dataset
FDAY
2.9.3.3 DataElement Name/ID: Edit
-
Label
Edit
Required
Yes. Appears after every expense if date has been expanded.
Tab Index
Type
Clickable
Min Length
n/a
Max length
n/a
Read Only
Yes
Multiple Responses
No
Main Question Text
n/a
Title {mouse over text}
Answer Space Placeholder
Answer Space Pre-text
Answer Space Post-text
Answer Option Values and Labels
Edits
Skip Pattern
<on click ‘Edit’ button goto specific diary expense> [if CATEGORY=1 then goto ExpenseMLS, else if CATEGORY=2 then goto ExpenseFDB, else if CATEGORY=3 then goto ExpenseCLO, else goto ExpenseOTH.]
Special Instructions
2.9.3.4 DataElement Name/ID: Delete
-
Label
Delete
Required
Yes. Appears after every expense if date has been expanded.
Tab Index
Type
Clickable
Min Length
n/a
Max length
n/a
Read Only
Yes
Multiple Responses
No
Main Question Text
n/a
Title {mouse over text}
Answer Space Placeholder
Answer Space Pre-text
Answer Space Post-text
Answer Option Values and Labels
Edits
Skip Pattern
<on click the ‘Delete’ button, a warning should appear, “Are you sure you want to delete this item?”> [If user clicks ‘OK’ then delete expense from online and output records. Stay on WelcomeSummary Screen. Else if user clicks ‘Cancel’, stay on WelcomeSummary Screen.]
Special Instructions
2.9.3.5 DataElement Name/ID: Logout
-
Label
Logout
Required
Yes. Appears at the header at the top of every screen.
Tab Index
Type
Clickable
Min Length
n/a
Max length
n/a
Read Only
Yes
Multiple Responses
No
Main Question Text
n/a
Title {mouse over text}
Answer Space Placeholder
Answer Space Pre-text
Answer Space Post-text
Answer Option Values and Labels
Edits
Skip Pattern
On Click of ‘Logout’ button, logout of user’s profile and goto the Home_Login Screen.
Special Instructions
1. On Home_Login screen, display: “You have successfully logged out of the CE Web Diary. Please log in again to enter any additional expenses.”
2. After 15 minutes of inactivity, any screen displays a session expiration warning as follows: “Your session has expired. Please re-enter your Username and Password to continue.” No information entered in current field should be saved.
2.9.3.6 DataElement Name/ID: Help
-
Label
Help
Required
Yes. Appears at the header at the top of every screen.
Tab Index
Type
Clickable
Min Length
n/a
Max length
n/a
Read Only
Yes
Multiple Responses
No
Main Question Text
n/a
Title {mouse over text}
Answer Space Placeholder
Answer Space Pre-text
Answer Space Post-text
Answer Option Values and Labels
Edits
Skip Pattern
<on click ‘Help’ button goto Help Screen>
Special Instructions
2.10 Page Name/ID: DateScreen
2.10.1 General Instructions
Layout: Vertical
Title and Subtitle:
Pre-Instructions: CE Diary (Heading) Help Logout
Expenses Week 1(button) Week 2(button)
Main Question Wording:
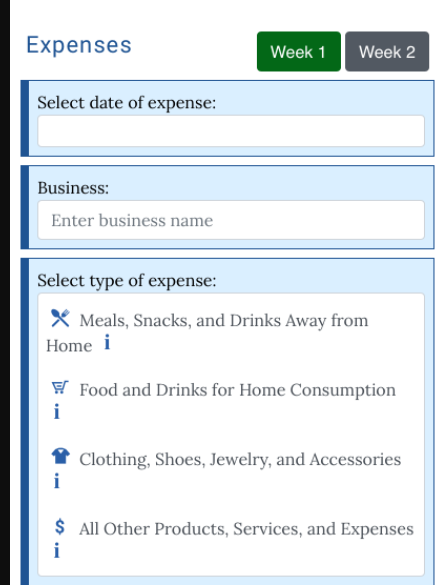
Select date of expense: (Dropdown list of 7 dates).
Business: _________
Type of Expense: (List of 4 categories-no dropdown) (‘I’ icon)
Post-Instructions: ‘Back’ button ‘Save’ button
Special instructions:
Screen has header on top of page with Census logo to the left, “CE Diary” in the middle, and ‘Logout’ and ‘Help’ links to the right
List of seven valid dates for the date dropdown menu should be dates DateBegin to DateBegin +6 for Week 1 and dates DateBegin +7 to DateBegin +13 for Week 2. Dates should be displayed with Day number as an icon (1-7), followed by the Day of the Week, Month (abbreviated), and day (i.e. 1 Monday, Nov 27).
All that is required to save an item is the date of purchase, business, category, and any ONE of the other fields. Upon click on ‘Save’, save record to database and popup should appear that says “Item Saved”. Popup under the banner should automatically disappear in 5 seconds, and then goto blank DateScreen. When an item is not saved because a required field is empty, a popup should appear that says “Please enter the date, business, type of expense, and the total cost”. Popup should automatically disappear in 5 seconds. Else if, upon click on ‘Back’, goto WelcomeSummary Screen. Do not save the expense and clear the current fields on the Add Expense page
Under the heading, Expenses should be left justified and the Week 1 and Week 2 buttons will be right justified. These buttons will allow the user to toggle between each week’s diary. The active week will be highlighted in green, while the other week will be gray. By default, the buttons should be gray. The week 1 button should be green while week 2 is gray unless the user selects week 2.For the Business variable, the empty field should say “Enter Business Name”. The business name will remain will remain in the field until the user changes it or exits to the summary screen. This is to allow ease of entry for multiple purchases made from the same store, restaurant, or website
Clicking ‘I’ icon next to each of the four categories opens a popup window with description of that specific category. See Appendix A 3.1 Categories for pictures of the popups.
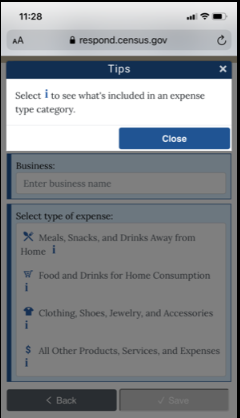
Upon first entry to DateScreen, display popup that says "Tips. Select I(icon) to see what's included in an expense type category." User selects “Close” to close the popup.
All four expense categories should be listed under “Select date of expense”
2.10.2 Online Layouts
Remove
Clear button
Clicking ‘I’ icon opens a popup window with description
of category. See Appendix A 3.1 Categories for pictures of the
popups.

Popup
only appears on first visit to the DateScreen.

2.10.3 Data Elements
2.10.3.1 DataElement Name/ID: Date_Purchased
-
Label
Date Purchased
Field Name
Date_Purchased
Required
Yes. When Add Expense button is clicked
Tab Index
1
Type
Dropdown list
.
Min Length
Max length
Read Only
No
Multiple Responses
No
Main Question Text
Select date of expense:
Title {mouse over text}
Answer Space Placeholder
Answer Space Pre-text
Answer Space Post-text
Answer Option Values and Labels
List of all seven valid dates (DateBegin to DateBegin +6 for Week 1 and dates DateBegin +7 to DateBegin +13 for Week 2 Dates should be displayed with Day number as an icon (1-7), followed by the Day of the Week, Month (abbreviated), and day (i.e. 1 Monday, Nov 27).
Edits
Skip Pattern
Goto OTLNAME
Special Instructions
If Date_Purchased is not empty, then save Day Number from Date_Purchased into ORIGDAY.
If Date_Purchased is not empty, then save Week Number (1 or 2) from the Week in the Expenses heading into WEEKPT.
2.10.3.2 DataElement Name/ID: ORIGDAY
-
Label
ORIGDAY
Field Name
ORIGDAY
Required
**OUTPUT VARIABLE**
Tab Index
1
Type
NUMBER
.
Min
01
Max
07
Read Only
No
Multiple Responses
No
Main Question Text
N/A
Title {mouse over text}
Answer Space Placeholder
Answer Space Pre-text
Answer Space Post-text
Answer Option Values and Labels
01-07
Edits
Skip Pattern
N/A
Special Instructions
If Date_Purchased is not empty, then save Day Number from Date_Purchased into ORIGDAY.
Dataset
EFDB, EMLS, EOTH, or ECLO depending on CATEGORY
2.10.3.3 DataElement Name/ID: WEEKPT
-
Label
WEEKPT
Field Name
WEEKPT
Required
**OUTPUT VARIABLE**
Tab Index
1
Type
NUMBER
.
Min
1
Max
2
Read Only
No
Multiple Responses
No
Main Question Text
N/A
Title {mouse over text}
Answer Space Placeholder
Answer Space Pre-text
Answer Space Post-text
Answer Option Values and Labels
1 or 2
Edits
Skip Pattern
n/a
Special Instructions
If Date_Purchased is not empty, then save Week Number (1 or 2) from the Week displayed in the Expenses heading into WEEKPT.
Dataset
EFDB, EMLS, EOTH, or ECLO depending on CATEGORY
2.10.3.4 DataElement Name/ID: OTLNAME
-
Label
Business
Field Name
OLTNAME
Required
Yes. Date_Purchased is not empty
Tab Index
Type
Textbox. Manual entry
Allow numeric, character and special. Allow spaces.
Min Length
1
Max length
50
Read Only
No
Multiple Responses
No
Main Question Text
Business:
Title {mouse over text}
Answer Space Placeholder
Enter Business Name
Pre-filled grey
Answer Space Pre-text
Enter Business Name
Answer Space Post-text
Answer Option Values and Labels
Edits
Skip Pattern
Goto Category
Special Instructions
When the user selects this field, the text keypad will appear allowing the user to enter the outlet of the expenditure. After the user enters the outlet, the entered text will change to black
The text entered will remain will remain in the field until the user changes it or exits to the summary screen. This is to allow ease of entry for multiple purchases made from the same store, restaurant, or website
Dataset
EFDB, EMLS, EOTH, or ECLO depending on CATEGORY
2.10.3.5 DataElement Name/ID: Category
-
Label
Category
Field Name
Category
Required
Yes. Business(OLTAME) is not empty
Tab Index
Type
Clickable
Min
01
Max
10
Read Only
No
Multiple Responses
No
Main Question Text
Select type of expense:
Title {mouse over text}
Answer Space Placeholder
Answer Space Pre-text
Answer Space Post-text
Answer Option Values and Labels
Meals, Snacks, and Drinks Away from Home
Food and Drinks for Home Consumption
Clothing, Shoes, Jewelry, and Accessories
All Other Products, Services, and Expenses
Category icons are the right of each item. Each category should be listed (no drop down). An ‘I’ button is to the right of each category.
Edits
Skip Pattern
If Category = Meals, Snacks, and Drinks away from home goto ExpenseMLS Screen
If Category = Food and Drinks for Home Consumption goto ExpenseFDB Screen
If Category = Clothing, Shoes, Jewelry, and Accessories goto ExpenseCLO Screen
If Category = “All Other Products, Services, and Expenses” goto ExpenseOTH Screen
Else if, upon click on ‘Save’, save record to database and popup should appear that says “Item Saved”. Popup should automatically disappear in 3 seconds, and then goto blank DateScreen.
Else if, Upon click on ‘Back’, goto WelcomeSummary Screen. Do not save the expense and clear the current fields on the Add Expense page
Special Instructions
When the user selects the category, the 4 categories (Meals, Snacks, and Drinks Away from Home, Food and Drinks for Home Consumption, Clothing, Shoes, Jewelry and Accessories, All Other Products, Services, and Expenses) will appear, allowing the user to choose one.
2.11 Page Name/ID: ExpenseMLS
2.11.1 General Instructions
Layout: Vertical
Title and Subtitle:
Pre-Instructions: CE Diary (Heading) Help Logout
Expenses Week 1(button) Week 2(button)
Main Question Wording:
Date: ___________
Business: _________
Type of Expense: Meals, Snacks, and Drinks Away from Home
Total cost (include tax and/or tip) (‘I’ icon)
Where did you make this purchase? - Buttons for:Fast food, Take-out, Delivery, Concession
Full Service places
Vending Machines or Mobile Vendors/Food Trucks
Employer or School Cafeteria
Were alcoholic beverages included? – Checkboxes for:
Yes
No
Cost of alcoholic beverages: _______
Post-Instructions: ‘Back’ button ‘Save’ button
Special Instructions:
Date, Business, and Type of Expense should be prefilled with information from DateScreen. Type of Expense is Meals, Snacks, and Drinks Away from Home.
After the user selects a button, make selected button appear suppressed/selected so that it’s clear to the user that they’ve made a selection. Prior to selection, the buttons should all be identical in appearance. Only allow one option to be selected for the meal question. If ‘None’ is selected for type of Alcohol, then no other option can be selected. Total cost of alcohol should only be available if Type of Alcohol is 1,2, and/or 3.
Character values will not be allowed in the Total cost field. When a non-numeric value other than a “period” is entered into the field an error message should prompt the user to this rule.
Else if, upon click on ‘Save’, save record to database and popup should appear that says “Item Saved”. Popup should automatically disappear in 5 seconds, and then goto blank DateScreen. When an item is not saved because a required field is empty, red text above the back and save button should appear that says “Please enter the date, business, type of expense, and the total cost”. Else if, upon click on ‘Back’, return to the WelcomeSummary Screen. Do not save the expense and clear the current fields on the Add Expense page
If reached this screen after clicking on the “Edit” button at the WelcomeSummary screen, then the button ‘Delete’ will appear. If the user clicks on the ‘Delete’ button a warning should appear to prevent the user from deleting an expense by mistake. The warning reads, “Are you sure you want to delete this item?” along with the Type of Expense listed, Description, Business, and Total Cost fields with the respondent’s responses. Only fields with data are included. The user can click on the red“Delete” button to delete or the gray “Cancel” button to keep the expense.
Under the heading, Expenses should be left justified and the Week 1 and Week 2 buttons will be right justified. These buttons will allow the user to toggle between each week’s diary. The active week will be highlighted in green, while the other week will be gray. The week 1 button should be green while week 2 is gray unless the user selects week 2.
Once users have entered at least one expense, a delete option (i.e. a trash icon) and an edit button (a pencil icon) should appear to the right of each expense to the right of the cost
Clicking ‘I’ icon next to the total cost opens a popup window with a receipt example for the Meals, Snacks, and Drinks Away from Home category. See Appendix B 4.1.1 Meals, Snacks, and Drinks Away from Home for picture of the popup.
If ALC_COST > COST_COM, then display the following soft error message, “The cost for alcohol must be less than or equal to the total cost.”
2.11.2 Online Layouts




IF COST_COM>999.99,
then display the following soft error message, “Please confirm
the cost you entered is correct.”
Clicking ‘I’ icon opens a popup
window with a receipt example for the Meals, Snacks, and Drinks Away
from Home category. See Appendix B 4.1.1 Receipt Example for Meals,
Snacks, and Drinks Away from Home for picture of the popup.
Change to: Cost of alcoholic beverages
Change to: Were alcoholic beverages included?
– Buttons for: Yes and No.
Replace meal type with VENDOR and replace all
answer options to the following:
Where
was the food purchase made?
Fast
food, Take-out, Delivery, Concession
Full
Service places
Vending
Machines or Mobile Vendors/Food Trucks
Employer
or School Cafeteria
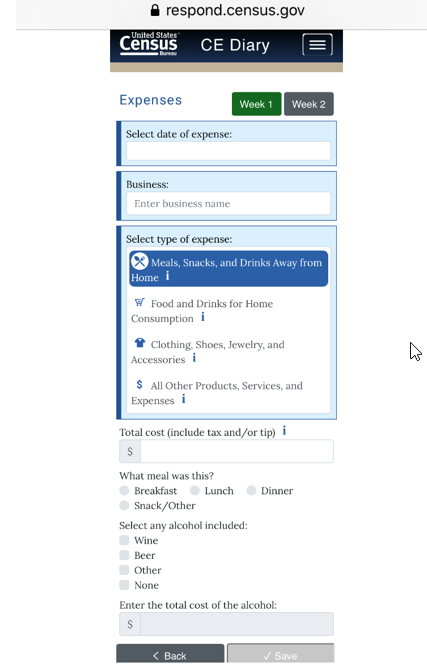
Fast food, Take-out, Delivery, Concession
Full Service places
Vending Machines or Mobile Vendors/Food Trucks
Employer or School Cafeteria
Alternative Text for Receipt Example
The Alternative Text for the Receipt Example for Meals, Snacks, and Drinks Away from Home category is shown below. The receipt example is shown in Appendix B 4.1.1.
“Business” is the name of the store or establishment that provided the food, drink, and/or services and is usually printed at the top of the receipt.
“Date” is the month, day, and year usually printed at the top or bottom of the receipt.
“Were alcoholic beverages included?” is answered “Yes” if alcohol is included in the list of items purchased on an itemized receipt. Otherwise select “No”.
“Cost of alcoholic beverages.” is determined by adding up all of the costs for any alcohol purchased.
“Total cost” is the purchase total, including tax and tip, and is usually printed in the bottom half of the receipt.
2.11.3 Data Elements
2.11.3.1 DataElement Name/ID: COST_COM
-
Label
COST_COM
Required
Yes. Screen opens after CATEGORY=1
Tab Index
1
Type
Real number, decimal
Min
0.00
Allow two decimal places
Max
99997.99
Allow two decimal places
Read Only
No
Length
8
Allow Empty
Multiple Responses
No
Main Question Text
Total cost (include tax and/or tip)
Title {mouse over text}
Answer Space Placeholder
0.00
Answer Space Pre-text
0.00
Answer Space Post-text
Answer Option Values and Labels
Edits
Skip Pattern
Goto VENDOR
Special Instructions
If COST_COM>999.99, then display the following soft error message, “Please confirm the cost you entered is correct.”
Dataset
EMLS
2.11.3.2 DataElement Name/ID: VENDOR
-
Label
VENDOR
Required
Yes. Screen opens after CATEGORY=1. Entry in COST_COM
Tab Index
1
Type
Buttons
Min
1
Allow Empty
Max
4
Read Only
No
Length
1
Allow Empty
Multiple Responses
No
Main Question Text
Where did you make this purchase?
Title {mouse over text}
Answer Space Placeholder
Answer Space Pre-text
Answer Space Post-text
Answer Option Values and Labels
Fast food, Take-out, Delivery, Concession
Full Service places
Vending Machines or Mobile Vendors/Food Trucks
Employer or School Cafeteria
Edits
Skip Pattern
Goto ALC_HOL
Special Instructions
Can only select one button. Save as values 1-4 for output, where Fast food food, delivery, take-out, concession is 1, Full Service places is 2, Vending Machines or Mobile Vendors/Food Trucks is 3, and Employer or School Cafeteria is 4.
Dataset
EMLS
2.11.3.3 DataElement Name/ID: ALC_HOL
-
Label
ALC_HOL
Required
Yes. Screen opens after CATEGORY=1. Entry in COST_COM
Tab Index
1
Type
Buttons
Min length
1
Allow Empty
Max length
2
Read Only
No
Length
1
Allow Empty
Multiple Responses
No
Main Question Text
Were alcoholic beverages included?
Title {mouse over text}
Answer Space Placeholder
Answer Space Pre-text
Answer Space Post-text
Answer Option Values and Labels
Yes
No
Edits
Skip Pattern
Goto ALC_COST
Special Instructions
Can only select one button. Save as values 1-2 for output, where Yes is 1, No is 2.
Dataset
EMLS
2.11.3.4 DataElement Name/ID: ALC_COST
-
Label
ALC_COST
Required
Yes. Screen opens after CATEGORY=1. If options 1,2, and/or 3 selected in TYPEALC
Tab Index
1
Type
Real number, decimal.
Min
0.00
Allow two decimal places
Max
99997.99
Allow two decimal places
Read Only
No
Length
8
Allow Empty
Multiple Responses
No
Main Question Text
Cost of alcoholic beverages.
Title {mouse over text}
Answer Space Placeholder
0.00
Answer Space Pre-text
0.00
Answer Space Post-text
Answer Option Values and Labels
Edits
Skip Pattern
<on click ‘Save’ button> save record to database and message should appear at the top of the page that says “Item Saved”. Popup should automatically disappear in 5 seconds, and then goto blank DateScreen.
<on click ‘Back’ button> do not save expense and goto WelcomeSummary Screen. Do not save the expense and clear the current fields on the Add Expense page
Special Instructions
Only display this category if “yes” button is selected in ALC_HOL. Do not display if “No” is selected in ALC_HOL.
If ALC_COST > COST_COM, then display the following soft error message, “The cost for alcohol must be less than or equal to the total cost.”
Dataset
EMLS
2.11.3.5 DataElement Name/ID: Delete
-
Label
Delete
Required
Appears if user clicked on the “Edit” button at the WelcomeSummary screen OR if respondent clicks on the “trash” icon next to each item in the Expenses section.
Tab Index
Type
Clickable
Min Length
n/a
Max length
n/a
Read Only
Yes
Multiple Responses
No
Main Question Text
n/a
Title {mouse over text}
Answer Space Placeholder
Answer Space Pre-text
Answer Space Post-text
Answer Option Values and Labels
Edits
Skip Pattern
<on click the ‘Delete’ button, a warning should appear, “Are you sure you want to delete this item?”> [If user clicks “Delete” from the Expenses screen then delete expense from online and output records. Stay on WelcomeSummary Screen. Else if user clicks ‘Cancel’, stay on WelcomeSummary Screen.]
[If user clicks “Delete” from edit panel then return to WelcomeSummary screen. Else if user clicks “Cancel”, return to edit panel.
Special Instructions
2.12 Page Name/ID: ExpenseFDB
2.12.1 General Instructions
Layout: Vertical
Title and Subtitle:
Pre-Instructions: CE Diary (Heading) Help Logout
Expenses Week 1(button) Week 2(button)
Main Question Wording:
Date: ___________
Business: _________
Type of Expense: Food and Drinks for Home Consumption
Describe item or expense – text box (‘I’ icon)
Total cost (do not include tax) (‘I’ icon)
How was the item packaged - Buttons for:
Fresh
Frozen
Bottled/Canned
Other
Post-Instructions: ‘Back’ button ‘Save’ button
Special Instructions:
Date, Business, and Type of Expense should be prefilled with information from DateScreen. Type of Expense is Food and Drinks for Home Consumption.
After the user selects a button, make selected button appear suppressed/selected so that it’s clear to the user that they’ve made a selection. Prior to selection, the buttons should all be identical in appearance. Only allow one option to be selected for the packaged and purchased questions.
Character values will not be allowed in the Total cost field. When a non-numeric value other than a “period” is entered into the field an error message should prompt the user to this rule.
Else if, upon click on ‘Save’, save record to database and popup should appear that says “Item Saved”. Popup below the banner should automatically disappear in 5 seconds, and then goto blank DateScreen. When an item is not saved because a required field is empty when you select “Save”, a red warning appears above the back and save button that says “Please enter the date, business, type of expense, and the total cost”. If you click on ‘Back’, return to the WelcomeSummary Screen. Do not save the expense and clear the current fields on the Add Expense page If select “save” with a completed entry, then save record to database and popup should appear that says “Item Saved”. Popup should automatically disappear in 5 seconds, and return to the WelcomeSummary Screen.
If reached this screen after clicking on the “Edit” button at the WelcomeSummary screen, then the button ‘Delete’ will appear. If the user clicks on the ‘Delete’ button a warning should appear, “Are you sure you want to delete this item?” to prevent the user from deleting an expense by mistake. The user can click on “Delete” to delete the expense or “Cancel” to keep the expense. Selecting “Cancel” will return the respondent to the edit screen.
Under the heading, Expenses should be left justified and the Week 1 and Week 2 buttons will be right justified. These buttons will allow the user to toggle between each week’s diary. The active week will be highlighted in green, while the other week will be gray. The week 1 button should be green while week 2 is gray unless the user selects week 2.
Once users have entered at least one expense, a delete option (i.e. a trash icon) and an edit button (a pencil icon) should appear to the right of each expense to the right of the cost.
Clicking ‘I’ icon next to the description item or expense opens a popup window with description of expenses in Food and Drinks for Home Consumption category. See Appendix A 3.2.1 Description for Food and Drinks for Home Consumption for picture of the popup.
Clicking ‘I’ icon next to the total cost opens a popup window with a receipt example for the Food and Drinks for Home Consumption category. See Appendix B 4.1.2 Food and Drinks for Home Consumption for picture of the popup.





Soft error/inline message displays if cost_com>$299.99, “Please
confirm that the cost you entered is correct.”
When ‘I’ clicked, instruction box for FDH will appear,
under section 3.2.1
When ‘I’ clicked, receipt example pops up in new window.
See Appendix B 4.1.2 Receipt Example for Food and Drinks for Home
Consumption for picture of the popup.
Clicking ‘I’ icon opens a popup window with description
of expenses in Food and Drinks for Home Consumption category. See
Appendix A 3.1.2 Description for Food and Drinks for Home
Consumption for picture of the popup.
Add business auto-suggest feature (see
section 2.10.3.4 special instructions)
2.12.2 Online Layout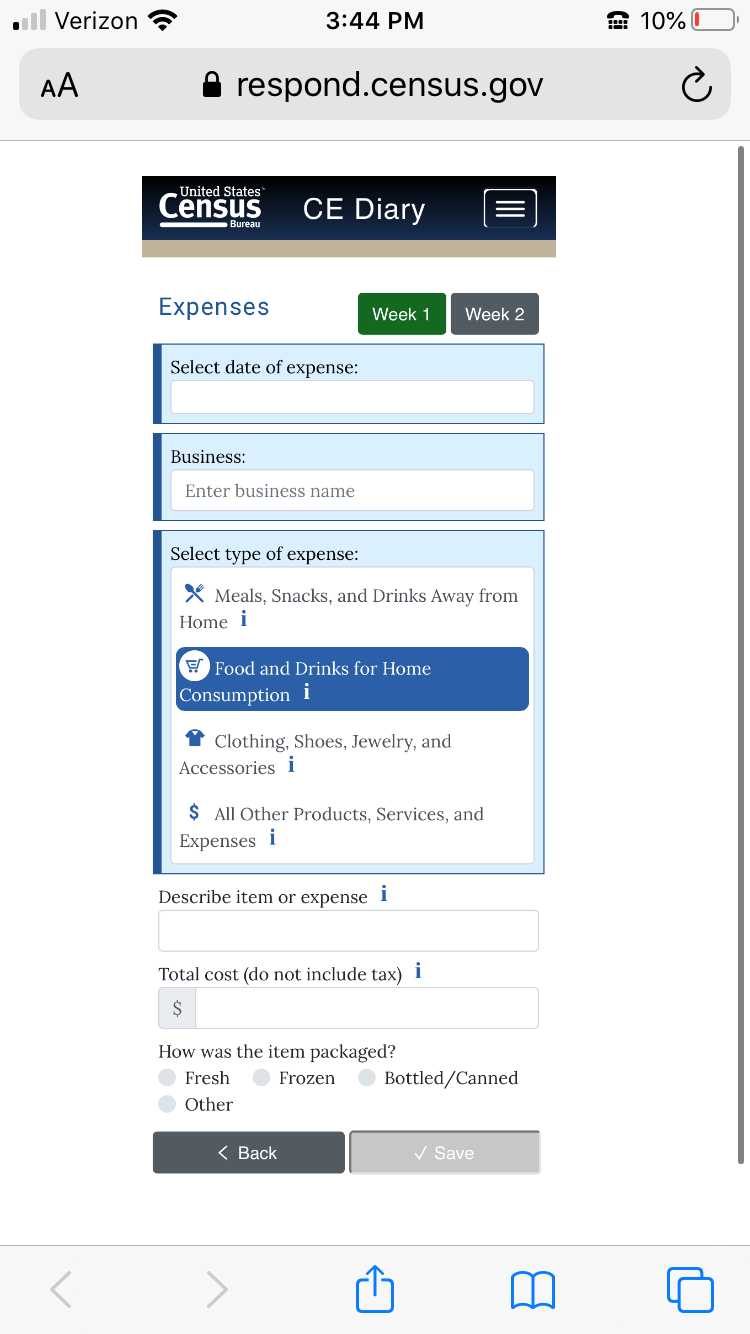
Alternative Text for Receipt Example
The Alternative Text for the Receipt Example for Food and Drinks for Home Consumption category is shown below. The receipt example is shown in Appendix B 4.1.2.
“Business” is the name of the store or establishment where the item was purchased and is usually printed at the top of the receipt.
“Describe the food or drink item” is a brief description of the item purchased on the itemized list. For example, “strawberries” or “ground beef.”
“Total cost” is the purchase price of the item without tax.
“Date” is the month, day, and year usually printed at the top or bottom of the receipt.
2.12.3 Data Elements
2.12.3.1 DataElement Name/ID: ITEMDESC
-
Label
ITEMDESC
Required
Yes. Screen opens after CATEGORY=2.
Tab Index
1
Type
string
Min Length
1
Max Length
50
Read Only
No
Length
8
Allow Empty
Multiple Responses
No
Main Question Text
Describe item or expense
Title {mouse over text}
Answer Space Placeholder
Enter description
Answer Space Pre-text
Answer Space Post-text
Answer Option Values and Labels
Edits
Skip Pattern
Goto COST_COM
Special Instructions
Dataset
EFDB
2.12.3.2 DataElement Name/ID: COST_COM
-
Label
COST_COM
Required
Yes. Screen opens after CATEGORY=2. Entry in ITEMDESC
Tab Index
1
Type
Real number, decimal
Min
0.00
Allow two decimal places
Max
99997.99
Allow two decimal places
Read Only
No
Length
8
Allow Empty
Multiple Responses
No
Main Question Text
Total cost (do not include tax)
Title {mouse over text}
Answer Space Placeholder
0.00
Answer Space Pre-text
0.00
Answer Space Post-text
Answer Option Values and Labels
Edits
Skip Pattern
Goto PKG_TYPE
Special Instructions
If COST_COM>299.99, then display the following soft error message, “Please confirm the cost you entered is correct.”
Dataset
EFDB
2.12.3.3 DataElement Name/ID: PKG_TYPE
-
Label
PKG_TYPE
Required
Yes. Screen opens after CATEGORY=2. Entry in ITEMDESC
Tab Index
1
Type
Buttons
Min
1
Max
4
Read Only
No
Length
1
Allow Empty
Multiple Responses
No
Main Question Text
How was the item packaged?
Title {mouse over text}
Answer Space Placeholder
Answer Space Pre-text
Answer Space Post-text
Answer Option Values and Labels
Fresh
Frozen
Bottled/Canned
Other
Edits
Skip Pattern
<on click ‘Save’ button> save record to database and popup should appear that says “Item Saved”. Popup should automatically disappear in 5 seconds, and then goto blank DateScreen.
<on click ‘Save’ button but required field(s) empty> red text should appear over the Back and Save button that says “Please enter the date, business, type of expense, and the total cost”.
<on click ‘Back’ button> do not save expense and goto WelcomeSummary Screen. Do not save the expense and clear the current fields on the Add Expense page
Special Instructions
For output, save values as numbers where Fresh is 1, Frozen is 2, Bottled/Canned is 3, and Other is 4.
Dataset
EFDB
2.12.3.4 DataElement Name/ID: Delete
-
Label
Delete
Required
Appears only if user clicked on the “Edit” button or selects the trash icon at the WelcomeSummary screen
Tab Index
Type
Clickable
Min Length
n/a
Max length
n/a
Read Only
Yes
Multiple Responses
No
Main Question Text
n/a
Title {mouse over text}
Answer Space Placeholder
Answer Space Pre-text
Answer Space Post-text
Answer Option Values and Labels
Edits
Skip Pattern
<on click the ‘Delete’ button, a warning should appear, “Are you sure you want to delete this item?”> along with the Type of Expense, Business, and Description if entered by the respondent [From the trash icon, if user clicks ‘Delete’ then delete expense from online and output records. Stay on WelcomeSummary Screen. Else if user clicks ‘Cancel’, stay on WelcomeSummary Screen.]. [From the edit icon, if user clicks ‘Delete’ then delete expense from online and output records. Return to the WelcomeSummary Screen; Else if select “Back, prompt the box “Do you want to save”. If select Yes or No, return to WelcomeSummary Screen]
[From the edit icon, if user clicks ‘Delete’ then delete expense from online and output records. Return to the WelcomeSummary Screen; Else if select “Back”, prompt the box “Do you want to save”. If user selects Yes, return to WelcomeSummary Screen and save the new entry]. Else if select “Back”, prompt the box “Do you want to save”. If user selects No, return to WelcomeSummary Screen and keep the prior entry]. If user does not select an answer, the “Do you want to save?” screen remains open. User may also select the box in the top right corner to close this box and return to the WelcomeSummary Screen.
Special Instructions
2.13 Page Name/ID: ExpenseCLO
2.13.1 General Instructions
Layout: Vertical
Title and Subtitle:
Pre-Instructions: CE Diary (Heading) Help Logout
Expenses Week 1(button) Week 2(button)
Main Question Wording:
Date: ___________
Business: _________
Type of Expense: Clothing, Shoes, Jewelry, and Accessories
Describe item or expense – text box (‘I’ icon)
Total cost (do not include tax) (‘I’ icon)
Was this item for: - Buttons for;
Child under 2
Boy 2 – 15
Girl 2 – 15
Man 16 & over
Woman 16 & over
Post-Instructions: ‘Back’ button ‘Save’ button
Special Instructions:
Date, Business, and Type of Expense should be prefilled with information from DateScreen. Type of Expense is Clothing, Shoes, Jewelry, and Accessories.
After the user selects a button, make selected button appear suppressed/selected so that it’s clear to the user that they’ve made a selection. Prior to selection, the buttons should all be identical in appearance. Only allow one option to be selected from the age/gender and the purchased questions.
Character values will not be allowed in the Total cost field. When a non-numeric value other than a “period” is entered into the field an error message should prompt the user to this rule.
Else if, upon click on ‘Save’, save record to database and popup should appear that says “Item Saved”. Popup should automatically disappear in 5 seconds, and then goto blank DateScreen. When an item is not saved because a required field is empty, a popup should appear that says “Please enter the date, business, type of expense, and the total cost”. Popup should automatically disappear in 5 seconds. Else if, upon click on ‘Back’, popup should appear that says “Do you want to save?” with Yes/No options. If yes then save record to database and popup should appear that says “Item Saved”. Popup should automatically disappear in 5 seconds, and return to the WelcomeSummary Screen. If no then goto WelcomeSummary Screen. Do not save the expense and clear the current fields on the Add Expense page.
If reached this screen after clicking on the “Edit” button at the WelcomeSummary screen, then the button ‘Delete’ will appear. If the user clicks on the ‘Delete’ button a warning should appear, “Are you sure you want to delete this item?” to prevent the user from deleting an expense by mistake. The user can click on “Delete” to delete or “Cancel” to keep the expense.
Under the heading, Expenses should be left justified and the Week 1 and Week 2 buttons will be right justified. These buttons will allow the user to toggle between each week’s diary. The active week will be highlighted in green, while the other week will be gray. The week 1 button should be green while week 2 is gray unless the user selects week 2.
Once users have entered at least one expense, a delete option (i.e. a trash icon) and an edit button (a pencil icon) should appear to the right of each expense to the right of the cost.
Clicking ‘I’ icon next to the description item or expense opens a popup window with description of expenses in Clothing, Shoes, Jewelry, and Accessories category. See Appendix A 3.2.2 Clothing, Shoes, Jewelry, and Accessories for picture of the popup.
Clicking ‘I’ icon next to the total cost opens a popup window with a receipt example for the Clothing, Shoes, Jewelry, and Accessories category. See Appendix B 4.1.3 Clothing, Shoes, Jewelry, and Accessories for picture of the popup.
2.13.2 Online Layouts
IF
COST_COM>9999.99,
then display the following soft error message, “Please confirm
the cost you entered is correct.”
Clicking ‘I’ icon opens a popup window located in
Appendix A 3.2.2
Clicking ‘I’ icon opens a popup window with description
of expenses in Clothing, Shoes, Jewelry, and Accessories category.
See Appendix A 3.1.3 Description for Clothing, Shoes, Jewelry, and
Accessories for picture of the popup.
Clicking ‘I’ icon opens a popup
window with a receipt example for the Clothing, Shoes, Jewelry, and
Accessories category. See Appendix B 4.1.3 Receipt Example for
Clothing, Shoes, Jewelry, and Accessories for picture of the popup.


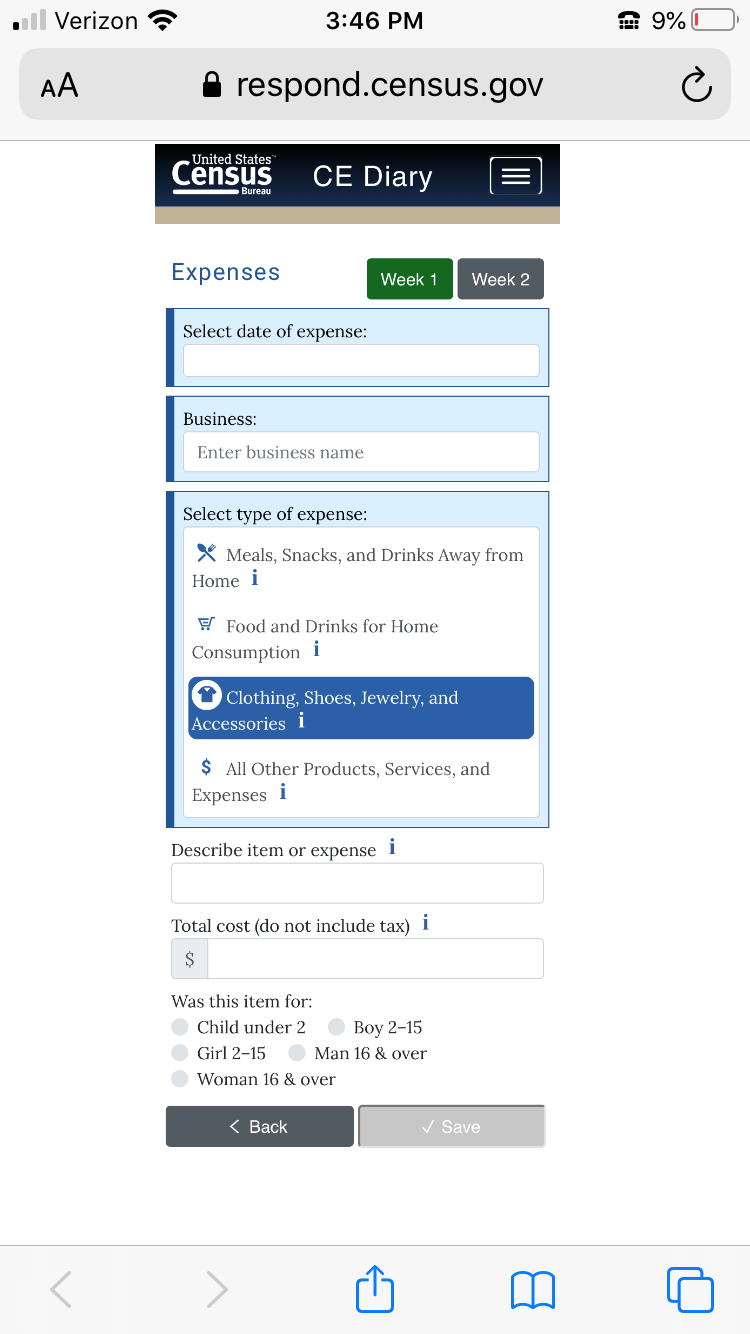
Alternative Text for Receipt Example
The Alternative Text for the Receipt Example for Clothing, Shoes, Jewelry, and Accessories category is shown below. The receipt example is shown in Appendix B 4.1.3.
“Business” is the name of the store or establishment where the item was purchased and is usually printed at the top of the receipt.
“Date” is the month, day, and year usually printed at the top or bottom of the receipt.
“Describe item or expense” is a brief description of the item purchased on the itemized list. For example, “sweater” or “pants.”
“Total cost” is the purchase price of the item without tax.
“Age” is for whom the item was purchased and answered by choosing one of three options: Under 2, 2-15, and 16 & Over. This can sometimes be determined by using the description if the description mentions baby, child, adult etc.
“Gender” is for whom the item was purchased and answered by choosing one of two options: female or male and can sometimes be determined using the description if the description mentions girls, boys, women's, men’s, etc.
2.13.3 Data Elements
2.13.3.1 DataElement Name/ID: ITEMDESC
-
Label
ITEMDESC
Required
Yes. Screen opens after CATEGORY=3.
Tab Index
1
Type
string
Min Length
Max Length
Read Only
No
Length
50
Multiple Responses
No
Main Question Text
Describe item or expense
Title {mouse over text}
Answer Space Placeholder
Enter description
Answer Space Pre-text
Answer Space Post-text
Answer Option Values and Labels
Edits
Skip Pattern
Goto COST_COM
Special Instructions
Dataset
ECLO
2.13.3.2 DataElement Name/ID: COST_COM
-
Label
COST_COM
Required
Yes. Screen opens after CATEGORY=3.
Tab Index
1
Type
Real number, decimal
Min Length
0.00
Allow two decimal places
Max Length
99997.99
Allow two decimal places
Read Only
No
Length
8
Allow Empty
Multiple Responses
No
Main Question Text
Total cost (do not include tax)
Title {mouse over text}
Answer Space Placeholder
0.00
Answer Space Pre-text
0.00
Answer Space Post-text
Answer Option Values and Labels
Edits
Skip Pattern
Goto AGE_SEX
Special Instructions
If COST_COM>9999.99, then display the following soft error message, “Please confirm the cost you entered is correct.
Dataset
ECLO
2.13.3.3 DataElement Name/ID: AGE_SEX
-
Label
AGE_SEX
Required
Yes. Screen opens after CATEGORY=3. Entry in COST_COM
Tab Index
1
Type
Buttons
Min Length
1
Max Length
5
Read Only
No
Length
1
Multiple Responses
No
Main Question Text
Was this item for:
Title {mouse over text}
Answer Space Placeholder
Answer Space Pre-text
Answer Space Post-text
Answer Option Values and Labels
Child under 2
Boy 2-15
Girl 2-15
Man 16 & over
Woman 16 & over
Allow blank
Edits
After the user selects a button, make selected button appear suppressed/selected so that it’s clear to the user that they’ve made a selection. Prior to selection, the buttons should all be identical in appearance.
Skip Pattern
<on click ‘Save’ button> save record to database and popup should appear that says “Item Saved”. Popup should automatically disappear in 3 seconds, and then goto blank DateScreen.
<on click ‘Save’ button but required field(s) empty> popup should appear that says “Please enter the date, business, type of expense, and the total cost”. Popup should automatically disappear in 5 seconds.<on click ‘Back’ button> do not save expense and goto WelcomeSummary Screen. Do not save the expense and clear the current fields on the Add Expense page
Special Instructions
For output, save value as numbers (1-5) where Child under 2 is 1, Boy 2-15 is 2, Girl 2-15 is 3, Man 16 & over is 4, and Woman 16 & over is 5.
Dataset
ECLO
2.13.3.4 DataElement Name/ID: Delete
-
Label
Delete
Required
Appears only if user clicked on the “Edit” button or trash icon at the WelcomeSummary screen
Tab Index
Type
Clickable
Min Length
n/a
Max length
n/a
Read Only
Yes
Multiple Responses
No
Main Question Text
n/a
Title {mouse over text}
Answer Space Placeholder
Answer Space Pre-text
Answer Space Post-text
Answer Option Values and Labels
Edits
Skip Pattern
<on click the ‘Delete’ button, a warning should appear, “Are you sure you want to delete this item?”> [From the trash icon, If user clicks ‘Delete’ then delete expense from online and output records. Stay on WelcomeSummary Screen. Else if user clicks ‘Cancel’, stay on WelcomeSummary Screen.] [From the edit icon, if user clicks ‘Delete’ then delete expense from online and output records. Return to the WelcomeSummary Screen; Else if select “Back, prompt the box “Do you want to save”. If select Yes or No, return to WelcomeSummary Screen]
Special Instructions
2.14 Page Name/ID: ExpenseOTH
2.14.1 General Instructions
Layout: Vertical
Title and Subtitle:
Pre-Instructions: CE Diary (Heading) Help Logout
Expenses Week 1(button) Week 2(button)
Main Question Wording:
Date: ___________
Business: _________
Type of Expense: All Other Products, Services, and Expenses
Describe item or expense – text box (‘I’ icon)
Total cost (do not include tax)- text box (‘I’ icon)
Post-Instructions: ‘Back’ button ‘Save’ button
Special Instructions:
Date, Business, and Type of Expense should be prefilled with information from DateScreen. Type of Expense is Meals, Snacks, and Drinks Away from Home.
Character values will not be allowed in the Total cost field. When a non-numeric value other than a “period” is entered into the field an error message should prompt the user to this rule.
Else if, upon click on ‘Save’, save record to database and popup should appear that says “Item Saved”. Popup should automatically disappear in 5 seconds, and then goto blank DateScreen. When an item is not saved because a required field is empty, a popup should appear that says “Please enter the date, business, type of expense, and the total cost”. Popup should automatically disappear in 5 seconds. Else if, upon click on ‘Back’, popup should appear that says “Do you want to save?” with Yes/No options. If yes then save record to database and popup should appear that says “Item Saved”. Popup should automatically disappear in 5 seconds, and return to the WelcomeSummary Screen. If no then goto WelcomeSummary Screen. Do not save the expense and clear the current fields on the Add Expense page.
If reached this screen after clicking on the “Edit” button at the WelcomeSummary screen, then the button ‘Delete’ will appear. If the user clicks on the ‘Delete’ button a warning should appear, “Are you sure you want to delete this item?” to prevent the user from deleting an expense by mistake. The user can click on “Delete” to delete or “Cancel” to keep the expense.
Under the heading, Expenses should be left justified and the Week 1 and Week 2 buttons will be right justified. These buttons will allow the user to toggle between each week’s diary. The active week will be highlighted in green, while the other week will be gray. The week 1 button should be green while week 2 is gray unless the user selects week 2.
Once users have entered at least one expense, a delete option (i.e. a trash icon) and an edit button (a pencil icon) should appear to the right of each expense to the right of the cost.
Clicking ‘I’ icon next to the total cost opens a popup window with a receipt example for the All Other Products, Services, and Expenses category. See Appendix B 4.1.4 All Other Products, Services, and Expenses for picture of the popup.
Clicking ‘I’ icon next to the description item or expense opens a popup window with description of expenses in All Other Products, Services, and Expenses category. See Appendix A 3.2.3 All Other Products, Services, and Expenses for picture of the popup.
2.14.2
Online Layouts
IF
COST_COM>99999.99,
then display the following soft error message, “Please confirm
the cost you entered is correct.”
Clicking “I” icon opens popup window located under
Appendix A.3.2.3.
Clicking ‘I’ icon opens a popup window with description
of expenses in All Other Products, Services, and Expenses category.
See Appendix A 3.1.4 Description for All Other Products, Services,
and Expenses for picture of the popup.
Clicking ‘I’ icon opens a popup
window with a receipt example for the All Other Products, Services,
and Expenses category. See Appendix B 4.1.4 Receipt Example for All
Other Products, Services, and Expenses for picture of the popup.



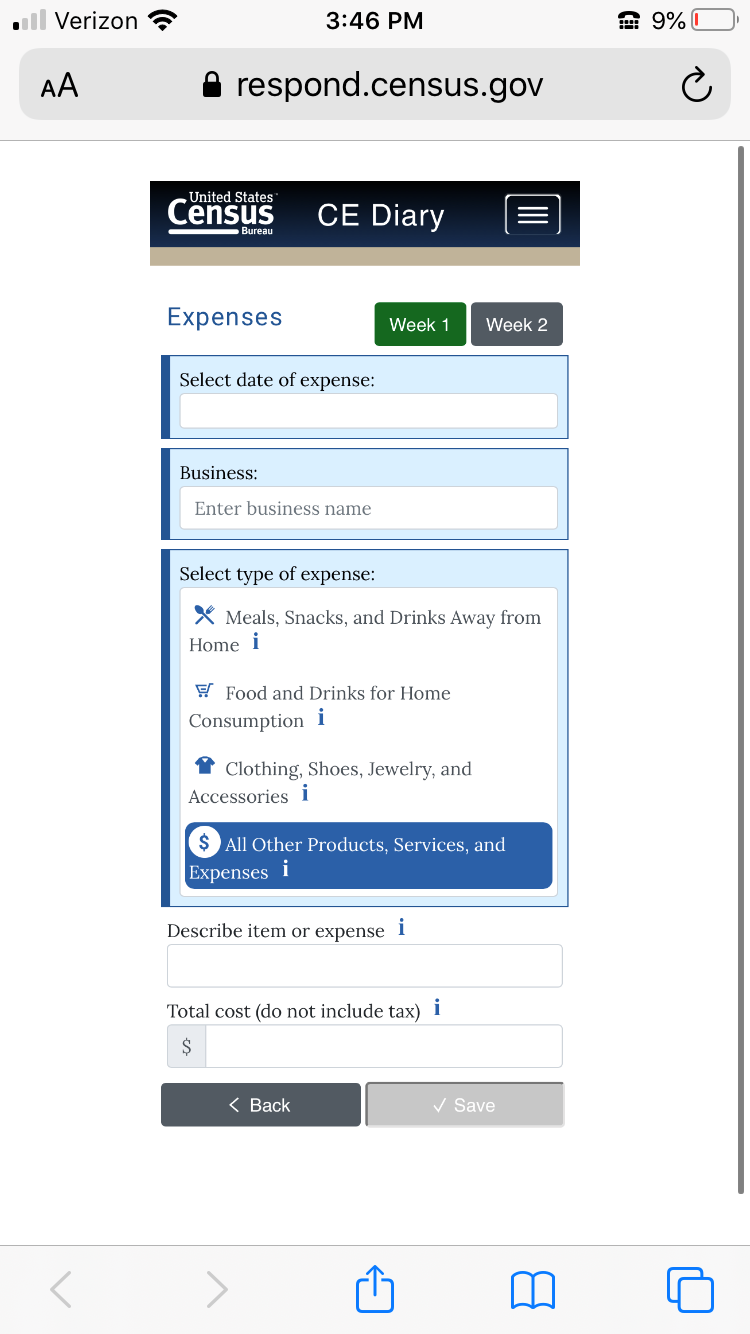
Alternative Text for Receipt Example
The Alternative Text for the Receipt Example for All Other Products, Services, and Expenses category is shown below. The receipt example is shown in Appendix B 4.1.4.
“Business” is the name of the store or establishment where the item was purchased and is usually printed at the top of the receipt.
“Date” is the month, day, and year usually printed at the top or bottom of the receipt.
“Describe item or expense” is a brief description of the item purchased on the itemized list. For example “handsoap” or “trash bags.”
“Total cost” is the purchase price of the item without tax.
2.14.3 Data Elements
2.14.3.1 DataElement Name/ID: ITEMDESC
-
Label
ITEMDESC
Required
Yes. Screen opens after CATEGORY= 4
Tab Index
1
Type
string
Min Length
Max Length
Read Only
No
Length
50
Multiple Responses
No
Main Question Text
Describe item or expense
Title {mouse over text}
Answer Space Placeholder
Enter description
Answer Space Pre-text
Answer Space Post-text
Answer Option Values and Labels
Edits
Skip Pattern
Goto COST_COM
Special Instructions
Dataset
EOTH
2.14.3.2 DataElement Name/ID: COST_COM
-
Label
COST_COM
Required
Yes. Screen opens after CATEGORY= 4
Tab Index
1
Type
Real number, decimal
Min Length
0.00
Allow two decimal places
Max Length
99997.99
Allow two decimal places
Read Only
No
Length
8
Allow Empty
Multiple Responses
No
Main Question Text
Total cost (do not include tax)
Title {mouse over text}
Answer Space Placeholder
0.00
Answer Space Pre-text
0.00
Answer Space Post-text
Answer Option Values and Labels
Edits
Skip Pattern
<on click ‘Save’ button> save record to database and popup should appear that says “Item Saved”. Popup should automatically disappear in 3 seconds, and then goto blank DateScreen.
<on click ‘Save’ button but required field(s) empty> popup should appear that says “Please enter the date, business, type of expense, and the total cost”. Popup should automatically disappear in 3 seconds.
<on click ‘Back’ button> do not save expense and goto WelcomeSummary Screen. Do not save the expense and clear the current fields on the Add Expense page
Special Instructions
IF COST_COM>99999.99, then display the following soft error message, “Please confirm the cost you entered is correct.”
Dataset
EOTH
2.14.3.3 DataElement Name/ID: Delete
-
Label
Delete
Required
Appears only if user clicked on the “Edit” button or trash icon at the WelcomeSummary screen
Tab Index
Type
Clickable
Min Length
n/a
Max length
n/a
Read Only
Yes
Multiple Responses
No
Main Question Text
n/a
Title {mouse over text}
Answer Space Placeholder
Answer Space Pre-text
Answer Space Post-text
Answer Option Values and Labels
Edits
Skip Pattern
<on click the ‘Delete’ button, a warning should appear, “Are you sure you want to delete this item?”> [From the trash icon, If user clicks ‘OK’ then delete expense from online and output records. Stay on WelcomeSummary Screen. Else if user clicks ‘Cancel’, stay on WelcomeSummary Screen.]
[From the edit icon, if user clicks ‘Delete’ then delete expense from online and output records. Return to the WelcomeSummary Screen; Else if select “Back, prompt the box “Do you want to save”. If select Yes or No, return to WelcomeSummary Screen]
Special Instructions
2.15 Page Name/ID: Help
2.15.1 General Instructions
Layout: Vertical
Title and Subtitle:
Pre-Instructions: CE Diary (Heading)
Main Question Wording:
User Settings (link)
User Guide (link to pdf)
Video Tutorials (link to census youtube playlist)
General Instructions (link)
How to Fill Out Your Diary (link)
Diary Examples (link)
FAQs (link)
Definitions (link)
Contact Us
Please contact us with any questions or concerns. We will get back to you as soon as possible.
CE Diary Help Desk: Census.CE.Helpdesk@census.gov (Monday-Friday 9am-5pm EST)
You can reach the Help Desk by email at [email protected] or by telephone at 877-744-1522. Our Help Desk representatives are available: Monday through Friday from 9 am to 10 pm ET, Saturday from 9 am to 9 pm ET and Sunday from 11 am to 9 pm ET.
After hours: Please leave your name, phone number, and a detailed message. We will get back to you as soon as possible.
Post-Instructions: ‘Closebutton
Special Instructions:
Upon click of ‘Help’, open new window with Help Screen.
At the bottom of the screen there should be a ‘Close’ button that takes closes Help window.
Clicking on ‘General Instructions’ link should open the window General Instructions Screen.
Clicking on the ‘How to Fill Out Your Diary’ link should open the window How to Fill Out Your Diary Screen.
Clicking on the ‘Diary Examples’ link should open the window with the Diary Examples Screen.
Clicking on the ‘FAQs’ link should open the window with the FAQs Screen.
Clicking on the ‘Definitions’ link should open the window with the Definitions Screen.
User Settings link should only be visible after a successful login. Clicking on the ‘User Settings’ link should open the window with the User Settings.
2.15.2 Data Elements
2.15.2.1 DataElement Name/ID: Help
-
Label
Help
Required
Yes. Help Screen opens on clicking ‘Help’ button.
Tab Index
Type
Clickable
Min Length
n/a
Max length
n/a
Read Only
Yes
Multiple Responses
No
Main Question Text
n/a
Title {mouse over text}
Answer Space Placeholder
Answer Space Pre-text
Answer Space Post-text
Answer Option Values and Labels
Edits
Skip Pattern
<on click ‘Close’ button> [close Help Window]
Special Instructions
2.15.2.2 DataElement Name/ID: Ch_UN
-
Label
Ch_UN
Required
Yes.
Tab Index
Type
Clickable
Min Length
n/a
Max length
n/a
Read Only
Yes
Multiple Responses
No
Main Question Text
n/a
Title {mouse over text}
Answer Space Placeholder
Answer Space Pre-text
Answer Space Post-text
Answer Option Values and Labels
Edits
Skip Pattern
< From the User Settings Screen, click ‘Change Update button> [goto Change_Username Screen]
Special Instructions
2.15.2.2b DataElement Name/ID: Ch_PW
-
Label
Ch_PW
Required
Yes.
Tab Index
Type
Clickable
Min Length
n/a
Max length
n/a
Read Only
Yes
Multiple Responses
No
Main Question Text
n/a
Title {mouse over text}
Answer Space Placeholder
Answer Space Pre-text
Answer Space Post-text
Answer Option Values and Labels
Edits
Skip Pattern
<From the User Settings Screen, click ‘Update> [goto Change_Password Screen]
Special Instructions
2.15.2.3 DataElement Name/ID: Gen_Ins
-
Label
Gen_Ins
Required
Yes.
Tab Index
Type
Clickable
Min Length
n/a
Max length
n/a
Read Only
Yes
Multiple Responses
No
Main Question Text
n/a
Title {mouse over text}
Answer Space Placeholder
Answer Space Pre-text
Answer Space Post-text
Answer Option Values and Labels
Edits
Skip Pattern
<on click ‘General Instructions’ link > [goto General Instructions screen]
Special Instructions
2.15.2.4 DataElement Name/ID: How_to
-
Label
How_to
Required
Yes.
Tab Index
Type
Clickable
Min Length
n/a
Max length
n/a
Read Only
Yes
Multiple Responses
No
Main Question Text
n/a
Title {mouse over text}
Answer Space Placeholder
Answer Space Pre-text
Answer Space Post-text
Answer Option Values and Labels
Edits
Skip Pattern
<on click ‘How to Fill Out Your Diary’ link > [goto How to Fill Out Your Diary screen]
Special Instructions
2.15.2.5 DataElement Name/ID: DiaryEx
-
Label
DiaryEx
Required
Yes.
Tab Index
Type
Clickable
Min Length
n/a
Max length
n/a
Read Only
Yes
Multiple Responses
No
Main Question Text
n/a
Title {mouse over text}
Answer Space Placeholder
Answer Space Pre-text
Answer Space Post-text
Answer Option Values and Labels
Edits
Skip Pattern
<on click ‘Diary Examples’ link > [goto Diary Examples screen]
Special Instructions
2.15.2.6 DataElement Name/ID: FAQs
-
Label
FAQs
Required
Yes.
Tab Index
Type
Clickable
Min Length
n/a
Max length
n/a
Read Only
Yes
Multiple Responses
No
Main Question Text
n/a
Title {mouse over text}
Answer Space Placeholder
Answer Space Pre-text
Answer Space Post-text
Answer Option Values and Labels
Edits
Skip Pattern
<on click ‘FAQs’ link > [goto FAQs screen]
Special Instructions
2.15.2.7 DataElement Name/ID: Definitions
-
Label
Definitions
Required
Yes.
Tab Index
Type
Clickable
Min Length
n/a
Max length
n/a
Read Only
Yes
Multiple Responses
No
Main Question Text
n/a
Title {mouse over text}
Answer Space Placeholder
Answer Space Pre-text
Answer Space Post-text
Answer Option Values and Labels
Edits
Skip Pattern
<on click ‘Definitions’ link > [goto Definitions screen]
Special Instructions
2.16 Page Name/ID: Change_Password
2.16.1 General Instructions
Layout: Vertical
Title and Subtitle:
Pre-Instructions: CE Diary (Heading)
Main Question Wording:
Change Password
Passwords must contain all of the following:
At least 8 characters
At least 1 uppercase letter
At least 1 lowercase letter
At least 1 number
At least 1 special character from the following: ! # $ * & ? ~
New Password _________________
Confirm New Password ____________
Post-Instructions: ‘Save’ button ‘Back’ Button
Special Instructions:
All fields must be filled in before Password change can be accepted.
The headers “New Password” and “Confirm New Password” should be left justified.
Entries in new Password and Confirm New Password should be the same.
Entries in Email address and Confirm email address should be the same.
At the bottom of the screen there should be a ‘Back’ button that takes the user back to the previous screen.
Upon click ‘Save’ button and all criteria are met, popup should appear that says “Your password has been updated”. Popup should automatically disappear in 5 seconds.
If user has previously changed password or username and has an email and security answer saved, do not ask for Email and Security questions.
2.16.2 Online Layouts
2.16.3 Data Elements
2.16.3.1 DataElement Name/ID: New_PW
-
Label
New_PW
Required
Yes. User clicks on Update link under User Guide Settings under Help menu.
Tab Index
2
Type
Text
Min Length
8
Max length
20
Read Only
No
Multiple Responses
No
Main Question Text
New Password
Title {mouse over text}
Answer Space Placeholder
Answer Space Pre-text
Answer Space Post-text
Answer Option Values and Labels
Edits
Skip Pattern
Special Instructions
2.16.3.2 DataElement Name/ID: Confirm_PW
-
Label
Confirm_PW
Field name
Confirm_PW
Required
Yes. User clicks on Update link under User Guide Settings under Help menu..
Tab Index
1
Type
Text, manual entry
Min Length
8
Max length
40
Read Only
No
Multiple Responses
No
Main Question Text
New Password
Title {mouse over text}
Answer Space Placeholder
Answer Space Pre-text
Answer Space Post-text
Answer Option Values and Labels
Edits
Skip Pattern
<on click ‘Save’ button> if New_PW is not the same as Confirm_PW, then display message saying “Your New and Confirm Passwords do not match.”
Else if New_PW and Confirm_PW are the same, but New_PW does not fit the following criteria: at least 8 characters, at least 1 uppercase letter, at least 1 lowercase letter, at least 1 number, at least 1 special character from the following: ! # $ * & ? ~, then display message saying “Your new Password must meet the following criteria:
1. At least 8 characters
2. At least 1 uppercase letter
3. At least 1 lowercase letter
4. At least 1 number
5. At least 1 special character from the following: ! # $ * & ? ~.”
Else if goto new_email
Special Instructions
2.16.3.3 DataElement Name/ID: New_PW
-
Label
Confirm_PW
Required
Yes. User clicks on Update link under User Guide Settings under Help menu.
Tab Index
2
Type
Text
Min Length
8
Max length
20
Read Only
No
Multiple Responses
No
Main Question Text
Confirm New Password
Title {mouse over text}
Answer Space Placeholder
Answer Space Pre-text
Answer Space Post-text
Answer Option Values and Labels
Edits
Skip Pattern
<on click ‘Save’ button> if New_PW is not the same as Confirm_PW, then display message saying “Your New and Confirm Passwords do not match.”
Else if New_PW and Confirm_PW are the same, but New_PW does not fit the following criteria: at least 8 characters, at least 1 uppercase letter, at least 1 lowercase letter, at least 1 number, at least 1 special character from the following: ! # $ * & ? ~, then display message saying “Your new Password must meet the following criteria:
1. At least 8 characters
2. At least 1 uppercase letter
3. At least 1 lowercase letter
4. At least 1 number
5. At least 1 special character from the following: ! # $ * & ? ~.”
Else if goto new_email
Special Instructions
2.16.3.4 DataElement Name/ID: New_email
-
Label
New_email
Field name
New_email
Required
Yes. User clicks on “Update” under User Settings under Help menu.
Tab Index
1
Type
Text, manual entry
Min Length
8
Max length
50
Read Only
No
Multiple Responses
No
Main Question Text
Email Address Confirm Email Address
Title {mouse over text}
Answer Space Placeholder
Answer Space Pre-text
Answer Space Post-text
Answer Option Values and Labels
Edits
Skip Pattern
After After hitting “save” if email addresses match display ““Your Email Address has been updated” and return to User Setting Screen. After selecting “Back” return to User Settings screen.
Special Instructions
After selecting “Save”, If email addresses don’t match red display message, “Email addresses do not match”. The warning should stay up until the user selects a either the “Save” or “Return” button again.
2.16b Page Name/ID: Change_Username
2.16.1 General Instructions
Layout: Vertical
Title and Subtitle:
Pre-Instructions: CE Diary (Heading)
Main Question Wording:
New Username Confirm New Username
Post-Instructions: ‘Save’ button ‘Back’ Button
Special Instructions:
All fields must be filled in before Username change can be accepted.
The headers “New Username” and “Confirm New Username” should be left justified.
Entries in new Username and Confirm New Username should be the same.
Entries in Email address and Confirm email address should be the same.
At the bottom of the screen there should be a ‘Back’ button that takes the user back to the previous screen.
Upon click ‘Save’ button and all criteria are met, popup should appear that says “Your username has been updated”. Popup should automatically disappear in 5 seconds.
2.16.2 Online Layouts
2.16.3 Data Elements
2.16.3.1 DataElement Name/ID: New_UN
-
Label
New_UN
Required
Yes. User clicks on on the Update link under User Settings.
Tab Index
2
Type
Text
Min Length
8
Max length
20
Read Only
No
Multiple Responses
No
Main Question Text
New Username
Title {mouse over text}
Answer Space Placeholder
Answer Space Pre-text
Answer Space Post-text
Answer Option Values and Labels
Edits
Skip Pattern
Special Instructions
2.16.3.2 DataElement Name/ID: Confirm_UN
-
Label
Confirm_UN
Field name
Confirm_UN
Required
Yes.
Tab Index
1
Type
Text, manual entry
Min Length
8
Max length
20
Read Only
No
Multiple Responses
No
Main Question Text
Confirm New Username
Title {mouse over text}
Answer Space Placeholder
Answer Space Pre-text
Answer Space Post-text
Answer Option Values and Labels
Edits
Skip Pattern
On Selecting “Save”, if New_UN and Confirm_UN do not match or are empty, display “Your New and Confirm Usernames do not match” and stay on screen, else if New_UN and Confirm_UN match display “Your Username has been updated” for 5 seconds and return to previous screen. If you select “Back” return to previous screen.
Special Instructions
2.16.3.3
2.16.3.4 DataElement Name/ID: New_email
-
Label
New_email
Field name
New_email
Required
Yes. User clicks on Update link under User Settings.
Tab Index
1
Type
Text, manual entry
Min Length
8
Max length
50
Read Only
No
Multiple Responses
No
Main Question Text
Email:
Title {mouse over text}
Answer Space Placeholder
Answer Space Pre-text
Answer Space Post-text
Answer Option Values and Labels
Edits
Skip Pattern
Special Instructions
2.16.3.5 DataElement Name/ID: Confirm_email
-
Label
Confirm_email
Required
Yes. User clicks on Change Username link.
Tab Index
2
Type
Text
Min Length
8
Max length
50
Read Only
No
Multiple Responses
No
Main Question Text
Confirm Email Address
Title {mouse over text}
Answer Space Placeholder
Answer Space Pre-text
Answer Space Post-text
Answer Option Values and Labels
Edits
Skip Pattern
<on click ‘Save’ button> if New_email is not the same as Confirm_email, then display message saying “Email addresses do not match.”; If New_email OR Confirm_email are empty display, “Please enter an email address.”
If New_email and Confirm_email are the same but that email is already registered display “That email address is already registered. Please try a different email address.
Else if New_email and Confirm_email are the same but the email address is new, display “Your e-mail address has been updated” for 5-seconds.
<On clicking Back> return to previous screen.
Special Instructions
2.17 Page Name/ID: General Instructions
2.17.1 General Instructions
Layout: Vertical
Title and Subtitle:
Pre-Instructions: CE Diary (Heading)
Main Question Wording:
General Instructions
Complete this diary for Week 1 and Week 2 of the two-week period. Enter EVERYTHING you and the people in your household spend money on each day – the products you buy, the services you use, the household expenses you have during the week – no matter how large or small they are.
We recommend that you record your expenses each day. Think about where you went and what you did.
Include payments by:
Cash Credit/Debit Card Automatic Withdrawal/Payroll Deduction
Check Money Order Store Charge Card
Food Stamps WIC Voucher Gift Certificate
Keep receipts and other records so that you will remember to record what you bought or paid for.
Some record types include:
Receipts Bank Statements Catalog/Internet Purchases
Bills Credit Card Statements
Pay Stubs
Include items that you bought for people who are not in your household, such as gifts.
DO NOT RECORD:
♦ Expenses while you were away from home overnight.
♦ Business or farm operating expenses
♦ Sales tax except for Meals, Snack, and Drinks Away from Home.
Post-Instructions: ‘Back’ button
Special Instructions:
Upon click of ‘General Instructions’ link, open new window with General Instructions Screen.
At the bottom of the screen there should be a ‘Back’ button that takes the user back to the previous screen.
2.18 Page Name/ID: How to Fill Out Your Diary
2.18.1 General Instructions
Layout: Vertical
Title and Subtitle:
Pre-Instructions: CE Diary (Heading)
Main Question Wording:
How to Fill Out Your Diary
For each category, please record:
Meals, Snacks, and Drinks Away from Home
Select the date of purchase.
Enter the name of the restaurant, vendor, or cafeteria where you made this purchase.
Enter the total cost with tax and tip.
Mark one of the four choices that best describes where you made the purchase.
Mark whether alcoholic beverages were included or not, and if yes, enter the cost of the alcoholic beverages.
Food and Drinks for Home Consumption
Select the date of purchase.
Enter the name of the store, business, or website where the item was purchased.
Describe the item.
Enter the cost without tax and deduct any discounts or coupons.
Mark whether the item was fresh, frozen, bottled/canned, or other.
Clothing, Shoes, Jewelry, and Accessories
Select the date of purchase.
Enter the name of the store, business, or website where the item was purchased.
Describe the item and enter the cost without tax.
Mark the appropriate sex and age range of the person for whom the item was bought.
All Other Products, Services, and Expenses
Select the date of purchase.
Enter the name of the store, business, or website where the item was purchased.
Describe the item and enter the cost without tax.
Post-Instructions: ‘Back’ button
Special Instructions:
Upon click of ‘How to Fill Out Your Diary’ link, open new window with How to Fill Out Your Diary Screen.
At the bottom of the screen there should be a ‘Back’ button that takes the user back to the previous screen.
2.19 Page Name/ID: Diary Examples
2.19.1 General Instructions
Layout: Vertical
Title and Subtitle:
Pre-Instructions: CE Diary (Heading)
Main Question Wording:
Diary Examples
1. Meals, Snacks, and Drinks Away from Home
■ Fast Food, Take-out, Delivery, Concession (you pay BEFORE you eat/drink)
■ Full Service Places (you pay AFTER you eat/drink)
■ Vending Machines or Mobile Vendors/Food Trucks (include vending machines, carts, & food trucks that move from place to place)
■ Employer and School Cafeterias (includes elementary school pre-payments)
2. . Food and Drinks for Home Consumption
■ Grain Products (cake mixes, cereal, cornmeal, flour, pasta, rice, spaghetti, etc.)
■ Bakery Products (cakes, cookies, frozen waffles, pies, white bread, other bread, etc.)
■ Beef (briskets, ground beef, round & other roasts, sirloin, etc.)
■ Pork (bacon, ham, pork chops, sausage, etc.)
■ Poultry (chicken parts, duck, whole turkey, etc.)
■ Other meats (bologna, frankfurters, lamb, liverwurst, organ meats, salami, etc.)
■ Fish & Seafood (fish, shellfish, etc.)
■ Oils, Fats & Dressings (salad dressing, shortening, vinegar, etc.)
■ Eggs & Dairy Products (butter, cream, cheese, ice cream, skim milk, powdered milk, etc.)
■ Fruits & Fruit Juices (apples, bananas, cranberry juice, oranges, orange juice, etc.)
■ Sugar, Sugar Substitutes & Sweets (artificial sweeteners, candy, gum, jams, jellies, etc.)
■ Vegetables & Vegetable juices (beans, corn, lettuce, potatoes, tomatoes, tomato juice, etc.)
■ Other Food Items (baby food, pet food, frozen foods, gourmet/specialty items, sauces, seasonings, soups, etc.)
■ Non-Alcoholic Beverages (carbonated & non-carbonated waters, cola & other carbonated beverages, fruit-flavored beverages, instant & ground coffee, tea, etc.)
■ Alcoholic Beverages (beer, champagne, liqueurs, whiskey, wine, etc.)
■ Food & Beverages Purchases as Gifts for someone not in your household (candy, cheese, fruit baskets, wine, etc.)
3. Clothing, Shoes, Jewelry, and Accessories
■ Casual, Sportswear, Formal (dress, pants, shirt, shorts, suit, sweater, etc.)
■ Undergarments & Sleep Clothes (hosiery, lingerie, pajamas, socks, etc.)
■ Outdoor, Work, School, Costumes (coat, jacket, thermals, uniform, windbreaker, etc.)
■ Shoes (boots, dress, sandals, slippers, sneakers, etc.)
■ Sports-team Clothes & Sports Shoes (cleats, golf shoes, ski boots, team uniform, etc.)
■ Jewelry, Accessories, & Sewing Items (belt, buttons, hairpiece, hat, ring, thread, umbrella, etc.)
4. All Other Products, Services, and Expenses
■ Medicines, Medical Supplies & Services (bandages,canes & other medical equipment, doctor & dentistservices, prescription eyeglasses, health insurance, prescription drugs, ointments, vitamins, wheelchairs,etc.)
■ Entertainment/Amusements & Sports/Recreation(admissions to movies, clubs, sporting & culturalevents, camping, CDs, concert tickets, hunting, sports & exercise equipment, tapes, toys, TVs, video/stereo equipment, video purchase/rental, etc.)
■ Housekeeping Supplies & Services (bathroom tissue, brooms, laundry & cleaning detergents, light bulbs,maid service, mops, paper towels, sponges, etc.)
■ Housewares & Small Household Appliances(blenders, coffee makers, cooking utensils,dinnerware, glassware, irons, utensils, pots & pans, telephones, & toasters, etc.)
■ School Expenses (daycare, high school & collegetuition, room & board, school supplies, textbooks, etc.)
■ Transportation Expenses (airline fares, buses, car rental, commuter fares, new & used cars,maintenance and repair, parking fees, taxis, tolls, trainfares, etc.)
■ Personal Care Products & Services (cosmetics, dental products, deodorants, hair care products, hand soap, men’s & women’s haircuts, perfume, shaving products, skin care products, etc.)
■ Clothing Services (alterations, dry cleaning, shoe repairs, storage, tailoring, etc.)
■ Tobacco & Smoking Supplies (cigarettes, cigars, pipes, smoking accessories, tobacco, etc.)
■ Gasoline, Oil, & Additives (brake fluid, coolants,gasoline, motor oil, etc.)
■ Home Furnishings, Decorative Items, Linens, & Major Appliances (art work, clocks, curtains, lamps, picture frames, pillows, plants, refrigerators, rugs, sheets, sofas, stoves, table cloths, tables, towels, vases, etc.)
■ Home Maintenance, Hardware, Lawn Supplies &Services (hand tools, improvement & repair equipment, lawn/garden equipment, nails, power tools, screws, supplies, services, etc.)
■ Housing Expenses (cable service, electricity, garbage removal, heating/cooling, insurance, maintenance fees, mortgage payments, property taxes, rent, telephone, etc.)
■ All Other Expenses (alteration and repair ofhousehold furnishings, ATM service fees, babysitting, books, club dues, diaper services, donations, legal & accounting fees, magazines, newspapers, pet supplies & veterinary services, photographic supplies, postage, sewing goods, shipping & handling, stationery, etc.)
Post-Instructions: ‘Back’ button
Special Instructions:
Upon click of ‘Diary Examples’ link, open new window with Diary Examples Screen.
At the bottom of the screen there should be a ‘Back’ button that takes the user back to the previous screen.
2.20 Page Name/ID: FAQs
2.20.1 General Instructions
Layout: Vertical
Title and Subtitle:
Pre-Instructions: CE Diary (Heading)
Main Question Wording:
Frequently Asked Questions
1. What should I do if I forget my Username and Password? Click on the “Forgot Username” and/or “Forgot Password” links on the login screen. Follow the relevant directions. If you have any issues, call the CE Help Desk at 877-744-1522 or email [email protected]
2. How detailed should my descriptions be? Refer to the Examples Page for examples of the level of detail needed in each part. [insert hyperlink to Diary Examples Screen]. Do not rely solely on brand names.
3. How can I delete or make changes to an expense that I’ve saved? Locate the saved expense listed under the relevant date in the Expenses section of the main page. Click on the saved expense and make any changes. Click the ‘Save’ button to save your changes. Click the ‘Delete’ button to delete your expense.
4. How should I record multiple quantities? You may group identical items on the same entry and enter a total cost of all the items, or you may write each item on a separate entry with the individual cost.
5. How should I record pre-payments such as a subway fare card? Record the expense when you pay for it, not when you use it.
6. How should I record credit card purchases? Record the purchase on the day that you use your credit card to pay for it, not the day you receive or pay your credit card bill.
7. Should I record automatic deductions taken from my paycheck or bank account? Yes, record automatic deductions (such as health insurance premiums taken out of your account or paycheck) only if they are deducted that week. Write them in the section called All Other Products, Services, and Expenses.
8. Should I record typical monthly bills? Yes, record typical monthly bills only if you pay them during the week that you have the diary. Enter them in the section called All Other Products, Services, and Expenses.
9. What should I do when I use coupons, discount cards, or loyalty cards? Subtract the discount from the original price and enter the amount that you paid.
10. Can I just give you receipts instead of entering the information online? No, we need you to enter the information into the online diary. We encourage you to save your receipts to review them with your Field Representative at the end of the week.
11. How should I record items if I don’t know whether it includes tax? Write down the amount paid.
12. What if I make a contribution or charitable donation? Record money contributions or donations in the section called All Other Products, Services, and Expenses.
13. What about gift certificates or gift cards? If you buy a gift certificate to give to someone, enter it as a regular expense. If you buy a gift certificate to give to someone, write down the cost of it under the appropriate section (e.g., a certificate to a clothing store would go under Clothing, Shoes, Jewelry, and Accessories and a certificate to a department store would go under All Other Products, Services, and Expenses. If you use a gift card, enter the full amount for your purchase as if paid with cash.
14. What do I do about returns and exchanges? If an item is bought and returned during the diary period, it can be deleted (see FAQ 3). If it was bought outside the diary period and returned during the period, do not make any entry. If an item is exchanged during the diary period, change or edit the item that was returned to the new item and its cost on the day the exchange was made (see FAQ 3).
15. Should I record subsidized/reimbursed expenses? Yes, but if someone not in your household pays for or helps pay for an expense or if you will be reimbursed for an expense, only record the amount that you or someone in your household has to pay.
16. What should I do about shipping & handling costs? Include the shipping & handling cost in the total price of the item. If the shipping & handling covered multiple items, include the shipping & handling in the total price of one item from the order.
17. How do I know what items to report for each type of expense? Click or tap on the icon next to each expense type category.
Post-Instructions: ‘Back’ button
Special Instructions:
Upon click of ‘FAQs’ link, open new window with FAQs Screen.
At the bottom of the screen there should be a ‘Back’ button that takes the user back to the previous screen.
2.21 Page Name/ID: Definitions
2.21.1 General Instructions
Layout: Vertical
Title and Subtitle:
Pre-Instructions: CE Diary (Heading)
Main Question Wording:
Definitions
Date Purchased – select the date from this list on which the meal or item was purchased. The dates available reflect the data collection period for your household’s diary keeping period.
Describe item or expense – Type in a brief description of your purchase. Be as specific as possible.
Where did you make this purchase? (Meals, Snacks, and Drinks Away from Home) – Select the type of place where the Meals, Snacks, and Drinks Away from Home was purchased by someone in your household. For example:
Fast Food, Delivery, Take-out, Concession: you pay before you eat or drink;
Full Service places: you pay after you eat or drink;
Vending Machines or Mobile Vendors/Food Trucks: include vending machines, carts, and food trucks that move from place to place;
Employer or School Cafeteria: includes school meal pre-payments.
Were alcoholic beverages included? (Meals, Snacks, and Drinks Away from Home) – If beer, wine, or other alcoholic beverages were purchased, select the yes box.
Is this item? (Food and Drinks for Home Consumption) – Select the nature or type of packaging for the Food and Drinks for Home Consumption that was purchased. For example: Fresh, Frozen, Bottled/Canned, or Other.
Business (Enter Business Name) - Type in the name of the store, restaurant, or website where the item was purchased.
Was the item for: (Clothing, Shoes, Jewelry, and Accessories) – Select the age range and gender of the person for which clothing, shoes, jewelry, or accessories was purchased. For example: Under 2 years old, Boy 2 to 15 years old, Girl 2 to 15 years old, Man 16 year and over, or Woman 16 year and over.
Post-Instructions: ‘Back’ button
Special Instructions:
Upon click of ‘Definitions’ link, open new window with Definitions Screen.
At the bottom of the screen there should be a ‘Back’ button that takes the user back to the previous screen.
2.22 Page Name/ID: Accessibility
2.22.1 General Instructions
Layout: Vertical
Title and Subtitle:
Pre-Instructions: CE Diary (Heading)
Main Question Wording:
The Census Bureau is committed to making online forms and other public documents on its Internet server accessible to all. Currently, we are reviewing our web sites and making modifications to those pages, which are not in compliance with the Americans with Disabilities Act. We use Hypertext Markup Language (HTML) to create pages that are generally accessible to persons using screen-reading devices, and we are careful in our construction of HTML documents to ensure maximum accessibility. We include alternate text describing graphics.
Many Census Bureau Internet documents are in ASCII or HTML formats. These documents are accessible to persons using screen-reading software. We also have a large number of documents in Adobe Acrobat PDF (Portable Document Format) files. Currently, many people using screen-reading devices cannot read documents in PDF format, specifically those that were created from a scanned hard copy.
Adobe Systems, Inc. is producing various products designed to make Adobe Acrobat documents accessible to persons using screen-reading software. Adobe's accessibility web pages describe their efforts.
To allow us to better serve those with visual disabilities who are having difficulty accessing PDF documents; you may contact us directly for further assistance at 301-763-INFO (4636), 800-923-8282, or by submitting a request at ask.census.gov.
Post-Instructions: ‘Close’ button
Special Instructions:
Upon click of “Accessibility Statement” link, open new window with Accessibility Screen.
At the bottom of the screen there should be a ‘Close’ button that takes closes the Accessibility popup.
2.22.2 Data Elements
2.22.2.1 DataElement Name/ID: Accessibility
-
Label
Burden
Required
Yes. Screen opens on clicking “Accessibility” link
Tab Index
Type
Clickable
Min Length
n/a
Max length
n/a
Read Only
Yes
Multiple Responses
No
Main Question Text
n/a
Title {mouse over text}
Answer Space Placeholder
Answer Space Pre-text
Answer Space Post-text
Answer Option Values and Labels
Edits
Skip Pattern
<on click ‘Close’ button> [close popup window]
Special Instructions
2.23 Page Name/ID: User Settings
2.23.1 General Instructions
Layout: Vertical
Title and Subtitle:
Pre-Instructions: CE Diary (Heading)
Main Question Wording:
User Settings
Follow the links below to change either your Username or Password
‘Change Password’ Button
‘Change Username’ button
Post-Instructions: ‘Return to Diary’ button
Special Instructions:
Upon click of ‘Change Password’, go to Change_Password page.
Upon click of ‘Change Username’, go to Change_Username page.
At the bottom of the screen there should be a ‘Return to Diary’ button that takes the user back to the previous screen.
2.23.2 DataElement Name/ID: Security_Question
-
Label
Security_Question
Field name
Security Question
Required
Yes. User clicks on Change Username link. User must add a security question to enter a username or password.
Tab Index
1
Type
Dropdown list; clickable
Min
1
Max
5
Read Only
No
Multiple Responses
No
Main Question Text
Title {mouse over text}
Answer Space Placeholder
Answer Space Pre-text
Answer Space Post-text
Answer Option Values and Labels
What is the name of your first pet?
In what city were you born?
What is your paternal grandfather’s first name?
What was the last name of your third grade teacher?
Who was your childhood hero?
What is the name of your favorite pet?
When you were young, what did you want to be when you grew up?
Edits
Skip Pattern
<on click ‘Save’ button> if security_question is empty, then display message saying, “Please select a security question.”
Else goto Security_ans
Special Instructions
User must add a security question to enter a username or password. Until a user has entered a security question display in red under Username and Password under User Settings the text, “Please add a security question and answer in order to change your username”.
2.23.3 DataElement Name/ID: Security_ans
-
Label
Security_ans
Required
Yes. User clicks on Change Username link.
Tab Index
2
Type
Text
Min Length
8
Max length
20
Read Only
No
Multiple Responses
No
Main Question Text
Security Question Answer
Title {mouse over text}
Answer Space Placeholder
Answer Space Pre-text
Answer Space Post-text
Answer Option Values and Labels
Edits
Skip Pattern
<on click ‘Save’ button> if security_ans is empty, then display message saying, “Please answer security question.”
Else if user entered an answer then display message, “Your security question and answer has been updated” and return user to previous screen.
Special Instructions
3. APPENDIX A: “I” POPUPS
3.1 Categories:
The following popups are for each category of expenditures. These popups appear in the Category section on the DateScreen, when the user clicks the “I” icon for each of the four expenditure categories.
3.1.1 Meals, Snacks and Drinks Away from Home
![]()

3.1.2 Food and Drinks for Home Consumption:
![]()
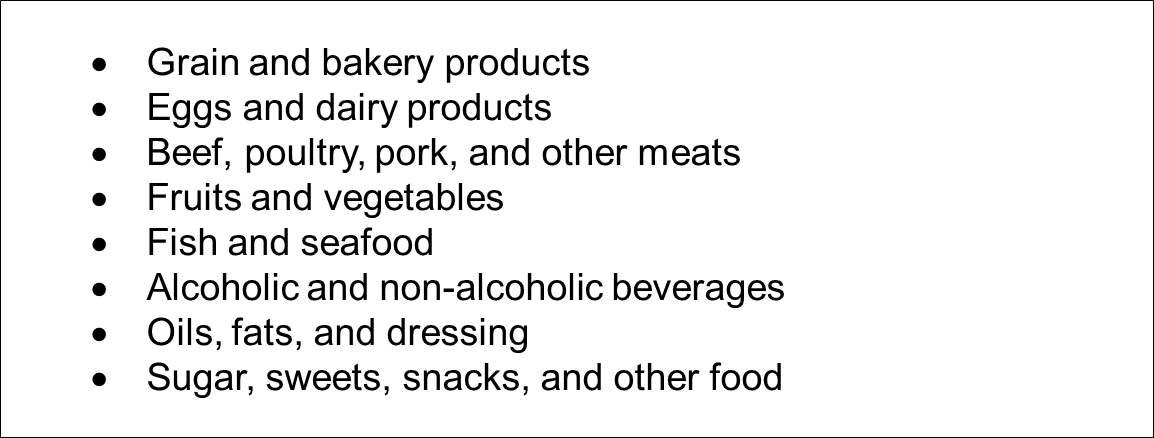
3.1.3 Clothing, Shoes, Jewelry and Accessories:
![]()
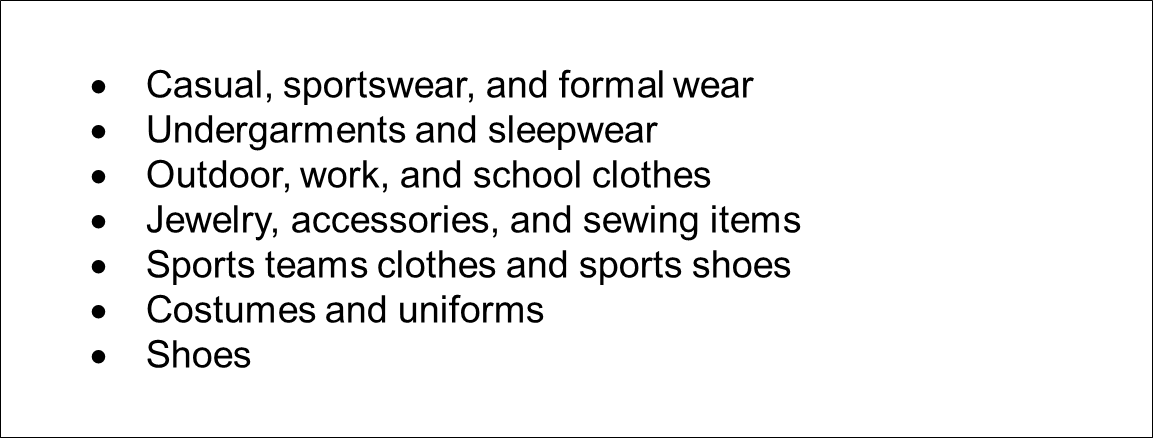
3.1.4 All Other Products, Services, and Expenses
![]()
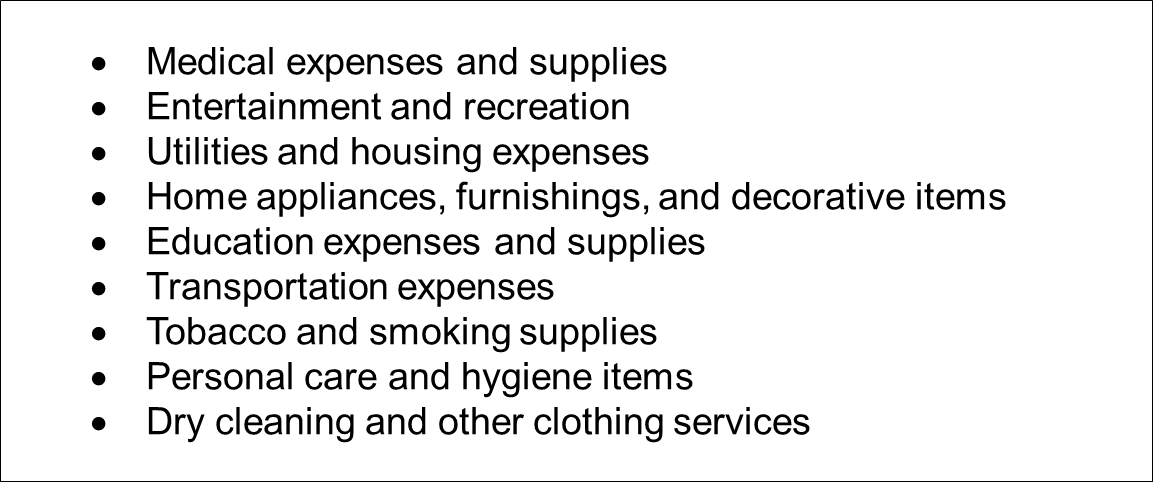
3.2 Descriptions:
These popups appear when the ‘I’ icon next to the description item or expense variable on the ExpenseFDB, ExpenseCLO, and ExpenseOTH screens is clicked.
NOTE: There is no description field for Meals Snacks and Drinks away from Home.
3.2.1 Food and Drinks for Home Consumption:

3.2.2 Clothing, Shoes, Jewelry and Accessories:

3.2.3 All Other Products, Services, and Expenses

4. APPENDIX B: Receipt Examples
4.1 Receipt Examples:
Receipt examples popup when the ‘I’ icon next to the Total Cost variable on the ExpenseMLS, ExpenseFDB, ExpenseCLO, and ExpenseOTH screen is clicked.
Alternative Text for these receipt examples is displayed in the specs for each relevant screen (Page 40 for ExpenseMLS, page 47 for ExpenseFDB, page 52 for ExpenseCLO, page 57 for ExpenseOTH)
4.1.1 Meals, Snacks and Drinks Away from Home
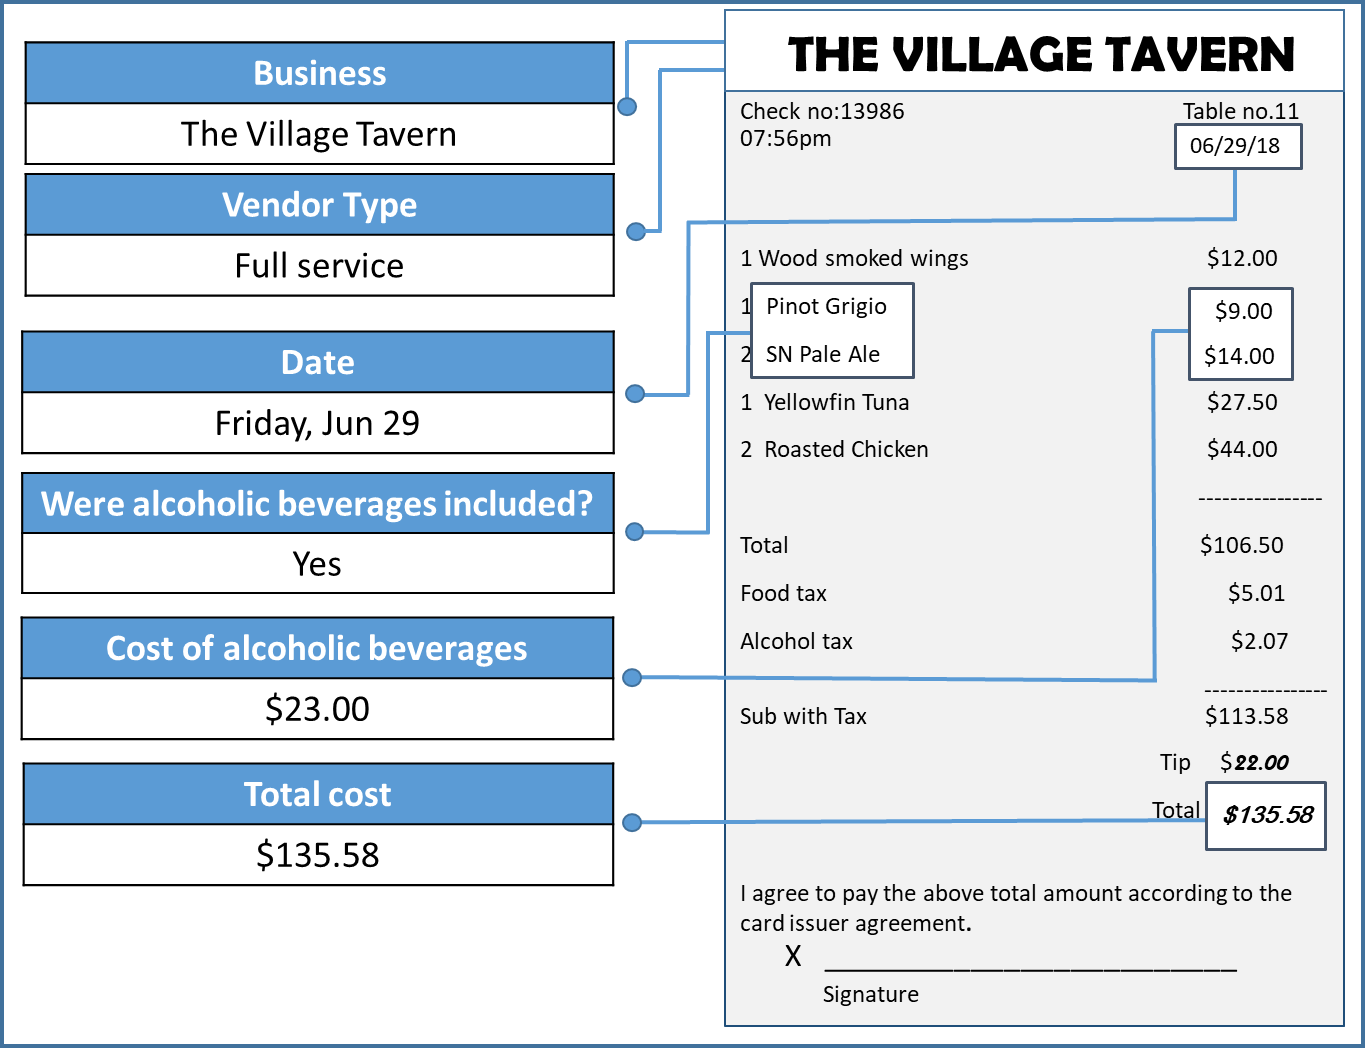
4.1.2 Food and Drinks for Home Consumption:
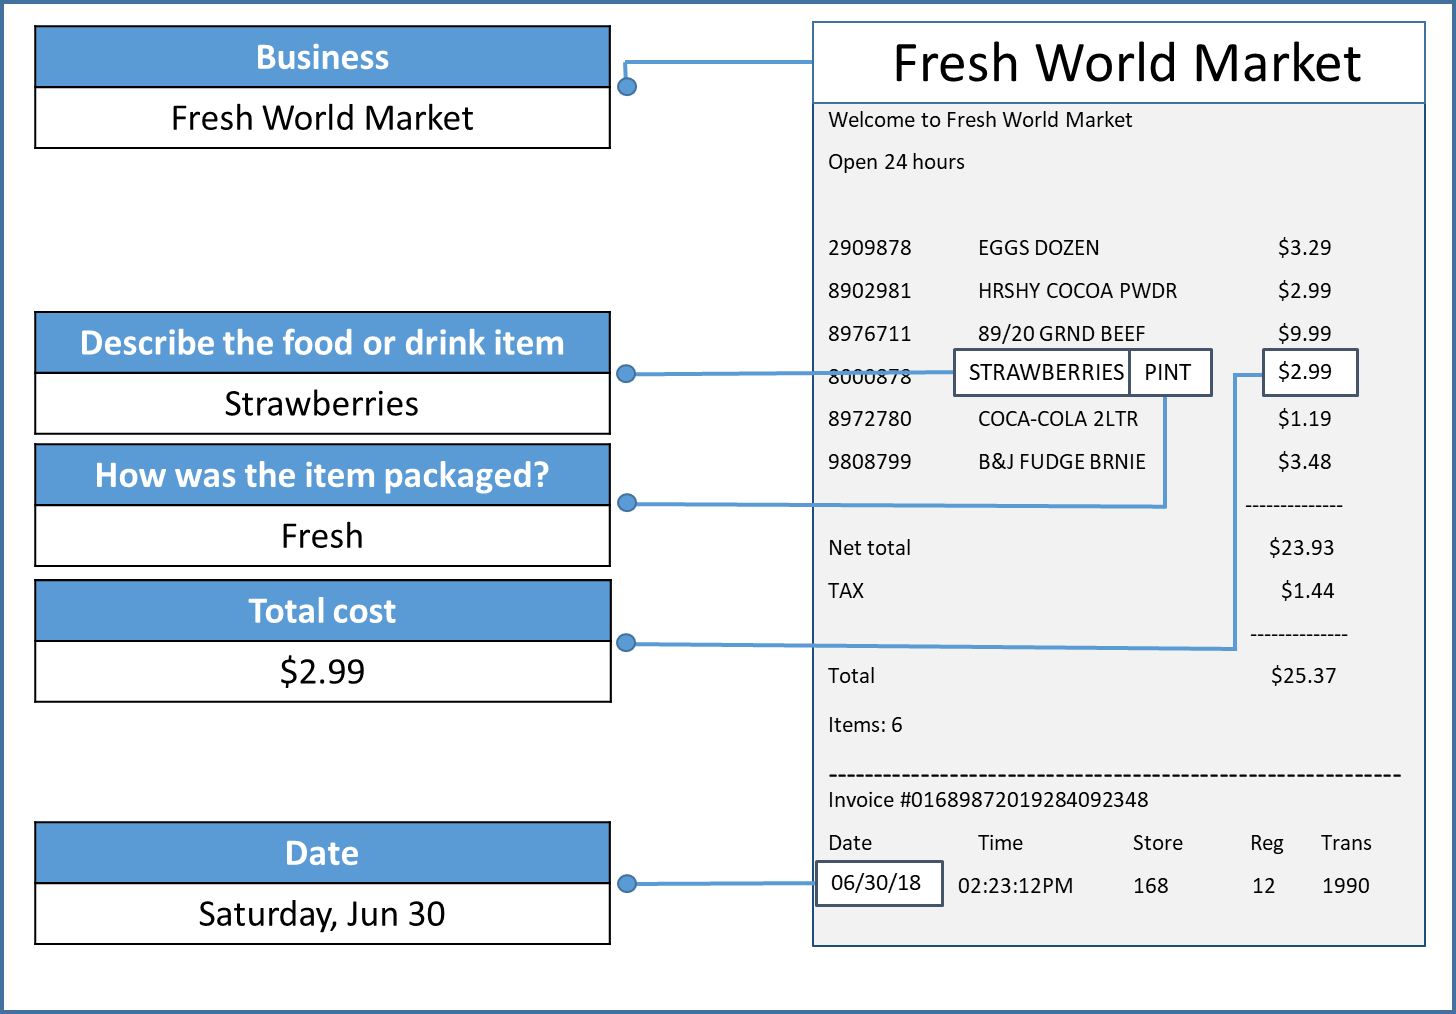
4.1.3 Clothing, Shoes, Jewelry and Accessories:
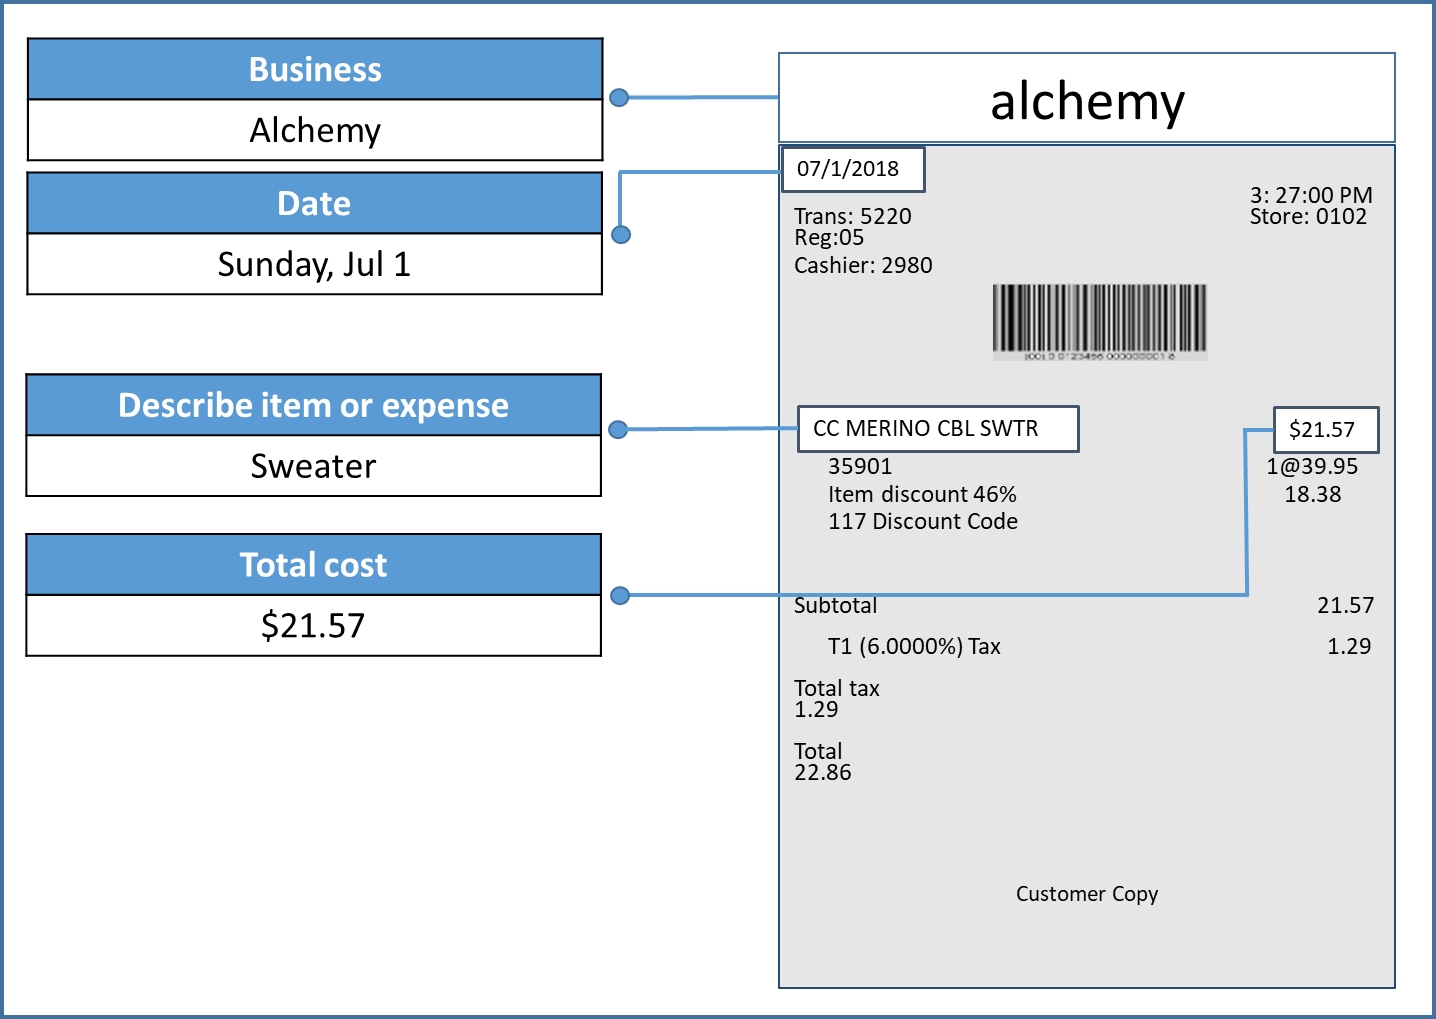
4.1.4 All Other Products, Services, and Expenses
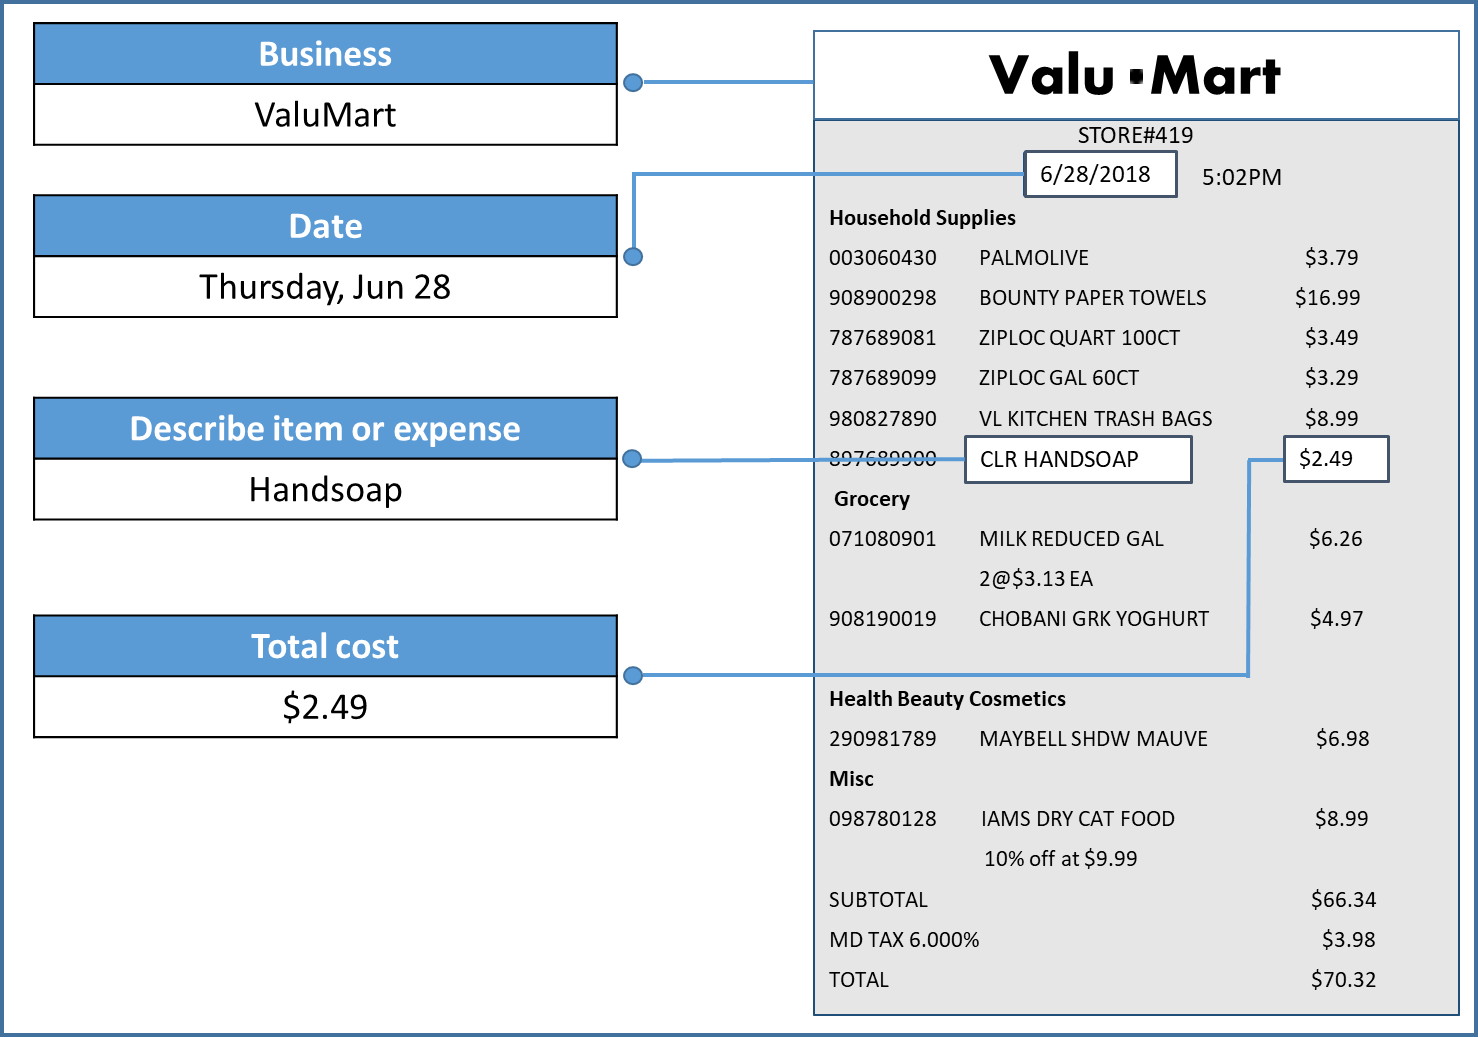
| File Type | application/vnd.openxmlformats-officedocument.wordprocessingml.document |
| Author | mille498 |
| File Modified | 0000-00-00 |
| File Created | 2023-08-26 |
© 2026 OMB.report | Privacy Policy