2 & 3- Cms-10495 (0938-1237). Screenshots - Ops_pra_covered_recipient_messages_registration_and_nomination
2 & 3- CMS-10495 (0938-1237). SCREENSHOTS - OPS_PRA_COVERED_RECIPIENT_MESSAGES_REGISTRATION_AND_NOMINATION.docx
Registration, Attestation, Dispute Resolution and Correction, Assumptions Document and Data Retention Requirements for Open Payments (CMS-10495)
2 & 3- CMS-10495 (0938-1237). SCREENSHOTS - OPS_PRA_COVERED_RECIPIENT_MESSAGES_REGISTRATION_AND_NOMINATION
OMB: 0938-1237
Covered Recipients: Messages
The screenshots below illustrate the differences in Covered Recipient Messages between Open Payments System 1.0 and Open Payments System 2.0.
Step 1: Log in to the Open Payments system at https://openpayments.system.cms.gov using your IDM credentials and select the Messages tab on the tool bar and then select System Messages.
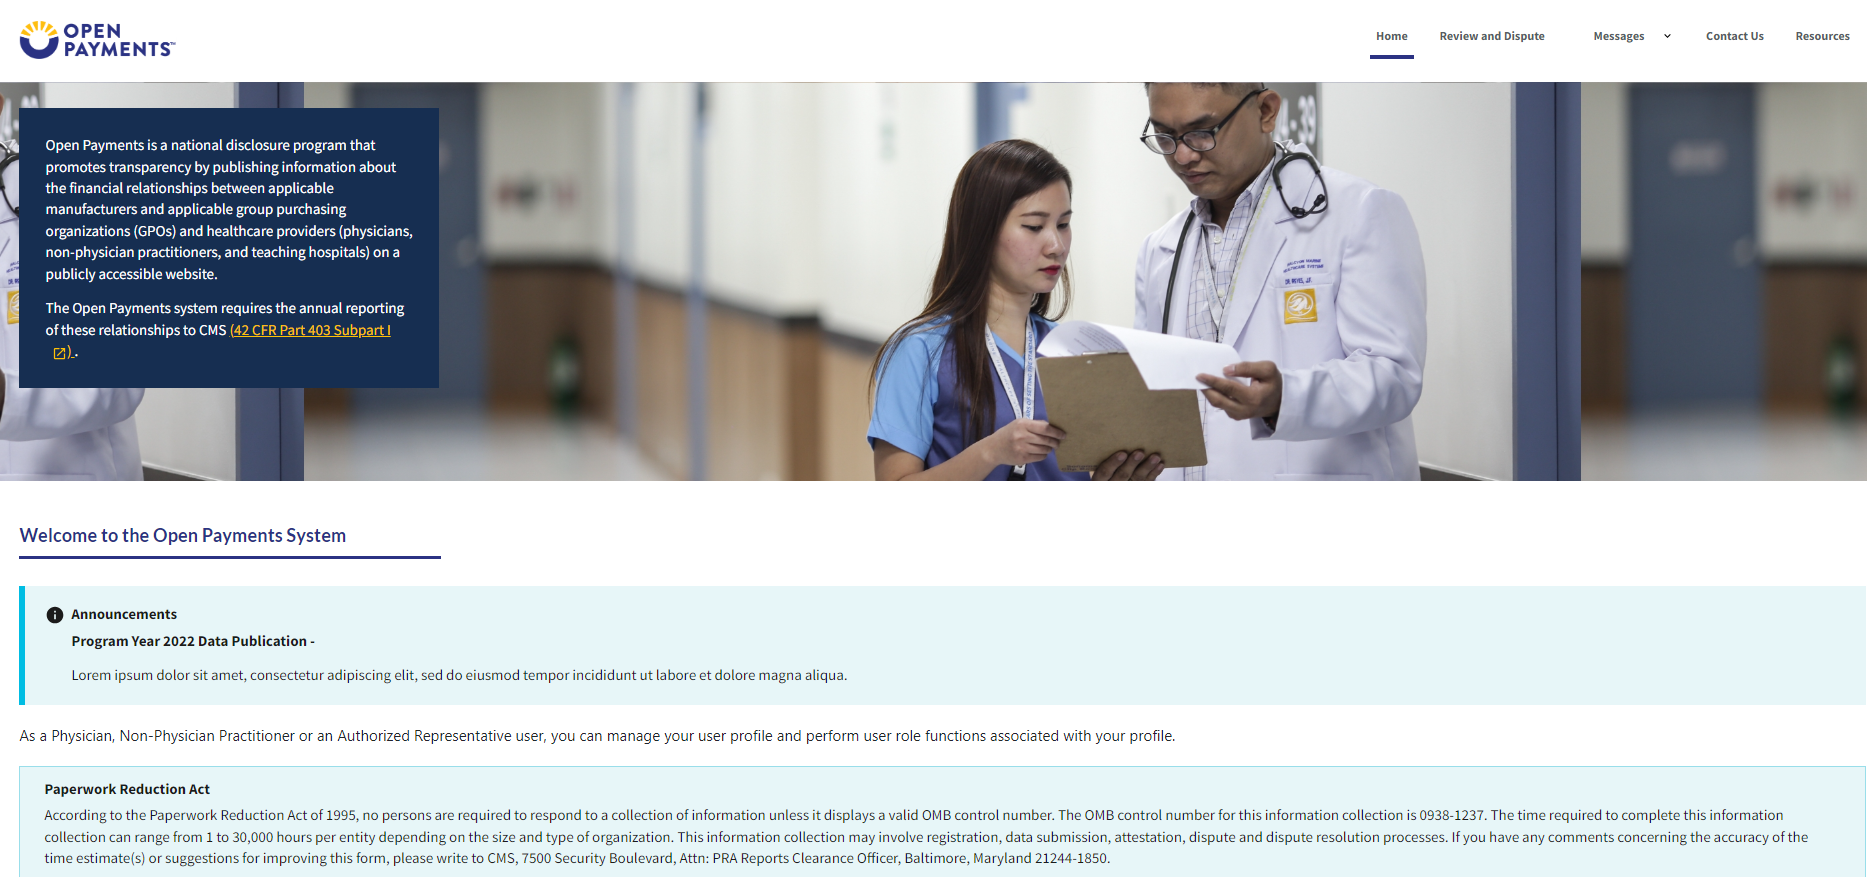
Figure 1: Open Payments Landing Page for Returning Users (OPS 1.0)
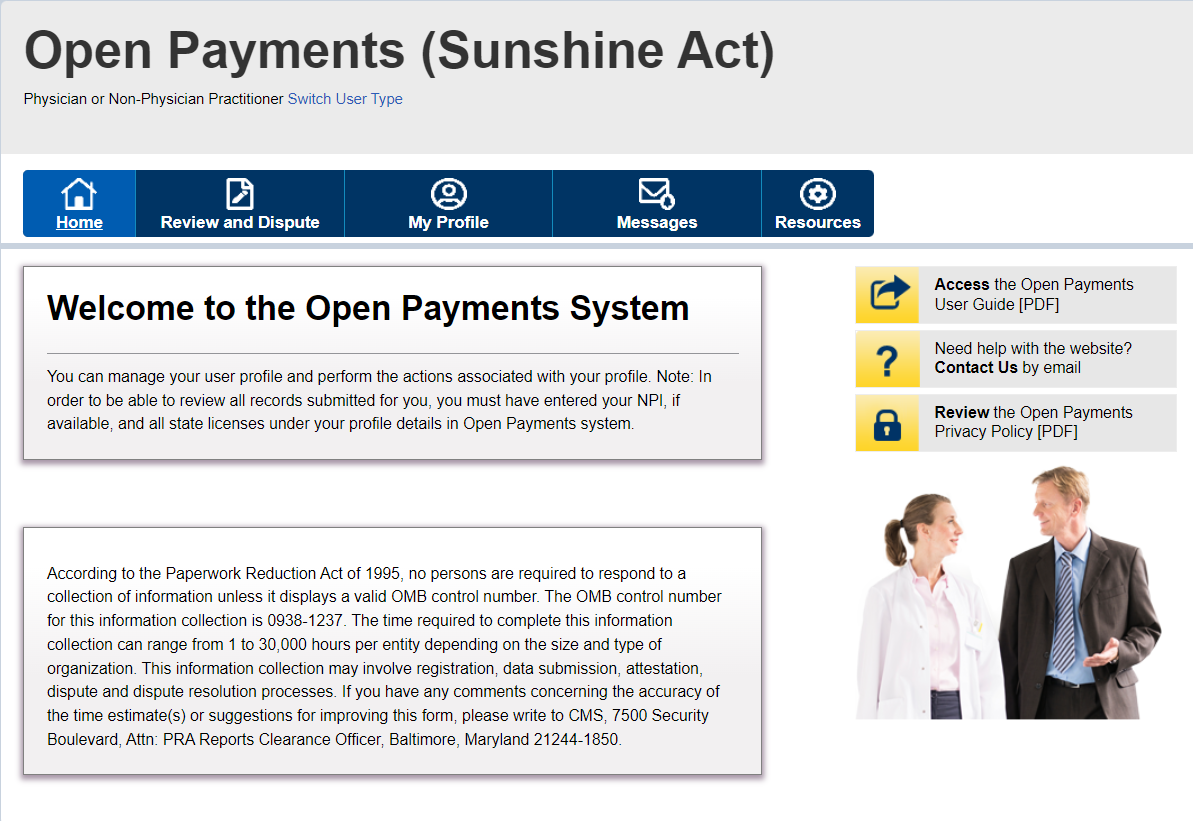
Figure 2: Open Payments Landing Page for Returning Users (OPS 2.0)
Step 2: On the “Messages” page, you can search results based on the following search criteria:
Teaching Hospital or Physician or NPP Name, Record ID (only applicable for Message Category of “Review and Dispute”)
Figure 3: Messages Page (OPS 1.0)
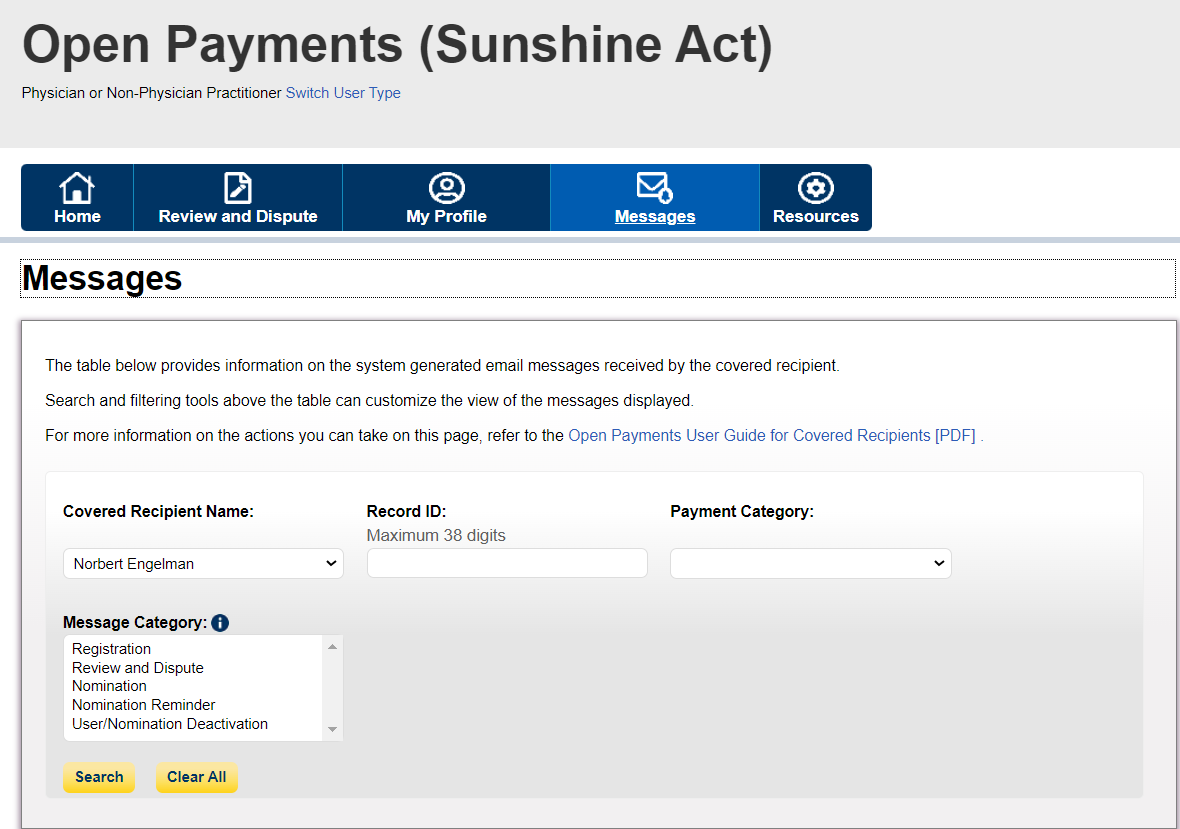
Figure 3: Messages Page (OPS 2.0)
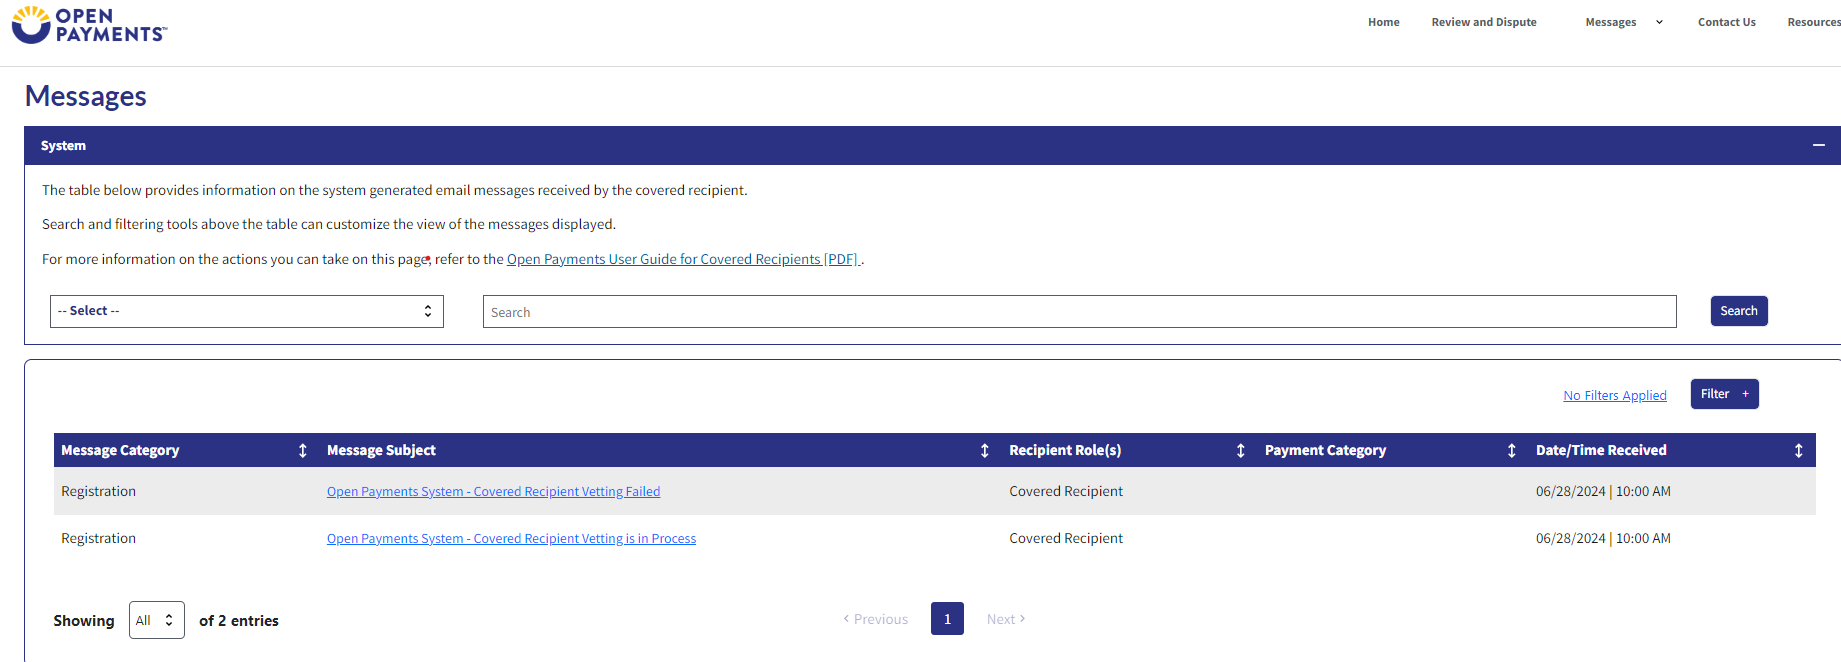
Step 3a: Select the Search button to initiate the search. After selecting the Search button, a data table with the list of messages will display.
Figure 3a: Messages Page Search Results (OPS 1.0)
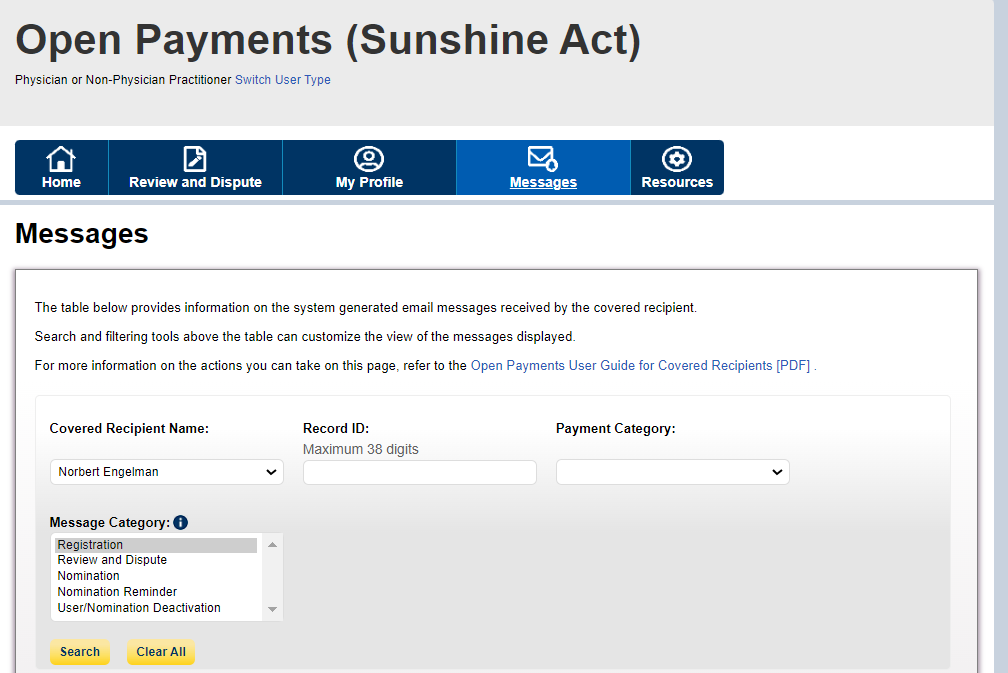
Figure 3b: Messages Page Search Results (OPS 1.0)

Figure 4: Messages Page Search Results (OPS 2.0)
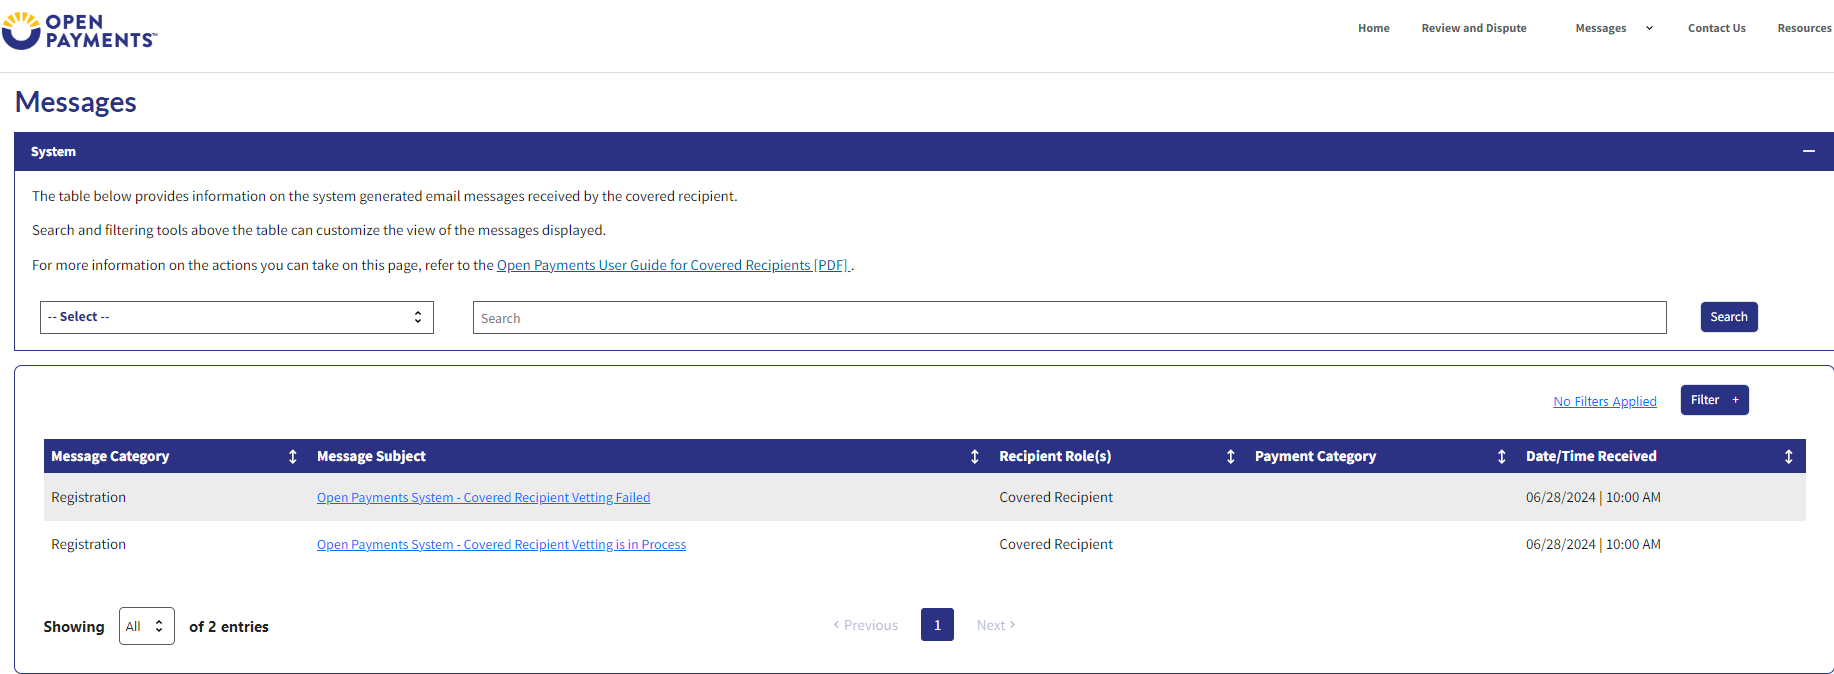
Step 3b: Select the Filter button to help refine your search results
Figure 5: View Full Message Pop-out (OPS 1.0)
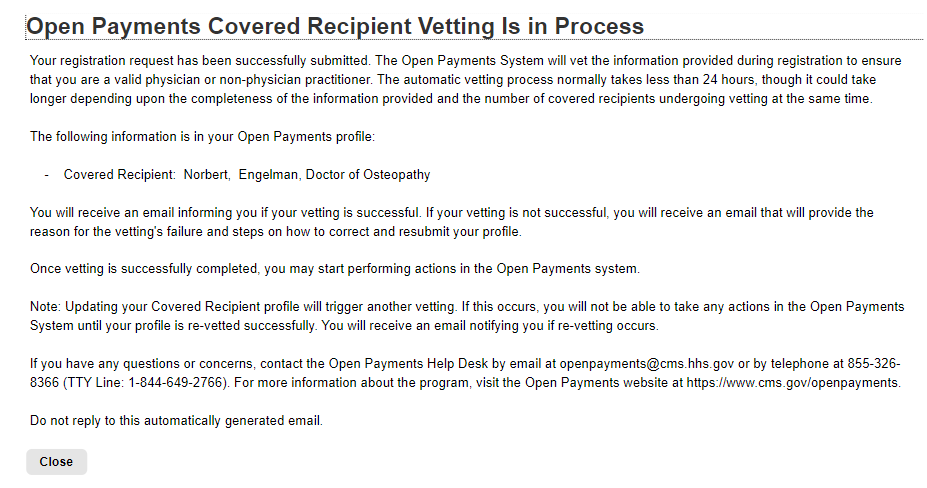
Figure 4: View Full Message Pop-out (OPS 2.0)

Open Payments Covered Recipient Registration and Nominations PRA
The screenshots below illustrate the differences in physician and non-physician practitioner (NPP) registration between Open Payments System (OPS) 1.0 and OPS 2.0.
Creating an Open Payments Profile as a Physician or NPP (First Time System Users)
If you are registering as a physician or NPP and are a first-time user in the Open Payments system, follow the steps below.
Step 1: Log in to the Open Payments system at https:/openpayments.system.cms.gov using your Identity Management (IDM) credentials and agree to the Terms and Conditions.
After selecting the Log in button verify your identity using the Multi-Factor Authentication (MFA). The email address you input during IDM registration is the default MFA device.
Figure 1: Open Payments System Log in Page (OPS 1.0)
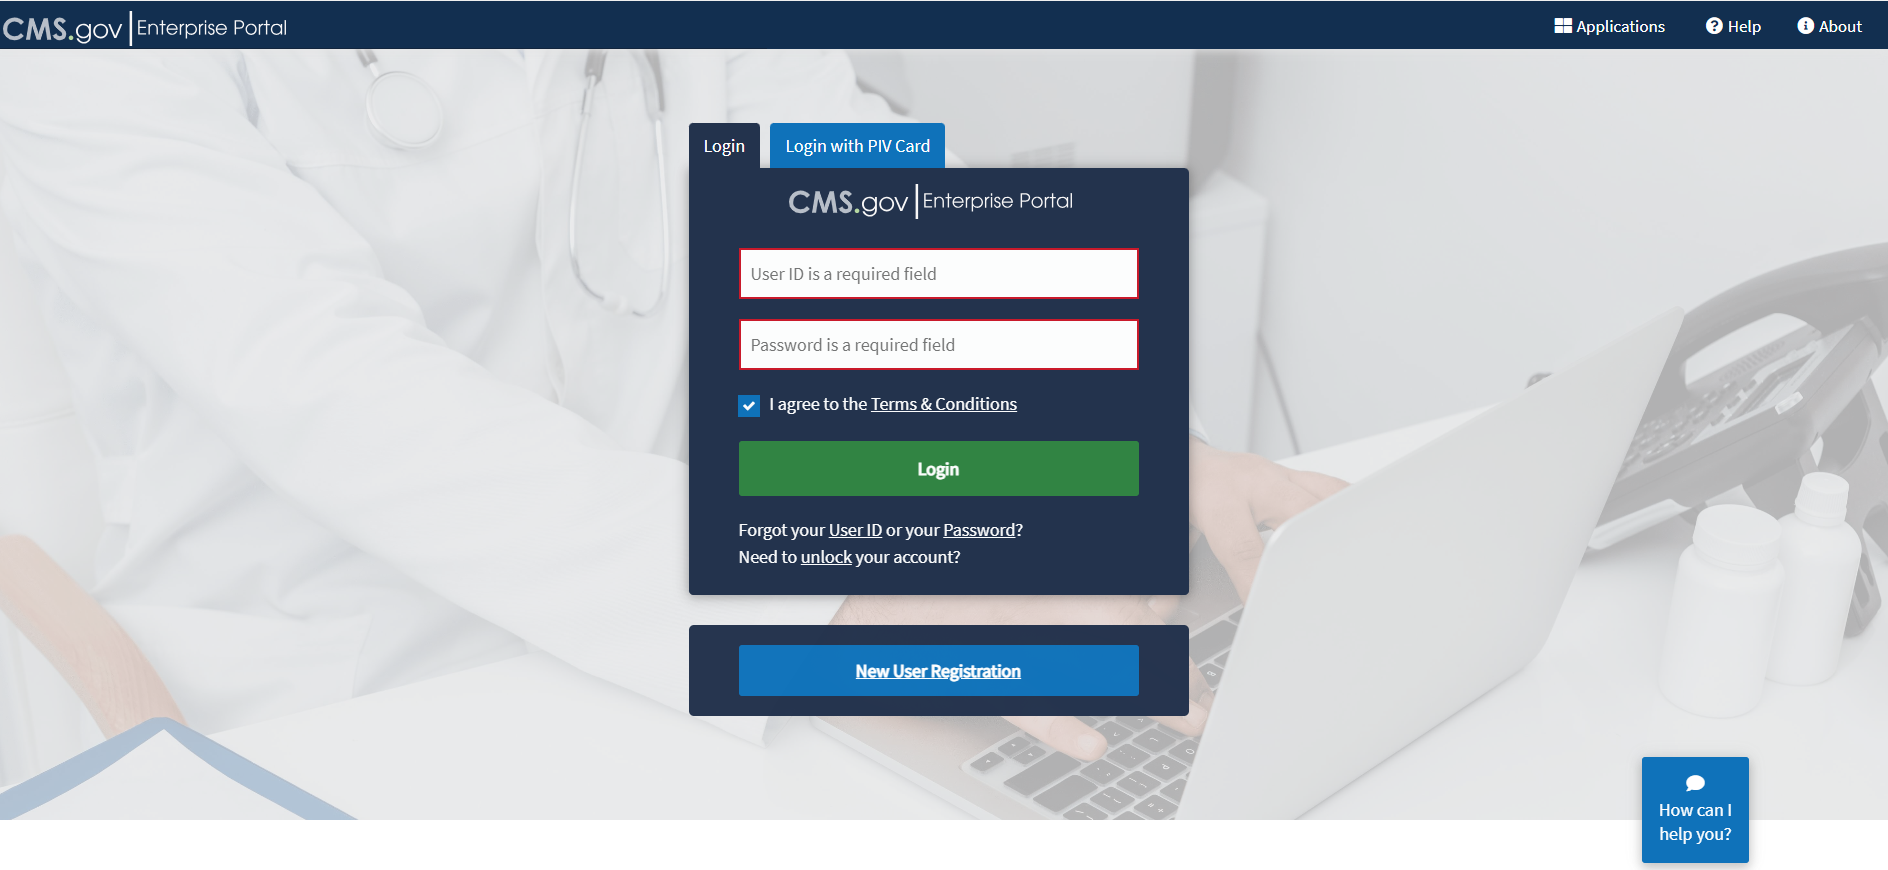
Figure 2: Open Payments System Log in Page (OPS 2.0)
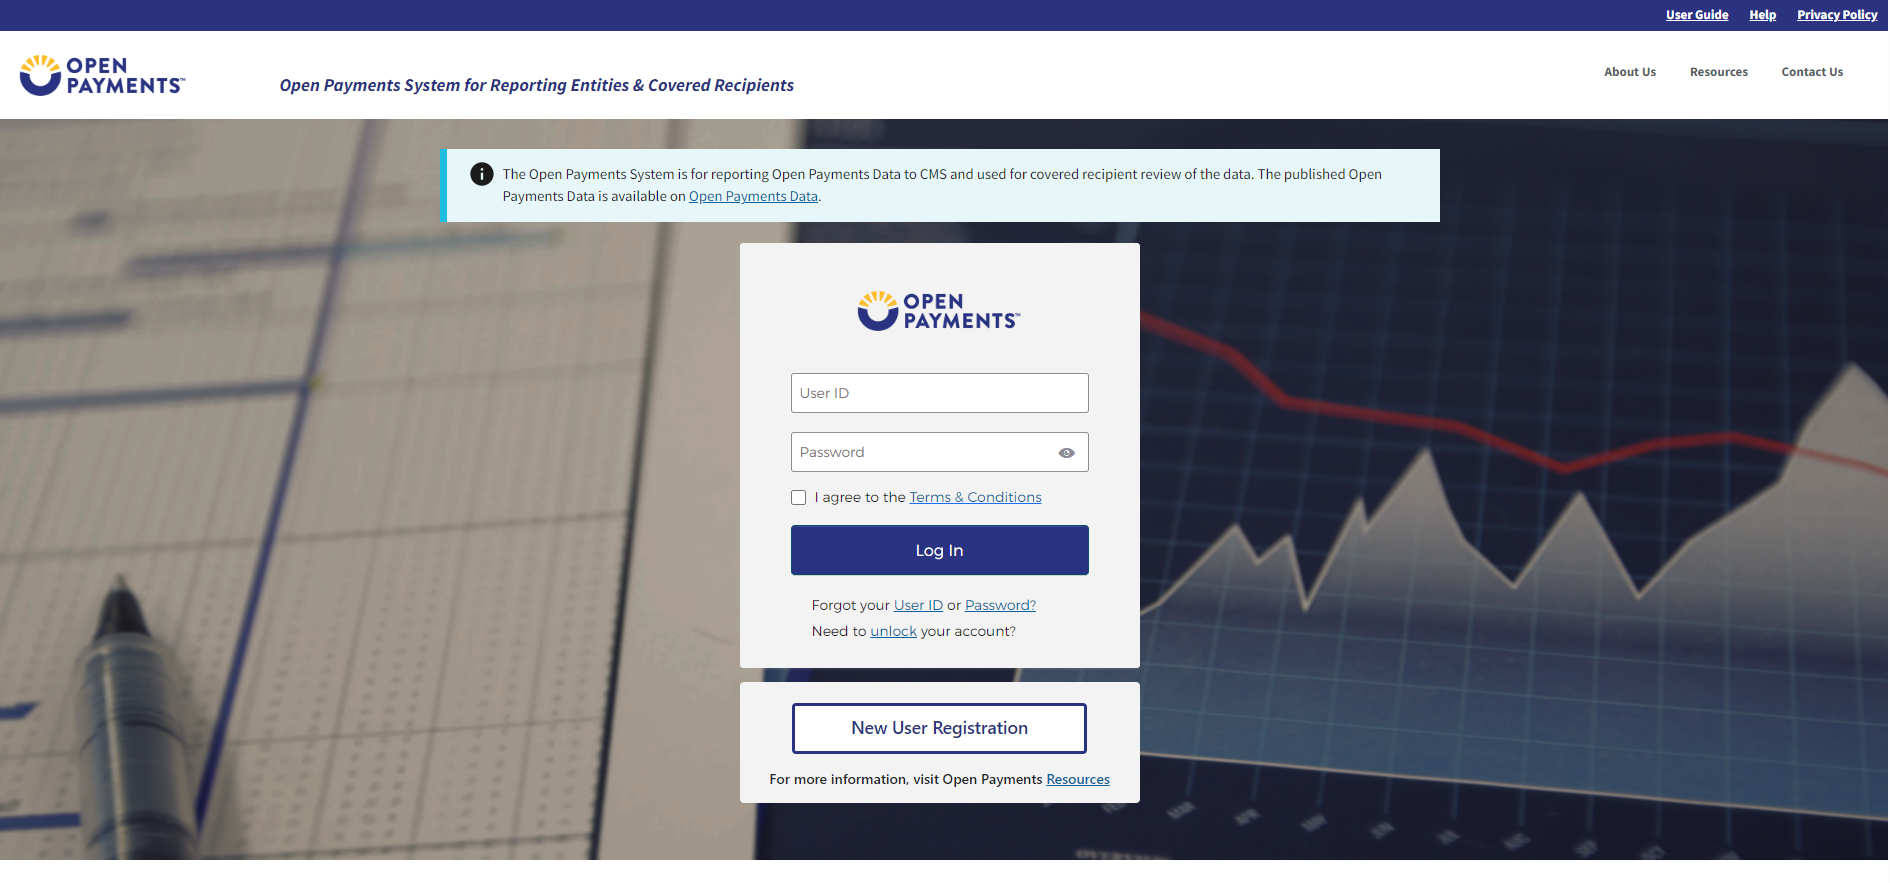
Figure 3: Open Payments Home Page for First-Time System Users (OPS 1.0)
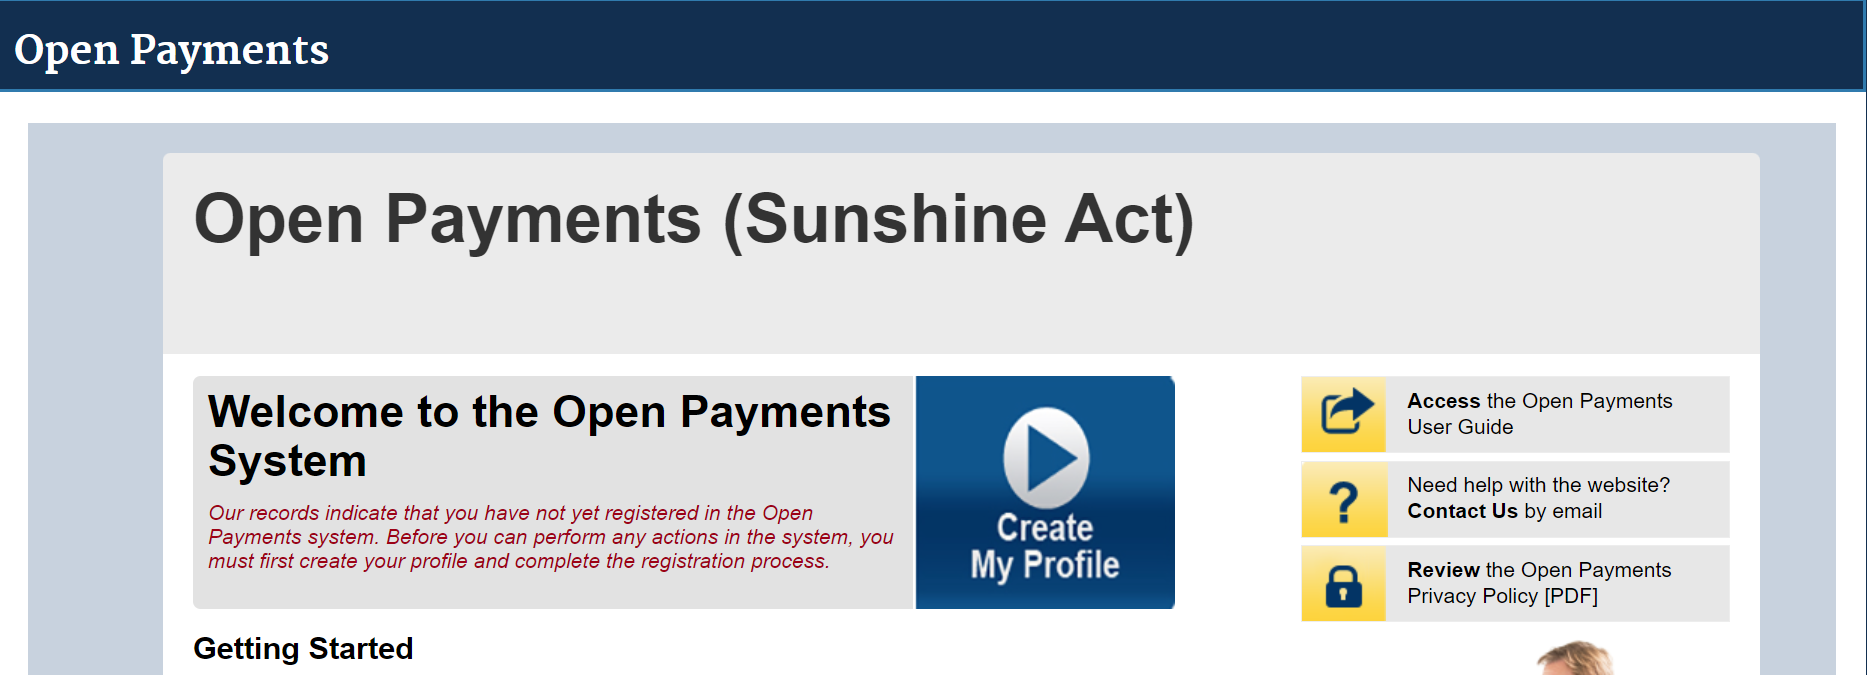
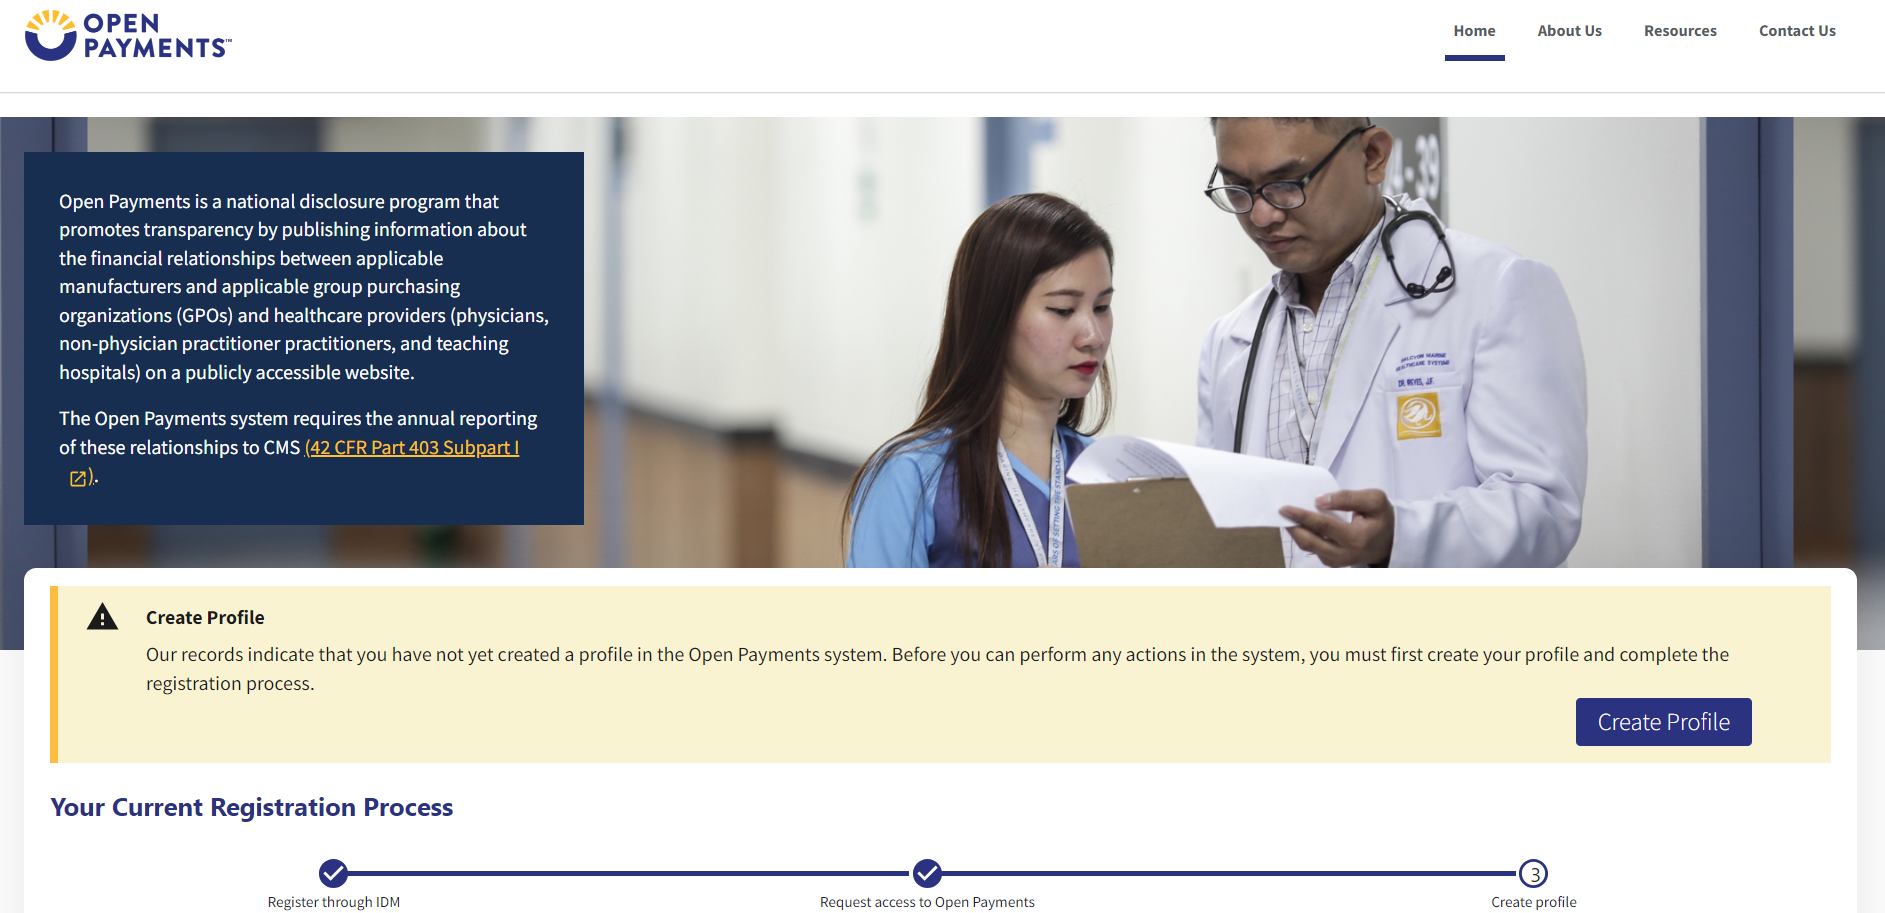
Figure 4: Open Payments Home Page for First-Time System Users (OPS 2.0)
Step 2: The on-screen text contains important information regarding creating your physician profile. Read the on-screen text and select Start Profile at the bottom of the page when you are ready to continue.
Note: To enhance clarity, some larger screenshots will be split. The figure descriptions will describe these instances.
Figure 5a: Create My Profile Page (UPPER HALF) (OPS 1.0)
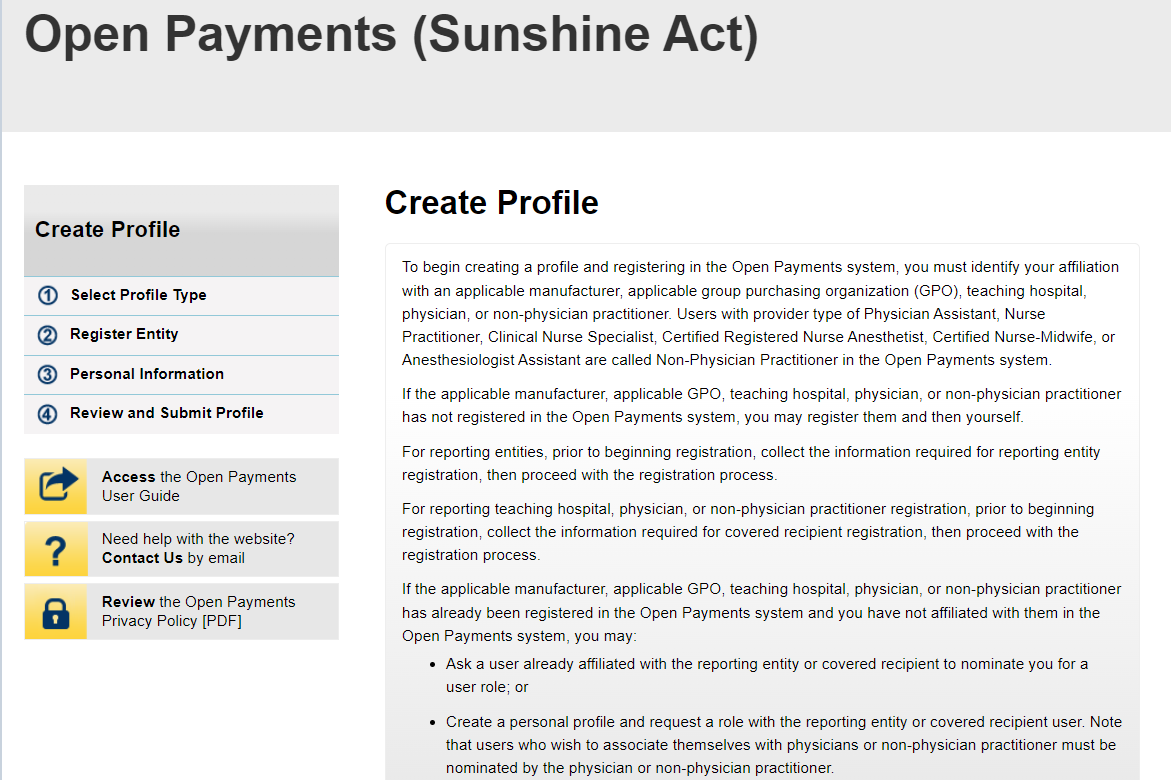
Figure 5b: Create My Profile Page (LOWER HALF) (OPS 1.0)
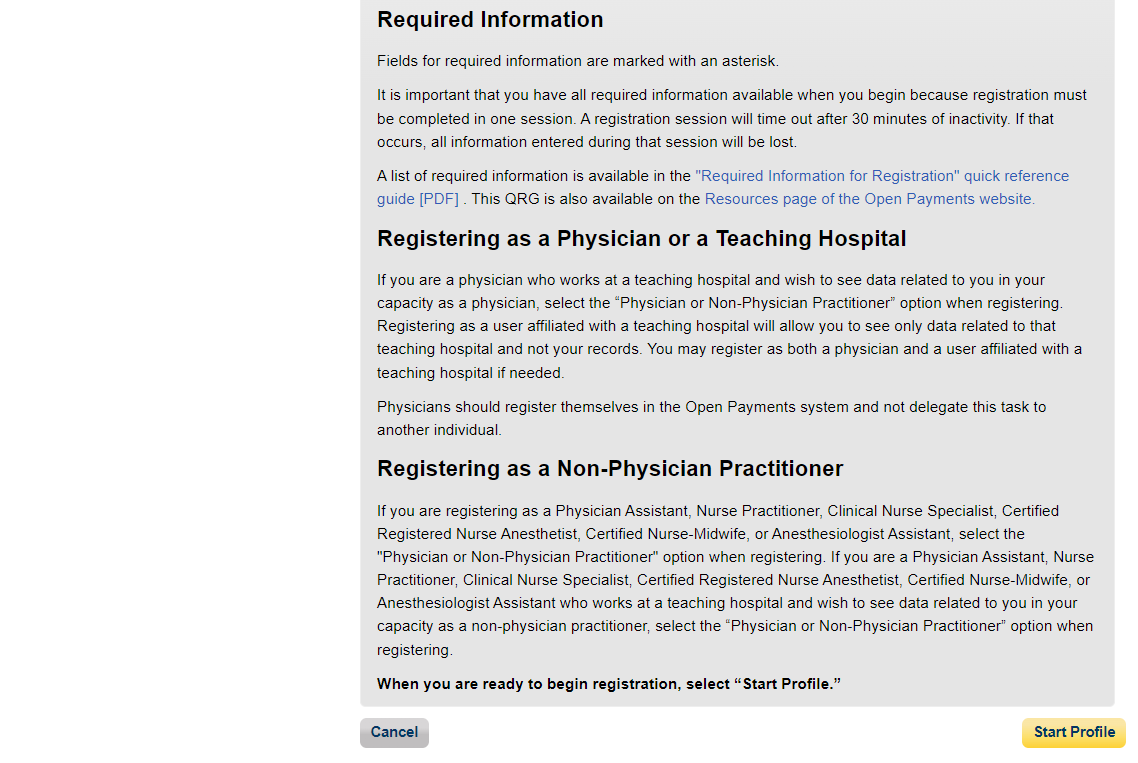
Figure 6a: My Profile Page (UPPER HALF) (OP 2.0)
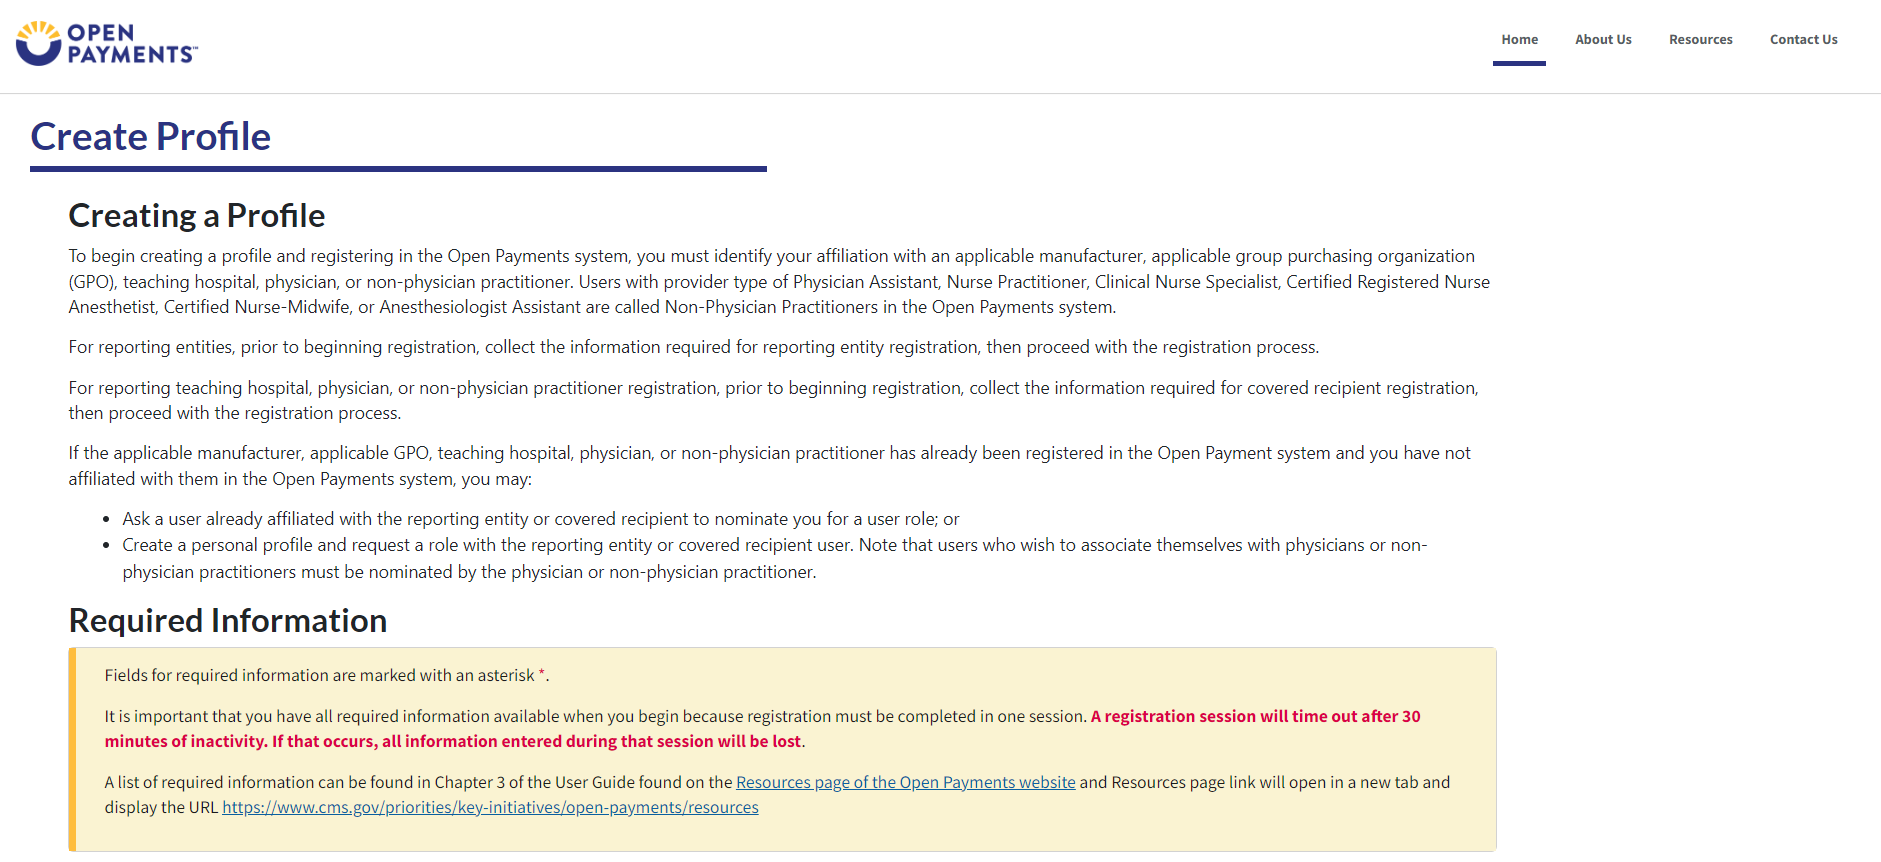
Figure 6b: Create My Profile Page (LOWER HALF) (OP2.0)

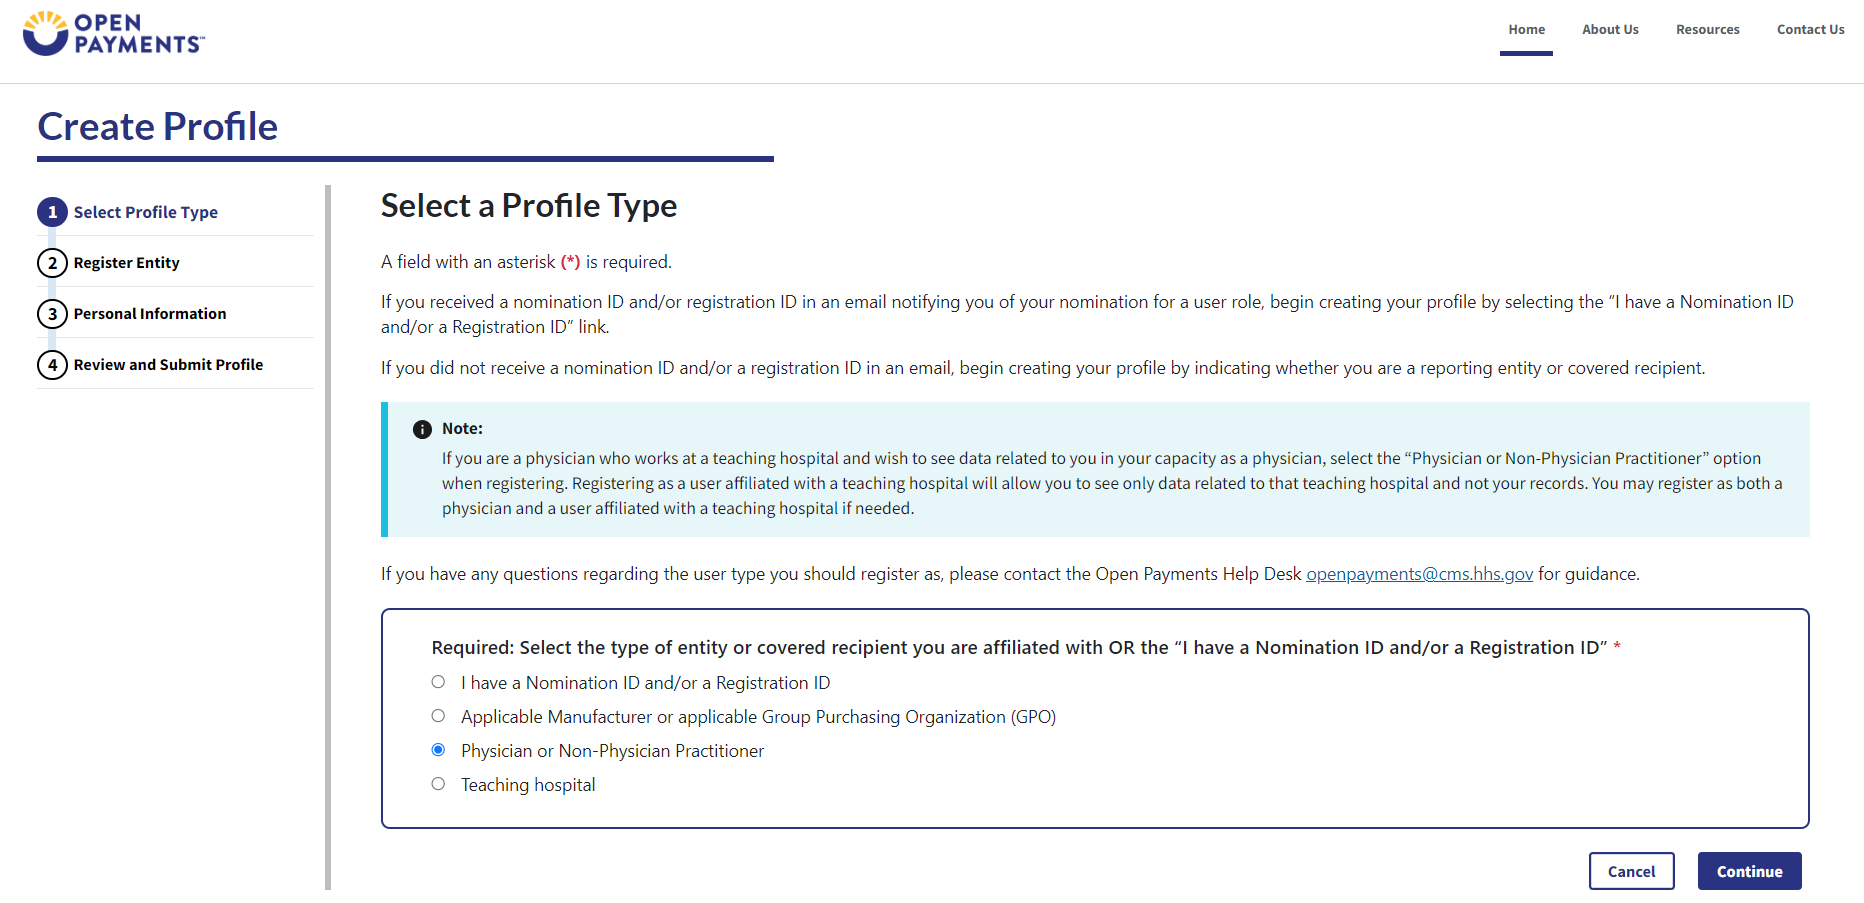
Step 3: Select the profile type Physician or Non-Physician Practitioner and select the Continue button.
Figure 7: Select Profile Type Page (OP 1.0)
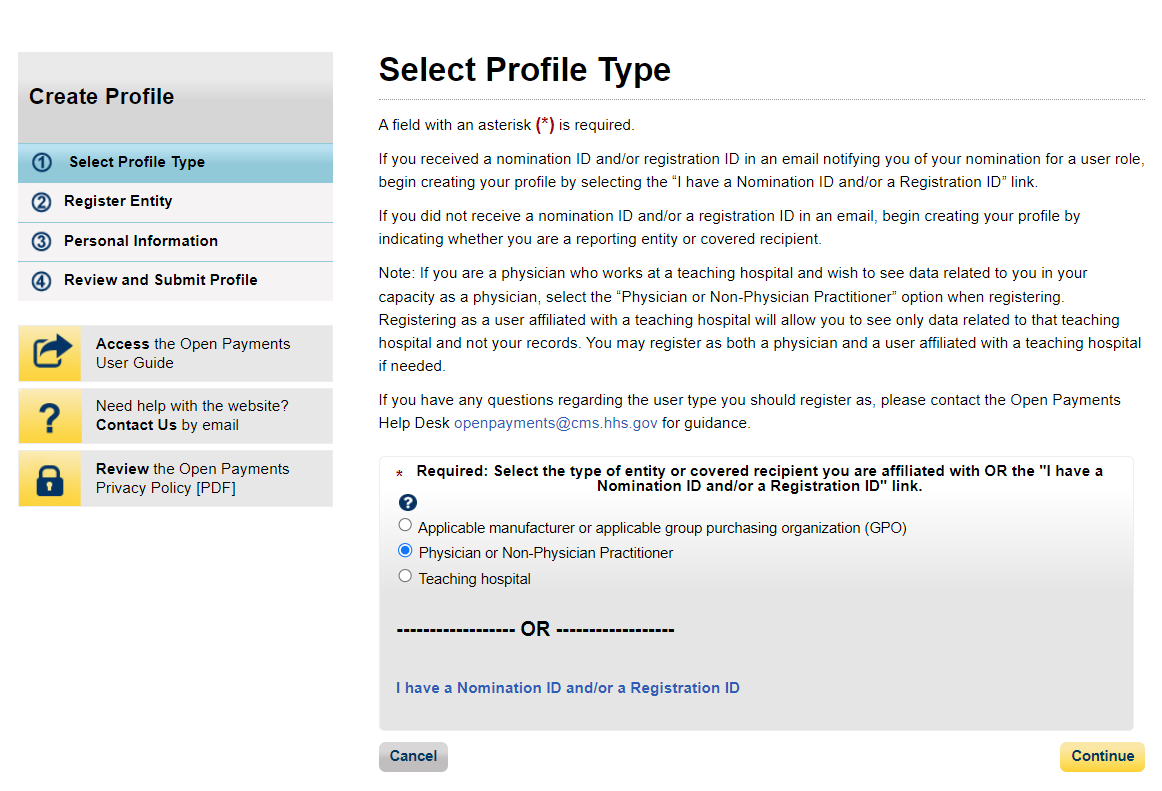
Figure 8: Select Profile Type Page (OP 2.0)
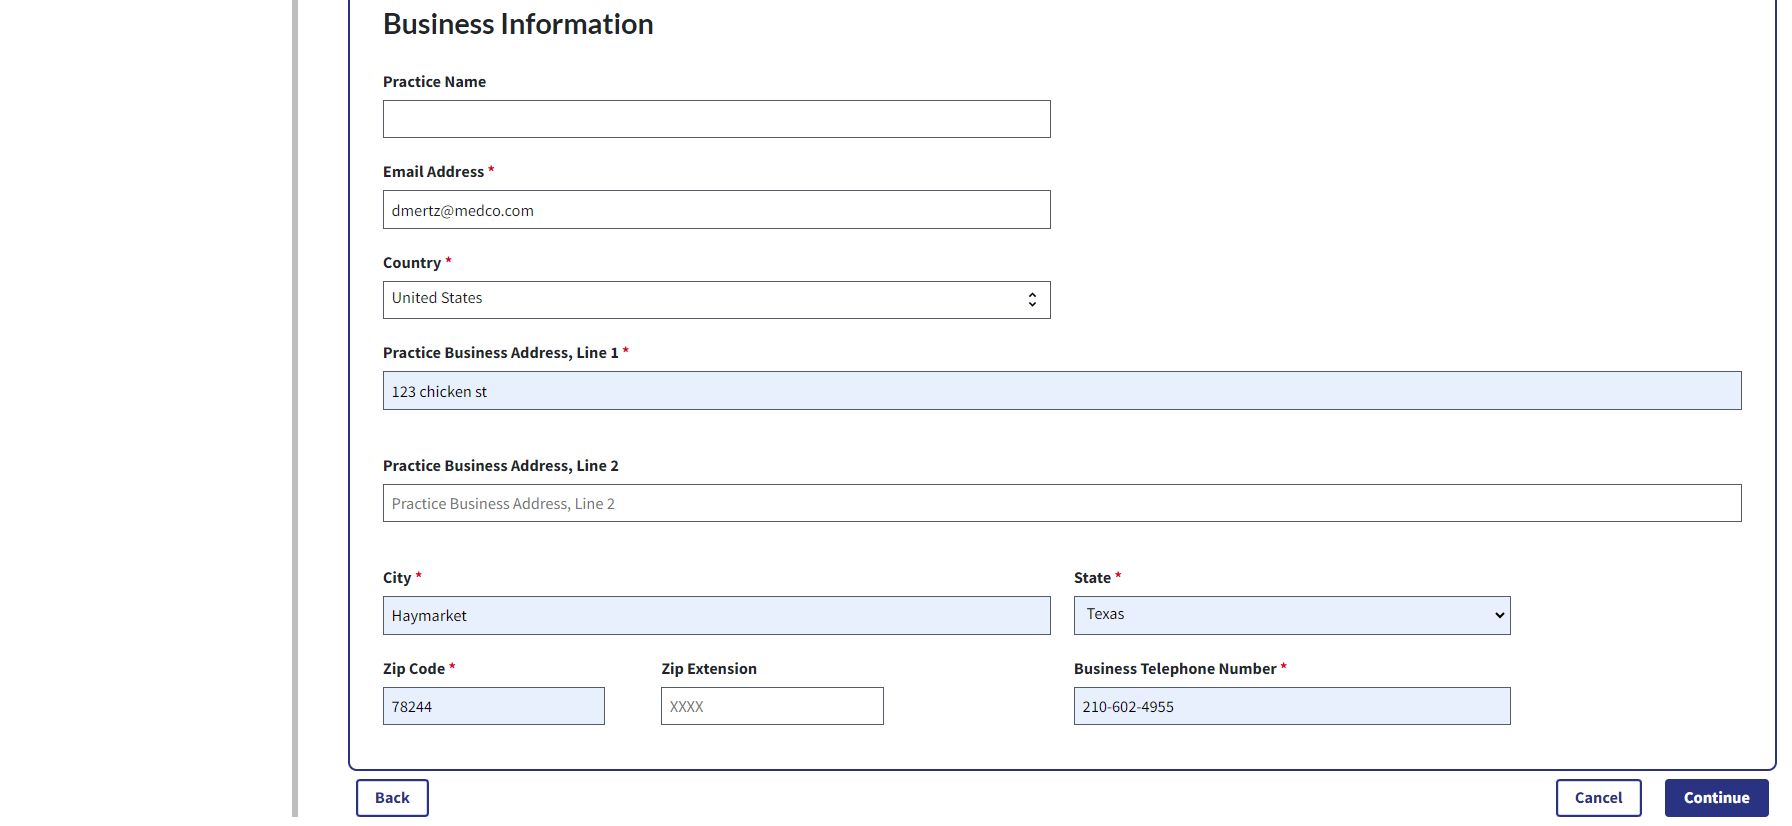
Step 4: Enter your personal and business information. All required fields are marked with an asterisk (*). You will not be able to proceed with registration until all the required fields are entered. You may register with a foreign address by selecting the “Country” field drop down value other than “United States”.
Figure 9a: Covered Recipient Personal Information Page (UPPER PORTION) (OPS 1.0)
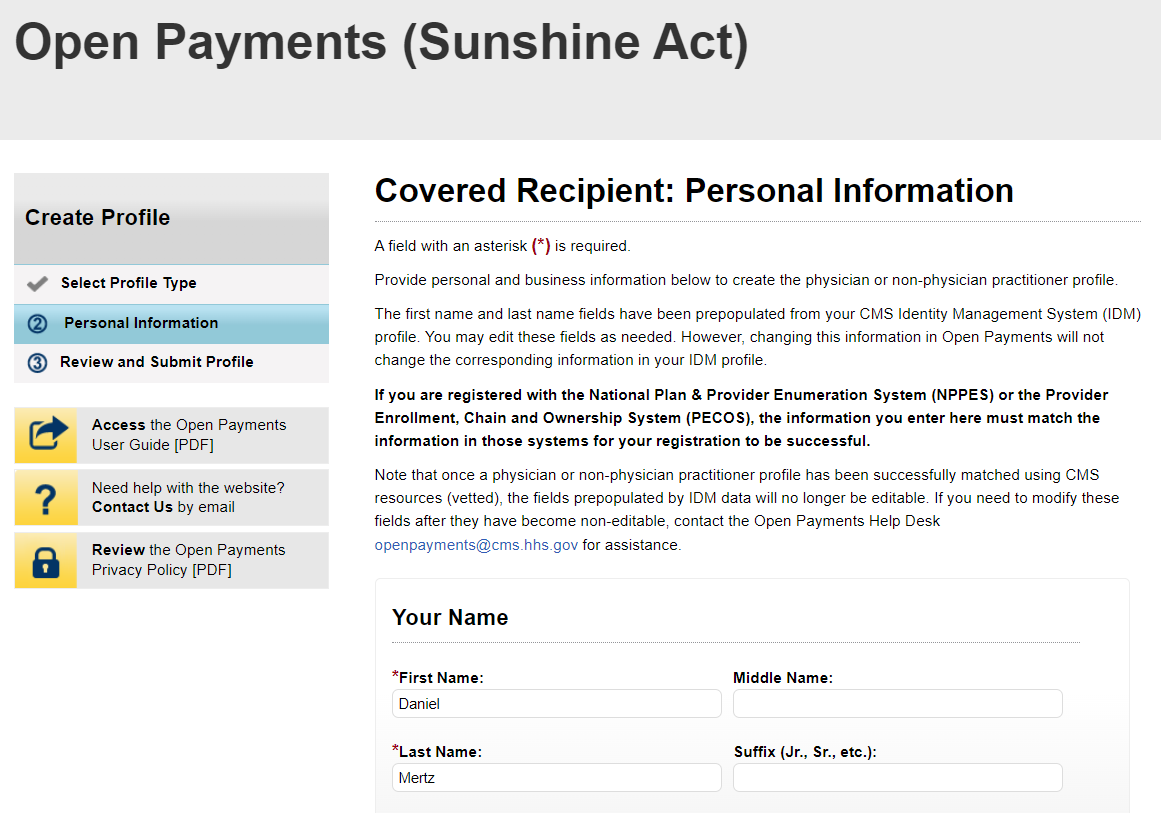
Figure 9b: Covered Recipient Personal Information Page (LOWER PORTION) (OPS 1.0)
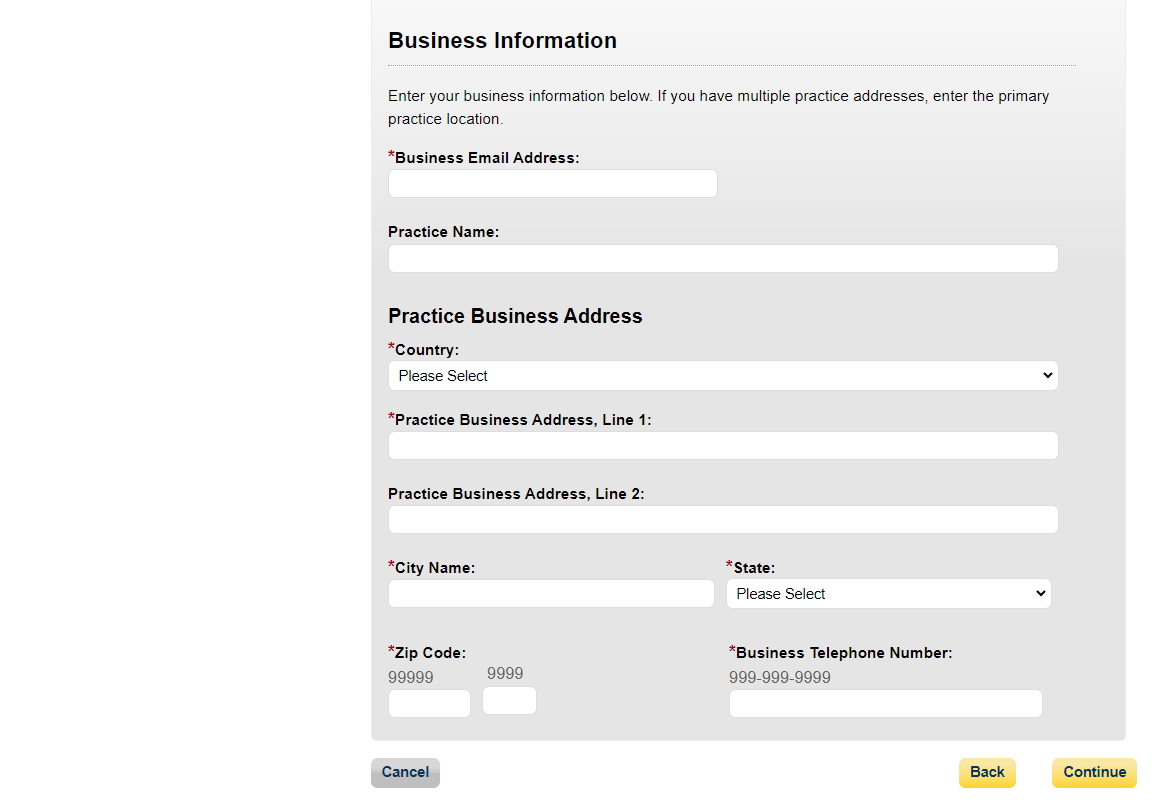
Figure 10a: Covered Recipient Personal Information Page (UPPER PORTION) (OPS 2.0)
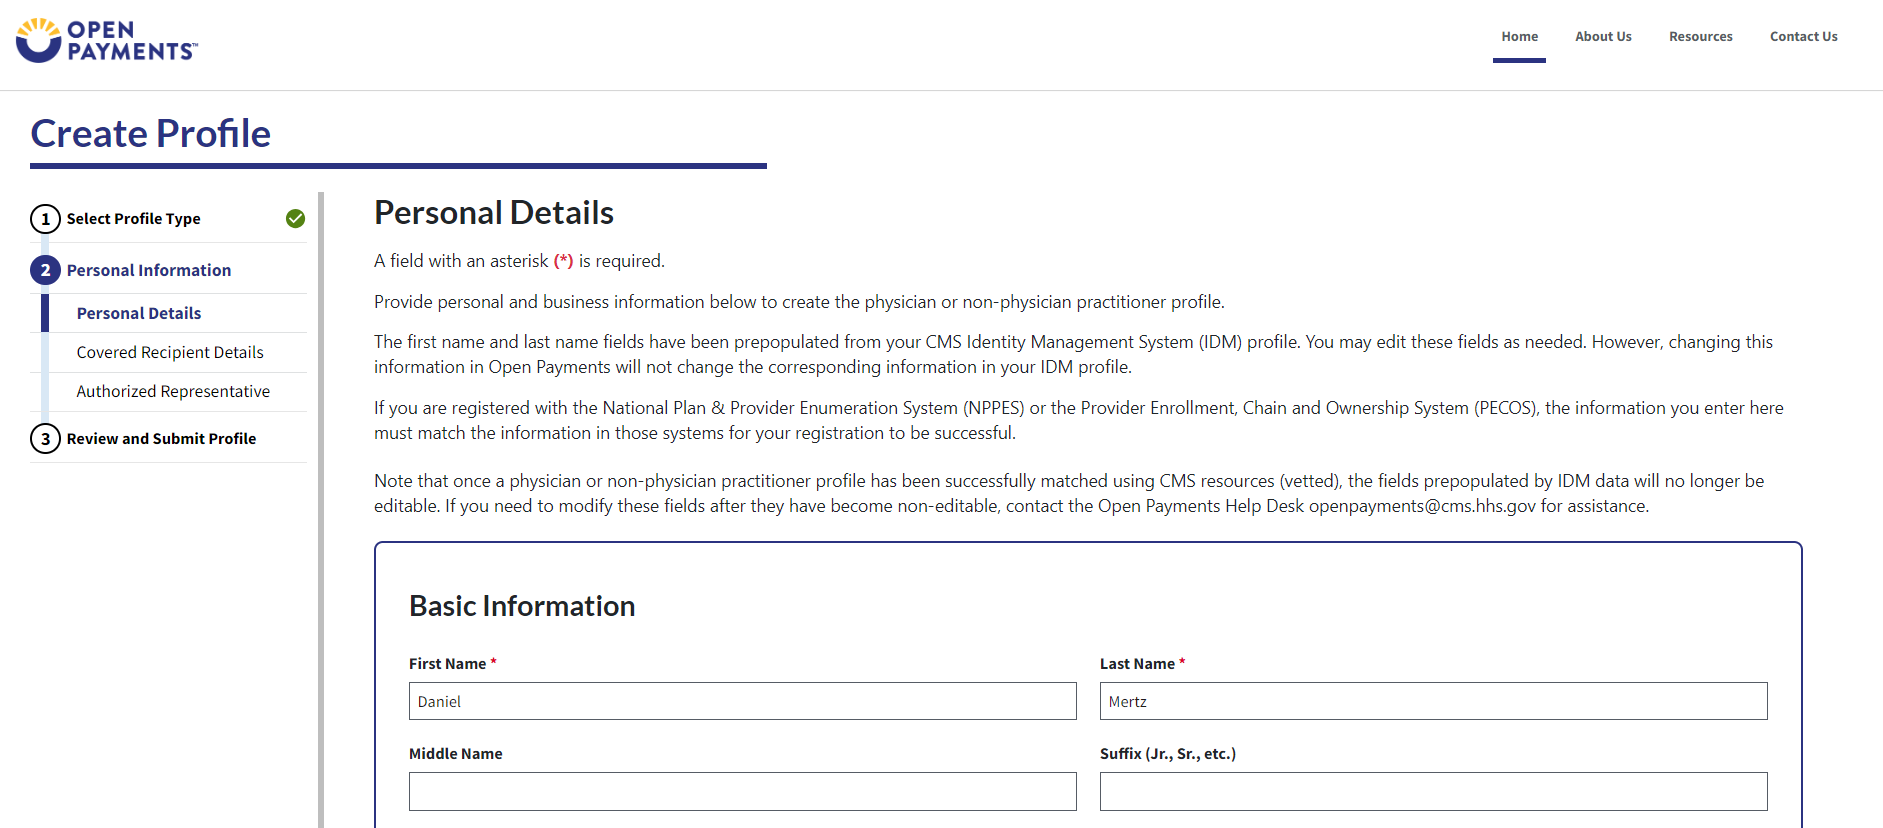
Figure 10b: Covered Recipient Personal Information Page (LOWER PORTION) (OPS 2.0)
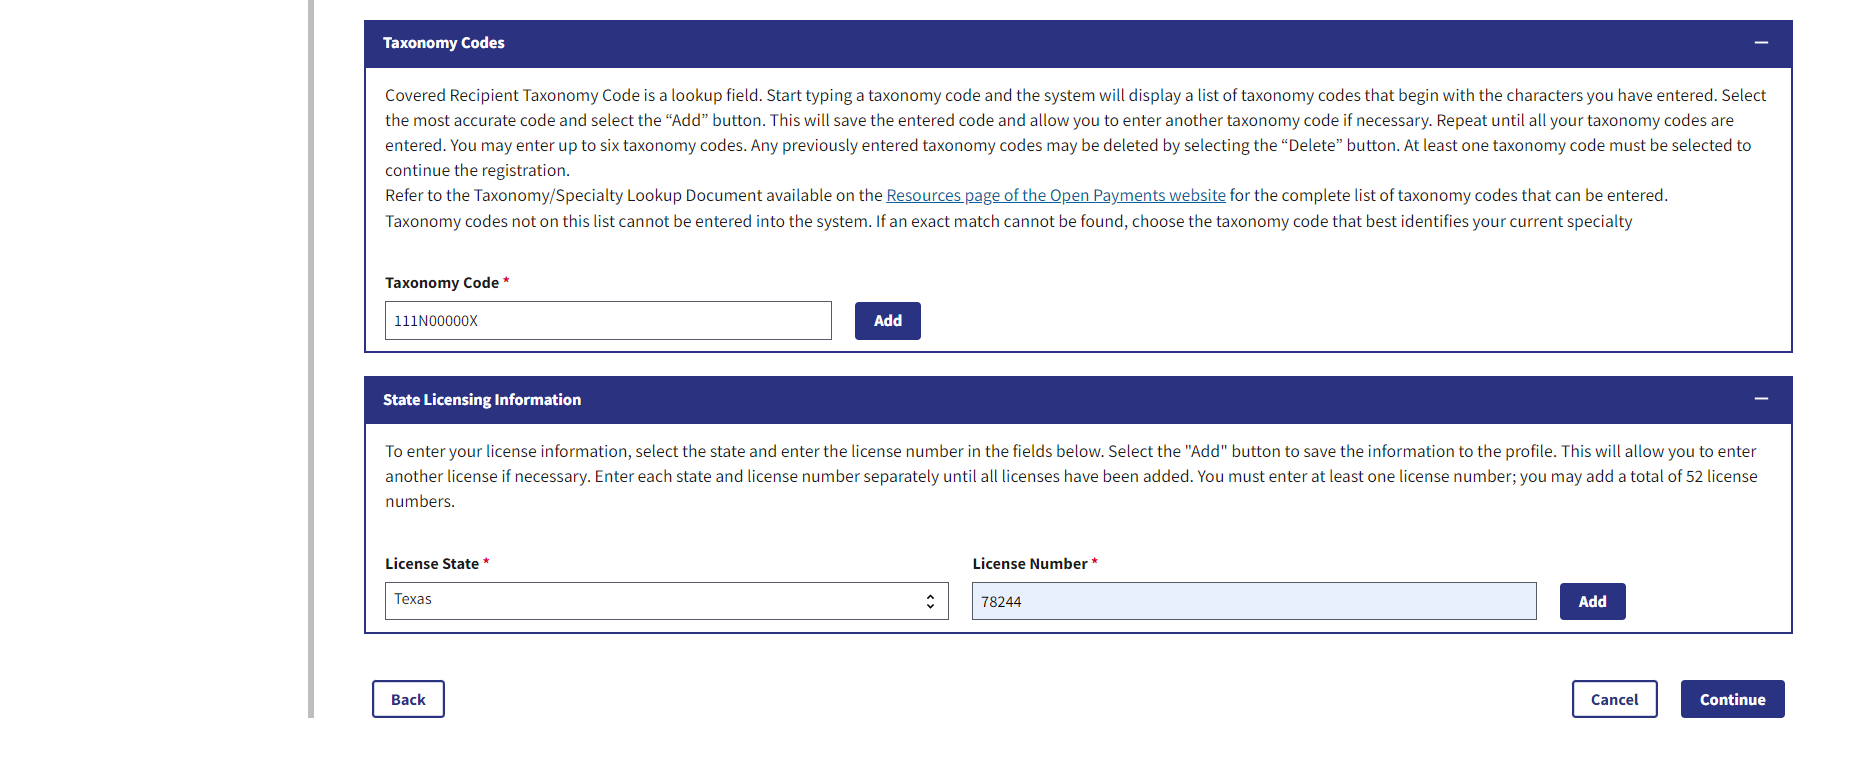
Step 5: Enter your covered recipient details. All required fields are marked with an asterisk (*).
Figure 11a: Covered Recipient Details Page (UPPER PORTION) (OPS 1.0)
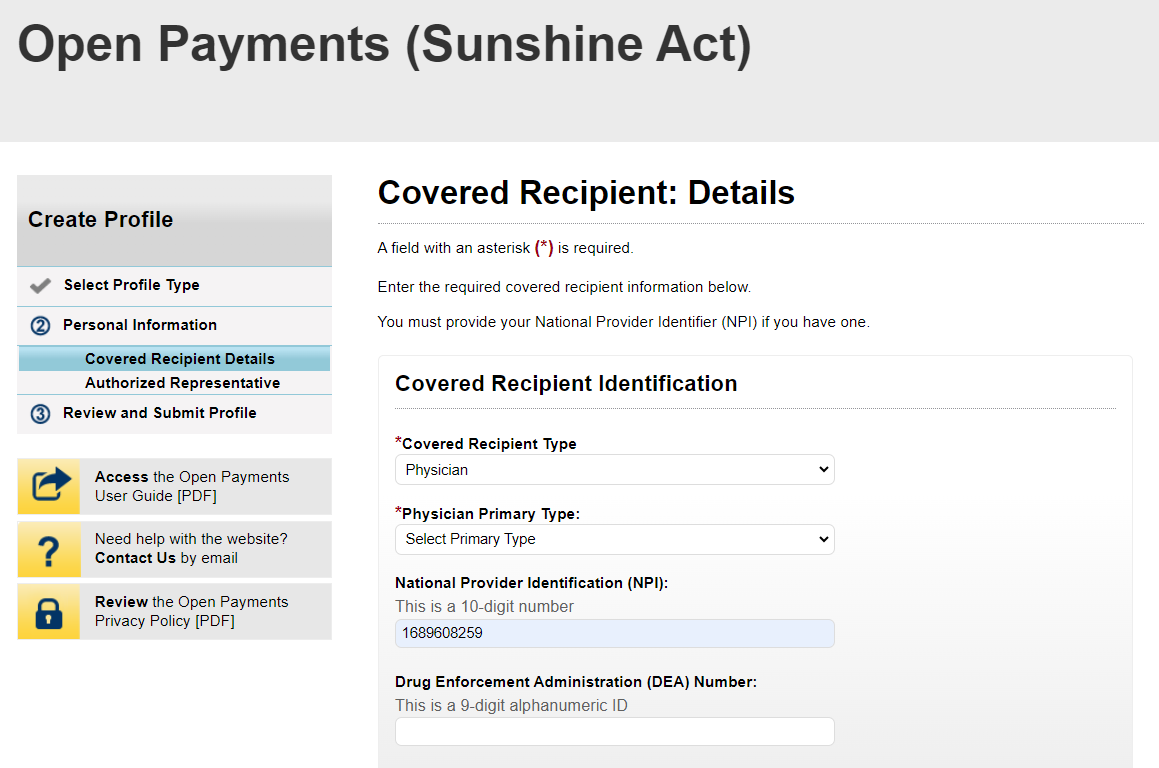
Figure 11b: Covered Recipient Details Page (LOWER PORTION) (OPS 1.0)
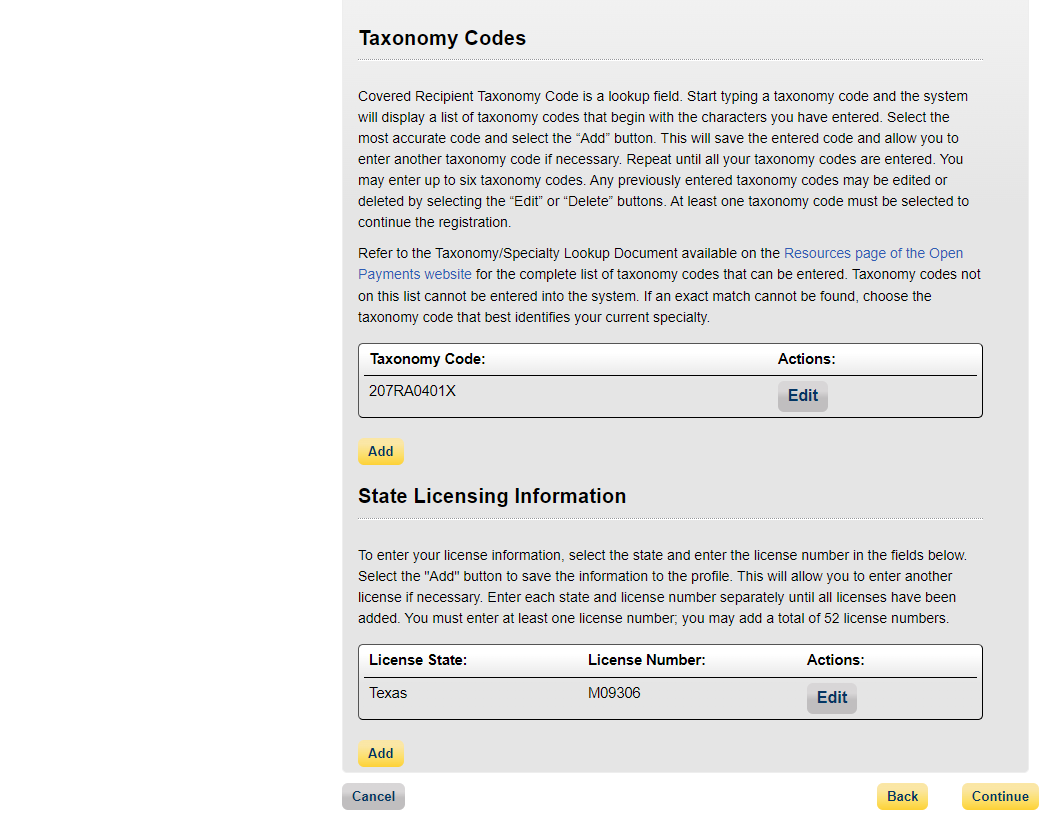
Figure 12a: Covered Recipient Details Page (UPPER PORTION) (OPS 2.0)
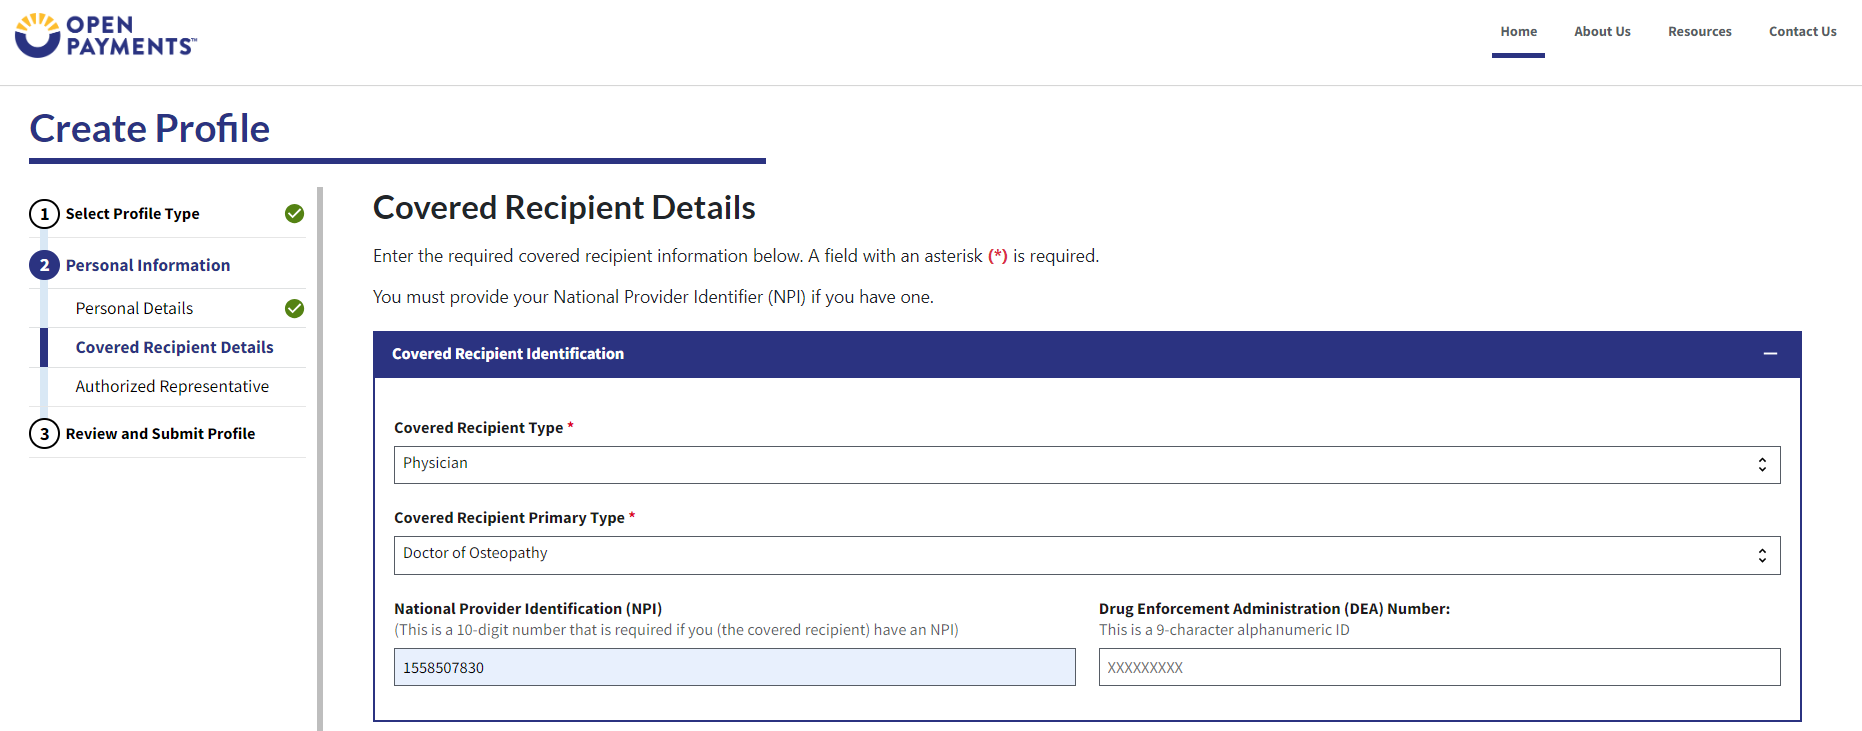
Figure 12b: Covered Recipient Details Page (LOWER PORTION) (OPS 2.0)
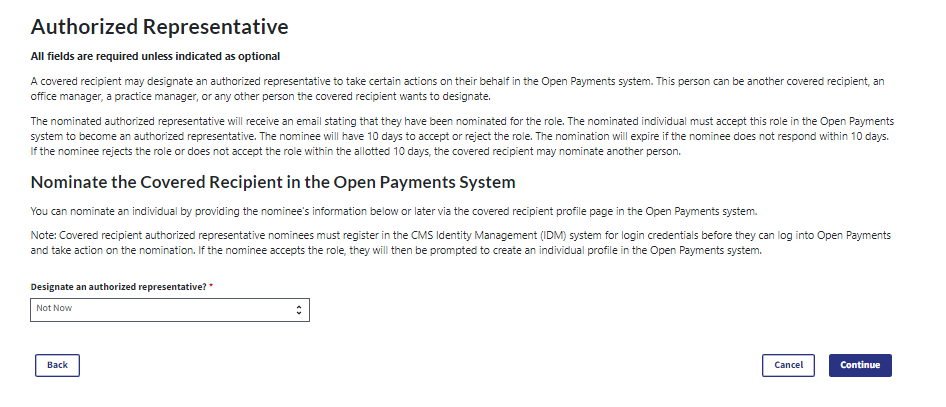
Step 6: You can nominate an individual to serve as your authorized representative within the Open Payments system at this registration point. By default, “Designate an Authorized Representative” will be selected.
Figure 13: Decision to NOT Nominate an Authorized Representative (OPS 1.0)
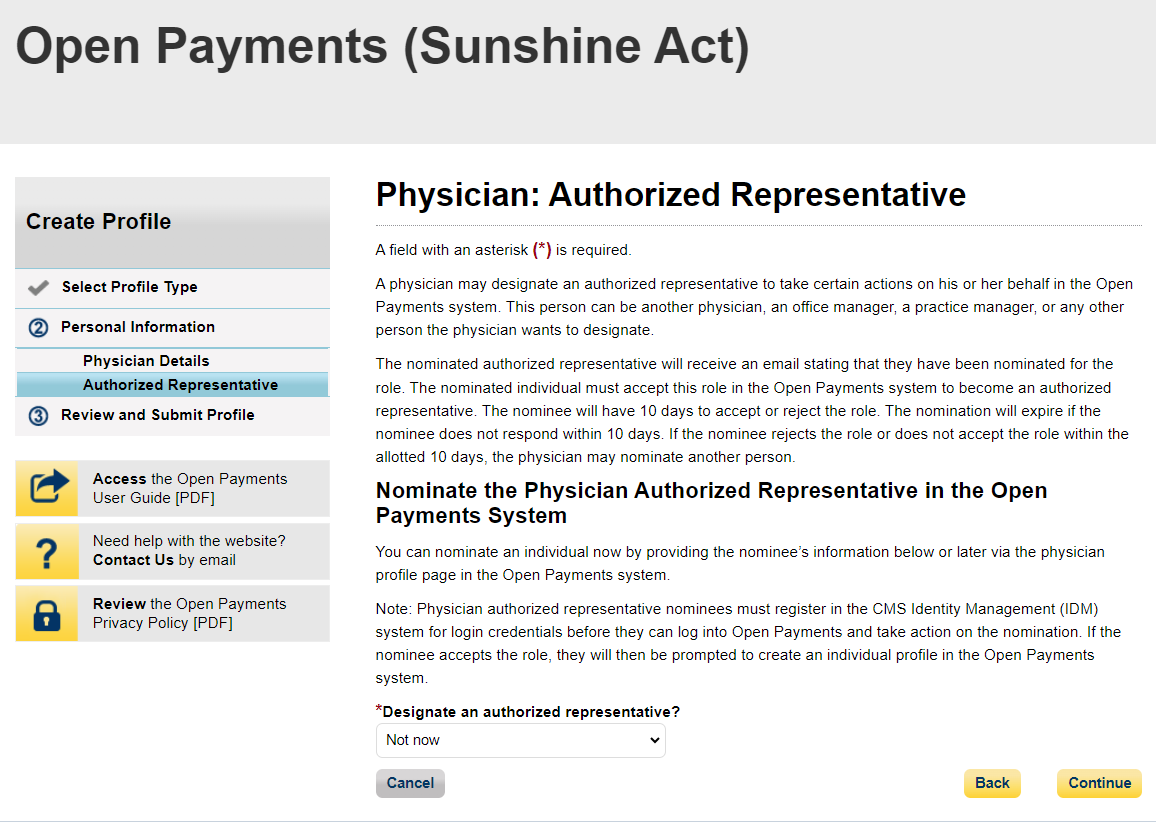
Figure 14: Decision to NOT Nominate an Authorized Representative (OPS 2.0)
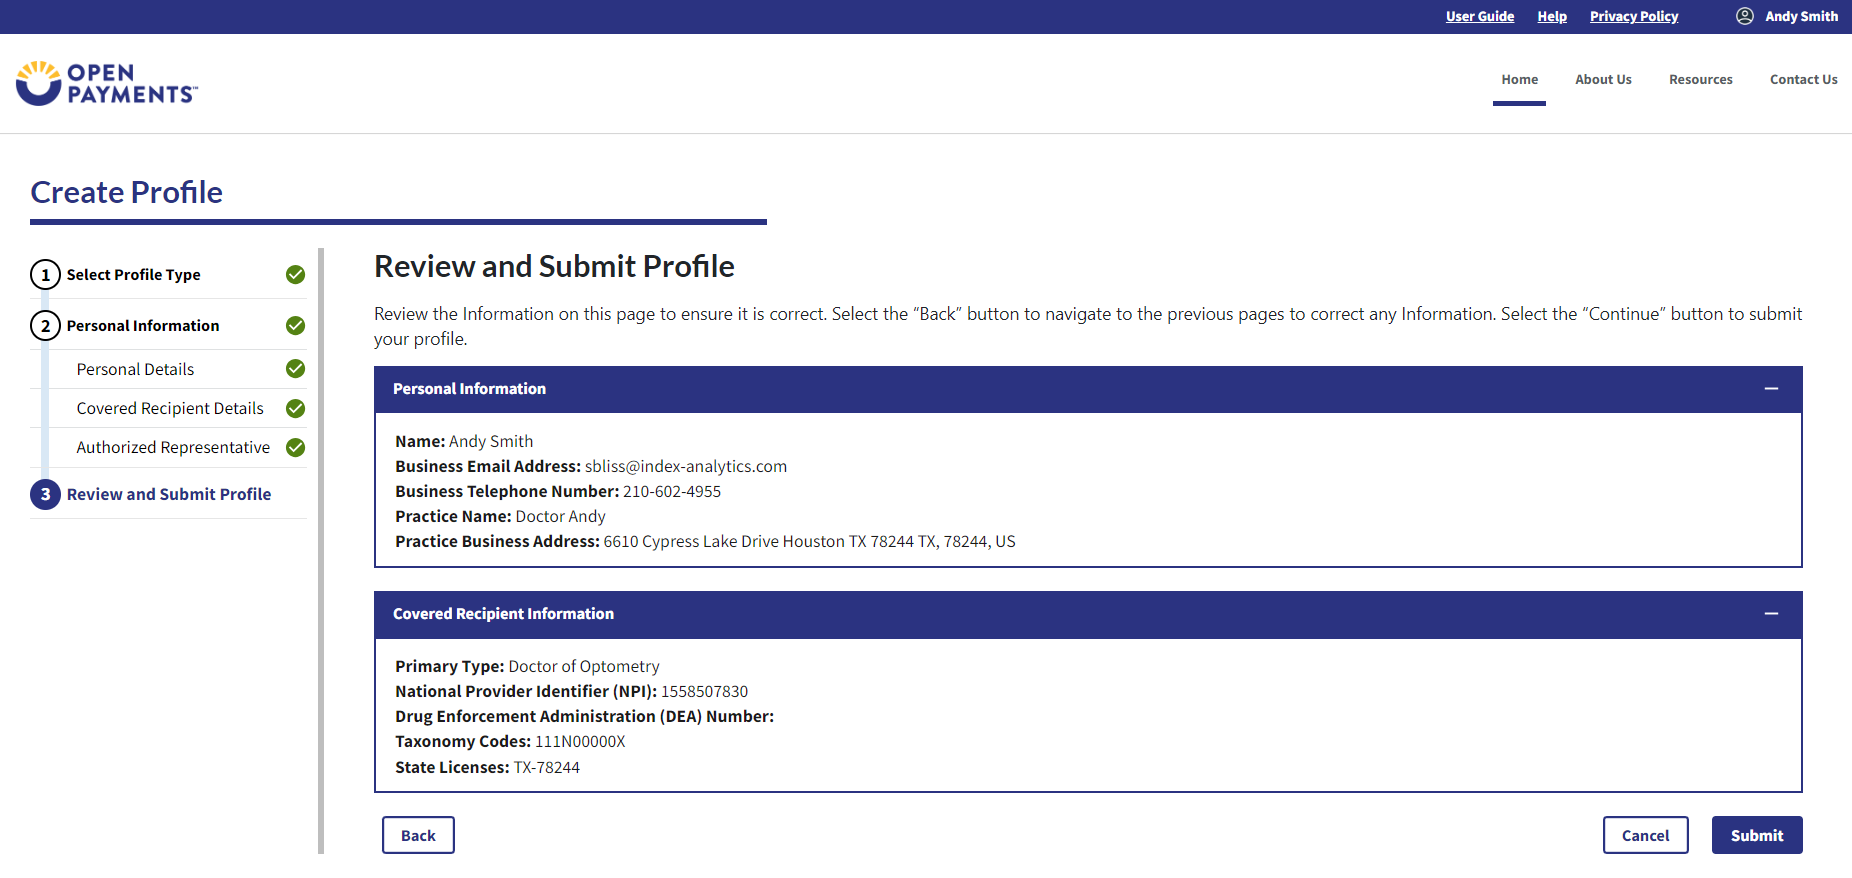
Step 7: Review the information entered. Select the Back button at the bottom of the page to go back and edit any information. Once you have reviewed the information and determined it is correct, select Submit.
Figure 15: Review and Submit Profile Page (UPPER PORTION) (OPS 1.0)
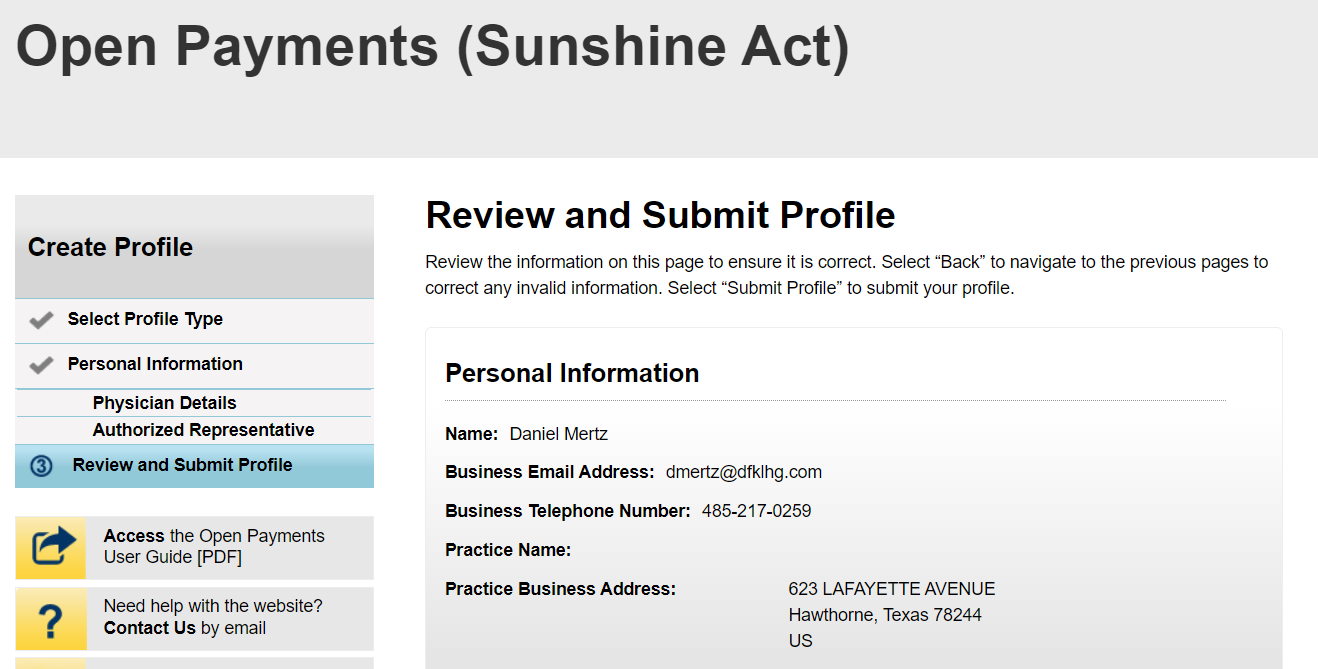
Figure 15b: Review and Submit Profile Page (BOTTOM PORTION) (OPS 1.0)

Figure 16: Review and Submit Profile Page (OPS 2.0)
The following message in Figure 9 will appear on-screen to confirm your profile has been successfully created. If you choose to designate an authorized representative, an email notification with a nomination ID will be sent to the nominated individual.
Figure 17: Registration Complete On-Screen Message (OPS 1.0)
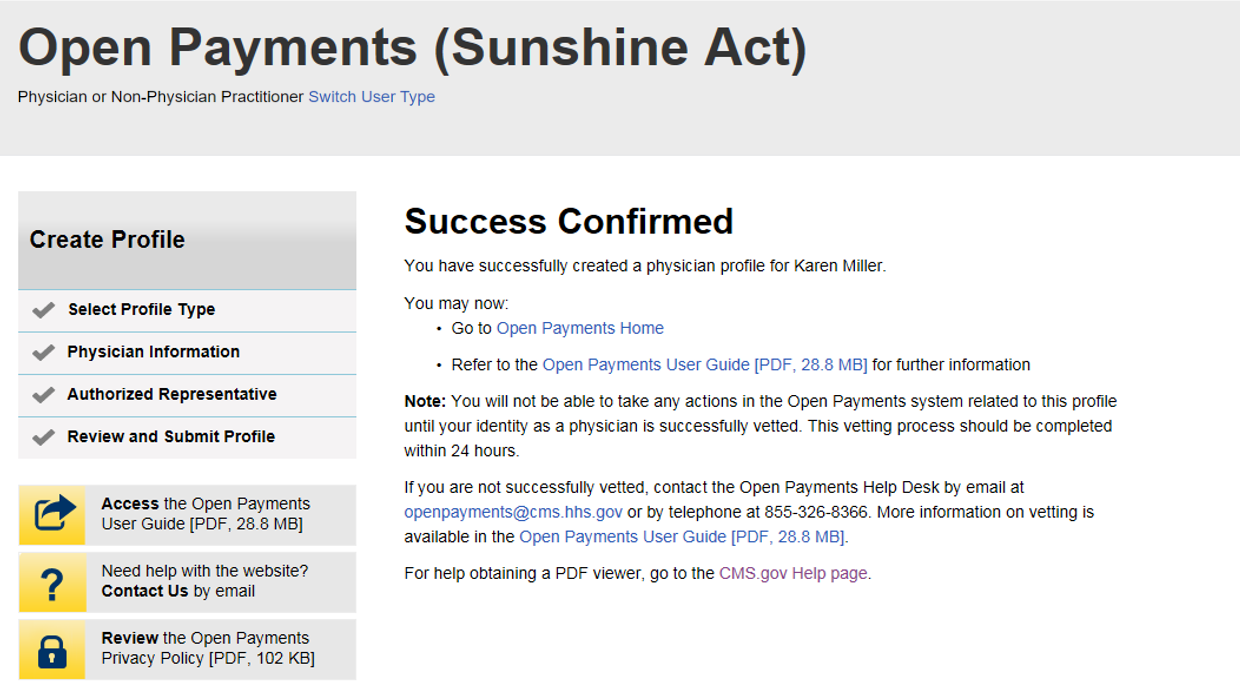
Figure 18: Registration Complete On-Screen Message (OPS 2.0)

Creating an Open Payments Profile as a Teaching Hospital (First Time System Users)
If you are registering a teaching hospital and are a first-time user in the Open Payments system, follow the steps below.
Step 1: Log in to the Open Payments system at https:/openpayments.system.cms.gov using your IDM credentials and agree to the Terms and Conditions.
After selecting the Log in button verify your identity using the Multi-Factor Authentication (MFA). The email address you input during IDM registration is the default MFA device.
Figure 19: Open Payments System Log in Page (OPS 1.0)

Figure 20: Open Payments System Log in Page (OPS 2.0)

Step 2: The on-screen text contains important information regarding creating your physician profile. Read the on-screen text and select Start Profile at the bottom of the page when you are ready to continue.
Note: To enhance clarity, some larger screenshots will be split. The figure descriptions will describe these instances.
Figure 21a: Create My Profile Page (UPPER PORTION) (OPS 1.0)

Figure 21b: Create My Profile Page (LOWER PORTION) (OPS 1.0)

Figure 22a: Create My Profile Page (UPPER PORTION) (OPS 2.0)

Figure 22b: Create My Profile Page (LOWER PORTION) (OP2.0)

Step 3: Select the profile type Teaching hospital and select the Continue button.
Figure 23: Select Profile Type Page (OPS 1.0)
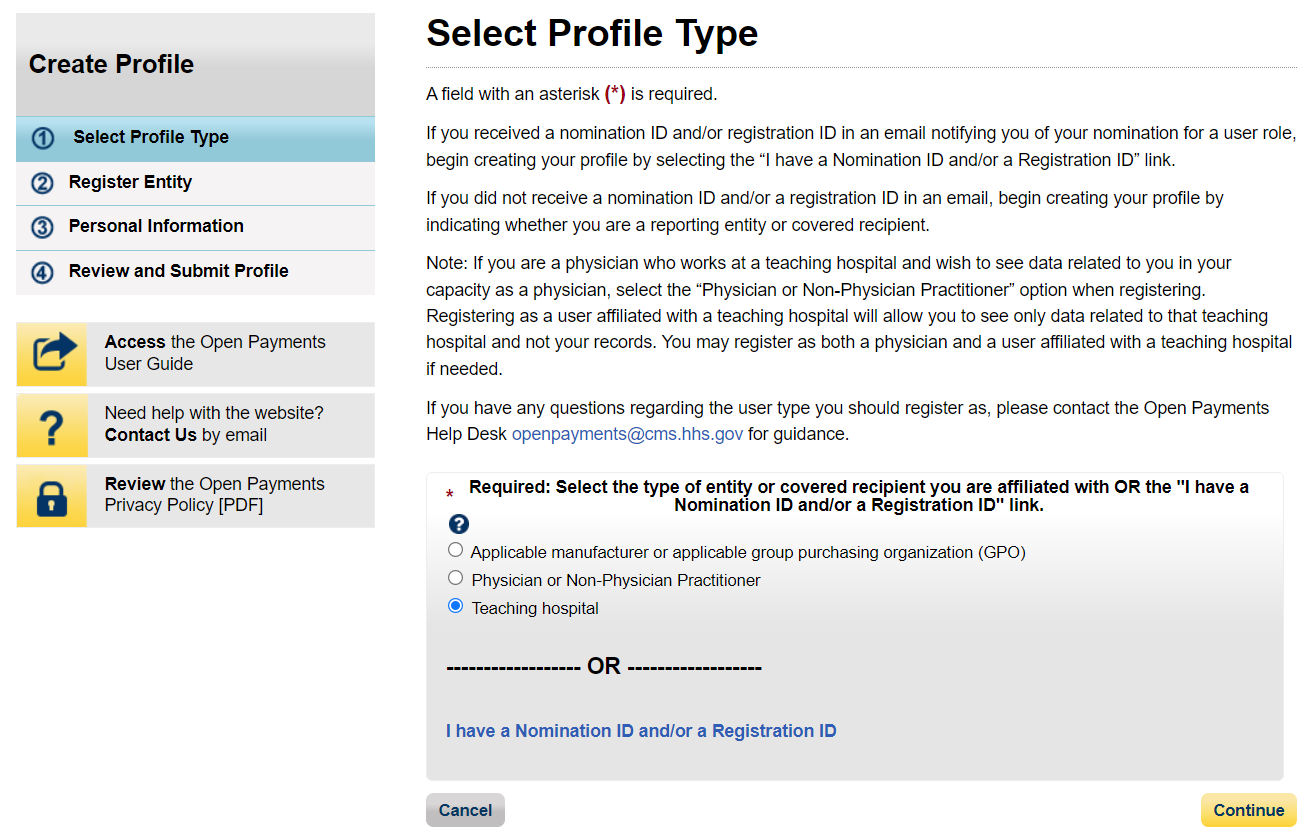
Figure 24: Select Profile Type Page (OPS 2.0)
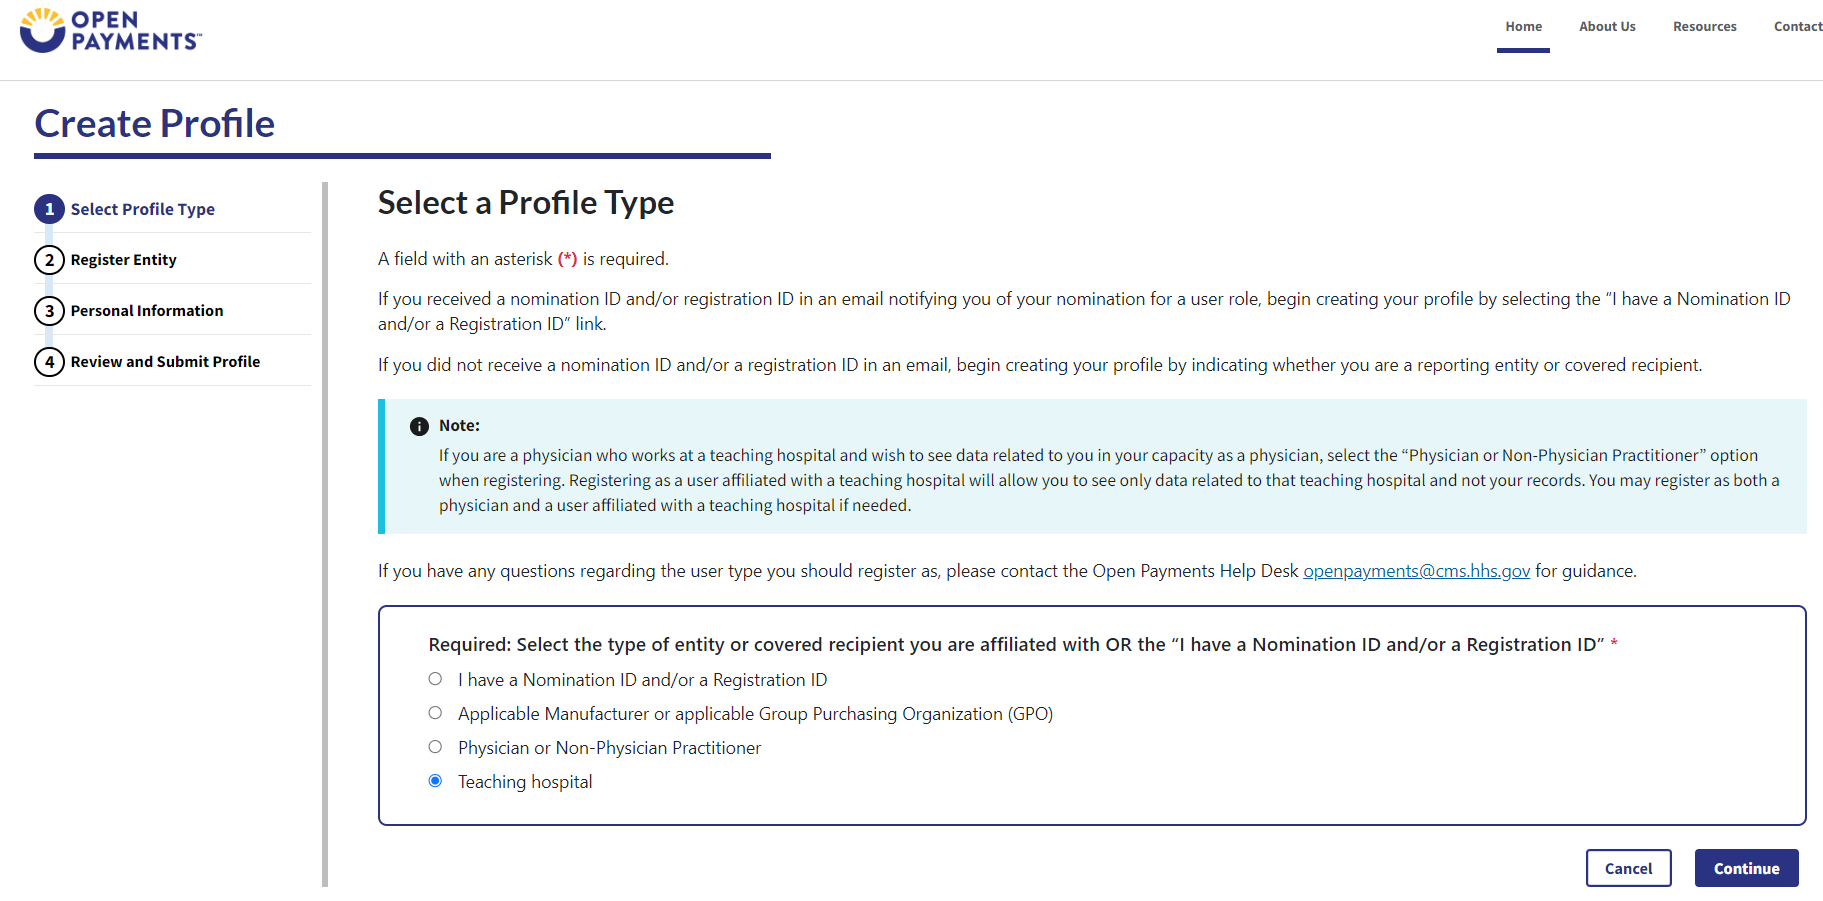
Step 4: Search for the teaching hospital by selecting the appropriate state, teaching hospital legal name, teaching hospital business address, and Taxpayer Identification Number (TIN) from the dropdowns and select Search.
Figure 25a: Teaching Hospital Search Page (UPPER PORTION) (OPS 1.0)
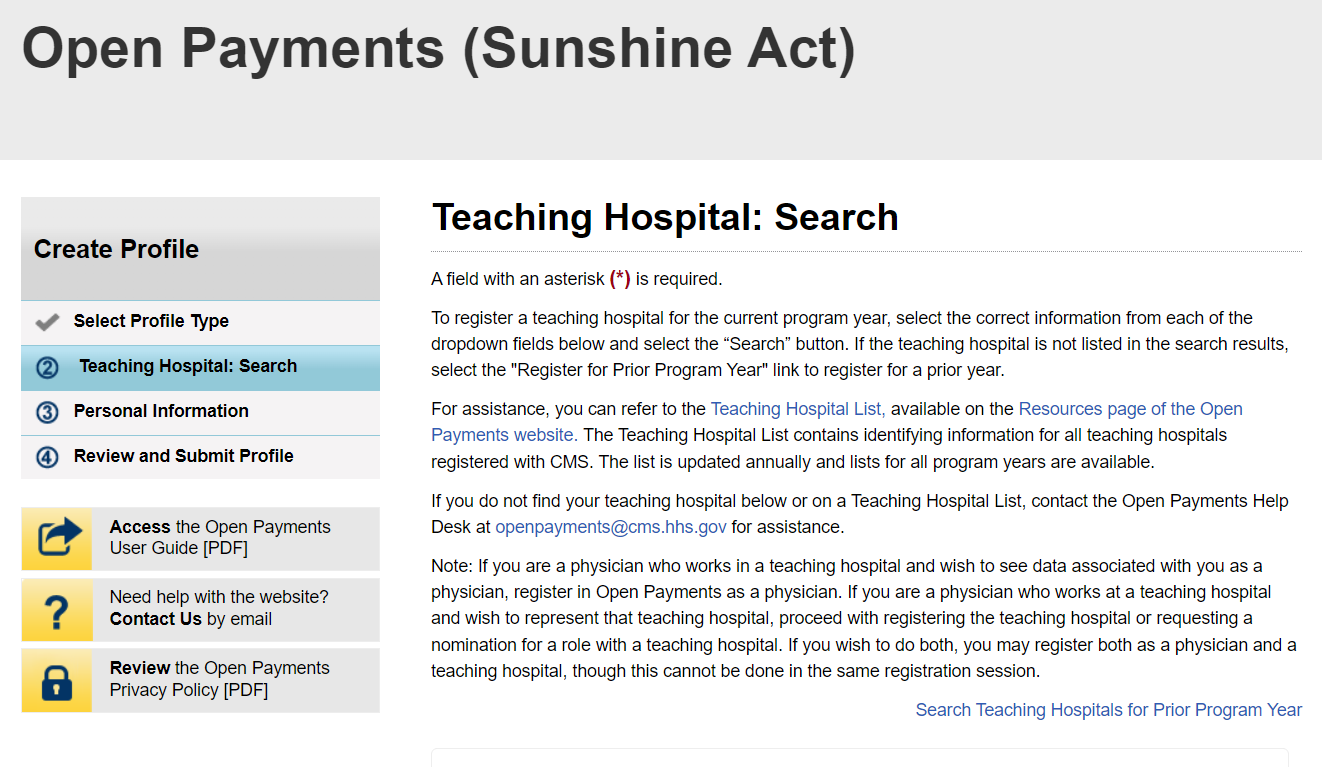
Figure 25b: Teaching Hospital Search Page (LOWER PORTION) (OPS 1.0)
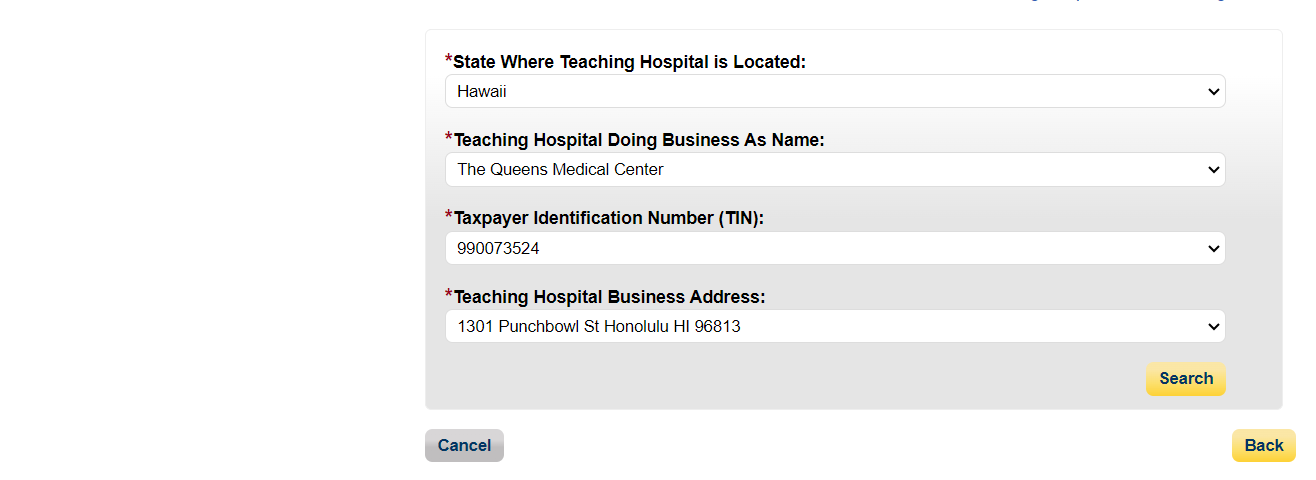
Figure 26a: Teaching Hospital Search Page (UPPER PORTION) (OPS 2.0)

Figure 26b: Teaching Hospital Search Page (LOWER PORTION) (OPS 2.0)

Step 5: Review the information displayed on the page. Select the Continue button if the information displayed is the teaching hospital you wish to register.
Figure 27a: Teaching Hospital Search Page Search Results (UPPER PORTION) (OPS 1.0)
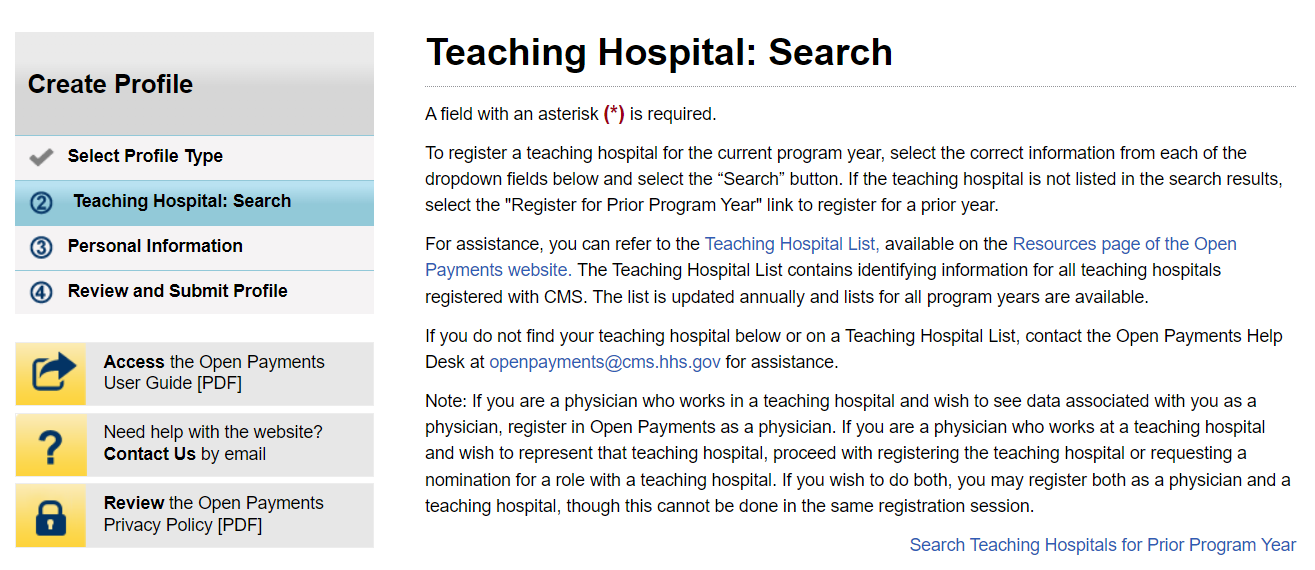
Figure 27b: Teaching Hospital Search Page Search Results (LOWER PORTION) (OPS 1.0)
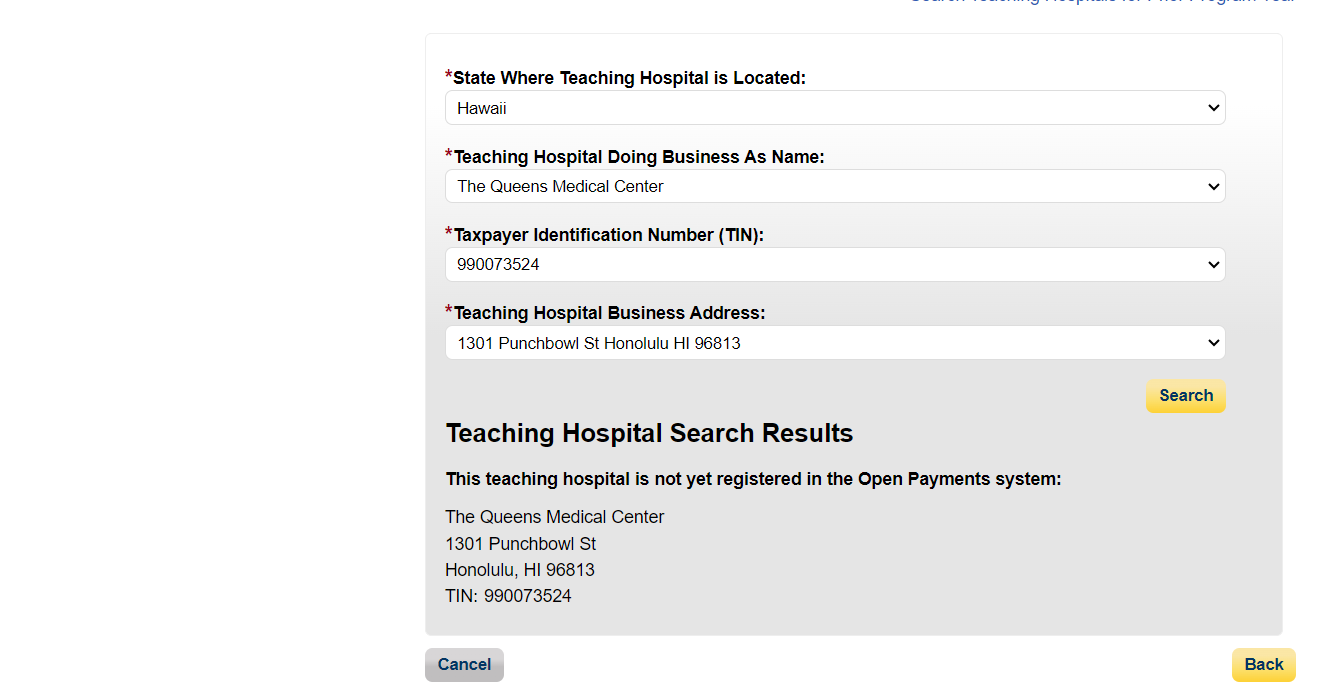
Figure 28a: Teaching Hospital Search Page Search Results (UPPER PORTION) (OPS 2.0)

Figure 28b: Teaching Hospital Search Page Search Results (LOWER PORTION) (OPS 2.0)
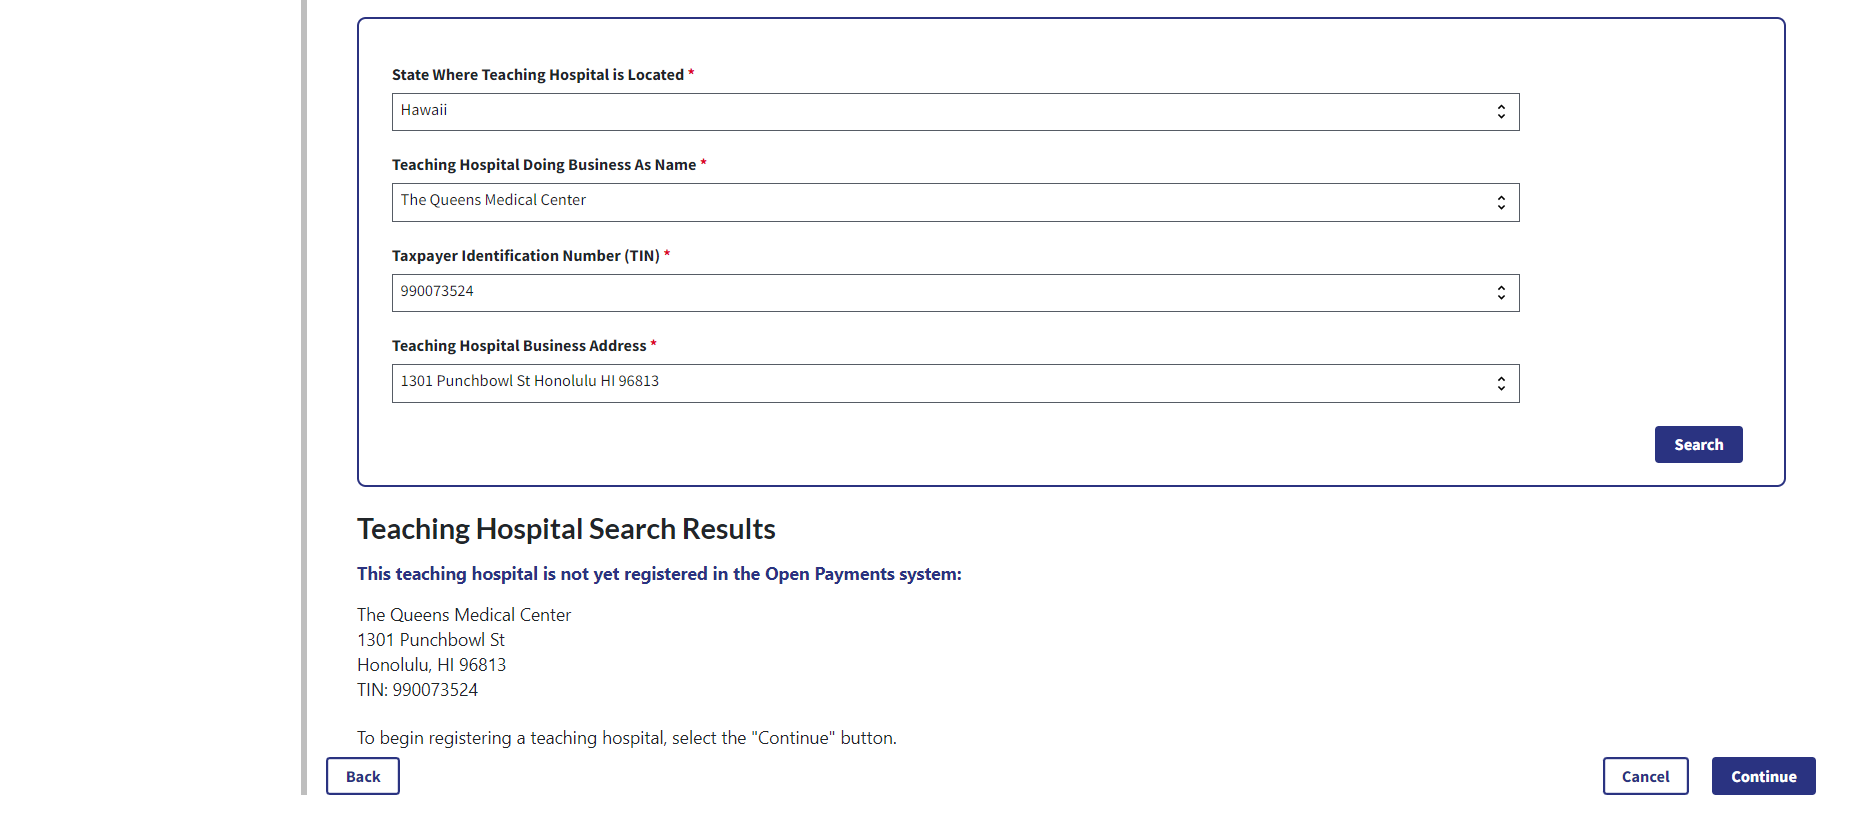
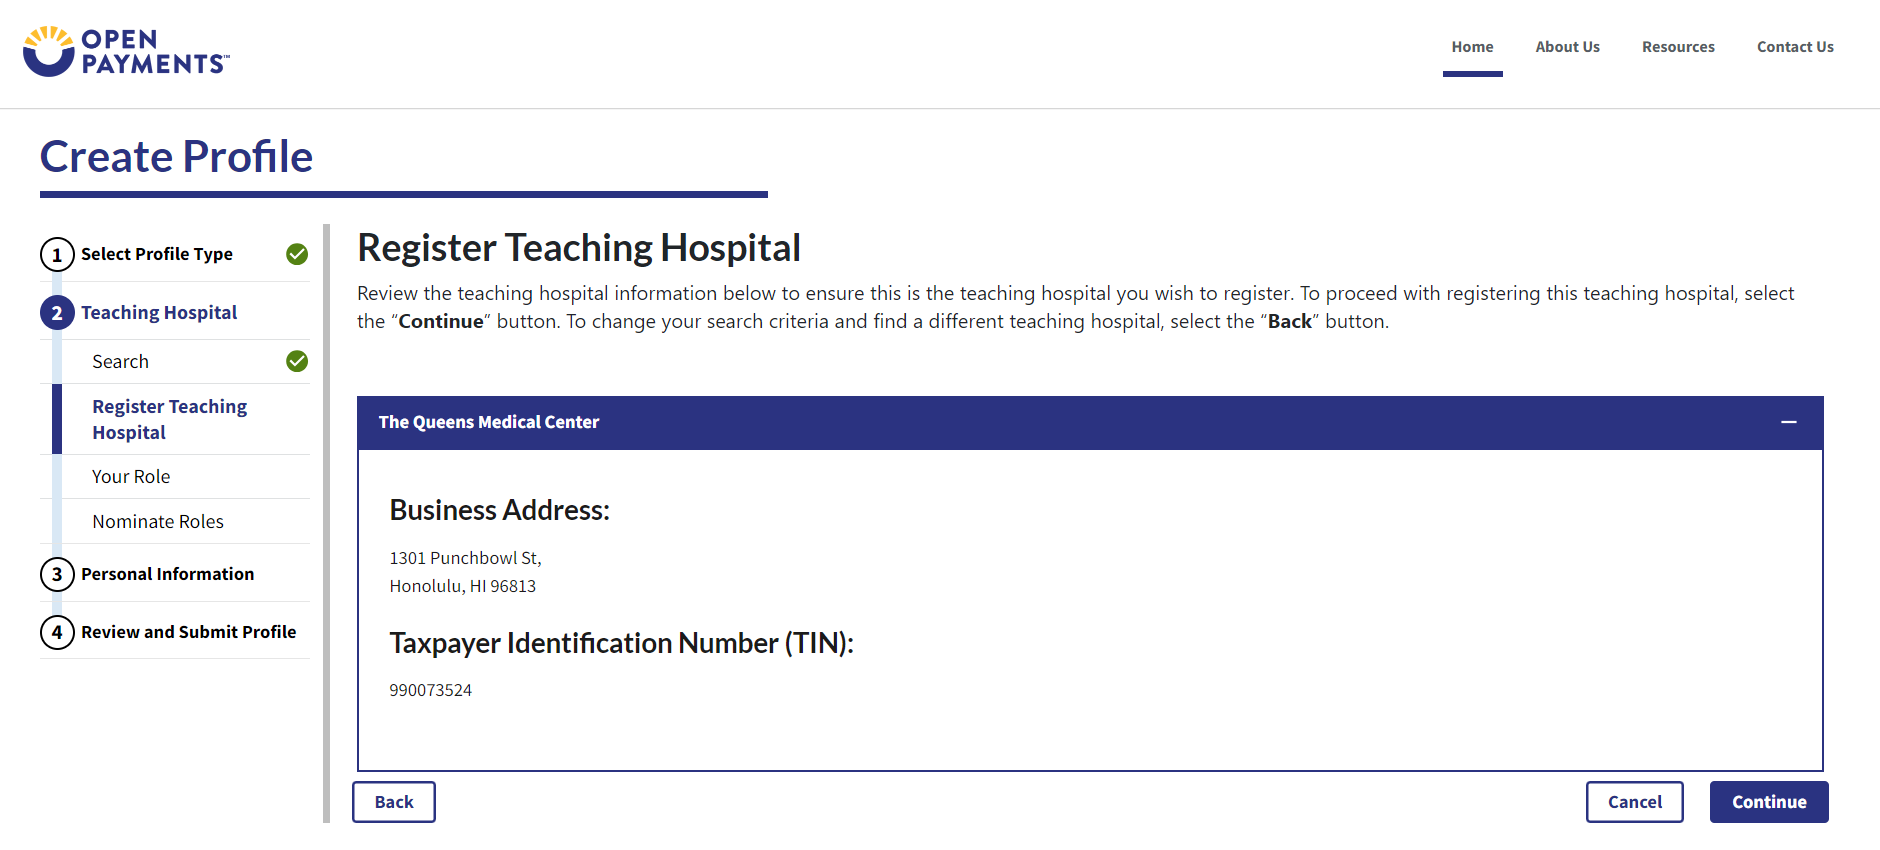
Step 6: Review the information displayed on the page. When complete, select the Continue button.
Figure 29: Register Teaching Hospital Page (OPS 1.0)
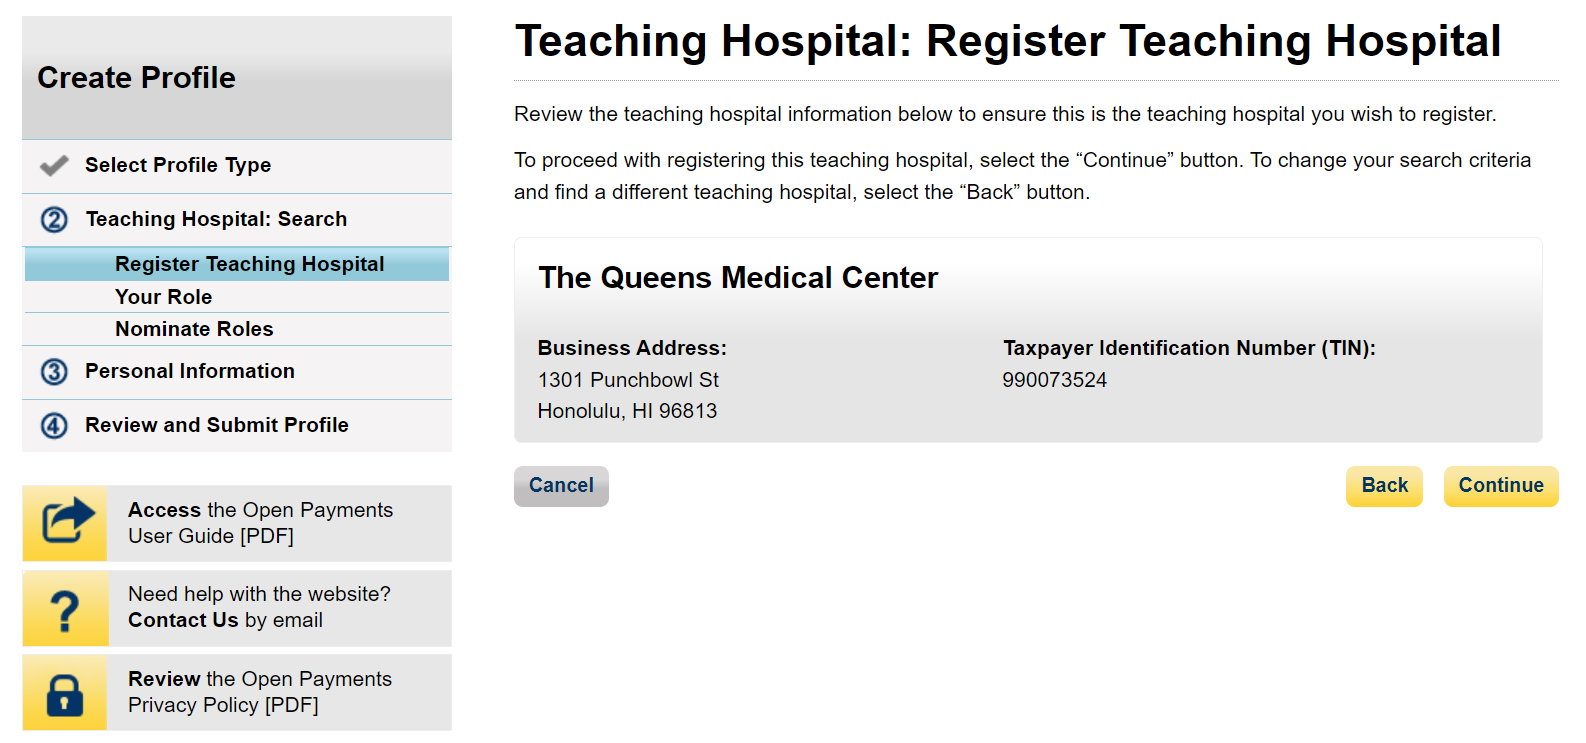
Figure 30: Register Teaching Hospital Page (OPS 2.0)
Step 7: Review the information generated by the system related to your role. You must select the role of “Authorized Official” for yourself to proceed with registration.
Figure 31: Teaching Hospital Your Role Page (OPS 1.0)
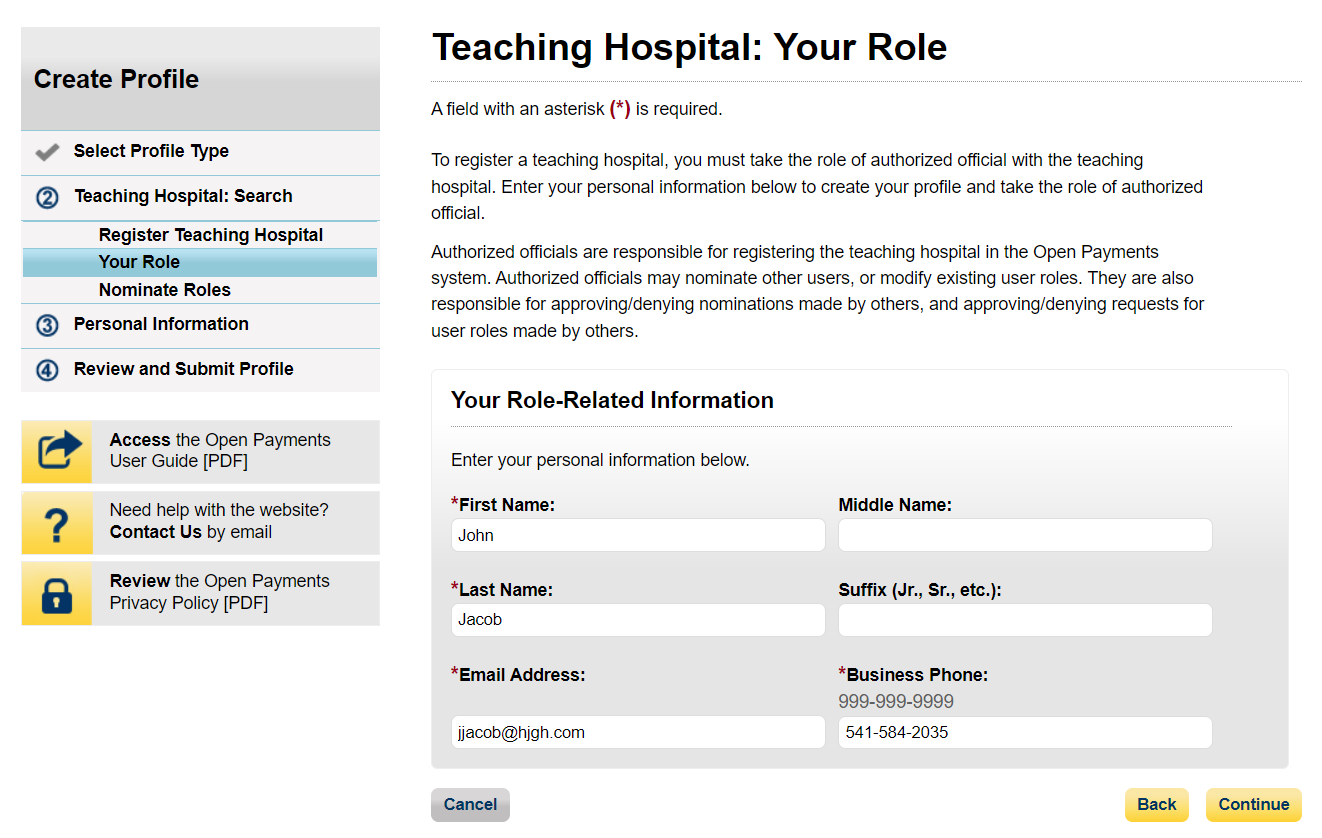
Figure 32a: Teaching Hospital Your Role Page (UPPER HALF) (OPS 2.0)
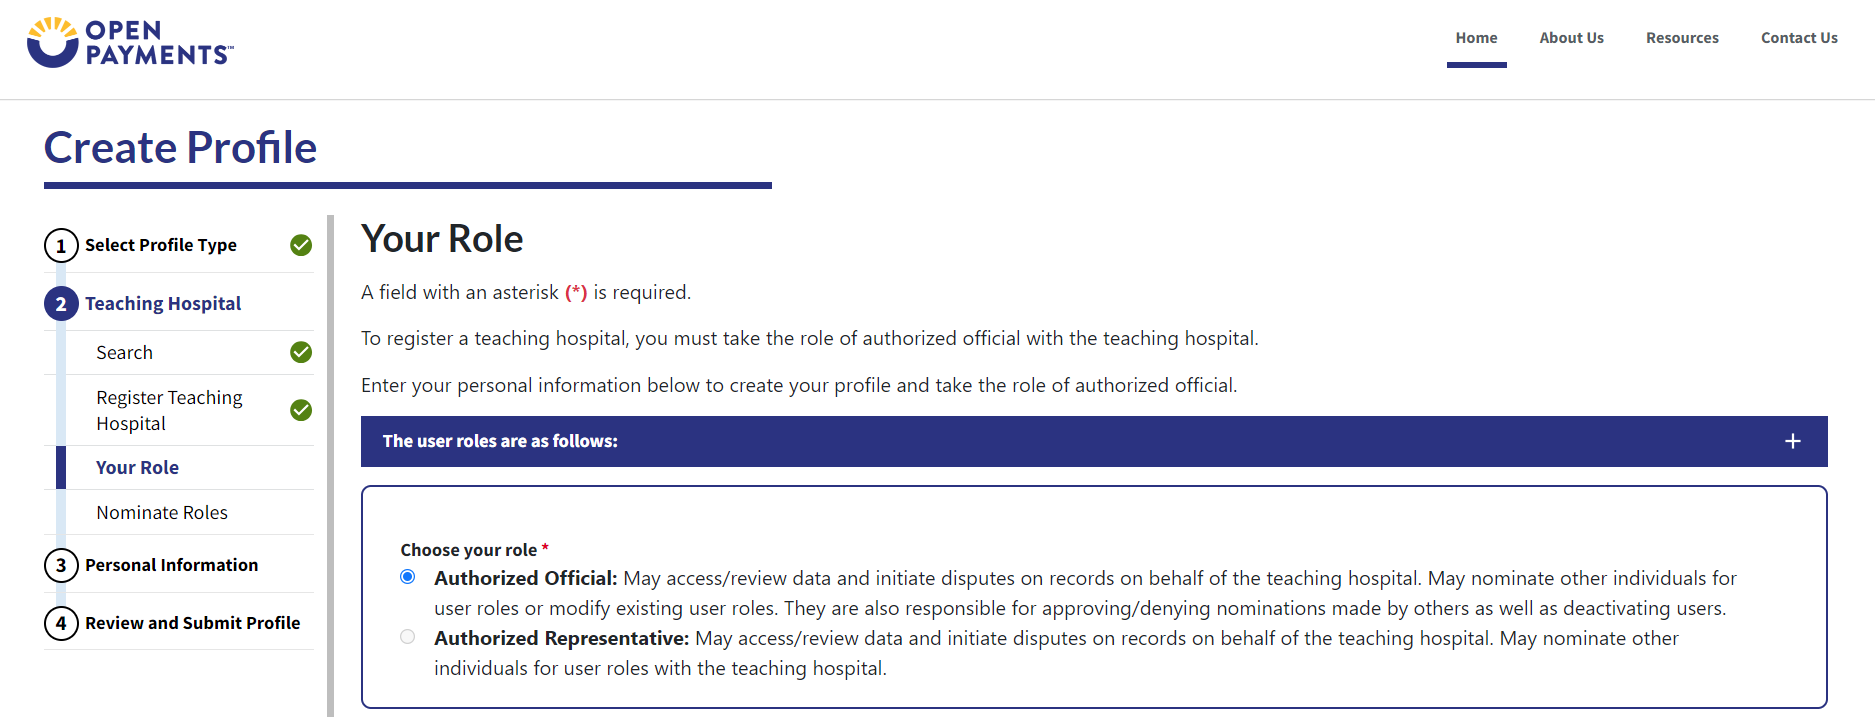
Figure 32b: Teaching Hospital Your Role Page (LOWER HALF) (OPS 2.0)

Step 8: You may choose to nominate additional users to fill the authorized official or authorized representative roles. To do so, select Add to nominate any additional individual(s). If you choose not to add nominees at this time, select the Continue button without adding any nominee information and proceed to Step 9.
Figure 33a: Teaching Hospital Nominate Roles Page (UPPER PORTION) (OPS 1.0)
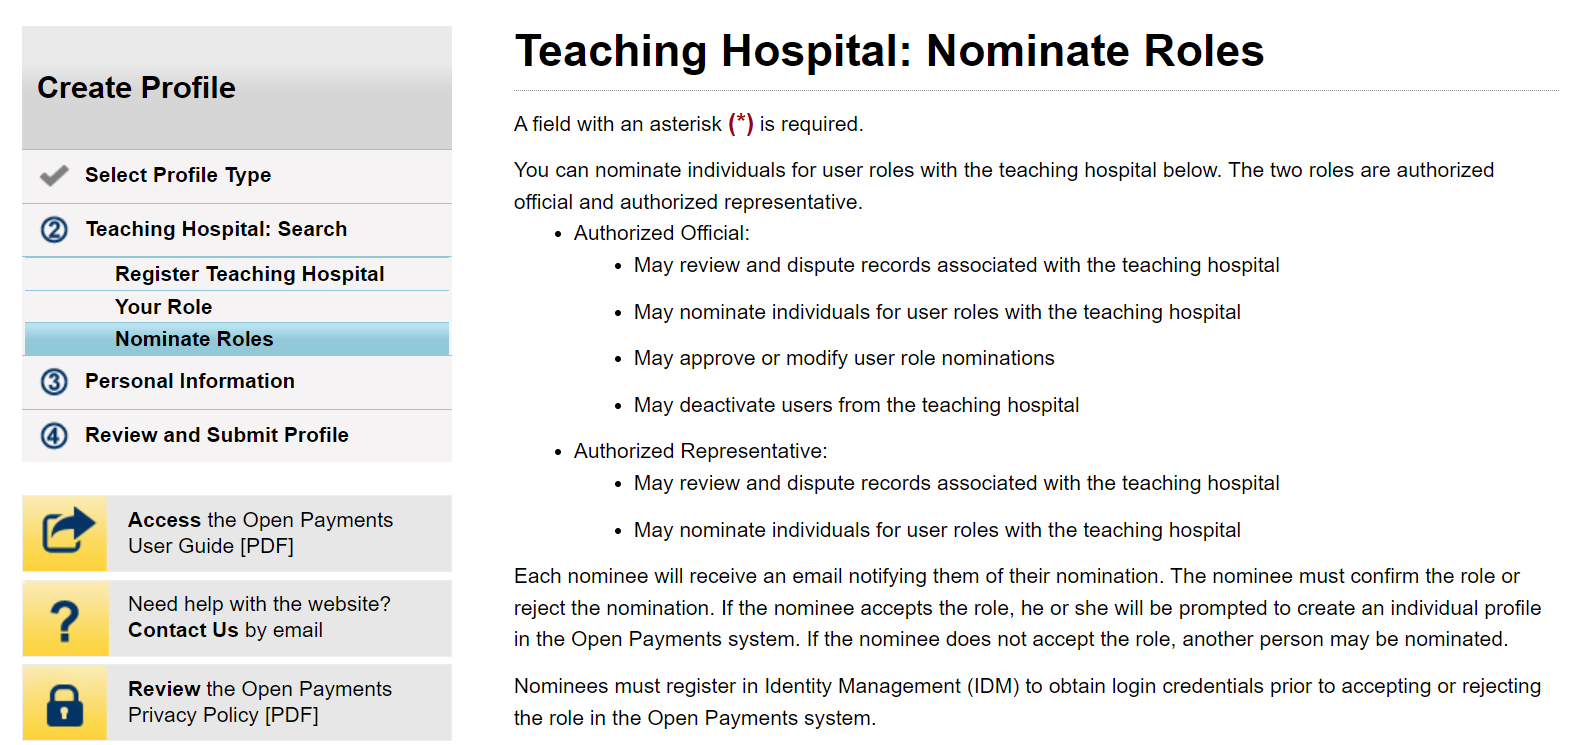
Figure 33b: Teaching Hospital Nominate Roles Page (LOWER PORTION) (OPS 1.0)
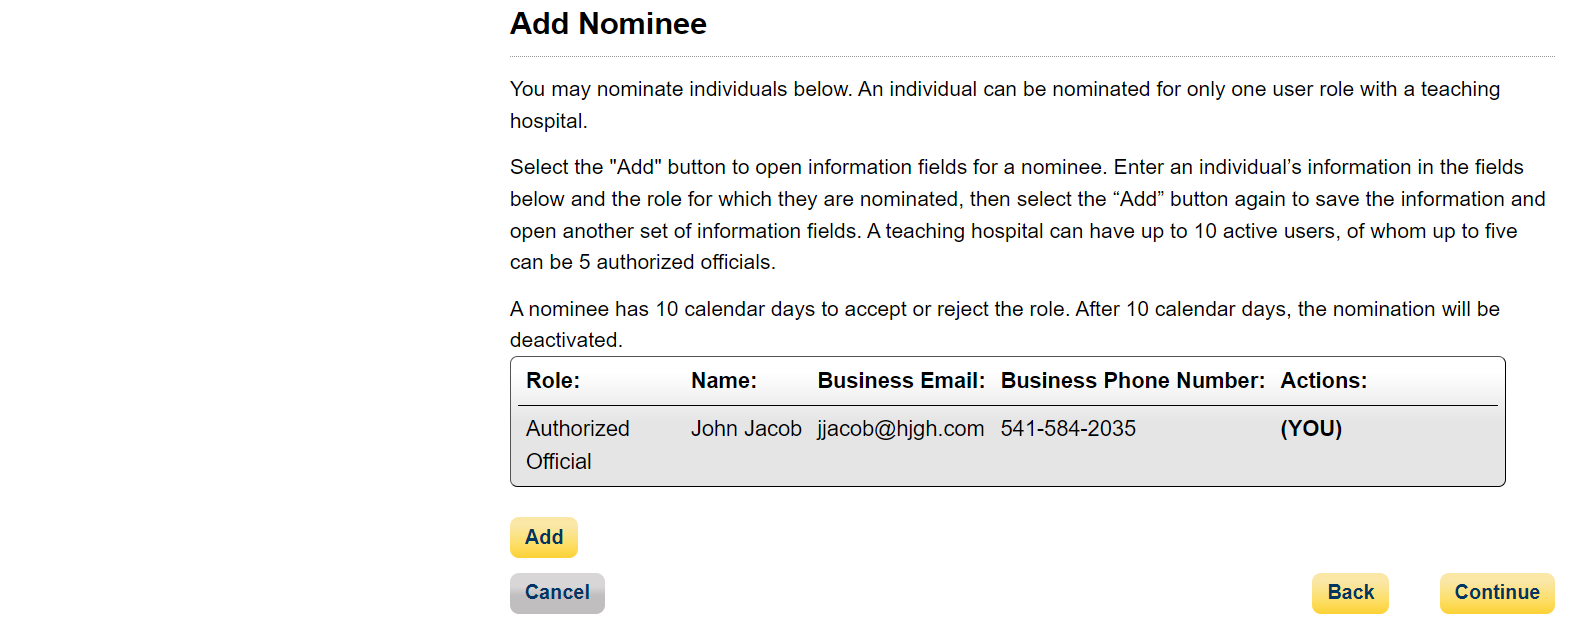
Figure 34a: Teaching Hospital Nominate Roles Page (UPPER PORTION) (OPS 2.0)
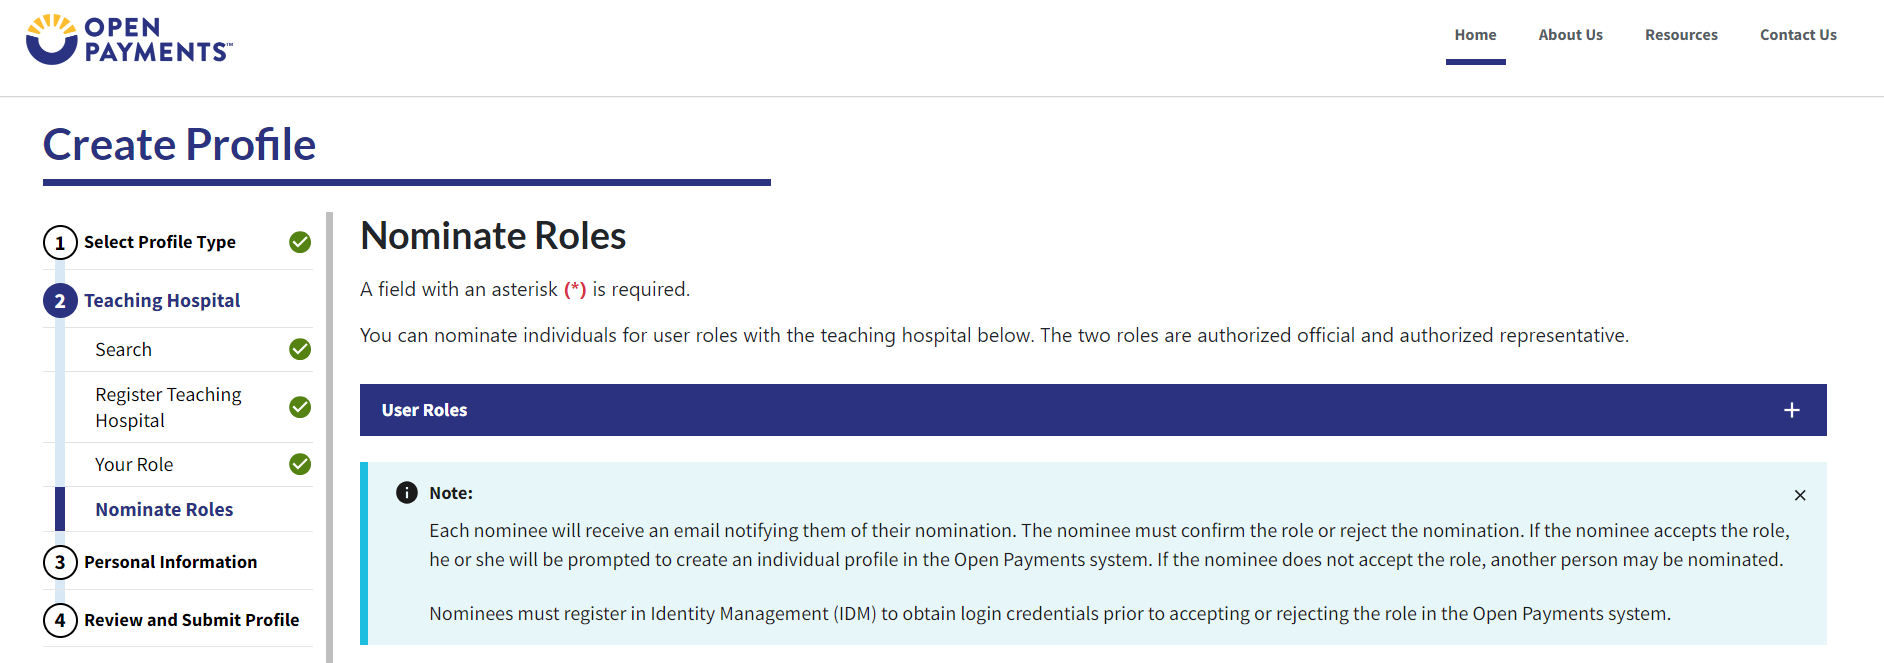
Figure 34b: Teaching Hospital Nominate Roles Page (LOWER PORTION) (OPS 2.0)

Step 8a: If you selected Add, enter the required information for one individual and select either “Authorized Official” or “Authorized Representative” to nominate the individual for the selected role. Information on teaching hospital user roles is available in Section 3.4c. When you have entered the information, select Add.
Figure 35a: Teaching Hospital Nominate Roles Page Add Nominee (PORTION 1/4) (OPS 1.0)
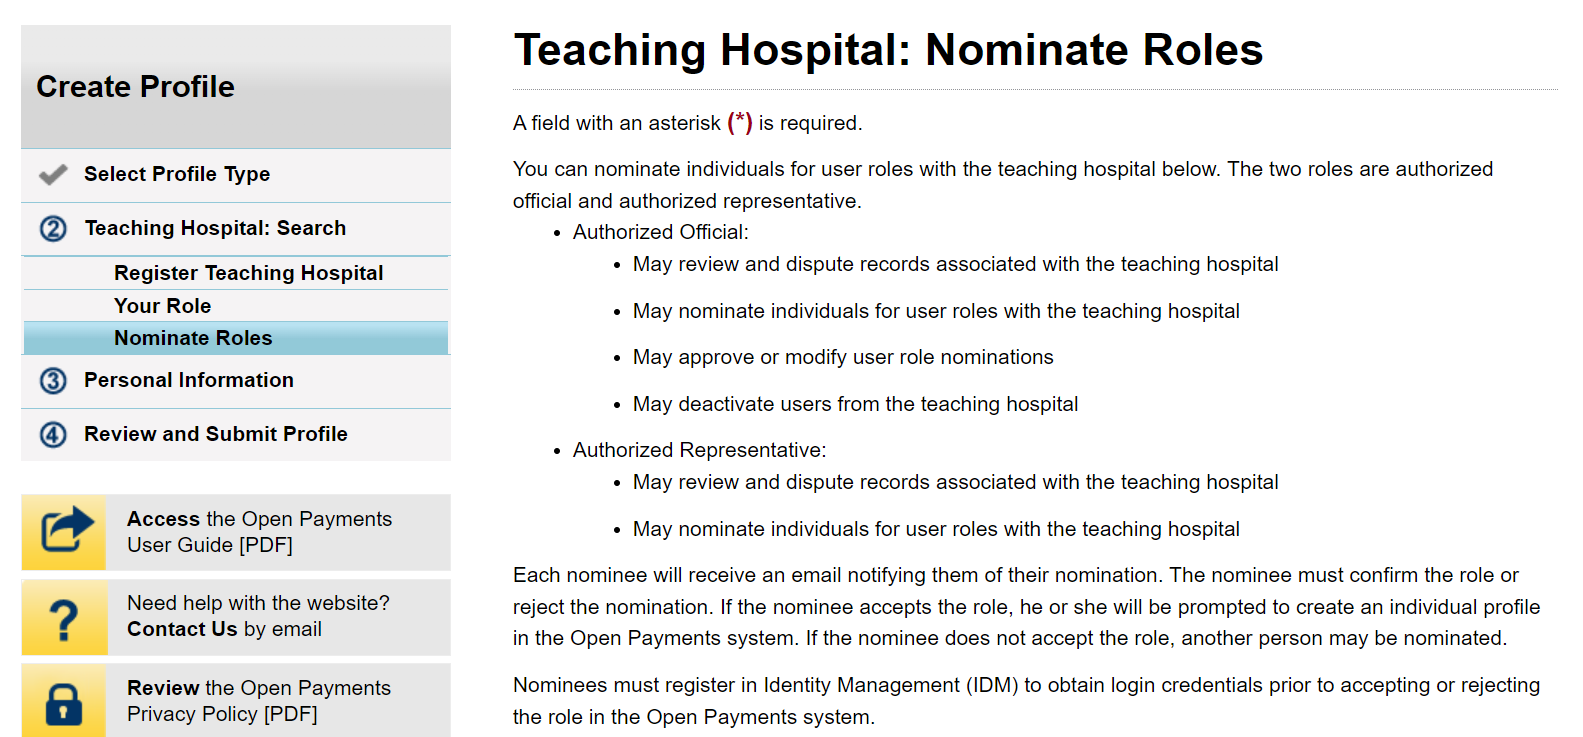
Figure 35b: Teaching Hospital Nominate Roles Page Add Nominee (PORTION 2/4) (OPS 1.0)

Figure 35c: Teaching Hospital Nominate Roles Page Add Nominee (PORTION 3/4) (OPS 1.0)
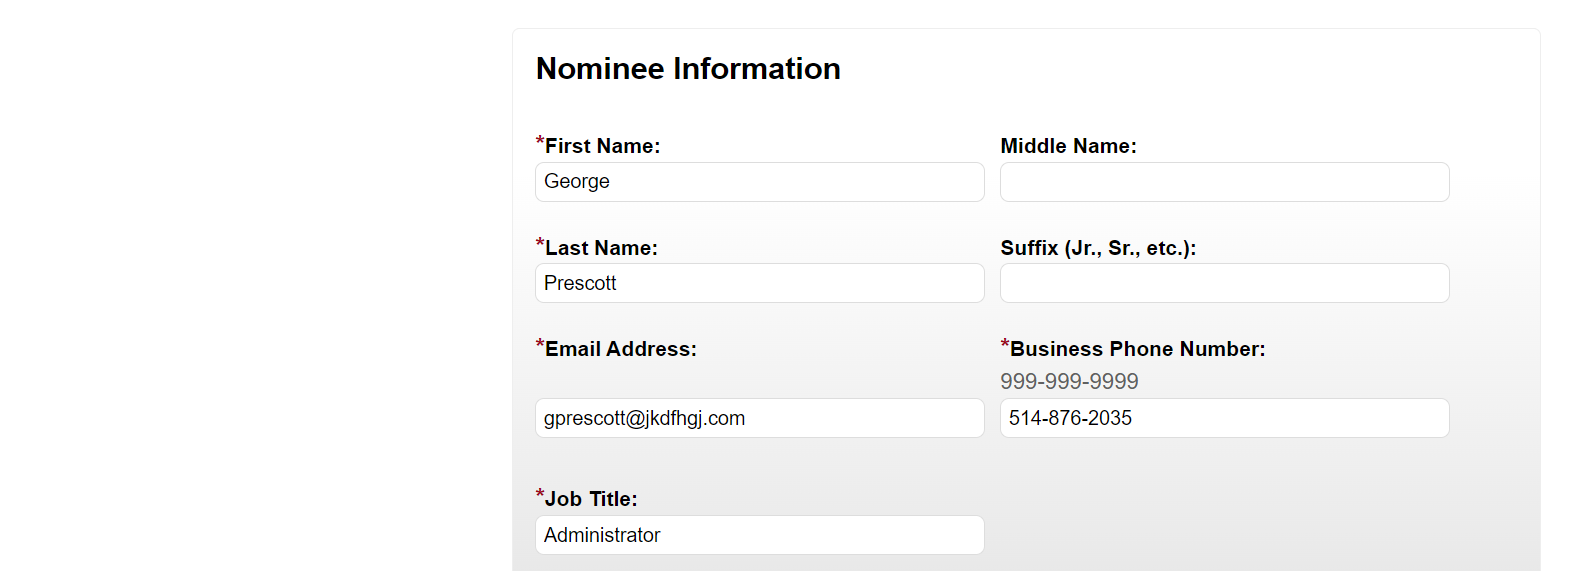
Figure 35d: Teaching Hospital Nominate Roles Page Add Nominee (PORTION 4/4) (OPS 1.0)
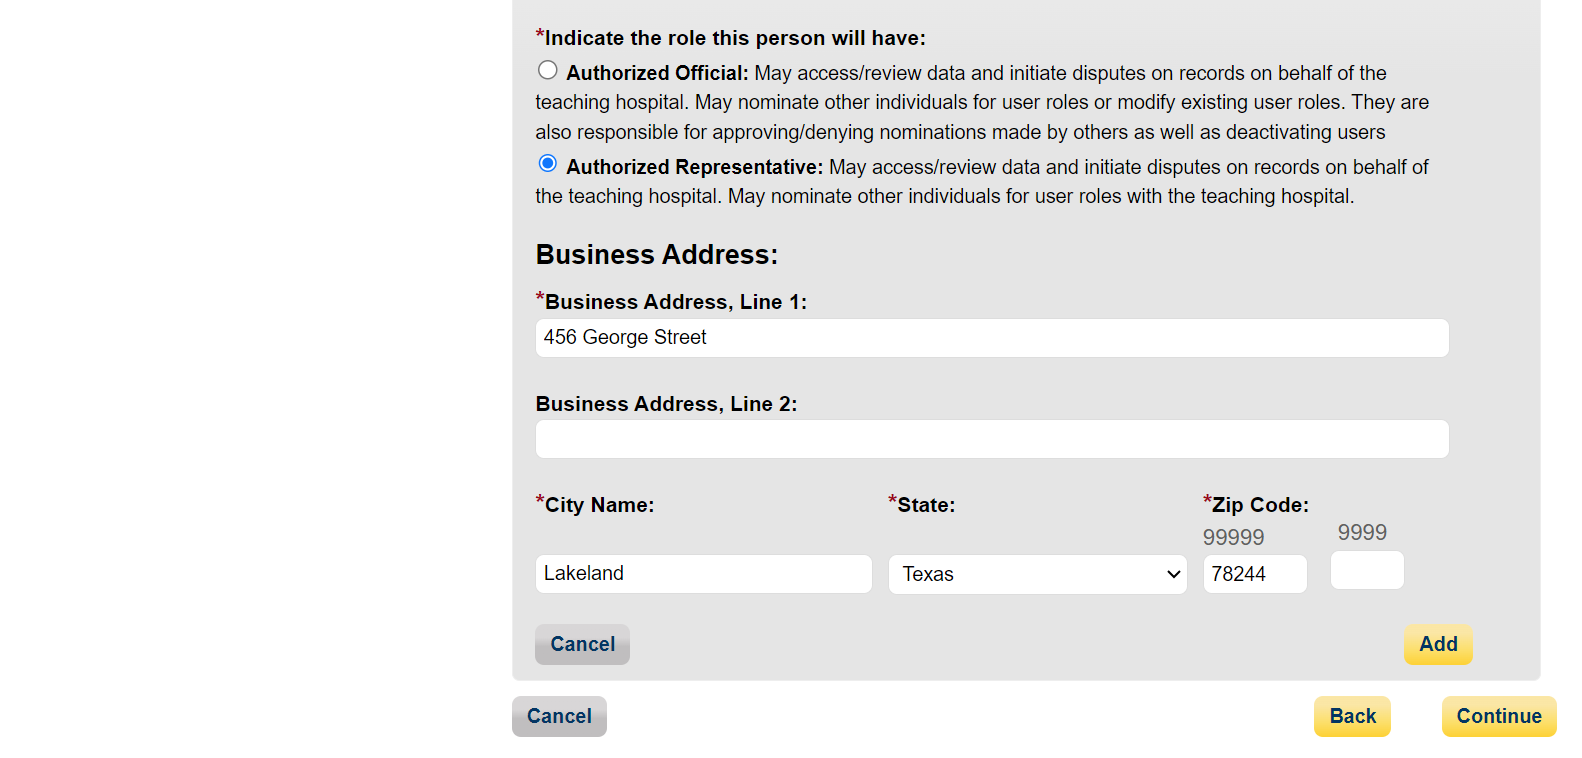
Figure 36a: Teaching Hospital Nominate Roles Page Add Nominee (PORTION 1/4) (OPS 2.0)
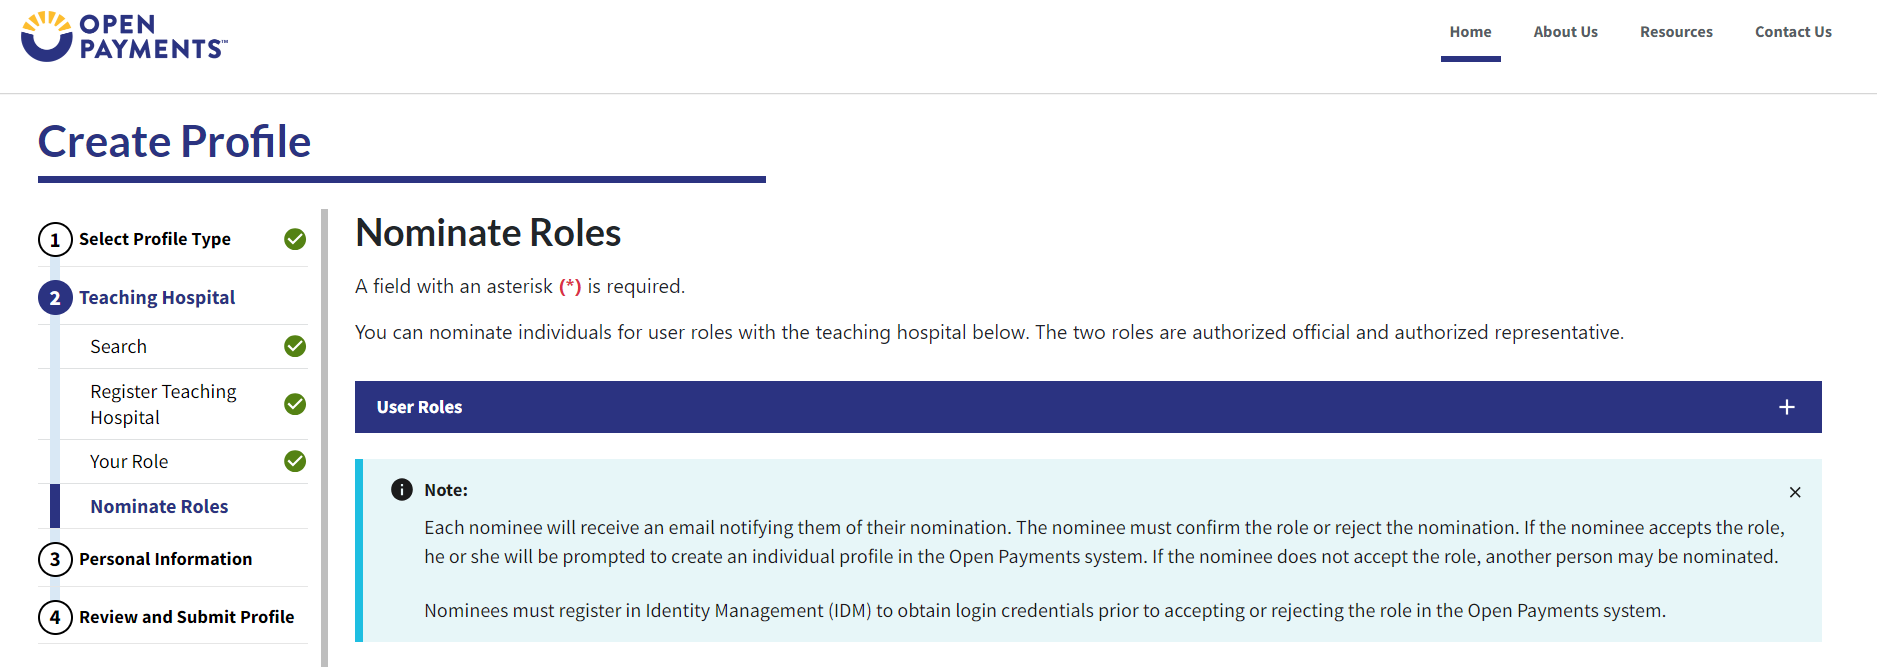
Figure 36b: Teaching Hospital Nominate Roles Page Add Nominee (PORTION 2/4) (OPS 2.0)

Figure 36c: Teaching Hospital Nominate Roles Page Add Nominee (PORTION 3/4) (OPS 2.0)

Figure 36d: Teaching Hospital Nominate Roles Page Add Nominee (PORTION 4/4) (OPS 2.0)

If you entered any nominees, you would see the nominee information displayed on the page. Confirm the information and when complete select the Continue button.
Figure 37a: Teaching Hospital Nominate Roles Page with Added Nominees (UPPER PORTION) (OPS 1.0)
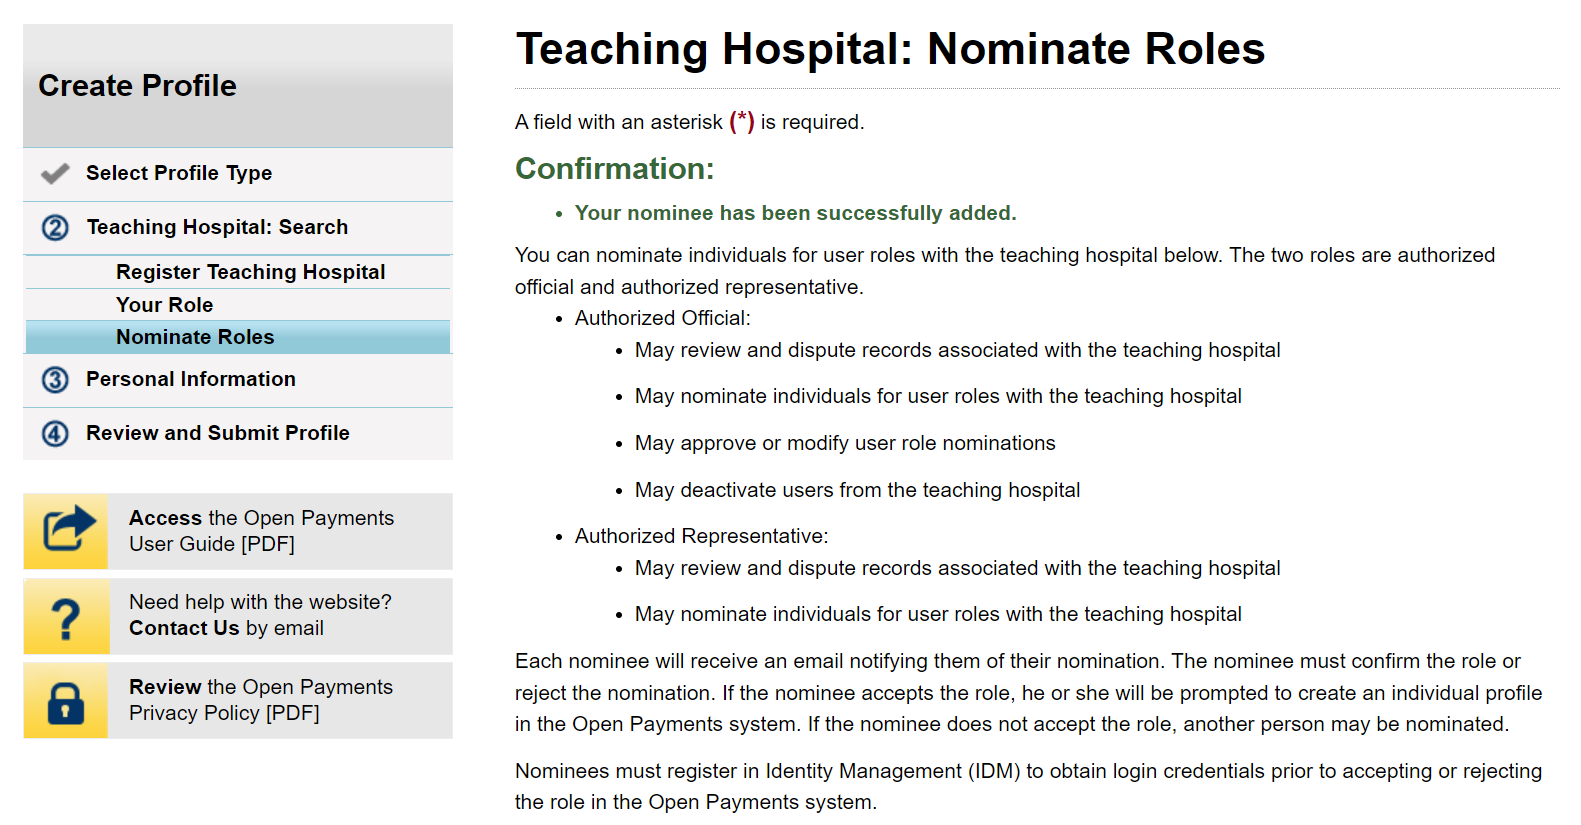
Figure 37b: Teaching Hospital Nominate Roles Page with Added Nominees (LOWER PORTION) (OPS 1.0)
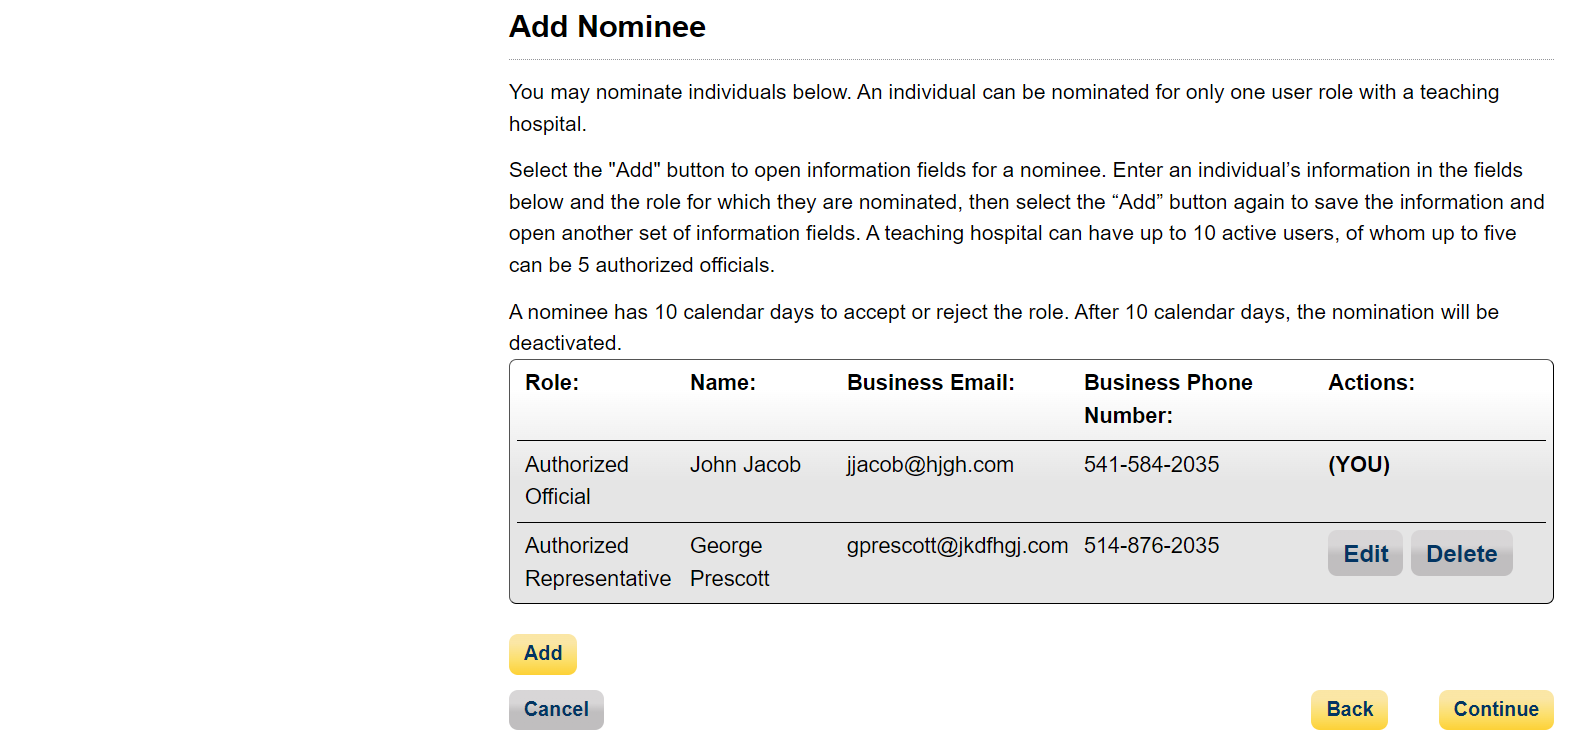
Figure 38a: Teaching Hospital Nominate Roles Page with Added Nominees (UPPER PORTION) (OPS 2.0)
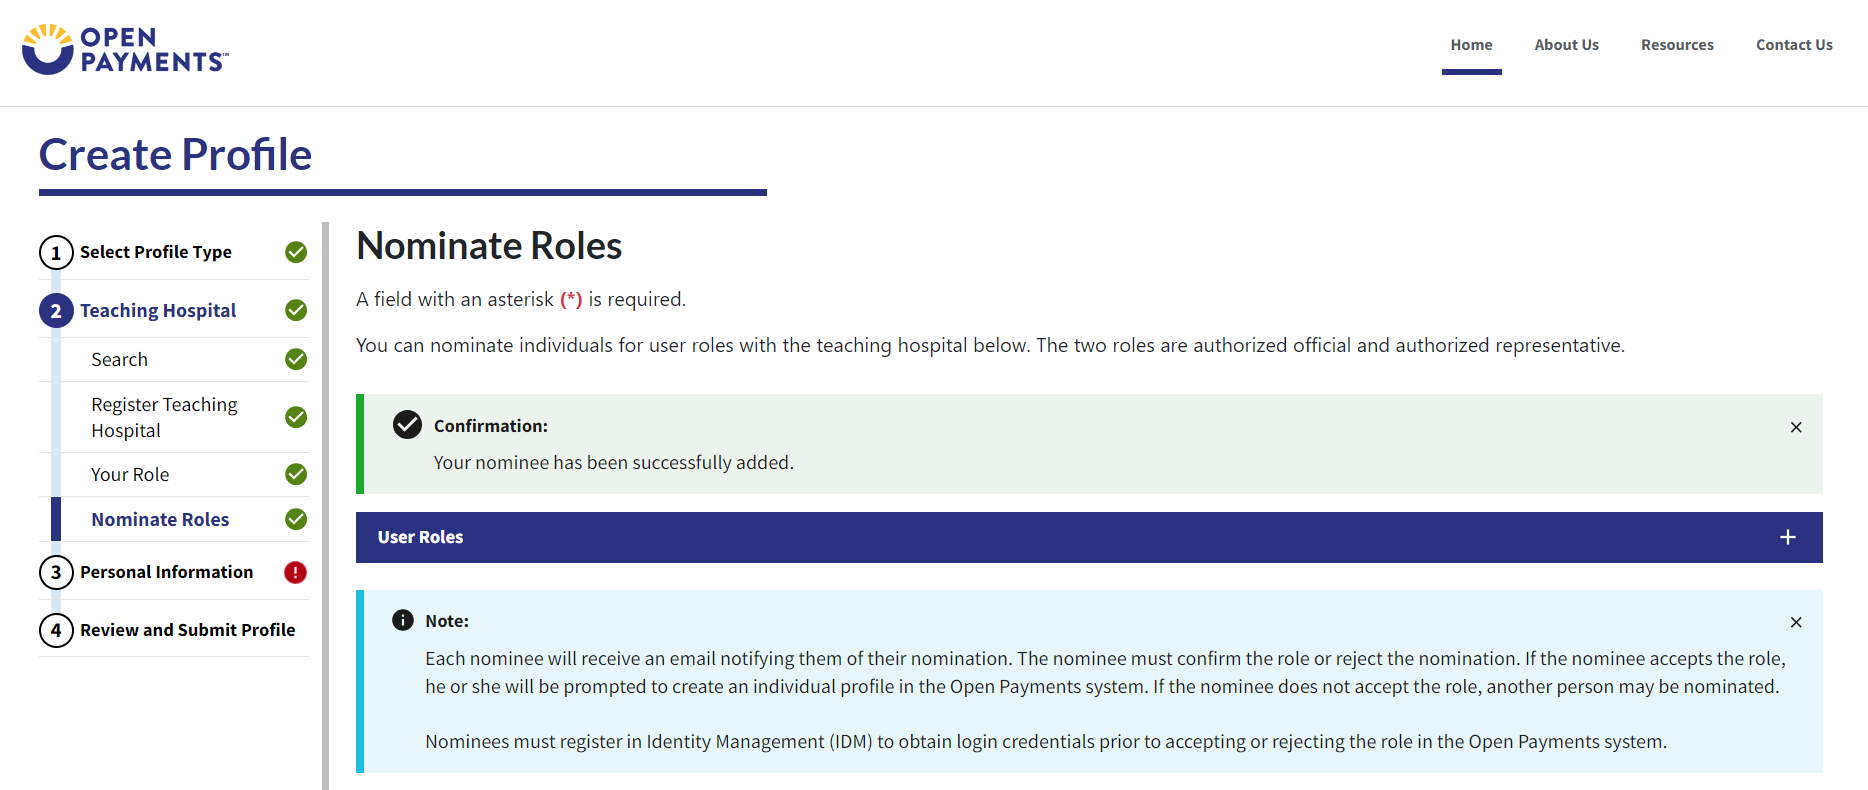
Figure 38b: Teaching Hospital Nominate Roles Page with Added Nominees (LOWER PORTION) (OPS 2.0)
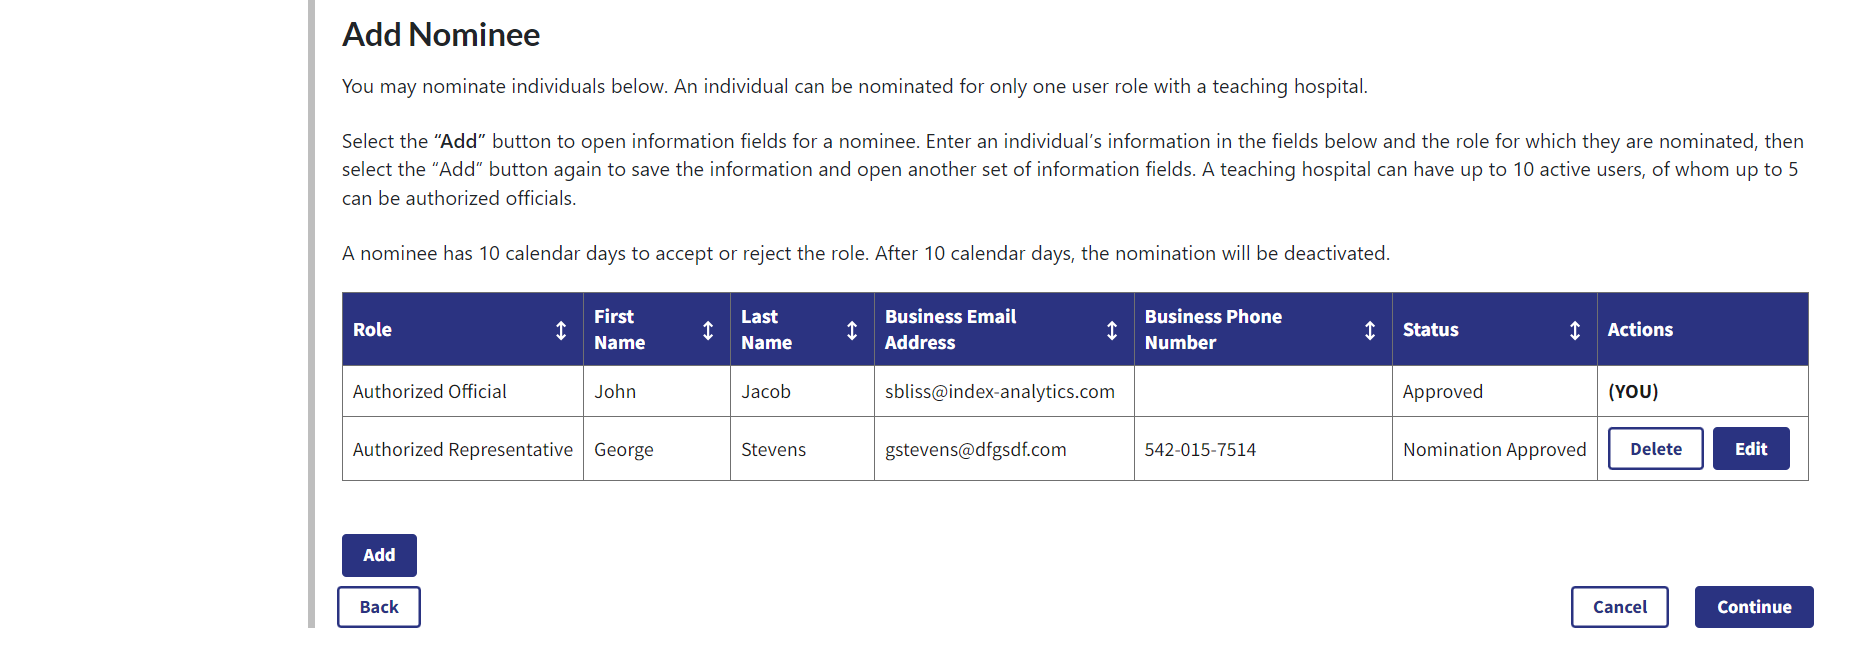
Step 9: Enter your personal and business information. When finished, select the Continue button.
Figure 39a: Personal Information Page (UPPER PORTION) (OPS 1.0)
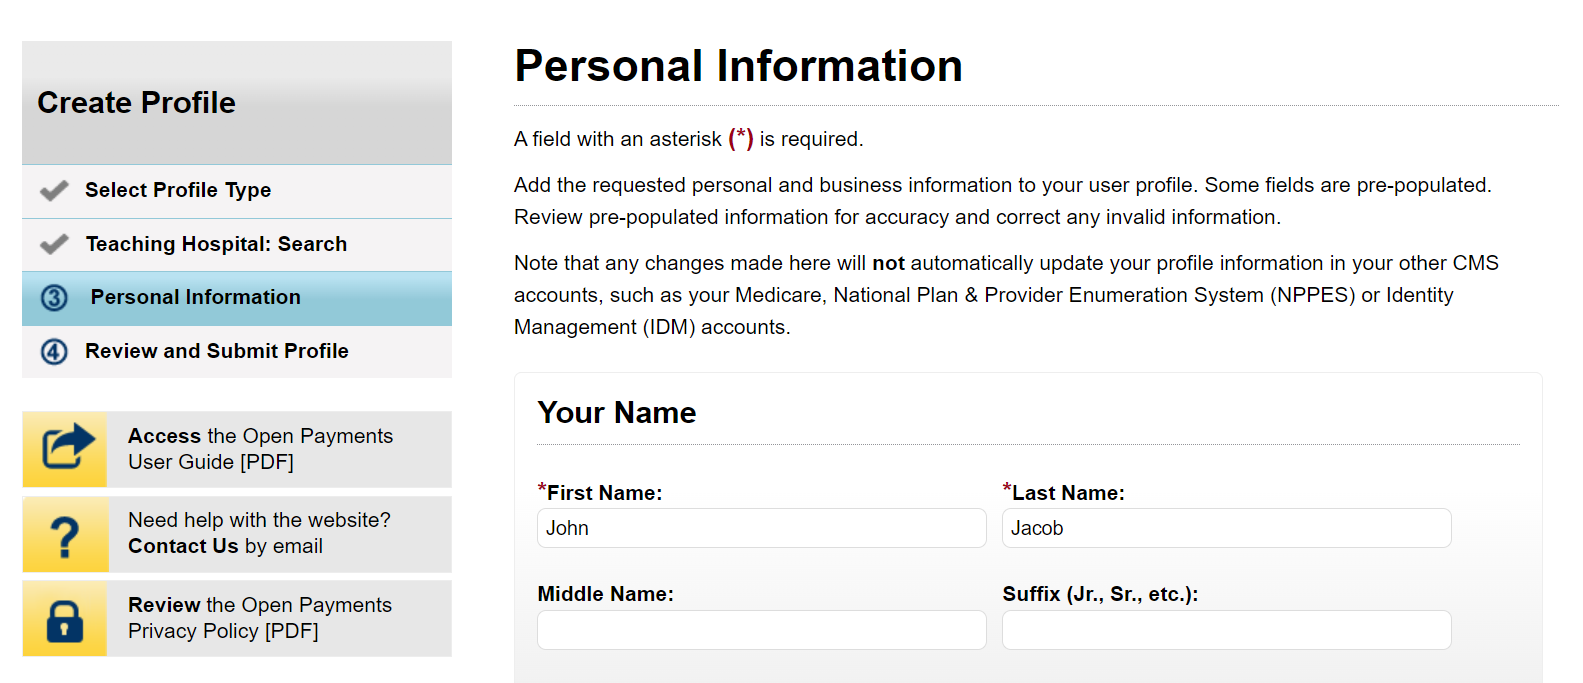
Figure 39b: Personal Information Page (LOWER PORTION) (OPS 1.0)
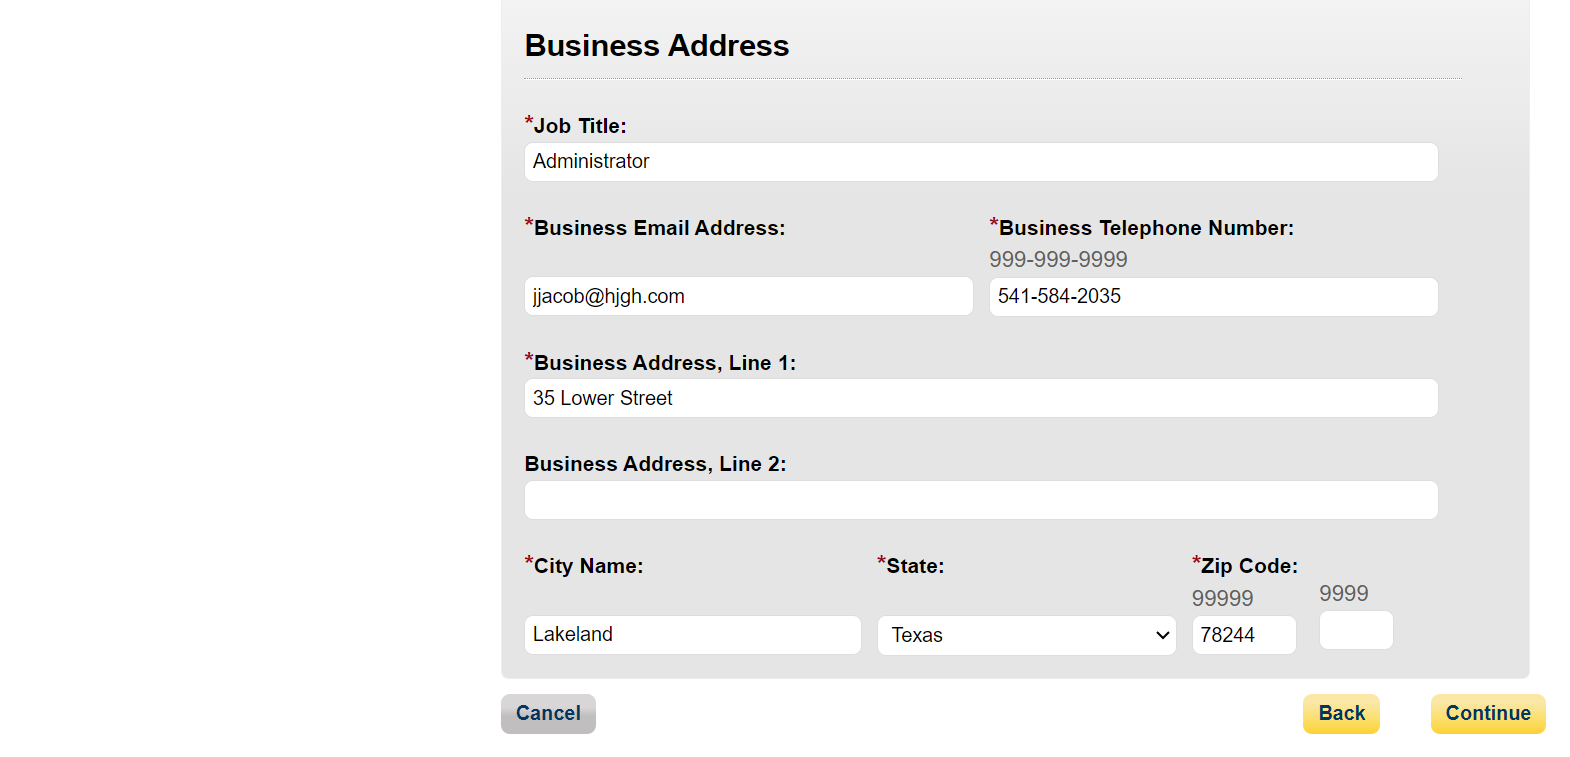
Figure 40a: Personal Information Page (UPPER PORTION) (OPS 2.0)
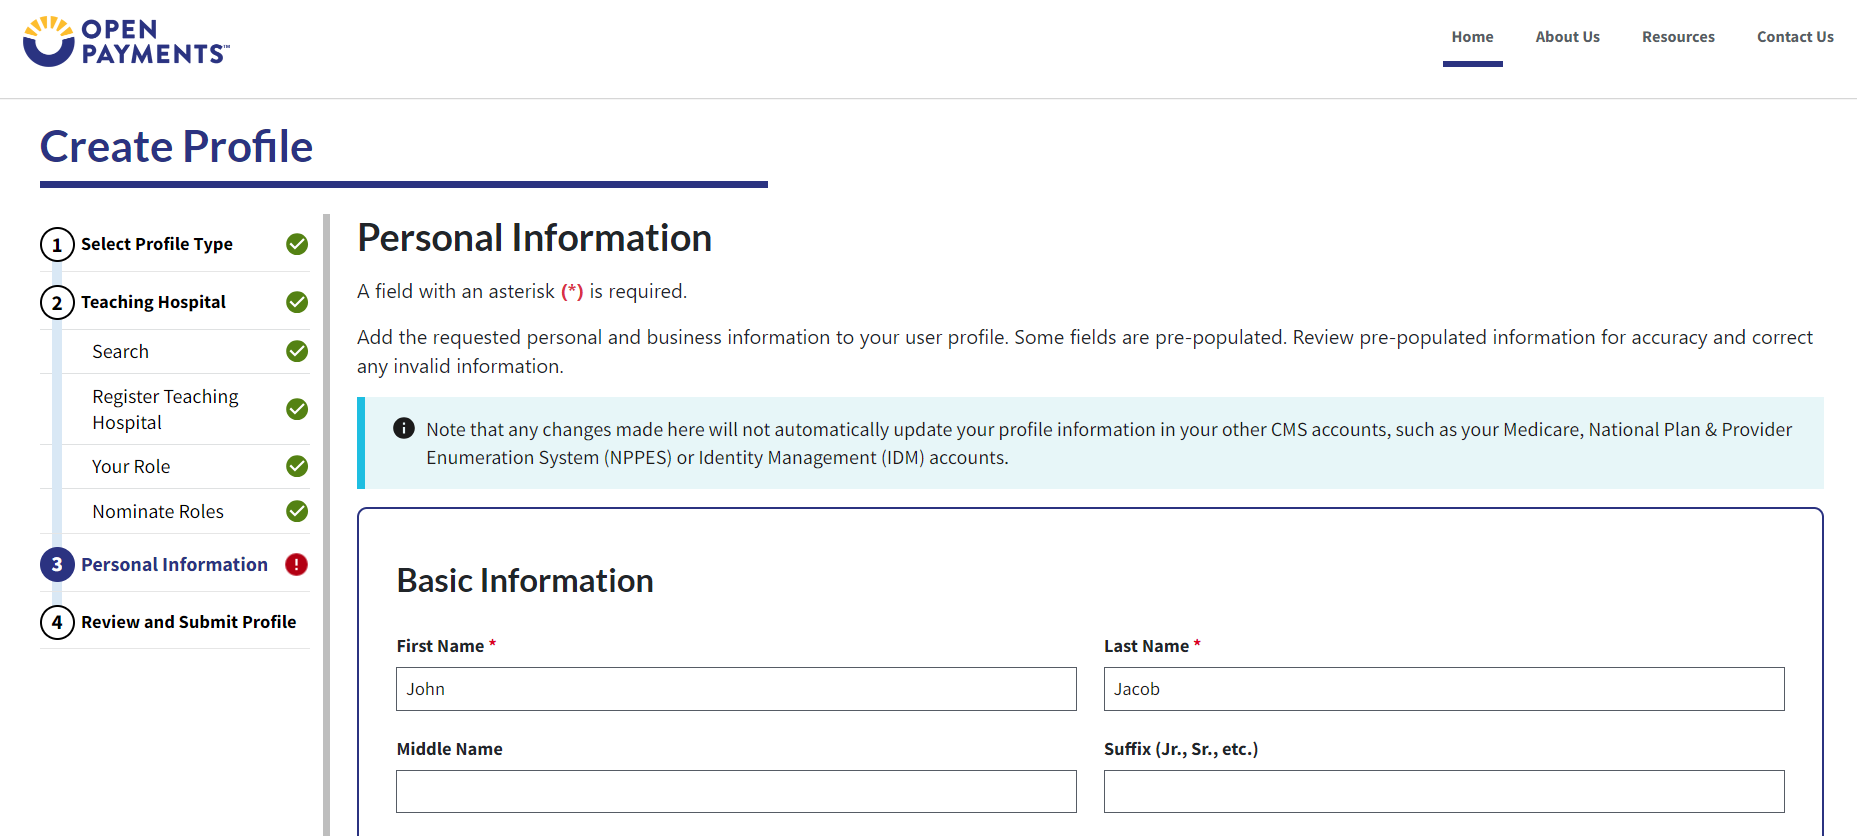
Figure 40b: Personal Information Page (LOWER PORTION) (OPS 2.0)
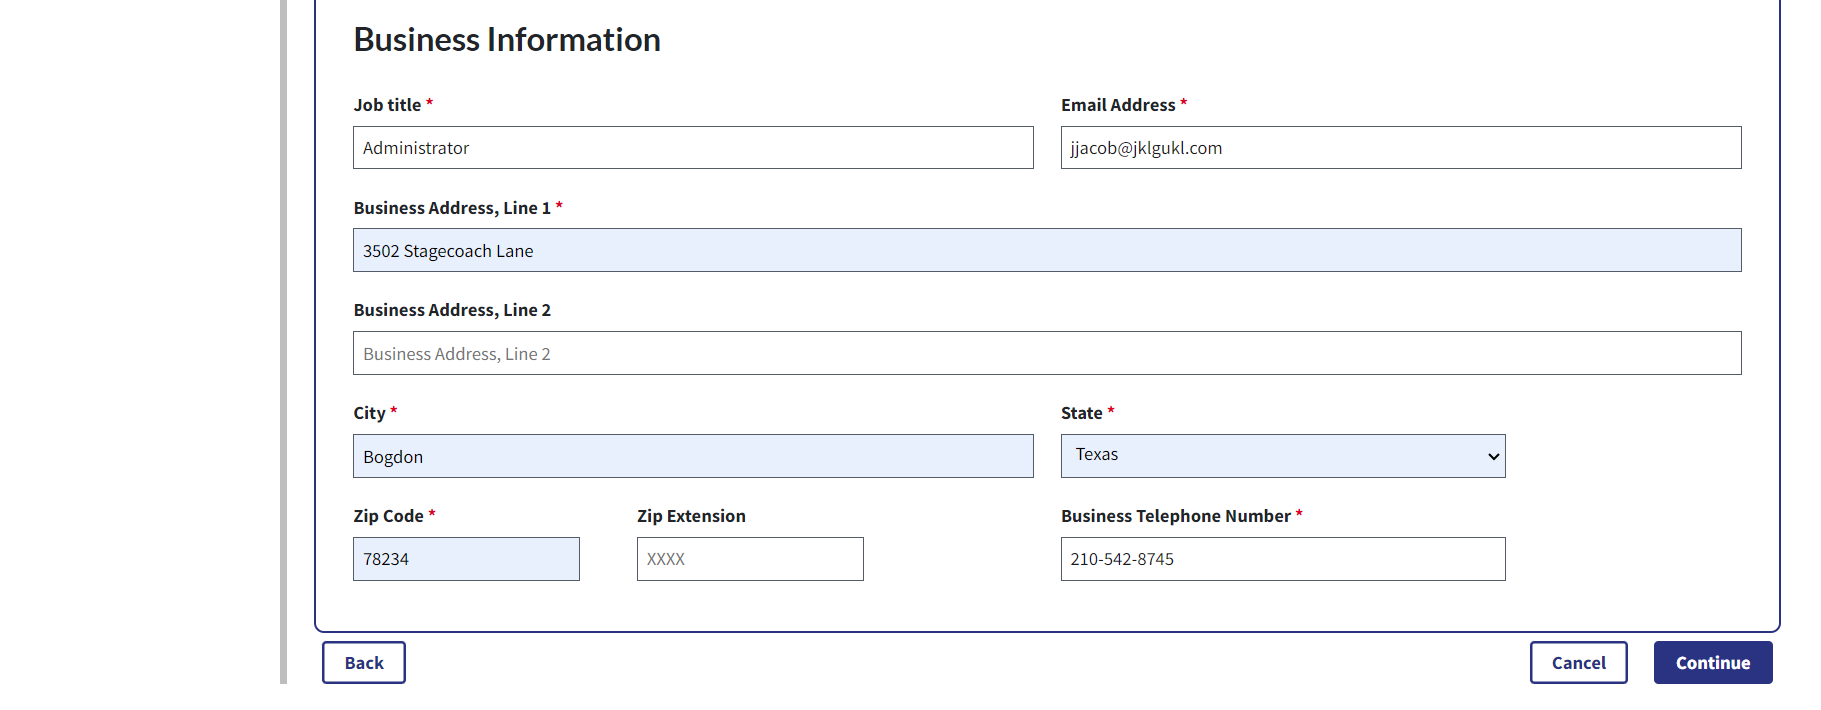
Step 10: Review your profile information on the “Review and Submit Profile” page. Select the Back button at the bottom of the page to go back and edit any information. Once you have reviewed the information and determined it to be correct, select the Submit button.
Figure 41a: Review and Submit Profile Page (UPPER PORTION) (OPS 1.0)
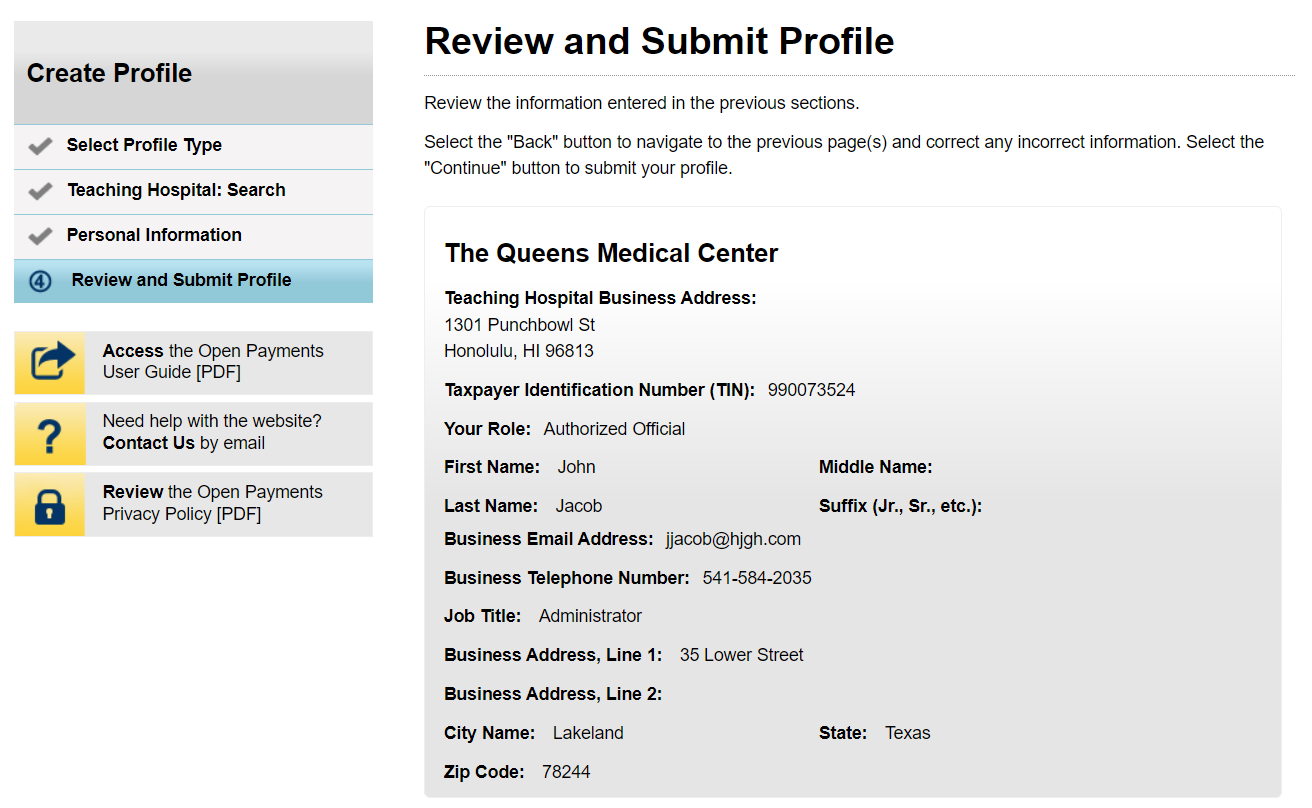
Figure 41b: Review and Submit Profile Page (LOWER PORTION) (OPS 1.0)

Figure 42: Review and Submit Profile Page (UPPER PORTION) (OPS 2.0)
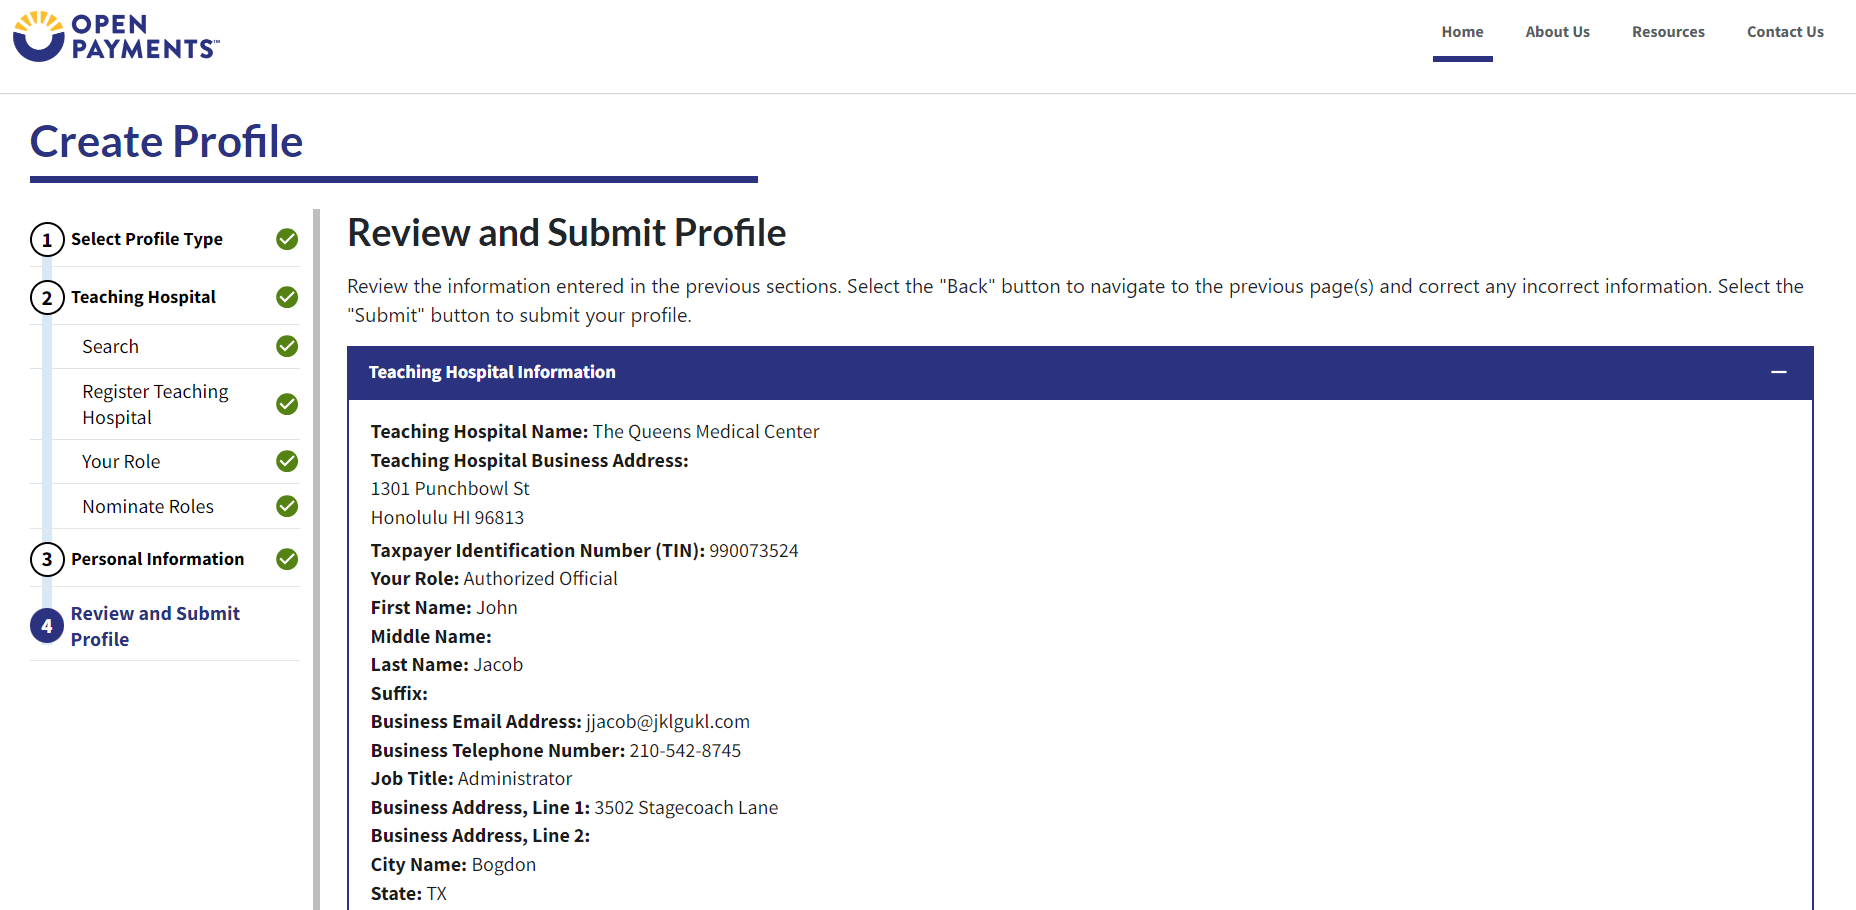
Figure 42b: Review and Submit Profile Page (LOWER PORTION) (OPS 2.0)

The following message will appear on-screen to confirm your profile has been successfully created.
Figure 43: Success Confirmed On-Screen Message (OPS 1.0)
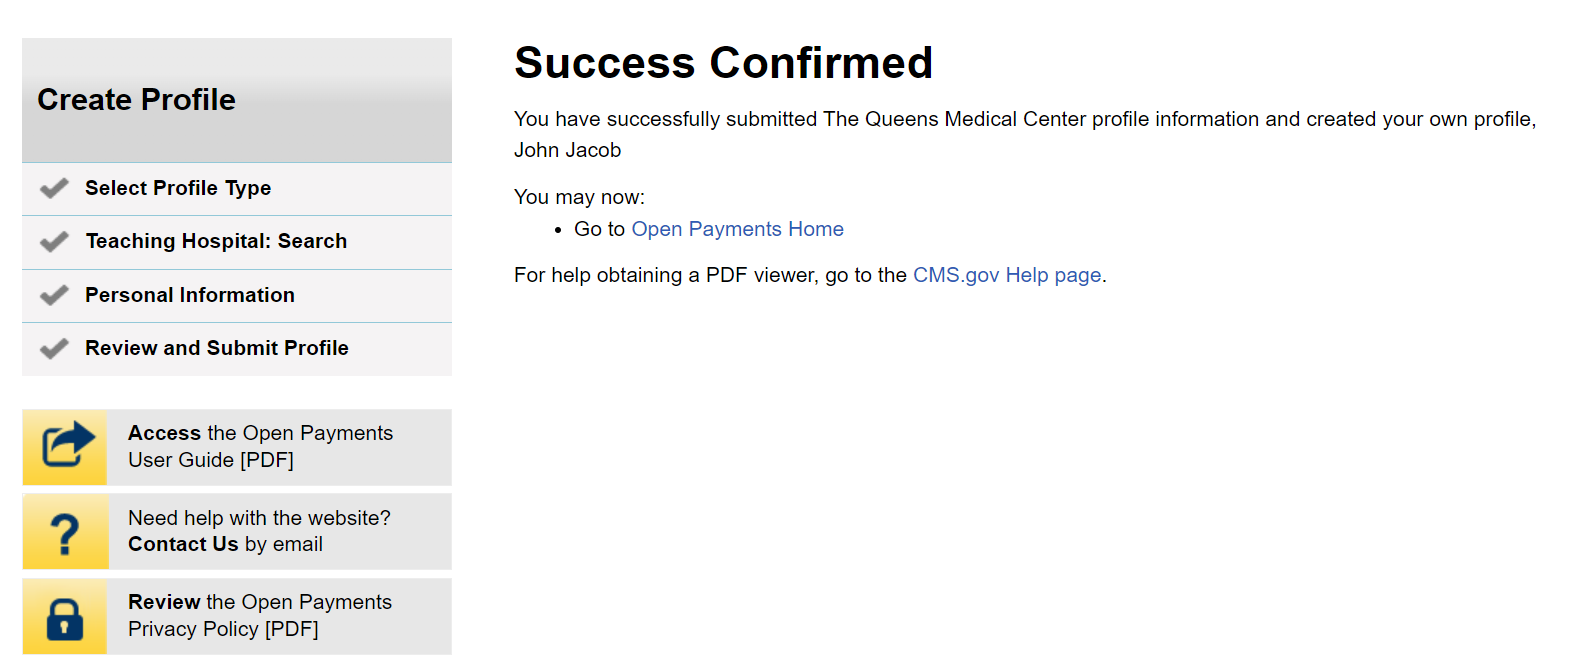
Figure 44: Success Confirmed On-Screen Message (OPS 2.0)

Registering a Teaching Hospital (Returning System Users)
Step 1: Select the Manage Teaching Hospitals tab on the home page.
Figure 45: Open Payments Home Page for Returning System Users (OPS 1.0)
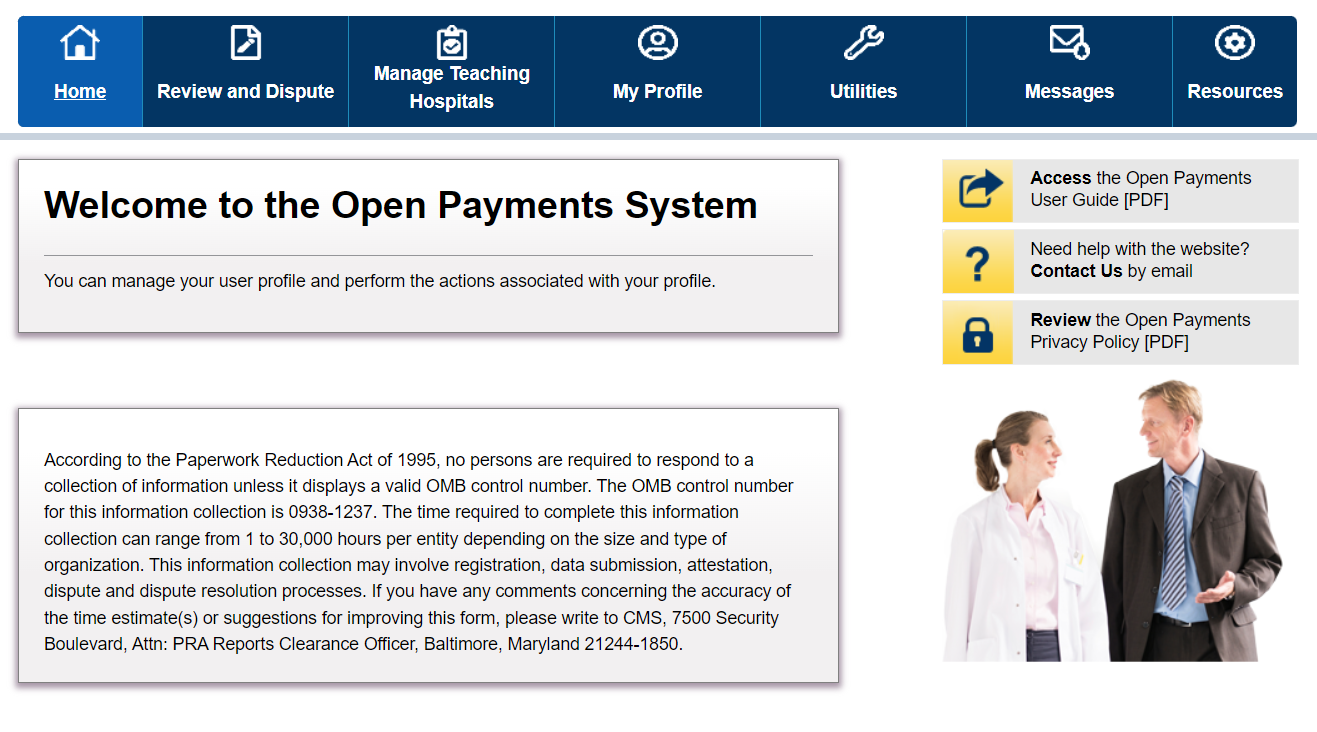
Figure 46: Open Payments Home Page for Returning System Users (OPS 2.0)
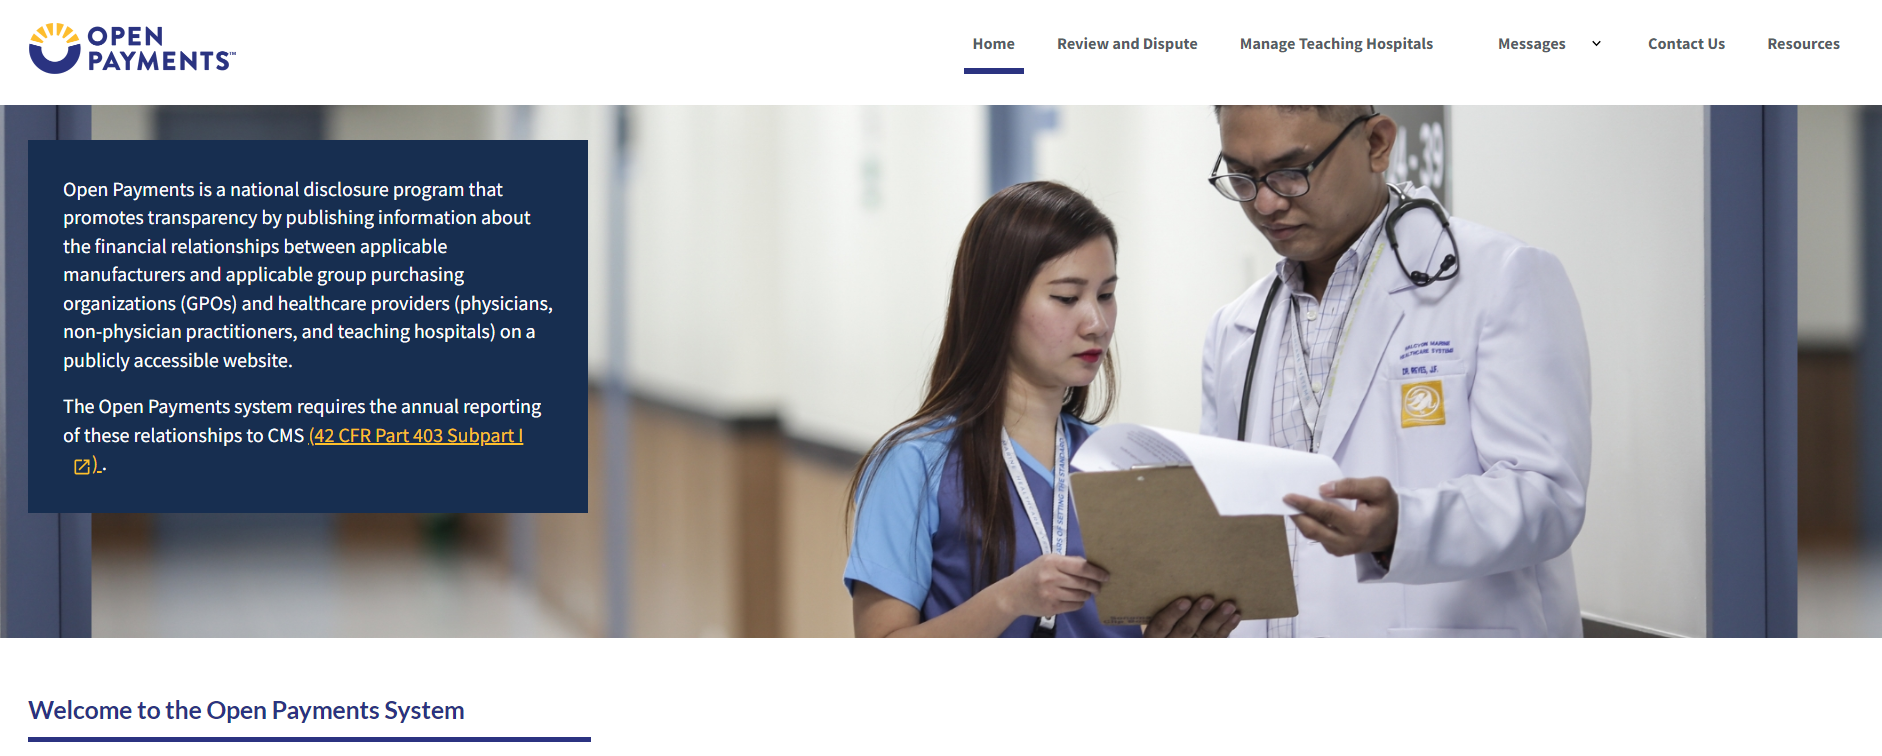
Step 2: From the “Manage Teaching Hospitals” page, select, Register New Teaching Hospital.
Figure 47: Manage Teaching Hospitals Page (OPS 1.0)
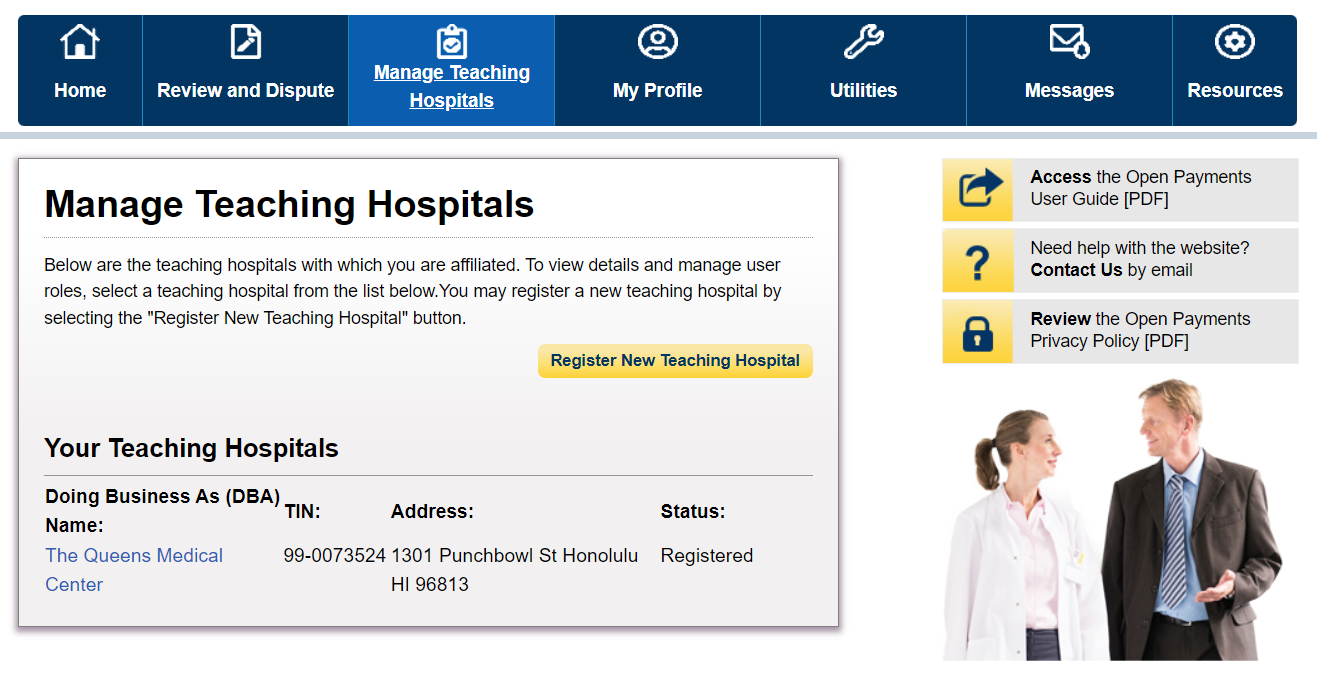
Figure 48: Manage Teaching Hospitals Page (OPS 2.0)

Step 3: The remaining steps in this scenario are identical to registering a first teaching hospital, beginning with Figure 24a and onwards.
Nominating an Authorized Representative for Physicians or NPPs (Returning System Users)
Authorized Representative nomination for physicians or NPPs features an entirely different workflow in OPS 2.0. Because of this, screenshot comparisons are not possible.
Accepting or Rejecting a Nomination (Authorized Representative – First-Time Users)
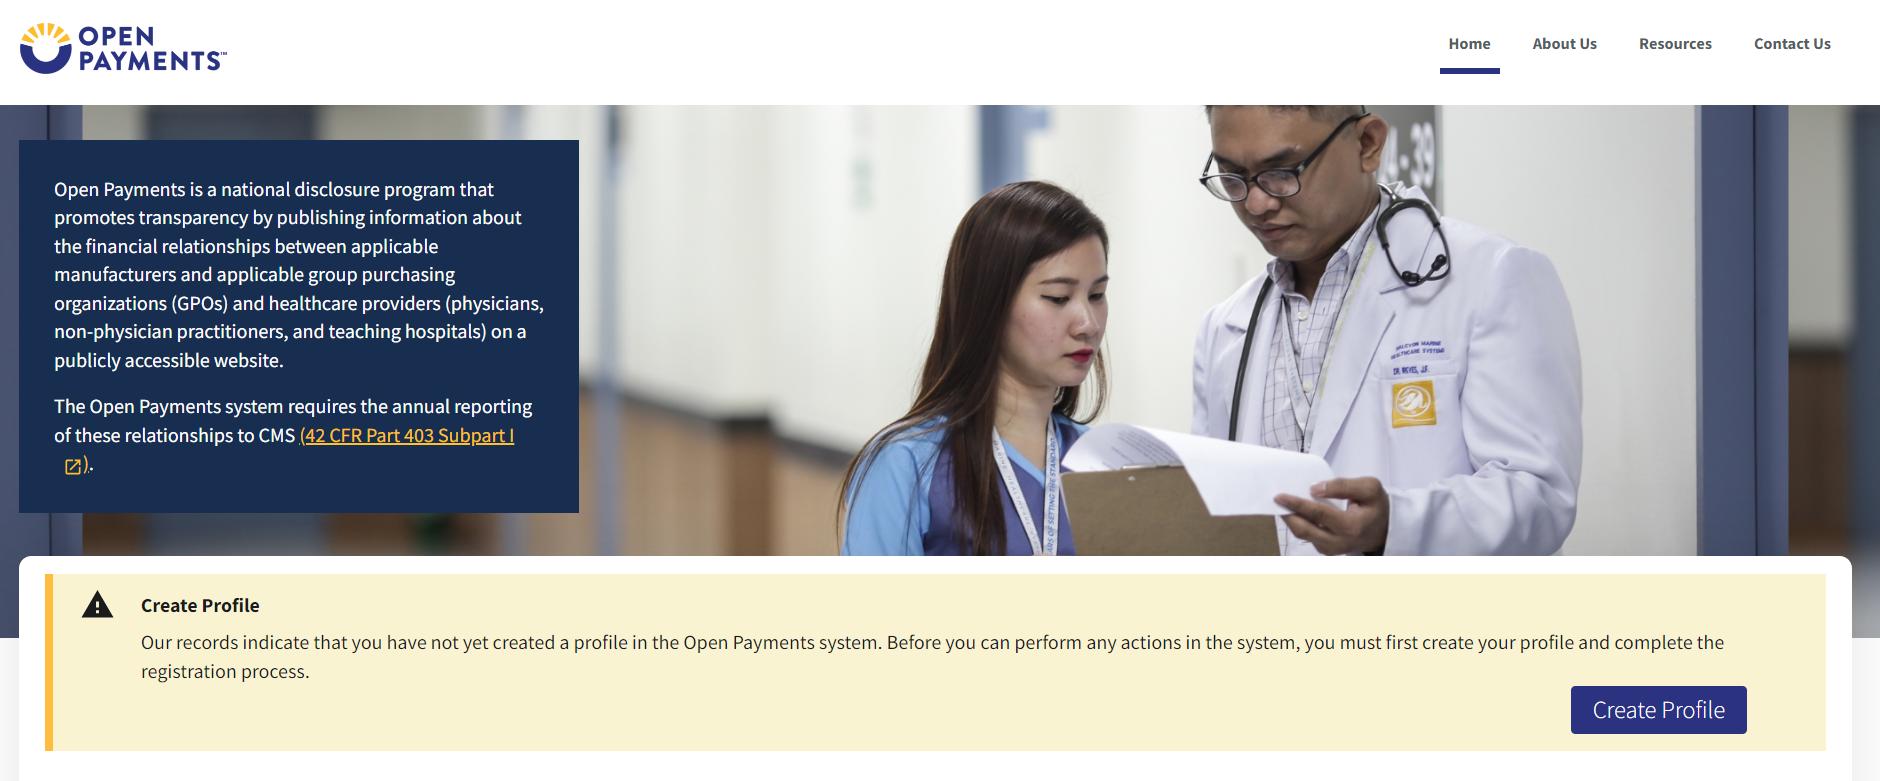
Step 1: Once you have an account in IDM, go to the Open Payments landing page, and select Create my Profile.
Figure 49: Open Payments Landing Page for First-Time System Users (OPS 1.0)
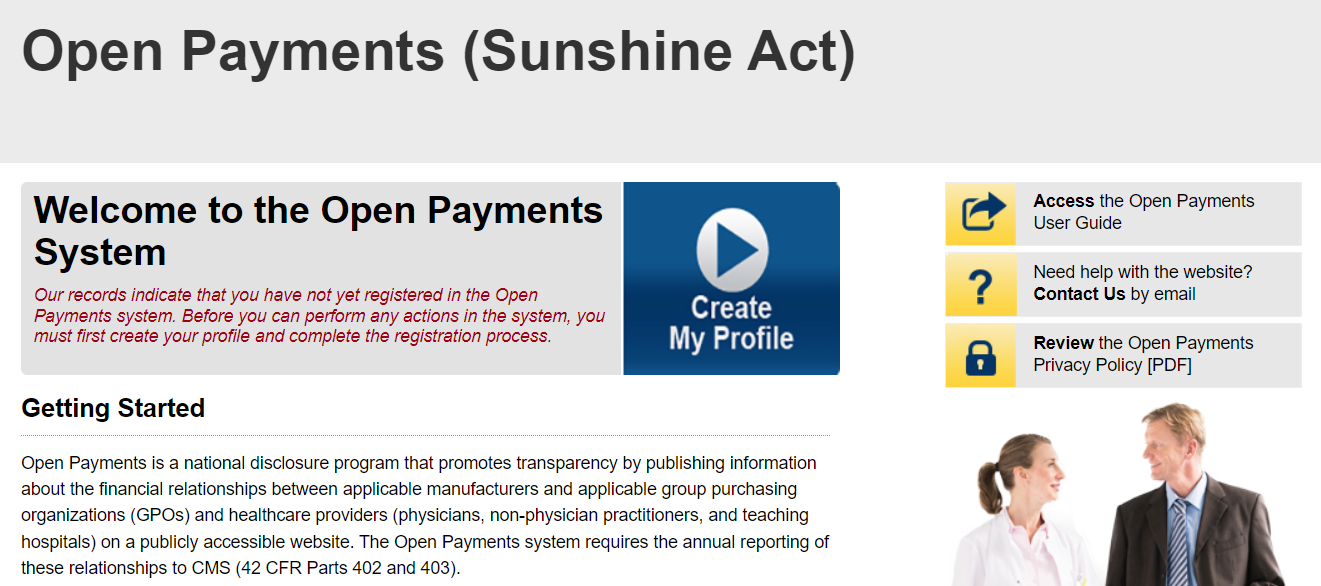
Figure 50: Open Payments Landing Page for First-Time System Users (OPS 1.0)
Step 2: The on-screen text contains important information regarding creating the physician, NPP, and individual profiles. Read the on-screen text and select Start Profile at the bottom of the page when you are ready to continue.
Figure 51: Create My Profile Page (OPS 1.0)
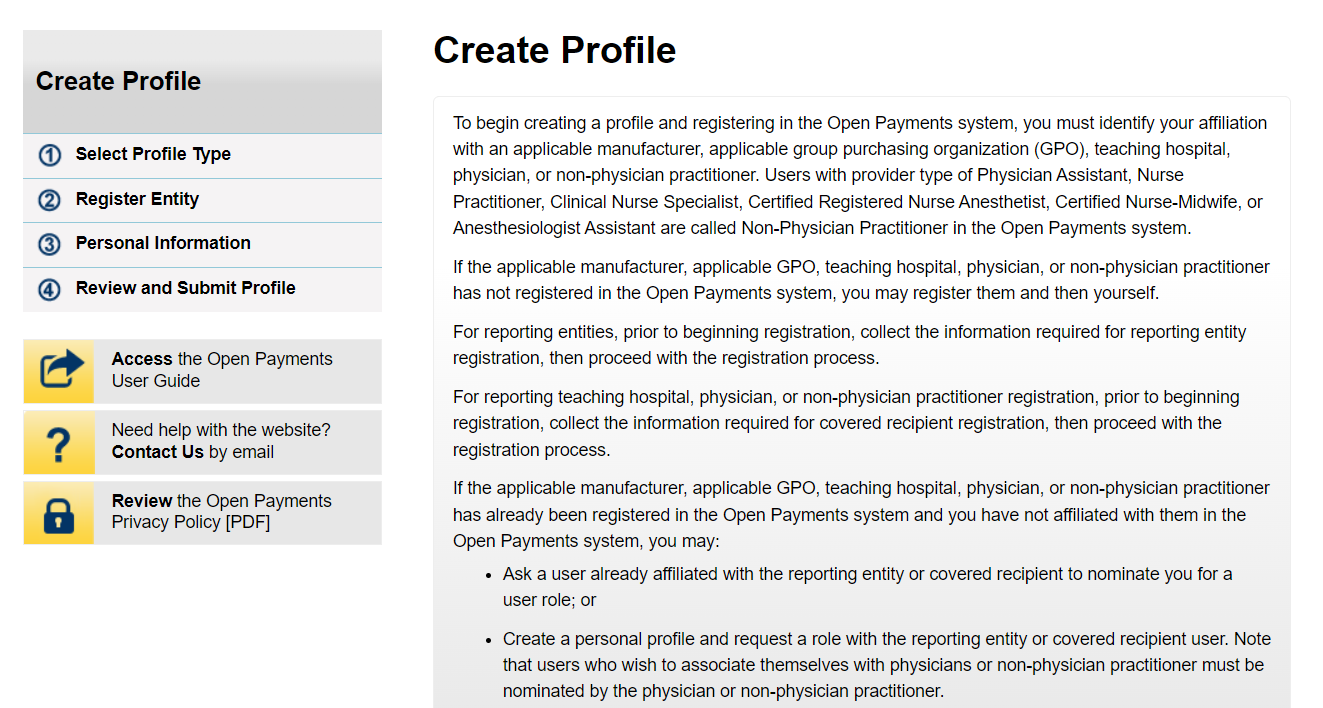
Figure 52: Create My Profile Page (OPS 2.0)
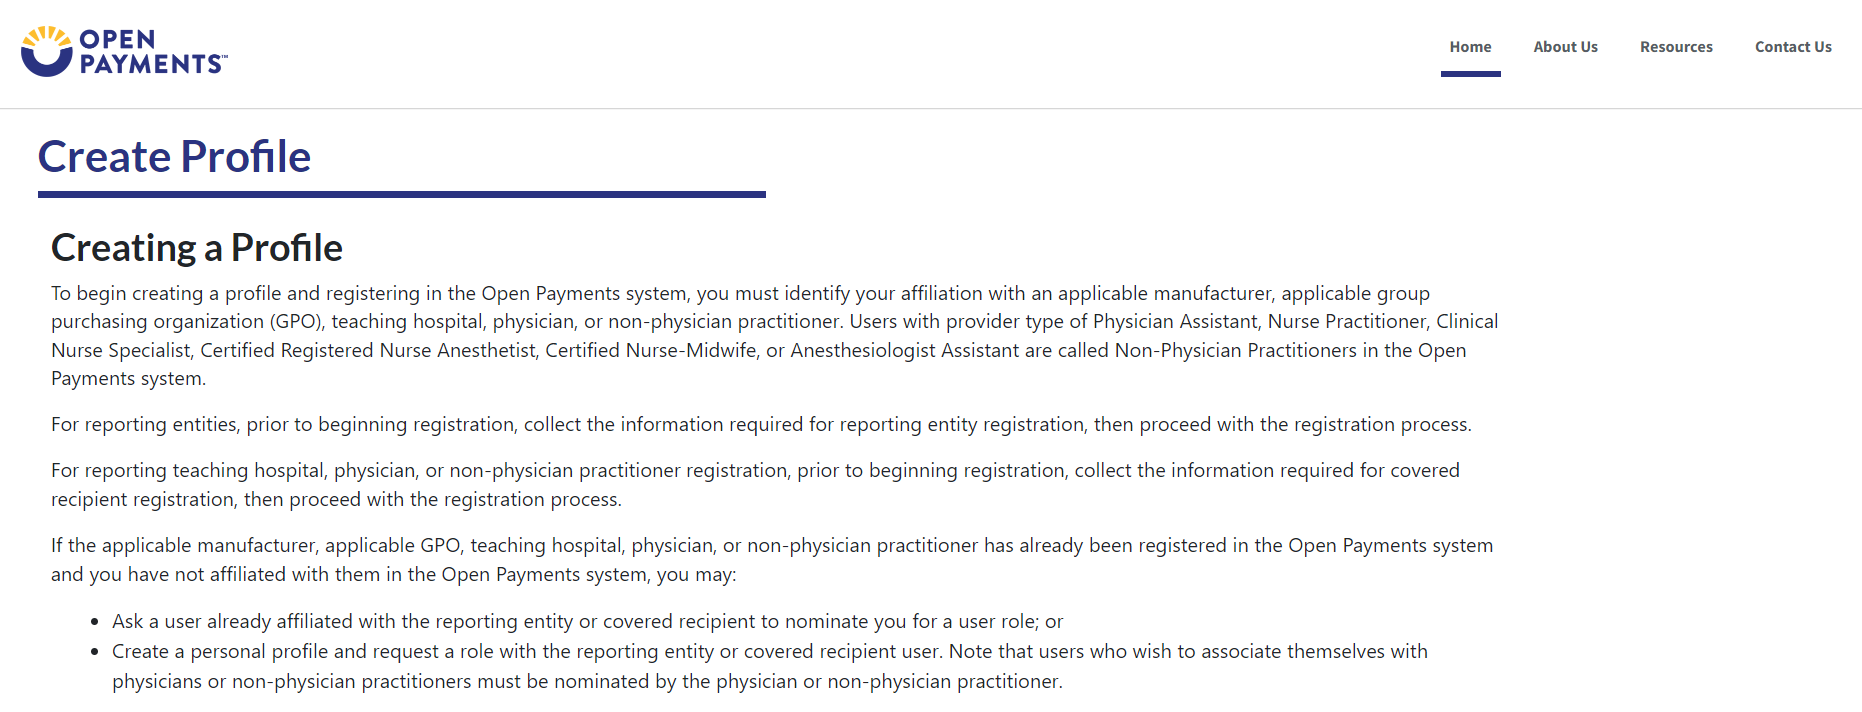
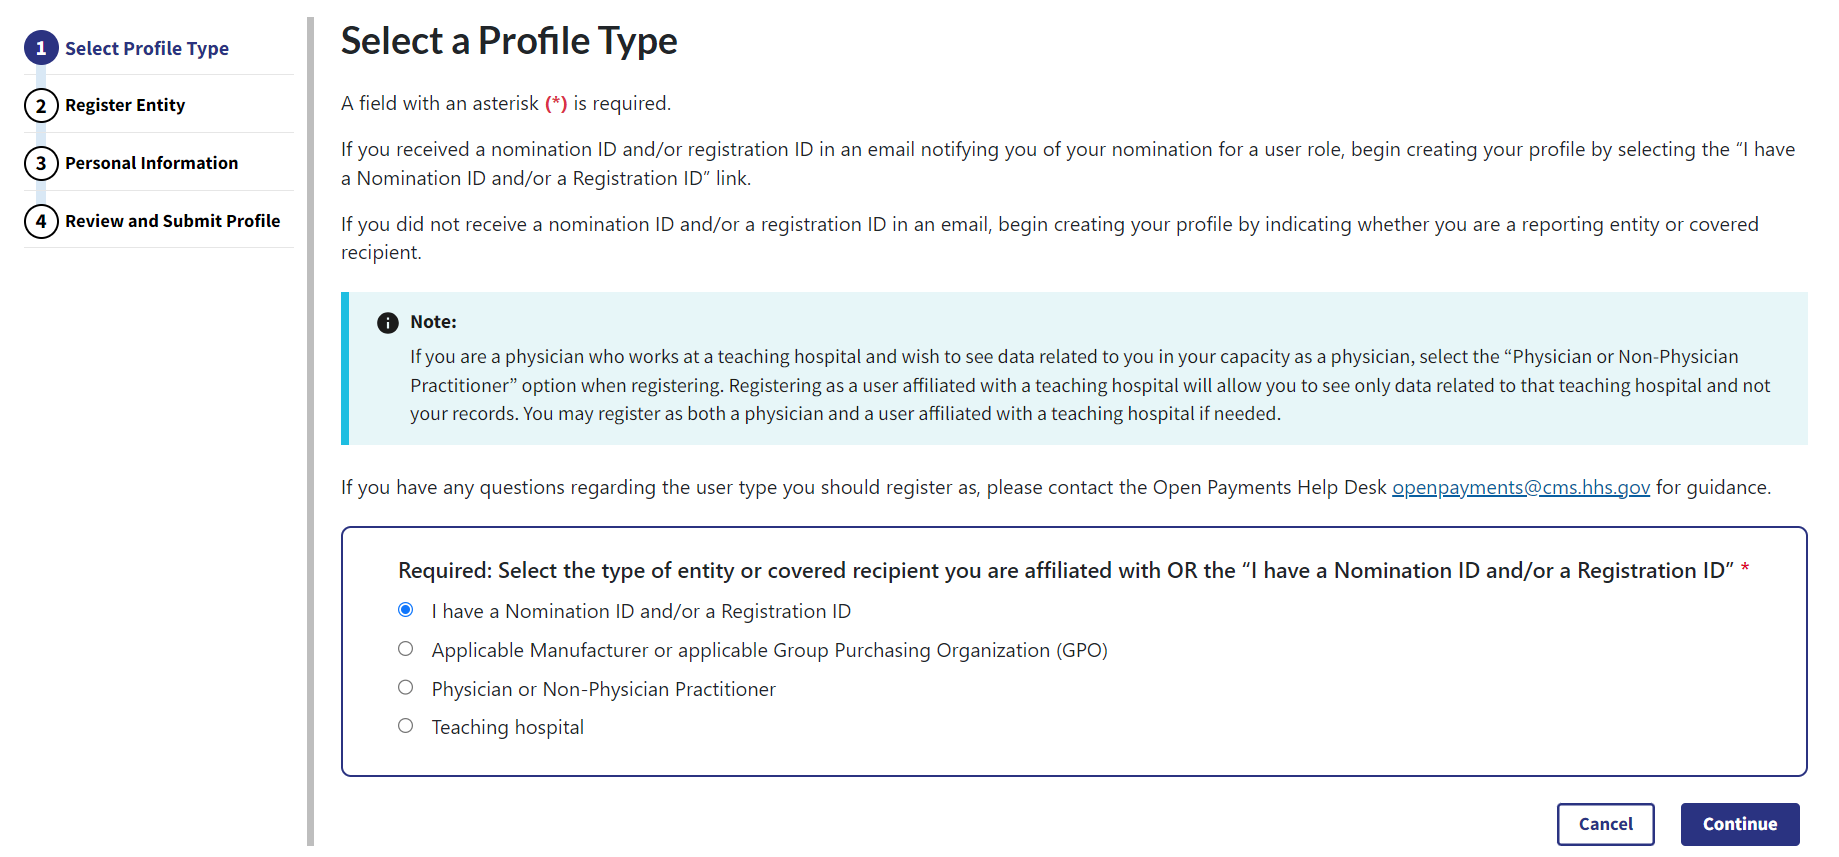
Step 3: Although you are affiliating with a physician or NPP, do not select Physician or Non-Physician Practitioner on the “Select Profile Type” page. Instead, select the I have a Nomination ID and/or a Registration ID link.
Figure 53: Select Profile Type Page (OPS 1.0)
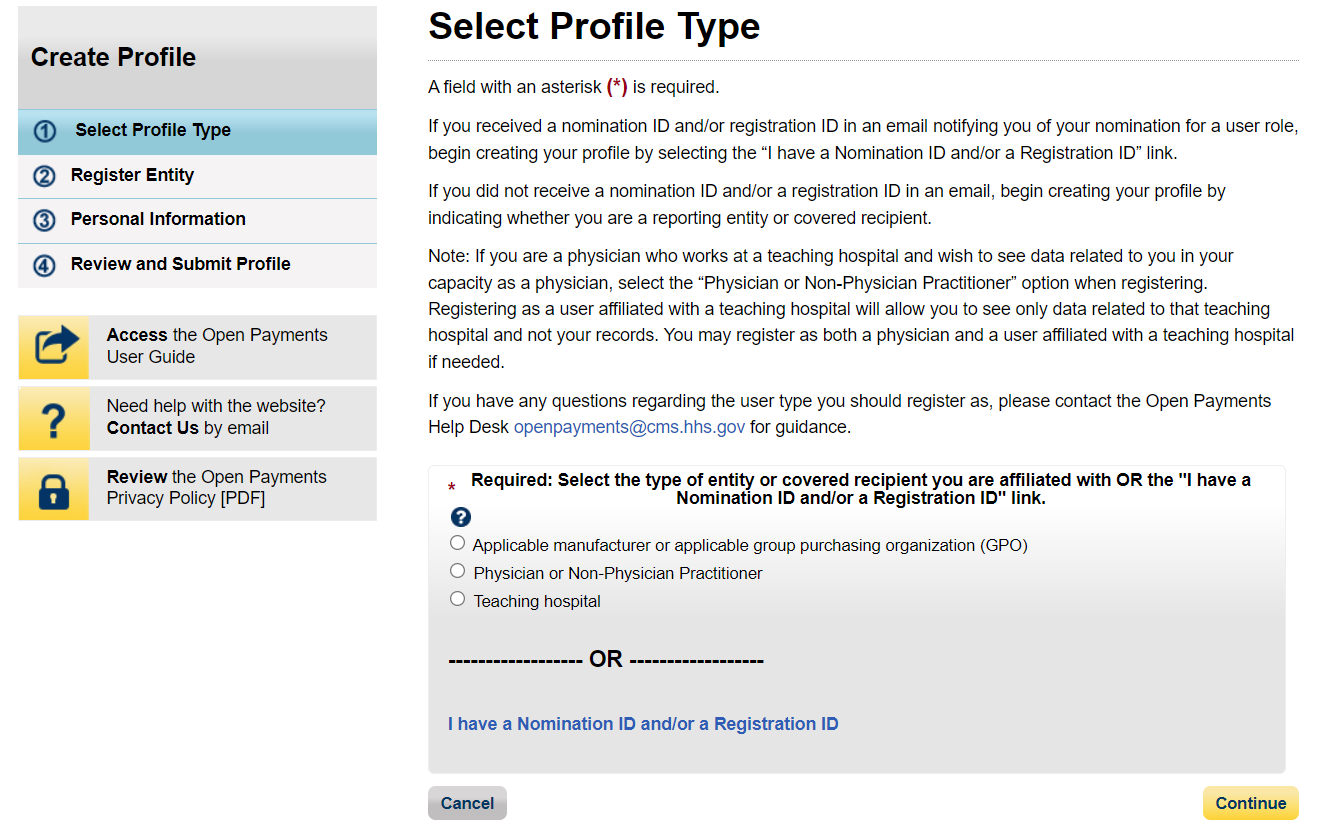
Figure 54: Select Profile Type Page (OPS 2.0)
Step 4: Select the User Type Physician or Non-Physician Practitioner from the dropdown. Enter the nomination ID included in the nomination notification email you received and then select the Show Nomination button.
Figure 55: Search for Nomination Page (OPS 1.0)
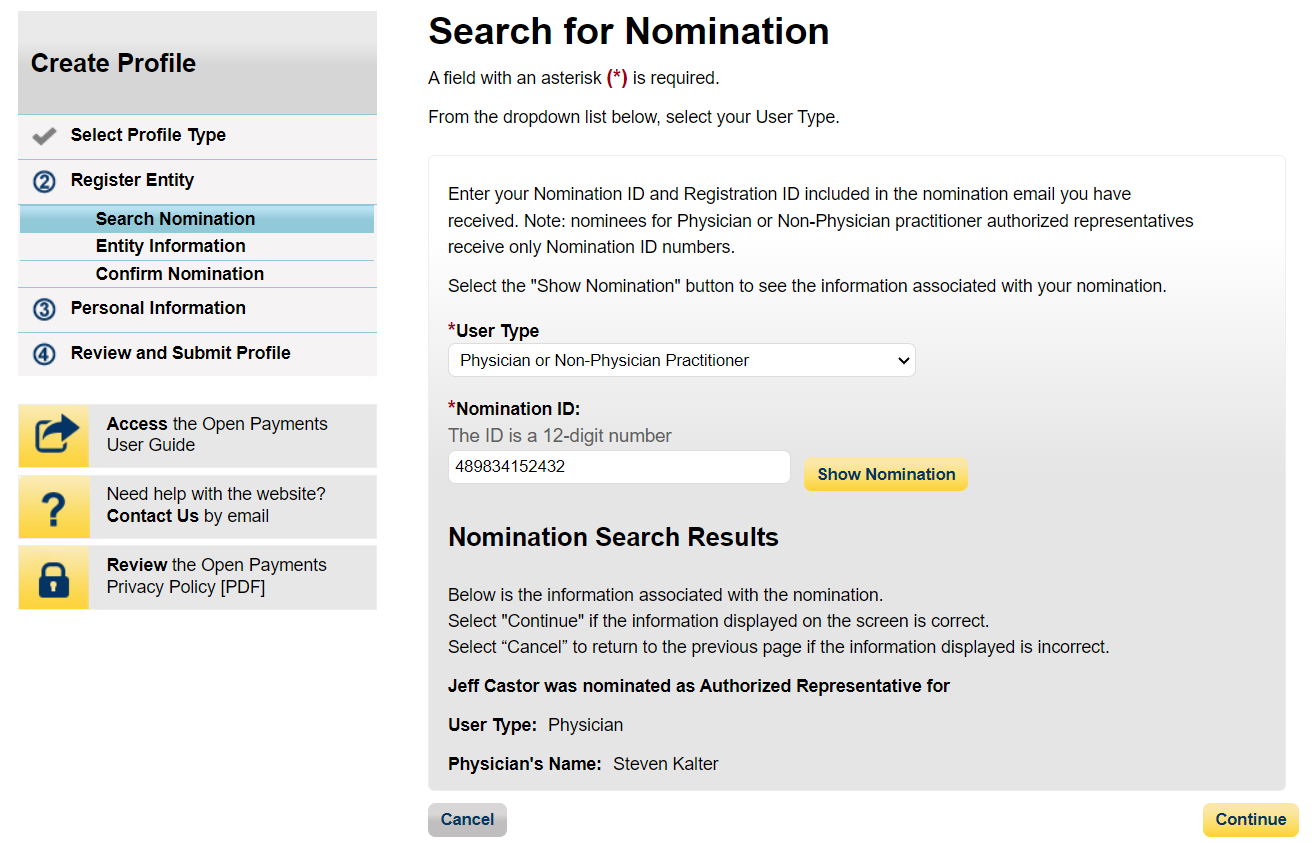
Figure 56: Search for Nomination Page (OPS 2.0)
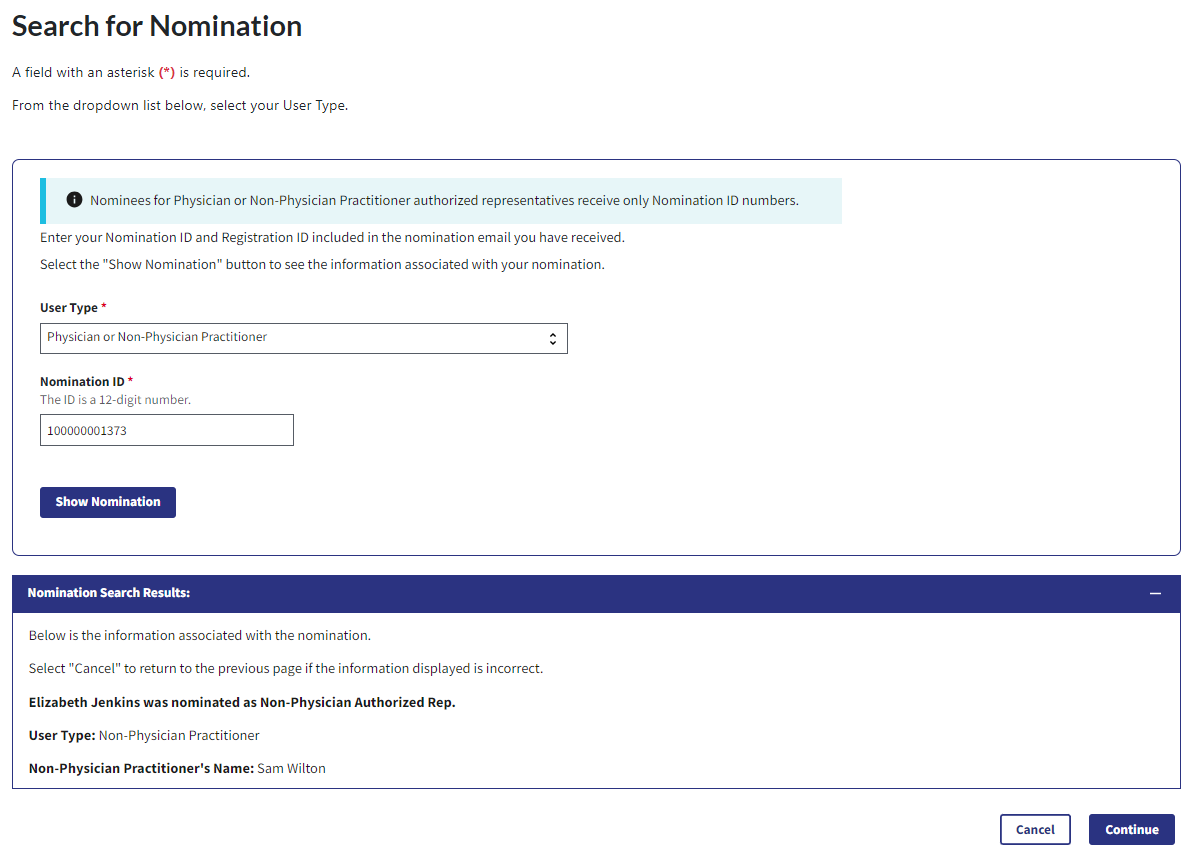
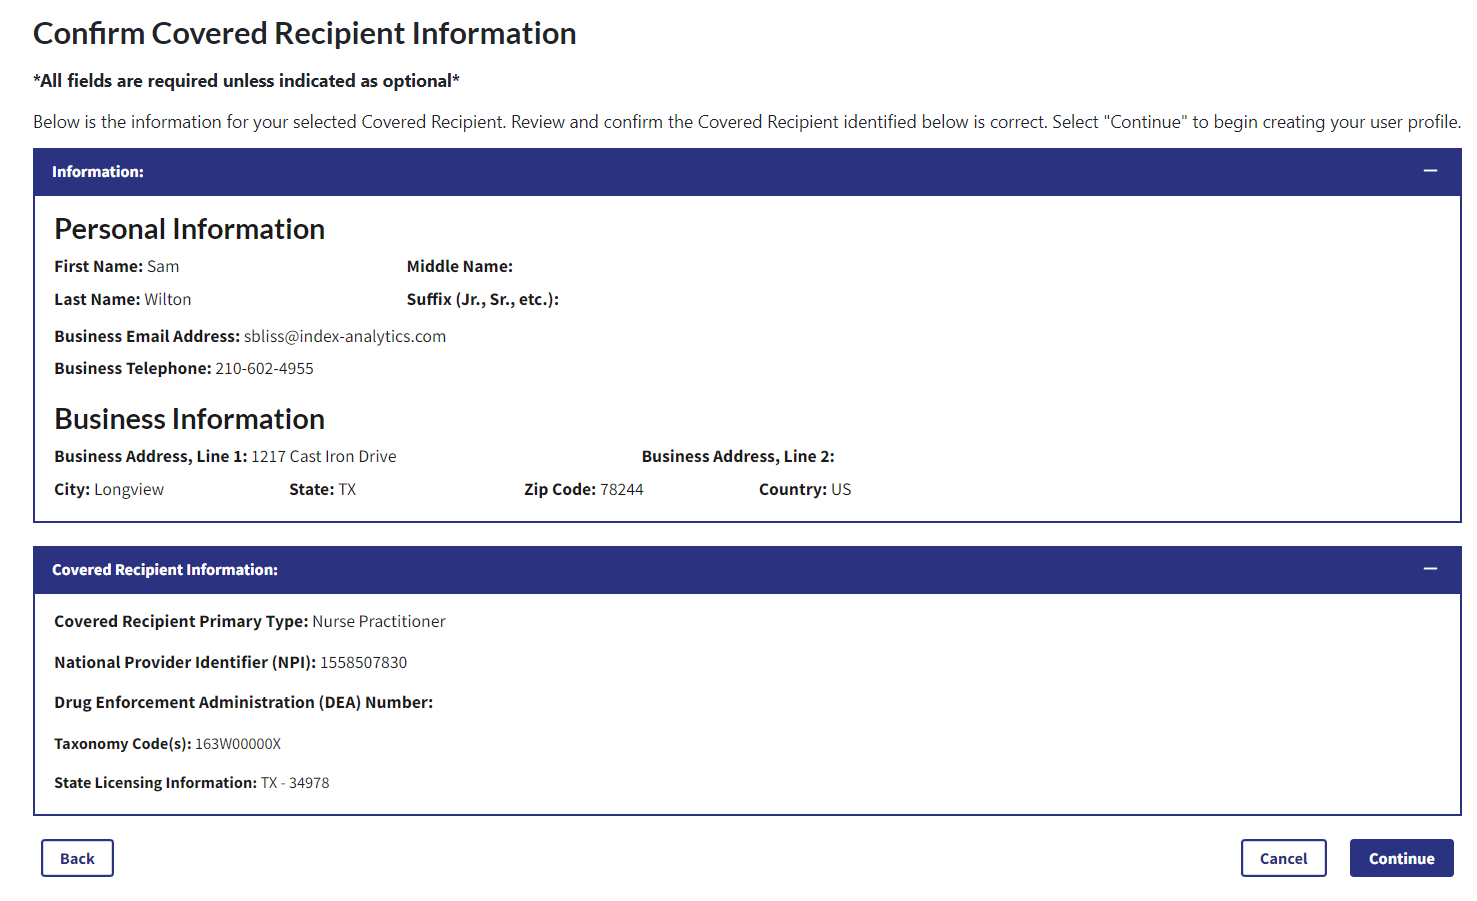
Step 6: Review the physician or NPP information displayed on the page. You will not be able to edit the information. Ensure that this is the physician or NPP for which you want to accept the user role nomination. If it is not the correct physician or NPP, either select the Back button at the bottom of the page to return to the previous page to correct the information you have entered or select the Cancel button to end the acceptance process.
Figure 57: Confirm Covered Recipient Information Page (OPS 1.0)
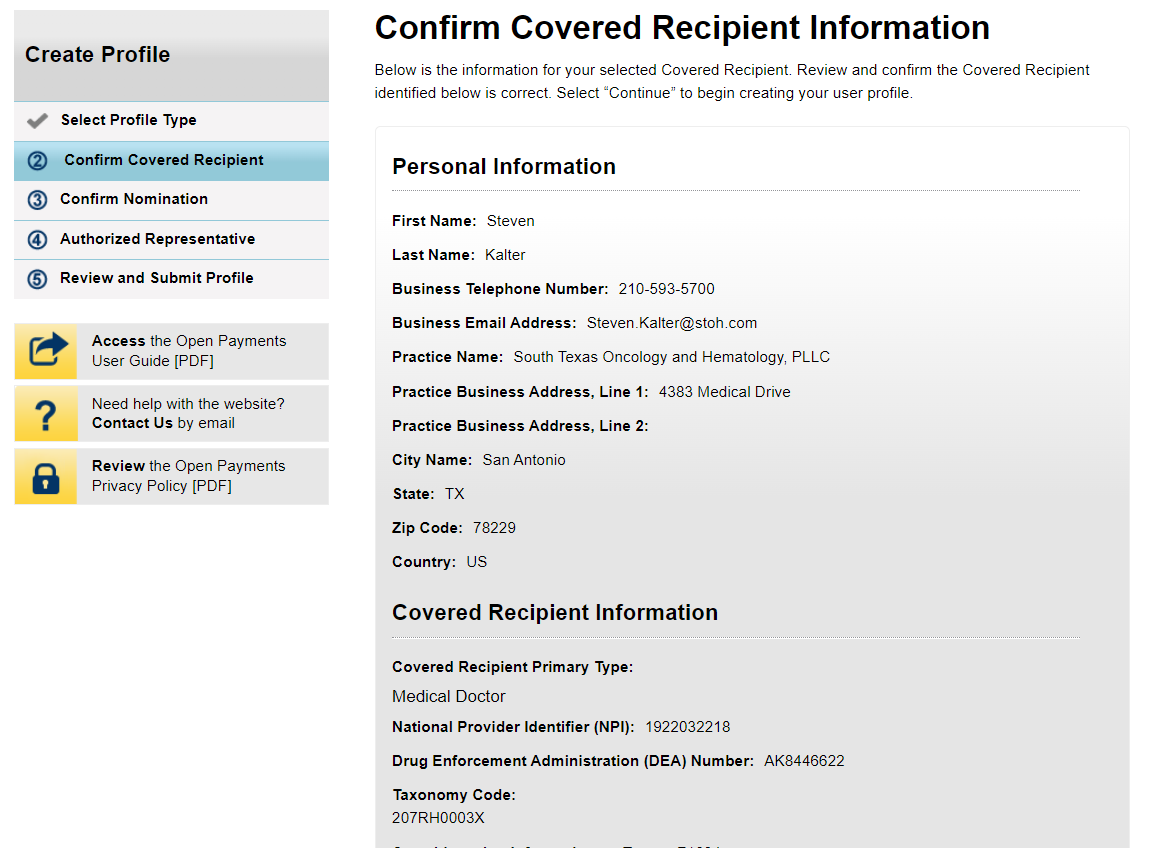
Figure 58: Confirm Covered Recipient Information Page (OPS 2.0)
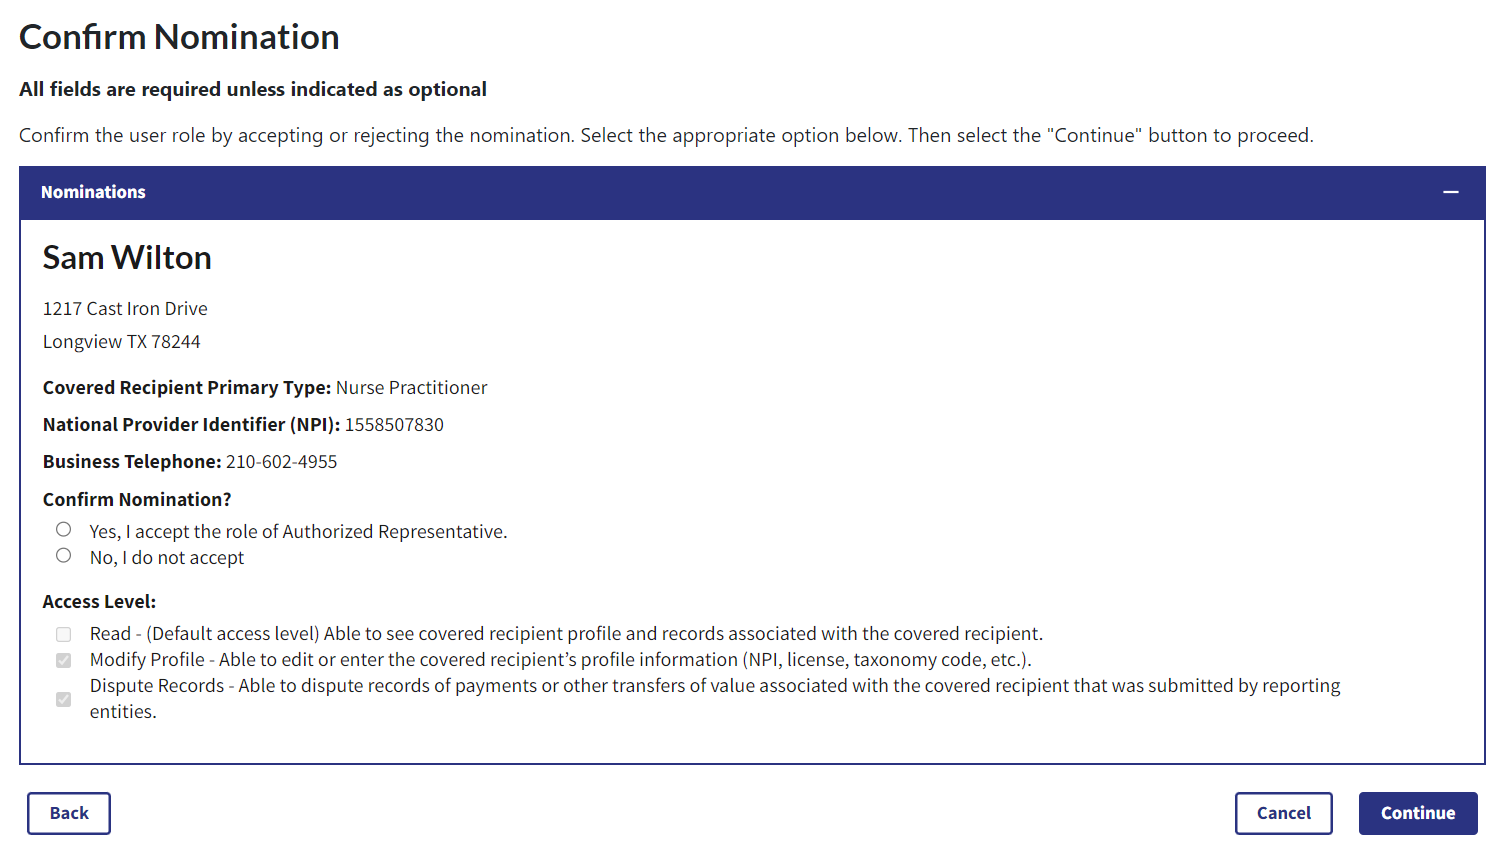
Step 7: Review the nomination information on the page. Select “Yes, I accept the role of Authorized Representative” if you wish to accept the role or “No, I do not accept” if you do not wish to accept the role. If you accept the role and select Continue, you will continue the nomination confirmation process.
Figure 59: Confirm Nomination Page (OPS 1.0)
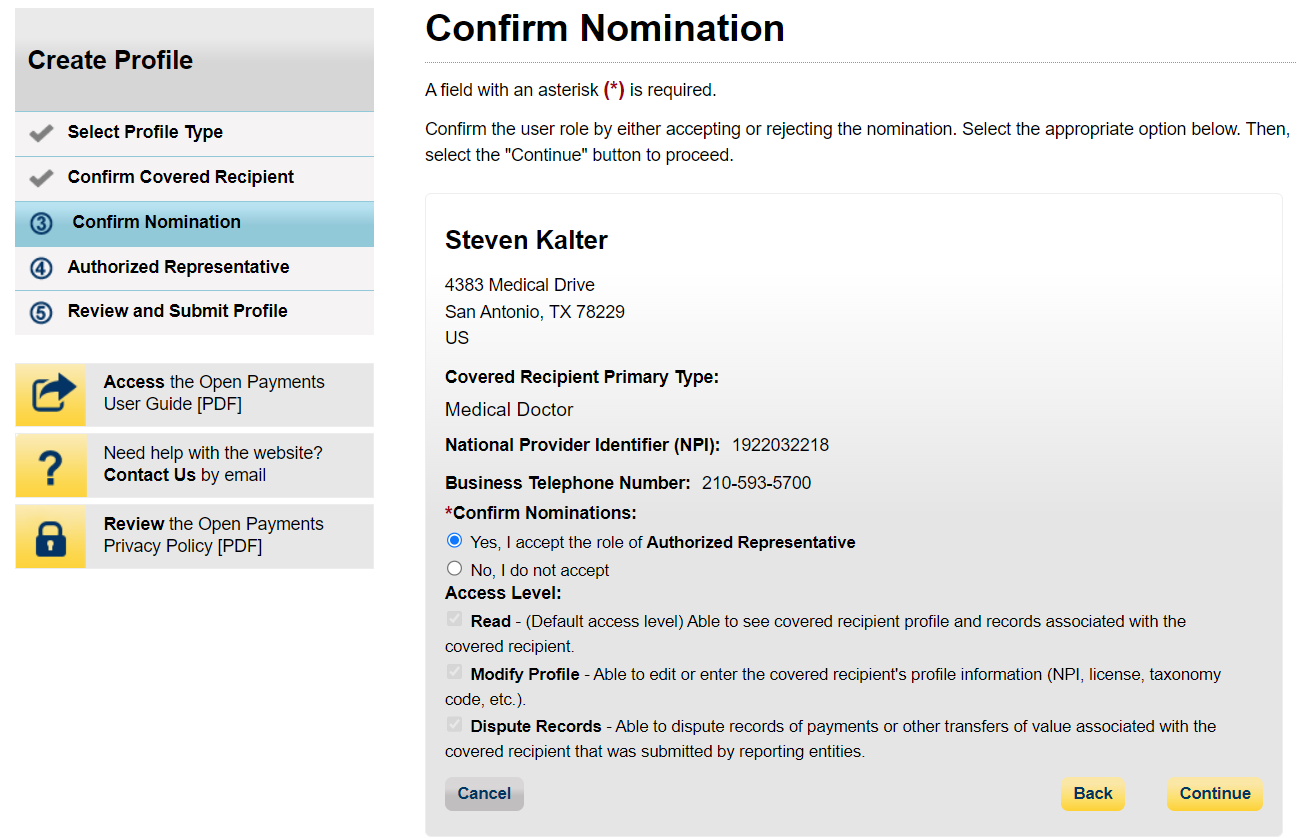
Figure 60: Confirm Nomination Page (OPS 2.0)
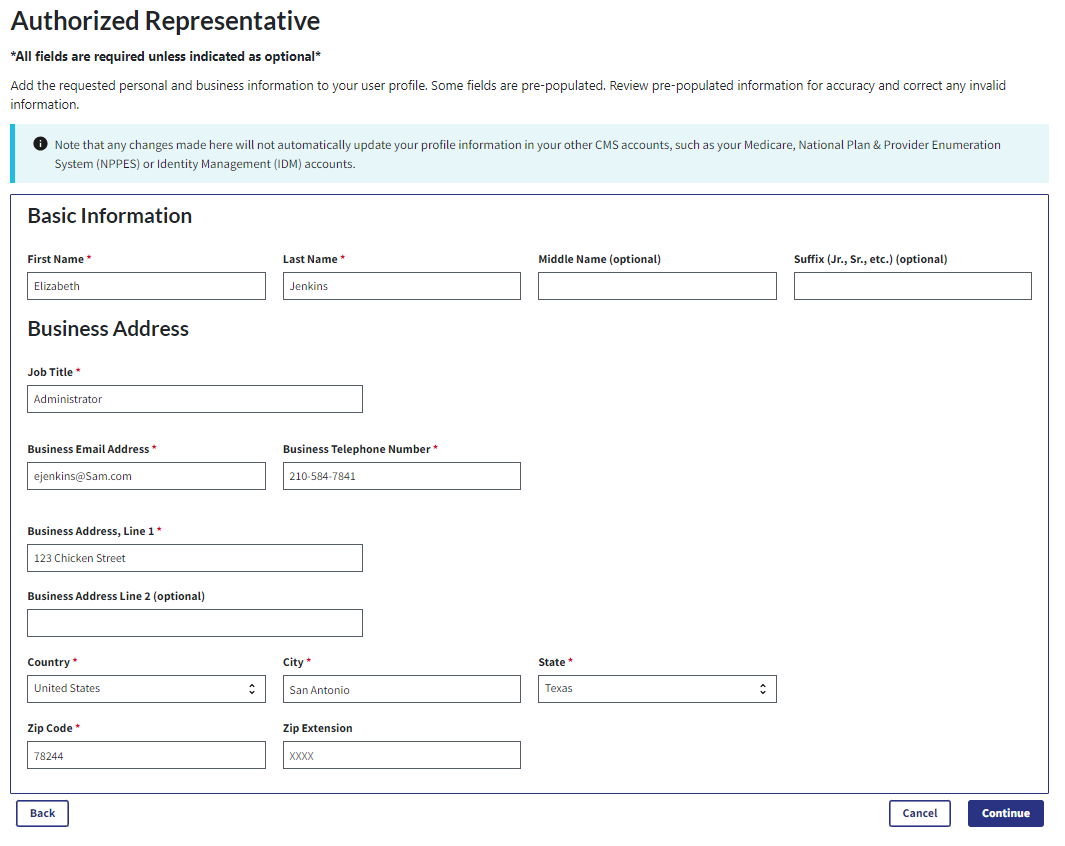
Step 8: Enter your personal information and select the Continue button.
Figure 61a: Authorized Representative Page (UPPER PART) (OPS 1.0)
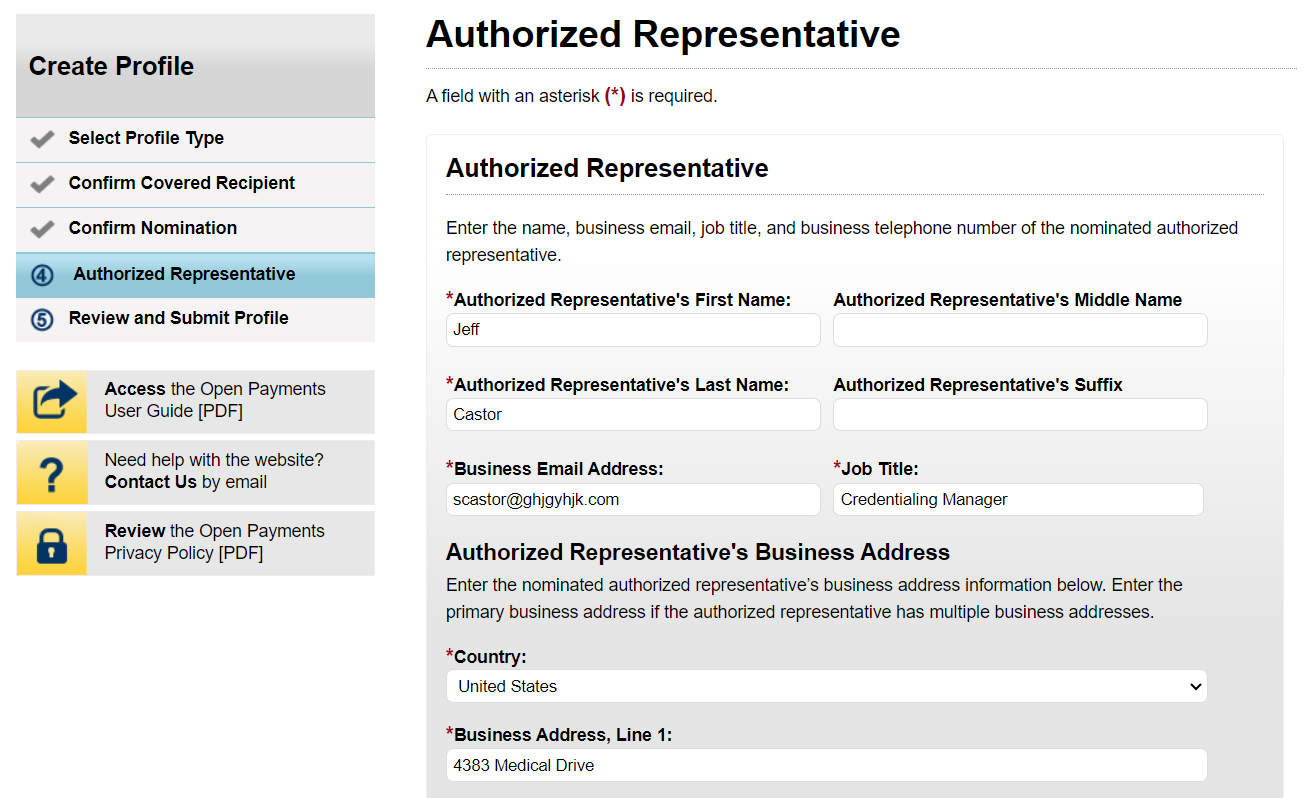
Figure 61b: Authorized Representative Page (LOWER PART) (OPS 1.0)

Figure 62: Authorized Representative Page (OPS 2.0)
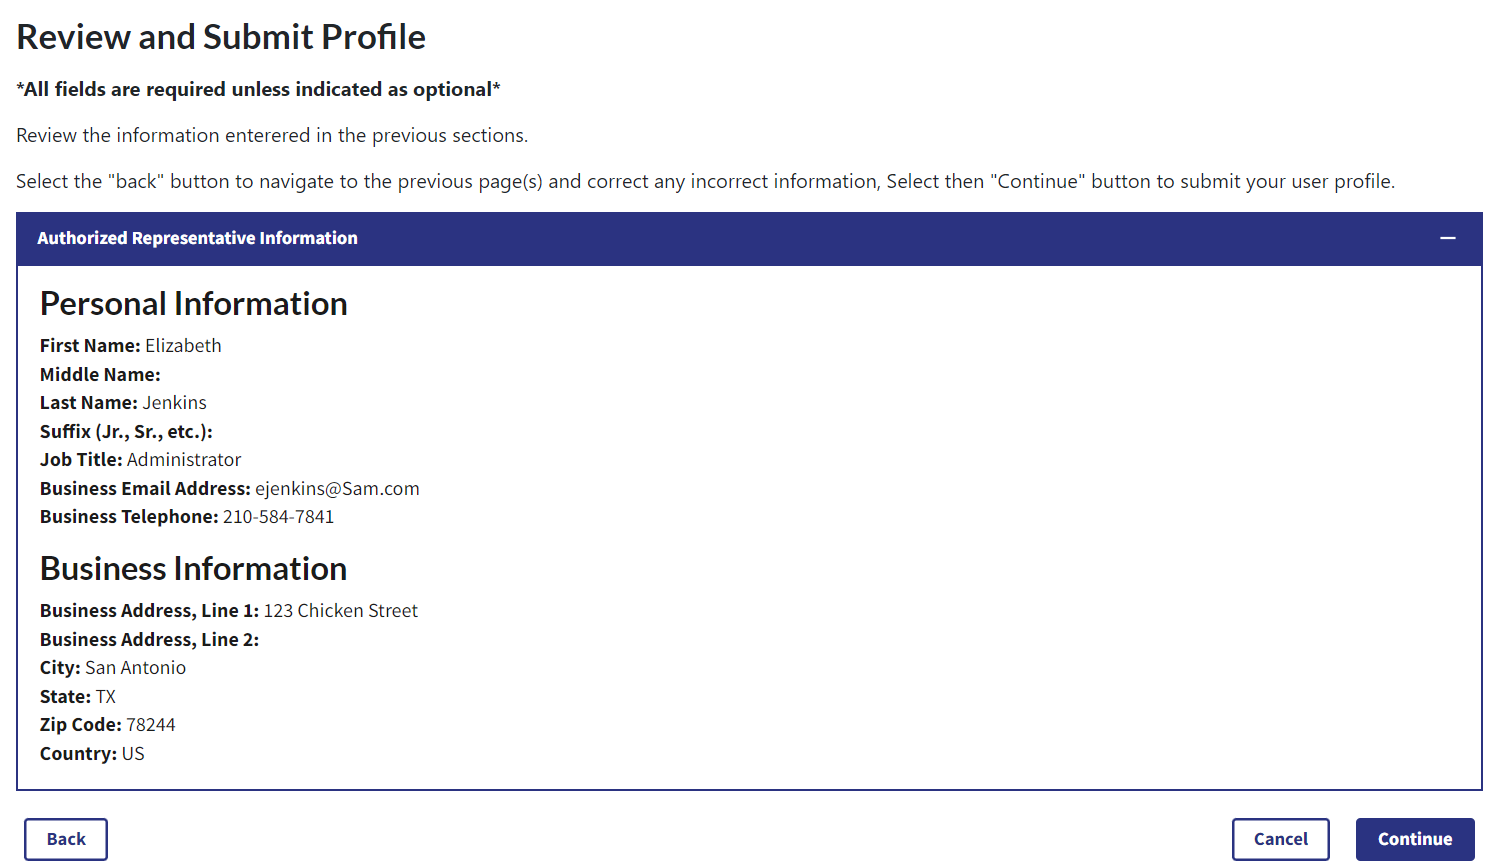
Step 9: Now you will be asked to review the information you have entered. To correct any errors, select the Submit button at the bottom of the page to return to previous pages and make your corrections. If the information is correct, select the Back button.
Figure 63: Review and Submit Profile Page (OPS 1.0)
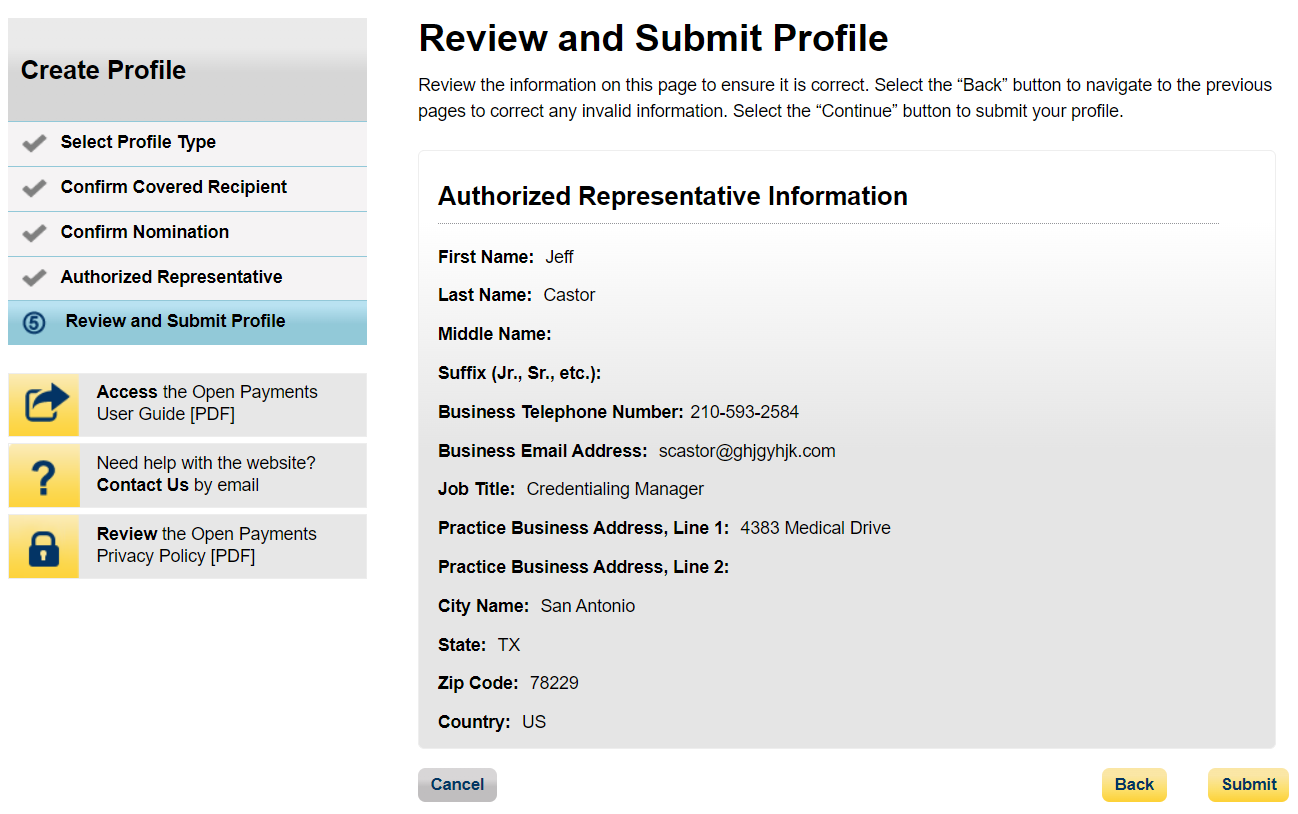
Figure 64: Review and Submit Profile Page (OPS 2.0)
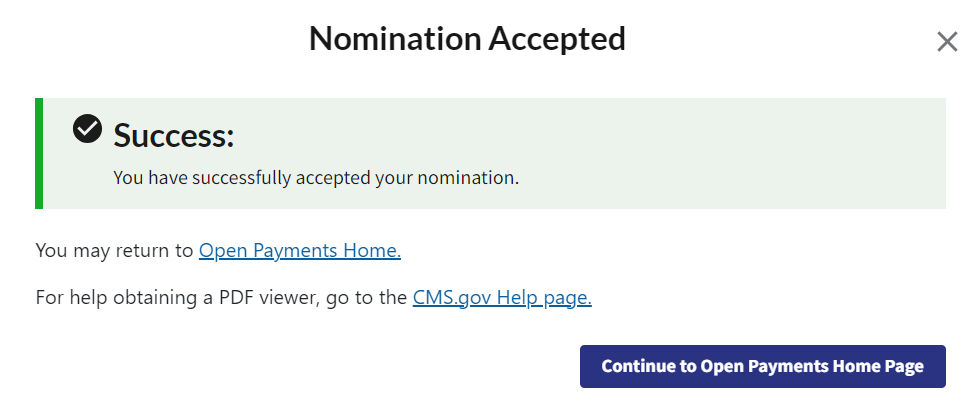
The following message will appear on-screen to confirm your nomination has been successfully accepted.
Figure 65: Success Confirmed Page (OPS 1.0)
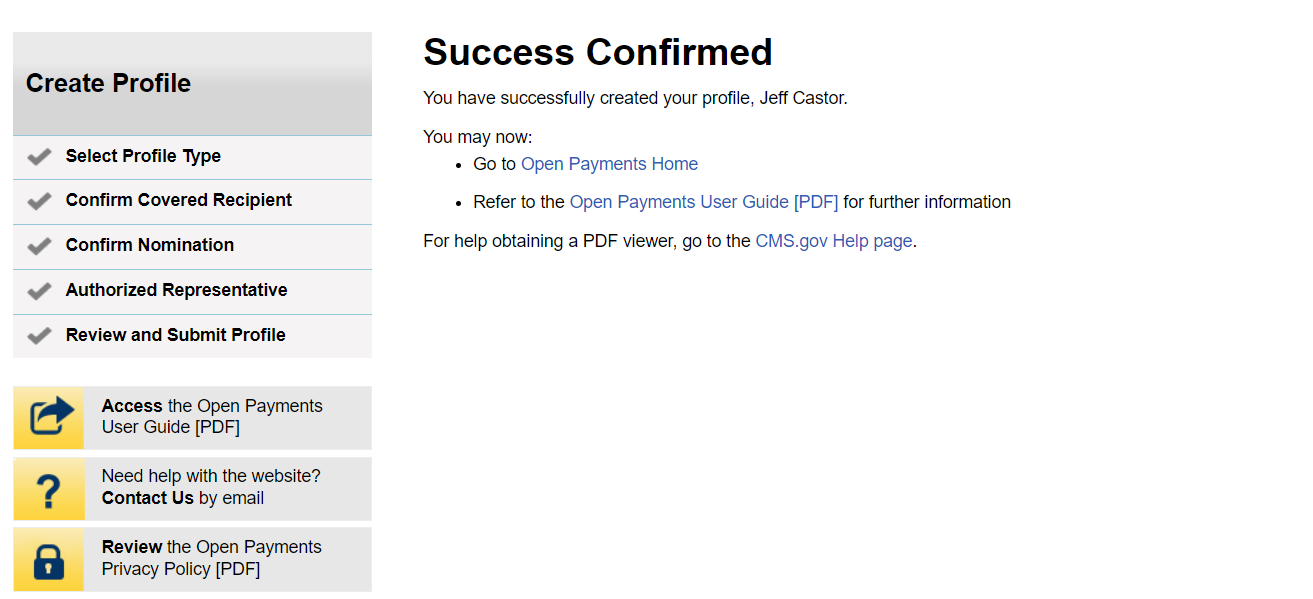
Figure 66: Success Confirmed Page (OPS 2.0)
Self-Nomination: Requesting a Role (Teaching Hospital - First Time System Users)
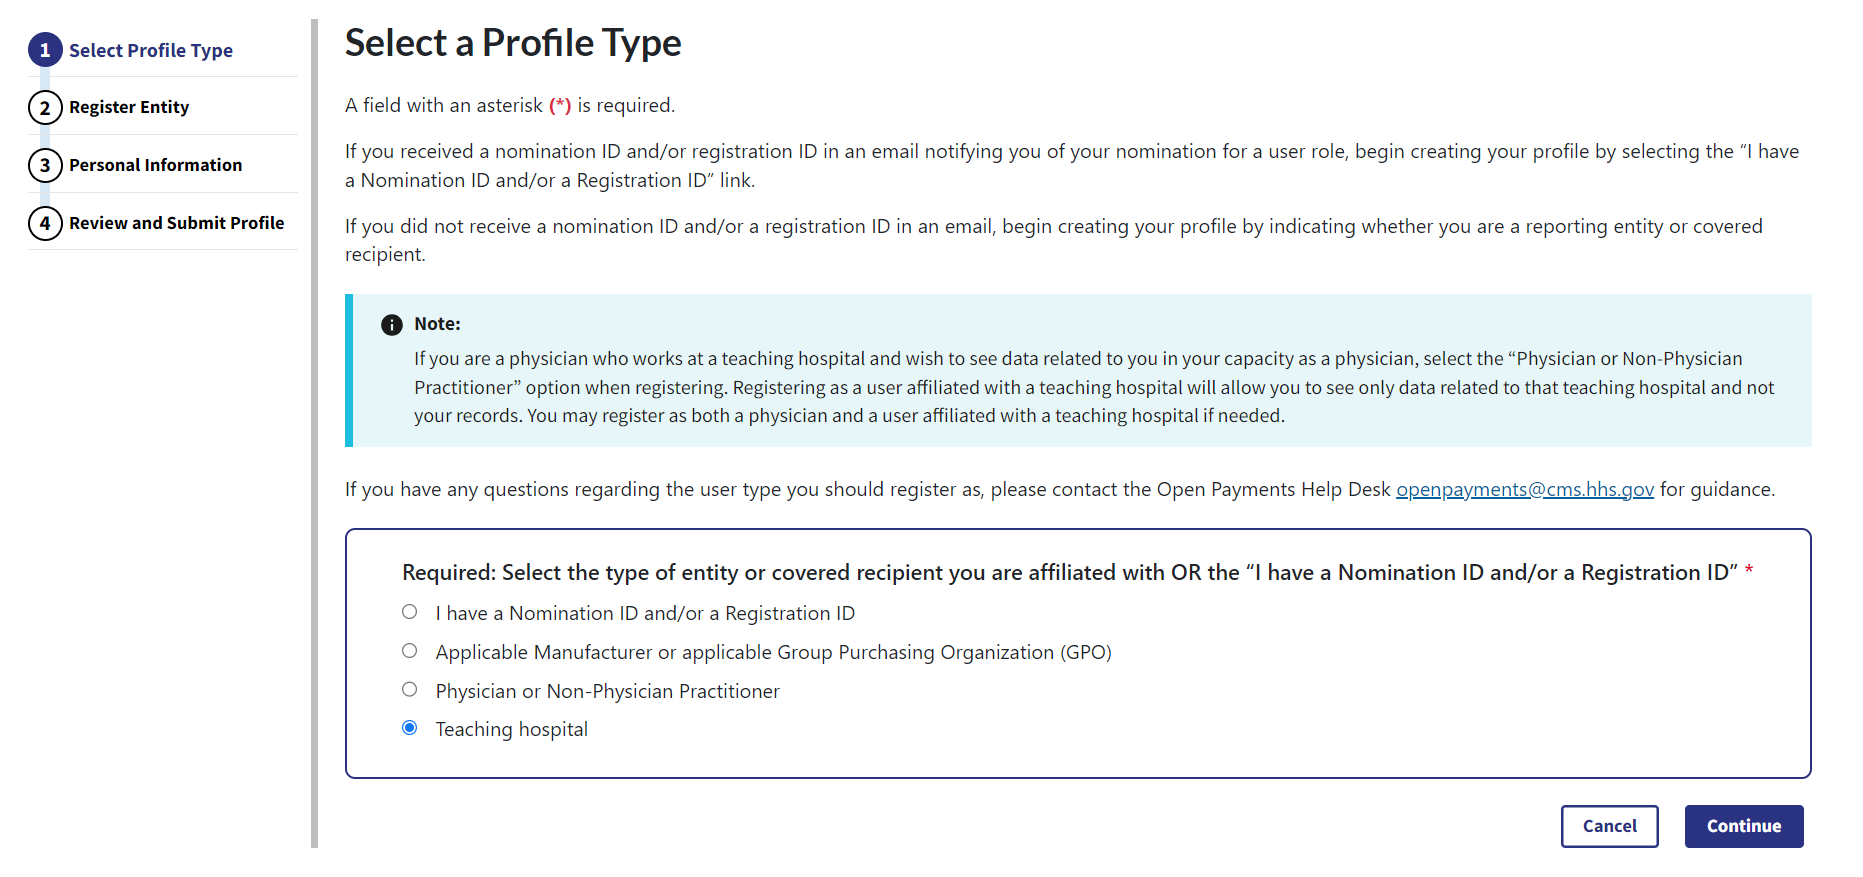
Step 1: Select the profile type Teaching Hospital. When finished, select the Continue button.
Figure 67: Select Profile Type Page (OPS 1.0)
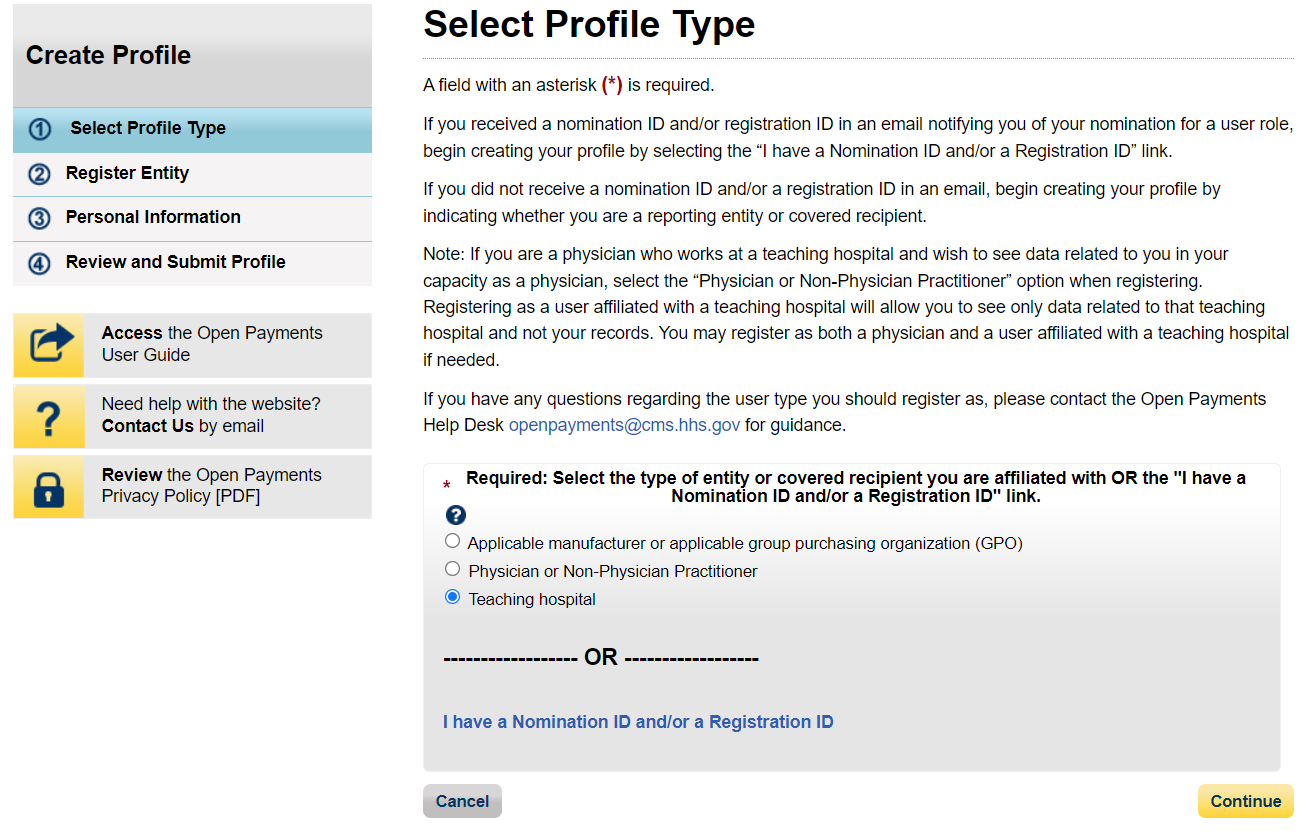
Figure 68: Select Profile Type Page (OPS 2.0)
Step 2: Search the database for the correct teaching hospital. Select the teaching hospital’s state, name, business address, and Taxpayer Identification Number (TIN) from the dropdowns. When finished, select the Search button.
Figure 69a: Teaching Hospital Search Page (UPPER PART) (OPS 1.0)
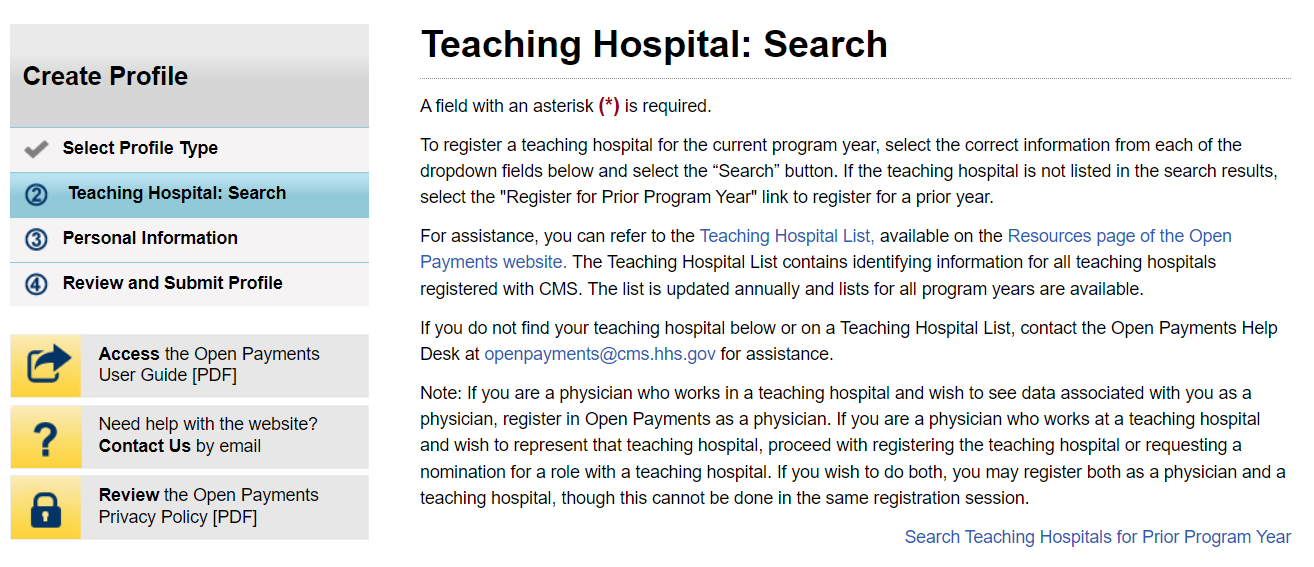
Figure 69b: Teaching Hospital Search Page (LOWER PART) (OPS 1.0)
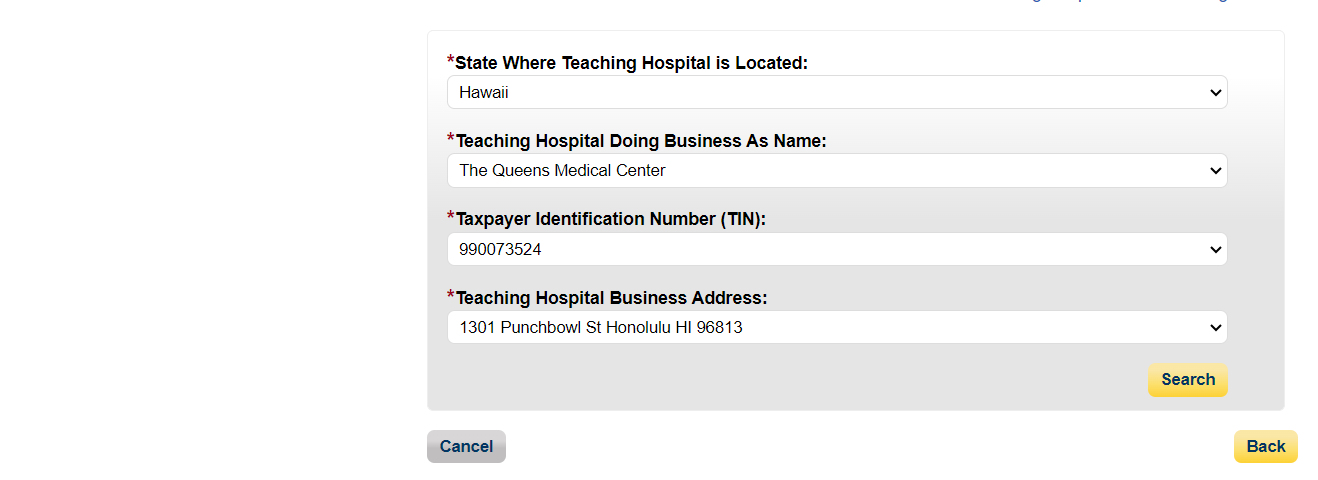
Figure 70a: Teaching Hospital Search Page (UPPER PART) (OPS 2.0)
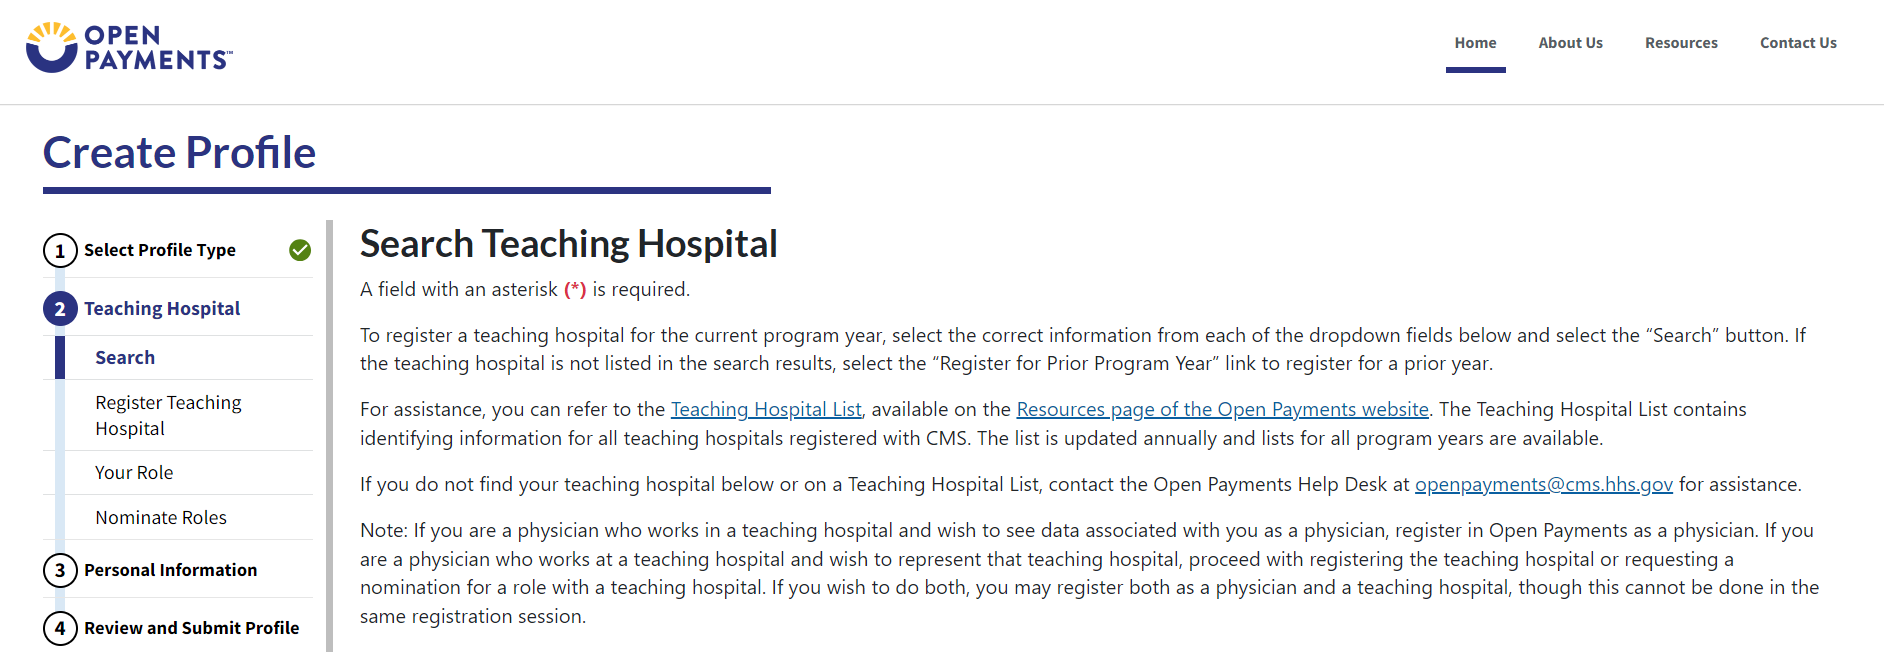
Figure 70b: Teaching Hospital Search Page (LOWER PART) (OPS 2.0)
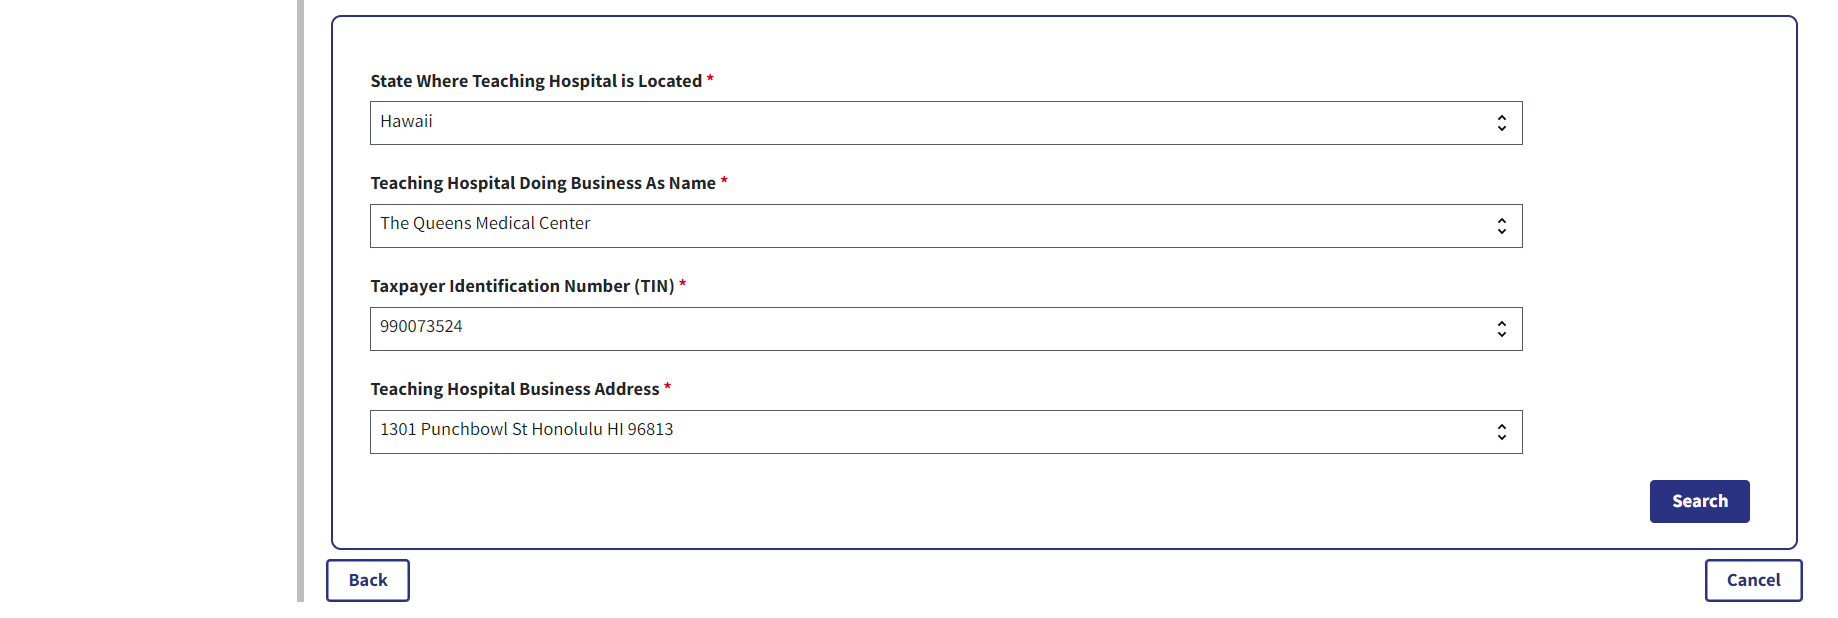
Step 3: Review the returned information displayed on the page. Select the Continue button if the information displayed is correct.
Figure 71: Teaching Hospital Search Page Search Results (UPPER PART) (OPS 1.0)
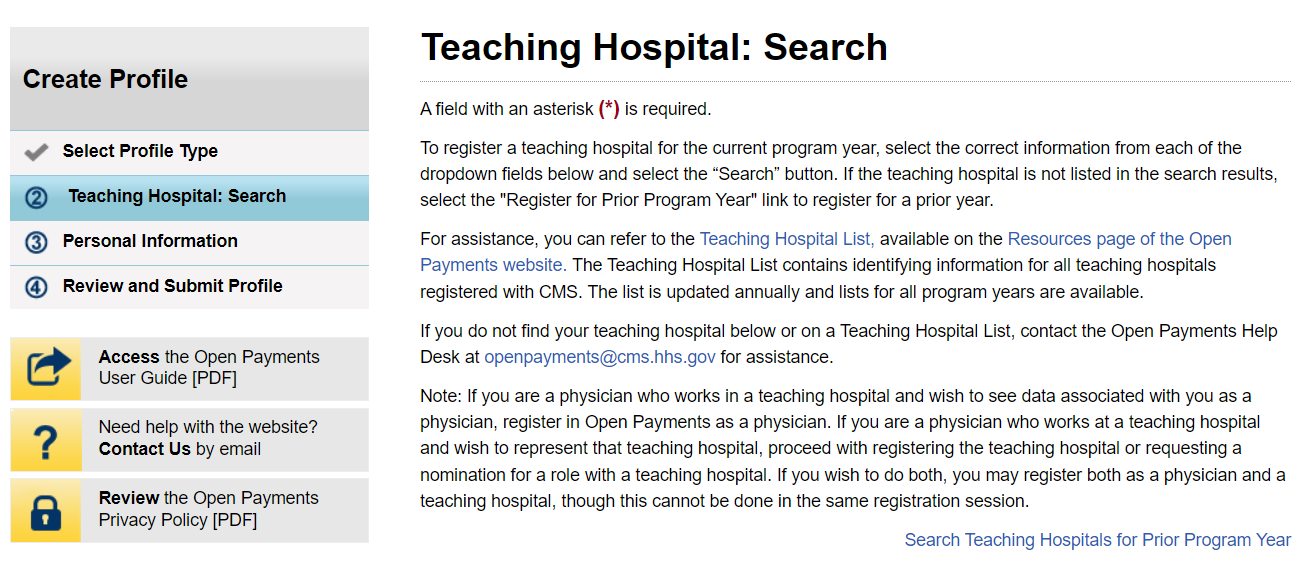
Figure 71b: Teaching Hospital Search Page Search Results (LOWER PART) (OPS 1.0)
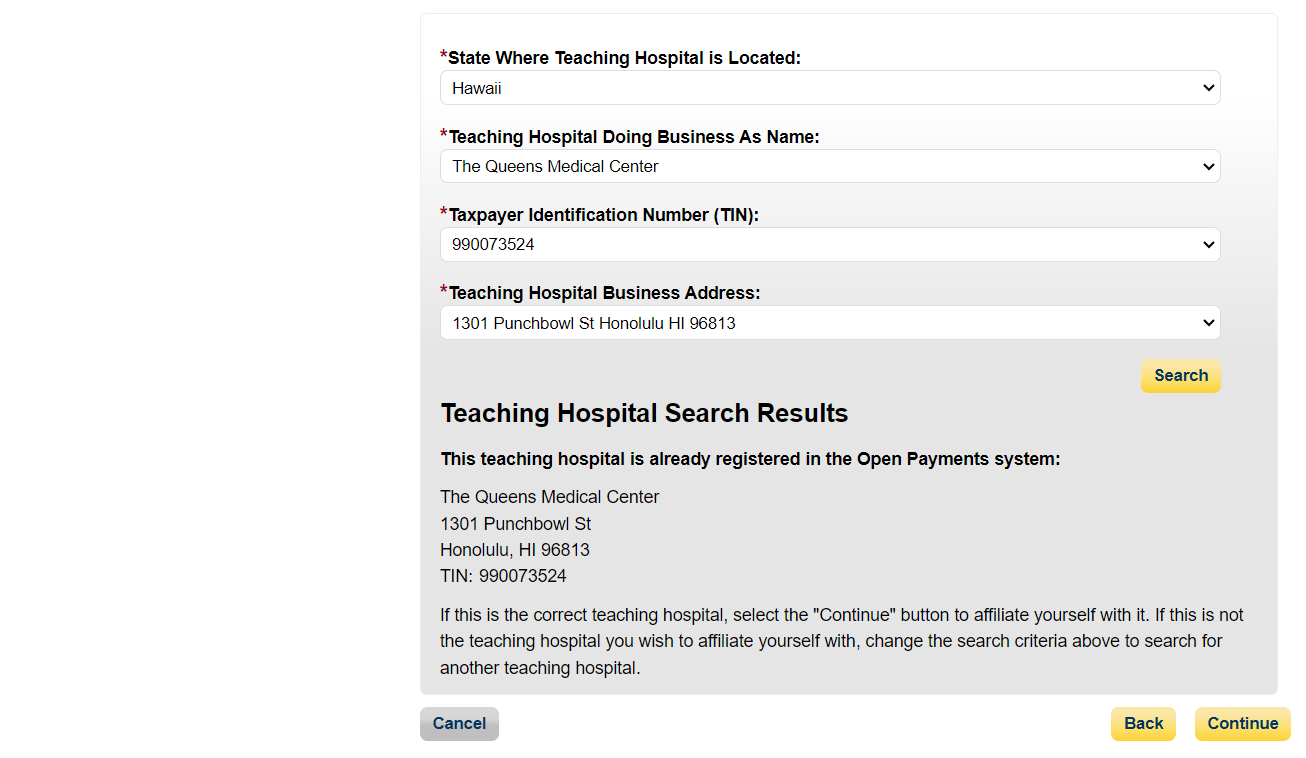
Figure 72a: Teaching Hospital Search Page Search Results (UPPER PART) (OPS 2.0)
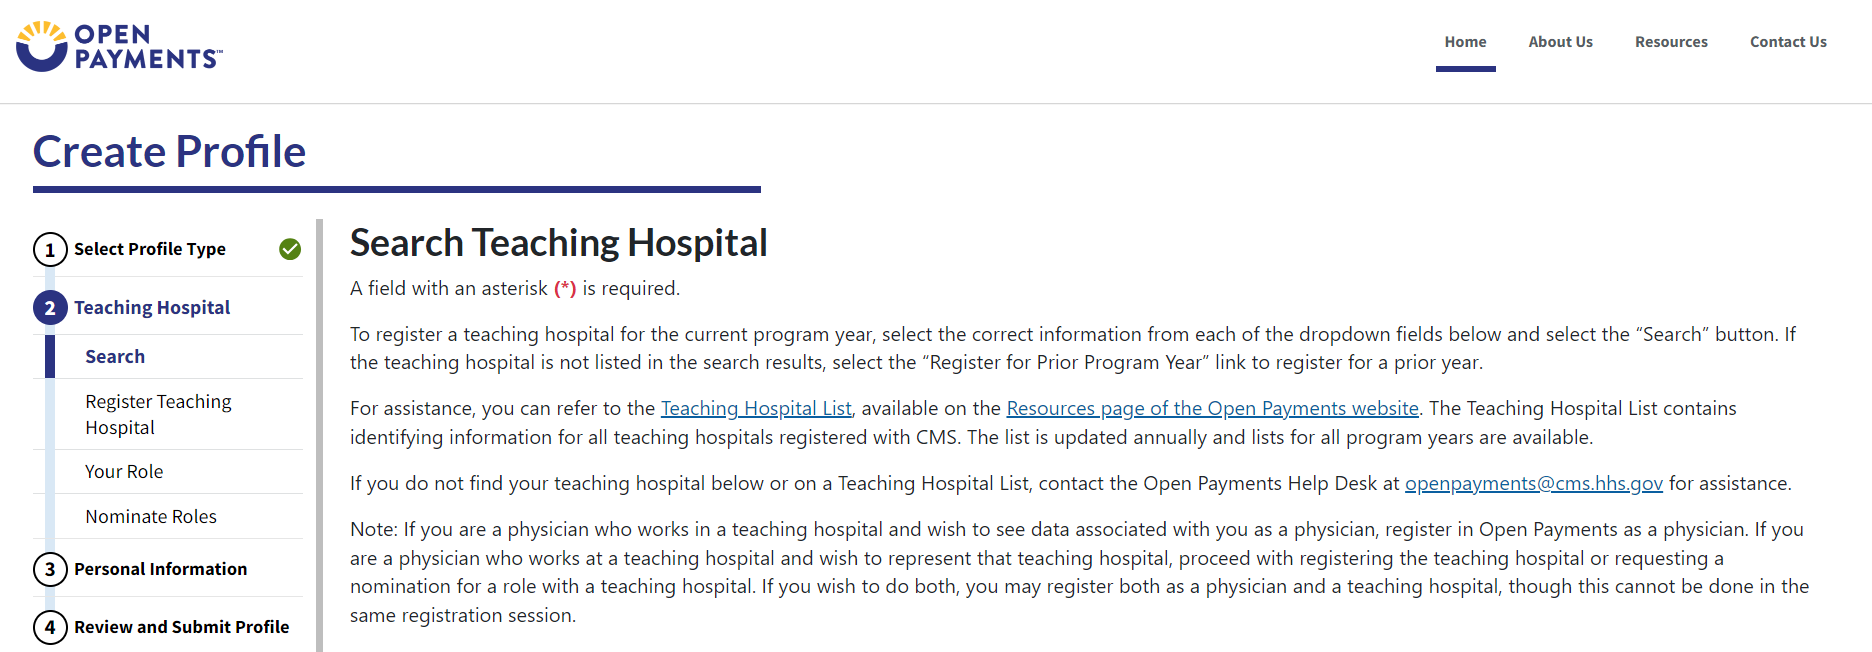
Figure 72b: Teaching Hospital Search Page Search Results (LOWER PART) (OPS 2.0)
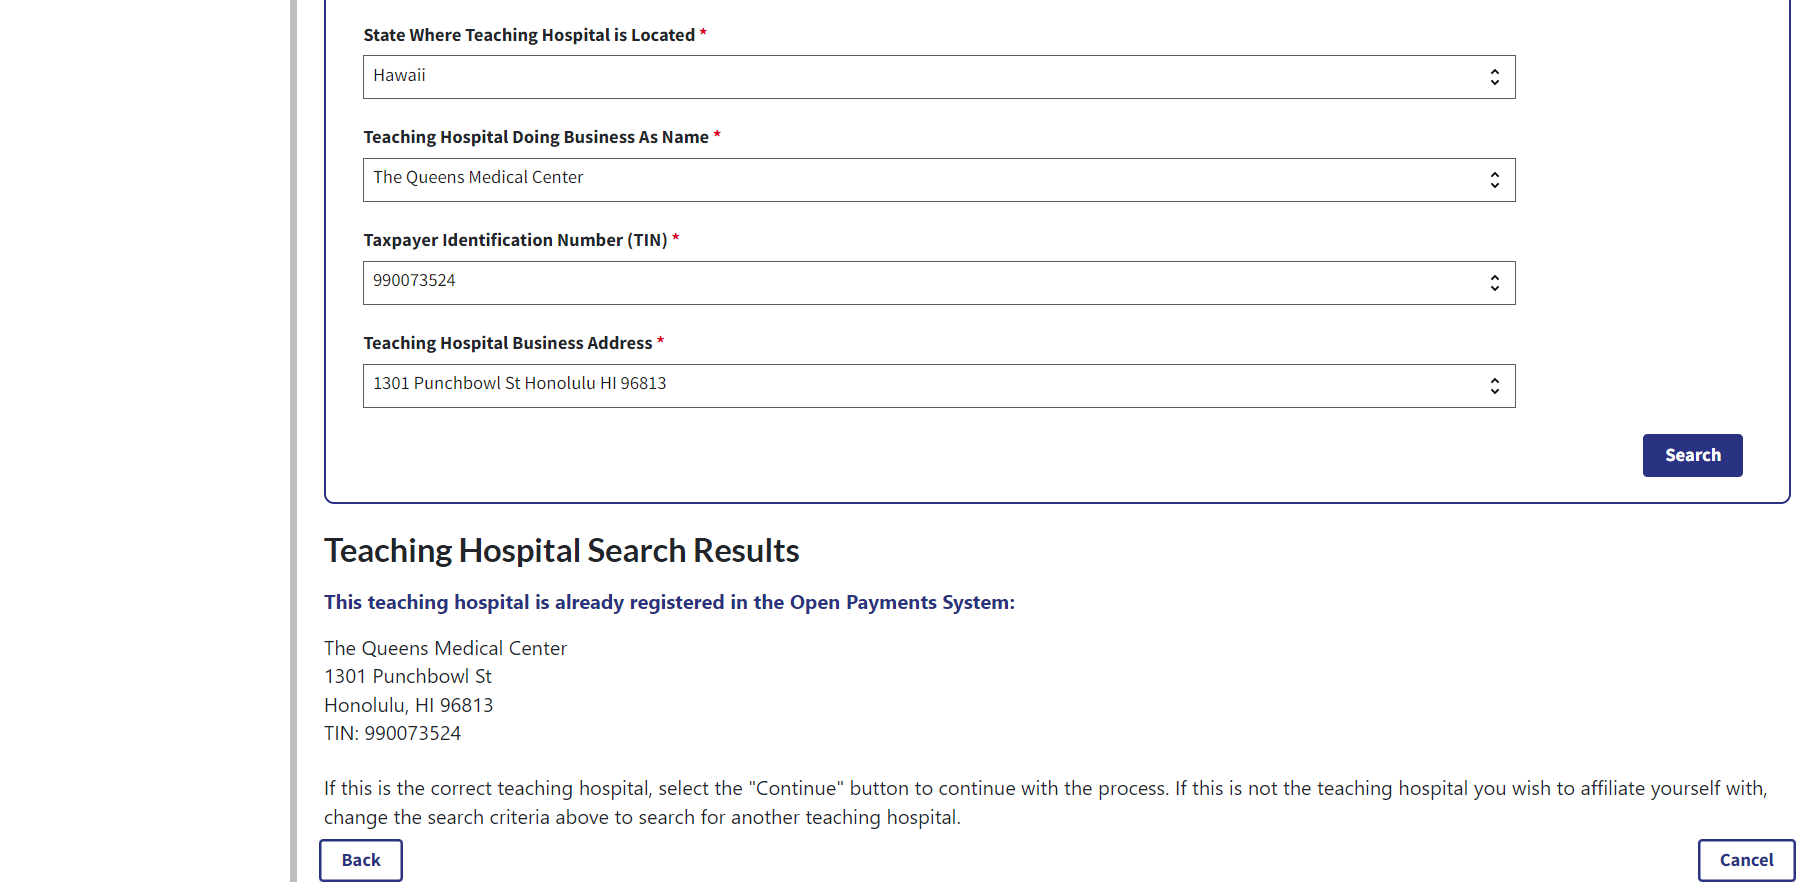
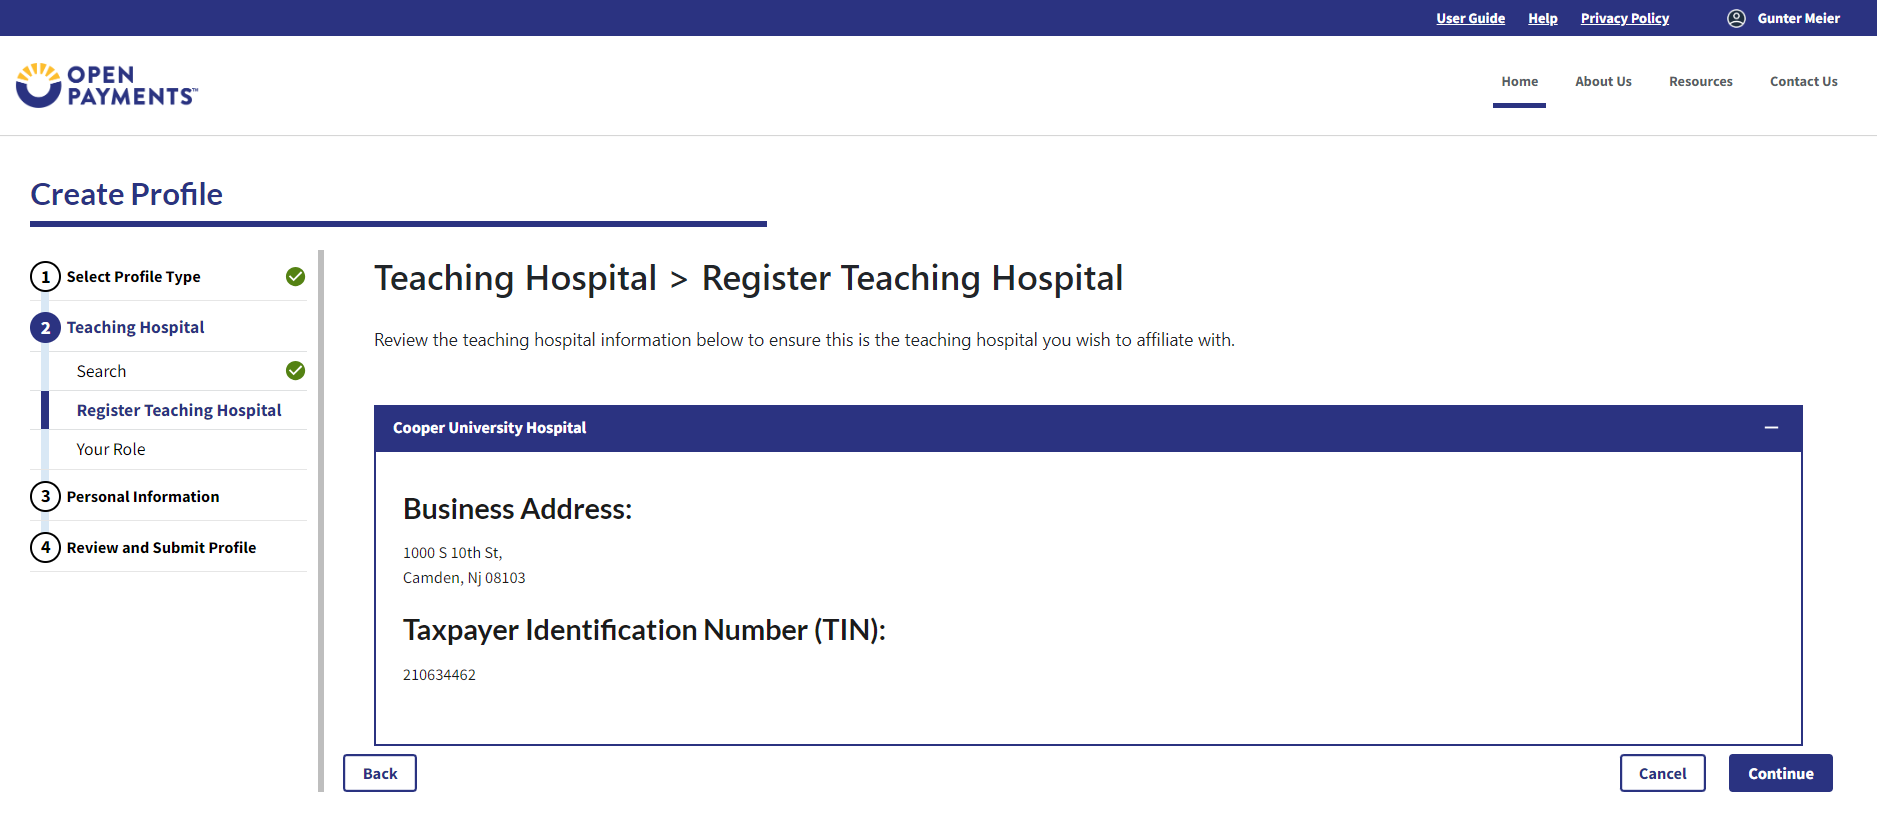
Step 4: Review the information displayed on the page. If the information is correct, select the Continue button. If the information is not correct, select the Back button at the bottom of the page to select a different teaching hospital.
Figure 73: Register Teaching Hospital Page (OPS 1.0)
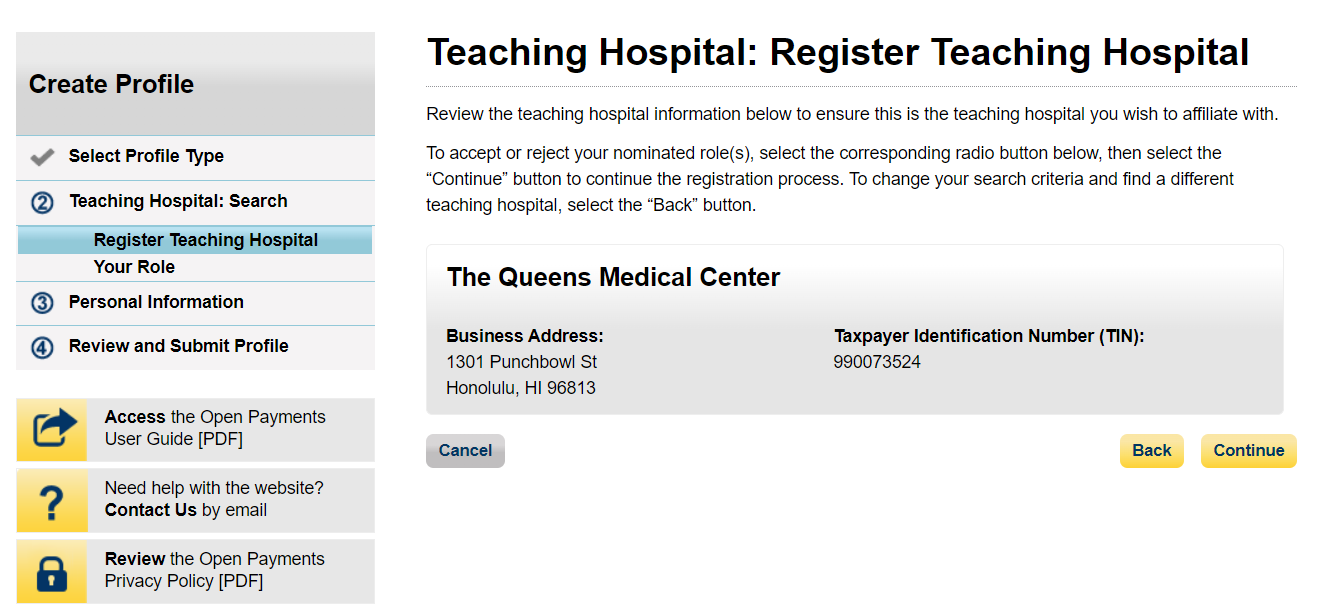
Figure 74: Register Teaching Hospital Page (OPS 2.0)
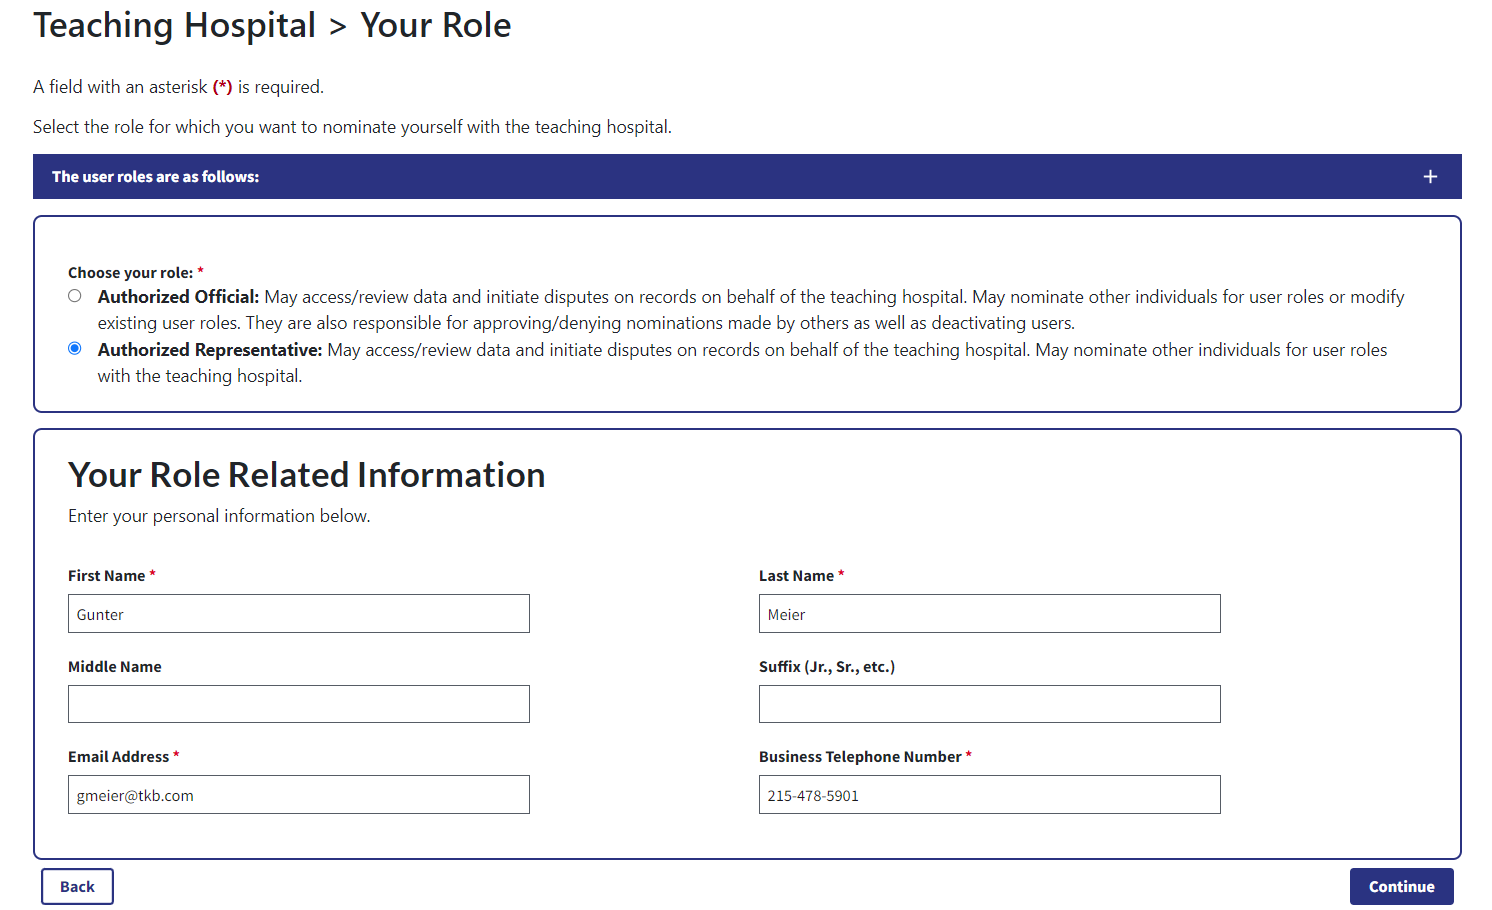
Step 5: Select the role you wish to nominate yourself for in the teaching hospital. Note that as you are not registering with the teaching hospital, you may select either role. After you have chosen your role, enter in the role-related information in the data fields. Required fields are marked with an asterisk. Once you have entered all the information, select the Continue button.
Figure 75: Teaching Hospital Your Role Page (OPS 1.0)
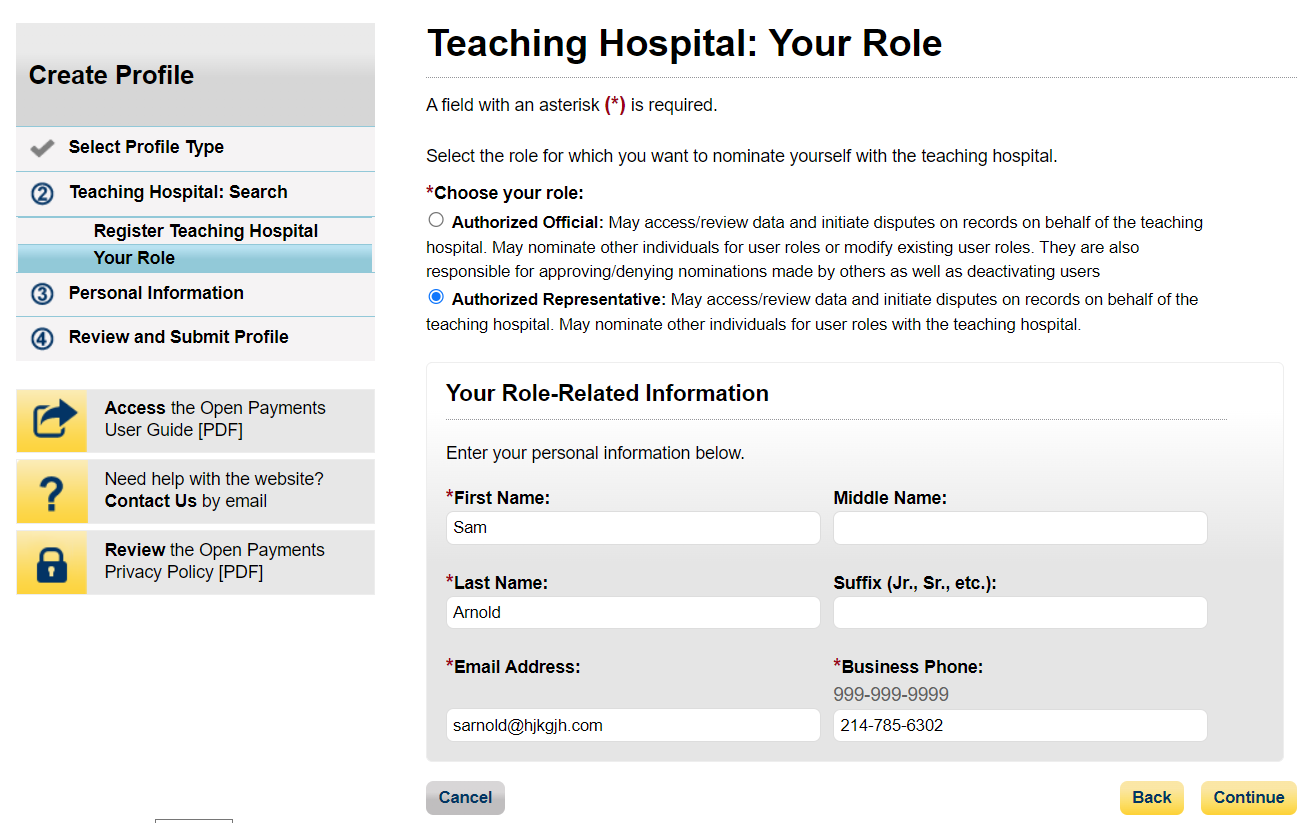
Figure 76: Teaching Hospital Your Role Page (OPS 2.0)
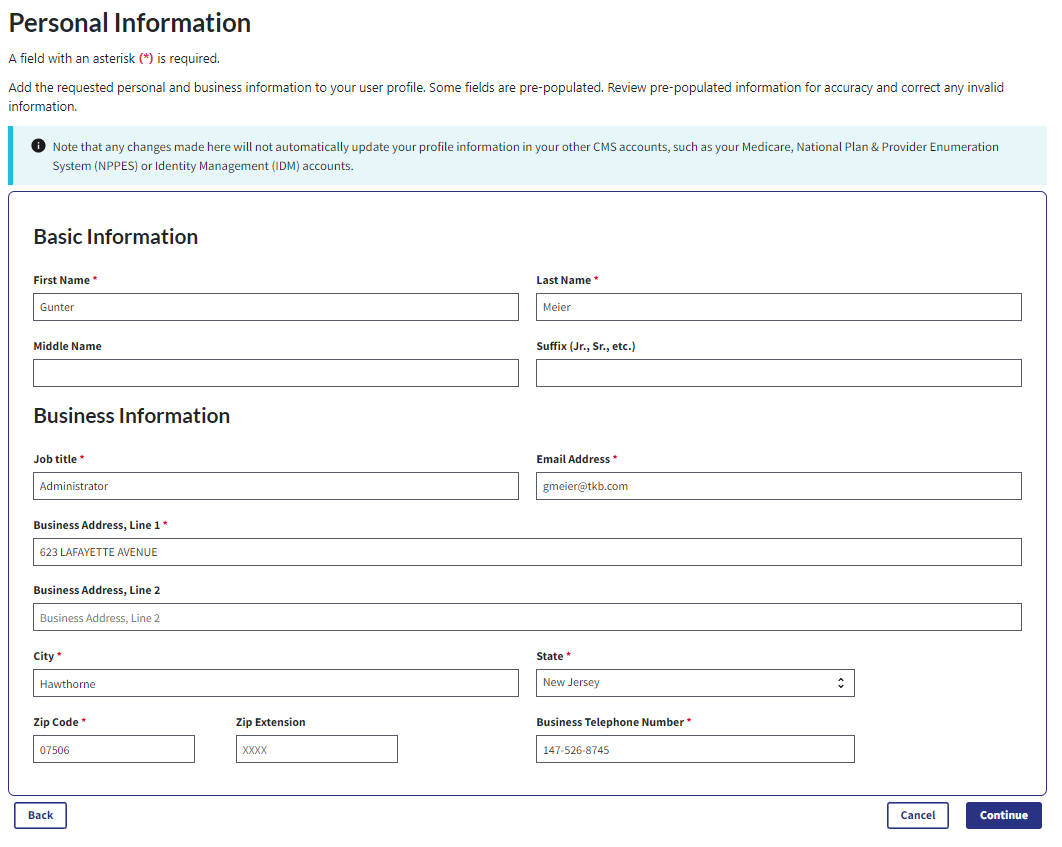
Step 6: Review your information displayed on the page. Enter your job title and business address. When finished, select the Continue button.
Figure 77a: Personal Information Page (UPPER PART) (OPS 1.0)
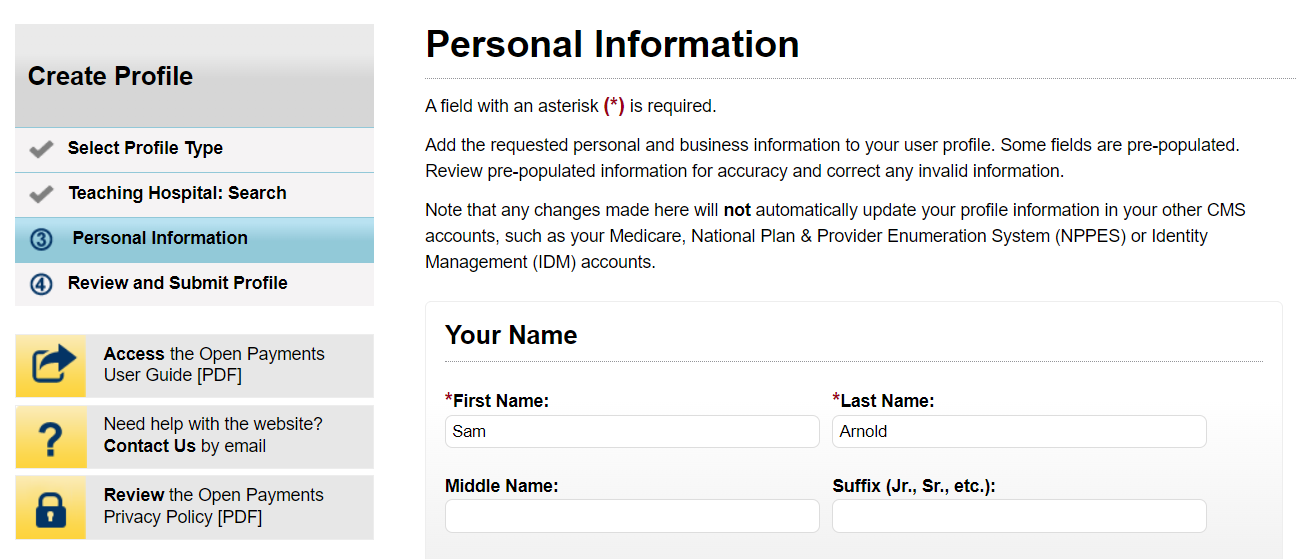
Figure 77b: Personal Information Page (LOWER PART) (OPS 1.0)
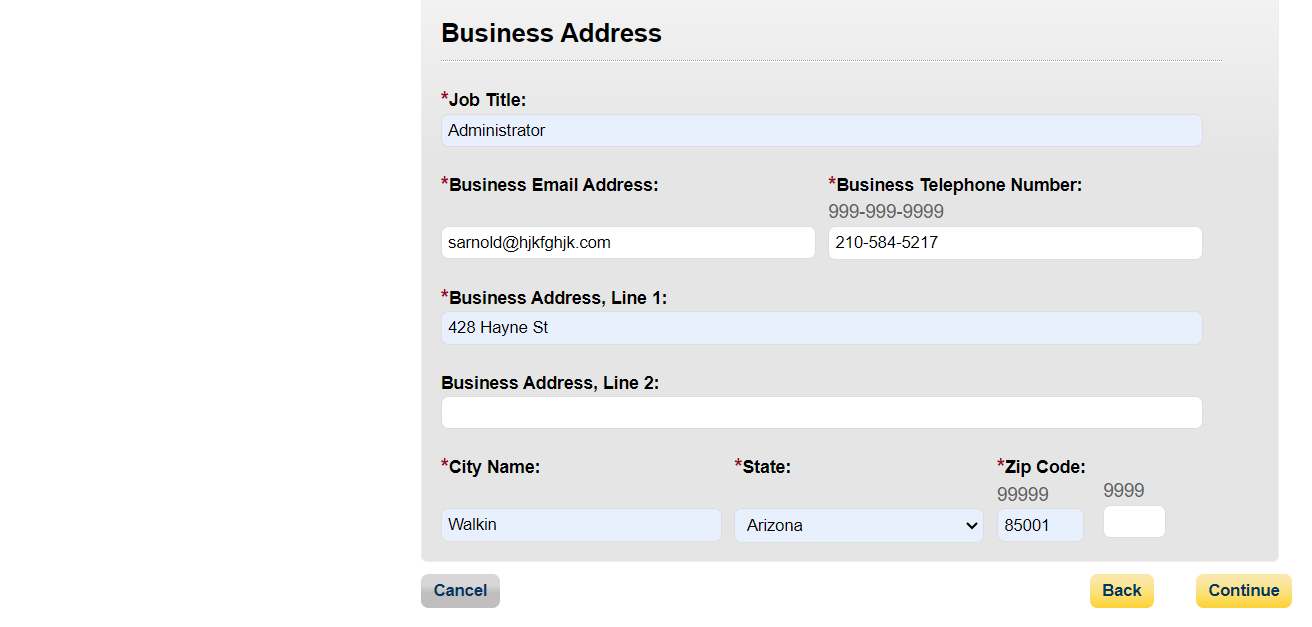
Figure 78: Personal Information Page (OPS 2.0)
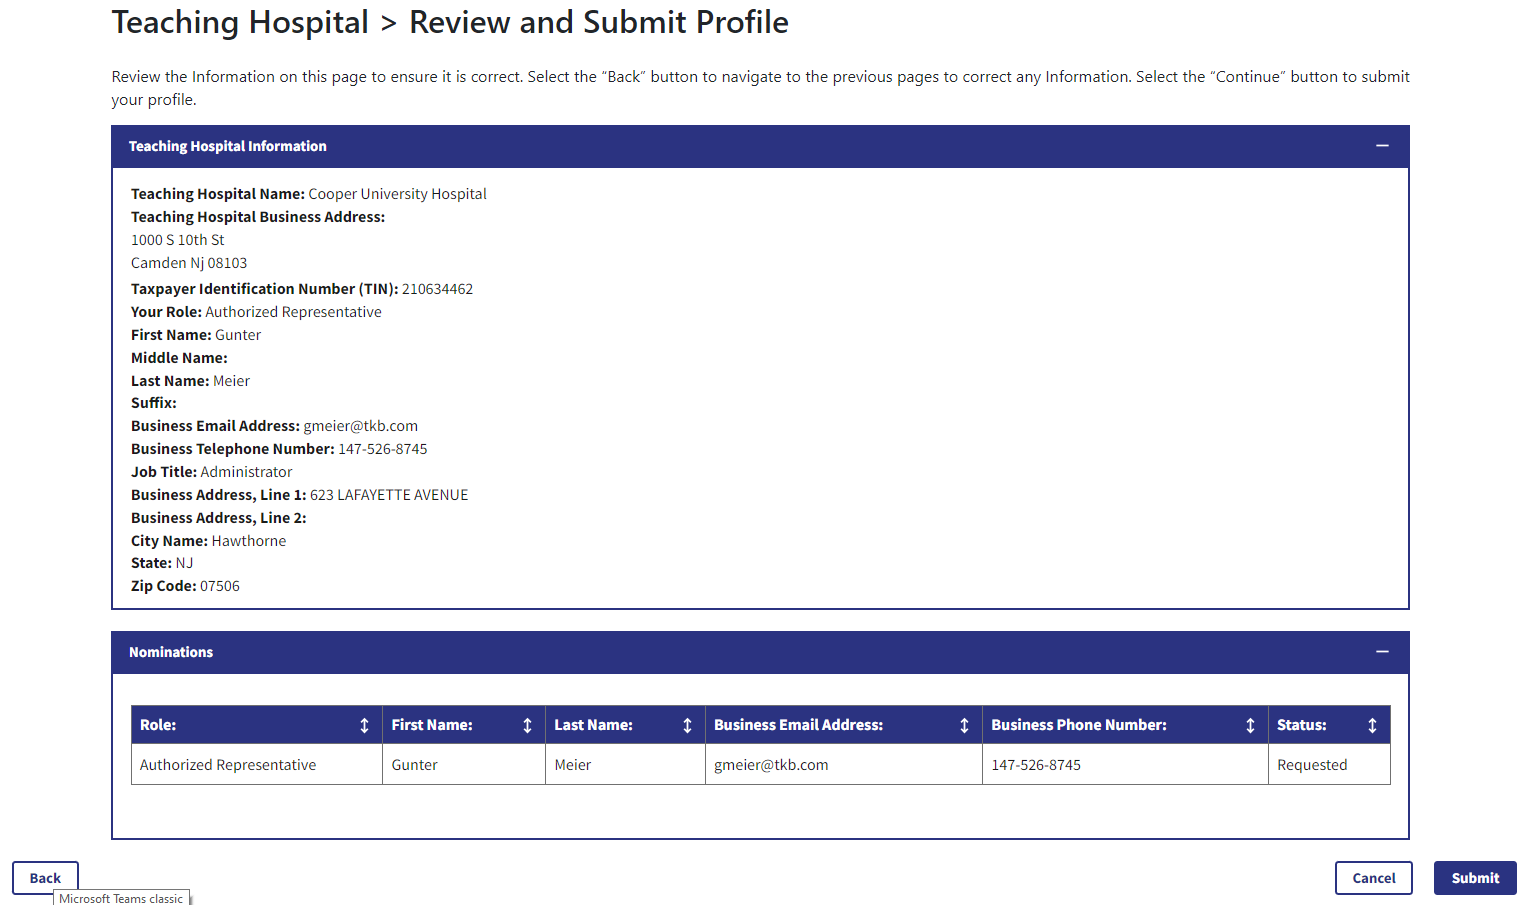
Step 9: Review your profile information on the “Review and Submit Profile” page. Select the Back button at the bottom of the page to go back and edit any information. Once you have reviewed the information and determined it to be correct, select the Submit button.
Figure 79a: Review and Submit Profile Page (UPPER PART) (OPS 1.0)
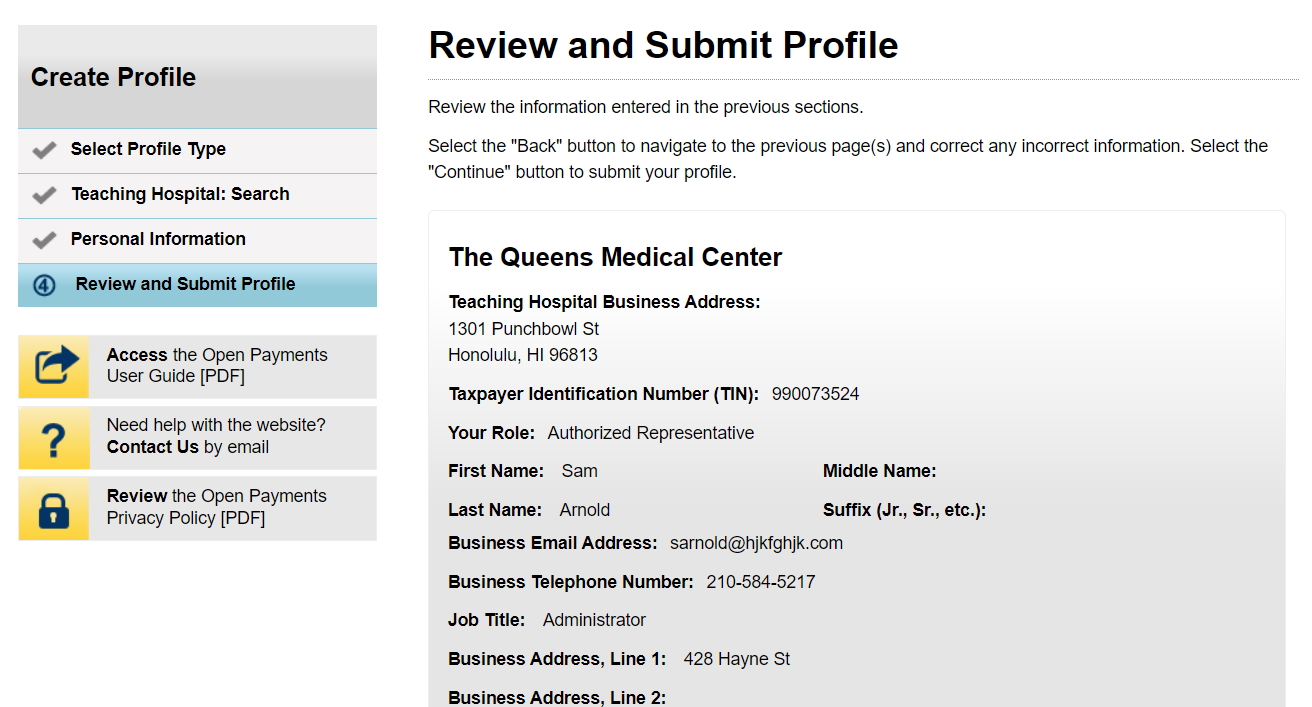
Figure 79b: Review and Submit Profile Page (LOWER PART) (OPS 1.0)
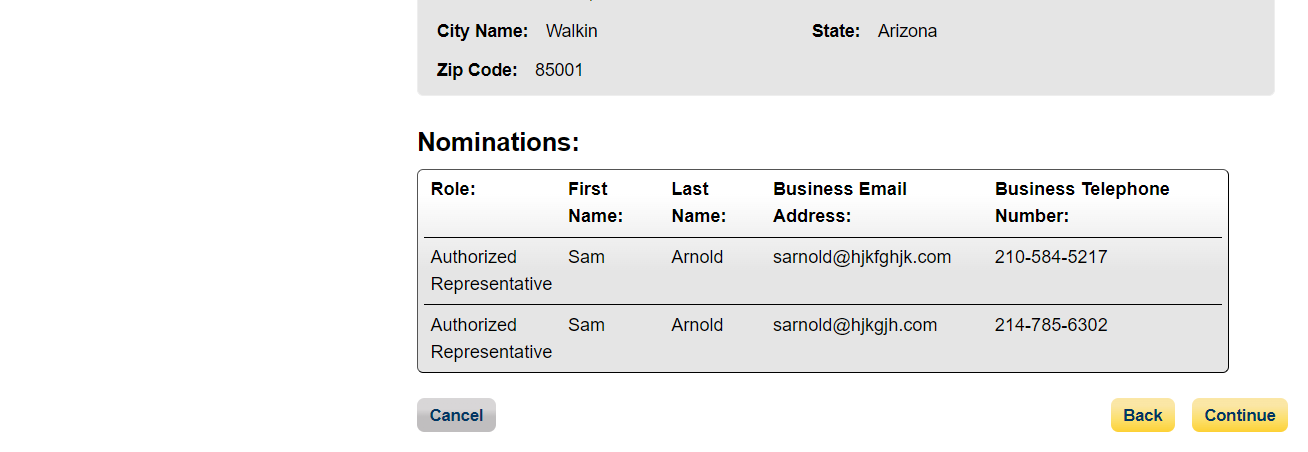
Figure 80: Review and Submit Profile Page (OPS 2.0)
The following message will appear on-screen to confirm your profile has been successfully created. You will receive an email when your nomination is approved.
Figure 81: Success Confirmation Page (OPS 1.0)
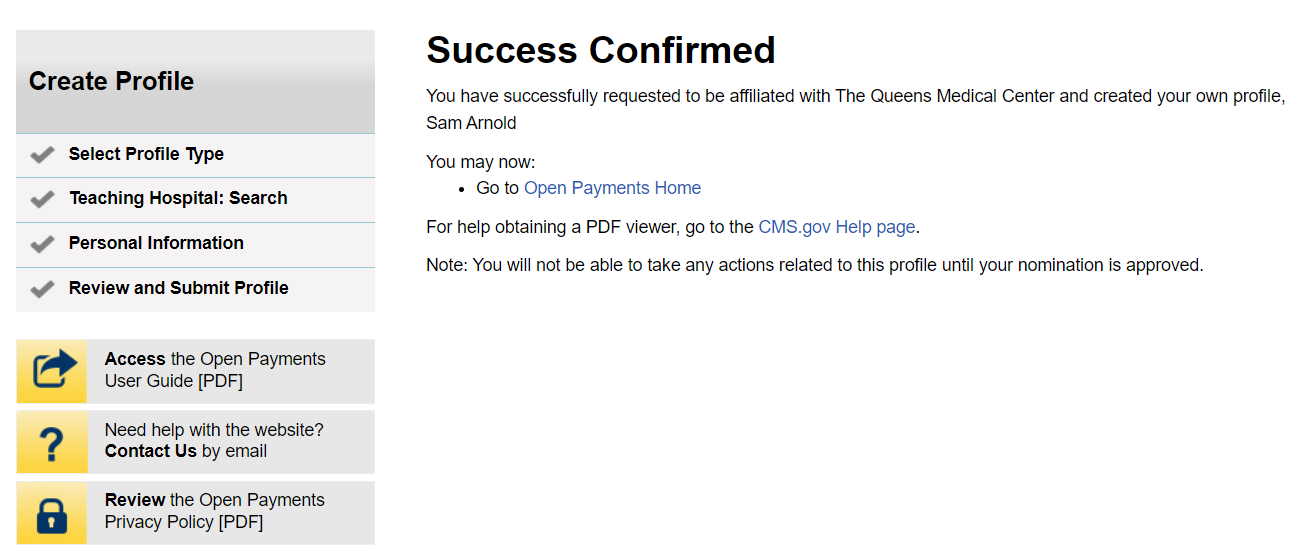
Figure 82: Success Confirmation Page (OPS 2.0)

| File Type | application/vnd.openxmlformats-officedocument.wordprocessingml.document |
| Author | Kelly Efobi |
| File Modified | 0000-00-00 |
| File Created | 2024-07-26 |
© 2026 OMB.report | Privacy Policy