Fereral Perkins Data Provider instructions
Att_Perkins Instructions NSLDS.doc
National Student Loan Data System (NSLDS)(KI)
Fereral Perkins Data Provider instructions
OMB: 1845-0035

DRAFT
U.S. Department of Education
Federal Perkins
Data Provider Instructions
(Version 2)
July 23, 1999
Contents
Introduction 1
About This Manual 1
Data Provider Responsibilities 1
Data Privacy 3
Data Accuracy and Timeliness 3
Perkins DataPrep Version 2 4
Extract Process Changes Needed by September 3, 1999 6
Full Extract Submissions—Report All Loans Every Month 6
Loans Closed Prior to October 1, 1989 6
Report Outstanding Principal Balances Monthly 7
Reporting Outstanding Principal Balances that are Less Than One Dollar 7
Unique Data Provider Loan ID 7
Changes Made to Trailer Record 7
What Is NSLDS? 8
What Are the NSLDS Functions? 9
Where Does NSLDS Data Come From? 12
NSLDS Users 14
Overview of the NSLDS Update Process 15
Files Used in the NSLDS Update Process 19
Getting Started 21
System Requirements 21
Estimated Required Disk Space 21
Setting Up Communications Links with NSLDS 22
Setting Up a Submittal Schedule 23
Initial Population 23
File Protection and Backups 23
Getting Help 24
Using Servicers 25
Multiple Schools or School Branches 26
Installing DataPrep for Windows-Based Users 26
Setting Up Viewers 28
Installing DataPrep for OS/390 LE-Based Users 30
Install the Unload JCL That Unloads the Tape 30
The Unload JCL 31
Run the Unload Tape JCL 31
Running Test Files 32
Testing Load Processing Error Reports 37
Step 1: The Extract File 42
Creating the Database Extract File 42
Header Record 42
Detail Records 42
Standards and Conventions 43
Extract File Attributes 44
Past Period Changes 45
Changing Existing Records 46
Changing Student and Loan Identifiers—Keys 46
Types of Identifiers 46
Fields and Loan Identifiers 46
Student Identifiers 47
Loan Identifiers 47
Changing Identifiers to Multiple Records 48
Changing Non-Identifier Data—Values 49
Determining whether Data Is Current or Historical 49
Checking History Online 50
Changing Event Dates 50
Changing Event Values 51
Changing Both Value and Date 51
Deleting Data with History 52
Update Examples 52
Key Date Change 52
Change in Value 53
Changing Both Value and Date 53
Step 2: Running Extract Validation 54
What Happens in Extract Validation? 54
DataPrep Error Path 56
File-Level Edits 57
Domain-Level Edits 57
Running Extract Validation on a PC 58
Extract Validation 59
Output 60
Validation Log 60
Using the Information from the Validation Log File 62
Explanation of Your Extract Validation Process 63
Extract File Summary Data 66
Records Processed 66
Loan Record Summary 66
Extract Validation for Mainframes (OS/390 LE-Based Users) 67
Step 3: Generating and Using the Extract Error Report 68
The Extract Error File 68
Summary Report or Detail Report 69
Selection Criteria 70
Updating Selection Criteria 70
Adding Selection Criteria 71
Steps to Add Selection Criteria 72
Example 1: One Criterion 72
Example 2: Two Criteria 73
Steps to Add Selection Variable 74
Example 3: A Variable Criterion 75
Selection Criteria Comparisons’ Syntax 77
Comparisons 77
Comparison Parameters 78
Compare Parameters 78
Examples 79
Sorting Options 80
Updating Sort Options 80
Steps to Add Sort Parameters 82
Error Reports 83
Generating Error Reports for Mainframes (OS/390 LE-Based Users) 84
Summary Report Sorting 84
Detail Report Sorting 84
Using the Extract Summary Error Report 85
Using the Extract Detail Error Report 85
Domain—Level Errors 86
Numeric Field Error 86
Invalid Date Error 87
Missing Identifier 87
Missing New Identifier 87
Reviewing the Extract File 88
Sorting Options & Selection Criteria 89
Step 4: Sending the Submittal File 90
The Submittal File 90
Sending the Submittal File 90
Unsuccessful Transmissions 90
Submitting Concatenated Files 90
Tape/Cartridge Submittal Procedures 91
Step 5: The NSLDS Load Process 92
Error Submittal Summary Notification File 94
Record-Level Edits 95
Duplicate Stripping 95
Data Field Edits 95
Y2K/Reasonability Edits 95
Load-Level Edits 96
Invalid Codes 96
Identifier Conflicts 96
Date Sequence Errors 97
Step 6: Using the Load Process Error File to Correct Your Database 98
The Load Process Error File 98
Retrieving the TEF File 98
Importing Files 99
Importing the TEF File 99
Importing the Load Process Error File 100
Importing the Loan Detail File 101
Generating the Load Process Error Report for Windows Users 102
Generating the Error Report for OS/390 LE Users 104
Record-Level Edits 104
Y2K Errors 105
Reasonability Errors 105
Load-Level Errors 105
Correcting Data Field Errors 106
Correcting Date Sequence Errors 106
Correcting Identifier Conflicts 106
Loan Detail Report 108
Backing Up Your Files 110
Final Thoughts 113
Appendix A: Federal Perkins Loans Data Dictionary
Introduction A-1
Indexes A-3
Table A–1: Header: List of Federal Perkins Loans Data Elements (Sorted by Position in Database Extract File) A-3
Table A–2: Detail: List of Federal Perkins Loans Data Elements (Sorted by Position in Database Extract File) A-4
Table A–3: Detail: List of Federal Perkins Loans Data Elements (Sorted by Field Code Number in Database Extract File) A-6
Table A–4: Detail: List of Federal Perkins Loans Data Elements (Sorted Alphabetically by Field Name in Database Extract File) A-8
Table A–5: Trailer: List of Federal Perkins Loans Data Elements (Sorted by Position in Submittal File) A-10
Header Record Layouts A-11
Detail Record Layouts A-22
Trailer Record Layouts A-106
Appendix B: Federal Perkins Loan Code Tables
Introduction B-1
Table B–1: Loan Type Codes B-2
Table B–2: Loan Status Codes B-3
Table B–3: Closed Loan Status Codes B-11
Table B–4: Enrollment Status Codes B-12
Table B–5: Deferment Type Codes B-13
Table B–6: Cancellation Type Codes B-14
Table B–7: Perkins Commercial Servicer Codes (NSLDS ID) B-15
Table B–8: Detail Record Errors (Sorted by Error Code Number) B-16
Table B–9: Detail Record Errors (Sorted by Field Code Number) B-24
Table B–10: PC Version—File Level and Header Error Messages B-32
Table B–11: Mainframe (OS/390 LE) Version—File Level and Header Error Messages B-34
Appendix C: Past Period Change Record Layout
Introduction C–1
Header Record C–1
Detail Record Identifiers C–1
Record Type Indicator C–1
PPC Detail Records C–2
Indexes C–3
Table C-1: PPC Detail Record Layout (Sorted by Field Code) C–3
Table C-2: PPC Detail Record Layout (Sorted by Field Name) C–4
Table C-3: PPC Detail Record Layout (Sorted by Position) C–5
PPC Events C–6
PPC Event Cancellation C–6
PPC Event Current School C–10
PPC Event Deferment C–11
PPC Event Disbursement C–16
PPC Event Loan Status C–18
PPC Event School Servicer C–22
PPC Event Student Status C–26
Appendix D: Federal Perkins Loans Load Error File (Record Layouts)
Introduction D–1
Table D–1: Error Record D–2
Table D–2: SSN Conflict Error Record D–4
Appendix E: Federal Perkins Loans TEF File Layout
Introduction E–1
Table E-1: TEF Record E–2
Appendix F: Error Submittal Summary Notification File
Introduction F–1
Table F-1: Error Submittal Summary Notification File Layout F–2
Table F-2: Corrective Actions for Error Submittal Summary Notification File F–5
Appendix G: DataPrep JCL for OS390/LE
Introduction G–1
Step 1: JCL for Installation G–1
Step 2. JCL for the Unload Tape G–2
Step 3: JCL for DataPrep Extract Validation G–6
Step 4: JCL for NSLDS DataPrep Reporting G–15
Appendix H: Glossary of Terms
Appendix I: Technical Updates
Figures
Figure 1, Sources of NSLDS Data 13
Figure 2, Outflow of NSLDS Information 14
Figure 3, Data Provider Six Step Process 17
Figure 4, DataPrep Processing Flow for Extract Validation and Error Report Generation 18
Figure 5, NSLDS Edit Process 20
Figure 6, Directories Dialog Box 27
Figure 7, DataPrep Main Menu with Options Menu Selected 28
Figure 8, DataPrep Main Menu with Options/Viewers Selected 29
Figure 9, Viewer Maintenance Dialog Box 29
Figure 10, DataPrep Main Menu with Extract Validation Selected 32
Figure 11, Validate Extract Dialog Box 33
Figure 12, Extract Validation Was Successful 33
Figure 13, Log Report Dialog Box 34
Figure 14, Sample Log Report 34
Figure 15, Test Summary Error Report 35
Figure 16, Extract Validation Successful 36
Figure 17, Error Reports Load Processing Screen 38
Figure 18, Summary Error Report Message Box 38
Figure 19, Sample Summary Error Report 39
Figure 20, Backup Files Dialog Box 40
Figure 21, New Backup File Folder Dialog Box 40
Figure 22, Backup Files Dialog Box 41
Figure 23, List Backup Files Dialog Box 41
Figure 24, PPC Events, Keys, and Values 45
Figure 25, Past Period Change Example 1: Change to Both Value and Date 51
Figure 26, Past Period Change Example 2, Change to Key Date 52
Figure 27, Past Period Change Example 3, Change in Value 53
Figure 28, Past Period Change Example 4: Change in Key Date and Value 53
Figure 29, Extract Validation Process 55
Figure 30, DataPrep Edit Process 56
Figure 31, DataPrep Main Menu with Extract Validation Selected 58
Figure 32, Validate Extract Dialog Box 58
Figure 33, File Information Dialog Box 59
Figure 34, Validation Extract Processing Status 60
Figure 35, DataPrep Main Menu with Log Report Selected 61
Figure 36, Log Reports Dialog Box 61
Figure 37, Validation Log 62
Figure 38, Failed Validate Extract Status Screen 64
Figure 39, DataPrep Main Menu with Error Report Selected 68
Figure 40, Error Reports Dialog Box 69
Figure 41, File Information Message Box 69
Figure 42, Main Menu Selection Criteria Option 70
Figure 43, Selection Criteria Dialog Box 71
Figure 44, Selection Criteria Edit Dialog Box 71
Figure 45, Selection Criteria Edit Screen 72
Figure 46, Selection Criteria Edit Screen 73
Figure 47, Selection Variable Edit Dialog Box 74
Figure 48, Selection Variable Edit Dialog Box 75
Figure 49, Selection Criteria Edit Dialog Box 76
Figure 50, Main Menu Sort Parameter Option 80
Figure 51, Sort Parameters Dialog Box 81
Figure 52, Sort Parameter Edit Dialog Box 81
Figure 53, Sort Parameter Edit Dialog Box 82
Figure 54, Sort Parameter Edit Dialog Box 83
Figure 55, Summary Error Report Message Box 83
Figure 56, Sample Summary Extract Error Report–No Sort 85
Figure 57, Sample Detail Extract Error Report–Error Code Sort 86
Figure 58, DataPrep Main Menu with Loan Detail Report Selected 88
Figure 59, Loan Detail Reports Dialog Box 88
Figure 60, File Information Message Box 89
Figure 61, NSLDS Load Process 93
Figure 62, DataPrep Main Menu 99
Figure 63, Importing the TEF File. 100
Figure 64, Importing the TEF File. 100
Figure 65, File Transfer Screen — Loan Detail File 101
Figure 66, DataPrep Main Menu with Error Report Selected 102
Figure 67, Error Reports—Load Processing 103
Figure 68, Load Process Error Report 103
Figure 69, DataPrep Main Menu, Loan Detail Report 108
Figure 70, Loan Detail Report Screen 109
Figure 71, Sample Loan Detail Report 109
Figure 72, DataPrep Main Menu with File Backup Selected 110
Figure 73, Backup Files Dialog Box 111
Figure 74, New Backup File Folder Screen 111
Figure 75, Moving and Copying Files to Backup Folders 112
Figure 76, List Backup Files Screen 112
Figure 77, File Information Dialog Box 113
Introduction
Dear
Colleague Letter April
1995 CB-95-5
(LD)
All
schools in the Title IV aid programs are required to participate
with NSLDS. Schools with active Perkins Loans (including National
Direct Student Loans, National Defense Student Loans, and Income
Contingent Loans) are required to provide updated data to NSLDS once
a month on a schedule that will be established between your school
or servicer and ED.![]()
About This Manual
This manual is intended to assist users with the data provider portion of the NSLDS update process as well as provide basic information about the entire process.
To make the instruction manual as easy as possible to follow, we have included icons that help you identify key points. The following icons are used:

Indicates a definition or explanation that you will need to keep in mind throughout the discussion.
I ndicates
a special note, suggestion, or comment that will assist you in
running DataPrep or in providing insight into the NSLDS update
process.

Indicates a warning of which you should take special note.
Data Provider Responsibilities
Data providers must provide information to NSLDS on Federal Perkins loans and regularly report on new loans and changes to existing loans. These reports must be submitted on an ongoing basis and on a regular schedule established between the data provider and the U.S. Department of Education (ED).
Schools
and Servicers
The
term schools in this document includes both schools and their
servicers. Together, schools and servicers are referred to as data
providers.![]()
Meet all NSLDS reporting requirements as detailed in this operating manual.
Report all Federal Perkins loans that were open or closed on or after October 1, 1989.
Report new loans or updates to existing loans monthly and on a schedule established by NSLDS. Data reported must be current and not extracted earlier than shown on the established schedule for the data provider.
Create an Extract file in accordance with the specifications contained in Appendix A. Data providers are responsible for coding and testing the software as needed to properly format the Extract file.
Use the NSLDS provided DataPrep software to perform Extract Validation and create a Submittal file.
Transmit the Submittal file to NSLDS on ED-provided communication lines in accordance with the established schedule.
Retrieve the Load Process Error file for each submittal. Data providers must review errors and correct as many as possible before the next submittal. Data providers are responsible for the accuracy of data as well as the timely reporting of loan data to NSLDS.
Work with other data providers [e.g., guaranty agencies (GAs), Direct Loan, Debt Management Collection System, and Pell Grant System] to resolve identifier conflict records.
Receive and process reconciliation files provided by NSLDS. Reconciliation of loan data between NSLDS and the school’s system of record may be done voluntarily upon request from the school or mandated by ED if it is determined necessary to meet data quality standards.
In summary, data provider data must meet NSLDS reporting requirements and quality standards. All data submitted to NSLDS must be as complete and correct as possible. Schools that fail to meet their NSLDS reporting requirements are subject to the limitation, suspension, and termination regulatory provisions.
Data Privacy
Privacy
of Data
All
NSLDS data is subject to the protections of the Privacy Act of 1974,
as amended.![]()
Data security is the responsibility of both the data provider and NSLDS. Sensitive materials such as data, software documentation, operation manuals, and handbooks should be labeled as such and stored in a secured location. You are responsible for NSLDS data when it is in your possession.
Data Accuracy and Timeliness
The data provider’s role in supplying data to NSLDS is critical to its overall success. Therefore, reporting must be timely, complete, and accurate. To help ensure the best possible data quality, NSLDS monitors submissions in two ways:
Calculating
the Error Rate:
The
error rate uses the number of records in error, not the total number
of errors (there can be more than one error in a record).
Example:
If
there are a total of 25 errors, but those errors appear in only 19
records out of 456 records extracted, the calculated error rate is:
19
/ 456 = 4.2%![]()
Submittal Tracking: NSLDS monitors late and missed submittals on a continuing basis.
Error Tracking: NSLDS’ Error Tracking function calculates the percentage of records in a submittal that are in error. NSLDS maintains a record of all errors until the error condition is resolved. Error rates are monitored on a regular basis to ensure data accuracy.
NSLDS divides the number of loan records with errors by the total number of records extracted to calculate the error rate. If there is more than one error in a record, the system will only count this as one error. Thus, the total number of errors will not necessarily equal the number of records with errors.
Data providers falling short of expectations in either of these areas are subject to the limitation, suspension, and termination regulations of ED.
Perkins DataPrep Version 2
The DataPrep software and load process have been modified as follows:
DataPrep now checks for file-level and file-formatting error conditions and rejects the entire file if errors are found. You are expected to fix all file-level errors before submissions. Previously, such errors were not detected until the Submittal file was processed by NSLDS. Thus, the change means you have immediate feedback. DataPrep also does domain checks (i.e., date fields are real dates or zeroes, numeric fields are numeric, identifier and new identifier fields are properly populated) and provides a report on domain error conditions. However, loans with domain errors may be sent to NSLDS so that a single complete error file can be generated after load processing.
Delta processing has been removed from DataPrep enabling all loans to be transmitted to NSLDS every month. Therefore, you will see a significant reduction in the amount of time it takes to run DataPrep. Also, reporting of Outstanding Principal Balance can be changed from quarterly to monthly, thus simplifying the extract process.
The Load Process Error Report has been changed from a print file to a data file. Capability has been added in DataPrep to view and print the Load Process Error Report. DataPrep also supports the printing of a report on domain errors.
All First Level edits (except domain-level edits) have been removed from DataPrep, but will continue to be performed at NSLDS. This will enable NSLDS to change edits as needed without releasing a new software version of DataPrep. Domain errors have been added to the Load Process Error Report enabling you to receive a complete error report each month.
The checking for duplicate loans (i.e., two or more loans with identical loan identifiers) has been removed from DataPrep and added to the Load Process. This will enable NSLDS to identify duplicate loans and treat them as errors. An error record for each duplicate loan will be added to the Load Process Error Report.
You may now populate the Extract file with your own loan identifier that will also be returned on the Load Process Error Report. The 19 bytes of filler at the end of the existing Detail record are used for this purpose. This facilitates loan record matches and the identification of duplicate loans created by changing loan identifiers without using the identifier change process.
The Year 2000 (Y2K) problem and reasonability edits have been added to protect NSLDS data from receiving non-compliant data. Edits were added to each date field to ensure the date is not before an allowable date for the field. Similarly, an edit will determine the latest date allowable for a date field. Reasonability edits to ensure compliance with Federal Perkins regulations have also been added.
Capability has been added to view and print a reconciliation file. The format of the file will be the same as that of the Extract file. This gives you the capability of having a formatted printout of the content of your Database Extract file.
In the current DOS version of DataPrep, servicers, or central collection offices servicing multiple campuses were required to do a separate extract for each campus. The Submittal files were then combined for submission to NSLDS. The new Windows-based DataPrep will support processing of multiple campuses in a single Extract file. Servicers should either modify their extract procedures to create a single Extract file with a separate header for each campus, or merge the individual campus Extract files into a single file before performing an Extract Validation using the new DataPrep.
The process for nullifying Perkins loans has been simplified in version 2. Currently, under version 1 of DataPrep, a data provider may not know all the data on the loan and is, therefore, unable to report the loan to NSLDS in a CA status. In version 2 a loan can be nullified by reporting the loan identifiers, setting the loan status to CA, and setting the Loan Status Date to the date the loan was nullified. All other fields in the record can then be set to defaults or the current valid values that exist. In either case, the loan will be nullified and dollar values set to zero.
Extract Process Changes Needed by September 3, 1999
Although there are a number of changes to the Extract Validation process in DataPrep version 2 that impact how records are reported, the record format does not change. Therefore, the internal procedures you currently use to create an Extract file under DataPrep version 1 will still work with DataPrep version 2. Therefore, your institution can begin to use DataPrep version 2 before making the following changes to your extract procedures.
All data providers are expected to implement the new DataPrep version 2 by September 13, 1999. Submittal files created by DataPrep version 1 (i.e., DOS and MVS versions) will not be accepted after September 31, 1999.
In addition, you are also expected to make the following changes to your extract procedures by September 13, 1999.
Full Extract Submissions—Report All Loans Every Month
In the new version of DataPrep, there will no longer be First Level and Delta processing. Instead, a full extract of all loans in your database that is either currently open or was closed on or after October 1, 1989, will be processed through the new DataPrep software and submitted to NSLDS. Your extract will include all open loans and all loans not yet reported and loaded to NSLDS in a closed or assigned status.
You will have to modify your Extract file creation procedures so that you no longer extract closed loans already reported and successfully loaded to NSLDS. For example, a borrower makes the final payment on a loan in March 1999. You report the loan as paid in full (PF) with your April submittal. The record contains no errors and updates NSLDS. Thus, you would not extract this loan record again when you create future Extract files.
Loans Closed Prior to October 1, 1989
If you currently extract loans that were closed before October 1, 1989, discontinue extracting such loans. A new edit will reject any loan closed before October 1, 1989. You can prevent these rejects by not extracting such loans.
Report Outstanding Principal Balances Monthly
The Date of Outstanding Principal Balance will reflect the date of the most recent change in the principal balance. The Outstanding Principal Balance may change as a result of a disbursement, loan payment, or cancellation. Since all loans in your database will be submitted every month, the requirement to update Outstanding Principal Balance on a quarterly basis is eliminated. Instead, you must update the dollar amount and the date of the outstanding principal balance using the current remaining amount and the date of the most recent change in Outstanding Principal Balance. If you have been reporting the last day of the month regardless of when the balance changed, you must modify your extract procedure to provide the actual day when the balance changed.
Reporting Outstanding Principal Balances that are Less Than One Dollar
If a loan is reported with an open loan status, it must have a positive Outstanding Principal Balance. If the loan has a balance of less than one dollar, but not zero, you will report the Outstanding Principal Balance as one dollar. If the loan is being maintained in an open status because of a negative balance on the account (i.e., a credit balance), you will also report a balance of one dollar until the loan is closed.
Unique Data Provider Loan ID
You will be able to track a loan through the NSLDS process using your own unique Data Provider Loan ID if you so choose. The last field in the detailed loan record will be available to allow you to insert the unique loan ID that will be carried through the process and returned on the error records in the error file. The use of this new field is optional.
Changes Made to Trailer Record
In the past, positions 55-300 in the trailer record were filler. Now, positions 55-66 is the Total Amount of Loan, positions 67-78 is the Total Amount of Cancellation, positions 79-90 is the Total Amount of Outstanding Principal Balance, and positions 91-300 is filler.
What Is NSLDS?

To improve the quality and accessibility of student aid data
To reduce the burden of administering Title IV aid
To minimize abuse within the aid programs through accurate tracking of funds appropriated to assist the postsecondary students for whom the programs were designed
NSLDS is a national database of Title IV recipients, enrollment data, loan information, Federal Pell Grants and overpayments on student aid disbursed under Title IV of the Higher Education Act of 1965, as amended (the Act). Data in NSLDS is provided by schools, GAs, and ED agencies. The data include information about the following:
Federal Family Education Loan Program (both FFELP and Direct Loans)
Federal Perkins loans (including National Direct Student Loans, National Defense and Income Contingent Loans)
Federal Pell Grants
Demographic and enrollment data of Title IV recipients
What Are the NSLDS Functions?
NSLDS currently has responsibility for the following functions:
Prescreening for Title IV Aid Eligibility—The NSLDS Prescreening function gives schools electronic access to information on prior Title IV aid received by aid applicants. Schools use this information to determine applicants’ eligibility for further Title IV aid.
Postscreening for Title IV Aid Eligibility—The NSLDS Postscreening function informs institutions when their applicants’ eligibility for Title IV aid changes due to a change in default or overpayment status after their initial prescreening.
Default Rate Calculations—Default rates are calculated annually for schools participating in the Federal Stafford, Unsubsidized Stafford, Supplementary Loans for Students (SLS) programs, and the Federal Direct Loan Program (FDLP). Schools with default rates above established thresholds for at least three consecutive years may be disqualified from participating in some or all student financial aid programs.
Monitoring of GA and Lender Billings for Reasonability—NSLDS allows ED to monitor billings for reasonability by supporting more timely assessment and by providing loan-level information. This helps ensure that the billings ED receives from lenders and GAs reflect the status of their portfolios as reported to NSLDS.
Research Studies and Policy Development Support—NSLDS provides several types of access in support of users performing research and developing policy. Online queries range from focused queries, pertaining to a single student or school for relatively small amounts of data, to massive queries requiring NSLDS to supply or summarize massive amounts of data.
ED Budget Analysis and Development—Every year, ED develops input for the President’s budget, based partly on projected loan program costs for a seven-year period. NSLDS information is used to develop reliable, sound assumptions on which to base the estimated program budget; answer budget related questions; and support necessary hypothetical analyses.
Audit and Program Review Planning—ED uses audits and program reviews to assess the performance of various Title IV aid delivery system participants. Audit and program review planning functions include retrieving specific data from NSLDS on organizations (schools, lenders, and GAs), and identifying key indicators used to schedule audits and reviews for maximum effectiveness.
Assessment of FFELP Administration by GAs, Schools, and Lenders—NSLDS provides the data for researching and assessing FFELP administration by GAs, schools, and lenders. Such research may be either short- or long-term and generally aims to evaluate the effectiveness of specific program practices.
Refund/Cancellation Support—When a student withdraws from school early and qualifies for a refund, the school is required to provide the refund or return of a check to the appropriate party within a fixed time period. NSLDS provides information about the time schools take to perform these actions. This information helps auditors and program reviewers identify schools with poor records of handling refunds and cancellations.
Borrower Tracking—The Borrower Tracking function is employed by qualified users attempting to locate borrowers who have defaulted on student loans. NSLDS Borrower Tracking capabilities allow these qualified users to identify other schools, GAs, and lenders previously associated with a borrower, so they may be contacted for the borrower’s current address.
Pre-Claims Assistance/Supplemental Pre-Claims Assistance Notification Support—Lenders must request Pre-Claims Assistance (PCA) on delinquent loans within 10 days of the date that assistance is available from the loan guarantor. Lenders must also notify schools when PCA requests are made for borrowers of FFEL loans attending those schools. The NSLDS helps facilitate this process.
Loan Transfer Tracking—Loan Transfer Tracking monitors transfer activity by maintaining dates of sale and names of loan holders. This information identifies likely problems with participants. It also helps evaluate the administration and billing of Title IV loan programs.
Student Status Confirmation Report—Student Status Confirmation Report (SSCR) information is used by loan holders to verify a borrower’s enrollment status. The enrollment information enables loan holders to properly place a borrower into repayment. NSLDS has standardized the SSCR process and maintains current enrollment information.
Financial Aid Transcript—The Financial Aid Transcript (FAT) component of the NSLDS summarizes all previous Title IV aid a student has received.
Credit Reform Act Support—The Credit Reform Act (CRA) requires loan level tracking of all federally guaranteed loans. NSLDS tracks and reports loans by program and by cohort year in which the loan is guaranteed within risk category summary totals. Loan data is used semi-annually to estimate government costs associated with loan programs.
Aid Overpayment—NSLDS maintains a record of overpayments owed and repaid by students on Federal Pell Grants, Federal Supplemental Educational Opportunity Grants, and Federal Perkins Loans. The information is used to determine a student’s eligibility for aid.
Organization Contact—NSLDS enables users, such as schools, to enter contact information by function. This online contact capability helps users locate the person at a school, GA, or other data provider quickly.
These function areas, and the system capabilities designed to support them, reflect requirements established by ED business organizations to meet the goals established for NSLDS.
Where Does NSLDS Data Come From?
As a comprehensive repository of Title IV recipients and their loan, Pell Grant, overpayment and enrollment information, NSLDS receives data from many sources (some external and some internal to ED) and makes it available to approved users for a variety of purposes authorized by the Act. The principal sources are the following:
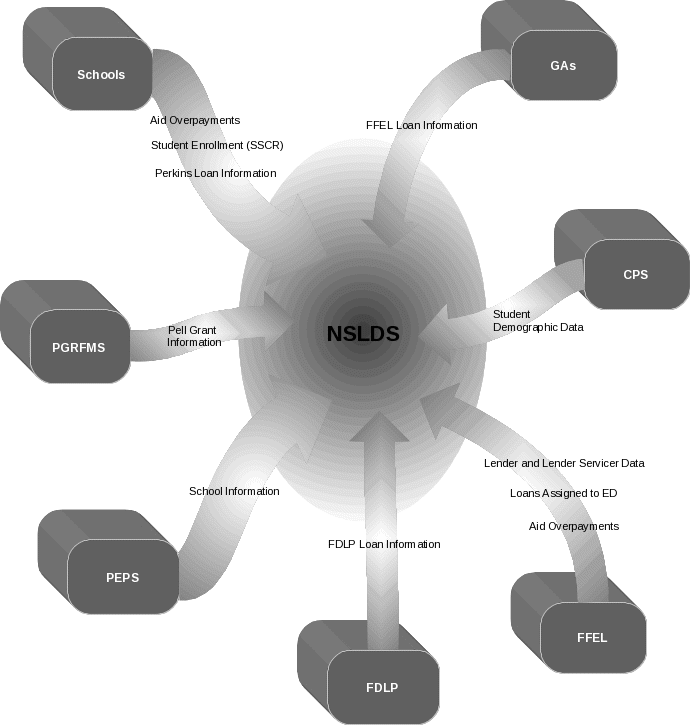
Guaranty Agencies (GAs) provide loan data on FFELP loans from loan origination until the loan is paid in full. Some of the information provided, such as loan balances, is received from lenders who report on loans through their GAs. Data is provided monthly.
Postsecondary Institutions (schools) provide enrollment data via the SSCR process.
Schools (or their servicers) that participate in the Federal Perkins Loan Program provide monthly updates of loans.
The Federal Family Education Loan (FFEL) System provides data monthly on loans and overpayments assigned to ED and weekly data on lenders and lender servicers.
The Postsecondary Education Participant System (PEPS) provides weekly data on schools.
The Central Processing System (CPS) provides quarterly demographic data on students in the NSLDS database.
The Pell Grant Recipient Financial Management System (PGRFMS and the new RFMS) provides daily updates on Pell Grant payments to students.
The Federal Direct Loan Program (FDLP) Servicers provide monthly data on FDLP loans.
Figure 1, Sources of NSLDS Data
NSLDS Users
NSLDS users include personnel from ED, other Federal agencies, GAs, lenders, schools, and independent researchers.
NSLDS provides its users with both online and batch processing. The system’s products are designed to provide efficient access to NSLDS data for a variety of user levels and purposes. See Figure 2 for the flow of data from NSLDS to various users.

Figure 2, Outflow of NSLDS Information
Overview of the NSLDS Update Process
Warning:
Data Provider Responsibility
Data
providers are responsible for submitting data to NSLDS using edit
rules, format, and the processing flow specified by ED. Caution
should be exercised when using specifications or software
applications developed by other organizations and/or vendors.
Regardless of whether or not third party software or procedures are
used, data providers remain responsible for the accuracy of their
data and for using procedures approved by ED. Schools and Third
Party Servicers are jointly and severally responsible
for compliance.![]()
Data Providers Create the Database Extract File—Data providers create a copy of their loan portfolio in a format specified by NSLDS. This copy, called the Database Extract file, includes all loans as defined in the data dictionary.
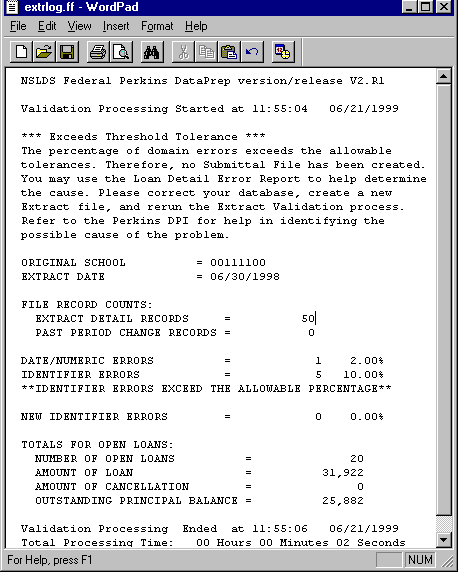
Data Providers Run the Extract Validation Process Using DataPrep—The Database Extract file is run through the NSLDS DataPrep Extract Validation process to check for file-level and domain-level errors. If there are file-level errors (an incorrect header or a school code for any record that does not match the header record school code), the process stops.
If the number of domain-level errors (i.e., non-numeric character in a numeric field, invalid date, missing identifier, or missing new identifier) is above a specified threshold, the process also stops and the complete Extract file is rejected.
If the number of domain-level errors is within the prescribed limits, DataPrep creates a new file called the Submittal file.
Data Providers Generate Error Reports—Using the Extract Error Data file produced by DataPrep, you generate Extract Error Reports (both a summary and detail report is available) and use this information to make all necessary file-level and domain-level changes to your database and Extract file. You can also use the Extract Validation Log file to perform a test of reasonability—a review of the data comparing the current data with previous submittals to look for the numbers of records processed and loan amount totals.
If you make corrections, you then start again at step 1 by recreating a Database Extract file, running the Extract Validation process, and running Extract Error Report.
Data Providers Transmit the Submittal File—Once a Submittal file has been successfully created (after all file-level errors are corrected and after the number of domain-level errors is below the specified threshold), you transmit the data to NSLDS through the Title IV Wide Area Network (WAN).
NSLDS Runs the Load Validation Process—NSLDS loads the Submittal file and runs record-level edits to check for Y2K and reasonability errors such as duplicate records, data content validity, and data reasonability. Records that fail a record-level edit or new records that do not contain all three student identifiers are not loaded into NSLDS and an error record is created for the error file and the NSLDS Error History file.
Records that successfully pass record-level edits are then compared with the data in NSLDS (Load Process). If no previous data exists for the student, the student and loan are added to NSLDS. If the loan had been loaded in a prior submittal, updates are made to the record.
Data Providers Retrieve Error Files and Run Load Process Error Reports—After processing the Submittal file, you retrieve from NSLDS three files: the Error Submittal Summary Notification file, the Load Process Error file, and the Threshold, Error Code, and Field Code file (TEF file). They will be sent to your WAN mailbox within 48 hours of the time your submittal is scheduled to be loaded. You then use DataPrep to generate Load Process Error Reports (both summary and detail reports are available) to review the errors, make corrections to your own database, and resolve data conflicts prior to the next monthly extract.
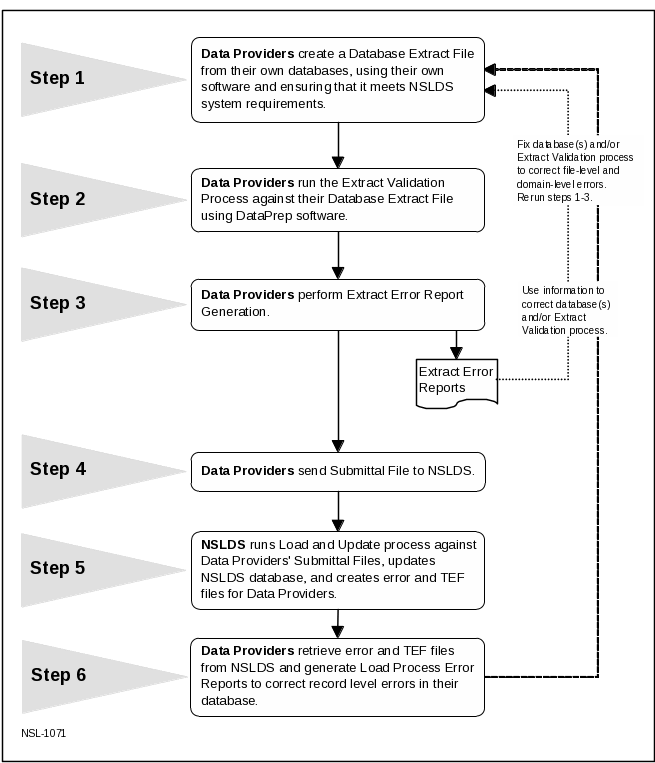
Figure 3, Data Provider Six Step Process
The six-step process can also be illustrated in the following way, with the shaded boxes representing school or data provider responsibility and the darkened boxes representing operations handled by DataPrep.
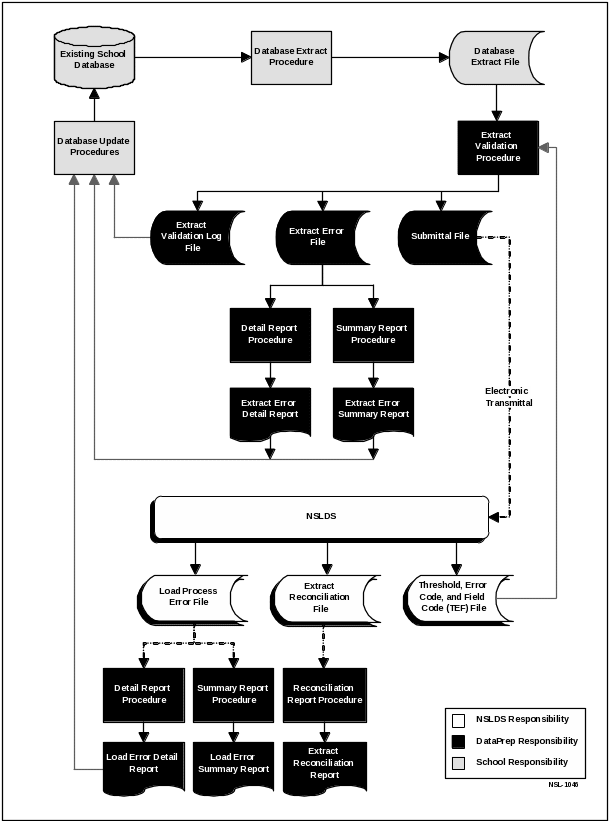
Figure 4, DataPrep Processing Flow for Extract Validation and Error Report Generation
Files Used in the NSLDS Update Process

File Names
Data providers may determine the naming conventions for files used and created exclusively at their own sites. But Windows users cannot alter the names used by DataPrep otherwise the program will not work properly.
It is strongly recommended that mainframe users use the suggested file names provided by DataPrep and used in the sample Job Control Language (JCL) in Appendix G.
Database Extract File (extract.ff)—This is the formatted Extract file created by data providers from their loan database. It includes the Header and Detail records and may include Past Period Change records to correct certain kinds of reporting errors in previous cycles. This file is the input to Extract Validation process.
Submittal File (submit.ff)—This file is created by DataPrep software once the number of domain-level errors in the Database Extract file is below the acceptable threshold. The Submittal file contains all current records and all Past Period Change records. This file is transmitted to NSLDS, where it becomes input to the Load Validation Process. This file may contain four record types: Header, Detail, Past Period Change, and Trailer.
Extract Error File (extrerr.ff)—This file is an output from the Extract Validation process. The contents of the file can either be viewed on screen or printed. The file contains the records with domain errors, the field in which the error occurred, and the value and description of the error.
Error Submittal Summary Notification File (shsntfop.ff)—This file informs you that your submittal file was not processed by NSLDS and that you must make corrections and resubmit it. The file can either be viewed on-screen or printed. The file identifies the errors that prevented the submittal file from being loaded.
Load Error File (loaderr.ff)—This file contains the details of the records that failed the NSLDS load edits. The file can either be viewed on-screen or printed. The file identifies errors detected during the Load process. The file also contains header and trailer records.
Threshold, Error Code, and Field Code File (TEF) (tef.ff)—This file contains software parameters for Load Error processing and error field names and messages for the processing of the Load Error file.

Getting Started
This manual is written for data providers who submit data to NSLDS from either a mainframe (OS/390 LE) batch environment or a PC-based platform using Windows (95, 98, or NT), and who use the ED-provided software, DataPrep. Data providers who use other platforms or who wish to develop their own software should contact ED for more information. Data provider-developed software must meet the standards established in this manual.
System Requirements
T
o
run the DataPrep software and submit your data, the minimum system
requirements are either:
An IBM/IBM compatible mainframe running the OS/390 LE environment operating system and an appropriate sort utility, or
A fully IBM-compatible personal computer with at least a 200 MHz Pentium processor, Windows 95, 98, or NT operating system, 64 Mb of available memory, and 8 Mb of hard disk space store the program and work files, and additional hard disk space to store data files and backups. For more information about ED system requirements, see Action Letter GEN-97-12 (November 1997). For optimal viewing of reports, you may have to set your monitor’s resolution to 1024 x 768 pixels.
Estimated Required Disk Space
You will need approximately 8 Mb of disk space to store the DataPrep software and its associated test data files. This is the minimum disk space required and does not include storage space for your data files. You should also allow enough space in which to sort work files.
Estimate your space requirements by adding the following:
Database Extract Files N * 300 bytes * Y
Submittal Files [(N * 300 bytes) + (PPC * 300 bytes)] * Y
Extract Error Files X * 300 bytes * Y
Extract Error Reports X * 132 bytes * Z * 1.1
Load Process Error Files X * 300 bytes * Y
Load Process Error Reports X * 132 bytes * Z * 1.1
Threshold Error File 32,000 bytes
Loan Detail File N * 300 bytes * Y
Loan Detail Reports N * 132 bytes * Z * 1.1
(Equals) _____ bytes of space required
Where:
N = Number of records extracted from your database.
X = Estimated number of errors.
PPC = Estimated number of Past Period Change (PPC) records.
Y = Number of Backup files created and stored.
Z = Number of Reports Generated.
All mainframe examples in this document assume use of Direct Access Storage Device (DASD). Tape may be substituted for DASD for any of the NSLDS files, but in that case, you are responsible for converting the calculations from DASD to that medium.

Signing
Up for NSLDS
To
sign up for NSLDS you must use the Title IV WAN Enrollment Document.
For more information, phone Title IV WAN Customer Service Center at
(800) 615-1189.
Setting Up Communications Links with NSLDS
All data providers access NSLDS through the Title IV WAN using EDConnect software. Data providers are assigned a mailbox, which is used both to request and retrieve data from NSLDS. The WAN ID account number serves as the mailbox identifier.
Title IV WAN Customer Service Center is responsible for setting up new user accounts on the Title IV WAN. You may obtain enrollment information, forms, and copies of the Title IV WAN user’s guide by calling (800) 615-1189. For more information, see Action Letter GEN-98-24.
Setting Up a Submittal Schedule
When you sign up with NSLDS, you will be assigned scheduled days and times when you will have to send updates to NSLDS. All submittal schedules are preset and are based on the state where the institution is or the servicer used. For more information, or to obtain a copy of the schedule, contact the NSLDS Customer Service Center (CSC) at (800) 999-8219.
Initial Population
The first-time transfer of information from schools or data providers that sign up with NSLDS is called the initial population. In addition to current loan data, the initial population also includes data for loans that are closed. See Appendix A for detailed information about what data to include in an initial population Database Extract file.
Except for the addition of closed loan data and a slight difference in data reporting requirements, the process for an initial population submission is the same as the one you follow for subsequent updates.
File Protection and Backups
Saving
Generations
We
recommend that you plan on saving at least two generations of all
your files and reports. DataPrep can help you using the File Backup
function.![]()
While we recommend a minimum of two generations, the sample JCL for OS/390 LE environments provided in Appendix D allows for four generations. Mainframe operators who use the sample JCL provided in Appendix F will find that a backup of the Submittal file, named NSLDS.SUBMIT.BKUP, is created automatically by the software.
Getting Help
Customer
Service Center
Contact
the CSC at (800) 999-8219 between 8 a.m. and 8 p.m. Eastern time,
weekdays, except on federal holidays. Customer Service personnel
will log your call, issue a confirmation number, answer questions,
and, if possible, resolve problems immediately. If the problem
requires further research, Customer Service will estimate when you
can expect a return call.
In addition, the CSC can help:
Identify other data providers to resolve identifier conflicts
Clarify Data Provider Instructions
Schedule initial and ongoing data loads
Troubleshoot problems on DataPrep installation
Discuss submittal requirements
Explain specific error codes
Review your submittal schedule
When you call the CSC you may be asked to provide specific information including:
Your OPE ID code and school name and phone number
Whether you are using the mainframe or Windows-based version of the software
The release date of the DataPrep software you are using
The nature of the problem
The part of the process you were working with at the time the problem occurred
Whether you have been able to duplicate the problem and, if so, what the conditions were at the time
Error messages or other indicators of the source of the problem.
Using Servicers
Institutional
Responsibility
Because
systems and procedures vary significantly from one institution to
another, each school is responsible for determining how it will meet
the NSLDS reporting requirements.![]()
If you use a servicer, you must consider and incorporate into your reporting procedures the following:
Coordinating Any Changes to Identifiers—Whenever an identifier changes, the new identifiers on each loan must be submitted. This must be done through the servicer.
Transferring Records From School to Servicer or Third Party—The same organization reporting on a loan must report all attributes for that specific loan. If the responsibility for reporting on a specific loan is transferred from one party to another, all the data for that record must be transferred. The receiving party would then continue to report all required attributes on that loan even though there may not be updates to a specific attribute.
For example, when a school transfers the loan to the servicer, the school must transfer all the data for that loan including the student’s enrollment status at the time the loan was first disbursed. Although the servicer may not update this attribute, the servicer must include it as part of the loan record that it extracts and submits to NSLDS. All data fields in the NSLDS extract should be transferred.
Changing Servicers—If a school changes services, it must carefully coordinate with both the current and new servicers to ensure that all data is properly transferred. Regardless of any change in servicer, the school is expected to transmit the Submittal file within 90 days. ED has determined that servicers should transfer portfolios using the same file layout as a Submittal file to NSLDS. The same data should be extracted and prepared as if a Submittal file was to be created. That Extract file should be sent to the new servicer. The new servicer in turn uses the Submittal file to populate its database so the same student and loan identifiers are provided to NSLDS.
Multiple Schools or School Branches
Numbers
of Schools or Branches
There
is no limit on the number of school or branch sets of data that may
be appended together in a single Database Extract File.![]()
When combining schools or branches, the data records must be concatenated into one single file for processing through DataPrep. The resulting file should be structured to contain a Header record, followed by all Detail records for the first school or branch, and all Past Period Change records for that school or branch. Following the first school records, the second school’s data may then be appended to the file. The file structure is illustrated in the box at right.
Multiple
School/Branch File Structure
School
1 Header Record
School
1 Detail Record
School
1 Detail Record
School
1 PPC Record
School
2 Header Record
School
2 Detail Record
School
2 Detail Record
School
3 Header Record
School
3 Detail Record
School
3 Detail Record
Etc.![]()
Note that you do not insert a trailer record because DataPrep will do so for you in the Extract Validation process.
Installing DataPrep for Windows-Based Users
Diskettes
DataPrep
is sent to you on six diskettes, with the Data Provider Instructions
on www.IFAP.ed.gov, from which you can download and print the
instructions.![]()
During the setup procedure, you will have to determine the file names and paths DataPrep will use to access your Extract files. DataPrep will default to specific names that are strongly recommended. Any of these can be changed later in the Options menu. In addition, before you complete the installation process, you will have a chance to review your selections and make any necessary corrections.
If you need to change anything during installation, you can simply return to an earlier screen by selecting “Back.”
I
f
you are running Windows NT, you may not have administrative
privileges to install new software. Therefore, some of the system
files associated with DataPrep will not be installed properly. The
install program will look first to see if you have administrative
access. If you do not, you will get this message:

You can still install DataPrep, but some of the functions may not work (for example, the print function using the DataPrep viewer). Check with your information technology department before proceeding.
Directories
Temp:
the location of your temporary sort work files (*.tmp).
Extract:
the location of your database Extract file (extract.ff).
Current:
the location of the TEF file (TEF.ff) and all DataPrep output files
(*.ff).
Backup:
the location of your backup file folders (yCCYYmMM).
Loan:
the location of the Loan Detail file obtained by special
arrangement (loandtl.ff)![]()
When the installation process is complete for the first time,
the Directories screen (see below) will appear, prompting you to
select the directory path where the DataPrep files are read from and
written to. Default values will be inserted but the directory paths
can be updated as needed. It is essential that you insert the correct
paths and file names or DataPrep will be unable to locate your data
files. In addition, when you transmit your data to NSLDS via the
Title IV WAN, you will have to specify the correct directory path.
If you press OK and there is no existing directory path, DataPrep will ask you if you want to create the specified directory path.
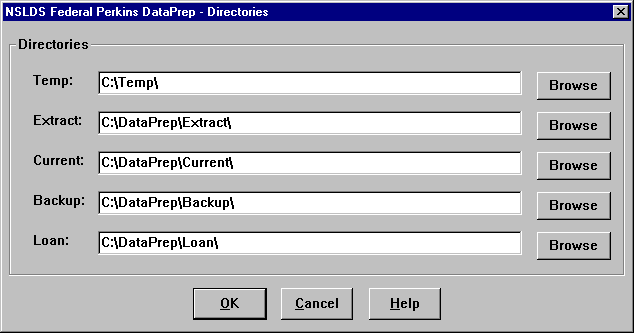
Figure 6, Directories Dialog Box
If you want to change the directory path later, click Options on the menu bar of the DataPrep Main Menu, then Directories. This will bring up the Directories dialog box.
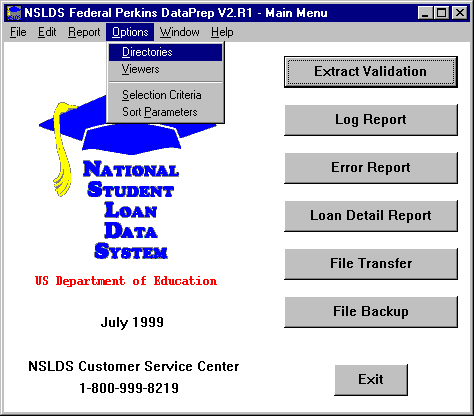
Figure 7, DataPrep Main Menu with Options Menu Selected
Setting Up Viewers
DataPrep allows you to select which word processing software you wish to use to view or print the various reports. The default viewer developed for DataPrep (NSLDS-V2/uta0.exe) enables you to easily view the reports generated with the correct format.
However, DataPrep also includes Notepad and Microsoft Wordpad as optional viewers (note that if you use either of these you may have to reformat the reports to fit the paper). If you wish to change the default viewer, you do so from the main menu. Click Options, then Viewers.
Pressing
OK Does NOT Change the Viewer
From
the Viewer Maintenance screen, pressing OK does not change the
selection. You must Move the selected software to the top of the
list and then press OK.![]()
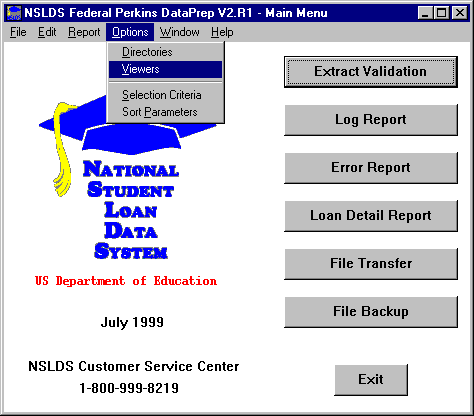
Figure 8, DataPrep Main Menu with Options/Viewers Selected
Selecting
the Viewer
The
word processing software at the top of the list is the viewer
selected. If you want to use a different viewer, you first highlight
it, then choose Move, then point the cursor to the top of the list
and click. The new viewer selected will be moved to the top of the
list and DataPrep will use it to view reports.![]()

Figure 9, Viewer Maintenance Dialog Box
The word processing software that appears at the top of the list is the software DataPrep will use to view reports, the default viewer. To change the default viewer, you must highlight the software you want, then press Move, then point the cursor to the top of the list, and click the mouse. This will move the highlighted software to the top. You then select OK to exit the screen.
If, after you highlight the software you wish, you only press OK, that viewer does not become the default viewer. You must move the software to the top of the list for it to be your viewer!
If you wish to add word processing software, you first select Add and then specify the directory path for the software.
To remove the word processing software, select the software you wish to delete from the Viewer option and then Remove. DataPrep will ask you to confirm that you wish to delete the viewer program from the list.
You will be able to use any viewer to view a particular report after it is generated, if it is one of the viewers on the list. But you can only change the default viewer from the DataPrep Main Menu.
Installing DataPrep for OS/390 LE-Based Users
To install DataPrep on your mainframe, you must first install an Unload JCL that unloads the DataPrep installation program. Note that by installing DataPrep JCL for OS/390 LE, you will be creating dataset names on your system when unloading the tape. The Unload JCL provided contains a specific naming convention. In particular, the second and last node in the dataset names contain identifying information (Version/Release/Levelset Date) to assist in tracking and identifying software in use. We strongly recommend that you retain this naming convention.
Install the Unload JCL That Unloads the Tape
The following JCL will be used once to unload additional JCL, which, in turn, will unload the rest of the tape. Your site will probably have a JCL file similar to this that executes IEBCOPY. Modify the file to have the file names indicated below.
The Unload JCL
//PSY20002 JOB (P75333AA-5100AAAA,066),'SCH TAPE UL1',
// CLASS=A,MSGCLASS=A,REGION=4M
//*
//* -------------------- PSY20002 --------------------
//* JOB DESCRIPTION
//*
//* SYSTEM SOFTWARE - SCH DATA PROVIDER TAPE UNLOAD - PART1
//*
//* PSTEP010 - IEBCOPY
//*
//* --------------------------------------------------
//*
// SET DB2=NSLD
// SET ENV=P
// SET LVLSET=LS990715
// SET SPACE01=CYL
// SET UNITPERM=SYSDA
// SET UNITTAPE=CART
// SET VR=PROD
//*
//* -------------------- IEBCOPY --------------------
//*
//* JOBLIB DD DISP=SHR,DSN=??????????????????????
//*
//*
//*
//PSTEP010 EXEC PGM=IEBCOPY
//*
//SYSIN DD DUMMY
//*
//SYSPRINT DD SYSOUT=*
//*
//SYSUT1 DD DSN=NSLDS.&VR..CUTTAPE.&LVLSET,
// DISP=SHR,
// UNIT=&UNITTAPE
//*** VOLSER=??????
//*
//SYSUT2 DD DSN=NSLDS&ENV..&VR..CUTTAPE.&LVLSET,
// DISP=(NEW,CATLG,DELETE),
// SPACE=(&SPACE01,(30,3,400)),
// UNIT=&UNITPERM
//*
//*
// IF PSTEP010.RC NE 0 THEN
//PSTEP011 EXEC CKRCODE
// ENDIF
//*
Run the Unload Tape JCL
The JCL that appears in Appendix G was unloaded to your system after running step 1. This JCL will be run to set up the actual libraries and software to allow you to execute the DataPrep software. This install JCL will normally only run once. However, if you need to run this JCL again to reinstall DataPrep, be aware that step PSTEP005 will delete all datasets previously created.
This JCL may be referenced from the library created with CUTTAPE as part of the name (created in step 1). The library member name is UNLOAD.
Running Test Files
Running
Samples
Before
testing, you must first copy the sample Extract files
(extract-pass.ff and extract-fail.ff), the Prior Extract
(priorextr.ff), the Load Process Error file (loaderr.ff) and the TEF
files (tef.ff) that were included with the software. Using Windows
Explorer, copy them (rather than move them) to the appropriate
directories, as specified in the installation. The two extract files
must be in C:\DataPrep\Extract\ (or the directory you set up). And
“priorextr.ff” and “tef.ff” must be in
C:\DataPrep\Current\.
For
more information about copying and/or renaming files, refer to
Windows Help. To access Help, go to either My Computer or Explorer,
click on Help, and scroll down to “Copying file” or
“Renaming files.”
![]()
For the Windows-based software, the files are all located in the directory Samples, and include two different Extract files (extract-fail.ff and extract-pass.ff), an Error Submittal Notification Summary file (shsntfop.ff), a TEF file (tef.ff), and a load error file (loaderr.ff). For mainframes, the running test files JCL is in Appendix G and will be unloaded when you install the software.
To test the installation of DataPrep for Windows, you must first copy the extract-pass.ff file to the correct directory path (the default directory path is C:\DataPrep\Extract\) and rename it extract.ff since DataPrep will only validate the file called extract.ff. You can copy and rename the file using Windows Explorer. You must also copy the TEF (tef.ff) and Prior Validated Extract files (priorextr.ff) to the current directory (C:\DataPrep\Current).
Then begin the Extract Validation process. From the DataPrep Main Menu, select Extract Validation:
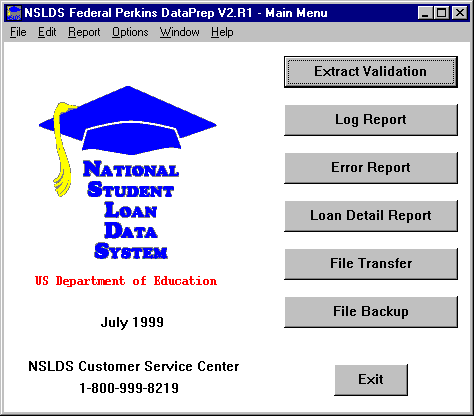
Figure 10, DataPrep Main Menu with Extract Validation Selected
The Validate Extract dialog box will appear:

Figure 11, Validate Extract Dialog Box
Now click Run, and if your installation was done correctly, the Validate Extract Status dialog box should appear with the following message:
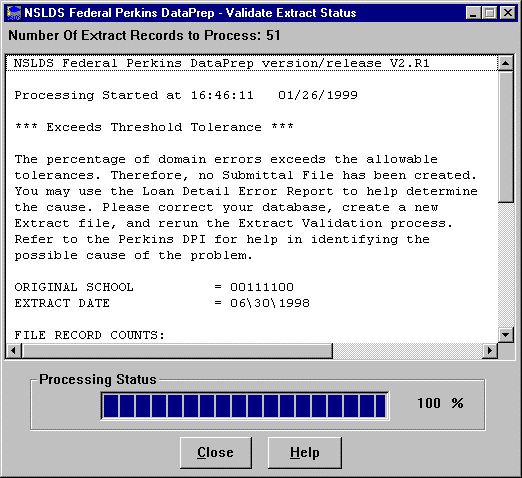
Figure 12, Extract Validation Was Successful
If you get any other message, or if Extract Validation did not run, first check that you had renamed the file originally called extract-pass.ff and had labeled the Extract file correctly as extract.ff. Then, make sure that you specified the correct directory path for DataPrep to find the extract.ff file.
If Extract Validation ran correctly and you got the correct message, you should then go through the rest of the process.
Now go back to the Main Menu and click Log Report. The Log Report dialog box should appear:
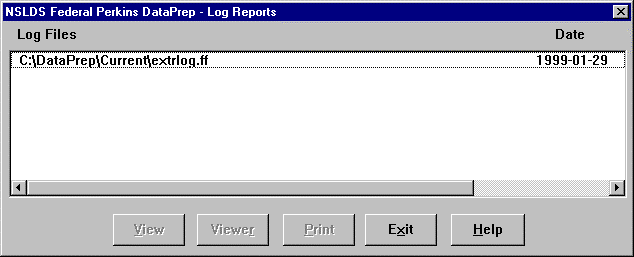
Figure 13, Log Report Dialog Box
Y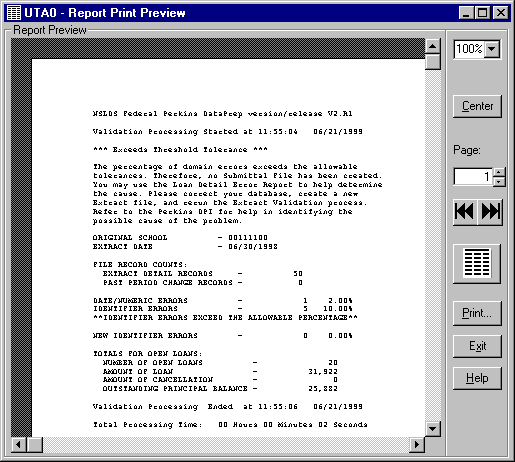
ou
must first highlight the file listed before you can view the log
report. Then click View, launching the default viewer. (In this
example the default was set to DataPrep’s viewer.)
Then, from the DataPrep Main Menu, click Error Report, highlight the
Extract file, and generate a summary error report sorted by E
rror
Code. The following report should then appear:
Figure 15, Test Summary Error Report
If this screen appears, you should return to the Main Menu and run a log report, and summary and detail error reports using any of the sort criteria and different viewers. Then look over the reports to get a good idea of what they look like. Also check steps 3 and 6 for more information about error files and reports.
Now test the second test file. But before you do, you must first rename the extract.ff file back to extract-pass.ff, and extract-fail.ff to extract.ff. You can use Windows Explorer to do so. Then run Extract Validation again.
This time you should get the following message:
F
igure
16, Extract Validation
Successful
If this screen appears, you should return to the Main Menu and run a log report, summary error reports, and detail error reports using any of the sort criteria and different viewers. Then look over the reports to get a good idea of what they look like.
Testing Load Processing Error Reports
The Samples directory included in the software also contains sample Load Process Error and Threshold, Error Code, and Field Code files.
Before you can generate a Load Process Error report, you must import these two sample files into the correct directory where DataPrep can process them. Unlike the sample Extract file, however, you do not have to use Windows Explorer to copy the files. Instead, you can use the DataPrep function, File Transfer.
Mainframe
Testing
For
testing the Load Error Report function for mainframes, refer to
Appendix G.![]()

rom
the DataPrep Main Menu, select File Transfer. Then select the
Threshold, Error Code, and Field Code File Type.
File
Types
When
browsing for files, you may have to change the “Files of
type:” box located on the bottom of the screen to “All
Files (*.*)” in order to find the file.![]()
Y
ou
will then have to use the Browse function to locate the sample TEF.ff
file, which is located in NSLDS-V2\Samples\TEF.ff.
Select “Open” and the previous screen will appear from which you can select “Copy.” Then repeat the procedure for the Load Process Error file (loaderr.ff).
Can’t
Find the File?
When
browsing, if none of the sample files are listed, you may have to
change the Files of Type so that all files are listed, not just
specific ones. The default looks for the appropriate message class
(e.g., the load error function looks for the slderrop.* file).![]()
A
fter
you’ve successfully imported the Load Process Error and TEF
files, you can now proceed with running Load Process Error Reports.
From the DataPrep Main Menu, click Error Report. The following screen
will appear:
Figure 17, Error Reports Load Processing Screen
Highlight the loaderr.ff file and generate a summary report using the Count option. You should see the Summary Error Report message box.

Figure 18, Summary Error Report Message Box
The report will look like this:
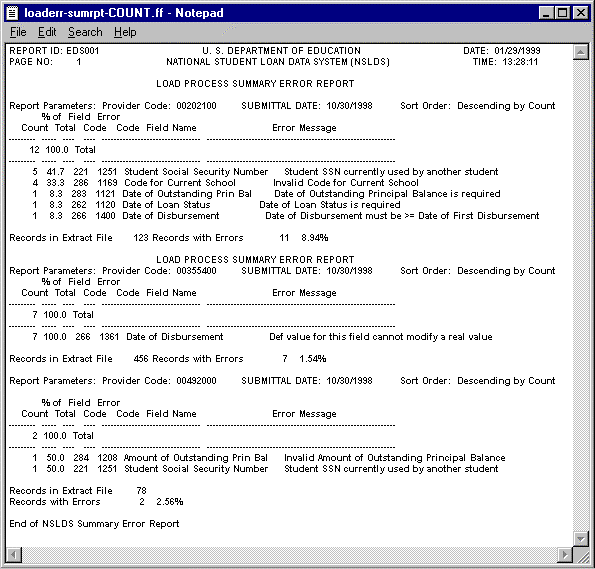
Figure 19, Sample Summary Error Report
If the report you generated looks the same, you should generate other reports; including Detail Error Reports with different sort options. Refer to step 6 on 98 for more information about Load Error Reports.
Before you begin to use DataPrep to process your live data, you should delete the sample Submittal file and all the report files you generated. You can do so either by using Windows Explorer, or by using DataPrep’s File Backup function (see File Backup in step 6 on page 110).
From the DataPrep Main Menu, click File Backup.
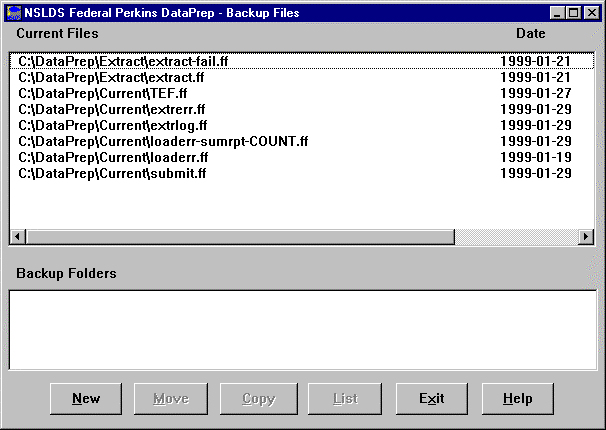
Figure 20, Backup Files Dialog Box
Click New.

Figure 21, New Backup File Folder Dialog Box
And Click OK.
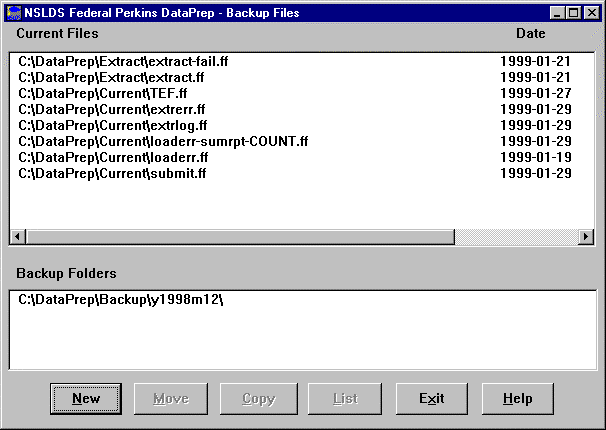
Figure 22, Backup Files Dialog Box
A new Backup folder will appear.
Highlight all of the files listed AND the Backup Folder. Then click Move, and all of the files will move to the new backup folder you created. Click List, and a list of all the files in the highlighted folder will appear.

Figure 23, List Backup Files Dialog Box
From this screen you can delete all of the files by highlighting them and clicking Delete. Once the folder is empty, you can delete the backup folder by clicking Delete again.
Problems?
If
you have any problems with installation or testing, be sure to call
the CSC at (800) 999-8219 between the hours of 8 am and 8 pm Eastern
Time, weekdays.![]()
Step 1: The Extract File
 The
first step in the NSLDS update process is for you to create the
Database Extract file. This file is a mirror image of the school’s
database(s) at the time of the extract and must follow the record
layout rules and format provided in the data dictionary (see Appendix
A). Remember that the Extract file must be named extract.ff. Each
school is responsible for determining how to create and creating the
Database Extract file from its own records or database(s). The
Database Extract file is subject to audit by ED.
Creating the Database Extract File
School
Requirements
You
must create an Extract File once a month and no more than ten days
prior to the scheduled submittal date as established by NSLDS. The
file must be an exact mirror image of your database and should not
be edited or changed. The Database Extract file is fully auditable,
field by field, to your database.![]()
Header record (as defined in Appendix A) must be the first record in the Database Extract file;
Detail records for each loan record; and
Past Period Change records (see page 45), which are used to amend previously-submitted event data stored in history.
Header Record
Version
and Release Number
The
DataPrep software will automatically insert the version and release
number so schools should leave this field blank when creating the
header record.![]()
Detail Records
A separate record must be created for each loan in your school’s database(s). Thus, the Database Extract file will be an exact copy of the school’s database(s). Each month you must submit all records in your database until one of the following events occur:
A loan is closed and successfully reported to NSLDS with a Closed loan status, or
The school receives a notice from ED that it has accepted an assigned loan.
Initial
Population
When
a data provider submits data to NSLDS the first time, the data is
referred to as the Initial Population. During this submission,
schools must provide NSLDS not only with all outstanding (open)
loans, but also any loans that have been closed on or after October
1, 1989.![]()
Example of closed loan:
When a borrower makes the final payment on a Perkins loan, the school extracts the record, reporting the activity with a Loan Status Code of PF (Paid in Full), and includes it with the next submission. Assuming there are no errors in the record and the record is accepted by NSLDS, the school should no longer report on this loan and not include it in future extracts. Loans that were nullified because they were incorrectly reported and loans awarded but the borrower did not go through with the loan, should be set to CA.
Standards and Conventions
Multiple
Databases
All
data must be combined into a single Extract file, even if you have
loan data stored in multiple databases or are reporting for several
campuses or branches in the same extract.![]()
Your Database Extract file must be run through Extract Validation process using the DataPrep software provided. Using the Extract Error Reports generated by DataPrep you should try to correct the errors identified during this process in your database (not in the Database Extract file or the Submittal file) before the next Extract file is run.
All data must be submitted as 300 byte, fixed-length EBCDIC for mainframe, or ASCII for a computer running Windows 95 (or Windows 98 and NT), with no carriage return/line feed or any other character between records. For Windows users, if you have such characters or lines in your Database Extract file, you can leave them there because DataPrep will strip them out before creating a Submittal file.
Extract File Attributes
In order for DataPrep to process your Extract file, the file must be created in the correct format and with fields populated as defined in Appendix B.
The following are general attributes for your Database Extract file.
Character fields may contain letters, numbers, or blanks.

Negative Numbers
NSLDS does not handle negative numbers. If the outstanding balance on a loan becomes negative (i.e., a credit balance), you must report the balance as one dollar and keep the status open until you can set the balance to zero.
If you report the Amount of Outstanding Principal Balance as negative, NSLDS will read this as a positive value.
Numeric fields must contain numbers only. Blanks, alpha, or other characters will cause errors.
Date fields must contain eight digits, be valid dates, and appear in the format CCYYMMDD (e.g., 19990131), where:
CC = 2 digits for the century
YY = 2 digits for the year
MM = 2 digits for the month
DD = 2 digits for the day
A valid date is any calendar date (invalid dates would be February 30, February 29 of a non-leap year, and September 31, for example).
The default value of 00000000 may be used in certain specifically-identified fields.
Less
than One Dollar
If
a loan has a positive outstanding principal balance of less than one
dollar, but not zero, you should report an amount of one dollar
until the loan is closed.![]()
The following types of fields use the described default values:
Character Fields—Must be filled with spaces.
Numeric Fields—Must be filled with zeros.
Date Fields—Must be filled with zeros.
All information must be reported (and changed) at the loan level. That is, the loan is the core information, and other data revolves around it. Therefore, if you report on three loans for the same student, and the loans were first reported with the wrong Student’s Date of Birth (e.g., 19690222), then the New Date of Student’s Birth (e.g., 19680222) must be updated for each of the three loans.
Past Period Changes
Past
Period Changes
When
developing the process to extract records from your school's
database, be certain to include the ability to identify and create
Past Period Change records in the Database Extract File. Past Period
Change records require the erroneous date that was reported so that
the specific posting can be corrected.
Appendix
C identifies which attributes require this special transaction for
proper correction.![]()
To delete previously reported events that are reported in error (e.g., an event was reported for the wrong borrower)
To correct historical data that cannot be adjusted simply by correcting current data fields (e.g., a previously reported loan status that should have been reported with another value at the time it was originally reported)
Past Period Change records can be added at any location in the Database Extract file, and thus can be appended conveniently to the file after the extraction processing has concluded.
Past Period Change records are used to change events in the history prior to the current system value. See Figure 24 for a complete list of changes that can be made using PPC records.
|
Data Element Event Key |
|
Cancellation |
Old Date of Cancellation |
New Date of Cancellation New Type of Cancellation New Amount of Cancellation |
Deferment |
Old Date Deferment Starts |
New Date Deferment Starts New Date Deferment Stops New Type of Deferment |
Disbursement |
Old Date of Disbursement |
New Date of Disbursement |
Loan Status |
Old Date of Loan Status |
New Date of Loan Status New Code for Loan Status |
School Servicer |
Old Code for Servicer |
New Code for Servicer New Date of Servicer Responsibility |
Figure 24, PPC Events, Keys, and Values
Changing Existing Records
C
hanging
Student and Loan Identifiers—Keys
Loan identifiers are the values contained in positions 1–47 of a record that uniquely identify a loan, distinguishing it from the millions of others stored in NSLDS. Although loan identifiers appear on both Detail and Past Period Change records, they are only modified via the Detail record.
Because the entire string of information contained in these fields is needed to singularly identify a loan, loan identifiers are processed as a block. Similarly, when changes are made to one identifier, the values in the rest of them must also be reconfirmed. To this end, a counterpart set of new identifiers is used.
When you update identifiers, you leave the existing values in the original identifier fields and use the counterpart new identifier fields (positions 50–96) to report changes. If you are changing an identifier, you must fill in all the new identifier fields, whether the values in them are new ones or ones that you have been reporting all along.
Types of Identifiers
W
ithin
the loan identifiers for a loan exist two sets of information:
Student identifiers
Loan identifiers
Fields and Loan Identifiers
Field Type of Identifier
Code for Original School Loan Identifier
Student’s Social Security Number Loan/Student Identifier
Date of Student’s Birth Loan/Student Identifier
Student’s First Name Loan/Student Identifier
Type of Loan/Other Aid Loan Identifier
Date of First Disbursement Loan Identifier
Student Identifiers
S
Student
Identifiers Student’s
Social Security Number Date
of Student’s Birth Student’s
First Name![]()
tudent Identifiers are used to make each student unique and to
match data to an existing student on NSLDS. When a new record is sent
to NSLDS, the load process checks to see if a student exists under
the given Social Security Number (SSN). If no one exists under that
SSN, a new student record is built using the student’s name and
DOB from the submitted loan record. The loan is then loaded under
that student. For a new loan and an existing student under that SSN,
the load process reviews the student’s First Name and DOB to
determine if the student on the submitted record is on NSLDS. If a
match occurs, the load process continues. If a match is made on SSN
but not on first name (FN) and date of birth (DOB) using the NSLDS
match criteria, the record will reject as an identifier conflict
error. Because of this, it is crucial that the data be correct when
submitted. Incorrect name and DOB data submitted for a student could
prevent other data providers from loading their data to NSLDS.
Incorrect data should be corrected using the identifier change
process for each loan record you provide for the student.
Loan Identifiers
L
Loan
Identifiers Code
for Original School Student’s
Social Security Number Date
of Student’s Birth Student’s
First Name Type
of Loan/Other Aid Date
of First Disbursement![]()
oan Identifiers are used to make each loan unique on NLSDS.
The load process determines whether a loan is new or a student is new
to NSLDS. Once that determination is made, the load process checks to
see if there is any record on NSLDS with the loan identifiers. If a
loan exists for the submitted Original School Code, SSN, Loan Type,
and Date of First Disbursement, the loan will be updated without
regard to the student name and DOB data. If a loan does not exist
with those four loan identifiers, the match criteria will check
against the student name and DOB identifiers. Then if a match is
found, the new loan record will be created for that student. But if a
match is not found, a new student record is created. Therefore, all
changes to the loan identifier fields must use the identifier change
process.
How to Change Loan Identifier Data Assume you have been submitting the following information about a loan:
Then you discover that the Type of Loan/Other Aid code is incorrect. To update the erroneous identifier, submit the data exactly as shown above and, at the same time, also report the following values in these fields:
Note: Only the Type of Loan/Other Aid was changed. All other values were resubmitted as before. |
Changing Identifiers to Multiple Records
W
New
Loan Identifiers New
Code for Original School New
Student’s Social Security Number New
Date of Student’s Birth New
Student’s First Name New
Type of Loan New
Date of First Disbursement![]()
hen changing identifiers to multiple records, the old and new
identifiers must both be populated for each record being changed. You
should then review the Load Level Error file to see if the records
erred out. If all of the records loaded, then all of the new
identifiers should become the current identifiers on your system.
However, if not all of the records were updated, then you need to review the changes so that future submissions can be handled correctly. If any one of the loans loaded to NSLDS, then the new identifiers will become the current values on the database. This means that new first names and dates of birth will be present for all records on NSLDS. You should make certain that successive submissions of all loans, particularly those that erred out, reflect the changes to the new identifiers. So, if any record updates the database with new identifiers for first name or date of birth, then all records will reflect the new name or date of birth. And all future reporting of loans for that student should reflect the change created by the record that loaded/updated.
Changing Non-Identifier Data—Values
Events
Events
are treated as if they were linked because they give each other
meaning. For example, Date of Loan Status must have an accompanying
Code for Loan Status. Together they are a discrete occurrence—or
event—called Change in Loan Status. An event may be classified
either as a current event, prior event, or history.![]()
As NSLDS processes your Submittal file, it determines whether the data element (or field) being modified is one for which history is kept. If it is not, you update NSLDS by submitting your change on a Detail record. Once the new information passes all the edits and verifications, it is integrated with the NSLDS database.
If the data element you want to modify is one for which history is kept, you update NSLDS using a Detail record. Then NSLDS determines whether you are trying to change what is already the current value. If so, then once the new information passes all the edits and verifications, it is integrated with the NSLDS database.
If the data element being modified is one that is stored in History and it is not the current value but one that belongs to a previous event (e.g., a disbursement), then you must submit the modification using a Past Period Change record.
Determining whether Data Is Current or Historical
When data is first submitted to NSLDS, all your values are, of course, current values. When you then submit changed records, your data gets classified as either current or historical information.
First, NSLDS determines whether the changing data element that you have submitted is an element stored in history.
If the data element is not stored in history, it can be processed by NSLDS as part of the regular submittal cycle. No special rules apply, and so long as the changed data element passes verification, NSLDS will be updated with the new value. You don’t have to do anything beyond normal submittal with the latest information.
If the changing data element is one for which NSLDS keeps history, NSLDS determines what other fields are linked to it through that event. For these fields, NSLDS edits the record from the submittal by comparing the element in the existing database.
Old
and New
When
a PPC field name starts with the word Old (e.g., Old Date of Loan
Status) you must report the exact value already contained in the
field you are changing. When the PPC field name says New, (e.g., New
Date of Loan Status) you report the new value you want that data
element to contain.![]()
Historical events are edited using the key (or index) of the event, and the most important associated value(s), which together describe the event. The key is the most critical element and is usually the date of the event. Some events (e.g., Change in Enrollment Status) have a compound key, requiring more than one field to uniquely identify a specific event. See Appendix A for more information.
Only report the data you want to change. There is no need to fill all the Old/New fields.
Checking History Online
Changing
History
If
a record-level or load-level error occurs when you are submitting
identifier changes, make sure you keep resubmitting them until the
record does not err.
When
data is submitted to NSLDS, the system first processes Detail
records, then PPC records. For this reason, if you want to change
historical information on a loan whose identifiers are also being
modified at the same time, the PPC record must refer to the new
identifiers, not the old ones.
Just
because a record passes Extract Validation, doesn’t mean NSLDS
will automatically be updated. The update must also pass Load Level
Validation and the processing rules that apply to history changes.![]()
Changing Event Dates
There are two important things to remember when making date changes with a Past Period Change:
You may not change the chronological order of events contained in history. Do not re-date an event so it predates one that occurred before it or postdates one that occurred after it.
You may not change the date of an event so that it equals the date of a pre-existing event. For example, if there is a loan status effective date of 3/1/98, you cannot correct another loan status effective date to 3/1/98.
Changing Event Values
To change the value associated with an event, send NSLDS a Past Period Change record containing the loan identifiers, the event key (as stored in NSLDS), and the new value.
Changing Both Value and Date
If both the date of the event and the associated data must be changed, send a Past Period Change record containing the loan identifiers, the event key matching the one stored in NSLDS, the new key, and the new value.
Existing on the database:
Loan Deferment
Start Stop Type
01/01/98 01/15/98 FP
02/01/98 02/15/98 FP
03/01/98 03/15/98 FP
04/01/98 04/15/98 FP
If you want to correct the 02/01/98 deferment to a starting date of 02/02/98 and the Type of Deferment from FP to FS, use the following Past Period Change:
Loan Identifiers |
Old
Deferment |
New
Deferment |
New
Deferment |
New Deferment Type |
Loan XYZ |
19980201 |
19980202 |
00000000 |
FS |
Figure 25, Past Period Change Example 1: Change to Both Value and Date
The New Deferment End Date contained the default value 00000000 because the value wasn’t being changed.
Deleting Data with History
Although you cannot delete the last Change in Loan Status or the last Change in Enrollment Status event, other data with history can be deleted using a Past Period Change record. To delete an event, submit a Past Period Change record that contains the exact loan identifiers and event key stored in NSLDS, along with default values (given in the Past Period Change record layouts in Appendix C) in all the New fields. (Loan identifiers consist of all the information contained in positions 1–47 of the loan record.)
Update Examples
The following is an example of a valid change of date in a Change in Loan Status event. (For simplicity, loan identifiers are represented here as Loan XYZ, but in fact, they consist of all the information contained in positions 1–47 of the loan record.)
Key Date Change
In this example, the Loan Status date is changed from April 1, 1994, to March 1, 1995. Notice that it was not necessary to provide the Code for Loan Status (i.e., value) associated with the April 1, 1994, event because it was not changing.
Loan Identifiers |
Old
Date of |
New
Date of |
New Code for Loan Status |
Loan XYZ |
19940401 |
19950301 |
BLANKS |
Figure 26, Past Period Change Example 2, Change to Key Date
Change in Value
In this example, the Code for Loan Status associated with the April 1, 1994 Loan Status is changed to RP, so the New Code for Loan Status will replace the former value for the event. Since the date of the event is not changing, it was not necessary to provide a New Date of Loan Status. Because it was the value of the event that was changing (as opposed to the key), it was not necessary to provide the former Code for Loan Status, only the new one.
Loan Identifiers |
Old
Date of |
New
Date of |
New
Code for |
Loan XYZ |
19940401 |
ZEROES |
RP |
Figure 27, Past Period Change Example 3, Change in Value
Changing Both Value and Date
If both the date of the event and the associated data must be changed, send a Past Period Change record containing the loan identifiers, the event key matching the one stored in NSLDS, the new key, and the new value. The following is an example of a change to both the date of the event and the value associated with it.
Loan Identifiers |
Old
Date of |
New
Date of |
New
Code for |
Loan XYZ |
19940401 |
19950301 |
RP |
Figure 28, Past Period Change Example 4: Change in Key Date and Value
In the above example, the date of the Loan Status event is changed from April 1, 1994 to March 1, 1995.
Once you have finished creating your Extract file, you are now ready to begin using DataPrep.
Step 2: Running Extract Validation
O nce
you have created your Extract file, you’re ready for step 2,
running Extract Validation. This step is done entirely by DataPrep.

Reasons
Extract Validation Will Abort
File-level
errors
Header
record errors
(See
Appendix B-10 (PC users) or B-11 (OS 390/LE users) for a description
of these types of errors.)
What Happens in Extract Validation?
File-level errors
Header record errors
In the Extract Validation process, DataPrep first examines the Extract file to make certain the format is acceptable. DataPrep checks for a proper header record, 300-byte record lengths, and school code. These are called file-level edits. If the header format is not correct, DataPrep cannot continue the process and an error message will appear in a dialog box informing you that there was a header error and that processing was aborted. The Extract Validation process will also abort if any record has a school code that does not match the header record school code. (Therefore, servicers and schools reporting multiple schools or branches should be certain there is a header for each school or branch.)
Domain-Level
Errors
There
are four kinds of domain-level errors:
Numeric
field errors (character other than a number is in a field requiring
all numbers)
Invalid
date errors (date specified does not exist on a calendar or is not
zeros)
Missing
Identifiers
Missing
New Identifiers![]()
If your Database Extract file passes the file-level edits,
DataPrep examines all Detail and Past Period Change records in the
file to ensure that each data element meets domain requirements. If
the percent of domain errors exceeds the threshold set by ED (see box
at right), DataPrep will issue an error message informing you that
you have exceeded the threshold and that no Submittal file was
created. All errors are noted in an Extract Error Data file from
which you can generate a report detailing the error records. From
this you can correct your database or extract program and create a
new Extract file. You then rerun the Validation Extract program with
your new Extract file to create the Submittal file.
If your Database Extract file passes the file-level edits and the percent of domain errors is below the maximum threshold established by NSLDS, DataPrep will create a Submittal file that you will then send to NSLDS.
The Extract Validation process produces three output files:
Validation Log File—a summary report of the transactions processed during Extract Validation,
Extract Error File—a file from which you can generate a report listing all domain errors (created only if the Database Extract file passes file-level edits), and
Submittal File—the file you will transmit to NSLDS (created only if the Database Extract file passes file-level and domain-level edits).
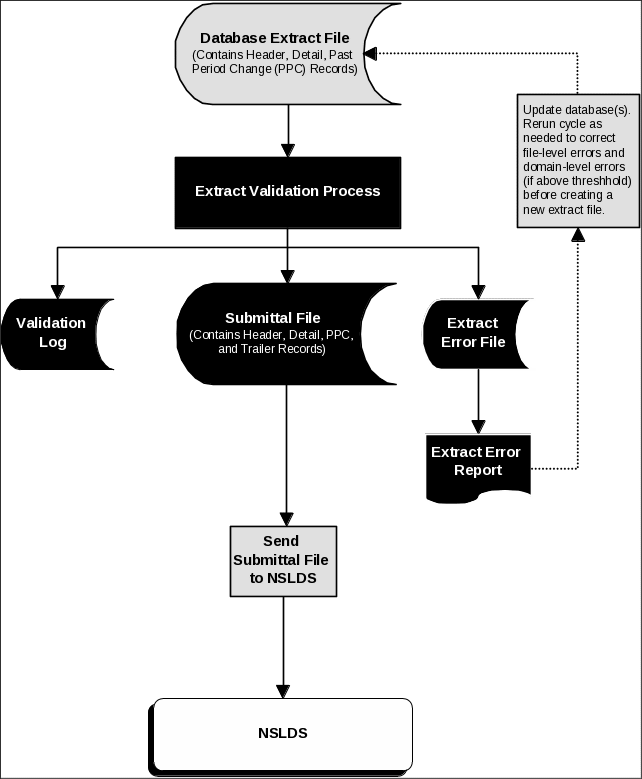
Figure 29, Extract Validation Process
DataPrep Error Path
DataPrep performs two sets of edits during the Extract Validation process:
File-level edits
Domain-level edits
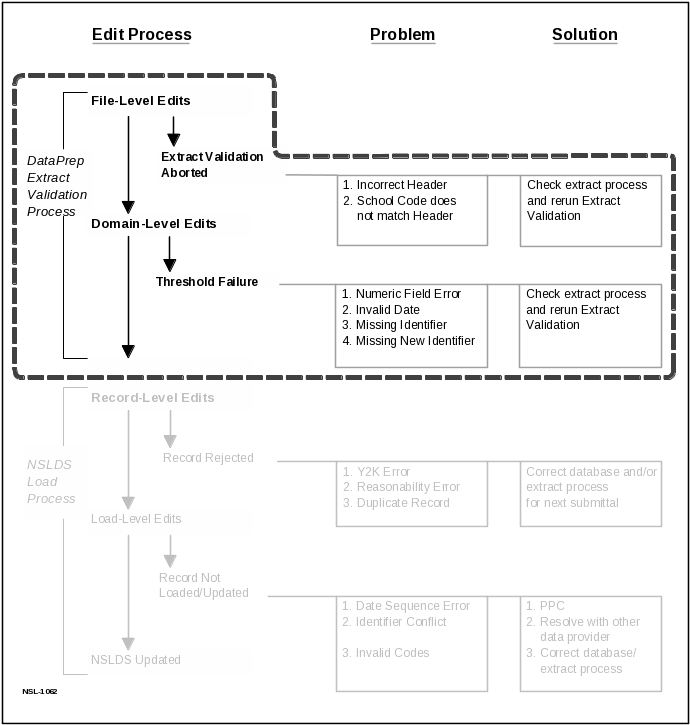
Figure 30, DataPrep Edit Process

Multiple
Errors in a Record
DataPrep
validates the entire record and multiple errors can be detected on a
single input record. The error rate calculated by DataPrep is based
on the number of records with one or more errors, not on the total
number of errors detected.
File-Level Edits
File-level edits check to see that the Extract file is a legitimate file with the correct header, 300-byte records, and a school code in each record that matches the header. If DataPrep detects any one of these file-level edits, the Extract Validation process will abort and an error message, with a description of the error, will appear on screen. You must correct your Extract file and rerun Extract Validation. See Appendix B-10 (PC users) or B-11 (OS 390/LE users) for a complete list of all the file-level and header errors that cause the Extract Validation process to abort.
Domain-Level Edits
There are four kinds of domain-level errors: numeric field errors (character other than a number is in a field requiring all numbers), invalid date errors (date specified does not exist on a calendar or is not all zeros), missing identifiers, and missing new identifiers. If the percent of these errors exceeds the threshold established by NSLDS, the Extract Validation process will not be completed and no Submittal file will be created. You must then correct your database and rerun the Extract Validation process.
Running Extract Validation on a PC
Naming
the Extract File
Remember
that your database Extract file must be named extract.ff so that
DataPrep can locate and process it.![]()
To begin, on the DataPrep Main Menu, click Extract Validation.
File
Date
Note
that the date a file was last modified or created appears on the
screen. This is to help you make sure you are running the correct
Extract file.
If
you select the plus sign next to the file date, the File Information
Dialog Box will appear showing you the date and time the file was
last modified and the number of bytes in the file.![]()

Figure 31, DataPrep Main Menu with Extract Validation Selected
The Validate Extract dialog box will appear.
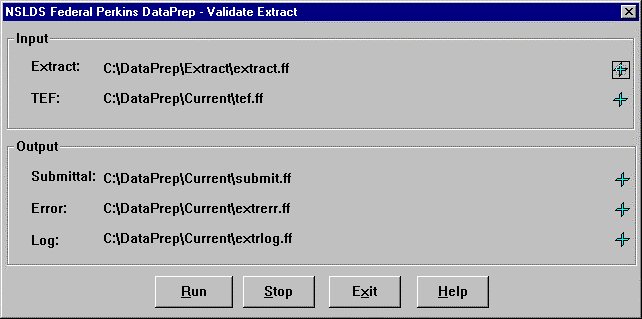
Figure 32, Validate Extract Dialog Box
Number
of Bytes, Not
Number of Records
The
File Information Dialog Box shows the number of bytes in the file,
not the number of records. For the Extract file, dividing by
300 bytes will yield the number of records. But for any error or
report file, you cannot easily determine the number of records in
the file.![]()
F
igure
33, File Information Dialog
Box
Extract Validation
While
Validation is Processing
While
DataPrep is performing the Validation process, you may minimize the
screen and go on to other tasks. When the process is complete, the
Validate Extract Status screen will show that 100% of the process
was completed.![]()
Once Extract Validation begins, the Validate Extract Status screen will appear (see Figure 34 below), showing you how much of the process is complete. While the process is being performed, you may go on to other tasks by minimizing the screen or by selecting Close. When the process is complete, the Validate Extract Status screen will show that 100% of the process was complete, and will detail the number of Extract Detail records processed, the number of Past Period Change records, Date/Numeric Errors, Identifier Errors, and New Identifier Errors.
Once you close this screen, you’ll get back to the previous screen from which you must exit to get back to the DataPrep Main Menu. From there you have several options, including generating reports.

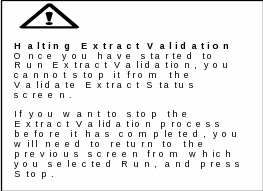
Figure 34, Validation Extract Processing Status
Output
The successful Extract Validation process produces three files:
Validation Log file (extrlog.ff),
Extract Error file (extrerr.ff), and
Submittal file (submit.ff).
Validation Log
Extract
Validation Log
The
Extract Validation Log is a tool created by DataPrep that shows the
number of domain-level errors detected, whether or not the rejection
thresholds have been met, and the number of records processed. The
file can assist you in identifying potential errors and problems in
your system or your database.
![]()
To view a Validation Log, first go to the Main Menu and click Log Report.
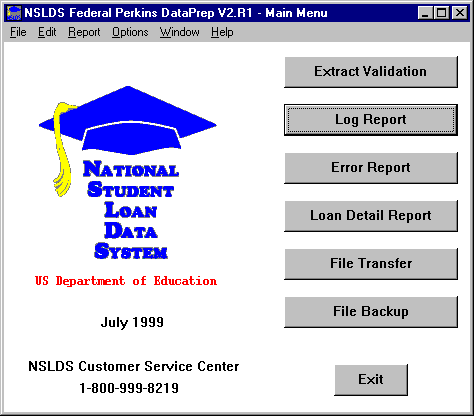
Figure 35, DataPrep Main Menu with Log Report Selected
Designated
Viewer
When
you first set up DataPrep, you can specify which viewer program
software you’ll use to both view and print the reports (either
the DataPrep default software, MS-Wordpad, or Notepad). In addition,
you can change which viewer you use by clicking on the Viewer button
and changing the designation. This does not change the default
viewer —the viewer you select will only be used for this one
report.![]()
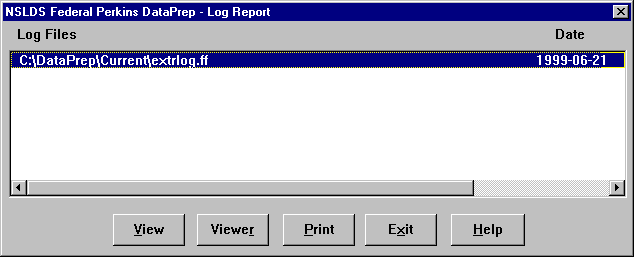
Figure 36, Log Reports Dialog Box
From this screen you must first highlight the appropriate file (the log file in your current directory). After that, you can either print the report or view it using a viewer you designate.
Using the Information from the Validation Log File
T
Entire
Submittal Rejected for High Error Rate
If
the number of domain errors (date/numeric field error, identifier
errors, or new Identifier errors) found in the Detail and PPC
records exceeds the threshold as defined by ED, the whole
Submittal file will be rejected! The Validation Log File provides
you with your error rates.![]()
An explanation of your Extract Validation process, including whether the process succeeded or failed and instructions about what you should do next.
Extract File Summary Data,
The records processed, with an accounting of the domain-level errors, and
Summary loan data to provide a monthly reference.
Explanation of Your Extract Validation Process
This information tells you whether the process was successful and provides instructions about what you should do next.
Extract Validation is Successful
What
To Do When Your Validation Extract Is Successful
The
Extract Validation Log will tell you whether or not the Extract
Validation process was successful. If so, before proceeding to the
next step, compare the Log with Logs from prior Validations to make
sure the number of records and amounts of loan and outstanding
principal are reasonable.![]()
Your Extract file was processed successfully. Please do a reasonability check comparing this Log with Logs from prior runs. If the amounts and number of records extracted are reasonable, send the Submittal file to NSLDS. If not, review your Extract file, make the needed corrections, and rerun Extract Validation.
Compare the summary data on this Log with the summary data on Logs you ran for prior Validation Extracts to make sure the numbers are reasonable. Look at the number of records processed, amount of loan, and amount of outstanding principal to make sure they are close to the numbers for prior Extracts.
Extract Validation Fails Because of File-Level Errors
If DataPrep was unable to read your Extract file or if the Validation Process was aborted because of other file-level errors, the Validation Status screen will automatically appear and state the reason the process was halted.
What
to Do When Your Validation Extract Process Is Halted
If
your Validation Extract failed because of a file-level error causing
the process to abort, check to see that you’ve used the
correct Extract file, that it has a header record, is in the proper
format, and that the records are all 300 bytes in length.![]()
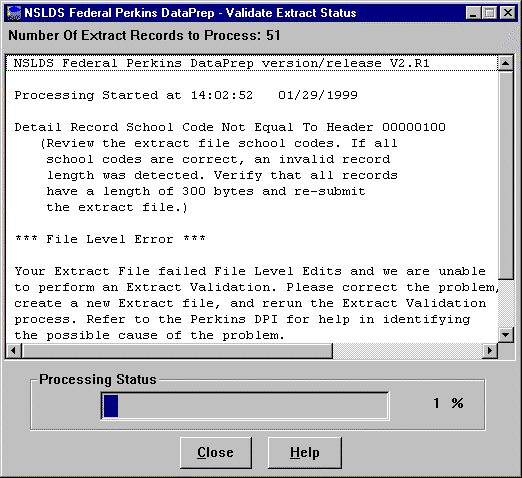
Figure 38, Failed Validate Extract Status Screen
Some possible causes of a failed Validation are:
No header record
An incorrect format was detected
Your data shifted because you inserted a space or a character
The records were not the required 300-byte length
The code for original school does not match the school code in the header record.
Extract Validation Fails Because of Domain Errors
If the percentage of domain-level errors exceeded the allowable threshold, the Log will state that no Submittal file was created, will report the error rate, and will explain the reason for the failure (excessive date/numeric, identifier, or new identifier errors). The Validation Log will state:
The percentage of domain errors exceeds the allowable tolerances. Therefore, no Submittal File has been created. You may use the Loan Detail Error Report to help determine the cause. Please correct your database, create a new Extract file, and rerun the Extract Validation process. Refer to the Perkins DPI for help in identifying the possible cause of the problem.
Domain
Error Threshold Levels
ED
has set the threshold level for domain errors at:
Combined
Date and
Missing
Identifier 5%
Missing
New Identifier 5%
These
percentages are subject to change at EDs discretion.![]()
Numeric Field Errors 10%
There are a number of reasons for such errors. Some of the following causes and corrections may explain your situation:
Y

our data is stored incorrectly on your database: the solution is to correct the appropriate fields on your database (i.e., your database accepted six digit dates instead of eight).
Your extract process calculates fields incorrectly: review and correct any programming logic in your extract process (i.e., Date Entered Repayment is calculated by adding one day to the end of the enrollment period and sets the date to 2-29-1999, an invalid date, instead of 3-1-1999).
Your extract process only picks up changed fields: change your process to populate the other fields with the current data for those fields.
Extract File Summary Data
The Extract File Summary Data contains the Extract Date and the OPEID of the school being processed. When multiple institutions are reported on the same extract the School ID field is populated by the number of schools reported on the file. The Extract Date is provided for your reference on the Log.
Records Processed
Records Processed provides key information for review with each submission, including the numbers of Detail records and Past Period Change records. It also contains the numbers of domain errors (Date/Numeric Errors, Identifier Errors, and New Identifier Errors) found in the Detail and Past Period Change records. If the percentage of any of these errors exceeds the threshold defined by ED, DataPrep will not create a Submittal file. The Log file will provide your error rate and will tell you if you’ve exceeded the acceptable threshold. If so, you must correct your database, re-start the extract process, and re-validate until your error rate is below the accepted level.

Checking
the Loan Record Summary
Large
increases in the number of loans, amounts of loans, or outstanding
principal balance could indicate duplication of records or
extracting some incorrect records.
Loan Record Summary
The Loan Record Summary provides basic totals for your review. Totals for Amount of Loan, Amount of Cancellation, and Outstanding Principal Balance are provided to help you spot errors or potential problems. You should review this summary before transmitting your Submittal file to see if there are any glaring errors or large changes that could indicate a problem in the data or your extract process.
Extract Validation for Mainframes
(OS/390 LE-Based Users)
Previous
Datasets
The
first step in the JCL will delete any datasets previously created.
If you want to save your previous Submittal file, you must copy it
to another file name.![]()
The JCL references a sample Extract file containing 50 student/loan records of which 2 are in error. This should be reported in the Log file report, the Detail Error Report, and the Summary Error Report that is output from the Extract Validation process.
A second sample extract is included for your use that contains 50 student/loan records, of which 6 are in error, and in which error thresholds are exceeded. If you use this sample to test your installation, no Submittal file should be created. To use the second sample, you must change the JCL to reference the sample extract containing DBEXTERR as part of the name.
Step 3: Generating and Using the Extract Error Report
 As
step 3 in the NSLDS update process, you generate an Extract Error
report and use it to correct domain and missing identifier errors.
Reviewing the reports will give you a head start on fixing your
database or extract procedures so such errors do not recur in
subsequent Extract files. You will use the same process to identify
load process errors after your data is processed by NSLDS.
The Extract Error File
Correcting
Your Database
Use
the Extract Error Report to fix your institution’s databases
or extract procedures. Do not make corrections by changing the
Extract file as the errors will reappear the next time you create an
Extract file.![]()
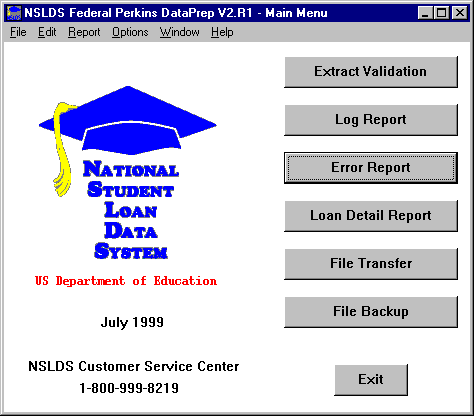
To create an Extract Error report, click Error Report on the DataPrep Main Menu.
Figure 39, DataPrep Main Menu with Error Report Selected
Extract
Error Report or Submittal File Error Report
The
Error Report screen allows you to generate either an Extract Error
Report from your Validated Extract file or a Load Level Error Report
that resulted from the Submittal file you sent to NSLDS. Be sure to
specify from which Error Source you want to generate a report.![]()
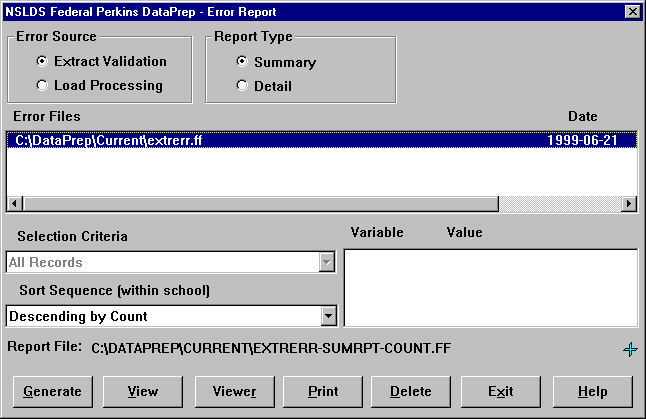
Figure 40, Error Reports Dialog Box
Y
Extract
Error Reports for Concatenated Files
DataPrep
sequentially reads a concatenated Extract file and produces a single
file with information for each set of data concatenated together.
Therefore, an Extract Error Report will be produced for School 1
followed by School 2’s error report, then School 3’s.
This allows a school or servicer to split up the file so that the
originating school or branch can make the required corrections.
The
Extract Error Report generation process for concatenated files is
identical to the process for single schools.![]()
You can scroll to the right to see more information about the file. When you double-click the highlighted file, a File Information message box will appear showing you the date and time the file was last modified and the number of bytes in the file.

Figure 41, File Information Message Box
Summary Report or Detail Report
You have the option of generating either a Summary Report or a Detail Report. There are different sorting options for each. In addition, for Detail Reports, you can select by various criteria.
Selection Criteria
In addition to different sorting options, you also have the option of generating a variety of Detail Reports using different selection criteria. Within these reports, you can vary the sorting criteria. Several selection options have been preprogrammed:
Data Fields in Error
Identifier Fields in Error
New Identifier Fields in Error
No SSN Conflict Records
Only SSN Conflict Records
Selected Error Code
Selected Error and Field Code
Selected Field Code
Updating Selection Criteria
D
ataPrep
allows you to add new selection criteria, and to change or delete
existing selection criteria. To update selection criteria, select
“Selection Criteria” under Options in the main menu:
Figure 42, Main Menu Selection Criteria Option
The following dialog box will appear:
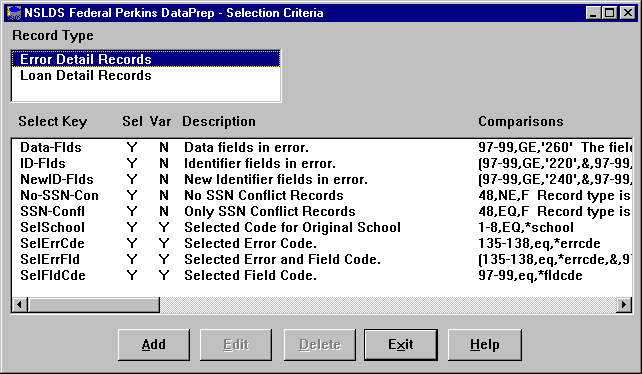
Figure 43, Selection Criteria Dialog Box
From this screen you can Add, Edit, or Delete any selection criteria for the Detail Extract Error report, Load Level Error Report, or Loan Detail Report. Click on Error Detail or Loan Detail to add, edit, or delete selection criteria for that report type.
Adding Selection Criteria
To create a new selection criteria, select “Add,” and the following dialog box will appear:
F
igure
44, Selection Criteria Edit
Dialog Box
Steps to Add Selection Criteria
Use
of Spaces
Do
not insert any spaces after position numbers. If you do, the program
will assume the sort parameter you’ve specified has ended. If
you wish to add any comments (e.g. additional description) you can
put comments after a space.![]()
(Up to 10 characters that names the selection criteria—generally includes the field name, e.g. if you want to select for all loan status in repayment, e.g. “LoanStatRP.”)
Step 2: Enter the Description
(Up to 35 characters that describe the selection criteria. This is what will appear in a drop down list on the report dialog box when you go to run a report, e.g. “Loan Status in Repayment.”)
Step 3: Enter the Comparisons
(The codes that specify which records are to be included in the specified report. Put in the position of the field, then the appropriate comparison, such as equal to, greater than, or less than, then the value. See examples and Syntax.)
Example 1: One Criterion
To add a selection criteria for all loans with loan status in repayment:
Sel Key = LoanStatRP,
Description = Loan Status in Repayment,
Comparison = 119-120,EQ,RP.
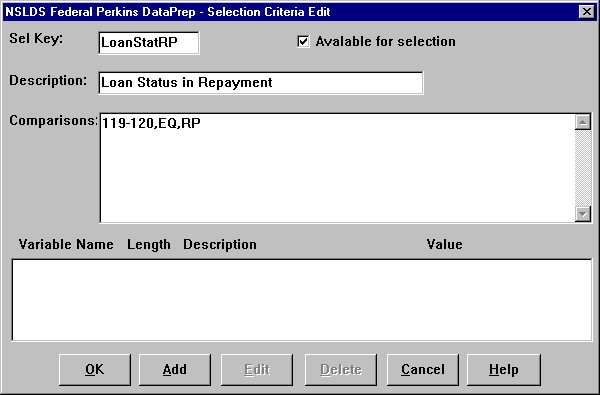
Note:
Loan Status is position 119-120
Figure 45, Selection Criteria Edit Screen
Example 2: Two Criteria
To add selection criteria for all loans with loan status in repayment AND a date of first disbursement after January 1, 1998:
Sel Key = RP-Jan1998
Description = Loan in RP and Disbursement>= Jan 1998
Comparison = (119-120,EQ,RP,&,40-47,GE,’19980101’)
Notes: 119-120 is Loan Status position, 40-47 is Date of First Disbursement position, & is AND connector, GE is greater than or equal to. You must use parentheses when including an & sign.
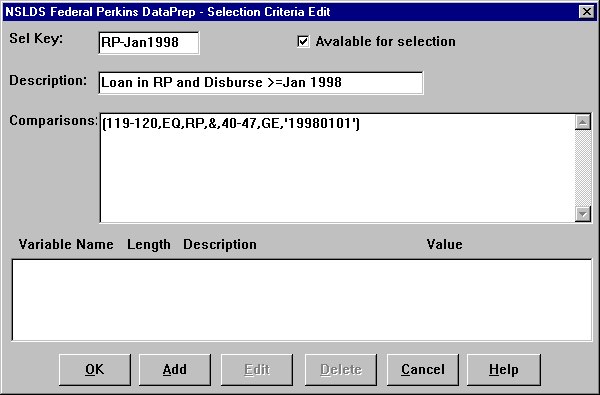
Figure 46, Selection Criteria Edit Screen
Steps to Add Selection Variable
If you want to add a variable selection criterion, from the selection variable dialog box, select “Add” and then follow these steps:
Step 1: Enter the Name
(Up to 10 characters that names the variable.)
Step 2: Enter the Length of the Field
(The length must be equal to the length of the Data Element that the Selection Variable Value is to be compared with.)
Step 3: Enter a Description of the Variable
(Up to 35 characters that describe the variable.)
Step 4: Enter the Value
(The initial value of the Selection Variable. Must match the possible values in the record, e.g. ‘RP’.)
Step 4: If using a variable, select “Add” and the following dialog box will appear:
Adding
a Variable Criterion
To
create a report with a criterion that varies each time you run the
report, you use the Selection Criteria Edit Screen and complete the
upper portion. When adding the variable, select “Add”
and the appropriate dialog box will appear.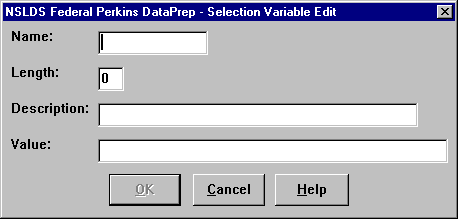
![]()
Figure 47, Selection Variable Edit Dialog Box
Example 3: A Variable Criterion
To add a selection criterion for all loans with a loan status equal to the variable value that you set each time you run a report:
Sel Key = SelLoanSt
Description = Selected Loan Status
Comparison = 119-120,EQ,*LoanStat
Notes: 119-120 is Loan Status position, EQ is equal to, and * indicates the variable you will set when you select the specific report (e.g. RP, FB, etc.).
To add the variable, click on the “Add” button to bring up the Selection Variable Edit dialog box:
Name = LoanStat
Length = 2
Description = Loan Status Code
Value = ‘RP’
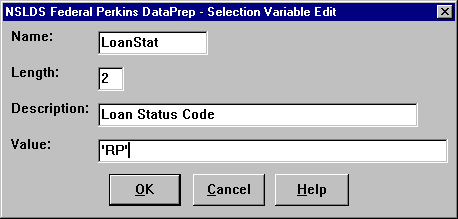
Figure 48, Selection Variable Edit Dialog Box
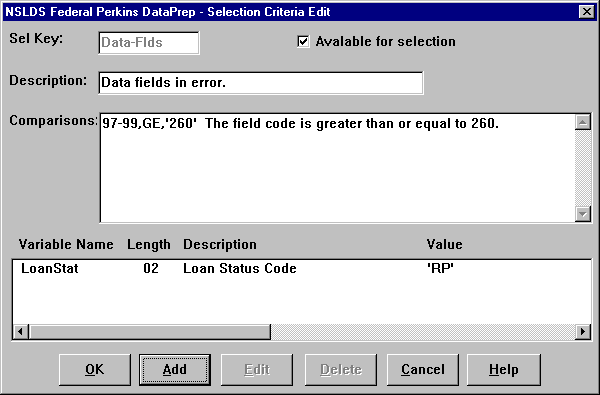
Figure 49, Selection Criteria Edit Dialog Box
For more information about adding, editing, and creating your own selection criteria, refer to the Help screens in the software and the Comparison Syntax that follows.
Selection Criteria Comparisons’ Syntax
Comparisons
Comparisons are made up of one or more comparison parameters linked using the AND connector within commas (,&,) and the OR connector within commas (,|,), and grouped using parentheses ().
[(]comparison1[)][[,connector2,[(]comparison2[)]]…[,connectorN,[(]comparisonN[)]]][)]
[comments]
( ) pairs Balanced pairs of parentheses that enclose comparison parameters in order to clarify or to alter the order in which the comparisons are done.
{Without parentheses, the comparisons ‘A,|,B,&,C,|,D’ would be interpreted as ‘((A,|,B),&,C),|,D’, but you will need to use parentheses if the intent is either ‘(A,|,B),&,(C,|,D)’ or ‘A,|,(B,&,C),|,D’ or ‘A,|,((B,&,C),|,D)’.}
comparison1 First comparison parameter.
connector2 Second compare parameter connector. (optional){Use ampersand (&) for the AND connector, and use bar (|) for the OR connector.}
comparison2 Second comparison parameter (optional)
connectorN Nth compare parameter connector. (optional)
{Use ampersand (&) for the AND connector, and use bar (|) for the OR connector.}
comparisonN Nth comparison parameter. (optional)
comments Comments. (optional){At least one space between last compare parameter and start of comments.}
Comparison Parameters
A comparison parameter is made up of one or more compare parameters linked using the AND connector within commas (,&,) and the OR connector within commas (,|,).
compare1[[,connector2,compare2]…[,connectorN,compareN]]
compare1 First compare parameter
connector2 Second compare parameter connector. (optional){Use ampersand (&) for the AND condition, and use bar (|) for the OR condition.}
compare2 Second compare parameter (optional)
connectorN Nth compare parameter connector. (optional){Use ampersand (&) for the AND connector, and use bar (|) for the OR connector.}
compareN Nth compare parameter (optional)
Compare Parameters
A compare parameter is made up of a record character position, a compare condition, and a compare value linked by commas (,).
compare => start[-end|:length|:1],condition,string|position|*variable
start Data Element starting position.
{A number from 1 to 640.}
end Data Element ending position. (optional)
{A number from starting position to 640.}
length Data Element length. (optional)
{A number from 1 to 1 + 300 - starting position. Defaults to a length of 1 when neither the ending position nor the length is given.}
condition The code identifying the compare condition.
{One of the following two-character compare conditions — not case sensitive}
EQ = Equal to
NE = Not Equal to
GT = Greater than
GE = Greater than or Equal to
LT = Less than
LE = Less than or Equal to
string The character sting that is to be compared with the Data Element.
{A string of characters whose length is equal to that of the Data Element.}
If a string’s first character is a number or an asterisk (*), or its last character is a space, then the string must be enclosed in single quotation marks (‘string’).
When a quoted string is less than the length of the Data Element, the string is padded out to the correct length using the last character in the string. {You can use ‘ ‘ to check for spaces and ‘0’ to check for zeroes.}
If you wish to include a single quote (‘) in the comparison string, then you will need to enter two single quotes (“).
position The starting position of a second Data Element within the record that is to be compared with the first Data Element.
{A number from 1 to 1 + 300 - length of Data Element.}
variable The variable name that is replaced with a value at report generation time.
{The variable name must be prefixed with an asterisk (*) and defined in the Variable Name list.}
Examples
Example 1: 105-110,gt,'0' Amount of Loan is greater than zero.
Example 2: (58-66,NE,' ',&,58-66,NE,4) New SSN is not spaces, and it is not equal to current SSN.
Example 3: 9-17,eq,*ssn Student SSN is equal to the variable value.
Sorting Options
Sorting
the Extract Error Report
The
Extract Summary Report can only be sorted by count, error code, or
field code while the Detail report can also be sorted by any
criteria you choose. DataPrep has provided preprogrammed sorting
options for data provider loan identifier, error code, field code,
and student’s name or SSN.
When
sorting by count (summary report only), the report will be in
descending order with the field with the largest number of errors
appearing first.
If
you select No Sort (detail report only), the report will be sorted
in the same order as the file from which it was created (i.e., your
Database Extract file).![]()
Data Provider Loan Identifier
Error Code
Field Code
Student’s Name, or
Student’s SSN.
For the Detail report you can also select No Sort, which means the records in the report will be listed in the same order as the file from which it was generated.
Updating Sort Options
D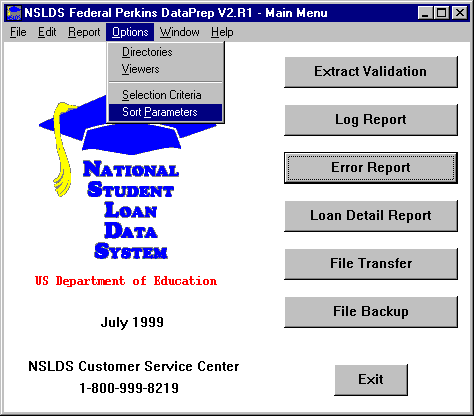
ataPrep
allows you to create new sorting options, and to change or delete
existing sort options. To update sort options, choose “Sort
Parameters” under “Options” in the main menu:
Figure 50, Main Menu Sort Parameter Option
The following dialog box will appear:

Figure 51, Sort Parameters Dialog Box
From this screen you can Add, Edit, or Delete any sort options for the Detail Extract Error report, Load Level Error Report, or Loan Detail Report. Click on Error Detail or Loan Detail to add, edit, or delete sort options for that report type.
To create a new sort option, select “Add,” and the following dialog box will appear:

Figure 52, Sort Parameter Edit Dialog Box
Steps to Add Sort Parameters
Step 1: Enter the Sort Key
(Up to 10 characters that name the report — generally the field name, e.g. “Field Code.”)
Step 2: Enter the Description
(Up to 35 characters that describe the sort sequence. This will appear in the drop down list on the report dialog box.)
Step 3: Enter the Positions
(Up to 60 characters that define the positions in the record by which the report will sort. Use commas between fields).
Selection
Flag Box
Check
the “Available for Selection” box if you want the new
Sort Parameter to be listed in the sort sequence drop down list on
the report dialog box.![]()
If you want to have a report that sorts by Loan Type and Social Security Number,
Step 1: Enter “Type-SSN” in Sort Key box.
Step 2: Enter Loan Type & SSN in Description box.
Step 3: Enter 38-39,9-17 in Positions box.
S
tep
4: Press “OK.”
Use
of Spaces
Do
not insert any spaces after position numbers. If you do, the program
will assume the sort parameter you’ve specified has ended. If
you wish to add any comments (e.g. additional description) you can
put comments after a space.![]()
When you view the Sort Parameters Dialog Box, you’ll see:

Figure 54, Sort Parameter Edit Dialog Box
This sort parameter will now be listed in the sort sequence options in the Error report dialog box.
Error Reports
Viewers
Remember
that the DataPrep default viewer (NSLDS-V2/ota.exe) produces a
correctly formatted report while the other viewers may not. If you
use one of the other viewers to view or print a report, you may have
to either adjust the font and size to fit on a page or print your
report using landscape rather than portrait format.![]()
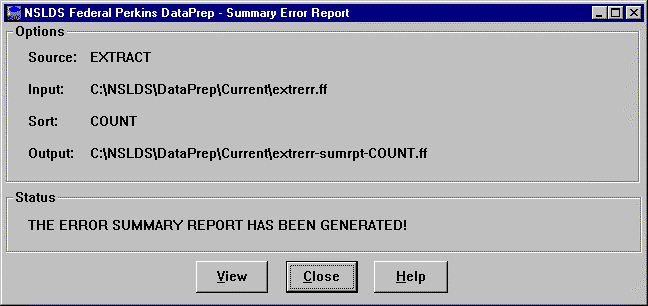
Figure 55, Summary Error Report Message Box
Once the Error Report is generated, you have the option of viewing or printing it using either the viewer program you designated during setup or by selecting a different viewer.
Generating Error Reports for Mainframes (OS/390 LE-Based Users)
The JCL for mainframes (OS/390 LE-based users) performs both Extract Validation and Error file generation (see Appendix G).
Main
Frame Users:
Extract
Report Sorting
The
Summary Extract Error Report for mainframes can be sorted by count,
error code, and field code. However, the Detail Extract Error Report
for mainframes is ONLY sorted by social security number.![]()
Summary Report Sorting
There are three options for sorting the Summary report: error count, error code, and field code. The JCL provided specifies that the report will be sorted by error count. If you want to change this default, you must change the JCL (see Appendix G). You do so by adding an asterisk (*) after the two slashes in the JCL line:
// SET SORTPARM=PUTB4001
and deleting the asterisk in the JCL line that specifies the sort option you wish to use.
Change either:
//* SET SORTPARM=PUTB4002
or
//* SET SORTPARM=PUTB4003
Detail Report Sorting
The Detail report is automatically sorted by SSN within school. This is the only sorting option available in Detail Error reporting.
If do not wish to automatically produce an Extract Detail Error Report, you must change the JCL (see Appendix G).
Using the Extract Summary Error Report
Using
the Extract Summary Error Report
You
can use the Summary report to focus quickly on the types of errors
that have occurred.
If
a large portion of your errors come from the DOB field, for example,
that will show up in the summary report. You can then generate a
detail report to show individual records that will need to be
corrected.![]()
The Summary report is a tool you can use to help you quickly spot problem areas in either your Database Extract file or the Extract Validation process.

Figure 56, Sample Summary Extract Error Report–No Sort
Using the Extract Detail Error Report
View
the Extract Summary Error Report First
We
suggest that you generate and view a Summary Error Report before
viewing a Detail Report. The summary will give you the numbers of
the types of errors in your Extract file, making it easy for you to
spot large problems.![]()
Appendix D contains a detailed list of all error messages, a cross-reference to the fields to which they refer, and the error message associated with each edit applied against a data element. You can also refer to the Field Code and use Appendix A to review the requirements for reporting on the specific field.
Note: It is essential that you correct your database rather than just correct the Database Extract file. Otherwise, the errors will reappear in the next processing cycle, and your data will be out of sync with NSLDS.
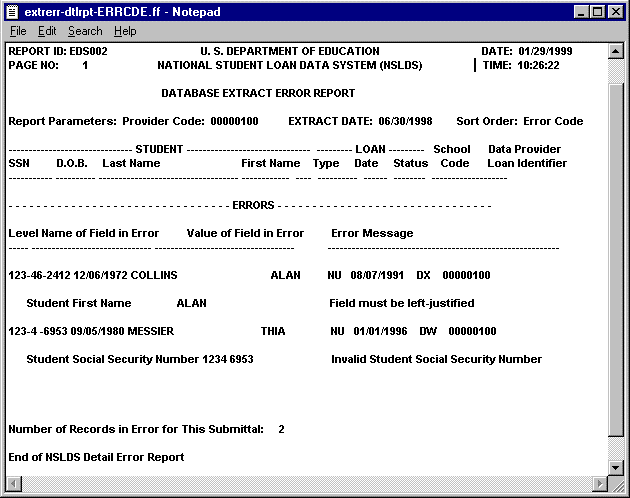
Figure 57, Sample Detail Extract Error Report–Error Code Sort
Domain—Level Errors
There are four types of domain-level errors that you must correct in your database before DataPrep will create a Submittal file:
Numeric Field Error
Invalid Date Error
Missing Identifier
Missing New Identifier
Numeric Field Error
A numeric field error occurs when a field requiring all numeric characters is populated by some other character or space. This type of domain error may indicate extraction of the wrong data, an incorrect result in a calculated field, truncated data, incorrect field length, or another type of data problem. The Extract Error Reports will identify the data that erred and you can use either the Summary Report or the Detail Report to identify the data in your system needing correction or trace back the source of the corruption. You can also review the loan record using the Loan Detail Report option on DataPrep to review the whole record.
Invalid Date Error
An invalid date error occurs when an invalid date appears in a field requiring a date. This may be caused by an incorrect character in the date field (e.g., a non-numeric character) or if the date is not a calendar date (e.g., 1998-02-30—February 30th is not a valid date). An invalid date error will not occur if the date is valid, regardless of whether or not it is reasonable (e.g., a student date of birth of 1998-02-28 will pass this domain-level edit, although clearly 1998 is not a reasonable date for a current student. That record-level error will occur later when NSLDS tries to load the data).
You should note that a date field with all zeros will pass the domain edit, but may err in the load process if a date is required.
Missing Identifier
Identifier errors occur when one or more loan or student identifier field is left unpopulated. Examples of identifier errors are Loan Type with spaces or birth date with zeros. These create a loan record with an invalid format loan record. Identifier errors often occur either when there is missing data in your database or when your extract process is not properly working. It is essential you review the cause of this error so it does not continue to occur.
Missing New Identifier
New Identifier errors occur when one or more of the loan or student new identifiers is populated by valid data, but the remaining new loan- or student-identifiers are not. This occurs if you try to perform an Identifier change but fail to fill in all of the New Identifiers. New identifier errors indicate an identifier change process that is not occurring properly so it is essential you review the cause of the error.
Reviewing the Extract File
Changing
the Extract File
If
you view or review your Extract file, be certain you do not make
any changes. The Extract file must be a validated, mirror image of
your database.![]()

Figure 58, DataPrep Main Menu with Loan Detail Report Selected
T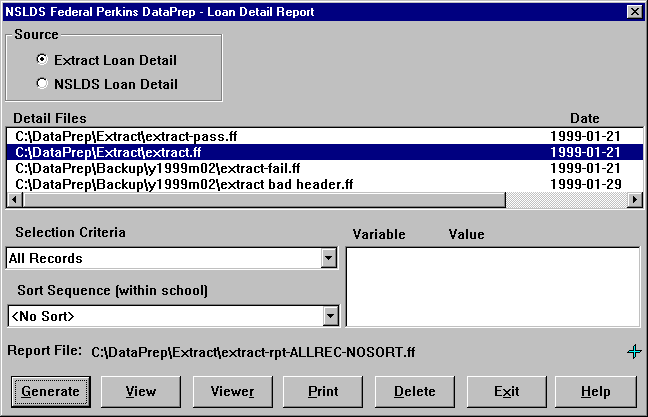
he
Loan Detail Reports dialog box will appear.
Figure 59, Loan Detail Reports Dialog Box
You can scroll to the right to see the date and time the file was last modified and the number of bytes in the file. If you have several Extract files, this can help you determine which one you want to view or print.
Double-clicking the file (or selecting the button to the right of the file name, if there is a button) will create a File Information message box that will show you the same information: date and time the file was last modified and the number of bytes in the file.

Figure 60, File Information Message Box
Sorting Options & Selection Criteria
Like the Extract Error and Load Error Reports, the Loan Detail Report, Extract file, and Submittal File can be sorted by a variety of parameters using a variety of selection criteria. You can also add, edit, or delete the selection criteria and sort parameters (see pages 70 to 80 for information about sort parameters and selection criteria). If you select No Sort, the report will be sorted in the same order as the file from which it was generated (i.e., the Database Extract file).
Select the appropriate Extract Detail file, choose the desired sort sequence, and generate the report. Once it is generated, you can either view or print the report. Refer to page 28 for more information about selecting the viewer and print options.
Step 4: Sending the Submittal File
The Submittal File
 Once
you have completed the Extract Validation process (all file-level
errors are corrected and the number of domain-level errors is below
the threshold), DataPrep creates a Submittal file for you to send to
NSLDS. The file contains one Header record, all Detail records, all
Past Period Change records, and a Trailer record (created by
DataPrep).
The Trailer record marks the end of the submittal and contains basic information about the number of records processed and the number of records in error at each level of validation.
Sending the Submittal File
Missing
Your Scheduled Submittal Date
Schools
and data providers have a specific window within which they must
transmit their Submittal file. If you do not transmit within the
time frame, your submittal will be rejected by NSLDS and you’ll
get a message back instructing you to resubmit on your next
scheduled date.
ED
keeps track of all missed submissions as well as error rates in
determining an institution’s ability to properly manage Title
IV student aid programs.![]()
Because of the number of data providers and the size of some of the Submittal files, it is critical that you submit your data according to the schedule established by NSLDS. NSLDS will provide the schedule to you each year, usually in December.
Unsuccessful Transmissions
If you are not able to successfully transmit your Submittal file, contact the NSLDS CSC at (800) 999-8219 (Monday through Friday, 8 a.m. to 8 p.m. Eastern Time). You may also need to contact the Title IV WAN CSC at (800) 615-1189 if the problem is with the EDConnect software or transmission lines.
Submitting Concatenated Files
DataPrep processes concatenated Extract files in much the same way as individual school extract files. A Submittal file will be produced after all file-level edits are corrected and the number of domain-level errors is below the threshold.
T

Where
to Send Your Tape
Data
providers are strongly encouraged to transmit their data using the
Title IV WAN. By special arrangement with NSLDS, data providers may
send tapes or cartridges instead of transmitting their Submittal
File via the Title IV WAN. Tapes or cartridges must be sent in time
to meet your scheduled submission and should be addressed to:
CSC
Meriden
Attn:
Tape Librarian
71
Deerfield Lane
Meriden
CT 06450
ape/Cartridge Submittal Procedures
When you must supply NSLDS data using a tape or cartridge, you must use one of these formats:
Cartridge input conforming with IBM 3480 standard label tape cartridges, EBCDIC, format.
IBM 6250 BPI standard label tapes, EBCDIC
IBM 1600 BPI standard label tapes, EBCDIC
IBM 800 BPI standard label tapes, EBCDIC
The magnetic media external label must contain the following information:
Internal Volume Serial Number
Creation Date
Data Provider Name
Blocksize
Logical Record Length
Record Format
Number of records
Step 5: The NSLDS Load Process
 After
you transmit your Submittal file, NSLDS performs the Load Process. A
key part of this process is the additional edits NSLDS performs on
the Submittal file—checking the file, the integrity of the
data, and the compatibility of the added and updated records with the
data currently on NSLDS.
First, NSLDS determines whether there are errors in the Submittal file that prevent processing the file (such as an incorrect format, late file, the wrong file sent, or corrupted data). If so, an Error Submittal Summary Notification file explaining the problem will be distributed within 1 or 2 days via the Title IV WAN (through the message class SHSNTFOP).
After checking the readability of the file, NSLDS checks that the submittal time and date are within the scheduled time frame established for the school. If not, NSLDS will reject the Submittal file and will inform you of this status in the Error Submittal Summary Notification file.
Next, NSLDS checks the contents of each record (record-level edits) to determine whether the data contained in each record is acceptable to NSLDS. Record-level edits include identification of duplicates, Y2K edits, and tests of reasonability.
Following a successful pass through record-level edits, the record is compared with data already on the NSLDS database. During this process—load-level edits—loan identifiers are checked against existing loans on the database, student identifiers are checked against existing students in the database, and data fields on updated records are checked for compatibility (such as sequence errors). Records passing the load-level edits then update NSLDS.
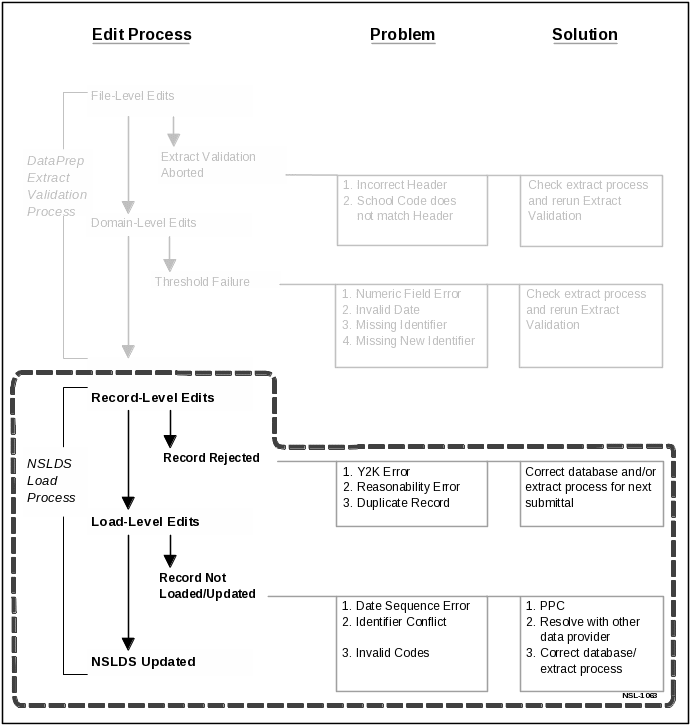
Error Submittal Summary Notification File
Check
Your Mailbox Early
It’s
important that you check your Title IV WAN mailbox a day or two
after transmitting your Submittal File. If there is a problem in
reading the file or some other error that prevents an NSLDS update,
you will be notified through the message class SHSNTFOP that you
need to correct and retransmit the Submittal file.![]()
Reasons that will prompt an Error Submittal Summary Notification file are:
An incorrect file was sent instead of a validated Submittal file (this might be your Extract file. The Submittal file will be labeled submit.ff, while the Extract file will be called extract.ff.) A file was sent with an invalid format (for example, there is no valid header, no 300-byte records, or no trailer record).
The file got corrupted either during the Title IV WAN submittal processes or cartridge/tape production process.
Your Submittal file is not received during the time frame in which NSLDS can load the data.
If processing cannot occur, the Error Submittal Summary Notification file will be made available one or two days after you transmit your Submittal file. The file will consist of a header record, one or more detail records containing an error message (schools or servicers providing data for more than one institution or branch will receive a detail record for each school they sent to NSLDS), and a trailer record. See Appendix F for the complete layout description.
The detail record(s) will indicate why the Submittal file was rejected and will give you a brief description of the problem through a message code that can be found in Appendix F. Appendix F also lists the actions you must take to correct the error(s).
Record-Level Edits
Duplicate Stripping
Duplicate
Records Rejected
If
two loan detail records have the same identifiers, both records will
be rejected since NSLDS has no way of determining which record is
correct. You will have to resubmit the record in a later submission.
Duplicate loan records will have an Error Code of 1423 (Identifiers
must be unique on each detail record) on Field Code 225 (Date of
First Disbursement).![]()
Data Field Edits
NSLDS performs edits to ensure that data is contained in proper fields under specific edit criteria. Records are rejected if they fail data field edits. An example of a data field edit is not filling in a required field such as the Date Entered Repayment field or a Cancellation Amount on a loan that has a Cancellation type. Records that fail on data field edits will not be checked for additional errors.
Y2K/Reasonability Edits
NSLDS will now check for Y2K and Reasonability edits. NSLDS reviews all date and amount fields on each record to ensure that ED standards for Y2K compliance are adhered to. In addition, NSLDS edits date and amount fields for reasonability of data based on Title IV rules. For example, if a loan is reported as a PU loan (Perkins Loan) with a Date of First Disbursement of 1982-01-15, it will be rejected since Perkins loans did not exist in 1982.
Load-Level Edits
Invalid Codes
N
Correcting
Invalid Codes
Submitted
records with invalid codes will be rejected. To correct these code
errors, you must correct either your database or the extract
process.![]()
Identifier Conflicts
NSLDS reviews the identifiers against those of loan records on the database. If the student SSN does not match an SSN on NSLDS, either current or in history, the student is considered a new student. If the record then passes all the remaining edits, a new student is created with a loan assigned to the SSN.
If the student SSN on the Submittal file matches an SSN on the NSLDS database, the Identifier Match Criteria will attempt to match the submitted record with one that currently exists on the system. If another Perkins loan record matches on four criteria: student SSN, Original School, Loan Type, and Date of First Disbursement, the record will be considered an attempted update. If all other edits are successful, the record will update the NSLDS database.
Correcting
Identifier Conflicts
Submitted
records that match on SSN but not on the other student identifiers
(student DOB and first name) will cause an identifier conflict. To
correct this error, you must resolve the conflict with the data
provider whose data conflicts with yours.![]()
If a match cannot be made based on the Identifier Match Criteria, the record will be rejected. If that occurs, you will need to resolve the identifier conflict with the data provider(s) whose data conflicts with yours.
On the Load Process Error Report, discussed in detail in the next step, the student’s SSN and first name you input will be listed, along with the student’s SSN and first name, and the name of the other data provider (guarantee agency or school) currently on the system. This information will assist you in resolving the conflict with the other data provider.
Date Sequence Errors
Correcting
Date Sequence Errors
Submitted
records that do not conform to certain date sequence logic (e.g.,
deferment stop date prior to a deferment start date) will not update
NSLDS. To correct these errors, you must submit a PPC.![]()
Step 6: Using the Load Process Error File to Correct Your Database
 The
next step is for you to use the Load Process Error file generated by
NSLDS to make corrections to your database. To do so, you’ll
first have to obtain two files from NSLDS:
Load Process Error File—identifies the records that require correction or conflict resolution. This file will be sent to you via tape.
Threshold, Error Code, and Field Code File (TEF)—a utility file used by DataPrep that translates error codes and field codes into error messages. This file you must retrieve from NSLDS via the Title IV WAN.
Once you have both files, you can use DataPrep to either print or view the Load Process Error file in a report format, or export the file in a flat-file format for manipulation through other software.
The Load Process Error File
The Load Process Error file will be sent to you via Title IV WAN on tape or cartridge. The format of this file has not changed except to add your unique loan ID to the record. Once you receive the file, you must use an internal procedure to move the file into a PC. Then you can use DataPrep to create error reports.

Retrieving
TEF File from NSLDS
It
is strongly suggested that you retrieve the TEF file a day or two
after your Submittal file is loaded into NSLDS. This will ensure you
have the latest error codes and messages when processing your error
file.
Retrieving the TEF File
After your Submittal is processed, NSLDS will transmit a new TEF file to you via the Title IV WAN. The TEF file will be transmitted by WAN only, regardless of your submittal medium. You must retrieve the TEF file and import it into DataPrep. You can do this by using the NSLDS File Transfer function from the DataPrep Main Menu.
Importing Files
T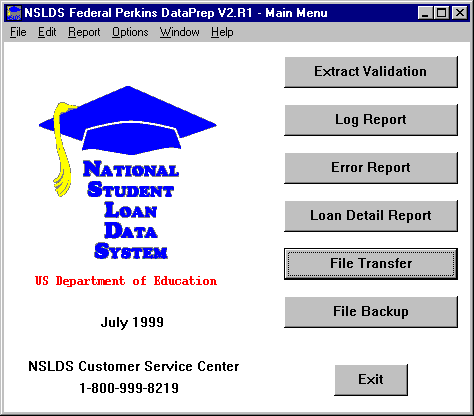
o
import files into DataPrep, select “File Transfer” from
the Main Menu.
Message
Class Input and Output Files
Regardless
of what file name you insert in the input screen, DataPrep will
change the output name so that it can be used. The TEF file message
class, TEFFILOP will output as TEF.ff.![]()
The screen that will appear offers you the choice of importing the Load Process Error file, Thresholds, Error Codes and Field Codes (TEF) file, and a loan detail file (query) requested from NSLDS.
Importing the TEF File
To import the TEF file, you will actually have to import the message class TEFFILOP from your Title IV WAN mailbax. Therefore, you must change the value on the input file screen to search for the correct file. You can do so using the “Browse” function on the File Transfer screen. The output must be TEF.ff.
Figure 63, Importing the TEF File.

Once you move or copy the file, you’ll receive a message stating that the move or copy was successful.
Transferring
the Load Process Error File
The
Load Process Error file will be sent to you on tape. Therefore, to
import it into DataPrep you must first develop your own internal
procedures to transfer it to your PC. Then DataPrep can move or copy
it to the correct directory (current\loaderr.ff).![]()
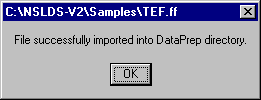
igure
64, Importing the TEF File.
Importing the Load Process Error File
After you’ve transferred the TEF file into DataPrep, you can transfer the Load Process Error file by duplicating the steps. Once the file is on your PC, you can use the DataPrep “File Transfer” function to move or copy it to the correct directory (current\loaderr.ff).
Importing the Loan Detail File
By special arrangements, you can obtain from NSLDS a Loan Detail file to help identify and resolve error conditions. You can also request a complete Reconciliation file of all your records on NSLDS. Once received, you can use the DataPrep “File Transfer” function to move or copy it to the correct directory.

Figure 65, File Transfer Screen — Loan Detail File
You can also insert a Version name by filling in the Version box. This can help if you have more than one loan detail file. However, the file will have to be named “loandtlVersionname.ff” and it will be placed in the directory you specified in the Directory options. If you did not specify a directory, DataPrep will automatically place it in the C:\DataPrep-GA\Current\ directory.
See page 108 for more information about generating Loan Detail Reports.
Generating the Load Process Error Report for Windows Users
To generate and view the Load Error Process Report, click Error Report on the DataPrep Main Menu.

Figure 66, DataPrep Main Menu with Error Report Selected
Next, select Load Processing as the Error Source, select the error file from which you will generate a report, select a detail or summary report, and choose the desired sort options. Then click Generate.
Using
the Sort Option
Sorting
your report by type of error will help in speeding along the
correction process. Using sort options in the report generation
function will help you determine patterns of data errors in your
submittals and improve your procedures for future submittals.![]()
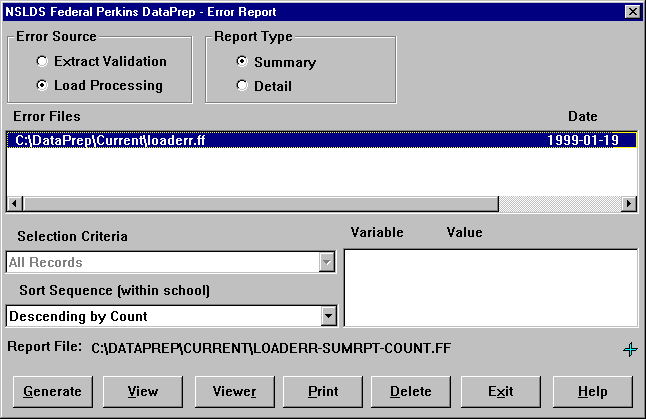
igure
67, Error Reports—Load
Processing
Once the report has been generated, you can view or print it using the designated viewer or printer and use it to help you correct your database before the next extract.
Sorting
the Summary Error Report
You
can sort the Summary Error Report in any of 3 ways: error count,
error code, or field code. To select a sort option, use the SET
statement.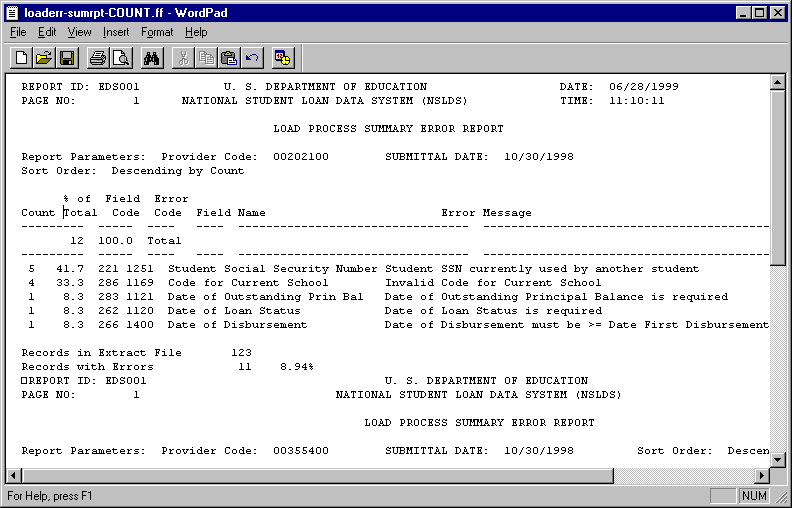
![]()
Figure 68, Load Process Error Report
G

Using
the Sort Option
Sorting
your report by type of error will help in speeding along the
correction process. Using sort options in the report generation
function will help you determine patterns of data errors in your
submittals and improve your procedures for future submittals.
enerating the Error Report for OS/390 LE Users
Datasets
Deleted
The
first step in the JCL will delete any datasets previously created.
If you want to save your previous error files, you may want to copy
them to another file name.![]()
This JCL may be referenced from the library created with JCLLIB as part of the name. The library member name is DRBB2000.
As with the Extract Validation Error reporting, you have the option to sort the Summary Error report in three different ways (by Error Count, or Error Code, or Field Code). You do so by changing the SET statement. See the in-stream documentation in Appendix G. Note that the Detail Load Process Error report can be sorted only by SSN.
The JCL references a sample Load Process Error file containing 35 student/loan records for 3 different schools, all in one Extract file. School 002021 has 11 errors, school 003554 has 7 errors, and school 004920 has 2 errors. This should be reported in the Detail Error Report and the Summary Error Report.

Correcting
Record-level Errors
There
are two types of record-level errors: Y2K and reasonability.
To
correct either of them, you must correct the data in your database.
When you next extract the data using DataPrep, the next Submittal
file will have the corrected information. NSLDS will load the
corrected information in the next load process.
Record-Level Edits
If there are record-level errors in your Submittal file (Y2K and reasonability errors—see step 5), the NSLDS will have rejected the record and NONE of the information in that record will have been updated. To remedy this you will have to CORRECT and RESUBMIT the correction in next month’s submittal.
There are two types of record-level errors:
Y2K Errors
Reasonability Errors
Y2K Errors
NSLDS reviews all date and amount fields on each record to ensure that ED standards for Y2K compliance are adhered to and that the century is reasonable. To correct Y2K errors, you must correct the information in your database. When you next run the Extract Validation function in DataPrep, the corrected information will be in the Submittal file. When NSLDS loads the Submittal file, the record will be updated and will reflect the corrected, and reasonable, information.
Reasonability Errors
Reasonability errors result from submitted data that doesn’t make sense logically. To correct these errors, like Y2K errors, you must correct the information in your database. When NSLDS loads the corrected Submittal file, the record will be updated and will reflect the corrected, and reasonable, information. Following are two examples of Reasonability Errors:
Loan type equals PU (Federal Perkins Loan). Date of First Disbursement submitted equals 19810120 (January 20, 1981). This is not reasonable since the Perkins Loan Program did not exist until 1987 (Date of First Disbursement must be at least 19870101). Therefore, you must correct your database to reflect that the loan type equals NU, National Direct Student Loan (NDSL).
Date of First Disbursement equals 19950905. Date of birth submitted for student equals 19910713. Student cannot have received a Perkins loan and be only 4 years old. Correct the information in your database as needed (date of birth must be at least 12 years before Date of First Disbursement).
Load-Level Errors
Load-level errors occur when the specific data submitted on your Submittal file conflict with the data already in NSLDS. When there is a load-level error, the entire record is rejected.
To correct load-level errors you must correct the information in your database and submit a Past Period Change in your next Submittal file.
There are three types of load-level errors:
Data Field Errors
Date Sequence Errors
Identifier Conflicts
Correcting Data Field Errors
Data field errors that appear on your Load-Process Error Report usually require that you make changes to the respective field(s) in your database before your next extract, (e.g., a typographical error for the Date of Disbursement where your system field had 1896-01-25 instead of 1996-01-25. In this instance, NSLDS would reject that date as being prior to the loan program’s existence). In your next Submittal file, you must submit a Past Period Change with a Date of First Disbursement of 1996-01-25.
However, data field errors may also occur if there is a problem with your extract process. For example, incorrect information may have been placed in a field that fails a companion field edit, such as a date of birth entered on your system as 19960415 instead of 19760415. While this typo in itself would not err out since the Date of First Disbursement for the loan is 19970902 and the date of birth occurs before that date, the companion field comparison causes a reasonability error.
Correcting Date Sequence Errors
Date sequence errors result when you attempt to change a date field that requires you to use a Past Period Change. No update will occur unless you submit a Past Period Change.
Correcting Identifier Conflicts
Identifier conflicts occur when a new loan is submitted for a student SSN already on the NSLDS database but the match criteria cannot match the name and or date of birth. This kind of error can be caused by a number of factors: typos, a student reporting two different first names to two different data providers, (e.g., a student who uses a middle name as a first name), two different students mistakenly using the same SSN, or even fraud. Regardless of the reason for the conflict, you must resolve the situation in order to get the record successfully loaded to NSLDS.
Loan records erring due to identifier conflicts should be compared with the data the record erred against in the load process. The Load Process Error report will show the conflicting identifiers and the data provider that had supplied the conflicting data. You should check to see what the conflict is and if it is something that should be corrected on your database.
If it appears your data is accurate but there is a conflict with data from another data provider, you’ll have to contact the conflicting data provider to resolve the conflict before NSLDS can be updated. You can use the on-line contact screens to get the necessary information about the other data provider. You may have to discuss with the other data provider(s) the differences in the materials you have on hand regarding the student compared to their materials in order to determine which piece of information is correct. If you have to correct the name or DOB information, you will have to use the identifier change process to correct the information on NSLDS so that the loan can load and the data can be accurate.
Loan Detail Report
I
f
you’ve made arrangements for NSLDS to send you a reconciliation
Loan Detail file, and have imported that file into DataPrep (see page
101), you can generate a
Loan Detail Report from that file. From the Main Menu, select Loan
Detail Report.
Figure 69, DataPrep Main Menu, Loan Detail Report
From the Loan Detail Report screen, select the file from which you wish to generate a report. Then choose the Selection Criterion (see page 70 for more information about Selection Criteria), choose the Sort Parameter you wish to use (see page 80 for more information about Sort Parameters), and select “Generate.” Once the report is generated, you can print it or view it using one of the viewer options. This is the same procedure you use for reviewing the Extract and Submittal files. Refer to page 68 for more information.

Figure 70, Loan Detail Report Screen
After you’ve generated the report, you can print or view it using any of the available viewers.
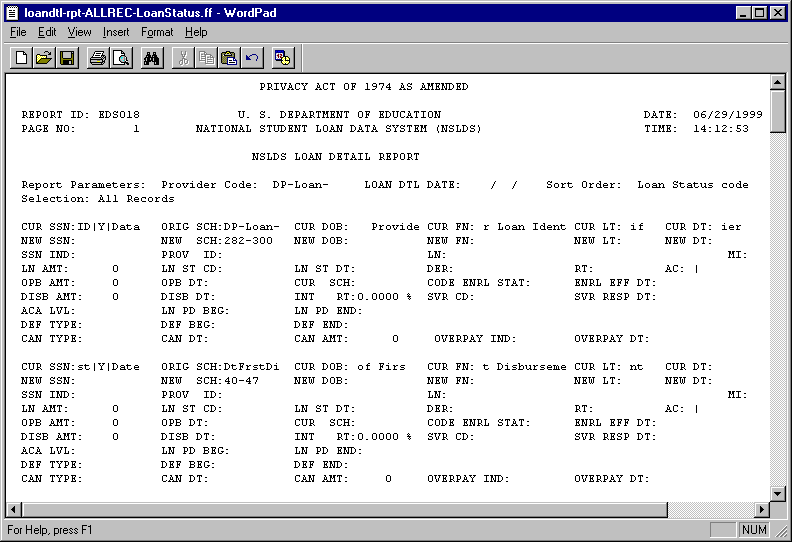
Figure 71, Sample Loan Detail Report
Backing Up Your Files
Using
Backup Files
Backup
files can help you track the loan dollar and number totals from
month to month to ensure the extract process is functioning
correctly, and provides an audit trail. They will also help you
minimize the number of domain-level edits.![]()
Click File Backup on the DataPrep Main Menu.
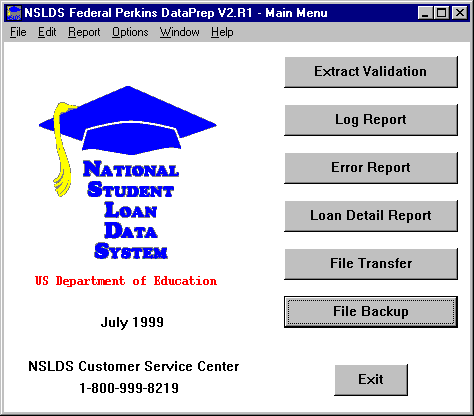
Figure 72, DataPrep Main Menu with File Backup Selected
The Backup Files dialog box will appear.
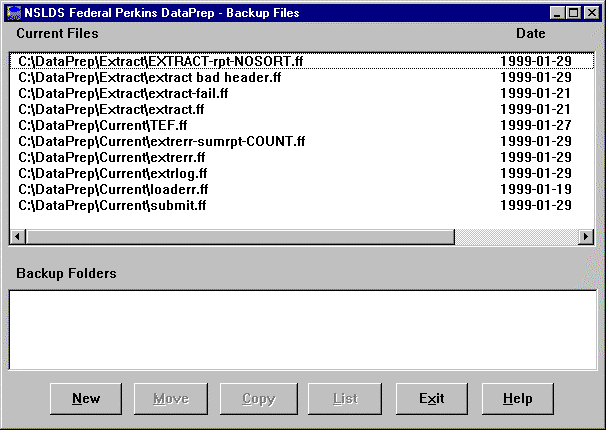
Figure 73, Backup Files Dialog Box
First, you must create a new folder for the backup files by clicking New.

Figure 74, New Backup File Folder Screen
The counter will help you select the month and year of the new folder in which you’ll store the backup files.
Select the file(s) you
want to move or copy to the new folder by
Moving/Copying
Files to Backup Folders
Before
you can move or copy files to a backup folder, you must select the
file(s) and the folder. The date, time, and number of bytes
of each file are provided for you by moving the scroll bar to the
right margin or by double-clicking the file name.![]()
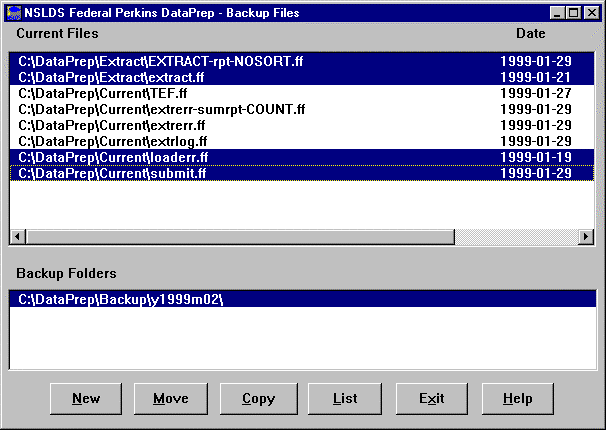
Figure 75, Moving and Copying Files to Backup Folders
Once you Move the files, they will disappear from the screen and will have moved from the Current directory to the Backup directory. If you Copy the files, they will remain in the current directory and on the screen.
To see what files are in a particular folder, select the folder and click List.
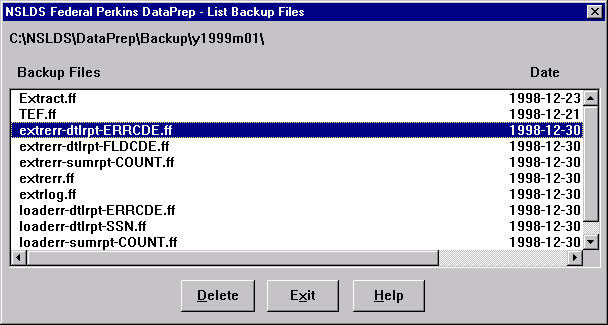
Figure 76, List Backup Files Screen
Deleting
Backup Files and Folders
If
you wish to delete a backup folder (you probably don’t want to
keep more than a year’s worth of backup folders and files),
delete all the files in the folder. Then select “Delete”
again and DataPrep will ask you to confirm that you want to delete
the folder.![]()

Figure 77, File Information Dialog Box
Final Thoughts
We hope this Data Provider Instructions manual has been helpful in showing how DataPrep functions. We also hope including the entire 6-step process and a description of how DataPrep interacts with NSLDS, gives you a needed overview of the entire NSLDS update system.
If you have any questions about the use of DataPrep or the NSLDS update process, please be sure to call the CSC at (800) 999-8219 between the hours of 8 a.m. and 8 p.m. eastern time, weekdays, except federal holidays.
In addition, if you have any suggestions about how this manual can be improved, please be certain to call the CSC and let them know your suggestions.
| File Type | application/msword |
| File Title | Concatenated Files |
| Author | Raytheon Systems |
| Last Modified By | DoED |
| File Modified | 2006-09-26 |
| File Created | 2006-09-26 |
© 2026 OMB.report | Privacy Policy
