2010 Census Public Use Microdata Areas (PUMA) Program
Generic Clearance for Geographic Partnership Programs
2010PUMA_Participant_Guidelines
2010 Census Public Use Microdata Areas (PUMA) Program
OMB: 0607-0795

2 010
Public Use Microdata Areas Program
MAF/TIGER Partnership Software Participant Guidelines




September
2011
Table of Contents
1 Introduction 1
2 Changes From 2000 to 2010 PUMA 2
1. Summary of changes to final criteria for 2010 2
3. No Changes to the Final Criteria From the Proposed Criteria 8
3 2010 PUMA Criteria 8
1. One level of PUMAs will be delineated for the 2010 Census. 8
3. PUMAs may not cross state boundaries. 9
6. Each PUMA must constitute a geographically contiguous area. 10
4 2010 PUMA Guidelines 10
5 2010 PUMA MTPS Procedures 11
1. Installation and Starting the PUMA MTPS 11
6. Submitting PUMA Delineations 29
1. Map 1: Single County PUMA 33
2. Map 2: Multiple County PUMA 33
3. Map 3: PUMAs Crossing County Boundaries 34
4. Map 4 : Combining Standard PUMAS to make POW and MIG PUMAs 35
5. Map 5: Multiple PUMAs in an AIA 36
Appendix B. PUMA MTPS Tools 37
Appendix C. Splitting States into Multiple Work Areas 47
Appendix D. Creating Set-up Files for Multiple Work Areas 49
Appendix E. Creating Census Tract Equivalency Files 51
Appendix F. MTPS Error Resolution Guidelines 56
Appendix G. PUMA Naming Criteria 58
1Introduction
PUMAs (Public Use Microdata Areas) are statistical geographic areas defined for the tabulation and dissemination of decennial census and American Community Survey (ACS)1 Public Use Microdata Sample (PUMS) data.2 Additionally, PUMAs are used in the publication of ACS period estimates. Nesting within states, or equivalent entities,3 PUMAs cover the entirety of the United States, Puerto Rico and the Island Areas that contain a 2010 Census population of 100,000 or more.4 PUMA delineations are subject to population, building block geography, geographic nesting, and contiguity criteria. State Data Centers (SDCs) define PUMAs with the cooperation of regional, state, local, and tribal organizations and agencies.
This document will provide participants with the following information:
Changes from 2000 to 2010 PUMA delineation criteria
PUMA Overview and Criteria
PUMA MTPS Installation and Data Download Procedures
How to use the PUMA MTPS for PUMA delineations
How to create multiple work units out of one State PUMA delineation project
How to name PUMAs
How to use the PUMA MTPS to Verify delineations
How to submit final delineations to the Census Bureau
PUMA MTPS tools and functionality
If there are questions regarding PUMA delineation or about downloading materials, please email the GEO PUMA team at [email protected], or call the Census Bureau at 301.763.1099 and ask to speak to one of the following GEO PUMA Team members:
Ryan Short
Nick Moebius
Patrick Jurgens
Brian Brlansky
April Avnayim
Aaron Basler
Dierdre Bevington-Attardi
Participating State Data Center (SDC) representatives will have four months to submit all delineations to the Census Bureau after they have downloaded essential materials.
2Changes From 2000 to 2010 PUMA
1.Summary of changes to final criteria for 2010
On January 1, 2011, the Census Bureau published the 2010 PUMA proposed criteria on its website (http://www.census.gov/geo/puma/puma2010.html) and requested participant comment on the following proposed criteria changes for 2010:
(1) Only one level of PUMA is proposed to be delineated for the United States, Puerto Rico, Guam, and the U.S. Virgin Islands, as compared with two levels (PUMAs and Super-PUMAs) used for Census 2000.
(2) The required minimum population threshold of 100,000 persons must be maintained throughout the decade.
(3) Counties and census tracts are proposed to be used as the only PUMA building block geography, as compared with counties, census tracts, minor civil divisions (in some states), and incorporated places with populations of 100,000 persons or greater for Census 2000.
2.Responses
The Census Bureau received letters and e-mails containing comments on several issues from the proposed criteria from various organizations and individuals. The correspondence received pertained mostly to the building block entities (3 above), specifically, the elimination of incorporated places and minor civil divisions (MCD) as building block entities. In addition, there were several comments regarding the recommended guidelines and further suggestions for the inclusion of specific research communities, governmental organizations, and local data users in the review process. A major public policy research organization recommended a guideline to make PUMAs coincident with metropolitan boundaries. Comments received are summarized below, as well as the Census Bureau’s response to these comments.
Comments on Eliminating Incorporated Places and MCDs as building block entities for 2010 PUMAs: The Census Bureau received four (4) comments opposed to the elimination of incorporated places and MCDs building block entities for 2010 PUMAs. These comments were from a major policy research organization as well as the states of California and Michigan and representing state and local government agencies, and a regional organization.
The public policy research organization recommended that cities (incorporated places) should continue to be used as PUMA building blocks. This organization feels that their audience needs “real world” data that corresponds to the places where they live and work. Their argument maintains that a vast majority of cities keep their boundaries consistent, and that data users need to access reliable data for these geographies. The California local agency also maintained that PUMAs should be allowed to be built from incorporated places with populations greater than 100,000, as data aggregated by incorporated places with populations greater than 100,000 residents are more meaningful than data aggregated by large groups of census tracts. The Michigan state agency objected to the elimination of MCDs and places with 100,000 residents as PUMA building blocks because this would significantly decrease the utility of PUMS files. A regional agency from Michigan objected to the elimination of MCDs as a building block entity because these entities are very important to their local data users and in a few instances, notably in Ann Arbor and in Monroe County, census tracts do not correspond to MCD boundaries.
The comment from a California university favored the proposed elimination of incorporated places building block entities since Los Angeles County currently has many noncontiguous PUMAs that are created where PUMAs are based on places that contain enclaves and exclaves. This organization prefers to eliminate all such anomalies in favor of geographically contiguous areas.
The Census Bureau presents the following research supporting the elimination of Incorporated Places as building blocks:
Incorporated place-based PUMAs whose boundaries change over the decade represent significant PUMS publication disclosure risks for residence PUMAs and place of work (POW) PUMAs. This is of particular concern since annual PUMS will be published for 2010 PUMAs.
Research reviewed by several internal Census Bureau committees (including the Disclosure Review Board (DRB), the Statistical Areas Committee (SAC), and the 2010 PUMA working group provide convincing evidence that this represents a disclosure risk and, therefore, incorporated places should not be permitted as 2010 PUMA building blocks.
More specifically, changes in PUMA boundaries present ample opportunity for PUMS “geographic identification” as outlined in the Federal Register detailing the Criteria for Releasing Public Use Microdata (Vol. 68, No. 86)--see II.B.1.a.6 below. These disclosure concerns apply in situations where PUMAs are built upon building block geography that changes over a decade (e.g., incorporated places that annexes or deannexes an area). In these cases the potential for creating a sliver piece of geography with low populations greatly increase the risk of disclosure.
The Census Bureau found that nationally, incorporated places of 100,000 or more residents only comprise 17% of all 2000 PUMAs. A majority (60%) of the place-based 2000 PUMAs (places with 100,000 or more residents) have had annexations or deannexations over the past 10 years.
Since changes in PUMA building block geography represent a disclosure risk for PUMS publication, and since a majority (60%) of all place-based 2000 PUMAs had annexations/deannexations from 2000 to 2010, the Census Bureau will not permit the use of incorporated places as building blocks for 2010 PUMAs. Census tracts provide much more stable boundaries, and may be aggregated to approximate the extent of other types of geographic entities.
Follow-up research from participant comments found PUMAs built from incorporated places that contain enclaves and exclaves, some of which have very low populations (see items 4 and 5 below). Areas with low populations’ present opportunities for “geographic identification” as outlined in the Federal Register detailing the Criteria for Releasing Public Use Microdata (Vol. 68, No. 86)--see II.B.1.a.6 below. To help ensure confidentiality of PUMS data, the Census Bureau set forth a new criterion for 2010 PUMAs: tract-based PUMAs may cross county boundaries provided that each single PUMA-county part meets a minimum population threshold of 2,400 persons (i.e., the 2010 Census minimum population threshold for a census tract (1,200) x 2). This change seeks to eliminate unique geographic areas within a PUMA that contain low populations.
It was argued that PUMS data would be less useful and meaningful if census tracts were used to approximate incorporated place or MCD boundaries, as the data would not relate to the actual building block geographic entity the PUMA was created to represent. Since PUMS data are subject to “noise” (i.e., small amounts of variation) and data swapping, the PUMS data are less susceptible to the small differences between a census tract boundary and an incorporated place or MCD boundary, and these differences are not likely to have a significant impact on the representation of the PUMS data for an incorporated place or MCD.
California’s place-based PUMAs (places with 100,000 or more residents) represent 33% of all PUMAs in California. A majority of these are noncontiguous (55%) and have had annexations or deannexations in the past 10 years (69%). PUMAs built exclusively with more than one place represent only 6% of all PUMAs in California. A majority of California’s place-based PUMAs, particularly those in Los Angeles County referenced by the respondent from a California university (above), represent significant disclosure risks from noncontiguous enclaves/exclaves, and sliver geography created from annexations or deannexations. Incorporated places are not stable boundaries in these instances and therefore cannot be permitted as building blocks in California.
Michigan’s place-based PUMAs (places with 100,000 or more residents) represent 22% of all PUMAs in Michigan. Half of these are noncontiguous (50%), and 38% have had annexations or deannexations in the past 10 years. Ann Arbor, Michigan5 exemplifies a place-based PUMA, with significant disclosure risks from both noncontiguous enclaves/exclaves and sliver geography created from annexations or deannexations. Incorporated places are not stable boundaries in these instances and therefore cannot be permitted as building blocks in Michigan.
The following information, referred to in II.B.1.a.1 and II.B.1.a.2 above, comes from the Federal Register/Vol. 68, No. 86/Monday, May 5, 2003/Notices, page 23694-Criteria for Releasing Public Use Microdata:
Once a file has been released with one set of geographic identification, the same records cannot be released with different identification if the two geographic schemes in combination identify any area with a population fewer than 100,000 persons.
Specifications for each file must be reviewed to assure confidentiality is protected. To do so, the Census Bureau’s Checklist on Disclosure Potential of Data must be completed by the data producers and reviewed by disclosure experts at the Census Bureau. This review may result in:
The introduction of “noise” (i.e., small amounts of variation) into selected data items.
The use of data swapping (i.e., locating pairs of matching households in the database, based on a set of predetermined variables, and swapping those households across geographic areas to add uncertainty for households with unique characteristics).
Census Bureau presents the following research to eliminate MCDs as building blocks for 2010 PUMAs:
In 29 states, MCDs are the primary governmental or administrative division of a county having legal boundaries, names, and descriptions. MCDs represent different types of legal entities (i.e., towns, townships, boroughs, incorporated places) and vary in characteristics, powers, and functions depending upon the state and the type of MCD. In the 12 states in which MCDs serve as general-purpose local governments (Connecticut, Maine, Massachusetts, Michigan, Minnesota, New Hampshire, New Jersey, New York, Pennsylvania, Rhode Island, Vermont, and Wisconsin), only Michigan provided opposing comments on this topic. Presumably all other MCD states are satisfied with the proposed change from 20006.
In 20 MCD states7 some or all of the incorporated places have governments that function independently from the jurisdiction of the surrounding MCD or MCDs, and these incorporated places are referred to as MCD equivalents. The State of Michigan has two types of MCDs: those that are coextensive with an active incorporated place that is independent of any county subdivision and serves as a county subdivision or MCD equivalent, referred to here as ‘false MCDs’; and those that are active county subdivisions that are not coextensive with an incorporated place, referred to here as ‘legal-general purpose MCDs’. A minority (22%) of the 2000 PUMAs were built on (solely consist of) one false MCDs/incorporated places. PUMAs that were built on multiple geographic entities, one or more of which were false MCDs/incorporated places accounted for only 19% of all PUMAs. The remaining PUMAs in Michigan were built with legal-general purpose MCDs, tracts, and/or counties. Most Michigan PUMAs in 2000 were tract-based, and therefore coincident with county boundaries.
Most of the PUMAs in Michigan have a strong correlation with census tract and/or county boundaries. Tracts and county boundaries provide stable building blocks for PUMAs and can be used to approximate the boundaries of MCDs in many cases.
Additional guidelines to improve the utility and meaningfulness of the PUMA and PUMS/estimate data for PUMAs that were formerly delineated with incorporated places or MCDs as primary building blocks
To improve the utility and meaningfulness of the PUMA and PUMS/estimate data, participants will have the ability to name PUMAs (so that the areas will be recognizable in name, if not precisely the same boundaries).
To improve the utility and meaningfulness of the PUMA and PUMS/estimate data, PUMA equivalency files will be published on the Census Bureau’s website (as in Census 2000) to help users better understand the relationship between the PUMA and the underlying counties, county subdivisions (e.g., MCDs), places, and census tracts.
Guideline to make PUMAs coincident with Metropolitan Statistical Area Boundaries, as well as other place definitions, and principal cities: A major public policy research organization strongly recommends a guideline to make PUMAs coincident with metropolitan statistical area boundaries. They support the guideline to define PUMAs that are either entirely inside or entirely outside a metropolitan statistical area whenever possible. They also support the guidelines that place definitions, urban/rural status, and local knowledge should inform PUMA delineations, and to maximize the number of standard PUMAs. In addition they suggest that PUMAs be defined to approximate principal city boundaries so that researchers can use PUMA data to study differences between urban, suburban, and rural populations.
The Census Bureau recommends that PUMAs approximate metropolitan statistical area boundaries as well as other meaningful geographies: The participant will use counties and census tracts as the building blocks for the delineation of PUMAs to approximate the full extent of the metropolitan statistical area boundaries as well as other types of meaningful geographies (cities, etc). This guideline is unchanged from Census 2000.
Metropolitan Statistical Areas available during 2010 PUMA delineation: Metropolitan and micropolitan areas available for the 2010 PUMA delineation are those that are available as of January 1, 2010. These areas are not based on the results from the 2010 Census or the 2010 ACS.
Include other organizations within the state during the 2010 PUMA delineation process: A regional organization from Missouri and transportation planning agencies from Maryland and New Mexico have suggested that local input for geographic areas should be required by the Census Bureau (rather than recommended) for PUMAs that include metropolitan statistical areas. Groups such as the Tribal Governments, State Departments of Transportation (DOT), and the Metropolitan Planning Organizations (MPO) are examples of organizations that can provide appropriate information and knowledge to develop boundaries for 2010 PUMAs in metropolitan areas.
The Census Bureau recommends local input for PUMAs in metropolitan areas: Existing partnerships established by the SDCs to support the 2010 Census are recommended for the delineation of PUMAs in metropolitan areas.
3.No Changes to the Final Criteria From the Proposed Criteria
Upon reviewing all comments regarding appropriate building blocks as well as additional guidelines and recommendations, the Census Bureau will not put forth any new changes to the final criteria from the proposed criteria.
32010 PUMA Criteria
The criteria contained herein apply to the United States, Puerto Rico, and the Island Areas. In accordance with the final criteria, the Census Bureau may modify and, if necessary, reject any proposals for PUMAs that do not meet the established criteria. In addition, the Census Bureau reserves the right to modify the boundaries and attributes of PUMAs as needed to maintain geographic criteria and relationships before the final 2010 PUMA geography is finalized.
The Census Bureau will use the following criteria and characteristics to identify the areas that will qualify for designation as PUMAs for use in tabulating data from the 2010 Census and the ACS.
1.One level of PUMAs will be delineated for the 2010 Census.
The Census Bureau previously published two levels of PUMA geography corresponding to the two types of PUMS files available (1-percent super-PUMA and 5-percent standard PUMA). Because 1-percent PUMS files are not produced for the ACS and are not planned for the 2010 Census, only one type of PUMA—the standard 5-percent PUMA—is needed. The standard PUMAs for 2010 will be used to tabulate and present decennial census and ACS PUMS as well as ACS period estimates.
2.Each PUMA must have a population of 100,000 or more persons. Each PUMA must contain a minimum population of 100,000 persons at the time of delineation.
PUMAs with a population substantially below 100,000 persons present disclosure concerns for the ongoing publication of ACS PUMS and potentially for ACS estimates. If the population of a PUMA falls substantially below the minimum population threshold of 100,000 through the decade, the Census Bureau will evaluate the disclosure risk and may combine the PUMA with one or more adjacent PUMAs for ACS PUMS publication to ensure data confidentiality. For those areas currently experiencing population decline, or where population decline is anticipated, PUMAs should be delineated to encompass a population substantially higher than 100,000 persons such that the population will remain above 100,000 throughout the decade.
3.PUMAs may not cross state boundaries.
4.Counties and equivalent entities8 and census tracts will be the geographic “building blocks” for PUMAs.
Examples of PUMA building blocks are provided in the map examples in Appendix A (Maps 1 – 3).
One county may be designated as a PUMA as long as it meets the minimum population threshold of 100,000 persons (MAP 1).
Two or more contiguous counties may be aggregated to create a PUMA (MAP 2). Tract-based PUMAs may cross county boundaries provided that each single PUMA-county part meets a minimum population threshold of 2,400 persons (i.e., double the 2010 Census minimum population threshold for a census tract of 1,200 persons). This minimum population threshold for census tract populations that cross county boundaries is a new criterion for 2010 to ensure confidentiality of data within a single PUMA-county part (MAP 3).
Census tracts may be aggregated to approximate the extent of other types of other geographic entities, including MCDs, incorporated places, census designated places (CDPs), and/or urban areas (UAs).
5.POW PUMAs and/or Migration (MIG) PUMAs are larger aggregates of standard PUMAs and can consist of a single PUMA for county-based PUMAs, or a combination of adjacent tract-based PUMAs. When combined, these larger PUMAs may be aggregates of one or more complete counties (MAP 4).
The Census Bureau defines POW PUMAs and MIG PUMAs to provide detailed characteristics regarding workers and their work places and detailed characteristics for migrants, respectively. This criterion is similar to Census 2000 with one important exception: incorporated places may not be used to form 2010 PUMAs.
6.Each PUMA must constitute a geographically contiguous area.
A PUMA may be noncontiguous only if a county or a census tract used as a building block for the PUMA is noncontiguous.
42010 PUMA Guidelines
The Census Bureau does not require participants to adhere to the following guidelines, but strongly encourages participants to consider the benefits of creating geographic entities that conform to these guidelines. In some instances, it may be geographically impossible to adhere to some of these guidelines.
1.Wherever possible, each PUMA should comprise an area that is either entirely inside or entirely metropolitan or micropolitan statistical areas.
2.The Census Bureau recommends that 2010 place definitions, 2000 urban/rural definitions, and local knowledge inform PUMA delineations.
The number of standard PUMAs should be maximized, and PUMAs should not contain more than 200,000 persons, wherever possible, unless the PUMA is defined for an area in which population decline is anticipated.
3.PUMAs should avoid unnecessarily splitting American Indian reservations and/or off-reservation trust lands (AIRs/ORTLs), and separating American Indian populations particularly if large numbers of American Indians are included within all parts of the split AIRs/ORTLs (MAP 5).
Since AIRs/ORTLs may cross state boundaries, this guideline applies only to the portion of an AIR/ORTL within a state. In addition, multiple AIR/ORTLS with low populations may be combined with other AIR/ORTLs to delineate a PUMA within a state. In all such instances, the total population and makeup of the affected areas should be considered in any decisions regarding the adjustment of PUMAs for AIRs/ORTLs. The goal of this guideline is not to make PUMA boundaries noncontiguous or needlessly complex and separate their relationship from other important geographic boundaries like counties. Census tracts for the 2010 Census had a similar requirement, so by limiting 2010 PUMA building block geography directly to counties and census tracts, this should make following this guideline more straightforward.
4.PUMA names:
Descriptive names will be added to the Census Bureau’s public products including demographic/housing products and geographic products (i.e. TIGER/Line Shapefiles and map products). PUMA names will be provided by SDCs during PUMA delineation. In all cases, the objective is to clearly identify the extent of the PUMA by means of an area name, since PUMA names should always be meaningful to data users. The Census Bureau will have final approval of all names for inclusion in its public products and will collaborate with SDCs to create PUMA names during the delineation process.
PUMA names should generally be based on geographic areas within a PUMA containing the most population, housing, and/or area, e.g., a county, place (incorporated place or Census Designated Place (CDP), county subdivision, American Indian reservation or off-reservation trust land, military installation, national park, and/or prominent physical feature; the PUMA’s geographic relationship within or to a geographic area, e.g., "Northeast Utah", "West Loudoun" in Virginia, or "Northeast Minneapolis" in Minnesota; or a well-known region primarily within the PUMA, e.g., "Florida Panhandle".
Refer to Appendix G for PUMA naming concepts and rules.
5.PUMA codes:
1. Each PUMA code must consist of a 5-digit numeric code that is unique within the state.
2. A group of PUMAs that nest within a county must be identified with codes that contain the same first three digits (i.e., 00101, 00102, 00103 and 00104).
3. For each PUMA that consists of either an entire county or a group of counties, assign a PUMA code that has ‘00’ for the fourth and fifth characters of the PUMA code (i.e., 00100).
4. Assign the PUMA codes sequentially, beginning with 00100, 00200, 00300, and so forth. Use a geographic sequence, beginning with the PUMA located in the northwest corner of the state. Then proceed west to east, then east to west, in a serpentine fashion.
Note: If the geographic extent of a proposed 2010 PUMA is primarily unchanged from Census 2000, SDCs may wish to retain the same code as was used for Census 2000. SDCs should indicate their preferences to retain codes for specific PUMAs by reusing the 2000 PUMA code for the 2010 PUMA.
52010 PUMA MTPS Procedures
1.Installation and Starting the PUMA MTPS
The following installation guidelines are for SDC participants who will use Census Bureau-provided spatial data and PUMA MTPS software to delineate and submit PUMAs to the Census Bureau.
5.1.1Downloading Census Data
In order to create a PUMA MTPS project for your state or other predetermined coverage area, you will need shapefile layers provided online by the Census Bureau. These shapefiles contain all of the necessary data for your state’s coverage area. Please follow the instructions below for obtaining your spatial data:
N
Note: If you are unable to download the necessary data or software from our FTP site, contact the PUMA team at [email protected] to request a UPS delivered CD (or DVD) containing the necessary files.
avigate to the following website:
http://www.census.gov/geo/www/pvs/PUMA_PVS.html
Download data for your entire state. For smaller states there is an option to download the entire state in one .zip archive. Due to size limitations on file transfers, larger states cannot be downloaded in one file. These states are segmented into several files for downloading purposes. Individual counties may also be selected if you do not wish to download the entire state at one. County level requests are limited to five counties per download.
After selecting your state (or a segment of your state), a “File Download” screen will appear. Save the .zip file to a new folder on your C: drive, and give this folder the name “MTPSData”. If you have a previously existing C:\MTPSData folder, delete, or rename it. The PUMA MTPS must use data located in the C:\MTPSData folder, and extraneous files stored in that folder may cause corruption to your delineation project data.
Open the “C:\MTPSData” folder and extract the contents of the .zip file(s) to the “C:\MTPSData” folder. The Zip File will contain several zip files (one for each county and one for the state as a whole). Unzip all of these archives into your “C:\MTPSData” folder as well. The “MTPSData” folder should now contain multiple shapefiles pertaining to your state and each of its counties.
You will receive an email that will include a customized setup file (i.e., an *.xml file). The PUMA MTPS will need this file to create a project specific for your coverage area. When you obtain this file from email, move it into your “MTPSData” folder as well.
5.1.2Installing the PUMA MTPS
The PUMA MTPS will be downloaded from the Census Bureau website as well. The Census Bureau will provide a password for the software (via phone) because the software download is password protected. To obtain a password, contact the Census Bureau, Geographic Areas Branch (GAB) by telephone at (301) 763-1099 and ask for a PUMA team member. At this point you will also receive a separate password for submitting final delineations to the Census Bureau.
Once you have received a password, navigate to the following website:
http://www.census.gov/geo/www/pvs/PUMA_PVS.html
Note: This will take you to the same page where Census shapefiles are located.
Near the top of the page, select Download the MAF/TIGER Partnership Software (MTPS). Type the password that was provided to you over the phone (case sensitive).
Save the .zip archive and extract it to a folder on your local C: drive. The exact location should not matter, but it is best to extract these files to a new folder that does not contain any other data.
Locate and double-click on the SETUP.EXE file.

Installation of the PUMA MTPS (Version 5.X0) will overwrite previous versions of the MTPS on your workstation, however previous modules of the MTPS are residually contained within Version 5.X0 meaning that the new copy of the MTPS will still function with older delineations from other geographic programs (BAS, SDRP, RDP, etc.).
On the “Welcome” screen, click “Next.”
For “Installation Type” choose “Single User” and click “Next”. The installation guide suggests how to best set up the PUMA MTPS software. It is best to accept the default settings.
Once the program is installed, the setup indicates that “Setup Needs the Census Data” and prompts you to insert the Census Data CD or to browse and select the data from a file on your computer. Because you have already added your PUMA related data to the “MTPSData” folder (see section 5.1.1 step e) this process is unnecessary. Click “Skip”.
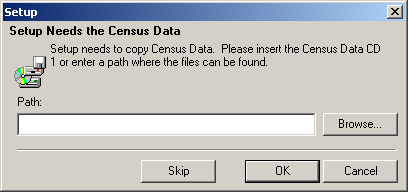
Click “Finish”.
Log in with the case sensitive User Name: “PUMA”.
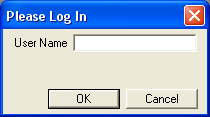
The MTPS will begin to build your initial delineation project based on the shapefiles stored in the C:\MTPSData folder. It may take up to 4 hours for the PUMA MTPS to create a project. The amount of time depends on the geographic extent of your state coverage as well as the capabilities of your computer’s hardware. This process is only necessary to build the initial project files, in subsequent instances you will not have to wait for this process.
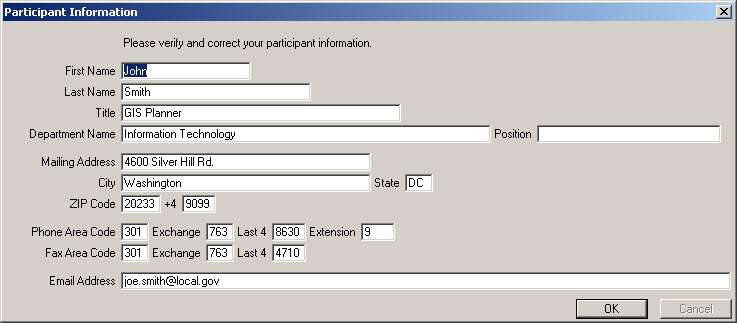
The “Participant Information” window will appear. The Census Bureau provides this information for the “official” PUMA participant contact, and therefore may not be the same as your contact information. Only provide contact information updates for the official PUMA contact. It is not necessary to provide the contact information for each individual working on the project. Verify and correct (if necessary) the information in the box and press OK when complete.
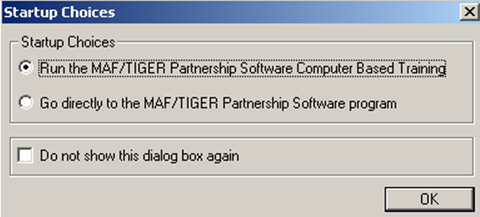
The following Startup Choices box will appear. Select “Run the MAF/TIGER Partnership Software Computer Based Training”. The Census Bureau encourages participants to complete the PUMA Training Tutorial before delineating any PUMAs. The Computer Based Training (CBT) will provide instructions and exercises that prepare participants for delineating PUMAs using the PUMA MTPS.
A webpage will appear listing all of the CBT tutorials that are available for various Census projects. Review the “Basic Skills” and “PUMA” tutorial videos. Exit the CBT tutorial page when completed.
2.Delineation Options
Participants have the following options for delineating PUMAs using the PUMA MTPS:
Option 1: Create an empty PUMA layer. This option gives participants the ability to create 2010 PUMAs from a blank slate. In this case all delineation work will be completed using the PUMA MTPS software. Existing PUMAs from Census 2000 are provided in the MTPS for reference purposes.
Option 2: Import a Census Tract Equivalency File (CTEF). Participants have the option of using their own files (.csv, .txt, or .dbf) files to build PUMAs in the PUMA MTPS. If participants will be using multiple CTEFs, the .dbf method cannot be used. The CTEF option allows users to complete most of their delineation work with their own GIS software. When the delineation is completed in the participants preferred GIS, the information can be ported over to the MTPS by converting the geography into CTEF files.
CTEFs must contain three attribute fields in each file. The first field (named TRACTID) contains concatenated state/state equivalent, county/county equivalent, & tractce codes and must consist of eleven text characters. For example, the TRACTID would appear as “11001000200”, where the “11” is the state FIPS code, “001” is the county FIPS code (COUNTYFP below), and “000200” is the TRACTCE number. If your CTEF currently shows those geographic areas as separate fields, they will need to be concatenated into a single field before the import is initiated. The second field is the PUMACE10 code which must consist of five text characters (The PUMA MTPS will automatically pad this record with zeros if it is less than 5 digits long). The third field in the CTEF file is the NAME field. If you are assigning descriptive names to PUMAs, then add them to this field in text format not to exceed 86 characters in length. If descriptive names are not included, then this field may be left blank.
Below is an example of an acceptable PUMA record within a CTEF file:
TRACTID |
PUMACE10 |
NAME |
“31007607504” |
“06079” |
“Western Nebraska” |
For additional information about creating Census Tract Equivalency Files and an example, refer to Appendix E.
3.S
Note: Participants can exit the
PUMA MTPS at any time (except while the MTPS is actively processing
a change. Closing the software while it is processing will result in
data corruption); the software automatically saves each update. In
order to reopen the PUMA MTPS, locate and open it from Start
menu/Programs/MAF-TIGER Partnership Software/MAF-TIGER Partnership
5.X3.
tarting a Project
The first time that a PUMA MTPS project is opened the user is presented with a Startup Settings dialogue for choosing the desired delineations options (described in 5.2, above). To delineate PUMAs from scratch using only the MTPS select the “Create empty PUMA layer” radio button and then click “OK”. The MTPS will build your map and you may begin delineation.

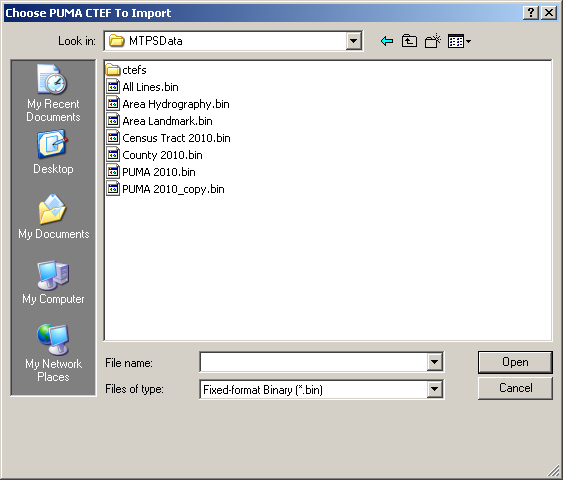
To import PUMAs delineated using additional software (other than the PUMA MTPS) select the radio button for either “Import a Census Tract Equivalency File” or “Import multiple Census Tract Equivalency Files” and click “OK”. A file browser dialogue window will appear. Select the appropriate CTEF(s) containing your previous PUMA delineation work. Note: you must select the correct file type in the “Files of Type:” drop down menu at the bottom of the window in order for the files to be available to select. Click “Open” to continue.
Another dialogue window will prompt for the appropriate field headers to use. Make sure that you select the appropriate fields for each of the three drop down selections and click “OK” to continue. The MTPS will import the entities from the selected CTEF file(s).
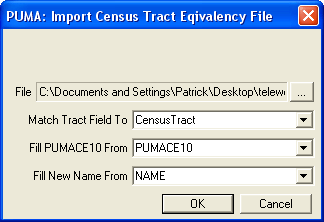
As part of the CTEF import process the MTPS automatically verifies that CTEFs do not contain duplicate tract records and that PUMA names (if provided) meet the PUMA naming criteria (See Appendix G for more details on PUMA naming). If a CTEF does not pass this check the MTPS will provide an error message, and will not import the CTEF.

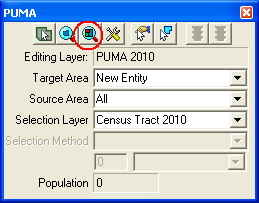
If the new project does not display the data or map, or starts with a blank page, click on the “Zoom to Area Layer” tool in the PUMA toolbox. This will zoom to a map at the full extent of the project area, which will include data for the entire state currently assigned.
4.Start Delineating PUMAs
This section provides procedures for delineating PUMAs using the MTPS. Prior to delineating PUMAs refer to the criteria in Section 3.
The MTPS tools needed for PUMA delineation are described in Appendix B.
If the MTPS reports a fatal error or simply stops functioning, do not take any further actions until reading procedures provided in Appendix F, located at the end of this document. Do not exit or shut down the PUMA MTPS while it is processing. Doing so will cause the project to corrupt and your work will be lost.
5.4.1Customizing and Adding Reference Layers in the MTPS
To
change the layer setting in the MTPS, open the “Map Layers”
window by clicking on the “Map Layers” button near the
top of the MTPS window.

The “Map Layers” window lists all layers currently available in the MTPS, allows the user to change their symbolism, and allows the user to add new layers to the map.
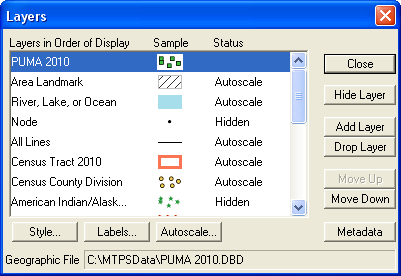
Double-click on a symbol to edit its properties.
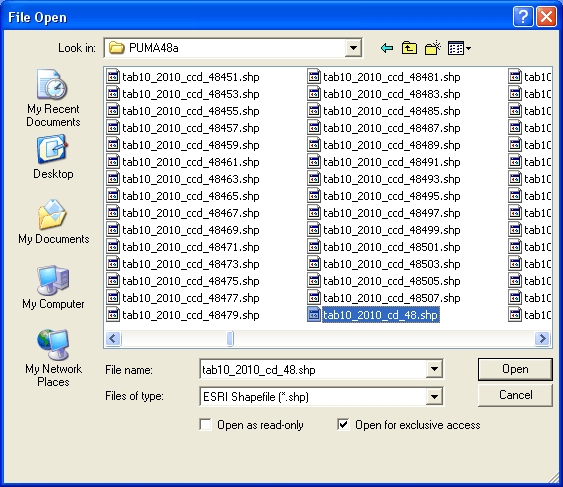
To add new layers to the map click “Add Layer”. In the “File Open” dialog select the desired layer (remember to first select the appropriate file type from the “Files of type:” dropdown menu) and click open.
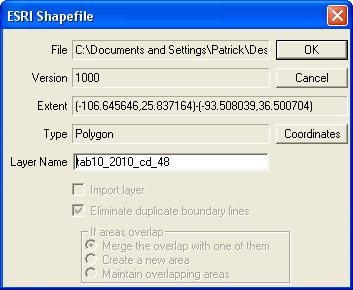
Accept the default values in the ensuing settings window or change the “Layer Name” if desired.
5.4.2Tools for Delineating PUMAs
To delineate a new PUMA or change the shape of an existing PUMA, use the PUMA Toolbox:
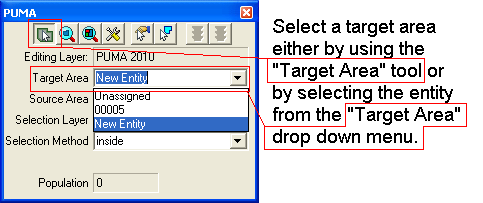
Select a Target Area. The target area identifies a new or existing PUMA that will be originated or modified during the delineation process. To delineate a new PUMA select “New Entity” from the “Target Area” dropdown menu. To alter the geometry of an already existing PUMA select that PUMA’s code from the “Target Area” drop down menu or use the “Target Area” tool to select the PUMA by clicking on it in the map.
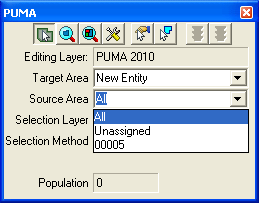
Use the “Source Area” dropdown to select a source area. The source area can be used to limit the areas that are eligible to be changed. The source area can be set as “All”, “Unassigned”, or an existing PUMA. The default source area “All” will allow any area to be edited. Setting the source area to “Unassigned” will prevent any previously delineated areas from being edited. When the source area is set to a specific PUMA code, the MTPS will only allow edits to Census Tracts that are currently assigned to that PUMA.
Use the “Selection Layer” drop down menu to select the desired selection layer. The selection layer determines what layers the software will use to select tracts. Because PUMAs must be assigned at the census tract level, this entity is the default setting for the Selection Layer. With the Census Tracts set as the selection layer, the user may select individual tracts to assign to the target area. Any visible polygon layer (including those added by the user) may be set as the selection layer. When a layer other than Census Tracts is set as the selection layer, the user may click an entity in the selection layer, and the MTPS will select multiple census tracts based on their spatial interaction with the selection layer. For instance, by setting Incorporated Places as the selection layer, the user can click on an incorporated place thereby selecting all tracts that are inside of that place. This allows the user to quickly delineate PUMAs that resemble incorporated place boundaries (yet still base PUMAs on Census Tract boundaries).
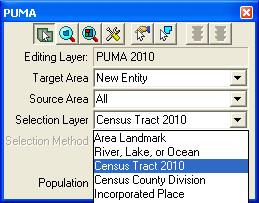
If a selection layer other than Census Tract 2010 is used, then the “Selection Method” drop down menu will specify the desired selection method. Specified below, the selection method setting determines what type of spatial interaction is used to link the Census Tracts to the selection layer:
Selection method: |
Result: |
Touching or contained |
Selects Census Tracts that have any spatial contact with the selection entity. |
Inside |
Selects Census Tracts that are completely contained by the selection entity. |
Not inside |
Selects Census Tracts that are not completely contained by the selection entity. |
Within |
Selects within a buffer distance. The buffer zone is based on the shape’s centroid, not the boundary of the shape. Thus a buffer of one mile will select all tracts within one mile of the geographic center of selection layer entity. |
Not within |
Selects Census Tracts that fall outside of a given buffer distance. The buffer zone is based on the shape’s centroid, not the boundary of the shape. |
Closest and within |
Selects only the nearest unselected tract that is within the buffer distance. The buffer zone is based on the shape’s centroid, not the boundary of the shape. Subsequent clicks will select the next nearest tract within the buffer distance until all tracts within the buffer distance are selected. |
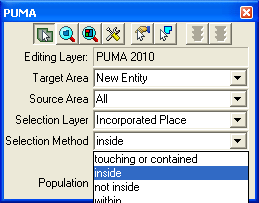
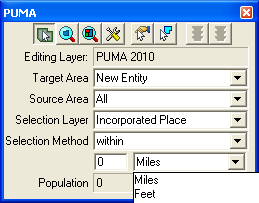
Use the selection tool to select the areas (Census Tracts) that will be added to the target area. Hold down the “Control” key while clicking to de-select areas. The population of the target area and selected area is tallied at the bottom of the PUMA toolbox (for new entities this is simply the selected area). Click and drag on the map to draw a selection rectangle; all entities completely contained by the rectangle will be multi-selected. If you are using a source area other than Census Tracts 2010, then multiple tracts may be selected at once depending on the selection method.

When all of the desired changes are selected, press the green light button on the PUMA toolbox to save the edits. Alternatively, to cancel an edit, click on the red light button on the PUMA toolbox. After saving changes to a new entity, the user is prompted for PUMA attributes. Enter a five digit PUMA code and a descriptive PUMA name (Refer to Appendix G for criteria guidance on naming PUMAs) up to 86 characters. Click “OK” to complete the change.
Note: The MTPS will only add to areas. To remove a tract from one area, simply add it to another area, or add it to the “Unassigned” target area.

5.4.3Changing Attributes of Existing PUMAs
To change the attribute values of an existing PUMA use the “Display Area Data” tool from the PUMA Toolbox.
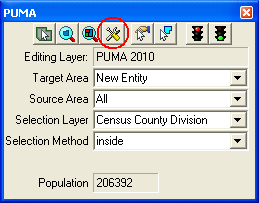
To use the “Display Area Data” tool first select the desired PUMA entity using the Target Area selection tool or the Target Area drop down menu. Click the “Display Area Data” tool to invoke the “PUMA 2010 Attributes” screen for the targeted PUMA.
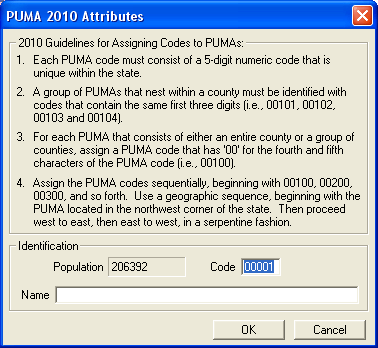
Within the “PUMA 2010 Attributes” screen change the Code or Name as desired and click “OK” to save the changes. Before the user can save changes, the MTPS will verify that the code and name meet PUMA criteria. If the attributes fail to meet criteria, a notification window will appear explaining which criteria were not met.

5.4.4Resetting PUMA Delineations
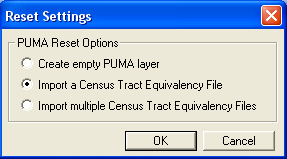
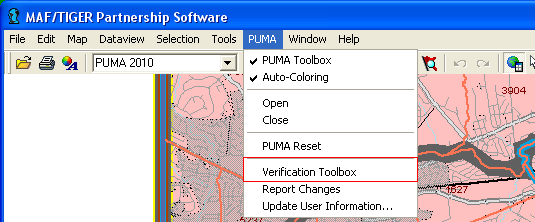
If there is ever a need to reset all work and start the delineation over the user can do so by selecting “PUMA Reset” from the “PUMA” menu at the top of the MTPS window.

Selecting “PUMA Reset” will invoke the “Reset Settings” dialogue. Select the preferred delineation option for resetting your work. At this point clicking “OK” will delete all previous work and replace it according to the selected option. Click “Cancel” to back out of the reset if is not desired.
5.Verification
The PUMA “Verification toolbox” is provided as a simple means of ensuring that all PUMAs within a given delineation are compliant with the PUMA criteria as outlined in Section 3 of this document. Verification may be run at any time during delineation and must be run before reporting changes. To verify a delineation:
Select “Verification toolbox” from the “PUMA” menu at the top of the MTPS Window.
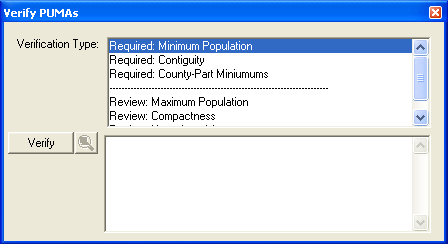
The Verification toolbox lists seven verification checks. The first three checks are required. The user must be run and pass these checks in order to report changes. The remaining four checks are marked as “Review” checks. The review checks are not required in order to report changes, but they are highly recommended as a way to catch delineation mistakes. A review verification error can be ignored if it reflects an area where the delineation was intentionally made (e.g., If the “Maximum Population” check highlights a PUMA that was intentionally delineated above the optional, maximum population threshold of 200,000, then the error may be ignored). To facilitate splitting state-wide projects into smaller working areas the unassigned areas check is not required in order for the MTPS to report changes, but the final delineation returned to the Census Bureau must not contain any unassigned areas.
Check: |
Description: |
Minimum Population, Required |
Lists PUMAs whose population falls below the minimum threshold of 100,000 persons. |
Contiguity, Required |
Lists PUMAs that are noncontiguous (multiple parts). PUMAs that are noncontiguous as a result of a valid Census Tract that is also noncontiguous will be ignored by this check. |
County-Part Minimums, Required |
Lists PUMAs containing a population subset of fewer than 2,400 persons within the extent of a single county. This check will ignore counties whose total population is less than 2,400 persons as long as the entire county is delineated in only one PUMA. |
Maximum Population, Review |
Lists PUMAs whose population exceeds the maximum threshold of 200,000 persons. |
Compactness, Review |
Lists PUMAs whose perimeter is disproportionately large in comparison to its area. An exact description of the formula is provided as part of the criteria in Section 3 of this document. |
Split AIR/ORTL Features, Review |
Lists PUMAs that split an American Indian Area or Off Reservation Trust Land. Note: this check will not be present in the “Verification toolbox” if the area of work does not contain any AIR/ORTL entities. |
Unassigned Area, Review |
Lists areas where no PUMA has been delineated. The final delineation returned to the Census Bureau must not contain any unassigned areas; however, because delineation work may be distributed among several project loads, compliance with this check is not required in order to report changes from the MTPS. |
To run verification checks, select the desired check from the “Verification Type” list and click the “Verify” button. The time required to run each check depends which check is selected and the size of the project’s geographic coverage. The MTPS will list all errors found by the verification check in the lower half of the “Verify PUMAs” toolbox. Click the Zoom button (next to the “Verify” button) to automatically navigate the Delineation map to the selected error.

Use the tools from the PUMA toolbox to correct errors. After correcting all errors, click “Verify” again to rerun the checks.
If the selected verification check does not encounter any errors, then a popup message will appear indicating that no errors were found.
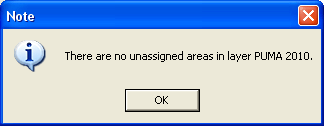
After all verification checks are run without encountering any errors, a popup notification will indicate that verification is complete.

6.Submitting PUMA Delineations
Once all PUMAs are delineated as desired and pass verification, all that remains is to report the changes and submit them to the Census Bureau. The participant must report all PUMAs for a given state coverage together as one unit. If the work was split into multiple pieces for ease of delineation, then the participant must combine those pieces back together and re-verify it as one, complete state coverage. See Appendix C for instruction on creating multiple work areas and combining them back together again.
5.6.1Report Changes
The report changes function in the MTPS does not transmit any data to the Census Bureau. The MTPS will store your reported changes in a .zip archive in the “C:\MTPSData” directory. To report changes from the MTPS select “Report Changes” from the PUMA menu at the top of the MTPS window.
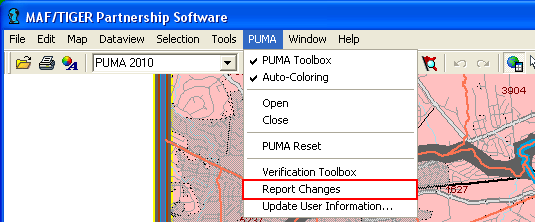
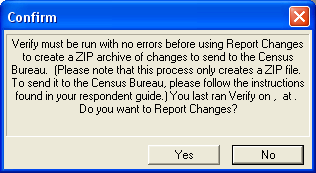
A popup message will indicate the last time when verification was run and ask for confirmation that no additional work was done since the last verification. Click “Yes” to continue.
It may take a while to report changes depending on the size of the delineation. Once the MTPS completes the report change process, a popup message will indicate the location of the change report ZIP file.

Click “OK” and close the MTPS. All delineation work is completed.
5.6.2Submitting Files via the File Transfer Protocol (FTP)
In a web browser navigate to:
https://secure.census.gov/cgi-bin/sendfile.

You will be prompted for a case-sensitive user name and password. Login information for the return FTP site will be provided to the primary participant by telephone at the same time that the password to download the MTPS software is distributed.

Fill in the form with the file that you wish to send and press “Upload”.
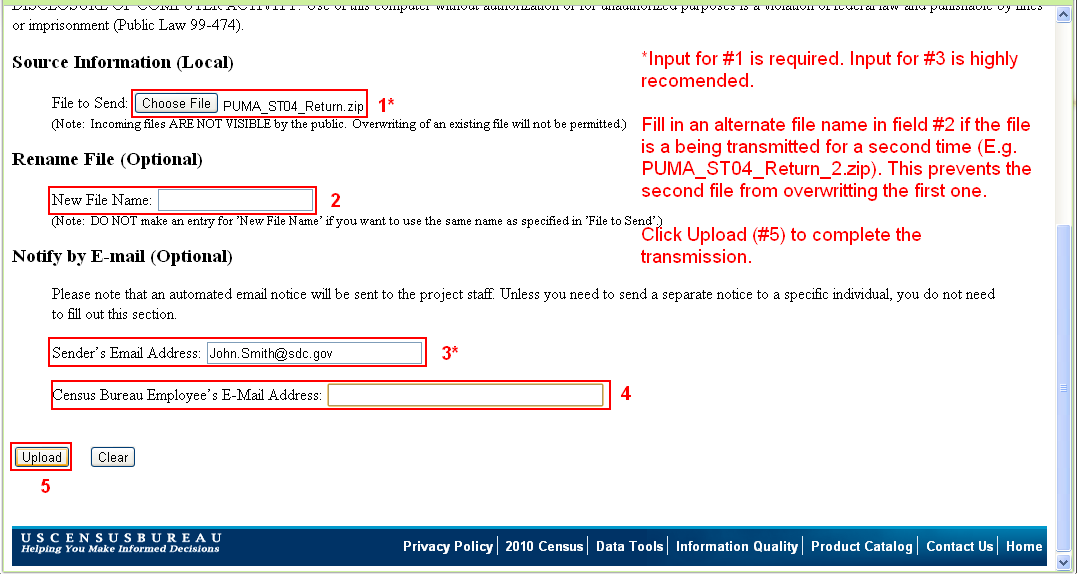
A confirmation screen will indicate whether the transfer was successful or not.
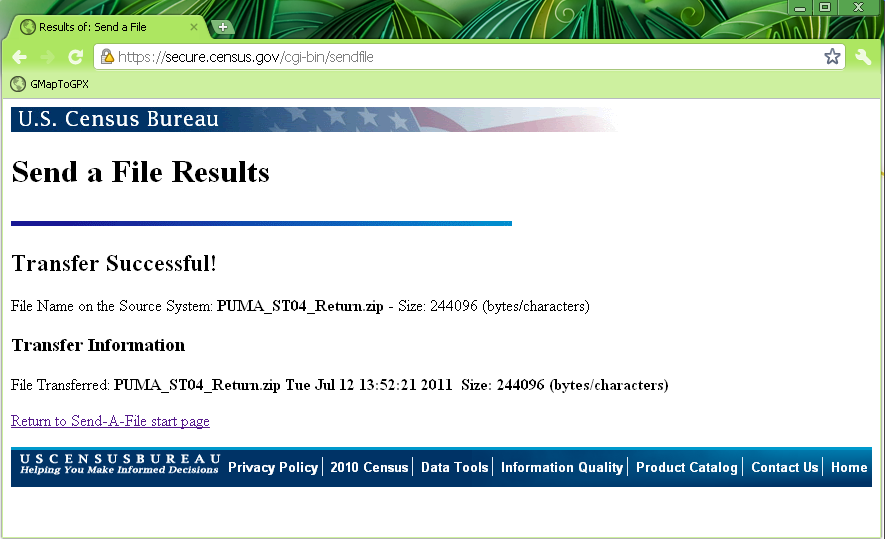
An email notification will be sent to the [email protected] email list along with any other emails addresses added to the upload form. Thank you for participating in the PUMA delineation process.
Appendix A. PUMA Examples
1.Map 1: Single County PUMA
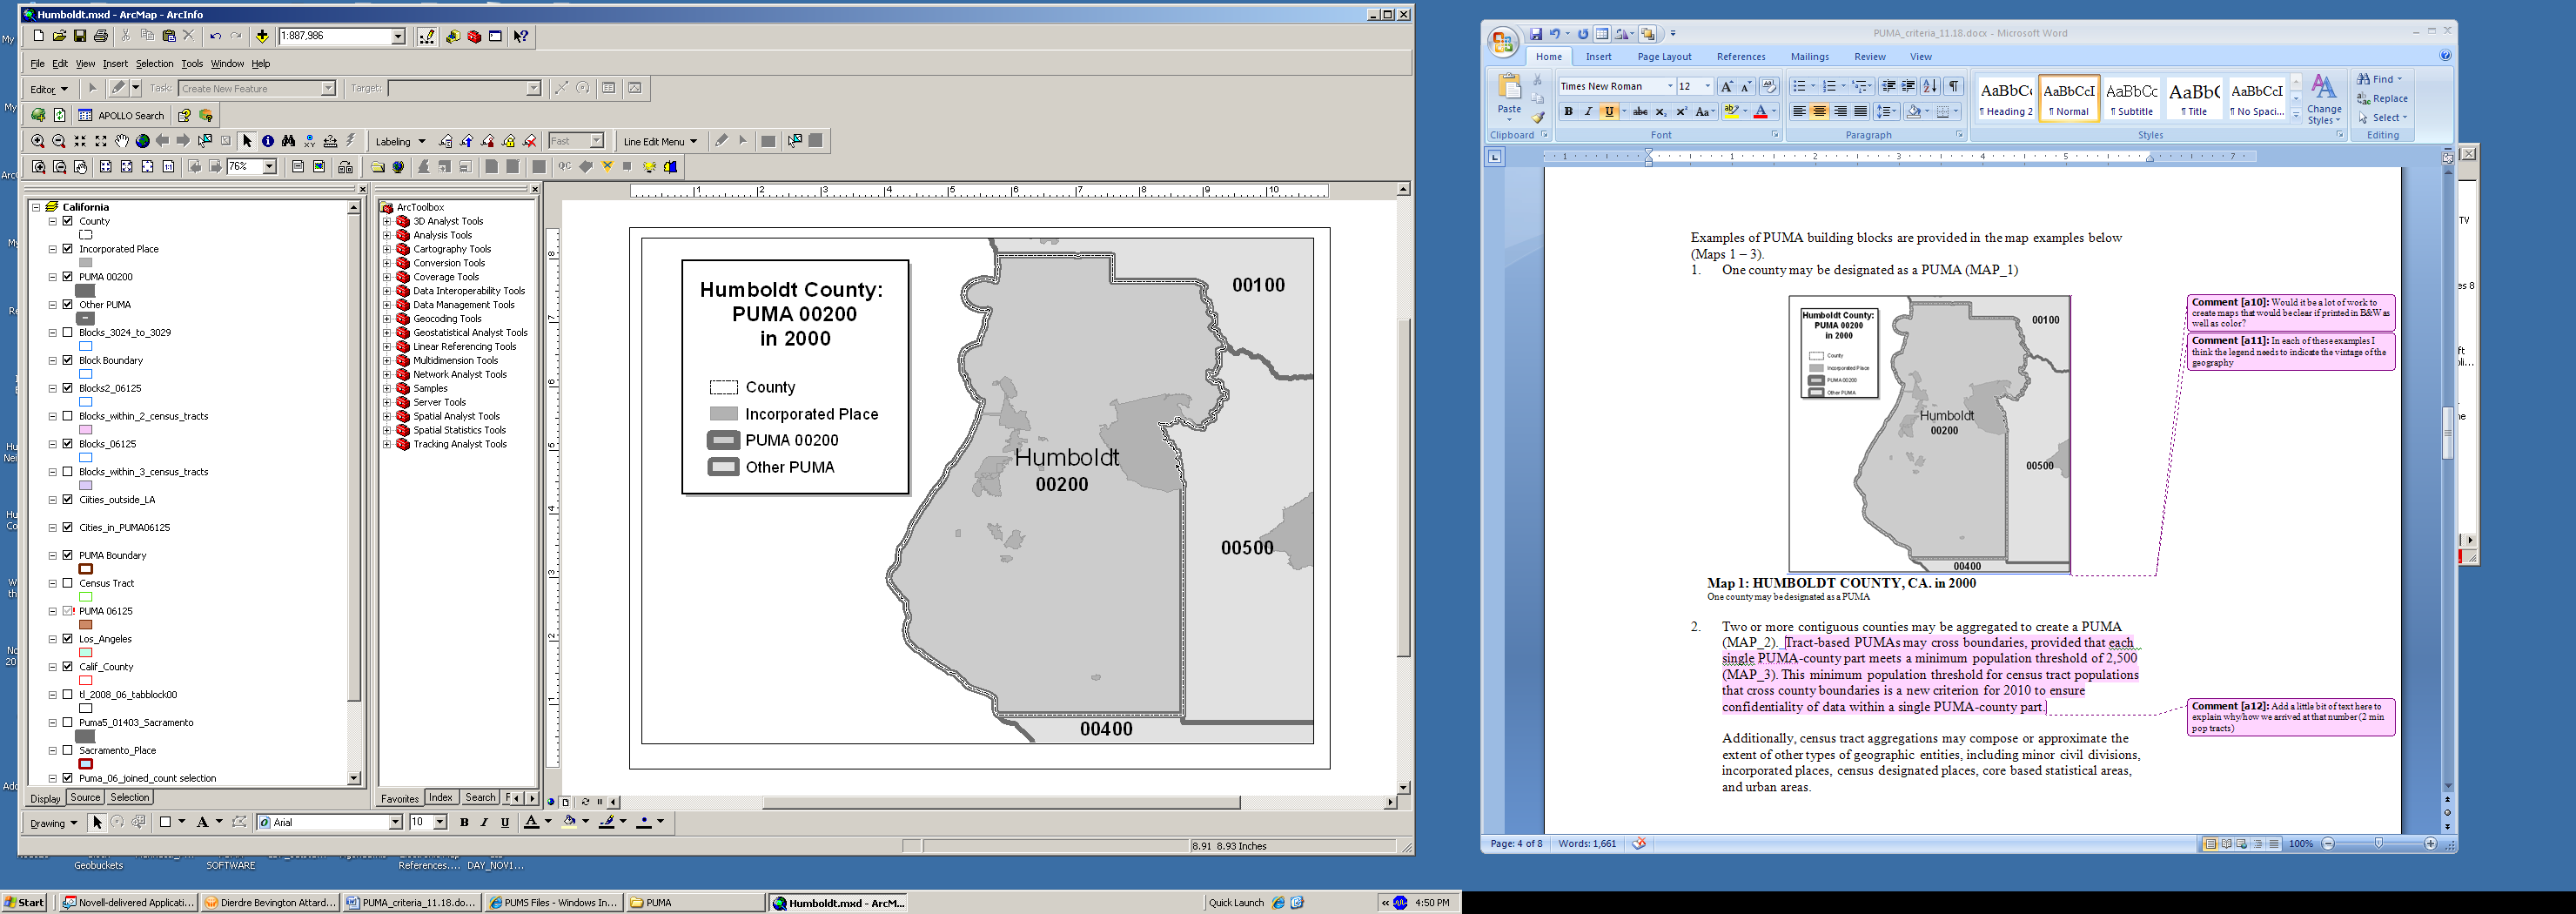
Humboldt County, California in 2000
One county may be designated as a PUMA as long as it meets the minimum population threshold of 100,000 persons.
2.Map 2: Multiple County PUMA
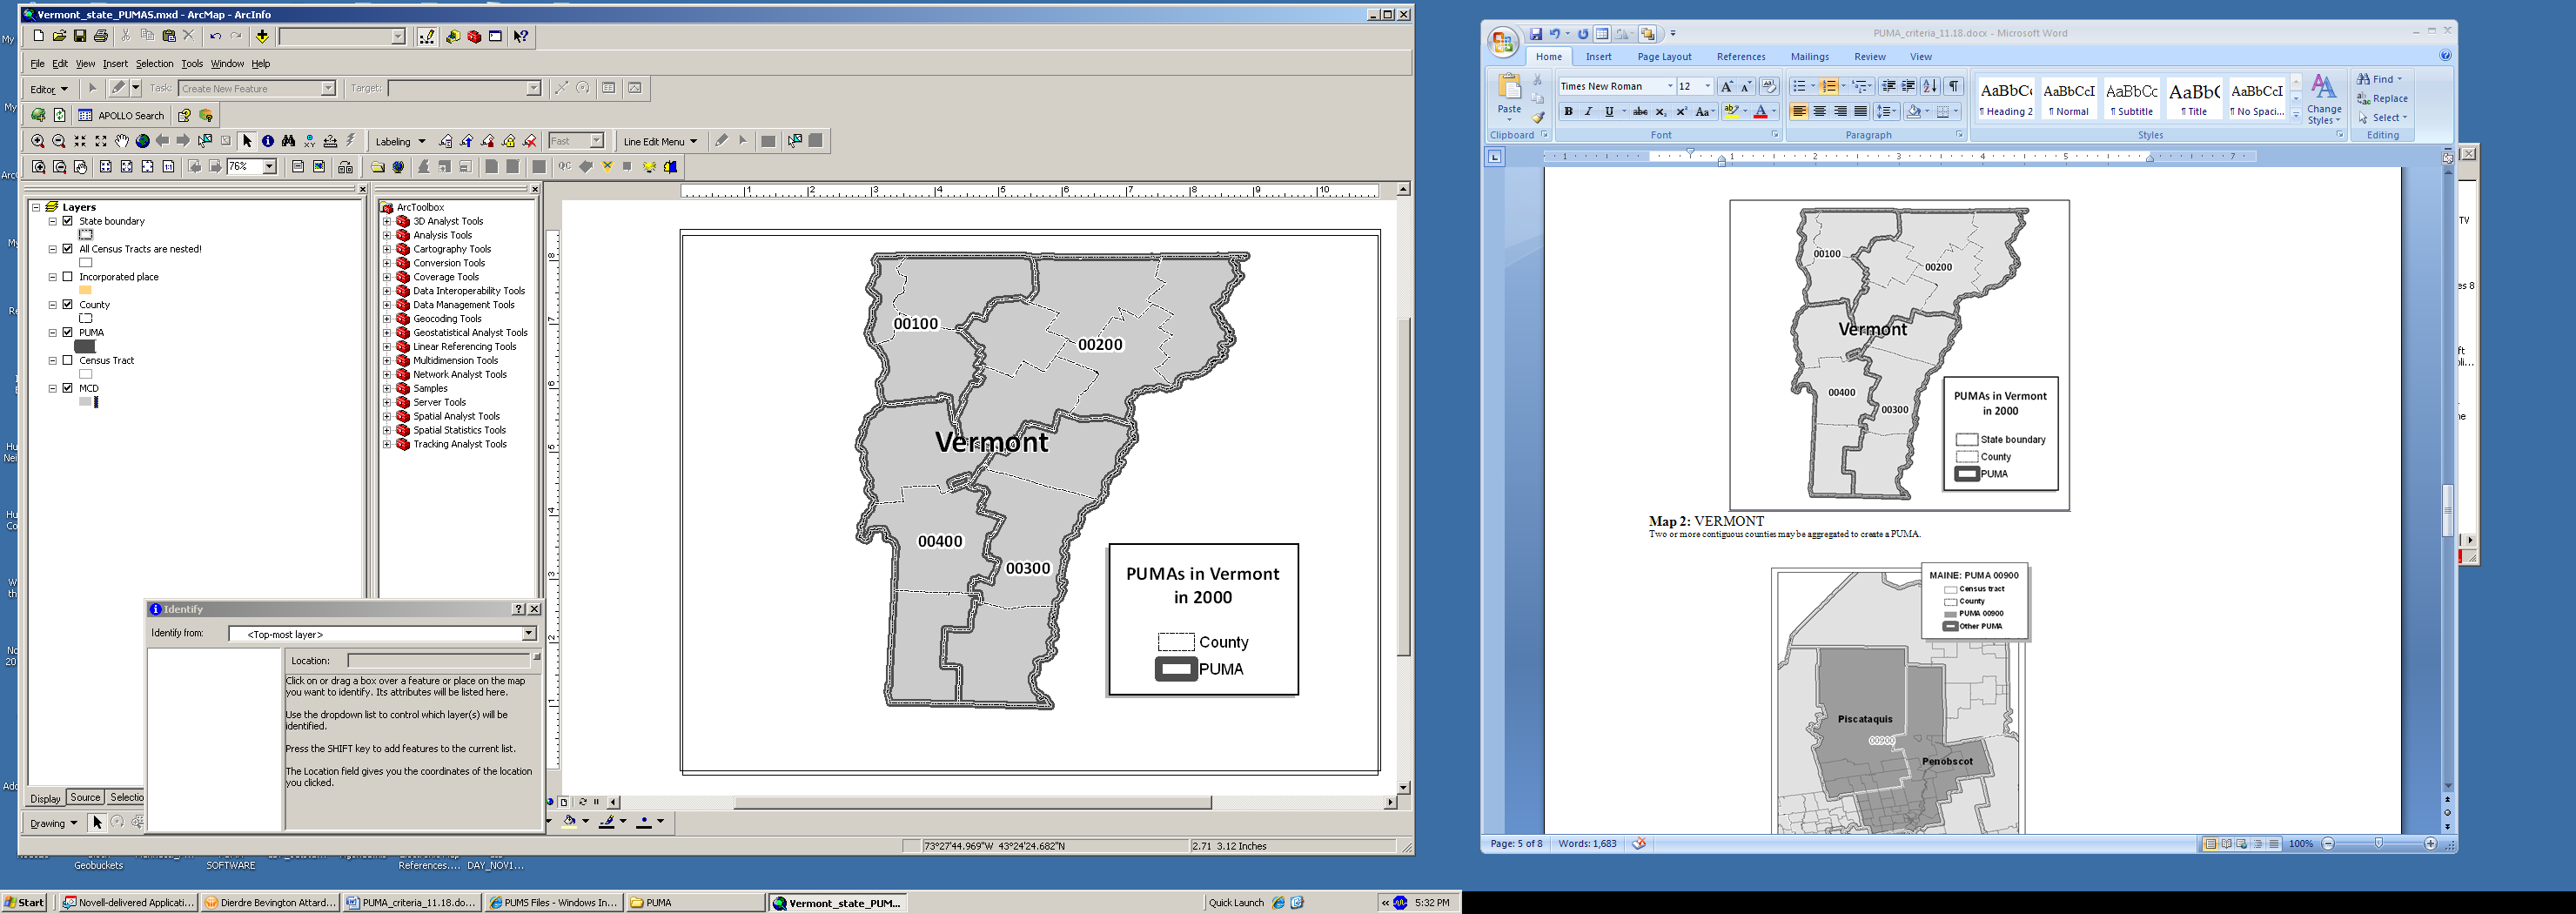
Multi-County PUMAs in Vermont in 2000
Two or more contiguous counties may be aggregated to create a PUMA.
3.Map 3: PUMAs Crossing County Boundaries

PUMA 00900 in Piscataquis County, Penobscot County, and Census Tract 410 in Waldo County, Maine in 2000
Tract-based PUMAs may cross county boundaries provided that each single PUMA county-part meets a minimum threshold of 2,400 persons. PUMA 00900 is comprised of two counties and census tract 410 in a third county (Waldo). The single PUMA county part in Waldo County (Census Tract 410) has a population of 3,602 persons.
4.Map 4 : Combining Standard PUMAS to make POW and MIG PUMAs

POW and MIG PUMA 00700 in Ohio in 2000
POW and MIG PUMA 00700 is comprised of three standard PUMAs (00701, 00702, 00703) within two counties (Lake and Geauga counties).
5.Map 5: Multiple PUMAs in an AIA

Lake Traverse Reservation in 2000
The reservation boundaries cross North Dakota and South Dakota state boundaries and are contained within three separate PUMAs --00300 (ND), 00300 (SD), and 00400 (SD). The portion of Lake Traverse Reservation within PUMA 00400 contained a population of 1,924 persons in Census 2000. This situation should be avoided in 2010.
Appendix B. PUMA MTPS Tools
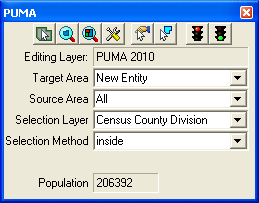
The PUMA toolbox:
|
Selects Target Area for editing. |
|
Zoom to the PUMA entity that is selected as the Target Area. |
|
Zooms out to the entire PUMA project area. |
|
Displays attribute data for the PUMA entity that is selected as the Target Area. The attribute data may be edited using this display. |
|
Selects an area to add to a PUMA either by clicking on each area or by drawing a bounding rectangle. All eligible areas completely contained by the bounding rectangle will be selected. |
|
Allows user to draw a polygon around an area. Double-click to complete polygon. All eligible areas completely contained by the polygon will be selected. |
When using either of the Selection tools above: |
Ctrl + Click Unselects area from a selection set. |
|
Completes and saves geographic edits to the PUMA layer. |
Target Area |
Drop down to select an entity to edit |
Source Area |
Drop down selection menu to select a source area. The source area can be used to limit the areas that are eligible to be changed. The source area can be set as “All”, “Unassigned”, or as a specific, already existing PUMA. The default source area “All” will allow any area to be eligible for editing. Setting the source area to “Unassigned” will prevent any areas that have already been delineated from being edited. By setting the source area to a specific PUMA code the MTPS will only allow edits to Census Tracts that are currently assigned to that PUMA. |
Selection Layer |
Drop down selection menu that determines which layer will be used for selecting tracts to add to the Target Area PUMA. |
Selection Method |
If using a selection layer other than Census Tract 2010, then use the “Selection Method” drop down menu to set the desired selection method. The selection method setting determines what type of spatial interaction is used to link the Census Tracts to the selection layer. |

The Tools toolbox:
|
Zoom in on map screen. Click to zoom or click and drag to draw a zoom rectangle. |
|
Zoom out from the map screen. |
|
Pan around the map. Click and drag to move the map in any direction. |
|
View the map at the previous scale. |
|
View the map at the initial scale. The initial scale is the position the map was in when the MTPS was opened up. |
|
Click on an entity from the active view layer to get detailed attribute information about that entity. |
|
Click a location on the map to get attribute information for entities from all visible layers present at that location. Layers with information are listed on the left frame of the display. Click a layer to see specific details on the right frame of the display. |
|
Click a location on the map to get attribute information for entities from all visible layers present at that location. All information is stored in a single display array. Scroll through the array to see various attributes from all of the layers. The order of display can be altered to suit specific needs. |
|
Digitize a line on the map screen to measure distance. Double click to complete the line. Select the desired measurement units. Click “OK” to return to the map. |
|
Digitize a polygon on the map screen to measure area. Double-click to complete the polygon. A popup window reports the area and perimeter in feet (this unit of measurement is dictated by the map unit setting. To change these settings go to “Edit>Preferences”, select the “System” tab, and change the “Map Units” to the desired setting under the “Units of Measurement” heading.). Click “OK” to return to the map. |
Working with Map Layers:
The initial PUMA map built by the MTPS during startup includes the following default layers:
PUMA 2010
County subdivision (Minor Civil Division and Census County Division)
Area Landmark
River, Lake, or Ocean
All lines (Roads, Hydrography, & Railroads)
Census Tract 2010
County subdivision (Minor Civil Division or Census County Division)
American Indian/Alaskan Native*
American Indian Area 2010
Incorporated Place
Census Designated Place*
PUMA 2000
Current SLD Lower*
Current SLD Upper*
Congressional District*
County 2010
CBSA*
State
*Indicates layers that are automatically added to the map, but hidden from view by default.
To
adjust the settings of these layers or to import additional layers,
open the layers dialog box by selecting “Layers” from the
“Map” menu or by clicking the “Map Layers”
icon
![]() in
the “Standard” toolbar.
in
the “Standard” toolbar.
Use the Layers dialog box to view and edit the map layers and settings:

Note: The content within the layers dialog box above is an example of the layers that may be present in the layers dialog box.
To do this… Do this…
Open
the Layers dialog box Go
to Map:
Layers
or click the Map
Layers
icon
![]() on the “Standard toolbox”, or click the right mouse
button on the map window and choose Layers
to open the Layers dialog box.
on the “Standard toolbox”, or click the right mouse
button on the map window and choose Layers
to open the Layers dialog box.
Choose a layer Highlight the layer in the scroll list, which shows the layers in the order they will be drawn, from first to last, a sample of the style, and the status (Hidden means the layer will not be drawn, Autoscale means the layer will be drawn between certain scales, and blank means the layer will be drawn at all scales). You can also hold the Shift key and click on another layer to highlight a range of layers, or hold the Ctrl key and click on a layer to toggle the highlight on or off.
Hide/Show a layer Click Hide Layer. The button will change to Show so that you can reshow the layer.
Add a layer Click Add Layer to display the File Open dialog box. You can choose the type of file and one or more files to add. Click Cancel to close the dialog box without adding any layers. Note: If you add additional files to your PUMA MTPS project, you must not move or delete those files on your PC until you “drop” them from the PUMA MTPS project. Failure to drop the files from the project before moving or deleting them will render the project unable to open.
Drop a layer Click Drop Layer to display a Confirm dialog box. Click Cancel to close the dialog box without dropping the layer. Note: Only drop layers that you have imported from your own digital files. If you do not want to see a layer that is included in the PUMA MTPS, you should “Hide” the layer.
Change the order of the layers Click Move Up or Move Down to move the highlighted layer up or down.
Change the style settings for a layer Click Style to display the Style dialog box, which is different for point, line, and area layers. Edit the style settings and click Apply if you want to make the changes to style settings. Click Cancel to close the dialog box without changing the settings.
Change the label settings for a layer Click Labels to display the Automatic Labels dialog box. Edit the label settings and click Apply if you want to make the changes to label settings. Click Cancel to close the dialog box without changing the settings.
Change the autoscale settings for a Click Autoscale to display the Autoscale dialog box. The
layer largest drop down menu, if not blank, shows the “largest” scale at which the layer is displayed, as you zoom in. The “smallest” drop down menu, if not blank, shows the smallest scale at which the layer is displayed, as you zoom out. Edit the autoscale settings and click Apply if you want to make changes to the autoscale settings. Click Cancel to close the dialog box without changing the settings.
Close the Layers dialog box Click Close.
Standard MTPS Tools:
Most of the PUMA delineation work can be completed using tools available in the PUMA toolbox and in the Tools toolbox. However, participants are also equipped with many other tools that are available in the Standard toolbox. The standard toolbox is docked by default below the menu bar and contains many of the functionalities within the menus.
S
Map Layers
Manage Bookmarks
Working
Layer
Open File
Add a Bookmark
Main
Toolbox


Show or Hide the Legend
Automatic Labels
Layer Style
Set the Map Scale
Selection
Toolbox![]()


![]()

Note: The layer displayed in the “Working Layer” is the featured layer that will be displayed in the dataview if the dataview is opened, in the attribute table if a feature is selected using the “Info” tool in the Tools toolbox, etc.
To do this… Do this…
Open
a file Go
to File:
Open
or click the Open
File
icon
![]() on the Standard toolbar.
on the Standard toolbar.
Print
a map
Go to File:
Print
or click the Print
icon
![]() on
the Standard toolbar.
on
the Standard toolbar.
To
view map properties Go
to File:
Properties
or click the Properties
icon
![]() on the standard toolbar.
on the standard toolbar.
To
change the working layer Select
the Working
Layer
drop down menu
![]() and
navigate to and select the name of the layer that you would like to
select as the working layer.
and
navigate to and select the name of the layer that you would like to
select as the working layer.
To
open the dataview for the working Click
the New
Dataview
icon
![]() to open the dataview
to open the dataview
layer (or data table) for the layer displayed in the Working Layer drop down menu.
To
edit the map layers Go
to Map:
Layers,
click the Map
Layers
icon
![]() on the Standard toolbox, or click the right mouse button on the map
window and choose Layers
to display the Layers dialog box. To
show or hide the legend Click
the To
Show or Hide Legend
icon
on the Standard toolbox, or click the right mouse button on the map
window and choose Layers
to display the Layers dialog box. To
show or hide the legend Click
the To
Show or Hide Legend
icon
![]() to show the legend (if hidden) or hide the legend (if displayed).
to show the legend (if hidden) or hide the legend (if displayed).
To
edit the layer style Click
the Layer
Style
icon
![]() to edit the style of the layer displayed in the Working
Layer
drop down menu.
to edit the style of the layer displayed in the Working
Layer
drop down menu.
To
display or edit labels Click
the Automatic
Labels
icon
![]() to display or edit labels for the layer displayed in the Working
Layer
drop down menu.
to display or edit labels for the layer displayed in the Working
Layer
drop down menu.
To
edit the map scale Click
the Map
Scale
icon
![]() to edit the map scaling method.
to edit the map scaling method.
To
add a bookmark Click
on the Add
a Bookmark
icon
![]() to save a map extent.
to save a map extent.
To
manage bookmarks Click
on the Manage
Bookmarks
icon
![]() to edit or apply a bookmark.
to edit or apply a bookmark.
To
show/hide the tools toolbox Click
on the Main
Toolbox
icon
![]() to
display the Tools toolbox (if hidden) or hide the Tools toolbox (if
displayed)
to
display the Tools toolbox (if hidden) or hide the Tools toolbox (if
displayed)
To
show/hide the selection toolbox Click
on the Selection
Toolbox
icon
![]() to display the Selection toolbox (if hidden) or hide the Selection
toolbox (if displayed) for the layer displayed in the “Working
Layer” drop down menu. Note:
The selection toolbox contains specific selection and selection
review tools.
to display the Selection toolbox (if hidden) or hide the Selection
toolbox (if displayed) for the layer displayed in the “Working
Layer” drop down menu. Note:
The selection toolbox contains specific selection and selection
review tools.
Standard Dataview Toolbox:
When a Dataview is open the Standard toolbox with dataview-specific tools is available.
Properties
Working Layer
Print


Open File
New Dataview
Increase Width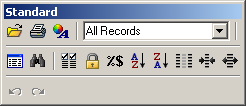


Find
Dataview Fields
Lock Columns
Column Settings
Sort Increasing
Sort Decreasing
Hide Columns
Reduce Width
To do this… Do this…
Open
a file Go
to File:
Open
or click the Open
File
icon
![]() on the Standard toolbar.
on the Standard toolbar.
Print
a map
Go to File:
Print
or click the Print
icon
![]() on
the Standard toolbar.
on
the Standard toolbar.
View
map properties Go
to File:
Properties
or click the Properties
icon
![]() on the Standard toolbar.
on the Standard toolbar.
View all or a selection set of the Select All Records or a specific selection set in the
dataview
records Records
to Display
drop down menu![]() .
.
Open
the dataview for a different layer Click
the Open
Dataview
icon
![]() and select the layer with the dataview you would like to display
and select the layer with the dataview you would like to display
Find
a specific record in the dataview Click
the Find
icon
![]() to search for a specific record in the open dataview.
to search for a specific record in the open dataview.
Change the display of the dataview Select Dataview: Fields or click the Dataview Fields icon
fields
![]() to display the Dataview
Fields
dialog box, which allows you to edit the fields and the displayed
order of the fields in the dataview.
to display the Dataview
Fields
dialog box, which allows you to edit the fields and the displayed
order of the fields in the dataview.
Lock
a field in the dataview Select
a cell or column heading of the field(s) you want to lock, and select
Dataview:
Lock Columns
or click Lock
Columns
icon
![]() .
.
Change
column settings in the dataview Go
to Dataview:
Column Settings
or click the Column
Settings
icon
![]() to edit the column formats and settings.
to edit the column formats and settings.
To
sort the fields in the dataview Select
a cell or column heading of the field(s) you want to sort and click
on the Sort
Increasing
icon
![]() or Sort
Decreasing
icon
or Sort
Decreasing
icon
![]() .
.
Hide
columns in the dataview Select
a cell or column heading of the field(s) you want to hide and click
on the Hide
Columns
icon
![]() .
.
Change the column width in the Select a cell or column heading of the field(s) you want to
dataview
increase or decrease the column width size, and click the Reduce
Width
icon
![]() or the Increase
Width
icon
or the Increase
Width
icon
![]() .
.
Imagery Tools:
It is possible to bring imagery and topographic maps into the PUMA MTPS from the TerraServer USA Imagery internet service. These images can function as layers in your maps in almost the same way as any other type of layer. There are two technical prerequisites to using this tool; there must be an active broadband internet connection, and the Microsoft .NET framework must be installed. The Microsoft .NET framework can be downloaded from Microsoft at: http://www.microsoft.com/downloads/details.aspx?FamilyID=0856eacb-4362-4b0d-8edd-aab15c5e04f5&displaylang=en . Moreover, if your system operates behind a firewall, please ensure that you are outside the firewall before using this feature.
Follow these steps use a Terra-Server-USA map image:
1. Zoom to the area for which you want the map image
2. Select “Tools: Imagery: TerraServer-USA toolbox” to open the TerraServer-USA toolbox.
Drop
Image
Image
Information
Save
Image


Get image

3. Choose one of the following options from the “Methods” drop down menu:
Aerial image – nationwide black and white digital orthophoto quadrangles (DOQs)
Topographic map – nationwide digitally scanned images of USGS topographic maps, also called digital raster graphics (DRGs)
Urban color maps – color DOQs for the 133 most populated metropolitan areas of the United States. Refer to the USGS Fact Sheet at: gisdata.usgs.net/IADD/factsheets/fact.html.
4. Choose the image resolution from the “Resolution” drop down menu. If you choose Autoscale, the PUMA MTPS will choose an appropriate resolution.
5. Click on the “Get image” icon
 to get the image. The PUMA MTPS requests, receives, and displays
the image in the map window.
6. Click on the “Save image” icon
 to display the Save Image As dialog box. Choose a folder, choose a
file type, type a name, and click Save to save the image in JPEG
format.
Click
on the “Drop image” icon
![]() to drop the image layer from the map. The metadata for the image can
be displayed by clicking on the “Image information” icon
to drop the image layer from the map. The metadata for the image can
be displayed by clicking on the “Image information” icon
![]() .
Click “OK” when you’re done reading the
metadata.
.
Click “OK” when you’re done reading the
metadata.
When finished, click on the close button in the top right-hand corner of the toolbox to close the toolbox.
Participants may also use other outside imagery as a layer:
Acceptable imagery files that may be brought into the PUMA MTPS as layers are:
Oracle Spatial Layer, Image Library (.cil), TIFF Image (.tif), JPEG Image (jpg), MrSID Image (.sid), JPEG 200 Image (jp2), ECW Image (.ecw), SPOT Image (.bil, .tif), Digital Orthophoto (DOQ/DOQQ)
Click on the map layers icon to open up the Layers window.

Click “Add Layer” from within the Layers window.
Locate and open an image layer to be used as a reference layer. Drop down to the file type of your imagery layer if it is not already available in the file box.
Click on the “Autoscale” tab near the bottom of the Layer window and adjust accordingly.
Appendix C. Splitting States into Multiple Work Areas
The simplest means of dividing work into multiple projects is by distributing each project to a separate work station (i.e. Split a state into multiple pieces each section of the state is stored on a different computer and worked on by a different person. This way, large areas can be completed more quickly by splitting the workload among several people.). Concurrent session of MTPS cannot be opened on a single work station. Thus, if multiple projects are to be edited at the same time, then they must be on separate machines. To limit a project to only a few counties you will have to edit the geographic coverage of each project to limit it to a subset of the state’s counties. This is accomplished by editing the Set-up XML file. See Appendix D for more details on changing the geographic coverage in the Set-up XML file.
To store two or more PUMA MTPS projects on a single computer the simplest solution is to store multiple “MTPSData” folders on the “C:\” drive with ascending number suffixes. For example:
C:\MTPSData1
C:\MTPSData2
C:\MTPSData3
Etc…
To view or work on a project rename its folder back to “C:\MTPSData” (without the numbered suffix). Then initiate the MTPS software. The MTPS should only recognize the data that is stored in the correctly named default folder (C:\MTPSData). All of the data folders with numbered suffixes will be ignored.
To change to another project:
Close the MTPS.
Rename the current “C:\MTPSData” folder back to its original name with the numbered suffix.
Rename the new project folder (that will be opened next) to “C:\MTPSData” (remove the numbered suffix).
Open the MTPS. It should automatically connect to the new dataset.
To combine multiple projects back together into one completed state coverage:
Run verification and report changes for each of the individual projects.
Collect the county level CTEF files from the reported changes of each individual project together into one folder.
Create a new “C:\MTPSData” folder (Delete, move, or rename any previously existing MTPSData folder first).
Add all of the initial startup data to the new “C:\MTPSData folder”. These include all of the shapefiles (downloaded in step 5.1.1) along with the original Setup XML file received from the Census Bureau.
Open the MTPS. Enter the username “PUMA”. And wait for the project to build.
After the project builds select to delineate PUMAs by importing Multiple CTEFs.
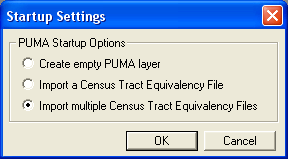
When prompted to select the Input CTEFs select all of the county level CTEFs from the various delineation projects.
Appendix D. Creating Set-up Files for Multiple Work Areas
The setup .xml file provided by the Census Bureau contains the geographic coverage data used by the MTPS to build the initial delineation map from the provided layers. When splitting a state coverage into multiple projects, the setup file can be edited to limit the extent of geography built into each partial project. This can be useful in reducing the amount of time the MTPS spends building each project. If the geographic coverage is limited to only a quarter of the counties in a given state, then the MTPS will spend roughly a quarter as much time building the initial map. Smaller delineation projects will also function more quickly when editing or creating PUMA delineations.
To change the geographic coverage for a given project (these steps must be completed before the MTPS builds the initial delineation project in section 5.1.2 of this document):
Create a copy of the setup XML file provided by the Census Bureau (Create a new copy for each sub project that will be created).
Open the copy of the setup XML with wordpad or some other text editing software. The area of interest is the <CoreCountyCoverage></CoreCountyCoverage> tag set. The standard Setup XML file (covering the entire state) will have the State FIPS code inserted between the “CoreStateCoverage” tags (e.g. <CoreStateCoverage>10</CoreStateCoverage>) and the “CoreCountyCoverage” tags will have no value assigned (e.g. <CoreCountyCoverage></CoreCountyCoverage>).

To limit the coverage of a project to only a subset of counties list all desired County FIPS codes, separated by commas, between the “CoreCountyCoverage” tags (e.g. <CoreCountyCoverage>10001,10005</CoreCountyCoverage>).

Save the changes to the copied setup XML file.
Make sure that you locate the edited copy of the XML file in the “C:\MTPSData” folder along with all the shapefiles pertaining to the entire state and the shapefiles pertaining to each of the counties listed in the XML file. According to the example shown above, the “C:\MTPSData” folder must contain 1) all the shapefiles for state 10 and 2) all the shapefiles for counties 10001 and 10005.
Appendix E. Creating Census Tract Equivalency Files
P
Note: To begin working on PUMA
CTEF files before the official PUMA shapefiles are available
download state-wide census tract shapefiles from the Tiger Line
Download page at: http://tigerline.census.gov/cgi-bin/shapefiles2009/national-files
Example of one possible CTEF creation methodology
There are many ways to create a CTEF for import into the PUMA MTPS. The following is an example of one methodology for creating a PUMA CTEF using ESRI ArcGIS 10.0 software. However, users can user other types of GIS software for creating CTEF files.
Create a copy of the state level Tract 2010 shapefile downloaded in section 5.1.1 of this document. Do not alter the original copy of the Tract 2010 shapefile, otherwise the MTPS may not work correctly.
Import the copied Tract 2010 shapefile into your GIS software.
Optional: If you choose to use an existing geography to inform your PUMA delineation (e.g., incorporated places, American Indian areas, or minor civil divisions), import that file into the project as well. We recommend that you make this “selection layer” hollow with a thick outline to distinguish between the 2010 Census Tract layers.
In the Census Tract attribute table (.dbf) add a field named PUMA10CE. The user must define the PUMA10CE field as a 5-character text field. (The PUMA MTPS requires this field to correctly read your created CTEF file.)
In the Census Tract attribute table (.dbf) add a field named PUMA10NAME. The user must define the PUMA10NAME as an 86-character text field. (The PUMA MTPS requires this field to correctly read your created CTEF file.)
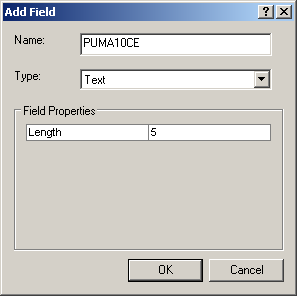
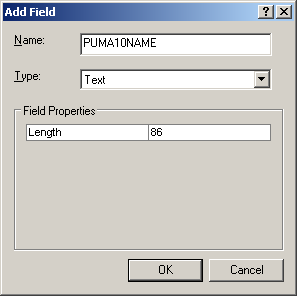
For simplicity sake, all unnecessary fields from the Tracts shapefile were removed from the following illustration leaving only the FID, Shape, TRACTID, POP10, PUMA10CE, & PUMA10NAME fields:
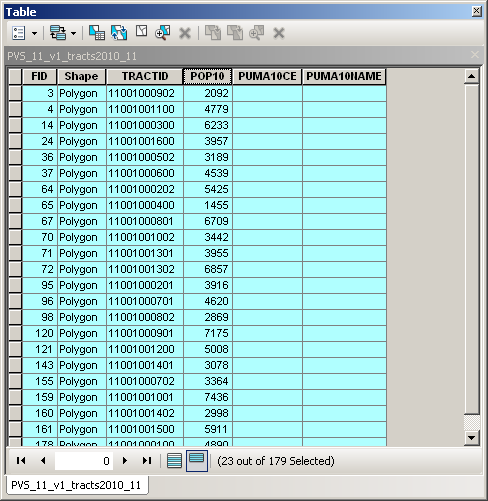
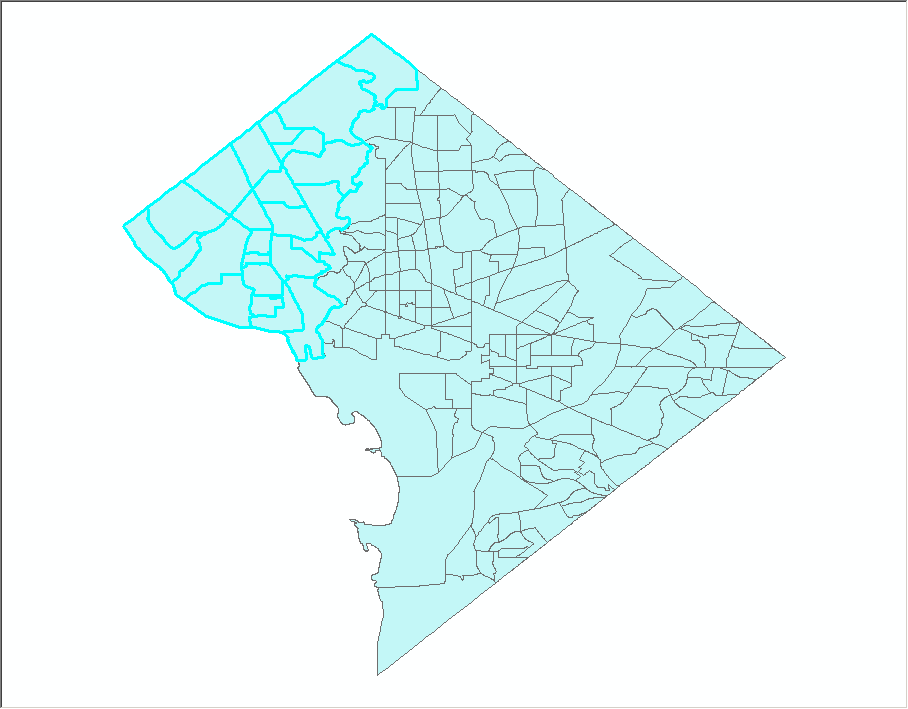
Select the 2010 Census Tracts within the desired area using select tool
 (or select by location based on your “selection layer”).
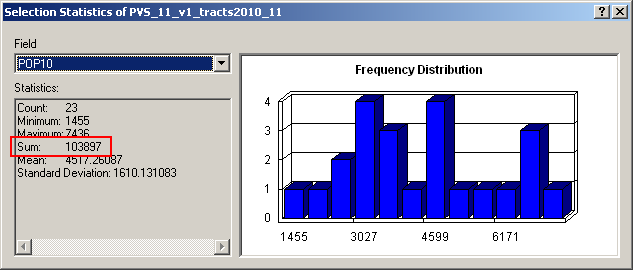
Open the 2010 Census Tract attribute table. Right click on the POP10 field and select “Statistics” from the drop down list. The statistics window includes a Sum of the population for the selected Tracts. Make sure that your selected area has a population of at least 100,000.
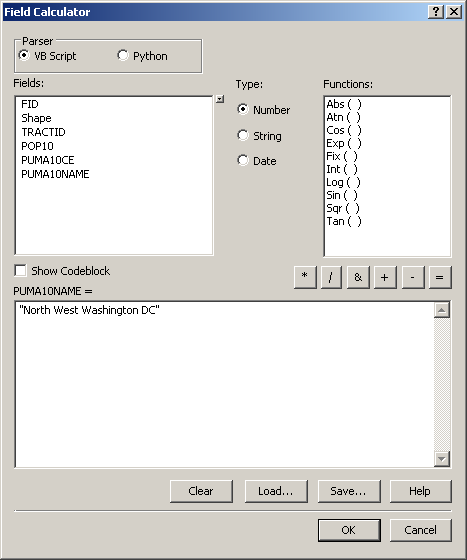
In the 2010 Census Tract attribute table. Right click on the PUMA10CE field and open Field Calculator. Assign the PUMA10CE a five-character PUMA code for the selected area.
Next assign the PUMA10NAME field with an appropriate PUMA name up to 86 characters in length.

Repeat this for each unique PUMA you want to create. Be sure to assign a unique five-character code and unique PUMA Name until all records no longer have a PUMA10CE value of “null”.
Export attribute table as a comma-delimited, text, or dbase (.csv, .txt, or .dbf) file (named “ST11_PUMA_CTEF.csv” in this example). Alternately, you can just use the .dbf from your shapefile as your CTEF.
Do not modify a CTEF in CSV format in Microsoft Excel. Doing so may change the formatting of the file and it will not be accepted by the PUMA MTPS. If records within a CTEF need to be modified after creating them, we recommend using Microsoft Access, WordPad, or Notepad.
If a CTEF will not import into the PUMA MTPS, check for the following scenarios:
Duplicate TRACTIDs within CTEF
CTEF is not of the correct file type or the name is not formatted correctly
Multiple CTEFs in DBF format
Modified CSV in Excel
Appendix F. MTPS Error Resolution Guidelines
Though it is uncommon, while performing updates in the PUMA MTPS you may encounter a fatal error message. If you encounter a fatal error message or cannot complete delineation due to issues with either the software of the data, then it is imperative that you stop all updates immediately and follow the instructions below, so the Census Bureau can resolve this issue as quickly as possible.
Resolution
Because the MTPS does not contain tools to fix data corruption issues and the fact many of these issues are difficult to resolve, the Census Bureau is requesting that you send the damaged files to Census Bureau staff via File Transfer Protocol (FTP), so we can quickly correct the problem. We will return corrected spatial files back to the PUMA program participant via Email, FTP, or DVD (depending on the size of the data, and the availability of and FTP site) usually within a couple of days of receiving the files.
Please carefully record error messages along with any other information that pertains to the issue. The better description you can give to the problem the easier it will be to resolve it.
FTP Instructions
The following are instructions for sending the problem MTPS Caliper-based files to the Census Bureau for repair:
Locate the MTPSData folder on your C: drive (C:\MTPSData).
Select the MTPSData folder, and using any ZIP software, compress the data into a ZIP file named <StateID>.zip (State ID is “ST” + the two digit state FIPS code. The state ID for Michigan is “ST26”. For Alabama it is “ST01”).
In a web browser navigate to http://secure.census.gov/cgi-bin/sendfile.
When prompted, enter the username: “puma” and password: “puma4usboc” to log on to the Send A File site.
In the Source Information (Local) section, click on the Browse button to navigate to the <StateID>.zip file. Select the <StateID>.zip file and click “Open”. The File to Send field now contains the file name. Note: Only one file can be sent at a time.
Click “Upload” to transmit your <StateID>.zip file to the Census Bureau for repair.
The Send A File Utility will automatically send email notifications to the Census PUMA team, however these email notification will not include information about why you are sending a resolution file. Please also send an email to [email protected] including:
Your name
The name of the file you are sending us (<StateID>.zip)
As many details as possible (error messages, screen shots, descriptions) about what issues are preventing you from finishing your PUMA delineation in the MTPS.
If you have any specific details or preferences concerning how we may send repaired files back to you (do you have an FTP site we can send to?), please also include those in the email.
Important Note!! If you must resubmit a file for any reason, you must rename the file. If not, the utility will produce an error message. Please retain the default naming convention of <StateID>.zip when you rename it.
Here are examples for re-naming a file:
<StateID>_revised.zip
<StateID>_revised2.zip
Census Bureau Return Files
Once the Census Bureau repairs your file(s), we will send the repaired MTPSData folder back to you.
If you cannot receive data via FTP, we may attempt to send the files as an email (if the size is not too large). Alternatively we may burn the data onto a CD or DVD and ship via UPS to the PUMA program participant.
The repaired data will be returned as a ZIP file named “MTPSData_<StateID>.zip”.
Locate your current “C:\MTPSData” folder, and rename it “C:\MTPSData_old”.
Create a new “C:\MTPSData” folder
Extract the contents of the “MTPSData_<StateID>.zip” into your newly created “C:\MTPSData” folder.
Open the PUMA MTPS and resume your PUMA updates.
Contact Information
If you have any questions regarding this particular issue or you are unsure how to proceed, please send an email to [email protected] or call the Census Bureau, Geographic Areas Branch (GAB) at (301) 763-1099 and ask for a PUMA team member.
Appendix G. PUMA Naming Criteria
Descriptive names will be added to the Census Bureau’s public products including demographic/housing products and geographic products (i.e., TIGER/Line Shapefiles and map products). PUMA names will be provided by SDCs during PUMA delineation. In all cases, the objective is to clearly identify the extent of the PUMA by identifying a concise area name that is also meaningful to data users. The Census Bureau will have final approval of all names for inclusion in its public products and will collaborate with SDCs to create meaningful PUMA names during the delineation process.
BASIC CONCEPTS AND NOMENCLATURE:
The goal in assigning names to PUMAs is to provide a means for easily understanding and identifying the geographic location of each PUMA. PUMA names should generally reference the geographic areas within a PUMA containing the most population, housing, and/or area, e.g., a county, place (incorporated place or census designated place (CDP)), county subdivision, American Indian reservation and/or off-reservation trust land, military installation, national park, and/or prominent physical feature; the PUMA’s geographic relationship within or to another geographic area, e.g., "Northeast Utah", "West Loudoun" in Virginia, or "Northeast Minneapolis" in Minnesota; or a well-known region primarily within the PUMA, e.g., "Florida Panhandle."
The following guidelines refer to the toponym of PUMA names and particular associations to the communities and features that the name represents:
PUMA names should be as short and concise as possible while still being descriptive, clear, and unique within a state.
PUMAs may be named after the largest population center, administrative division, or historically central place within it (e.g., “Burbank” in California, “Taos” in New Mexico). Names of incorporated places, CDPs, and county subdivisions may be used.
PUMAs may be named after a populous American Indian Reservation (AIR) within it, (e.g., “Navajo Nation Reservation - Hopi Reservation” in Arizona).
PUMAs may be named after a legal or statistical geography (e.g., county or CDP). The geographic type or area descriptor may be appended to the name to identify the particular geographic entity being described where there is a clear case that the name alone may cause confusion for data users (e.g., South San Bernardino County, San Bernardino City South).
Where a PUMA contains multiple centers or counties with relatively equal importance, a PUMA name may represent no more than three centers or counties (e.g., “Mount Pleasant - Moroni” in Utah). If it is not clear which centers or counties to include, the PUMA name should instead follow another of the name guidelines.
A PUMA may be named after a prominent physical feature (e.g., “Denali” or “Cook Inlet” in Alaska), a prominent land use area in which it is partially or wholly located (e.g., “Yellowstone National Park” in Wyoming), or a distinctive region within the county or state (e.g., “Everglades and Lower Keys” in Florida).
If there is no clear cultural focus or topographic name that can be applied, a PUMA name can consist of the state or county name, and a compass direction to indicate the portion of the state or county in the PUMA. The directional indicator should precede the state or county name (e.g., “Northeast Colorado”). Note: In all other cases, a state name or abbreviation should not be appended to a name.
A PUMA name may consist of a place name and compass direction to give the PUMA location relative to the place or within the place. If a place name is used, the directional indicator follows it (e.g., “Irvine South”).
RULES AND NAMING CONVENTIONS: The following detailed guidelines pertain to the structural components of the name apart from its origin or association to the communities or features it represents.
Character limit: All names shall not exceed 86 characters.
Unique names: A PUMA may not have the same name as another PUMA within the same state.
State name or abbreviation: A state name or abbreviation should be used only when the PUMA name consists of the state name and a compass direction to indicate the portion of the state in the PUMA (refer to #6, above). For clarity, state abbreviations will be appended to PUMA names in Census Bureau public products, as appropriate.
Hyphen usage for multiple geographic areas: Hyphens may be used to connect the names of multiple geographic areas used in the PUMA name. Up to three geographic area names may be included within a PUMA name.
Name hierarchy: Where a PUMA name represents two or more areas joined by hyphen(s), the names should be presented in order of population size or regional importance, listing the most populous/most important first.
Alphabet: All names must be in the Roman alphabet as normally used for writing the English language.
Diacritical marks and special characters: Diacritical marks (accents and tildes) may be added to names. For the 2010 Census, diacritical marks are allowed in all areas of the United States, not just in Puerto Rico and Guam. A list of valid characters for geographic area names will be added to Appendix H.
Abbreviations: The words Saint and Sainte (abbreviated as St. and Ste., respectively), Air Force Base (AFB), and Air Reserve Base (ARB) must be abbreviated. USPS two-letter state abbreviations may also be used, but are discouraged (refer to #11, above). Other abbreviations are discouraged, but may be accepted based on Census Bureau review and approval.
Appendix H. Valid Characters for PUMA Names
“Standard” characters allowed in Geographic Area Names (all other characters will be removed or changed):
Char |
Description |
A-Z |
Upper case letters |
a-z |
lower case letters |
0-9 |
umbers |
blank |
single blanks, not two or more consecutive |
’ |
apostrophe |
( |
open parenthesis |
) |
close parenthesis |
/ |
forward slash |
, |
comma |
& |
ampersand |
. |
period |
- |
hyphen |
Additional accepted characters from the ISO 8859-1 Character Set:
|
|
Appendix I. Disclosure to Respondents
The Geography Division manages programs to continuously update features, boundaries, addresses, and geographic entities in the Master Address File/Topologically Integrated Geographic Encoding and Referencing System (MAF/TIGER) database that is used to support programs and to conduct the census and surveys. PUMAs are statistical geographic areas defined for the tabulation and dissemination of decennial census and American Community Survey (ACS) Public Use Microdata Sample (PUMS) data. Additionally, PUMAs are used in the publication of ACS period estimates. Nesting within states, or equivalent entities, PUMAs cover the entirety of the United States, Puerto Rico, and the Island Areas that contain a 2010 Census population of 100,000 or more. PUMA delineations are subject to population, building block geography, geographic nesting, and contiguity criteria. State Data Centers (SDCs) define PUMAs with the cooperation of regional, state, local, and tribal organizations and agencies.
Public reporting burden for this collection of information is estimated to average 80 hours per respondent, including time for reviewing instructions, assembling materials, organizing and reviewing the information, and reporting all delineations. We anticipate that an estimated 52 SDCs will make and report delineations. Please send comments regarding this burden estimate or any other aspect of this collection of information, including suggestions for reducing this burden to:
Paperwork Project
0607-0795
U.S. Census Bureau
4600 Silver Hill Road
Room 3K138
Washington, D.C. 20233
You may e-mail comments to [email protected]. Use “Paperwork Project 0607-0795” as the subject.
Responses to this survey are voluntary. The authority for conducting these activities is covered under the legal authority of Title 13 U.S.C. Sections 141 and 193.
No agency may conduct and no person may be required to respond to a collection of information unless it displays a valid Office of Management and Budget (OMB) approval number. The OMB approval number for this information collection is 0607-0795.
1 The ACS is conducted in the United States and in Puerto Rico. In Puerto Rico the survey is called the Puerto Rico Community Survey (PRCS). For ease of discussion, the term ACS is used throughout this document to represent the surveys conducted in the United States and in Puerto Rico, as well as their data products.
2 PUMS are files which contain individual records of the characteristics for a sample of persons and households. Further information about microdata, PUMS, and confidentiality of PUMS data is provided on the Census Bureau website. Please refer to http://www.census.gov/main/www/pums.html and http://www.census.gov/acs/www/data_documentation/public_use_microdata_sample/.
3 States are the primary governmental divisions of the United States. The District of Columbia and Puerto Rico are treated as statistical equivalents of a state for data presentation purposes. The Census Bureau treats America Samoa, the Commonwealth of the Northern Mariana Islands, Guam, and the U.S. Virgin Islands as state equivalents as well.
4 There was only one PUMA delineated for each of the state equivalents of Guam and the U.S. Virgin Islands in Census 2000; therefore, the Guam and U.S. Virgin Islands SDCs did not delineate PUMAs. American Samoa and the Commonwealth of the Northern Marianas Islands did not meet the minimum population threshold for PUMS publication; therefore, PUMAs were not delineated in these areas. At the time of publication, the 2010 Census population counts were not yet released for the Island Areas. A 2010 PUMA will be delineated for those Island Areas that contain a 2010 Census population of 100,000 or more.
5 Michigan PUMA 03200 comprises Ann Arbor city and is extremely complex, including 4 exclaves and 86 enclaves (holes). Ann Arbor reported 194 annexations from January 1, 2000 through January 1, 2010. Total acreage annexed in that time, as reported in the Boundary and Annexation Survey, was 669.3 acres. Throughout Michigan, there were 794 legal boundary changes in the past 10 years, involving 21,345 acres.
6 For 2000 PUMAs, only MCDs in the New England states were permitted to be used as PUMA building block geographies.
7 In 20 states (Connecticut, Illinois, Indiana, Kansas, Maine, Massachusetts, Michigan, Minnesota, Missouri, Nebraska, New Hampshire, New Jersey, New York, North Dakota, Ohio, Pennsylvania, Rhode Island, South Dakota, Vermont, and Wisconsin) a majority of the MCDs are general-purpose governmental units. A majority of these MCDs are legally designated as towns or townships.
8 Includes parishes in Louisiana; boroughs and census areas in Alaska; independent cities in Maryland, Missouri, Nevada, and Virginia; that portion of Yellowstone National Park in Montana; districts in American Samoa; the three main islands of the U.S. Virgin Islands; municipalities in the Northern Mariana Islands; municipios in Puerto Rico; and the entire area constituting the District of Columbia and Guam.
| File Type | application/msword |
| Author | Nick Moebius x32551 |
| Last Modified By | short007 |
| File Modified | 2011-08-30 |
| File Created | 2011-08-30 |
© 2026 OMB.report | Privacy Policy