Disaster Information Reporting System (DIRS)
1003_DIRSUser Manual_031109_Final.doc
Communications Disaster Information Reporting System (DIRS)
Disaster Information Reporting System (DIRS)
OMB: 3060-1003

Disaster Information Reporting System (DIRS)
User Manual
Version 2
March 9, 2009
Table of Contents
1.2 Accessing the Disaster Information Reporting System 1
1.6 Screen for Forgotten Password Request 5
1.13 Upload Tab Delimited File 11
2 Wireline Switch 12
3 Wireline Digital Loop Carrier (DLC) 16
4 Wireline PSAP 19
5 Interoffice Facilities – Point to Point 22
6 Interoffice Facilities - Rings 24
7 IXC Blocking 26
9 Wireless Cell Site by County 31
10 Broadcast 34
1Using the System
1.1Introduction
The Disaster Information Reporting System (DIRS) is a voluntary, efficient, web-based system that communications providers, including wireless, wireline, broadcast, and cable providers, can use to report communications infrastructure status and situational awareness information during times of crises. Because the information that communications companies input to DIRS is sensitive, for national security and/or commercial reasons, DIRS filings shall be treated as presumptively confidential upon filing. To improve the utility of DIRS and facilitate Federal restoration efforts, the Commission will disseminate DIRS information to other Federal agencies that are authorized participants on the Emergency Support Function-2 (ESF-2) team. When DIRS is activated, the FCC will send an email to service providers, DIRS coordinators, and inputters notifying them of the activation. The e-mail will also include the geographic regions of the disaster and when the FCC requests the reports to be submitted.
To facilitate determination of network infrastructure located in counties declared to be part of the disaster area for a DIRS activation, an inputter or coordinator may find it useful to refer to www.zipinfo.com/search/zipcode.htm, which correlates zip codes with counties.
1.2Accessing the Disaster Information Reporting System
The DIRS home page is at:
https://www.fcc.gov/nors/disaster
1.3Security Banner
The following Security Banner will be displayed once the URL for the DIRS has been sent:
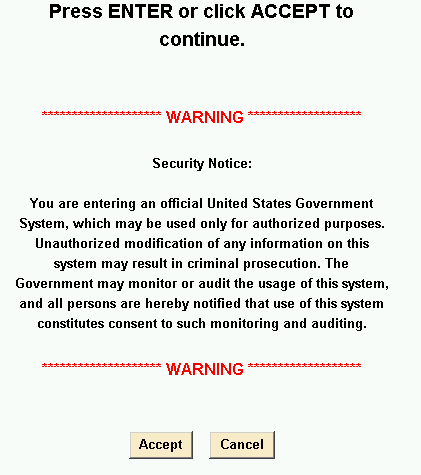
You will have to acknowledge that you “accept” the conditions stated in the Security Banner.
1.4DIRS Login
The Login screen is used to allow users to have access to the system. The system keeps track of two major types of filers: report inputters and report coordinators. Report inputters can file any type of report but can only update/resubmit reports that they personally have originally submitted. Report coordinators will be allowed to update and resubmit any report that was filed by someone from their company. DIRS makes this distinction for security reasons (to prevent someone posing as an employee of a company from getting access to the reports of that company).
You will need a User ID and a password. The DIRS system User ID and password will be authenticated when you click the Login button on the login screen. The login screen is:
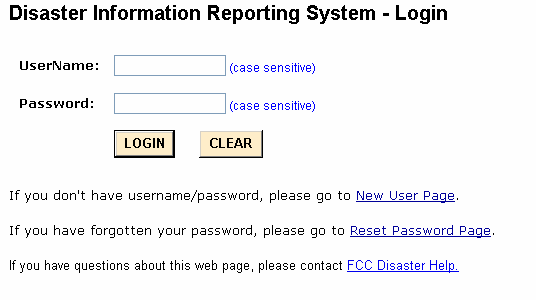
.
If you do not already have a User ID and Password, you should click the link marked “If you don’t have username/password, please go to New User Page” (click the underlined blue message). This will send you to the New User screen (given in Section 1.4). Note that if you forget your password, you should click the link marked, “If you have forgotten your password, please go to Reset Password Page.” The system will send you to a screen which asks for your User ID and your e-mail address. Your password will be e-mailed to you. If you need help or have questions, you should click the link marked “If you have questions about this web page, please contact FCC Disaster Help.” Alternatively, you may contact the phone number or numbers mentioned in the DIRS activation email.
1.5Screen for New Users
If you do not already have User ID, you will be required to identify yourself including providing a valid e-mail address and contact information. The system will respond with your User ID and password. You will then be allowed to file reports. You will also be able to update and modify reports that you inputted. The screen for New Users is:
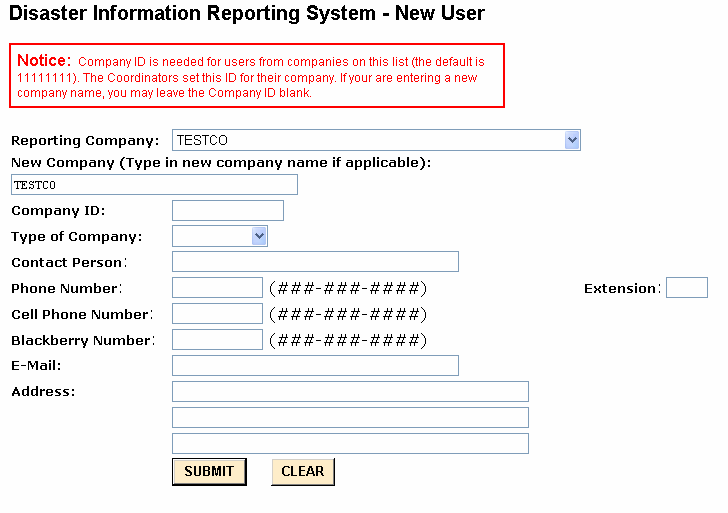
If someone from your company has User ID or has filed a report, your company will be listed in the scroll down menu under the Reporting Company. You will have to choose that company and know the Company ID (or password). The Company ID is controlled by the report coordinators for your company (if your company has report coordinator(s)). The initial value for it is 11111111. The Company ID is DIRS’ way to prevent any unauthorized person from saying that he/she is from your company. If your company is not in the scroll down menu, please give the name of your company. You will not have to provide a Company ID in this case.
In all cases you must provide your name, phone number and e-mail address. You will then be sent to the following screen which provides your User ID and password. You can then log onto the DIRS and file a disaster report.

1.6Screen for Forgotten Password Request
This screen allows you to get a new password if you have forgotten your current password. You should click the link marked “If you have forgotten your password, please go to Reset Password Page”.
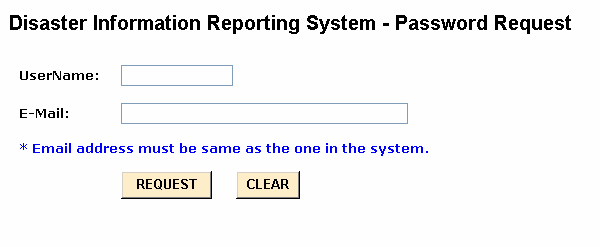
DIRS will send you your new password via e-mail.
1.7User Main Menu Screen
Those users with valid User IDs and valid passwords who are filing reports will go to the User Main Menu Screen upon logging on. Report inputters and coordinators have different menus. DIRS will authenticate your User ID and password and will send you to the correct user menu.
The Main Menu for coordinators is shown below.
Disaster
Information Reporting System - Main Menu
Welcome
John Doe from TESTCO. The name of current disaster is CARLTEMP.
Display/Update
Reports
-- To display/update disaster reports.
Modify
Password
-- To modify the password.
Modify
Profile
-- To modify the user profile.
Modify
Company ID
-- To modify the company id.
Modify
Company Information
-- To modify the company information.
Manage
User
-- To manage user information.
Upload
Tab Delimited File
-- To upload a tab delimited data file.
Download
Excel File
-- To download Excel file to generate tab delimited data file.
In the Main Menu screen example above, only one disaster is in progress. However, if there are multiple disasters being covered by DIRS at the same time, all of these disasters will be shown in the screen.
The “Display/Update Reports”, “Modify Password”, and “Modify Profile” selections on the menu are available to both inputters and coordinators. The other items are available only to coordinators.
If you select Display/Update Reports, you will be sent to the module for filing, displaying and updating any of the disaster reports. That is, if you want to file a new report, update an existing report or look at any report that you have filed, you should select this menu item. If you are a report inputter, you will be able to update and view only the reports that you personally have filed. If you are a report coordinator, you can update or view any report that you or anyone from your company has filed. It should be noted that no one from another company can see reports from your company. The only people allowed to view your outage reports are authorized FCC and DHS personnel. Authorized personnel from the FCC do have the ability to update your reports. This is for situations when you may not have access to the Internet but can get the information to the FCC using some alternate form of communication. If the FCC does update one of your reports, all your earlier versions will still be kept on the system. DIRS also keeps records of who did the update.
All users should change their password periodically to enhance security of their reporting and viewing of their reports. The menu to change a password is available by selecting Modify Password.
If a user wants to change or modify his/her profile, he/she should choose Modify Profile.
The Company ID is a company password maintained by the company’s report coordinators. It is DIRS’ way of allowing companies with report coordinators to control who can submit reports from their company. Anyone who wants to submit reports for a particular company must know the Company ID in order to get a User ID that is assigned to that company. Report coordinators maintain the Company ID. Report coordinators can change the Company ID. This is done under the heading, Modify Company ID.
If a coordinator wants to change or modify his/her company profile, he/she should choose Modify Company Information.
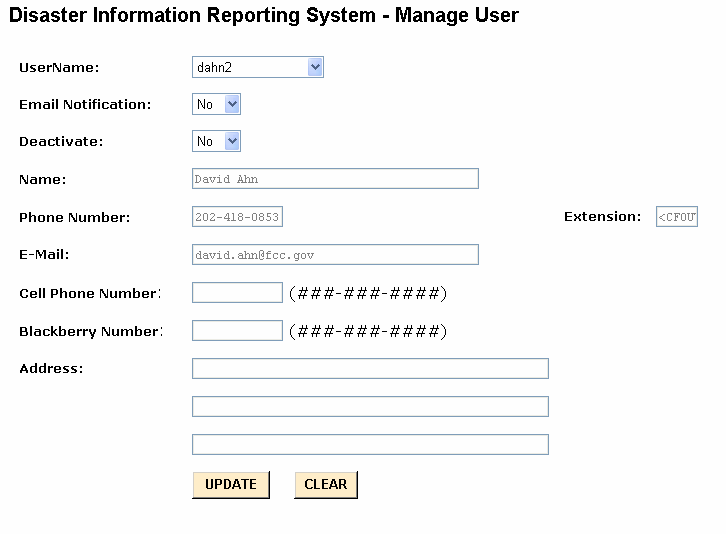
Report coordinators are allowed to modify the profile of an inputter or to deactivate the privileges of any inputter from their company. A coordinator can also deactivate another coordinator from their company. This is achieved by selecting Manage User.
A coordinator using Upload Tab Delimited File will be able to upload a file that has been created in advance and which contains data for multiple reports. The coordinator will be able to use Download Excel File to download a template to aid in creating the file that contains the data for multiple reports.
1.8Display/Update Reports
If you select Display/Update Reports, you will be sent to the following screen so that you can file, update or view your disaster reports:

You must select the type of report that you want to file, update or view from the drop down menu. The drop down menu from the preceding screen is shown below:
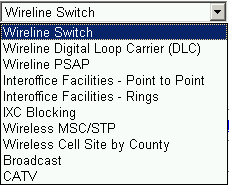
The reports that are requested depend on the type of company. For example, traditional local exchange carriers will need to fill in the Wireline Switch, Wireline Digital Loop Carrier (DLC) and Wireline PSAP reports. All companies that own interoffice facilities will fill in the Interoffice Facilities – Point to Point and the Interoffice Facilities – Rings reports. Interexchange carriers will fill in the IXC Blocking report. Wireless carriers will fill in the Wireless MSC/STP and the Wireless Cell Site by County reports. Broadcasters (AM/FM/TV) will fill in the Broadcast report. CATV operators will fill in the CATV report.
You must select the type of report that you want to file, update or view. Once you have selected the type of report and hit the retrieve button, the following screen will appear (we illustrate this for the moment with the Wireline Switch report):
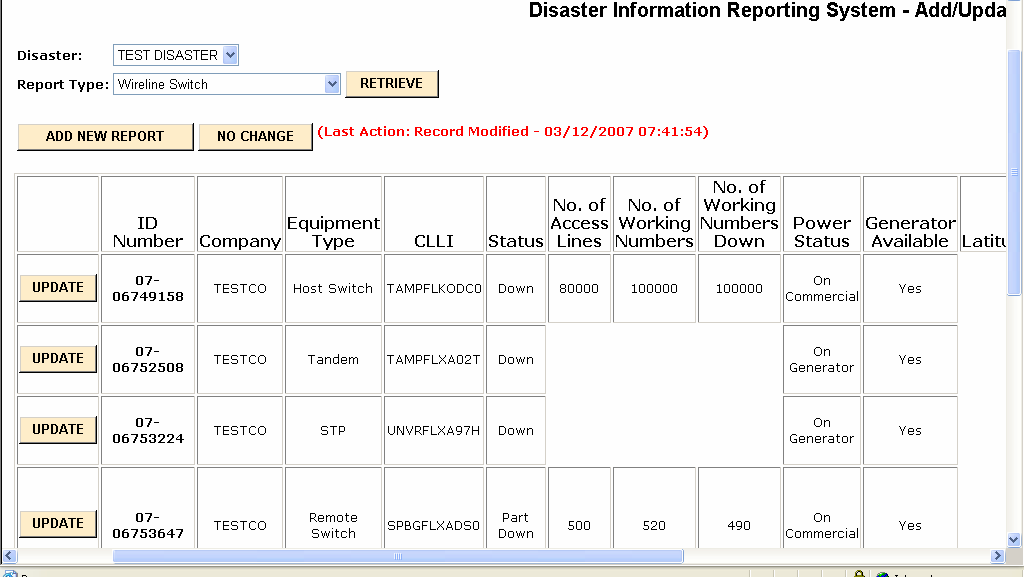
In the example above, there are no blank fields for the reports on the Host Switch and the Remote Switch. All fields must be filled in for those reports. However, the concept of access lines on a Tandem Switch or an STP is meaningless, and the fields left blank for the reports on the Tandem Switch and STP are correctly left blank.
All the reports that you are allowed to update will be listed in table format. There will be a scrollbar at the bottom so that you can see any of the fields for that report. If you need to input a new report, click on the button “ADD NEW REPORT”. If you want to update any report, click the UPDATE button next to that report.
Below in separate sections we will provide details for each report type.
1.9Modify Password
This screen allows you to modify or change your password.
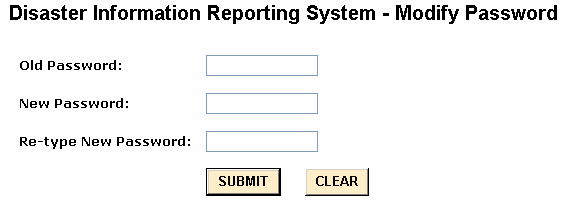
DIRS will confirm your change of password.
 .
.
Use your selected password for future outage reporting.
1.10Modify User Profile
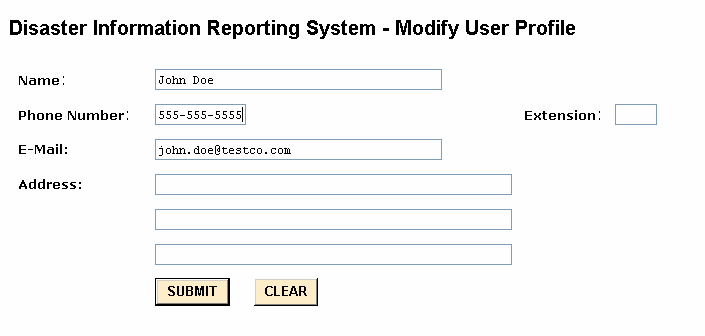
If you need to make changes to your user profile (contact information changes), you can make them by accessing this screen:
1.11Modify Company ID
This screen allows report coordinators (and only report coordinators) to modify or change their Company’s ID. The Company ID is essentially a company password that is implemented in DIRS to prevent people from outside the company from modifying or viewing reports.
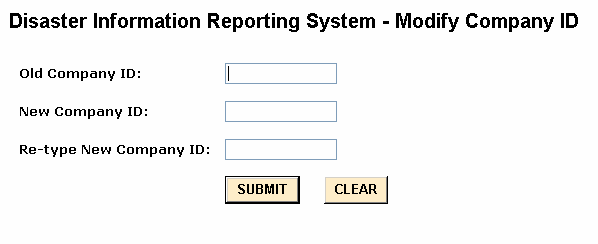
DIRS will confirm the change of Company ID.
1.12Manage User
Report coordinators can modify inputter and coordinator profiles or stop access to DIRS by their company’s report inputters and other report coordinators by using this screen:
1.13Upload Tab Delimited File
If you are a coordinator and select Upload Tab Delimited File, you will be sent the following screen:
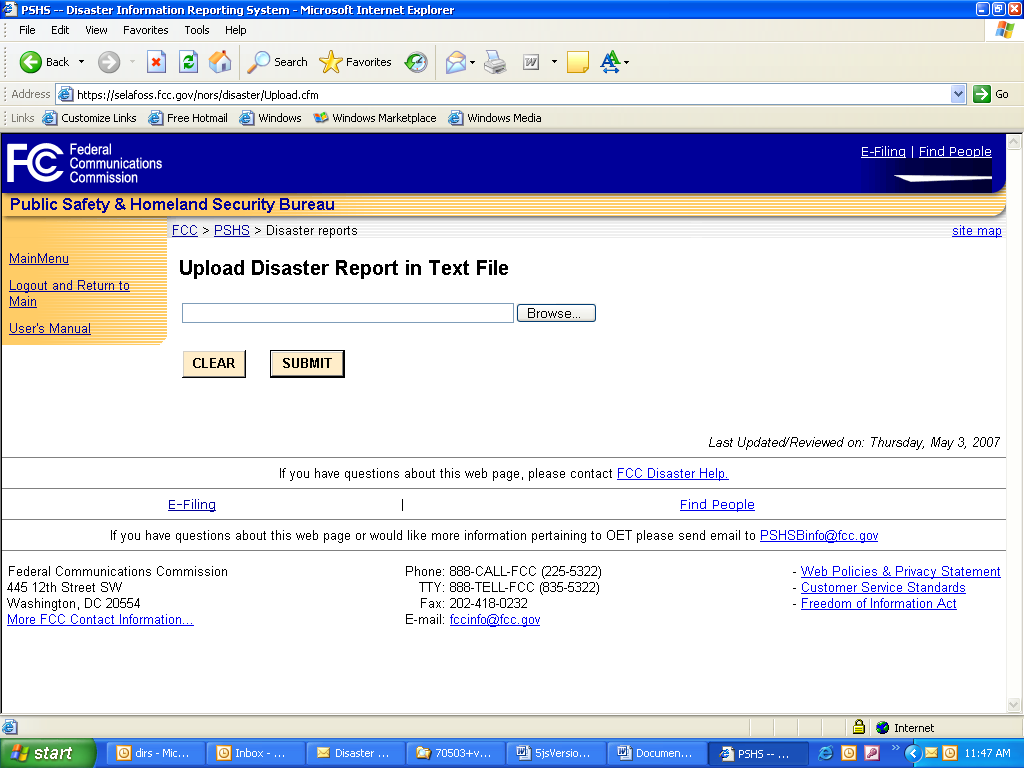
You may use the Browse button to select the tab delimited text file that you wish to upload to the Commission. When you have selected the file, press the SUBMIT button to upload the file. The user should ensure that the tab delimited file is not open on the desktop of the coordinator’s pc prior to pressing the SUBMIT button. Users should also ensure that all cells in the tab delimited file contain an entry (i.e., blank cells will cause upload errors.)
Note that a coordinator may upload updates on all reports previously submitted by your company, but an inputter may update only those reports that were initially submitted by the inputter. If the file being uploaded by an inputter includes data on a report that was initially submitted by someone else, DIRS will reject the file. Note: an inputter cannot upload updates to any information initially uploaded on a tab delimited file and can only submit single reports.
1.14Download Excel File
If you are a coordinator and select Download Excel File, you will be presented with a dialog box that will permit you to download an Excel file that may be helpful to use to create the tab-delimited text file discussed above. The instructions for using the Excel file to create the text file are provided in the first worksheet in the Excel file itself.
At the present time, it is not possible to download from DIRS bulk information that was previously submitted in a tab delimited file. DIRS is working on improving this situation.
2Wireline Switch
This section assumes that the user has chosen to input, update or view wireline switch reports. If “Wireline Switch” is chosen from the Display/Update Reports dropdown menu, the following screen will appear:
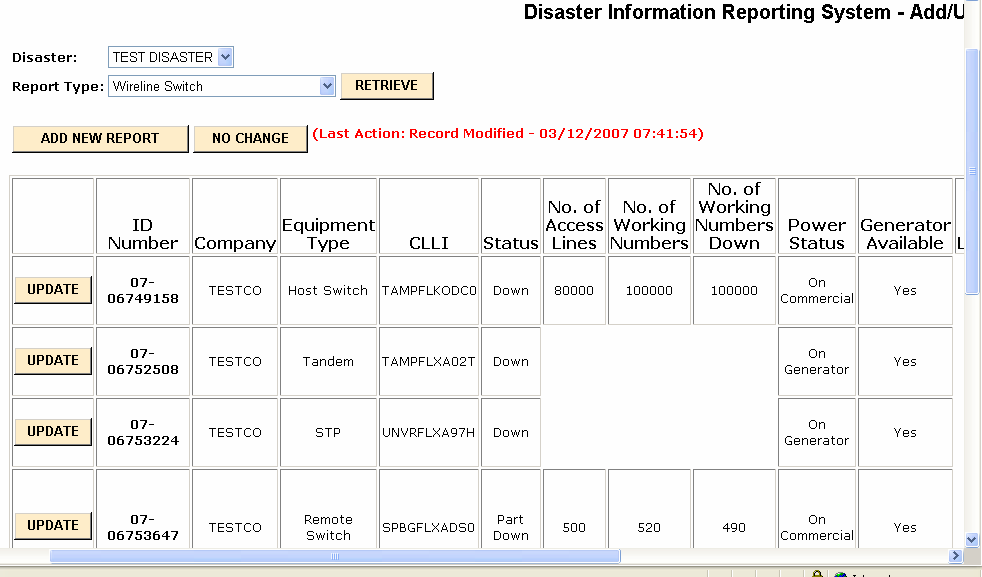
As shown above, all fields must be filled in for the reports on a Host Switch or a Remote Switch. Certain fields are meaningless for a tandem or STP, and these fields should be left blank.
All the reports that you are allowed to update will be listed in table format. There will be a scrollbar at the bottom so that you can see any of the fields for that report. If you need to input a new report, click on the button “ADD NEW REPORT”. If you want to update any report, click the UPDATE button next to that report.
If you click NO CHANGE, the following screen will appear:

If you click ADD NEW REPORT, the following input form will appear:
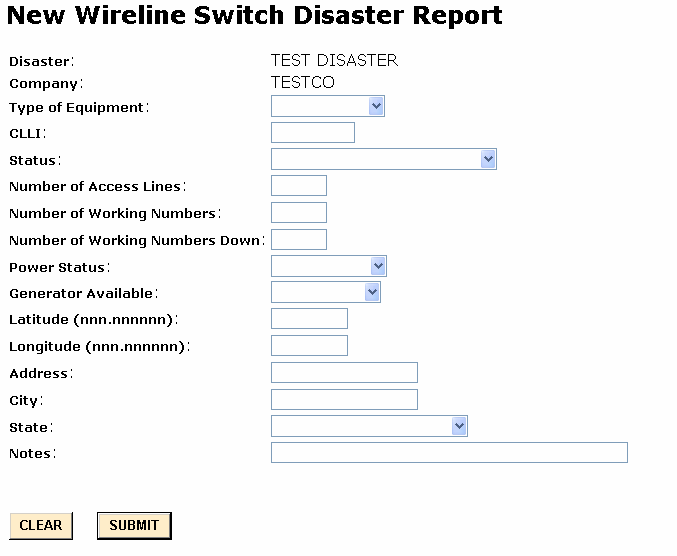
When you hit SUBMIT, DIRS will check to make sure that all the required fields are filled in. If some are not, DIRS will tell you to go back to the input screen and fill in those fields.
If you had clicked “UPDATE”, the report that you selected would have had much of the information prefilled. You can then make any changes that you want and resubmit the report.
Generally, reporting parties should treat fiber nodes as DLCs, and leave the wireline impact off of the Wireline Switch section to avoid double counting the impact.
Also, reporting parties should not count customer-caused service failures (e.g. subscribers that intentionally power their homes down); instead, the reporting parties should look at the node, and count all subscribers on the node, if the node is down. Therefore, the number of subscribers will be determined by whether or not a node is successfully up.
Below we describe how each of the fields on the Wireline Switch report should be filled out:
Disaster: The name of the disaster, e.g., Hurricane Katrina.
Company: The name of the company filling in the report. Company will be prepopulated based on who is submitting the information.
Type of equipment: The type of equipment that is being described in this row of the table. Only equipment that is down or on back-up power due to the disaster and in the affected area needs to be listed. Type of equipment can have the following entries:
Host Switch – A switch that resides in a central office building and provides call processing functions,
Remote Switch – A switch which depends on its host switch for call control but does provide intraswitch call processing. Remote terminals and Digital Loop Carriers are not to be considered remote switches.
Access Tandem – A switch that provides a concentration and distribution function for originating or terminating traffic between host switches.
STP – Signaling Transfer Point. A packet switch that performs message routing in a CCS (Common Channel Signaling) network
CLLI: The CLLI code for the equipment. CLLI is text field of 11 characters.
Status: The status of the equipment (generally whether the equipment is up or down). Status can take on the following values:
Up – Fully operational
Down – Completely down or at least 98% of the call processing is down.
Part Down – only a portion of the working numbers are down.
SS7 Isolated – the switch is isolated from the SS7 network
Switch Up but Outside Plant Down – the switch is up but at least 90% of the outside plant is not connected to the switch.
Number of access lines: The number of access lines served by the switch. There is no universally accepted definition of this term but each company keeps this data for each switch. Number of access lines is a 7 digit numeric field.
Number of working numbers: Number of working numbers served by the switch. Number of working numbers is defined to be the sum of all telephone numbers that can originate or terminate telecommunications. (For more explanation, see part 4 of the rules on outage reporting.) This is a 7 digit numeric field.
Number of working numbers down: Number of working numbers that are down and are served by the switch. Number of working numbers down is a 7 digit numeric field.
Power Status: The status of power for the equipment. This field can have the following entries:
On Commercial
No Power
On Generator
On Battery
Unknown
Generator available: Whether there is a generator available to power the equipment. This field can have the following entries:
Yes
No
Not Applicable – The equipment is on commercial power.
Unknown
Latitude: Latitude for the location of the equipment. Latitude is a 10 digit field - xxx.xxxxxx. For example, 40 degrees 30 minutes should be input 040.500000. Latitude and longitude or address and city are required.
Longitude: Longitude for the location of the equipment. Longitude is a 10 digit field - xxx.xxxxxx. For example, 40 degrees 30 minutes should be input 040.500000. Latitude and longitude or address and city are required.
Address: Address of the equipment. Address is a 20 character text field. Latitude and longitude or address and city are required.
City: City where the equipment is located. City is a 20 character text field. Latitude and longitude or address and city are required.
State: State where the equipment is located. State is selected from a drop down menu.
Notes: Notes contain additional information about any of the earlier fields. Notes is a 200 character text field.
3Wireline Digital Loop Carrier (DLC)
This section assumes that the user has chosen to input, update or view wireline digital loop carrier (DLC) reports. If “Wireline Digital Loop Carrier (DLC)” is chosen from the Display/Update Reports dropdown menu, the following screen will appear:
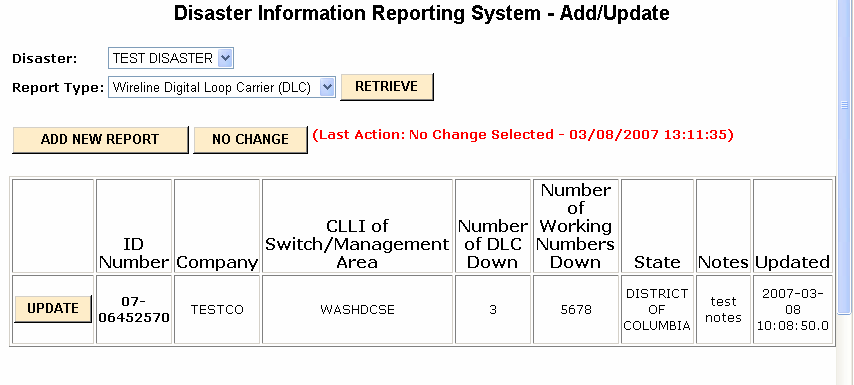
All the reports that you are allowed to update will be listed in table format. There will be a scrollbar at the bottom so that you can see any of the fields for that report. If you need to input a new report, click on the button “ADD NEW REPORT”. If you want to update any report, click the UPDATE button next to that report.
If you click NO CHANGE, the following screen will appear:

If you click ADD NEW REPORT, the following input form will appear:
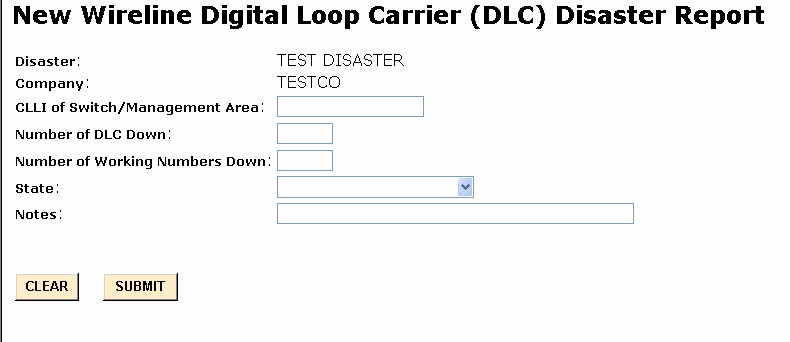
When you hit SUBMIT, DIRS will check to make sure that all the required fields are filled in. If some are not, DIRS will tell you to go back to the input screen and fill in those fields.
If you had clicked “UPDATE”, the report that you selected would have had much of the information prefilled. You can then make any changes that you want and resubmit the report.
Generally, reporting parties should treat fiber nodes as DLCs, and leave the wireline impact off of the Wireline Switch section to avoid double counting the impact.
Also, reporting parties should not count customer-caused service failures (e.g. subscribers that intentionally power their homes down); instead, the reporting parties should look at the node, and count all subscribers on the node, if the node is down. Therefore, the number of subscribers will be determined by whether or not a node is successfully up.
Below we describe how each of the fields on the Wireline Digital Loop Carrier (DLC) report should be filled out:
Disaster: The name of the disaster, e.g., Hurricane Katrina.
Company: The name of the company filling in the report. Company will be prepopulated based on who is submitting the information.
CLLI of building or the Management Area: CLLI of the building which serves all the digital loop carriers or the Management Area containing all the digital loop carriers. The goal here is to define a geographic area smaller than a state to obtain counts of affected digital loop carriers and counts of working numbers affected (down). The CLLI building code is 8 text characters.
Number of DLC down: Number of digital loop carriers from the switch or in the Management Area that are down (for any reason). This is a 3 digit numeric field.
Number of working numbers down: Number of working numbers that are down as a result of the digital loop carriers being down. Working numbers and access lines are treated as equivalent for this field. Number of working numbers down is a 7 digit numeric field.
State: State where the digital loop carriers are located. If the equipment is in more than one state, please pick the state with the majority of the equipment. State is selected from a drop down menu.
Notes: Notes contain additional information about any of the earlier fields. Notes is a 200 character text field.
4Wireline PSAP
This section assumes that the user has chosen to input, update or view wireline PSAP reports. If “Wireline PSAP” is chosen from the Display/Update Reports dropdown menu, the following screen will appear:
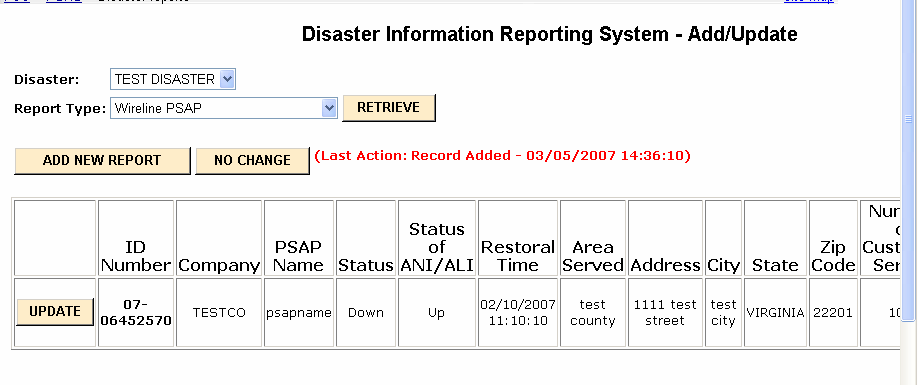
All the reports that you are allowed to update will be listed in table format. There will be a scrollbar at the bottom so that you can see any of the fields for that report. If you need to input a new report, click on the button “ADD NEW REPORT”. If you want to update any report, click the UPDATE button next to that report.
If you click NO CHANGE, the following screen will appear:

If you click ADD NEW REPORT, the following input form will appear:
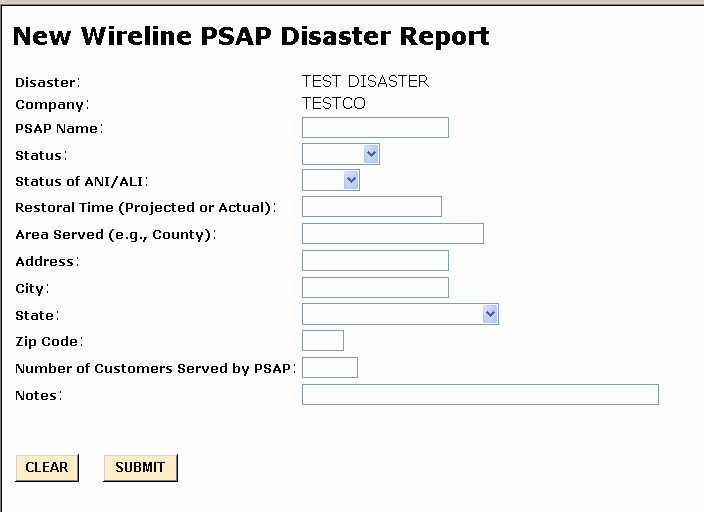
When you hit SUBMIT, DIRS will check to make sure that all the required fields are filled in. If some are not, DIRS will tell you to go back to the input screen and fill in those fields.
If you had clicked “UPDATE”, the report that you selected would have had much of the information prefilled. You can then make any changes that you want and resubmit the report.
Below we describe how each of the fields on the Wireline PSAP report should be filled out:
Disaster: The name of the disaster, e.g., Hurricane Katrina.
Company: The name of the company filling in the report. Company will be prepopulated based on who is submitting the information.
PSAP Name: The name of the PSAP. Companies are to list all the PSAPs in the affected area that are served by their Selective Routers (E911 Tandems). The PSAP name is a text field of 30 characters. Abbreviations like SO for Sheriff’s Office, PD for Police Department, FD for Fire Department are acceptable.
Status: The status of the PSAP at the time the report is being filled out. Status can take on the following values:
Up – Fully operational.
Down – Completely down; the PSAP can not receive calls
Rerouted – Calls to the PSAP have been rerouted to another PSAP or someplace else.
Status of ANI/ALI: Status of Automatic Number Identification (ANI) and Automatic Location Identification (ALI). The status can take on one of two values.
Up – Both ANI and ALI are functioning
Down – One or both of ANI and ALI are not functioning.
Restoral Time (Projected or Actual): If the PSAP is restored, this is the actual restoral time. If the PSAP is still down, this is the projected restoral time. This field can take on the following values:
Actual restoral time – if the PSAP is already restored.
Projected restoral time – if the PSAP is still down.
Customer Controlled – if the PSAP restoral time is controlled by the PSAP and is unknown to the carrier.
Unknown – if the restoral time is unknown.
NA – Not applicable, if the PSAP has not been down in any earlier report.
Area Served (e.g., County): Jurisdictional area served by the PSAP. Please provide the name and the jurisdictional level, for example, Beaumont City. Area served is a 20 character text field.
Address: Address of the PSAP. Address is a 20 character text field.
City: City where the PSAP is located. City is a 20 character text field.
State: State where the PSAP is located. State is selected from a drop down menu.
Zip code: Zip code where the PSAP is located. Zip code is a numeric field.
Number Of Customers Served by PSAP: Number of customers served by the PSAP. This is a 7 digit numeric field.
Notes: Notes contain additional information about any of the earlier fields. Notes is a 200 character text field.
5 Interoffice Facilities – Point to Point
This section assumes that the user has chosen to input, update or view Interoffice Facilities – Point to Point reports. If “Interoffice Facilities – Point to Point” is chosen from the Display/Update Reports dropdown menu, the following screen will appear:
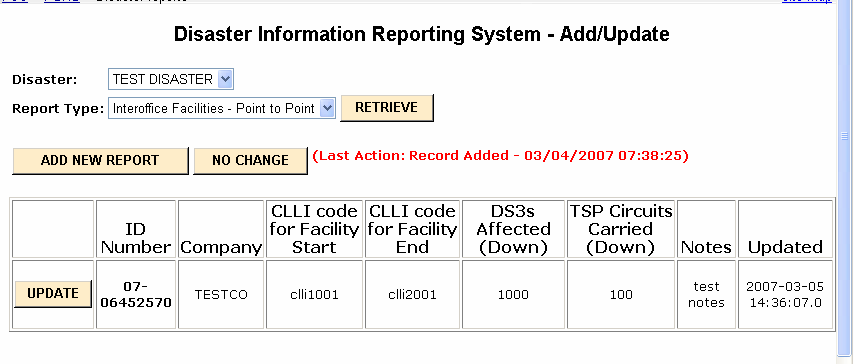
All the reports that you are allowed to update will be listed in table format. If you need to input a new report, click on the button “ADD NEW REPORT”. If you want to update any report, click the UPDATE button next to that report.
If you click NO CHANGE, the following screen will appear:

If you click ADD NEW REPORT, the following input form will appear:
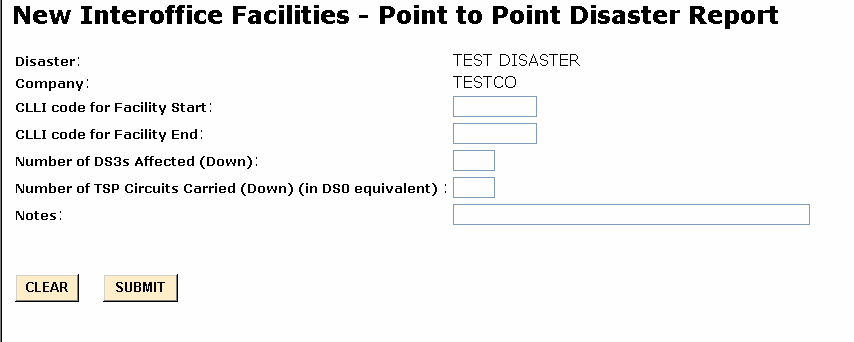
When you hit SUBMIT, DIRS will check to make sure that all the required fields are filled in. If some are not, DIRS will tell you to go back to the input screen and fill in those fields.
If you had clicked “UPDATE”, the report that you selected would have had much of the information prefilled. You can then make any changes that you want and resubmit the report.
Below we describe how each of the fields on the Interoffice Facilities – Point to Point report should be filled out:
NOTE: Only interoffice facilities which are down are to be listed.
Disaster: The name of the disaster, e.g., Hurricane Katrina.
Company: The name of the company filling in the report. Company will be prepopulated based on who is submitting the information.
CLLI for Facility Start: CLLI for the building at which the facility starts. Note we are not asking for information at the circuit level. In many cases it is arbitrary which office is considered the start and which office is considered the end of the facility. CLLI for the building is an 8 character text field.
CLLI for Facility End: CLLI for the building at which the facility ends. Note we are not asking for information at the circuit level. In many cases it is arbitrary which office is considered the start and which office is considered the end of the facility. CLLI for the building is an 8 character text field.
Number of DS3s Affected (Down): Ideally this is the number of DS3s (or equivalent) down because the facility is out. In cases where the exact number of DS3s down is not known, please list the size of the facility. This is a 5 digit numeric field.
Number of TSP Circuits Carried (Down) (in DS0 equivalent): The number of TSP circuits down because the facility is down. This is a 7 digit numeric field.
Notes: Notes contain additional information about any of the earlier fields. Notes is a 200 character text field.
6Interoffice Facilities - Rings
This section assumes that the user has chosen to input, update or view Interoffice Facilities - Rings reports. If “Interoffice Facilities - Rings” is chosen from the Display/Update Reports dropdown menu, the following screen will appear:
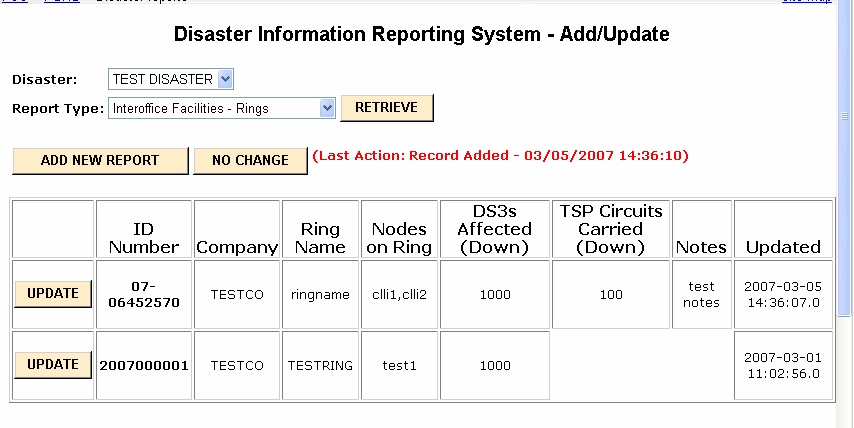
All the reports that you are allowed to update will be listed in table format. There will be a scrollbar at the bottom so that you can see any of the fields for that report. If you need to input a new report, click on the button “ADD NEW REPORT”. If you want to update any report, click the UPDATE button next to that report.
If you click NO CHANGE, the following screen will appear:

If you click ADD NEW REPORT, the following input form will appear:
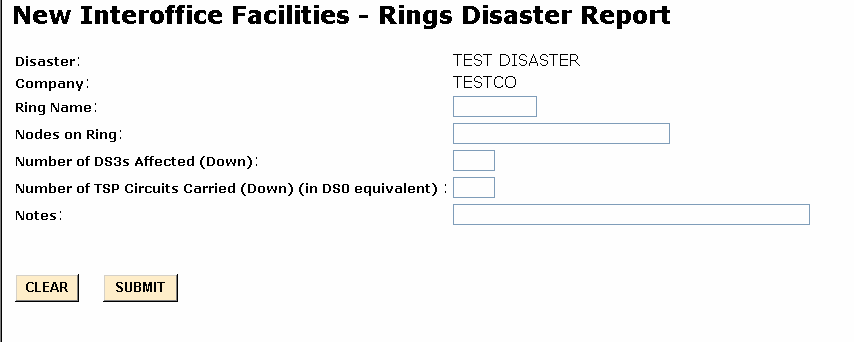
When you hit SUBMIT, DIRS will check to make sure that all the required fields are filled in. If some are not, DIRS will tell you to go back to the input screen and fill in those fields.
If you had clicked “UPDATE”, the report that you selected would have had much of the information prefilled. You can then make any changes that you want and resubmit the report.
Below we describe how each of the fields on the Interoffice Facilities - Rings report should be filled out:
NOTE: Only interoffice rings in which at least a portion of the traffic is unable to traverse the ring are to be listed.
Disaster: The name of the disaster, e.g., Hurricane Katrina.
Company: The name of the company filling in the report. Company will be prepopulated based on who is submitting the information.
Ring Name: An identifier for the ring. The ring name is a text field of 11 characters.
Nodes on rings: The CLLI for each building on the ring (8 characters for each building). The CLLI should be separated by commas: CLLI0001,CLLI0002,CLLI0003,CLLI0004. This field is a text field of 300 characters.
Number of DS3s Affected (Down): Ideally this is the number of DS3s (or equivalent) down because the ring is out. In cases where it is not known the exact number of DS3s down, please list the number of DS3s on the ring. This is a 5 digit numeric field.
Number of TSP Circuits Carried (Down) (in DS0 equivalent): The number of TSP circuits down because the facility is down. This is a 7 digit numeric field.
Notes: Notes contain additional information about any of the earlier fields. Notes is a 200 character text field.
7IXC Blocking
This section assumes that the user represents an IXC and has chosen to input, update or view IXC Blocking reports. If “IXC Blocking” is chosen from the Display/Update Reports dropdown menu, the following screen will appear:
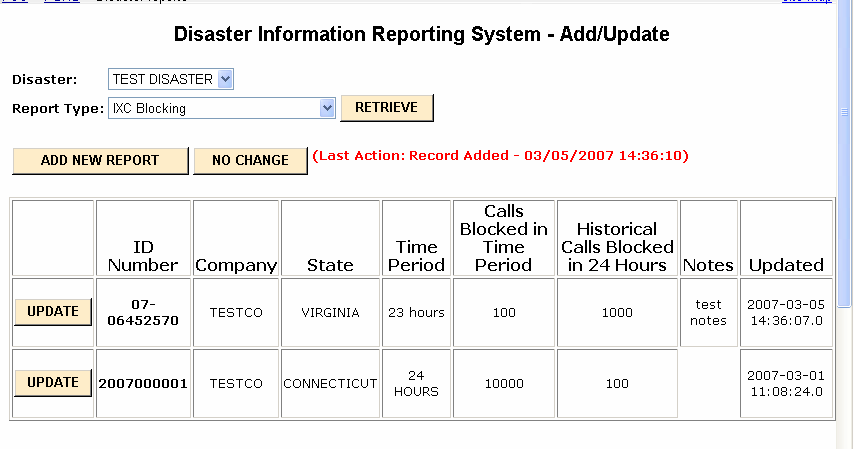
All the reports that you are allowed to update will be listed in table format. If you need to input a new report, click on the button “ADD NEW REPORT”. If you want to update any report, click the UPDATE button next to that report.
If you click NO CHANGE, the following screen will appear:

If you click ADD NEW REPORT, the following input form will appear:
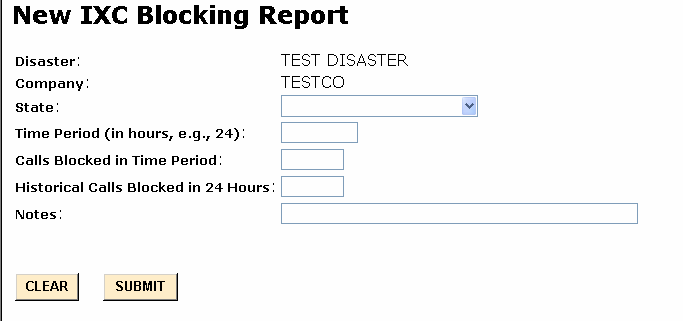
When you hit SUBMIT, DIRS will check to make sure that all the required fields are filled in. If some are not, DIRS will tell you to go back to the input screen and fill in those fields.
If you had clicked “UPDATE”, the report that you selected would have had much of the information prefilled. You can then make any changes that you want and resubmit the report.
Below we describe how each of the fields on the IXC Blocking report should be filled out:
Disaster: The name of the disaster, e.g., Hurricane Katrina.
Company: The name of the company filling in the report. Company will be prepopulated based on who is submitting the information.
State: State where the disaster occurred. State is selected from a drop down menu.
Time Period: Time period over which the blocked call data have been collected. This will usually be 24 hours.
Calls Blocked in Time Period: The number of terminating calls blocked in and into the state during the time period. This will be 8 numeric digits in the format nnnnnnnn
Historical Calls Blocked in 24 Hours: The historic number of terminating calls blocked in and into the state during 24 hours. This number will not change from day to day. This will be 8 numeric digits in the format nnnnnnnn
Notes: Notes contain additional information about any of the earlier fields. Notes is a 200 character text field.
Wireless MSC/STP
This section assumes that the user has chosen to input, update or view Wireless MSC/STP reports. If “Wireless MSC/STP” is chosen from the Display/Update Reports dropdown menu, the following screen will appear:
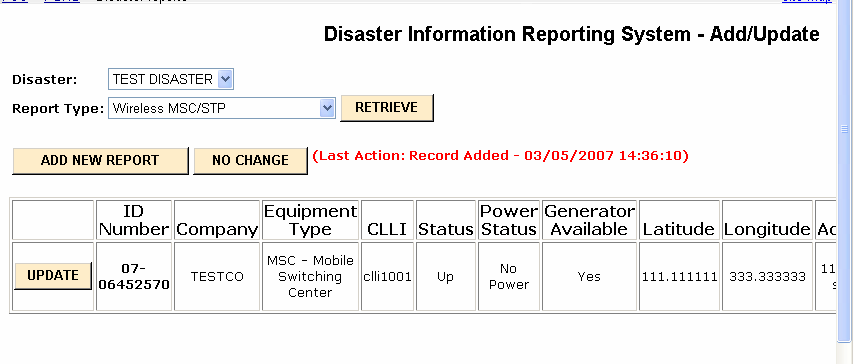
All the reports that you are allowed to update will be listed in table format. There will be a scrollbar at the bottom so that you can see any of the fields for that report. If you need to input a new report, click on the button “ADD NEW REPORT”. If you want to update any report, click the UPDATE button next to that report.
If you click NO CHANGE, the following screen will appear:

If you click ADD NEW REPORT, the following input form will appear:
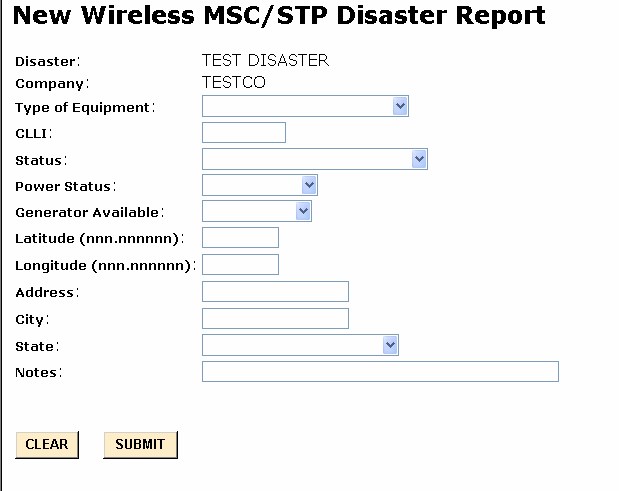
When you hit SUBMIT, DIRS will check to make sure that all the required fields are filled in. If some are not, DIRS will tell you to go back to the input screen and fill in those fields.
If you had clicked “UPDATE”, the report that you selected would have had much of the information prefilled. You can then make any changes that you want and resubmit the report.
Below we describe how each of the fields on the Wireless MSC/STP report should be filled out:
Disaster: The name of the disaster, e.g., Hurricane Katrina.
Company: The name of the company filling in the report. Company will be prepopulated based on who is submitting the information.
Type of equipment: The type of equipment that is being described in this row of the table. Only equipment that is down or on back-up power due to the disaster and in the affected area needs to be listed. Type of equipment can have the following entries:
MSC – Mobile Switching Center. A switch that resides in a central office building and provides call processing functions for mobile traffic.
STP – Signaling Transfer Point. A packet switch that performs message routing in a CCS (Common Channel Signaling) network
CLLI: The CLLI code for the equipment. CLLI is text field of 11 characters.
Status: The status of the equipment (generally whether the equipment is up or down). Status can take on the following values:
Up – Fully operational
Down – Completely down or at least 98% of the call processing is down.
Part Down – only a portion of the working numbers are down.
SS7 Isolated – the switch is isolated from the SS7 network
Switch Up but Outside Plant Down – the switch is up but at least 90% of the outside plant (cell towers) is not connected to the switch.
Power Status: The status of power for the equipment. This field can have the following entries:
On Commercial
No Power
On Generator
On Battery
Unknown
Generator available: Whether there is a generator available to power the equipment. This field can have the following entries:
Yes
No
Not Applicable – The equipment is on commercial power.
Unknown
Latitude: Latitude for the location of the equipment. Latitude is a 10 digit field - xxx.xxxxxx. For example, 40 degrees 30 minutes should be inputted 040.500000. Latitude and longitude or address and city are required.
Longitude: Longitude for the location of the equipment. Longitude is a 10 digit field - xxx.xxxxxx. For example, 40 degrees 30 minutes should be inputted 040.500000. Latitude and longitude or address and city are required.
Address: Address of the equipment. Address is a 20 character text field. Latitude and longitude or address and city are required.
City: City where the equipment is located. City is a 20 character text field. Latitude and longitude or address and city are required.
State: State where the equipment is located. State is selected from a drop down menu.
Notes: Notes contain additional information about any of the earlier fields. Notes is a 200 character text field.
8Wireless Cell Site by County
This section assumes that the user has chosen to input, update or view Wireless Cell Site by County reports. If “Wireless Cell Site by County” is chosen from the Display/Update Reports dropdown menu, the following screen will appear:
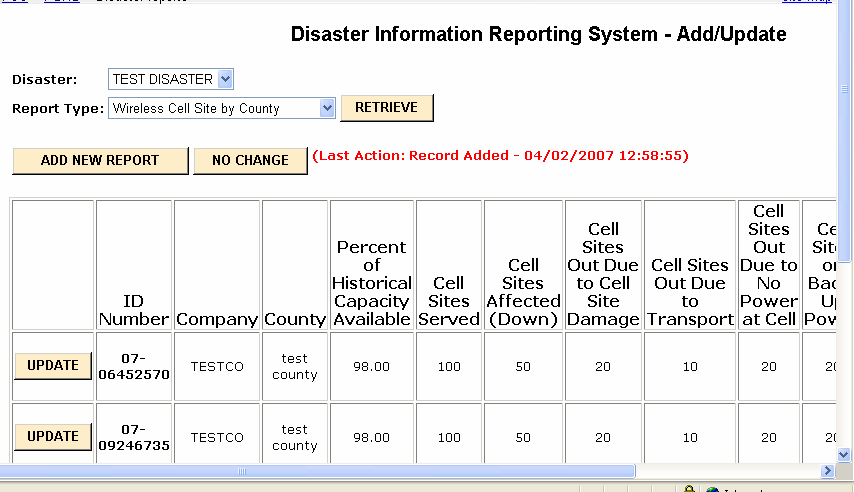
All the reports that you are allowed to update will be listed in table format. There will be a scrollbar at the bottom so that you can see any of the fields for that report. If you need to input a new report, click on the button “ADD NEW REPORT”. If you want to update any report, click the UPDATE button next to that report.
If you click NO CHANGE, the following screen will appear:

If you click ADD NEW REPORT, the following input form will appear:
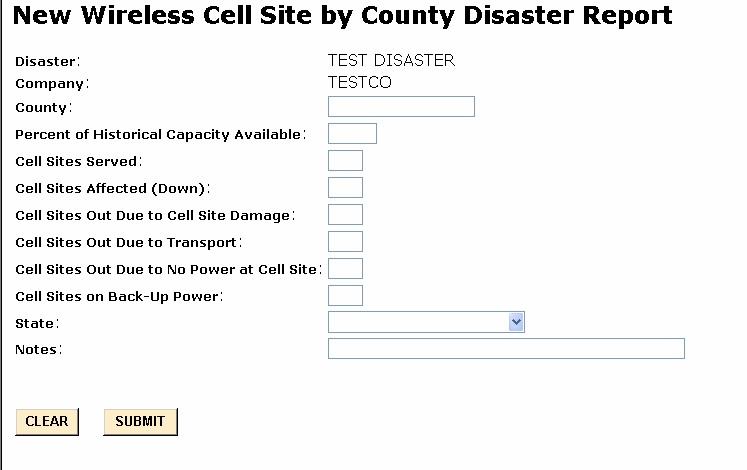
When you hit SUBMIT, DIRS will check to make sure that all the required fields are filled in. If some are not, DIRS will tell you to go back to the input screen and fill in those fields.
If you had clicked “UPDATE”, the report that you selected would have had much of the information prefilled. You can then make any changes that you want and resubmit the report.
Below we describe how each of the fields on the Wireless Cell Site by County report should be filled out:
Disaster: The name of the disaster, e.g., Hurricane Katrina.
Company: The name of the company filling in the report. Company will be prepopulated based on who is submitting the information.
County: The county which contains the cell sites.
Percent of Historical Capacity Available: The percent of capacity that is still available in the county. The wireless team is working on a more precise definition of this term. This is a 5 digit numeric field in the format xxx.xx%.
Cell Sites Served: The number of cell sites in the county. This is a 4 digit numeric field.
Cell Sites Affected (Down): The number of cell sites in the county that are out due to the disaster. If the entire MSC is down, than all the cell sites in the county served by that MSC would be counted as down. If all the MSCs are up, then the number of cell sites affected (down) will equal the total of the cell sites down due power, the cell sites down due to transport, and the cell sites down to damage or equipment failure at the cell site. This is a 4 digit numeric field.
Cell Sites Out Due to Cell Site Damage: The number of cell sites in the county that are down due to damage or equipment failure at the cell site. This is a 4 digit numeric field.
Cell Sites Out Due to Transport: The number of cell sites in the county that are down due to the inability to transport information between the cell site and the MSC. If the BSC is down, then all the cell sites off that BSC should be counted in this category. This is a 4 digit numeric field.
Cell Sites Out Due to No Power at Cell Site: The number of cell sites in the county that are down due to the inability to provide power at the cell site. This is a 4 digit numeric field.
Cell Sites on Back-Up Power: The number of cell sites in the county that are being powered by generator or battery (commercial power is not available). This is a 4 digit numeric field.
State: State where the equipment is located. State is selected from a drop down menu.
Notes: Notes contain additional information about any of the earlier fields. Notes is a 200 character text field.
9Broadcast
This section assumes that the user has chosen to input, update or view Broadcast reports. If “Broadcast” is chosen from the Display/Update Reports dropdown menu, the following screen will appear:
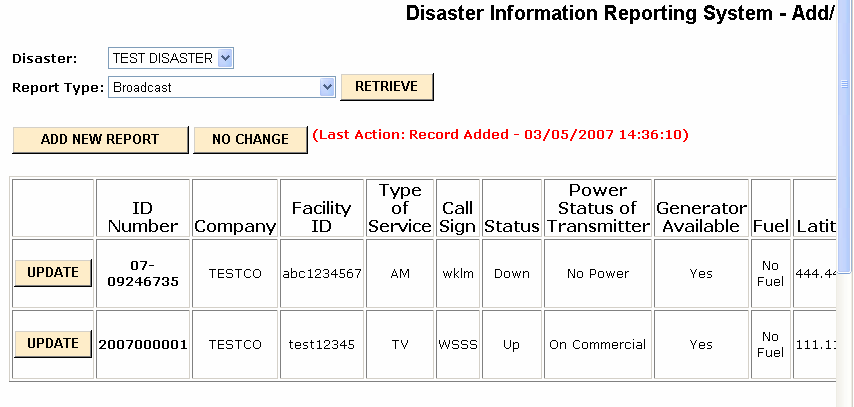
All the reports that you are allowed to update will be listed in table format. There will be a scrollbar at the bottom so that you can see any of the fields for that report. If you need to input a new report, click on the button “ADD NEW REPORT”. If you want to update any report, click the UPDATE button next to that report.
If you click NO CHANGE, the following screen will appear:

If you click ADD NEW REPORT, the following input form will appear:
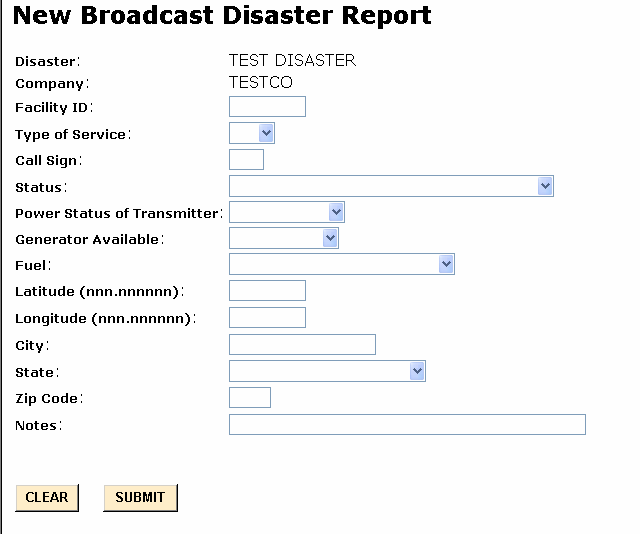
When you hit SUBMIT, DIRS will check to make sure that all the required fields are filled in. If some are not, DIRS will tell you to go back to the input screen and fill in those fields.
If you had clicked “UPDATE”, the report that you selected would have had much of the information prefilled. You can then make any changes that you want and resubmit the report.
Below we describe how each of the fields on the Broadcast report should be filled out:
Disaster: The name of the disaster, e.g., Hurricane Katrina.
Company: The name of the company filling in the report. Company will be prepopulated if a company representative is submitting the information.
Facility ID: The FCC Facility Identifier is an integer.
Type of service: The type of service is the type of broadcast station. There will be three choices in a drop down menu:
TV
AM
FM
Call Sign: The call sign of the station. This is usually a 4 letter text field. If the call sign is 3 letters, please provide the 3 letters.
Status: The status of the transmitter (generally whether the equipment is up or down or the programming is sent to another transmitter). Status can take on the following values:
Up – Fully operational
Down – Completely down.
Down but Programming Sent to Another Transmitter – The transmitter is not being used but programming is being sent out using alternate facilities.
Power Status of Transmitter: The status of power for the transmitter. This field can have the following entries:
On Commercial
No Power
On Generator
On Battery
Unknown
Generator available: Whether there is a generator available to power the transmitter. This field can have the following entries:
Yes
No
Not Applicable – The equipment is on commercial power.
Unknown
Fuel: The status of fuel for the generator. Fuel can take on the following values:
No Fuel
Adequate Fuel/Adequate Delivery – No problems with fuel onsite or with delivery of fuel.
Inadequate Fuel/Adequate Delivery – Problem with fuel onsite; however, fuel should be delivered to the site in time.
Adequate Fuel/Delivery Risk – Currently, there is enough fuel onsite; there is a major problem with fuel being delivered to the site
Inadequate Fuel/Delivery Risk – This site is at risk of power failure since there is not enough fuel and there is a major problem with delivering additional fuel to the site.
Unknown
Latitude: Latitude of the transmitter. Latitude is a 10 digit field - xxx.xxxxxx. For example, 40 degrees 30 minutes should be inputted 040.500000.
Longitude: Longitude of the transmitter. Longitude is a 10 digit field - xxx.xxxxxx. For example, 40 degrees 30 minutes should be inputted 040.500000.
City: City in which the transmitter is located.
State: State in which the transmitter is located.
Zip Code: Zip code in which the transmitter is located.
Notes: Notes contain additional information about any of the earlier fields. Notes is a 200 character text field. If the company has special needs, it should put them in this field.
10CATV
This section assumes that the user has chosen to input, update or view CATV reports. If “CATV” is chosen from the Display/Update Reports dropdown menu, the following screen will appear:
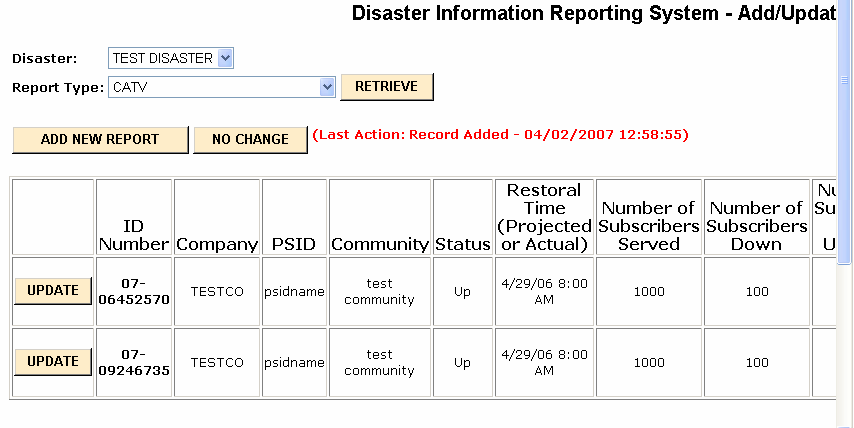
All the reports that you are allowed to update will be listed in table format. There will be a scrollbar at the bottom so that you can see any of the fields for that report. If you need to input a new report, click on the button “ADD NEW REPORT”. If you want to update any report, click the UPDATE button next to that report.
If you click NO CHANGE, the following screen will appear:

If you click ADD NEW REPORT, the following input form will appear:
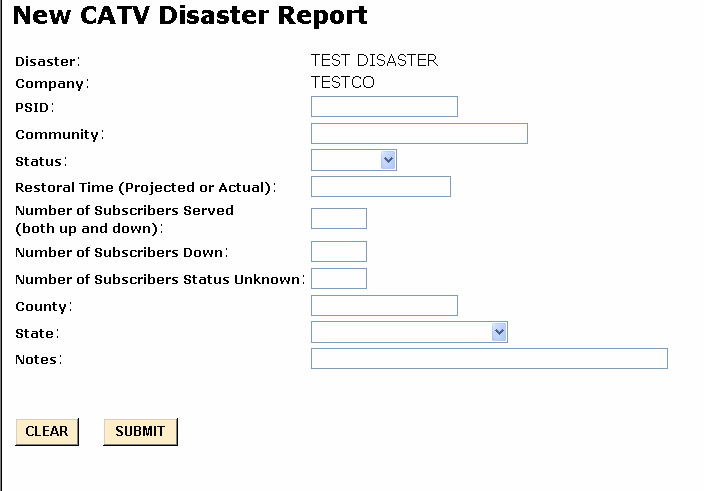
When you hit SUBMIT, DIRS will check to make sure that all the required fields are filled in. If some are not, DIRS will tell you to go back to the input screen and fill in those fields.
If you had clicked “UPDATE”, the report that you selected would have had much of the information prefilled. You can then make any changes that you want and resubmit the report.
Below we describe how each of the fields on the CATV report should be filled out:
Disaster: The name of the disaster, e.g., Hurricane Katrina.
Company: The name of the operator filling in the report. Company will be prepopulated based on who is submitting the information.
PSID: The physical system identifier for this CATV system. PSID is a 6 digit text field.
Community: Community or city in which the CATV system resides.
Status: The status of the CATV system (generally whether the equipment is up or down). Status can take on the following values:
Up – Fully operational, at least 98% of the subscribers have service.
Down – Completely down or at least 98% of the subscribers do not have service.
Part Down – only a portion of the subscribers are out of service.
Restoral Time (Projected or Actual): If the CATV system is restored, this is the actual restoral time. If the CATV system is still down, this is the projected restoral time. This field can take on the following values:
Actual restoral time – if the CATV system is already restored.
Projected restoral time – if the CATV system is still down.
Unknown – if the restoral time is unknown.
NA – Not applicable, if the CATV system has not been down in any earlier report.
Number of subscribers served (both up and down): Number of subscribers served by this CATV system. Number of subscribers is a 7 digit numeric field.
Number of subscribers down: Number of subscribers served by this CATV system that are down (do not have service). Number of subscribers down is a 7 digit numeric field.
Number of subscribers status unknown: Number of subscribers served by this CATV system whose status is unknown with respect to CATV service. Number of subscribers status unknown is a 7 digit numeric field.
County: The county which contains the CATV system.
State: State where the CATV system is located. State is selected from a drop down menu.
Notes: Notes contain additional information about any of the earlier fields. Notes is a 200 character text field.
| File Type | application/msword |
| File Title | INSTRUCTIONS FOR COMPLETING WIRE LINE OUTAGE REPORTING TEMPLATE |
| Author | John.Healy |
| Last Modified By | Judith-B.Herman |
| File Modified | 2012-04-23 |
| File Created | 2012-04-23 |
© 2026 OMB.report | Privacy Policy