Appendix F - Digitizer Instructions
Appendix F SABS 2013 and 2015 Digitizer Instructions.docx
School Attendance Boundary Survey (SABS) 2013 and 2015
Appendix F - Digitizer Instructions
OMB: 1850-0897
National Center for Education Statistics |
Public School Boundary Collection and Verification System |
Instruction Booklet |
|
Contents
Begin Drawing School Boundaries Option 3
Upload School Boundaries Option 5
Frequently Asked Questions (FAQs) 6
Introduction
School districts across the United States will be able to draw, upload, or update previous public school boundaries in a web application designed just for this purpose. The school boundaries will be added to NCES’ consolidated geodatabase and will be used to better serve school districts and members of the general public. A registered user for a school district can export their school boundaries as a shapefile or as a map or link to a map of the boundaries from their district or school websites.
Logging In
A lready
Registered Users
Two emails will be sent to contacts who contributed data to the 2010/2011 collection. The first email will explain the 2013/2014 collection and will provide the username. A second email will immediately follow the first and will include a temporary password. After logging in for the first time users will be asked to create a new password.
Enter username (email address) and password
C
 lick
the ‘Login’ button
New User Registration
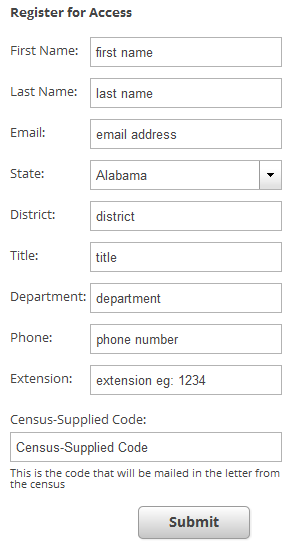
All other users will use the
‘Register for Access’ portion of
the login screen.
This group will consist of two types of registrants. The first group
will have received a letter from the Census that includes a unique
code. The second group will register without a Census-supplied code
and will be subject to a review process.
Group 1:
Fill in all fields under the ‘Register for Access’ section.
Click ‘Submit’
The user will be automatically asked to create a new password.
Group 2:
Fill in all fields except ‘Census-supplied Code’
Click ‘Submit’
Wait for delivery of a confirmation email
Use the temporary password provided in the email to login using the ‘Already Registered’ portion of the login page.

Click here to update user
details
Overview Page

Click on the other tabs to see more schools in the district
The bottom half of the page displays the status (complete or
incomplete) of all school boundaries in the district.
The top half of the page allows the user to draw or submit
boundaries.
Click either of these
buttons to get started


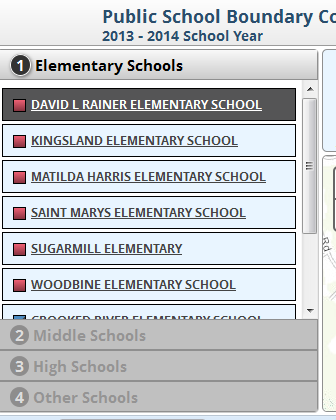
This is a list of all regular elementary schools in the district.
The red box next to the name means the school boundary has not been
drawn.
The pie chart provides symbolizes the percentages for school
boundaries complete. Blue = % complete

Creating School Boundaries
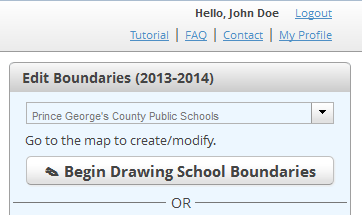
Begin Drawing School Boundaries Option
T his
option should be used by all districts that do not have their school
boundaries in a GIS format.

For districts with school boundaries saved in the system from previous years. Click the ‘Begin Drawing School Boundaries’ button
A new page will open that displays a map of the district on the right and a list of schools on the left.
Click on the name of any elementary school on the left side of the screen.
The application will automatically zoom to the school point.
Decide between two options:
‘Keep Existing’: If no changes were made to the school boundary the user should click on this button and then click on the next school in the list.


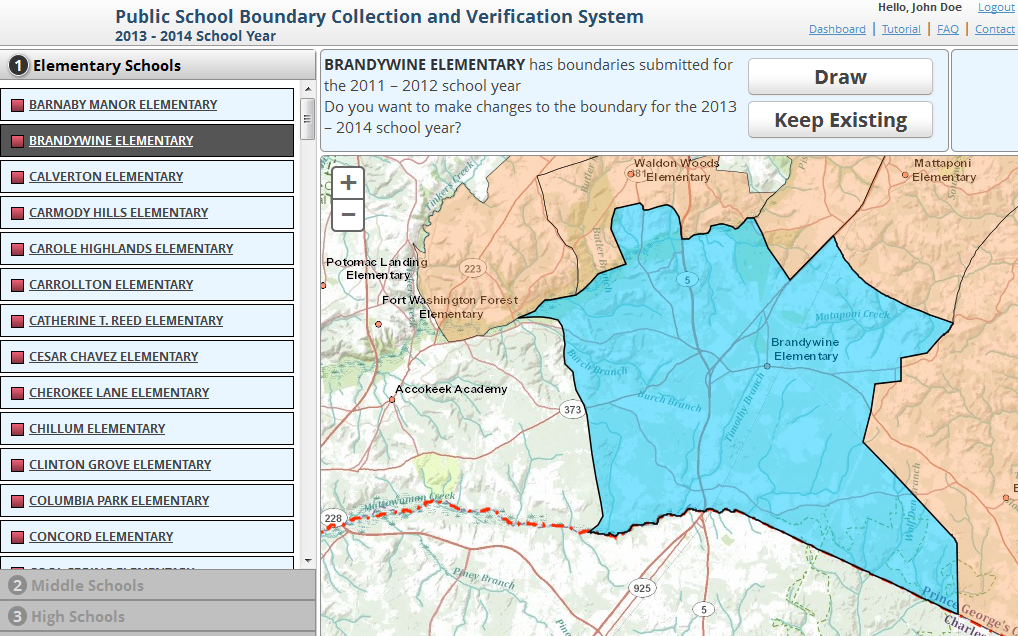
‘Draw’: The user should click on this button if any changes were made to the school boundary. The following tools can be used to make changes:
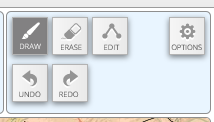
Draw: Useful for adding new neighborhoods to current boundaries.
Zoom in with the plus sign located in the upper left side of the map
Click on the ‘Draw’ button and then click once to start drawing and then click again at all vertices points. Double click when finished. (This tool can be used over and over again so it is not necessary to make all changes at once.)
Erase: Useful for removing neighborhoods from current boundaries.
Zoom in and then click on the ‘Erase’ button.
Click once to start and then click again at all vertices points. Double click when finished.
Edit: Useful for making small edits because instead of adding to a boundary like the ‘Draw’ tool, edit lets the user move current vertices.
Click the ‘Edit’ button and notice that all vertices are now displayed in the map.
Zoom into the desired area.
Place your cursor over a vertices then click and drag the point to the desired location.
Undo and Redo: Can be used to undo or redo any edits
O
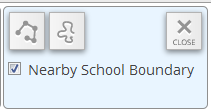 ptions:
Lets the user define the way the Edit tool draws.
The symbol on the left requires the user click for each vertex. This tool is more accurate and should be used for detailed work.
The symbol on the right allows the user to draw the boundaries free hand and only requires the user to click twice, once to start, and once to stop.
Nearby School Boundary: Click this box to turn on or off surrounding school boundaries.
Notes: Use the notes section to helpful comments like, “This school opened in 13/14.”
Once all necessary changes have been made click the ‘Save’ button.
Click on another school name and perform the same steps. Do the same for all middle and high schools.
If the system does not have school boundaries from a previous year the user will only have one option, ‘Draw’.
Using the same editing tools mentioned above draw the boundaries for each elementary school making an effort minimize gaps and overlaps in the coverage.

O
 nce
all elementary school boundaries have been click on the ‘Middle
Schools’ tab on the left hand side then click on a school
name.
nce
all elementary school boundaries have been click on the ‘Middle
Schools’ tab on the left hand side then click on a school
name.Two new options appear.
‘Draw’: Works exactly like the draw tools described above.

‘Select Feeder’: allows the district to select elementary schools that feed into middle schools and then middle schools that feed into high schools.
Click on the ‘Select Feeder’ button
The application automatically displays all elementary schools with a blank check box right of the school name. Check the box for all elementary schools that feed into the middle school.


Once all necessary elementary schools have been selected click on the ‘Merge Selected’ button.
Click ‘Save’
Please note: the feeder pattern steps can be used even if some elementary schools are split between multiple middle schools, etc.
Once the schools have been merged used the editing tools to add and erase boundaries as necessary.
Once all middle school feeder patterns are complete perform the same steps for all high schools.
Upload School Boundaries Option
 T
T his
option should be used by all districts that already have their school
boundaries in a GIS format. Please note: this upload option requires
the files be zipped up (file extension = *.zip) and files must be
small than 3000 MB. Once these steps are complete the collection of
the school boundaries for the district are considered complete.
Click the ‘Upload School Boundaries’ button
Click on the ‘Select File’ button and navigate to the location of zip folder.
Click ‘Upload’
Tracking Progress
The completed status of all boundaries are displayed on the bottom half of the welcome page.

Incomplete schools are represented by red and complete boundaries by blue.
The pie graph provides a visual representation of the percentage complete.
Updating User Information

C
 lick
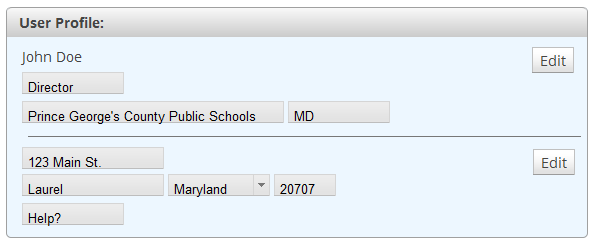
on the My Profile link in the upper left hand corner of the overview
page.
Click on either ‘Edit’ button in the User Profile section. Make any changes as needed then click ‘Save’.
Not all fields can be edited. Please contact the school boundary team if any of these fields need to be changed.
Getting More Help
Contacts
Frequently Asked Questions (FAQs)
Frequently Asked Questions
How is the “Other” school level category defined?
Schools are broken down by school level (elementary, middle, high, and other) as defined by the National Center for Education Statistics’ Common Core of Data (CCD). The CCD defines school level as follows:
Elementary (low grade: PK through 03; high grade: PK through 08)
Middle (low grade: 04 through 07; high grade: 04 through 09)
High (low grade: 07 through 12; high grade: 12 only)
Other (any other configuration not falling within the above three categories, including ungraded and operational schools)
What do I do if the list is missing one or more schools in my district?
Is the school missing from the list a charter or magnet school? If so, boundaries for these schools are not required and were intentionally left off of the collection list. If the missing school is not a magnet or charter school please contact Andrea Conver at (202) 600-8167 or [email protected] to resolve the problem.
Do I need to draw boundaries for magnet or charter schools?
No, boundaries are not required for magnet and charter schools.
Why are boundaries not required for magnet or charter schools?
Many magnet and charter schools accept students based on factors other than home address, such as a lottery system. At this time, the NCES has chosen to focus on schools with geographically based school attendance zones.
My district delivered boundaries to NCES in the past. Why aren’t they available in the Public School Boundary Collection and Verification tool?
Once collected, school boundaries are processed by the Department of Education. Sometimes a problem with the data arises during the processing stage and cannot be resolved. These districts have been withheld from the verification tool.
The district boundary displayed in the viewer is not correct.
Please contact Andrea Conver at (202) 600-8167 or [email protected] to resolve the problem.
My district does not use a typical feeder pattern. Do I have to create boundaries using the school feeder pattern option?
No, you are not required to create middle and high school boundaries using the feeder pattern option. This step is included to speed up the process for districts that use a simple feeder pattern, but it is not required.
Do I need to draw all of the boundaries in a single session?
No, save your edits before logging out and you can start back where you left off the next time you log in.
My district only has one high school. Do I need to create a boundary for it?
Yes, please select all middle or elementary schools in the feeder pattern dialog.
I’m in charge of multiple districts; can I submit data for than one district at a time?
No, the boundary collection system only accepts one district at a time. If you would like to submit boundaries for multiple districts please contact Andrea Conver at (202) 600-8167 or [email protected].
There is an error in my boundary file I submitted. How can I fix the issue?
Please contact Andrea Conver at (202) 600-8167 or [email protected] to resolve the problem.
Where will these boundaries be displayed once they are collected?
Public school boundaries collected through this application will be displayed on the NCES Map Viewer.
Will NCES sell these data once collected?
Neither NCES, nor its subcontractors, will sell these data.
4/16/2013
| File Type | application/vnd.openxmlformats-officedocument.wordprocessingml.document |
| File Title | Public School Boundary Collection and Verification System |
| Subject | Instruction Booklet |
| Author | Sana |
| File Modified | 0000-00-00 |
| File Created | 2021-01-29 |
© 2026 OMB.report | Privacy Policy