Form CMS-10291 Provider Data Submission Technical Information
CHIPRA 2009, Dental Provider and Benefit Information Posted on Insure Kids Now! Website (CMS-10291)
Insure Kids Now Technical Guidance Ver 2.9 December 2013
Collection of Dental Provider Information
OMB: 0938-1065
Insure Kids Now

Insure Kids Now
Provider Data Submission Technical Information
Version 2.9
Effective date: December 7, 2013
Centers for Medicare & Medicaid Services (CMS)
Health Resources Services Administration (HRSA)
Table of Contents
Section Page
1. Provider Data Submission Technical Information 6
2. Required Level of Detail / Key Concepts and Definitions 7
3. Submitting Data 7
3.1 Submitting Data Using the IKN Data Service 7
3.2 IKN Data Management Site 8
3.2.2 IKN Data Management Login and Home Pages 9
3.2.2.1 Upload Provider Data Feature 10
3.2.2.2 Edit Provider Data Feature 11
3.2.2.3 Program/Health Plan Name Validation 12
3.2.2.3.1 Manage Existing Data 16
3.2.2.4 Certify Provider Data Feature 16
3.2.2.5 Summary of Benefits Feature 17
3.2.2.6 Manage Organizations 19
3.2.2.6.1 Add New Organization Feature 19
3.2.2.6.2 Manage Organizational Profile Feature 20
3.2.2.7 Manage Person Feature 21
3.2.2.7.1 View/Update Profile 21
3.2.2.7.2 Manage Registered Organizations 23
3.2.3 Using the IKN Data Submission Client Tool 24
3.2.4 Using a Custom Client Tool Created By Your Organization 26
3.3.1 Data File Submission and Validation Receipt 26
APPENDIX A: Entry of Group Practice and Federally Qualified Health Centers Provider Data 30
APPENDIX B: Format for Text Data File Submission 31
APPENDIX C: Configuring the Insure Kids Now Data Submission Client Tool 44
Configuring the IKN Client Tool (First Time Use) 45
C.3 Submitting a File Automatically 49
C.4 Guidance for using a tool downloaded before May 21, 2012 54
APPENDIX D: Technical Reference For Creating a Custom Upload Client 56
Table of Figures
Figure 1: IKN Data Management Site Login Page 9
Figure 2: IKN Data Management Site Home Page 10
Figure 3: Upload Provider Data Feature 11
Figure 4: Edit Provider Data Feature 12
Figure 5: Certify Provider Data Feature 17
Figure 6: Summary of Benefits Feature (1) 18
Figure 7: Summary of Benefits Feature (2) 19
Figure 8: Add New Organization Feature 20
Figure 9: Manage Organization Profile Feature 21
Figure 10: View/Update Profile Feature 22
Figure 11: Manage Password Feature 23
Figure 12: My Registered Organizations 24
Figure 13: IKN Data Uploader Configuration Window 25
Figure 14: IKN Data File Uploader Window 25
Figure 15: Data File Submission and Validation Receipt 27
Figure 16: Geophone Report: Summary Tab 28
Figure 17: Geophone Report: Raw Results 29
Figure 18: Example of Provider Data File 31
Figure 19: IKN Data Uploader Configuration Window 45
Figure 20: IKN Data File Uploader Window 46
Figure 21: "File Not Found" Error Message Box 47
Figure 22: Confirmation Dialog Box Displayed Before an Upload 47
Figure 23: IKN Data File Uploader Window with Successful Upload Message 48
Figure 24: Error Window for Invalid Username or Password 48
Figure 25: Error Window for Invalid State and Insurance Program Combination 49
Figure 26: Schedule Task Wizard - Starting Screen 49
Figure 27: Scheduled Task Wizard - Frequency Setting Screen 50
Figure 28: Scheduled Task Wizard - Time and Day Setting Screen 50
Figure 29: Scheduled Task Wizard - Enter Name and Password Screen 51
Figure 30: Scheduled Task Wizard - Task Summary Screen 52
Figure 31: Sample of Modified Command Line on Advanced Properties Screen 53
Figure 32: IKN Client Tool Installation Location (Windows XP) 54
Figure 33: Opening the IKN Client Tool Configuration File with Notepad 55
Table of Tables
Page
Table 1 - Significant Change History iii
Table 3 - Sample Program Name/Health Plan Name Combinations 13
Table 5 - Text Data File Submission Fields and Information 33
Table 6 - Header Nodes and Attributes 57
Table 7 - Error Codes Associated with the IKN Submission Schema 59
Document Change History
Table 1 lists the significant changes to the document, with the most recent changes listed first. Changes to spelling, punctuation, minor re-wording, and other revisions are not explicitly called out or described.
Table 1 - Significant Change History
Version |
Date |
Change Description |
2.9 |
December 7, 2013 |
|
2.8 |
October 17, 2012 |
|
2.7 |
October 12, 2012 |
|
2.6 |
July 17, 2012 |
|
2.5 |
February 09, 2011 |
|
2.4 |
December 15, 2010 |
|
2.3 (draft) |
April 5, 2010 |
|
2.2 (final) |
December 29, 2009 |
|
2.2 (draft) |
December 7, 2009 (draft) |
|
(not numbered) |
October 10, 2009 (still dated October 1, 2009) |
|
(not numbered) |
October 1, 2009 |
|
(not numbered) |
July 16, 2009 |
|
The Insure Kids Now (IKN) website project collects data about qualified Oral Health Providers1 within each state or territory and makes the data available on insurekidsnow.gov through a locator tool. Data collection began in July 2009. The locator tool was launched in August 2009.
Children's Health Insurance Program Reauthorization Act (CHIPRA) requires states to provide quarterly data updates of the Medicaid and Children's Health Insurance Program (CHIP) providers in their state that provide oral health care to children. During implementation of this requirement, states indicated an interest in doing so more frequently— perhaps as often as daily— so that the locater tool will routinely have the latest information. To be responsive to state concerns and to ensure the beneficiaries have access to the most up-to-date information possible, Centers for Medicare and Medicaid Services (CMS) and Health Resources and Services Administration (HRSA) developed an automated data submission and management approach for frequent data updates. This process also helps states avoid having to devote human resources to the task on an ongoing basis.
CMS also tracks state compliance with the CHIPRA requirements. An authorized state official should notify CMS, via an email to [email protected], that the oral health provider information provided to IKN is “current and accurate.” The email should be sent within 10 calendar days after the quarterly deadline for IKN data submissions. For example, if the next deadline is February 4, the email notification is due to CMS no later than February 14. Submission deadlines are:
February 4th
May 4th
August 4th
November 4th
The remainder of this document is organized as follows:
Section 2 |
Description of the required data detail (granularity), including definitions of key concepts. |
Section 3 |
Data submission mechanisms and procedures |
Appendix A |
Entry of Group Practice and Federally Qualified Health Centers Provider Data |
Appendix B |
Format for Text Data File Submission |
Appendix C |
The Insure Kids Now Data Submission Client Tool |
Appendix D |
Technical Reference For Creating a Custom Upload Client |
The data are collected and reported such that each listing represents a “provider” who sees patients that are members of a particular “coverage plan” at a specific “location.” For the purposes of this document, the following definitions apply:
Provider - An individual, group practice, or health center/other facility. If individual provider names are supplied, they will appear on the website with the group practice and/or facility name, if supplied. Each record must have at least one of these three items included. Listing individual providers is preferred, when possible.
Coverage Plan - The combination of state Program (e.g., Medicaid, CHIP) and any subsidiary plan or option associated with it (e.g., managed care options, different plans that cover children of differing ages).
Location - A specific physical address to which patients could be directed to receive care. Mailing addresses, such as Post Office boxes, do not qualify as a physical address.
Three mechanisms are currently available for submitting data. These mechanisms are:
Upload prepared data files using the IKN Data Management site: https://ikndata.insurekidsnow.gov/WebExternal/Login.aspx
Upload prepared data files using the client tool.
Online editing via the IKN Data Management site: https://ikndata.insurekidsnow.gov/WebExternal/Login.aspx
(Please refer to
Appendix B for the details of how these files need to be laid out and
formatted.)
Each of these options is described in the following sections and related appendices.
3.1 Submitting Data Using the IKN Data Service
Beginning with the April/May 2010 update cycle, users were provided an option to submit data files via an internet web site. This option allowed states and their managed care organization to submit data as frequently as they desire. Files may be uploaded through the IKN Data Service using either the IKN Data Management website or using the IKN Data Submission Client Tool. The optional client tool2 is available and can be downloaded from http://ikndata.insurekidsnow.gov/clienttool/.
All files uploaded to the service are assumed to be data files and must conform to the specifications laid out in Appendix B. Users may only submit plain text files with a “TXT” extension. The service cannot accept Zip files, CSV files, Excel spreadsheets, or other formats.
3.2 IKN Data Management Site
This section provides detailed descriptions of the features available in the IKN Data Management Site.
All users may log into the IKN Data Management website to upload files and manage personal and organization information. Users with the State Administrator role may edit program name/health plan name combinations, manage existing data, and edit summary of benefits information.
New users must access the registration feature to create accounts. To register, a user must create an account and register it to an existing organization. If a user’s organization does not exist in the system, the user must contact the state administrator and ask them to create a new organization. (Typically, this only pertains to users affiliated with contractors or managed care organizations who upload data on the state’s behalf).
If users have trouble registering/managing privileges, they can contact the IKN Technical Help Desk for assistance at [email protected].
3.2.1 System Roles
System roles for the IKN data management website are contained in Table 2.
Once a new user has registered to an organization, the State Administrator must assign them the appropriate privileges by using the “Manage Organization Users” feature. The list of available permissions is also included in Table 2.
System Roles |
Privileges |
Website Permissions |
State Administrator (Upload Admin) |
|
|
State Uploader (Uploader) |
|
|
3.2.2 IKN Data Management Login and Home Pages
To login, users access the IKN Data Management site's login page, pictured in Figure 1 and reached at https://ikndata.insurekidsnow.gov/WebExternal/Login.aspx .
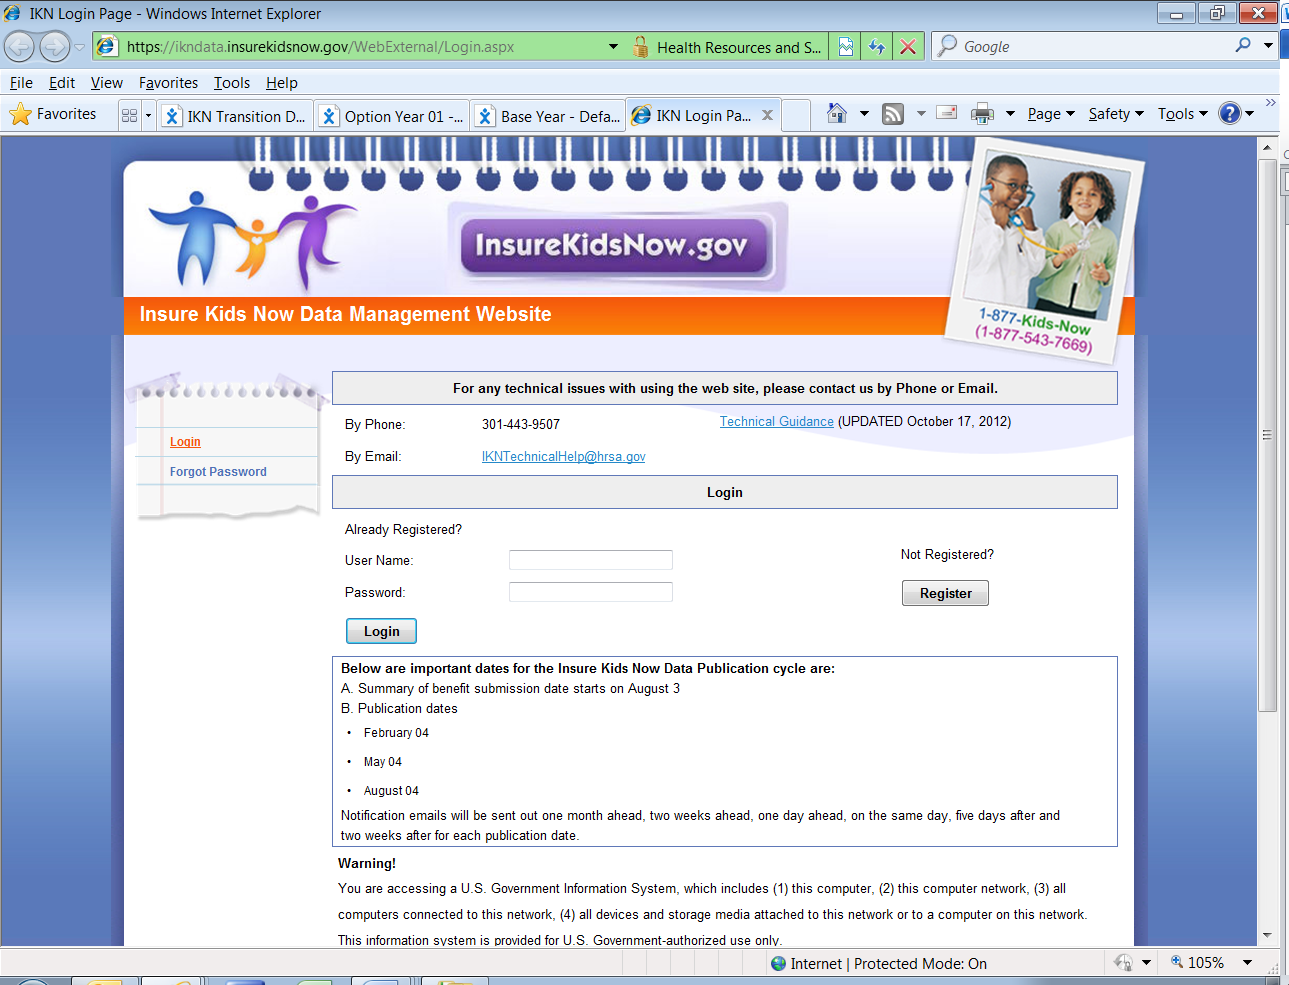
Figure 1: IKN Data Management Site Login Page
Once a user logs in, they are taken to the IKN Data Management website home page, pictured in Figure 2. The user will primarily use the left hand navigation panel on this home page to navigate through the site.
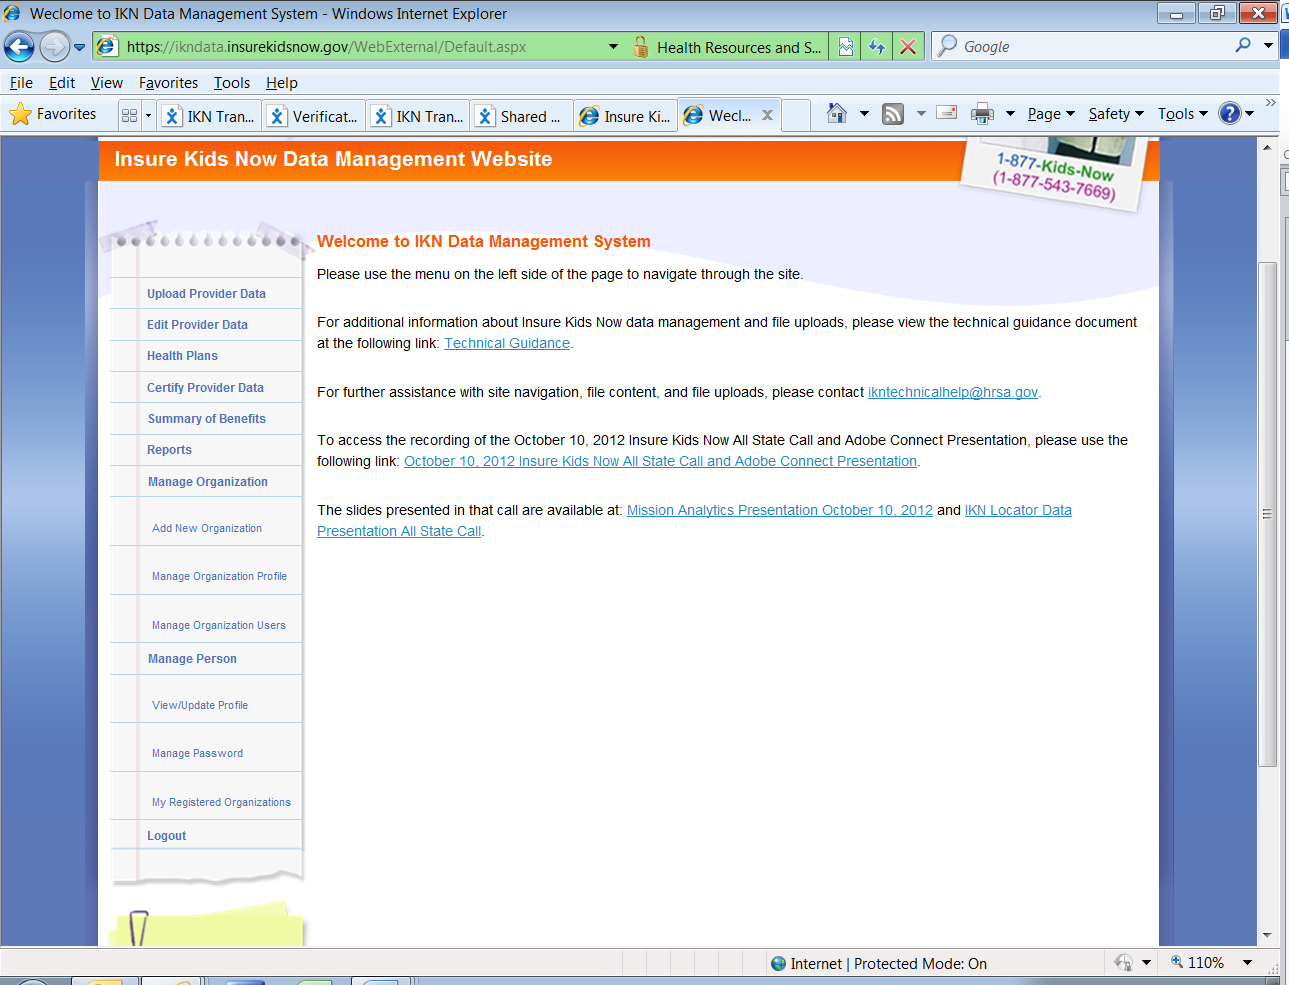
Figure 2: IKN Data Management Site Home Page
3.2.2.1 Upload Provider Data Feature
If the user wishes to upload their data submission file, they must select the ‘Upload Provider Data’ menu option from the left-hand menu on the IKN Data Management Site Home Page. The Upload Provider Data feature is pictured in Figure 3. The user must then select the state and program type (i.e., CHIP, Medicaid, or Both) for which they are uploading and specify the file to be uploaded. Once the file has been specified, they may use the ‘Upload’ button to upload their data. If the user does not want to complete the upload, then the user may select the 'Cancel' button.
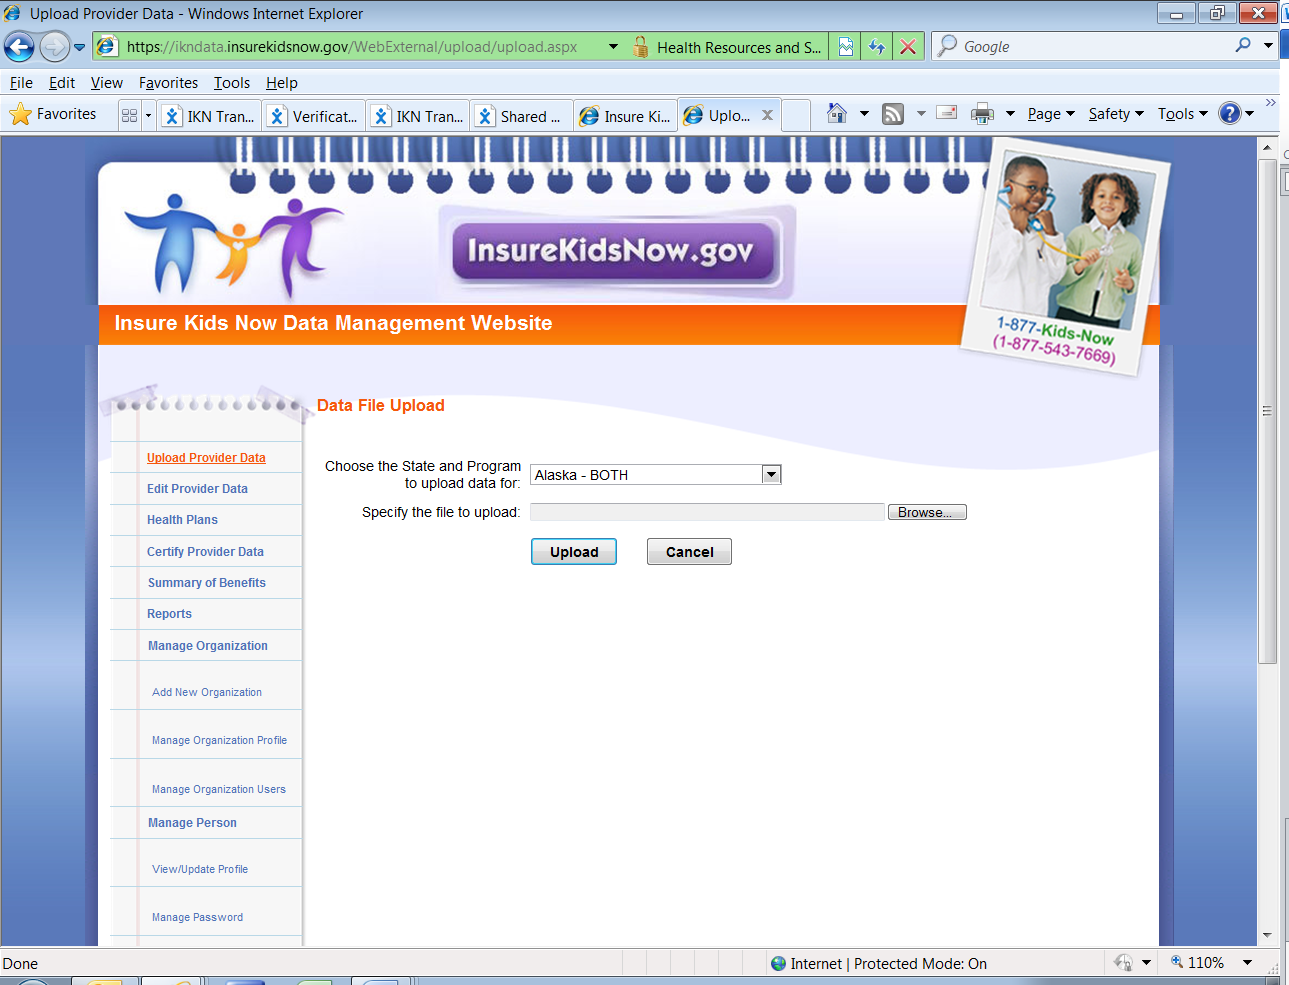
Figure 3: Upload Provider Data Feature
3.2.2.2 Edit Provider Data Feature
Users also have the option of editing existing data directly by selecting the ‘Edit Provider Data’ menu option, illustrated in Figure 4.
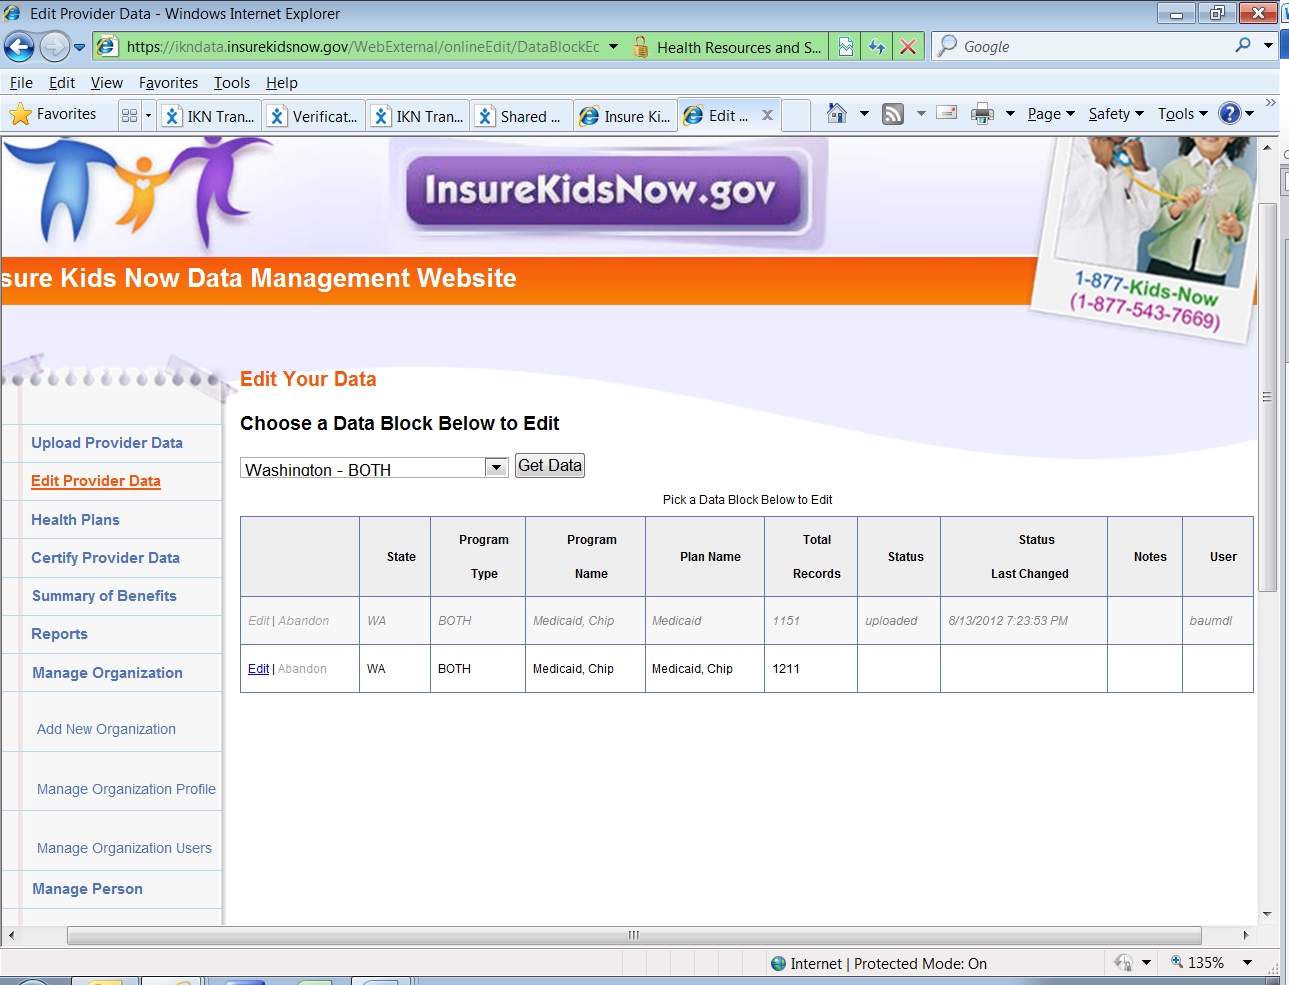
Figure 4: Edit Provider Data Feature
3.2.2.3 Program/Health Plan Name Validation
The purpose of the Program/Health Plan
Name validation page is to improve data quality and reduce
duplication. This page allows state administrators to provide a list
of coverage or benefit plan names against which data submissions can
be validated. Only state administrators have access to this page.
The Program Name and Health Plan Names entered on the Program Name/Health Plan Name Validation page are used to validate Program Name/Health Plan Name combinations submitted in data files for that state. If the Program Name/Health Plan Name combinations submitted in a specific file do not exactly match any of the Program Name/Health Plan Name combinations entered on the Program Name/Health Plan Name Validation page, the file will fail validation and will not be accepted for publication.
State administrators have the option to add or modify Program Name/Health Plan Name combinations through the Program/Health Plan Name Validation page. Together, the Program Name and the Health Plan Name identify a specific coverage or benefit plan in which beneficiaries might be enrolled. Please keep in mind the following important facts when updating the Program/Health Plan name validation page:
Program name is required.
Health Plan name is optional, but recommended, if applicable.
Program name + Health Plan name = Benefit or coverage plan name (website display name)
Table 3 represents the Program Name/Health Plan Name combinations identified by the state administrator as the benefit or coverage plans for which they expect to submit data that quarter.
Table 3 - Sample Program Name/Health Plan Name Combinations on Validation Page
Validation Page |
||
Program Name (Program_Name) |
Health Plan Name (Health_Plan_Name) |
Benefit or Coverage Plan Name (Website display name) |
Healthy Kids |
Aetna |
Healthy Kids Aetna |
Medicaid |
|
Medicaid |
Healthy Smiles |
Delta Dental |
Healthy Smiles Delta Dental |
Healthy Smiles |
Health Net |
Healthy Smiles Health Net |
When compared against the Program
Name/Health Plan Name combinations contained in Table 3,
a data file with the content displayed in Table 4
would produce the outcomes shown in the table.
Table 4 - Sample Data File Content and Outcomes
Provider Data Files |
|||
Program Name (Program_Name) |
Health Plan Name (Health_Plan_Name) |
Rows Accepted/Rejected |
Reason for rejection |
Healthy Kids |
Aetna |
Accepted |
N/A |
Medicaid |
|
Accepted |
N/A |
Healthy Smiles |
Delta Dental |
Accepted |
N/A |
Healthy Smiles |
Health Net |
Accepted |
N/A |
HealthyKids |
Aetna |
Rejected |
Spelling of HealthyKids is not consistent with program name identified on Program/Health Plan Name Validation page (Healthy Kids). |
|
Medicaid |
Rejected |
Program name is required. Combination of Program Name and Health Plan Name does not match combination identified on Program/Health Plan Name Validation page. |
Healthy Kids |
Delta Dental |
Rejected |
Delta Dental is not associated with the Program Name Healthy Kids in the Program/Health Plan Name Validation page. |
Healthy Smiles Health Net |
|
Rejected |
The Program/Health Plan Name Validation page does not include any combinations where Healthy Smiles Health Net is the Program Name and the Health Plan Name is blank. |
3.2.2.3.1 Manage Existing Data
The purpose of the Manage Existing Data page is to improve data quality and reduce duplication by allowing state administrators to delete outdated data. Only state administrators have access to this page.
Existing data that is older than one year
will be automatically deleted.
The Manage Existing Data page displays the benefit or coverage plan names currently displayed on the IKN website, along with the associated content for the following fields:
Program Type
Program Name
Health Plan Name
Date of last file upload
Name and username of the person who uploaded the most recent data file associated with that benefit plan.
The benefit plans displayed on the Manage
Existing Data page are divided into two tables: Table 1: Attention
Needed, and Table 2: No Action Required.
Table 1: Attention Needed: This table lists benefit plans where the Program Name/Health Plan Name combinations displayed on the IKN website do not match the Program Name/Health Plan Name combinations listed on the Program/Health Plan Name Validation page. Benefit plans without the Program Name are also listed. It is recommended that state administrators delete the data listed in this table.
Table 2: No Action Required: This table lists benefit plans where the Program Name/Health Plan Name combinations displayed on the IKN website exactly match the Program Name/Health Plan Name combinations listed on the Program/Health Plan Name Validation page. No action is required. If the next file submission matches the Program Name/Health Plan Name combinations listed here, the data in the new file will automatically replace the data listed in this table. State administrators have the option to delete data from this table if they wish to, but it is not required.
3.2.2.4 Certify Provider Data Feature
State Administrators also have the option to certify that the data submitted for their state is accurate and up to date, through the ‘Certify Provider Data’ feature. This feature is accessed by selecting the ‘Certify Provider Data’ menu option on the IKN Data Management Site Home Page. Figure 5 pictures the 'Certify Provider Data' feature.
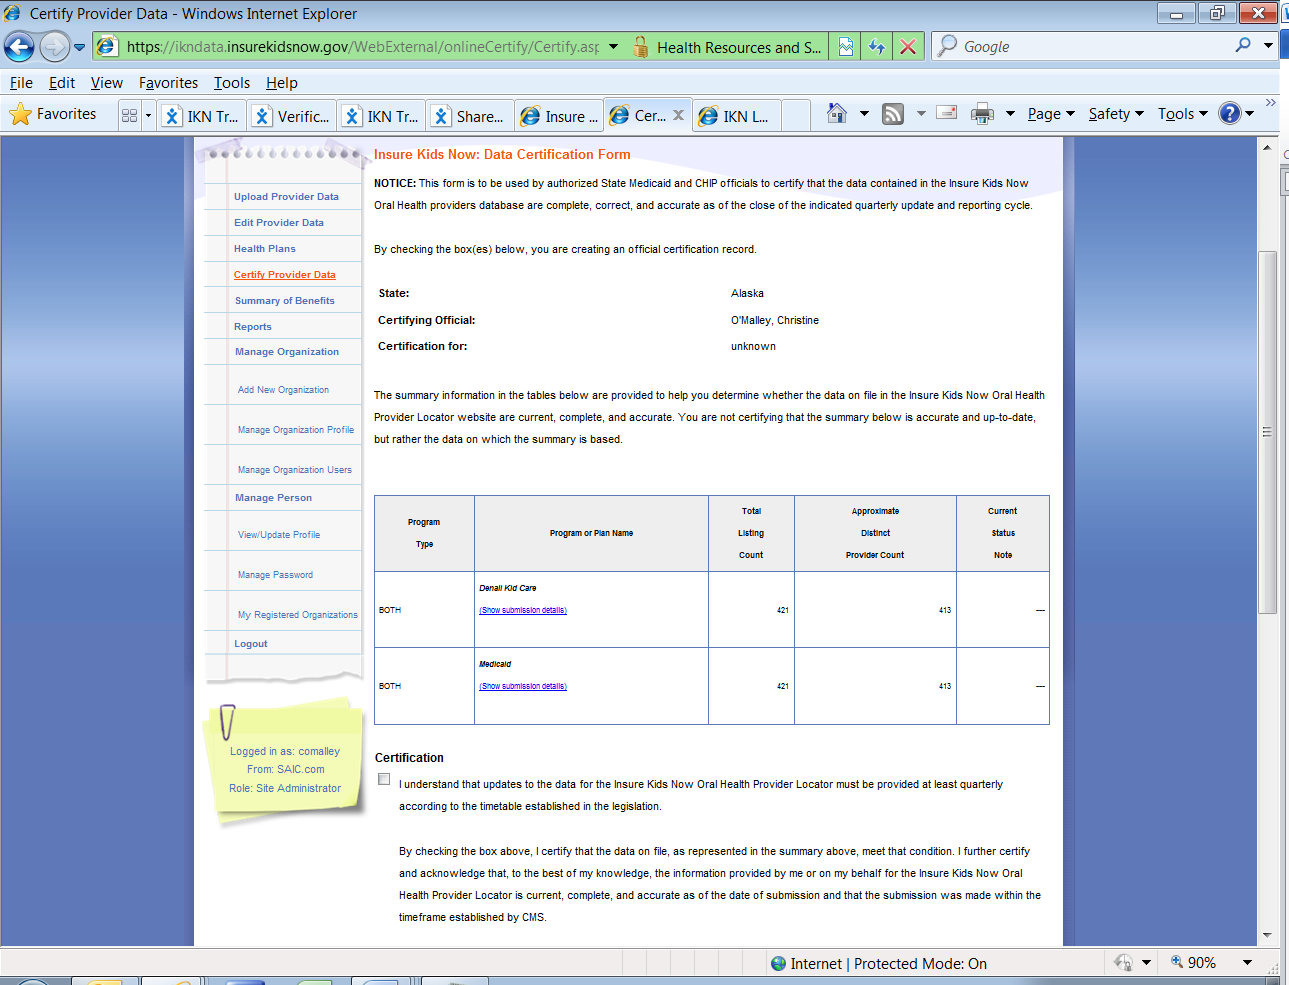
Figure 5: Certify Provider Data Feature
3.2.2.5 Summary of Benefits Feature
State Administrators must update the description of dental benefits or summary of benefits at least once per year through the ‘Summary of Benefits’ feature. The submission deadline for Summary of Benefits information occurs in August of each year. The 'Summary of Benefits' feature is accessed by selecting the ‘Summary of Benefits’ menu option on the IKN Data Management Site Home Page. To update the summary of benefits information for their state, State Administrators must provide their contact information and select the program for which they are updating benefits as shown in Figure 6.
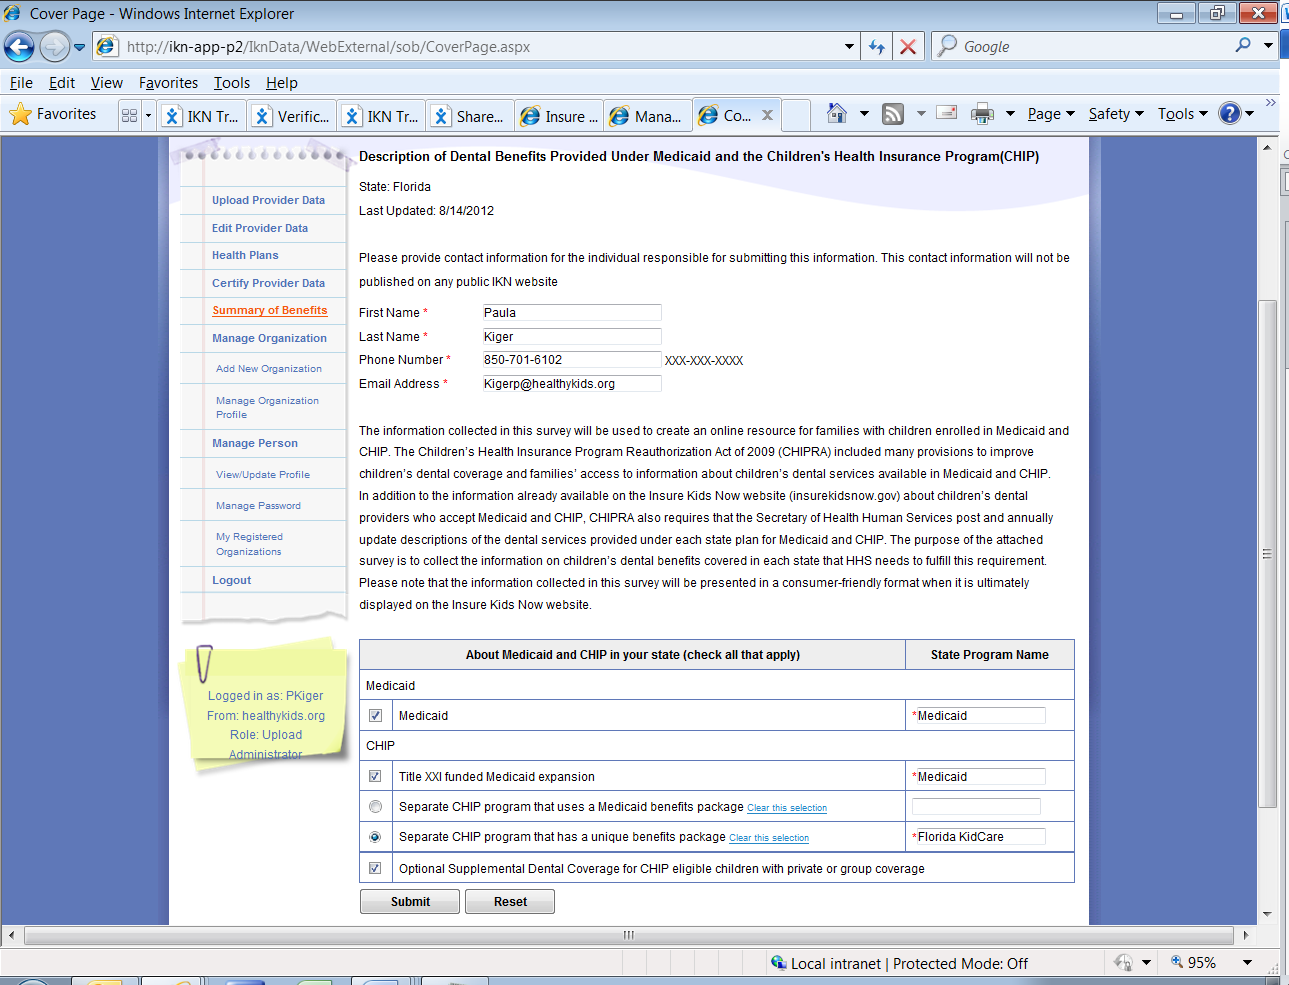
Figure 6: Summary of Benefits Feature (1)
After selecting the program for which they wish to update the summary of benefits, State Administrators can update the benefits provided using the form pictured in Figure 7. Once submitted, this data is published on www.insurekidsnow.gov as ‘Description of Dental Benefits,’ and available through links to non-editable (i.e., pdf) reports under each state. These reports are dynamically generated based on the data entered by the State Administrators in the Summary of Benefits feature of the IKN Data Management site.
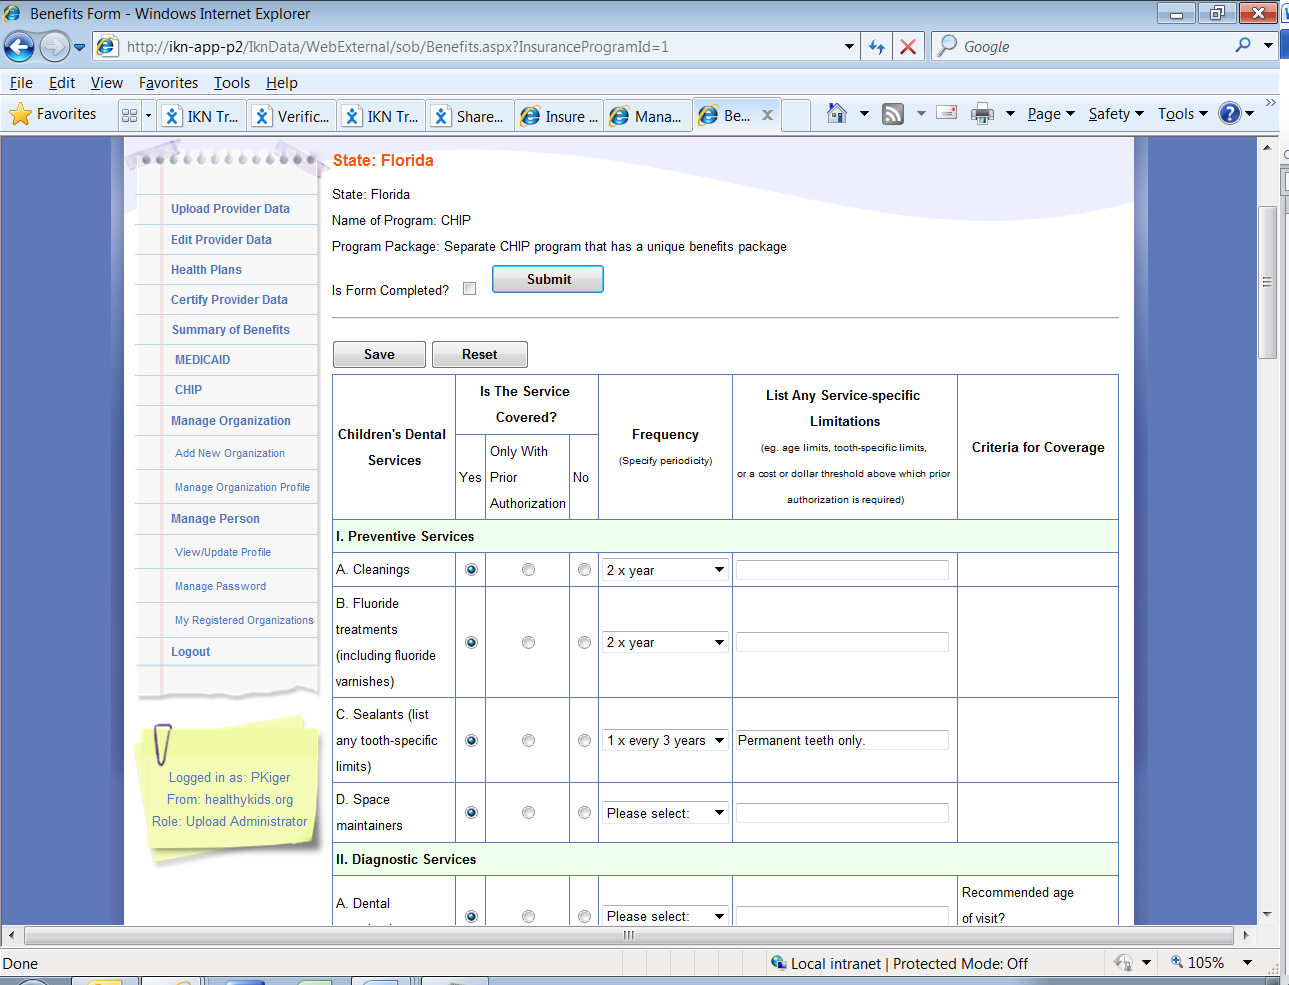
Figure 7: Summary of Benefits Feature (2)
3.2.2.6 Manage Organizations
The System Administrator may manage the organizations on the IKN Data Management site. They may add a new organization or manage an existing organization profile.
3.2.2.6.1 Add New Organization Feature
The State Administrator may create a new organization for a contractor/managed care organization if the organization does not already exist in the system. By adding the new organization, new users may register to the correct organization (illustrated in Figure 8). This feature may be accessed by selecting ‘Add New Organization’ under the ‘Manage Organization’ option in the left-hand menu on the IKN Data Management Site Home Page.
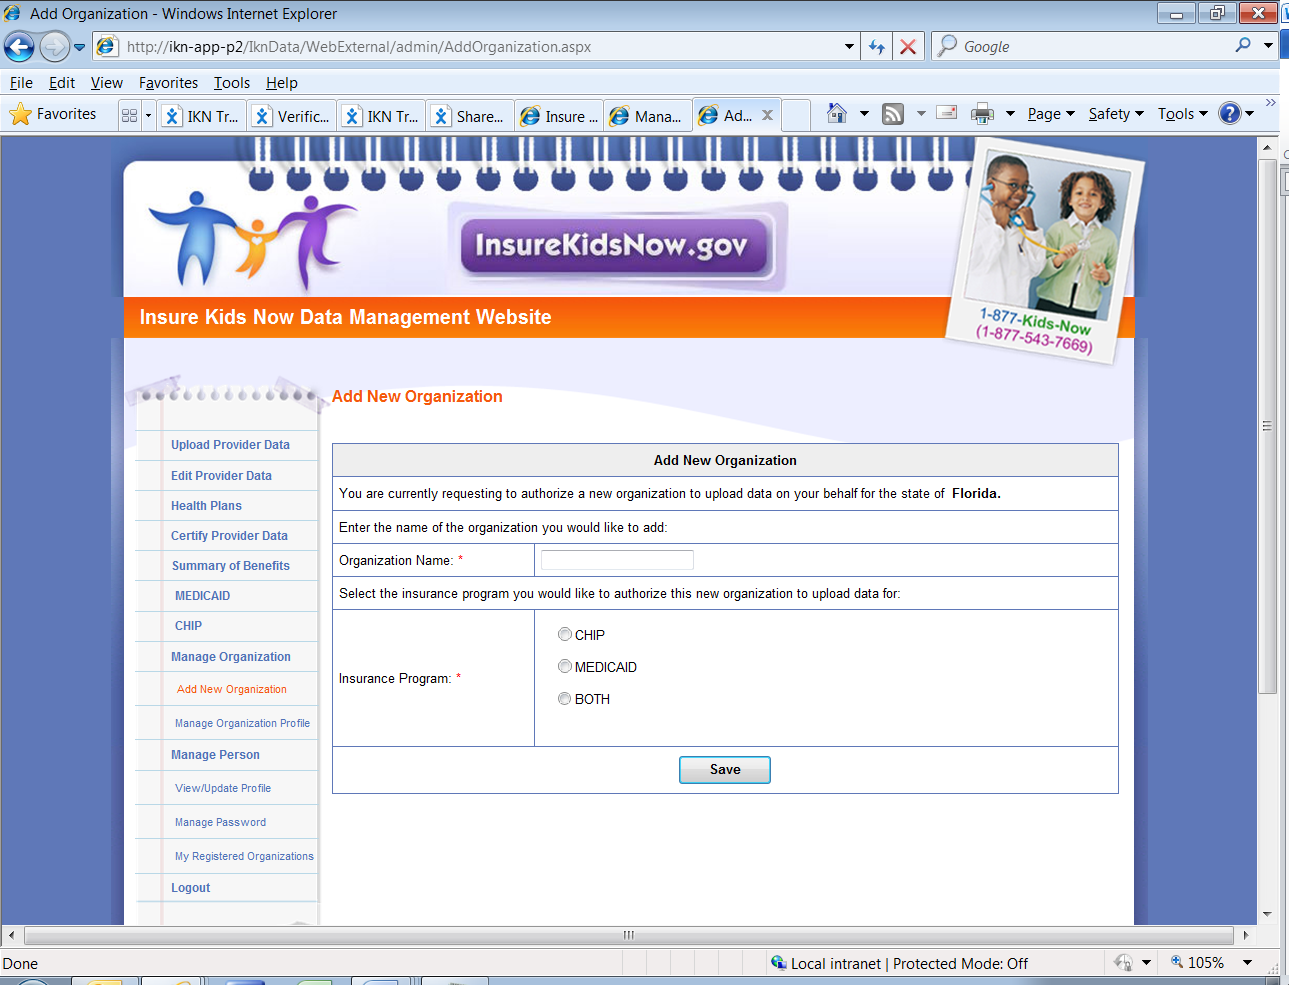
Figure 8: Add New Organization Feature
3.2.2.6.2 Manage Organizational Profile Feature
The State Administrator also has rights to edit organizational details by using the ‘Manage Organization Profile’ feature under the ‘Manage Organization’ option in the left-hand menu on the IKN Data Management Site Home Page. The 'Manage Organization Profile' page is shown in Figure 9.
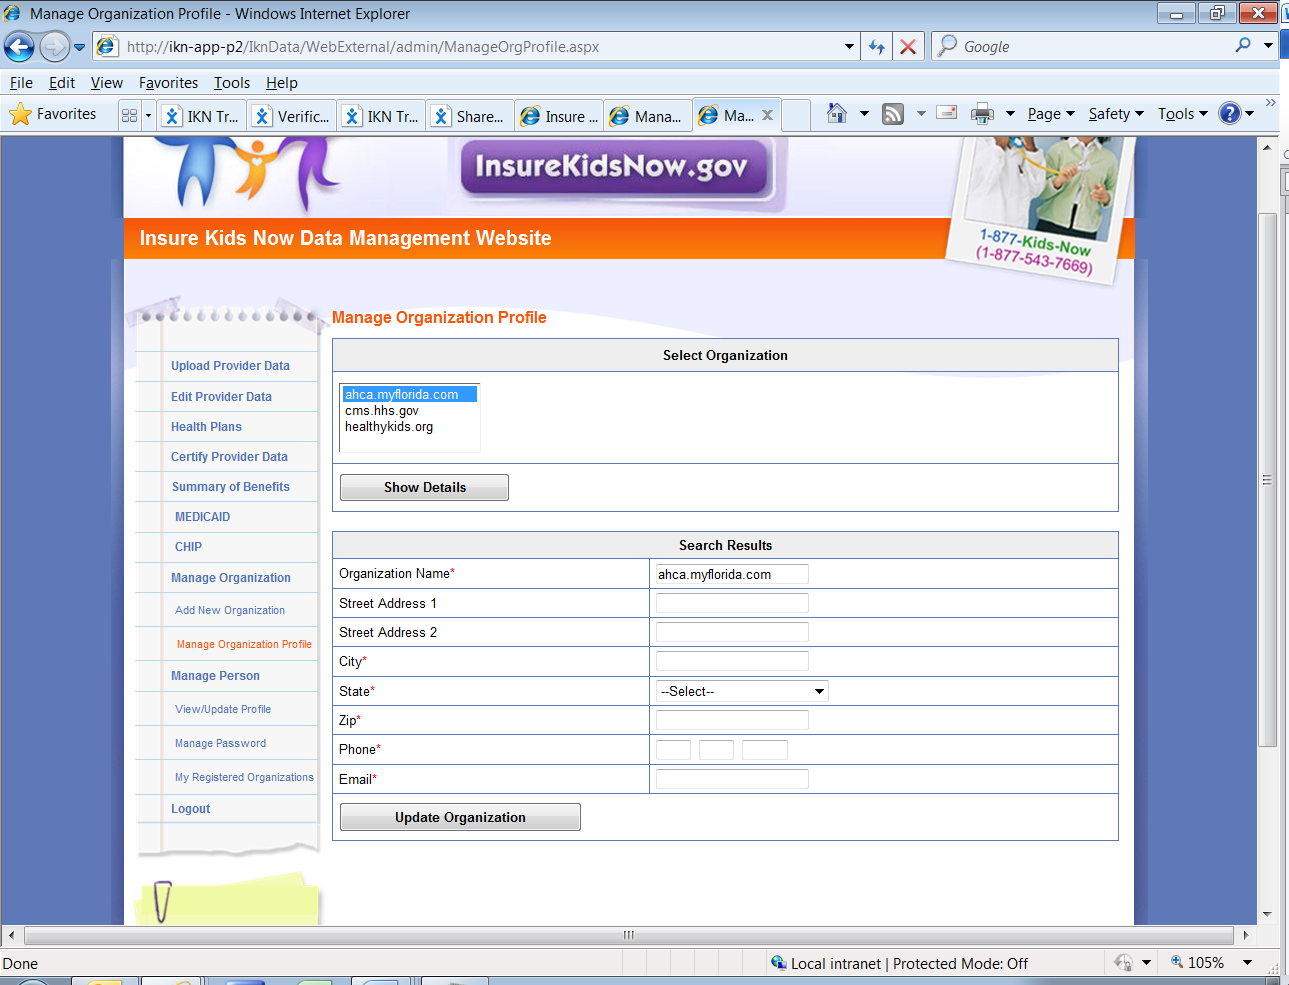
Figure 9: Manage Organization Profile Feature
3.2.2.7 Manage Person Feature
All users have the ability to manage their personal details, password, and related organizations on the IKN Data Management Site.
3.2.2.7.1 View/Update Profile
All users have the option to edit their personal details by selecting ‘View/Update Profile’ under the ‘Manage Person’ option in the left-hand menu on the IKN Data Management Site Home Page. The 'View/Update Profile' page is depicted in Figure 10.
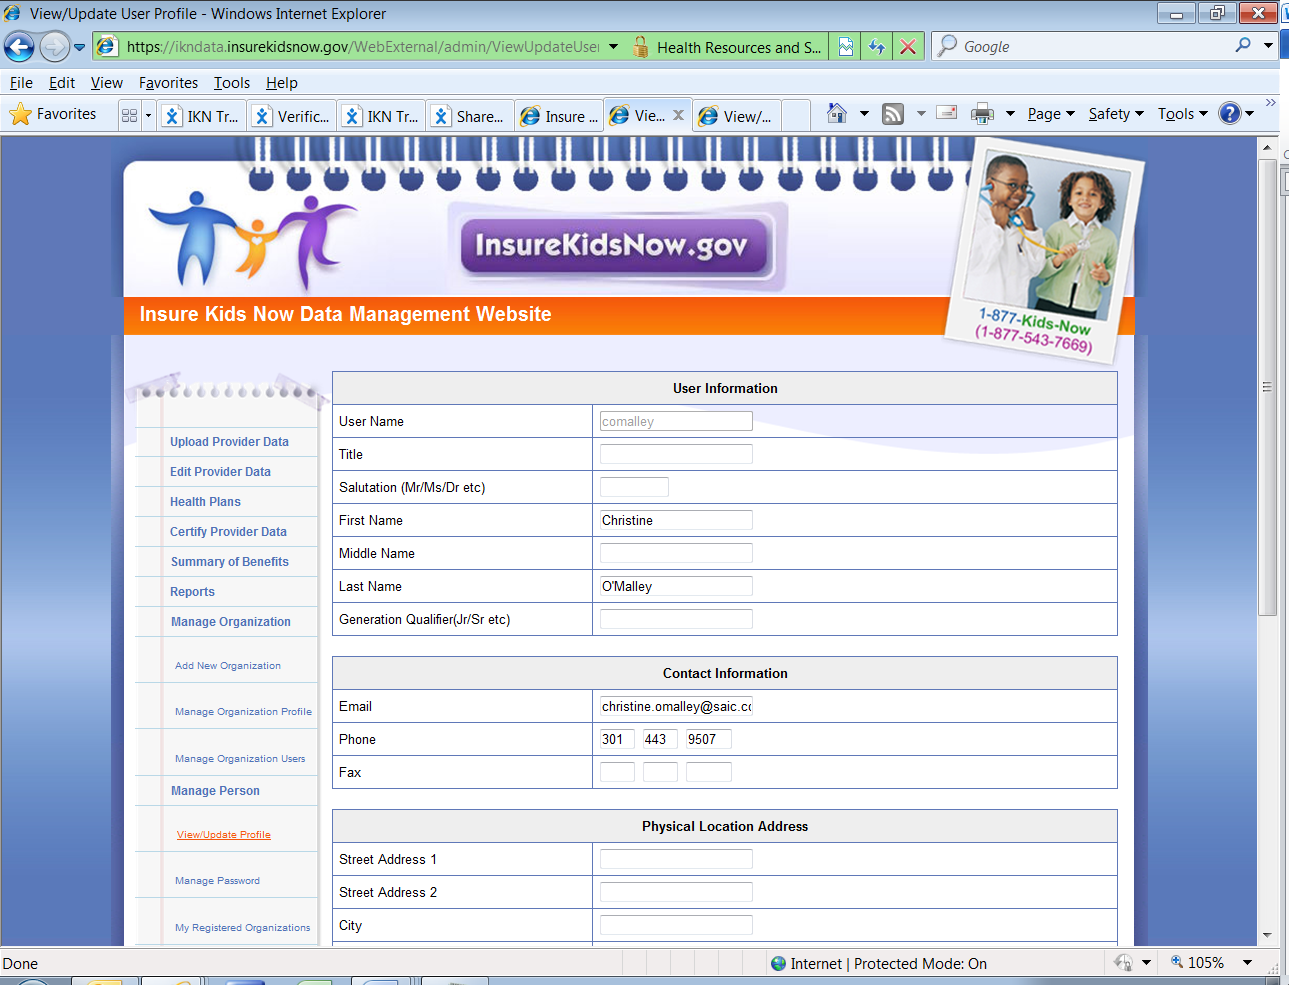
Figure 10: View/Update Profile Feature
3.2.2.7.2 Manage Password
All users have the option to edit their password by selecting ‘Manage Password’ under the ‘Manage Person’ option in the left-hand menu on the IKN Data Management Site Home Page. The 'Manage Password' page is depicted in Figure 11. Users may also update their security questions and answers by using the ‘Manage Password’ feature.
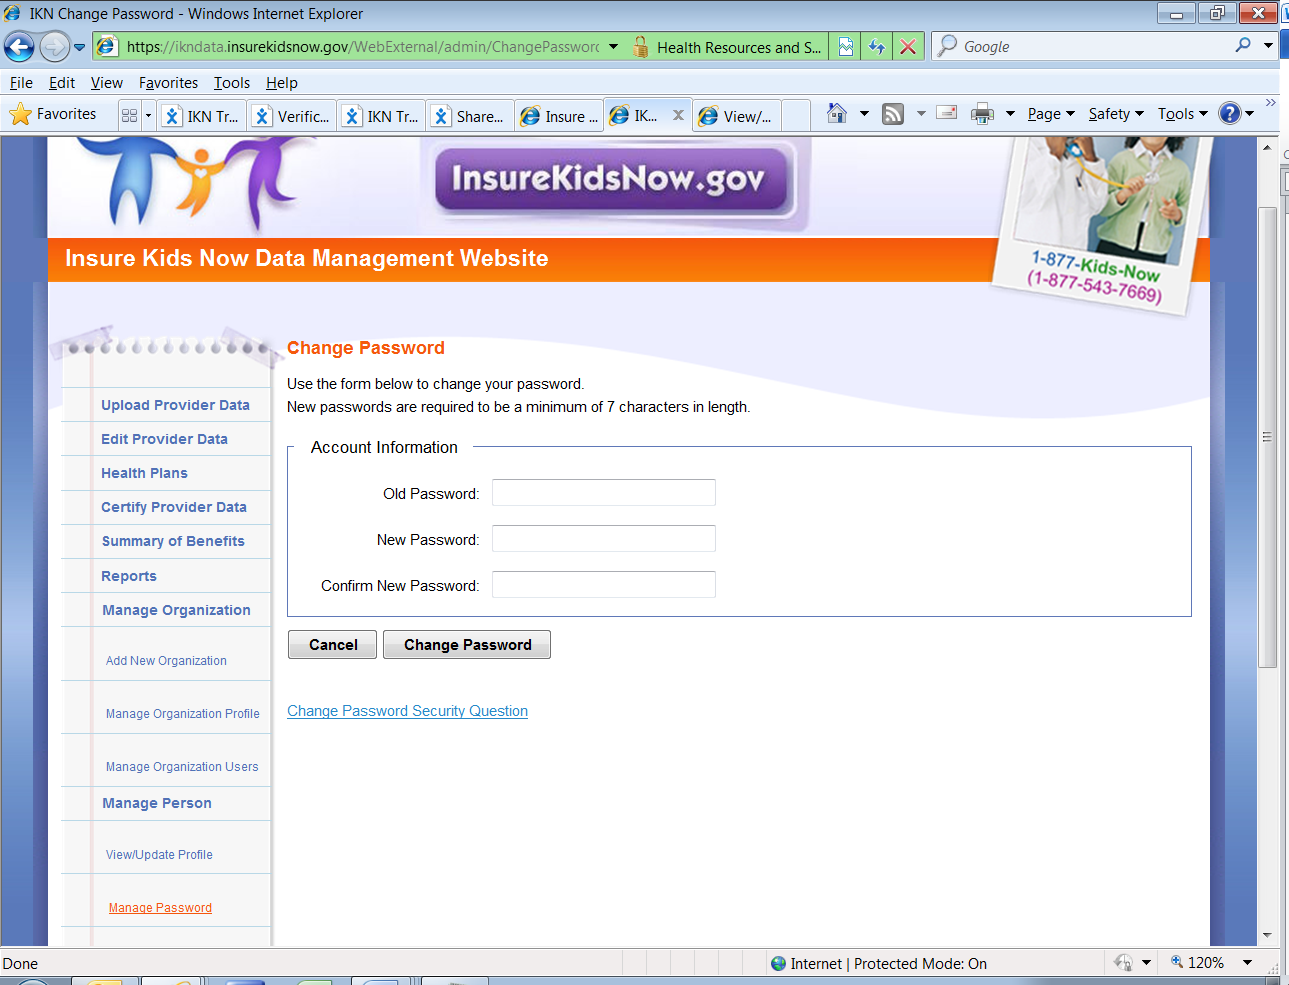
Figure 11: Manage Password Feature
3.2.2.7.2 Manage Registered Organizations
All users have the option to view the organizations they are registered under by selecting ‘My Registered Organizations’ option in the left-hand menu on the IKN Data Management Site Home Page. The 'My Registered Organizations' page is depicted in Figure 12.
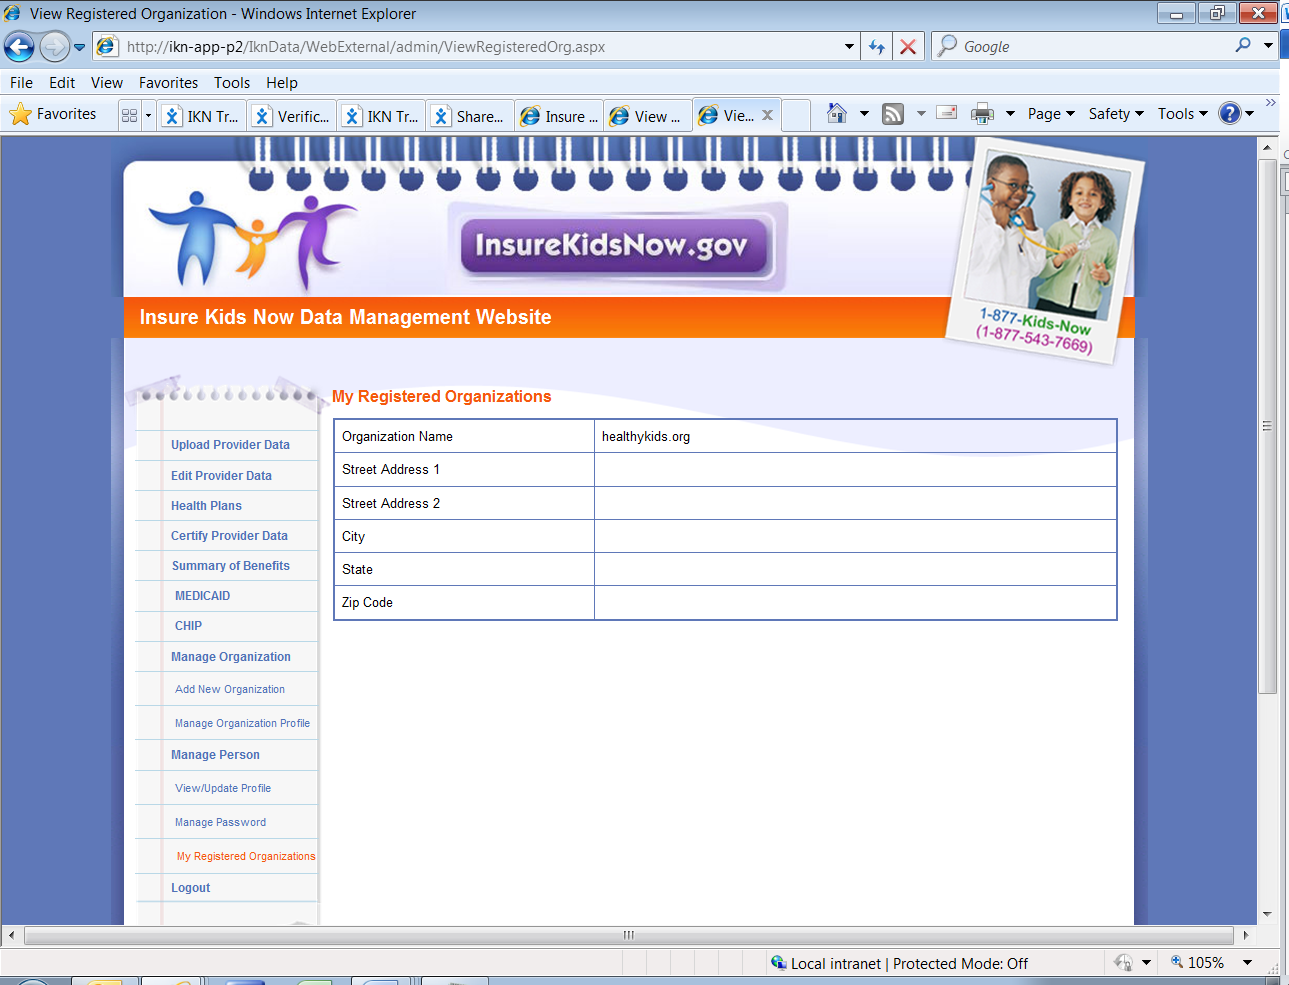
Figure 12: My Registered Organizations
3.2.3 Using the IKN Data Submission Client Tool
Data upload users have the option of uploading data via the IKN Data Submission Client Tool (as referred to as the IKN Client Tool) instead of the IKN Data Management site. Data files are processed the same way, regardless of the mechanism used. The primary advantage of the IKN Client Tool is that it allows users to configure the tool to allow them to upload data by program as frequently as they like without requiring them to actively log into the IKN Data Management Site and upload their files manually. Developed for data submission purposes only, the IKN Client Tool depicted in Figures 13 and 14, does not provide as many features as the data management site. Users who wish to submit their data more frequently or who can generate their data file automatically tend prefer the IKN Client Tool. Users who submit their data on a quarterly basis or generate their file manually prefer the IKN Data Management Site. In addition to these mechanisms, users also have the option to develop their own custom client tool.
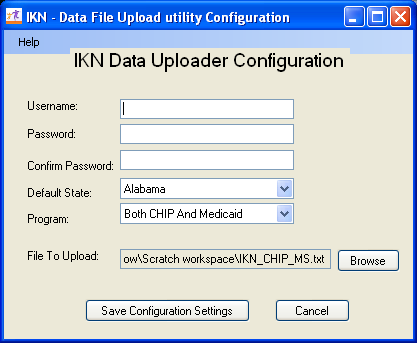
Figure 13: IKN Data Uploader Configuration Window

Figure 14: IKN Data File Uploader Window
Users may download the IKN Data Submission Client Tool from http://ikndata.insurekidsnow.gov/clienttool/.
The tool has a simple configuration interface that collects the user ID, password, location, and name of the file to upload. The tool uses this information to establish a connection to the data submission service and upload the designated file. Once the tool is configured, the user may use it to manually select and upload a file, or set a schedule to run automatically.
NOTE: The tool does not automatically schedule itself to run. The user will need to create a scheduled task using the Windows Scheduler to automate submissions using this tool. When the tool runs in unattended mode, it assumes that the file indicated exists. The user does do not have to generate files with unique names each time they submit a file. When the client is running in automatic mode, name the file to be uploaded the same every time to avoid having to reset the tool’s configuration.
Appendix C includes screen shots and step-by-step instructions on how to configure and use the client tool to submit data interactively or through an automated task.
3.2.4 Using a Custom Client Tool Created By Your Organization
If the IKN Data Submission Client Tool does not meet the user’s needs, the user may create a custom submission client. Appendix D includes the technical information (i.e., service address and name, XML structure, commands, etc.) necessary to construct a custom data submission client. Please note that the information is intended for use by those organizations that have the programming skills to create their own upload tool rather than use the tool described in Section 3.2.3 of this document.
3.3 Data Validation
3.3.1 Data File Submission and Validation Receipt
After a user uploads a file, a system generated email is sent to the email address registered under the user’s profile to confirm receipt of the submission. The email includes a Data File Submission and Validation Receipt (referred to hereafter as the submission receipt) as an attachment. A sample of this receipt is illustrated in Figure 15. The submission receipt indicates to users that their file was a) accepted with no rejected rows; b) accepted with rejected rows; or c) rejected. If a file is rejected, the reason for rejection is provided, but individual rejected rows are not identified. If a file is accepted with rejected rows, the rejected rows are identified along with the reason(s) for rejection.
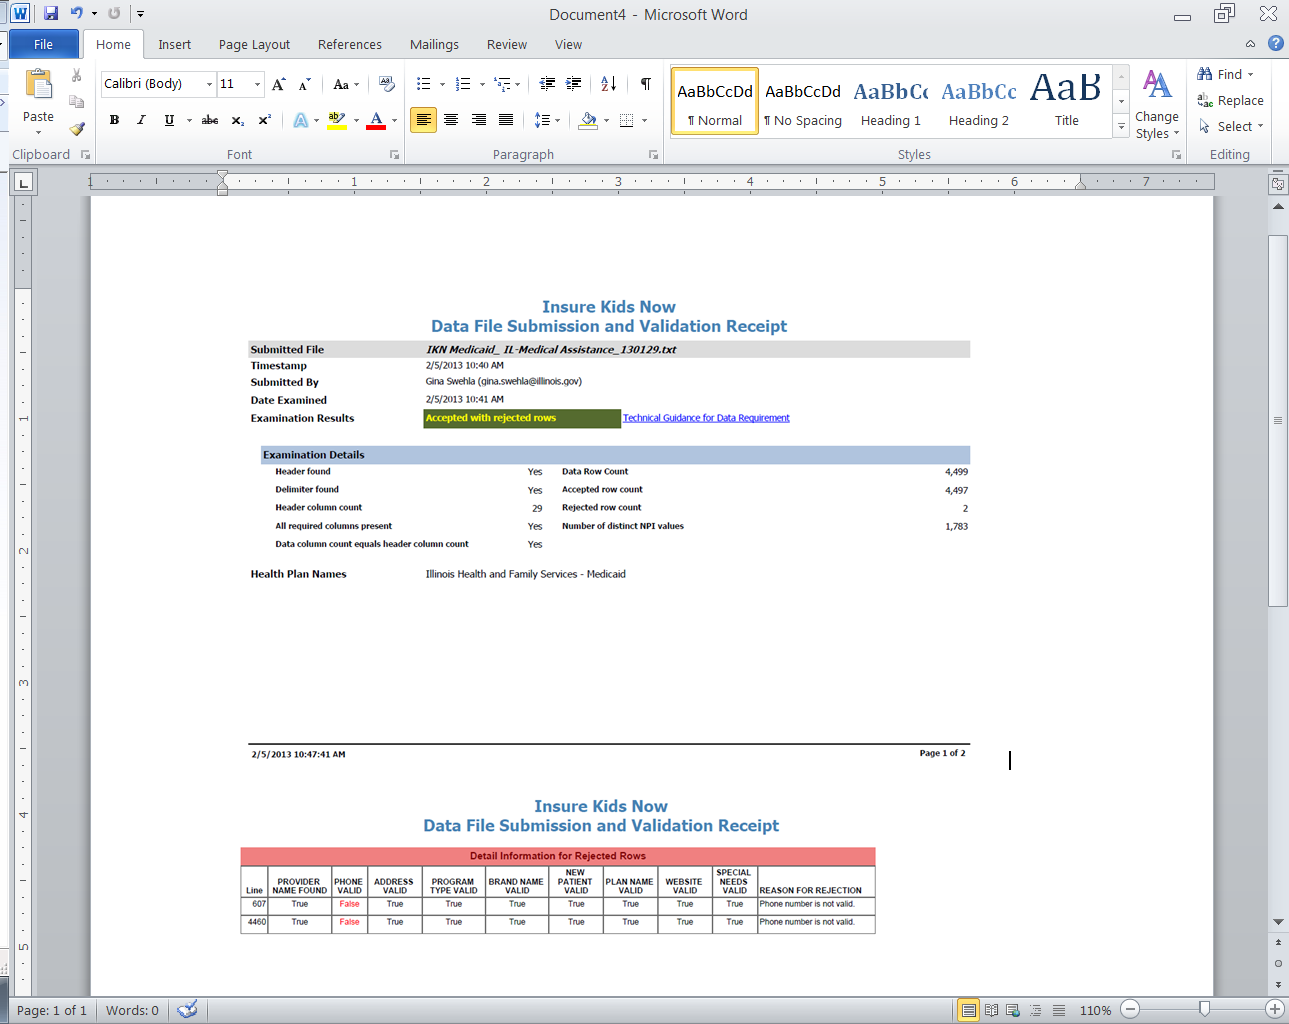
Figure 15: Data File Submission and Validation Receipt
3.3.2 Geophone Report
The email containing the submission receipt also includes links to Geophone reports, which list data validation process results and help identify potentially invalid data. The IKN data management team uses a third party subscription-based electronic service called DOTS Geophone to check the quarterly submission’s data against information available within public telephone directories. Reports are generated automatically to identify data that may be invalid. It is important to note that there is a 24-hour delay between receipt of the email submission receipt and when the Geophone report links are live due to the time required to validate submitted data.
The Geophone report is provided as an added service to states to help identify specific lines of data, which may be invalid, without the expense of extensive manual checks. The validation process checks every line of data submitted in a single data submission file against their certified data and categorizes the phone numbers based on the business rules outlined in the summary tab of the report. However, there may be instances when data flagged as suspect by Geophone is in fact correct. If states find upon investigation that data flagged as suspect was in fact correct as originally submitted, then no further action is required. The intent of the report is not to categorically declare that certain data is good or bad, but rather to serve as a tool to assist states in conducting quality control checks on their data.
The following validation rules are used to categorize data in Geophone reports:
Green: The phone number is good, the name matches on provider name, group name, or facility, and the address.
Blue: a) Name does not match. b) Street address, city, state, and zip all match.
Yellow: Neutral. Geophone has no data.
Orange: a) Name does not match. b) Street address, city, state, or zip matches.
Red: a) The phone number is invalid and the line of data is rejected or b) No name or geographical information.
A Geophone report is associated with a single data submission file. The report includes two tabs, a summary tab and a raw results tab:
Summary: The summary tab (shown in Figure 16) includes a breakdown of how all data rows, for both good and suspect data, were categorized as well as the rules used to categorize the data. Data categorized as blue or green is considered to have a high probability of being able to connect a Medicaid or CHIP family to a specific dental provider. Data categorized as orange or red is considered to have a high probability of being invalid (i.e., unable to connect a Medicaid or CHIP family to a dental provider). Data categorized as yellow is data which cannot be verified (i.e., Geophone has no data against which to validate state data or the numbers were unlisted).
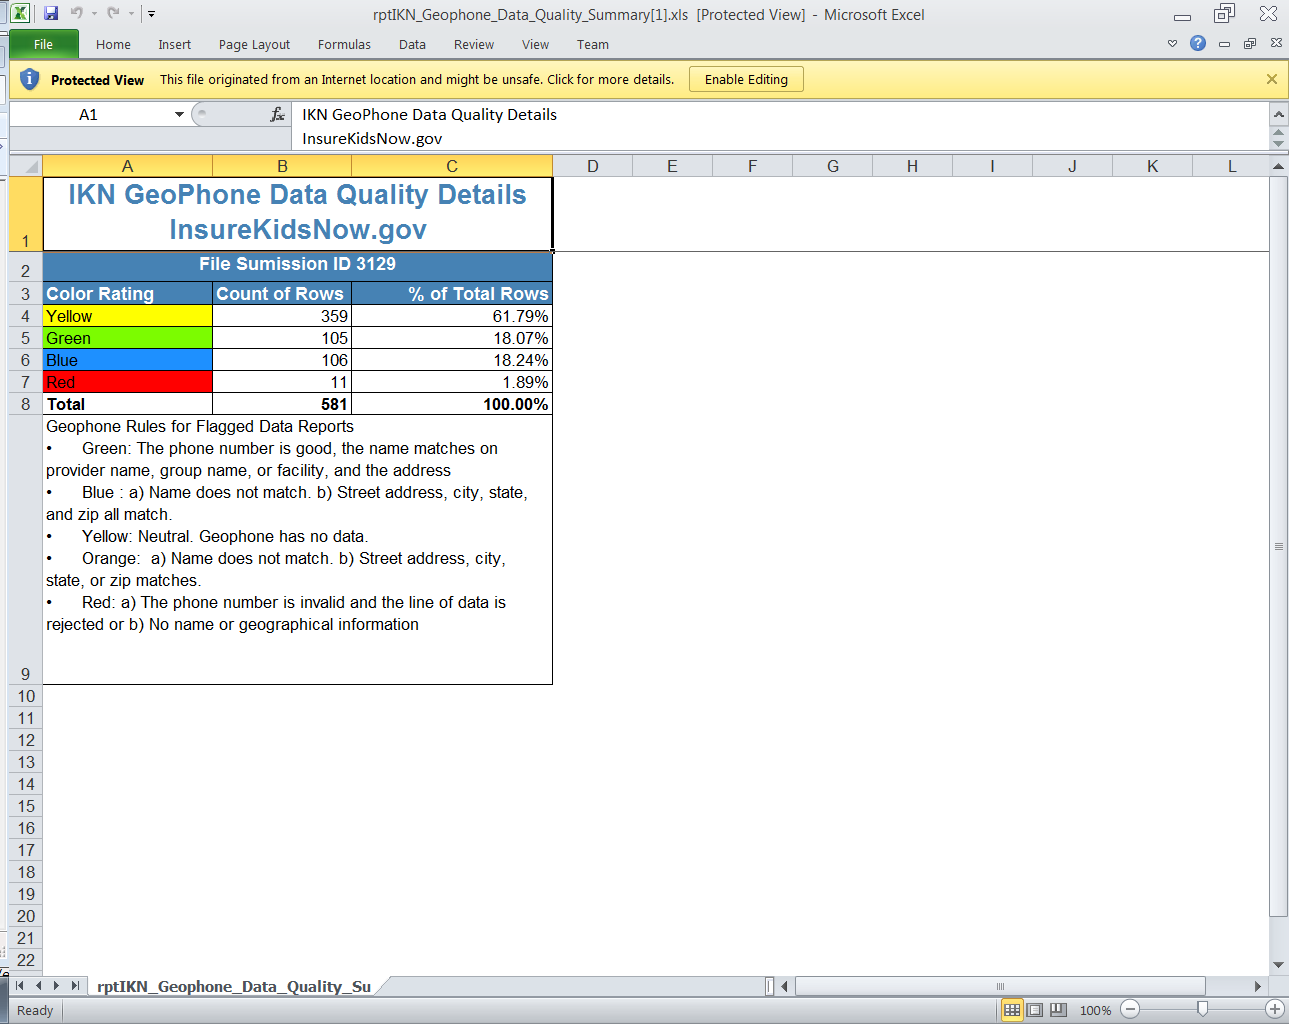
Figure 16: Geophone Report: Summary Tab
Raw Results: The raw results tab (shown in Figure 17) includes data submitted by the state and data supplied by Geophone. Data to the left of the black dividing line is the data submitted by the state, while data to the right is the Geophone data against which the state data was compared. The raw results tab does not include data verified as good data. This tab only includes data rows for suspect data (i.e., color rated as orange or red).
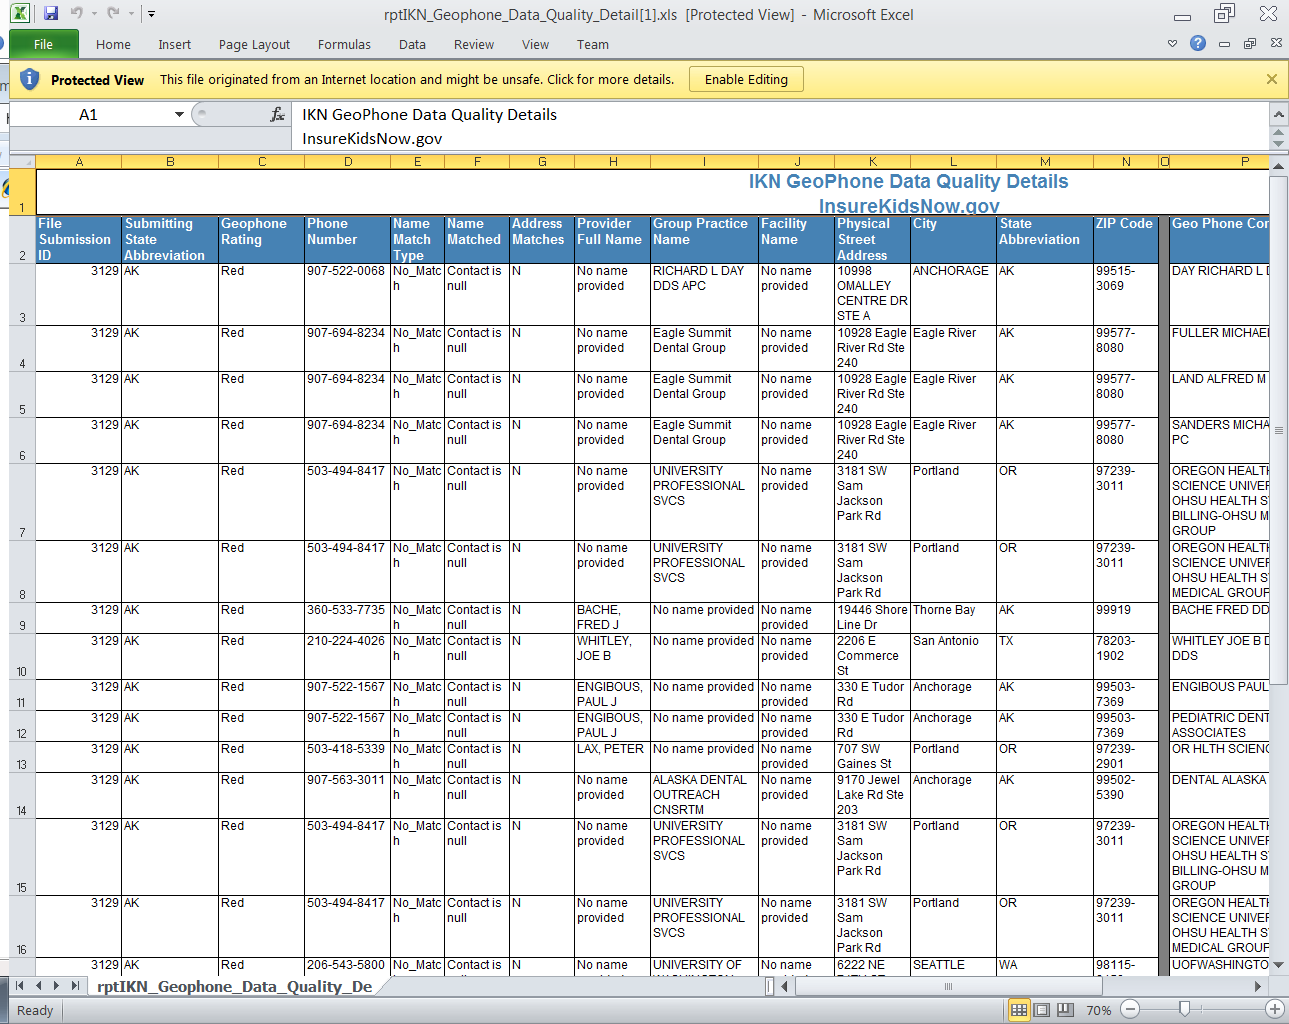
Figure 17: Geophone Report: Raw Results
Once users have reviewed the Geophone report, they have the option of either correcting suspect data and resubmitting the file or using the online editing feature in the IKN Data Management site to correct the data. If the user chooses not to correct the data, the same potential errors will be reported with each submission. Data in the raw results tab is not unique. If the Geophone data contained more than one provider name for a phone number, it would report each line of the Geophone data with each provider the state submitted for that phone number.
APPENDIX A: Entry of Group Practice and Federally Qualified Health Centers Provider Data
Many Federally Qualified Health Centers (FQHC) provide dental services through contracts with local private practices. Some contracted oral health providers supplying these services may not want their practice information listed on IKN. If the billing is done through the FQHC’s National Provider Identifier (NPI), the user does not have to provide the name and address of individual oral health providers that are seeing clients through contracts with FQHCs. Instead, when providing information for FQHCs, the user should separately list the addresses of all clinic locations that provide oral health services. For entries identified as an FQHC, IKN will only list the name, address, and phone number but not the provider's name.
If the data include group practices, please identify each member of the practice with the applicable NPI, if possible. If providers who are members of a group practice do not wish to have their individual names listed on the website, the user may submit one record for each location where members of a group practice see patients, using only the group practice name for the listing. The user should include a unique identifier for these practices just as they would when identifying an FQHC. As with FQHCs, this identifier should NOT be the NPI for an individual.
Do not put group practice or facility names in the columns reserved for names of individuals.
APPENDIX B: Format for Text Data File Submission
Based on feedback from state health officials during the initial data submission process, the data submission format accommodates states that use managed care plans. The format allows state health officials to submit provider information specific to a health plan, which allows for more accurate information for the public. For example, if a provider accepts new patients under one health plan but not the other, this will be reflected in the data.
State health officials submit multiple records (potentially in multiple files, one for each health plan) for a given provider. Each record should be a unique combination of:
Provider (individual, group practice, or facility)
“Benefit Plan” or “Coverage Plan”, which is a combination of:
Program name, and
Health plan name under that program, or “Fee for Service,” if applicable
Service Location
NOTE: There is no specific data element named “Benefit Plan” or “Coverage Plan”. This is something that is created from the combined values in the Program_Name and Health_Plan_Name fields.
All fields listed in Table 5 must be included as column headers in all file submissions, even if the columns contain no data. Every file should have 27 column headers total.
The data submission file is a text file. Each data value should be vertical pipe ( | ) delimited. (The pipe symbol separates the fields.) This file (or files) contains the data elements in the required order as described in Figure 18. The user may submit more than one file (e.g., one for Medicaid and one for CHIP, or one for each health plan the user’s state offers) but please clearly identify them.
Include the pipe-delimited list of field names (see Figure 18) in the first line of each data file as this will be used to validate the submission. If the user submits a file where one or more of the optional fields is not included, please either omit that field from the file header or use the instructions below regarding how to “skip” a value. In either case, the field layout in the file’s header must exactly match the layout in the data records.
In the data records themselves, for values left blank, two pipes will be together with nothing in between. Figure 18 shows the first few data fields of the first two lines in a data file.
Figure
18: Example of Provider
Data File
Provider_ID|Prov_Aff|First_Nm|Middle_Nm|Last_Nm|Fac_Nm|Phy_Street_Addr|City|…
12345|FQHC|John||Smith|Family
Dentistry|123 Elm Street|Topeka|…


Note that John Smith has no middle name, but the position is maintained by the two pipes with nothing in between. Some data elements are optional. An entry may remain blank if there is no content for these data elements. For fields that allow for multiple entries within them (e.g., Language), please use a comma (,) to separate the multiple entries (e.g., …|Spanish, Chinese|…).
The file must identify distinct providers. IKN prefers the National Provider Identification number, but another identifier is acceptable so long as it is “persistent” (i.e., does not change over time), unique to a provider, and used consistently through all data submitted by the state and its managed care contractors. In cases where only a group practice or facility (e.g., health center) is represented, use the identifier for the practice or facility rather than an identifier for a particular individual.
The file must include a record for each distinct physical location at which a provider practices. Below are some provider and location scenarios and the expected data records:
One Provider in One Plan at One Location: If a provider has one location and sees patients only from one coverage plan, then submit a single complete record for that provider.
One Provider in One Plan at Multiple Locations: If a provider sees patients from a single coverage plan, but has multiple locations (e.g., three), then submit three complete records for that provider.
One Provider in Multiple Plans at One Location: If a provider sees patients from more than one plan, but does so at a single location, then submit one complete record for each plan in which the provider participates.
One Provider, Multiple Plans, at Multiple Locations: If a provider participates in more than one plan, and sees patients in those plans at more than one location, then submit one complete record for each combination of provider, plan, and location. NOTE: Not all providers see patients from each plan in which they participate at every location where the provider sees patients.
Practice with More than One Provider and One Location: If a practice has two providers at a single location, submit two complete records (i.e., one for each provider) if the providers are willing to be listed. Otherwise, submit a single record for the group practice as an entity, but no details on the individual providers in the practice.
Practice with More than One Provider and Multiple Locations: If a practice has two providers and multiple locations, then submit a complete record for each provider associated with each location at which that provider practices.
Please refer to Appendix A, Entry of Federally Qualified Health Centers and Group Practice Provider Data for special instructions for handing FQHC data.
Table 5 - Text Data File Submission Fields and Information
Data Element Name |
Description |
Required |
Comments |
Test / Validation Plan |
Provider_ID |
Unique Provider Identifier |
Required |
Must be unique to a provider in your state.
For individual providers, the National Provider Identifier (NPI) is preferred, but IKN will accept an alternate (e.g., State Medicaid Provider ID) as long as it is used for ALL submitted files from your state and any contractor organizations.
For group practices and health centers, please include an alternate ID that uniquely identifies the practice or facility.
IKN will not display this data element, but it may be used for “behind-the-scenes” activities such as data cleansing and statistics. |
|
Prov_Aff |
Provider Affiliation |
Optional |
Select one or more of the two-letter codes from the following list: PP = Private Practice CHC = Community Health Center FQHC = Federally Qualified Health Center HD = Health Department OTH = Other NOTE: Use a comma (,) to separate multiple entries |
|
First_Nm |
Provider First Name |
Required, if applicable
(Must be present in file header; may be blank on individual data lines) |
Refer to Group Practice / FQHC exception specified in Appendix A.
Please do not enter special symbols or middle name for this field. |
|
Middle_Nm |
Provider Middle Name |
Optional |
Refer to Group Practice / FQHC exception specified in Appendix A. |
|
Last_Nm |
Provider Last Name |
Required, if applicable
(Must be present in file header; may be blank on individual data lines) |
Refer to Group Practice / FQHC exception specified in Appendix A. |
|
Grp_Prac_Nm |
Group Practice Name |
Required, if applicable
(Must be present in file header; may be blank on individual data lines) |
Only if applicable. |
|
Fac_Nm |
Facility Name |
Required, if applicable
(Must be present in file header; may be blank on individual data lines) |
Applies in cases where the practice location is associated with or contained in a facility such as a hospital, school, or community health center. |
|
Lang_Spoken |
Languages Spoken |
Optional |
Only enter languages other than English that are spoken at the facility. A blank entry indicates that only English is spoken.
NOTE: Use a comma (,) to separate multiple entries. |
|
Specialty |
Provider Specialty |
Required |
Select one or more from the following list:
NOTE: Use a comma (,) to separate multiple entries. |
|
Website |
Website address of provider |
Optional |
Provider’s website, if any.
Sites will be checked to ensure the url is associated with a functioning site and that the site includes content related to dentistry. |
|
Program_Type |
Type of Program |
Required |
Select from:
|
|
Program_Name |
Name of Program |
Required
(Must be present in file header; may be blank on individual data lines) |
The name by which a Medicaid or CHIP program is known to beneficiaries (e.g., TennCare, Kids First, Medicaid, CHIP, etc.) This is the “brand name” that beneficiaries would see on their membership card. When used in combination with the Health_Plan_Name, this uniquely identifies a specific coverage plan in which beneficiaries might be enrolled. The Program Name plus Health Plan Name combined is the coverage plan or benefit plan which families use to search for providers on the public IKN Website.
Avoid using the same value for both Program Name and Health Plan Name. For example, filling each value with “Medicaid” would result in a listing labeled “Medicaid Medicaid”. |
|
Health_Plan_Name |
Name of entity providing coverage |
Required, if applicable
(Must be present in file header; may be blank on individual data lines) |
The name of a Health Plan, if any, that is operated under the program listed in Program_Name. This is the second part of the “brand name”. When used in combination with the Program_Name, this uniquely identifies a specific coverage plan in which beneficiaries might be enrolled. The Program Name plus Health Plan Name combined is the coverage plan or benefit plan which families use to search for providers on the public IKN Website.
Avoid using the same value for both Program Name and Health Plan Name. For example, filling each value with “Medicaid” would result in a listing labeled “Medicaid Medicaid”.
Must match Health Plan name listed on “Program/Health Plan Name Validation” on IKN Data Management Website to prevent duplication. |
|
Phy_Street_Addr |
Provider Physical Site Street Address |
Required |
Physical location (i.e., street address) where services are provided. Please include Floor Number and Room Number, where applicable.
Mailing addresses such as P.O. Box or Rural Route information will be rejected. This information will be used to display the practice location on a map, and to provide routing instructions to patients. Mailing addresses such as P.O. boxes or rural route numbers cannot be used for this purpose. |
|
City |
Provider City |
Required
|
City or town in which the provider/practice is located. |
|
State_Abbr |
Provider State |
Required
|
Two character postal abbreviation. |
|
ZIP |
Provider ZIP Code |
Required (see NOTE following table)
(Must be present in file header; may be blank on individual data lines) |
99999-9999 (last four digits optional) for U.S. addresses
or
Letter-number-letter number-letter-number for Canadian Postal Codes (e.g., X0X 0X0) |
|
Phone_Num |
Phone Number |
Required
|
999-999-9999 x999 (extension optional)
Phone number must be in service.
Phone number verification will be checked using geophone system. |
|
FAX_Num |
FAX Number |
Optional |
999-999-9999 x999 (extension optional) |
|
New_Patients |
Accepts New Patients |
Required
|
Enter Y, N, or U. |
|
Special_Needs |
Can Accommodate Special Needs |
Required
|
Enter Y, N, or U.
Note: The data will be displayed along with a notation that the provider should be contacted for details in cases where the indicator is 'Y'. |
|
Active_Ind |
Active Status |
Required
(Must be present in file header; may be blank on individual data lines) |
Enter the provider’s status as of the date of the update. Use 'Y' to indicate that the provider is currently active and 'N' if inactive. Only active providers will be displayed on the national provider locator website.
Note: If a given provider will remain inactive for the entire reporting cycle, they do not need to be included. |
|
Central_ appointment_line |
Central Appointment Line |
Optional |
Enter Y, N, or U. Use 'Y' to indicate that the phone number is a centralized billing or appointment line that serves multiple providers and 'N' if it is not. Use 'U' if it is unknown. |
|
License_Num |
Dental License Number |
Optional
(However, states must submit data either in this field OR in the Provider_ID field) |
Data must be entered as text.
Must be unique to a specific provider. |
|
Services_Mobility |
Facility Can Provide Services for Children with Mobility Limitations |
Required
|
Enter Y, N, or U. Use 'Y' to indicate that the facility is equipped to provide dental services for children who have mobility limitations such as those who use a wheelchair and 'N' if it is not. Use 'U' if it is unknown. Note: The data will be displayed along with a notation that the provider should be contacted for details in cases where the indicator is 'Y'. |
|
Sedation |
Facility Can Provide Sedation for Children with Complex Medical or Behavioral Conditions |
Required
|
Enter Y, N, or U. Use 'Y' to indicate that the facility can provide sedation if needed by children with complex medical or behavioral conditions and 'N' if it cannot. Use 'U' if it is unknown.
Note: The data will be displayed along with a notation that the provider should be contacted for details in cases where the indicator is 'Y'. |
|
Services_Intellectual_Disability |
Facility Can Provide Services for Children Who May Have Difficulty Communicating or Cooperating Such as Those with Autism, Mental Retardation, or Intellectual Disability |
Required
|
Enter Y, N, or U.
Use 'Y' to indicate that the facility can provide services for children who may have difficulty communicating or cooperating such as those with autism, mental retardation, or intellectual disability and 'N' if it cannot. Use 'U' if it is unknown.
Note: The data will be displayed along with a notation that the provider should be contacted for details in cases where the indicator is 'Y'. |
|
NOTE: The purpose of these data is to help beneficiaries (prospective patients) locate dental health care providers that accept the beneficiaries’ coverage. It is important to know where the provider practices in order to do so, and a means for the beneficiary to contact the provider to obtain more information.
APPENDIX C: Configuring the Insure Kids Now Data Submission Client Tool
This
appendix describes the Windows-compatible data upload client tool3
available at http://ikndata.insurekidsnow.gov/clienttool/.
The tool has a simple configuration interface that collects the user
ID, password, location and name of the file to upload. It uses that
information to establish the connection to the service and upload the
designated file.
The following notes describe unique
requirements for the IKN Data Submission Client Tool:
Once the tool has been configured, the tool may be used to either manually select and upload a file, or set it on a schedule to run automatically. The tool does not automatically schedule itself to run.
Each user ID (username) is associated with only one State. If the user prepares data for several states (e.g., if the user is part of a managed care organization contracted to several states), the user must have a separate ID for each state for which they are submitting data. Data cannot be submitted for one state using an ID associated with another state.
The user may use each user ID to submit provider data for CHIP, Medicaid, or both programs. However, the client tool configuration must match what is in the master user list in the submission tool. The table below includes the permitted combinations. Combinations marked OK will work while combinations marked Fail will fail.
-
Client setting
Receiver Setting
CHIP
Medicaid
Both
CHIP
OK
Fail
OK
Medicaid
Fail
OK
OK
Both
Fail
Fail
OK
The
tool comes pre-configured with the information needed to connect to
the IKN data receiver service. Do not change this part of the
configuration in any way.
To obtain and install the tool:
Download and save the IKN Client Tool setup from http://ikndata.insurekidsnow.gov/clienttool/.
Unzip the downloaded file into a folder on a computer. This can be either an individual workstation or a Windows file server.
Run the setup.exe program to install the IKN Client Tool.
C.1 Configuring
the IKN Client Tool (First Time Use)
Open the IKN Client Tool by choosing [Insure Kids Now -> IKN Data Submission Client] from the Start -> Programs menu. Figure 19 shows the IKN Data Uploader Configuration window that is displayed.

Figure 19: IKN Data Uploader Configuration Window
On the IKN Data Uploader Configuration window, set the initial user ID, in the username field, and password information to be used for submissions. This step does not need to be repeated unless the user needs to update or change this information.
Select the state for the provider list to be uploaded.
Select the program type for the provider list to be uploaded.
Indicate the file to be uploaded by clicking “Browse” and navigating to the folder that contains the file. Then select the file to upload. The tool enforces the following restrictions:
The upload file must already exist. The tool will not allow the user to enter the name of a non-existent file.
The tool only allows text files with names ending in .TXT.
The tool will use the same folder and file name for each upload, unless the user changes the setting prior to uploading.
Click the “Save Configuration Settings” button to save the settings. The user can now use the IKN Client Tool to submit data. Alternatively, click the "Cancel" button to close the configuration form without saving any changes. Note: The tool will not upload data until all configuration settings are supplied. In addition, the IKN Client Tool does not require configuration changes from one upload to the next unless the user needs to change one or more of the pieces of information entered in Steps 2-5 above.
The IKN Data Uploader Configuration window closes, and the IKN Data File Uploader window is displayed. The IKN Data File Uploader window is shown in Figure 20.

Figure 20: IKN Data File Uploader Window
C.2 Manually Submitting a File
User may also submit files manually using the IKN Client Tool. Users would use the following steps to manually submit a file.
If it is not already open, open the IKN Client Tool by choosing [Insure Kids Now -> IKN Data Submission Client] from the Start -> Programs menu. The IKN Data File Uploader window is displayed.
The previously-saved State and Program information are displayed, along with the name of the file to be uploaded. You can change them here, but the changes are not saved permanently to the tool’s configuration settings. To make the changes permanent, use the “Settings” option on the tool’s menu to re-open the IKN Data Uploader Configuration window.
Select a file to upload, if the user plans to upload something other than the already-specified file. If the file specified is not found, the tool displays an error message as shown in Figure 21.

Figure 21: "File Not Found" Error Message Box
(After
uploading a file, the tool automatically moves it to a folder named
“processedFiles” underneath the folder where the uploaded
file was located. The file name is also changed to include the date
and time that it was uploaded. This is a safeguard, intended to help
prevent accidental submission of the same file more than once.)
On the IKN Data File Uploader window, click the “Upload file” button to send the file. The tool displays a confirmation dialog, as shown in Figure 22, before actually transmitting the file. The user must click the "OK" button in the Confirmation Dialog box in order for the file to be uploaded. If the user wishes to stop the upload, then the user should select the "Cancel" button in the Confirmation Dialog Box.

Figure 22: Confirmation Dialog Box Displayed Before an Upload
When the upload is completed, the tool will display a message like the one shown on the status line of the IKN Data File Uploader window (Figure 23).
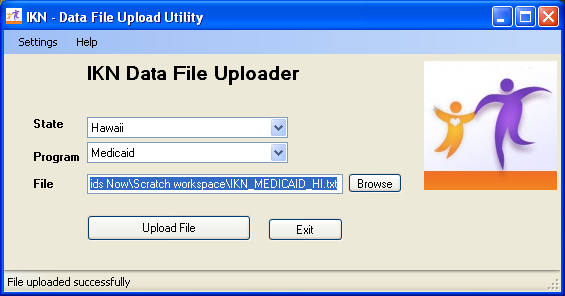
Figure 23: IKN Data File Uploader Window with Successful Upload Message
If the user is submitting more than one file (e.g., one file for each program or for a collection of health plans), repeat Steps 3 through 5 for each file being submitted.
When the user is finished, close the tool by clicking on the "Exit" button.
The IKN Client Tool will not work if a user's username, password, state, or program is incorrect in the IKN Upload Tool's system user data. If the entered username or password does not match what is on file in the upload system user data, the IKN Client Tool displays an Error window, which notes that authentication failed. This Error window is shown in Figure 24.

Figure 24: Error Window for Invalid Username or Password
Similarly, if the state and program type do not match the registration information, the IKN Client Tool displays an Error window, which indicates the user does not have privileges to upload files for the selected state and insurance program combination. This Error window is shown in .

Figure 25: Error Window for Invalid State and Insurance Program Combination
Use the “Settings” option on the IKN Data File Uploader window to open the IKN Data Uploader Configuration window, verify that the user has the correct information saved, and re-try the submission.
C.3 Submitting a File Automatically
Users may also configure the Windows Scheduler to automatically submit a file by using the following steps.
Create the file, ensuring that the name and location of the file match what is already stored in the IKN Client Tool configuration information.
Open the Windows Scheduler by clicking Start -> Settings -> Control Panel. Double-click on the Scheduled Tasks applet in the Control Panel top and start the process of creating a new task.
Double-click “Add Scheduled Task”, which starts the Scheduled Task Wizard. The starting screen of the Schedule Task Wizard is shown in Figure 26. Select the "Next" button.
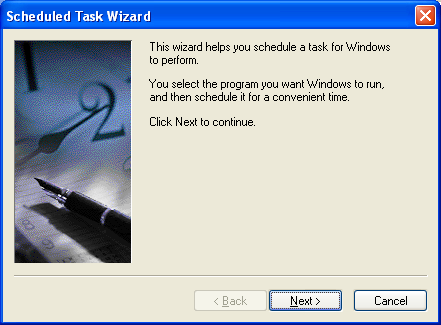
Figure 26: Schedule Task Wizard - Starting Screen
Click the “Browse” button and navigate to the folder where the data submission client is installed. By default, this is Program Files -> CMS -> IKN Data Uploader. Choose the file named "IKNClient.exe".
Enter a name for the task. "IKN Data Submission Client" is the suggested name. Choose the scheduling option that corresponds to the intended data generation and submission frequency. The Scheduled Task Wizard's task naming and frequency setting screen is shown in Figure 27.

Figure 27: Scheduled Task Wizard - Frequency Setting Screen
Set the time the data should be submitted and select whether the task will be performed every day, only on week days, or on every specified day (i.e., every 3 days). The user must also enter a start date for this task.
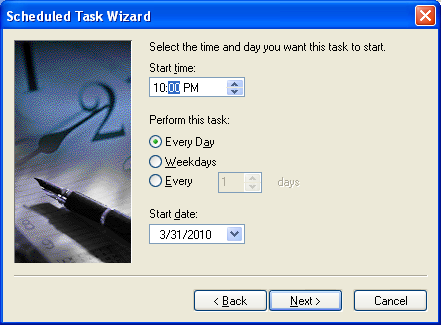
Figure 28: Scheduled Task Wizard - Time and Day Setting Screen
Enter the necessary user information to allow the job to run. This is your Windows user information for the computer on which the client is installed. Select the "Next" button to continue. Figure 29 shows the Scheduled Task Wizard's screen for entering the user's name and password. This name and password is not the same as the information entered for the IKN Client Tool in the user ID and password for the data submission.
NOTE: If the local system security policies require a periodic password change, it will be necessary to update this scheduled task at the same time or the scheduled task will not be able to run, and the data will not be submitted.
Please consider establishing a separate user account with a permanent password for the purposes of running the scheduled task. Consult with the organization’s network administrators for further guidance.
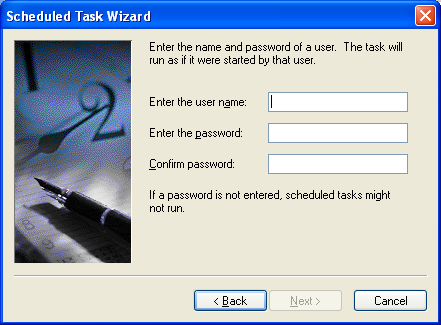
Figure 29: Scheduled Task Wizard - Enter Name and Password Screen
The Scheduled Task Wizard displays a summary of the scheduled job information after the user's credentials have been entered. Figure 30 shows the Schedule Task Wizard's summary screen. Click the checkbox to set the advanced properties of the task after selecting the "Finish" button.

Figure 30: Scheduled Task Wizard - Task Summary Screen
Users
must make a change to the default command line at this point.
In the “Run” box, add a space after the command line then add the word “yes”, also in double quotes. The final command line should look similar to the following:
"C:\Program Files\CMS\IKN Data Uploader\IKNClient.exe" "yes"
shows an example screen with this modified command line.
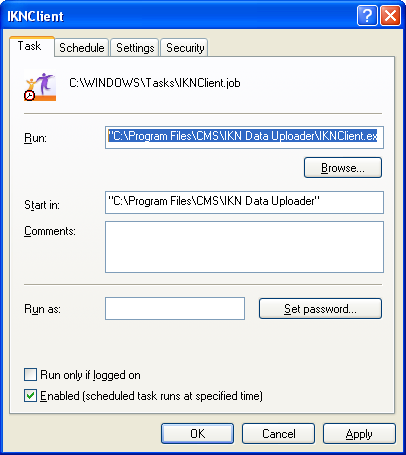
Figure 31: Sample of Modified Command Line on Advanced Properties Screen
Users
can also set other advanced properties for the task in this form, but
those are beyond the scope of this document.
C.4 Guidance for using a tool downloaded before May 21, 2012
All inbound communications to HRSA networks must use Secure Socket Layers (SSL). As of May 21, 2012, the IKN Client Tool connections changed to comply with this policy.
If the user submits through the IKN Data Management Website and does not use the IKN Client Tool, then the user does not need to make any changes.
If the user downloaded a version of the IKN Client Tool after May 21, 2012, then the user will not need to follow the steps below. However, if you downloaded a version of the IKN Client Tool before May 21, 2012, then the user must reconfigure the IKN Client Tool as described in the following steps.
1. Figure 32 shows the default installation location of the tool on Windows XP: c:\Program files\CMS\IKN Data Uploader.
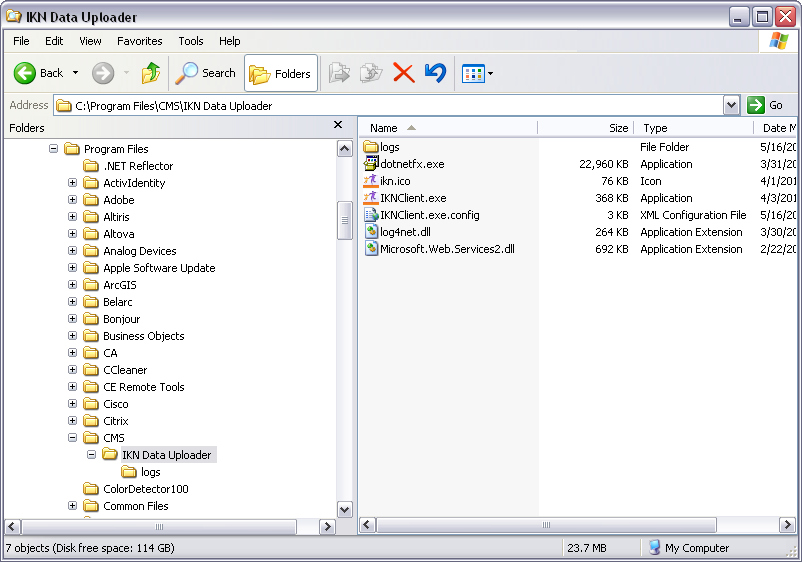
Figure 32: IKN Client Tool Installation Location (Windows XP)
Under this folder, there is a file named IKNClient.exe.config. Use a text editor, such as the Notepad, to open this configuration file. To open the configuration file with Notepad, right click on the file name and choose Notepad from the context menu as shown in Figure 33.
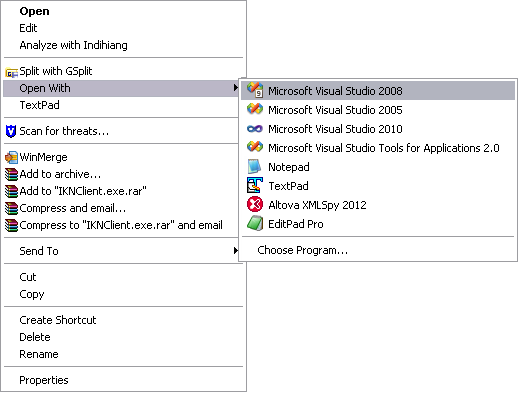
Figure 33: Opening the IKN Client Tool Configuration File with Notepad
2. Once opened, look for the following text:
<add key="URL" value="http://ikndata.insurekidsnow.gov/eis_v2/ikneis/GisWs.asmx"/>
3. Change http://ikndata.insurekidsnow.gov/eis_v2/ikneis/GisWs.asmx to
https://ikndata.insurekidsnow.gov/eis_v2/ikneis/GisWs.asmx.
4. Save the file and close Notepad.
After completing the above steps in Notepad, the user should test the IKN Client Tool by starting the IKN Client Tool and verifying that the tool is now using a Secure Socket Layer (SSL) connection.
APPENDIX D: Technical Reference for Creating a Custom Upload Client
This appendix provides the technical information needed to design a data submission client tool, if the user does not want to use the tool described in Appendix C. This is a guide for technical personnel with at least intermediate computer programming skills and knowledge of web services (i.e., “service oriented architecture”). It is not a teaching tool or a detailed “how-to” guide. The user must also adjust the pseudo code for the development environment. The information is provided in C-Sharp/Microsoft .NET format in the examples contained in the following steps.
Create the proxy by adding the Web reference to the Web service wsdl:
Location of the Web service: http://IKNData.insurekidsnow.gov/EIS_V2/IKNEIS/Gisws.asmx?wsdl
Opening this address with a Web browser will publish the service’s capabilities and service schema.
The service exposes a Web method, Execute, which takes XMLNode as a parameter and returns the XMLNode as a response.
The following is the XML input schema for the service:
<!--Input Schema for IKN file uploads-->
<IKN version="1.0">
<header authMode="user">
<token></token>
<!--SHA1 hash (username(lowercase)*password(hashed)*timestamp) -->
<timestamp></timestamp>
<!--Time Stamp-->
<user name="" />
<!--IKN UserName-->
</header>
<!--Add Input here-->
<uploads>
<upload>
<files>
<file id="" name="">
<!--id:UniqueIdentifier, name:name of the file-->
<lastModifiedDate></lastModifiedDate>
<!--Last Modified date of file-->
<state code=""/>
<!--State Code (LookupState)-->
<insuranceProgram code="" />
<!--insuranceProgram (LookupInsuranceProgram)-->
<action>new</action>
</file>
</files>
</upload>
</uploads>
</IKN>
<!--The maximum allowed size of the file will be :20 MB-->
<!--The allowed Extension is .txt-->
The schema contains two elements: Header and Schema.
The Header element encapsulates authentication information. Additional information can be exchanged in future via this element. Details of the authentication mechanism will be available in the design document.
Header constitutes the nodes and attributes contained in Table 6.
Table 6 - Header Nodes and Attributes
-
Element/Attribute
Purpose
Associated Element
authMode
Type of authentication. For IKN it should be ‘user’
header
name
UserName
user
token
Hash of
Username(Lower)*PassWord*timestamp(lower) using the SHA1 algorithm and converting to HEX decimal value
token
The following pseudo code may be used to construct the Header:
using System;
using System.Data;
using System.Configuration;
using System.Collections;
using System.Web;
using System.Text;
using System.Web.Security;
using System.Security.Cryptography;
using System.Web.UI;
using System.Web.UI.WebControls;
using System.Web.UI.WebControls.WebParts;
using System.Web.UI.HtmlControls;
using System.Security;
using Microsoft.Web.Services2.Attachments;
private string GenerateUserAuthenticationHeader()
{
string userName;
string password = "";
string hashValue;
string strHeader = "";
DateTime date;
userName = ConfigurationManager.AppSettings["UserName"];
password = ConfigurationManager.AppSettings["PassWord"]
password = GetHash(password);
date = DateTime.Now;
hashValue = GetHash(userName.ToLower() + "*" + password + "*" + date.ToString().ToLower());
strHeader = ("<IKN version='1.0'><header authMode='user'><token>" + hashValue + "</token><timestamp>"+ date.ToString()+"</timestamp><user name='" + userName + "'/></header><!--Add Input here--></IKN>");
return strHeader.ToString();
}
private string GetHash(string source)
{
HashAlgorithm hashProvider = new SHA1Managed();
byte[] bytHash;
byte[] bytIn = Encoding.GetEncoding(1252).GetBytes(source);
bytHash = hashProvider.ComputeHash(bytIn);
string hex = BitConverter.ToString(bytHash);
return hex.Replace("-", "");
}
Create uploads XML node as per the input schema with values. Combine with header node to form complete input schema xml.
Add the attachments to Web service using WSE 2.0. WSE 2.0 can be downloaded at
The following pseudo code may be used for adding the attachments using WSE 2.0:
Attachment attachment = null;
if (File1.PostedFile.FileName != "")
{
attachment = new Attachment(File1.PostedFile.ContentType, File1.PostedFile.InputStream);
attachment.Id = "215B4D7F-2456-4289-844F-6BC4DBFD8562";
objGISWSProxy.RequestSoapContext.Attachments.Add(attachment);
}
Note: The attachment ID should match
with file ID in the input schema. This should be UIID.
Errors related to individual requests will be communicated back to the calling system using the following structure:
<GEMS version="1.0">
<header>
<!--required-->
<token></token>
<timestamp></timestamp>
<system id=""/>
<request id="" />
</header>
<applications>
<application>
<action>getAll</action>
<err id="" action="getAll"/>
<warning id="" action="getAll"/>
</application>
</applications>
<errMsgs>
<errMsg id="1">
<time></time>
<comment>Required parameter was not passed</comment>
<errCodes>
<errCode id=""></errCode>
</errCodes>
</errMsg>
</errMsgs>
</GEMS>
The above example shows the error message returned when the client system does not pass an application ID, a required parameter, as a part of the request. An error identifier is embedded in the parent of the <action> element. Using the error identifier, the client system can retrieve and utilize the error details for display or logging purposes. Table 7 contains a list of error codes associated with the IKN Submission schema.
Table 7 - Error Codes Associated with the IKN Submission Schema
-
Error Code
Message
2001
File id is Invalid/Missing
2002
Filename is missing
2003
Invalid/Missing Insurance Program Code
2004
Invalid/Missing State Code
2005
Invalid/Missing Last Modified date
2006
Only text files can be uploaded.
2007
The maximum file size allowed is 20 MB.
2008
Attachments not Found.
2009
User does not have privileges to upload files for the State and Insurance Program combination.
1000
Action Tag Missing Error
IKN Error message Sample:
<errMsgs>
<errMsg id="1">
<time>3/29/2010 5:51:43 PM</time>
<comment>Please refer to the underlying error messages.</comment>
<errCodes>
<errCode id="2003">Invalid/Missing Insurance Program Code.</errCode>
<errCode id="2004">Invalid/Missing State Code.</errCode>
<errCode id="2009">User does not have privileges to upload files for the State and Insurance Program combination.</errCode>
<errCode id="2008">Attachmnets not Found.</errCode>
</errCodes>
</errMsg>
</errMsgs>
When the upload is successful, it returns the file id and name for reference:
<uploads>
<upload>
<files>
<file id="215B4D7F-2456-4289-844F-6BC4DBFD8562" name="test.txt">
</file>
</files>
</upload>
</uploads>
1 A qualified oral health provider is one who provides dental services to children enrolled in the State plan (or waiver) under Medicaid or the State child health plan (or waiver) under the CHIP.
2 The client tool currently runs on computers running Microsoft Windows XP or later, or Windows Server 2003 or later.
3 At this time, the IKN Client Tool has been developed using the Microsoft .NET platform. If the user’s organization uses something other than Windows, they will not be able to use this version of the tool.
| File Type | application/vnd.openxmlformats-officedocument.wordprocessingml.document |
| File Title | Insure Kids Now |
| Subject | Provider Data Submission Technical Information |
| Author | Art Narro |
| File Modified | 0000-00-00 |
| File Created | 2021-01-26 |
© 2026 OMB.report | Privacy Policy

