HRSA TRIP User Guide_v4
HRSA TRIP User Guide_v4.docx
BHPr Performance Report for Grants and Cooperative Agreements
HRSA TRIP User Guide_v4.docx
OMB: 0915-0061
B![]() ureau
of Health Workforce
ureau
of Health Workforce
HRSA Trainee Information Portal (TRIP) User Guide
Table of Contents
1.HRSA Trainee Information Portal (TRIP) (Overview) 5
2.1.1 Access the EHBs Home Page 6
2.1.2 Navigate to the Grants Folder 6
1. Training program is not active in EHBs 43
2. Training program is not linked to an active training program 43
3. Forms are submitted in EHBs 43
3.Frequently Asked Questions (FAQs) 43
TRIP Fields and Descriptions 44
Table of Figures
Figure 6. Start Program Button 10
Figure 7. Start Program – Page 1 10
Figure 8. Start Program – Page 2 11
Figure 9. Download Template Button 13
Figure 10. Template – Enable Macros 14
Figure 11. Template – Macros Enabled 14
Figure 12. Upload Data Button 16
Figure 16. Edit Profiles – Home Page 19
Figure 18. Edit Profiles – Training Program Card 21
Figure 19. Edit Profiles – Manage Program 22
Figure 21. Edit – Select Trainee 25
Figure 23. Trainee Program Data Form 26
Figure 24. Trainee Profile Form 27
Figure 25. Post Completion Plans Form 28
Figure 26. Edit Form Errors 29
Figure 29. Manage Program – Add Trainees Button 33
Figure 31. Add Trainee Error 34
Figure 32. Manage Program – Select Action Dropdown 35
Figure 33. Delete Response Button 35
Figure 34. Delete Response Modal 36
Figure 35. Delete Program Button 37
Figure 36. Delete Program Modal 38
Figure 37. Link Program Button 39
Figure 38. Link Program Modal 39
1.HRSA Trainee Information Portal (TRIP) (Overview)
The HRSA Trainee Information Portal (TRIP) is used to collect, manage, and submit data related to trainees in training programs funded by the Children’s Hospitals Graduate Medical Education (CHGME) grant program. Hospitals will utilize TRIP as their data collection application to ease the process of reporting key information currently within the IND-GEN and IND-GEN PY forms that exist today in the Electronic Handbooks (EHBs) application.
TRIP provides users with the ability to perform the following tasks:
- Log in using existing EHBS credentials
- View dashboard of key statistics and dates
- Start programs for data collection
- Bulk upload data into portal
- Edit data within portal
- Perform program management tasks, such as adding trainees, deleting responses, and deleting programs
- Import data into the EHBs
-
Export
data saved in the portal from prior years
Roles: Although EHBs currently offers role-based user accounts, TRIP has the same role for each user. All users for a given hospital or organization may collect and edit data for the entire organization.
2.How to Use TRIP
2.1 Log In
TRIP is designed to work with the existing EHBS credentials for all grantees within the CHGME program. In order to log in, users will follow the steps outlined below:
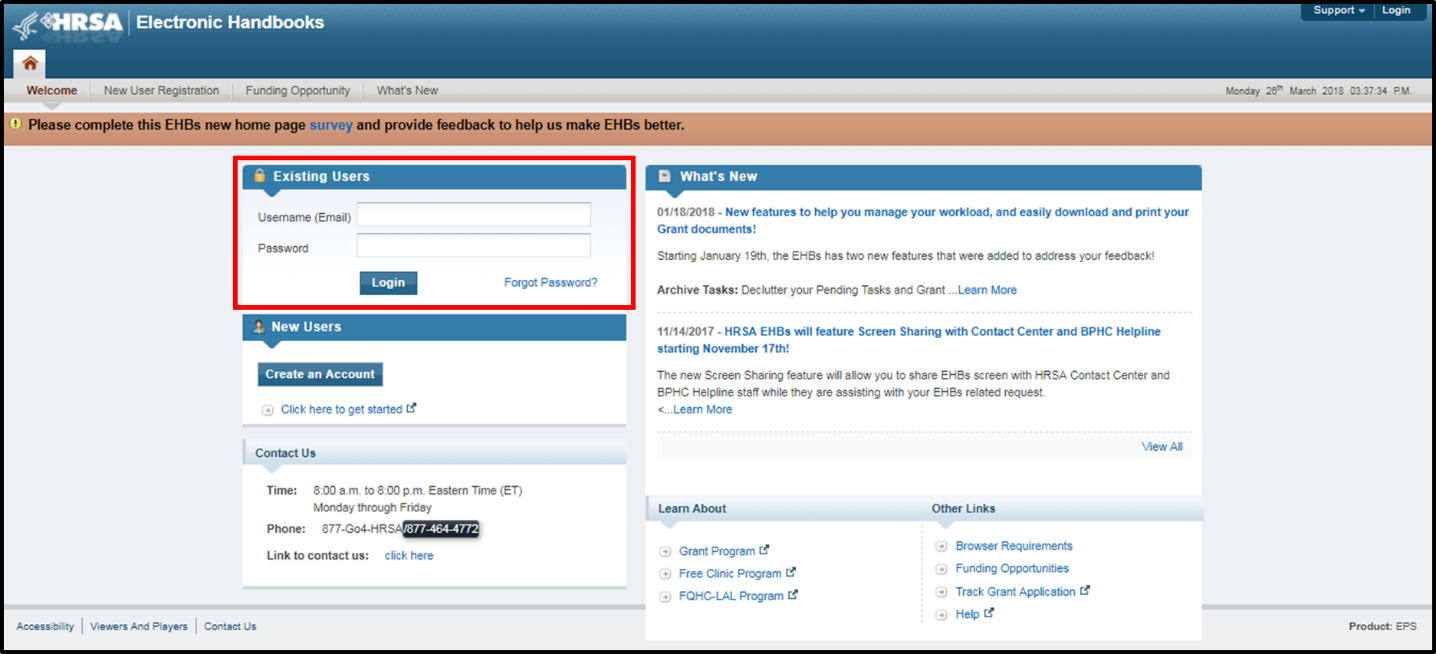
The EHBS home page can be accessed via the following link: https://grants.hrsa.gov/grantee. Users will enter their existing EHBs username and password to log in, as depicted in the below image.
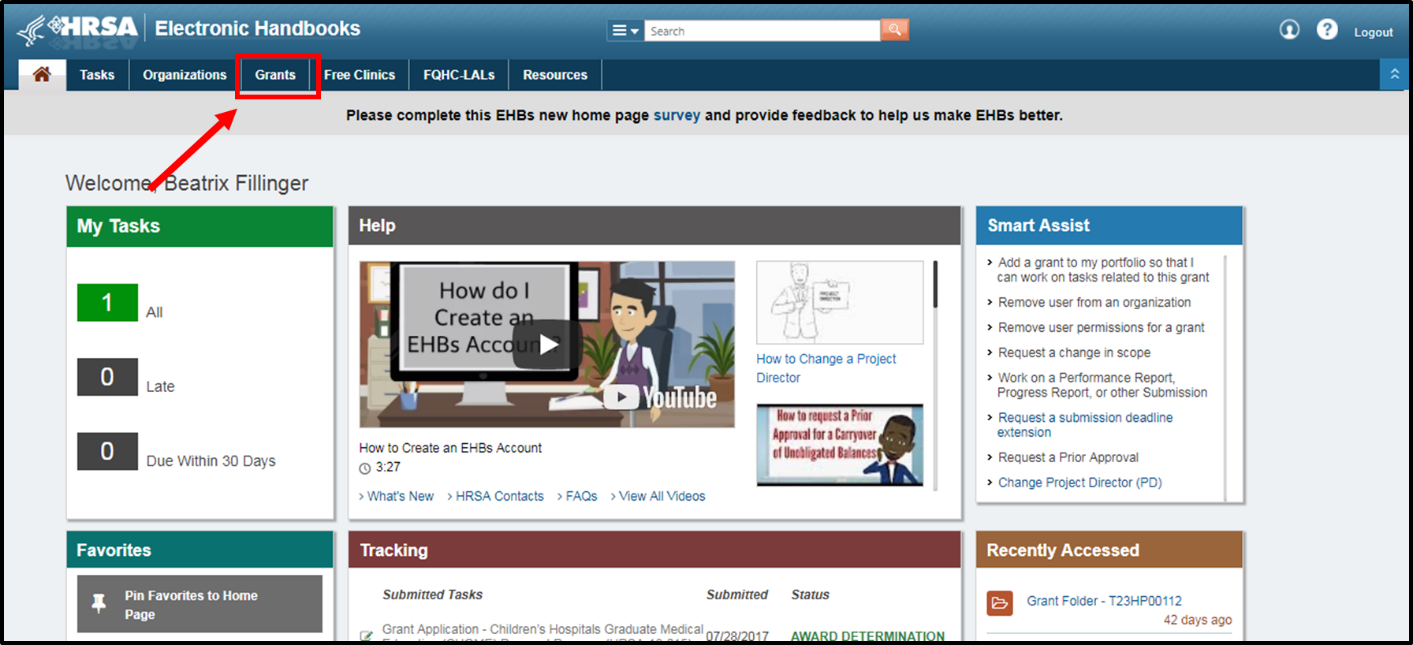
Select the ‘Grants’ tab as identified in the below image.
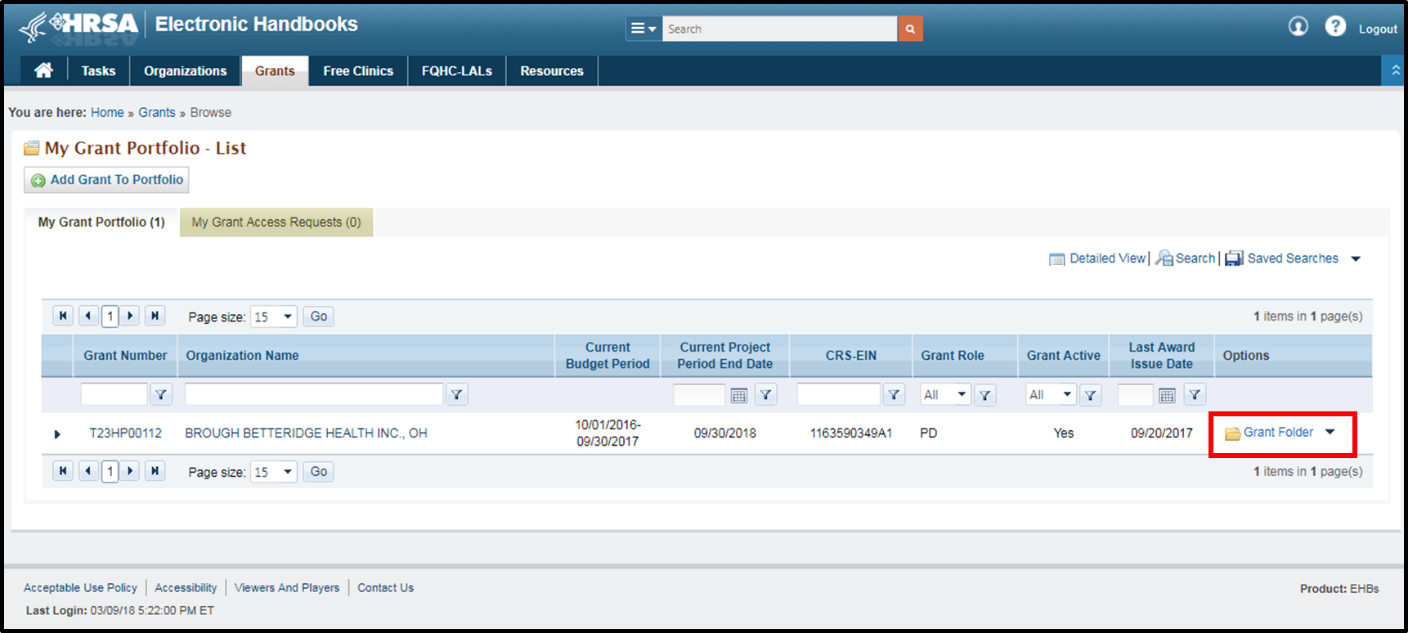
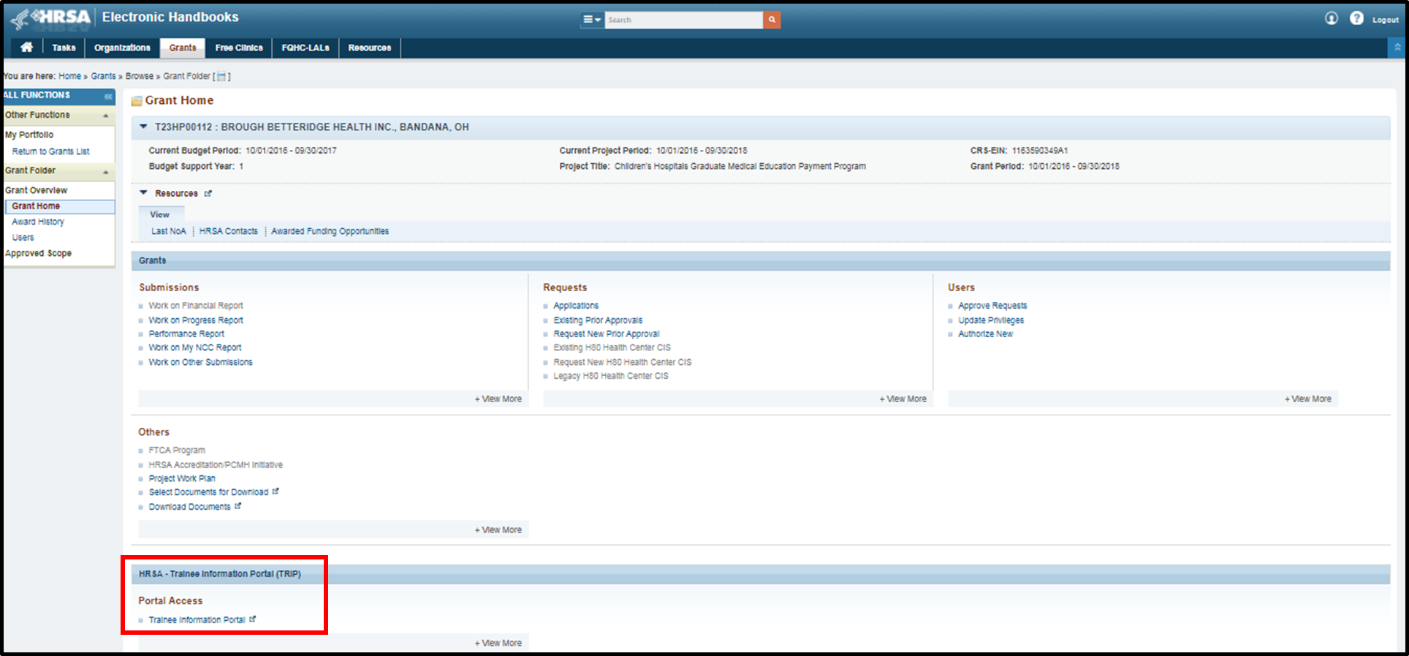
Once on this page, locate the correct grant for the CHGME program, identified by the “T23” Heading. Select the ‘Grant Folder’ link within the table.
Scroll down the page to locate the link titled “HRSA – Trainee Information Portal (TRIP)”. Select the link to open the portal.
2.2 Home Page
The home page of the portal contains key information and links to important functionality. Users can start training programs, manage or edit specific programs, access the upload and download functionality, and submit data to EHBs. A dashboard is available in the bottom right corner to display the number of complete FTE, open training programs, and days until the closure of submission from TRIP to EHB. At any point, users may return to the home page by selecting the top left logo.
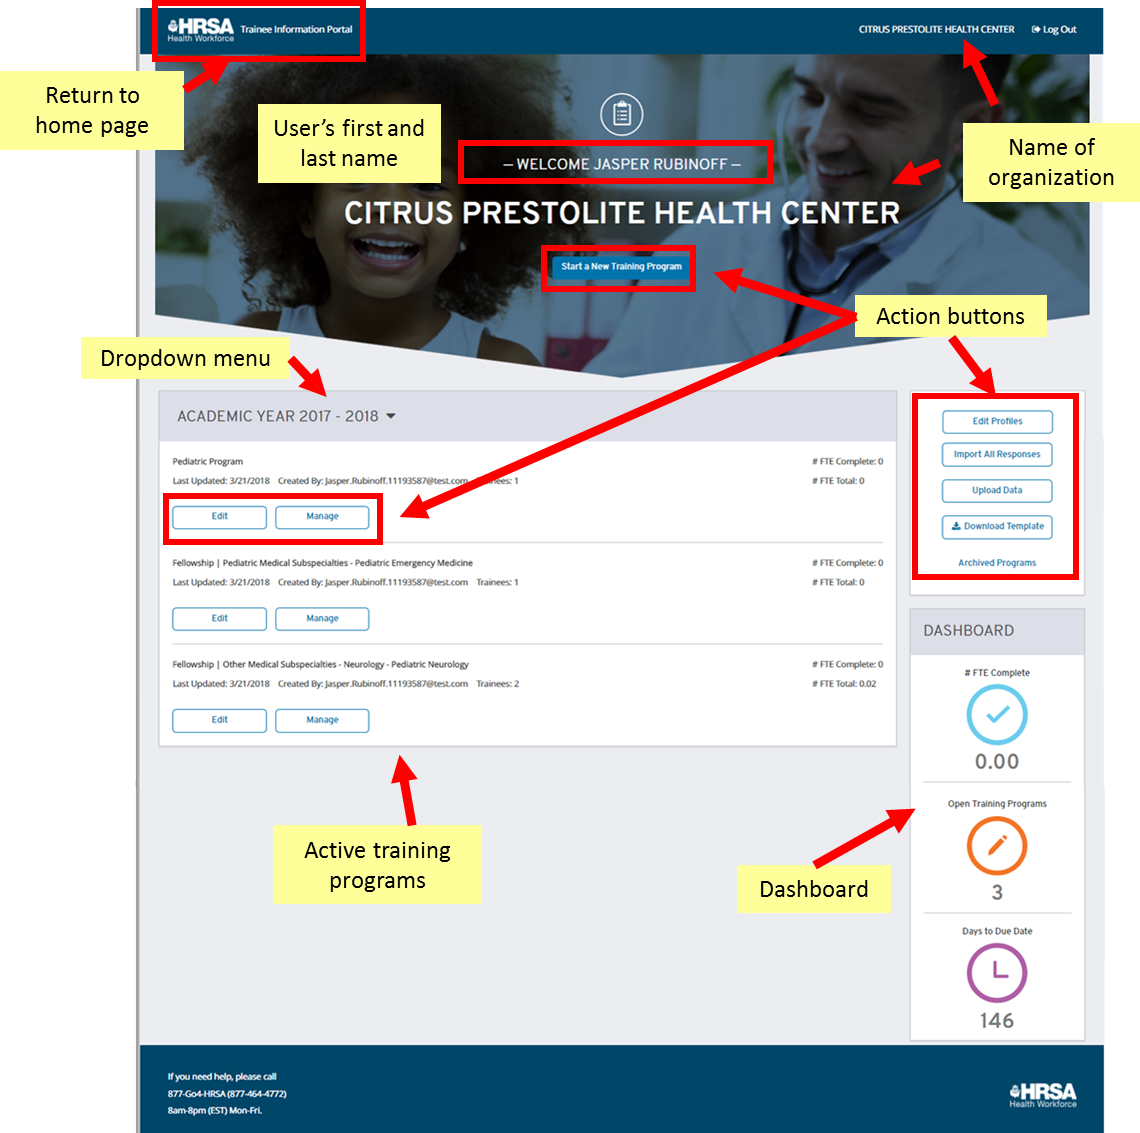
The home page includes a dropdown for the academic year, as displayed above. TRIP allows users to collect data for multiple academic years. Though the dates for these collection periods may change over the next several years, TRIP will be available for collecting the 2017-2018 reporting period data from May 1st, 2018 through August 10th, 2018. The 2018-2019 reporting period data may be collected in TRIP from July 1st, 2018 through July 21st, 2019. From July 1st, 2018 to August 10th, 2018, users will be able to collect data for both the 2017-2018 academic year as well as the 2018-2019 academic year. During this time period, the dropdown menu for academic year will display both years; users may switch between the two options to view and edit data associated with that academic year.
2.3 Start Program
Users must start a training program within TRIP prior to collecting data for the given training program in a selected academic year. This process will enable users to select an academic year, provide details, and add new trainee records to the training program.
To start a training program, select the “Start a Training Program” button from the home page as displayed below.
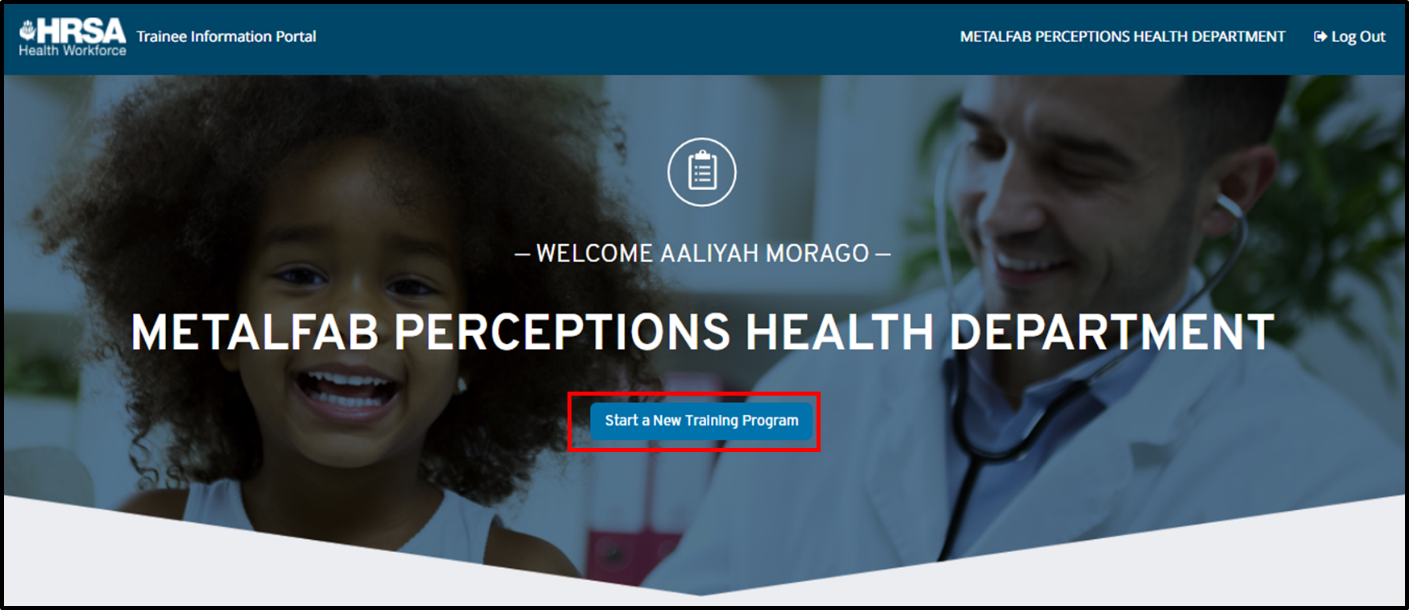
Figure 6. Start Program Button
This leads you into a two-step process to start the program, the first of which is shown below.
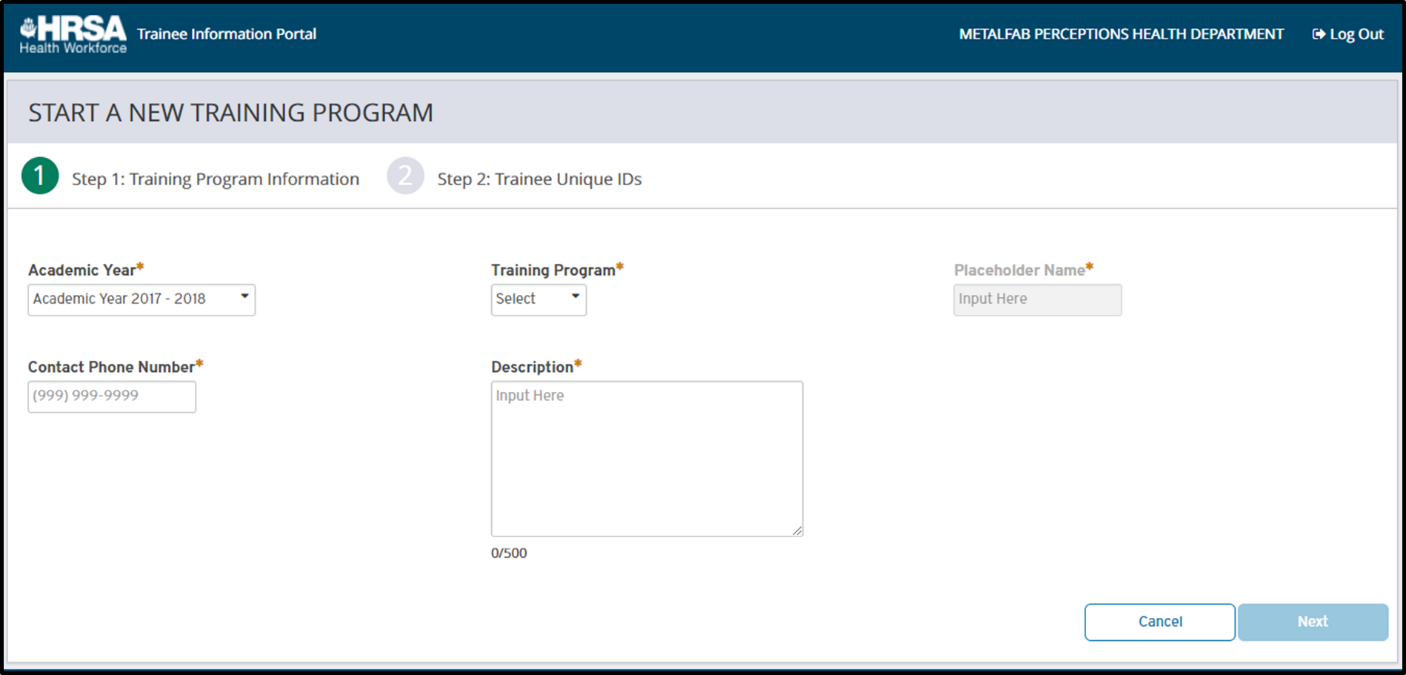
Figure 7. Start Program – Page 1
In the first step of this process, the user must enter the following fields:
1. Academic Year |
Select the academic year pertaining to the program that you would like to collect data for. Users may start training programs during the TRIP reporting period for the academic year; during the beginning and end of each academic year, there will be overlapping reporting periods during which time users will be able to start training programs for either academic year. This will be reflected in the dropdown menu when the functionality is available.
|
2. Training Program |
This is a list of all of the training programs that are active in EHBs for the current year, as well as the training programs that were active in EHBs for the previous year. If you are starting a new training program that is not currently in EHBs, you may select the value “Program Not Listed” and enter in a placeholder name in the next field. Please refer to the relevant section in the EHBs training manual for further instructions on setting up training programs in EHBs.
|
3. Placeholder Name |
For programs that are not listed in EHBs, users must enter in a placeholder name to identify the program. This must be linked to an EHBs program prior to data submission; refer to the ‘Link Program’ section below for additional detail. |
|
|
4. Contact Phone Number |
This is the phone number that will be displayed on the survey for trainees needing assistance; we recommend that you enter in an appropriate phone number for the relevant training program.
|
5. Description |
Users may enter in a brief description to further identify the training program and add context for other organization users. This will be displayed on the program management page. |
By selecting ‘Cancel’, users will return to the home page; to continue with starting the program, users may select “Next”. This will bring them to the following screen:
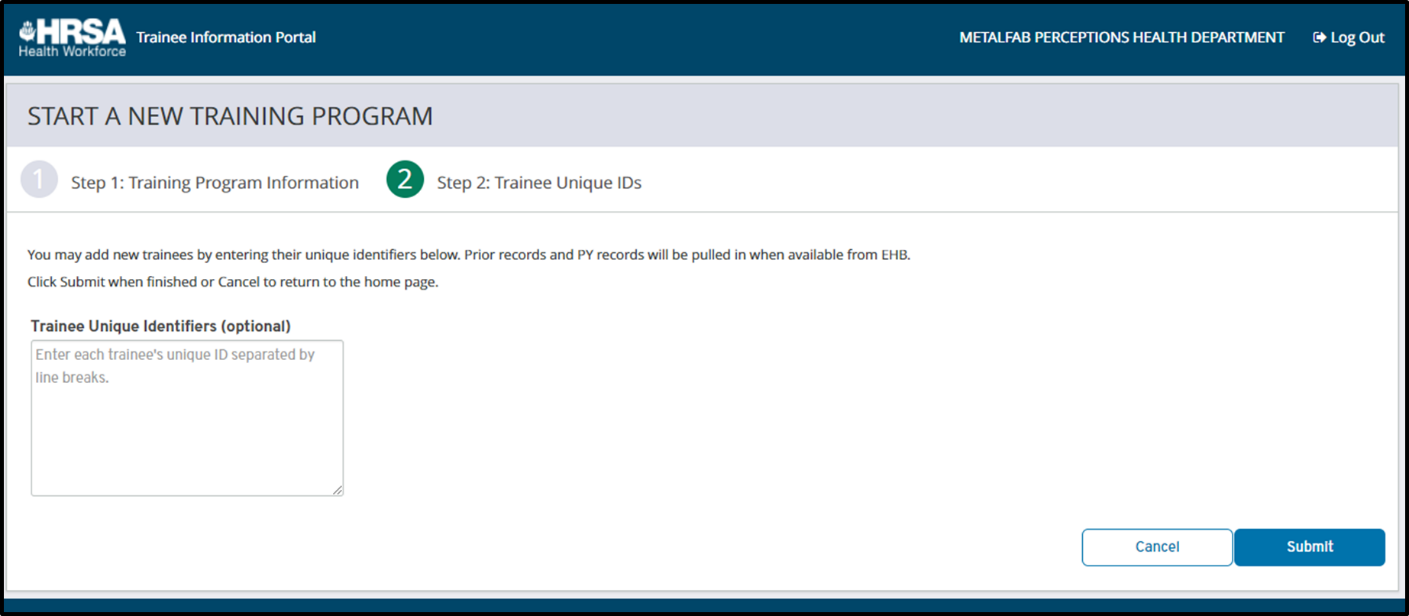
Figure 8. Start Program – Page 2
The second step allows users to add new trainees, if applicable. Trainees should be added by unique ID meeting the format as established by EHBs (seven alphanumeric characters). Users may also skip this step if they do not wish to add any new trainees at this time. To complete the program creation, users must select the “Submit” button.
At this time, users will be notified if they are trying to add any duplicate records. These are unique IDs that were reported on the previous year’s IND-GEN form that will be brought in automatically when available from EHBs. Users will be notified of this and the duplicate record will not be added. The user is then brought to the program management page, further detailed below.
2.4 Download Template
TRIP allows grantees the capability of downloading a template for offline data collection that can later be uploaded into the portal for the purposes of bulk creating/updating trainee records. This template is accessible via the TRIP home page. From the home page, users should ensure that they have selected the appropriate academic year for their template, as it will be populated with their training programs for the given year.
Once the academic year has been selected, users may select the “Download Template” link from the panel on the right of the home page.
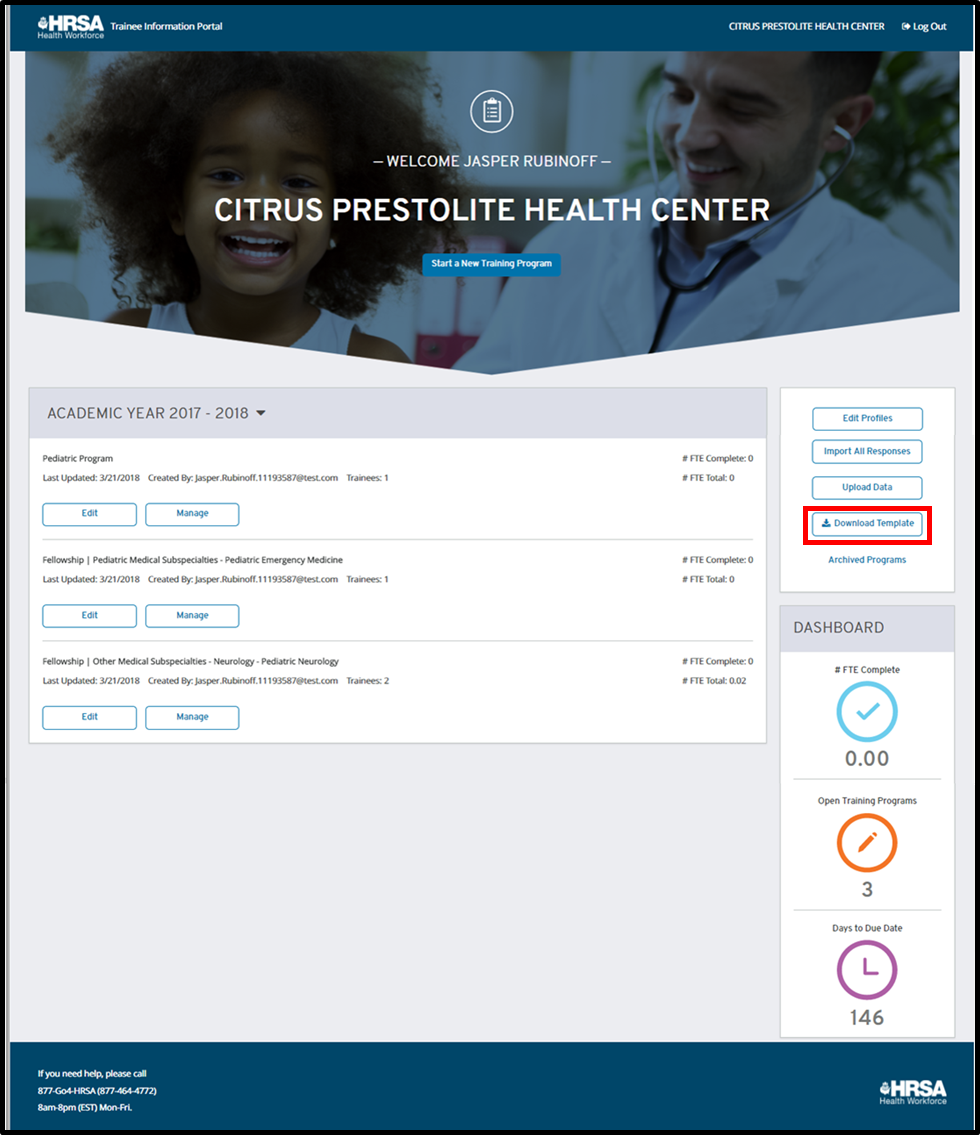
Figure 9. Download Template Button
The template will then download to the individual’s computer. If you are having trouble accessing the downloaded file, please contact your computer administrator as it may be due to security restrictions on your Internet settings. Please note that macros must be enabled in order to use the template with the required validations. In order to do this, select the “Enable Macros” button as called out in the following screenshot.
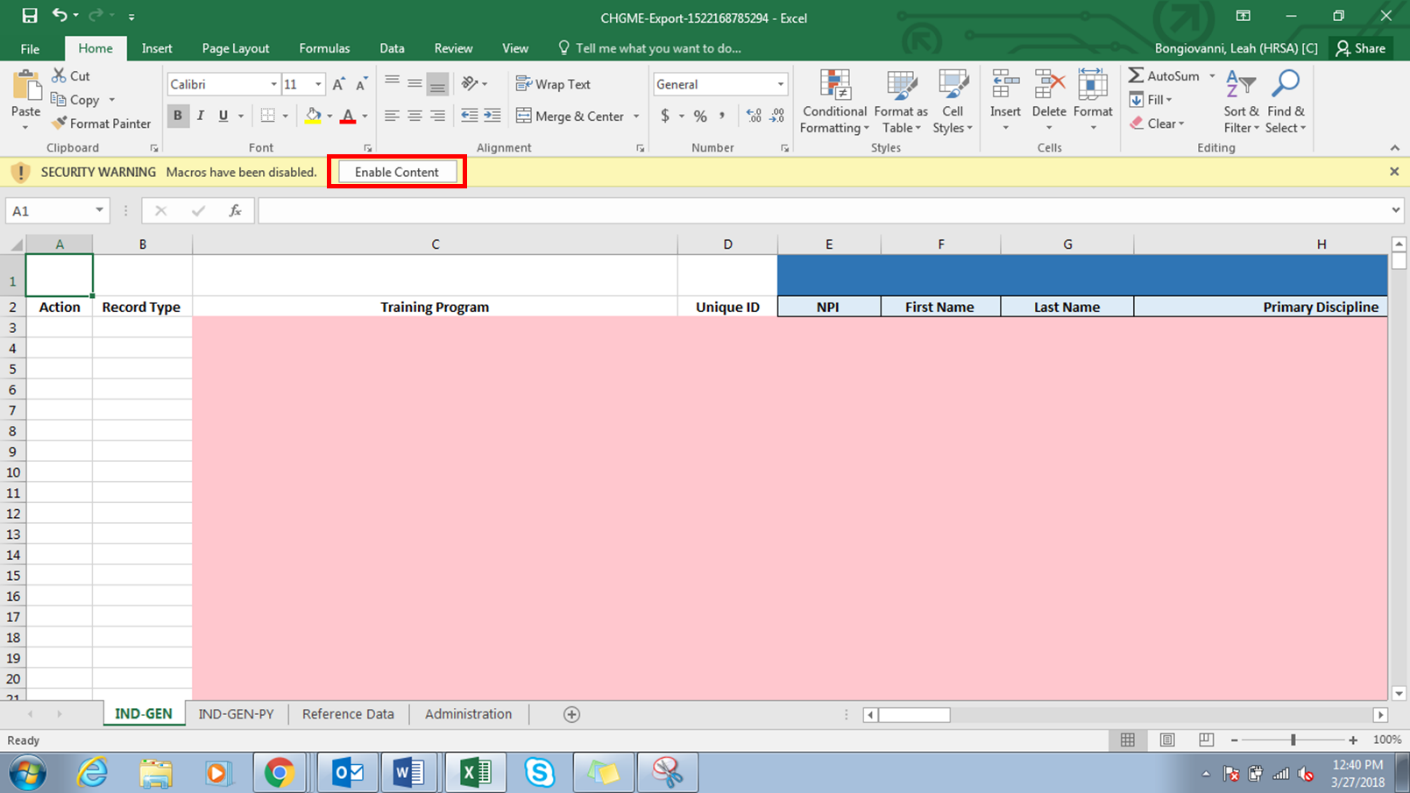
Figure 10. Template – Enable Macros
Once the macros are enabled, the Excel should resemble the image shown below:
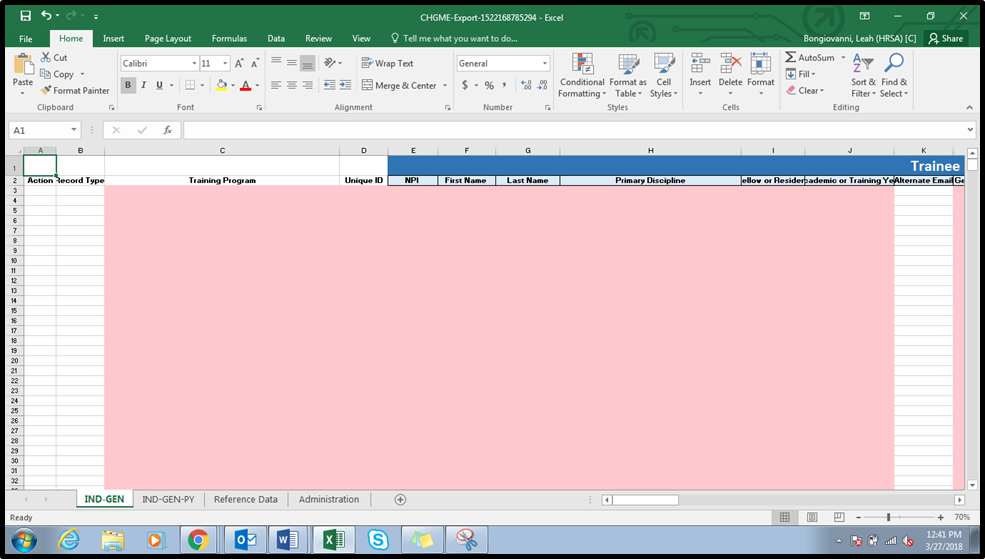
Figure 11. Template – Macros Enabled
2.5 Upload Data
A user may upload data for a given academic year once the training programs have been started within TRIP; please note that a user must start the training programs prior to uploading data, or the trainee record(s) will not be successfully uploaded. The upload can be performed as many times as necessary to add, delete, or modify data. This data upload can include:
A full data set of all trainees and all data
A partial data set of any trainees (i.e. full trainee data for a given training program)
A partial data set of any trainee data (i.e. trainee unique IDs and emails for the organization)
Once the template has been populated with this data and the user is ready to bulk upload/update trainee records in TRIP, the user should visit the “Upload” page by selecting “Upload Data” on the home page as shown below:
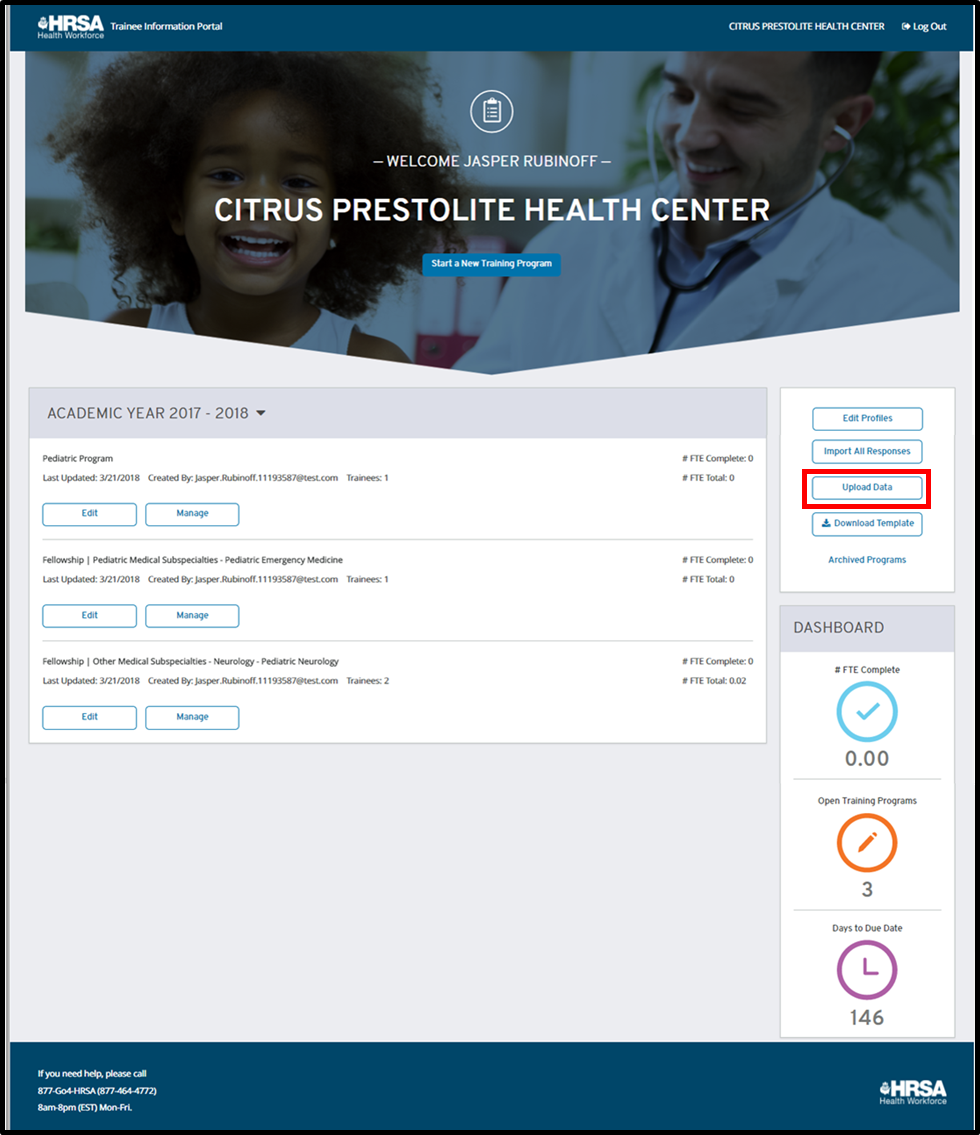
From here, the user may select the “Browse” button and browse for a file from their computer. Please note that this file must be the template provided via TRIP; if it is not, the system will reject the file altogether.
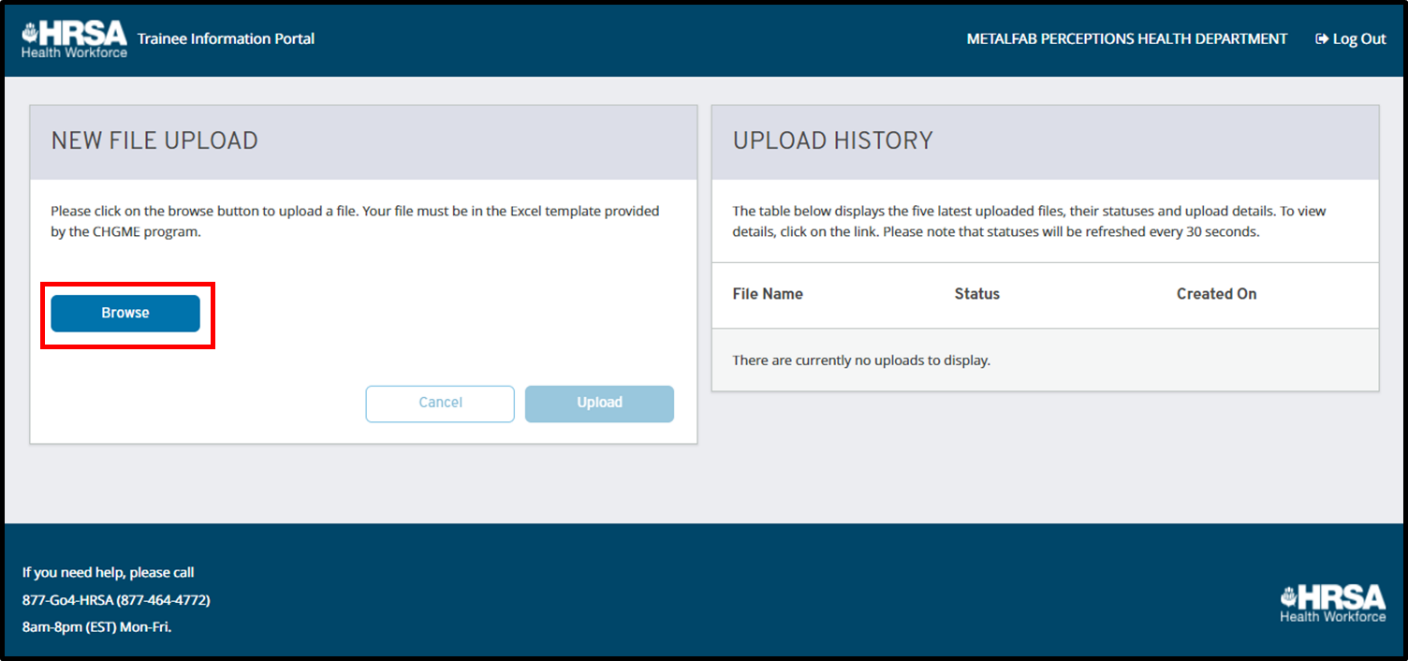
Once the user has chosen a file, they may then select the “Upload” button. This will send the file into the processing queue and it will be displayed in the “Upload History” section on the right hand side of the page, as shown below.
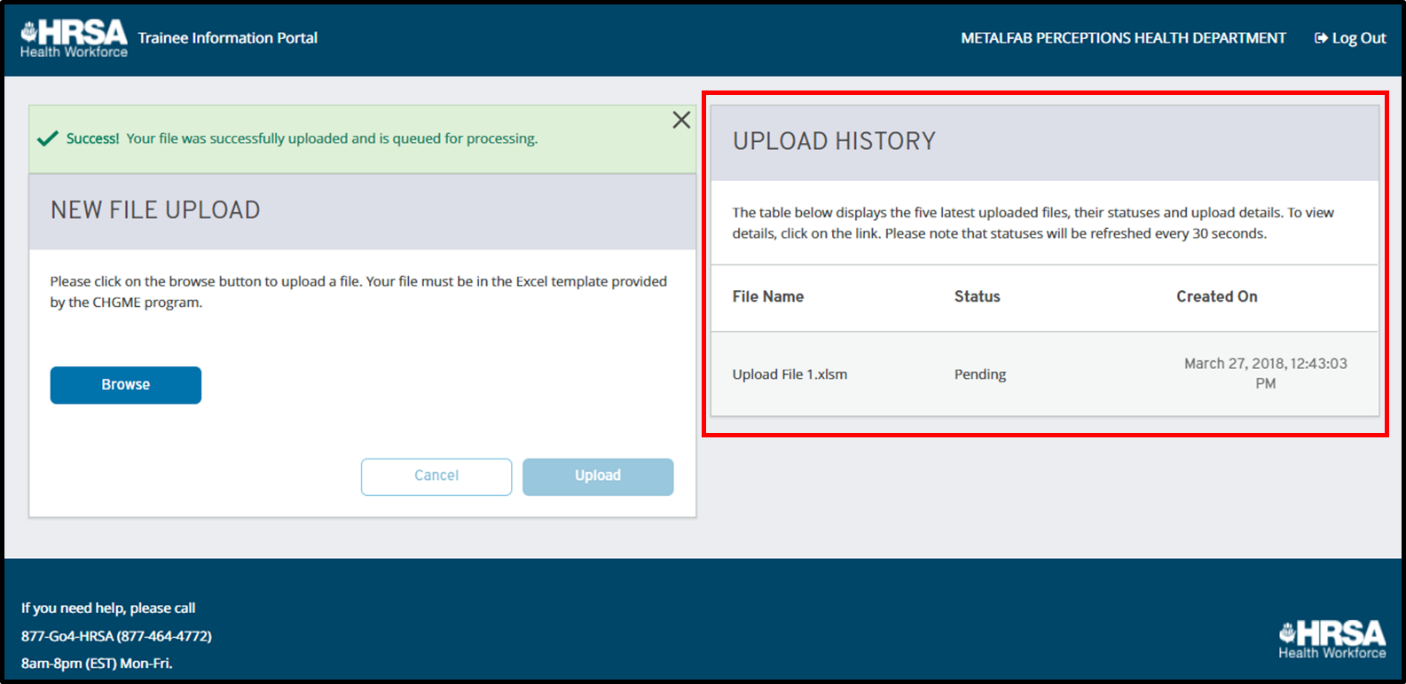
The file will remain in ‘Pending’ status until it has completed processing. Once the file has completed processing, it will be updated with one of three statuses:
Complete: this means the file and the data contained within were all uploaded successfully.
Complete with Errors: this means that the file contained some validation errors and not all rows were successfully uploaded.
Error Processing File: For some reason, the file was unable to upload at this time. The user may try to re-upload the file for a different result.
To display more detail, select the date/time stamp for the relevant file and additional details will be populated in the “Report Detail” section as displayed below.
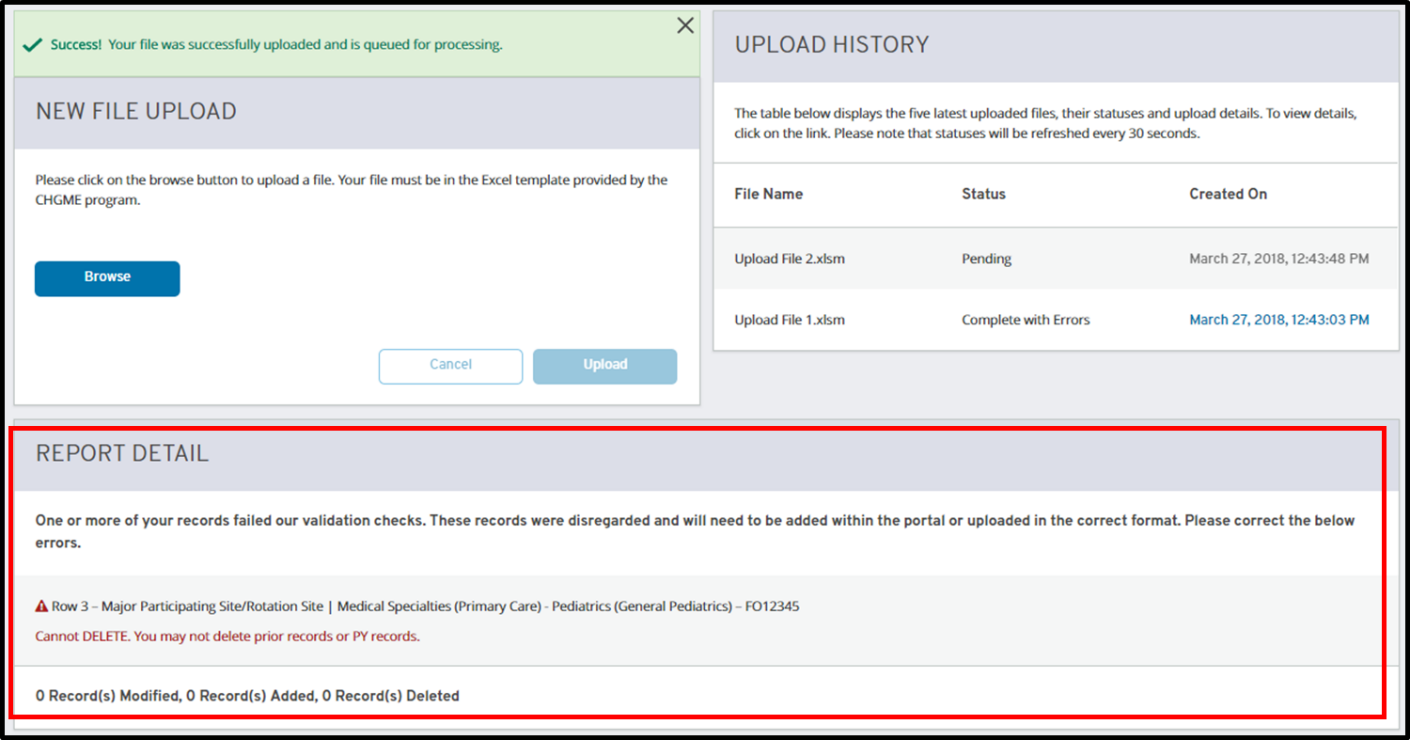
The “Report Detail” will contain additional information for the statuses ‘Complete’ and ‘Complete with Errors’:
Complete: the number of added, modified, and deleted trainees will be displayed.
Complete with Errors: the number of added, modified, and deleted trainees will be displayed. Additionally, the section will detail the validation errors encountered during the upload. For each error, the following will be shown:
Row number: identifying the number of the row in the Excel document where the validation error occurred
Training program: indicates the training program for the record with an error
Unique ID: indicates the unique ID for the record with an error
Field: the field for which the validation error occurred
Error message: the reason why the field was rejected
For all rows with errors, the entire record is ignored and
not updated. Users must correct the fields within the original
upload file or a new upload file and re-upload in order to view
updated information for the entire record.
2.6 Edit Data
Once you have added trainees via upload and/or starting a program, you may begin to edit their IND-GEN or IND-GEN PY data. You may begin editing via three paths in TRIP:
Via the home page: select “Edit Profiles” from the right panel to begin editing.
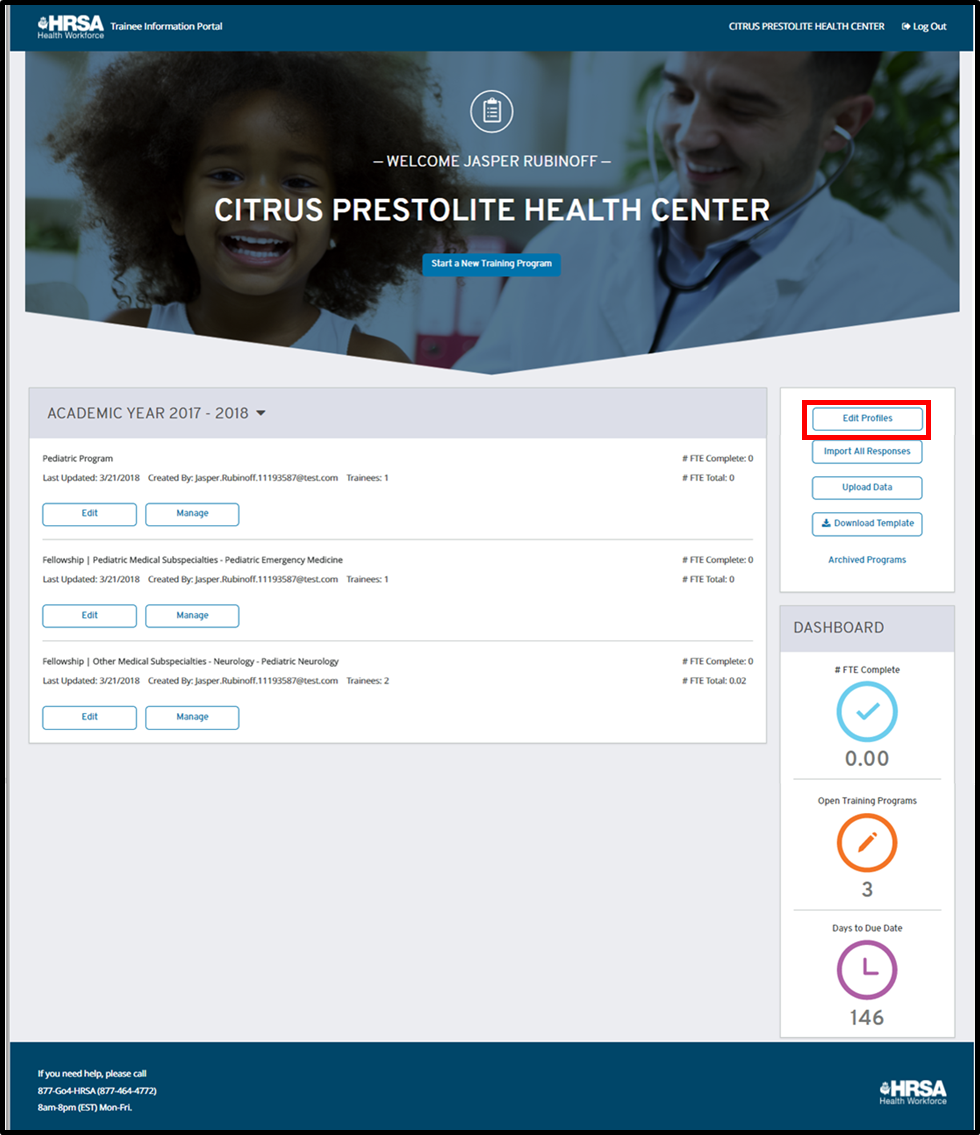
Figure 16. Edit Profiles – Home Page
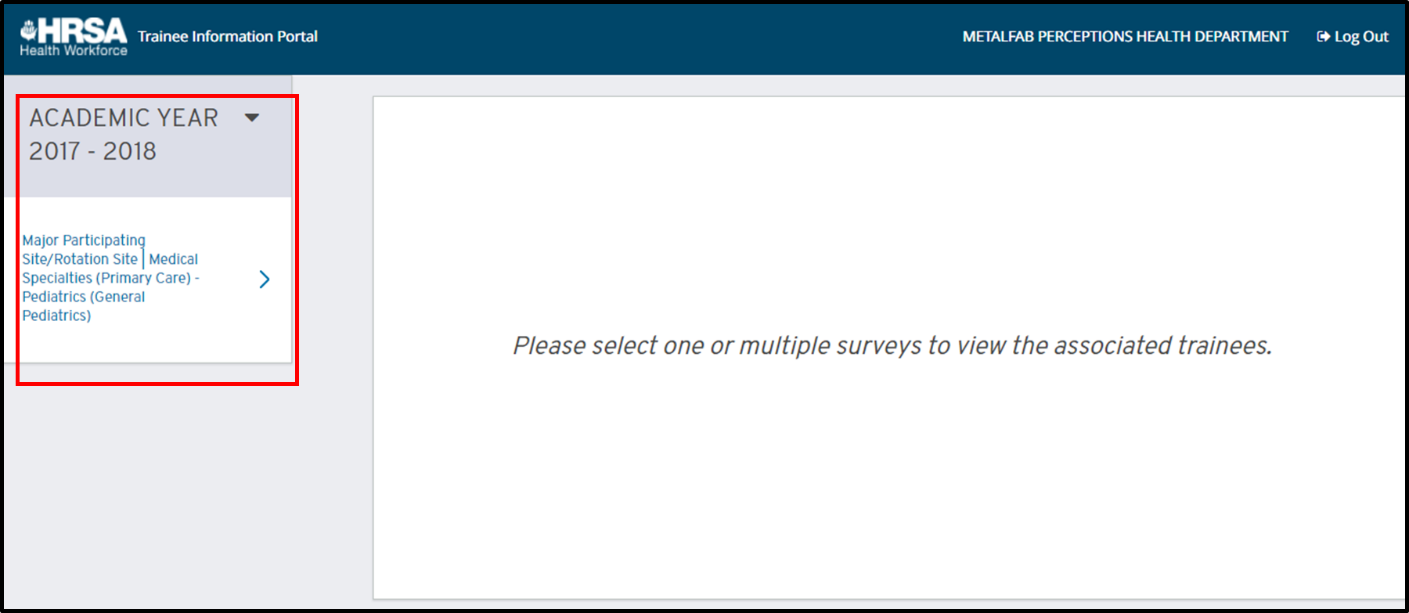
Once you have arrived at the edit page (shown below), select
the training program that you would like to edit from the left panel
to view associated responses.
Via the home page: locate the training program that you wish to edit and select “Edit” as shown below. This will bring you to the “Edit” screen with the selected training program already opened for editing.
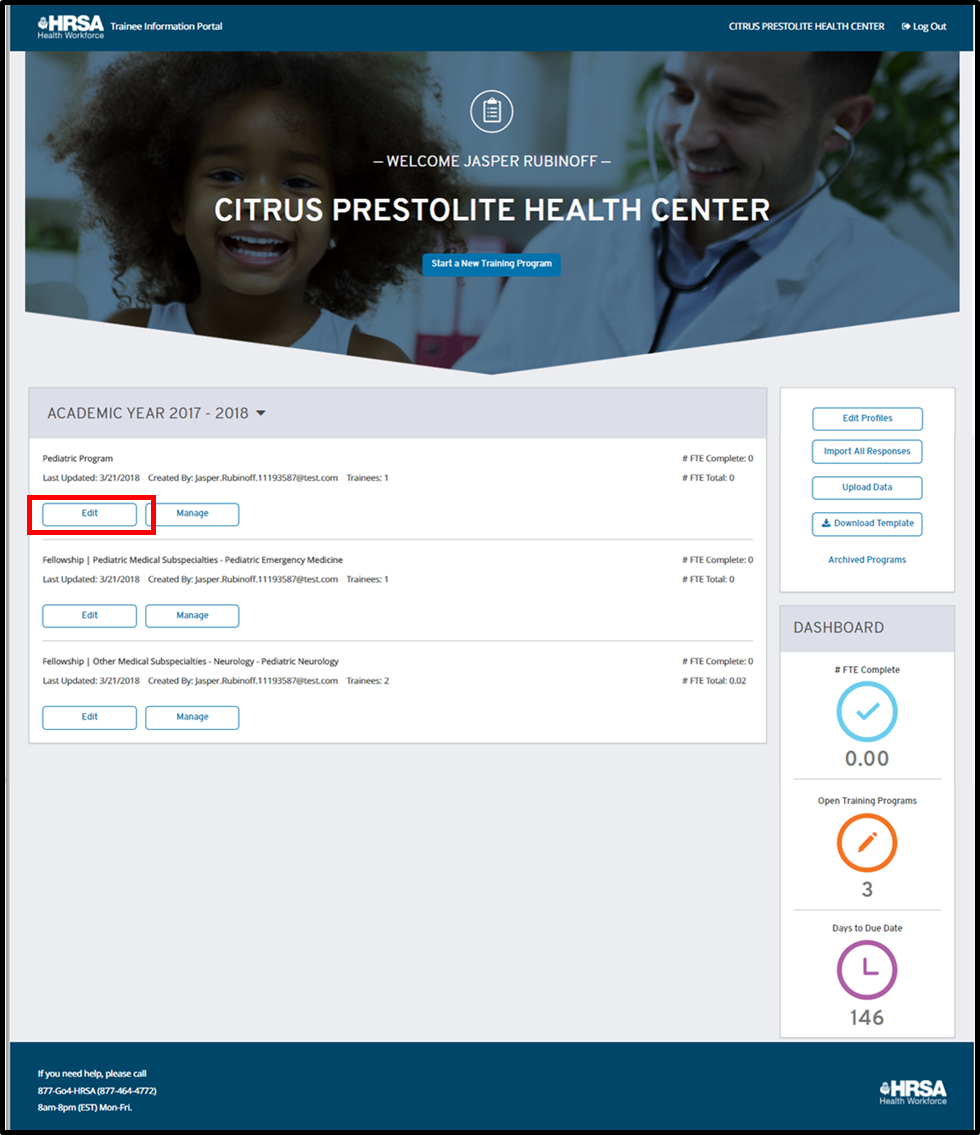
Figure 18. Edit Profiles – Training Program Card
Via the manage page: From the “Manage” screen, select the “Edit” button as shown below. This will bring you to the “Edit” screen with the selected training program already opened for editing.
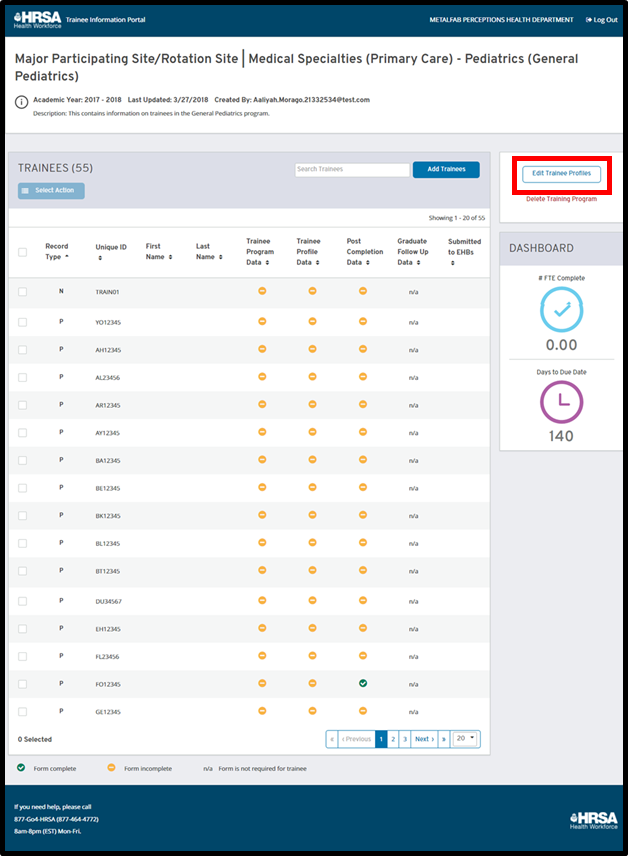
Figure 19. Edit Profiles – Manage Program
In order to edit, you must first select the training program containing the trainees that you would like to edit as mentioned above. Once you have selected the training program, choose a form for editing. You can select a form by choosing one of the four labels pictured below:

1. Trainee Program Data |
This form is a portion of the IND-GEN form and will be applicable to new records (label: N) and prior records (label: P). It consists of the program-related trainee data fields, including:
|
2. Trainee Profile |
This form is a portion of the IND-GEN form and will be applicable to new records (label: N) and prior records (label: P). It consists of the trainee’s demographic information, including:
|
3. Post Completion Plans |
This form is a portion of the IND-GEN form and will be applicable to new records (label: N) and prior records (label: P). It consists of the trainee’s plans following the year’s completion, including:
|
|
|
4. Graduate Follow Up |
This form contains all IND-GEN PY fields and will be applicable to prior year records only (label: PY). It collects data regarding the trainee’s plans following program completion, including:
|
Once
you have selected a form, all applicable trainee records will have
selectable radio buttons as shown below.
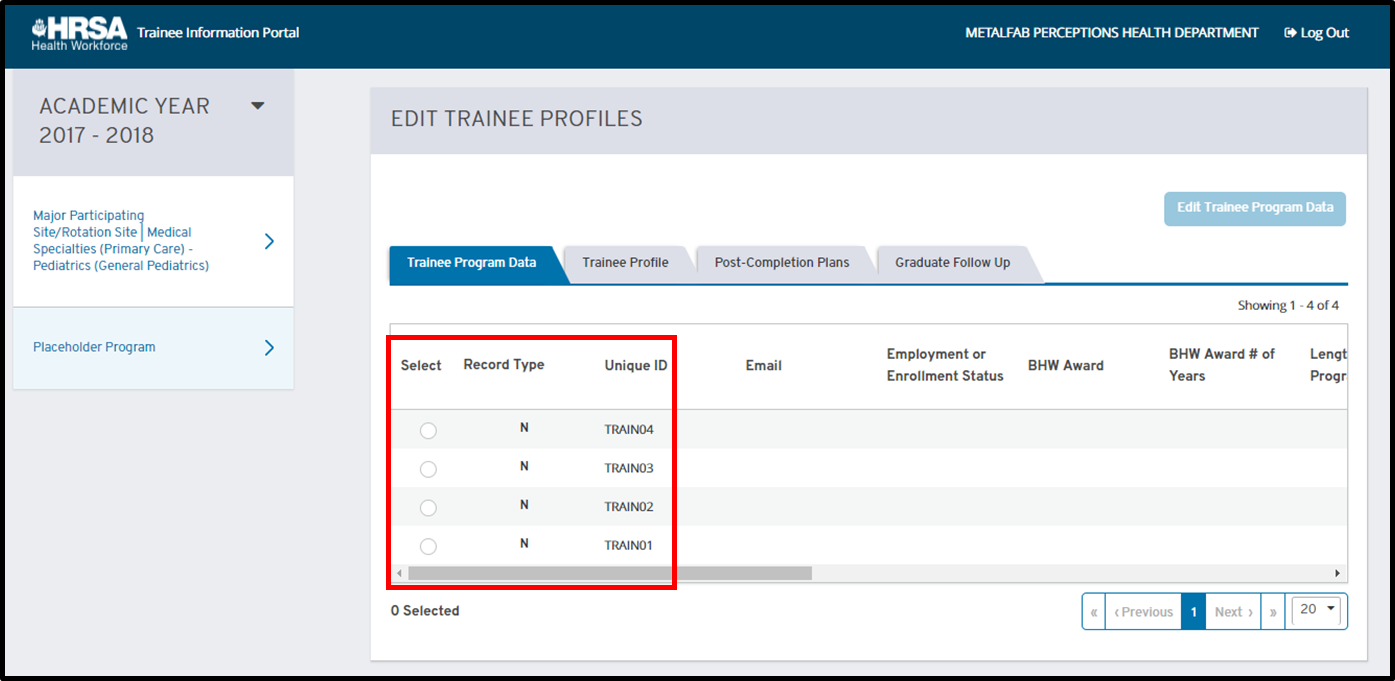
Figure 21. Edit – Select Trainee
Select the trainee record you wish to edit. The ‘Edit’ button will become active once a trainee record is selected, as shown below.
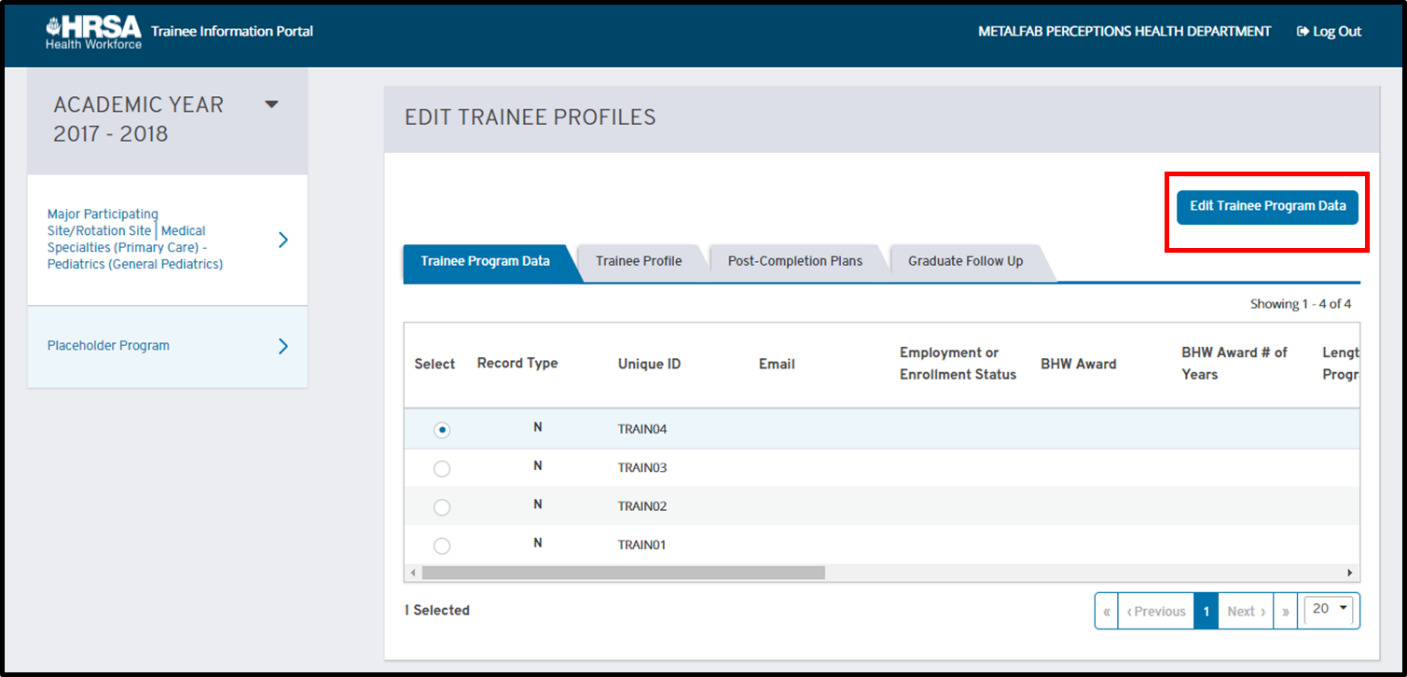
Select the “Edit” button to view the modal in which you may add or change information for the applicable fields. All four edit modals are displayed in the images below.
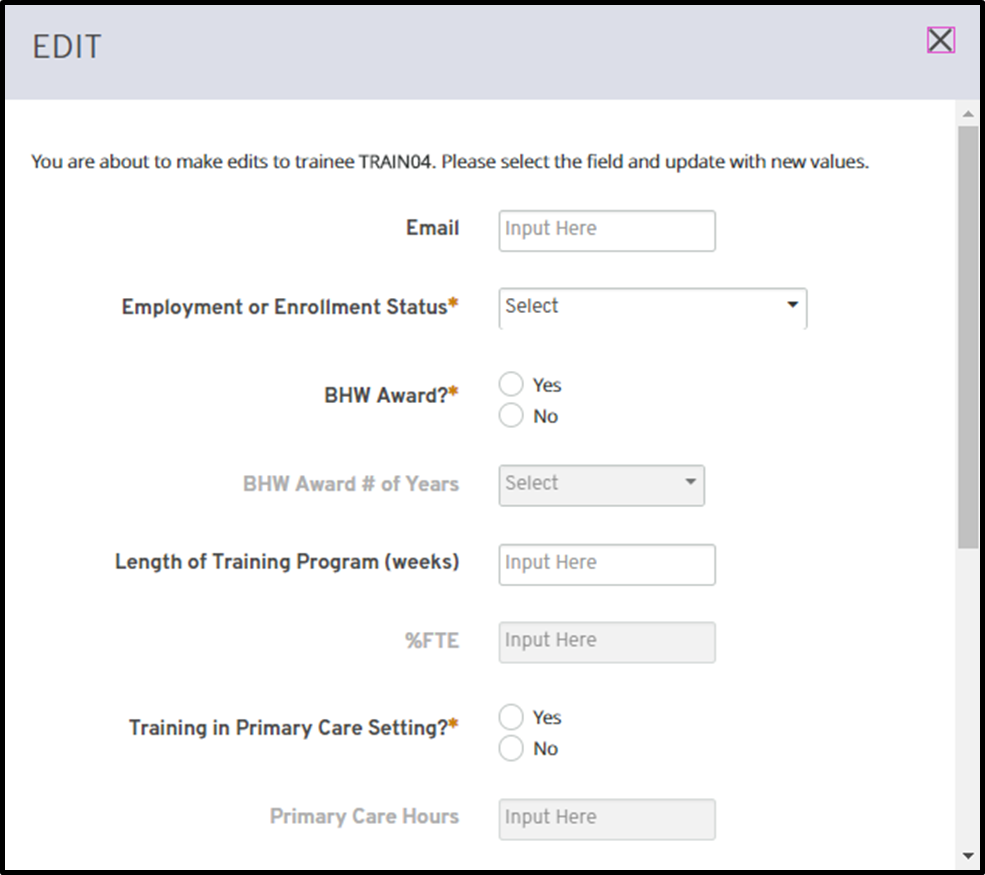
Figure 23. Trainee Program Data Form
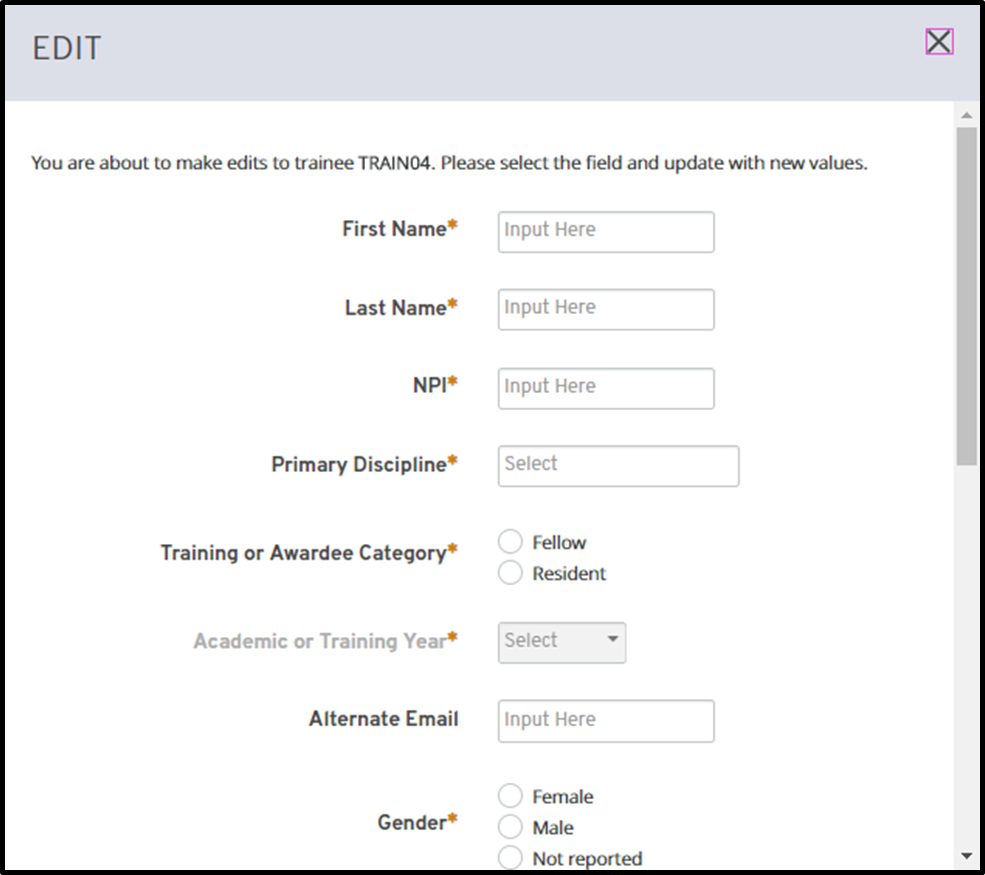
Figure 24. Trainee Profile Form
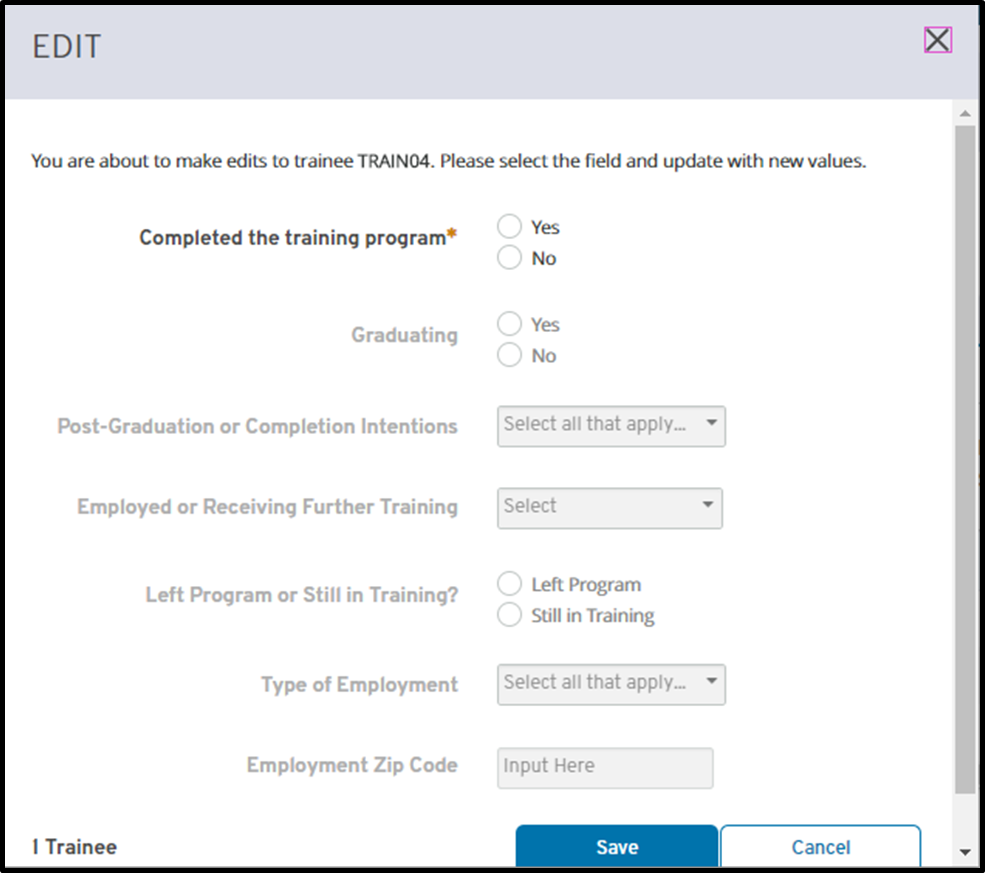
Figure 25. Post Completion Plans Form
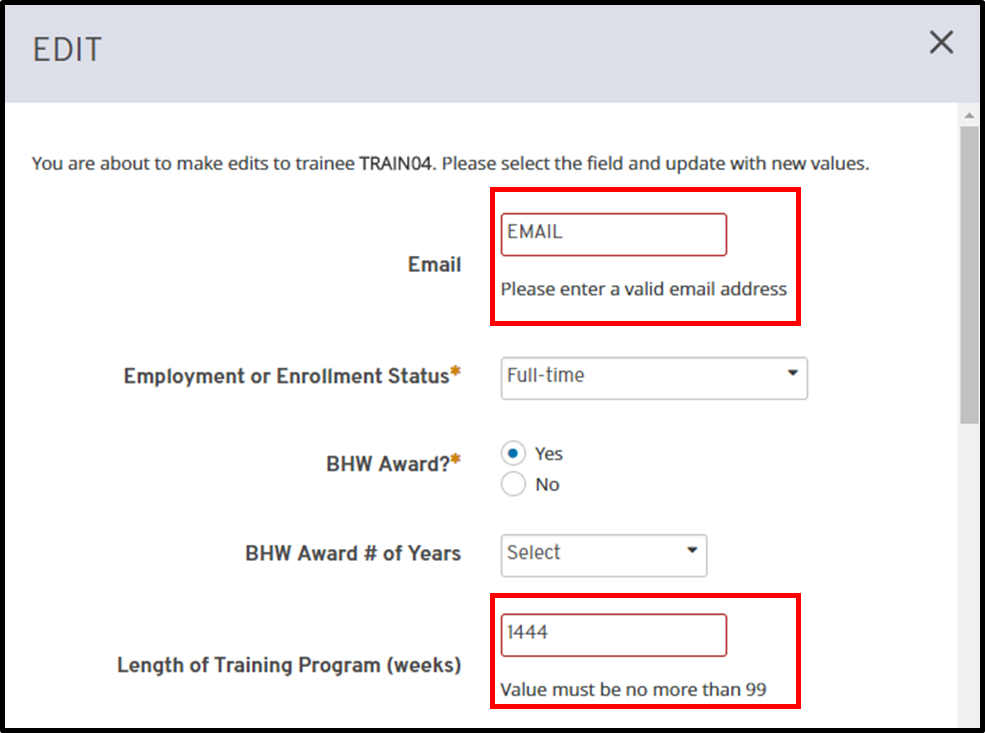
Once you have completed your edits, select the “Save” button to apply the changes. If you wish to discard the changes, simply select the “X” button located in the top right corner of the modal. If there are any validation errors, you will not be able to save until the errors are corrected. Errors are indicated by a red outline and message, as shown below:
2.7 Manage Program
The
manage program page displays key information about a training
program.
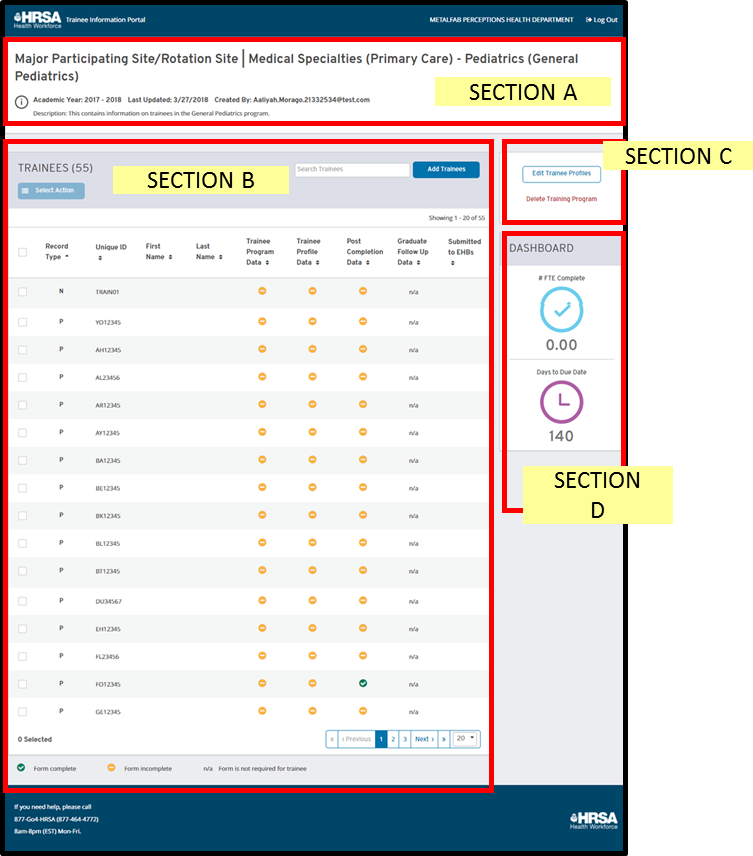
As
you can see in section A above, the top portion of the screen
displays the name of the training program, academic year, and
description as entered in the start program process.
Section B
displays the full list of trainees in a table, including several
columns to display further information. These columns include:
1. Record Type |
This is a column to indicate the record type for the given trainee. This will be one of three values:
|
2. Trainee Unique ID |
This is the seven character alphanumeric identifier used for a given trainee.
|
3. Trainee Name |
This field is a combination of the first and last name, if available, for a given trainee. This information is entered via the upload or edit portions of TRIP. Ideally, this will make it easier to identify a trainee within the table. |
|
|
4. Trainee Program Data Form Status |
This column indicates if a trainee has completed all required fields for the ‘Trainee Program Data’ form. As the legend shows at the bottom of the screen, you may have three possible indicators here: green (form is complete), yellow (form is incomplete), or n/a (form is not applicable to the trainee).
|
5. Trainee Profile Form Status |
This column indicates if a trainee has completed all required fields for the ‘Trainee Profile’ form. As the legend shows at the bottom of the screen, you may have three possible indicators here: green (form is complete), yellow (form is incomplete), or n/a (form is not applicable to the trainee).
|
6. Post Completion Plans Form Status |
This column indicates if a trainee has completed all required fields for the ‘Post Completion Plans’ form. As the legend shows at the bottom of the screen, you may have three possible indicators here: green (form is complete), yellow (form is incomplete), or n/a (form is not applicable to the trainee).
|
7. Graduate Follow Up Form Status |
This column indicates if a trainee has a complete ‘Trainee Program Data’ form has completed all required fields. As the legend shows at the bottom of the screen, you may have three possible indicators here: green (form is complete), yellow (form is incomplete), or n/a (form is not applicable to the trainee). |
|
|
8. Submitted to EHB |
If a trainee response has been submitted to EHBs, the most recent submission date will be displayed in this column. If this column is blank, the trainee has not yet been submitted to EHBs. |
This section also includes buttons to add trainees, delete trainees, and search trainees, which are further detailed in the corresponding sections below.
Section C displays the action panel on the manage program page. From here, you can select the “Edit Profiles” button to edit trainees for the given program. If the program is a placeholder program, you may select “Link Training Program” to associate the placeholder with a valid program that is set to ‘Active’ in EHBs. Lastly, you may select “Delete Training Program” to permanently delete the program and associated responses from TRIP. This functionality is further detailed in the corresponding sections below.
Section D includes a dashboard, similar to that of the home page. The dashboard includes:
1. #FTE Complete |
This number indicates the number of FTE complete for a given program. This number is calculated by the sum of the number FTE for the given trainees who have an overall status of complete, meaning that all applicable forms have all required fields complete.
|
2. Days to Due Date |
This is the number of days remaining before TRIP closes for the given academic year and the responses must be submitted to EHBs. |
2.8 Search Trainees
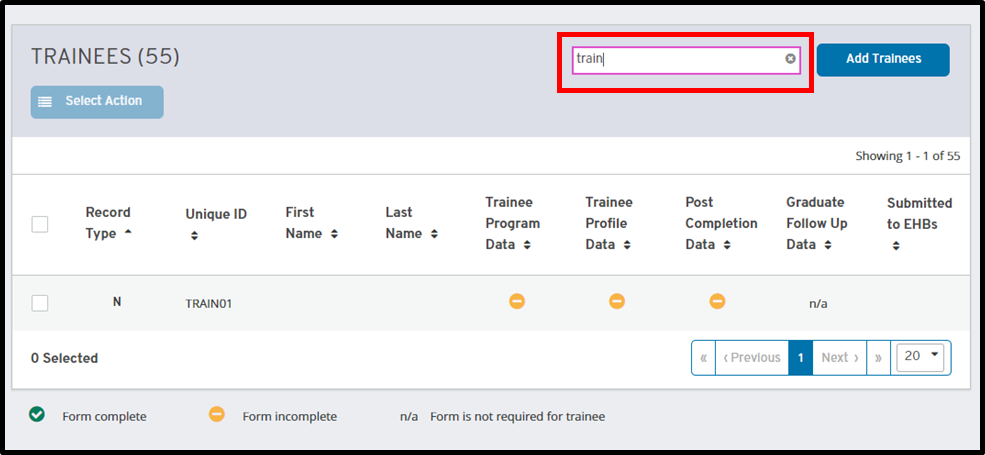
To enable users to more easily find trainee records within the trainee table on the ‘Manage Program’ page, a search bar has been implemented. To search, begin typing the letters for a trainee’s unique ID, first name, or last name. The table results will be narrowed to show only matching results, as shown below.
2.9 Add Trainees
Trainees may be added to a training program via the ‘Manage Program’ page. To begin the process, select the “Add Trainees” button as shown below.
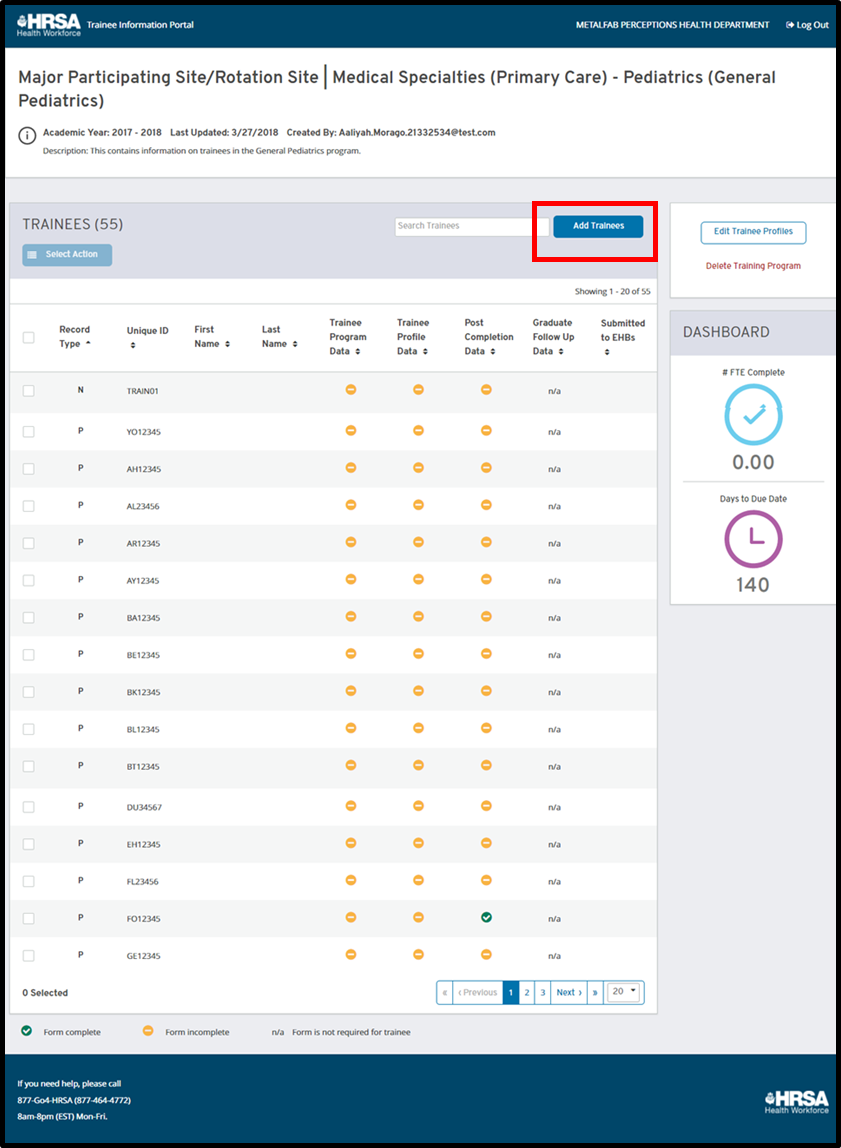
Figure 29. Manage Program – Add Trainees Button
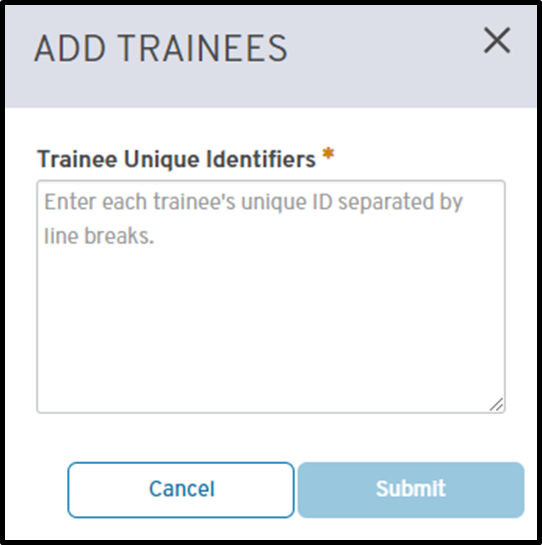
This will open a modal where the user may enter unique IDs separated by line breaks. The unique ID must be seven alphanumeric characters, as established by EHBs. Once the user has entered all the unique IDs that they wish to add, they can select the “Submit” button.
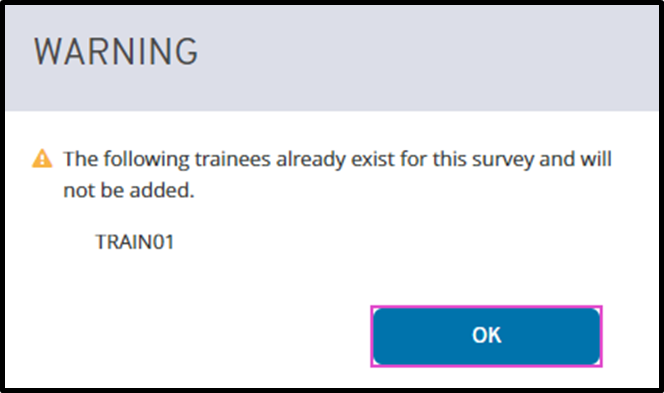
At this time, users will be notified if they are trying to add any duplicate records. These are unique IDs that are either already in the training program or were reported on the previous year’s IND-GEN form that will be brought in automatically when available from EHBs. Users will be notified of this and the duplicate record will not be added.
If the records are added successfully, the modal is closed and the user is returned to the ‘Manage Program’ page.
2.10 Delete Trainees
Trainee records may also be deleted from a training program. To delete a trainee record(s), select the checkbox next to the trainee(s) you would like to delete. Once a checkbox has been selected, the “Select Action” dropdown will become active, as shown below.

Figure 32. Manage Program – Select Action Dropdown
The user will then open the dropdown and select “Delete Response”.

Figure 33. Delete Response Button
This will open a modal summarizing the trainee record(s) to be deleted. To move forward with the deletion, select “Delete”; to cancel the deletion, press “Cancel”. Please note that deleting a trainee is a permanent action and their data cannot be retrieved after deletion.
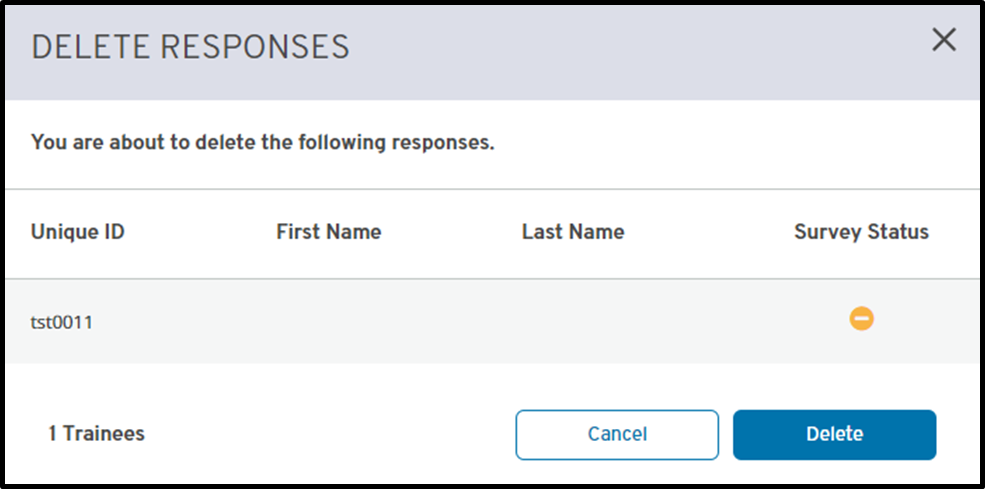
Figure 34. Delete Response Modal
2.11 Delete Program
If a program was created in error or as a duplicate, users may delete the entire training program and associated responses from TRIP. To perform this action, users will select the “Delete Training Program” button within the action panel on the ‘Manage Program’ page as shown below.
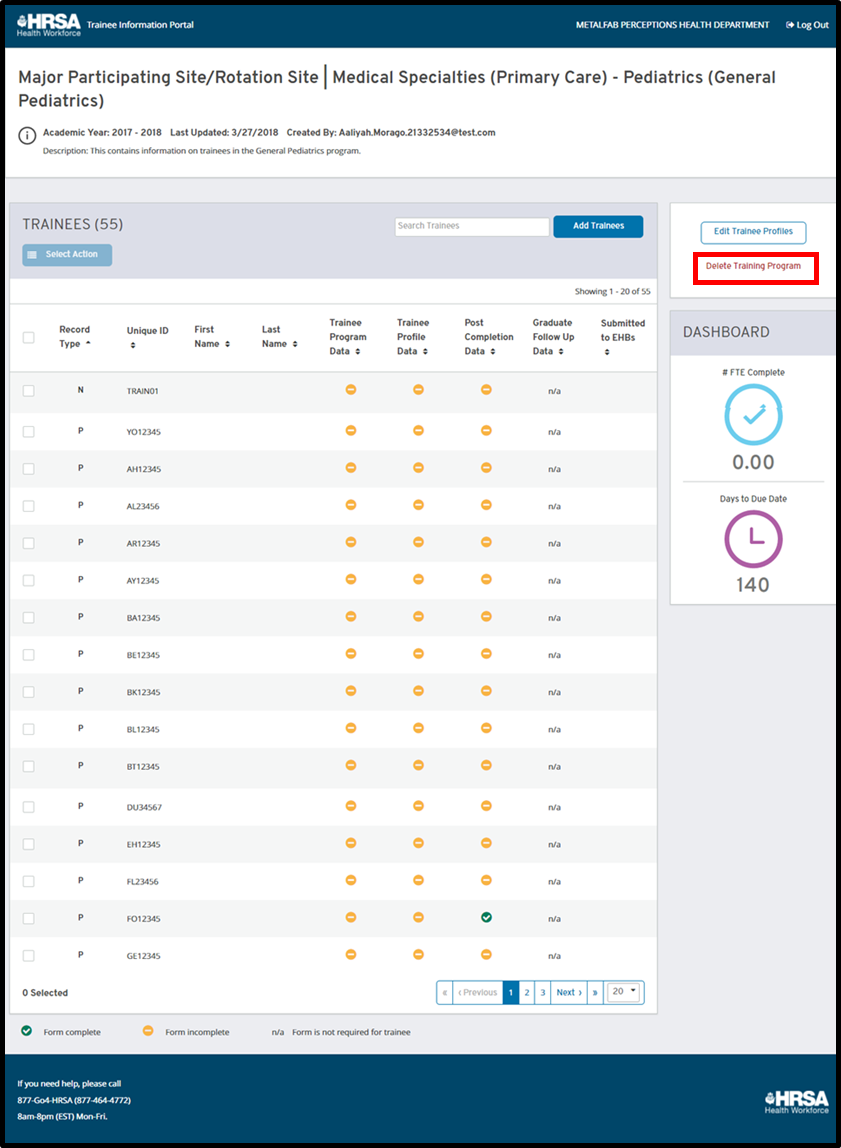
Figure 35. Delete Program Button
This will open a modal asking the user to confirm if they wish to delete the training program. To move forward with the deletion, select “OK”; to cancel the deletion, press “Cancel”. Please note that deleting a training program removes all data associated with the program, including all trainee responses. This is a permanent action and the data cannot be retrieved after deletion.
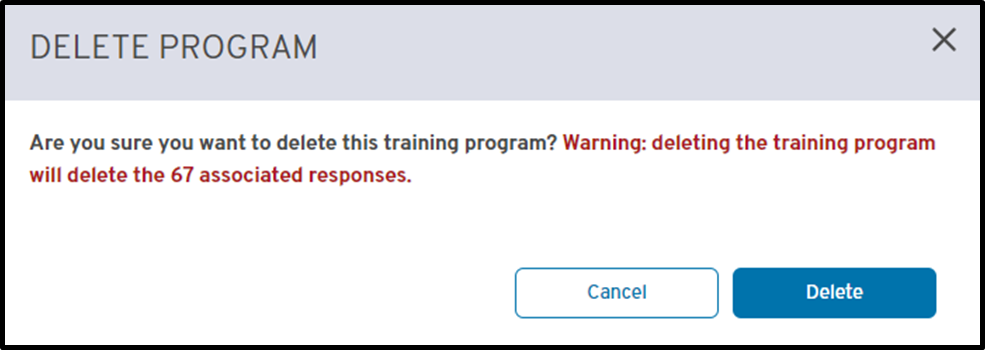
Figure 36. Delete Program Modal
If the program is successfully deleted, the user will be returned to the home page.
2.12 Link Program
Placeholder programs, as discussed in the ‘Start Training Program’ section, must be linked to EHBs training programs prior to submitting data. If they are not linked, the data will not be submitted to EHBs.
In order to link a training program, the program must first be set up within EHBs and set to ‘Active’. Refer to the EHBS user manual to accomplish this task.
Once the program is set to Active for the given academic year, users should return to TRIP and access the ‘Manage Program’ page for the placeholder program. The user will then locate the “Link Training Program” button in the right panel as shown below.
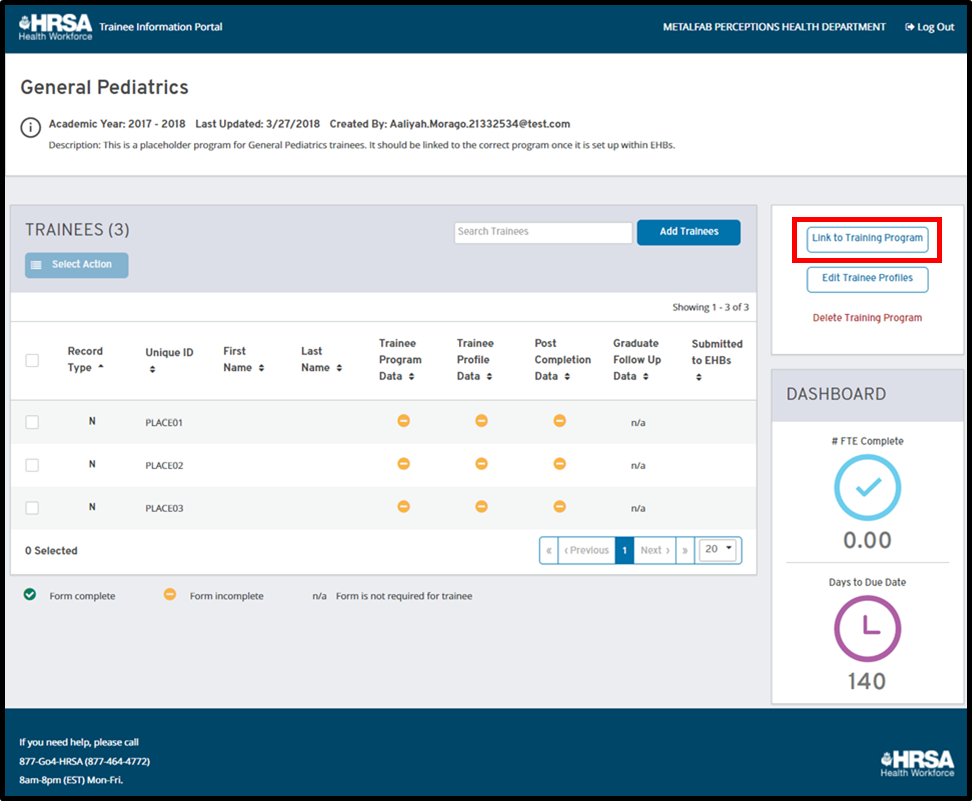
Figure 37. Link Program Button
To link the training program, users should select this button to open the modal shown below. This modal asks the user to select a training program from a dropdown list. This list contains all programs that are active in EHBs for the given year that are not already being used for data collection in TRIP.

Once a user has selected the correct training program, they can select “Link” and the training program name will be updated. To exit the process without linking the program, select “Cancel”.
2.13 Import to EHB
Once all data has been collected for the academic year, the user may import the data to EHBs. Please note that we recommend only one individual per organization import data, and that this action be performed at the end of the TRIP reporting period to ensure data integrity between TRIP and EHBs; however, users may import data to EHBs at any time once the ‘Import’ button is active. This functionality will become available once the reporting forms have been created in EHBs.
If information is updated after the initial import, users may re-import their data to EHBs. This will overwrite the data previously imported to EHBs for the selected trainee records. However, if a user wishes to delete a record that has already been imported to EHBs, they will have to delete the record within the EHBs application.
Please note that users must still submit their full reporting forms within EHBs. Importing to EHBs from TRIP does not fulfill reporting obligations.
In order to import data, locate the “Import to EHBs” button on the home page as shown below.
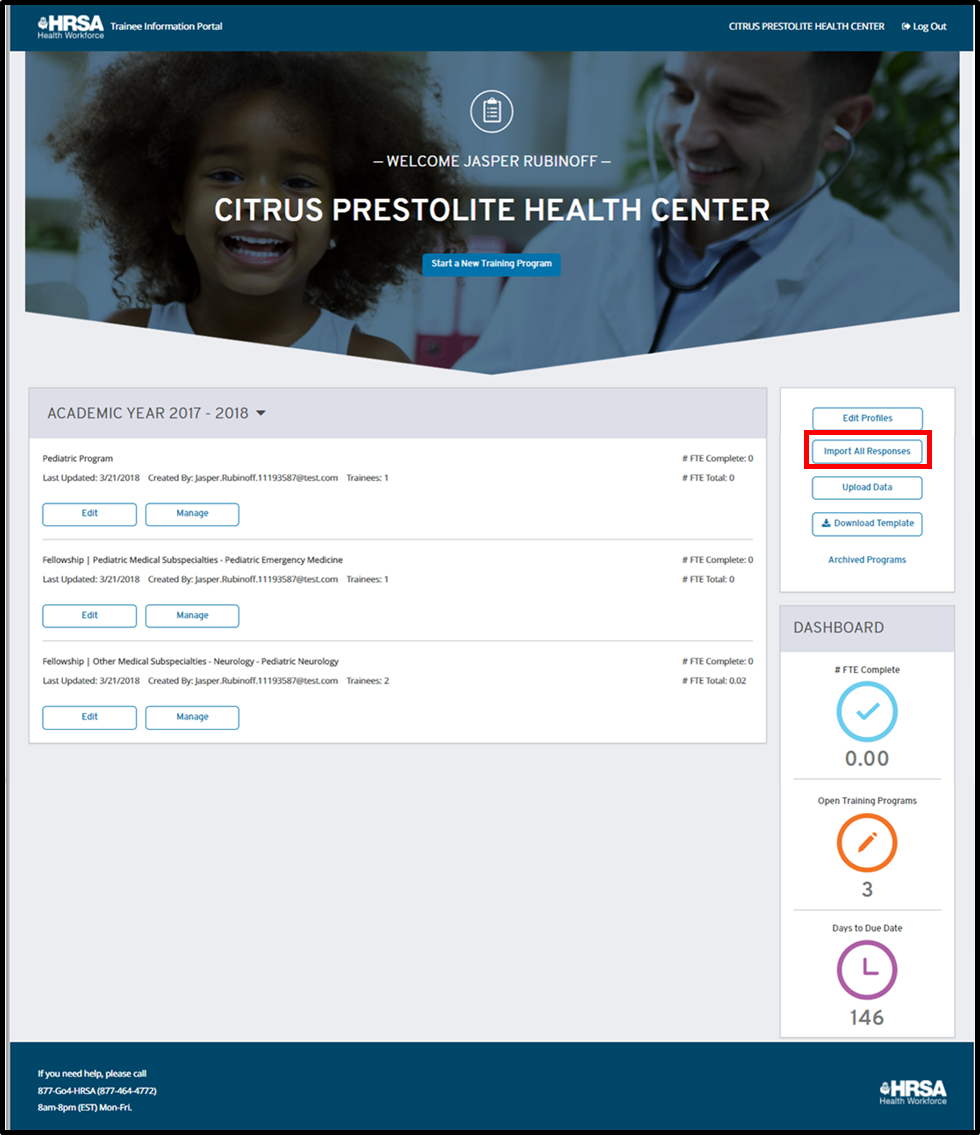
Figure 39. Import to EHBs Button
Selecting this button will open the modal shown below.
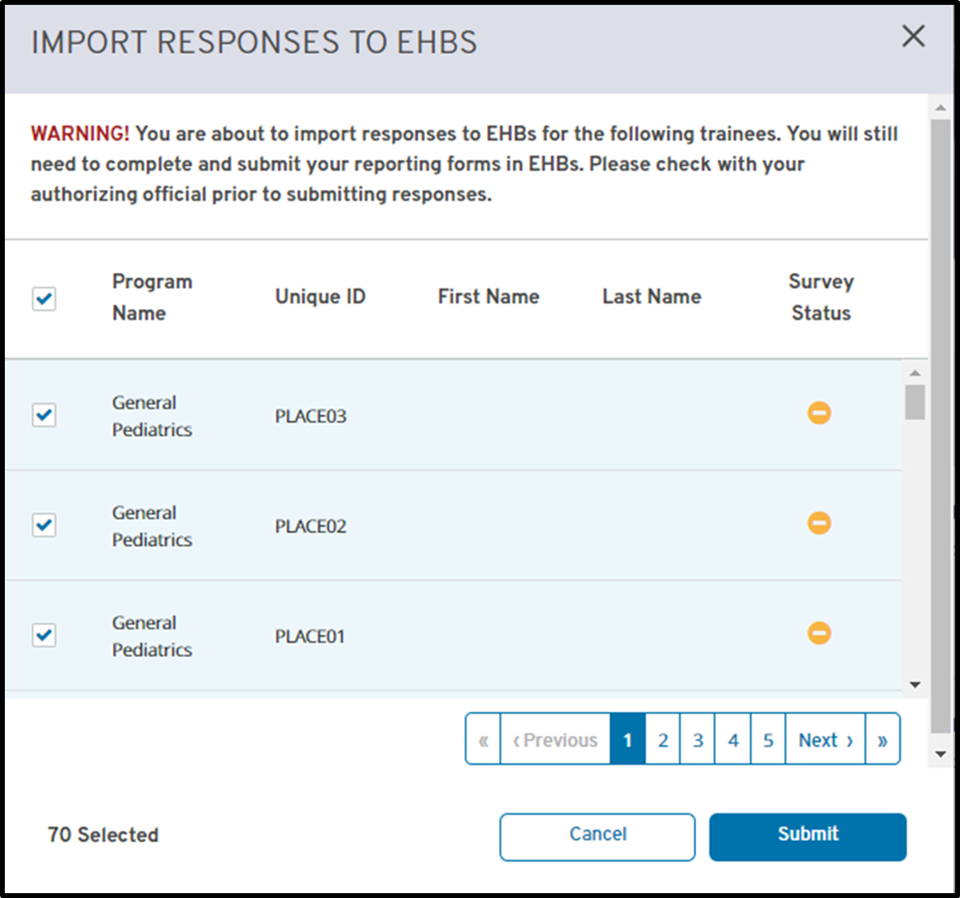
Figure 40. Import to EHBs Modal
This modal lists all trainees for all training programs for the organization. The following information is displayed:
1. Trainee Unique ID |
This is the seven character alphanumeric identifier used for a given trainee.
|
2.
Trainee Name |
This field is a combination of the first and last name, if available, for a given trainee. This information would be entered via the upload or edit portions of TRIP. Ideally, this will make it easier to identify a trainee within the table. |
3. Overall Form Status |
This indicates the trainee’s overall form status in the
portal, referencing whether or not all of their IND-GEN or IND-GEN
PY form fields are complete. A green icon indicates that all
required fields have been completed; a yellow icon indicates that
there are missing required fields. |
4. Training Program |
The relevant training program for each trainee is displayed to help users identify the correct individual. |
Each trainee has a checkbox next to their row; all checkboxes are selected by default. Users may deselect any individuals that they do not wish to import to EHBs.
Once the user has confirmed the users that they wish to import, they may select the “Import” button. To exit the process at any time, the user may select “Cancel”.
If the import is successfully sent to EHB, the user is returned to the home page. There are several errors that may occur while importing:
If any of the training programs being imported to EHBs are not listed as ‘Active’ in EHB, the user will not be able to submit the associated data. To correct this error, users must update the training program setup form in EHBS to show the training program(s) as active. Once this has been corrected, users may resend data from TRIP to EHB.
Users are not able to send trainee records associated with a placeholder programs to EHBs; all programs must be linked to active EHBS training programs prior to submission. To correct this error, users must link the training program in error. Refer to ‘Link Program’ section above.
If an organization has already submitted their reporting forms in EHBs, TRIP cannot submit additional data. There is no way to correct this error. If a user wishes to obtain the data in TRIP to retain for their own records, they may download the populated template prior to the end of the TRIP reporting period.
3.Frequently Asked Questions (FAQs)
4.Appendix
TRIP Fields and Descriptions
TRIP collects various fields, many of which are also on the IND-GEN and IND-GEN PY forms. See below for a full list of the fields as well as guidance for what they mean and how to answer them.
1. Action |
In order to add, delete, or modify a record, users must indicate which action they would like to take. Users may add new records, delete new records, or modify new, prior, and PY records. When adding a record for the first time, users should select “Add”. When updating an existing record, users should select “Modify”. When removing an invalid record, users should select “Delete”. Please note that you will not be able to add or delete prior records or PY records.
|
2. Record Type |
This is a read-only column to indicate the record type for the given trainee. This will be one of three values:
|
3. Training Program |
Users should indicate the training program for a given trainee in this row. Please note that this field is populated only by the training programs open for data collection within the portal; you will not be able to upload to a training program that has not been started. This field is read-only for prior records and PY records. |
|
|
4. Unique ID |
This is the seven character alphanumeric identifier used for a given trainee.
|
5. NPI |
This is the National Provider Identifier (NPI) number, used to
identify a trainee and their medical license. |
6. First Name |
The first name of the trainee should be entered into this column; please note that this is meant to facilitate user tracking of the trainees, and will not be sent to EHB.
|
7. Last Name |
The last name of the trainee should be entered into this column; please note that this is meant to facilitate user tracking of the trainees, and will not be sent to EHB. |
|
|
8.
Primary Discipline |
This is the primary discipline for the given trainee and must be selected from the dropdown field. |
9. Fellow or Resident |
This is the trainee or awardee category for the trainee. All trainees in a fellowship program must be listed as a fellow; all trainees in a residency program must be listed as a resident. For major participating sites/rotational programs, trainees may be either fellows or residents. |
10. Academic or Training Year
|
This indicates the trainee’s training year during their participation in the training program for the given academic year. |
11. Alternate Email
|
This is the alternate email on file for the trainee. |
12. Gender
|
This indicates the trainee’s gender. If the trainee has not reported their gender, the user may enter “Not Reported”.
|
13. Year of Birth
|
This indicates the trainee’s year of birth; if the trainee has not reported their ethnicity, the user may enter “Not Reported”.
|
14. Ethnicity
|
This indicates the trainee’s ethnicity; if the trainee has not reported their ethnicity, the user may enter “Not Reported”.
|
15. Race
|
This indicates the trainee’s race; the user may select all values that apply. “Not Reported” may not be selected in combination with any other option.
|
16. Veteran Status
|
This indicates the trainee’s veteran status during their participation in the training program.
|
17. International Medical Graduate
|
This indicates if the trainee is an International Medical Graduate (IMG) or not. |
18. Rural Area
|
This indicates if a trainee is from a rural residential background. |
19. Disadvantaged Background
|
This indicates if a trainee is from a disadvantaged background. |
20. Email
|
This is the primary email on file for the trainee. |
21. Percent FTE
|
This indicates the percent FTE covered by the HRSA CHGME grant funding. This field is only editable if “BHW Award” is set to “Yes”. Please enter the percent as a whole number; for example, if 50% of the individual’s FTE is covered by CHGME funding, enter “50” in this field.
|
22. Length of Training Program (weeks)
|
This indicates the length of the trainee’s training program in number of weeks. For example, if the trainee participated in the program for 10 weeks, “10” should be entered in this field. This will auto-calculate the “Percent FTE” field; users may update the “Percent FTE” if it does not accurately represent the trainee’s value.
|
23. Training in Primary Care Setting
|
This indicates if a trainee has received clinical or experiential training in a primary care setting during the current reporting period. |
24. Primary Care Encounters
|
This indicates the total number of patient encounters in a primary care setting during the reporting period. Note that this is only editable if “Training in a Primary Care Setting” is set to “Yes”.
|
25. Primary Care Hours
|
This indicates the total number of hours spent in a primary care setting during the reporting period. Note that this is only editable if “Training in a Primary Care Setting” is set to “Yes”.
|
26. Training in MUC Setting
|
This indicates if a trainee has received clinical or experiential training in a medically-underserved community (MUC) during the current reporting period. |
27. MUC Hours
|
This indicates the total number of hours spent in a medically-underserved community (MUC) during the reporting period. Note that this is only editable if “Training in a MUC Setting” is set to “Yes”.
|
28. Training in Rural Area
|
This indicates if a trainee has received clinical or experiential training in a rural area during the current reporting period.
|
29. Rural Hours
|
This indicates the total number of hours spent in a rural area during the reporting period. Note that this is only editable if “Training in a Rural Area” is set to “Yes”.
|
30. BHW Award
|
This indicates if the trainee received a BHW-funded financial award, such as salary and/or benefits, during the given reporting period. Note that this field must be yes for new trainee records.
|
31. BHW Award # Years
|
This indicates the number of years for which the individual has received a BHW-funded financial award. This number does not need to be consecutive; the cumulative total of the number of years should be reported. If an individual has received funding for a partial academic year, please round up to the nearest whole number. Note that this field must not be “0” for new trainee records.
|
32. Employment/ Enrollment Status
|
This is the trainee’s employment status during their participation in the training program. Note that new trainee records cannot be listed as “Inactive” or “On leave of absence”. |
33. Completed training program
|
This indicates if the trainee completed the training program during the current reporting period. |
34. Graduated at end of academic year
|
This indicates if the trainee graduated (or will graduate by the end of the academic year) during the current reporting period. |
35. Left program or still in training
|
This indicates if the trainee permanently left the training program before completion during the current reporting period. If the trainee has not left the program, this should be answered as “Still in training”.
|
36. Post-Graduation/ Completion Intentions
|
This indicates the trainee’s intentions following completion of the training program. Users may select all that apply. Note that “Not Reported”, “None of the Above”, and “N/A” may not be selected in conjunction with any other options.
|
37. Employed or Receiving Further Training
|
This indicates if the trainee is currently employed or receiving further training following completion of the training program. |
38. Type of Employment
|
This indicates the trainee’s type of employment following completion of the training program. Users may select all that apply. Note that “Not Reported”, “None of the Above”, and “N/A” may not be selected in conjunction with any other options.
|
39. Employment Zip Code
|
This indicates the zip code of the location of the trainee’s employment or training. This must be entered as a 5-digit number.
|
40. Currently Employed
|
This indicates if the trainee is employed (and employment data is known) following completion of the training program.
|
41. Current Training/ Employment
|
This indicates the trainee’s current training/employment status following completion of the training program. Users may select all that apply. Note that “None of the Above” and “N/A” may not be selected in conjunction with any other options.
|
42. Hired by your organization
|
This indicates if the grantee organization hired the trainee following training program completion. |
43. Hired by a partner organization
|
This indicates if a partner organization of the grantee organization hired the trainee following training program completion. |
44. Employment Location |
This indicates the trainee’s type of employment location. |
P![]()
![]()
![]()
![]() ROPERTY
OF HRSA |BHW
ROPERTY
OF HRSA |BHW
| File Type | application/vnd.openxmlformats-officedocument.wordprocessingml.document |
| Author | Gustavo Salinas |
| File Modified | 0000-00-00 |
| File Created | 2021-01-21 |
© 2026 OMB.report | Privacy Policy