Providing other specimens
Aerosols from cyanobacterial blooms: exposures and health effects in a highly exposed population
Att9 Urine Lung function Nasal swabs 20200212
Providing other specimens
OMB: 0920-1316
Attachment 9
Providing Urine, Lung Function Test, and Nasal Swabs
Form Approved OMB No. 0920-0079 Exp. Date XX/XX/XXXX |
CDC estimates the average
public reporting burden for this collection of information as 60
minutes per response, including the time for reviewing instructions,
searching existing data/information sources, gathering and
maintaining the data/information needed, and completing and
reviewing the collection of information. An agency may not conduct
or sponsor, and a person is not required to respond to a collection
of information unless it displays a currently valid OMB control
number. Send comments regarding this burden estimate or any other
aspect of this collection of information, including suggestions for
reducing this burden to CDC/ATSDR Information Collection Review
Office, 1600 Clifton Road NE, MS D-74, Atlanta, Georgia 30333; ATTN:
PRA (0920-0079).
URINE COLLECTION
(from CDC 2009-0058, Green Housing Study)
Before picking up urine specimens, prepare a cooler for transporting samples. Pre-freeze, in a -80C freezer, several ice packs rated to keep specimens frozen at -10C (Example is Saf-T-Pak model STT-410-1000, Saf-T-Temp Freezer Pak {-10C}).
Screw-cap polypropylene urine collection cups will be provided for each participant. Instruct each person to do the following for urine collection. First morning voids are the most concentrated and preferred sample however, collection may be at the discretion of the parent:
Hands should be rinsed with water and air-dried.
Do not remove the cap from cup until ready to void, remove cap and place face up while voiding.
Collect at least 30 mL urine in the cup.
Do not touch the inside of the cup or cap at anytime.
Recap the specimen and place a participant label on cup (not the cap)
Place in biohazard zip bag with absorbent material and freeze (do not refrigerate) as soon as possible
for transport. Sample will be shipped to CDC, Atlanta for further processing.
Please indicate on collection log if sample had thawed prior to shipping, time of last urination, date and time of urine sample collection for the study and pickup time by study personnel.
Aliquot labels will be printed at CDC and placed on the appropriate cyrovials. Urine samples will be thawed at CDC and split into the following aliquots using sterile, individually wrapped pipets. No preservative will be used:
Urine for Immediate testing: 4 mls will be transferred to a 5 ml polypropylene cyrovial.
Urine for Archive: 8-10 mls will be transferred to a 10 ml polypropylene cryovial.
Freeze/thaw cycles should be limited to 3. Any remaining urine will be discarded unless otherwise directly by the Principal Investigator.
All samples will be stored in appropriate grid boxes at -80C in the Sample Logistics Lab in Bldg 110, Room 1211 at CDC, Chamblee Campus.
SHIPPING PROCEDURE
Collection cup boxes will be provided for shipment. They hold 6 urine cups. Place each box of specimens in one of the Saf-T-Pak plastic bags with the biohazard symbol along with one of the absorbent gel sheets and seal the bag. Place this bag inside one of the Saf-T-Pak Tyvek bags and seal. Place the sealed Tyvek bags inside the Styrofoam shipping container along with 10-15 lbs dry ice. Add packing material or newspaper to fill any extra space. Add the styrofoam lid. Place a copy of the collection log inside a zip bag and tape to the top of the Styrofoam lid. Tape the cardboard outer flaps. Place a dry ice label on the outside of the container and write in the amount of dry ice in the shipper and on the airbill. Add a Category B, Biological Substance label to the outside of the container.
Ship to the following address, please call or email [email protected] on the day shipment is made:
Sample Logistics
Centers for Disease Control
4770 Buford Hwy
Building 110, Room 1211
Atlanta, GA 30341 (770) 488-4305
Lung Function Testing Procedures
(from the Green Housing Study)
Spirometry Testing
Purpose: Lung function will be measured by spirometry at each home visit so that changes in lung function can be used to assess the relationship between indoor exposure and pulmonary function.
Overview: Spirometry will be used to assess pulmonary function. We will use Hankinson standards, which is most appropriate for this study population. FVC, FEV1, FEV25-75, and PEF will be measured.
Supplies:
E
 asyOne
Spirometer
asyOne
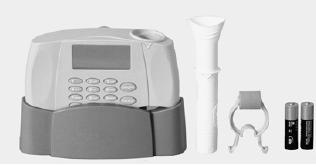
Spirometer3 liter Calibration syringe, adapter, calibration spirette
Spirometry/ eNO Form
Disposable nose clips and mouthpieces (carry extra!)
Temperature and Relative Humidity meter
Scale and tape measure (for height and weight)
Two AA batteries for EasyOne
EasyOne manual (Consult EasyOne manual when necessary)
Trash bag/Ziploc bag for discarding mouth/nose piece, etc.
Procedure:
During scheduling home visits:
Make sure that the respondent will be at home
Ask if the respondent is sick. RESCHEDULE appointment for another day if,
has gone through any surgery or procedure that may interfere with the procedure or restrict forceful expiration efforts, or
has any other illness or physical impairments
Instruct the parent(s) to make sure that the respondent does not
Have a heavy meal within the previous one hour of the scheduled test
Use inhaled medications (e.g., bronchodilators) within the previous four hours, unless necessary
Before the scheduled appointment:
Make sure that all supplies are with you (see supplies).
Check that the EasyOne is working and configured properly.
Step 1: Turn on the EasyOne (Press the ‘On/Off’ button for a few seconds till you hear a beep)
Step 2: Navigate the main menu with the arrows (‘>’ or ‘<’) and select configuration. Press ‘ENTER’.
Step 3: Select ‘Test Settings’. Make sure that ‘NHANES III’ is selected for the ‘Predicted’ field. If not, use arrows to select ‘NHANES III’ and press ‘ENTER’.
Step 4: Do not change any other settings (check default settings in the EasyOne manual if you think that something was changed inadverdently). Press and hold ‘0’ to return to previous menu.
Step 5: Select ‘General Settings’ and adjust the parameters (use ENTER button to navigate). Do this only if you want to put altitude, humidity, etc..
Make sure that the EasyOne machine is calibrated. Calibration check should occur at beginning of each day.
Step 1: From the main menu, use arrow buttons to select ‘Check calibration’. Press ENTER. Select ‘Calibration check’.
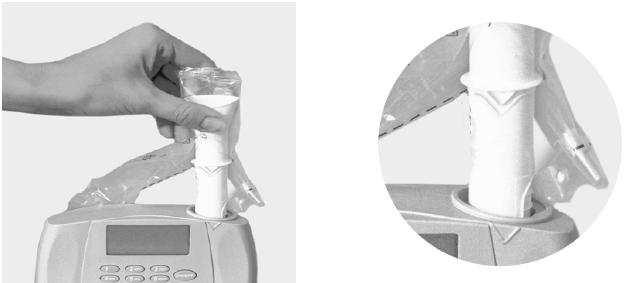
Step 2: Insert the spirette as shown. Make sure that the arrow on the spirette lines up with the arrow on the EasyOne. Push the spirette all the way down to stop.

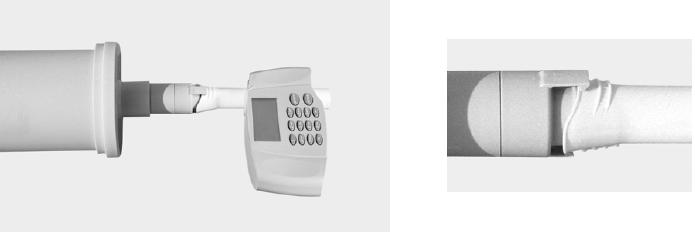
Step 3: Connect the spirometer as shown below using the calibration adapter and the syringe. Ensure that the piston is fully inserted.

Step 4: Now press ENTER. Wait until the baseline has been set and you hear an audible signal.
Step 5: Now execute one full inspiratory (pull outwards) pump stroke followed by one full expiratory(push back in) pump stroke at moderate speed. After you perform the maneuver, you will see the text "Accuracy confirmed" at the top of the display and, beneath it, the percentage deviation and the average flow velocity of the pump stroke. You can repeat the test, print the result or quit the program. The calibration test remains stored and can also be viewed or printed out later. If you do not reach ±3% accuracy, please follow the troubleshooting instructions in the manual.
Step 6: Press and hold ‘On/Off’ to turn EaysOne off.
Upon arrival at home:
Notes and measurements:
Ask if respondent is sick. If YES, then re-schedule.
In case of surgery or other ailment, reschedule after appropriate amount of time
If the respondent is not sick then proceed with spirometry testing.
Measure and record temperature and Relative humidity percent
Make note if respondent had had a heavy meal within the last one hour
Make note if respondent had used a bronchodilator within the last four hours
Make sure that the respondent is not wearing tight or restrictive clothing
Prepare the respondent:
Introduce yourself and explain the purpose of the test. Describe that this test is going to measure the health of his/her lungs and record the amount of air he/she can exhale quickly.
Explain that the procedure must be performed at least three times and assure that the procedure will not hurt.
Explain the procedure and demonstrate, more than once if needed. Emphasize the key elements:
filling lungs completely during deep inhalation
sealing lips around the spirette so that there are no leaks, taking care not to block its opening with teeth or tongue or bite down excessively
blasting out as hard and fast as possible
continue blowing out until the lungs are completely empty

Respondent measurements:
Measure the respondent’s height and weight.
Ask about respondent’s age, gender and race.
Record all information into EasyOne.
On the EasyOne machine main menu, select “Perform test” then “New” and confirm with ENTER. The instrument will now allow you to enter the patient data.
Note: do not enter slashes or dashes, simply enter the dates and numbers as a number string.
For “Predicted” make sure that “NHANES III” is selected.
Perform the test:
Have the respondent sit on a ‘hard’ chair without wheels.
The respondent should have his/her chin elevated and neck extended for most forceful expiration.
Properly put the nose clip on. It will ensure a more accurate test.
http://blog.copdfoundation.org/be-part-of-world-spirometry-day-october-14-2010/
Install the spirette as described previously (Section 2, C, Step 2). For maximum hygiene, consider tearing the spirette bag from the bottom, leaving spirette partially wrapped during insertion and until the spirometer is handed to the patient. The spirette is easily removed by pushing it up from the bottom.
From the "Test selection" menu. Choose the ‘FVC (Expiratory)’ test and confirm with ENTER.
The instrument now prompts you to avoid air flow in the spirette since it is setting the baseline. It is advisable to block off the spirette on one end in order to ensure that the baseline is set precisely even if the room is draughty. Press ENTER. An audible signal will sound when the baseline has been set. You will see prompt "Blast out" on the screen.
Hand the instrument to the patient. Ask the patient to breathe in deeply first and then insert the spirette correctly into his or her mouth. Now ask the patient to exhale as firmly and as quickly as possible, and continue exhaling until all air has been exhaled.
EasyOne will notify about the end of the maneuver. At the end of the maneuver, you will see a message on the display indicating whether the maneuver was acceptable. At least three acceptable maneuvers must have been performed before you see message "Session complete".
Overall session quality should be at least ‘Grade B’ (range: Grade A to F).
You can use ‘View Results’ from main menu for reviewing the test.
Do not attempt more than 8 times. Give respondents plenty of rest before attempts (at least one minute between each test). Pulmonary function tests require maximum effort on the part of the patient and may lead to sensations of dizziness or giddiness.
Complete the eNO/Spirometry form
After the tests are completed, download the following information from EasyOne: results from the spirometry tests (predicted, pre- and post-). Consult the EasyOne manual for downloading info.
Explanation of Results:
FVC = Forced Vital Capacity
This is the maximum volume of air in liters that can be forcibly and rapidly exhaled following a maximum inspiration. FVC is the basic maneuver in spirometry tests.
FEV1 = Forced Expiratory Volume in 1 second
This is the volume of air, expressed in liters, expelled in the first second of a forced expiration starting from full inspiration. A useful measure of how quickly full lungs can be emptied.
FEFR25%-75% = Forced Expiratory Flow Rate
This is the average forced expiratory flow rate at the middle part of the FVC maneuver. Expressed in liters per second, it gives an indication of what is happening in the lower airways. It is a more sensitive parameter and not as reproducible as the others. It is a useful serial measurement because it will be affected before FEV, so can act as an early warning sign of disease.
Average expired flow over the middle half of the FVC maneuver and is regarded as more sensitive of small airways narrowing than FEV1. Unfortunately FEF25-57% has a wide range or normality, is less reproducible than FEV1, and is difficult to interpret if the VC (or FVC) is reduced or increased.
PEFR = Peak Expiratory Flow Rate
This is the greatest flow that can be sustained for 10 milliseconds on forced expiration starting from full inflation of the lungs. It is measured in liters per minute with a peak flow meter.
Nasal Swab Collection Procedures
Swab Collection
The nasal swab is obtained by giving the subject 1 swab for the left nostril and 1 swab for the right nostril, and asking them to swab the medial side of the nares in a circular fashion at least 0.5 inches into each nasal cavity.
Swab Handling
All swabs will be labeled with the date, time, Study ID Number and Specimen Number (AM1, AM2 for morning and PM1, PM2 for afternoon). They will be processed according to a standard protocol (Backer et al., 2010; Cheng et al., 2007).
References:
Backer LC, McNeel SV, Barber T, Kirkpatrick B, Williams C, Irvin M, Zhou Y, Johnson TB, Nierenberg K, Aubel M, LePrell R, Chapman A, Foss A, Corum S, Hill VR, Kieszak SM, Cheng Y-S. 2010. Recreational Exposure to Microcystins During Algal Blooms in Two California Lakes. oxicon 55:909-921.
Cheng, YS, Zho Y, Irvin CM, Kirkpatrick B, Backer LC. 2007. Characterization
of aerosols containing microcystin. Marine Drugs 5:136–150.
| File Type | application/vnd.openxmlformats-officedocument.wordprocessingml.document |
| File Modified | 0000-00-00 |
| File Created | 0000-00-00 |
© 2026 OMB.report | Privacy Policy
