How to Enter and Access COVID-19 Summary Data
Att4c_How to Enter and Access COVID Summary Data.docx
National Healthcare Safety Network (NHSN) Patient Impact Module for Coronavirus (COVID-19) Surveillance in Healthcare Facilities
How to Enter and Access COVID-19 Summary Data
OMB: 0920-1290
national
healthcare safety network:
How
to Enter and Access COVID-19 Summary Data: For Facilities
Description
As part of CDC’s ongoing COVID-19 response, a new Patient Impact Module has been created in NHSN to help facilities track and monitor the number of cases reported in their facilities daily. The new module collects summary data which can be viewed in a table form without generating new analysis datasets. In addition, the summary data can be exported to excel/CSV for additional analysis outside the application. The data collected using this module will be informative and provide situational awareness at both state and national levels.
How to Access and Enter COVID-19 Summary Data
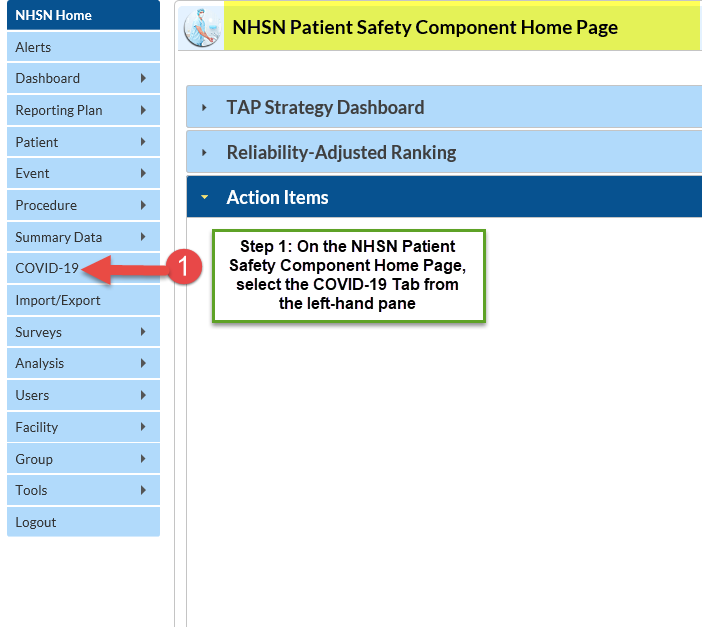
STEP 1: Select the COVID-19 tab on the left navigation pane.
A calendar defaulting to the current month will appear, as shown in the screenshot below. Note that data can be entered as far back as January 1, 2020. Disclaimer: Data included in this guide is fictitious and does not represent an actual facility's data. This data is meant for illustration purpose only.
In this module, data is expected to be collected each day at the same time and reported in the application for the date for which the data apply. Using the calendar below as an example:
Data can be entered for both weekdays and weekend days, through the present date.
Once you have entered data, the calendar date is marked green with a check mark, indicating ‘Completion’, as shown by the March 02, 2020 example in the calendar below. Calendar days with incomplete data will show a green checkmark but shaded light yellow. A calendar date with no data is shaded white. Future dates cannot be accessed.
The legend defining the color codes is located at the top of the calendar shown by the green arrow.
Data can be entered manually or uploaded using a CSV file. Use the ‘Upload CSV’ tab (A) to upload your daily counts of data.
Use the ‘Download CSV Template’ tab (B) to download a sample CSV file to upload your data. The headers in the CSV file represent the data fields on the ‘Add’ screen, which will be described subsequently.
Once you have entered data, you can manually view the data by double clicking on the calendar date(s) or using the ‘Export CSV’ (C) tab to export the data in a table form. Details on Uploading and Exporting are provided on page 4.

STEP 2: To Enter Data
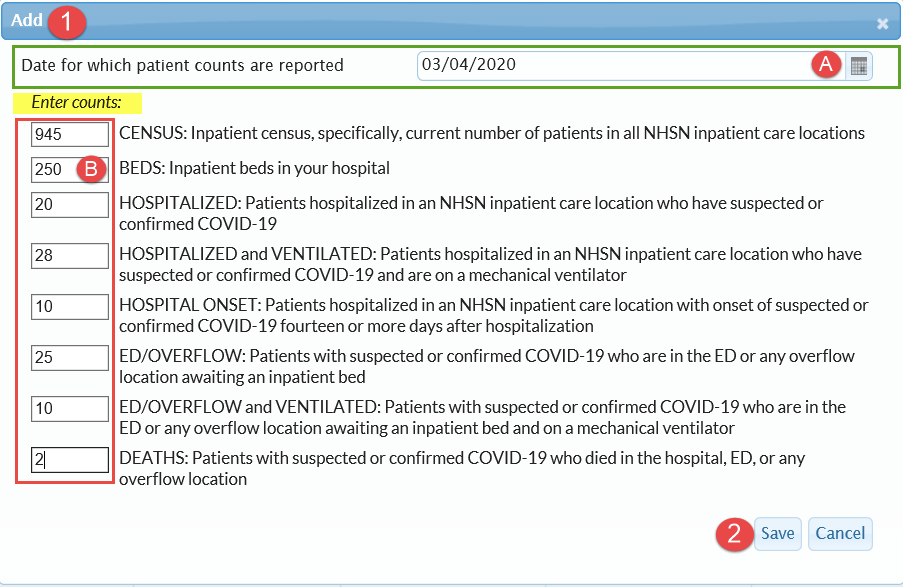
To enter data manually, double click on the date for which the data apply. A separate window will appear with a list of data fields or questions as shown in the screenshot below. Data for the ‘date for which patient counts are reported’ may be entered retrospectively into the application, for example, data collected for March 2, 2020 may be entered March 7, 2020. The ‘Collection date’ and the ‘BEDS: Inpatient beds in the hospital’ fields are required, and the remaining fields are optional. Please note a blank field indicates no data. If you intend to report ‘0’ for a field, please enter ‘0’.
The ‘Date for which patient counts are reported’ can be maintained or switch to a different date for which patient counts are report using the calendar icon (A).
The data field (B) that is marked ‘BEDS: inpatient beds in your hospital’ will be automatically populated with the data from your most recent facility annual survey. If this number has changed due to the COVID-19 response, please make the change to reflect the correct data. PLEASE NOTE: The number of beds on the 2019 annual survey should not be changed to match your hospital’s current bed size.
Once you have entered data in all applicable fields, click Save (2).
To View, Edit or Delete Data
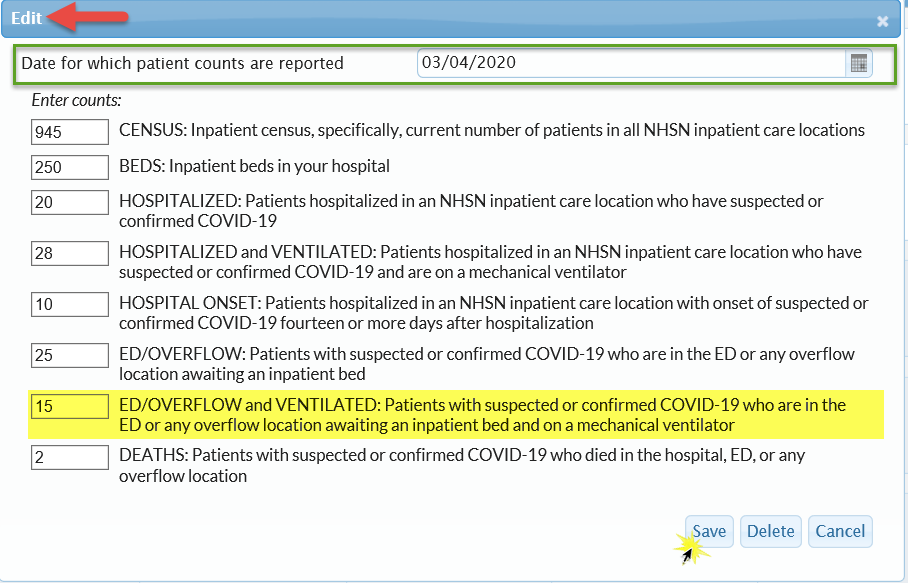
Once data have been entered and saved, it can be viewed or edited, if applicable. To view entered data, double click on the calendar date with the data. A pop-up dialogue box will appear with the list of data as shown in the screenshot below.
To edit the data, simply change the data in the applicable field(s), using the yellow highlighted field as an example. Once done, click Save. The dialogue box will then close.
To delete data from the calendar, double click on the calendar date and scroll down to select the Delete button. Once data has been deleted, the calendar date will return to the white shade.
Uploading data using the Upload CSV Option:
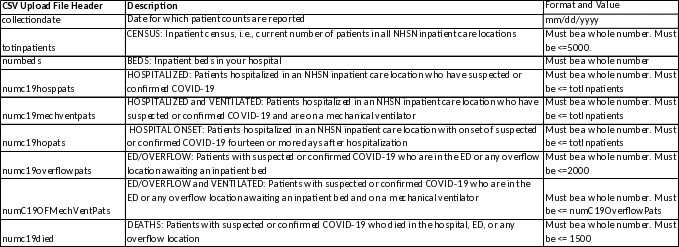
Once you have downloaded the template CSV using the Download CSV button outlined above, a CSV file will open with the title ‘COVID-19 Test CSV import_DRAFT_’. The headers of the CSV file mimic the titles of data fields in the screenshot above and appear in the same order as the data fields shown in the table 1 below.
 Table
1. COVID-19 Summary Data Upload Template

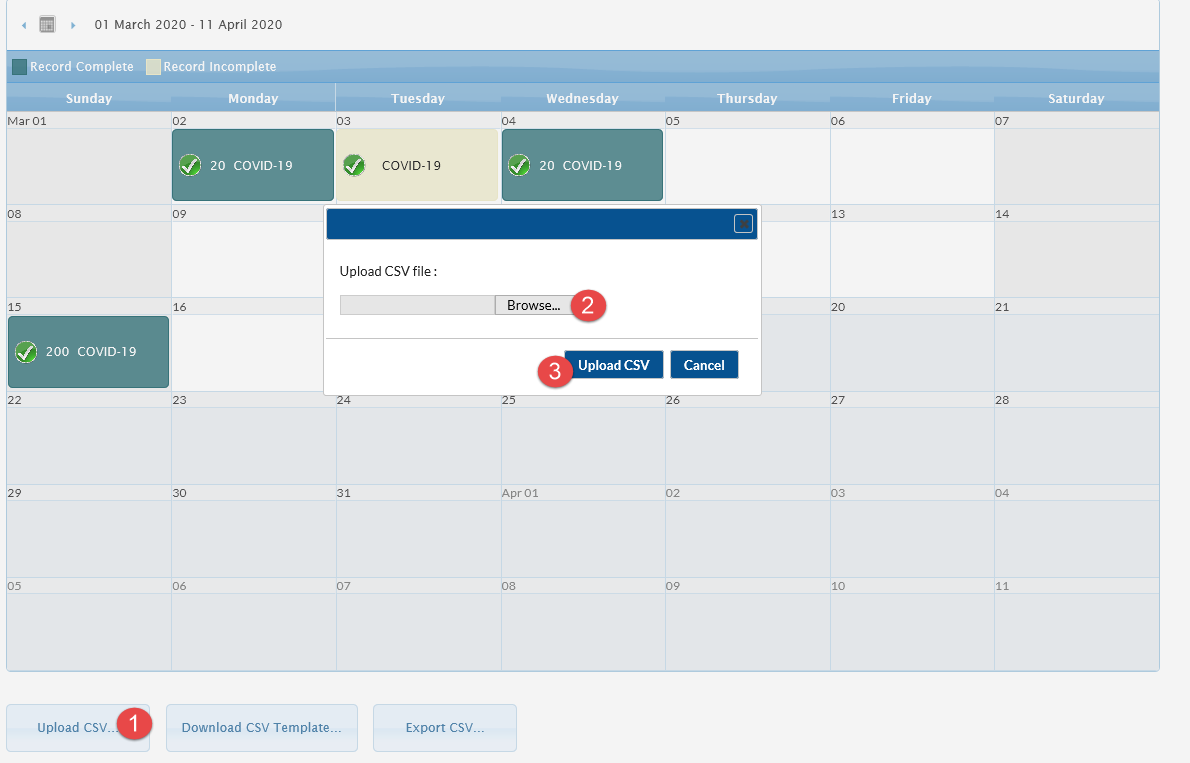
Enter data into the Upload Template file and save to file path from which you can upload into NHSN. Then select ‘Upload CSV’ button on the calendar as shown in the screenshot on page 3. A dialogue box will appear. Browse to the CSV file and click ‘Upload CSV’.
Exporting data using the Export CSV Tab:
Once data has been entered or uploaded, facility users can export their data in table form to view or to perform additional analysis outside the application. First select Export CSV on the calendar. A dialogue box will appear with options to Open or Save the file. Select preference and open to view data. A sample exported table is displayed below.
Table 2. COVID-19 Summary Data Export

Additional
Resources:
CDC’s Coronavirus (COVID-19) website: https://www.cdc.gov/coronavirus/2019-nCoV/index.html

| File Type | application/vnd.openxmlformats-officedocument.wordprocessingml.document |
| File Title | national healthcare safety network: |
| Author | Konnor, Rebecca Y. (CDC/OID/NCEZID) (CTR) |
| File Modified | 0000-00-00 |
| File Created | 2021-01-13 |
© 2026 OMB.report | Privacy Policy