Instructions for Editing Values
Instructions for editing values.docx
Public Lands Corps Tracking Sheet
Instructions for Editing Values
OMB: 0596-0247
Instructions for Editing Values for the Public Lands Corps Tracking Form
The Public Lands Corps Tracking form contains the following visible worksheets:
Instructions – basic guidance on how to use the worksheet and where to send it.
Participant Information – designed to capture information for each Public Lands Corps participant engaged.
Project Information – used to collect information for each of the projects
Project Tracking – used to track the number of hours each participant has worked on each of the projects tracked.
There are also two hidden worksheets that contain information for data validation.
Lists – Contains the values used for data validation – this sheet is normally hidden
The visible worksheets use a feature called Data Validation to ensure that the values entered for certain fields are valid. The fields that currently user validation are as follows.
Gender
Ethnicity
Race - 1
Race - 2
Education Level Completed
Military/Veteran Status
Partner Organization
Program Type
Deputy Area/Office
Type of Work
FS Unit (Location)
Certificate Status
The available values for these fields are listed on a hidden worksheet titles Lists. This worksheet may be unhidden by right clicking on any of the tabs at the bottom of the worksheet and selecting “Unhide” from the menu that appears and then clicking on “Lists” to unhide.

The basic process for modifying these values is as follows:
Unhide the Lists worksheet:
Right click on any tab at the bottom of the workbook.
Select Unhide from the pop up menu
Select Lists from the available hidden worksheets
Once the Lists Worksheet is unhidden you may change any of the values used for validation.

Locate the column that is associated with the validation values you want to change. Let’s say that we want to add an additional selection to the Gender validation field for “Declines to state”. You can simply click on the cell beneath the last entry, type “Declines to state” and press the return key. This value will be listed in the column for Gender as shown below.

Once you have the new/modified values in the Lists worksheet, you will need to modify the data validation rules on the entry worksheets (Participant Information, Project Information, and Project Tracking) as applicable.
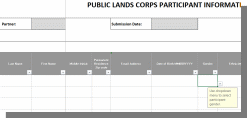
In our example we will continue to use the Gender field, so you would click on the Participant Information tab and select the first row below title Gender in the worksheet as shown below.

Press and hold the SHIFT key, then while still pressing the SHIFT key, also press the END key, followed by the DOWN ARROW. This will select all of the cells that we want to modify the data validation for.
Next select DATA from the menu at the top of the workbook, and data validation (highlighted in yellow below) from the Data Tools submenu displayed.

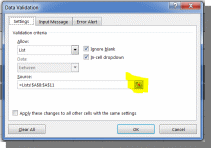
The Data Validation menu will appear, click on the icon to the right of the Source field, highlighted in yellow below:

This will then take you to the List sheets and display the current selection for validation. We see that the validation is using a range called Gender.

Click on the X in the upper right corner to close the Data Validation dialog box. We now need to modify the range to include all of the cells we want to use for validation.
Back on the Participants Information worksheet, select Formulas and then Name Manager as shown below.

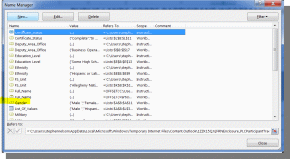
This will display the Name Manger dialog box. Locate the named range you want to update form the list and double-click on it.
This will display a list of all the named ranges in the workbook. Select the one you need to modify and double-click on it.

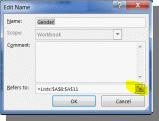
You will then see the following dialog:

Click on the small spreadsheet icon to modify the selection. This will display the current selection and you can then expand or reduce the selection to include the appropriate cells.

Once the correct cells are selected, click close and OK and you will return to the worksheet where you can check that the dropdown now contains the values you specified.
The last step is to hide the Lists worksheet. To do that you simply right click on the Lists tab at the bottom of the workbook and select Hide.
| File Type | application/vnd.openxmlformats-officedocument.wordprocessingml.document |
| Author | Nelson, Stephen - FS |
| File Modified | 0000-00-00 |
| File Created | 2022-02-21 |
© 2025 OMB.report | Privacy Policy