4 - Cms-10495 (0938-1237). Screenshots - Ops_pra_reporting_entity_review_and_dispute_and_messages_and_compliance
4 - CMS-10495 (0938-1237). SCREENSHOTS - OPS_PRA_REPORTING_ENTITY_REVIEW_AND_DISPUTE_AND_MESSAGES_AND_COMPLIANCE.docx
Registration, Attestation, Dispute Resolution and Correction, Assumptions Document and Data Retention Requirements for Open Payments (CMS-10495)
4 - CMS-10495 (0938-1237). SCREENSHOTS - OPS_PRA_REPORTING_ENTITY_REVIEW_AND_DISPUTE_AND_MESSAGES_AND_COMPLIANCE
OMB: 0938-1237
Open Payments Reporting Entity
Review and Dispute PRA
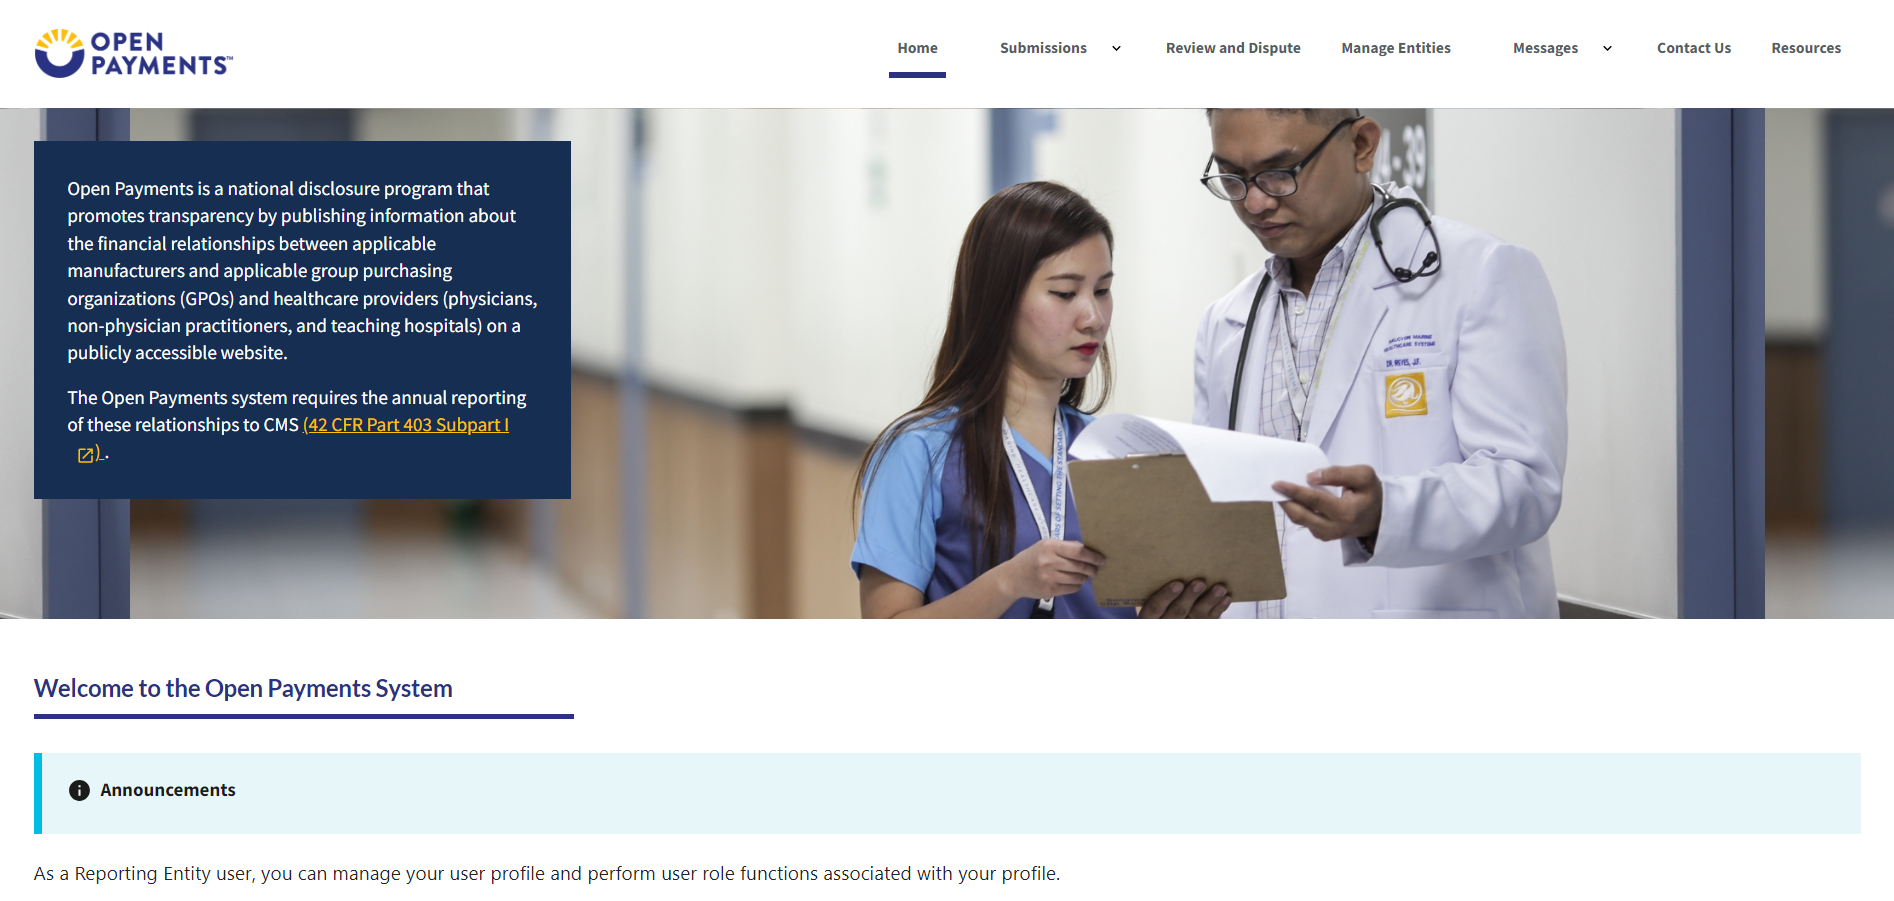
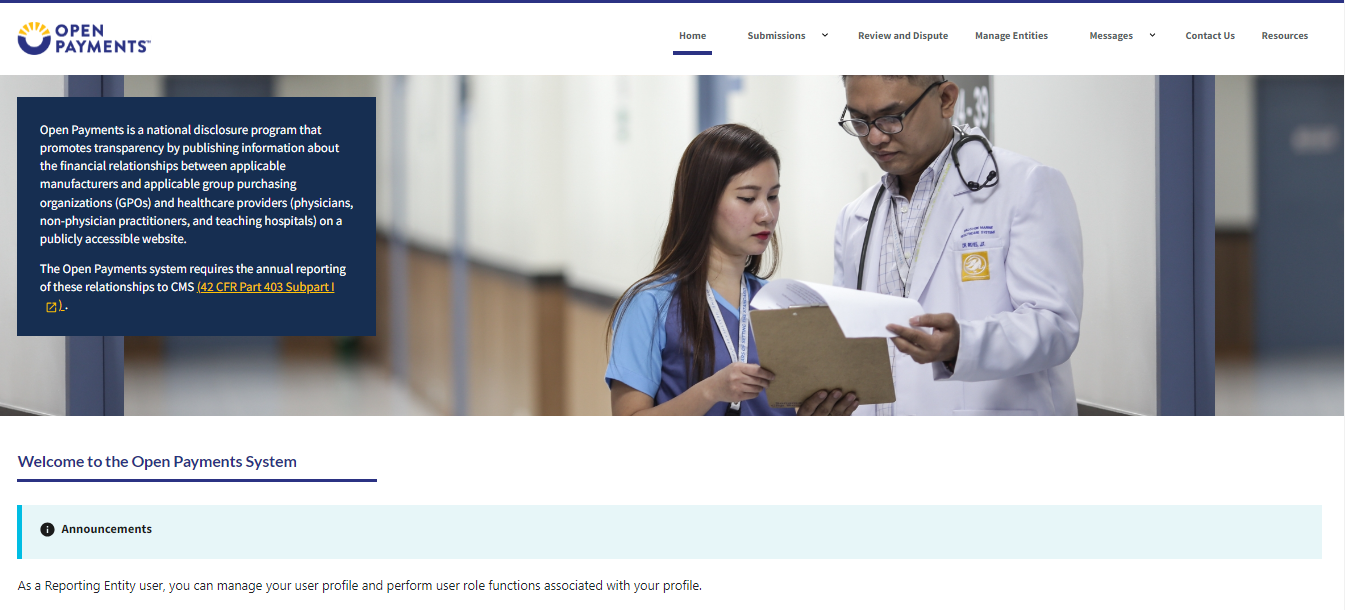
The screenshots below illustrate the differences in the Reporting Entity Review and Dispute screens between Open Payments System (OPS) 1.0 and OPS 2.0.
Review and Dispute for Applicable Manufacturers and Applicable GPOs
Review, Dispute, and Correction Overview
When an applicable manufacturer or applicable GPO has submitted records regarding payments, other transfers of value, or physician ownership or investment interests to the Open Payments system, the covered recipients identified in records have an opportunity to review those records. The covered recipient may affirm the information is correct, or if they find discrepancies with the submitted data, they can initiate a dispute within the Open Payments system. Applicable Manufacturers and Applicable GPOs can then work with the disputing party to resolve the dispute.
Figure 1: Open Payments System Review and Dispute Page (OPS 1.0)
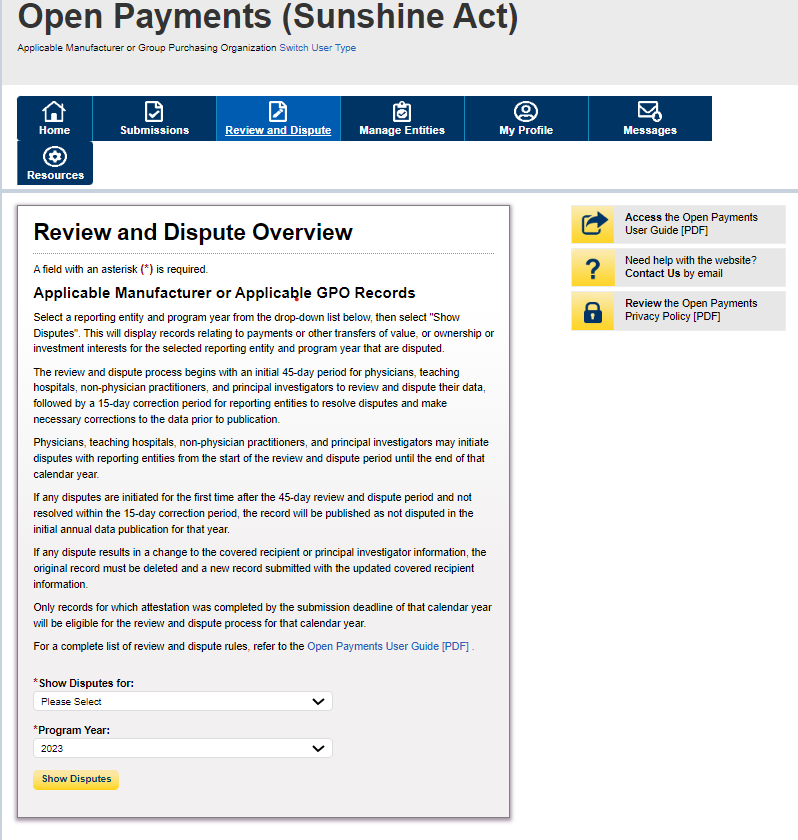
Figure 2: Open Payments System Review and Dispute Page (OPS 2.0)
Exporting Disputed Data
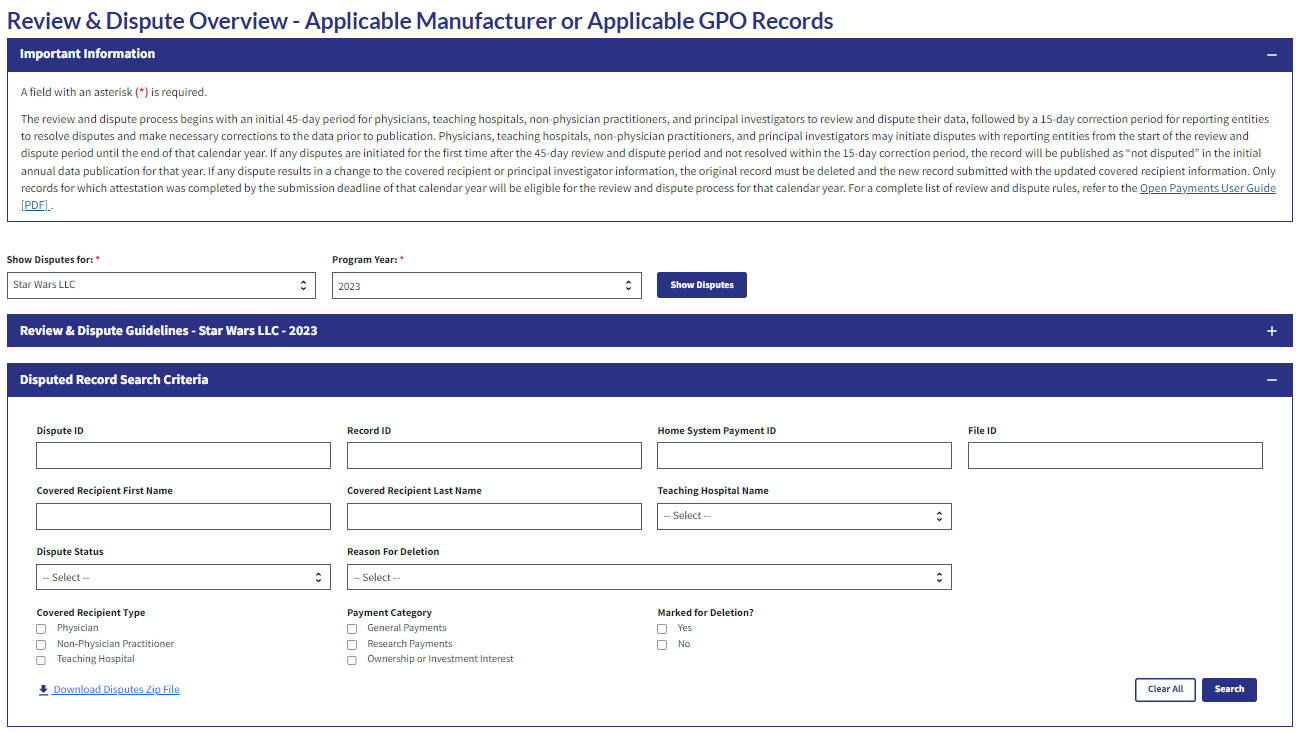
The Open Payments system allows users to download disputed data into a separate CSV file. Records are exported into a pipe (“|”) delimited CSV file by selecting the link labeled "Download Disputes” from your entity’s “Review and Dispute” page. The file will be compressed into a ZIP file and will contain all data fields displayed in the table and other data elements related to the dispute.
Figure 3: Open Payments System Download Disputes Zip File Hyperlink Page (OPS 1.0)
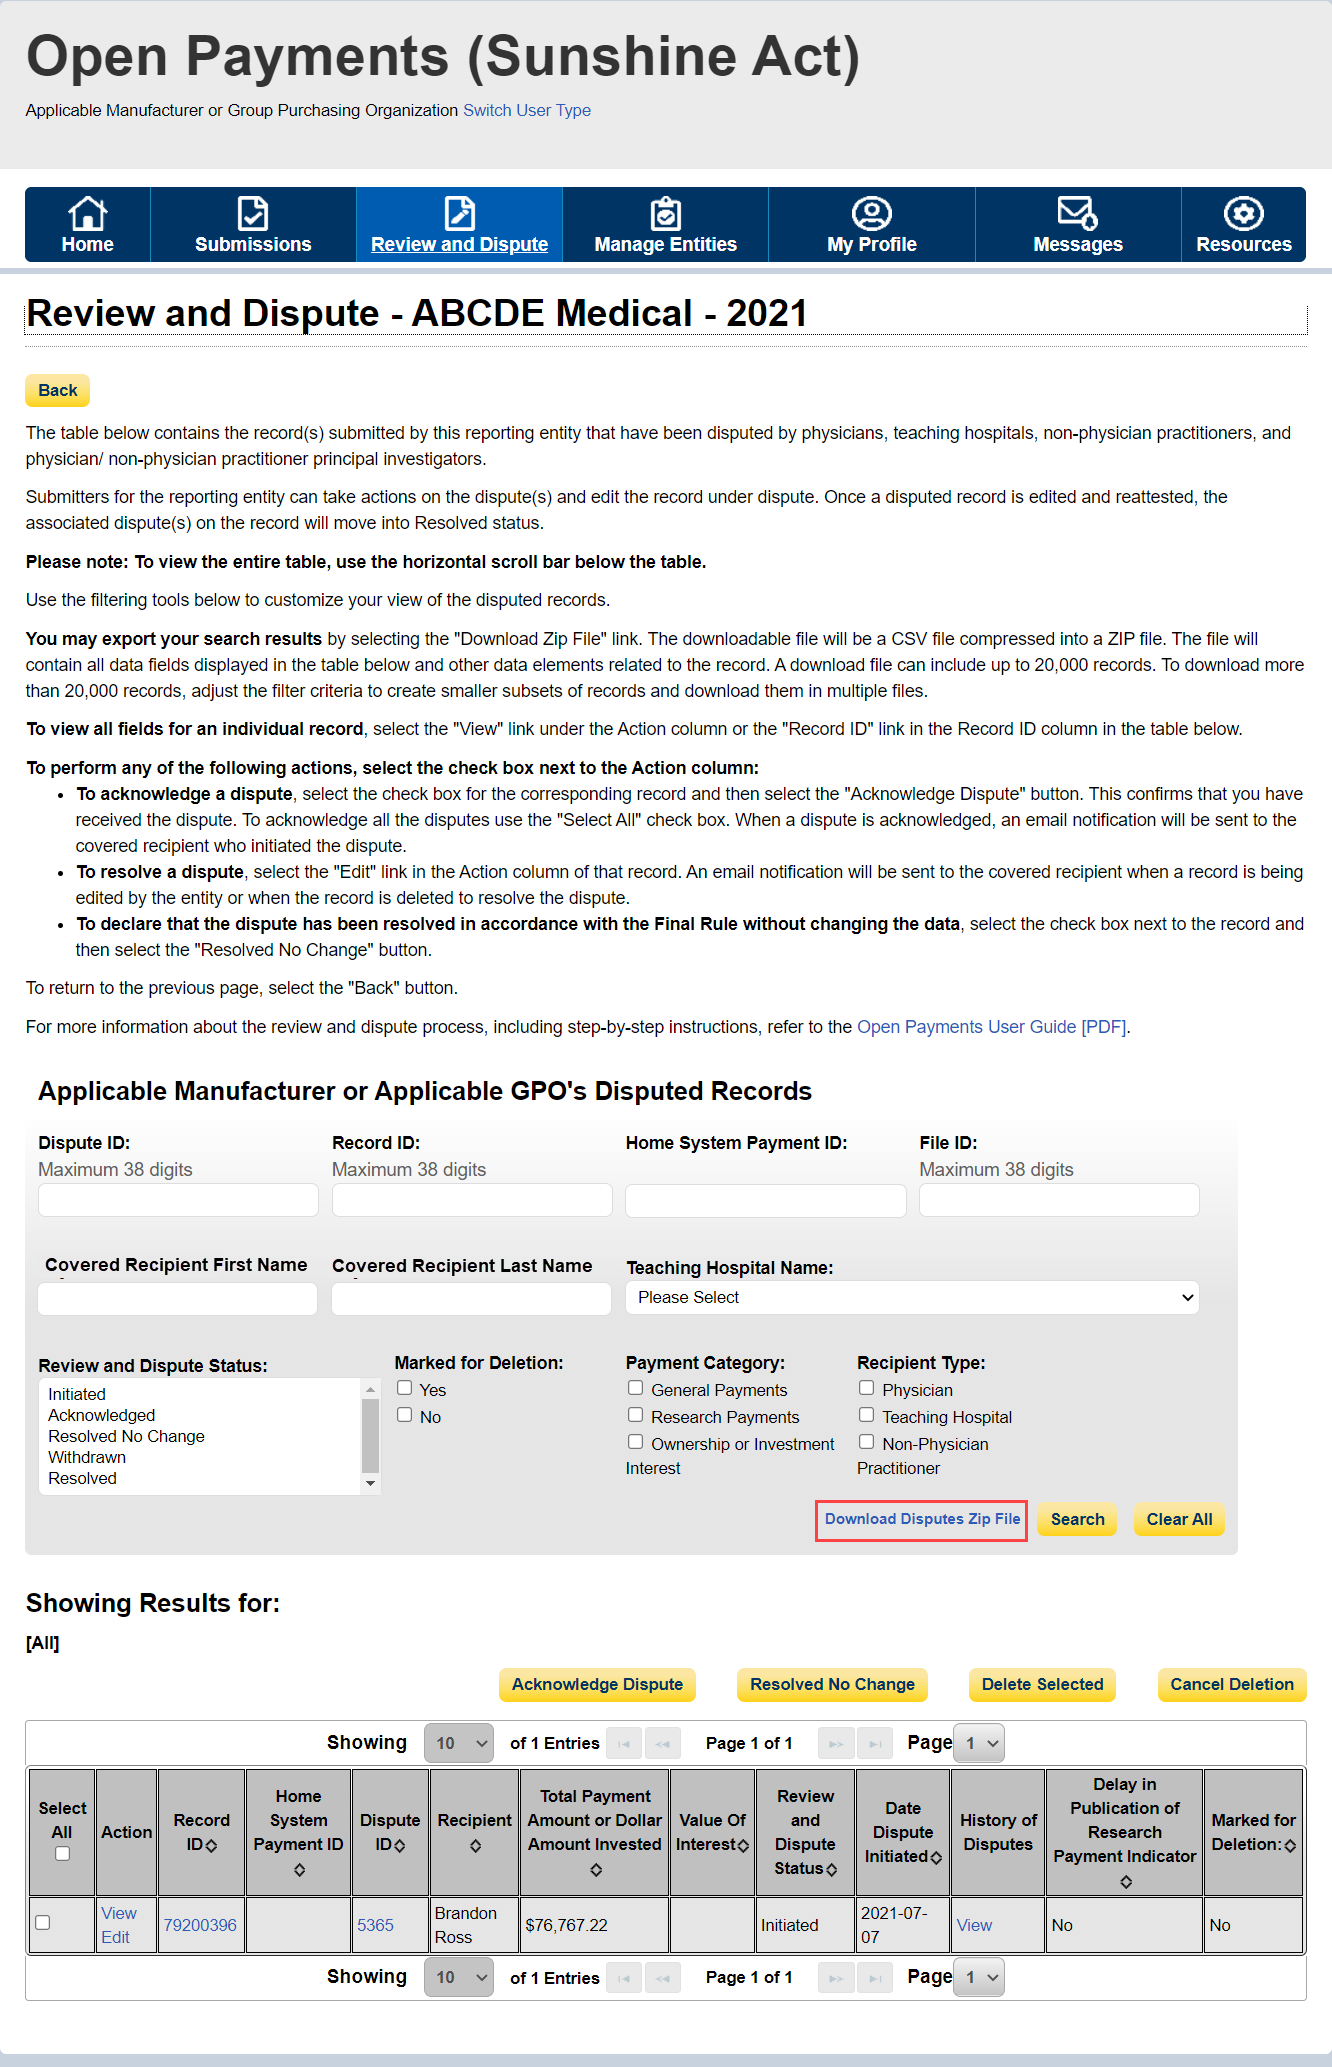
Figure 4: Open Payments System Download Disputes Zip File Hyperlink Page (OPS 2.0)
Acknowledging a Dispute
Step 1: Log in to the Open Payments system and select the “Review and Dispute” tab on the tool bar.
Figure 5: Open Payments System -> Review and Dispute Tab Page (OPS 1.0)
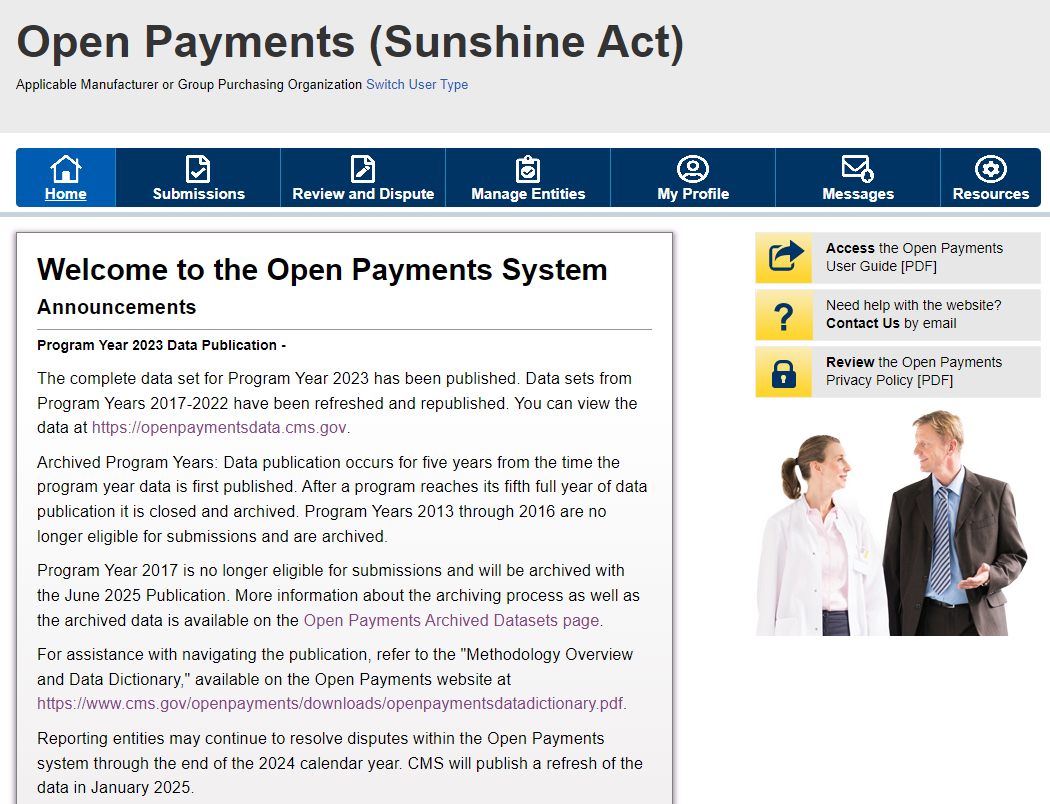
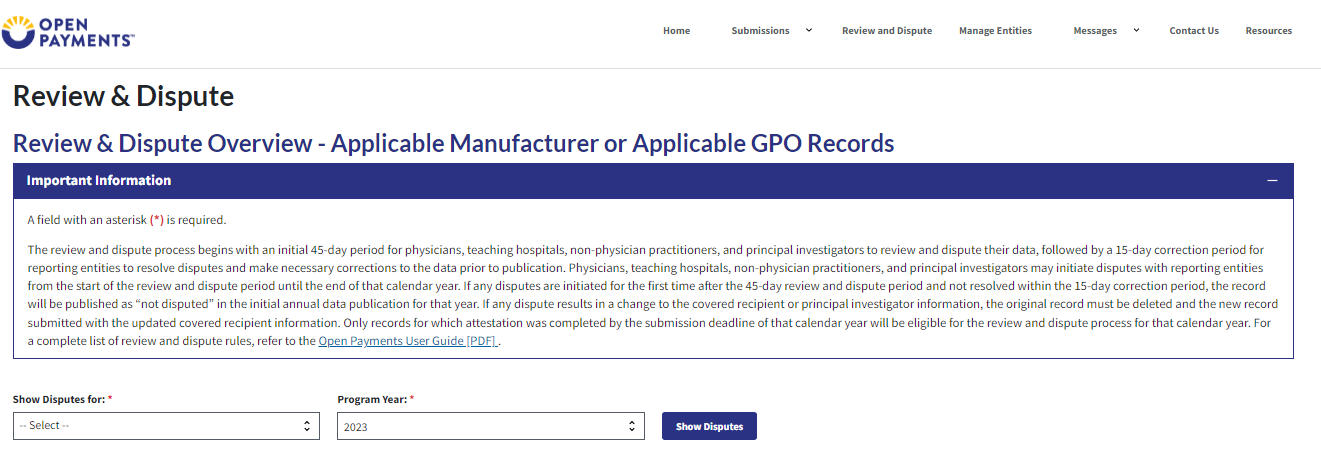
Figure 6: Open Payments System -> Review and Dispute Tab Page (OPS 2.0)
Step 2: Select the reporting entity and the program year from the drop-down menus. When finished, select the “Show Disputes” button. This will show users a list of all disputes for the selected entity in that program year.
Figure 7: Open Payments System Review & Dispute Overview Page -> Show Disputes Button Page (OPS 1.0)
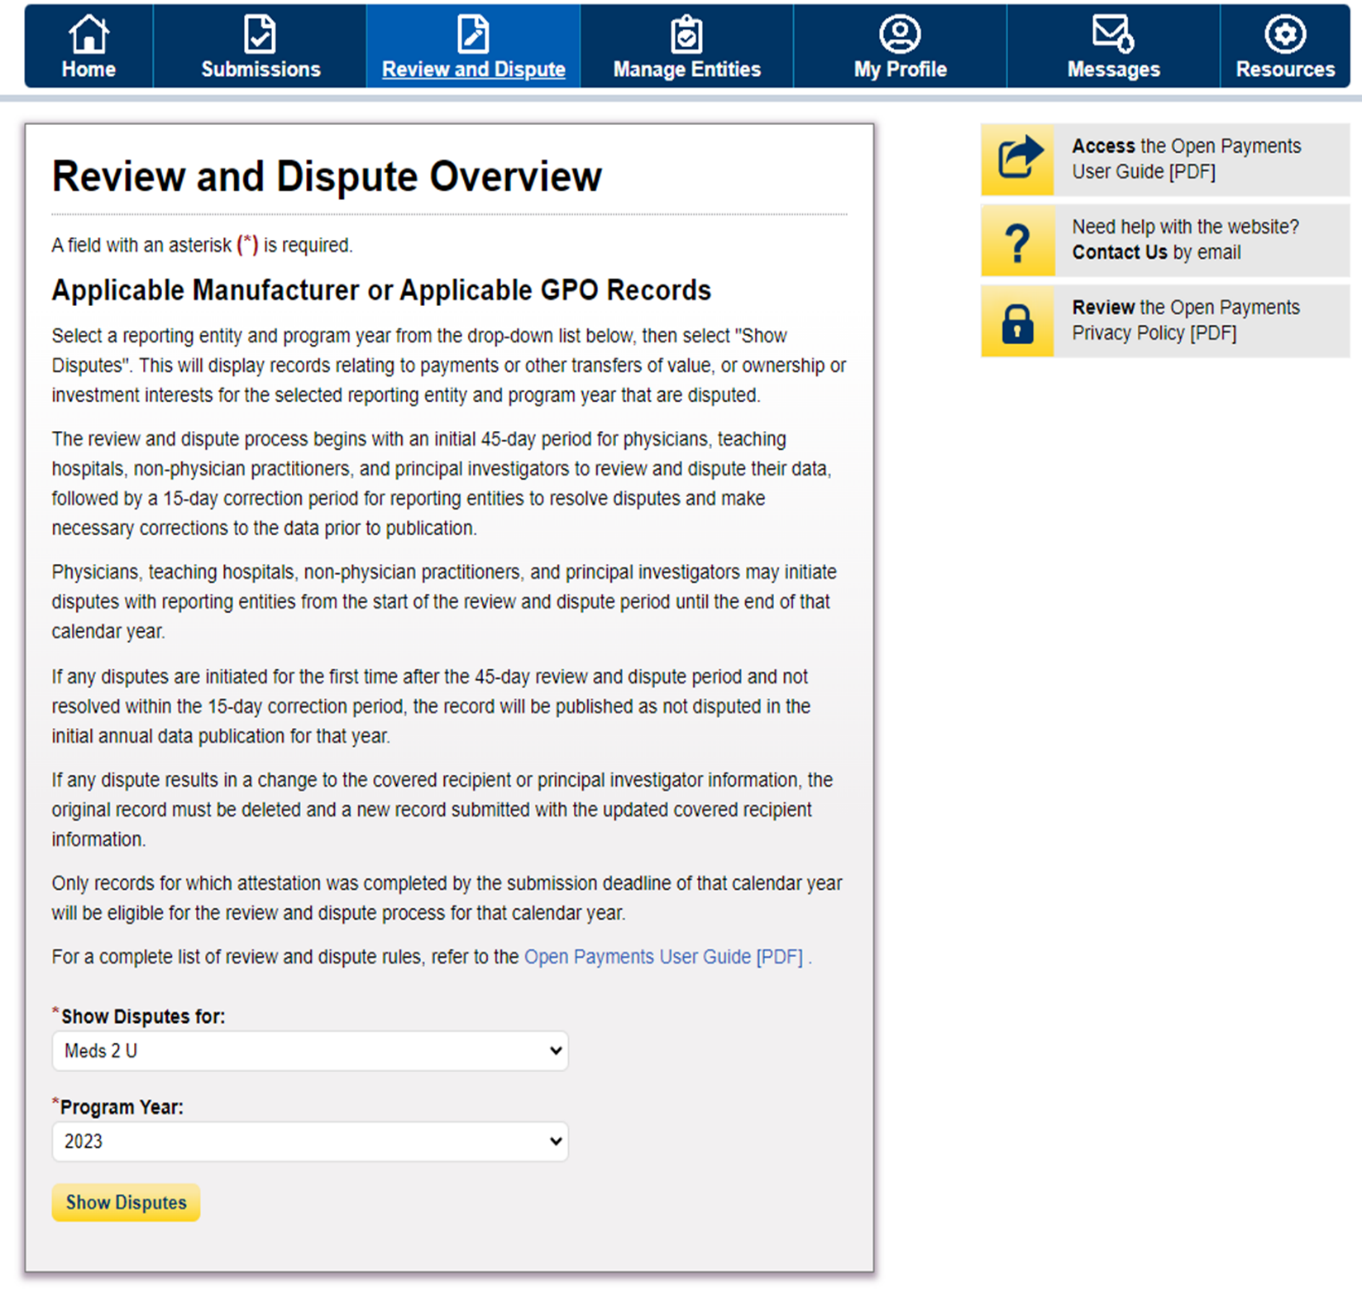
Figure 8: Open Payments System Review & Dispute Overview Page -> Show Disputes Button Page (OPS 2.0)
Step 3: On the “Review and Dispute” page, find the disputed record(s) to acknowledge. Users may filter the records using the search criteria options to help locate the correct record(s), such as filtering for records with a Review and Dispute status of “Initiated.”
Figure 9: Open Payments System Review & Dispute Overview Page -> Page -> Disputed Record Search Criteria Page (OPS 1.0)
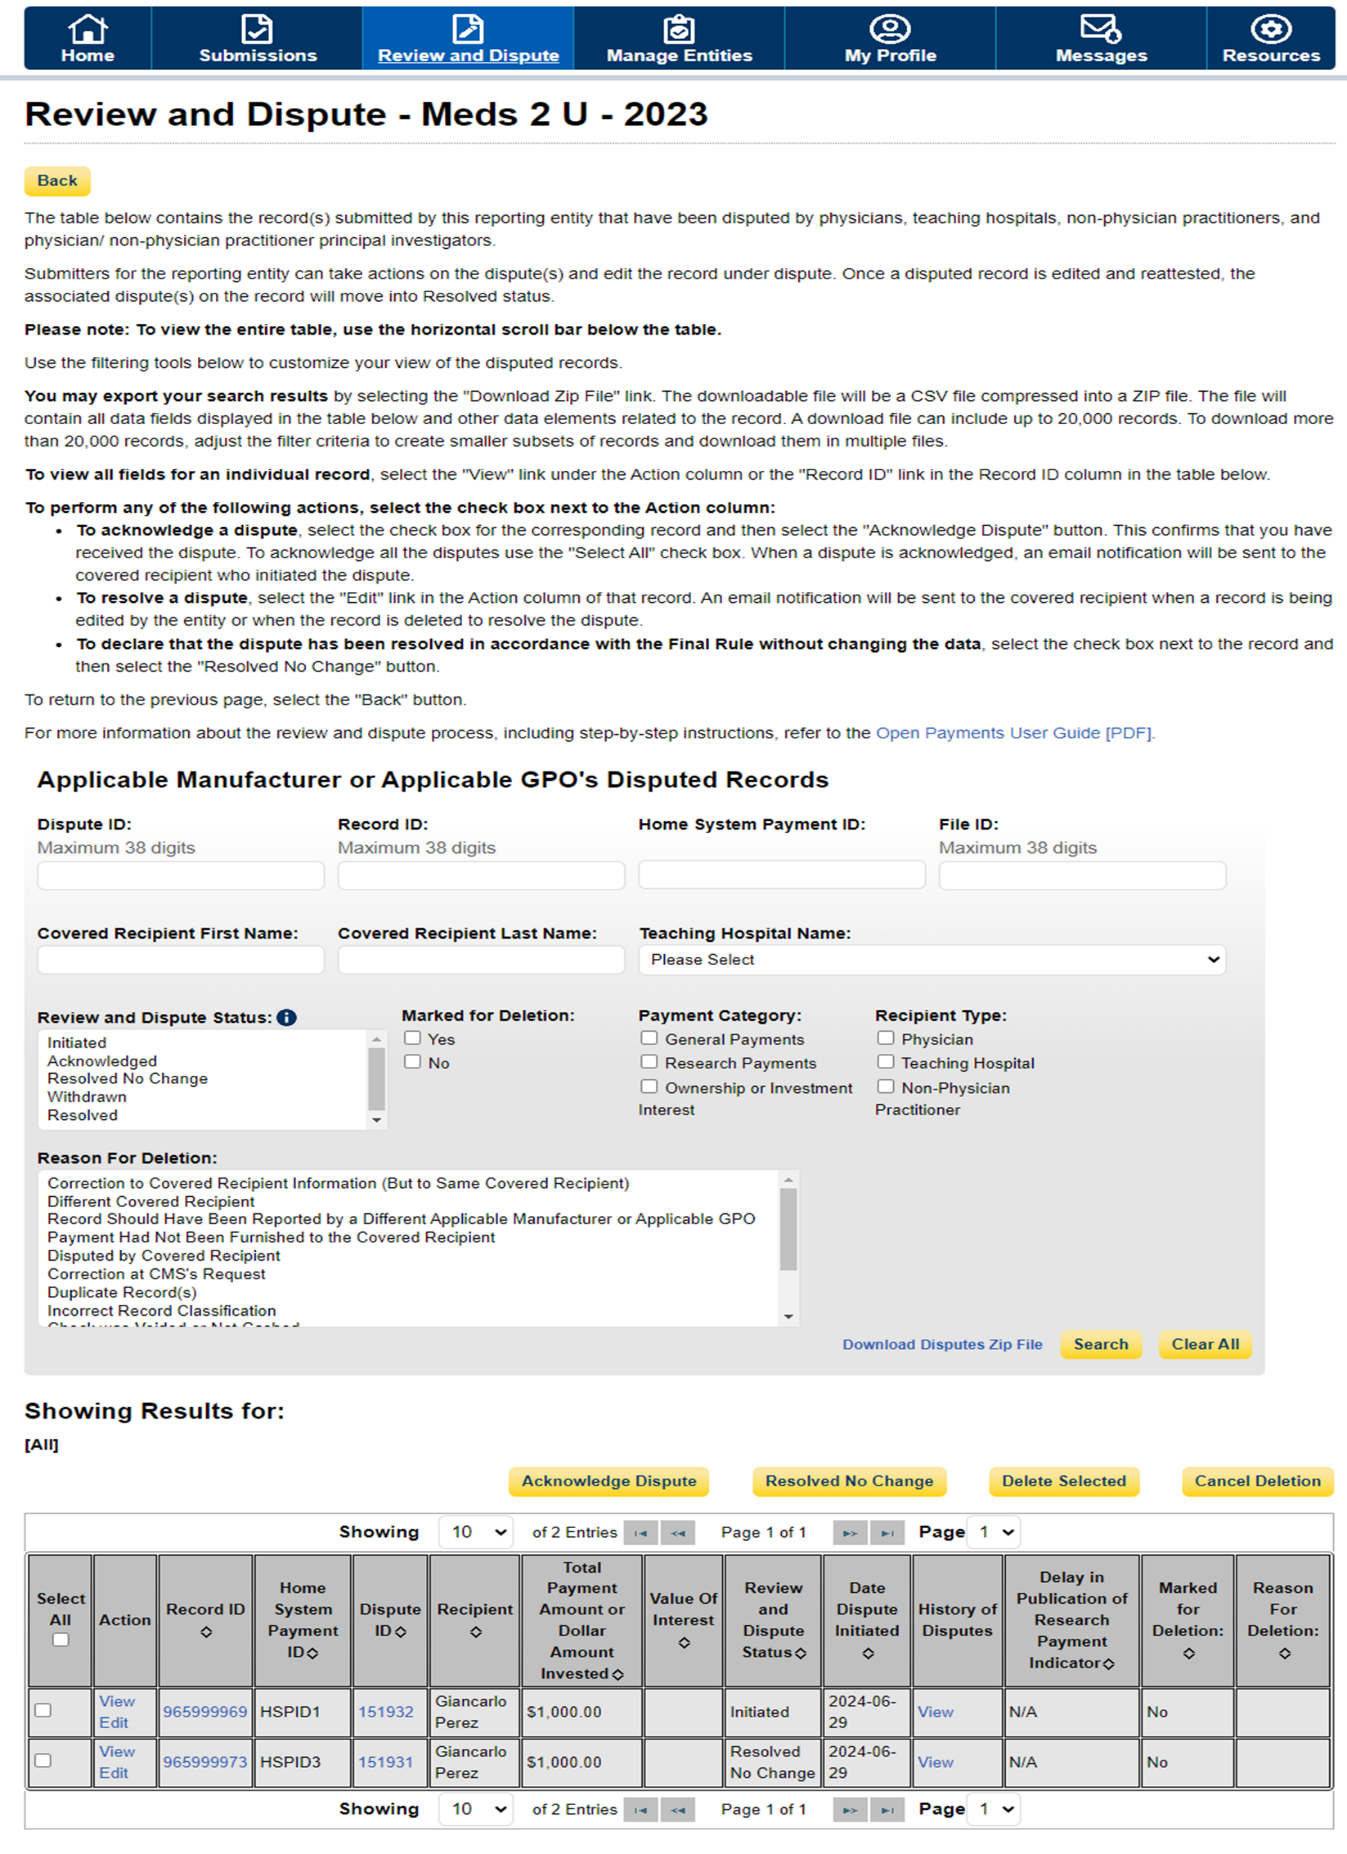
Figure 10: Open Payments System Review & Dispute Overview Page -> Page -> Disputed Record Search Criteria Page (OPS 2.0)
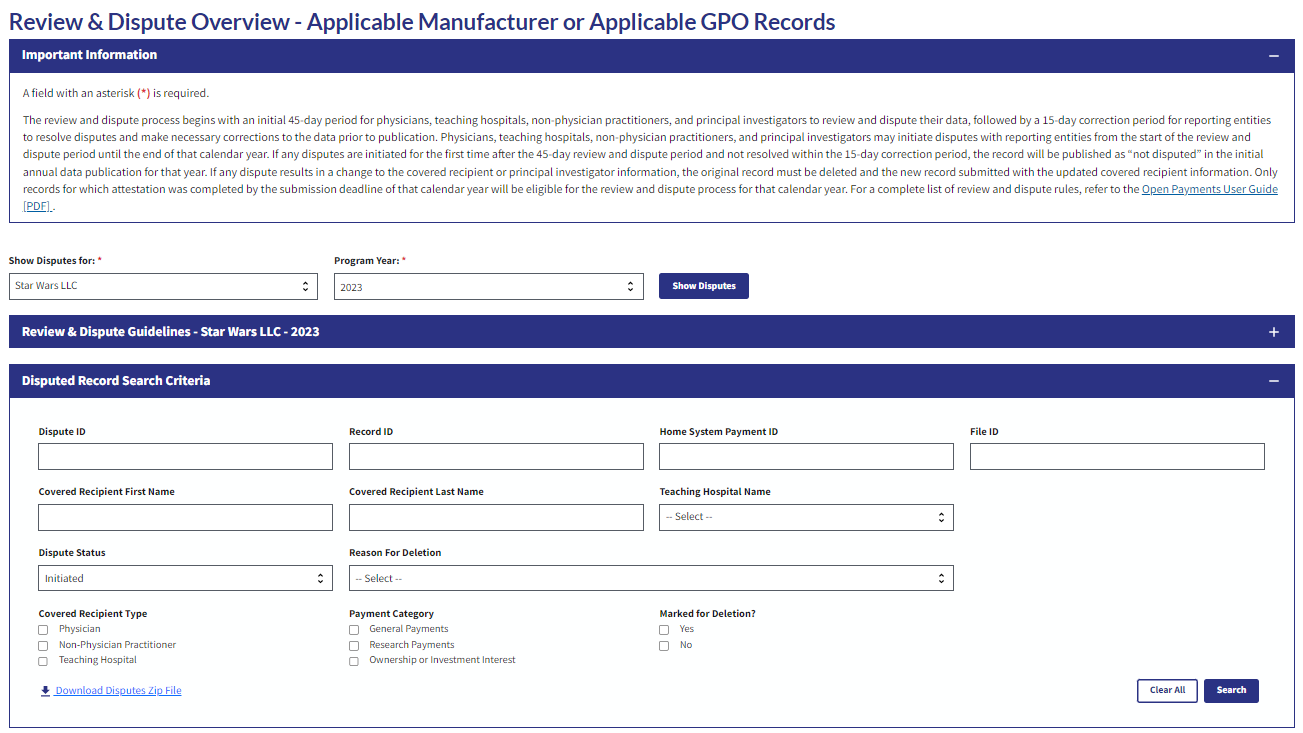
Step 4: Select the disputed record(s) to acknowledge, and then select “Acknowledge Dispute.” Note: Record(s) must be in “Initiated” status to acknowledge dispute(s).
Figure 11: Open Payments System Review & Dispute Page -> Acknowledge Dispute Button (OPS 1.0)
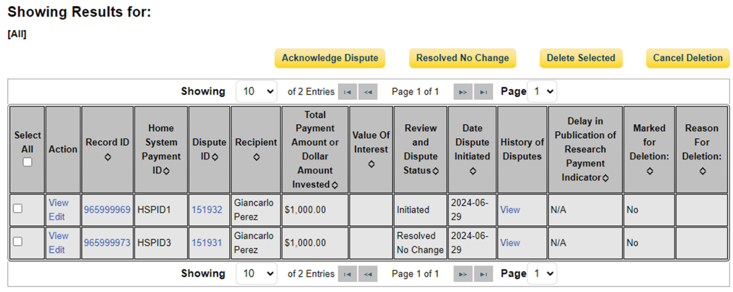
Figure 12: Open Payments System Review & Dispute Page -> Acknowledge Dispute Button (OPS 2.0)
OPS 2.0 PRA Screenshot
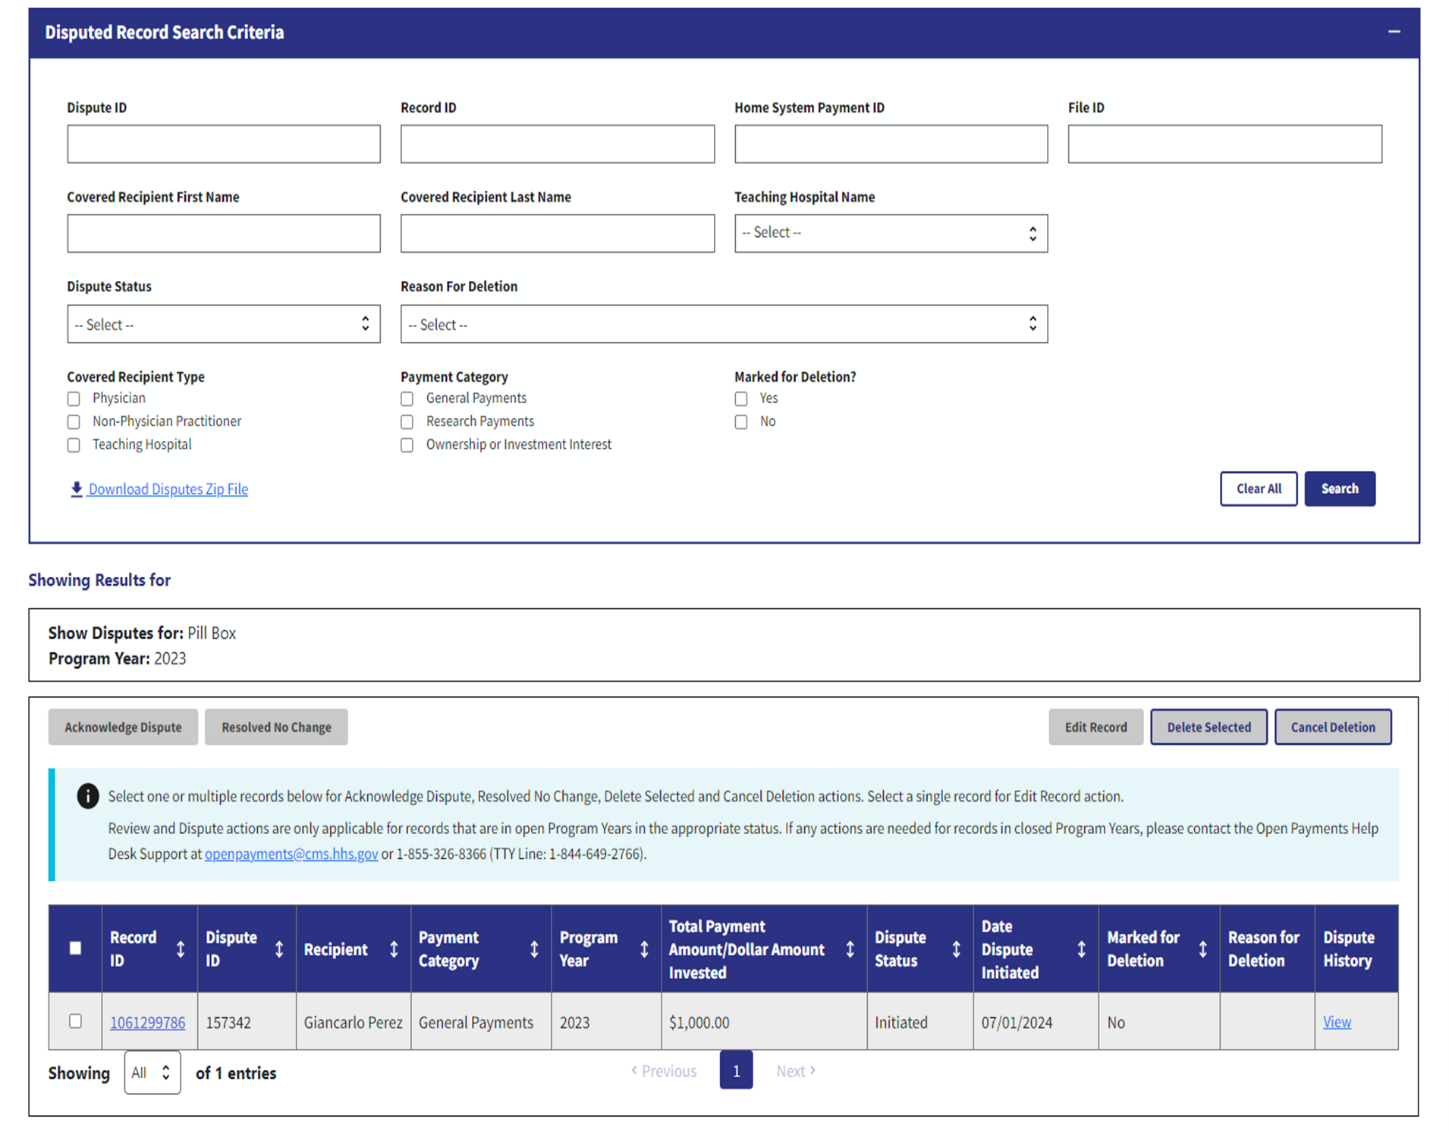
Step 5: Review the information displayed on the “Acknowledge Dispute” window. When finished, select the “Acknowledge” button.
Figure 13: Open Payments System Review & Dispute Page -> Acknowledge Button (OPS 1.0)
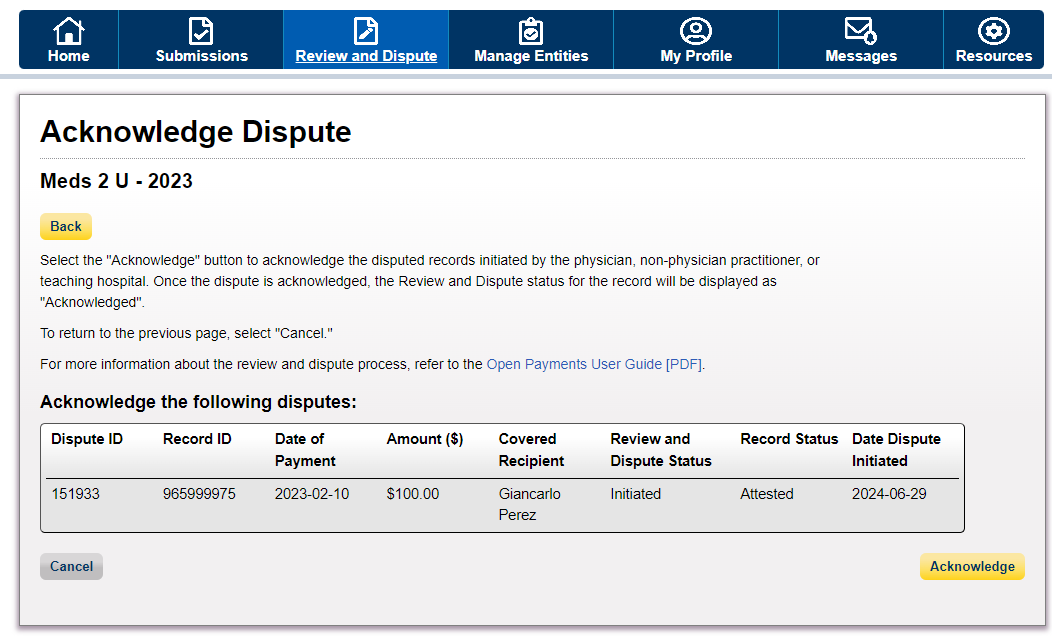
Figure 14: Open Payments System Review & Dispute Page -> Acknowledge Button (OPS 2.0)

Step 6: Review the notification message to confirm you successfully acknowledged the selected dispute(s) and then select the “Ok” button.
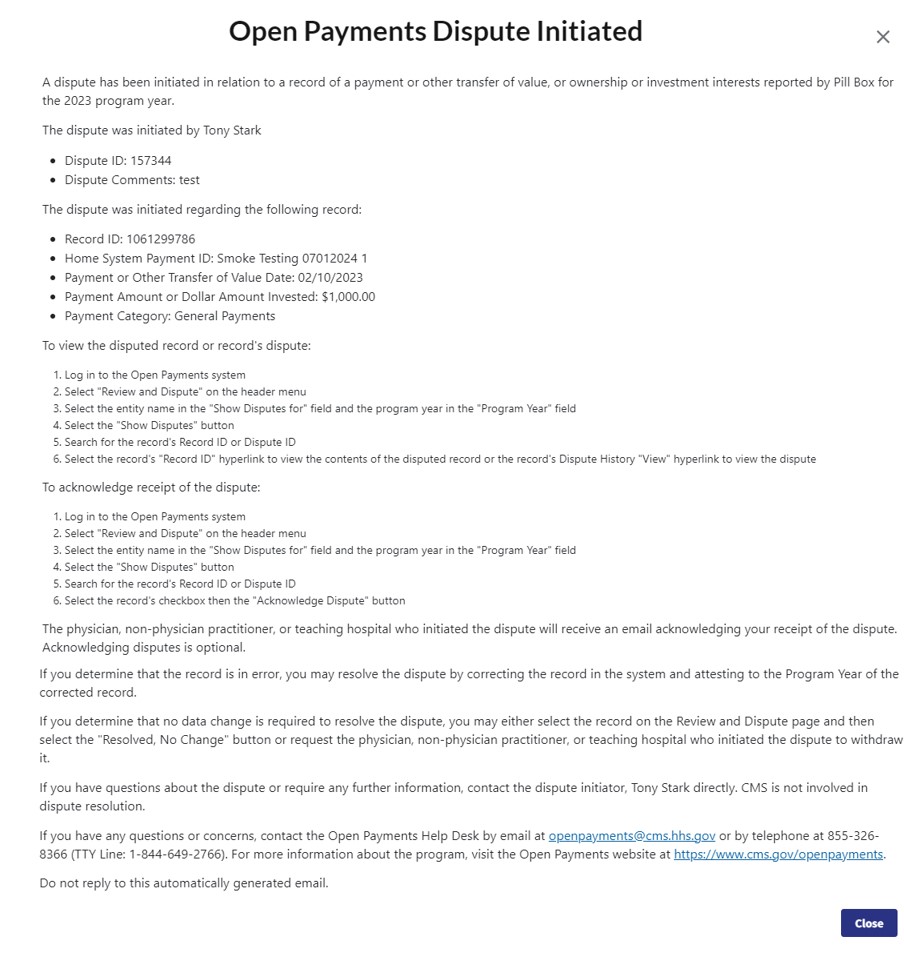
An email notification will also be sent to the covered recipient informing them that their dispute has been acknowledged.
Figure 15: Open Payments System Review & Dispute Page -> Acknowledge Dispute Window -> Confirmation Message (OPS 1.0)
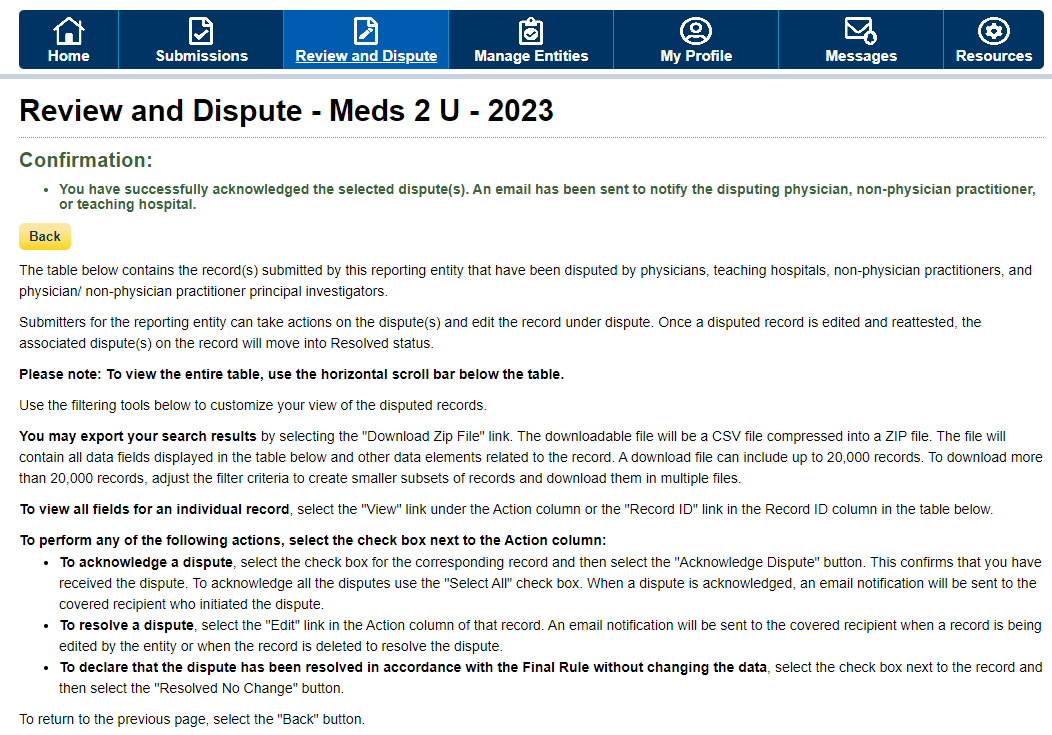
Figure 16: Open Payments System Review & Dispute Page -> Acknowledge Dispute Window -> Confirmation Message (OPS 2.0)

Resolved, No Change Disputes
Step 1: Log in to the Open Payments system and select the “Review and Dispute” tab on the tool bar.
Step 2: Select the reporting entity name and the program year from the drop-down menus. When finished, select “Show Disputes.” This will show you a list of all disputes for the selected entity in that program year.
Figure 17: Open Payments System Review & Dispute Page -> Show Disputes Button (OPS 1.0)

Figure 18: Open Payments System Review & Dispute Page -> Show Disputes Button (OPS 2.0
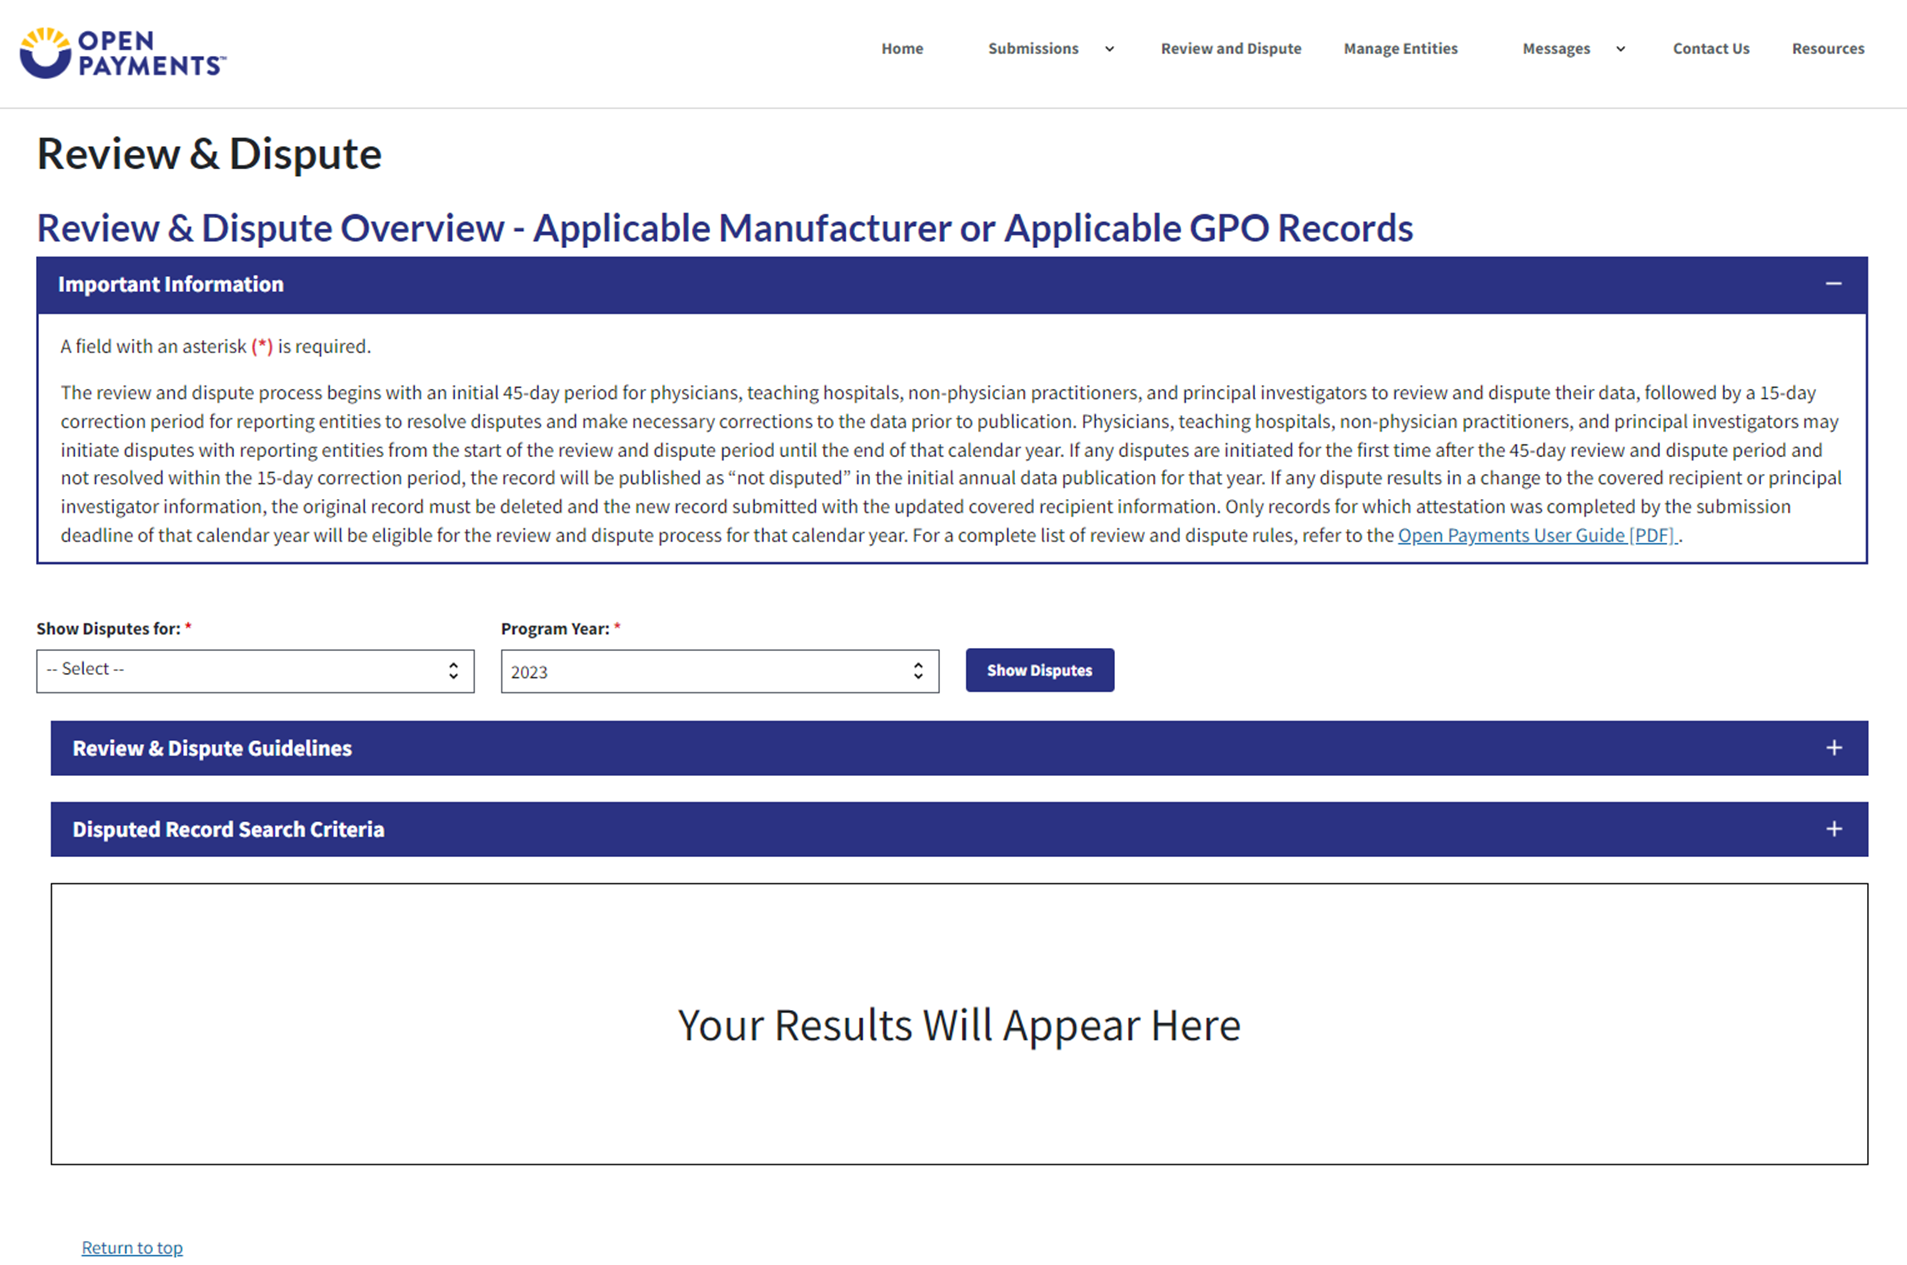
Step 3: On the “Review and Dispute” page, find the disputed record(s) to resolve without changing. Users may filter the records by using the search criteria options to help locate the correct record(s), such as filtering for records with a Review and Dispute status of “Initiated” or “Acknowledged.
Figure 19: Open Payments System Review & Dispute Page -> Disputed Record Search Criteria (OPS 1.0)

Figure 20: Open Payments
System Review & Dispute Page -> Disputed Record Search
Criteria (OPS 2.0)
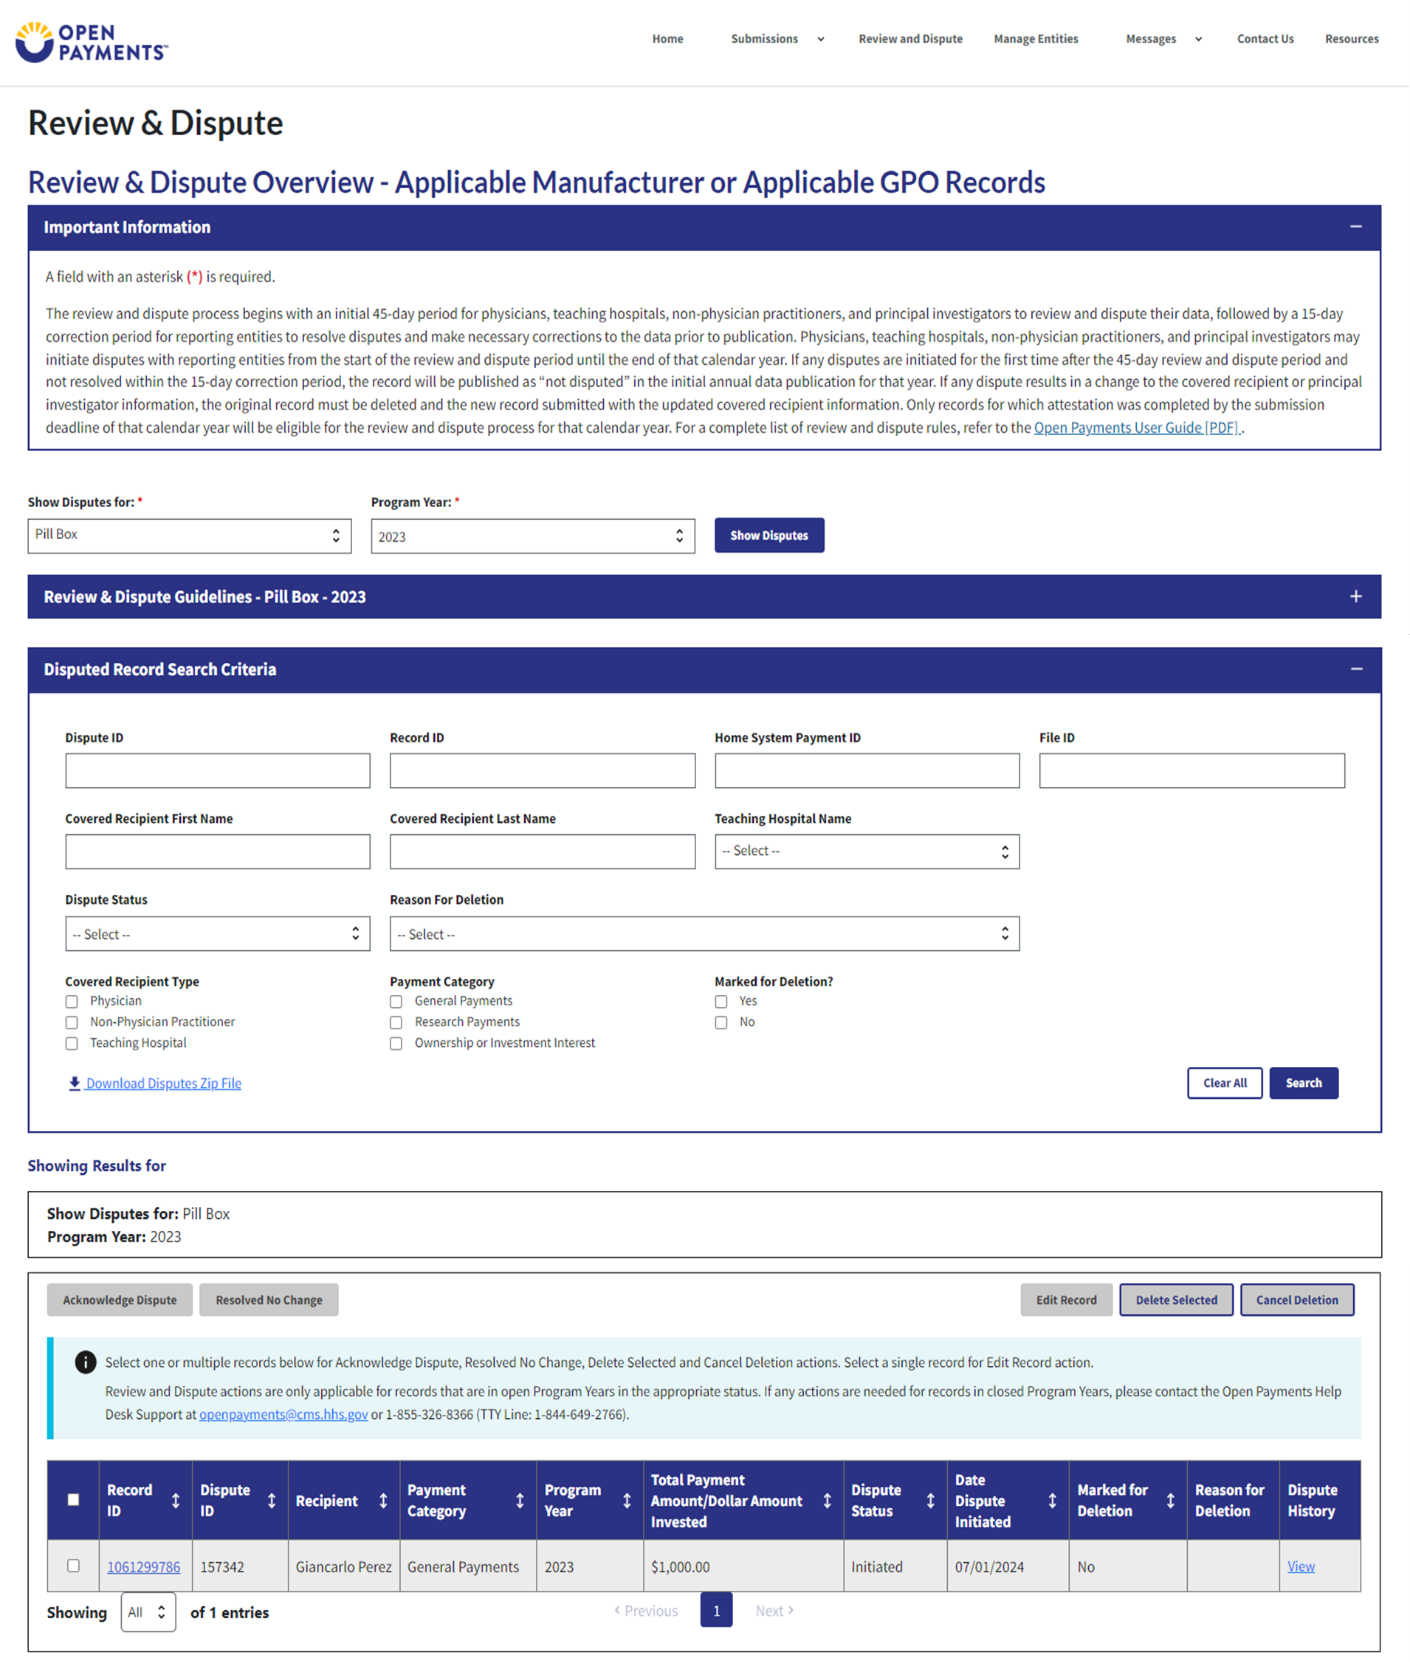
To view details about a disputed record by select the “Record ID” hyperlink under the “Record ID” column.
To view the detailed history for a record’s dispute by select the “View” hyperlink for the record under the “Dispute History” column.
Step 4: Select the disputed record(s) users wish to resolve with no changes, and then select the “Resolved No Change” button.
Disputed Record(s) must be in “Initiated” or “Acknowledged” status to resolve dispute(s) with no changes.
Users may only resolve disputes with no changes if the reporting entity and the disputing covered recipient have resolved the dispute in accordance with the guidance in the Final Rule.
Figure 21: Open Payments System Review & Dispute Page -> Resolved No Change Button (OPS 1.0)
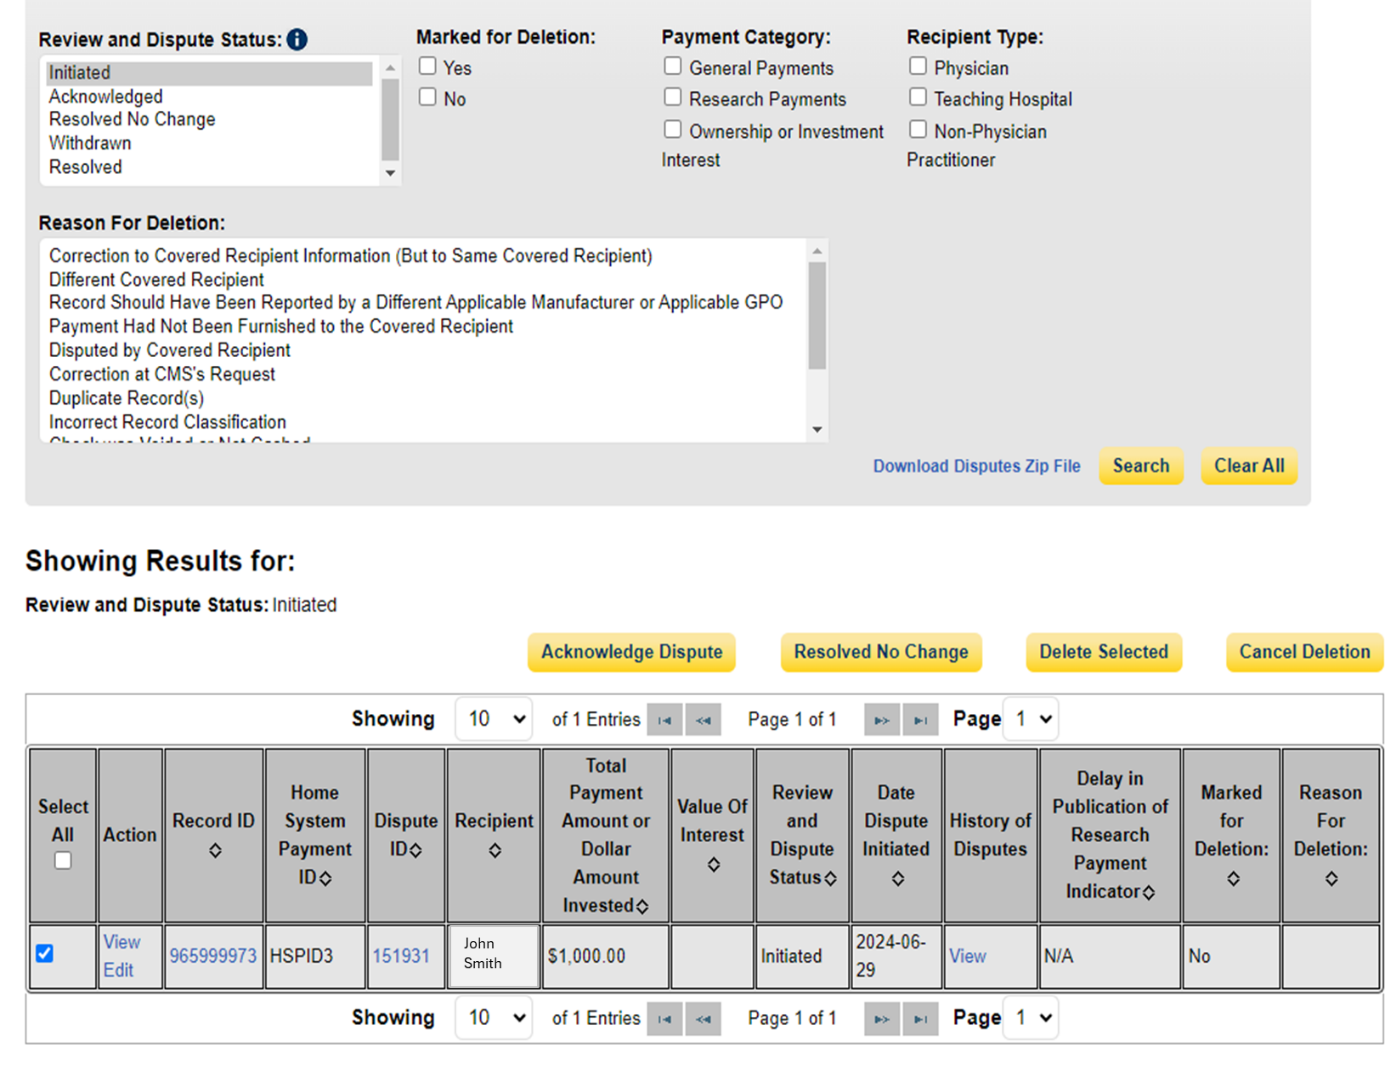
Figure 22: Open Payments
System Review & Dispute Page -> Resolved No Change Button (OPS
2.0)
Step 5: In the “Reason for dispute resolution with no change(s) to the data” box, enter the reason the dispute has been resolved with no changes. When finished, select the “Resolved No Change” button.
The text box can contain up to 4,000 characters, including spaces.
Figure 23: Open Payments System Review & Dispute Page -> Resolved No Change Window and Button (OPS 1.0)
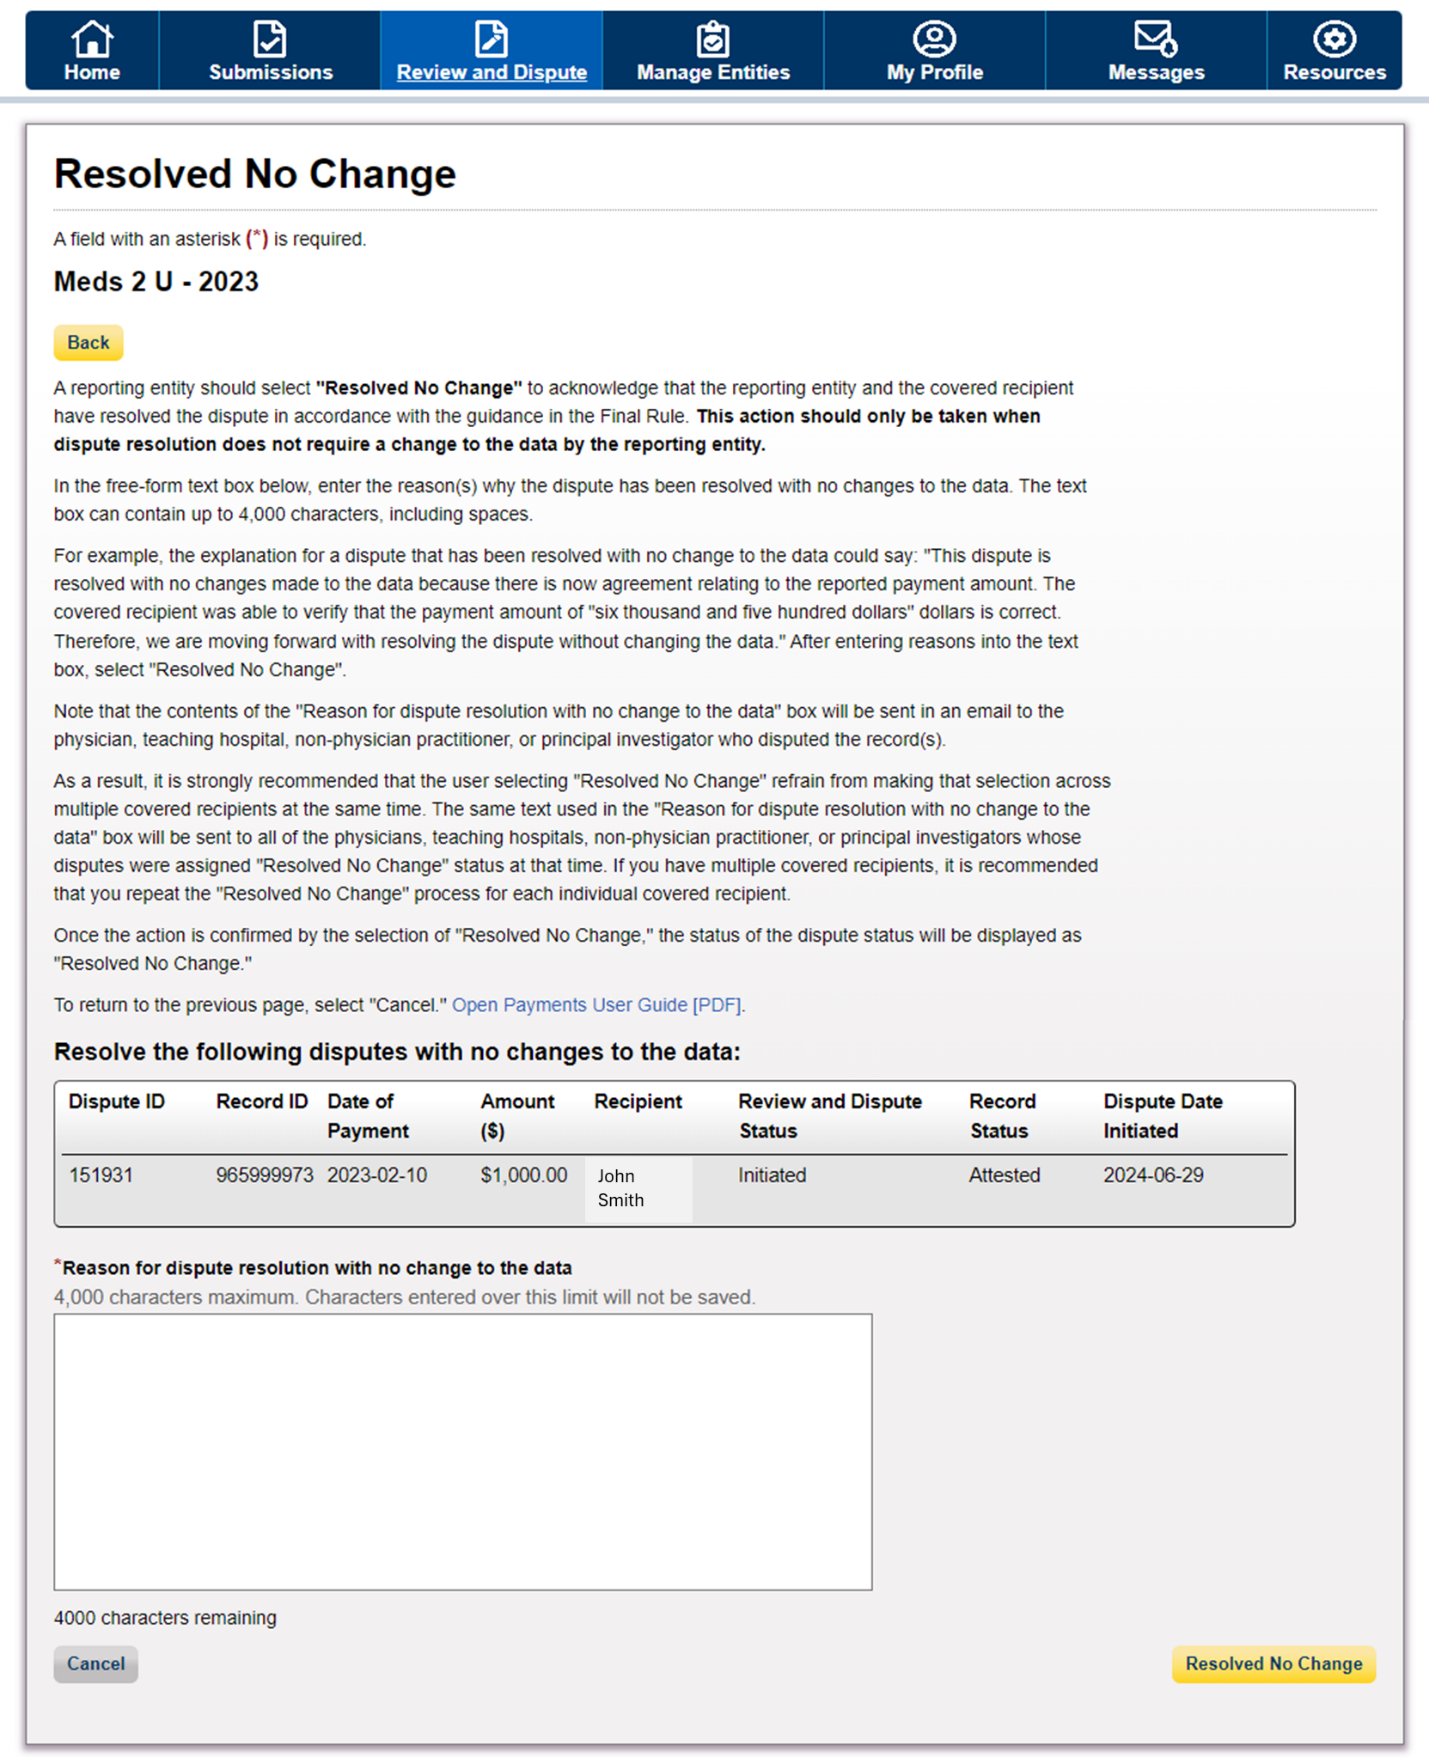
Figure 24: Open Payments System Review & Dispute Page -> Resolved No Change Window and Button (OPS 2.0)

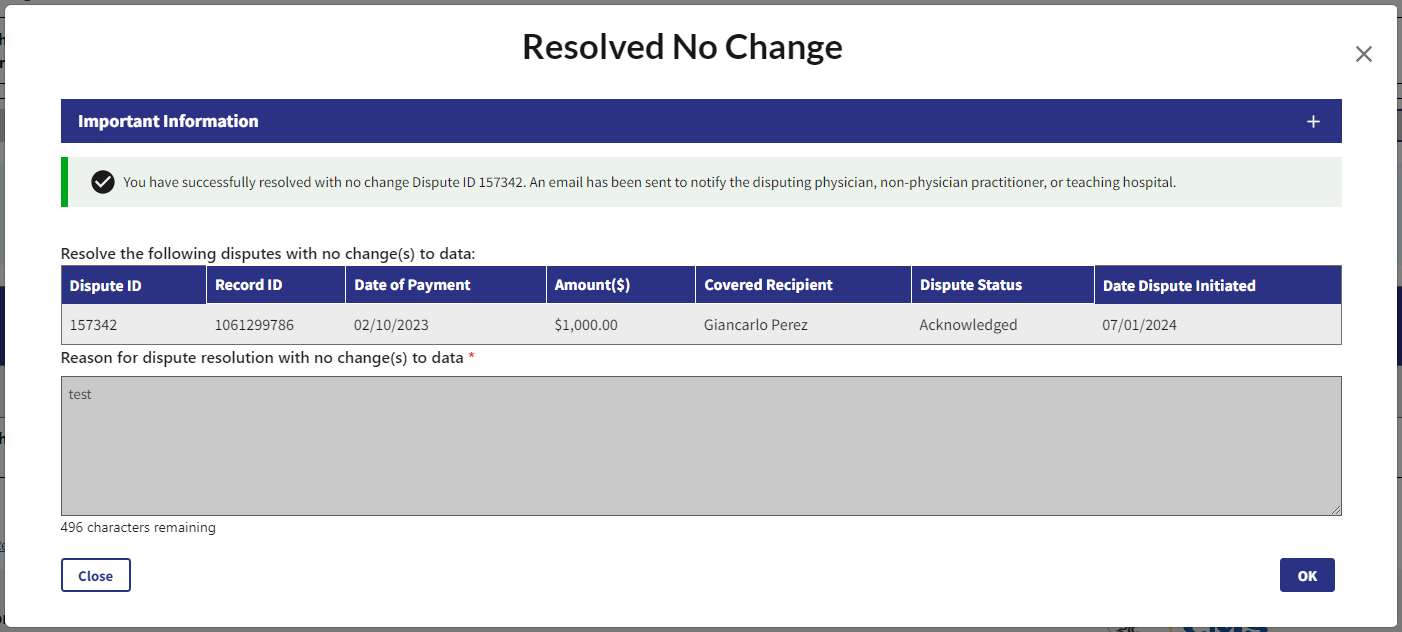
Step 6: Review the notification message to confirm you successfully resolved with no change(s) to the selected dispute(s) and then select the “Ok” button.
Figure 25: Open Payments System Review & Dispute Page -> Resolved No Change Window and Button (OPS 1.0)
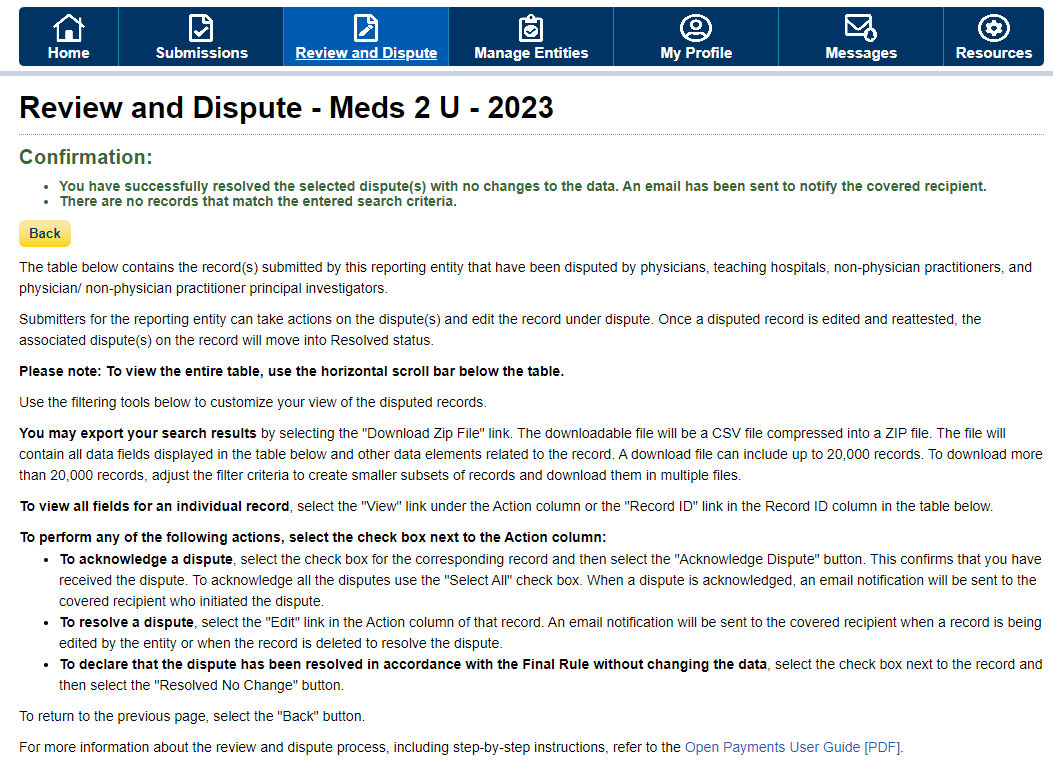
Figure 26: Open Payments System Review & Dispute Page -> Resolved No Change Window and Button (OPS 2.0)
Correction, Resolution, and Deletion of Submitted Payment Data
Edit Information and Resubmit Record
To manually edit an individual disputed record using the “Edit” function, follow the steps below.
Step 1: Log in to the Open Payments system and select the “Review and Dispute” tab on the tool bar.
Step 2: Select the reporting entity and the program year, for which you wish to edit disputed records, from the drop-down menus. When finished, select the “Show Disputes” button.
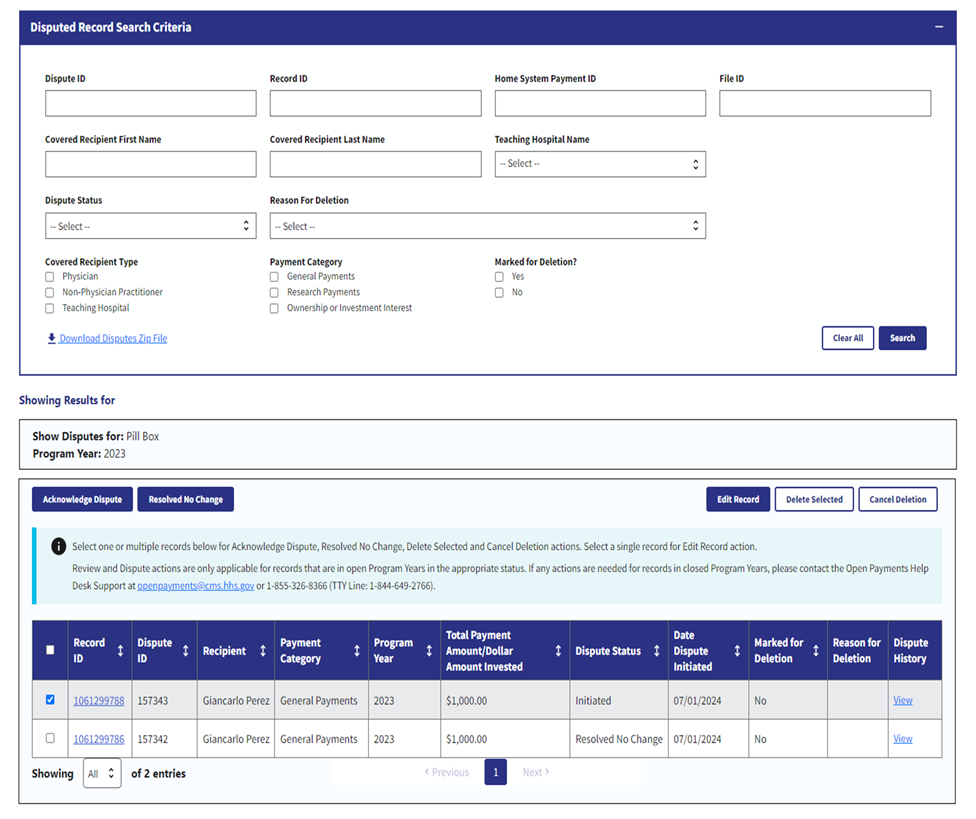
Step 3: On the Review and Dispute page, select the disputed record and then select the “Edit” button
Figure 27: Open Payments System Review & Dispute Page -> Manual Edit GUI -> Edit Button (OPS 1.0)

Figure 28: Open Payments System Review & Dispute Page -> Manual Edit GUI -> Edit Button (OPS 2.0)
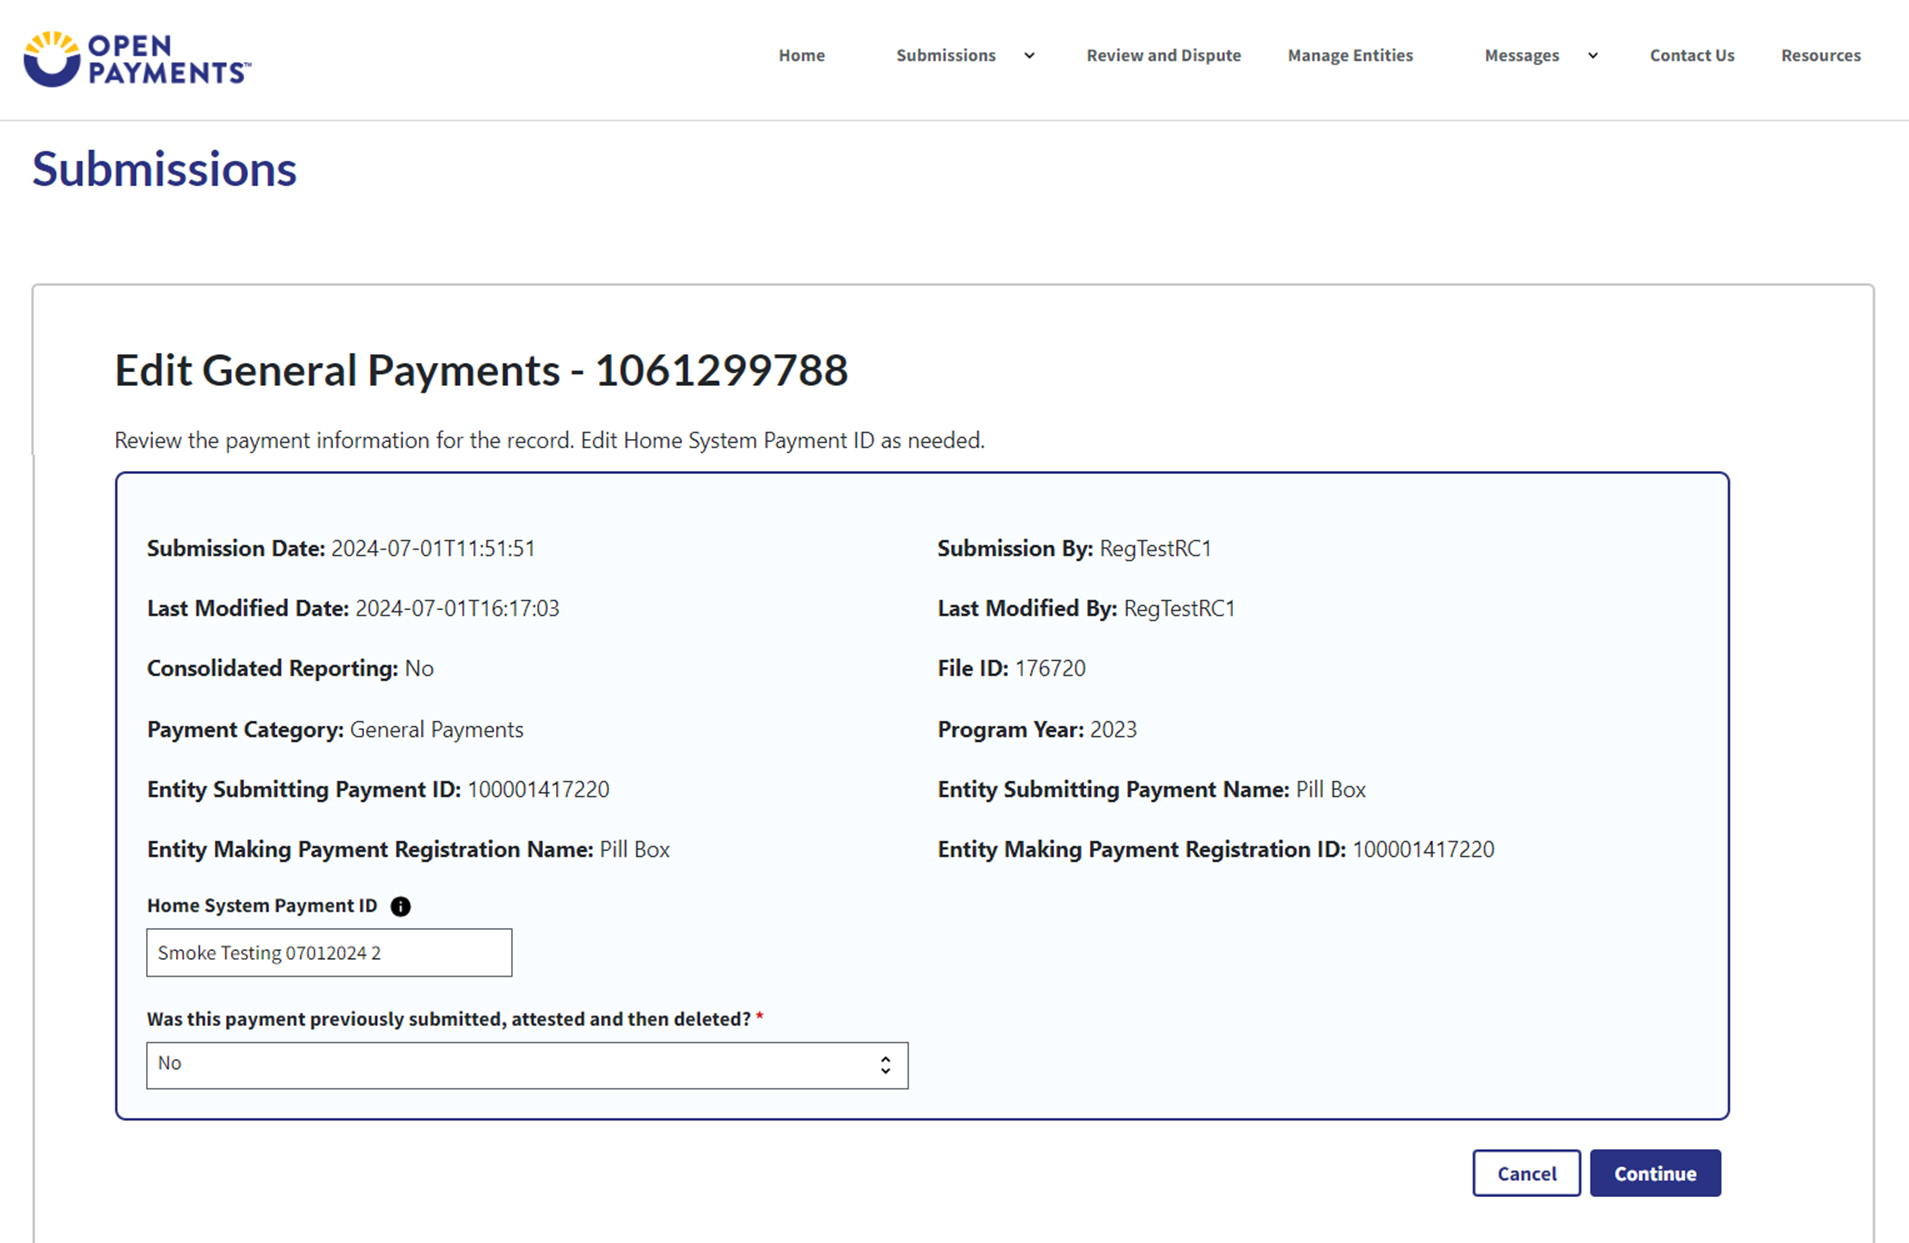
Step 4: Select the “Continue” button to proceed through the manual edit Graphical User Interface (GUI) to correct the field that corresponds with the covered recipient’s reason for dispute.
Figure 29: Open Payments System Review & Dispute Page -> Manual Edit GUI -> Continue Button (OPS 1.0)

Figure 30: Open Payments System Review & Dispute Page -> Manual Edit GUI -> Continue Button (OPS 2.0)
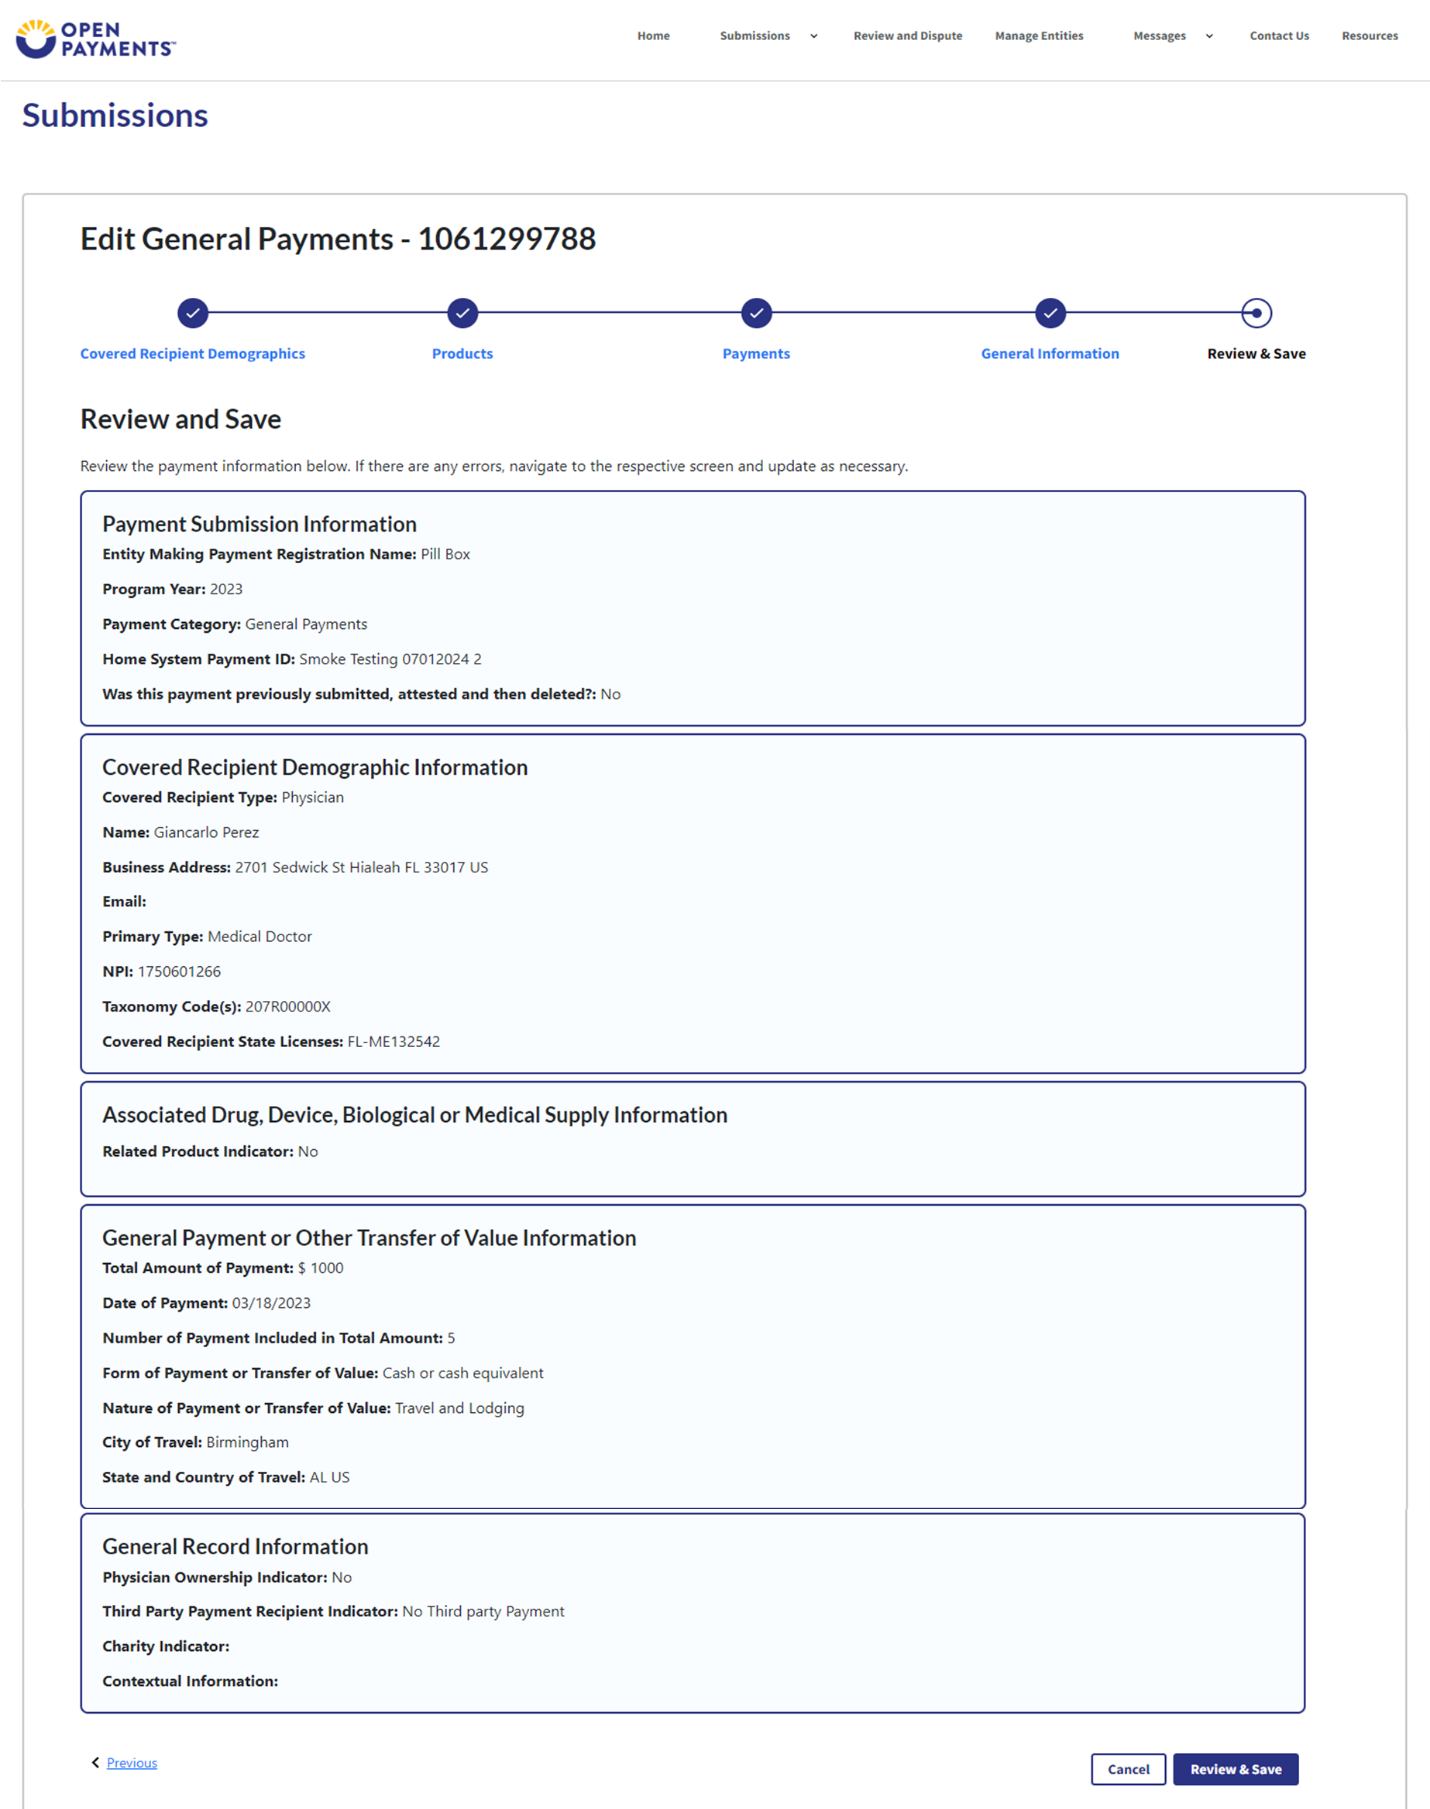
Step 5: Select “Review & Save” button after the disputed record is corrected.
Figure 31: Open Payments System Review & Dispute Page -> Manual Edit Review & Save Page and Button (OPS 1.0)
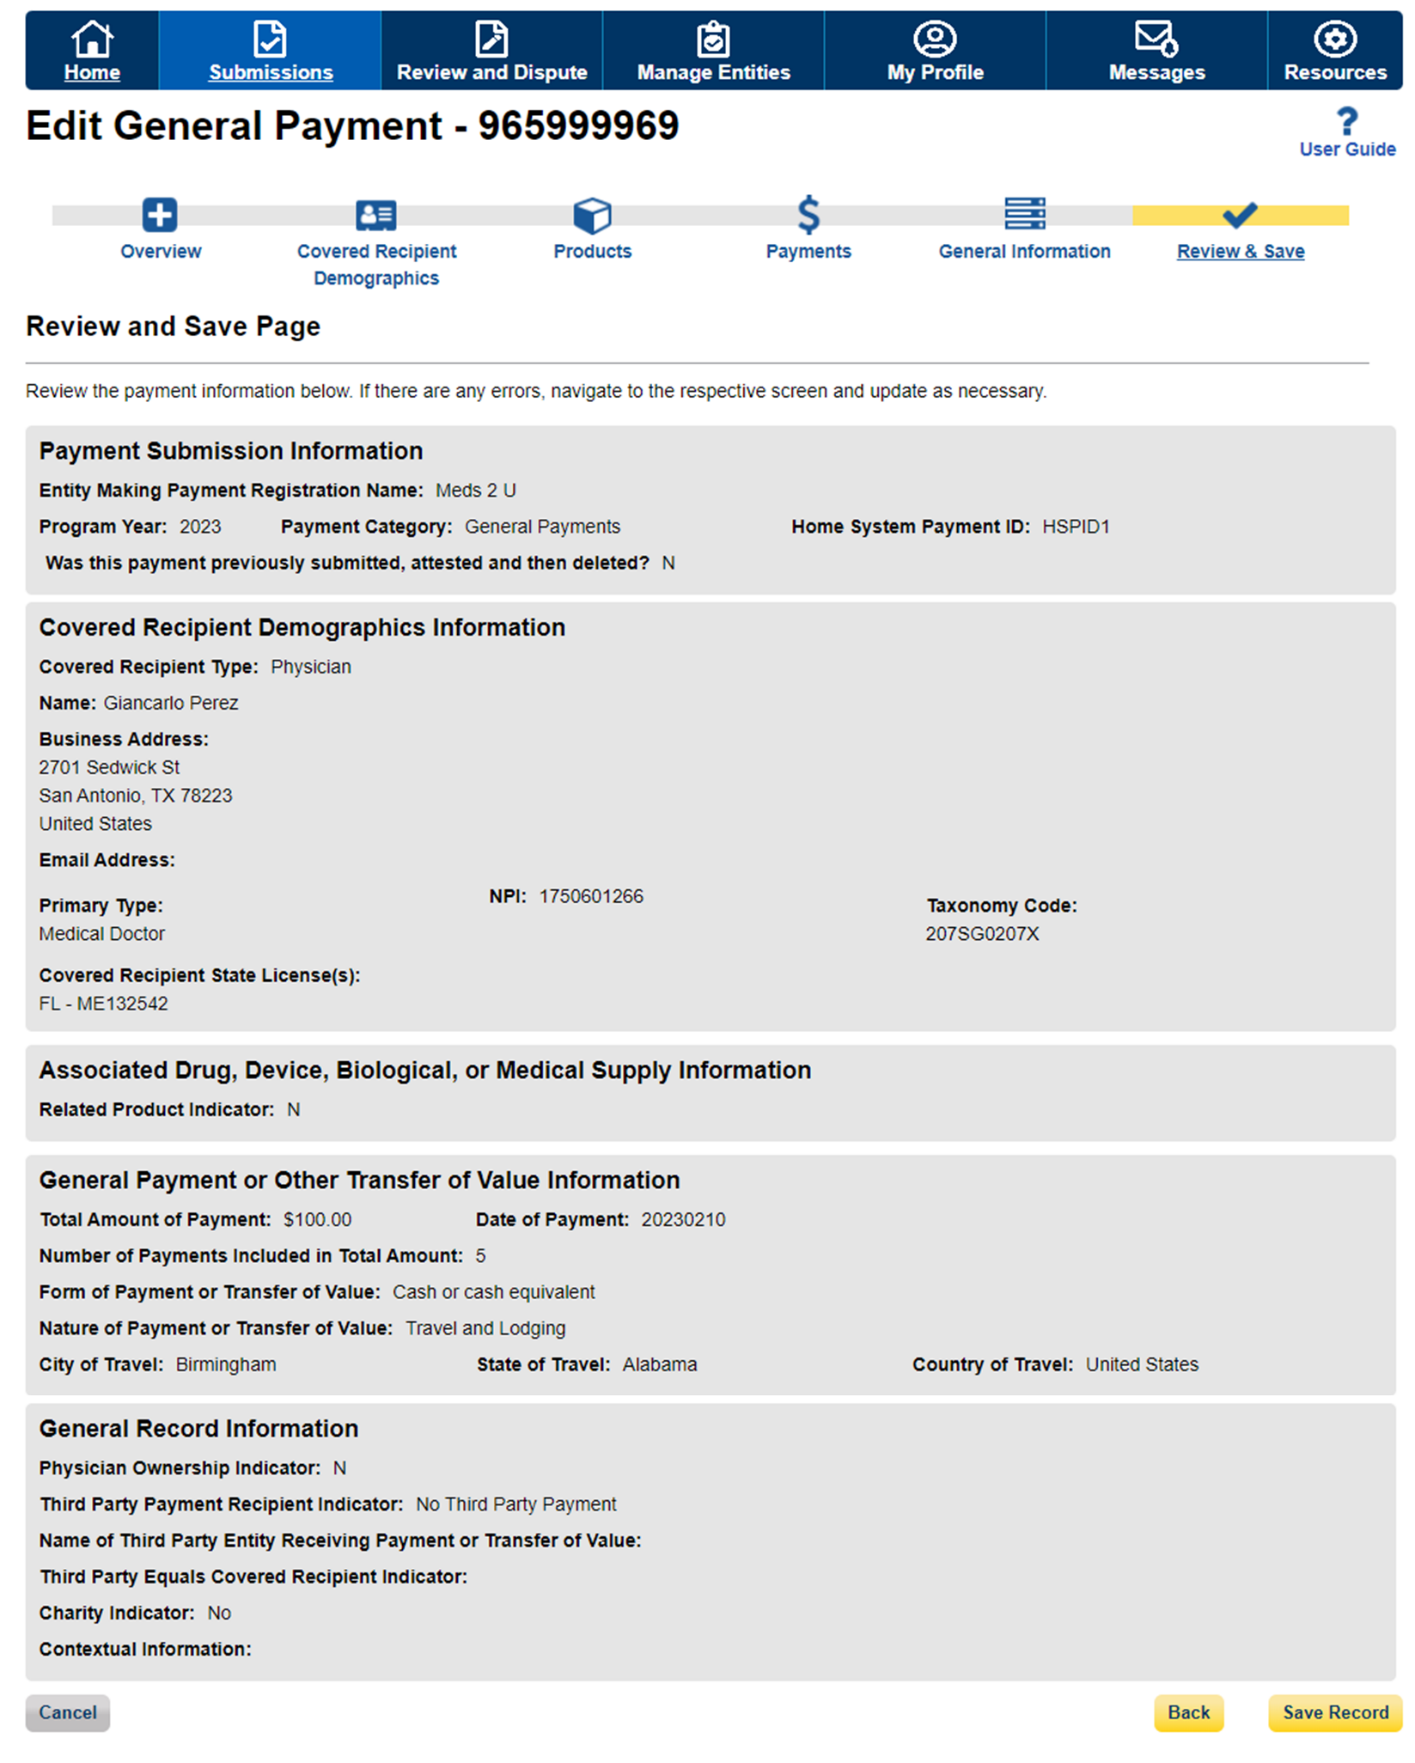
Figure 32: Open Payments System Review & Dispute Page -> Manual Edit Review & Save Page and Button (OPS 2.0)
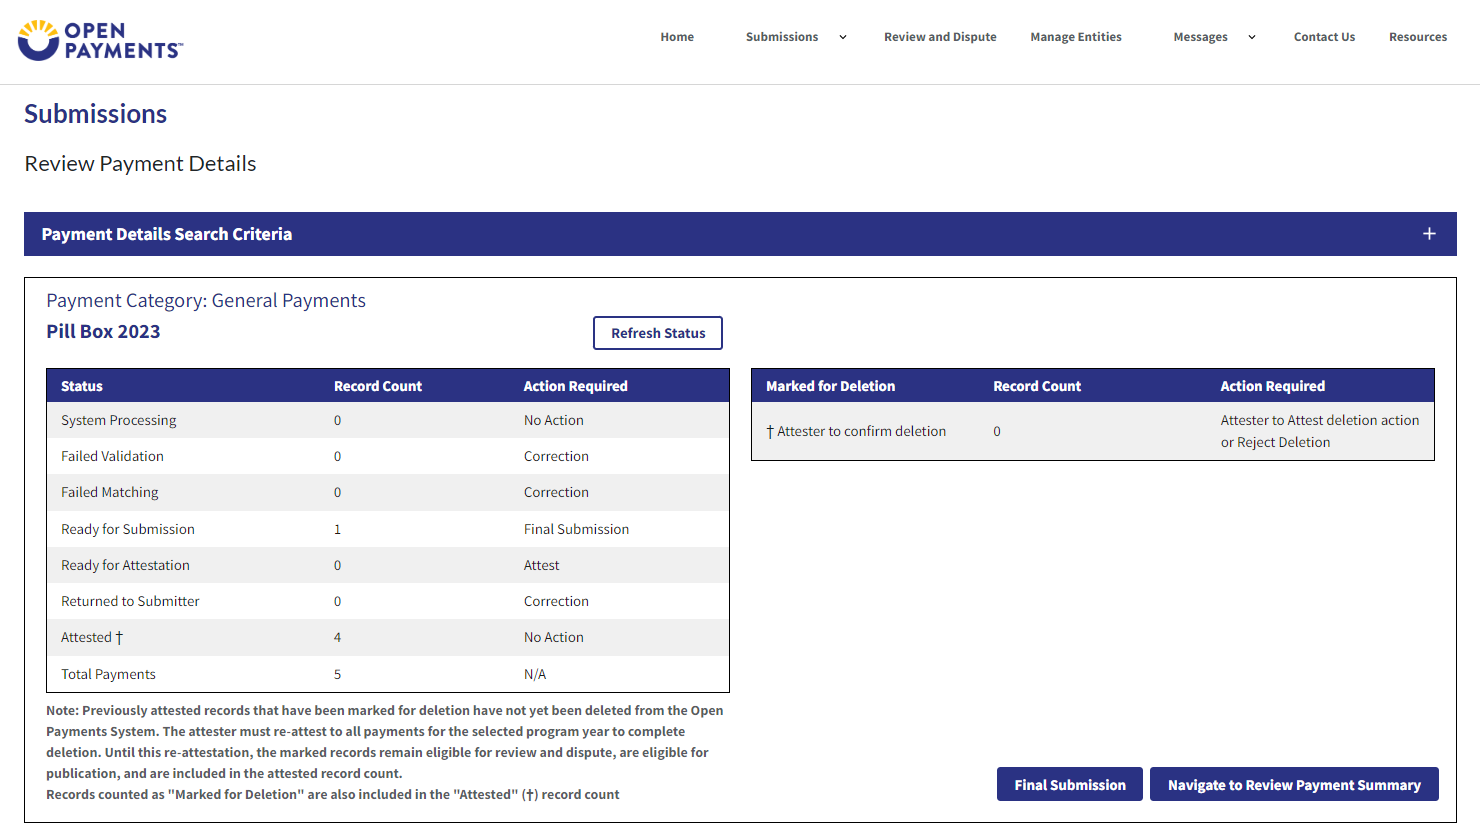
Step 6: Complete “Final Submission” on the “Review Payment Details” page if you are done correcting disputed records.
Figure 33: Open Payments System - Review Payment Details Page -> Final Submission Button (OPS 1.0)
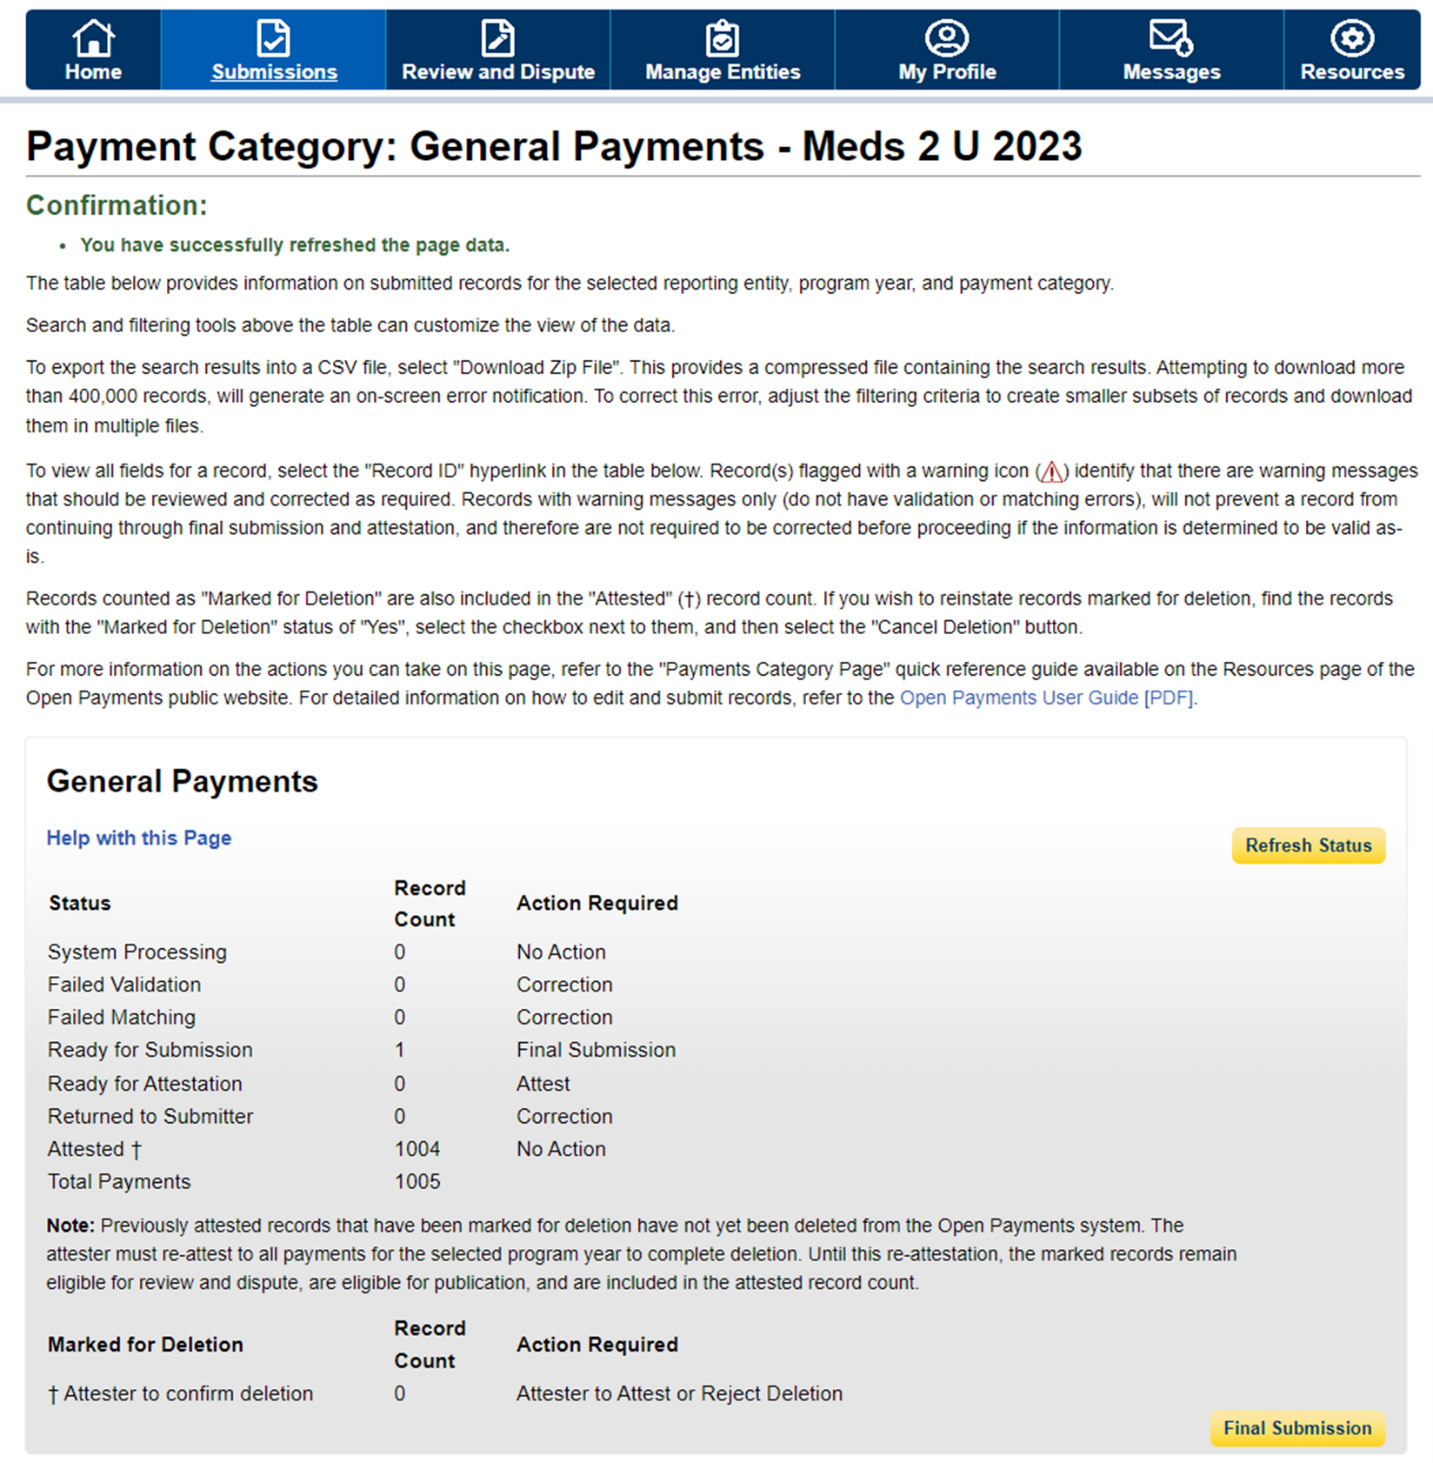
Figure 34: Open Payments System- Review Payment Details Page -> Final Submission Button (OPS 2.0)
Step 7: Perform Attestation on the corrected records. If you do not hold the Attester role, please notify the Attester that the corrected records are “Ready for Attestation”.
Messages and Compliance
Instructions for searching messages
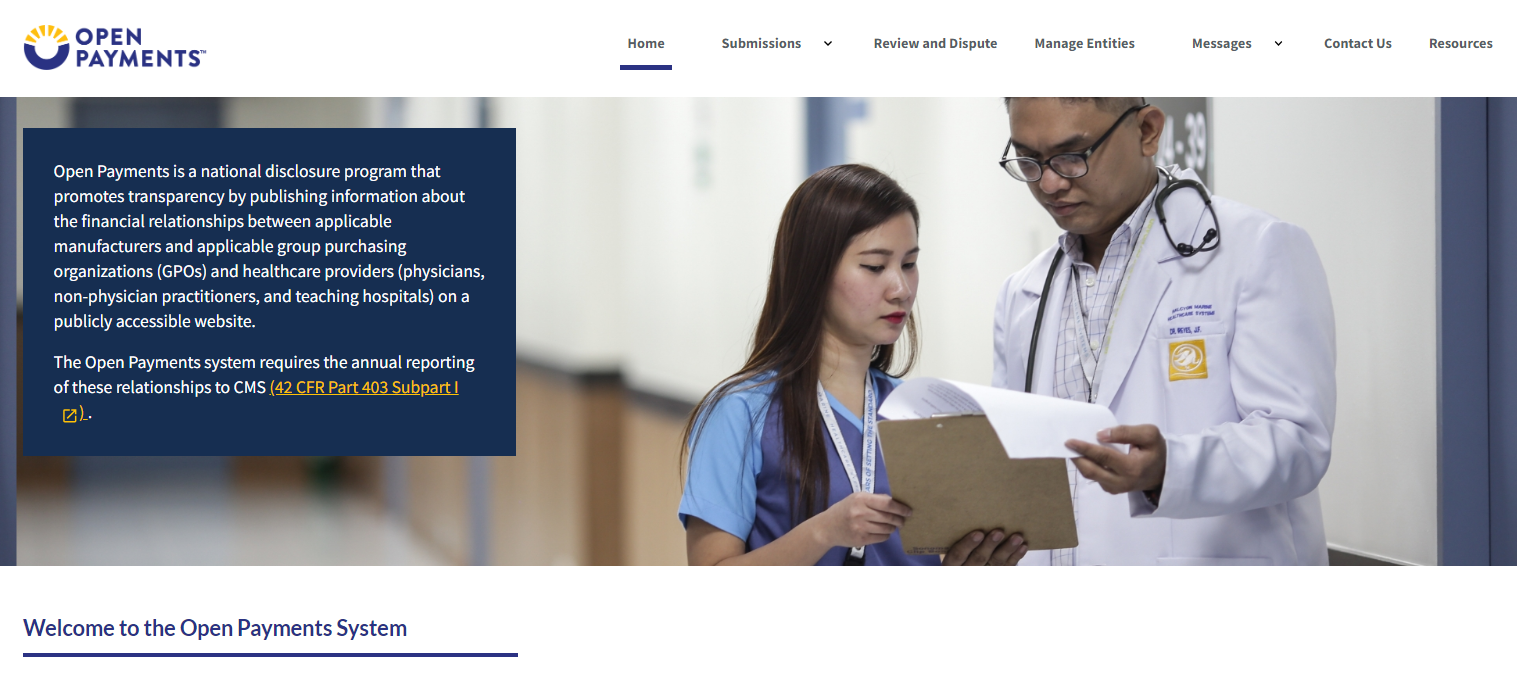
Step 1: Log in to the Open Payments system and select the “Messages” tab on the tool bar and then select “ System Messages”.
If you only hold the role of submitter and/or attester for your reporting entity, you will only see the “System Messages” option.
If you hold the role of officer and/or compliance for your reporting entity, you will see both the “System Messages” and “Compliance” options.
Figure 35: Open Payments Messages Tab -> System Messages Option (OPS 1.0)

Figure 36: Open Payments Messages Tab -> System Messages Option (OPS 2.0)
Step 2: On the “Messages” page, you can search based on the following search criteria:
Entity Name
File ID (only applicable for Message Category of “File Processing”)
Record ID (only applicable for Message Category of “Review and Dispute”)
Figure 37: System Messages Page -> Search Criteria (OPS 1.0)
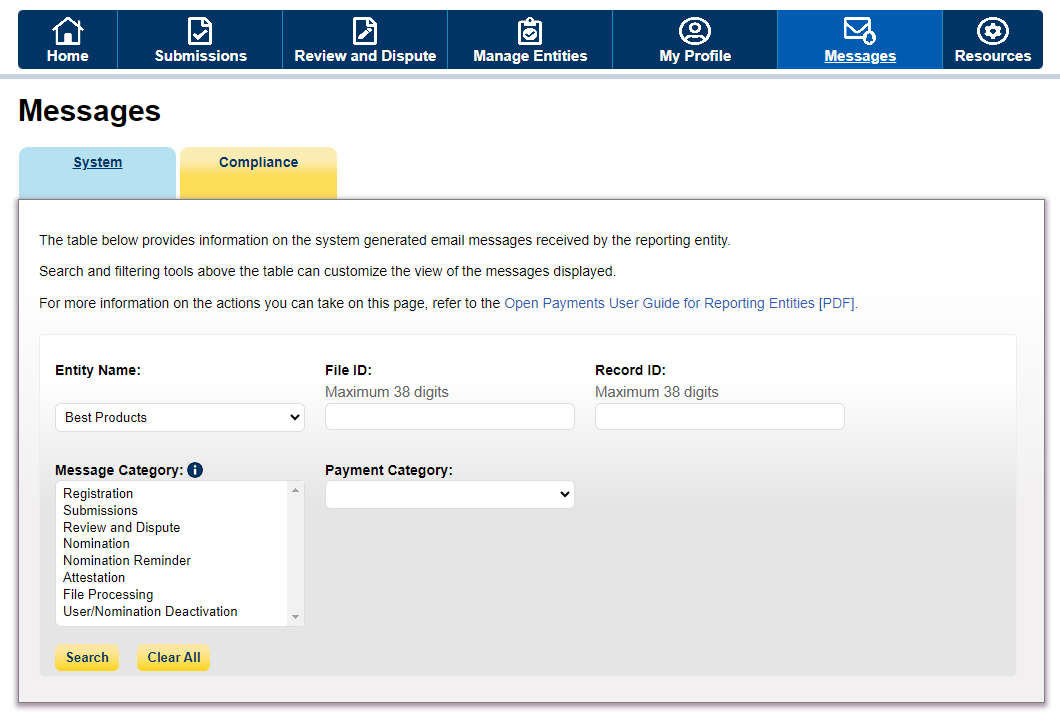
Figure 38: System Messages Page -> Search Criteria (OPS 2.0)
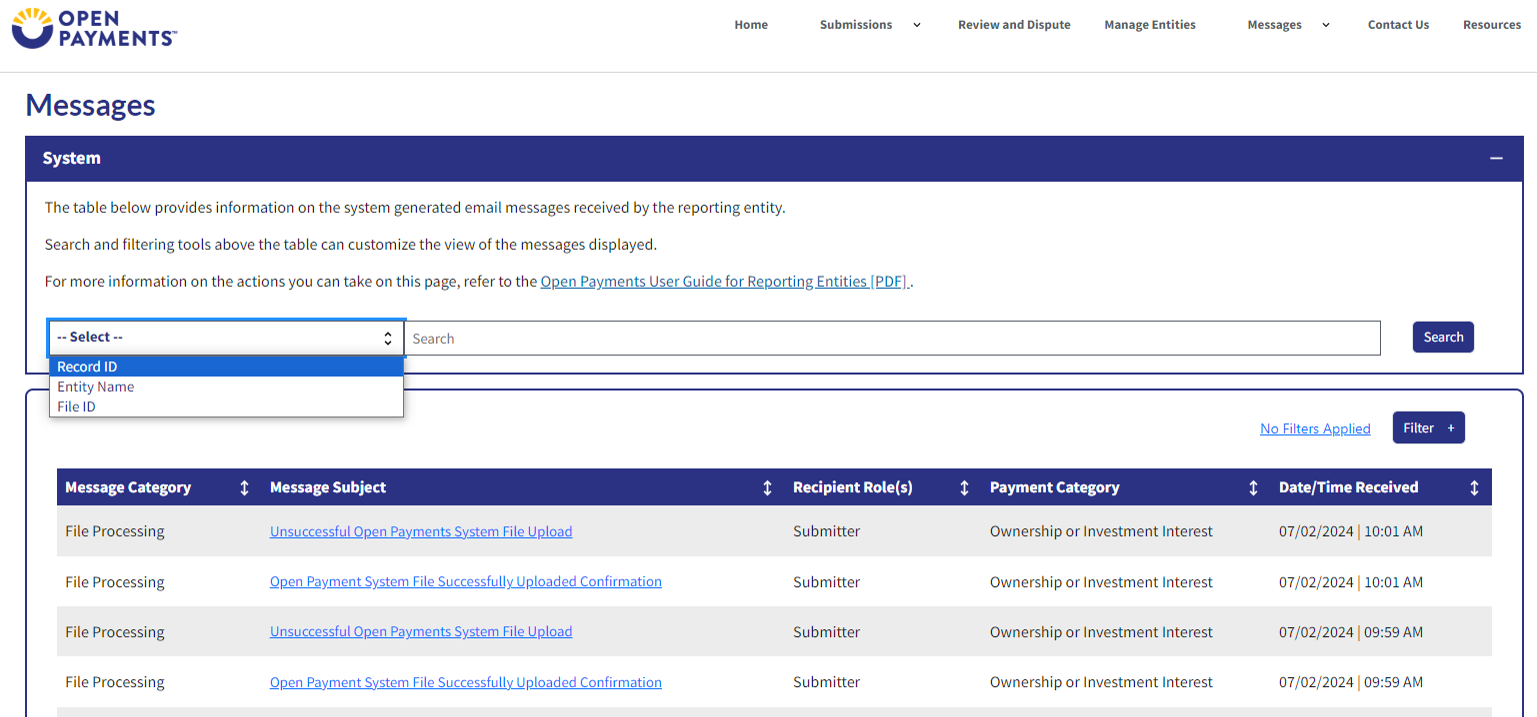
Step 3a: Select the “Search” button to initiate the search. After selecting the “Search” button, a data table with the list of all messages sent in the last 12 months will display. This list of messages is sorted from newest to oldest.
Figure 39: Search Button for System Messages (OPS 1.0)
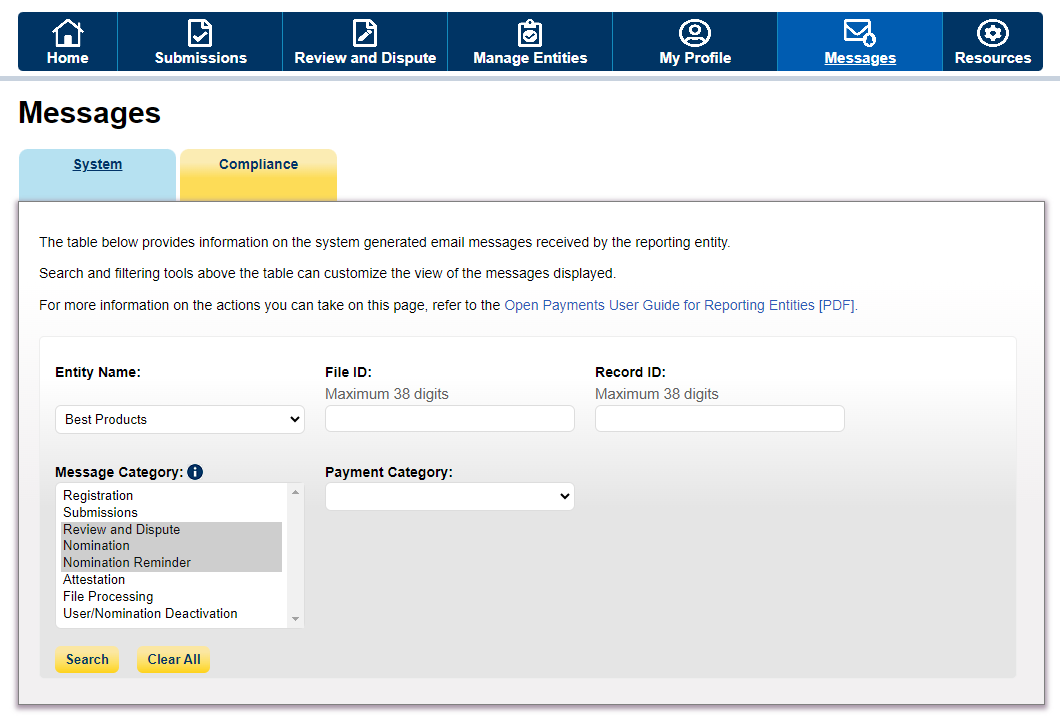
Figure 40: Search Button for System Messages (OPS 2.0)
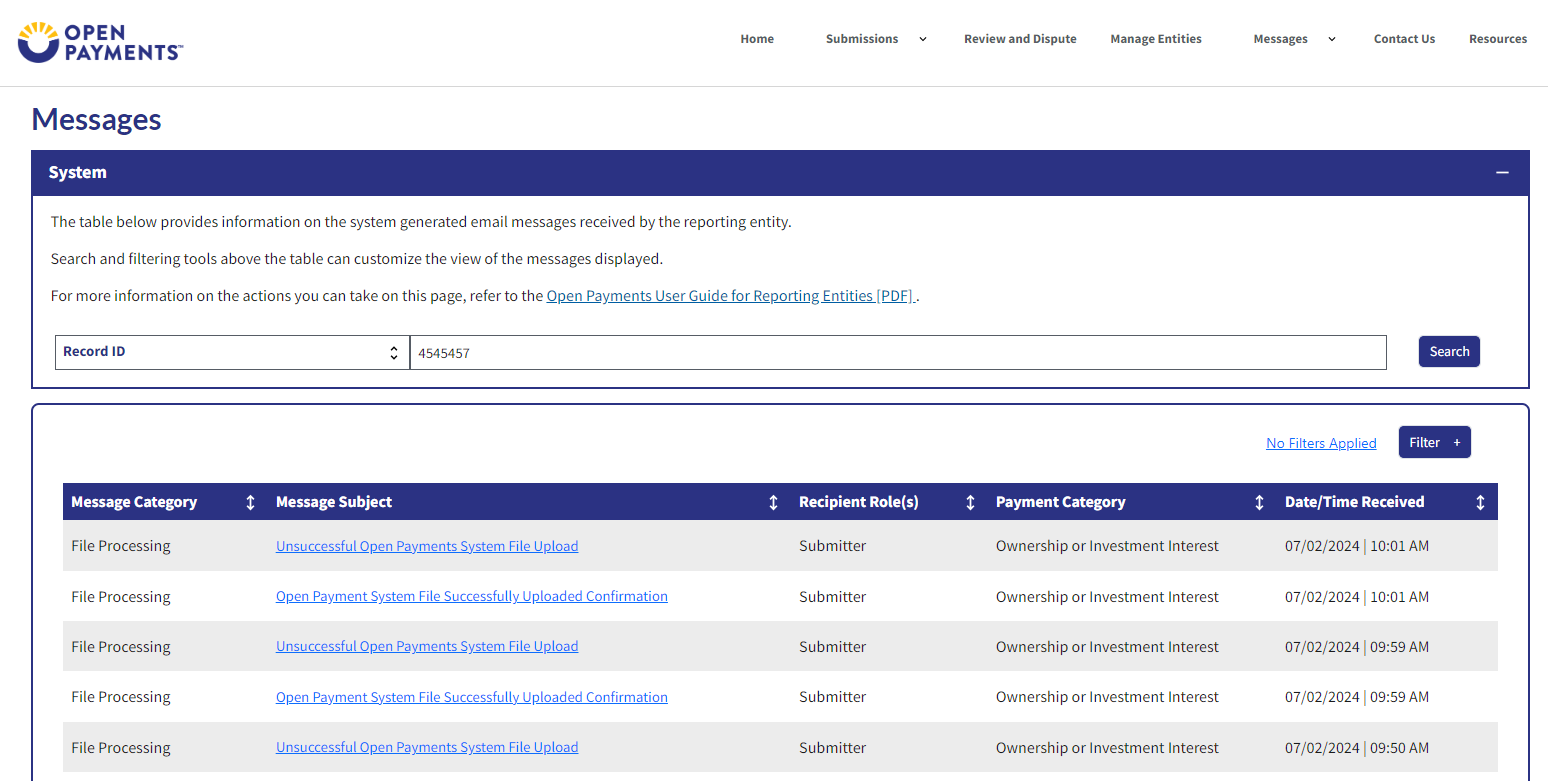
Step 3b: Select the “Filter” button to help refine your search results based on the following criteria:
Message Category
Payment Category (only applicable for Message Category of “Submissions”, “Review and Dispute”, “File processing”)
Figure 41: System Messages Search Results Filter Button (OPS 1.0)
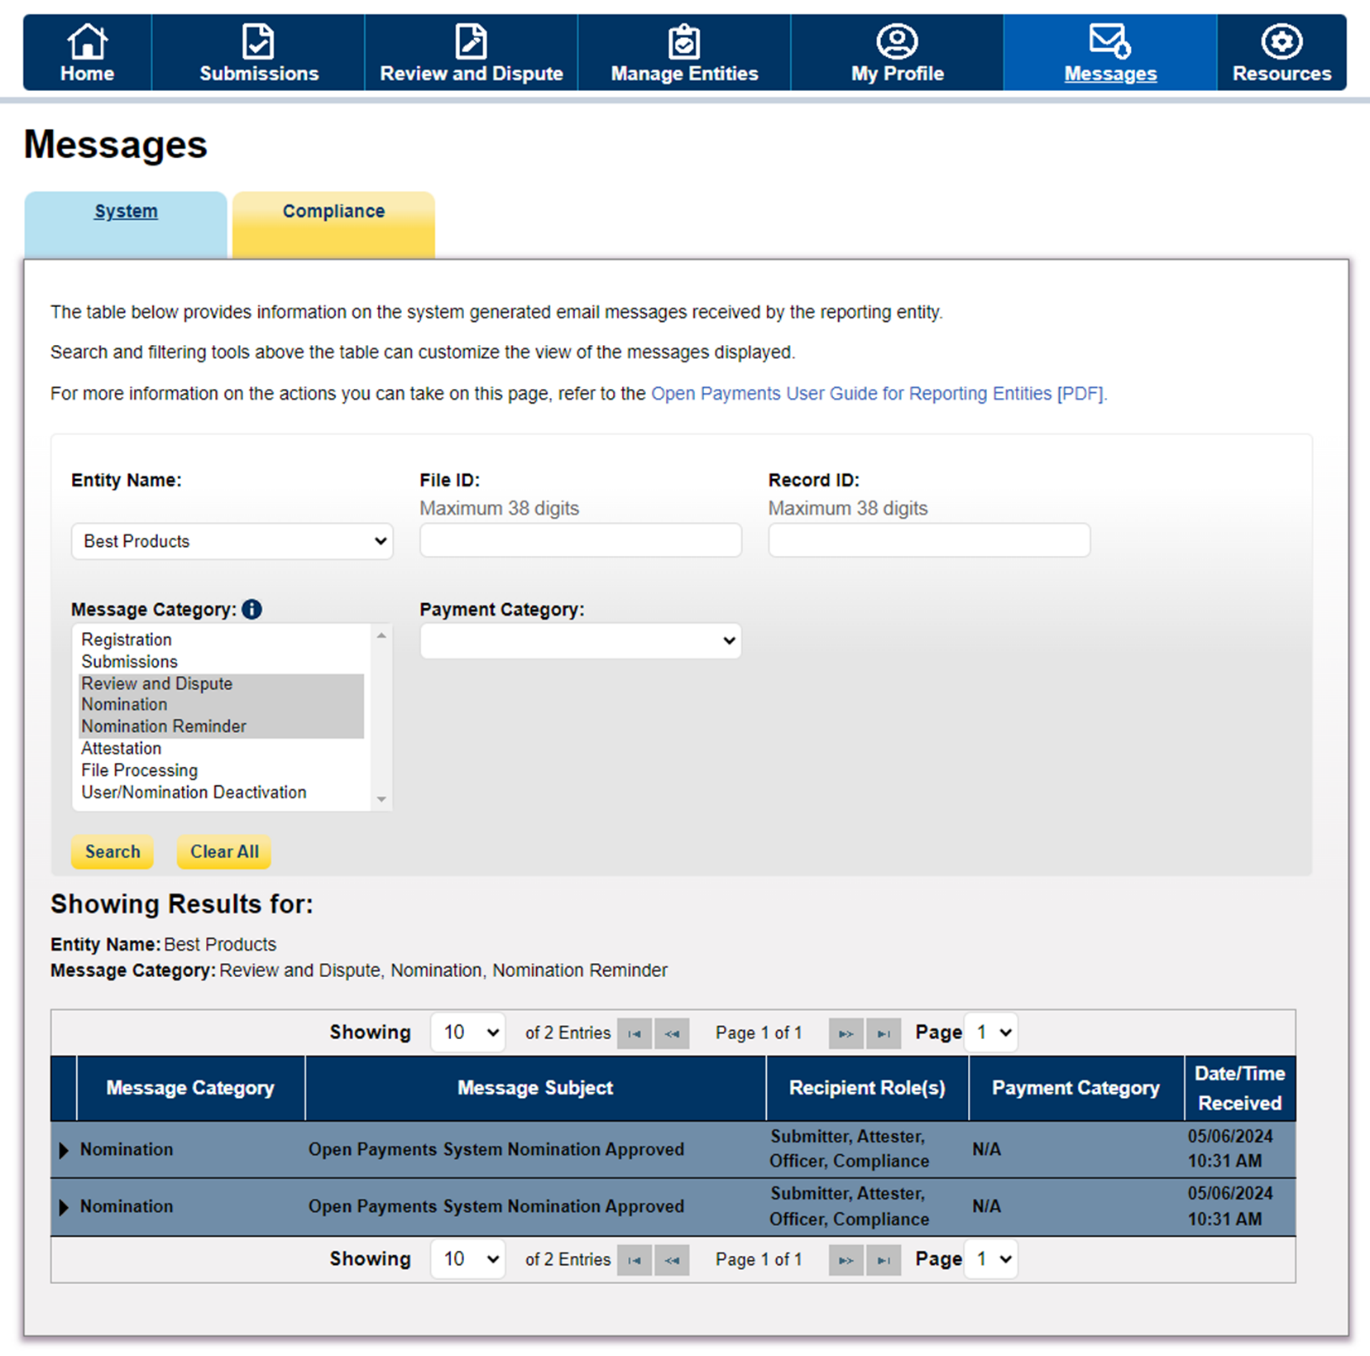
Figure 42: System Messages Search Results Filter Button (OPS 2.0)
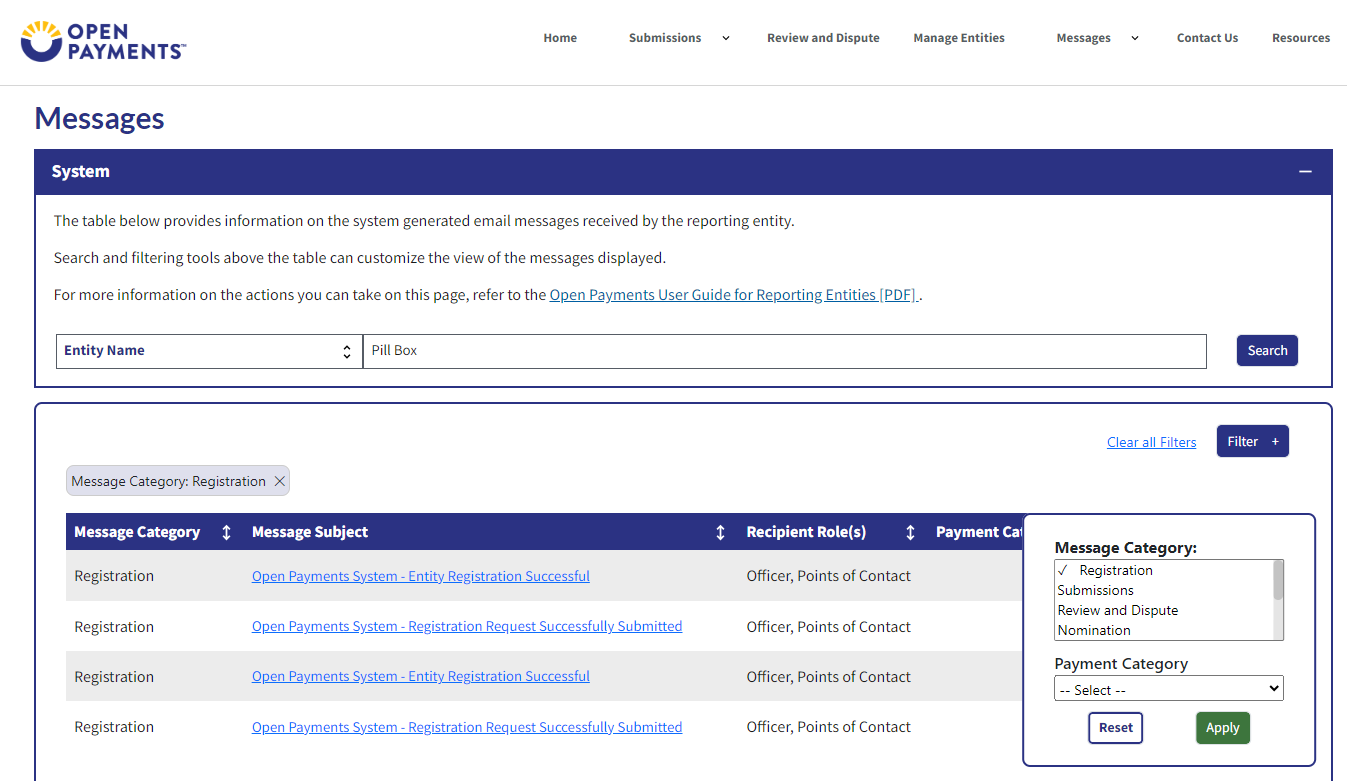
Step 4: Select the message subject hyperlink under the “Message Subject” column for the message you wish view.
Figure 43: Message Subject Hyperlink (OPS 1.0)
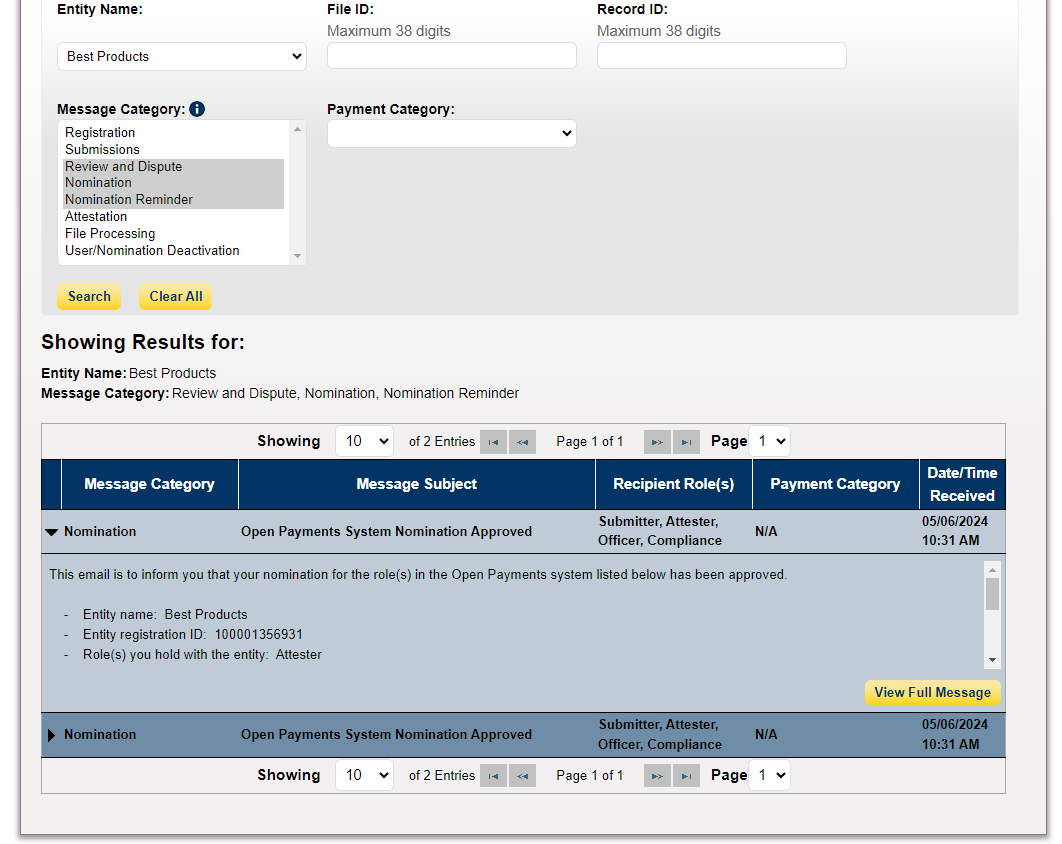
Figure 44: Message Subject Hyperlink (OPS 2.0)
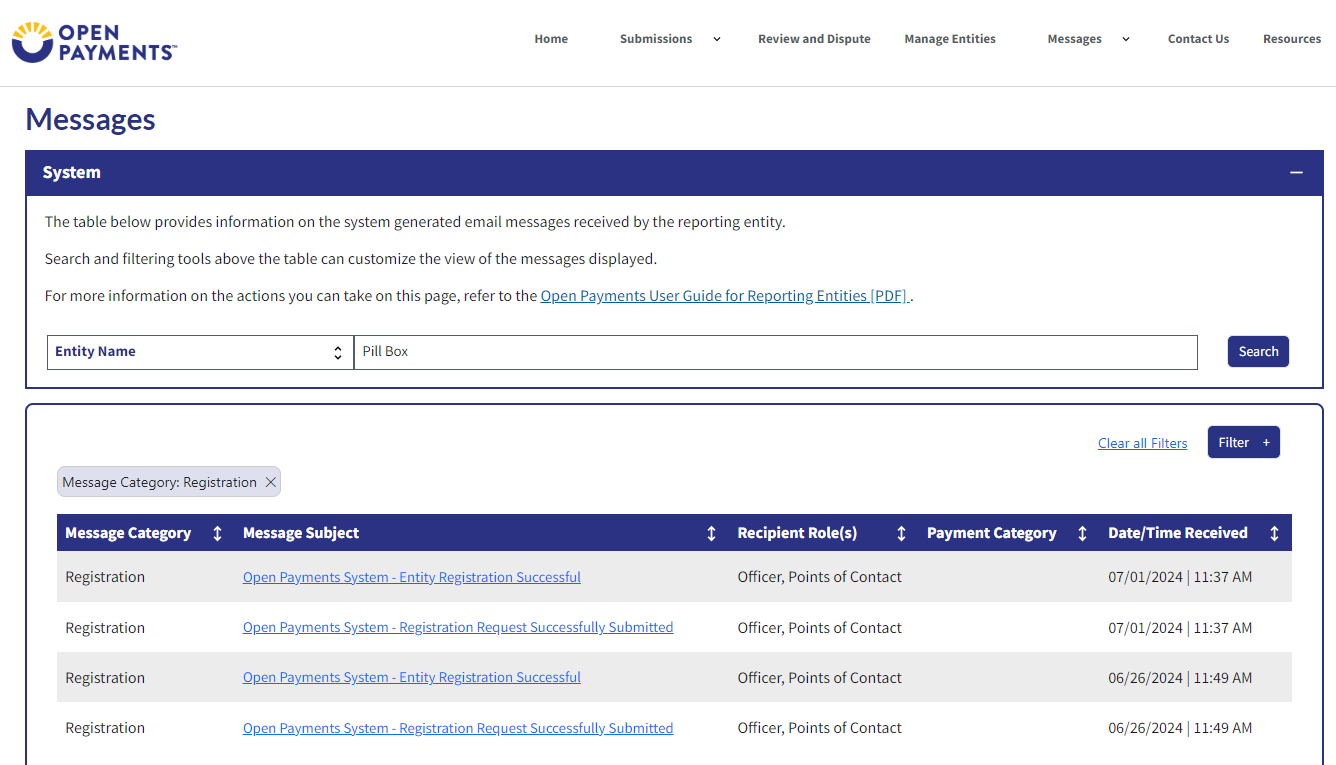
Step 5: View the full message displayed in the pop-up window and select the “Close” button when done.
Figure 45: Full Message Window -> Close Button (OPS 1.0)
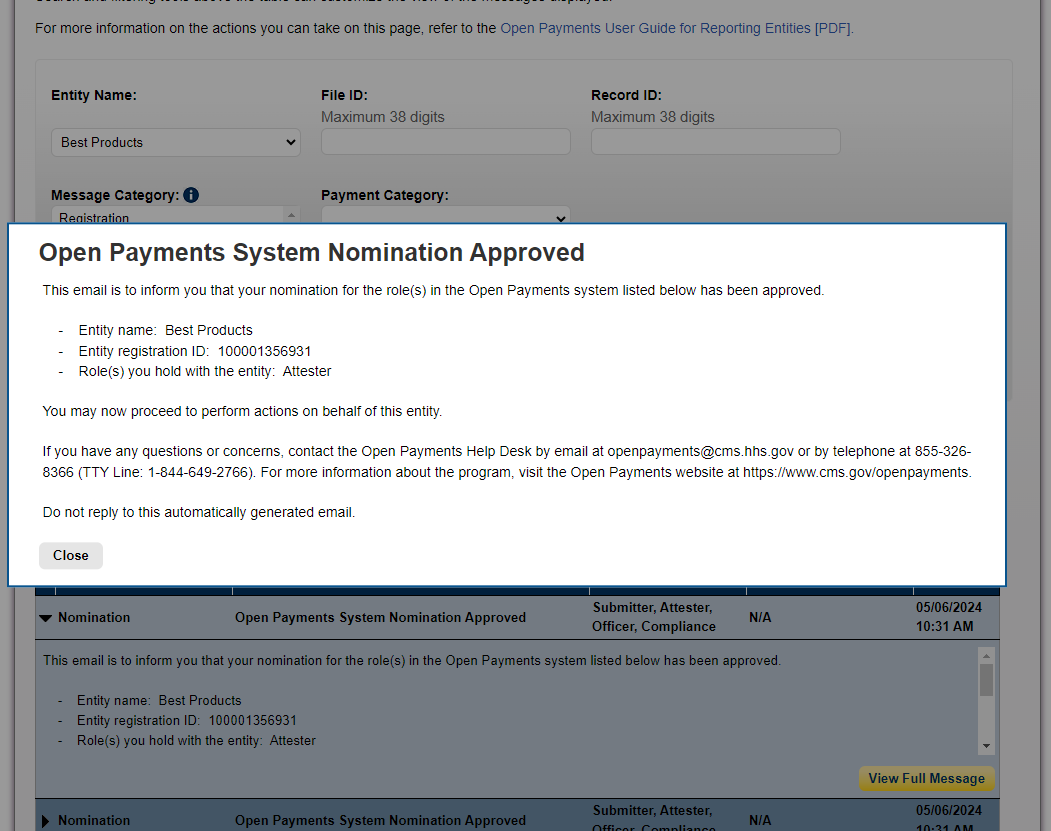
Figure 46: Full Message Window -> Close Button (OPS 2.0)
6.2: Compliance Tab
Only reporting entity users, who have officer role or the compliance role, can access the compliance communications. See Section 3.3: Open Payments Users and User Roles for more information on how to assign a user a compliance role. When a compliance communication is uploaded by the CMS Compliance Team for your entity, an email notification is received by the reporting entity officers, compliance user(s) and primary point of contact.
6.2a: Instructions for Searching Compliance Communications
Step 1: Log in to the CMS Enterprise Portal at https://portal.cms.gov using your IDM credentials, navigate to the Open Payments home page, and select the “Messages” tab.
Figure 47: Home Page Showing Messages Tab (OPS 1.0)
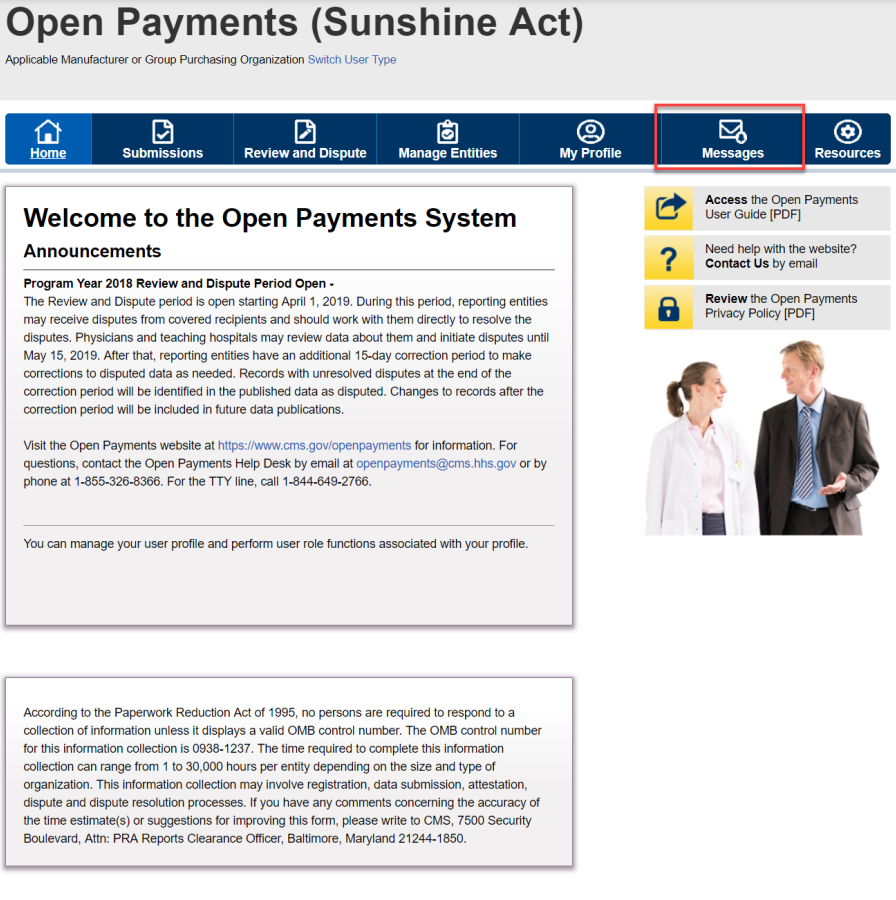
Figure 48: Home Page Showing Messages Tab – Compliance Tab (OPS 2.0)

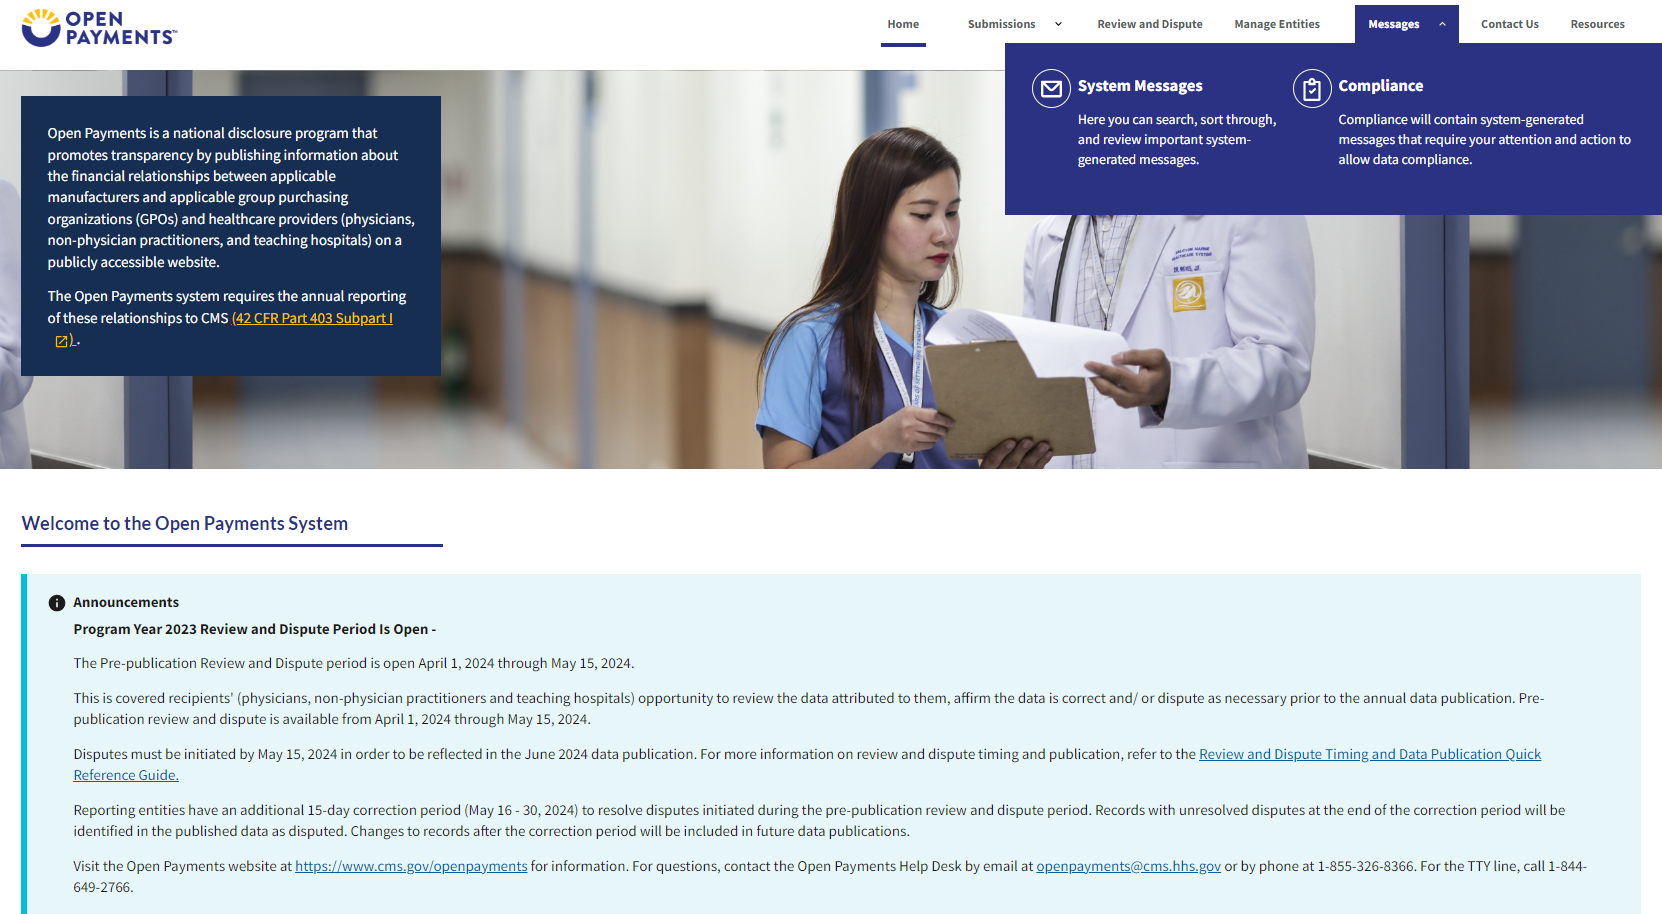
Step 2: You will be brought to the "Messages” page. Select the “Compliance” tab. NOTE: This functionality is available only for the officer and/or Compliance role.
Figure 49: Compliance Tab on Messages Home Page (OPS 1.0)
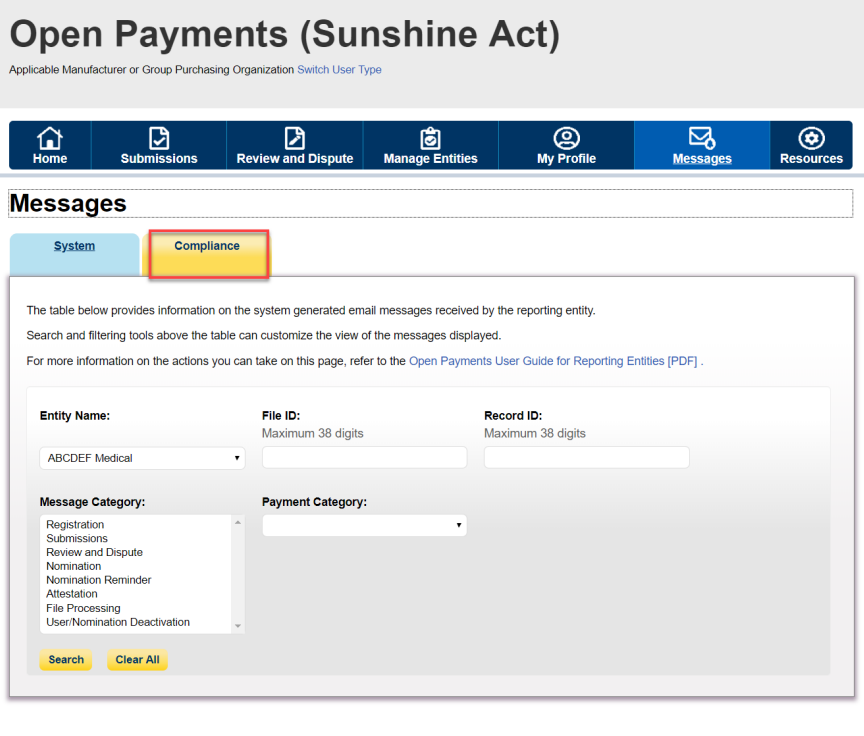
Figure 50: Compliance Tab on Messages Tab on Home Page (OPS 2.0)


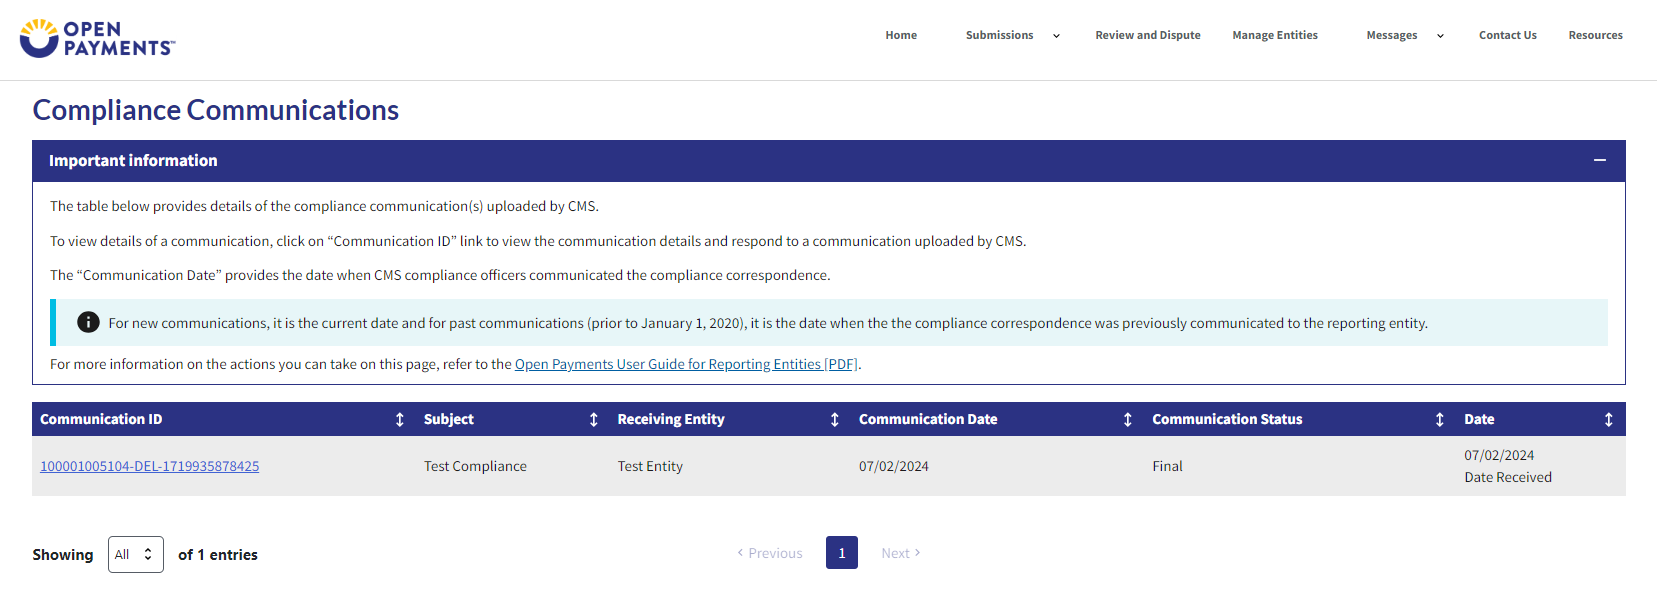
Step 3: You will be able to view all Compliance communications. For each communication, you can view the following details in the table.
Communication ID: A unique ID to view the details of a communication chain
Subject
Receiving Entity
Communication Date: Date when the compliance correspondence was communicated by the CMS compliance officer
Communication Status (Draft or Final) - The last communication status of a particular Communication.
Date Responded: Date when you responded to CMS for the communication.
Date Received (removed – replaced by other date fields)
Upon selecting the Communication ID, you can view the details of a communication. The "Communication Date" provides the date when the compliance correspondence was communicated by the CMS compliance officer. Note: For New communications, it is the current date and for past communications (prior to January 2020), it is the date when the compliance correspondence was previously communicated to you. The “Date Responded” provides the date when you last responded to CMS for the communication
Figure 51: Compliance Communication Table (OPS 1.0)
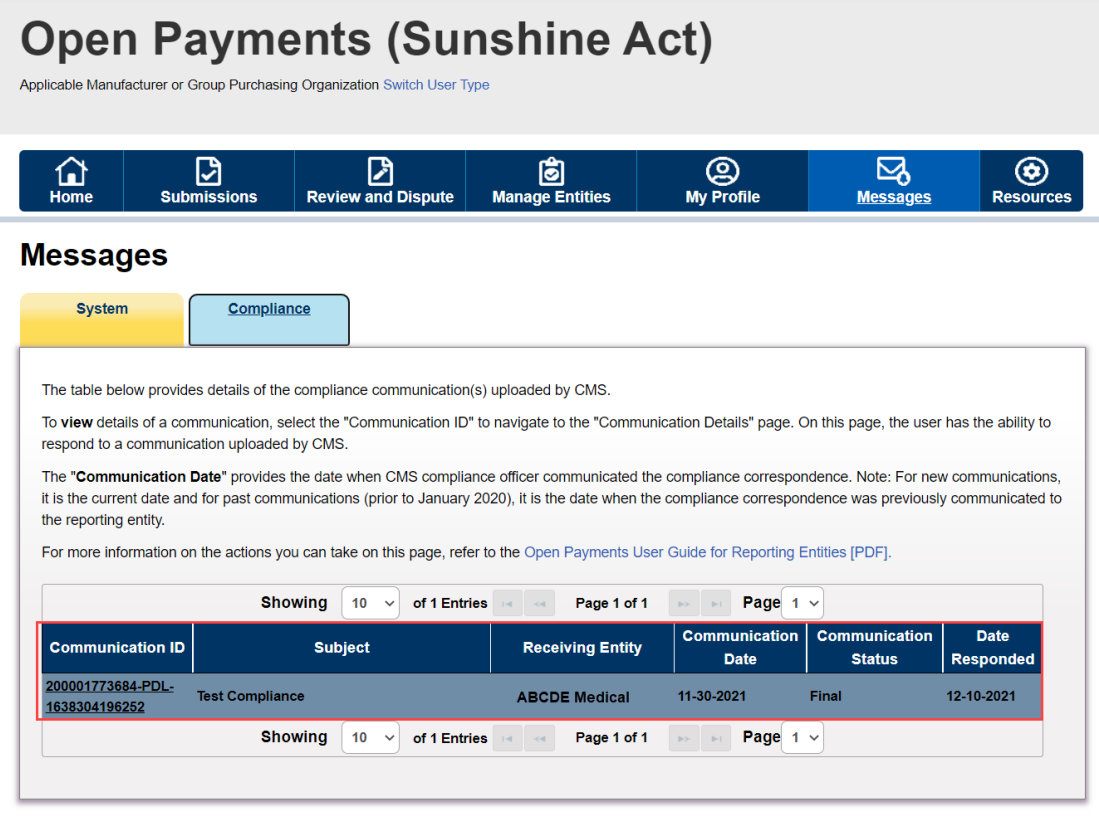
Figure 52: Compliance Communication Table (OPS 2.0)
6.2b: Communication Details Page
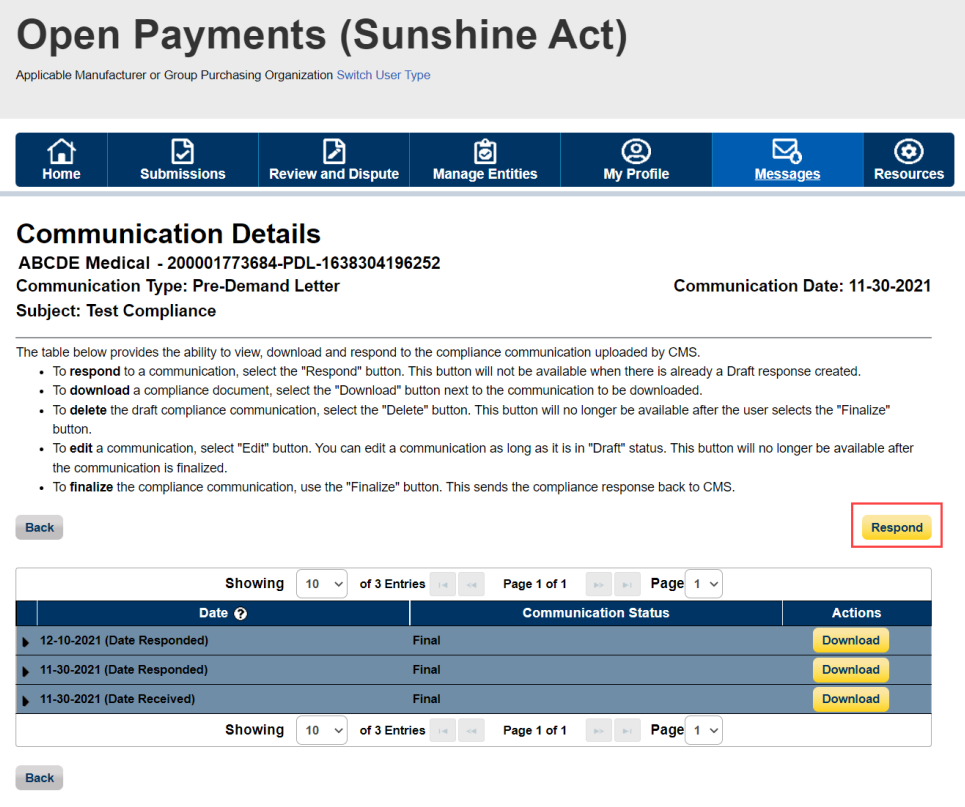
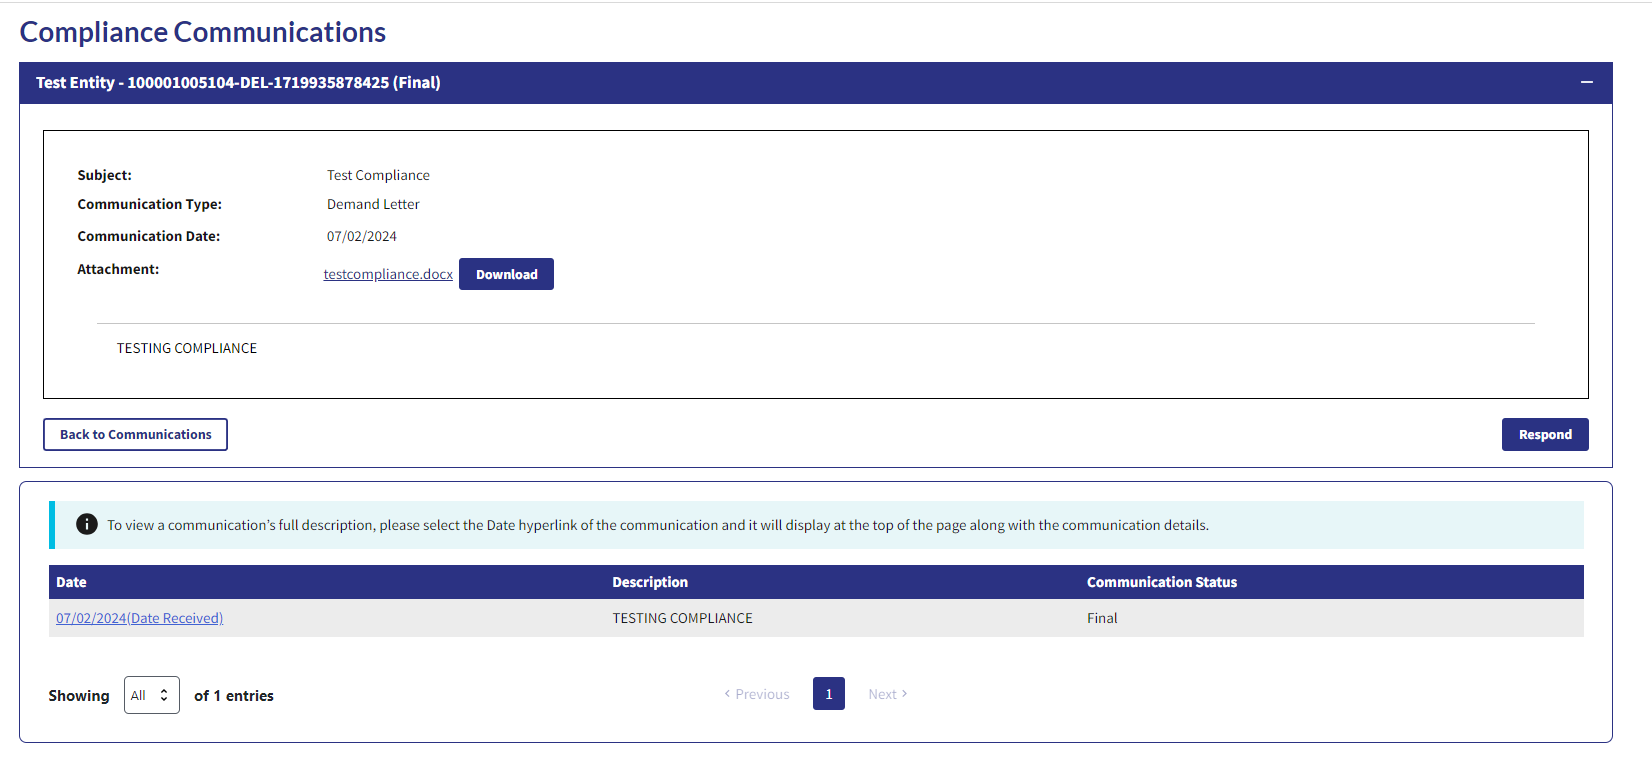
Upon selection of the “Communication ID” link on Compliance Messages tab, you will be taken to a new page “Communication Details” where you can view the complete details (received and responded communication(s)) of that particular communication.
This page will display the communications in the order it was last received or sent, one below the other in descending order. The table below provides the ability to view, download and respond to the compliance communication uploaded by CMS.
To respond to a communication, select the "Respond" button. This button will not be available when there is already a draft response created.
To download a compliance document, select the "Download" button next to the communication to be downloaded.
To delete the draft compliance communication, select the "Delete" button. This button will no longer be available after the user selects the “Finalize” button.
To edit a communication, select the “Edit” button. You can edit a communication as long as it is in “Draft” status. This button will no longer be available after the communication is finalized.
To finalize the compliance communication, use the "Finalize" button. This sends the compliance response back to CMS.
Figure 53: Communication Details Page (OPS 1.0)
 Figure
54: Communication Details Page (OPS 2.0)
6.2c: Upload Response to Compliance Communication Page
Upon receiving a CMS communication, you will have the ability to respond to the compliance communication received. Click the “Respond” button to navigate to the “Upload Response to Compliance Communication” page.
Figure 55: Upload Response to Compliance Communication (OPS 1.0)
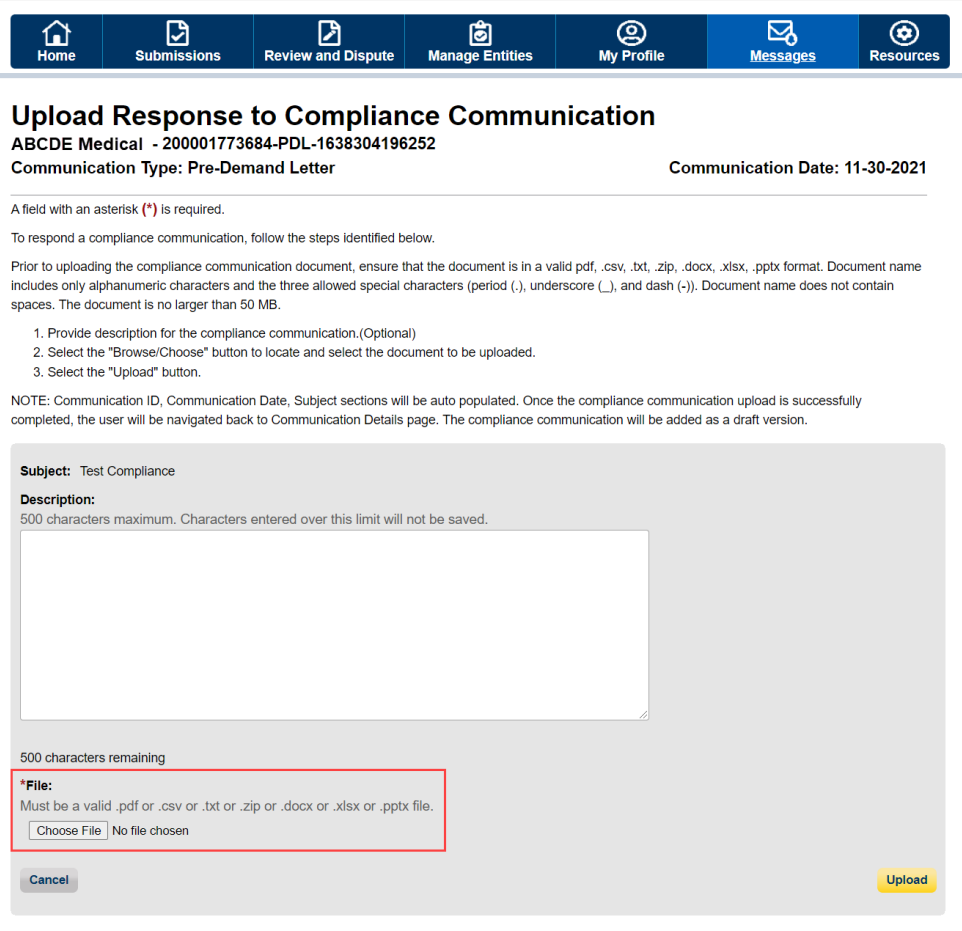
Figure 56a: Upload Response to Compliance Communication (OPS 2.0)
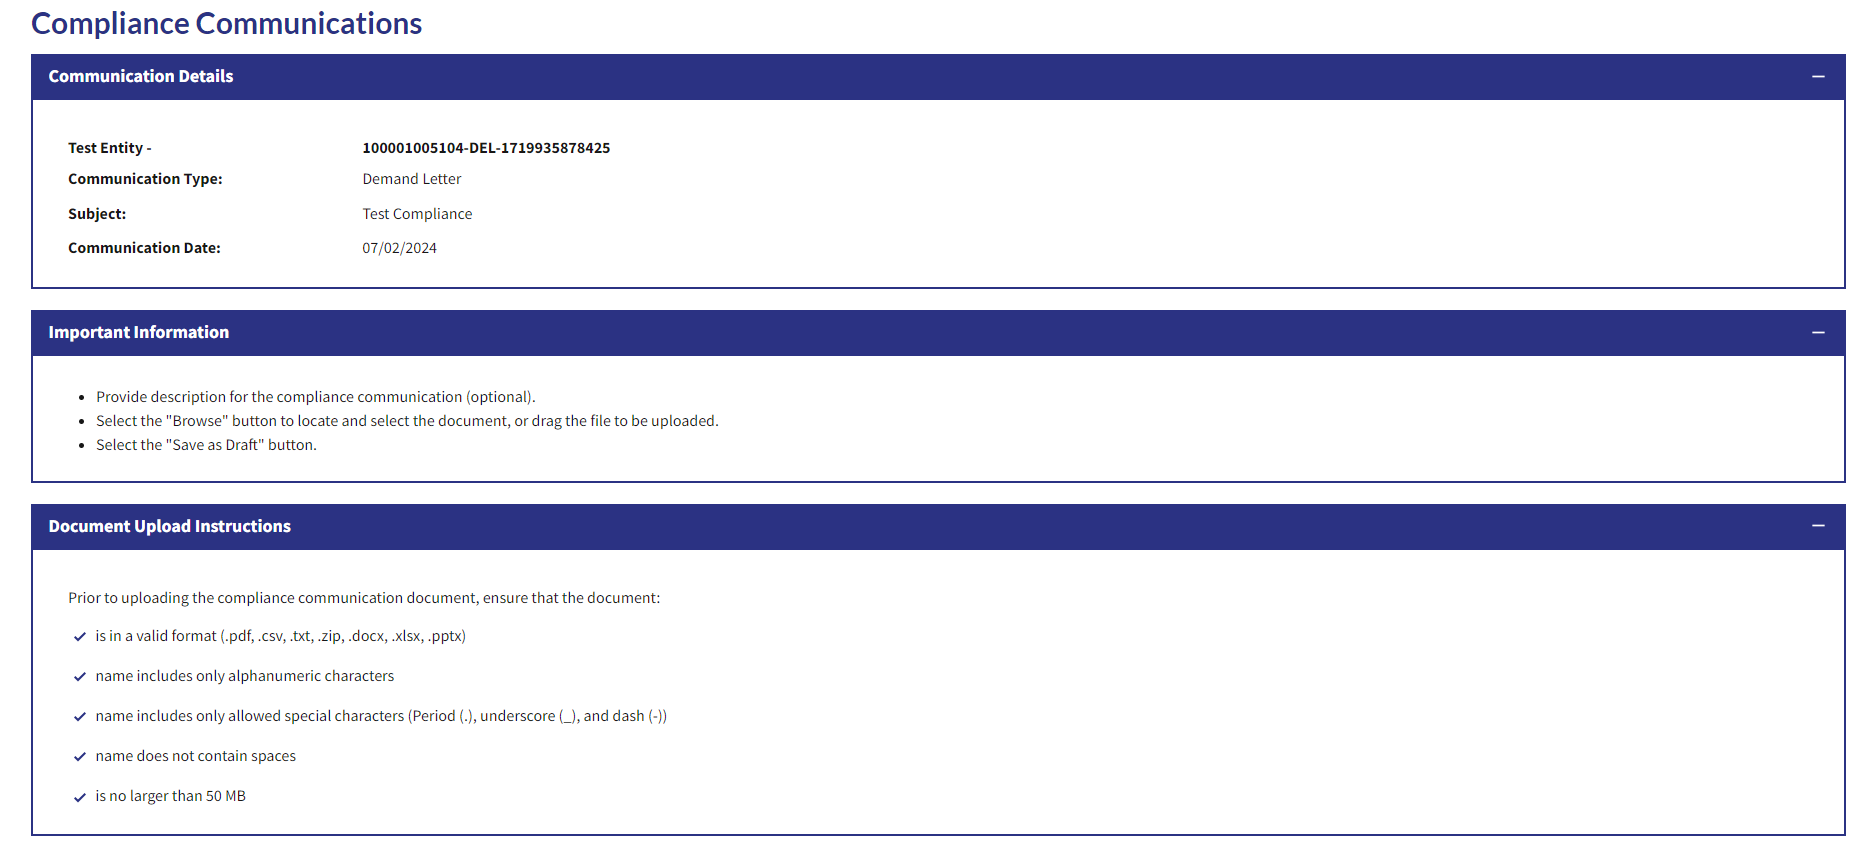
Figure 56b: Upload Response to Compliance Communication (OPS 2.0)

To respond to a compliance communication, follow the steps identified below.
Prior to uploading the compliance communication document, ensure that the document is in a valid pdf, .csv, .txt, .zip, .docx, .xlsx, or .pptx format. Document name must include only alphanumeric characters and the three allowed special characters (period (.), underscore (_), and dash (-)). Document name must not contain spaces. The document must be no larger than 50 MB.
Provide description for the compliance communication. This is optional.
Select the "Choose File” button to locate and select the document to be uploaded.
Select the "Upload" button.
Click “Yes” on the confirmation message to process with upload or click on “No” to cancel the upload.
NOTE: Communication ID, Communication Date, and Subject sections will be auto populated. Once the compliance communication upload is successfully completed, you will be navigated back to Communication Details page. The compliance communication will be added as a draft version.
Figure 57: Communication Details Page – Confirmation Message (OPS 1.0)
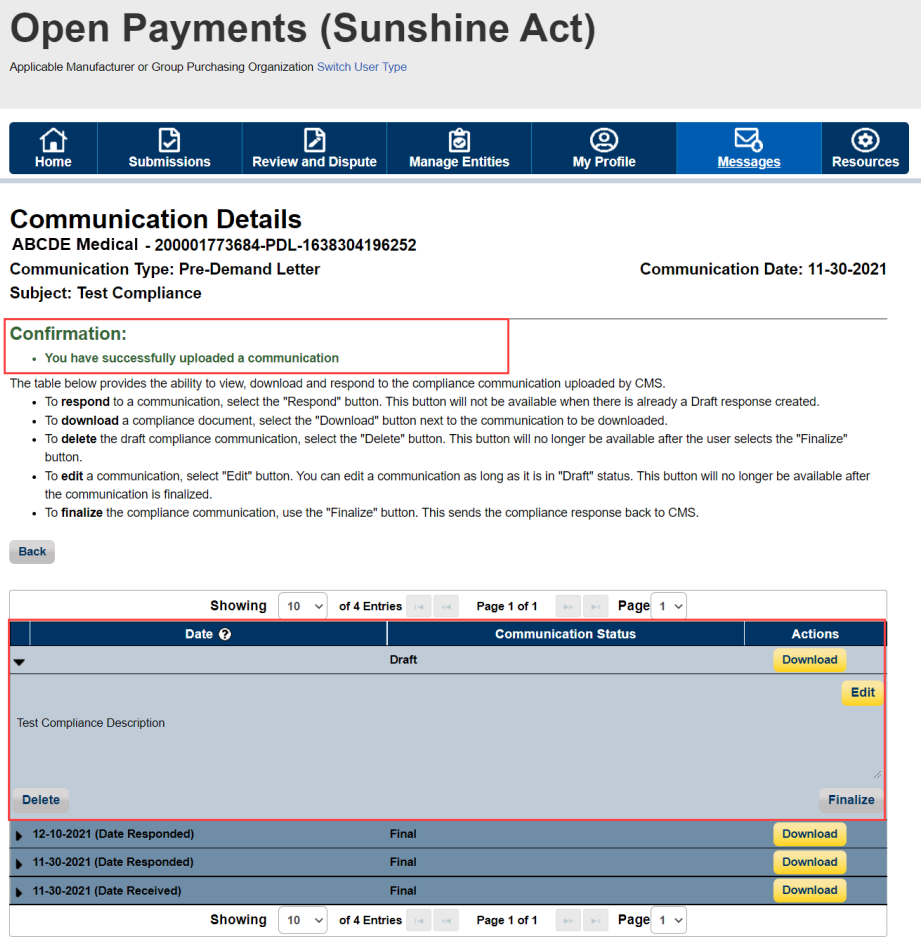
Figure 58: Communication Details Page – Confirmation Message (OPS 2.0)


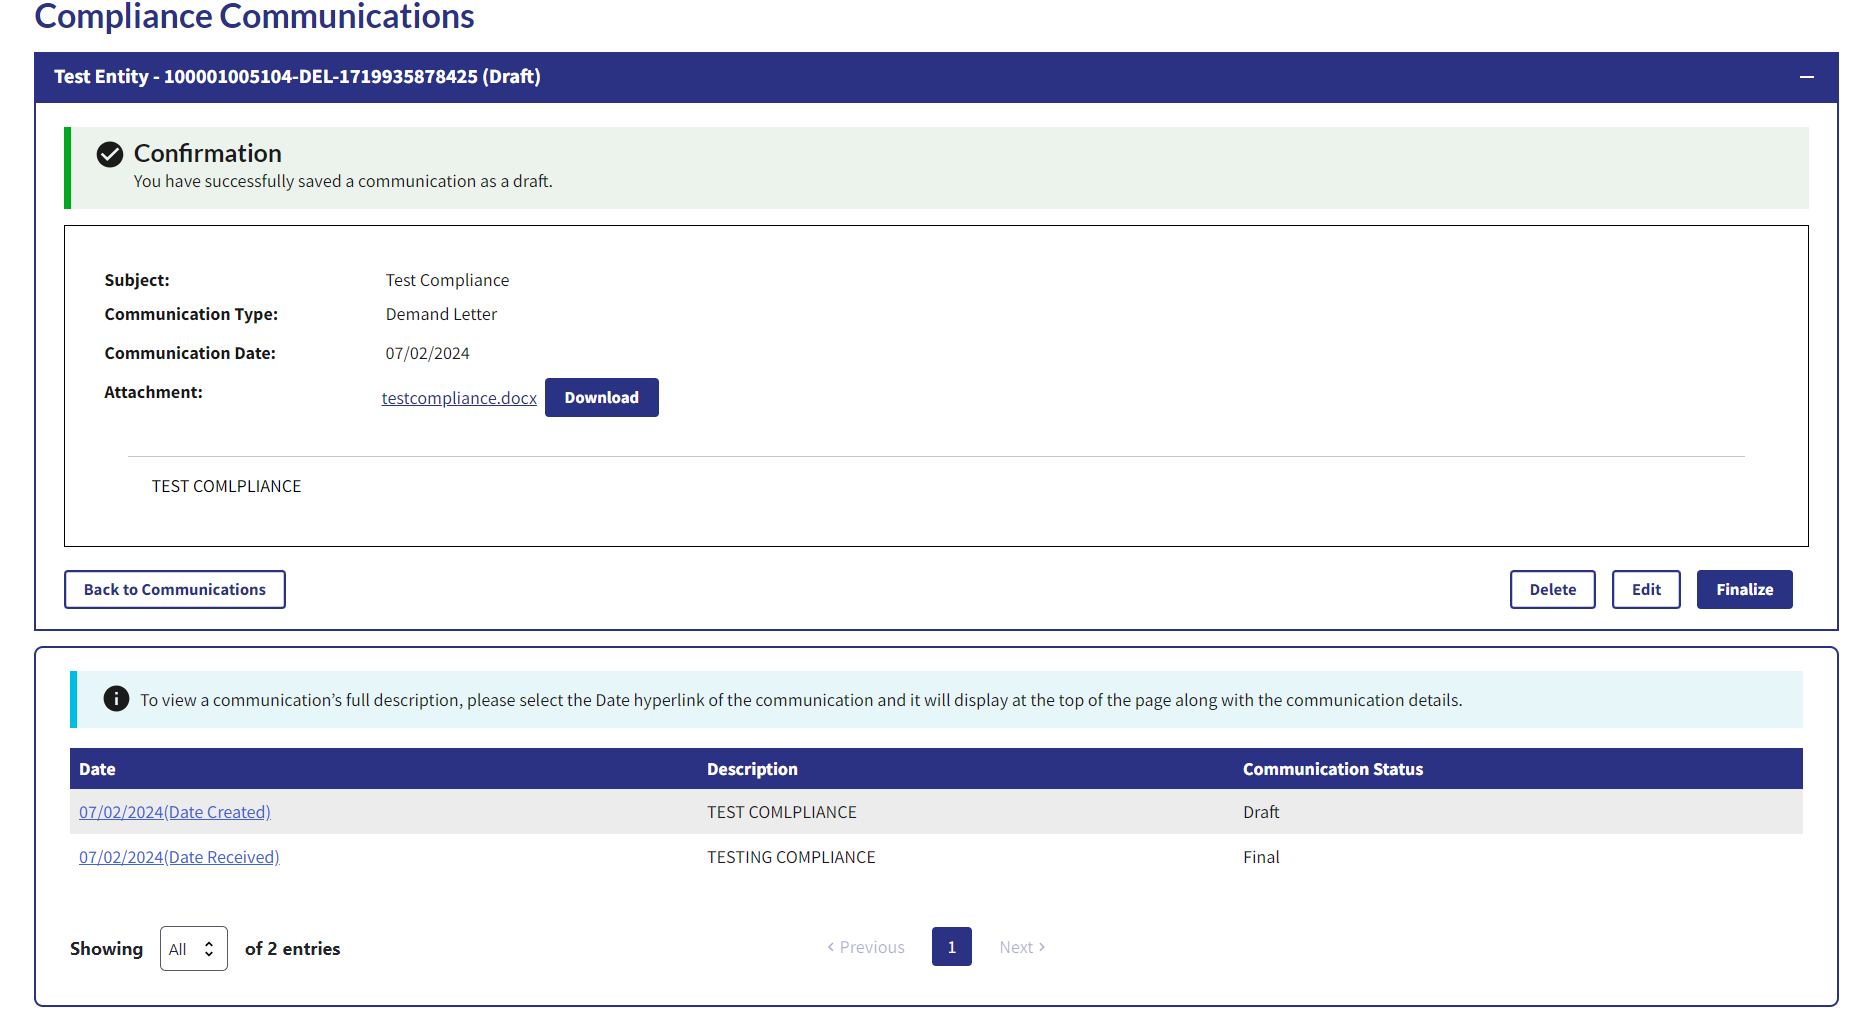
Once the communication is added as draft version, you will see an expandable view of the message text. Upon expanding the communication, you can either edit, delete or finalize the communication.
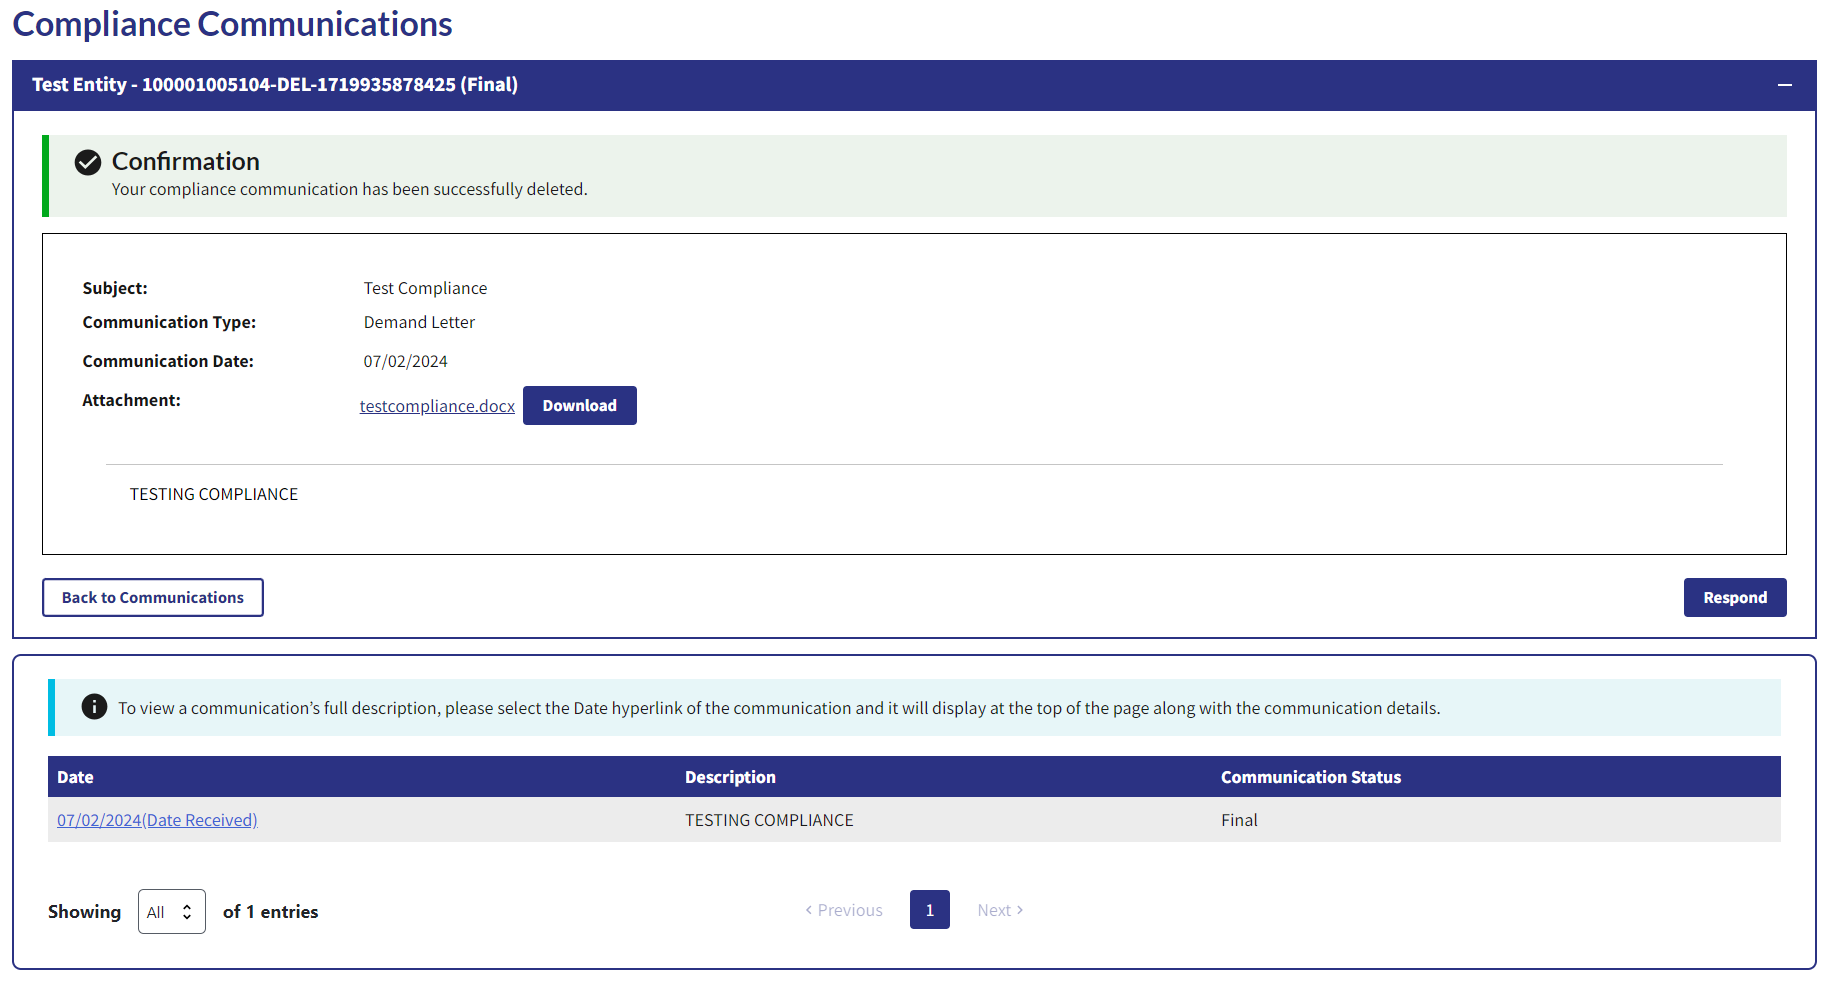
Upon selecting the “Delete” button, a confirmation message will appear allowing you to select either “Yes” to delete the communication or “No” to cancel the action. Upon selecting “Yes”, the draft communication will be deleted and you will see a confirmation message on the screen. Note that this action will delete only the draft communication and does not delete any previous communications. Also, the “Delete” button will not appear for the communications that are in final status.
Figure 59: Confirmation Message (OPS 1.0)
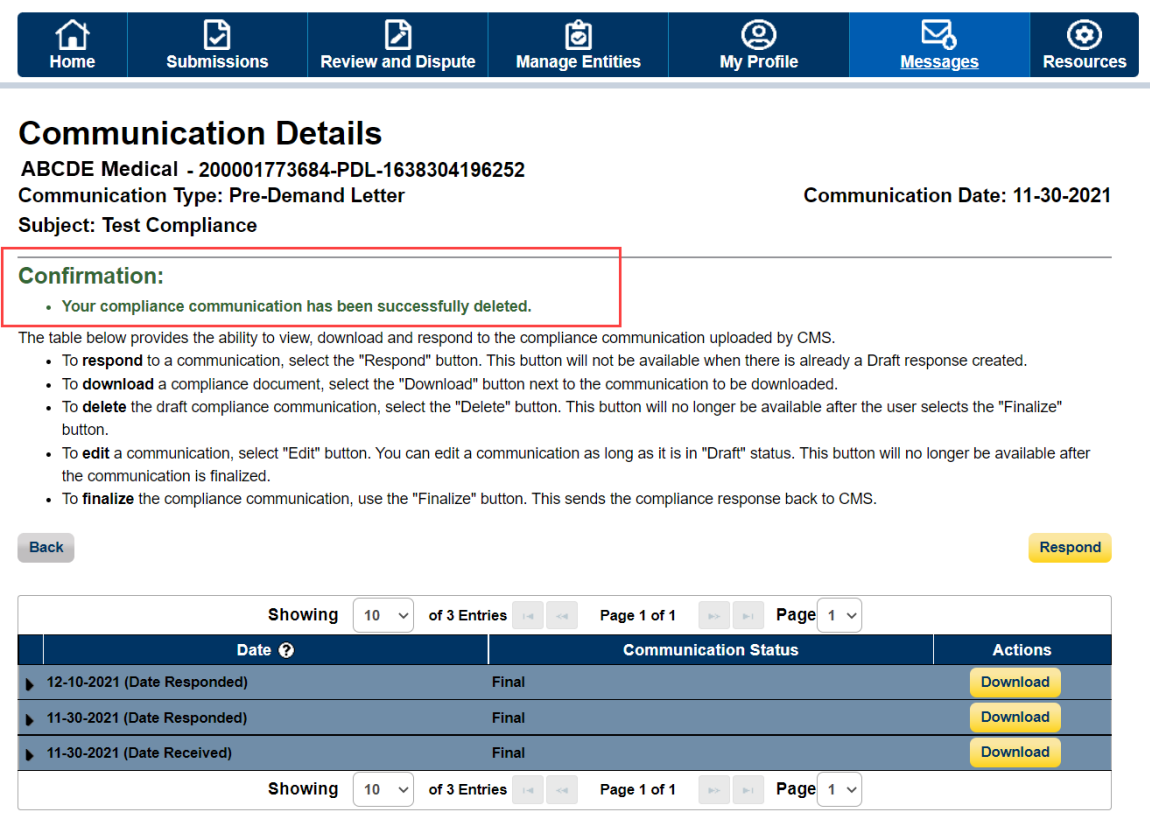
Figure 60: Confirmation Message (OPS 2.0)

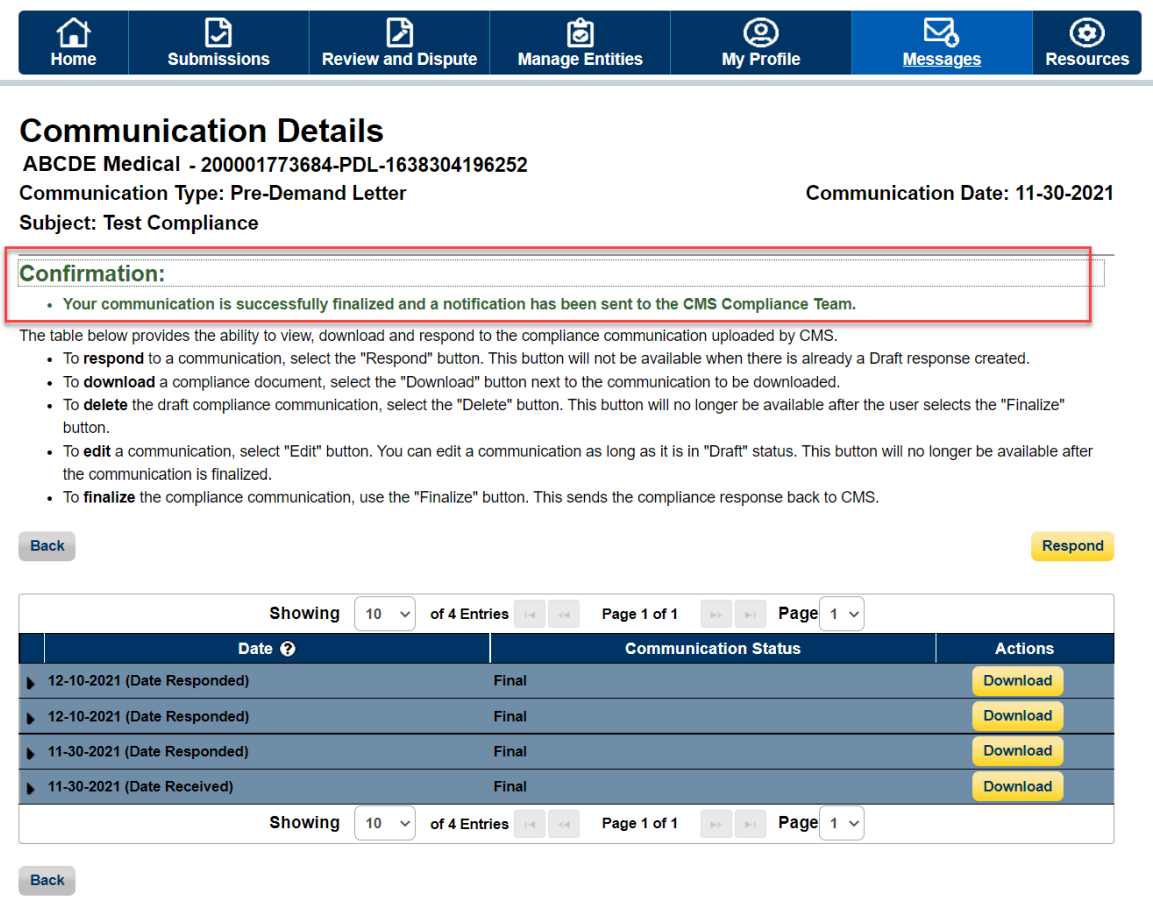
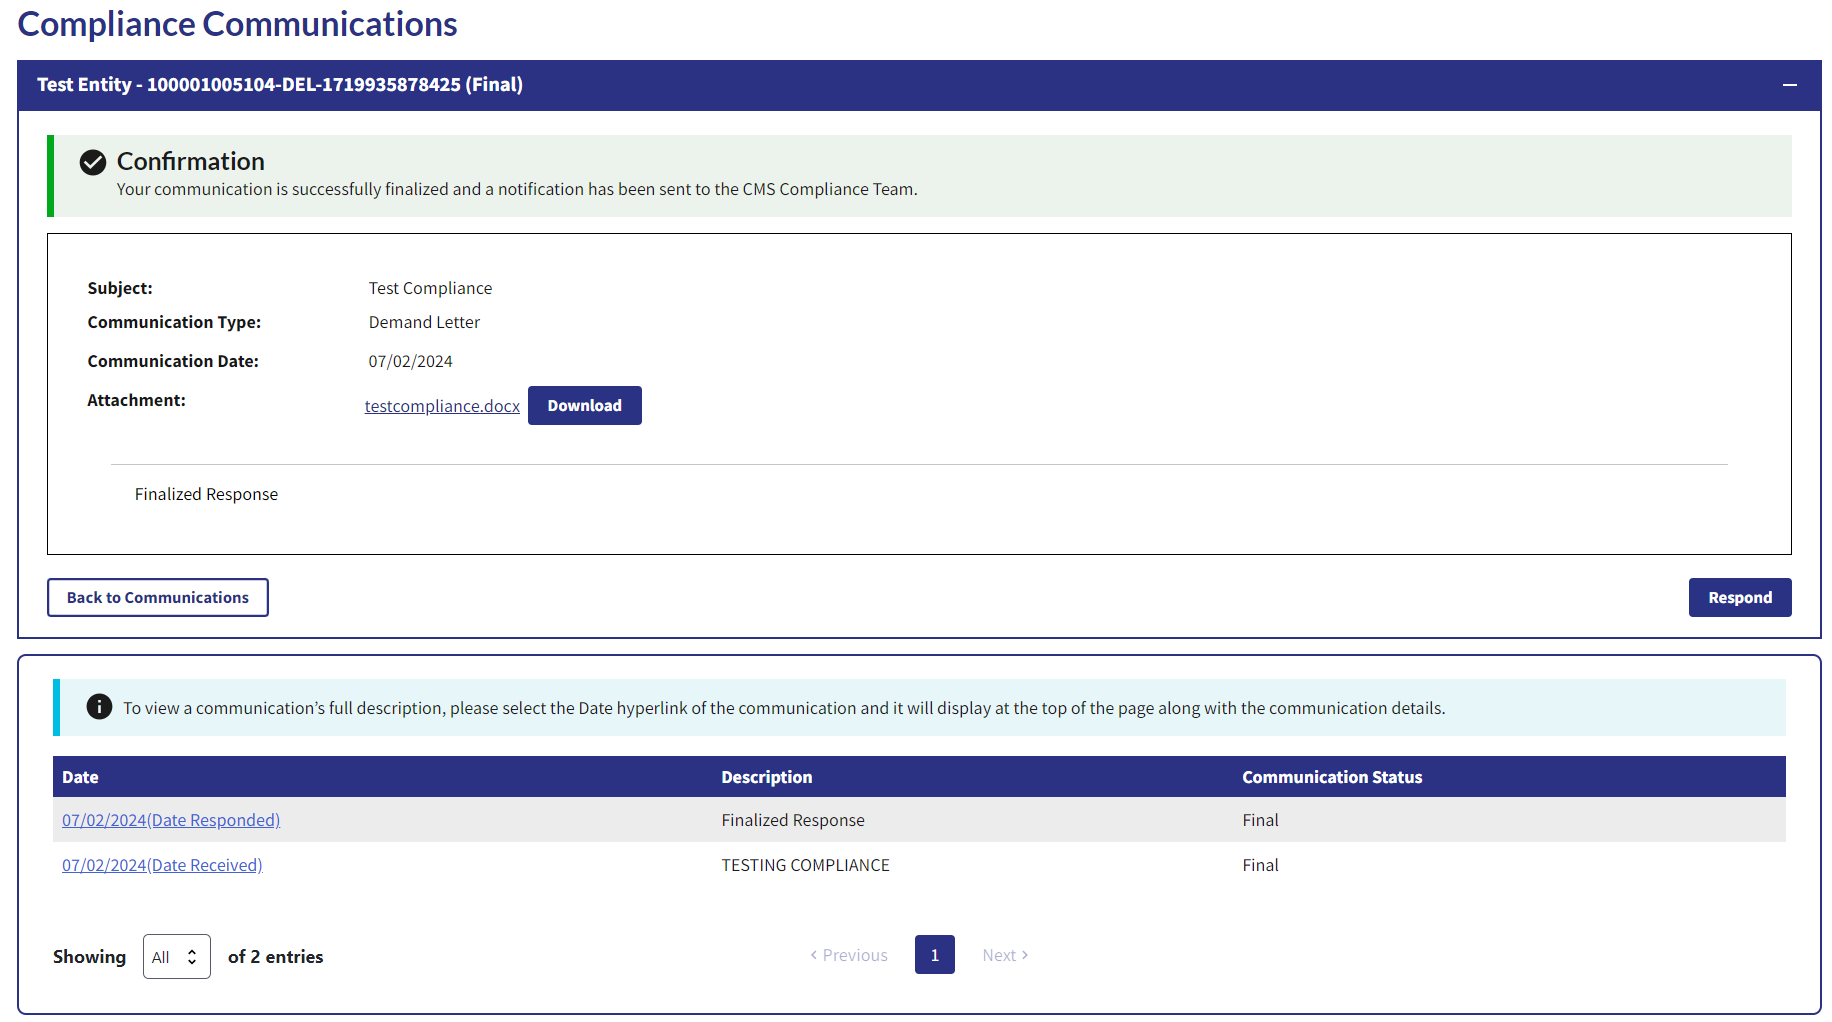
Upon selecting the “Finalize” button, the confirmation message will allow you to select either “Yes” to finalize the communication or “No” to cancel the action. Upon selecting the “Yes”, the “Communication Status” changes from draft to final. This action will notify the CMS Compliance team about the response. When a communication is finalized, a confirmation message will be provided on the page. Upon selecting the “No”, the user action will be cancelled.
Figure 61: Confirmation Message (OPS 1.0)
 Figure
62: Confirmation Message (OPS 2.0)
| File Type | application/vnd.openxmlformats-officedocument.wordprocessingml.document |
| Author | Prathima Joshyula |
| File Modified | 0000-00-00 |
| File Created | 2024-07-26 |
© 2026 OMB.report | Privacy Policy