5 - Cms-10495 (0938-1237).screenshots - Ops_pra_reporting_entity_registration_and_nomination
5 - CMS-10495 (0938-1237).SCREENSHOTS - OPS_PRA_REPORTING_ENTITY_REGISTRATION_AND_NOMINATION.docx
Registration, Attestation, Dispute Resolution and Correction, Assumptions Document and Data Retention Requirements for Open Payments (CMS-10495)
5 - CMS-10495 (0938-1237).SCREENSHOTS - OPS_PRA_REPORTING_ENTITY_REGISTRATION_AND_NOMINATION
OMB: 0938-1237
Open Payments Reporting Entity Registration and Nominations PRA
The screenshots below illustrate the differences in physician and non-physician practitioner (NPP) registration between Open Payments System 1.0 and Open Payments System 2.0.
Creating an Open Payments Profile as a Reporting Entity (First Time System Users)
Step 1: Log in to the Open Payments system at https:/openpayments.system.cms.govsing your IDM credentials and agree to the Terms and Conditions.
When you are finished, select Create My Profile.
Figure 1: Open Payments System Landing Page for first-time system users (OPS1.0)

Figure 2: Open Payments System Landing Page for first-time system users (OPS2.0)
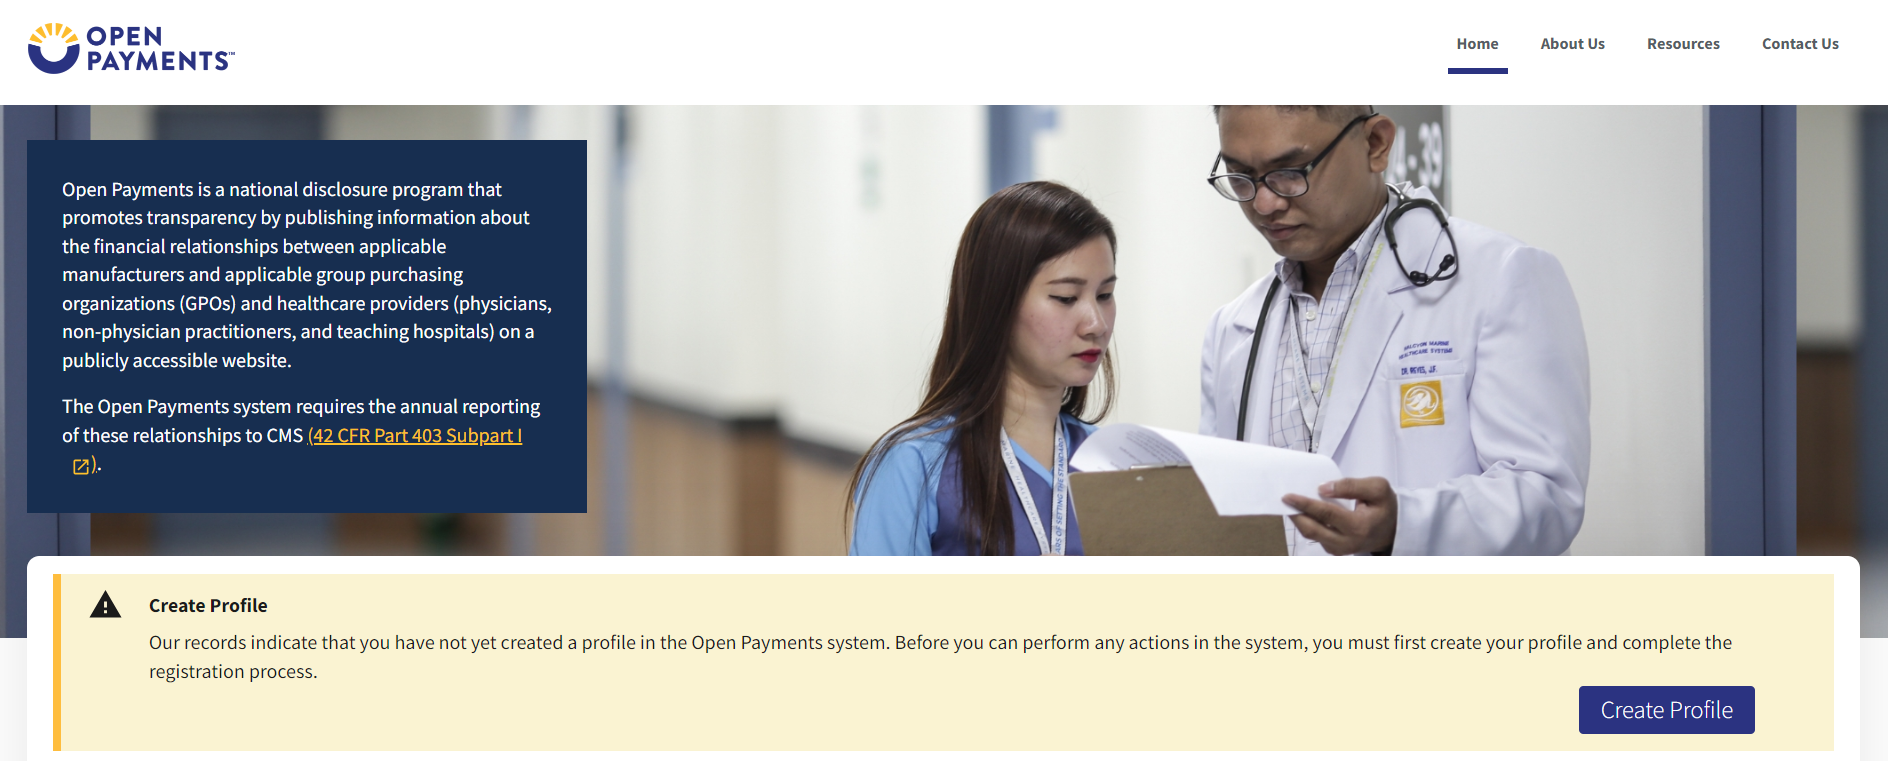
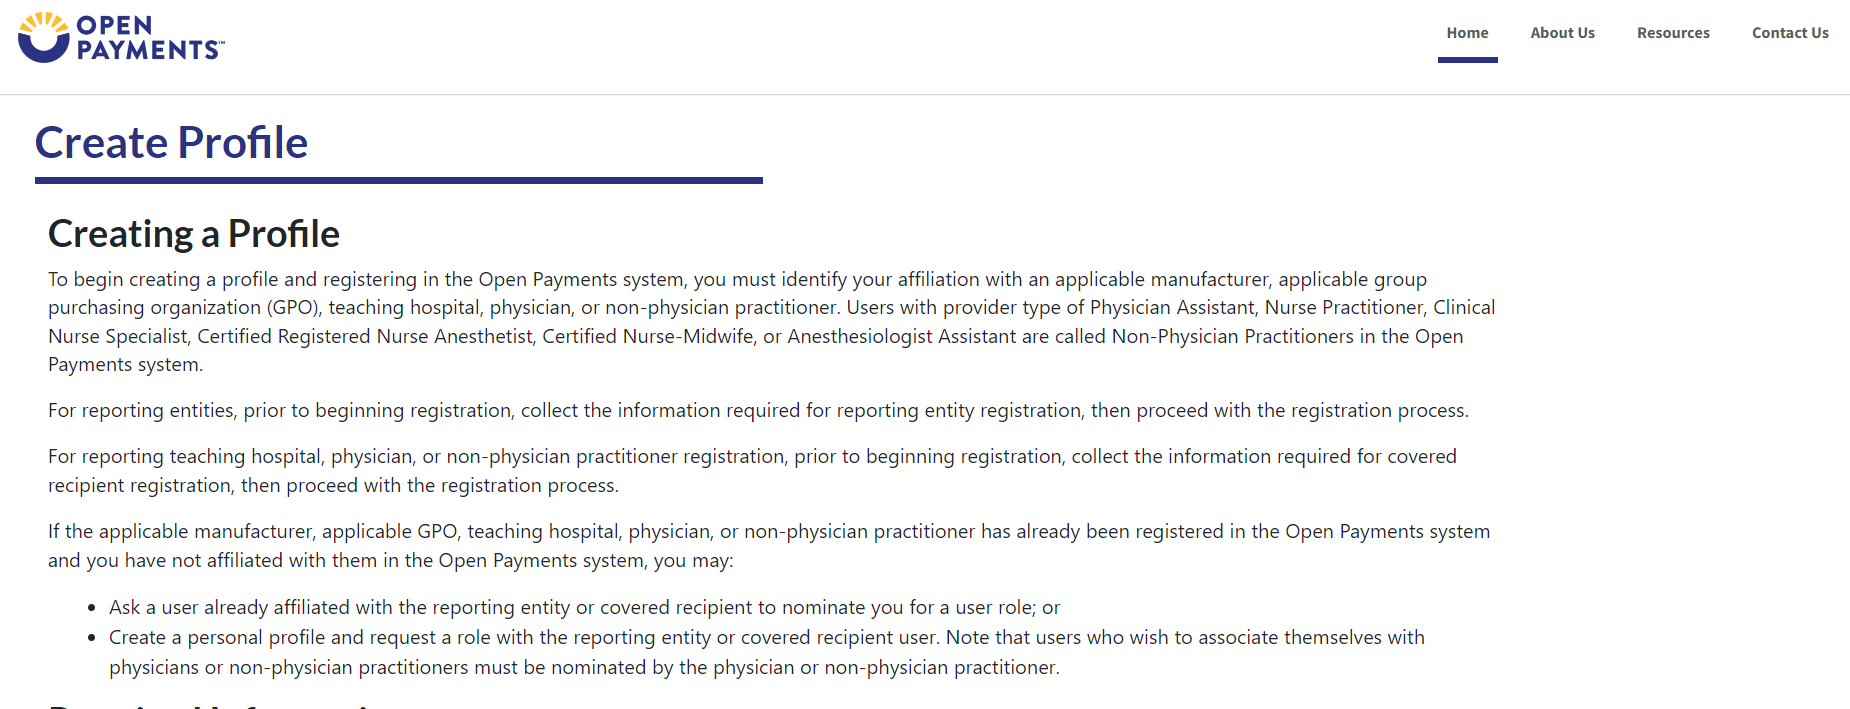
Step 2: The on-screen text contains important information regarding creating the reporting entity and individual profile. Read the on-screen text and select Start Profile at the bottom of the page when you are ready to continue.
Figure 3: Create Profile Page (OPS1.0)
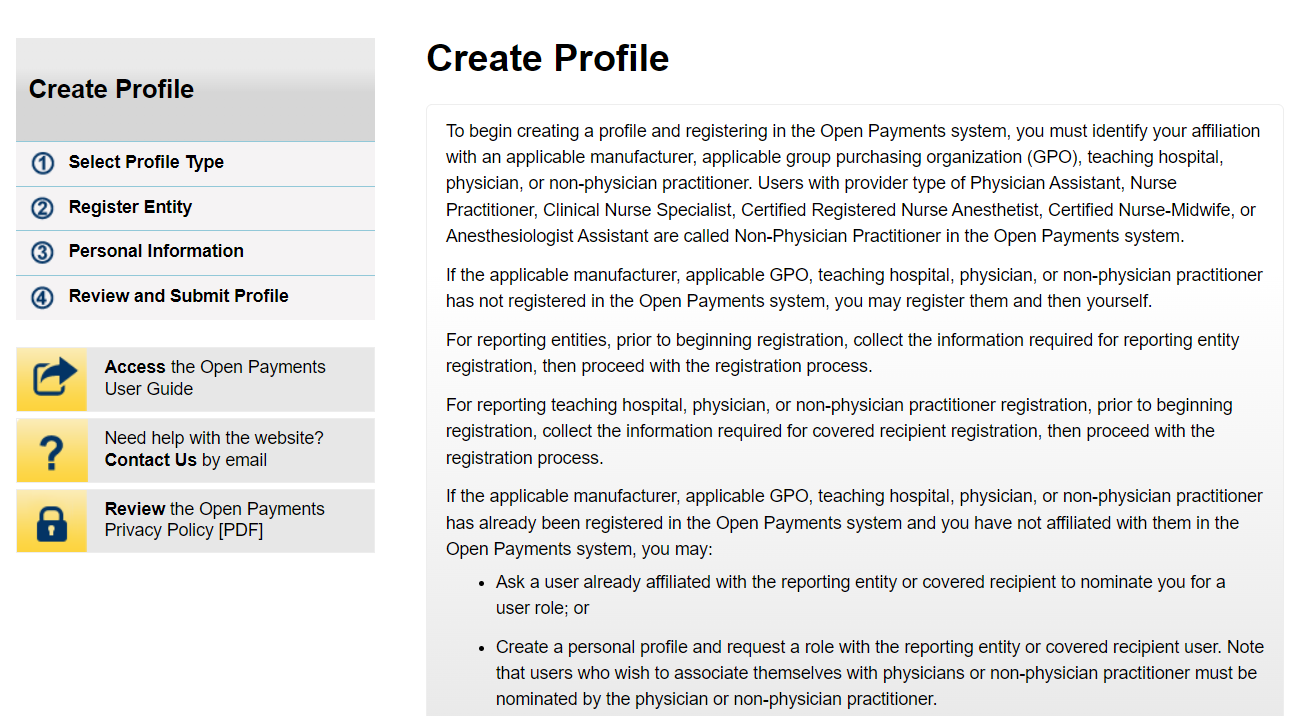
Figure 4: Create Profile Page (OPS2.0)
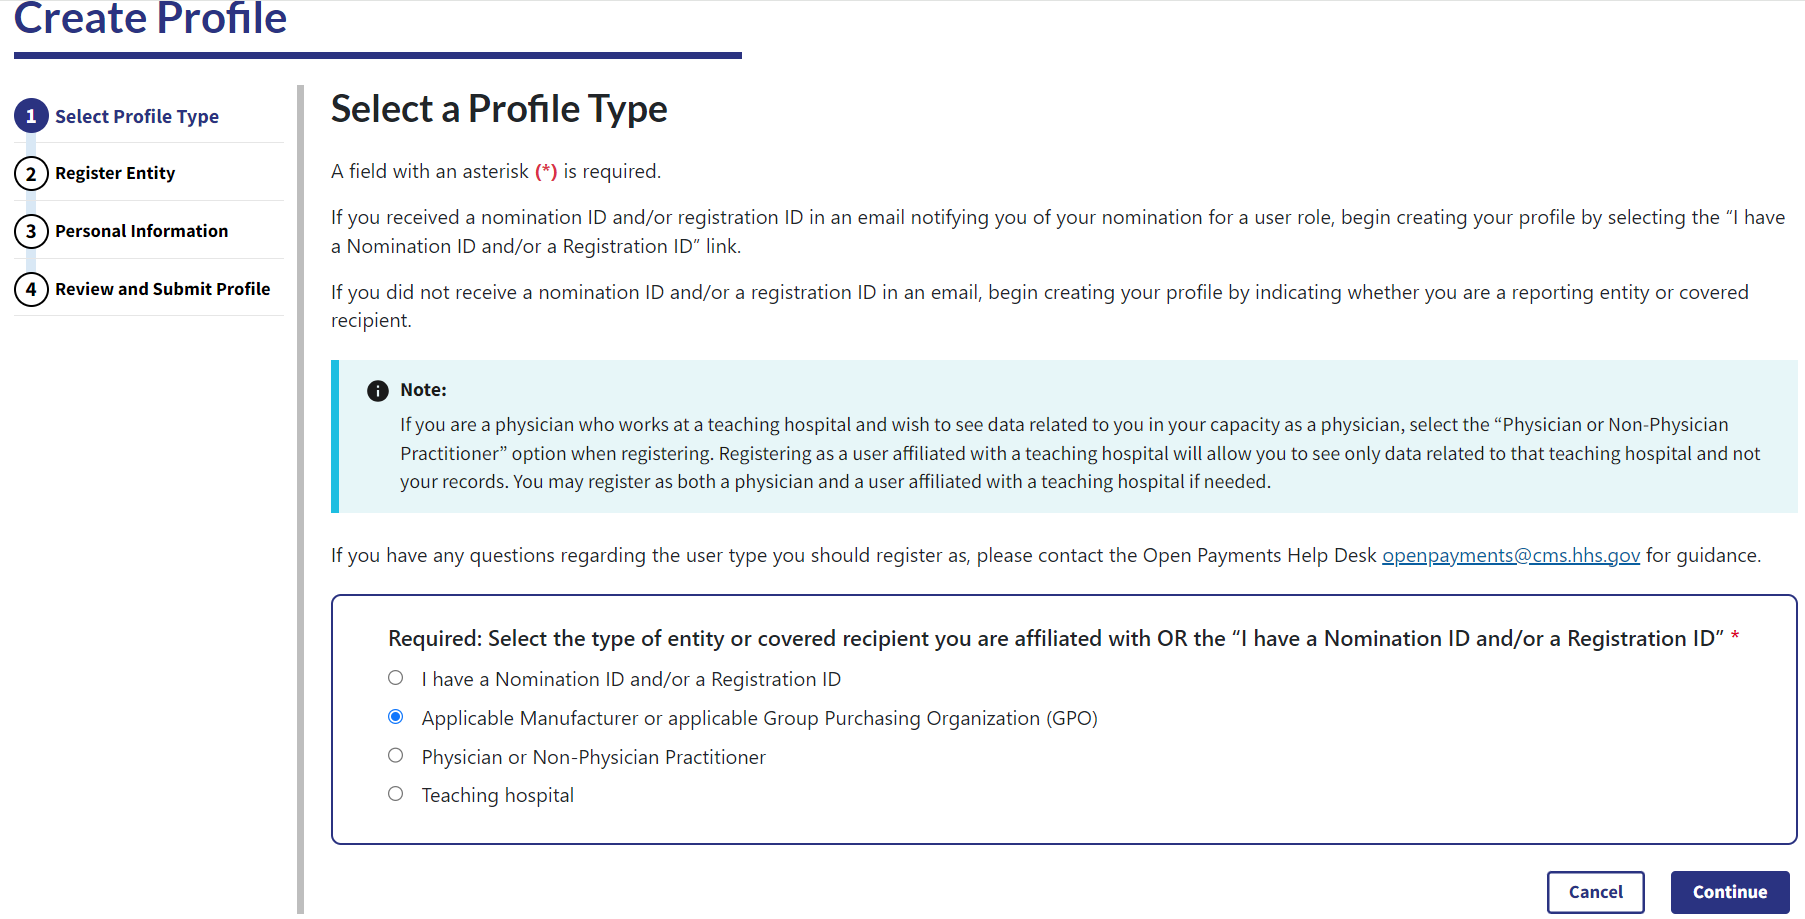
Step 3: Select the profile type Applicable manufacturer or applicable group purchasing organization (GPO) and then select Continue.
Figure 5: Select Profile Type Page (OPS1.0)
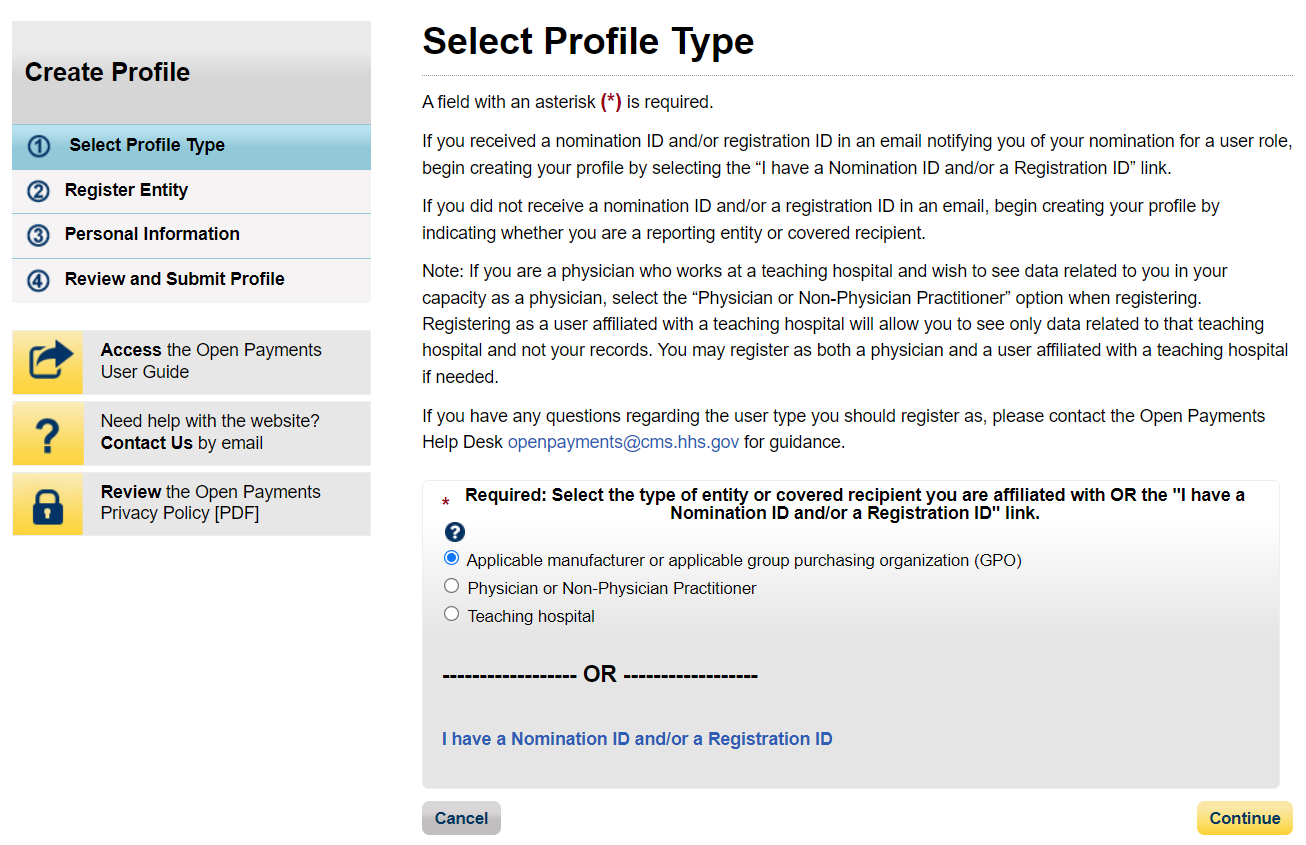
Figure 6: Select Profile Type Page (OPS2.0)
Step 4: Once your entity type is selected, provide the reporting entity’s 9-digit Taxpayer Identification Number/Employer Identification Number (TIN/EIN) and select Find Entity.
Figure 7: Find and Entity Page (OPS1.0)
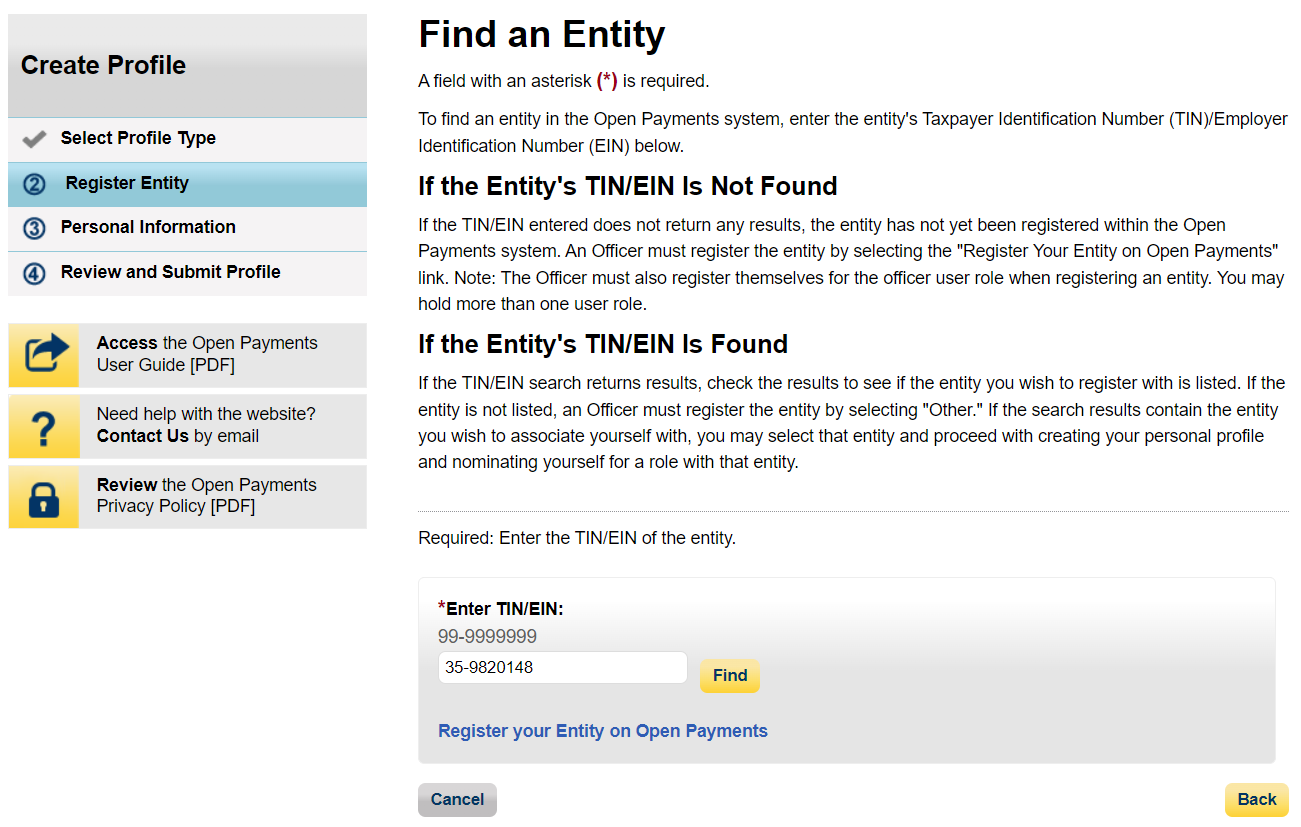
Figure 8: Find and Entity Page (OPS2.0)
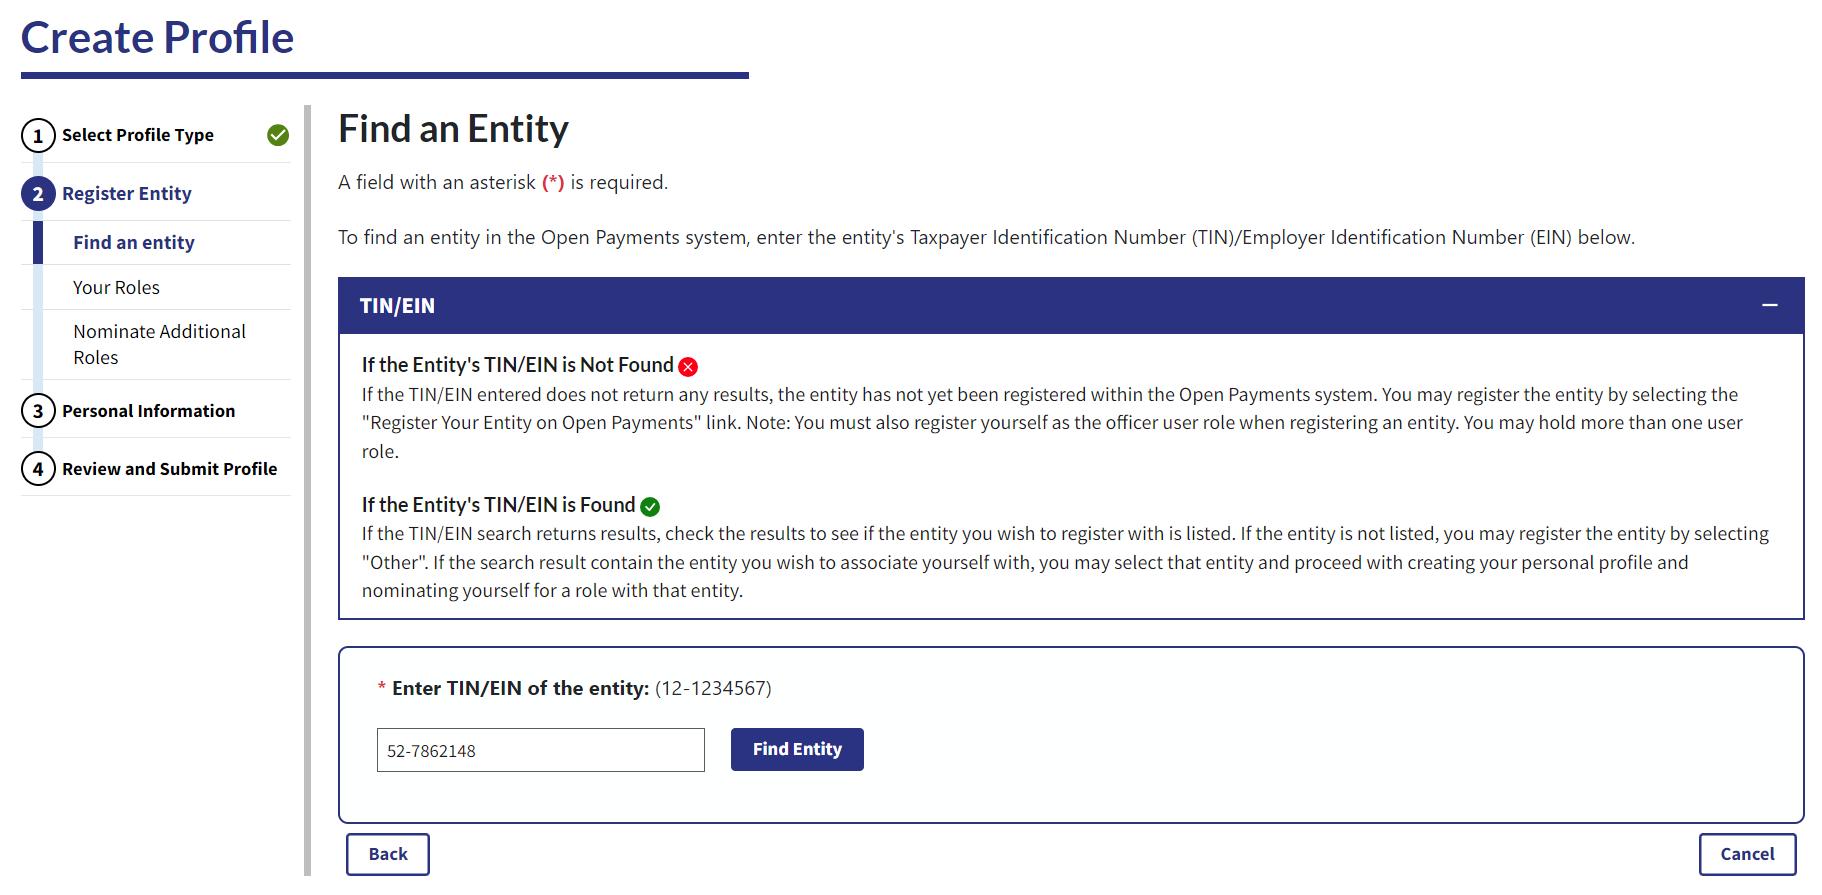
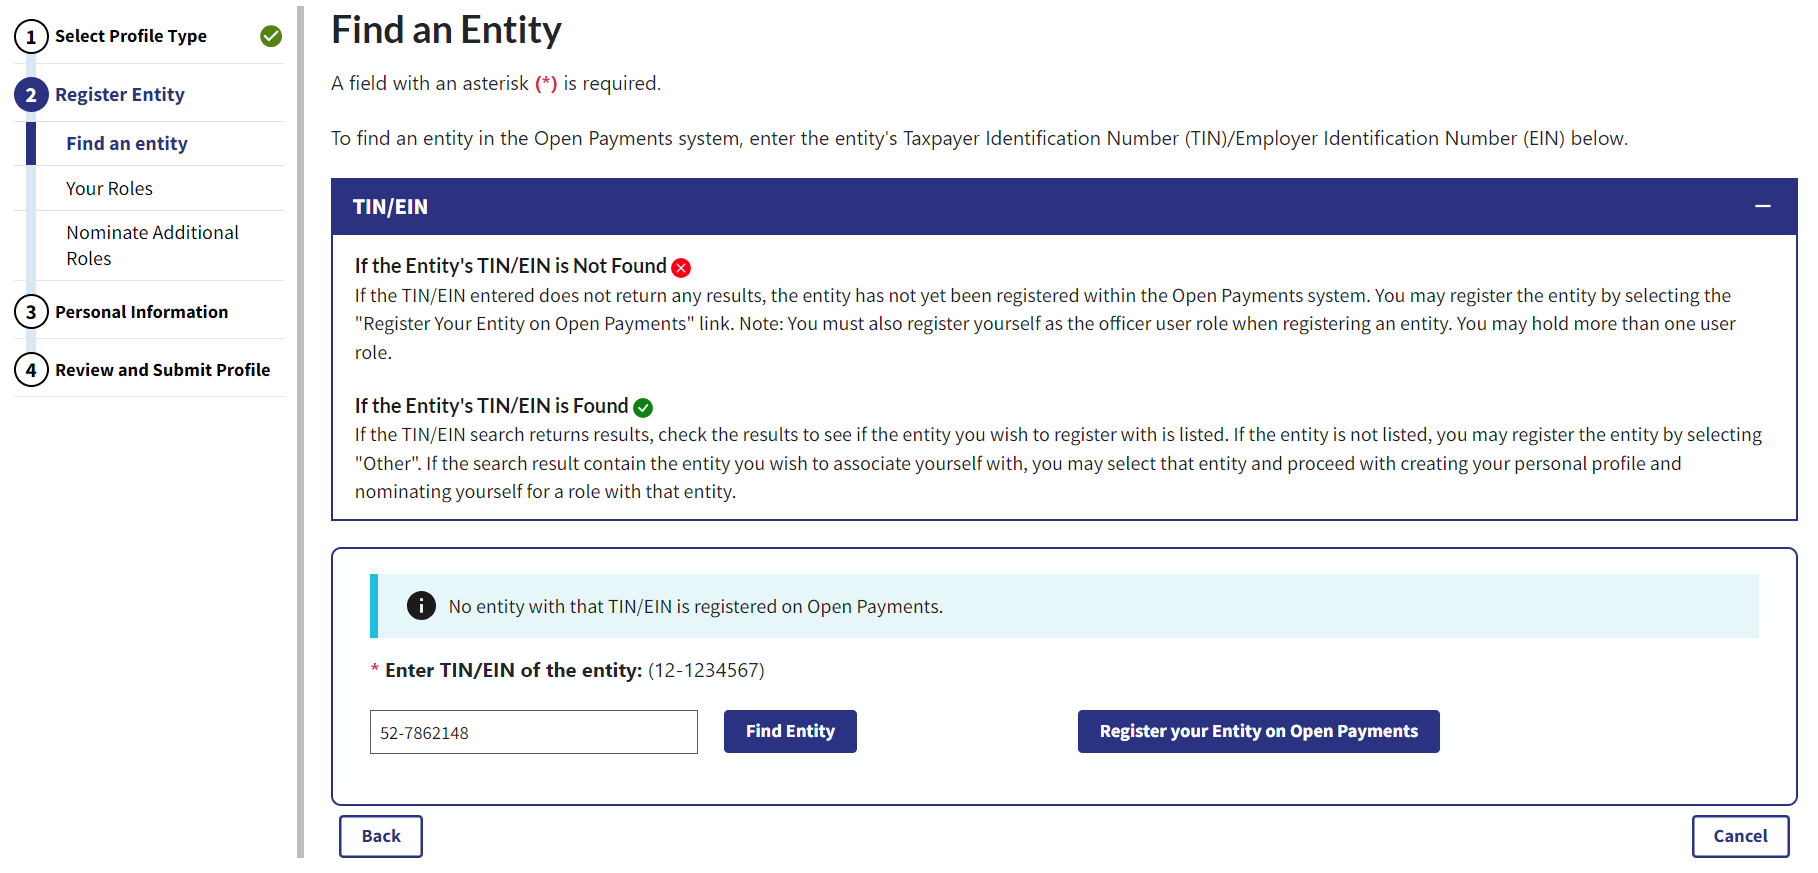
Step 5: The system will perform a search for the TIN/EIN you entered to determine if it has already been registered in the Open Payments system.
Figure 9: Find an Entity Page (OPS1.0)
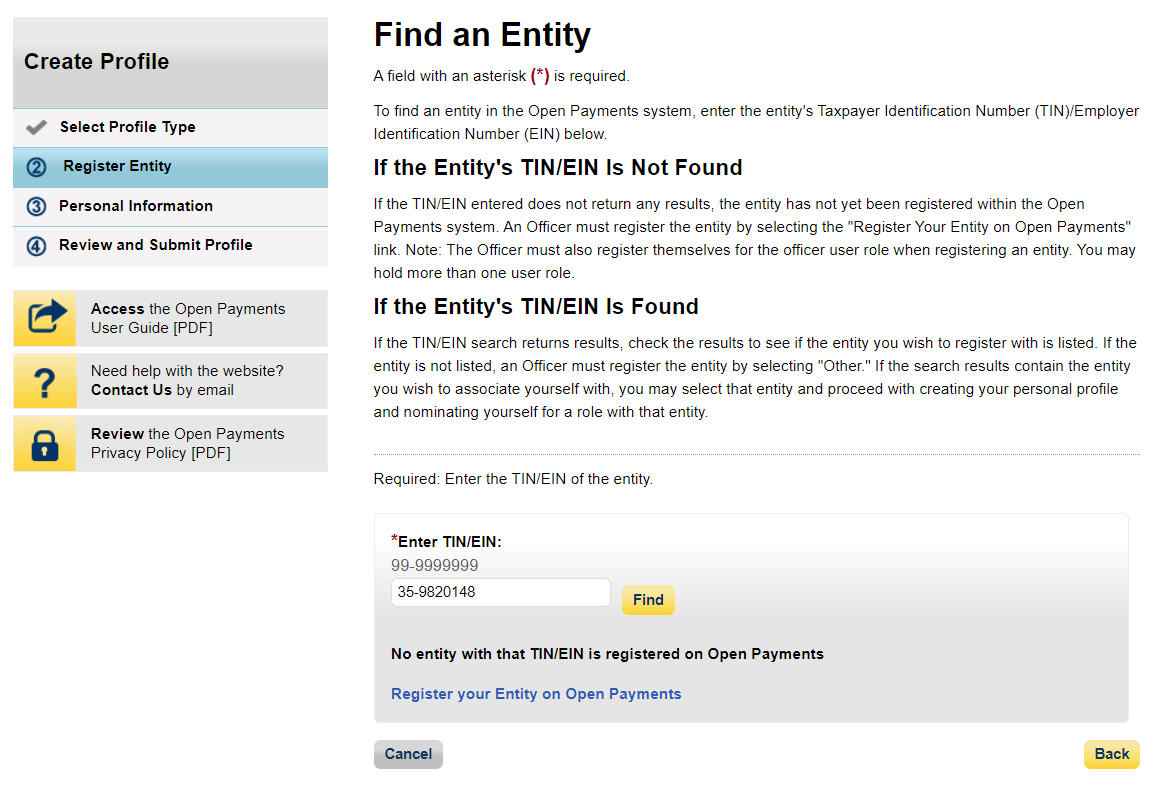
Figure 10: Find an Entity Page (OPS2.0)
Step 6: Enter the reporting entity’s information. All required fields will be marked with an asterisk (*). You will not be able to proceed with registration until all the required fields have been entered.
Figure11a: Register Entity Page (PART 1/4) (OPS1.0)
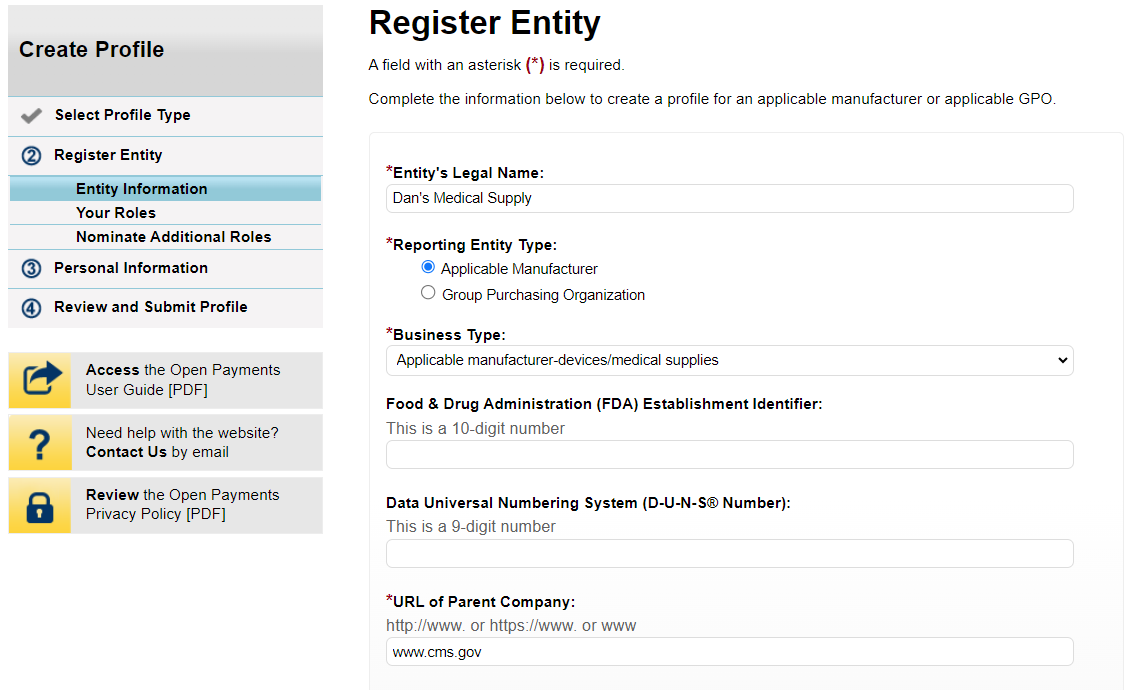
Figure11b: Register Entity Page (PART 2/4) (OPS1.0)
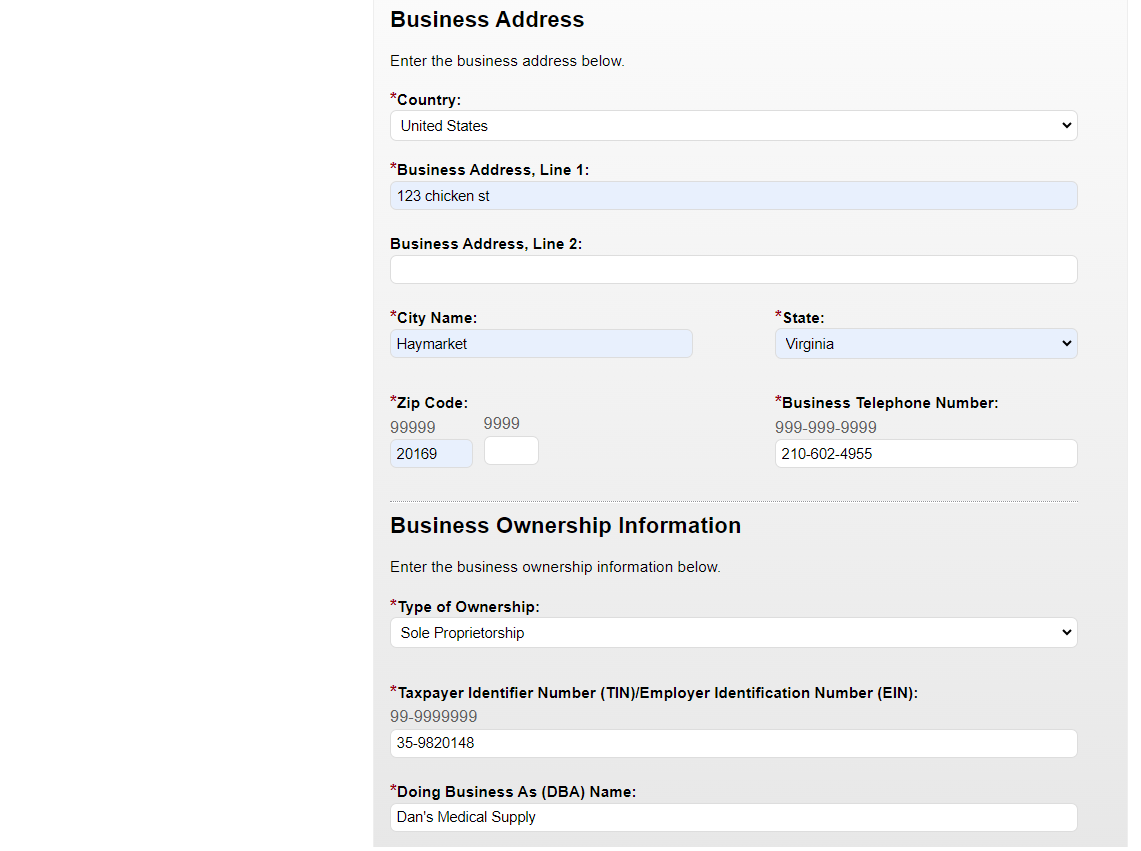
Figure11d: Register Entity Page (PART 3/4) (OPS1.0)
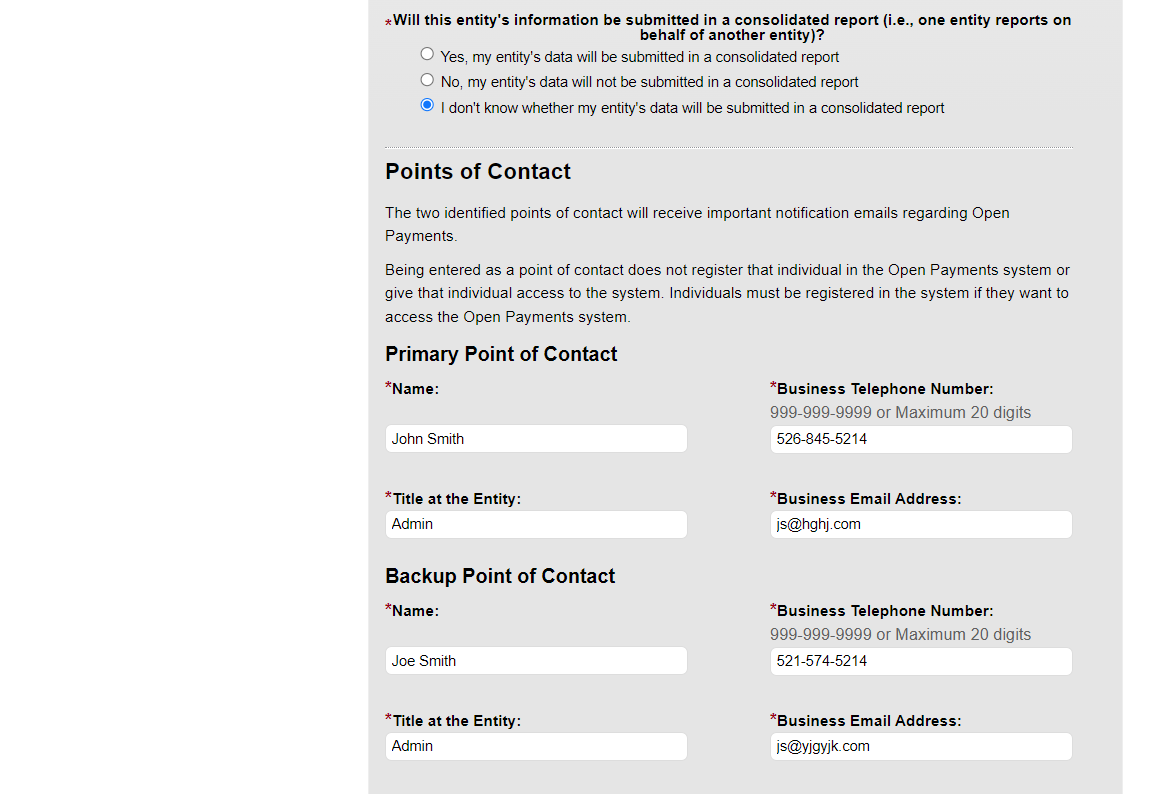
Figure11d: Register Entity Page (PART 3/4) (OPS1.0)
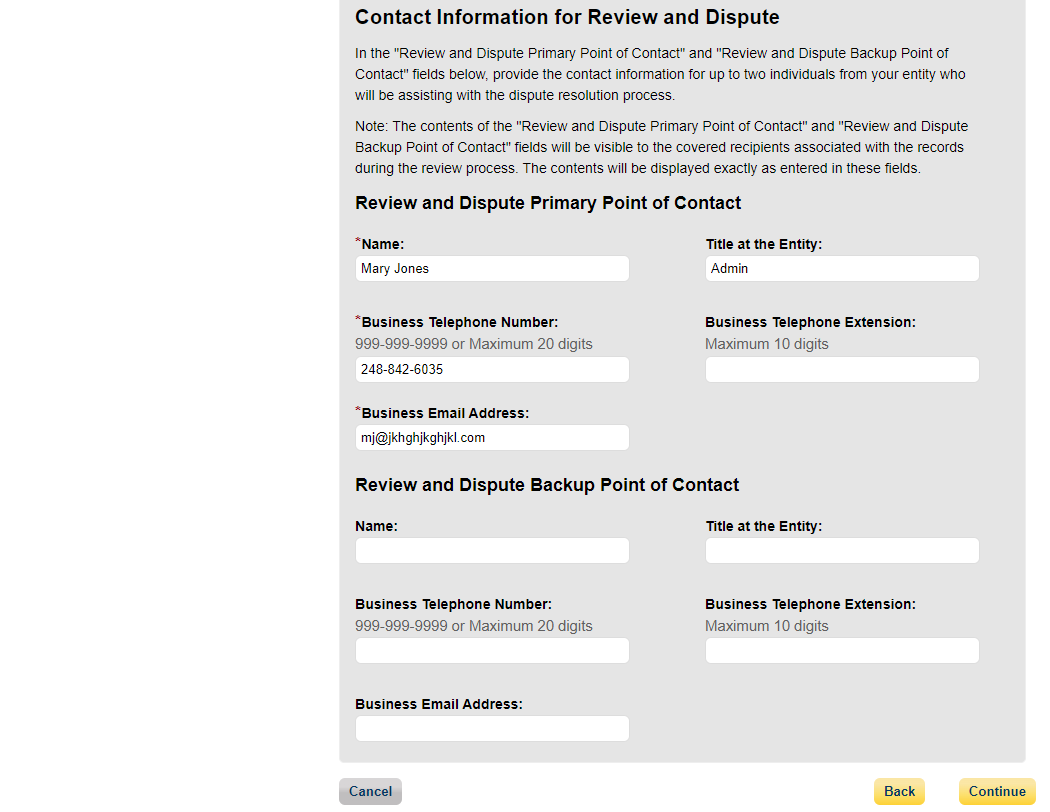
Figure 12: Register Entity Page (OPS2.0)
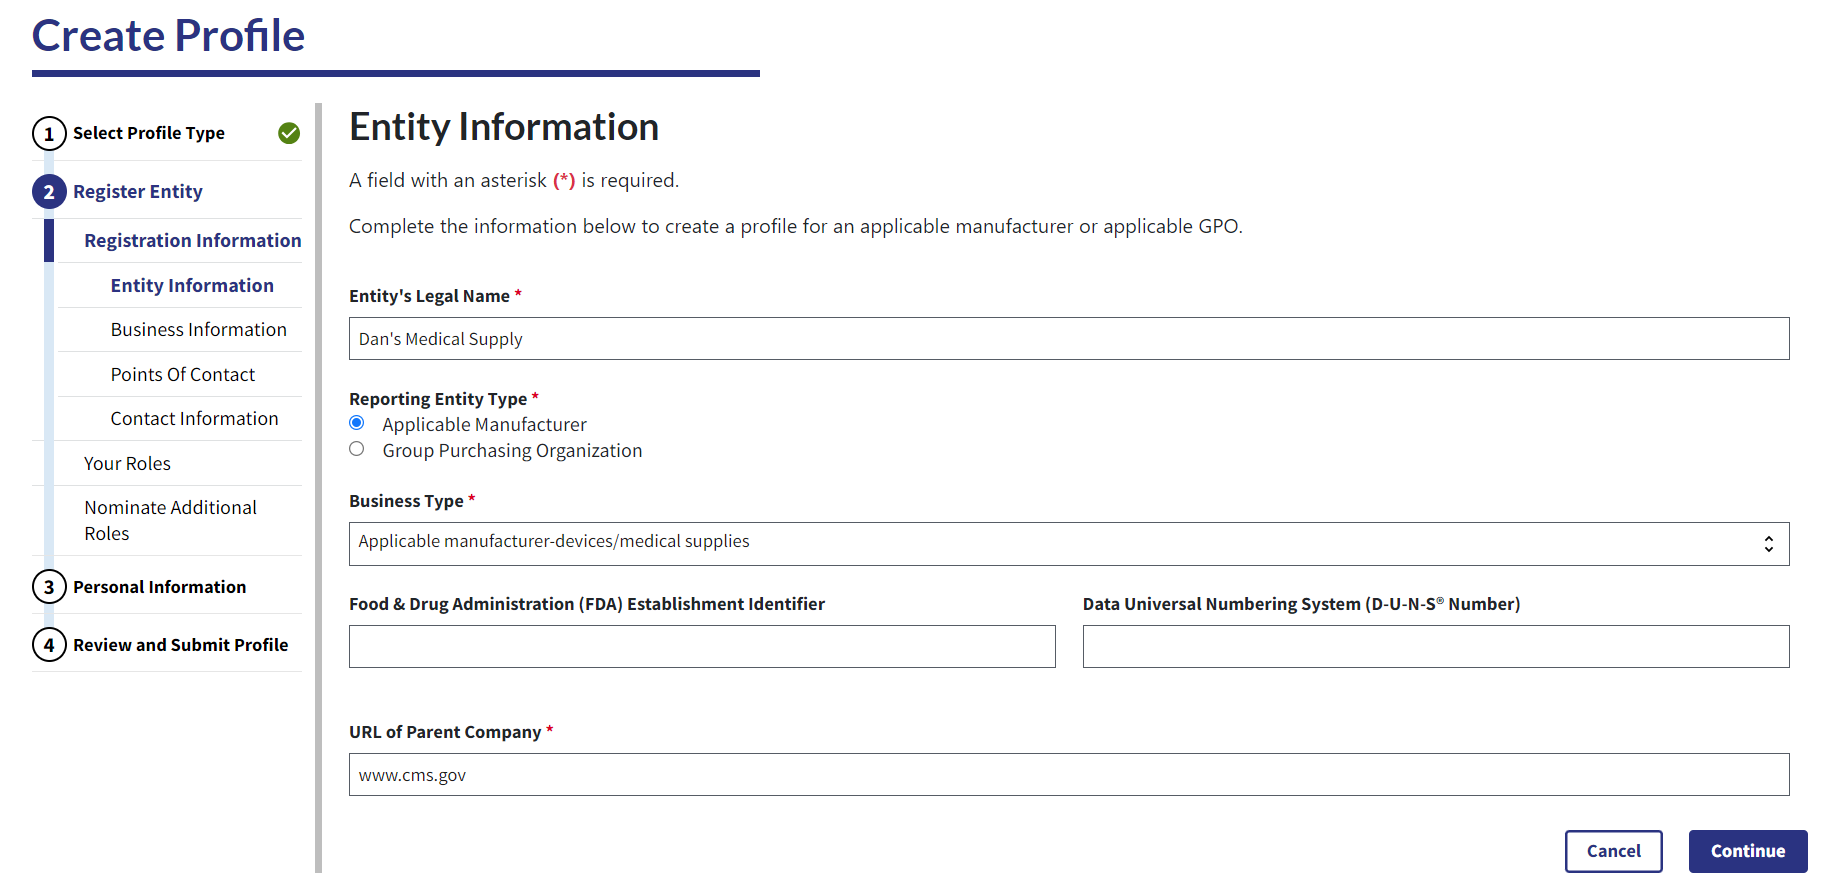
Figure 13a: Register Entity Page (TOP PART) (OPS2.0)
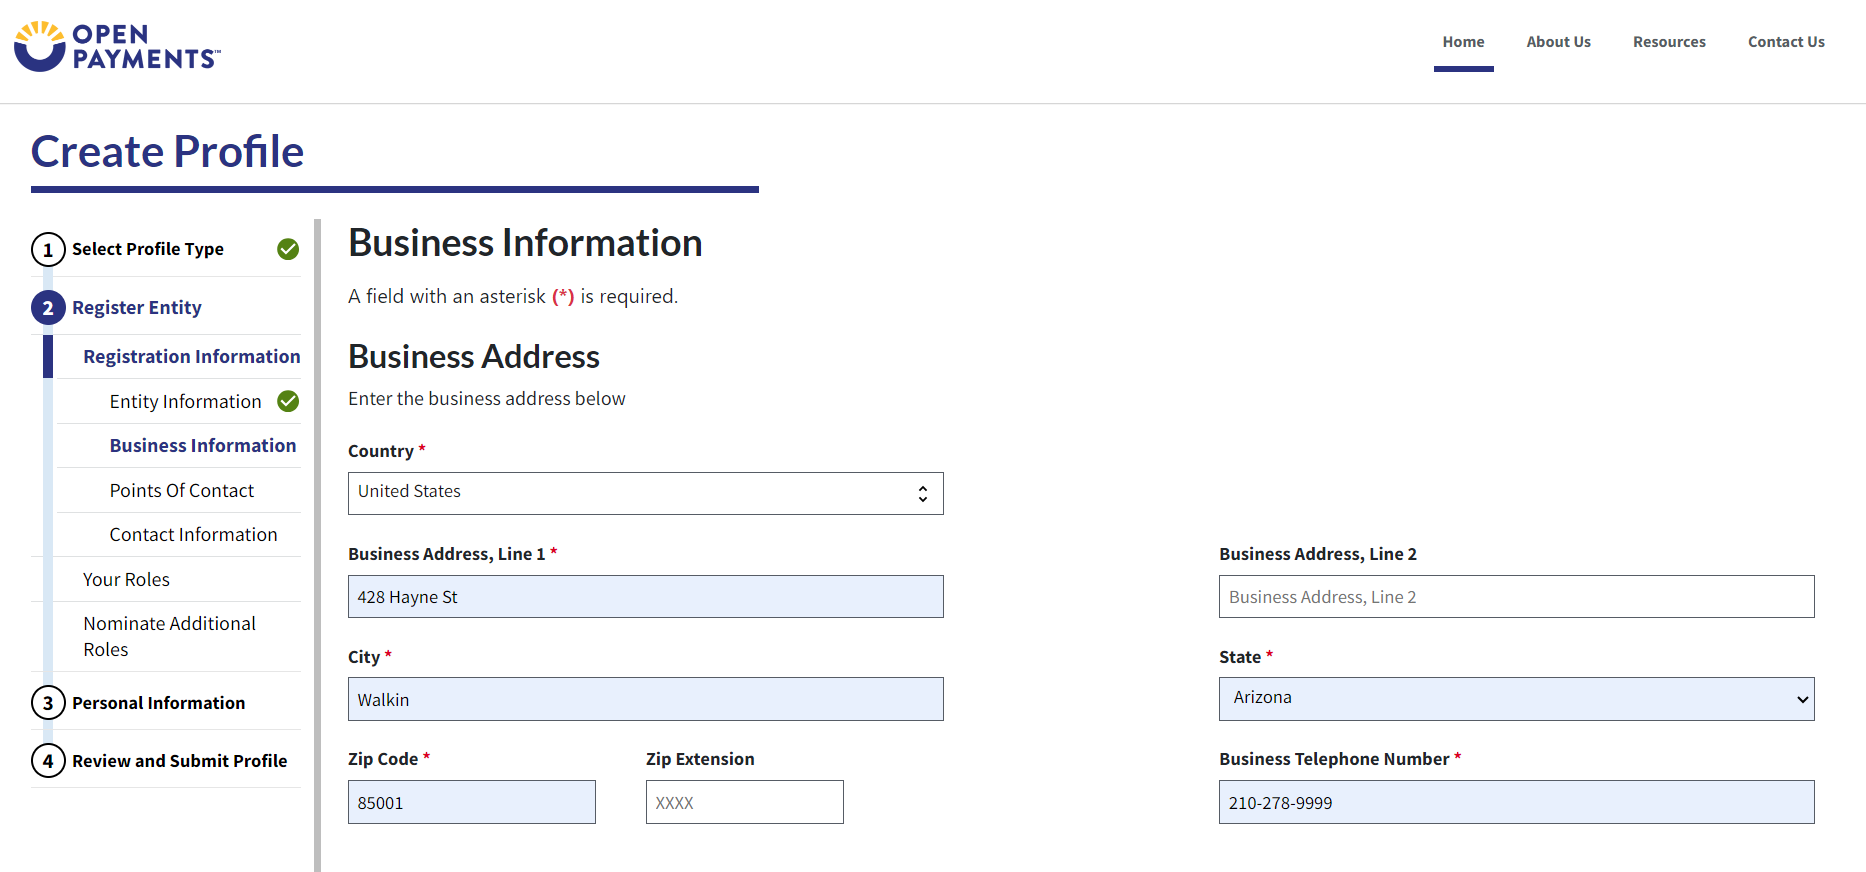
Figure 13b: Register Entity Page (BOTTOM PART) (OPS2.0)

Figure 14: Register Entity Page (OPS2.0)
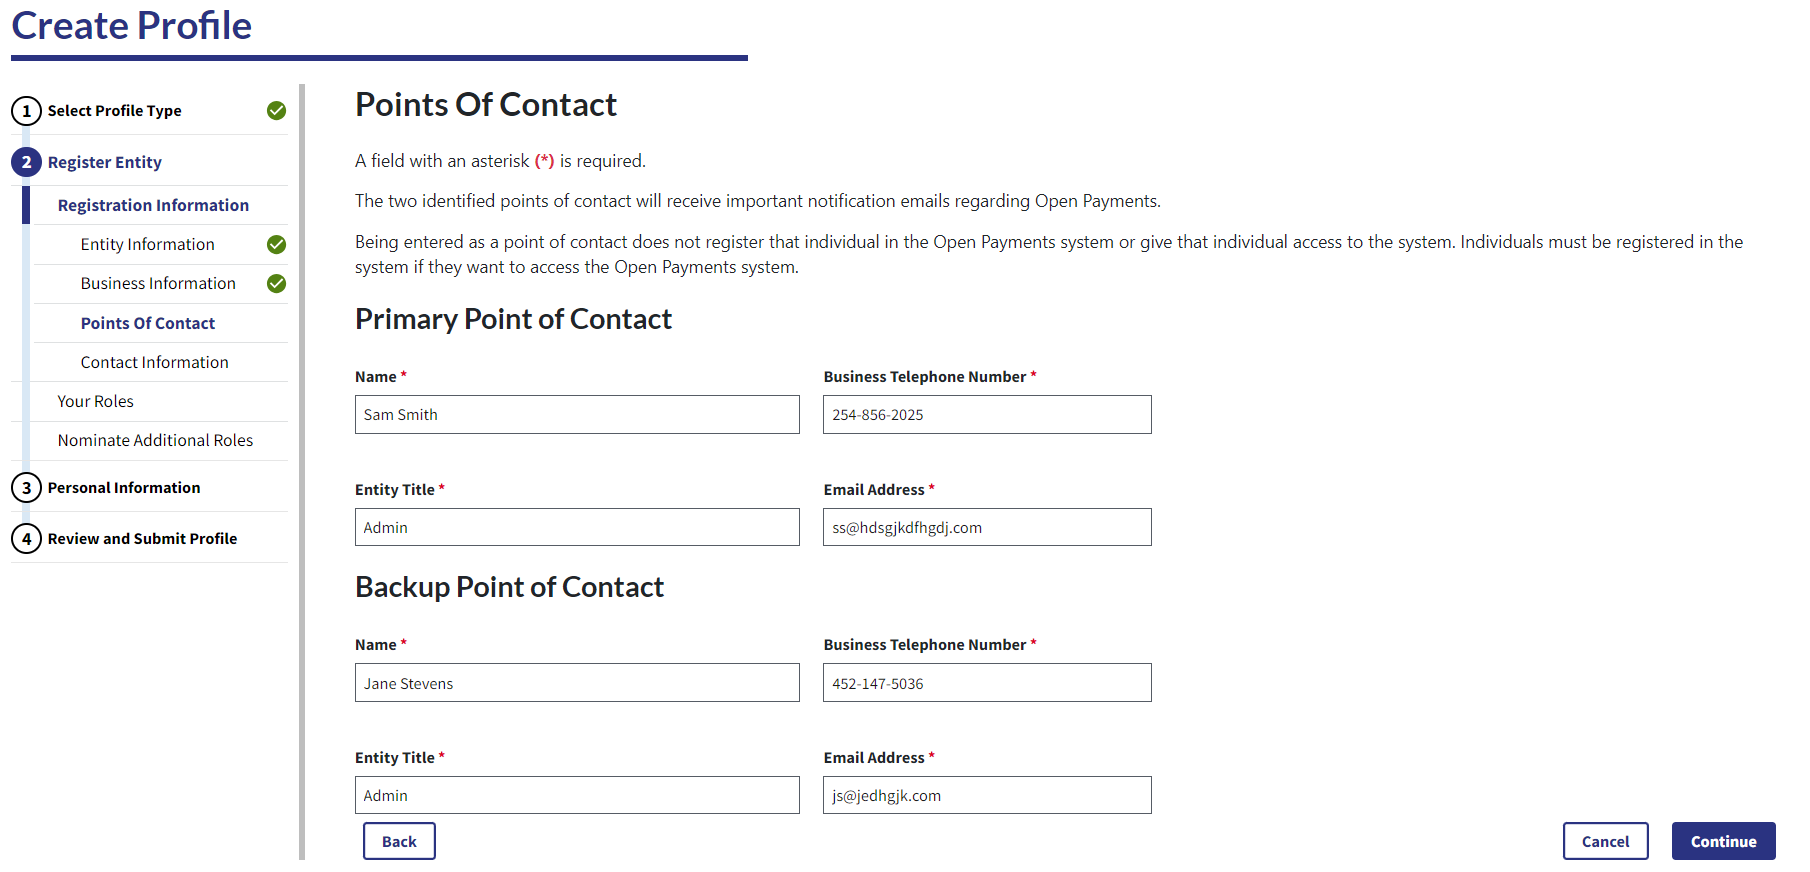
Figure 15: Register Entity Page (OPS2.0)
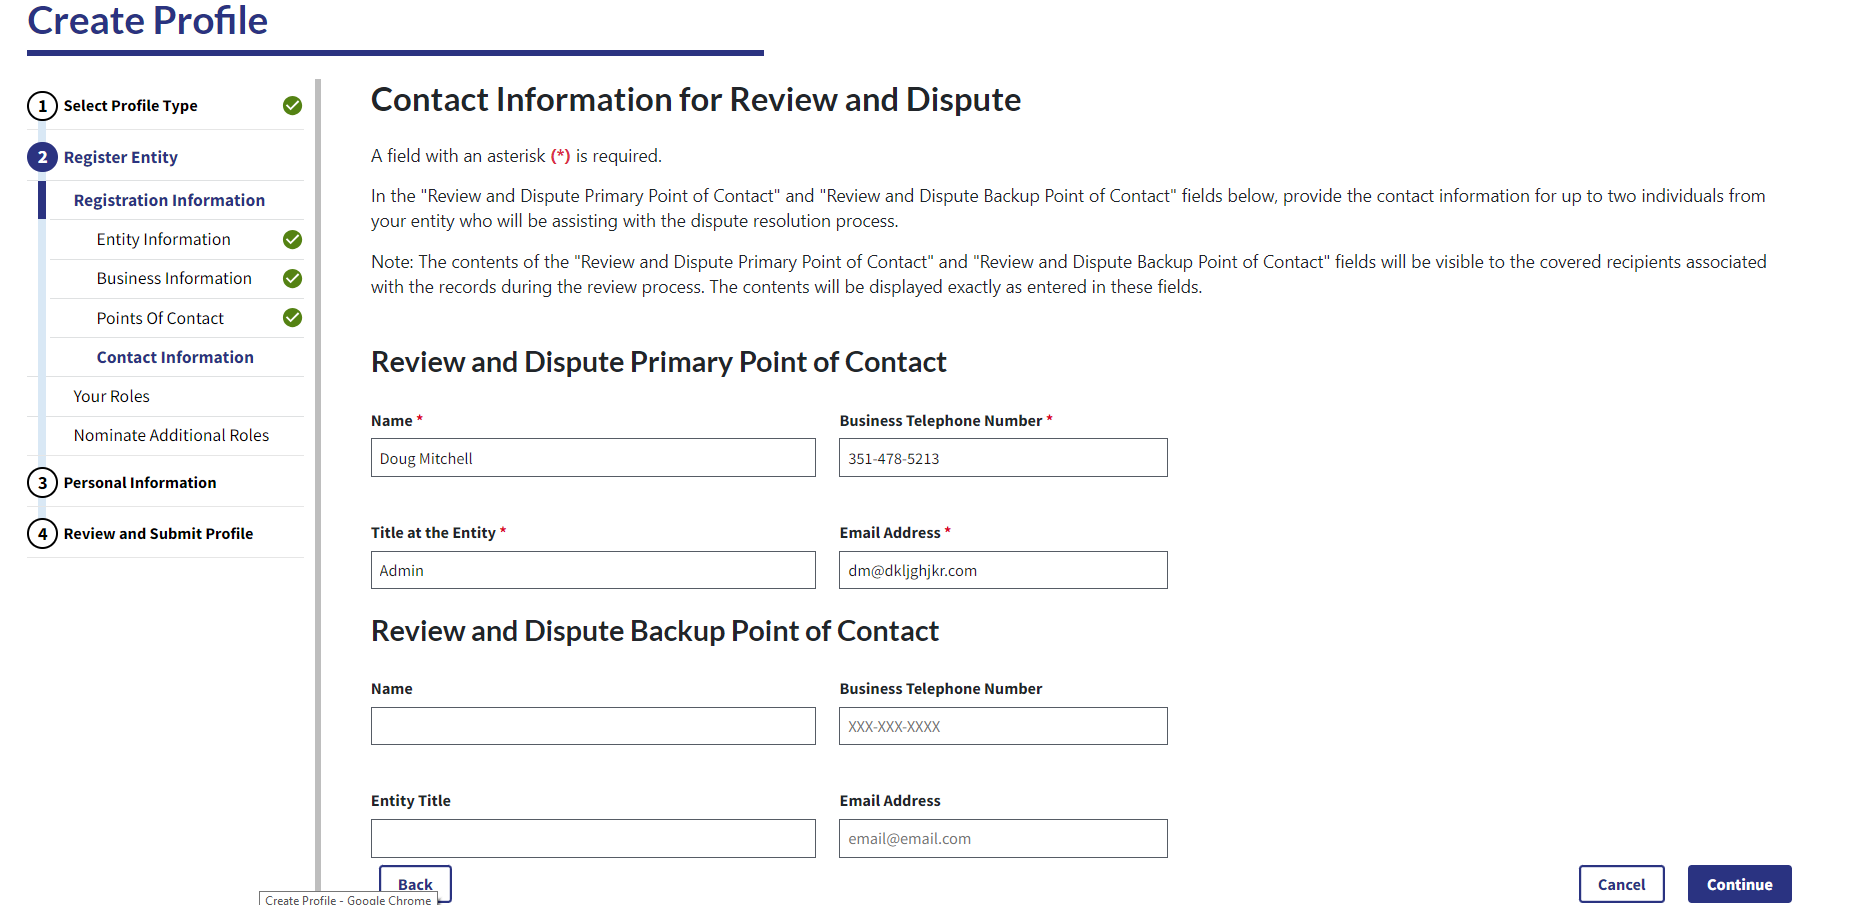
Step 7: Enter the required information and select the entity user roles you will be holding
Figure16a: Your Role Page (TOP PART) (OPS1.0)
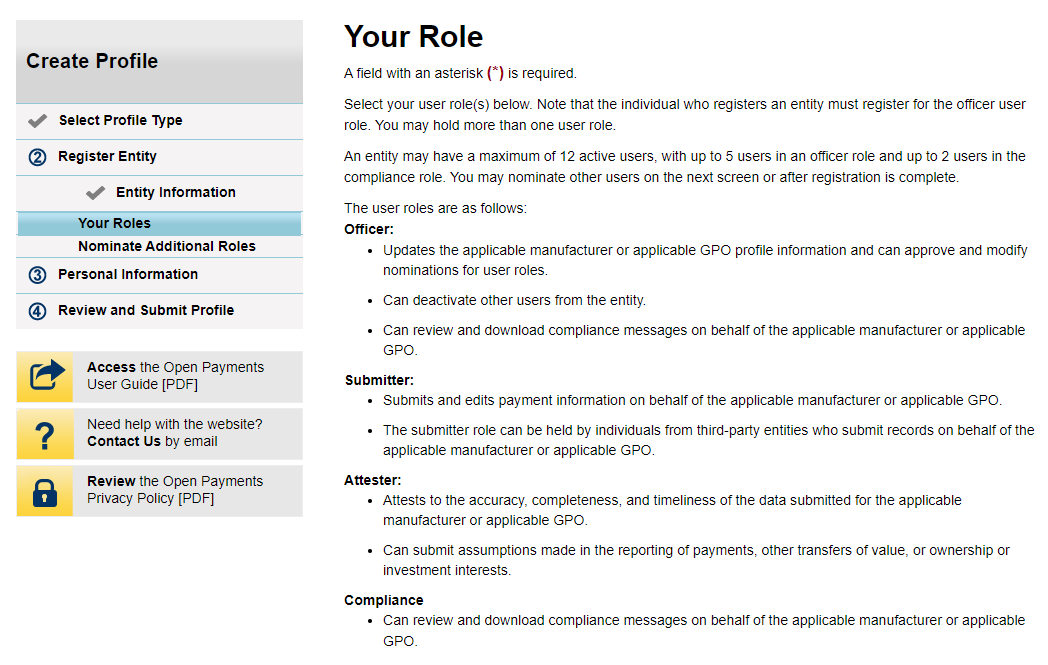
Figure16b: Your Role Page (BOTTOM PART) (OPS1.0)
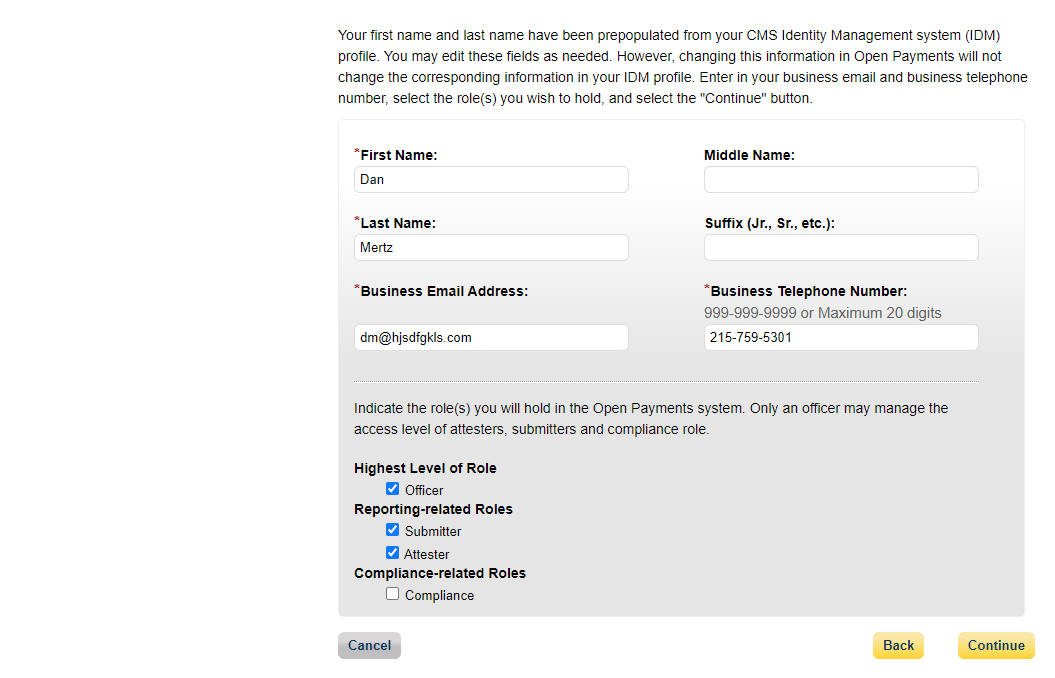
Figure17a: Your Role Page (TOP PART) (OPS2.0)
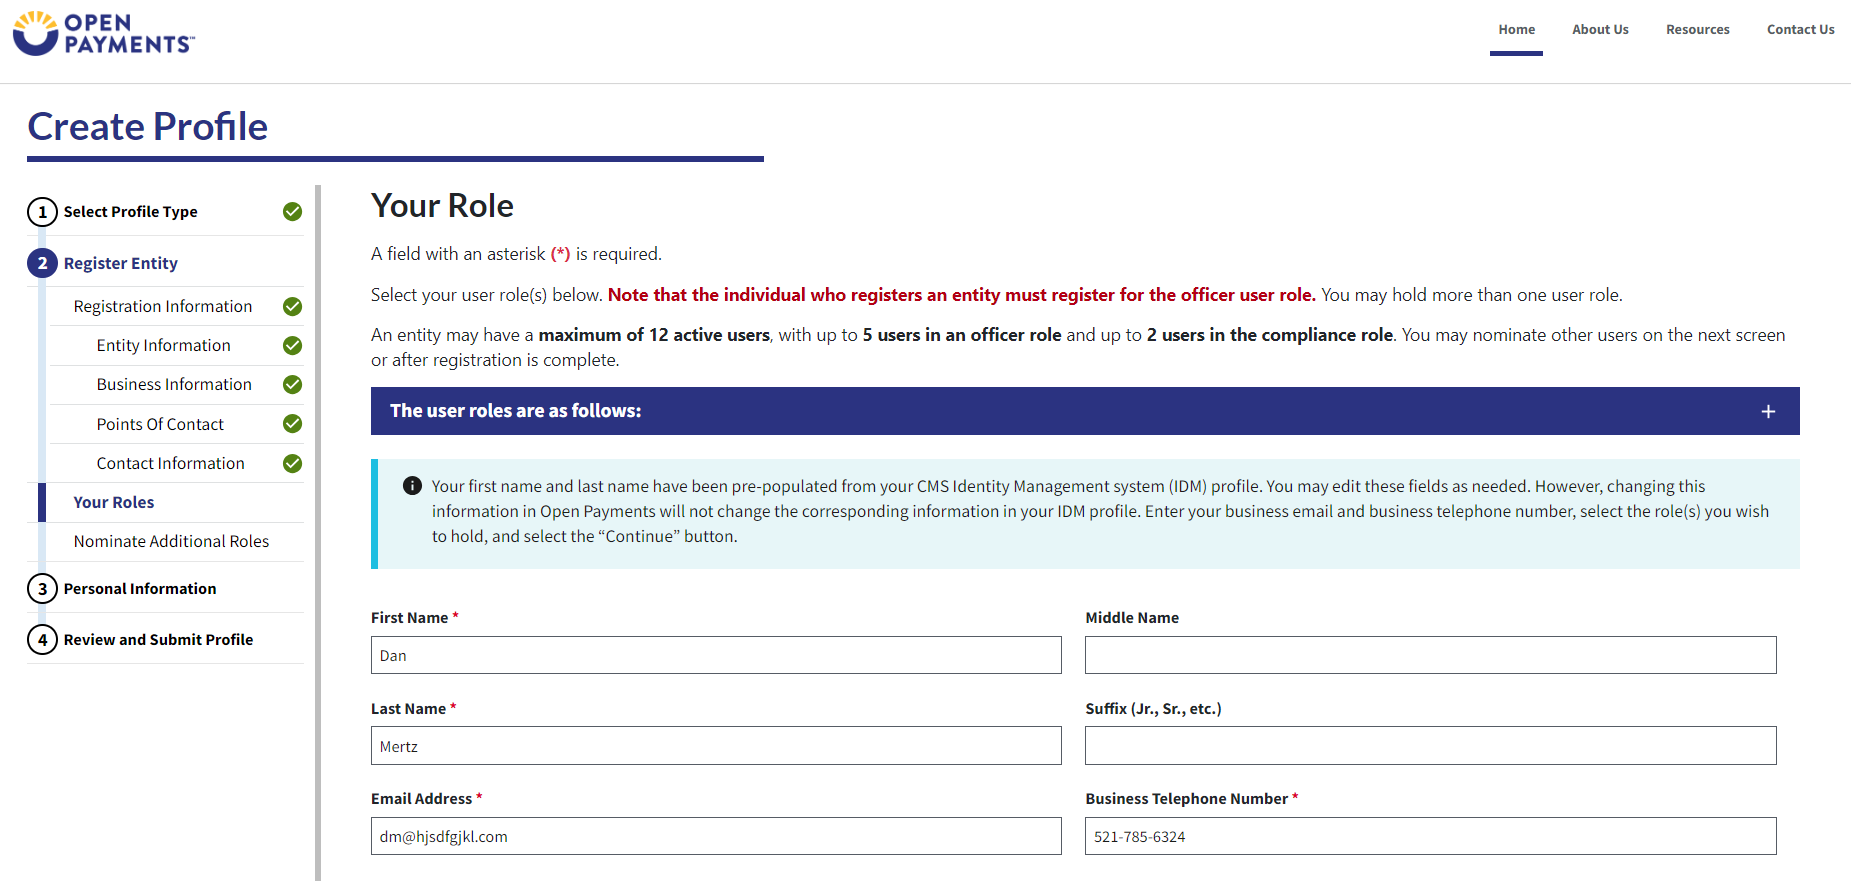
Figure17b: Your Role Page (BOTTOM PART) (OPS2.0)

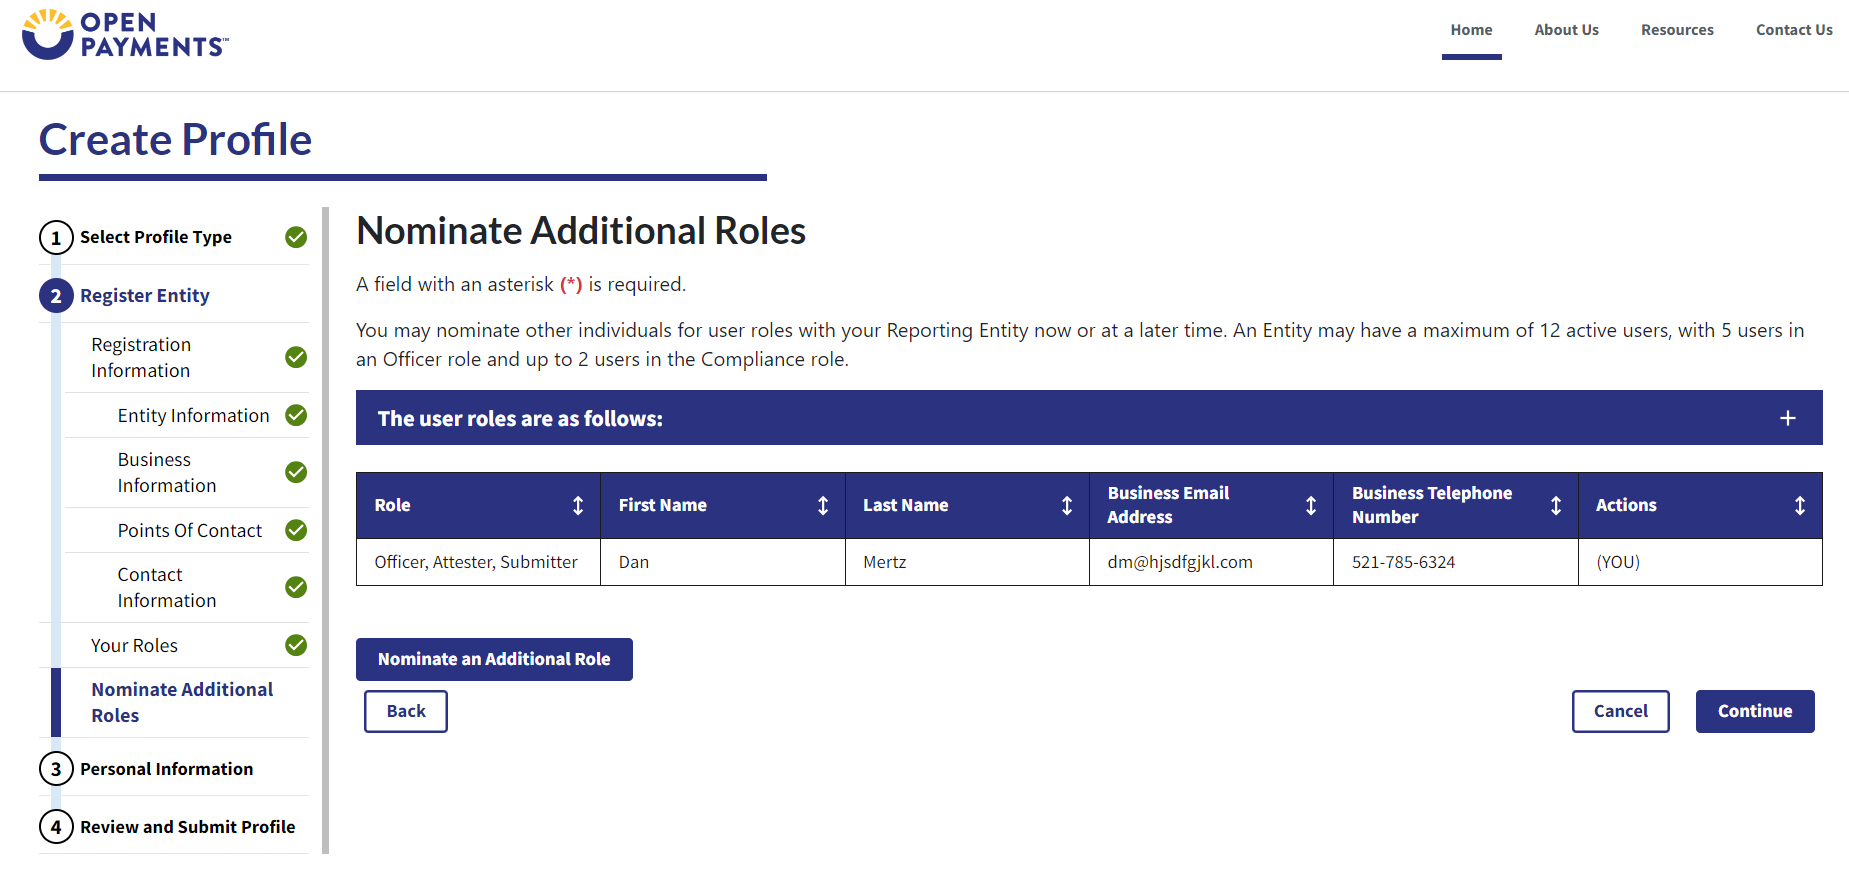
Step 9: At least one individual must be identified for officer, submitter, and attester roles in the Open Payments system during initial entity registration. The system will not allow you to proceed without at least one individual associated with each user role except compliance. The system will allow registering an entity without assigning a user for the compliance role.
Figure18: Applicable Manufacturer or Applicable GPO: Nominate Additional Roles Page (OPS1.0)
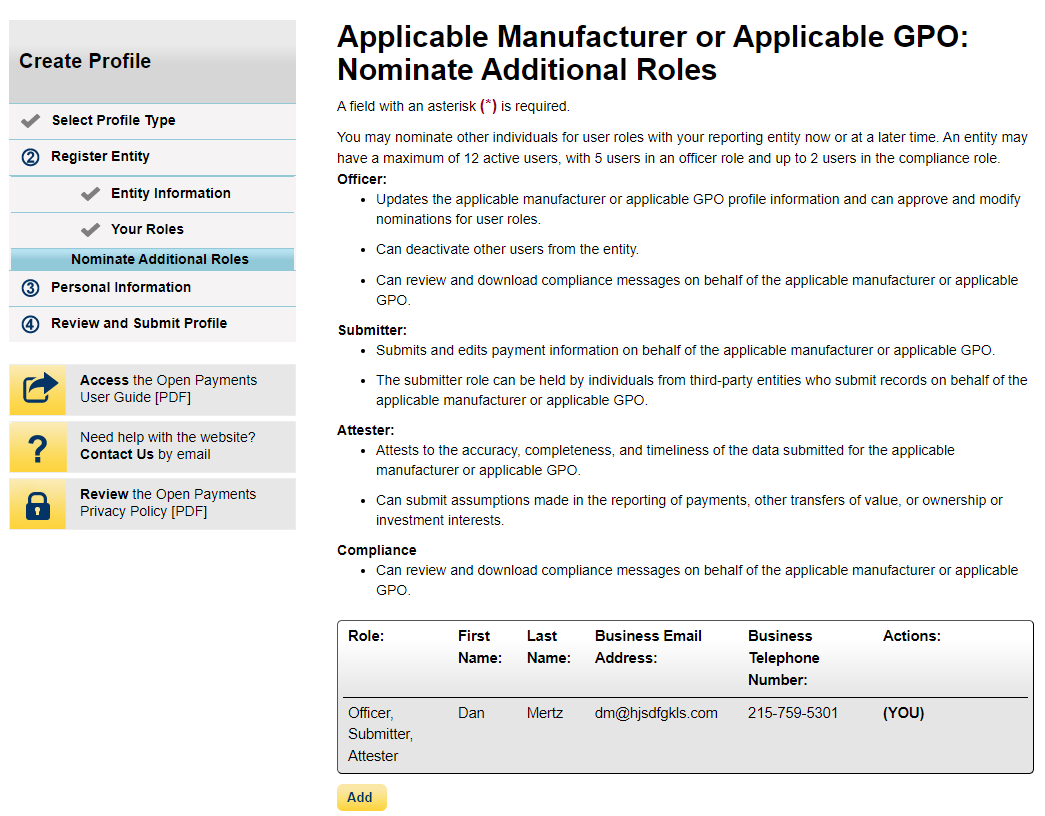
Figure19: Applicable Manufacturer or Applicable GPO: Nominate Additional Roles Page (OPS2.0)
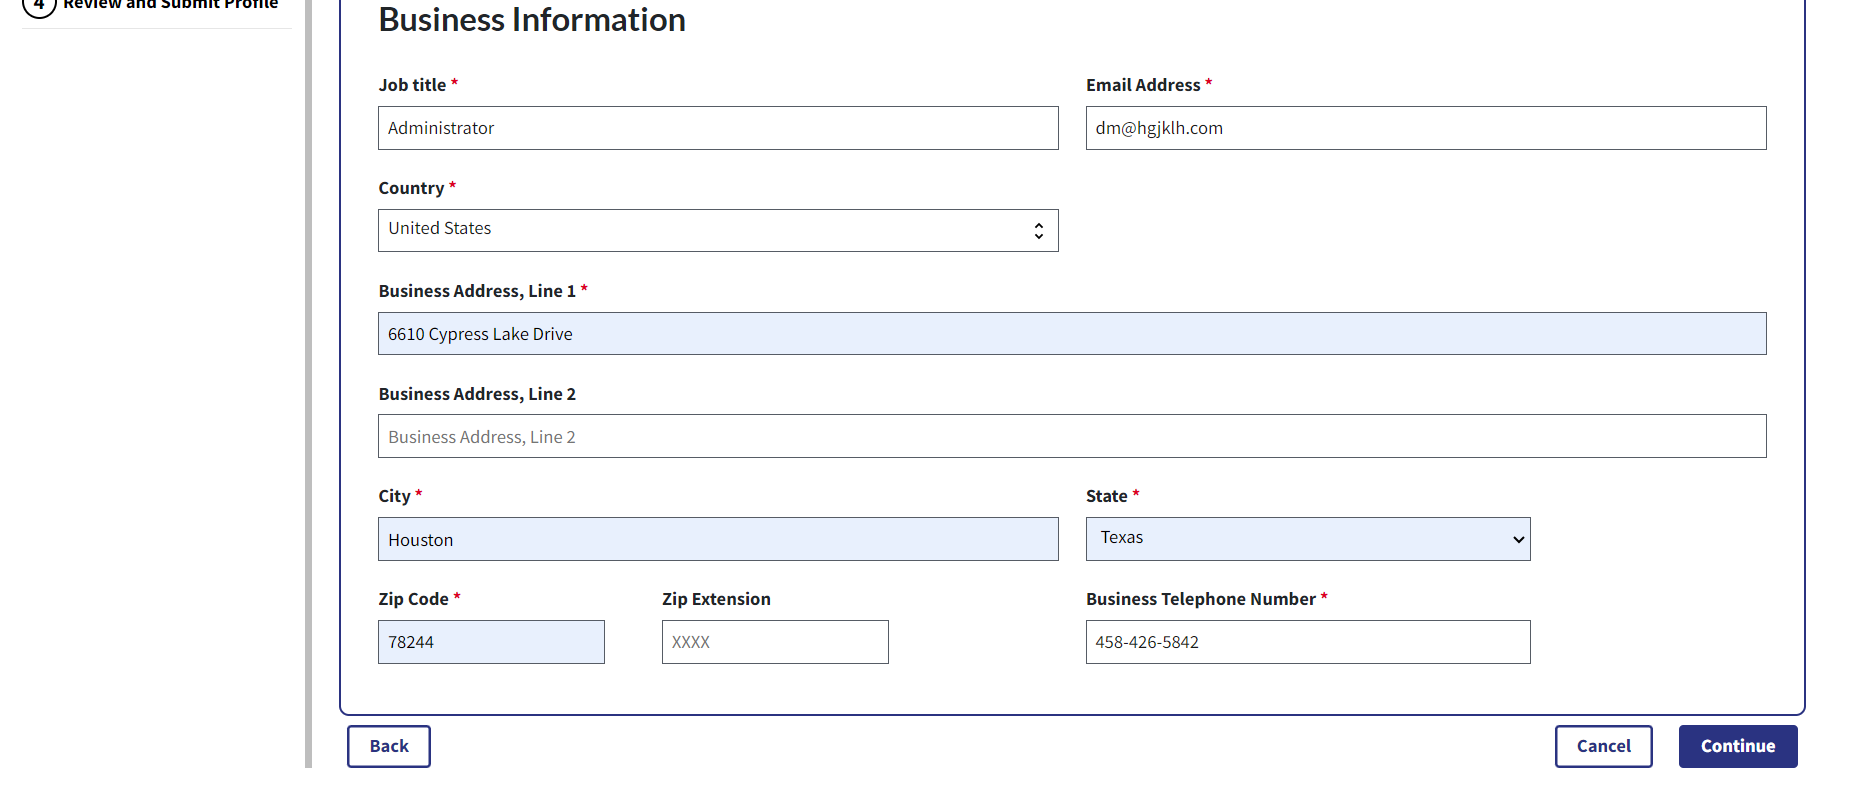
Step 10: Review any pre-populated information for accuracy and enter other personal information. Required fields are marked with an asterisk (*). You will not be able to proceed with registration until all the required fields have been completed. Once your personal information has been entered, select Continue.
Figure 20a: Enter Personal Information Page (TOP PART) (OPS1.0)
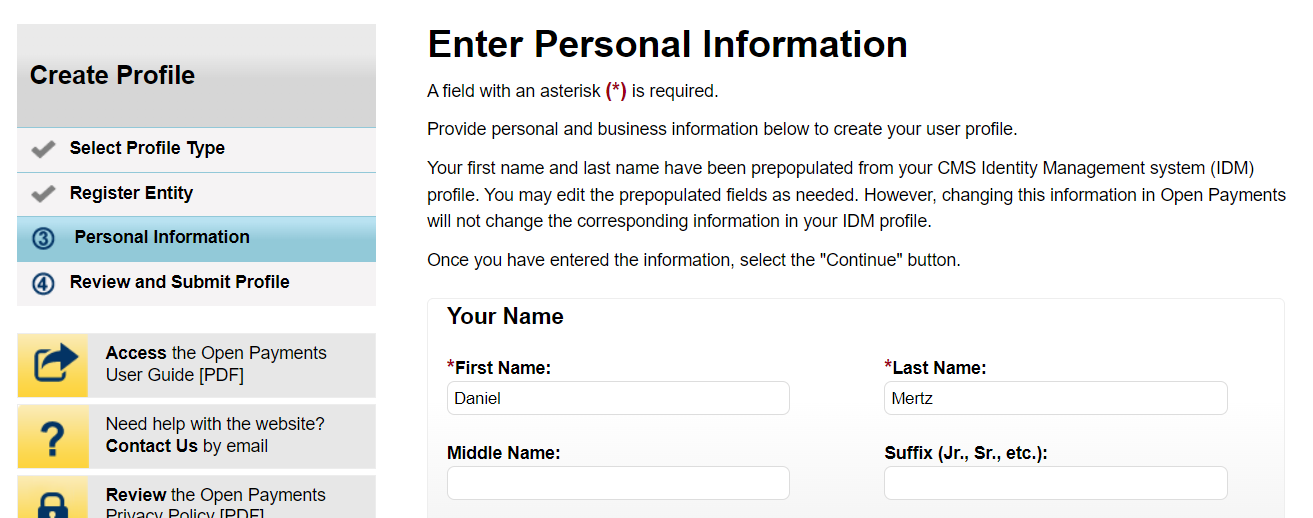
Figure 20b: Enter Personal Information Page (BOTTOM PART) (OPS1.0)
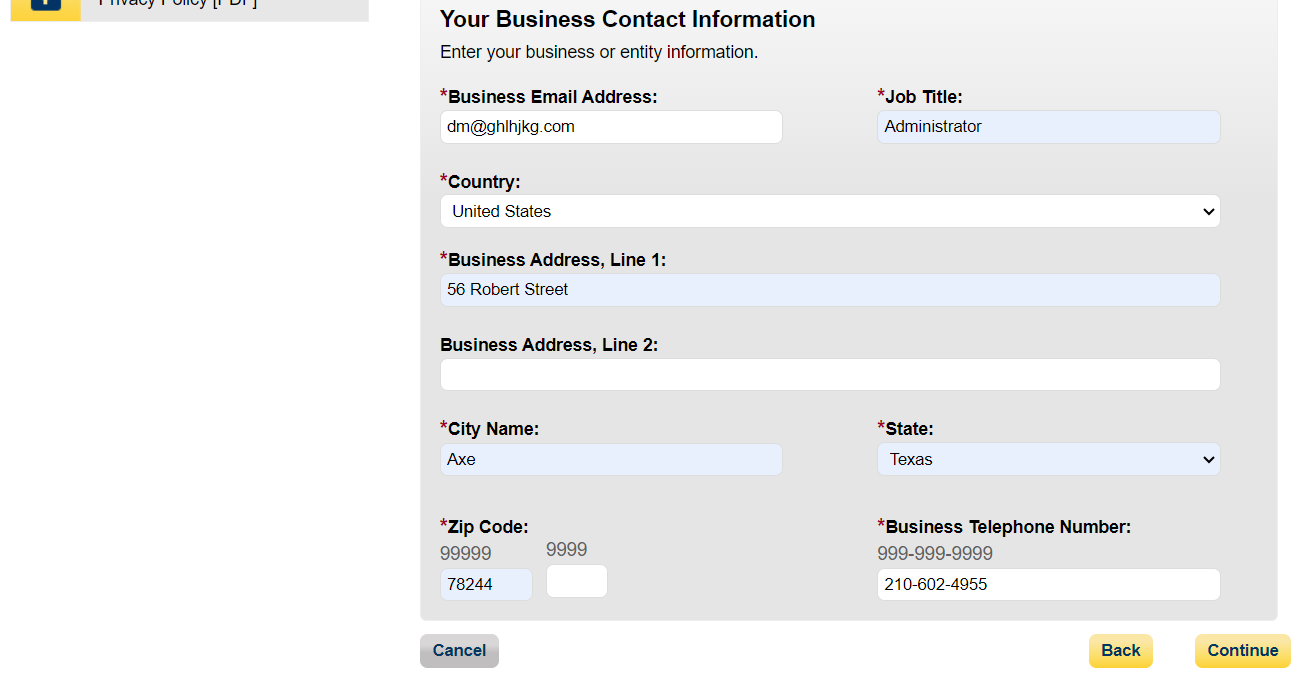
Figure 21a: Enter Personal Information Page (TOP PART) (OPS2.0)
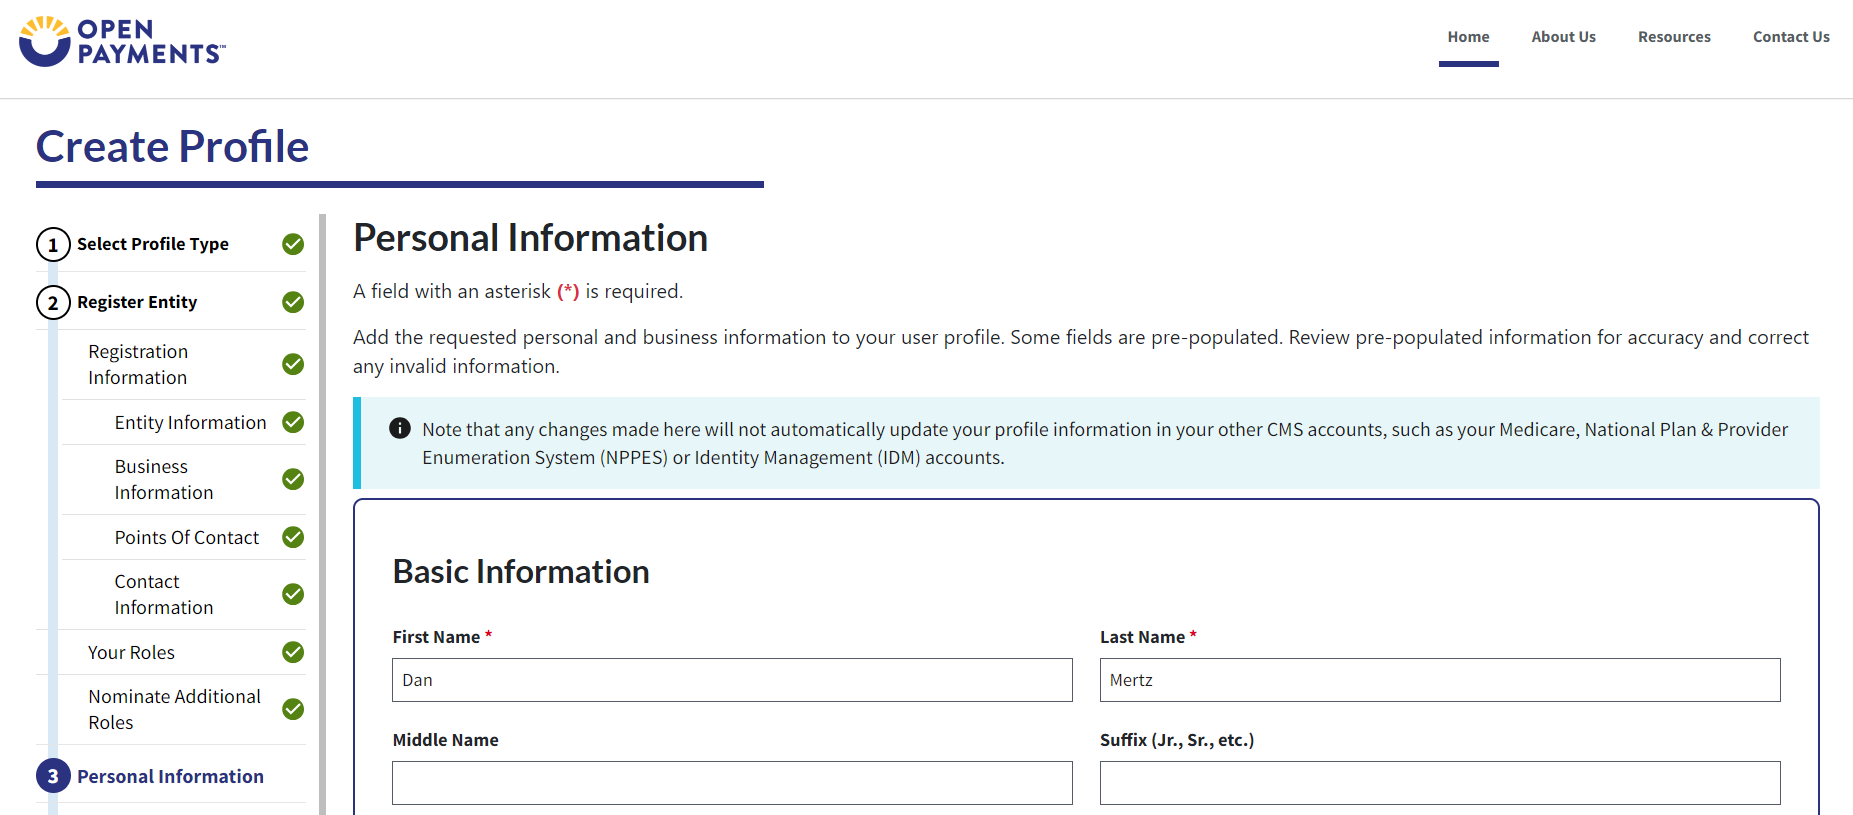
Figure 21b: Enter Personal Information Page (BOTTOM PART) (OPS2.0)
Step 11: Review the information entered for your reporting entity and personal profile. Select the Back button at the bottom of the page to go back and edit any information. Once you have reviewed the information and determined it to be correct, select the Continue button.
Figure 22a: Review and Submit Profile Page (TOP PART) (OPS1.0)
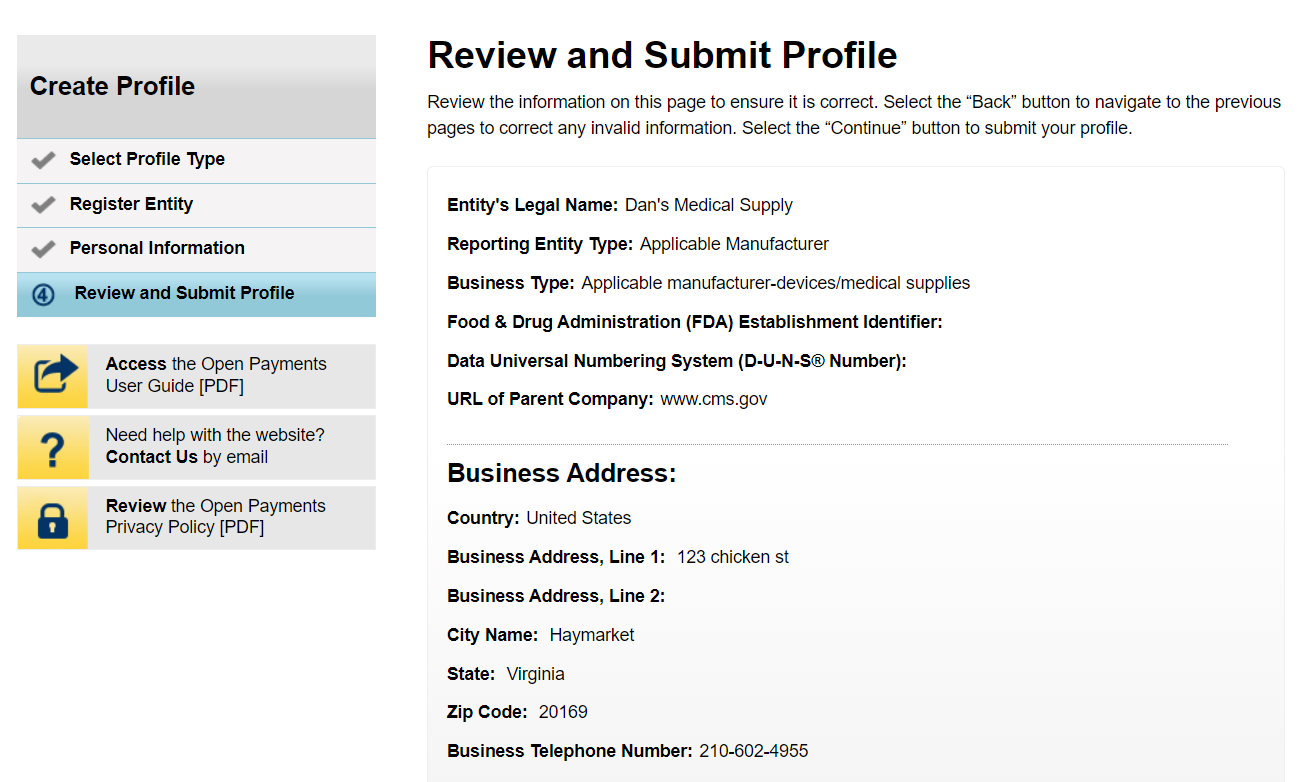
Figure 22b: Review and Submit Profile Page (MIDDLE PART) (OPS1.0)
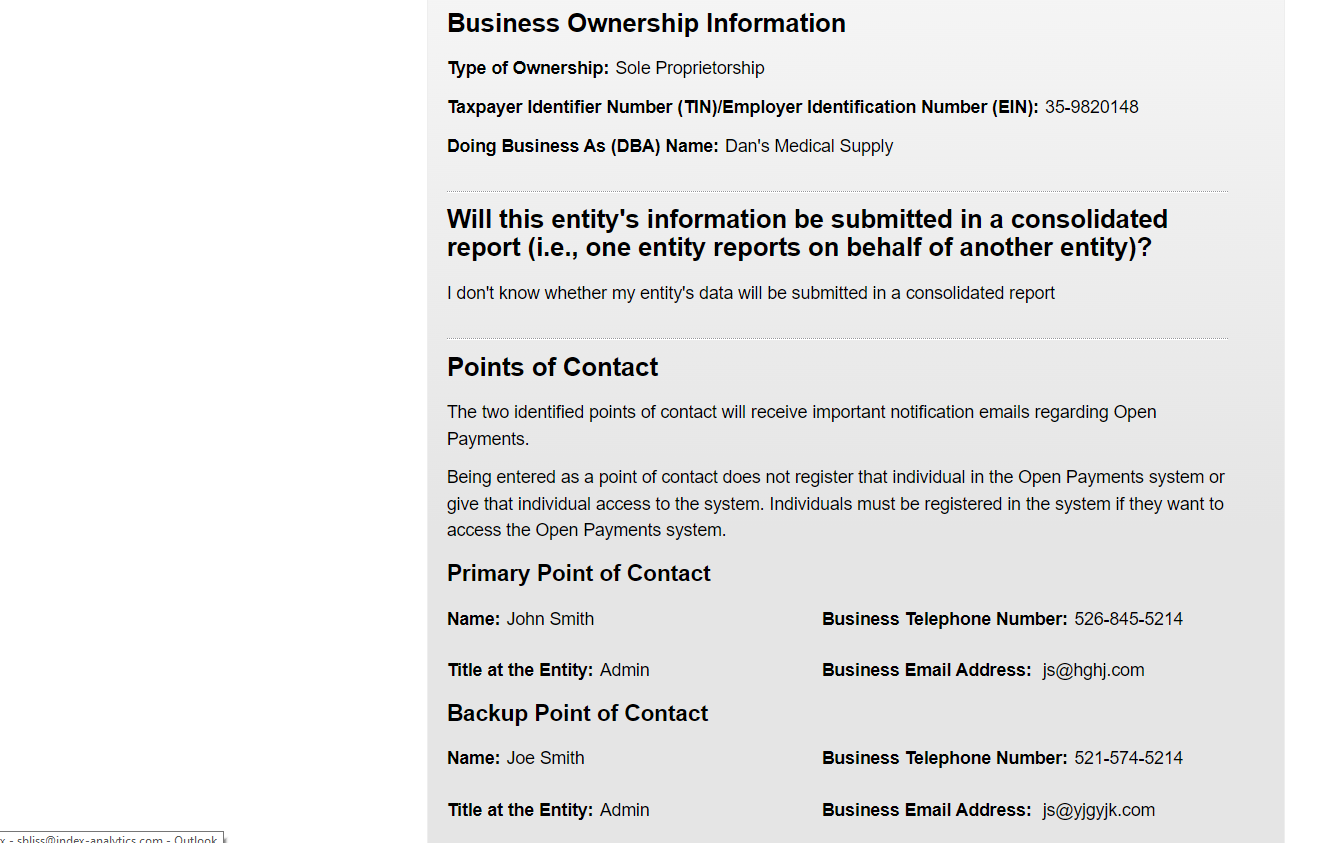
Figure 22c: Review and Submit Profile Page (BOTTOM PART) (OPS1.0)
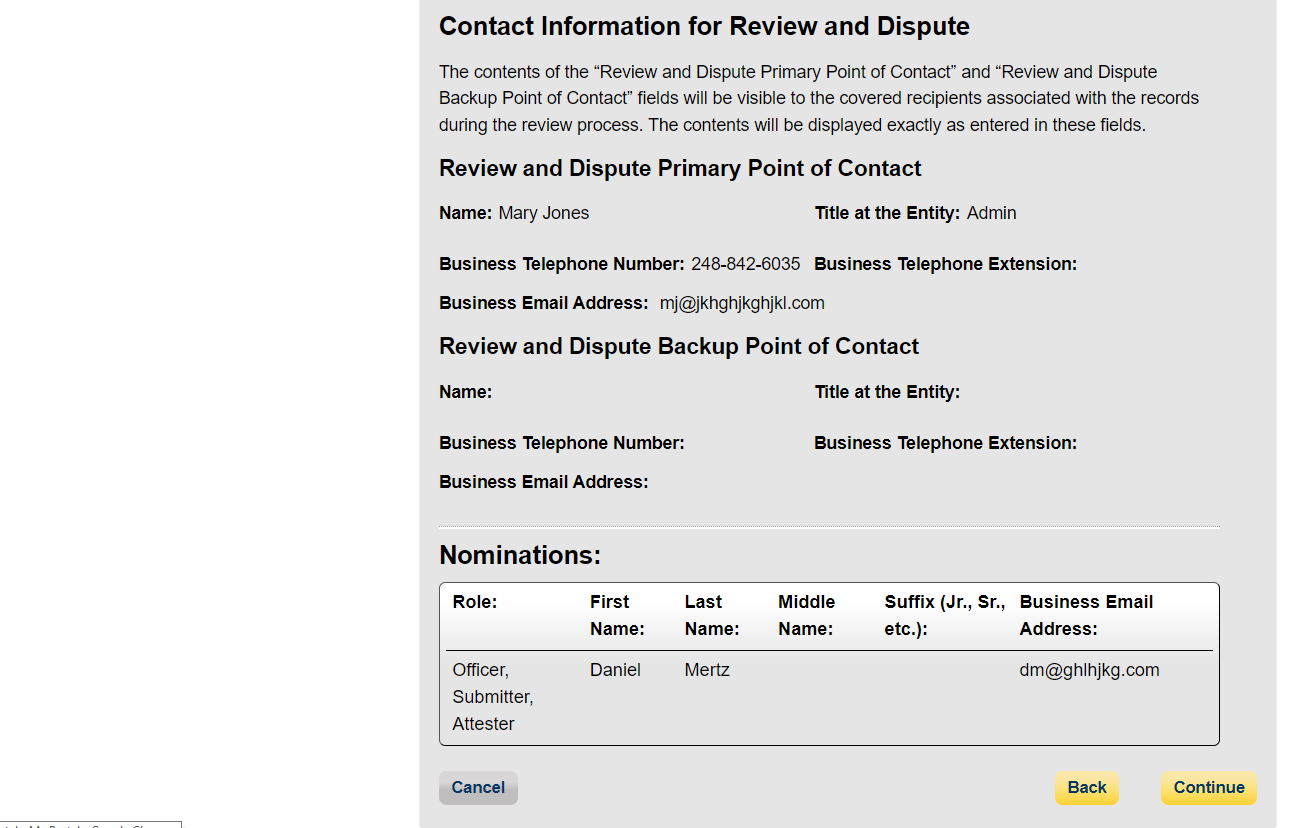
Figure 23a: Review and Submit Profile Page (TOP PART) (OPS2.0)
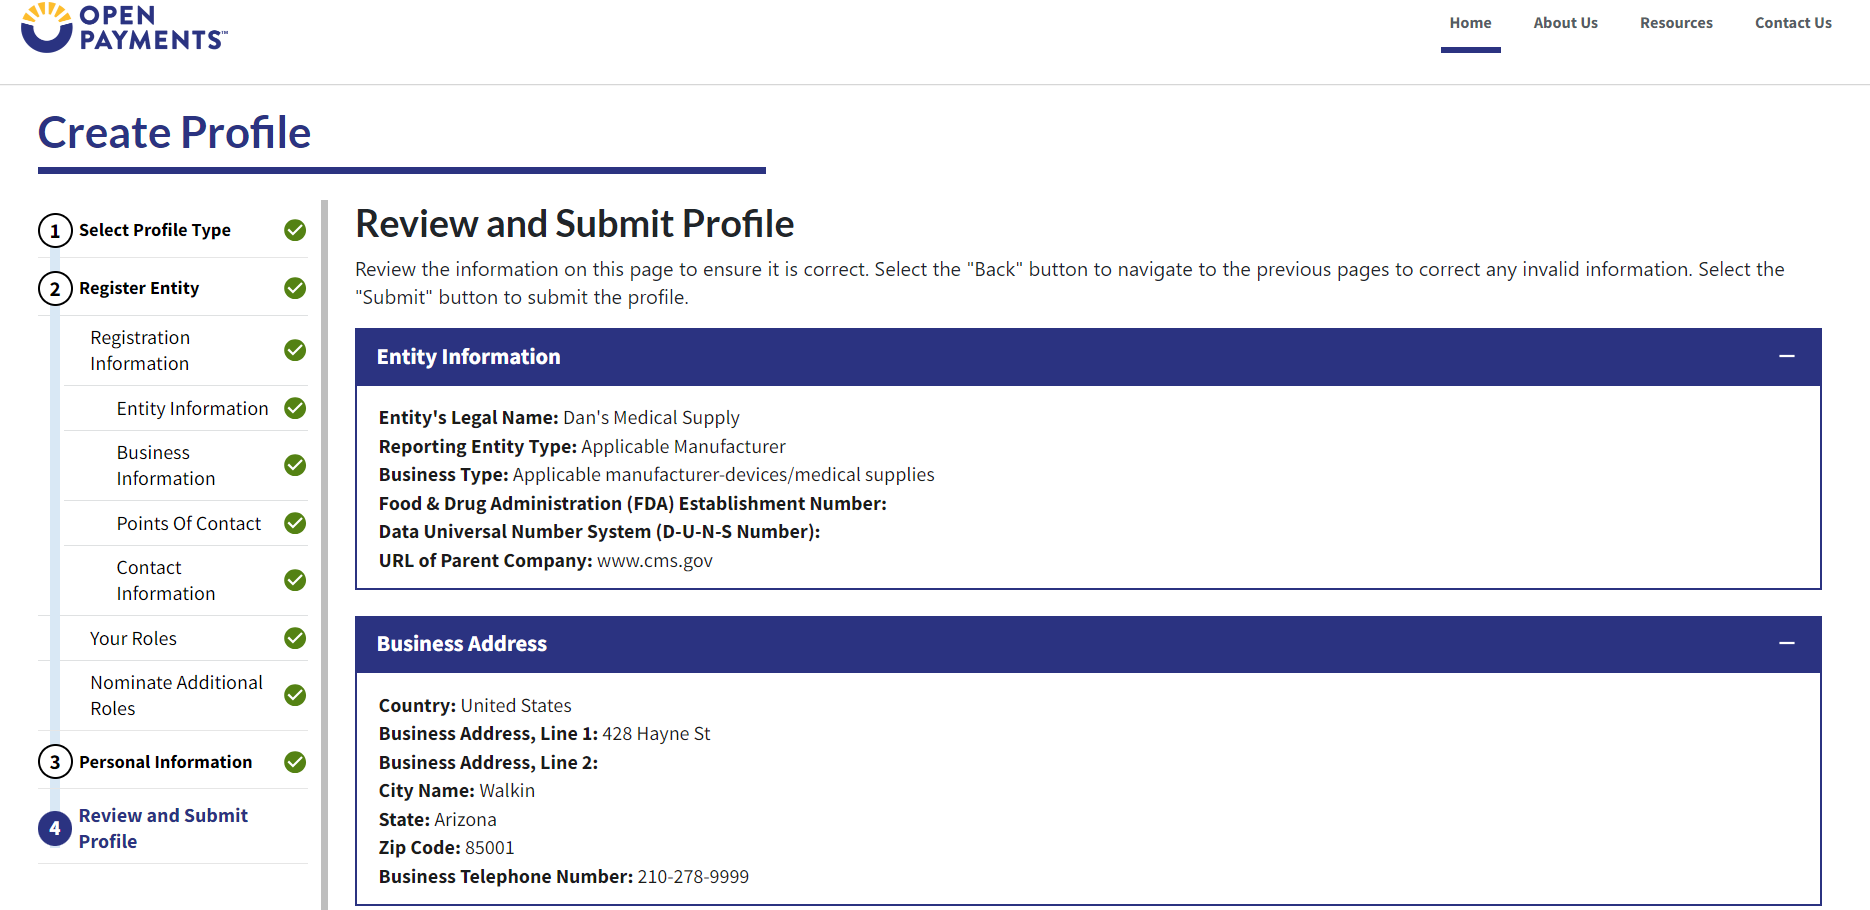
Figure 23b: Review and Submit Profile Page (MIDDLE PART) (OPS2.0)
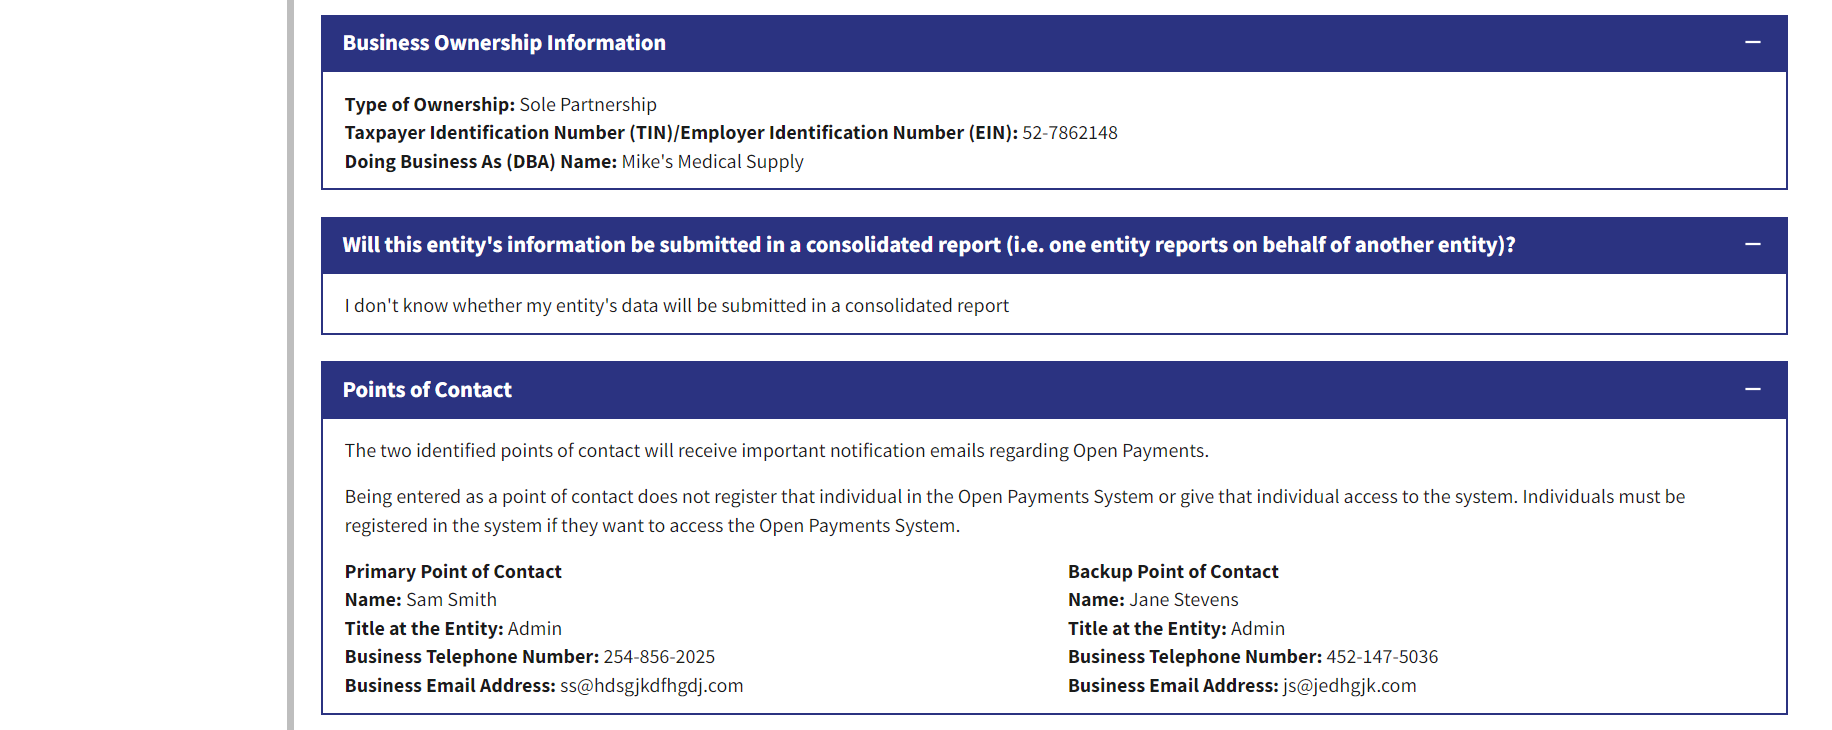
Figure 23c: Review and Submit Profile Page (BOTTOM PART) (OPS2.0)

The following message will appear on-screen to confirm your reporting entity and personal profile have been successfully created.
Figure 24: Success Confirmed Page (OPS1.0)
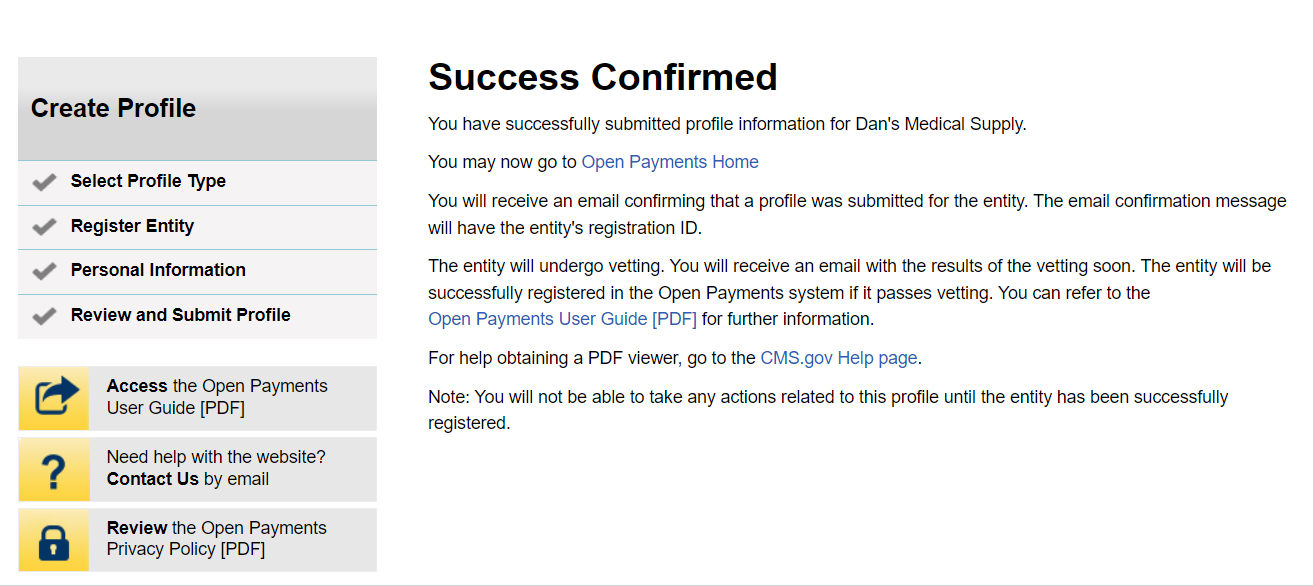
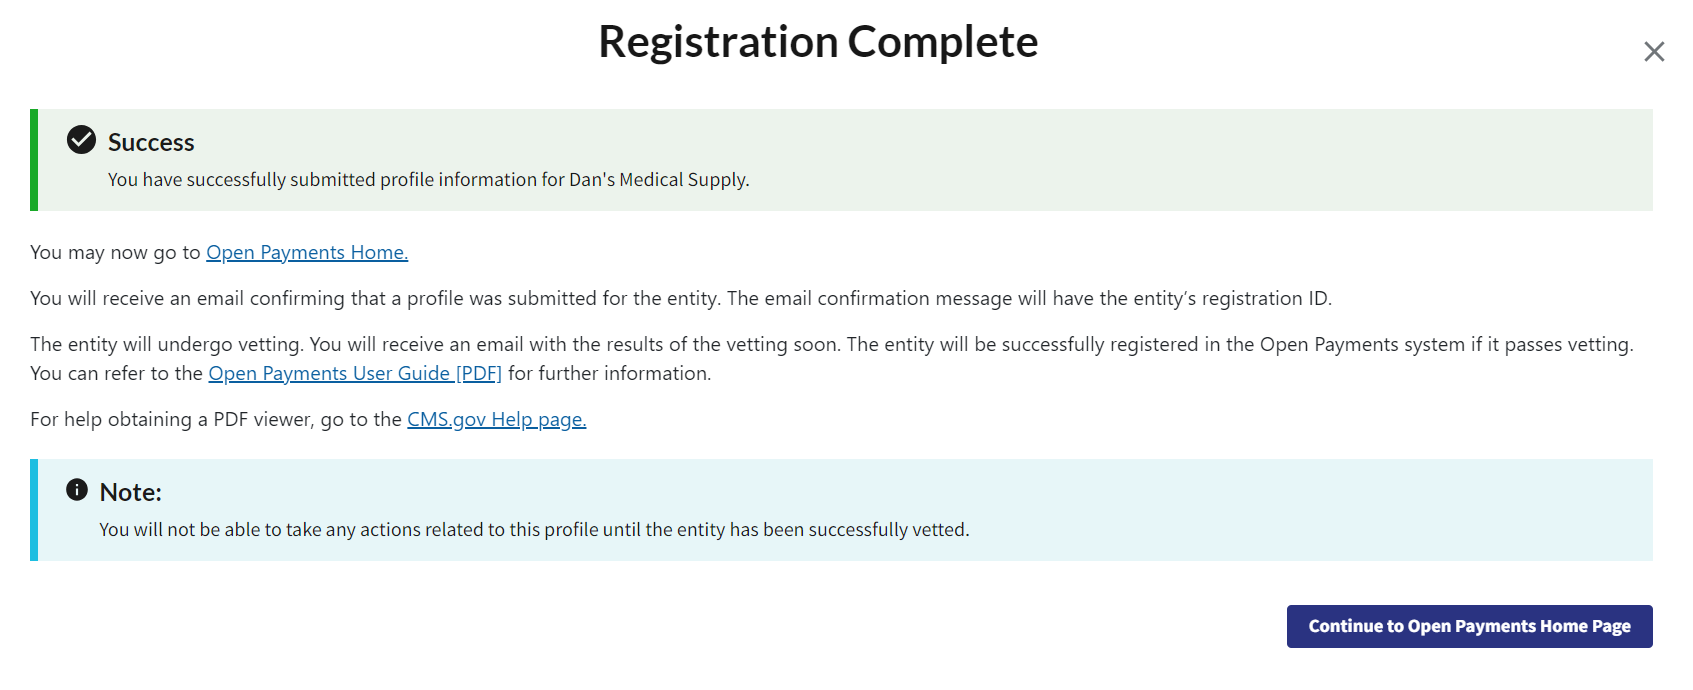
Figure 25: Success Confirmed Page (OPS2.0)
Registering an Entity as a Returning System User
Step 1: Select the Manage Entities tab from the header menu on the Open Payments home page.
Figure 26: Open Payments System Landing Page for returning system users (OPS1.0)
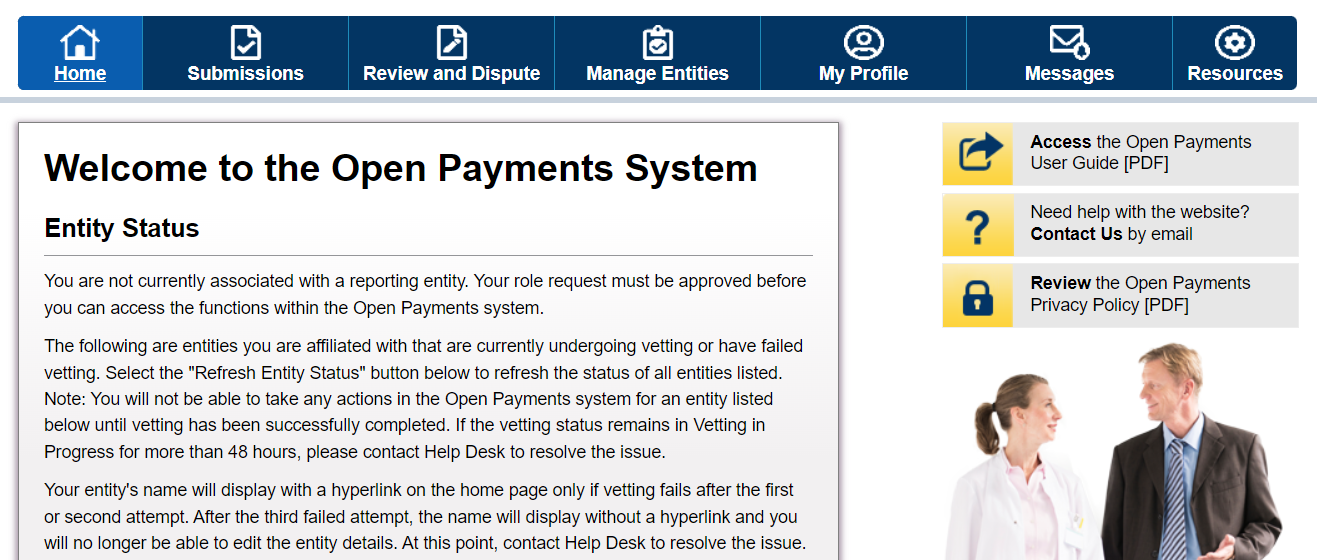
Figure 27: Open Payments System Landing Page for returning system users (OPS2.0)
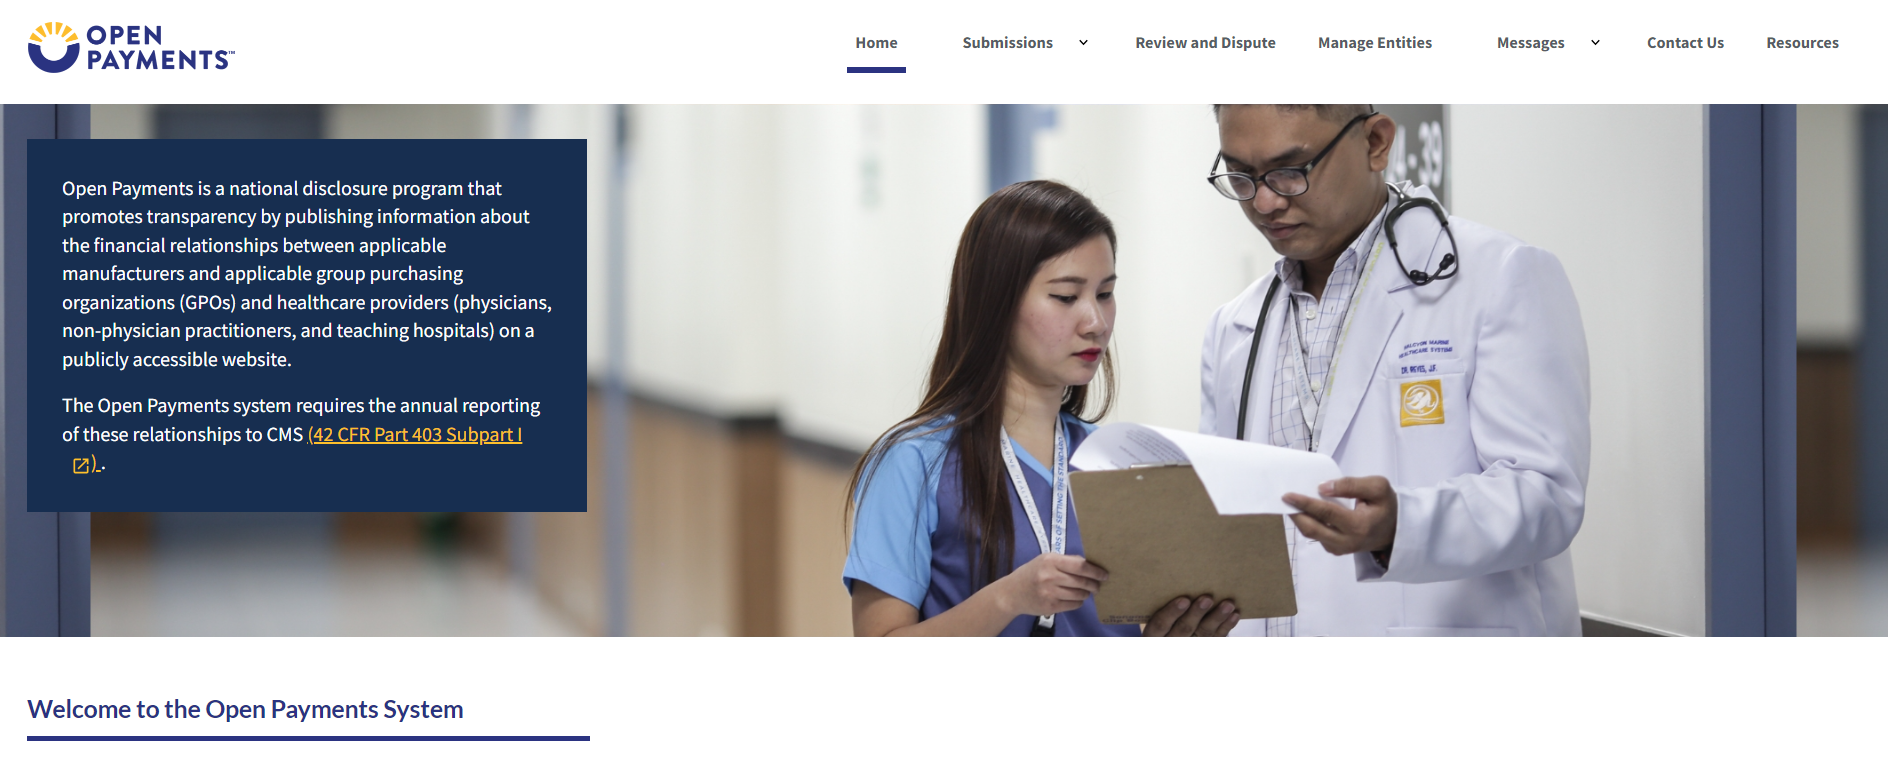
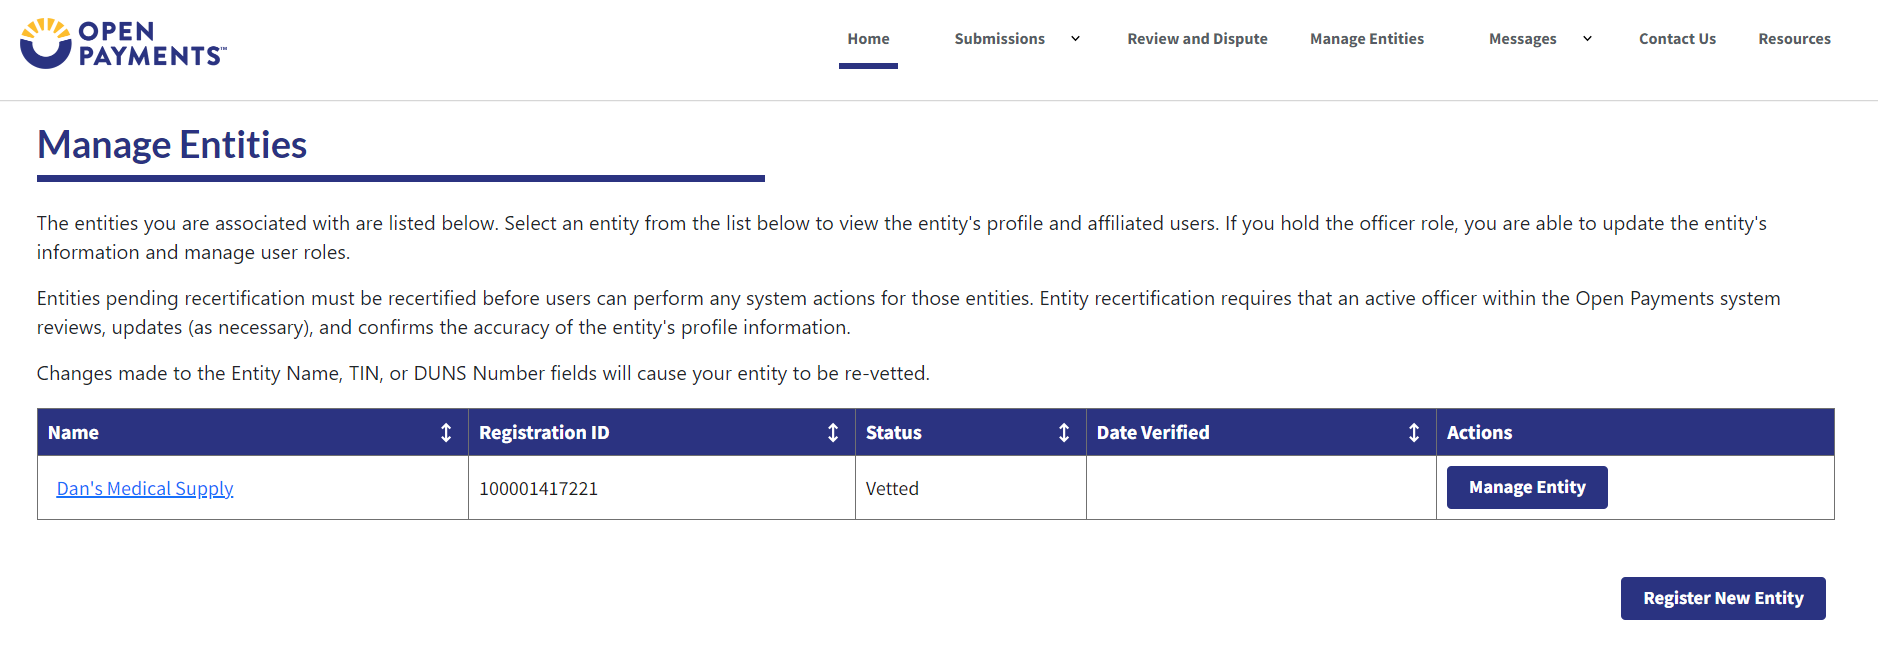
Step 2: Select Register New Entity.
Figure 28: Manage Entities Page (OPS1.0)
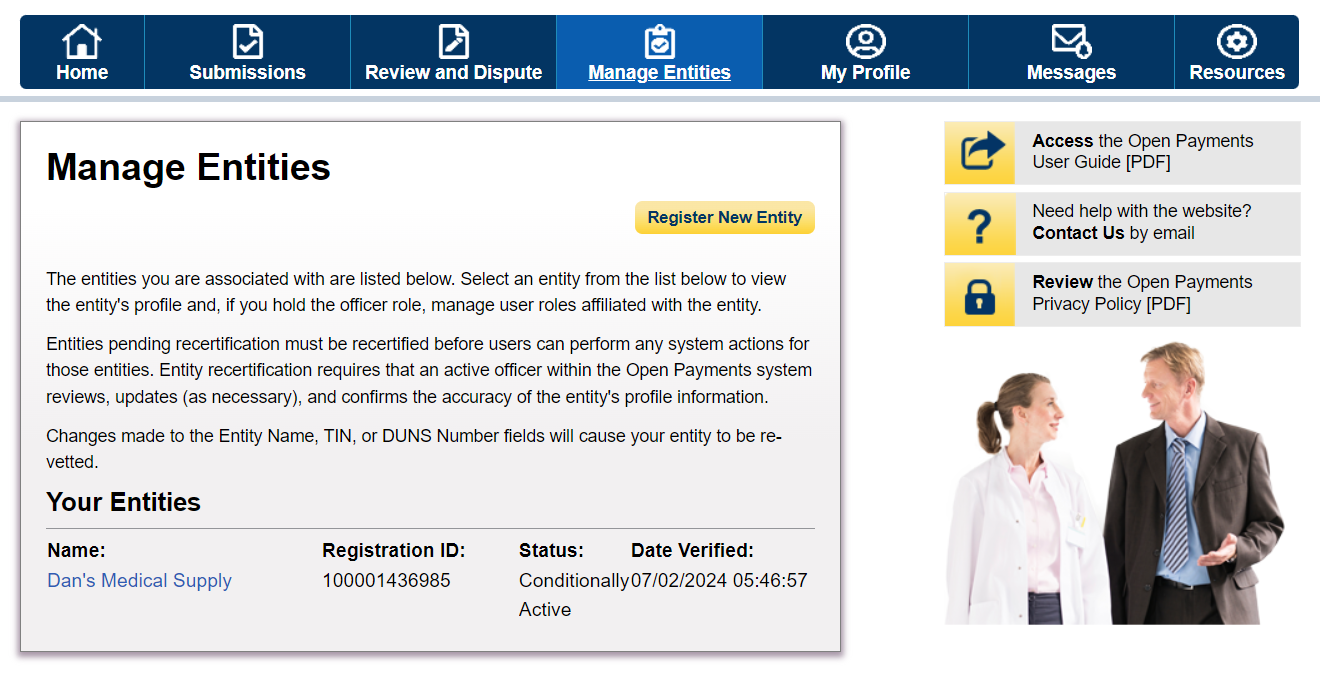
Figure 29: Manage Entities Page (OPS2.0)
Step 3: The remaining steps are the same as registering a profile for the first entity.
Please refer to Figure 7, and onwards.
Nominating Individuals for a Role with an Existing Reporting Entity
Step 1: Select the Manage Entities tab from the header menu on the Open Payments home page.
Figure 29: Open Payments System Landing Page for returning system users (OPS1.0)

Figure 30: Open Payments System Landing Page for returning system users (OPS2.0)

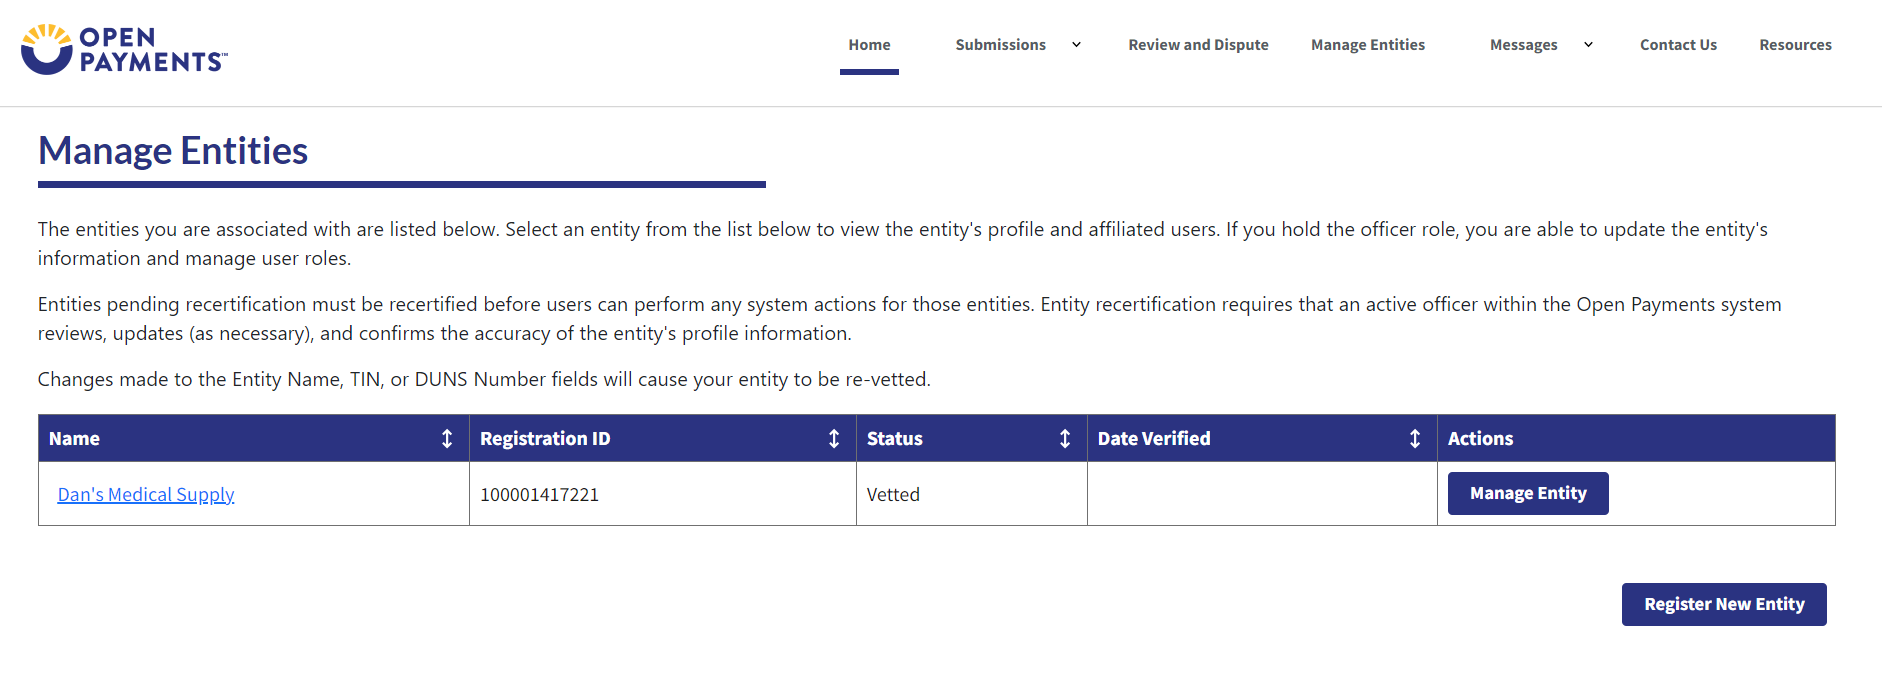
Step 2: On the “Manage Entities” page, indicate the reporting entity for which you will nominate an individual for a user role by selecting the reporting entity’s hyperlinked name.
Figure 31: Manage Entities Page (OPS1.0)

Figure 32: Manage Entities Page (OPS2.0)
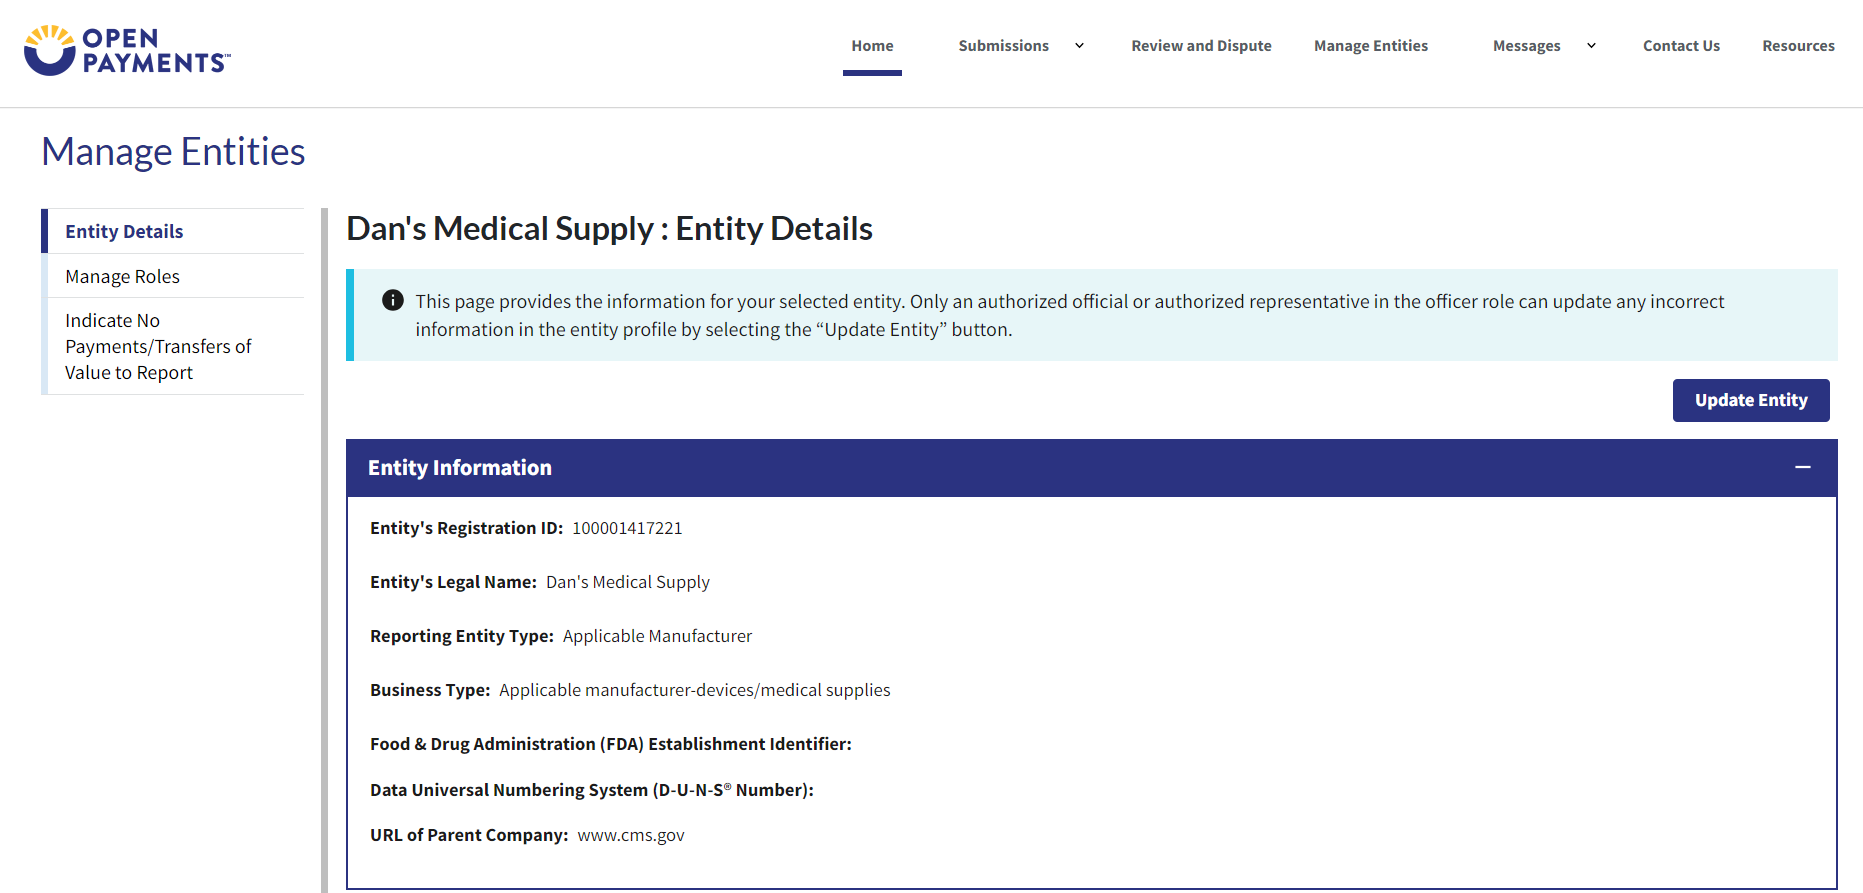
Step 3: Select the Manage Roles link
Figure 33: Manage Entities Page (OPS1.0)
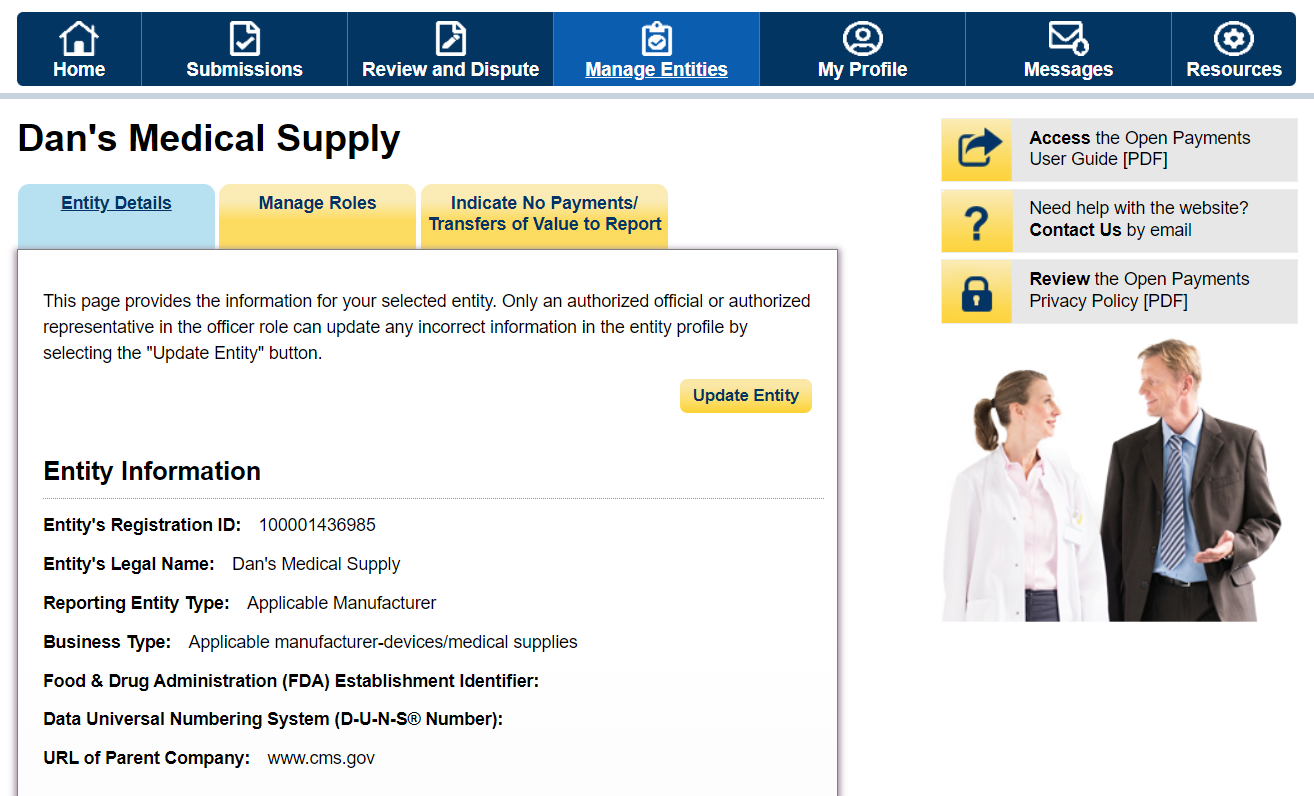
Figure 34: Manage Entities Page (OPS2.0)
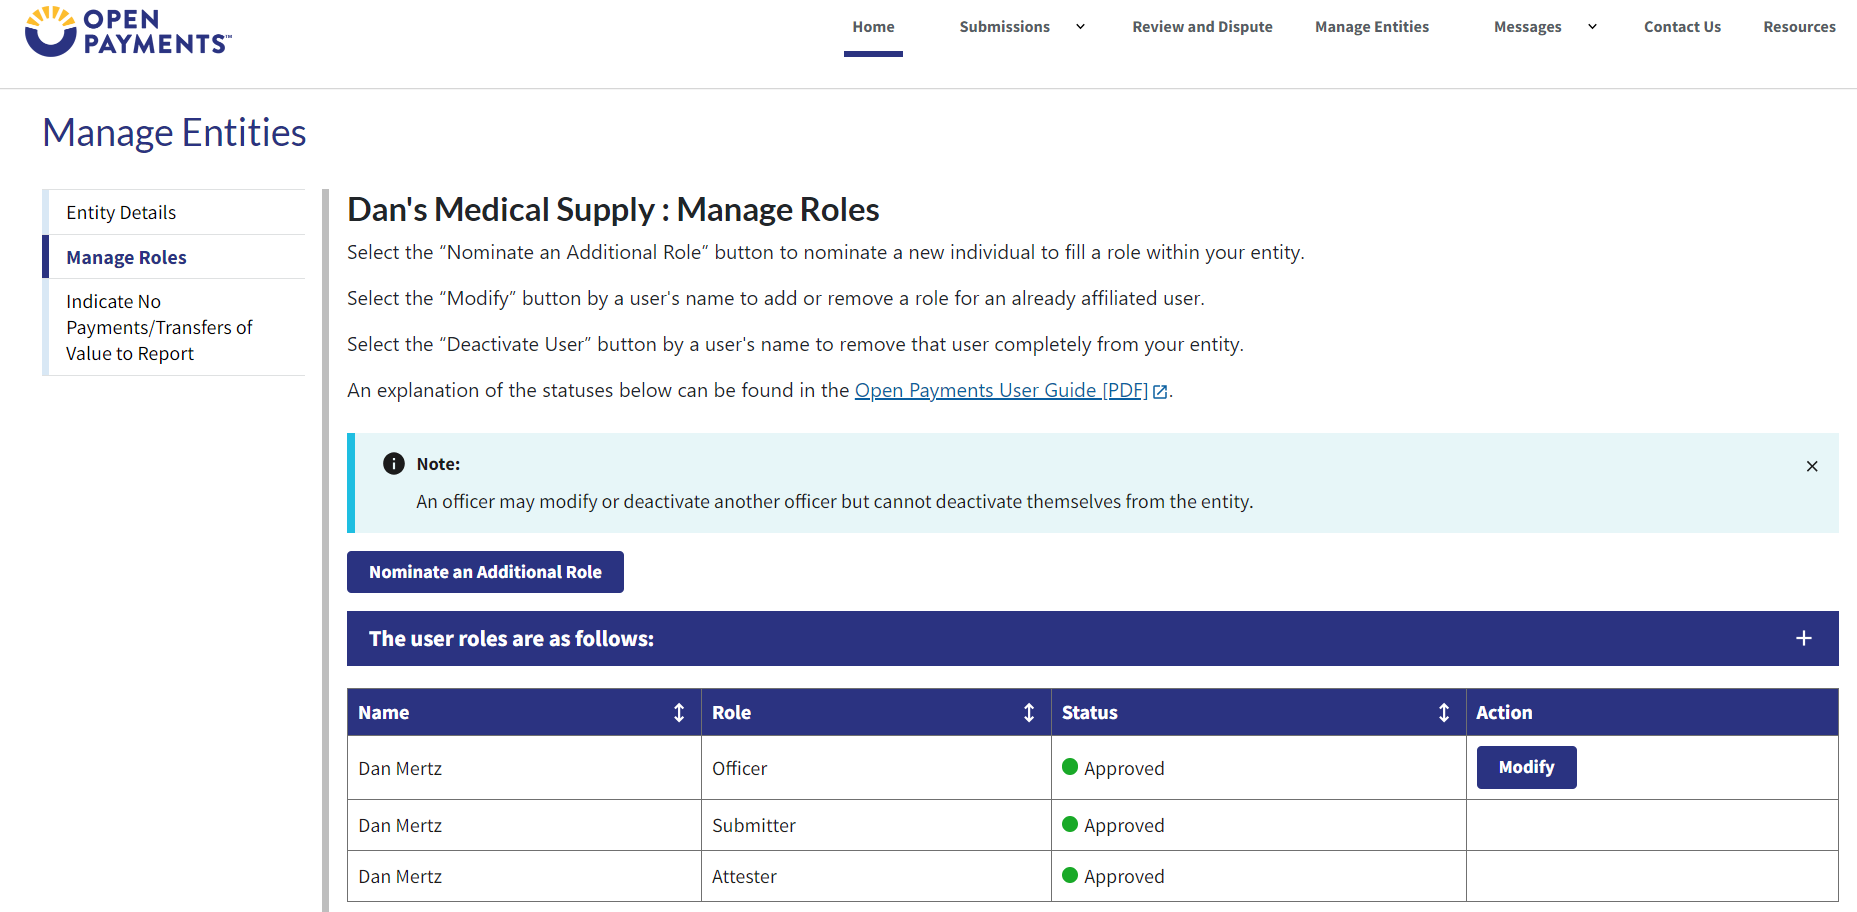
Step 4: Select Nominate an Additional Role.
Figure 35: Entities Manage Roles Tab (OPS1.0)
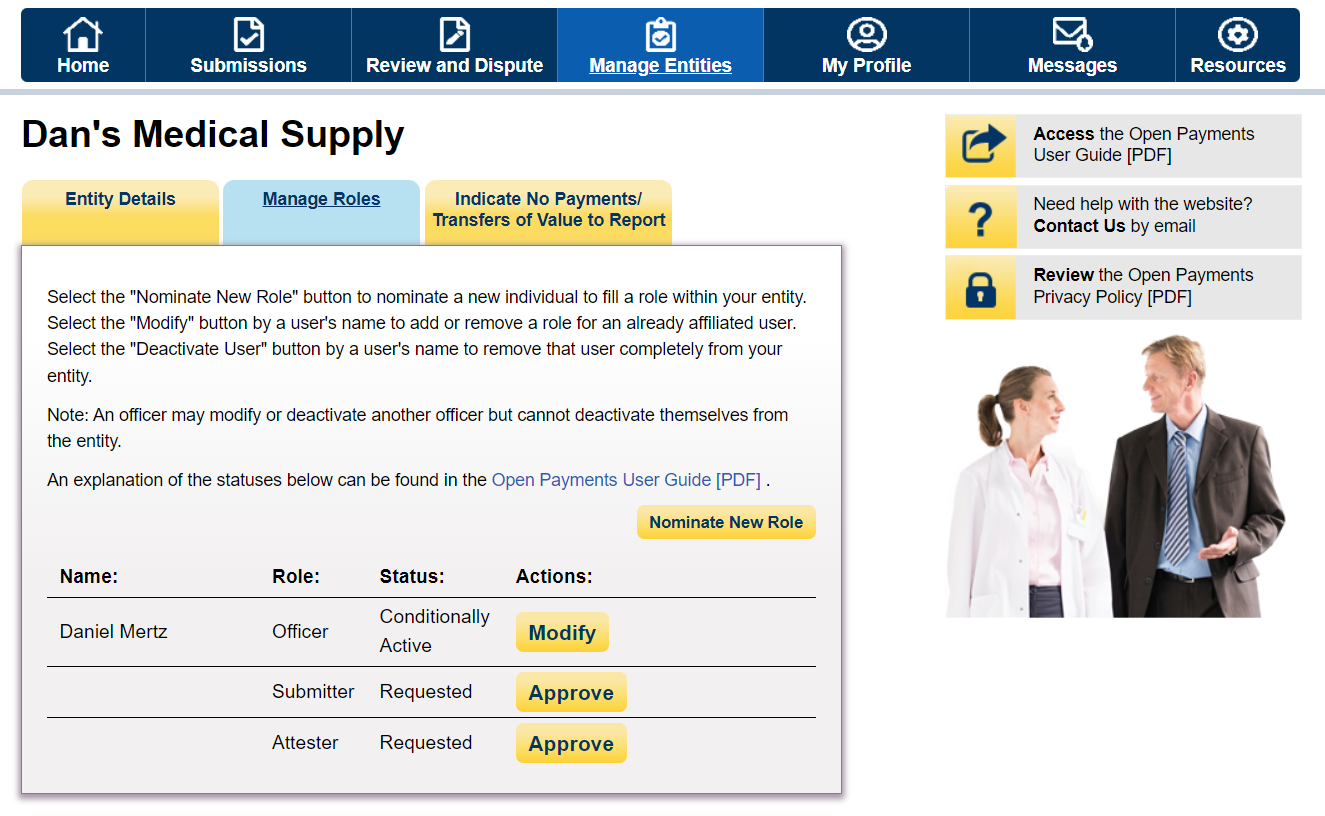
Figure 36: Entities Manage Roles Tab (OPS2.0)
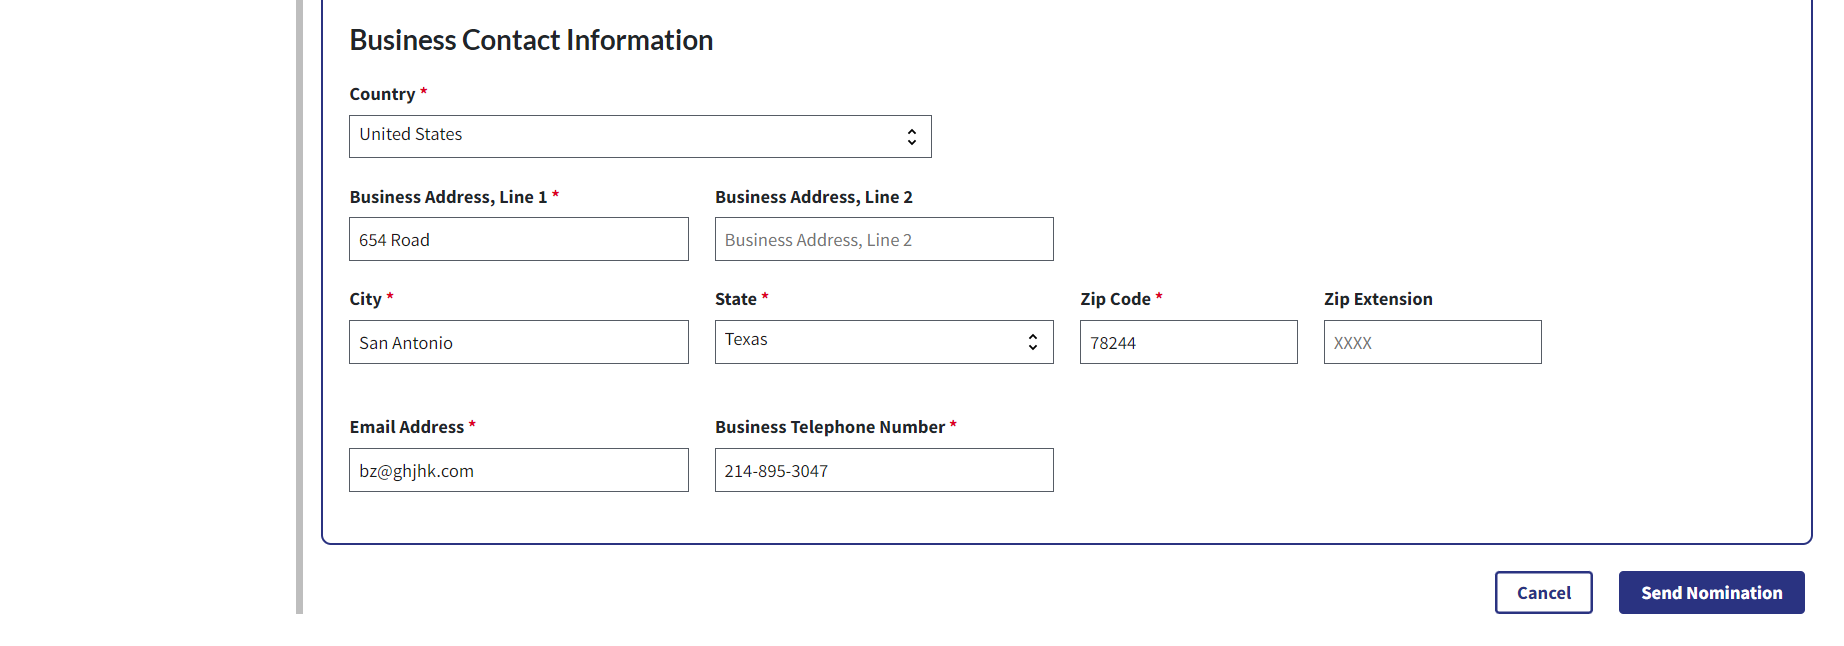
Step 5: Enter the required nominee information. Once you are done, select Send Nomination.
Figure 37a: Nominate New Role Page (TOP PART) (OPS1.0)
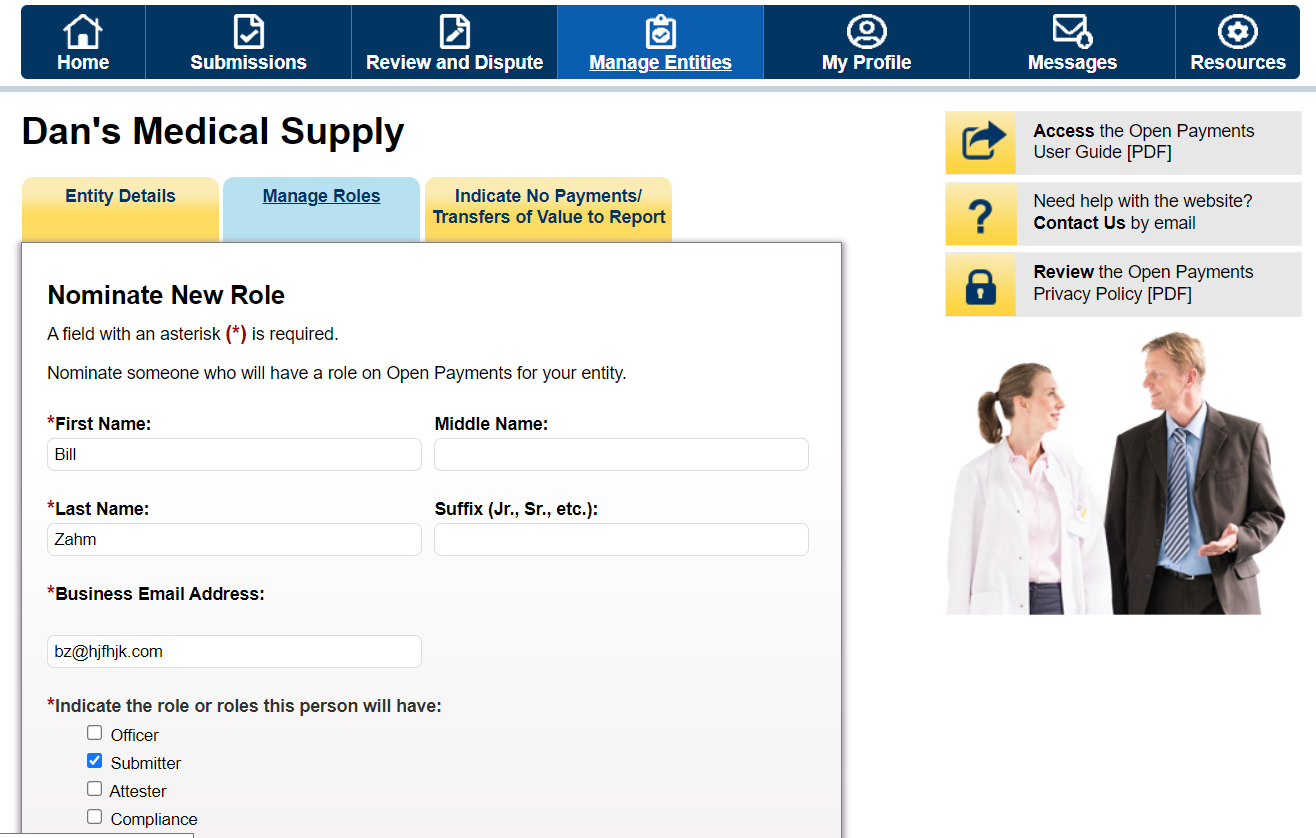
Figure 37b: Nominate New Role Page (BOTTOM PART) (OPS1.0)
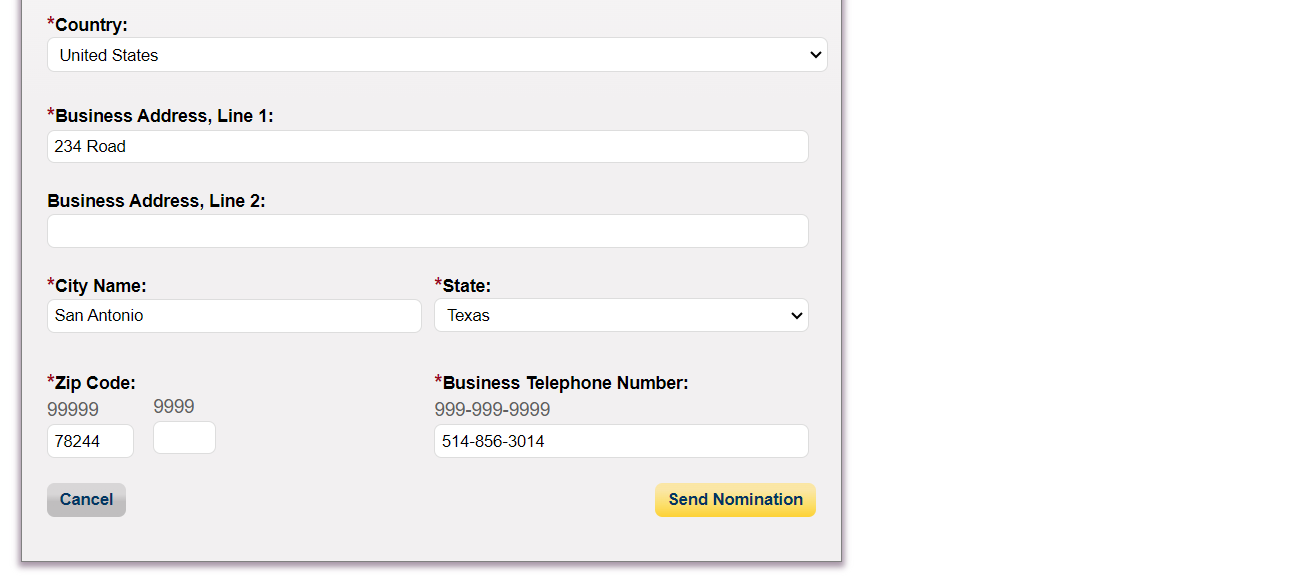
Figure 38a: Nominate New Role Page (TOP PART) (OPS2.0)
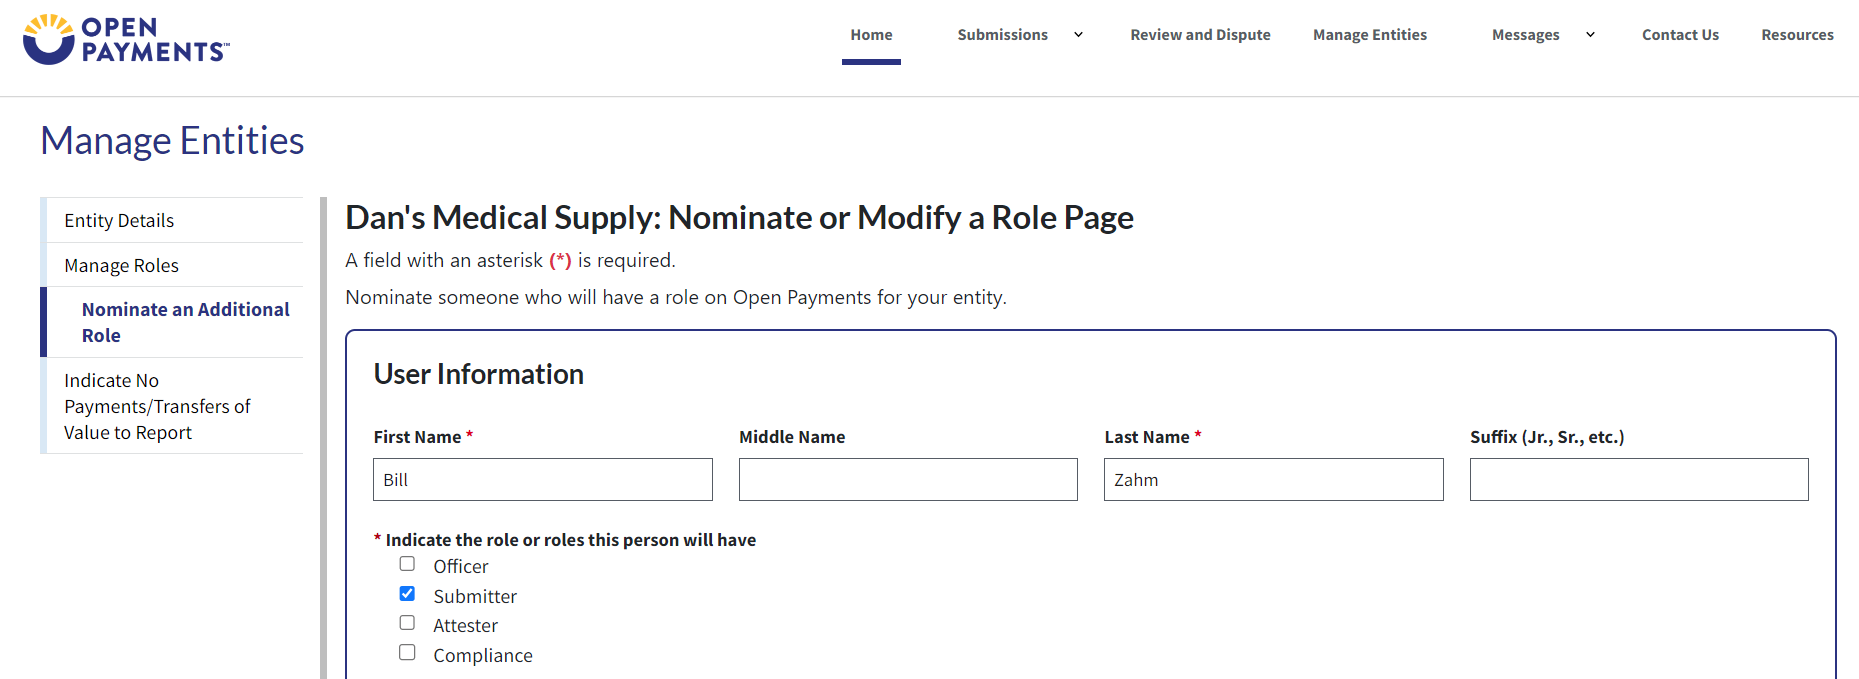
Figure 38b: Nominate New Role Page (BOTTOM PART) (OPS2.0)
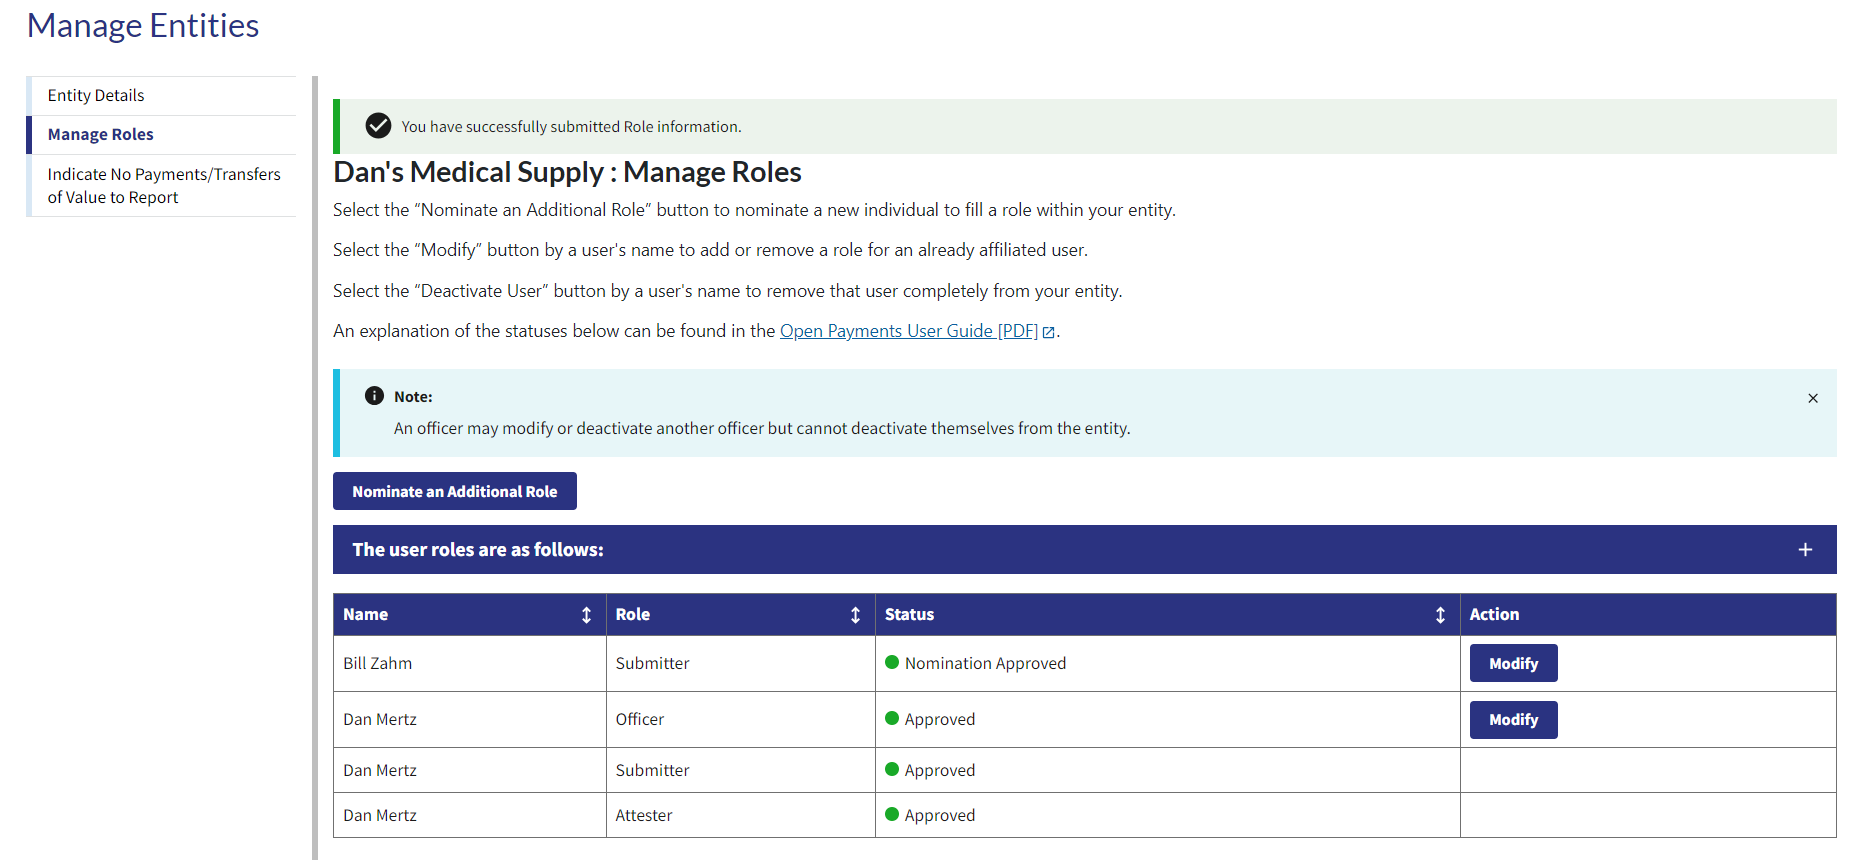
The on-screen message below will appear once you have completed the nomination. Note the addition of the nominee in the list.
Figure 39: Entities Manage Roles Tab confirming success of nomination (OPS1.0)
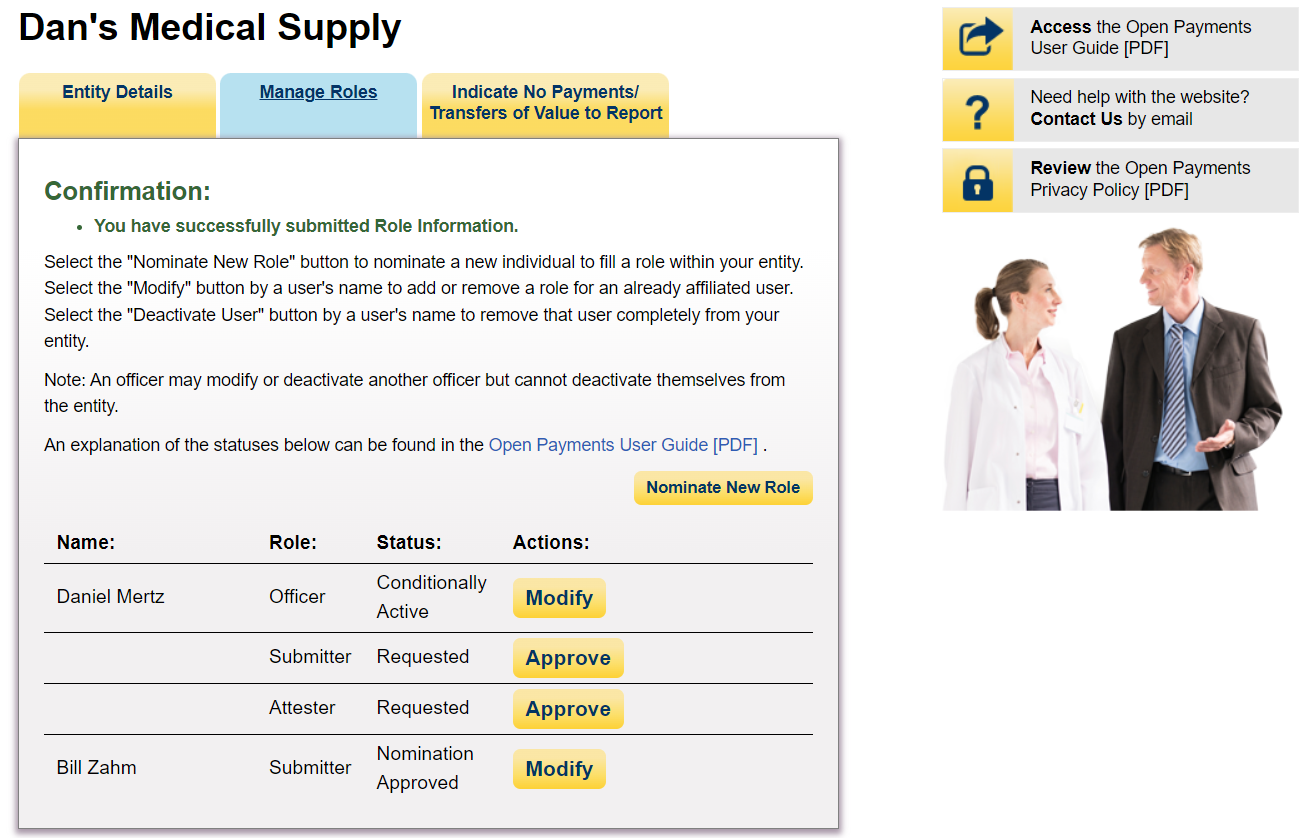
Figure 40: Entities Manage Roles Tab confirming success of nomination (OPS2.0)
Accepting a Nomination (First Time System Users)
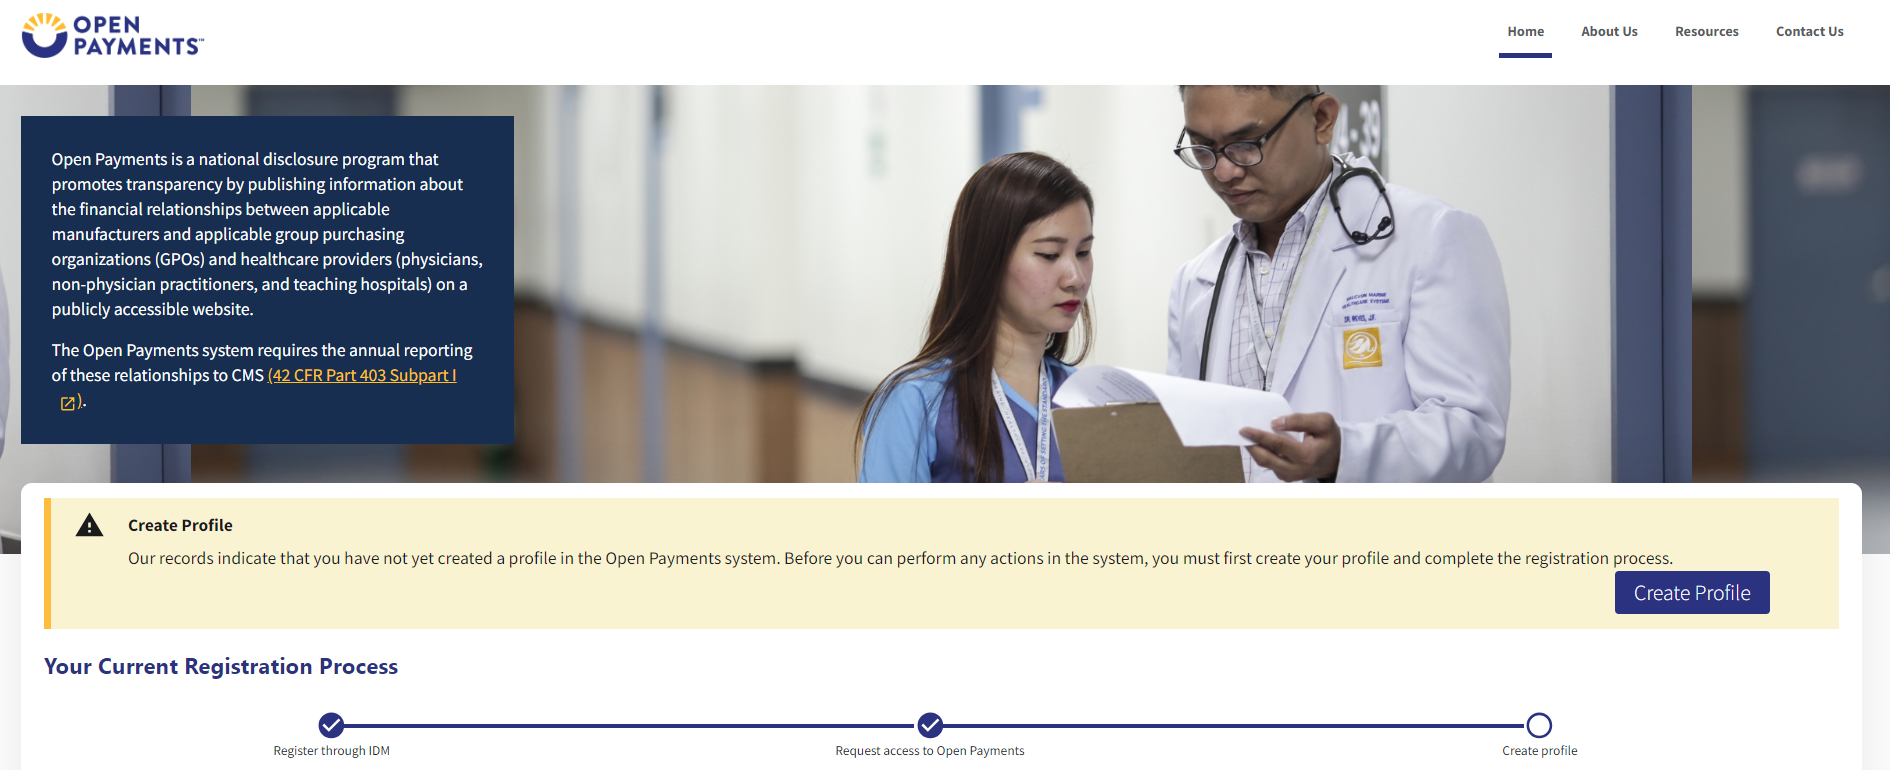
Step 1: Select Create Profile.
Figure 42: Open Payments System Landing Page for first-time system users (OPS1.0)
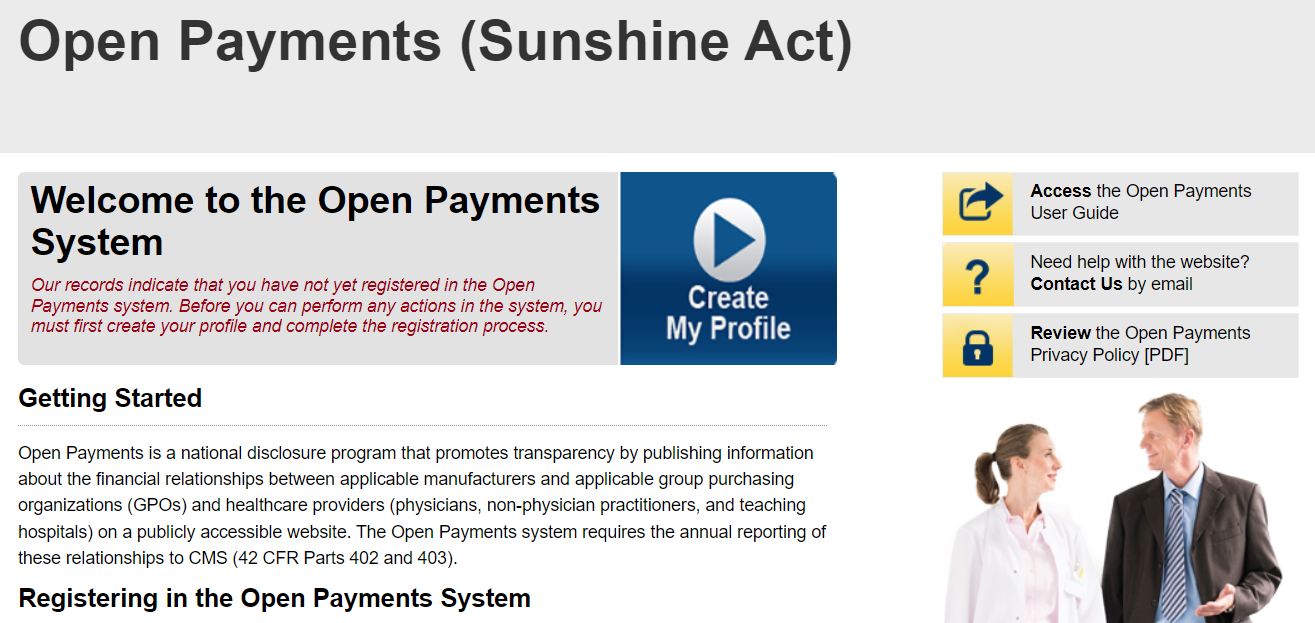
Figure 43: Open Payments System Landing Page for first-time system users (OPS2.0)
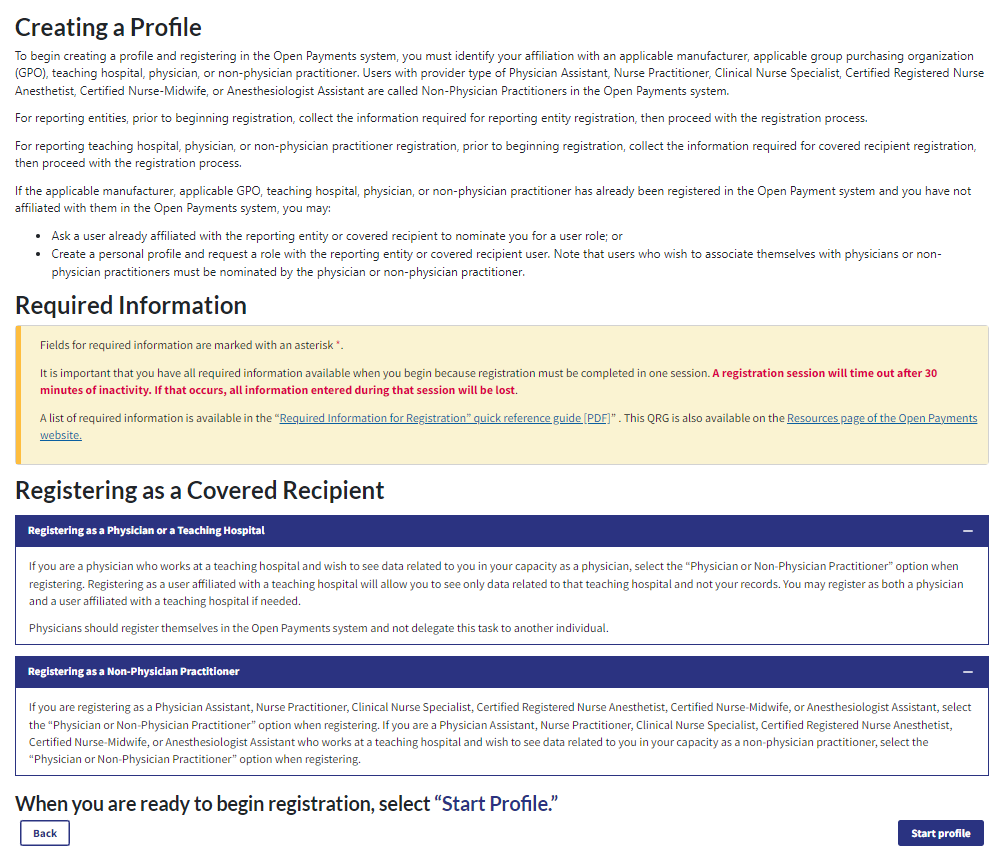
Step 2: Select Start Profile at the bottom of the page.
Figure 44: Create Profile Page (OPS1.0)
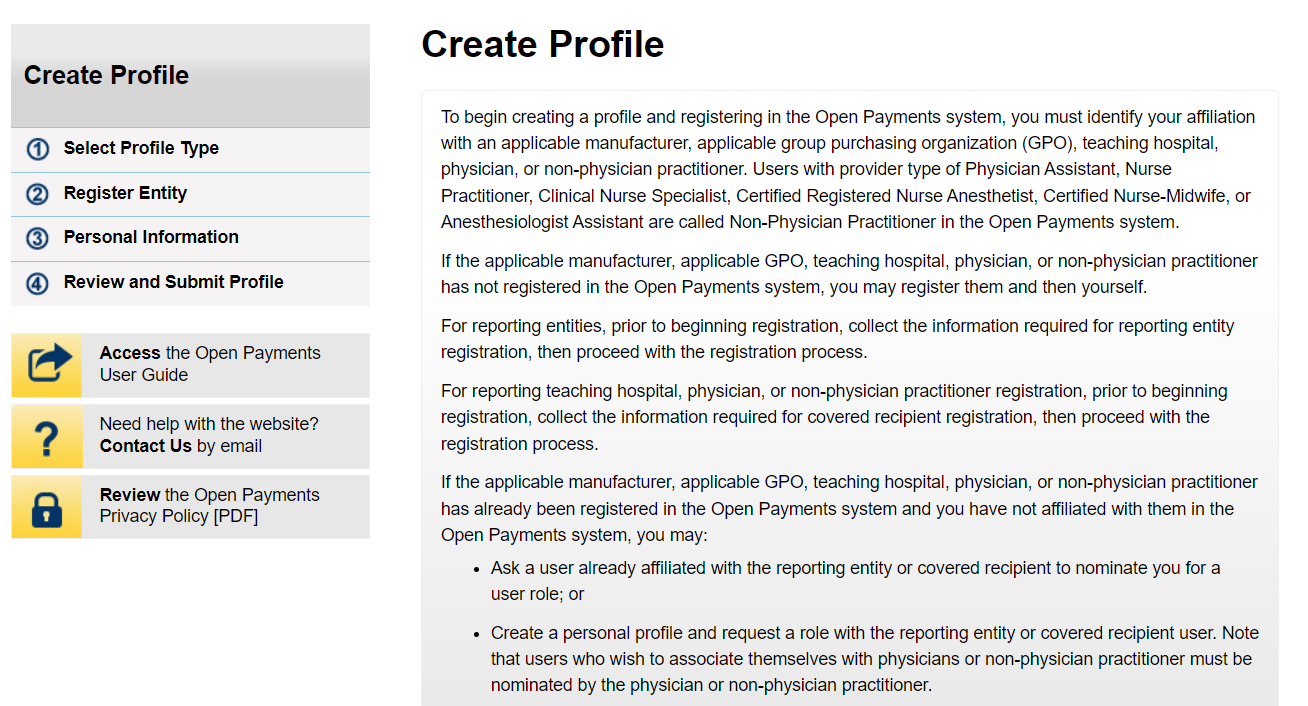
Figure 45: Create Profile Page (OPS2.0)
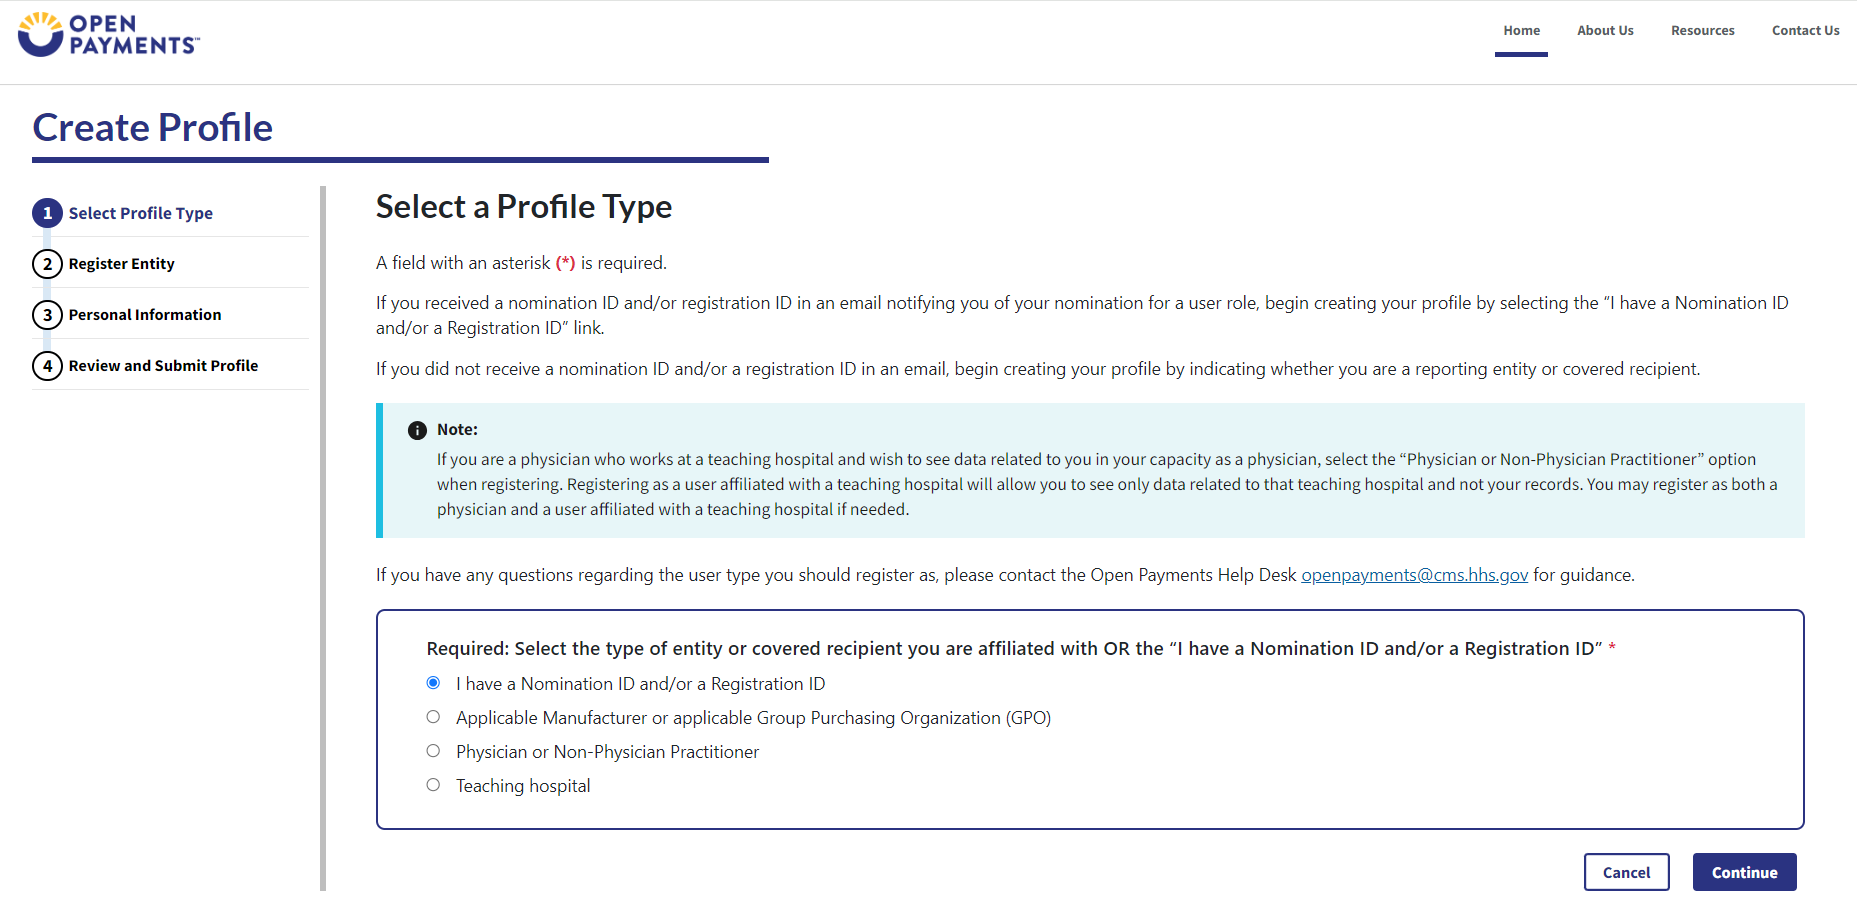
Step 3: Select the I have a Nomination ID and/or a Registration ID link on the “Select Profile Type” page.
Figure 46: Select Profile Type Page (OPS1.0)
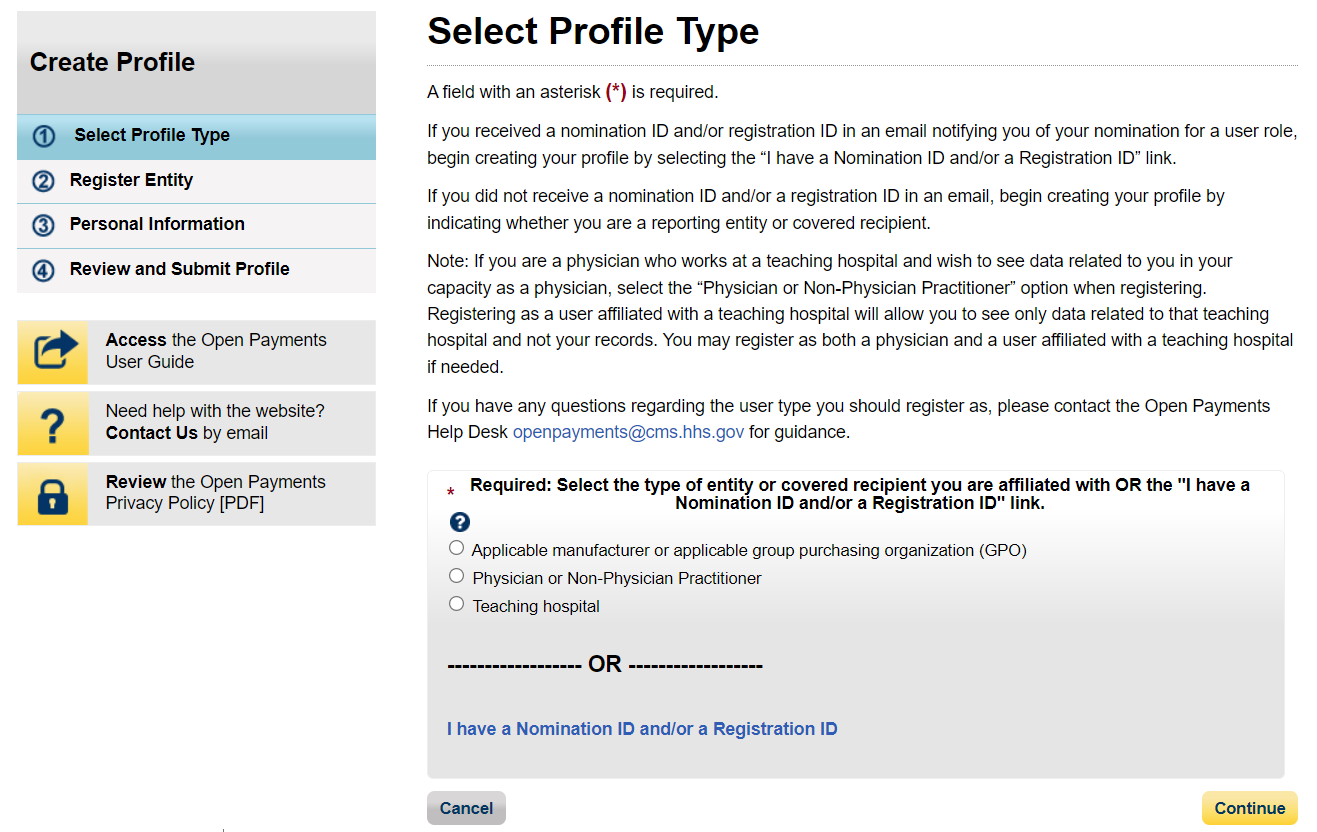
Figure 47: Select Profile Type Page (OPS2.0)
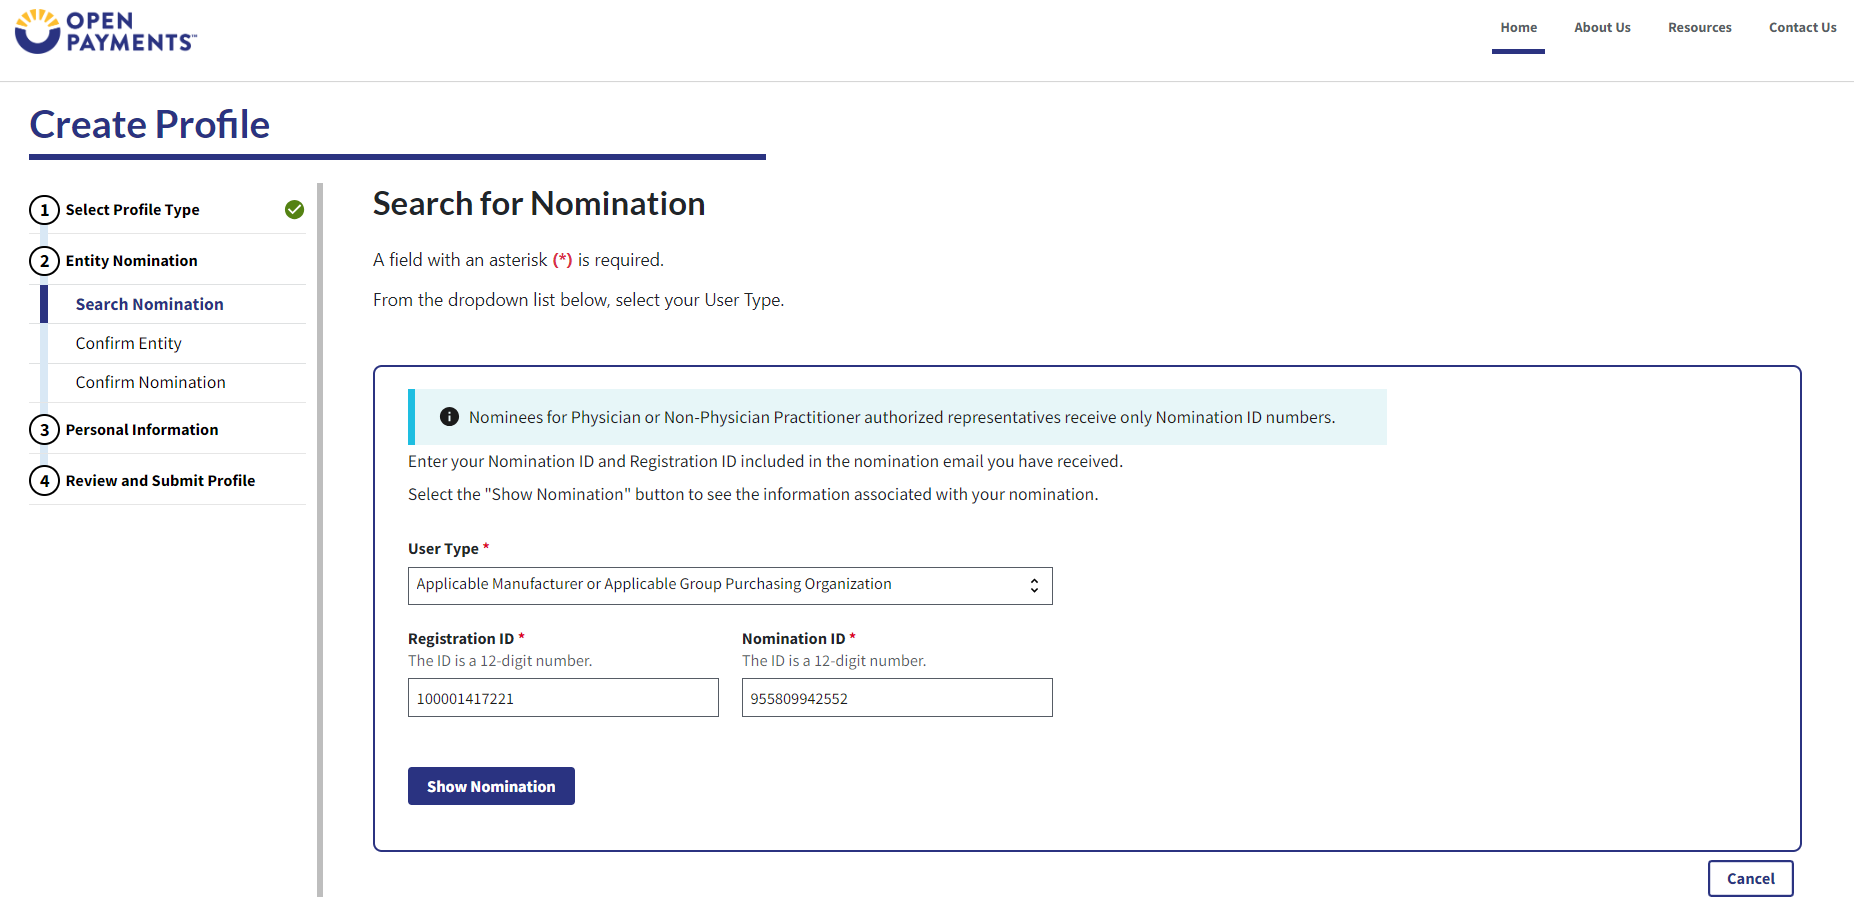
Step 4: Select the User Type “Applicable Manufacturer or Applicable GPO.” Enter the registration ID and nomination ID that you received in the nomination notification email and then select Show Nomination.
Figure 48: Search for Nomination Page (OPS1.0)
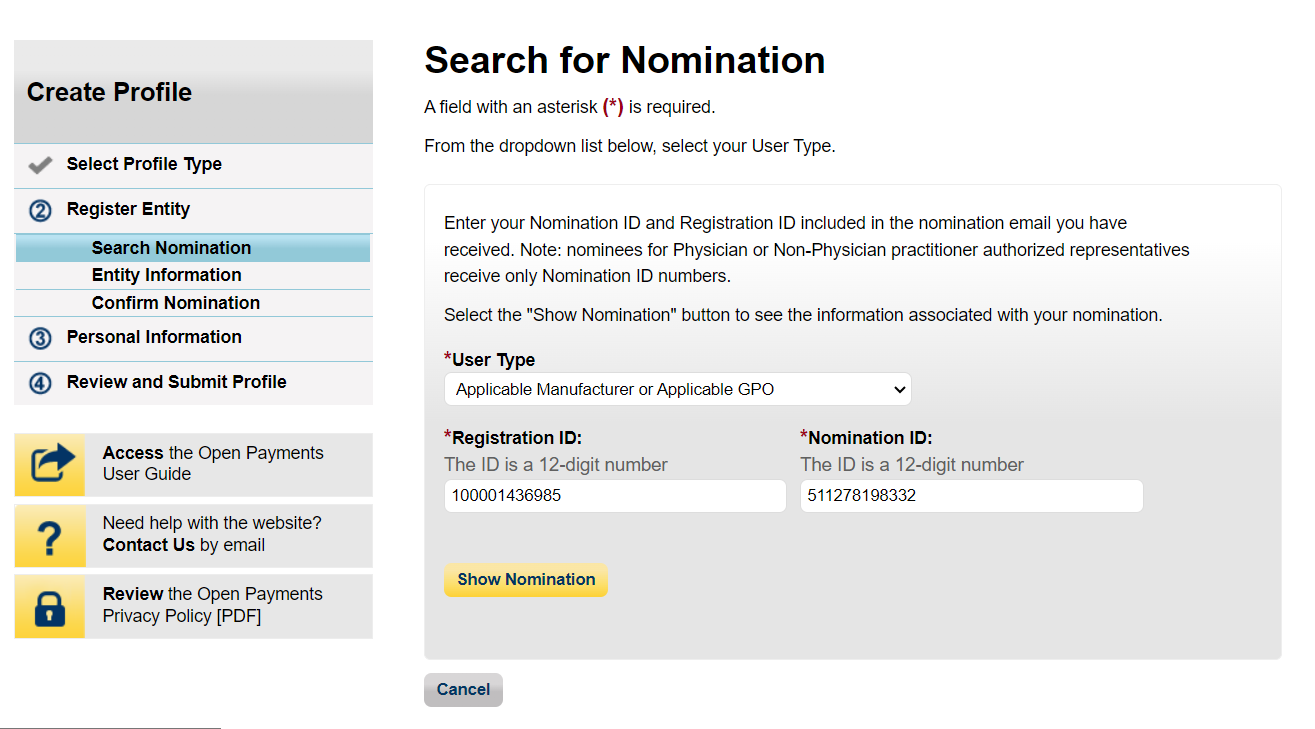
Figure 49: Search for Nomination Page (OPS2.0)
Step 5: Review the nomination information displayed. If the information is correct, select the Continue button.
Figure 50: Search for Nomination page (OPS1.0)
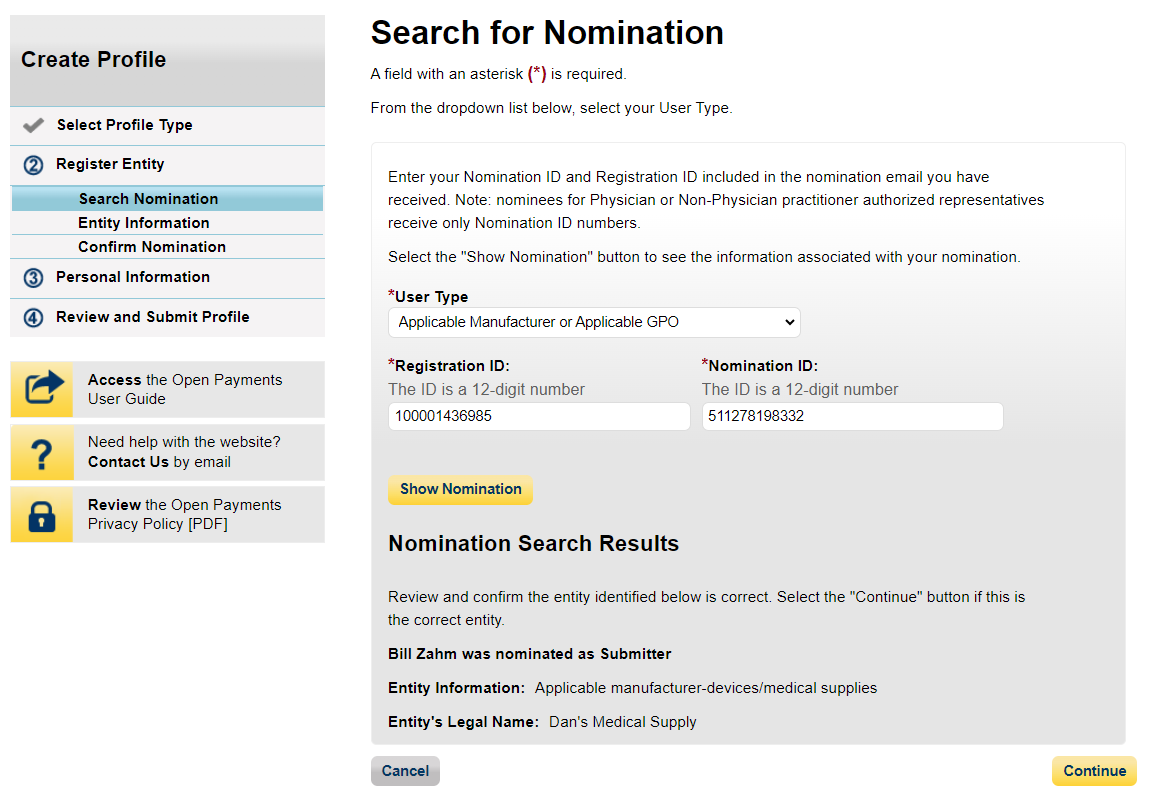
Figure 51a: Search for Nomination page (TOP PART) (OPS2.0)
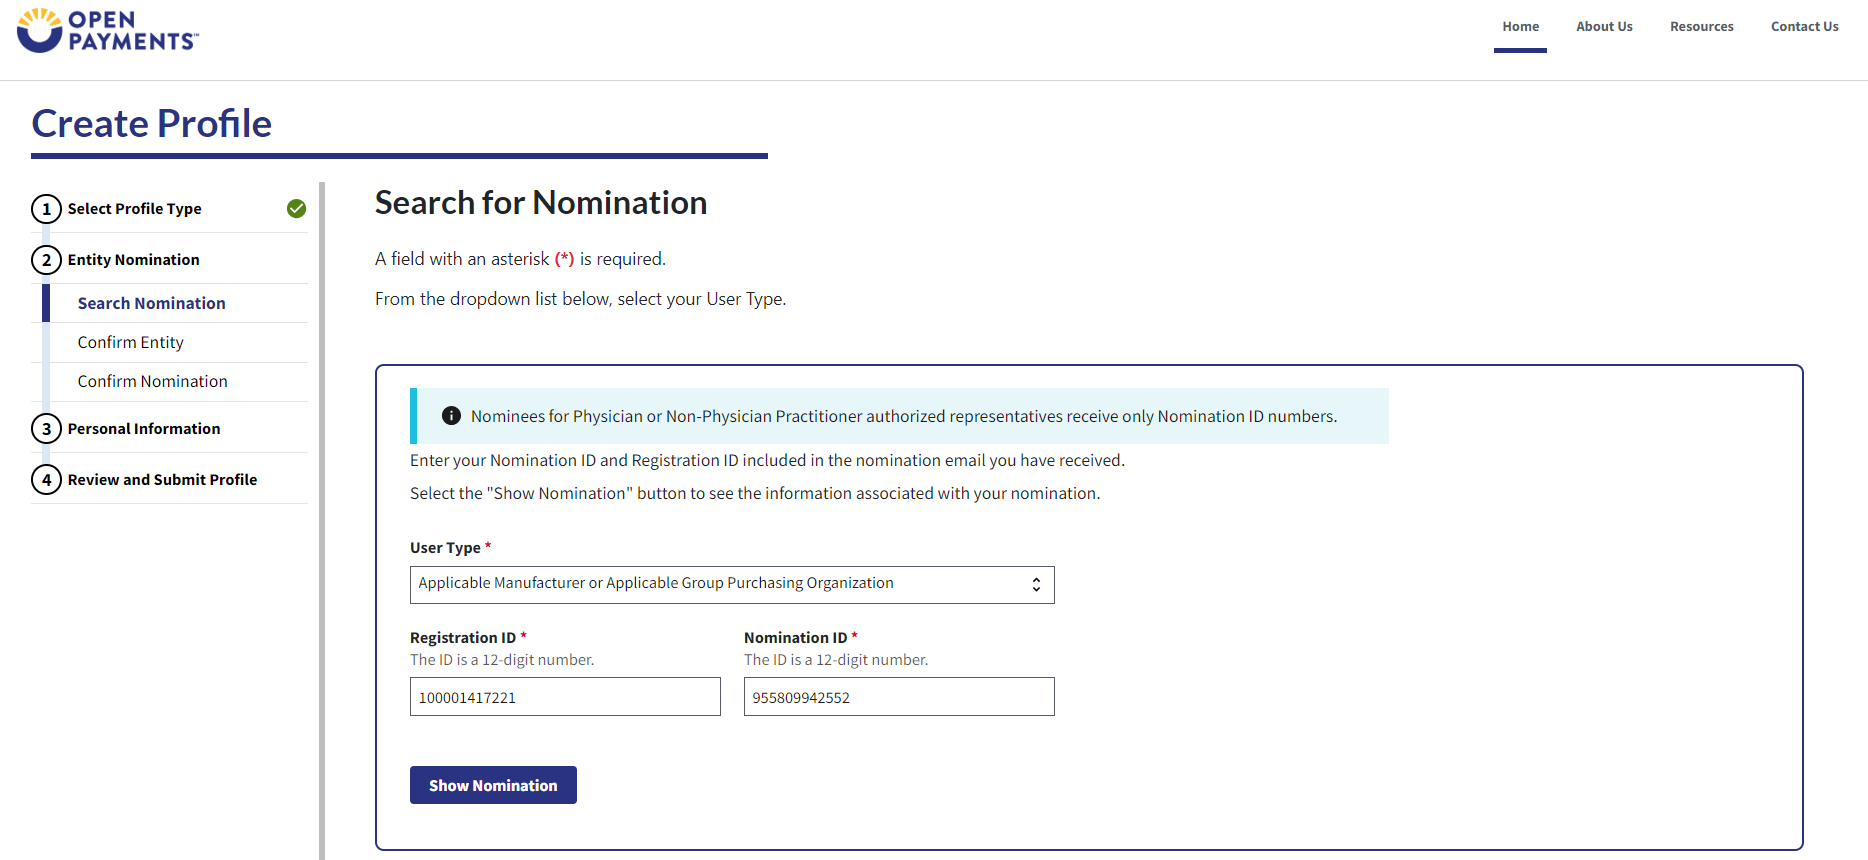
Figure 51b: Search for Nomination page (BOTTOM PART) (OPS2.0)

Step 6: If the information is correct, select the Continue button to proceed.
Figure 52a: Confirm Entity page (TOP PART) (OPS1.0)
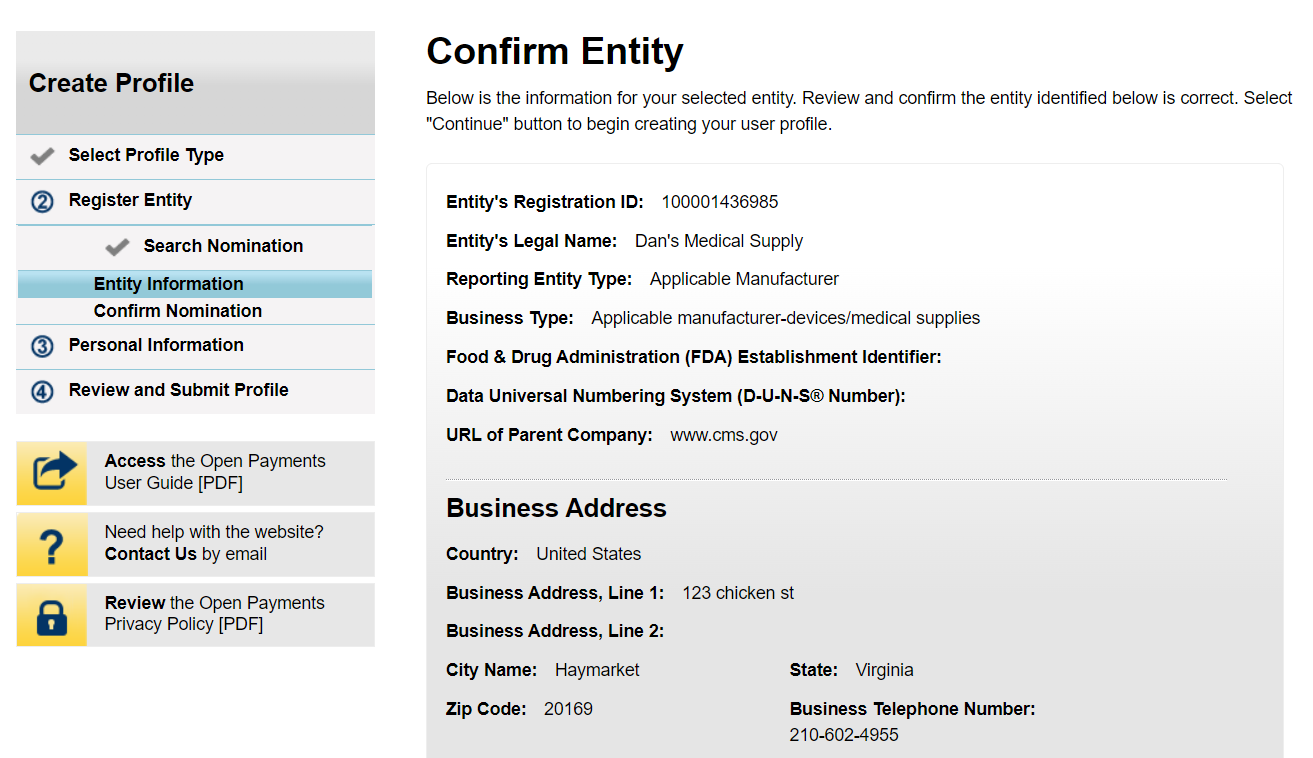
Figure 52b: Confirm Entity page (BOTTOM PART) (OPS1.0)

Figure 53a: Confirm Entity page (TOP PART) (OPS2.0)
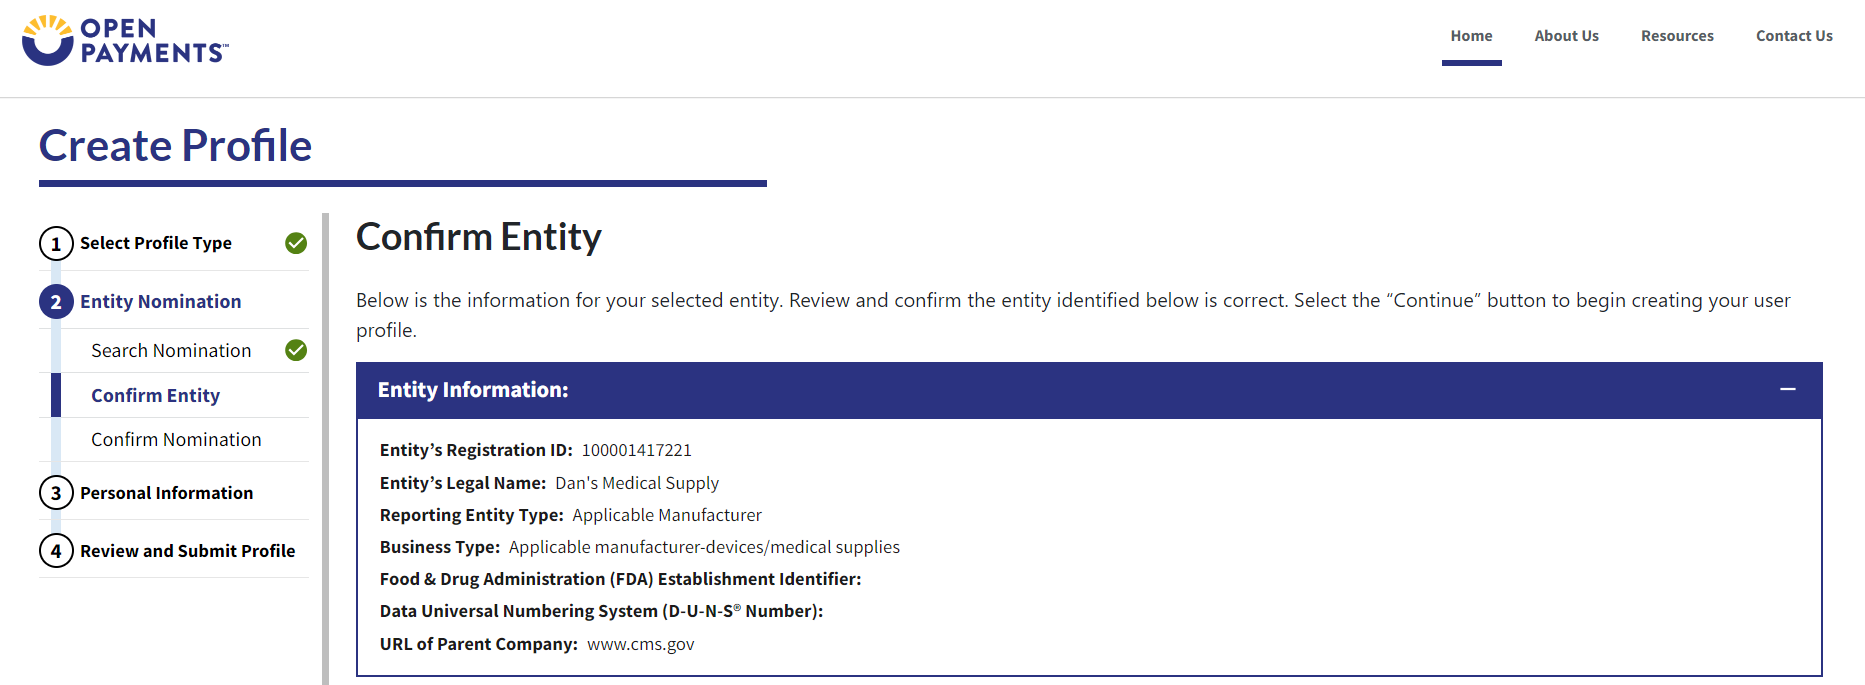
Figure 53b: Confirm Entity page (BOTTOM PART) (OPS2.0)
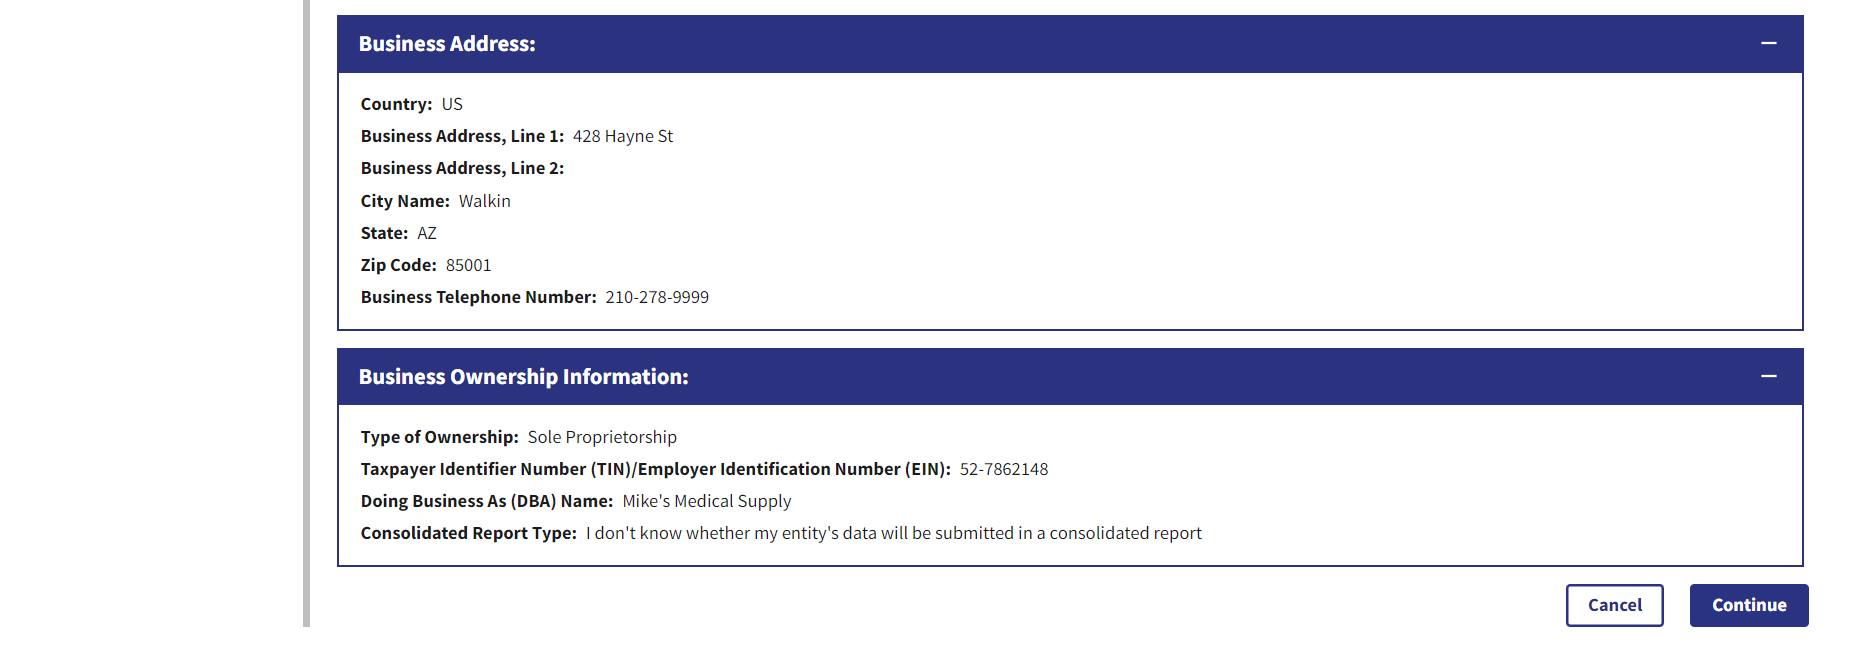
Step 7: Select “Yes, I accept” for roles you accept and “No, I do not accept” for roles you do not accept.
Figure 54: Confirm Nomination Page (OPS1.0)
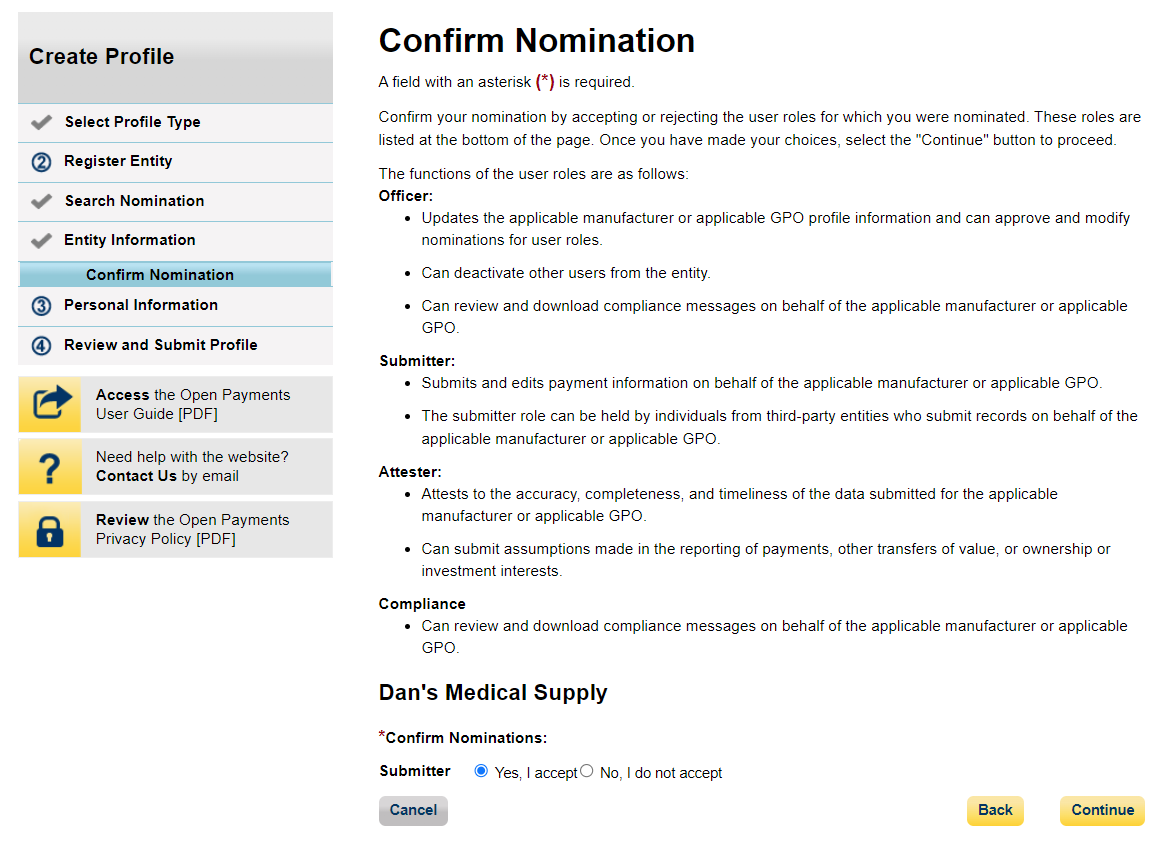
Figure 55: Confirm Nomination Page (OPS2.0)
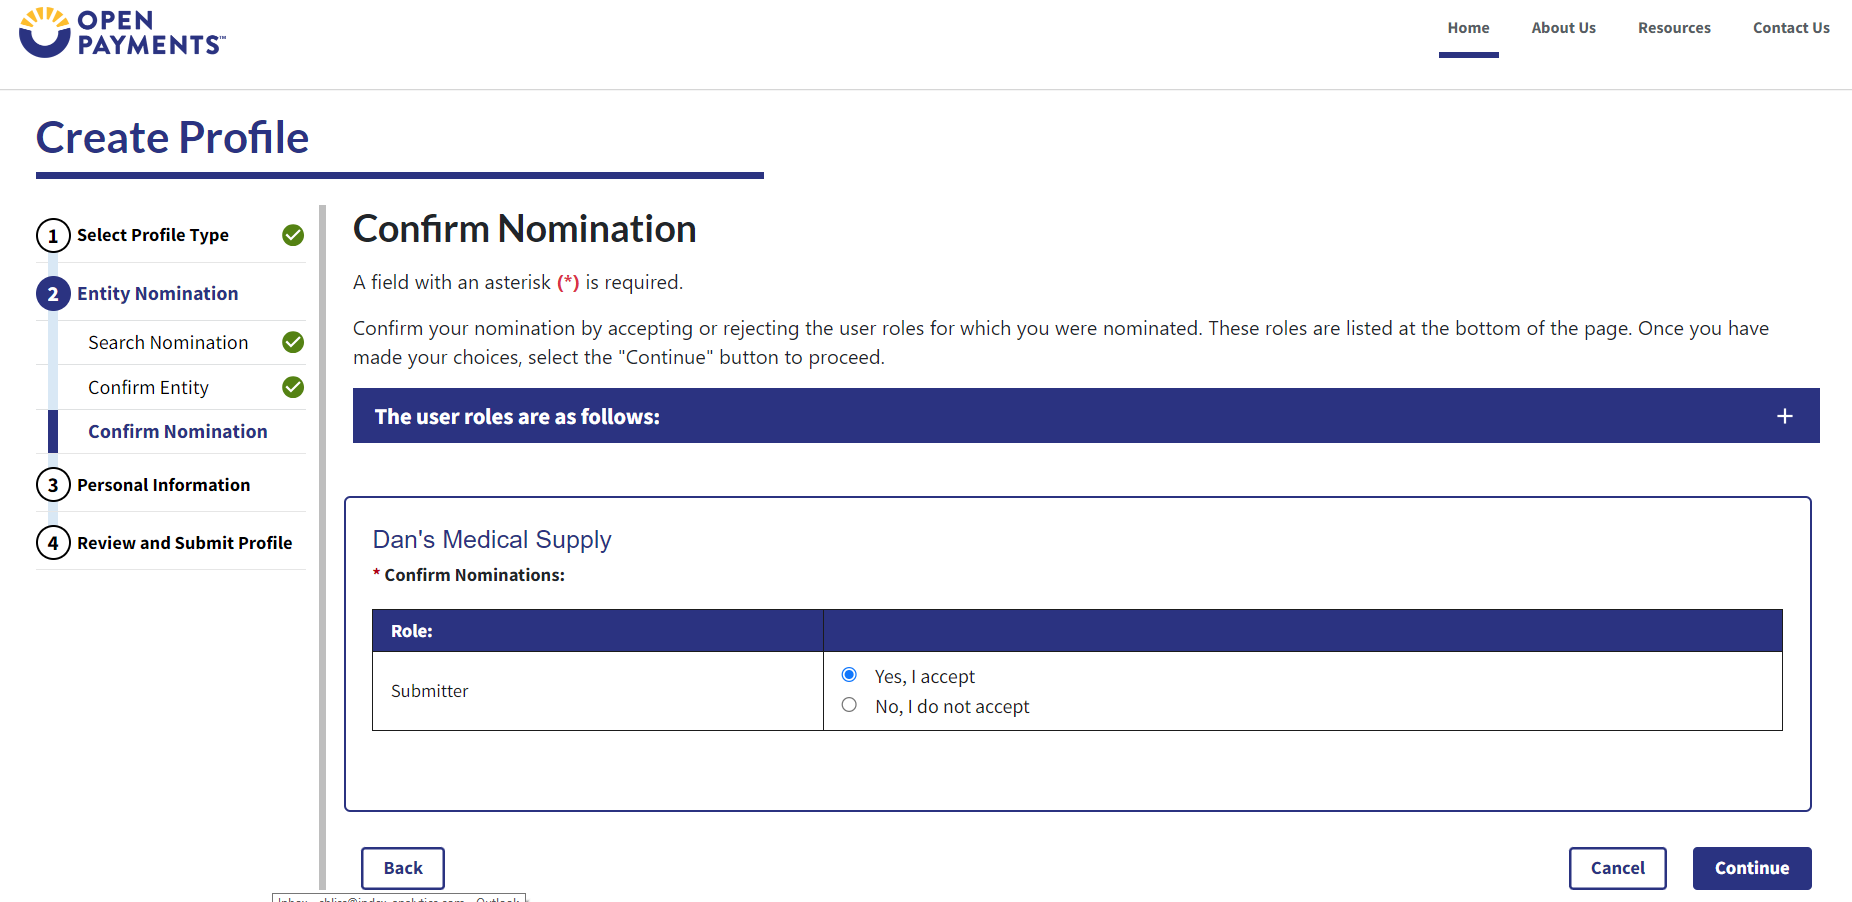
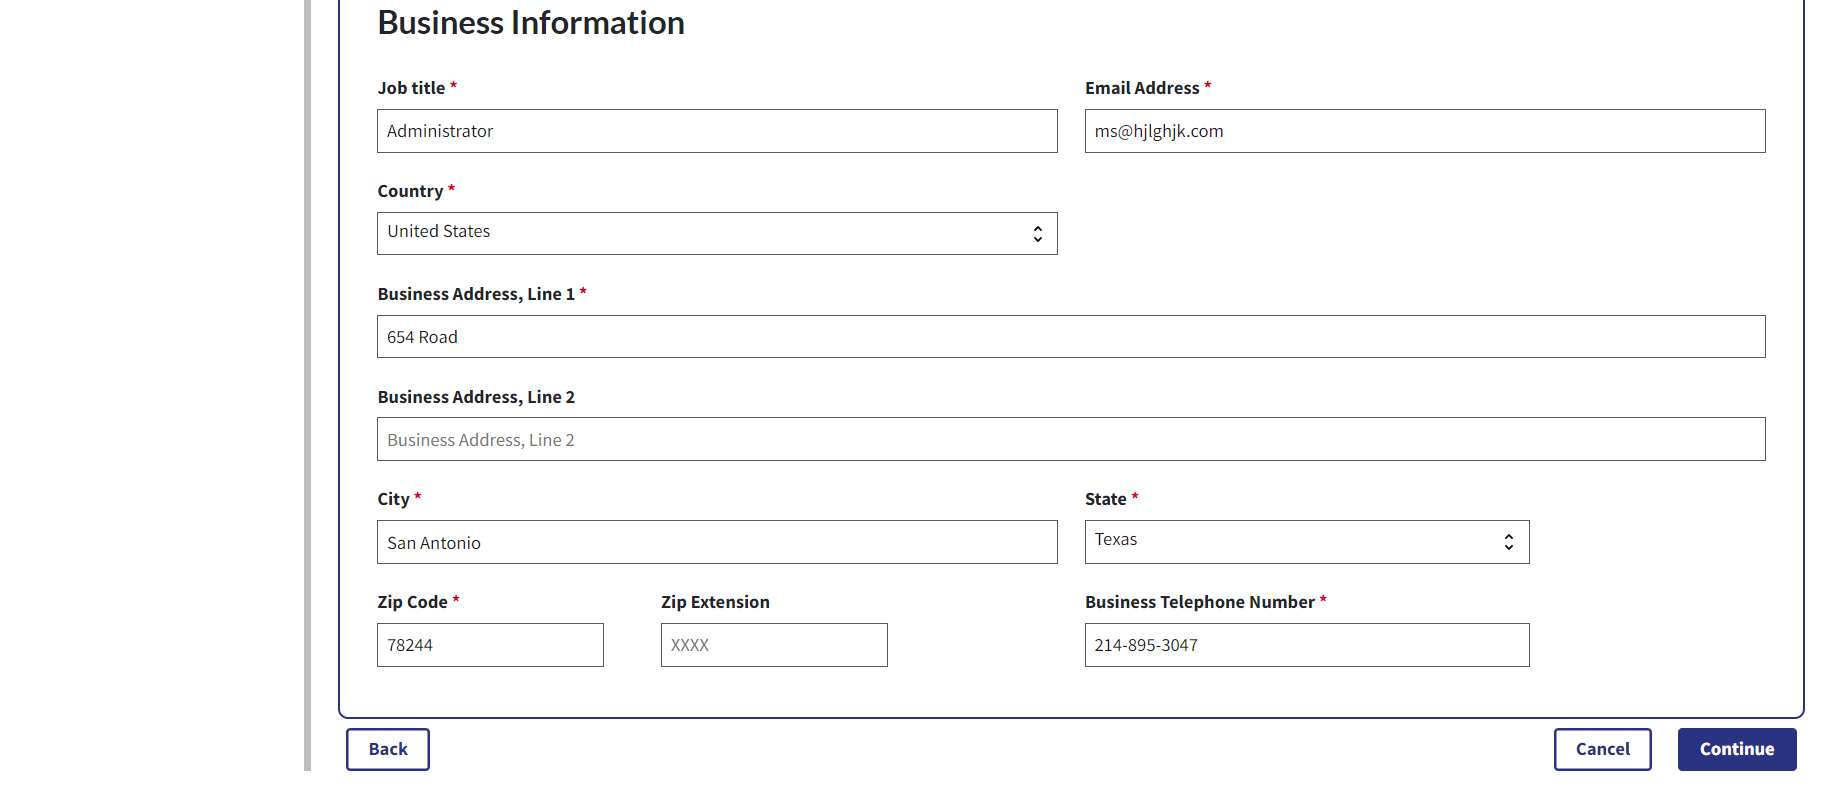
Step 8: Enter the requested information and select Continue.
Figure 56a: Enter Personal Information Page (TOP PART) (OPS1.0)
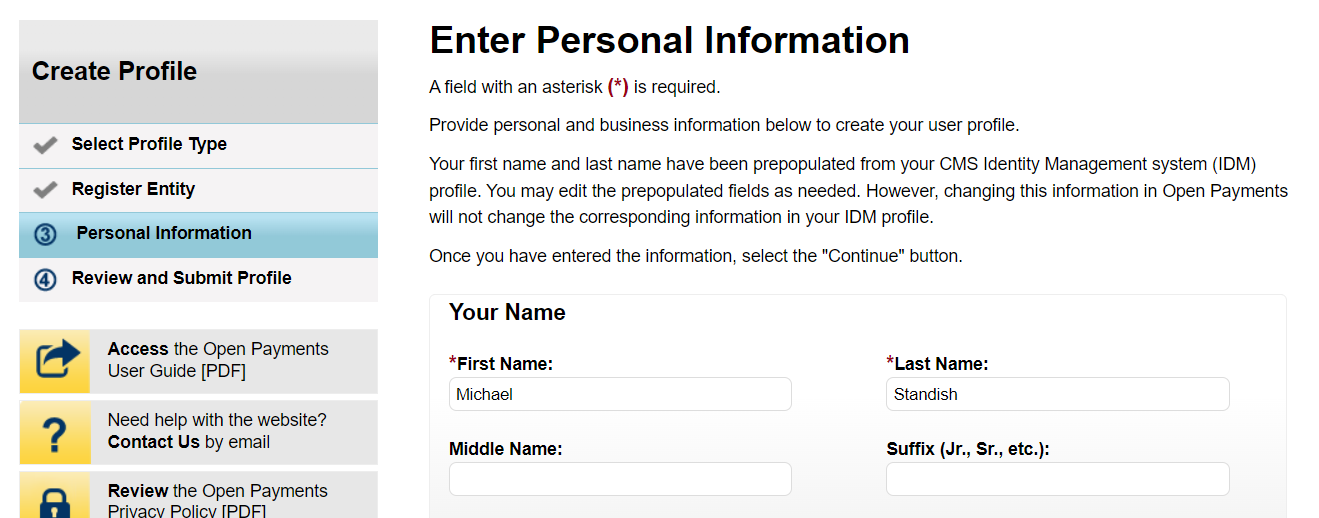
Figure 56b: Enter Personal Information Page (BOTTOM PART) (OPS1.0)
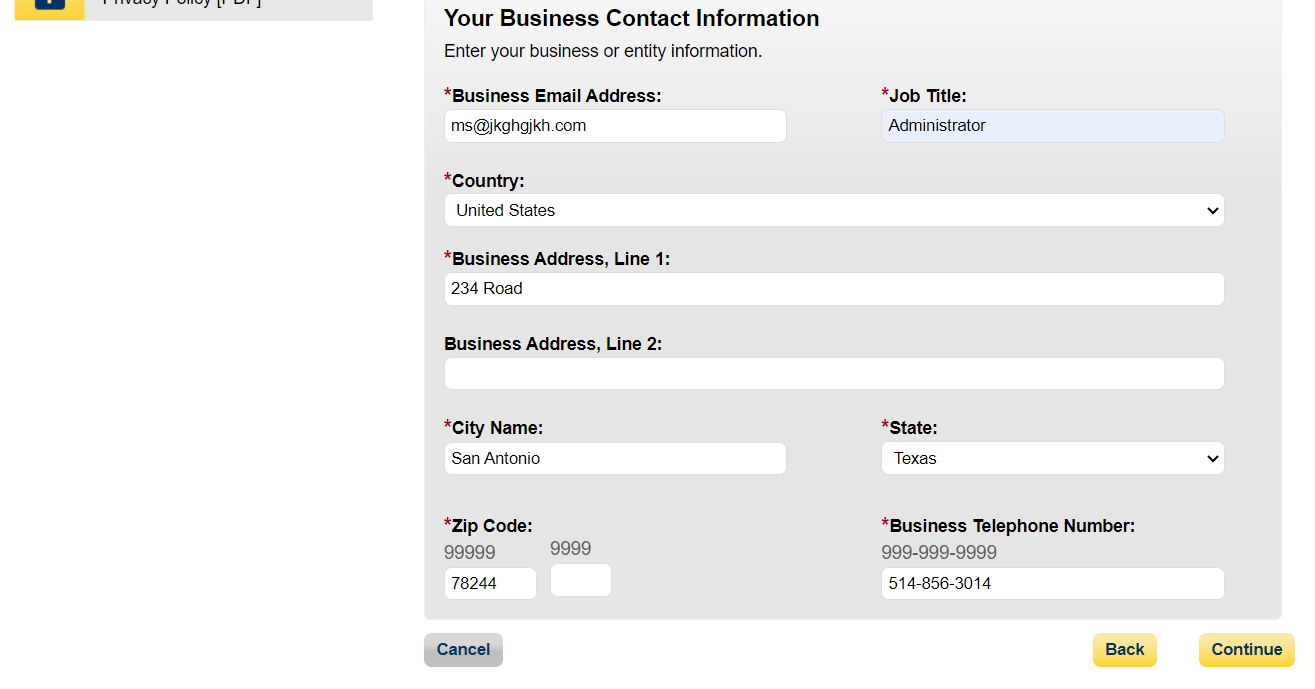
Figure 57a: Enter Personal Information Page (TOP PART) (OPS2.0)
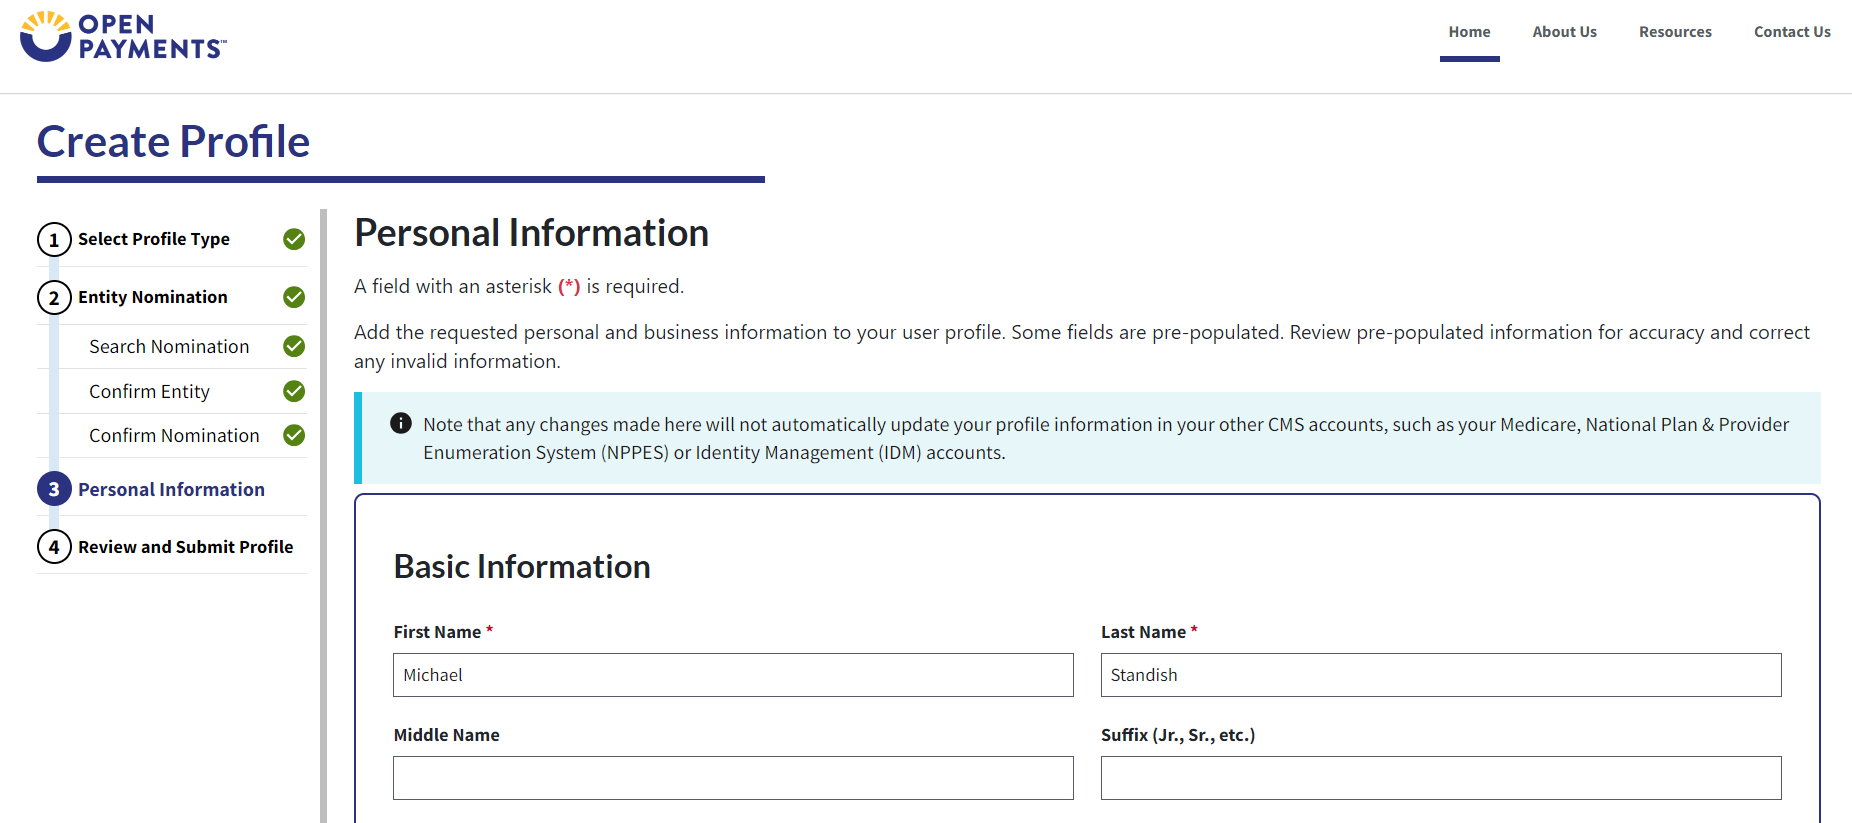
Figure 57b: Enter Personal Information Page (BOTTOM PART) (OPS2.0)
Step 9: Select Continue. You will receive confirmation after selecting Continue.
Figure 58a: Review and Submit Profile Page (TOP PART) (OPS1.0)
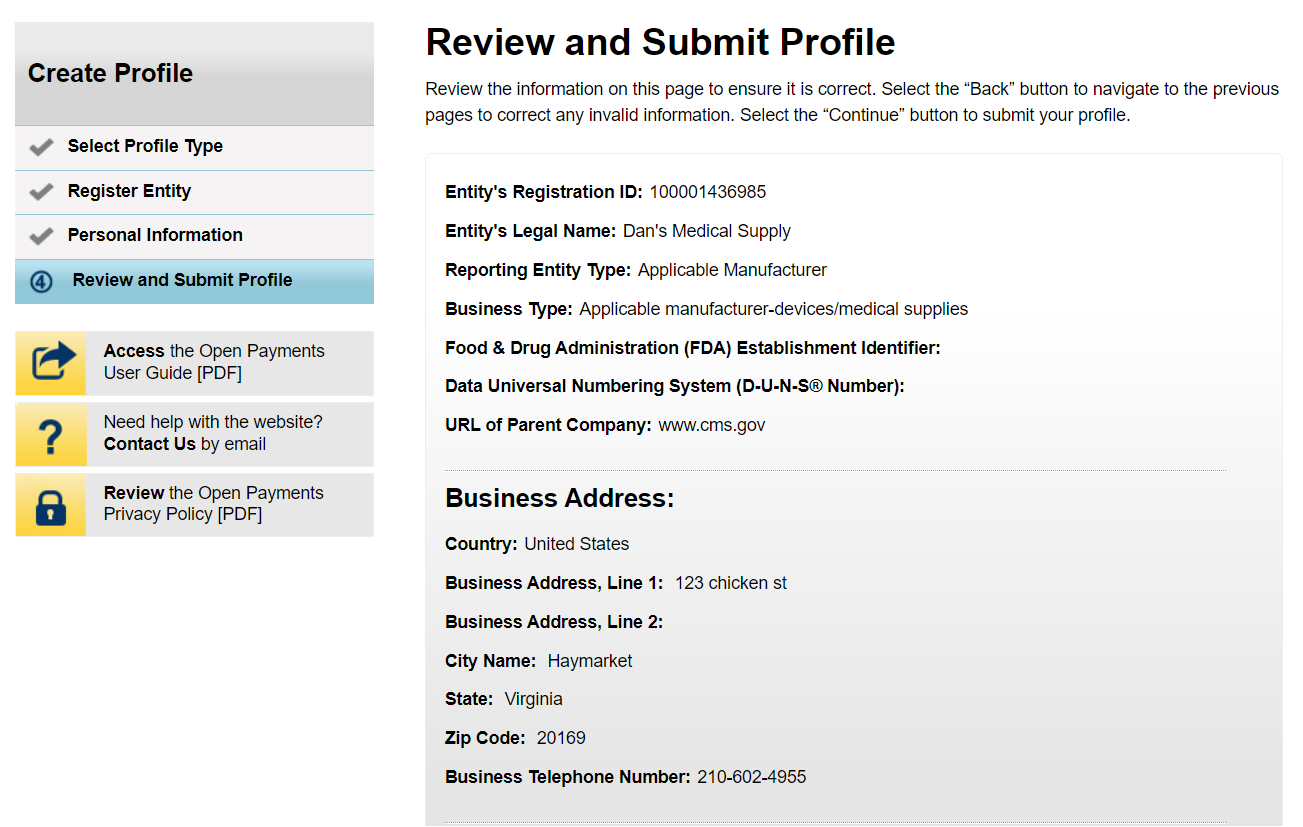
Figure 58b: Review and Submit Profile Page (BOTTOM PART) (OPS1.0)
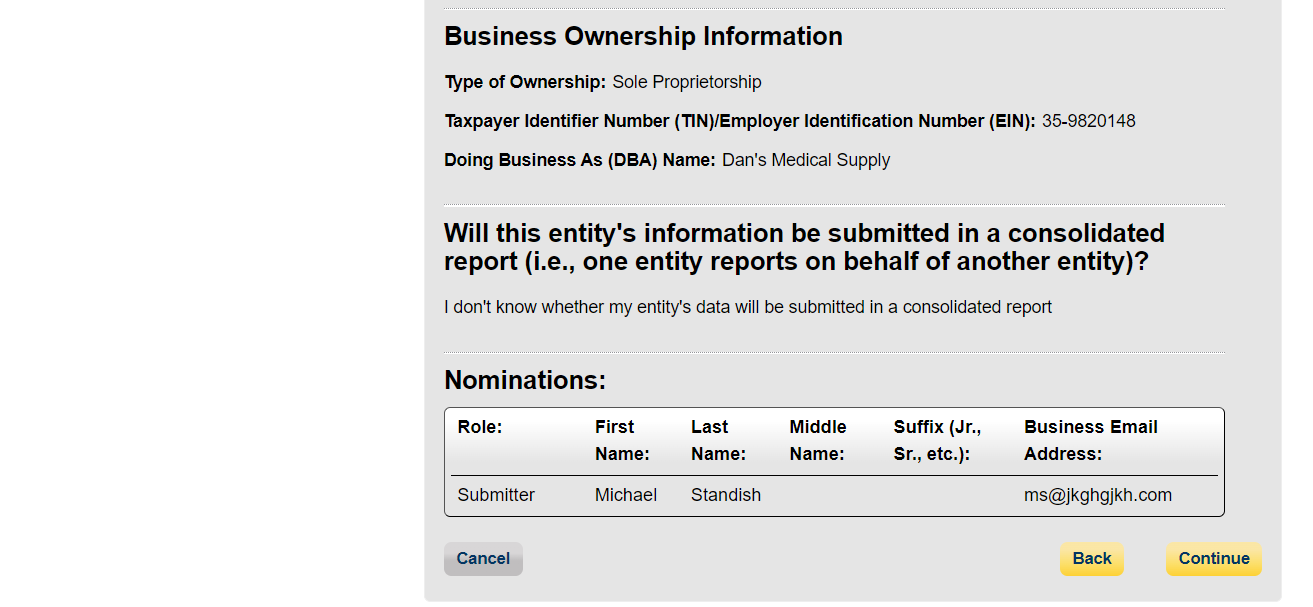
Figure 59a: Review and Submit Profile Page (TOP PART) (OPS2.0)
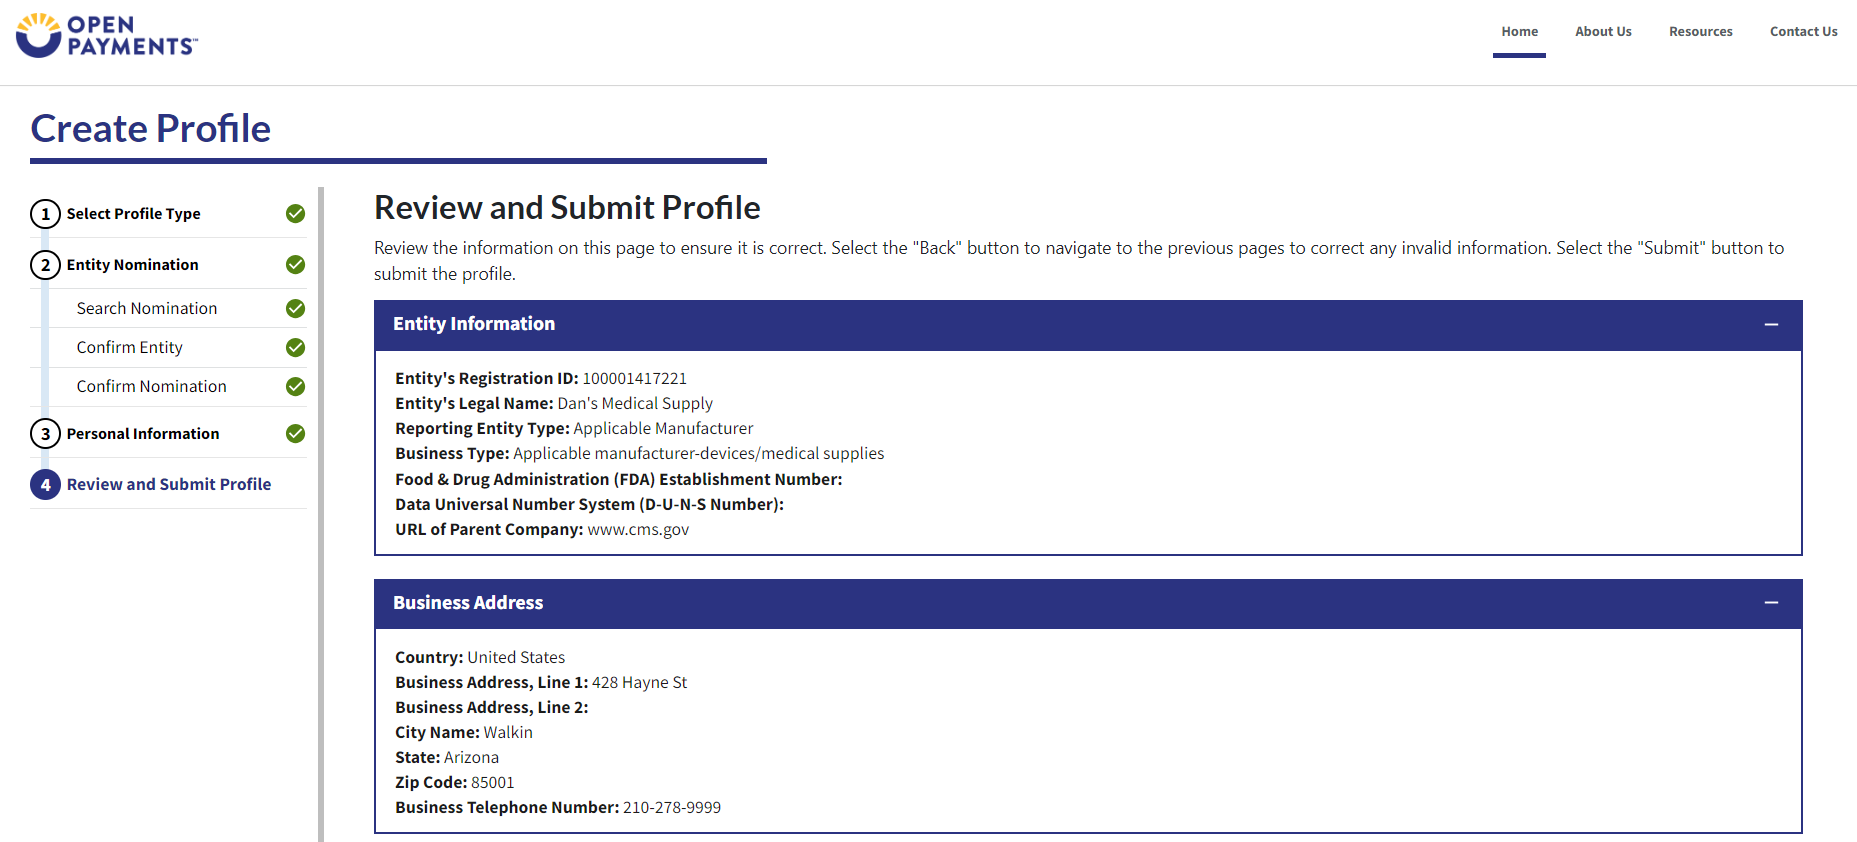
Figure 59b: Review and Submit Profile Page (BOTTOM PART) (OPS2.0)

The following message will appear on-screen to confirm your nomination has been successfully accepted.
Figure 60: Success Confirmed Page (OPS1.0)
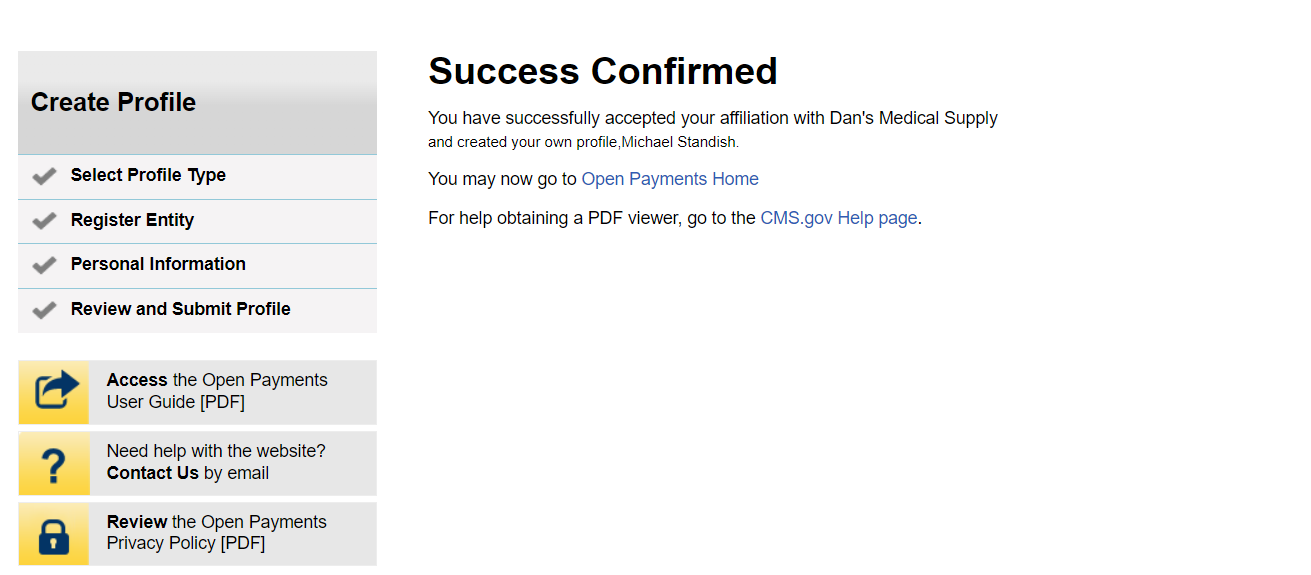
Figure 61: Success Confirmed Page (OPS2.0)

Accepting a Nomination (Returning System Users)
Step 1: Select My Open Payments Profile from the header menu on the Open Payments home page.
Figure 62: Open Payments System Landing Page for returning system users (OPS1.0)
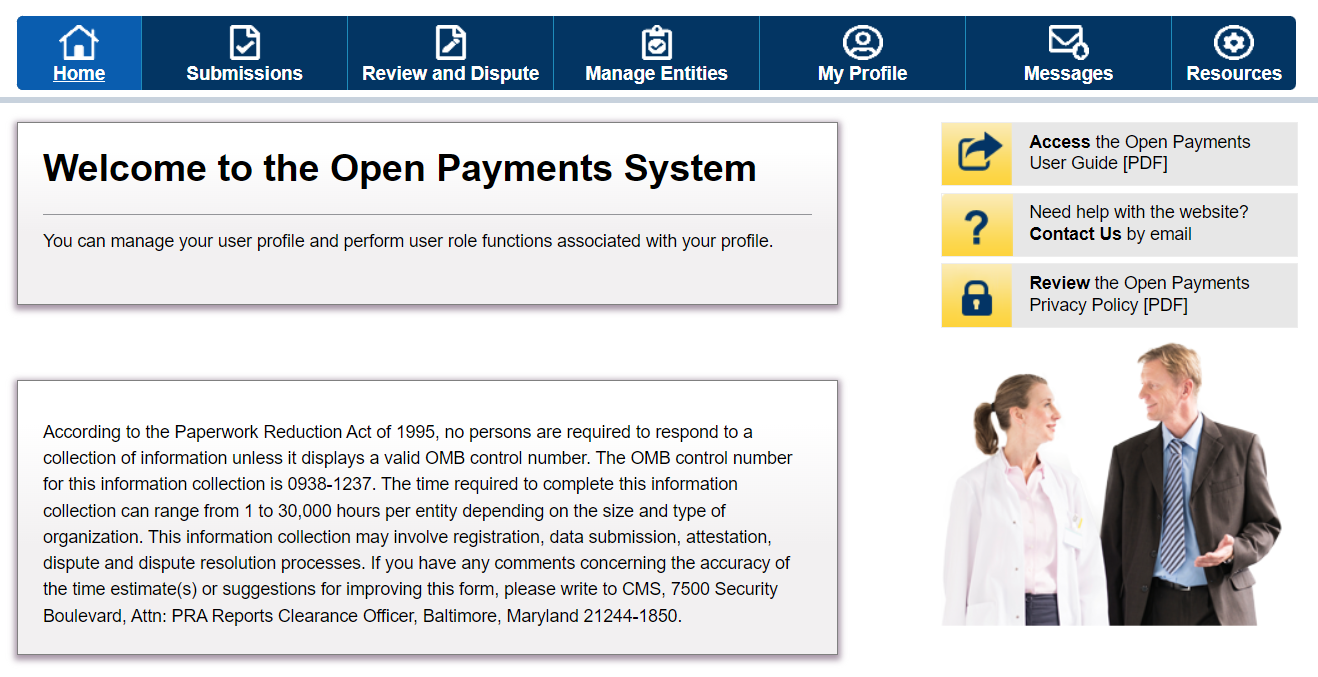
Figure 63: Open Payments System Landing Page for returning system users (OPS1.0)
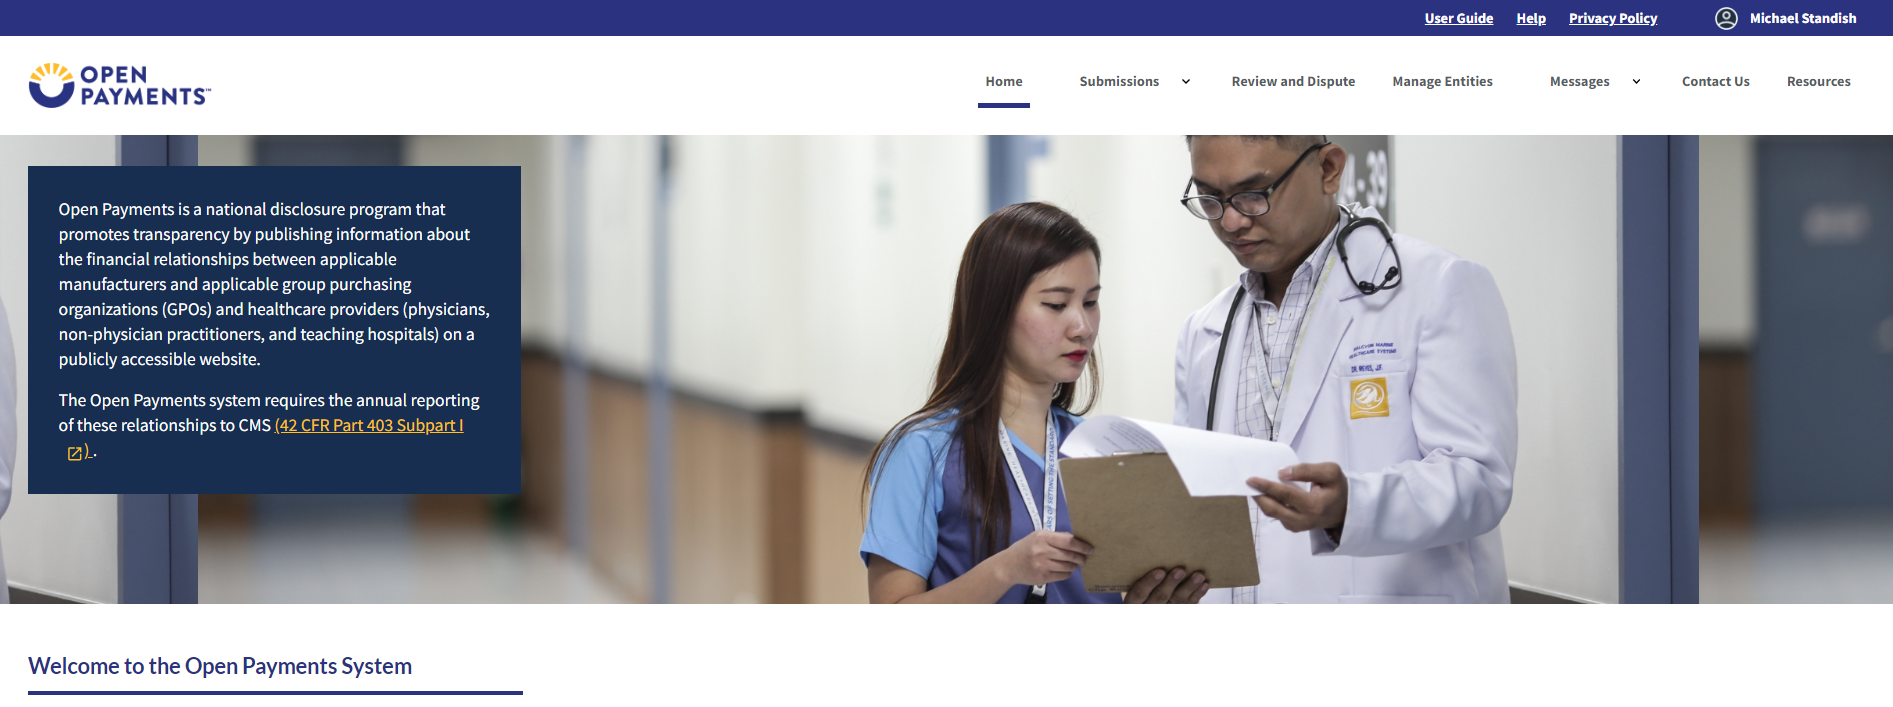
Step 2: Select the My Roles and Nominations link.
Figure 64: My Profile Page (OPS1.0)
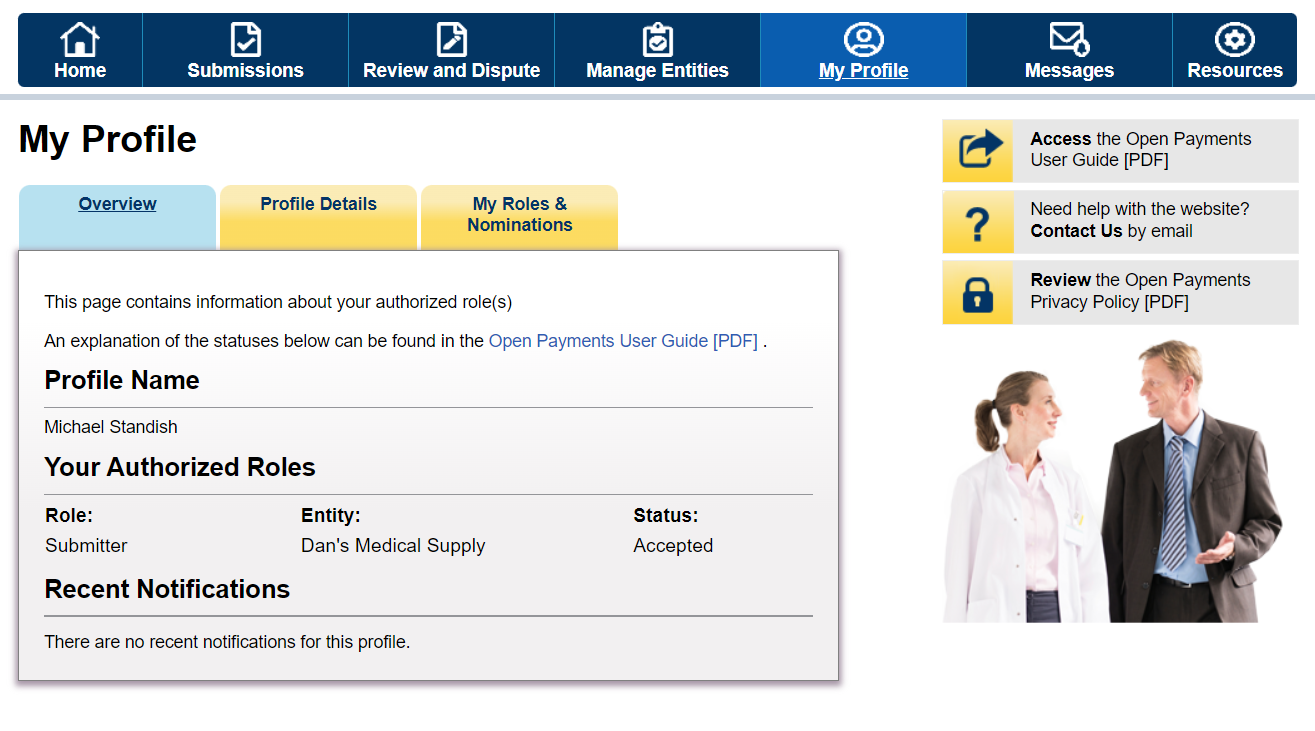
Figure 65a: My Profile Page (TOP PART) (OPS2.0)
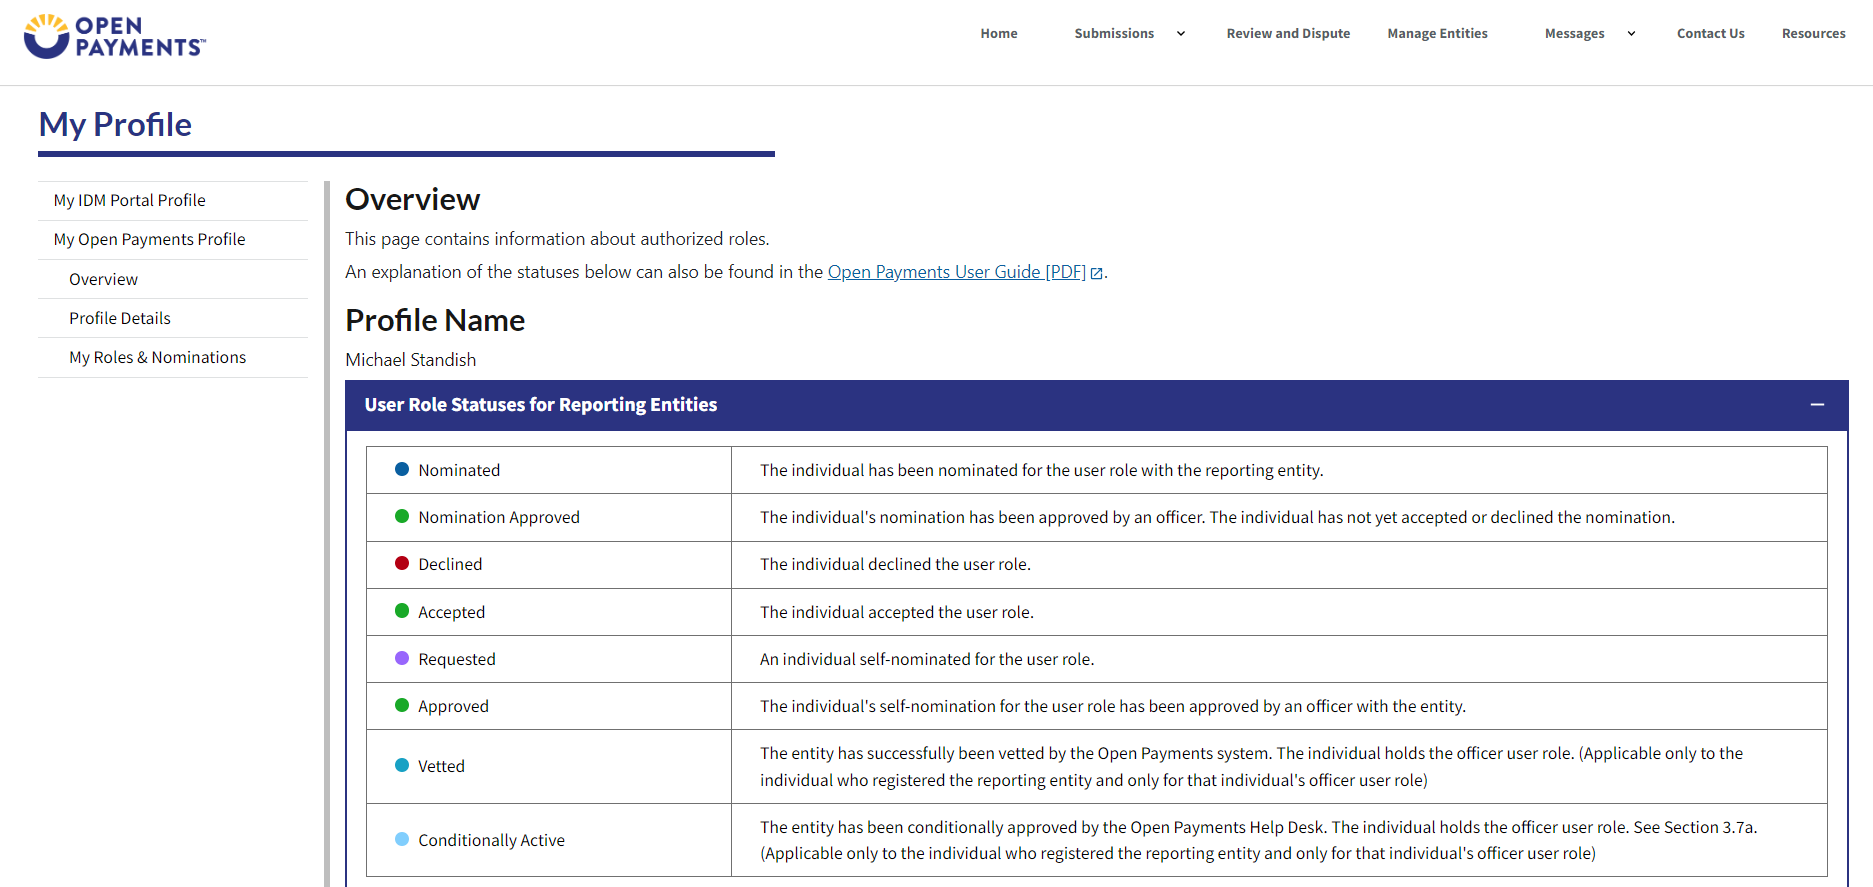
Figure 65b: My Profile Page (BOTTOM PART) (OPS2.0)

Step 3: On the “My Roles and Nominations” page, select Accept a Role.
Figure 66: My Roles and Nominations Page (OPS1.0)
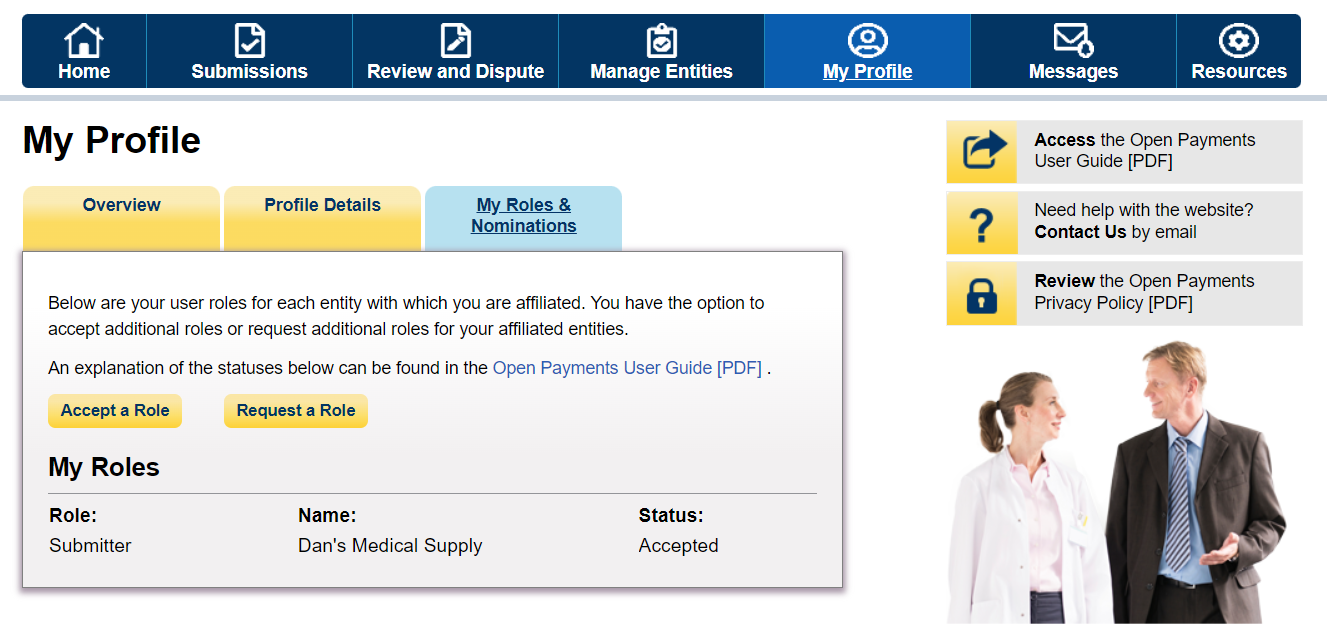
Figure 67: My Roles and Nominations Page (OPS2.0)

The rest of the process follows “Accepting a Nomination for First Time Users” Please see Figure 46 and onwards.
Self-Nomination with a Registered Entity (First Time System Users)
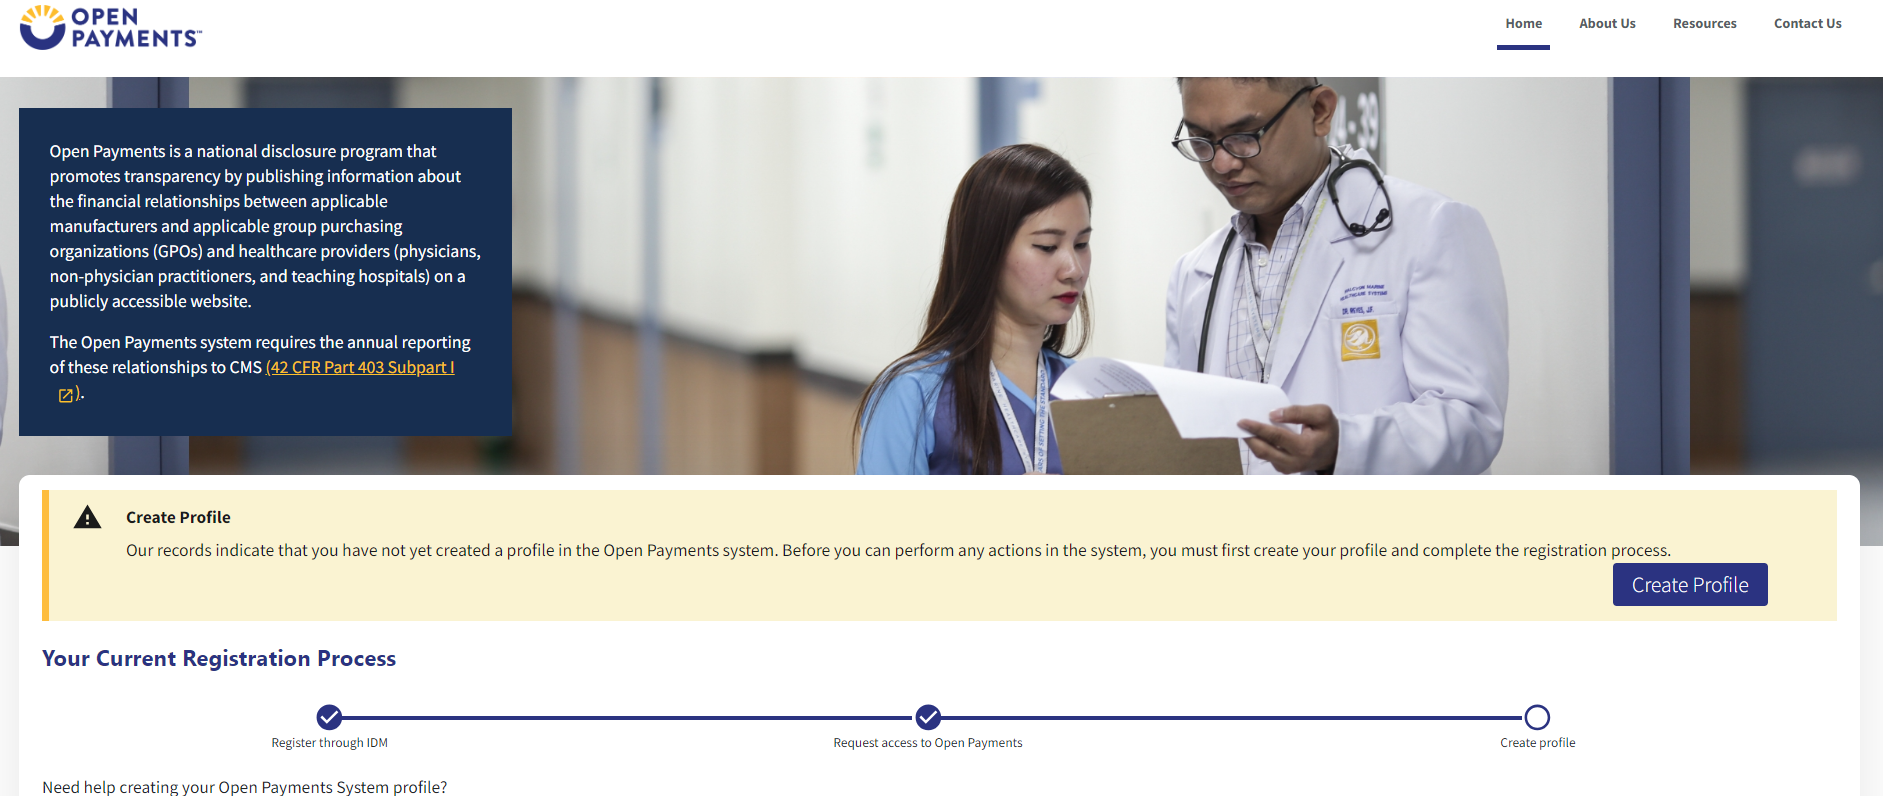
Step 1: Select Create My Profile to begin the registration process.
Figure 68: Open Payments System Landing Page for first-time system users (OPS1.0)
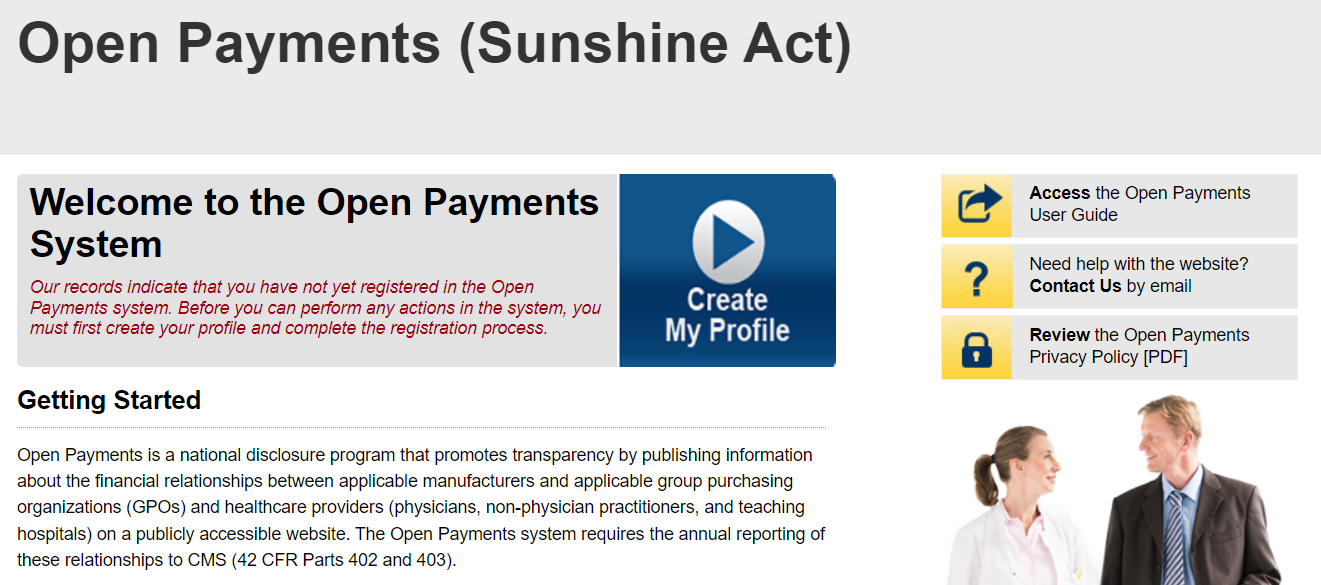
Figure 69: Open Payments System Landing Page for first-time system users (OPS2.0)
Step 2: Select “Start Profile” at the bottom of the page when you are ready to continue.
Figure 70: Create Profile Page (OPS1.0)
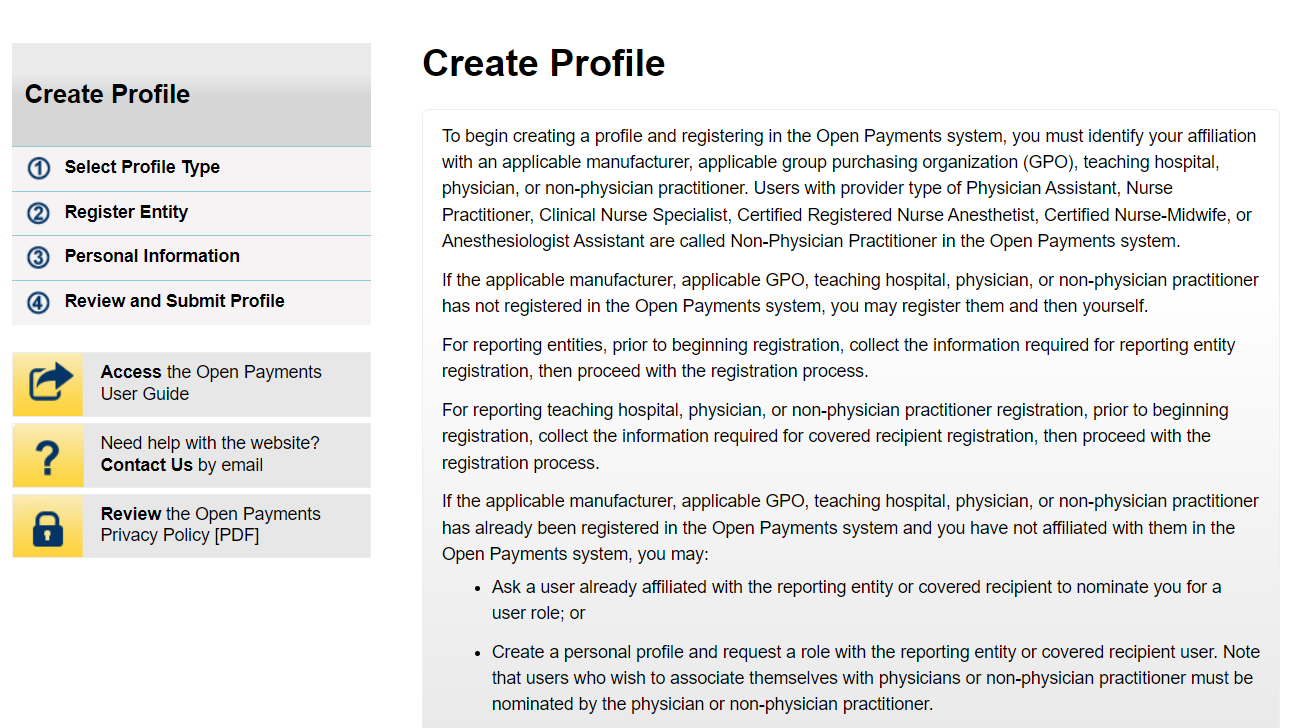
Figure 71: Create Profile Page (OPS2.0)

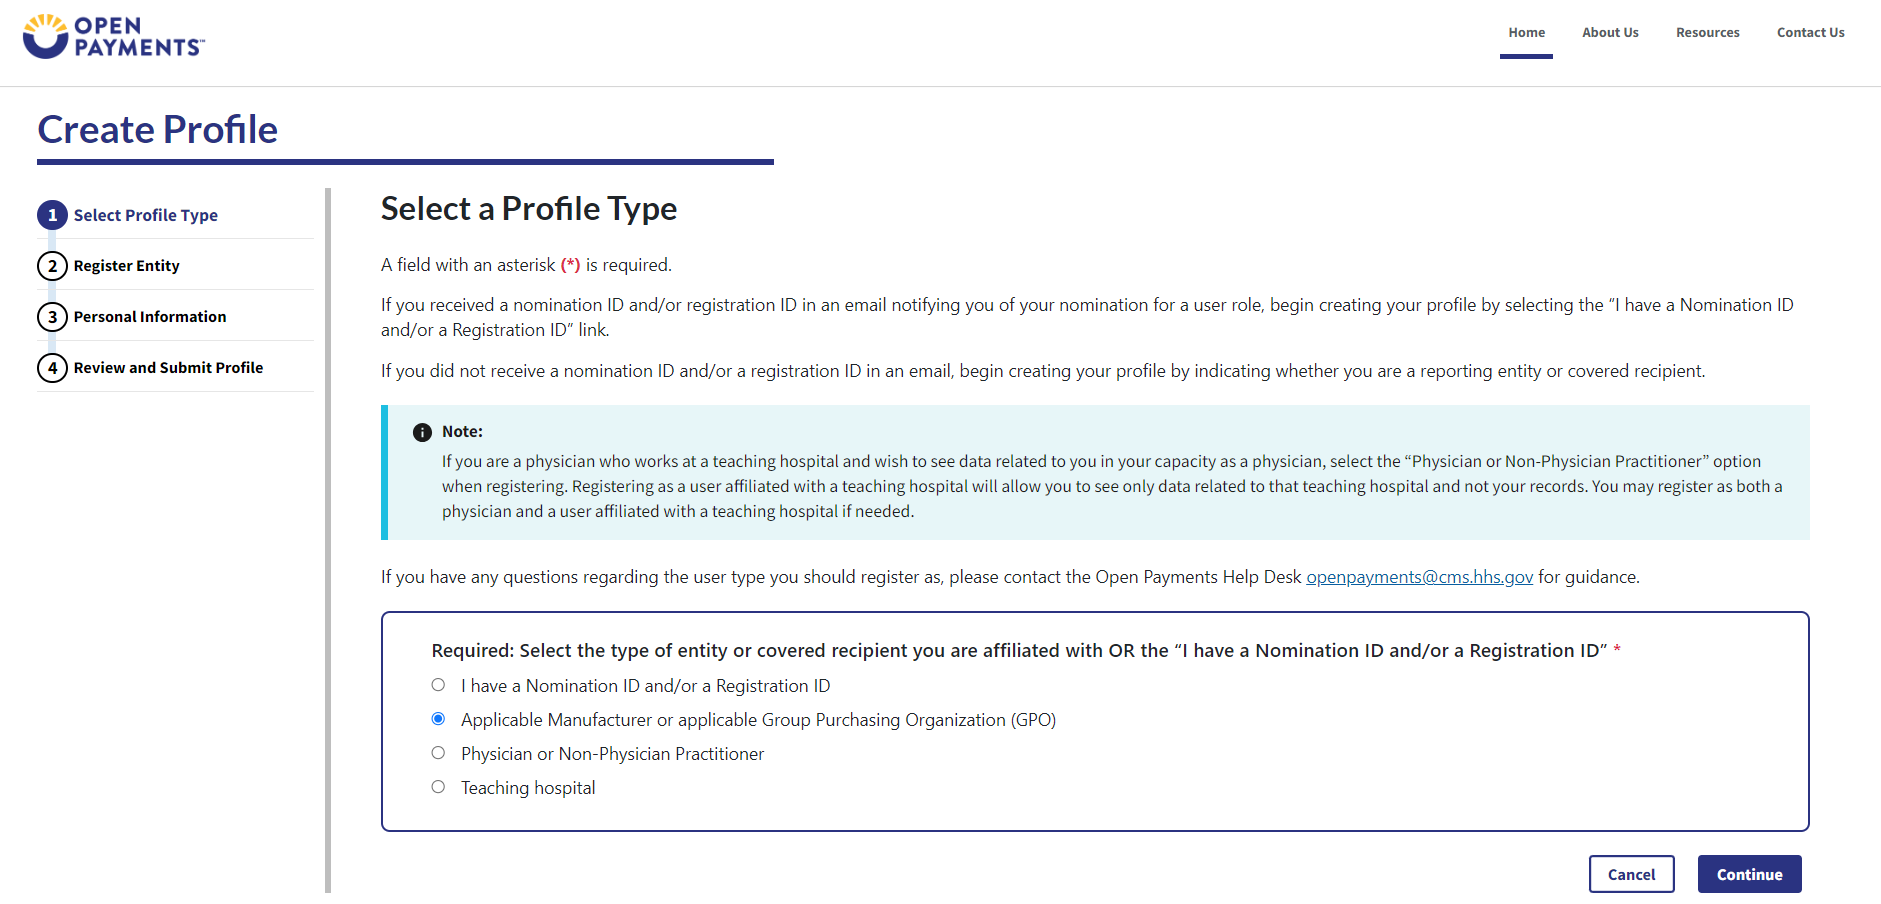
Step 3: Select the profile type “Applicable manufacturer or applicable group purchasing organization (GPO)” and select Continue.
Figure 72: Select Profile Type Page (OPS1.0)
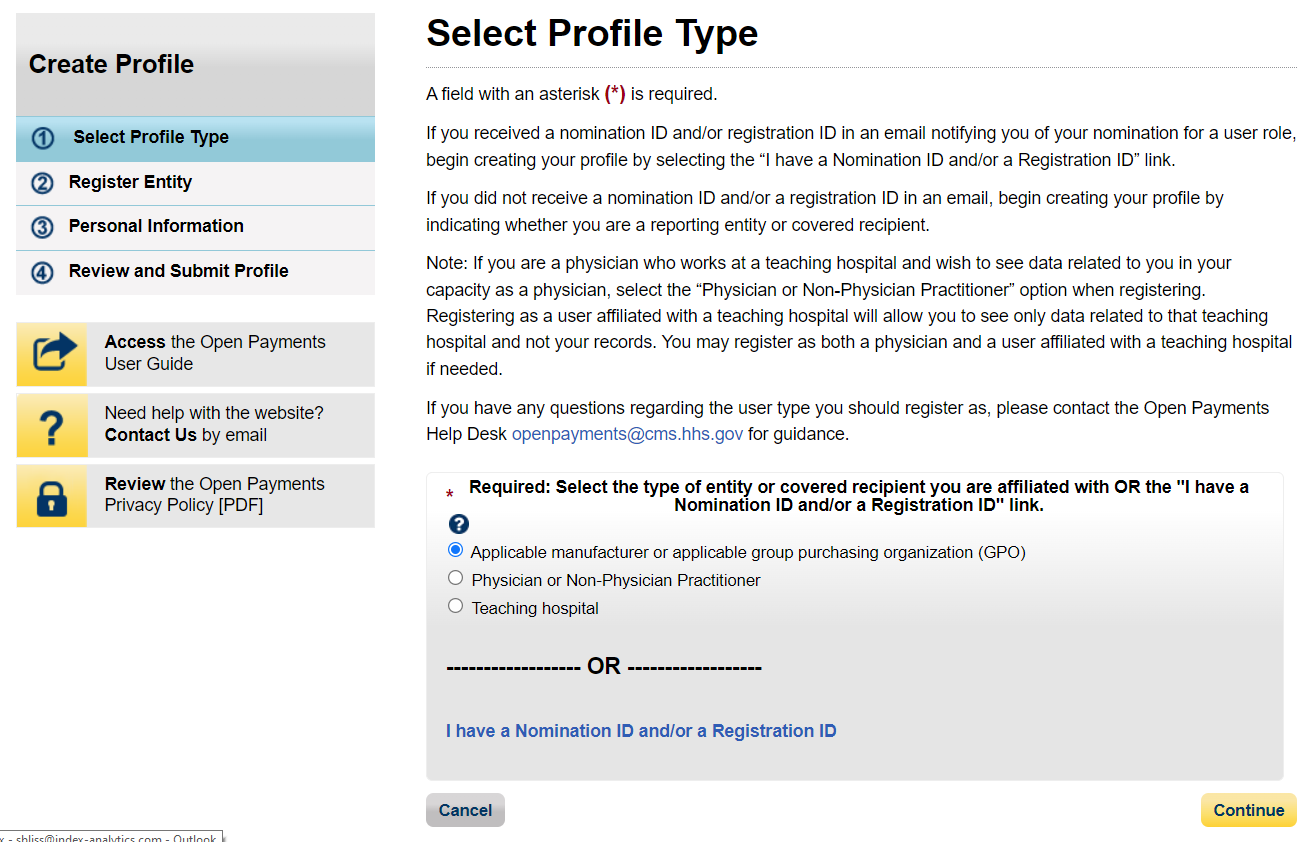
Figure 73: Select Profile Type Page (OPS2.0)
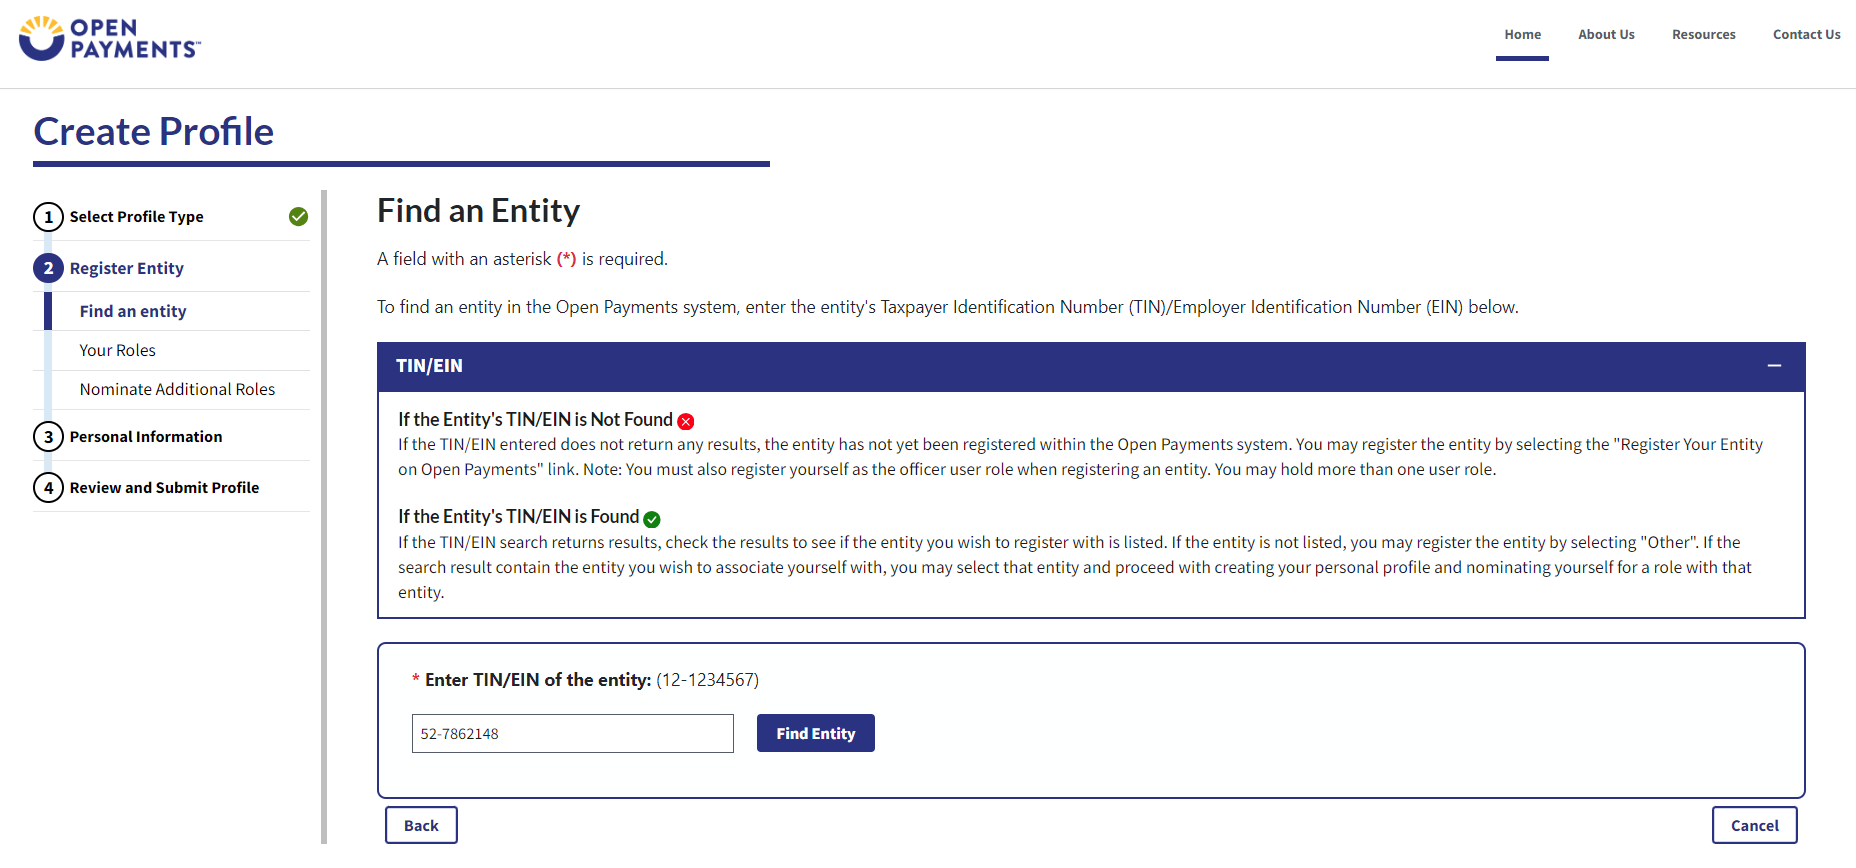
Step 4: Enter the Taxpayer Identification Number/Employer Identification Number (TIN/EIN) of the reporting entity that you want to associate yourself with. The TIN must be nine digits. Select Find.
Figure 74: Find an Entity Page (OPS1.0)
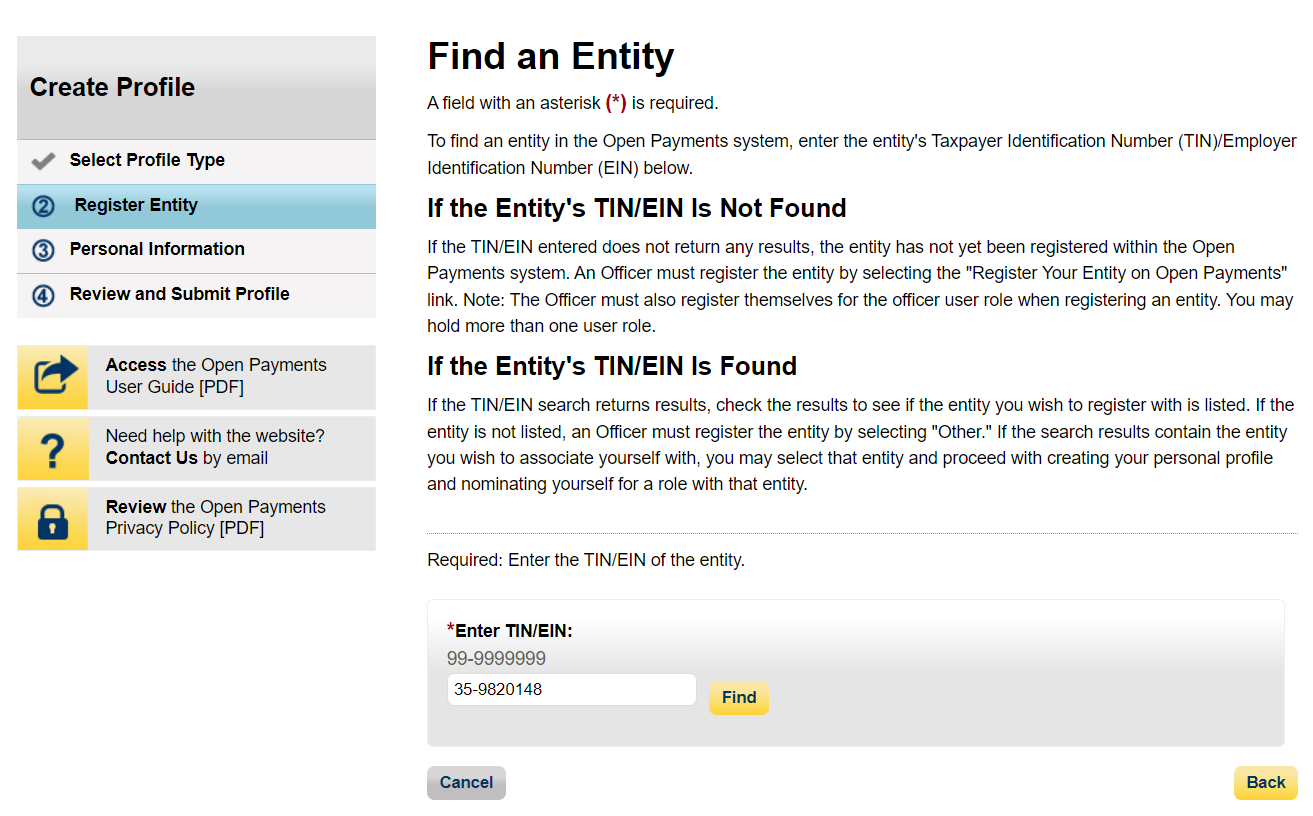
Figure 75: Find an Entity Page (OPS2.0)
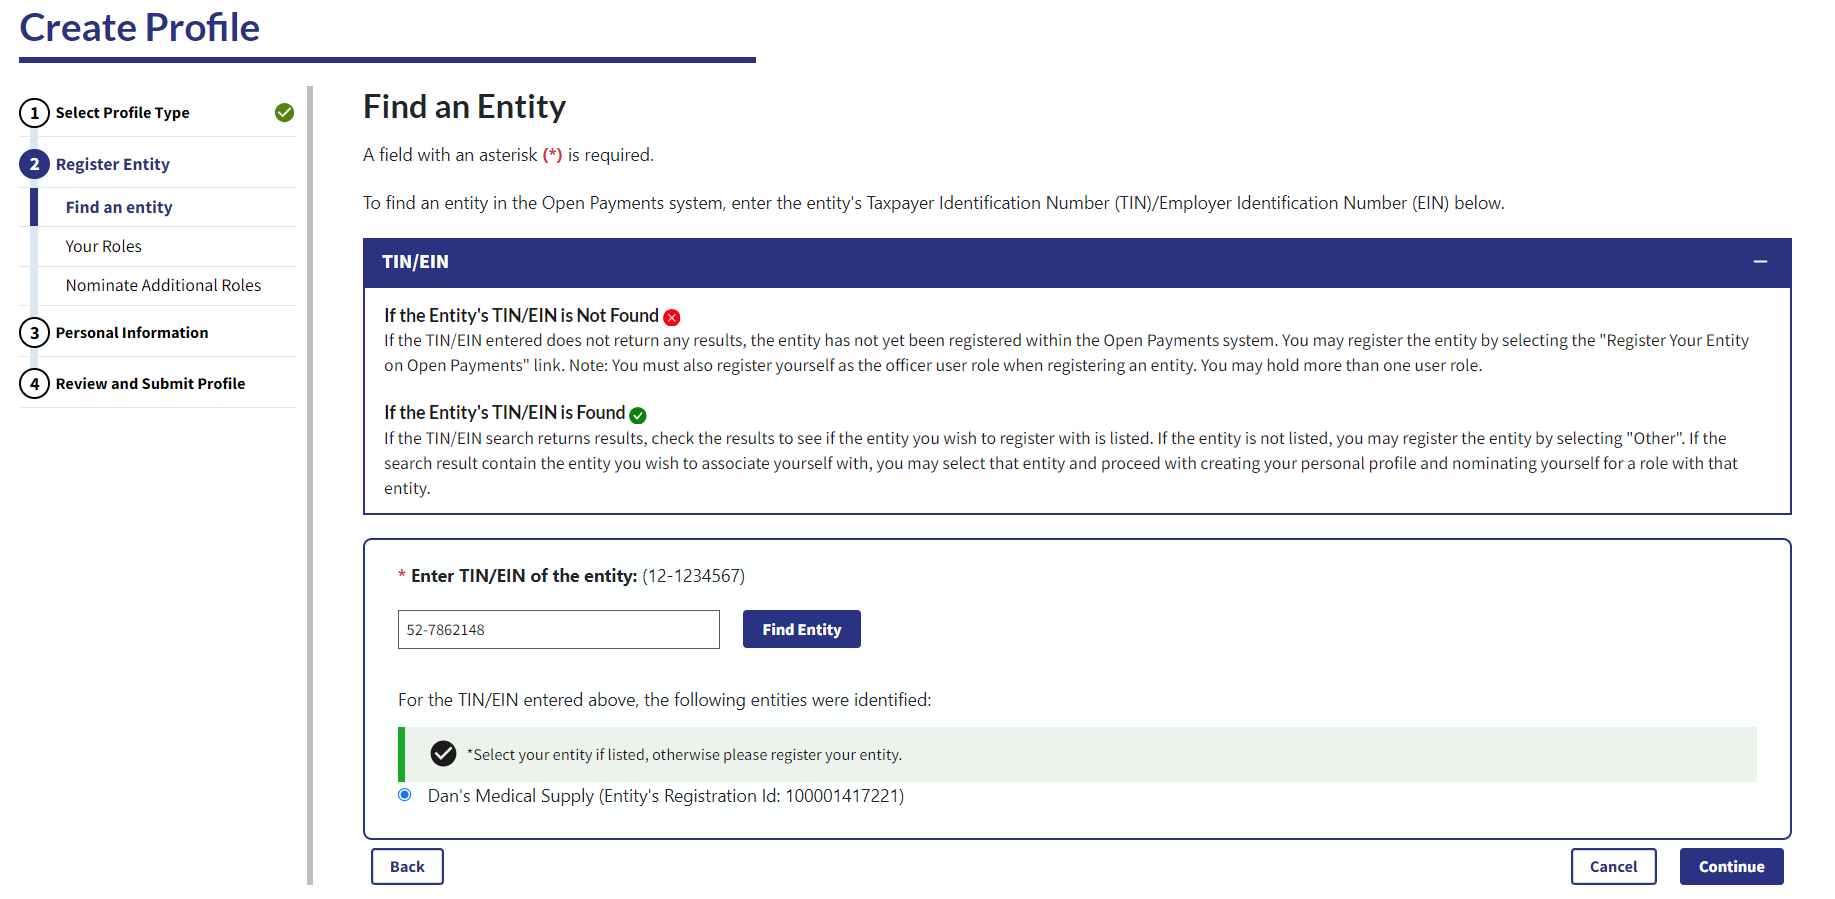
Step 5: Select the correct entity from the list displayed and select Continue.
Figure 76: Find an Entity Page (OPS1.0)
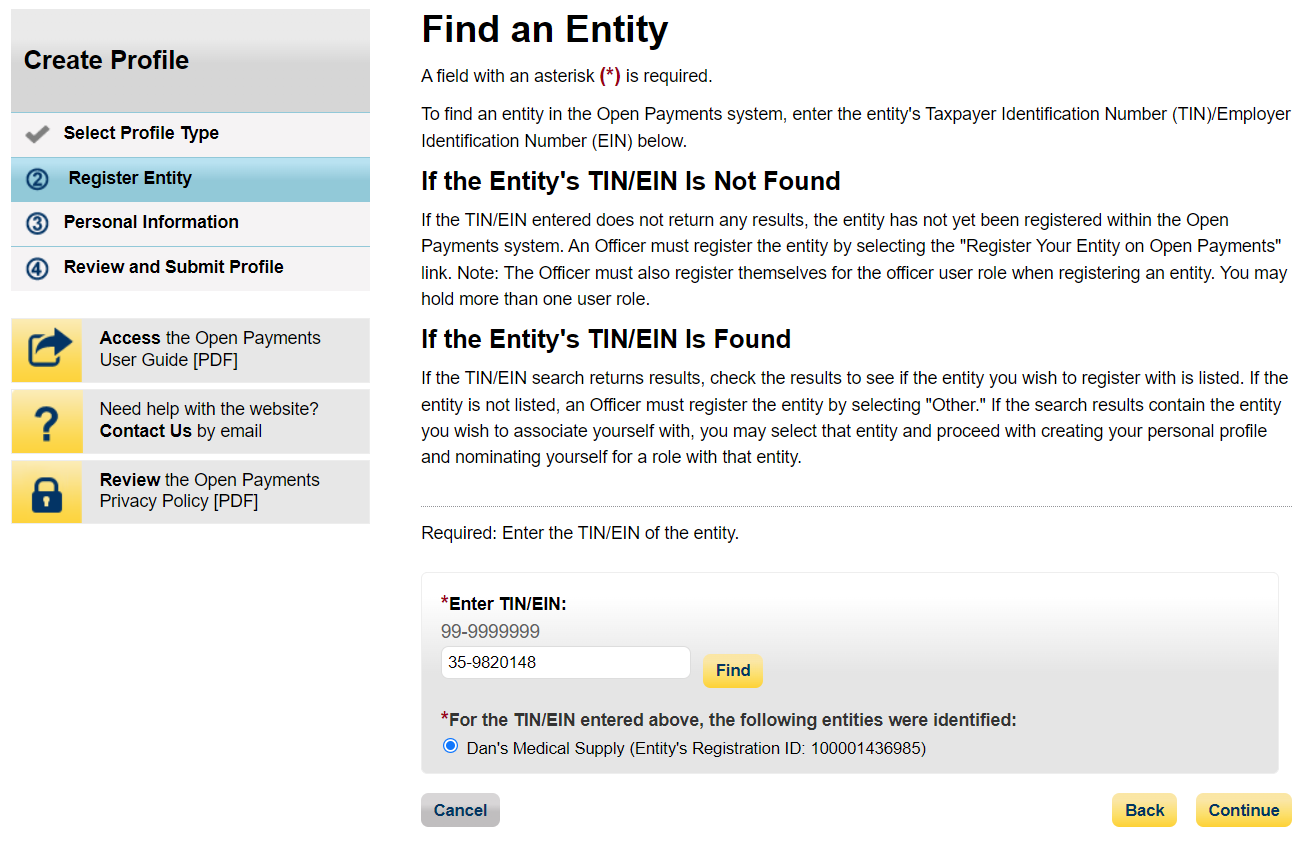
Figure 77: Find an Entity Page (OPS2.0)
Step 6: The rest of this process follows “Accepting a Nomination” workflow. Please see Figure 46 and beyond.
| File Type | application/vnd.openxmlformats-officedocument.wordprocessingml.document |
| Author | Steven Bliss |
| File Modified | 0000-00-00 |
| File Created | 2024-07-26 |
© 2026 OMB.report | Privacy Policy