Access and Recertification
CMS Enterprise Identity Management System
CMS EIDM User Account Registration Mockup_508
Access and Recertification
OMB: 0938-1236
CMS Enterprise Identity Management (EIDM) USER ACCOUNT REGISTRATION
The Centers for Medicare & Medicaid Services (CMS) is a federal agency that ensures health care coverage for more than 100 million Americans. CMS administers Medicare and provides funds and guidance for all of the 50 states in the nation, for their Medicaid programs and Children’s Health Insurance Program (CHIP). CMS works together with the CMS community and organizations in delivering improved and better coordinated care.
What is EIDM?
CMS has established the Enterprise Identity Management (EIDM) system to provide our Business Partners with a means to apply for, obtain approval, and receive a single User ID they can use to access one or more CMS applications.
What You May Need Before You Begin
Prior to requesting access, you should have received instructions from your organization or CMS contact. The instructions should include application-specific information you may need to complete the request, such as:
Social Security Number (SSN) / Taxpayer Identification Number (TIN)
Legal Business Name (LBN) or Organization
Application Name
Application Role
Other information specific to your application, for example, Contract Number, Gentran Mailbox, National Provider Identifier (NPI), Organization number.
You will have to create a user ID and password of your choosing if you do not already have a user ID and password. EIDM allows you to create a User ID up to 74 characters. However, some applications have restrictions on the number of characters, and special characters, you can have in the User ID you create. Check with your CMS point of contact to identify restrictions for your application.
Not every CMS application requires the same information, so it is important to get the specifics directly from your organization or CMS contact.
How to Register and Create a User ID and Password
This section provides information on how to register and create a user ID and password. The following are the basic step-by-step instructions.
Step |
Action |
Step 1 |
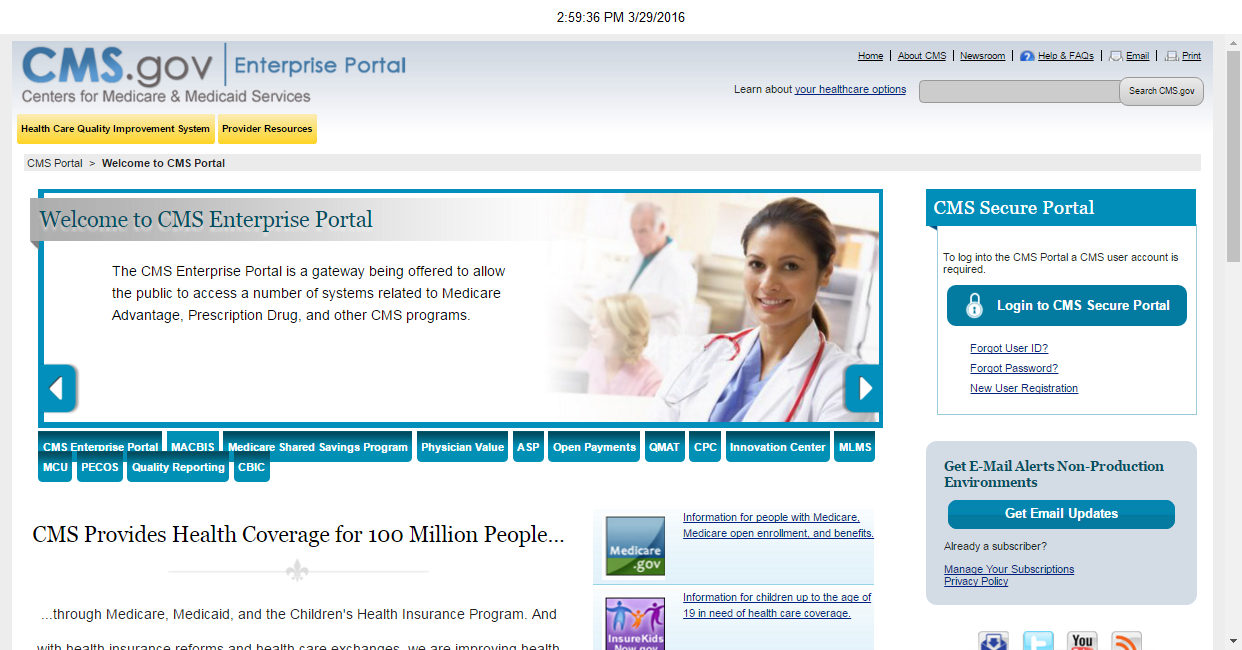
Navigate to https://portal.cms.gov. The CMS Enterprise Portal page is displayed, as illustrated below.
|
Step 2 |
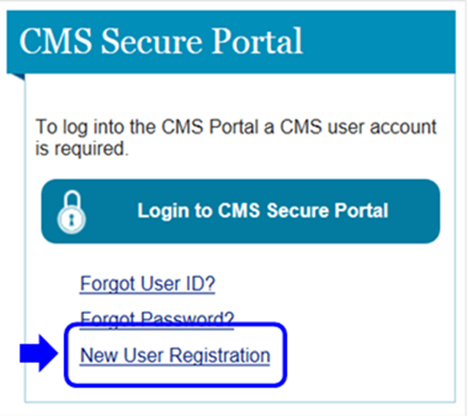
Select the New User Registration link.
|
Step 3 |
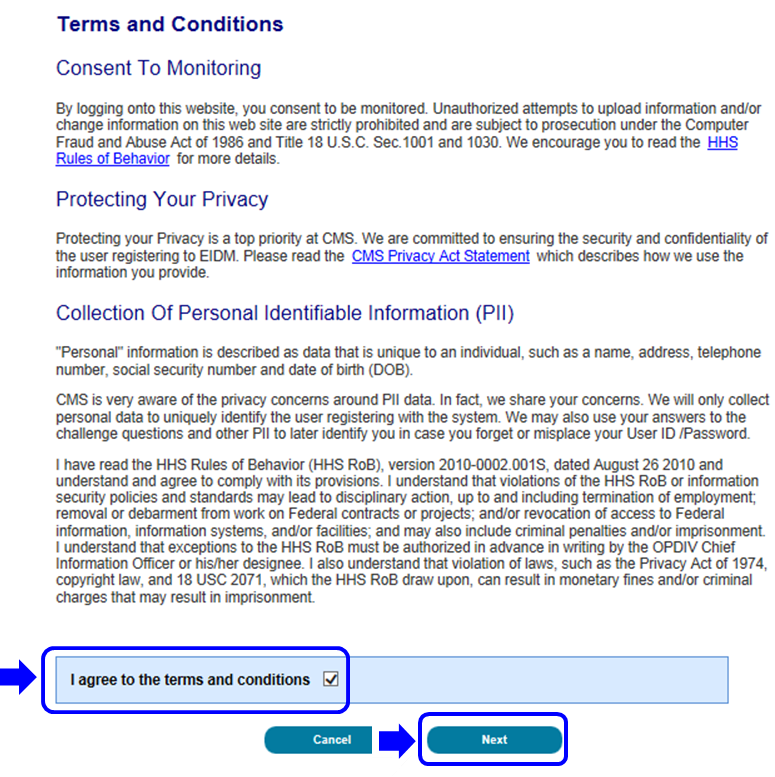
Read the Terms and Conditions, select I agree to the terms and conditions, and then select Next to continue with the registration process.
|
Step 4 |
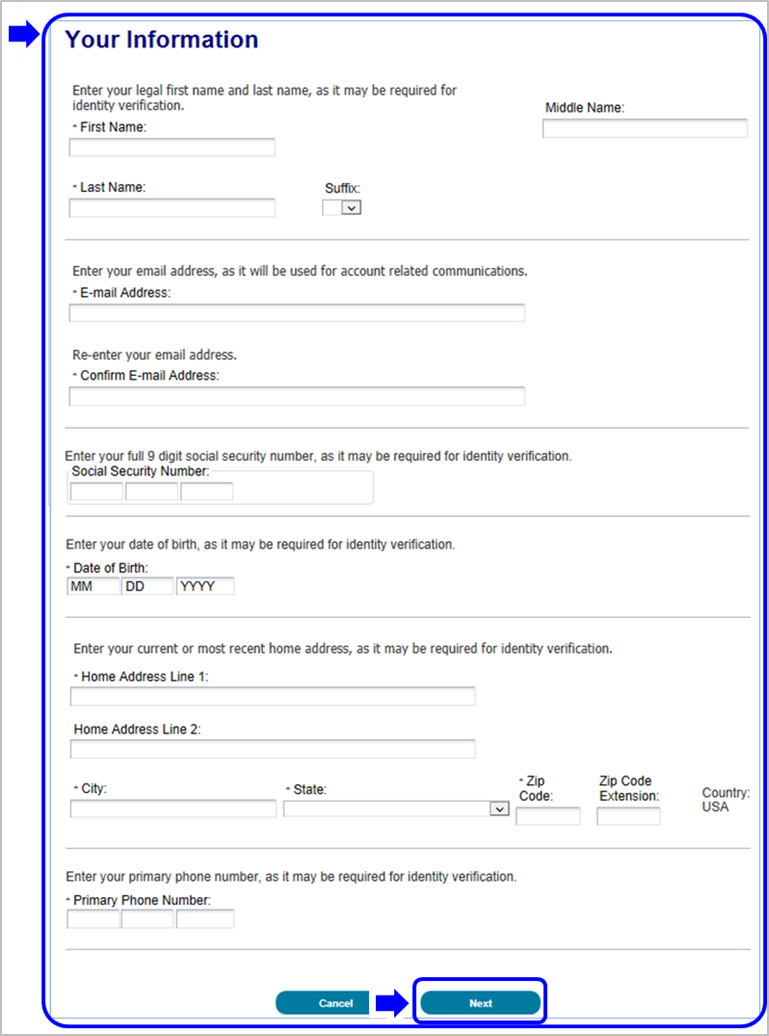
The Your Information page is displayed. Provide the information requested on the Your Information page. The fields with an asterisk (*) are required fields and have to be completed. After all required information has been provided, select Next to continue. Note: You may select Cancel at any time to exit out of the registration process. New information or changes entered will not be saved.
|
Step 5 |
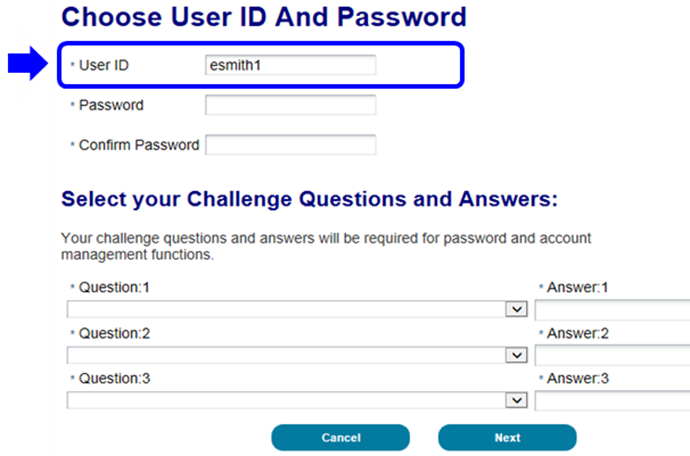
After providing the required information on the Your Information page, the Choose User ID and Password page is displayed. Create and enter a user ID of your choice, based on the requirements for creating a user ID. Note: EIDM will display instructions on what you are required to include in your user ID.
|
Step 6 |
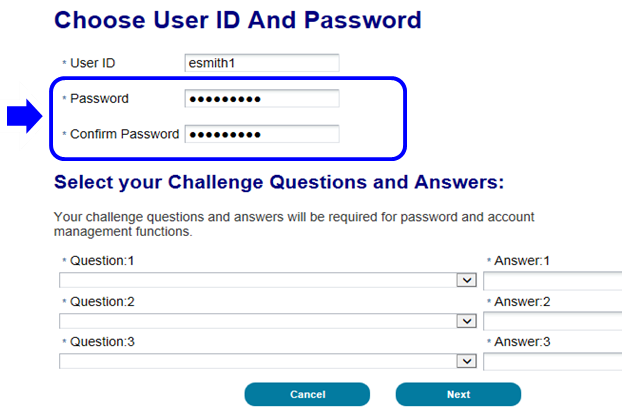
Create and enter a password of your choice. Note: EIDM will display instructions on what you are required to include in your password. Enter the same password in the Confirm Password field. Note: The passwords must match before you can continue.
|
Step 7 |
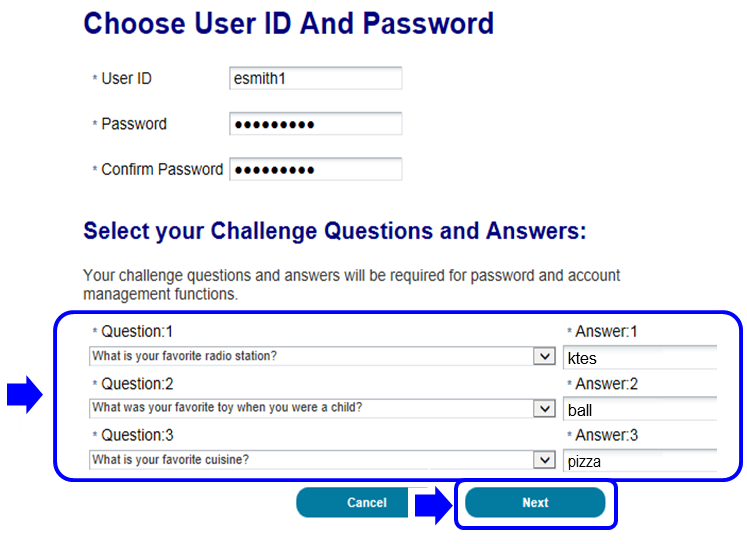
After entering the user ID and password you have created, select a question of your choice in the Select your Challenge Questions and Answers section and enter the answer you want to be saved with the question. Continue to select a question and enter an answer for Question 2 and Question 3. Select Next to complete the registration process. Note: You may select Cancel to exit out of the registration process. New information or changes entered will not be saved.
|
Step 8 |
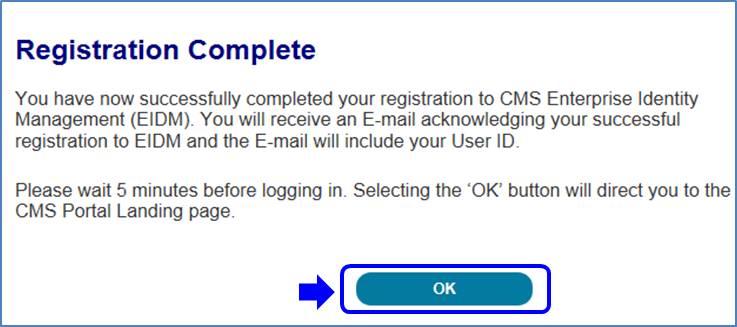
After selecting Next, the Registration Complete page is displayed and informs you that you will receive an E-mail acknowledging your successful registration and will include your user ID. Select OK to close the Registration Complete page.
|
How to Login
This section provides information on how to Login using your user ID and password. The following are the basic step-by-step instructions.
Step |
Action |
Step 1 |
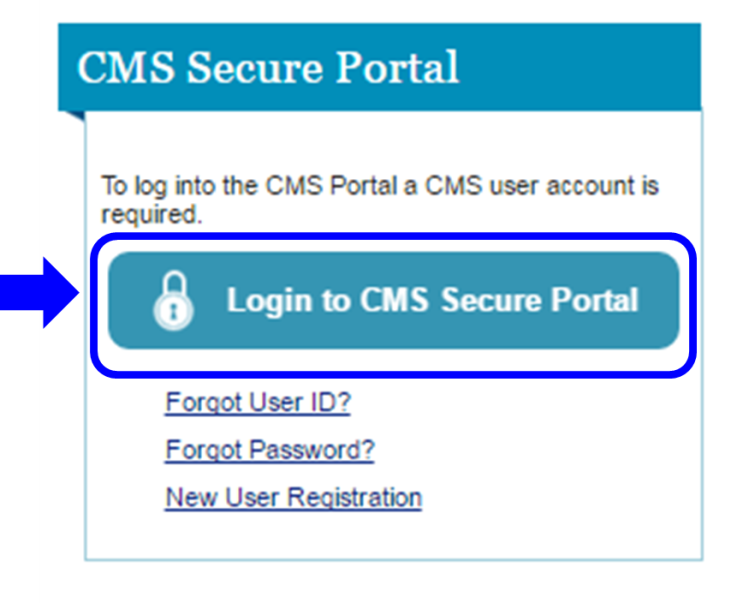
Navigate to https://portal.cms.gov. The CMS Enterprise Portal page is displayed, as illustrated below.
|
Step 2 |
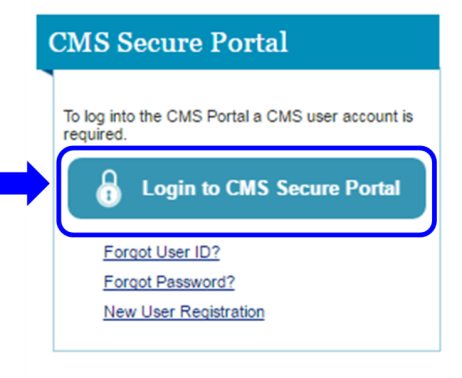
Select Login to CMS Secure Portal.
|
Step 3 |
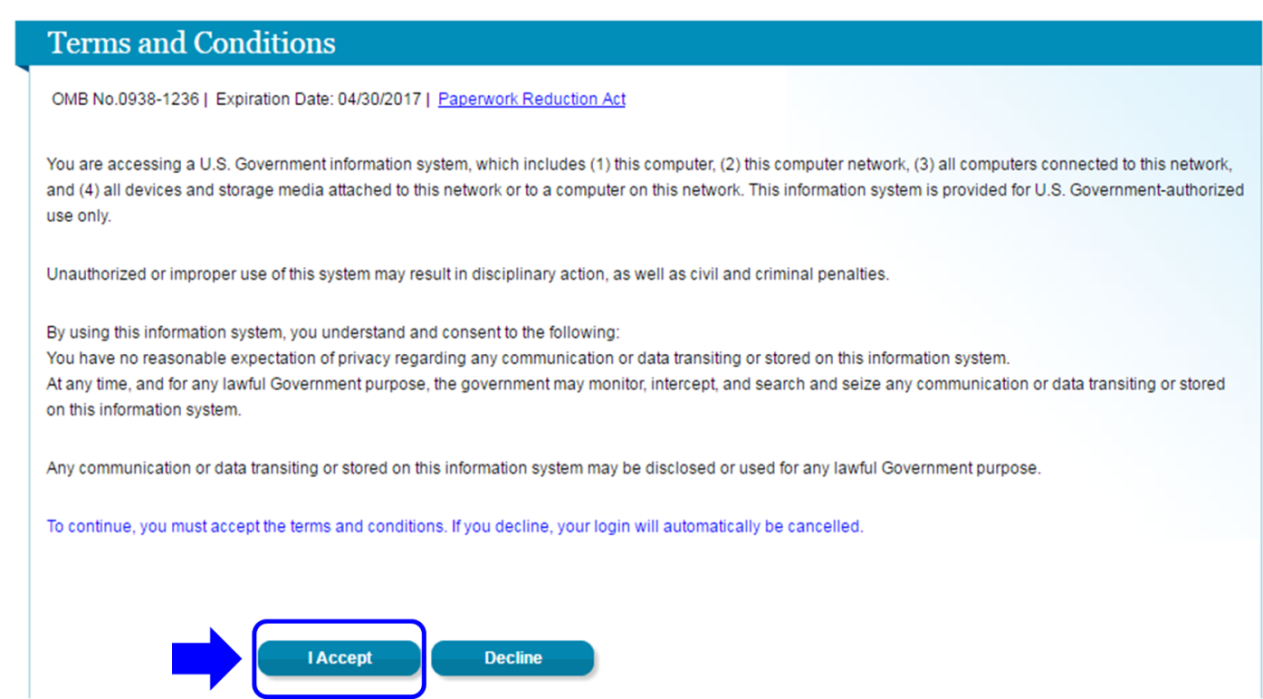
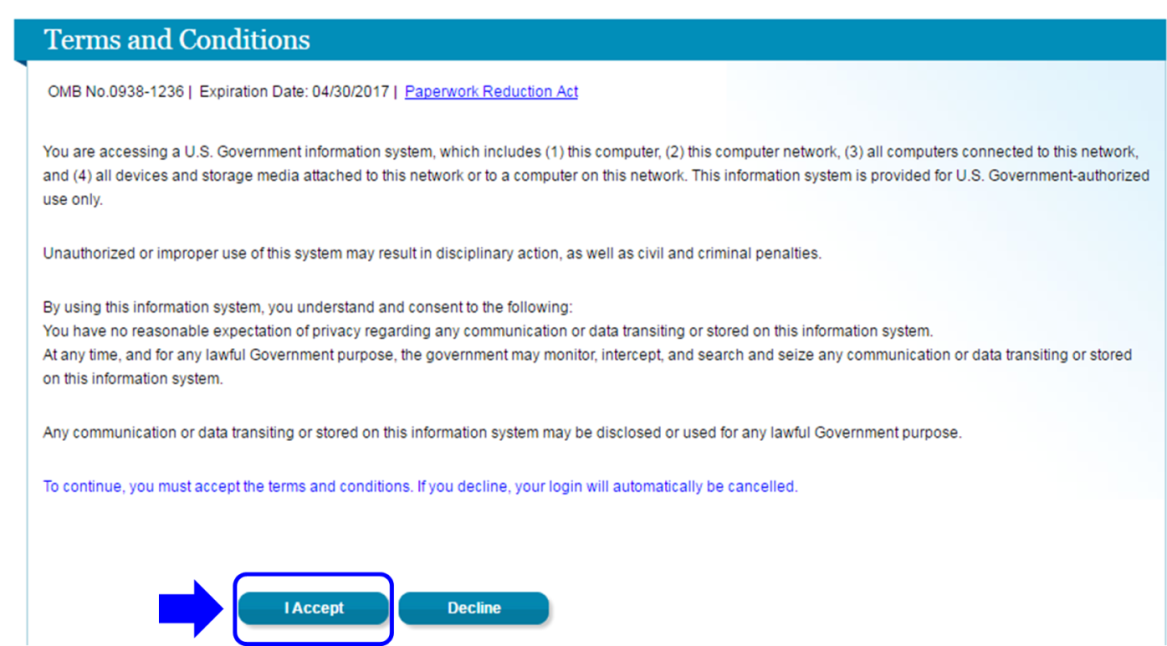
Read the Terms and Conditions and select I Accept to continue.
|
Step 4 |
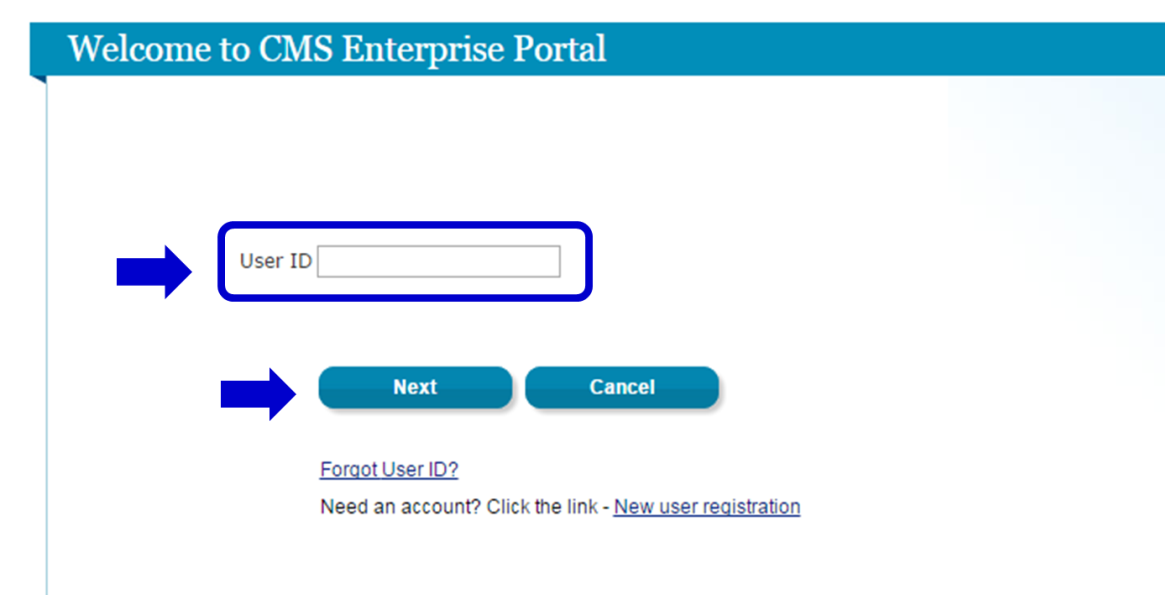
Enter your User ID and select Next to continue.
|
Step 5 |
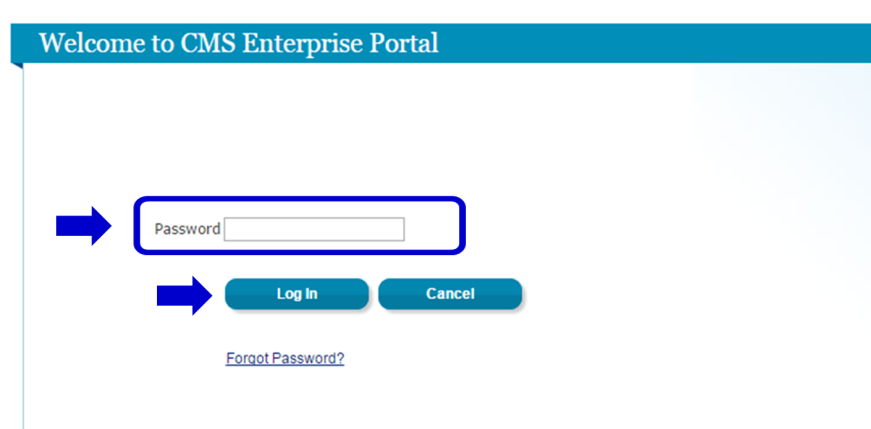
Enter your Password and select Log In.
After logging in, the Welcome to CMS Enterprise Portal page is displayed.
|
Identity Verification
Depending on the role and the information you provide, the system may take you to the Identity Verification page. The Identity Verification process, also known as Remote Identity Proofing (RIDP), is necessary for roles that require a higher level of security to access. Identity Verification is done by asking you questions based on your personal information.
Note: CMS uses credit reporting agencies like Experian to verify identity information. This is only an inquiry and will not affect your credit score.
To begin the Identity Verification process, follow these steps:
Step |
Action |
Step 1 |
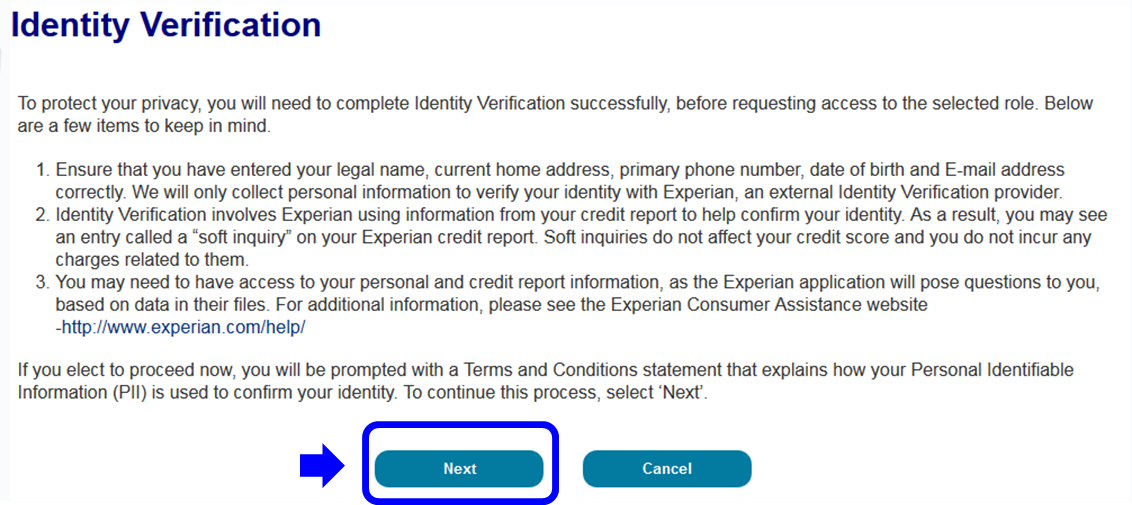
If you select a role that requires identity verification, you will first be directed to the Identity Verification page. Select Next, to begin the Identity Verification process.
|
Step 2 |
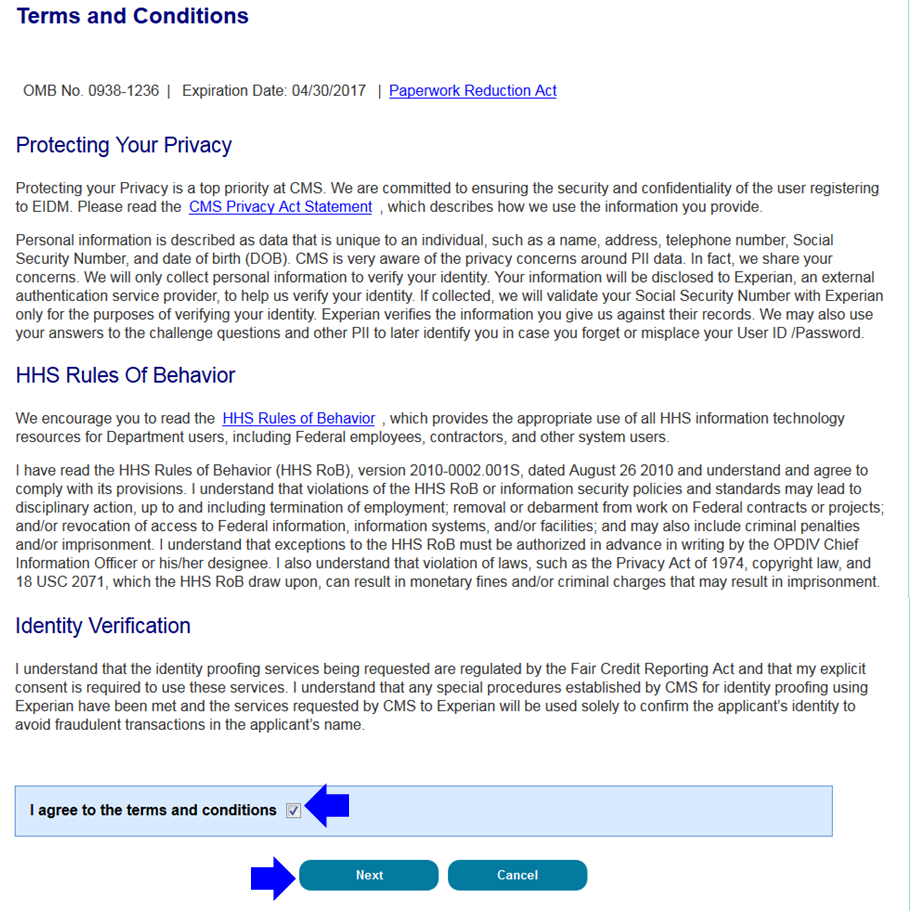
Read the important Terms and Conditions information on this screen and indicate your agreement by selecting the I agree to the terms and conditions checkbox. Select the Next button to continue.
|
Step 3 |
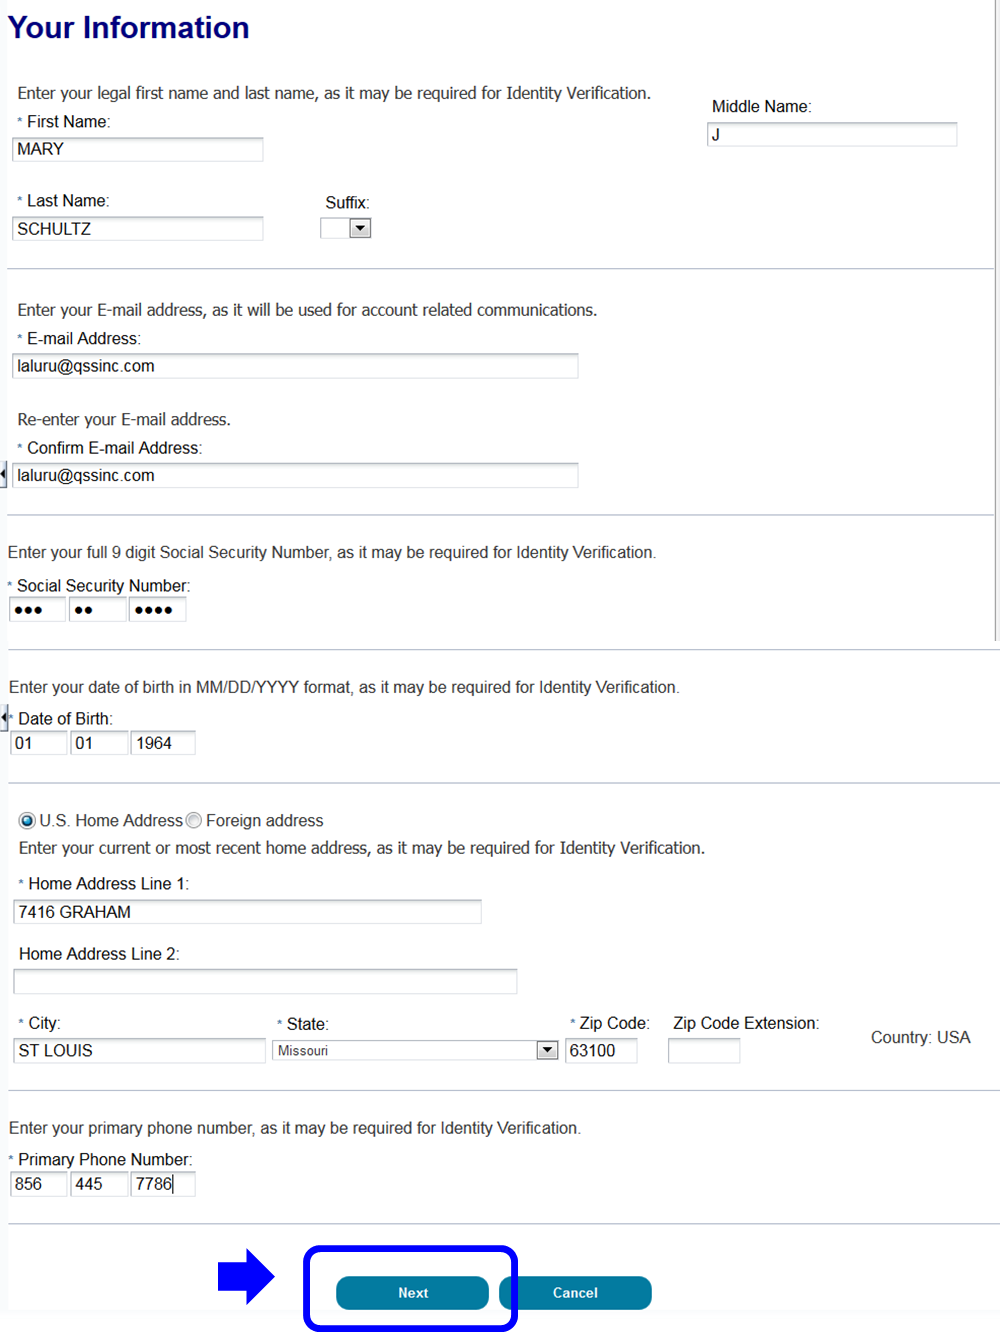
Enter your information into the required fields of the Your Information page. Select Next to continue the Identity Verification process.
|
Step 4 |
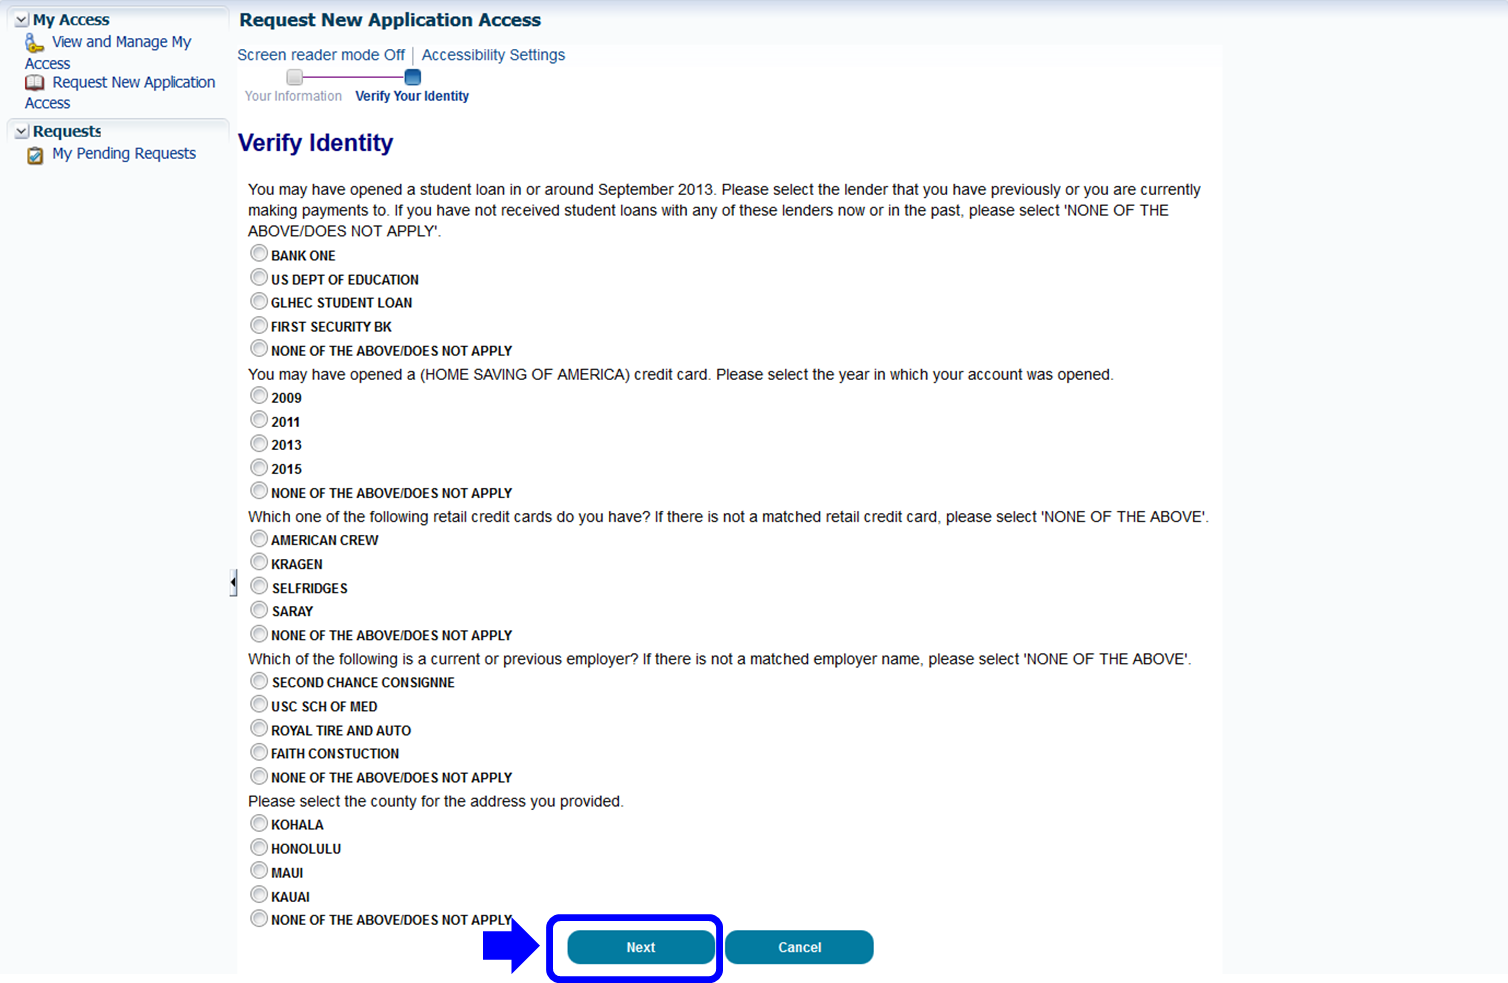
Depending on the information you provided, the Verify Identity page may be displayed. You will be required to answer several questions about information that may be in your personal records. Please answer the questions to the best of your ability. Select the Next button to submit the request. If you wish to terminate the request, select Cancel to return to the View and Manage My Access page.
|
Step 5 |
After submitting the request, the Identity Verification confirmation will be displayed. Select the Next button to continue with the role request process. Note: If the role auto-approves, the role is granted; log out and log back in to access it.
|
Identity Cannot Be Verified
If you receive an error message that your identity cannot be verified, it may simply mean that the information you provided could not be matched with the information available in the electronic records used for verification. You may need to take some additional steps to verify your identity.
Please follow the steps below.
Step |
Action |
Step 1 |
Check your personal information before trying again to register with the system. |
Step 2 |
If you have entered the correct information and still cannot be verified, you will be instructed to call the Experian Help Desk and provide the Review Reference Number displayed on the screen so the help desk representative can help you verify your identity. Experian is the contractor CMS uses to complete the Identity Verification process.
|
Step 3 |
After you have contacted Experian login to CMS Enterprise Portal and proceed again through Role Request process (see How to Request a Role for the steps). |
Step 4 |
On the Your Information screen, select the check box if you have contacted Experian and completed the identity verification process over the phone with the Experian Support personnel. Note: Selecting this checkbox will instruct the system to retrieve your identity verification results from Experian based on the phone verification process. You do have the option of not selecting the checkbox and continuing as you did in your original attempt of Identity Verification, prior to contacting Experian. Enter your information in the required fields.
|
Step 5 |
If your identity cannot not be verified by Experian, please contact your Application Help Desk for the next steps. Note: Depending on the type of role you requested, you may not be granted the role you requested until you have successfully undergone ID proofing. |
How to Request a Role
The following are the basic step-by-step instructions on how to request access to an application and a role, when you currently do not have a role in the application.
ASETT
ASP
EPPE
ESD
FFM/Training– Agents/Brokers/Assisters
IC
IDHD
MACPro
MCU
MLMS
Open Payments
SHIM
T-MSIS
zONE
To request a role for all other applications, please follow these steps:
Step |
Action |
Step 1 |
Navigate to https://portal.cms.gov. The CMS Enterprise Portal page is displayed, as illustrated below.
|
Step 2 |
Select Login to CMS Secure Portal.
|
Step 3 |
Read the Terms and Conditions and select I Accept to continue.
|
Step 4 |
Enter your User ID and select Next to continue.
|
Step 5 |
Enter your Password and select Log In.
|
Step 6 |
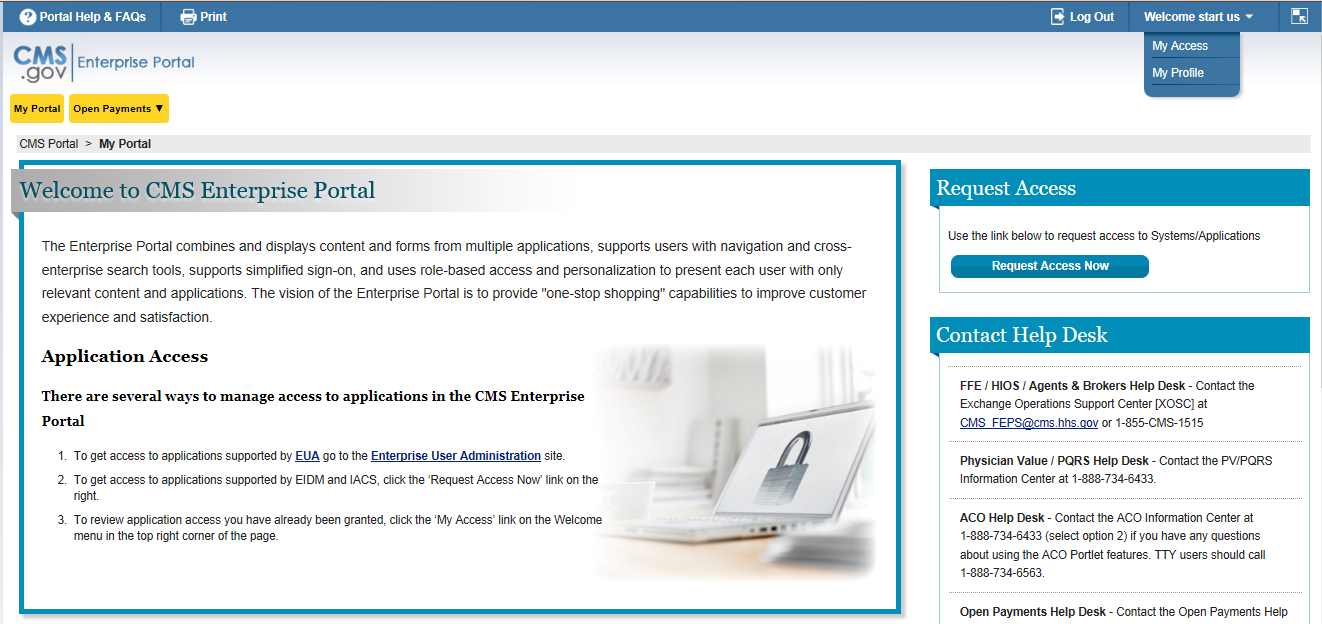
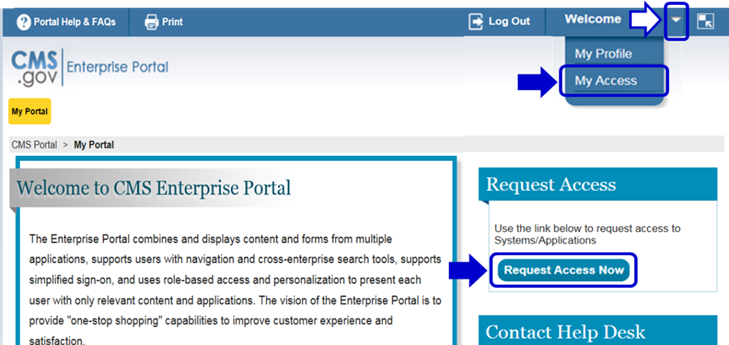
After logging in, the Welcome to CMS Enterprise Portal page is displayed. Select the down arrow icon that appears next to your name at the top of page. Then, select My Access from the drop-down menu to continue. Alternately, you may select Request Access Now to continue.
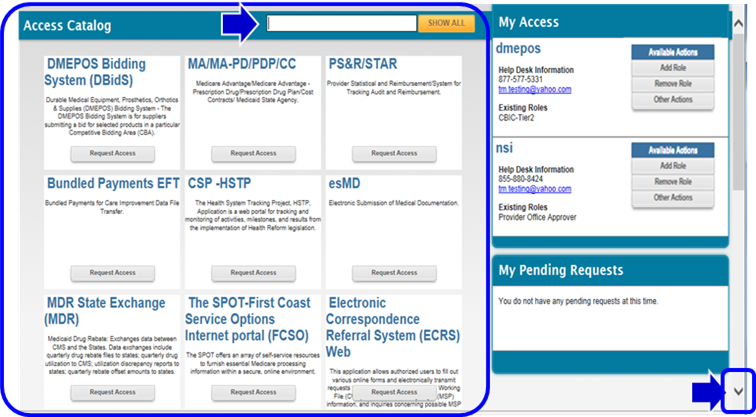
The application Access Catalog is displayed
|
Step 7 |
Scroll down to locate the application you need. Alternatively, enter the first few letters of the application in the Search section and all of the applications beginning with those letters will be displayed. Note: If you currently have access to one or more applications, those applications are displayed in the My Access section. If you have pending requests, they are displayed in the My Pending Requests section.
|
Step 8 |
After entering the first few letters of the application in Search, the applications beginning with those letters are displayed.
|
Step 9 |
Select Request Access for the application you need. In the example below, we will select Request Access for the CSR (Community Based Organization/Customer Service) application.
|
Step 10 |
The Application Description and Select a role sections are displayed. Select the role you need from the Select a role drop-down menu. In the example below, we will select User.
|
Step 11 |
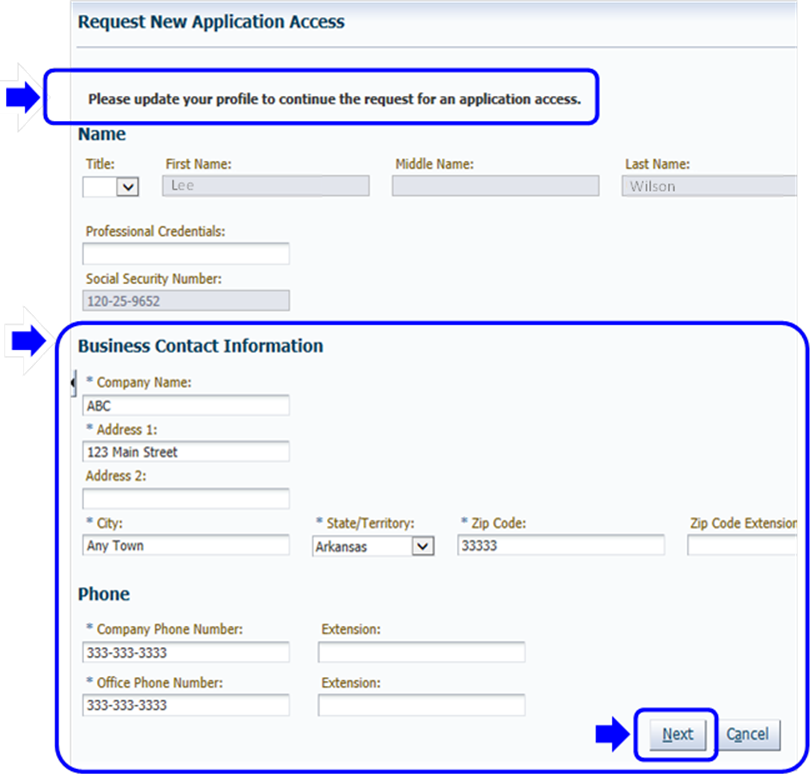
After selecting a role, the Request New Application Access page is displayed. If all of your required business contact information is not on file, you will have to provide this information before you can continue. Required fields are marked with an asterisk (*) and an error message will be displayed, if the information has not been entered or selected correctly, or is entered in the wrong format. Note: If all of your business contact information is on file, the “Please update your profile…” message will not be displayed and the Select a role drop-down menu will be displayed for you to continue. If the “Please update your profile…” message is displayed, enter the required information and then select Next.
|
Step 12 |
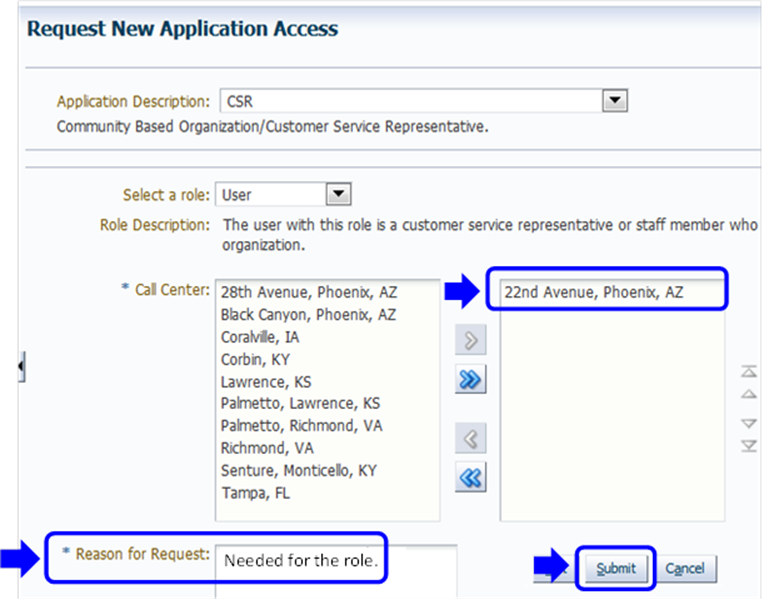
After providing your business contact information, EIDM may ask you to provide some additional information that is required for your application and the role you have selected. Provide any additional information that is requested, enter a reason for the request in the Reason for Request box and then select Submit.
What you may need before you beginIn the example below, we have selected the CSR application and the User role. EIDM also needs to know the Call Center. We will select 22nd Avenue, Phoenix, AZ from the list of Call Centers and then select the single right arrow icon. This will move the 22nd Avenue, Phoenix, AZ Call Center to the Selected Call Center(s) box. We will then enter the reason for the request in the Reason for Request box and select Submit to continue the process.
|
Step 13 |
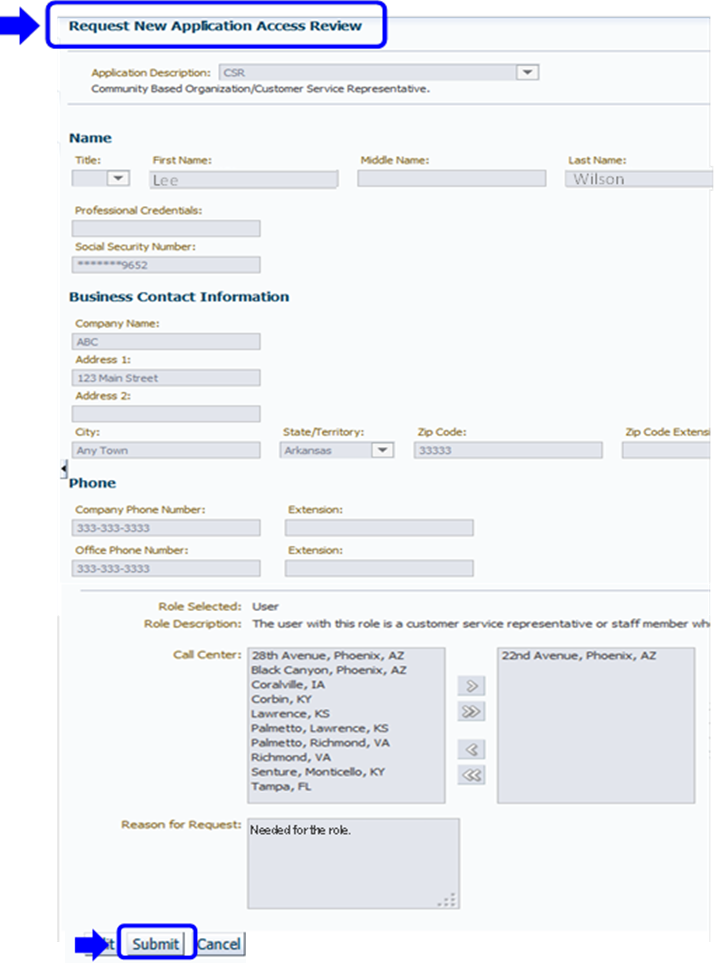
After selecting Submit, the Request New Application Access Review page is displayed. Review the information displayed. Select Edit to modify the information. Select Submit to submit the request for approval. Note: You may select Cancel to exit out of the Request New Application Access process. New information or changes entered will not be saved. In the example below, the information is correct. We will select Submit to submit the request for approval.
|
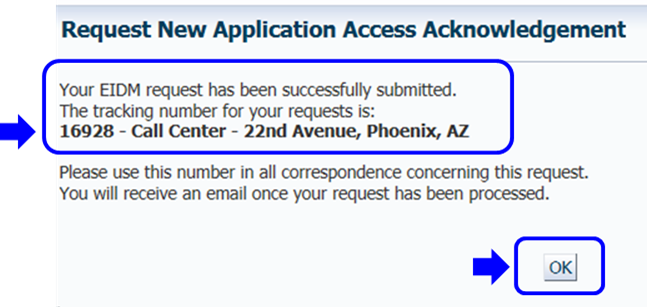
Step 14 |
After selecting Submit, the Request New Application Access Acknowledgement page is displayed. The acknowledgement page displays the tracking number for the request and informs you that you will receive an E-mail when the request has been processed. Note: If you have submitted a request for a role in an application where a CMS 4-character Resource Access Control Facility (RACF) is used for identification and verification, you may have to change your password and create and enter an 8-character password the next time you log in, after your request has been approved. An 8-character password may be required for applications that use RACF IDs. Select OK to close the acknowledgment page.
|
| File Type | application/vnd.openxmlformats-officedocument.wordprocessingml.document |
| File Modified | 0000-00-00 |
| File Created | 2021-01-22 |
© 2026 OMB.report | Privacy Policy
