Opportunity Zone Nomination Instructions
OZone Nomination Instructions.2.26.18.PRA.docx
Opportunity Zone Nomination Tool
Opportunity Zone Nomination Instructions
OMB: 1559-0049
Opportunity Zones:
Nomination Instructions
February 2018 |
Contents
3. Identity of Tracts Eligible for Designation as Qualified Opportunity Zones 4
4. Nominating Qualified Opportunity Zones 4
4.1.1 Information on State and Authorized Representative 4
4.1.4 Nominating Eligible Non-LIC Contiguous Tracts 6
4.1.5 Nominating LIC Tracts Based on 2012-2016 ACS Data 7
4.1.7 Testing Nominations in the Summary Worksheet 8
4.2 Letter from the State CEO 9
5. Visualizing Individual Census Tracts 10
5.1 Selecting a Census Tract 12
6.1 The AMIS Registration Process 16
6.1.1 Registering a New Organization and the First Contact 16
6.1.2 Changing the Organization’s Time Zone 18
6.1.3 Registering Additional Contacts 18
6.1.4 Creating a New Contact Manually 19
6.2 The Nomination Submission Process 20
On December 22, 2017, Congress amended the Internal Revenue Code (IRC) by adding Sections 1400Z–1 and 1400Z–2. These sections provide tax incentives to investors that reinvest certain specified gains into Qualified Opportunity Funds that in turn deploy these resources into population census tracts designated as Opportunity Zones.
The authority to implement IRC 1400Z-1 and 1400Z-2 has been delegated to the Internal Revenue Service (IRS). The CDFI Fund is supporting the IRS with the Opportunity Zone nomination and designation process under IRC 1400Z-1.
This document provides the Chief Executive Officers (CEOs) of States (including the District of Columbia and U.S. possessions) with instructions for nominating low-income community (LIC) population census tracts and eligible non-LIC contiguous population census tracts in their States as Qualified Opportunity Zones (QOZs) for purposes of IRC 1400Z–1 and 1400Z–2. In general, the CEO of a State must nominate census tracts to be QOZs not later than March 21, 2018 (the determination period). Furthermore, the Secretary of the Treasury has 30 days beginning on the date a nomination is received to certify the nomination and designate the nominated tracts as QOZs (the consideration period). See IRS Rev. Proc. 2018-16 (February 8, 2018) for more information.
A State CEO may request, and receive, an extension of the QOZ determination period for an additional 30 days to April 20, 2018. In addition, a State CEO also may request, and receive, a 30-day extension of the consideration period.
If the State wishes to extend either the determination or consideration period, or both, the State CEO or an Authorized Representative of the State must submit a formal request signed by the State CEO on executive letterhead. This letter should be sent as an attachment by electronic mail to [email protected].
The letter from the State CEO should include the following language:
[Title]
[State CEO]
[Address]
The [State/Commonwealth/District/Territory] of [State] formally requests under section 1400Z-1(b)(2) of the Internal Revenue Code that the Secretary extend for an additional 30 days the [determination and/or consideration] period to nominate a population census tract for designation as a qualified opportunity zone.
Based on 2011-2015 American Community Survey (ACS) 5-Year data from the United States Census Bureau (Census Bureau), there are a total of 31,848 LIC population census tracts (LIC Tracts) and 10,312 eligible contiguous non-LIC population census tracts (Eligible Non-LIC Contiguous Tracts) that meet the statutory requirements for designation as QOZs.
In the fall of 2017, the Census Bureau released the 2012–2016 ACS 5-Year data. However, due to the March 21, 2018, deadline for State CEOs to nominate census tracts for designation as QOZs, and the complexities of incorporating the most recent data information into the eligibility process, the 25 percent limitation on the number of designations in a State will be determined on the basis of the 2011–2015 ACS 5-Year data.
Therefore, States may rely upon the census tracts listed as eligible in the Opportunity Zone Nomination Tool provided to State CEOs as a “safe harbor,” in the event that a census tract deemed eligible under the 2011-15 ACS 5-Year data is no longer eligible under the more recent 2012-16 ACS 5-Year data.
In addition, States may nominate census tracts eligible under the 2012-16 ACS 5-Year data that are not already identified in the Nomination Tool. See additional instructions below for nominating additional census tracts using 2012-2016 ACS 5-Year data.
To nominate QOZs, a State CEO should use the Opportunity Zone Nomination Tool (the Nomination Tool), which can be found on the CDFI Fund website at XXX. The Nomination Tool includes separate lists of all LIC Tracts and Eligible Non-LIC Contiguous Tracts, including Eligible Non-LIC Contiguous Tracts whose eligibility is based on contiguity with a LIC Tract located in a different State.
In addition to the Nomination Tool, the State will need to submit a letter from the State CEO, on executive letterhead, confirming that the census tracts identified in the Nomination Tool represent the official nomination of the State CEO. See additional instructions below.
In the worksheet labeled “Information,” enter the information requested for the State and the Authorized Representative who prepared the Nomination Tool. In addition to the name of the State and the State CEO, the Authorized Representative should enter the “State Unique Opportunity Zone Code.” This code can be found in the letter from [Assistant Secretary for Tax Policy David J. Kautter?] to the State CEO transmitting the Nomination Tool and is intended to ensure that the information submitted is as authorized by the State CEO.
The worksheet in the Nomination Tool labeled “SUMMARY” shows the total number of LIC Tracts in each State, the maximum number of census tracts that can be nominated as QOZs, and the maximum number of Eligible Non-LIC Contiguous Tracts that can be included in that nomination. For example in the figure below, Alabama has a total of 629 LIC Tracts. The maximum number of tracts that can be nominated as QOZs in Alabama is 158 (25% of the 629 LICs, rounded up to the next whole number) and the maximum number of Eligible Non-LIC Contiguous Tracts that can be nominated is 8 (5% of 158, rounded up to the next whole number).
Figure 1: State Level Summary

This worksheet will also auto-populate based on the number and type of census tracts a State selects for nomination and can be used to test whether the nomination falls within the statutory limits on the number of nominations. (See additional instruction below.)
To nominate an LIC Tract, States should use the worksheet in the Nomination Tool labeled “1) LICs.” This worksheet includes a list of all LIC Tracts and can be sorted or filtered by State. To nominate a specific LIC Tract, find the census tract and type or select the word “Yes” next to that census tract in Column C (labeled “Enter "YES" Below to Nominate LIC).
The example below shows that an Authorized Representative has selected the State “District of Columbia” (using the Filter in the red square below and typing the name of the State in the text box) and has nominated census tracts 11001000201 and 11001000202 by typing the word “YES” in the adjacent column.
Figure 2: 1) LICs


To nominate an Eligible Non-LIC Contiguous Tract, States should use the worksheet in the Nomination Tool, labeled “2) Contiguous.” This worksheet includes a list that can be sorted or filtered by State, of all Eligible Non-LIC Contiguous Tracts whose eligibility is based on contiguity with an LIC Tract within the same State. Next to the list of Eligible Non-LIC Contiguous Tracts is a list of all LIC Tracts whose status as a QOZ would make the contiguous tract eligible for nomination and designation. In cases where an Eligible Non-LIC Contiguous Tract is adjacent to more than one LIC Tract, at least one of the listed LIC Tracts must be nominated to make the non-LIC tract eligible for nomination. Column F notes whether the Eligible Non-LIC Contiguous Tract may also be eligible based on contiguity with an LIC in a different State.
To nominate a specific Eligible Non-LIC Contiguous Tract, find the census tract and type or select the word “Yes” in Column D (labeled “Enter "YES" Below to Nominate Eligible Non-LIC Contiguous Tract). In addition, in Column E, enter the tract number of the corresponding contiguous LIC Tract that the State is nominating. The contiguous LIC Tract also must be nominated in the “1) LICs” worksheet, following the steps for nominating LIC Tracts described above.
The example below shows that a user has selected the State “District of Columbia” (using the Filter in the red square below and typing the name of the State in the text box) and has nominated census tracts 11001000100 and 11001000202 by typing the word “YES” in Column D. In addition, for the nomination of census tract 11001002102, the user identified census tract 11001009508 in Column E as the contiguous LIC Tract that is also being nominated and has been selected in the “1) LICs” worksheet.
Figure 3: 2) Contiguous Tracts


States may also nominate Eligible Non-LIC Contiguous Tracts whose eligibility is based on a LIC Tract in another State by using the worksheet in the Nomination Tool, labeled “3) Cross-State.” This worksheet includes a list that can be sorted or filtered by State of all such tracts, next to a list of the LIC Tracts, and the State in which each tract is located, whose status as a QOZ would make the contiguous tract eligible for nomination and designation. Column G notes whether the Eligible Non-LIC Contiguous Tract may also be eligible based on contiguity with an LIC in the same State.
IMPORTANT: Please note that an Eligible Non-LIC Contiguous Tract that qualifies based on contiguity with another State may be nominated only if the corresponding contiguous LIC Tract is nominated by the State in which the contiguous LIC Tract is located. Cross-state nominations will require coordination and confirmation that the contiguous State has nominated the contiguous LIC Tract.
To nominate a specific Eligible Non-LIC Contiguous Tract, find the census tract and type or select the word “Yes” in Column E (labeled “Select "YES" Below to Nominate Eligible Non-LIC Contiguous Tract). In addition, in Column F, enter the tract number of the corresponding contiguous LIC Tract that has been or will be nominated by the contiguous State.
The example below shows that a user selected the State “Alabama” (using the Filter in the red square below and typing the name of the state in the text box) and nominated census tract 01069041800 in Alabama by typing the word “YES” in Column E and 12063210100 in Colum F. For this tract to be eligible for nomination, the State should confirm that Florida has also nominated the LIC Tract 12063210100.
Figure 4: 3) Cross-State


As noted above, the census tracts listed in the Nomination Tool are based on 2011-2015 ACS 5-Year data and provide a “safe harbor,” meaning that if a State nominates one of the tracts identified in the Nomination Tool as being either an eligible LIC or an Eligible Non-LIC Contiguous Tract, a State’s nomination of that tract will not fail to be certified on the grounds that the tract is no longer eligible under the 2012-16 ACS 5-Year data.
If a State wishes to nominate an LIC Tract that is not identified in the Nomination Tool but that is eligible under the 2012-2016 ACS 5-Year data, the State may do so using the worksheet labeled “4) 2012-2016 ACS.”
Please note that 2012-2016 ACS 5-Year data may be used to nominate only LIC Tracts that meet the definition of an LIC based on poverty and/or the median family income of that tract. Nominations of Eligible Non-LIC Contiguous Tracts must be based on the 2011-2015 ACS 5-Year data as presented in the Nomination Tool.
To nominate a specific LIC Tract based on the 2012-2016 ACS 5-Year data, enter the State and census tract in Columns A and B, and type or select the word “Yes” next to that census tract in Column C (labeled “Enter "YES" Below to Nominate LIC). In addition, to support the State’s claim that the selected census tract meets the definition of an LIC, enter the following additional information on that tract:
2012-2016 Tract Poverty Rate (Column E)
2012-2016 Tract Median Family Income (Column F)
2012-2016 State Median Family Income (Column G)
2012-2016 Core Based Statistical Area (CBSA) Median Family Income (Column H)
Metro/Non-Metro (Column I)
The worksheet labeled “Tract Number Changes” includes a list of selected census tracts whose numbering was changed by the US Census Bureau in the 2011-2015 and the 2012-2016 ACS 5-Year data releases from the numbering used in the 2010 Census. The geographic definitions of these tracts remain the same the 2010 Census, the 2011-15 and the 2012-16 ACS 5-Year data releases. States may use either the “2010 Census Tract Number” or “2012-2016/2011-2015 Census Tract Number” in their nomination.
After the State selects its nominations by completing the worksheets in the Nomination Tool, the nomination can be tested by returning to the Summary worksheet and clicking the “Refresh All” button in the “Data” tab in the menu ribbon. The Summary table will then indicate the number of LIC Tracts and Eligible Non-LIC Contiguous Tracts nominated and whether the nomination falls within the statutory limits.
If the total number of tracts nominated (as determined by adding the numbers in Columns E and G) do not exceed the statutory limit indicated in Column B, then Column I will show that the nomination passes the 25 percent test. Similarly, if the total number of Eligible Non-LIC Contiguous Tracts nominated (as determined by adding the numbers in Columns F and G) do not exceed the statutory limit indicated in Column D, Column J will indicate that the nomination passes the 5 percent test. In contrast, if in either case the number of tracts nominated exceed the statutory limits, the worksheet will indicate that the nomination fails one or both tests.
The example below shows that the District of Columbia nominated 16 LICs and three Eligible Non-LIC Contiguous Tracts. The worksheet indicates that this passes the 25% test because the 18 tracts nominated is less than the maximum of 25 tracts allowable for the State. In this case, the State still can nominate seven additional tracts. However, the worksheet also indicates that the nomination fails the 5% Contiguous Tracts test. The three Eligible Non-LIC Contiguous Tracts nominated exceeds the statutory limit of Eligible Non-LIC Contiguous Tracts, which can make up no more than 5% of the total nomination (or no more than two Eligible Non-LIC Contiguous Tract for the District of Columbia if the total nomination consists of at least 20 tracts).
In this case, the State could return to the Contiguous tab of the Nomination Tool and deselect one of the nominated tracts, and nominate an additional LIC in its place. After doing so, returning to the Summary worksheet and refreshing the results the worksheet would indicate that the new nomination passes the test.
Figure 5: Refreshed Summary Tab

Please note that the worksheet test is provided solely for the convenience of the State and to provide assistance with the nomination process and is not determinative. The Secretary of the Treasury will make the final determination and designation of each State’s Opportunity Zones after reviewing the State’s nomination.
Once the Nomination Tool is complete, the State CEO must confirm that the census tracts identified in the Nomination Tool represent the official nomination of the State CEO. This may be done in the form of a letter, on executive letterhead, signed by the State CEO. The letter from the State CEO should include the following language:
[Title]
[State CEO]
[Address]
[Address to Secretary Mnuchin]
Section 1400Z-1(b)(1) of the Internal Revenue Code provides that a State’s chief executive officer may nominate a limited number of low-income community population census tracts and population census tracts that are contiguous to low-income communities for designation as qualified opportunity zones not later than the end of the determination period. The determination period ends March 21, 2018, unless there has been a request for an extension until April 20, 2018, by the chief executive officer of a State under section 1400Z-1(b)(2) of the Code. This letter serves as notification to the Secretary that the [State/Commonwealth/District/Territory] of [State] formally nominates the tracts identified in the accompanying Opportunity Zone Nomination Tool for designation as qualified opportunity zones based on Revenue Procedure 2018-16 published in the Internal Revenue Bulletin 2018-19 on February 26, 2018.
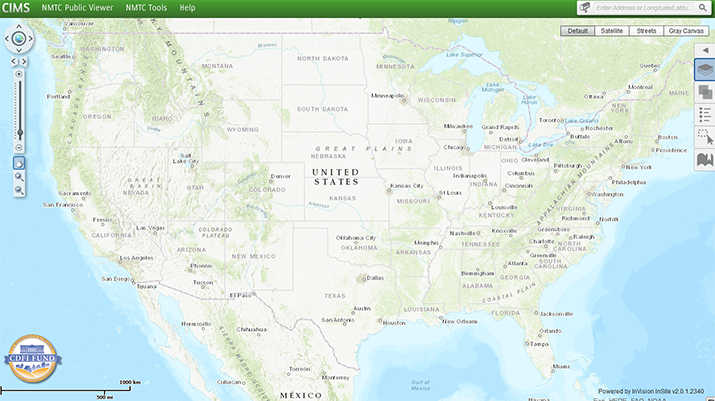
As an added convenience and tool for selecting their nominations, States may use the CDFI Fund’s Community Investment Mapping System (CIMS) to visualize LIC Tracts and Eligible Non-LIC Contiguous Tracts on a map. To use CIMS, click the link above or go to https://www.cims.cdfifund.gov/preparation/?config=config_nmtc.xml.
Figure 6: CIMS
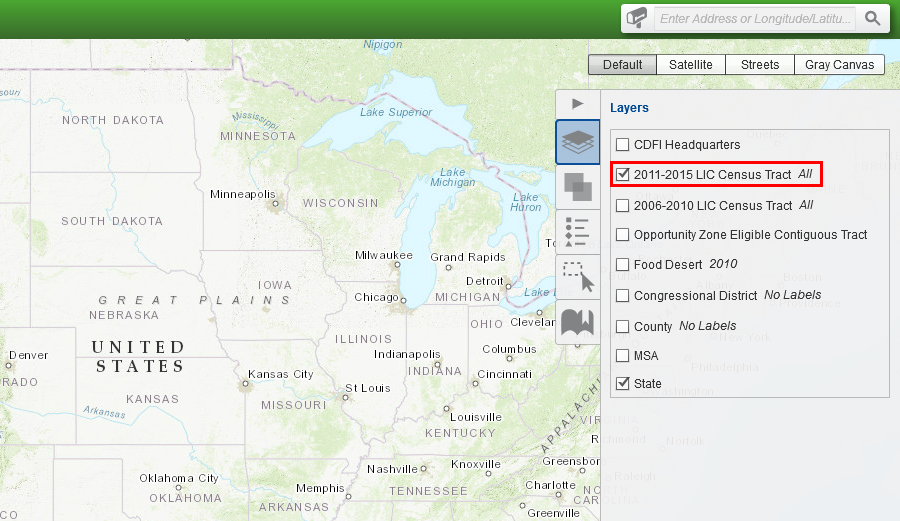
To view LICs, click on the “Layers” tab on the menu on the right hand side of the screen and select “2011-2015 LIC Census Tract.”
Figure 7: Selecting the 2011-2015 LIC Census Tract Layer
After zooming in to a specific area on the map, LICs will appear in green.
Figure 8: 2011-2015 LIC Census Tract View
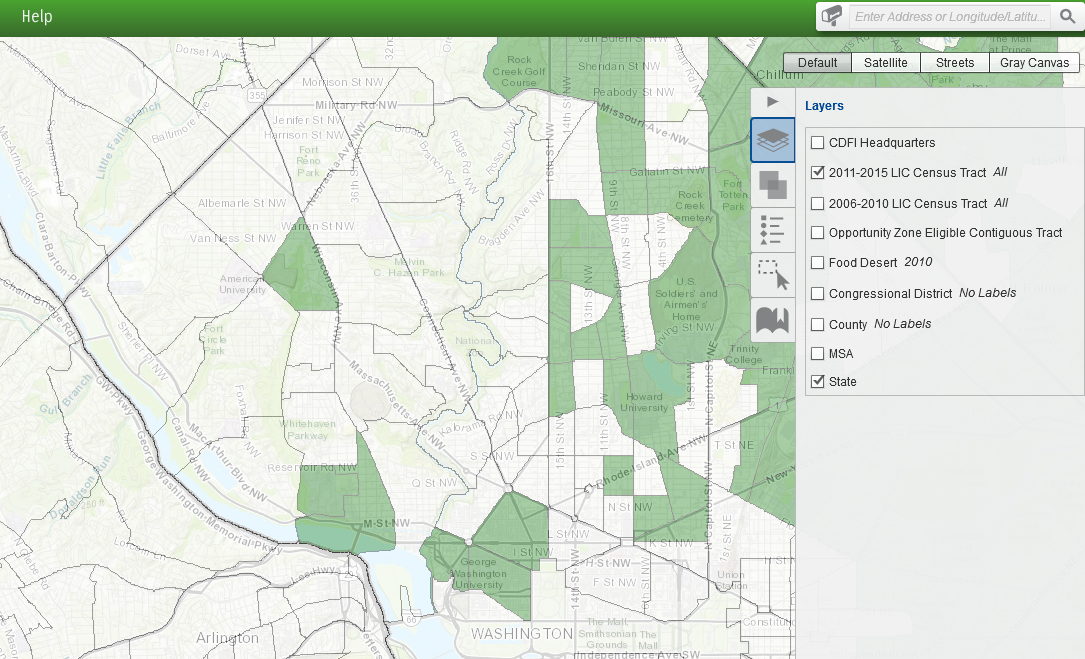
Layers are the mechanism used to display geographic datasets in the CIMS mapping application. The Layers tab allows users to show the list of available map layers and toggle the visibility (on or off) of any of the available layers. Users should be aware that in CIMS numerous layers of geography (county, tract, and individual addresses, for instance) can be displayed on the screen at the same time.
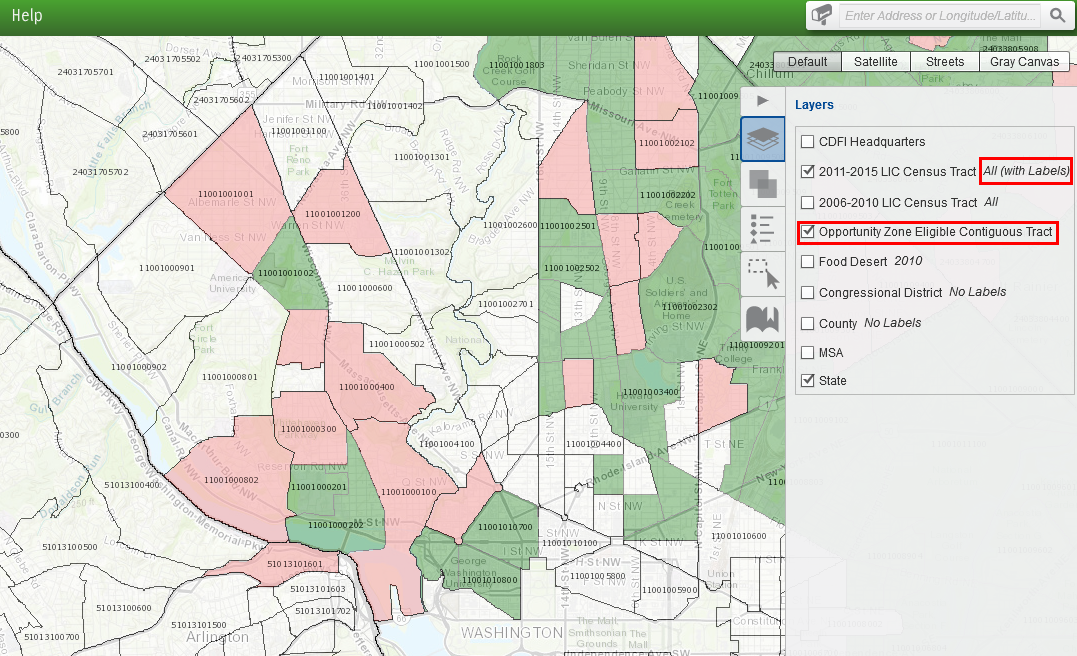
To view Eligible Non-LIC Contiguous Tracts, click on the “Layers” tab and select “Opportunity Zone Eligible Contiguous Tract.” Eligible Non-LIC Contiguous Tracts will appear in red.
To view census tract numbers select “All (with labels)” next to the “2011-2015 LIC Census Tract” option within the Layers tab. The 11-digit census tract numbers will appear labeled in the CIMS map as shown in the figure below.
Figure 9: Opportunity Zone Eligible Contiguous Tracts with Labels
To select and zoom in to a specific census tract, click on the mailbox on the left side of the search bar and select “2011-2015 LIC Census Tract.” Enter one of the 11-digit census tract numbers for a LIC Tract or Eligible Non-LIC Contiguous Tract, found in the Nomination Tool. In the example below, census tract 11001009400 in the District of Columbia was entered in the search bar and 2011-2015 LIC Census Tract was selected. After clicking on magnifying glass, one tract was found.
Figure 10: Searching for a Census Tract
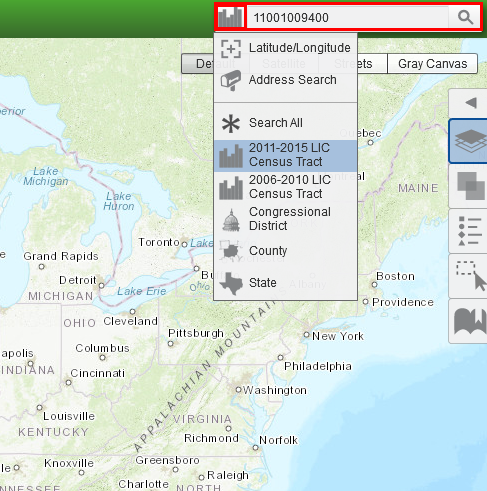
Figure 11: Selecting a Census Tract
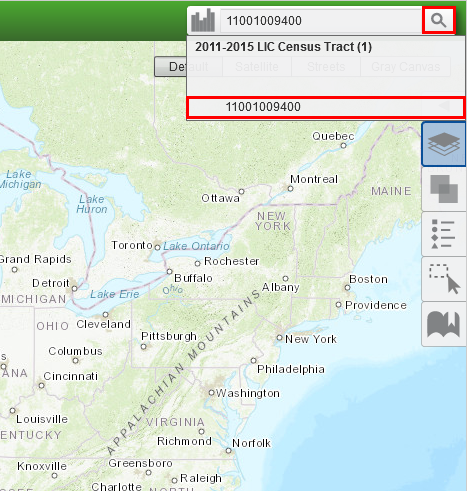
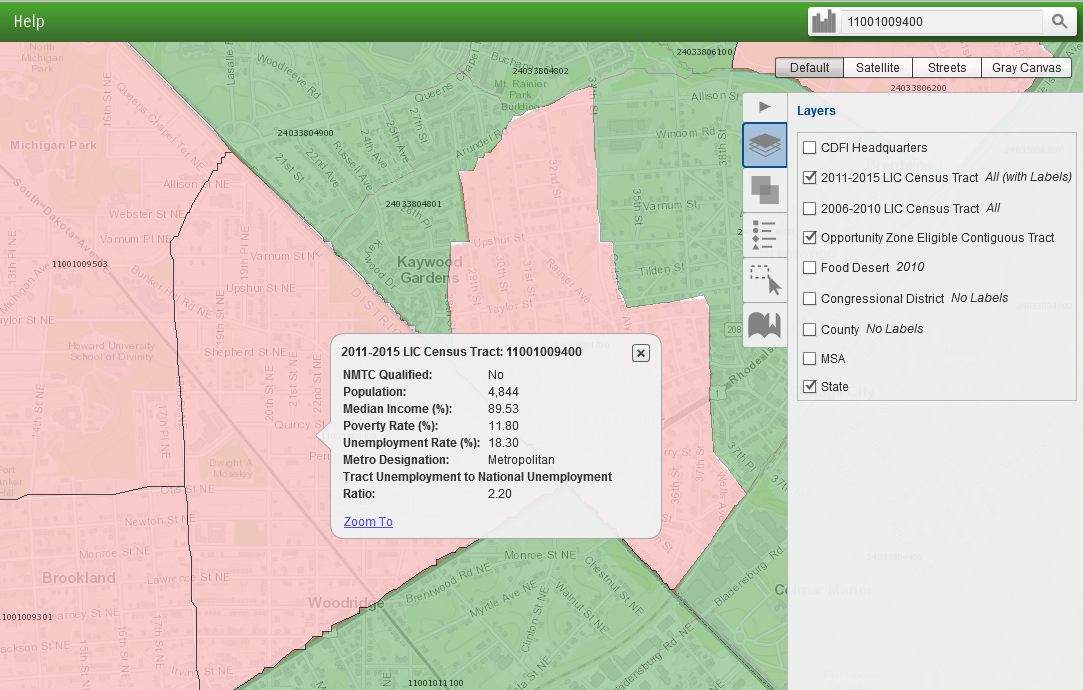
By clicking on the tract number under “2011-2015 LIC Census Tract (1)”, the map will zoom in on the results of the 11-digit census tract ID entered in the search bar as shown in the figure below.
Figure 12: Map of Census Tract
The CDFI Fund is using its Awards Management Information System (AMIS) for States to submit their QOZ nominations. States will use the AMIS Service Request feature to submit all required documentation, including the Opportunity Zone Nomination Tool.
In order to use the AMIS Service Request feature, a State must register an organization in AMIS. The organization may be the office of the State CEO or the office or agency of the Authorized Representative completing the Nomination Tool. Additionally, Authorized Representatives submitting the QOZ nominations must be registered as organization “Contacts” in AMIS. This document provides step-by-step instructions, along with screen shots, to explain and guide the registration and submission processes.
If you encounter any problems with the registration or submission processes, please contact the CDFI Fund AMIS Help Desk at [email protected] or 202-653-0422.
To register a new organization in AMIS, the registering user accesses the AMIS Landing Page and selects the login tab in the top right corner. This will display the AMIS “Terms of Use and Acceptance” and the text boxes for logging into AMIS.
Figure 13: AMIS Login Screen
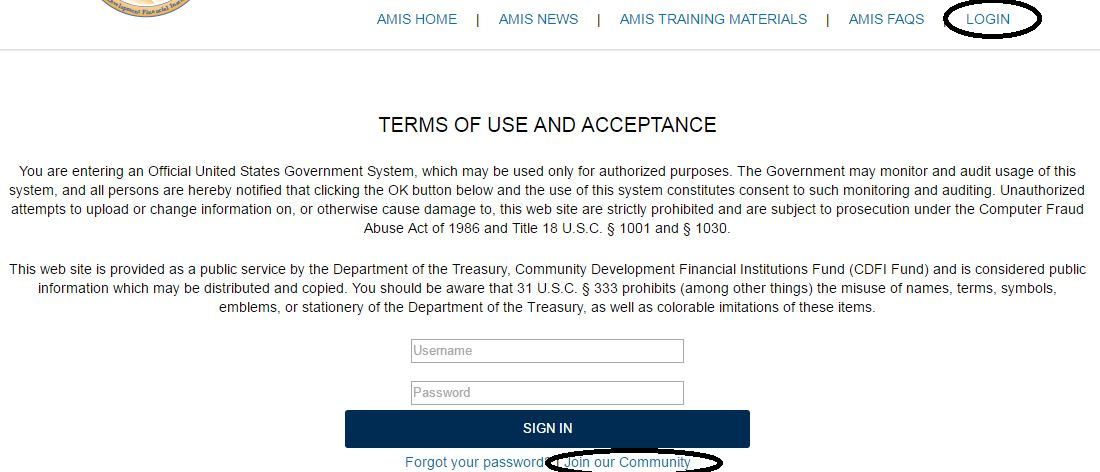
Underneath the “Sign In” button, the registering user selects the “Join our Community” link to begin the registration process. AMIS displays the New User Registration form.
Figure 14: New User Registration Form
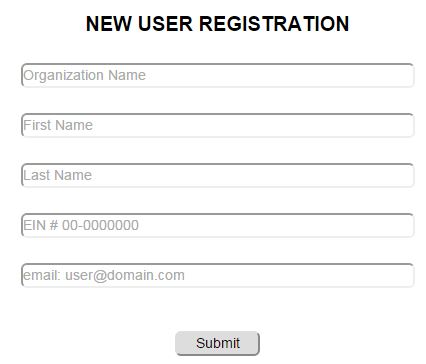
The registering user completes and submits the registration form, including Organization Name, First and Last Name of the Contact, the Organization’s EIN, and the email address for the Authorized Representative. Upon submission, AMIS displays a “Thank you for registering” message and sends the following “create password email message” to the email address provided on the registration form. Note that the email address must be unique within AMIS. The AMIS Username for the registering user is the user’s email address with four digits appended to it. The Username is included in the email message.
Figure 15: Create Password Email Message
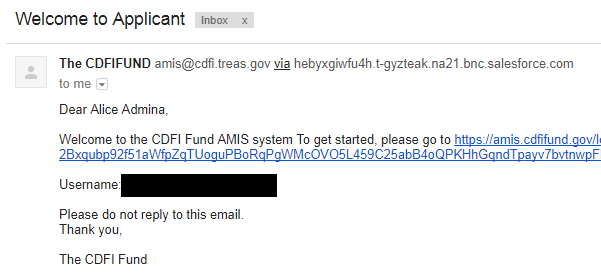
Selecting the link in the email displays the AMIS “Change Your Password” page, where the registering user creates the password for the AMIS account. The password must be at least 8 characters, and contain letters, numbers, and at least one special character from the following:
! # $ % - _ = + < >
After entering the new password, the registering user is logged into AMIS. Note that there are three Contact types in AMIS: Admin User (full control); User (same as Admin User, but cannot create or change the permissions of other Contacts); and Viewer (read-only). The registering user is made an Admin User Contact for the newly created organization.
AMIS creates all users in the Eastern Standard Time Zone (i.e., GMT-05:00). The CDFI Fund recommends that states not on Eastern Standard Time correct their time zone. To change the organization’s time zone, perform the following steps:
Select the My Settings option from the drop-down list that appears under your name in the top right corner of the screen.
Figure 16: My Settings Selection

Figure 17.
This displays the AMIS Settings options. Select Location Settings.
Figure 18: My Settings Screen
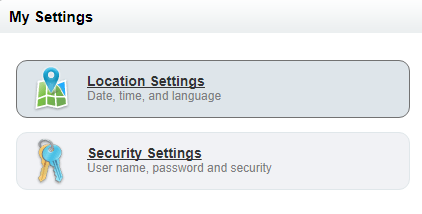
This displays the Location Settings option. Select the relevant time zone from the drop-down and click Save.
Figure 19: Location Settings Screen

Additional Contacts for an organization can be created in one of two ways. The preferred way is for the new user to go to the AMIS Login Page and click the “Join our Community” link. This will display the New User Registration page (see Figure 14: New User Registration Form).
The new user completes and submits the registration form. Upon submission, AMIS creates a Contact record (profile of Viewer) for that user for the organization requested. The new Contact has read-only permissions until an Admin User elevates the Profile to User or Admin User.
To elevate the Profile, the Admin User performs the following steps:
Go to the Contacts tab, select All Contacts from the drop-down, and click the Go! Button.
Figure 20: All Contacts View
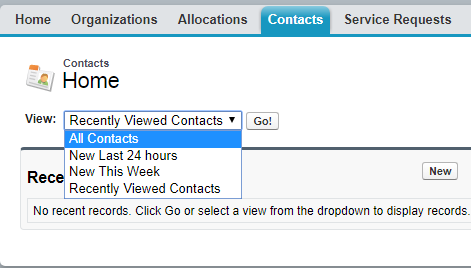
Click on the name of the Contact.
Figure 21: Organization List of Contacts

This displays the Contact Detail Page. Select View Partner User from the Manage External User drop-down.
Figure 22: Manage External User Options – View Partner User

This displays the User Detail page. Click Edit, change the Profile setting, and click Save. For purposes of submitting designated Opportunity Zones, the CDFI Fund recommends that all Contacts be made Admin Users.
Figure 23: Manage External User Edit Screen

The new user will now have the appropriate type of access based on the Profile selected.
The second way to create a new Contact is for an Admin User to create the Contact manually. To create a new Contact, the Admin User performs the following steps:
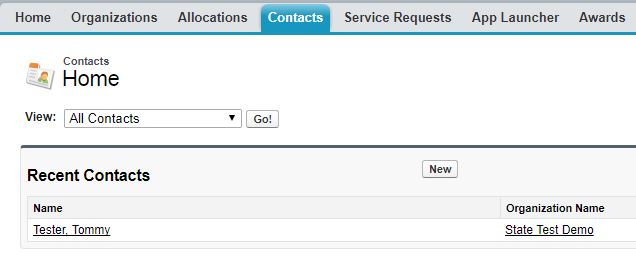
Go to Contacts tab and click on the New button.
Figure 24: New Contact Button
This displays the Contact Edit page. Complete the information for the new Contact and click Save. In AMIS, the red bar indicates a required field.
Figure 25: Contact Edit Page
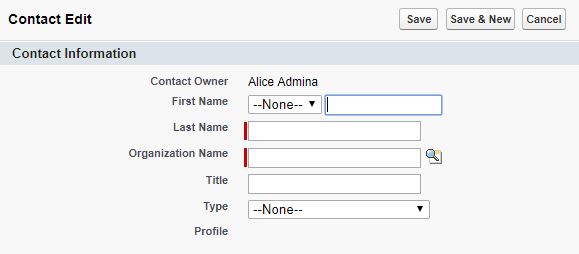
This creates the new Contact, but does not assign a Profile to the new Contact. Follow the steps in section 2.3 to make the new Contact an Admin User, User, or Viewer.
Within AMIS, Contacts cannot be deleted or removed, but they can be disabled by an Admin User. A disabled Contact cannot log into AMIS. To disable a Contact, the Admin User performs the following steps:
Follow steps 1 and 2 from Section 2.3 to select the Contact to be disabled.
This displays the Contact Detail Page. Select Disable Partner User from the Manage External User drop-down.
Figure 26: Manage External User Options – Disable Partner User

The Contact no longer has access to AMIS.
Once a State has registered an organization in AMIS and the relevant Contacts have been created, a Service Request can be submitted with the State’s nomination of qualified Opportunity Zones.
Once logged into AMIS, a user performs the following steps to create and submit a Service Request.
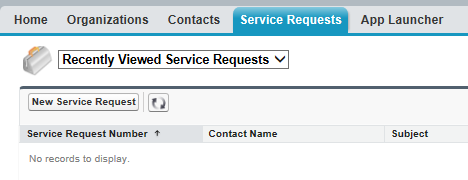
Go to the Service Request tab and select the New Service Request button.
Figure 27: Creating a Service Request
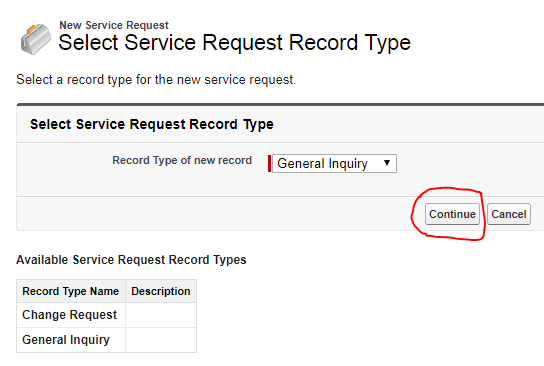
The Select Service Request Record Type page is displayed. Leave the default Record Type of “General Inquiry” and click the Continue button.
Figure 28: Select Service Request Record Type Page
The Service Request Detail page is displayed. AMIS initializes some fields for you. AMIS sets the Contact Name and Organization Name to your name and organization. AMIS also sets the Status to New, the Service Request Origin to Web, and the Priority to Medium. You need only to complete three fields, plus attach documents. The first field is Type, and it is located in the Additional Information section. For the Type field, select the value “Opportunity Zones Designation” from the drop-down list. Leave the Status, Service Request Origin, and Priority fields to their default values.
Figure 29: Service Request Additional Information

The last two required fields are the Subject and the Description. Enter “Qualified Opportunity Zone Nomination by <<State Name>>” for both the subject and the description.
Figure 30: Service Request Description Information

Click the Submit & Add Attachment button, which gives you the option to add attachments to the Service Request prior to submission. The Attach File to Service Request page is displayed. It provides the unique Service Request ID for your submission (i.e., 00010889 in the example below).
Figure 31: Attach File to Service Request Page
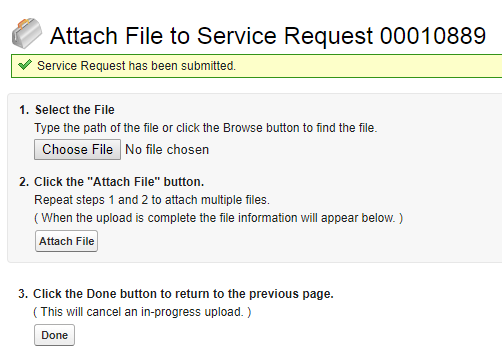
DOCUMENTS TO ATTACH: States should attach a completed Opportunity Zone Nomination Tool along with a letter from the State CEO, on executive letterhead, confirming the nomination.
To attach a document, click the Choose File button. This allows you to browse your computer for the document to attach. Once chosen, click the Attach File button. You will receive a message that the file is being attached, then you will see the name of the document displayed below the instructions, as shown in Figure 32. With a Service Request, you can attach only one document at a time; however, you can repeat the process (Figure 31, Steps 1 and 2) as many times as needed.
Figure 32: Attach File Page Showing an Attached Document
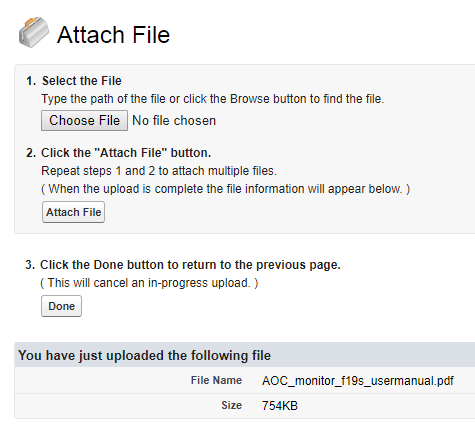
Once all of the required documents have been attached, verify that the file name(s) is displayed below the instructions and then click the Done button. Please do not click the Done button until you see the file name displayed below the instructions. Clicking Done before the files are properly attached will cancel the attachment, but you will not receive any message that the attachment was canceled.
This completes the submission of your Opportunity Zones nomination. As stated in the introduction, if you encounter any problems with the registration or submission processes, please contact the CDFI Fund AMIS Help Desk at [email protected] or 202-653-0422.
| File Type | application/vnd.openxmlformats-officedocument.wordprocessingml.document |
| File Title | OZone Nomination Instructions |
| File Modified | 0000-00-00 |
| File Created | 2021-01-21 |
© 2026 OMB.report | Privacy Policy
