Providing blood specimen
Aerosols from cyanobacterial blooms: exposures and health effects in a highly exposed population
Att8 Providing Blood Specimen 20200212
Providing blood specimen
OMB: 0920-1316
Attachment 8
Providing Blood Specimen
Form Approved OMB No. 0920-0079 Exp. Date XX/XX/XXXX |
Blood Collection Protocol and Processing (approved as part of 2009-0058e2 Green Housing Study)
CDC estimates the average
public reporting burden for this collection of information as 15
minutes per response, including the time for reviewing instructions,
searching existing data/information sources, gathering and
maintaining the data/information needed, and completing and
reviewing the collection of information. An agency may not conduct
or sponsor, and a person is not required to respond to a collection
of information unless it displays a currently valid OMB control
number. Send comments regarding this burden estimate or any other
aspect of this collection of information, including suggestions for
reducing this burden to CDC/ATSDR Information Collection Review
Office, 1600 Clifton Road NE, MS D-74, Atlanta, Georgia 30333; ATTN:
PRA (0920-0079).
COLLECTION PROCEDURE
1. Materials needed per respondent
Disposable gloves
Gauze sponges, alcohol pad and adhesive bandage
2(5mL) Gold top tube (contains a gel separator)
21g ¾” or 23g ¾” butterfly
Preprinted bar-coded labels
Tourniquet
Needle holder
Sharps container
2. Venipuncture procedure.
Locate a suitable table and chair for blood collecting and lay out blood collection supplies.
Apply the tourniquet to the upper arm (approximately 3-4” above the elbow for adults) Determine the best vein site for venipuncture by palpating the skin area above the antecubital space (i.e., above the inside of the elbow).
After a vein has been selected, remove the tourniquet, and cleanse the antecubital space vein site with an alcohol pad. Hold with 2 fingers on one side of the "alcohol wipe" so that only the other side touches the puncture site. Wipe the area in a circular motion beginning with a narrow radius and moving outward so as not to cross over the area already cleaned. Allow the skin to air dry. Locate vein and cleanse in manner previously described, then apply the tourniquet. If it is necessary to feel the vein again, do so; but after you feel it, cleanse with alcohol prep again, and let the site dry.
Fix the vein by pressing down on the vein about 1 inch below the proposed point of entry into the skin and pull the skin taut.
Approach the vein in the same direction the vein is running, holding the needle so that a 15 degree angle with the participant's arm.
With bevel facing up, push the needle (butterfly) firmly and deliberately into the vein. Activate the vacuum collection tube by pressing the tube onto the needle port inside the plastic needle holder. If the needle is in the vein, blood will flow freely into the tube. If no blood enters the tube, gently probe for the vein until entry is indicated by blood flowing into the tube. Never fish for a vein; if you cannot find the vein pull the needle out and restart the venipuncture process at a different site.
For collection, loosen the tourniquet immediately after blood flow is established and release entirely after the last tube has filled. After the last tube has filled, withdraw the needle with a swift backward motion. When the needle is out of the arm, press the gauze firmly on the puncture site. Heavy pressure as the needle is being withdrawn should be avoided because it may cause the sharp point of the needle to cut the vein.
Have the participant raise the arm (not bend it) and continue to hold the gauze in place for several minutes. This will help prevent hematomas and bruising.
Report any adverse reaction experienced by the participant during the venipuncture procedure to the in charge personnel.
Label the tube with the preprinted bar-coded labels provided, and use a ballpoint pen to add the date collected to the label. Place upright in a rack and allow the tube to clot for 30 minutes, but no more than 1 hour. Centrifuge the tube after it has clotted.
Place an adhesive bandage on the participant's arm.
3. Collect:
Collect the Gold top tubes for Serum. Allow the tubes to clot for 30 minutes and then centrifuge the tube to separate the serum.
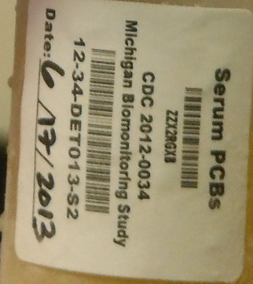
L abel
the tubes with the preprinted bar-coded labels provided, and use a
permanent marker to add the date collected to the label. Please make
sure to label each container with the appropriate bar-coded label.
The labels should be affixed to each container so that the barcode
resembles a ladder as the picture below notates.

Please place the label so
that the barcode looks like a ladder.

SERUM PROCESSING PROCEDURE
Materials and Equipment Needed per Participant
Disposable gloves
Disposable transfer pipet
2 (2mL) Sterile Cryovials for SERUM
Sample boxes
Preprinted bar-coded labels
Centrifuge (not provided)
Freezer (-20oC) or dry ice (not provided)
Processing
Blood is collected in gold top collection tubes. Gold-top tubes should be gently inverted 5 times. Label all tubes. Place the gold-top tubes upright in a rack and allow them to clot at room temperature for 30 minutes. DO NOT ALLOW SERUM TO REMAIN IN CONTACT WITH THE CLOT FOR LONGER THAN 1 HOUR AFTER THE SPECIMEN IS COLLECTED. Samples that sit longer than 60 min are likely to experience lysis of cells in the clot, releasing cellular components not usually found in serum samples.1 Centrifuge the red-top tubes for 15 minutes at 2200-2500 RPM within one hour of collection. Using a transfer pipette, pipette the serum from the participant's gold-top tube into the appropriate container listed below. The time between collecting blood and freezing serum should not be more than 1 1/2 hours. Note on the sample log if a sample is turbid or hemolyzed, or if the serum was left in contact with red cells for more than 1 hour or left at room temperature for more than 90 minutes before freezing.
To maximize the amount of serum recovered from all of the red top tubes, do the following:
Using a disposable pipet, transfer the liquid serum that is free and clear of red cells from the gold top tube into the 2mL cryovial for SERUM. Recap each container and freeze upright. Place upright in a -20oC (or lower) freezer and store at the same temperature until shipment to the CDC on dry ice.
Using a disposable pipet, transfer the rest of the liquid serum that is free and clear of red cells from the gold top tube into the 2mL cryovial for SERUM EXTRA. Recap each container and freeze upright. Place upright in a -20oC (or lower) freezer and store at the same temperature until shipment to the CDC on dry ice.
A collection log is provided. Place a label in the space provided indicating which aliquots were collected for each participant ID. Record in the comments section any variations from the protocol for collection, processing or storage. Once collection is complete for the study, include the collection log with the shipment. Please retain a copy for your records.
-
Volume
Container
Analyte
Comments
Storage
1.8 ml
2 ml cryovial
Serum
Do Not fill the vial more than 1.8 ml full
Store all vials at or below -20°C until ready to ship
1.8 ml
2 ml cryovial
Serum Extra
Do Not fill the tube more than 1.8 ml full
C. SHIPPING PROCEDURE
Storage boxes are provided for each vial/tube type. Place each of these boxes inside one of the plastic Saf-T-Pak or biohazard bags along with an absorbent pad, snap the bag shut.
Place the bagged specimen boxes inside the styrofoam shipping container. Add 10-15 lbs of dry ice to the shipper and place extra packing material around the specimens (newspaper, paper towels, etc.)
Prepare the proper documents needed for shipping and mark the appropriate boxes including the one for dry ice shipment and priority delivery.
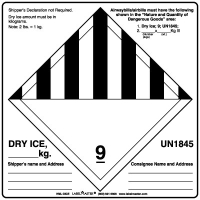
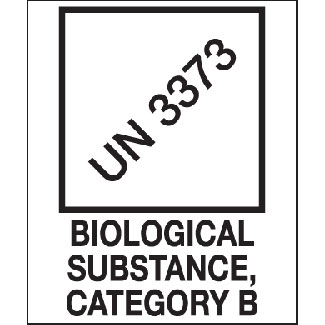
Place the following labels on the outside of the shipping container.


Shipping address:
TBD
Please phone, fax or email to the above numbers to inform the day the package is shipped. Ship only on Monday - Thursday to insure that the package will arrive during a regular work day and not over a weekend day or on a Federal Holiday.
Cyano Aerosol Study CDC STUDY IRB # 7242 |
|
SHIPMENT DATE:__________________________ |
RECEIPT DATE:____________________________ |
SHIPPED BY:______________________________ |
RECEIVED BY:_____________________________ |
S=Serum
![]() =SPECIMEN
COLLECTED X=SPECIMEN NOT COLLECTED
=SPECIMEN
COLLECTED X=SPECIMEN NOT COLLECTED
LABEL |
S |
|
COMMENTS:____________________________________________________________________________________________________________________________________________________________________________________________________________________________________________________________________ |
LABEL |
S |
|
COMMENTS:____________________________________________________________________________________________________________________________________________________________________________________________________________________________________________________________________________ |
|
|
|
|
||||
|
|
|
|
||||
|
|
|
|
||||
|
|
|
|
||||
|
|
|
|
||||
LABEL |
S |
|
COMMENTS:_____________________________________________________________________________________________________________________________________________________________________________ _____________________________________________________________________ |
LABEL |
S |
|
COMMENTS:______________________________________________________________________________________________________________________________________________________________________________________________________________________________________________________________________ |
|
|
|
|
||||
|
|
|
|
||||
|
|
|
|
||||
|
|
|
|
||||
|
|
|
|
| File Type | application/vnd.openxmlformats-officedocument.wordprocessingml.document |
| File Modified | 0000-00-00 |
| File Created | 0000-00-00 |
© 2026 OMB.report | Privacy Policy